709609_k01_000_26
TRANSCRIPT

7096
09.2
6
MomentumCommunications Adapter for PROFIBUS DPUser Manual11/2007

2

Table of Contents
Safety Information . . . . . . . . . . . . . . . . . . . . . . . . . . . . . . . . . . . . 5
About the Book . . . . . . . . . . . . . . . . . . . . . . . . . . . . . . . . . . . . . . .7
Part I PROFIBUS DP and PROFIBUS DP configuration with Momentum . . . . . . . . . . . . . . . . . . . . . . . . . . . . . . . . . 9Overview . . . . . . . . . . . . . . . . . . . . . . . . . . . . . . . . . . . . . . . . . . . . . . . . . . . . . . . . 9
Chapter 1 PROFIBUS DP and PROFIBUS DP Configuration with Momentum. . . . . . . . . . . . . . . . . . . . . . . . . . . . . . . . . . . . . . . . . . 11Overview . . . . . . . . . . . . . . . . . . . . . . . . . . . . . . . . . . . . . . . . . . . . . . . . . . . . . . . 11Introduction to PROFIBUS DP . . . . . . . . . . . . . . . . . . . . . . . . . . . . . . . . . . . . . . 12PROFIBUS DP Configuration with Momentum . . . . . . . . . . . . . . . . . . . . . . . . . . 13PROFIBUS DP Configuration Limits . . . . . . . . . . . . . . . . . . . . . . . . . . . . . . . . . . 14
Chapter 2 Use of I/O Base and Communications Adapter . . . . . . . . . . . . 15Overview . . . . . . . . . . . . . . . . . . . . . . . . . . . . . . . . . . . . . . . . . . . . . . . . . . . . . . . 15General Information about Communications Adapter 170 DNT 11000. . . . . . . . 16Architecture and Functionality of the Communications Adapter for PROFIBUS DP . . . . . . . . . . . . . . . . . . . . . . . . . . . . . . . . . . . . . . . . . . . . . . . . . . 18Potential Isolation of the PROFIBUS DP Bus Interface . . . . . . . . . . . . . . . . . . . 20
Chapter 3 Mounting the Components and the Connecting the Cables . . . . . . . . . . . . . . . . . . . . . . . . . . . . . . . . . . . . . . . . . .21Overview . . . . . . . . . . . . . . . . . . . . . . . . . . . . . . . . . . . . . . . . . . . . . . . . . . . . . . . 21Mounting of the bus adapter . . . . . . . . . . . . . . . . . . . . . . . . . . . . . . . . . . . . . . . . 22Mounting the I/O Module. . . . . . . . . . . . . . . . . . . . . . . . . . . . . . . . . . . . . . . . . . . 24Connection to the PROFIBUS DP. . . . . . . . . . . . . . . . . . . . . . . . . . . . . . . . . . . . 26Constructing the Bus Cable for the PROFIBUS DP . . . . . . . . . . . . . . . . . . . . . . 27
Chapter 4 EMC Measures for the Communications Adapter . . . . . . . . . . 31Overview . . . . . . . . . . . . . . . . . . . . . . . . . . . . . . . . . . . . . . . . . . . . . . . . . . . . . . . 31Central Discharge Function for the PROFIBUS DP . . . . . . . . . . . . . . . . . . . . . . 32Surge Protection for Bus Leads (Lightning Protection) . . . . . . . . . . . . . . . . . . . . 33
3

Chapter 5 Ordering Details for PROFIBUS DP Components. . . . . . . . . . 37Introduction . . . . . . . . . . . . . . . . . . . . . . . . . . . . . . . . . . . . . . . . . . . . . . . . . . . . . 37Ordering Details . . . . . . . . . . . . . . . . . . . . . . . . . . . . . . . . . . . . . . . . . . . . . . . . . . 38Ordering Details for PROFIBUS DP Components . . . . . . . . . . . . . . . . . . . . . . . . 39
Part II Module Descriptions for PROFIBUS DP Modules . . . . .41Overview . . . . . . . . . . . . . . . . . . . . . . . . . . . . . . . . . . . . . . . . . . . . . . . . . . . . . . . 41
Chapter 6 Module Descriptions for the 170 DNT 110 00 Communications Adapter . . . . . . . . . . . . . . . . . . . . . . . . . . . . 43Introduction . . . . . . . . . . . . . . . . . . . . . . . . . . . . . . . . . . . . . . . . . . . . . . . . . . . . . 43Brief Description. . . . . . . . . . . . . . . . . . . . . . . . . . . . . . . . . . . . . . . . . . . . . . . . . . 44Description of the Display and Operational Control Components . . . . . . . . . . . . 45Technical Specifications . . . . . . . . . . . . . . . . . . . . . . . . . . . . . . . . . . . . . . . . . . . 48
Part III PROFIBUS DP Module Software Linkage. . . . . . . . . . . .49Overview . . . . . . . . . . . . . . . . . . . . . . . . . . . . . . . . . . . . . . . . . . . . . . . . . . . . . . . 49
Chapter 7 Communications Adapter Data Mapping for PROFIBUS DP . . . . . . . . . . . . . . . . . . . . . . . . . . . . . . . . . . . . . . 51Overview . . . . . . . . . . . . . . . . . . . . . . . . . . . . . . . . . . . . . . . . . . . . . . . . . . . . . . . 51I/O Data Format and Size . . . . . . . . . . . . . . . . . . . . . . . . . . . . . . . . . . . . . . . . . . 52Data Mapping with I/O Bases . . . . . . . . . . . . . . . . . . . . . . . . . . . . . . . . . . . . . . . 54Example of a PROFIBUS DP Configuration . . . . . . . . . . . . . . . . . . . . . . . . . . . . 56Example of State Memory Addressing in Concept and Modsoft . . . . . . . . . . . . . 58
Chapter 8 Diagnostics. . . . . . . . . . . . . . . . . . . . . . . . . . . . . . . . . . . . . . . . . 61Overview . . . . . . . . . . . . . . . . . . . . . . . . . . . . . . . . . . . . . . . . . . . . . . . . . . . . . . . 61Evaluation of the PROFIBUS DP Diagnostic Message . . . . . . . . . . . . . . . . . . . . 62Ident Codes for Momentum I/O Bases. . . . . . . . . . . . . . . . . . . . . . . . . . . . . . . . . 68Trouble Shooting via PROFIBUS DP Diagnostic Messages . . . . . . . . . . . . . . . . 70
Index . . . . . . . . . . . . . . . . . . . . . . . . . . . . . . . . . . . . . . . . . . . . . . .73
4
§
Safety InformationImportant Information
NOTICE Read these instructions carefully, and look at the equipment to become familiar with the device before trying to install, operate, or maintain it. The following special messages may appear throughout this documentation or on the equipment to warn of potential hazards or to call attention to information that clarifies or simplifies a procedure.
The addition of this symbol to a Danger or Warning safety label indicatesthat an electrical hazard exists, which will result in personal injury if theinstructions are not followed.
This is the safety alert symbol. It is used to alert you to potential personalinjury hazards. Obey all safety messages that follow this symbol to avoidpossible injury or death.
DANGER indicates an imminently hazardous situation, which, if not avoided, will result in death or serious injury.
DANGER
WARNING indicates a potentially hazardous situation, which, if not avoided, can result in death, serious injury, or equipment damage.
WARNING
CAUTION indicates a potentially hazardous situation, which, if not avoided, can result in injury or equipment damage.
CAUTION
709609 11/2007 5

Safety Information
PLEASE NOTE Electrical equipment should be installed, operated, serviced, and maintained only by qualified personnel. No responsibility is assumed by Schneider Electric for any consequences arising out of the use of this material.
© 2007 Schneider Electric. All Rights Reserved.
6 709609 11/2007
About the Book
At a Glance
Document Scope This user manual contains information about Momentum components for use with PROFIBUS DP.
Validity Note This manual applies to Momentum I/O units connected to the PROFIBUS adapter 170 DNT 110 00.
Related Documents
Title of Documentation Reference Number
Momentum I/O Units, User Manual 870 USE 002 00
Quantum PROFIBUS DP in Concept, User Manual 840 USE 487 00
Quantum PROFIBUS DP in Modsoft, User Manual 840 USE 468 00
Profibus DP Configurator, 332 SPU 931 01 (Version 2) (part of Software Package 332 SPU 833 02)
840 USE 454 00
Note: Up-to-date information about PROFIBUS DP is available from the PROFIBUS Website http://www.profibus.com as well as from the PROFIBUS user organization: PROFIBUS Nutzerorganisation e.V., Haid- und Neu-Straße 7, D-76131 Karlsruhe, Germany.
709609 11/2007 7

About the Book
Product Related Warnings
User Comments We welcome your comments about this document. You can reach us by e-mail at [email protected]
When controllers are used for applications with technical safety requirements, please follow the relevant instructions.
For reasons of safety and the maintenance of the documented system data, components should only be repaired by the manufacturer.
Failure to follow these instructions can result in injury or equipment damage.
CAUTION
8 709609 11/2007

709609 11/2007
I
PROFIBUS DP and PROFIBUS DP configuration with MomentumOverview
Introduction This Part contains General Information about PROFIBUS DP, configuration with Momentum as well as connecting the communications adapter and installing the network.
What's in this Part?
This part contains the following chapters:
Chapter Chapter Name Page
1 PROFIBUS DP and PROFIBUS DP Configuration with Momentum
11
2 Use of I/O Base and Communications Adapter 15
3 Mounting the Components and the Connecting the Cables 21
4 EMC Measures for the Communications Adapter 31
5 Ordering Details for PROFIBUS DP Components 37
9

PROFIBUS DP and PROFIBUS DP configuration
10 709609 11/2007

709609 11/2007
1
PROFIBUS DP and PROFIBUS DP Configuration with MomentumOverview
Introduction This Chapter gives an overview of the PROFIBUS DP, the 170 DNT 110 00 Communications Adapter and the configuration of PROFIBUS DP with Momentum.
What's in this Chapter?
This chapter contains the following topics:
Topic Page
Introduction to PROFIBUS DP 12
PROFIBUS DP Configuration with Momentum 13
PROFIBUS DP Configuration Limits 14
11

PROFIBUS DP and PROFIBUS DP Configuration with Momentum
Introduction to PROFIBUS DP
Introduction PROFIBUS DP is an open industrial standard for integrated communication. It is a serial fieldbus, which provides a decentralized connection between sensors, actuators and I/O modules produced by various manufacturers, and connects them to the superset control level. PROFIBUS DP is a version of PROFIBUS optimized for performance, and was specifically designed to meet time critical communications requirements between the controller level and peripheral process devices.
The PROFIBUS DP network supports multiple communications master devices and several slaves. A master may be a PLC (e.g a Quantum with communication module PTQ PDP MV1), a PC or another controller device. A Momentum I/O module with communications adapter 170 DNT 110 00 is a typical PROFIBUS DP slave.
A PROFIBUS DP network supports a data rate of 12 Mbps over distances of 100m and a data rate of 93.75 kbps over distances up to 1200m. The cable consists of2-wire shielded cable.
A PROFIBUS DP network can support up to 125 devices (recommended configuration: one master per network) with up to 32 slaves per network segment. The individual segments are connected by repeaters. A typical PROFIBUS DP configuration with Momentum modules can be found in the Configuration, p. 13section.
12 709609 11/2007
PROFIBUS DP and PROFIBUS DP Configuration with Momentum
PROFIBUS DP Configuration with Momentum
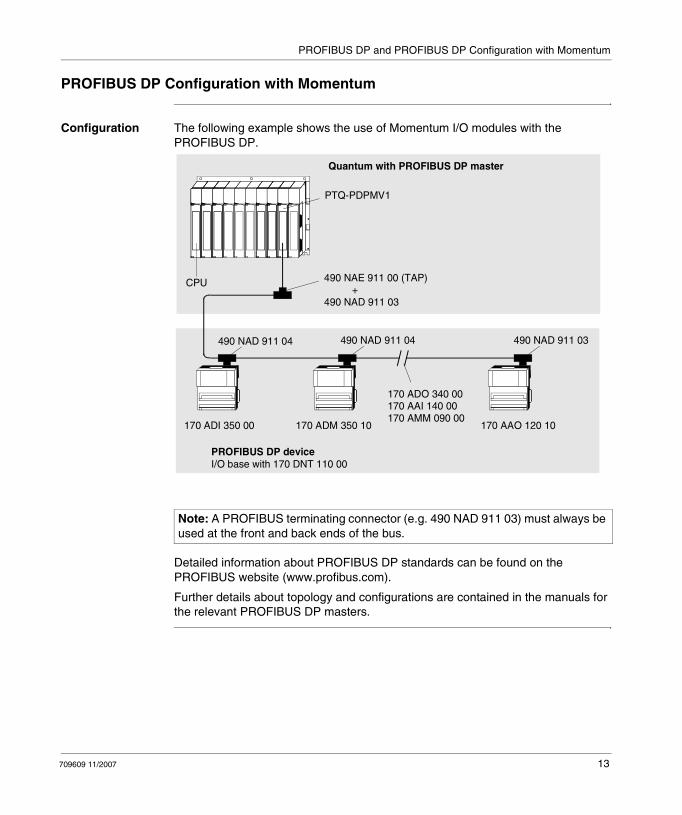
Configuration The following example shows the use of Momentum I/O modules with the PROFIBUS DP.
Detailed information about PROFIBUS DP standards can be found on the PROFIBUS website (www.profibus.com).
Further details about topology and configurations are contained in the manuals for the relevant PROFIBUS DP masters.
Note: A PROFIBUS terminating connector (e.g. 490 NAD 911 03) must always be used at the front and back ends of the bus.
CPU
PTQ-PDPMV1
Quantum with PROFIBUS DP master
170 ADM 350 10
490 NAE 911 00 (TAP)+
490 NAD 911 03
490 NAD 911 04 490 NAD 911 04 490 NAD 911 03
PROFIBUS DP device
170 ADI 350 00 170 AAO 120 10
I/O base with 170 DNT 110 00
170 ADO 340 00170 AAI 140 00170 AMM 090 00
709609 11/2007 13

PROFIBUS DP and PROFIBUS DP Configuration with Momentum
PROFIBUS DP Configuration Limits
Requirements The configuration limits assume a Quantum with a PTQ PDP MV1 as a master (see also the hardware description of the 170 DNT 110 00 communications adapter).
Configuration Limits
The following configuration limits apply to the PROFIBUS DP:
Bus Length Bus Length as a Function of the Transfer Rate
Parameter Limitations
max. number of devices 125 with repeater (max. 32 per segment)
max. number of I/O points per slave 244 bytes each
Transfer rate 9.6 kBit / s to 12 MBit / s
Bus Length Transfer Rate
Max 1.200 m (100 m) 9.6 ... 19.2 ... 93.75 kBit/s
Max 1000 m 187.5 kBit/s
Max 400 m 500 kBit/s
Max 200 m 1.5 MBit/s
Max 100 m 3 ... 6 ... 12 MBit/s
14 709609 11/2007

709609 11/2007
2
Use of I/O Base and Communications AdapterOverview
Introduction This chapter describes the relationship between the I/O base and the communications adapter
What's in this Chapter?
This chapter contains the following topics:
Topic Page
General Information about Communications Adapter 170 DNT 11000 16
Architecture and Functionality of the Communications Adapter for PROFIBUS DP
18
Potential Isolation of the PROFIBUS DP Bus Interface 20
15

Use of I/O Base and Communications Adapter
General Information about Communications Adapter 170 DNT 11000
General Information about Structure
The communications adapter can be combined with any I/O base from the Momentum family. Together they form a functional I/O module for the PROFIBUS DP network. These I/O modules can be used in a network together with other PROFIBUS DP compatible devices.
Representation of I/O Base with Adapter
View of an I/O base with PROFIBUS DP adapter installed:
1 170 DNT 110 00 Communications adapter2 I/O base
A fill-in label is shipped with the I/O base. This label fits into an area on the front of the adapter. The signal names belonging to the sensors and actuators can be written here. On the right hand side of the label is a clear window, through which the name of the communications adapter can be seen.
x10
x1
1
2
16 709609 11/2007

Use of I/O Base and Communications Adapter
Identification of decentralized I/O modules
Every Momentum I/O module in the PROFIBUS DP network needs an individual address, which can be assigned using the address switches on the front of the 170 DNT 110 00 communications adapter. Address settings are described in the section Address Settings, p. 46. This enables the PLC to communicate with each module individually via the PROFIBUS DP master.
The PROFIBUS DP adapter has a PNO ident number (7512 hex). This ident number is used for the internal administration of the PROFIBUS.
The I/O unit also has an ident number, which is evaluated by the communications adapter and output (via the bus) to the master for identification purposes. This acts as a safeguard against configuration error. The evaluation of the I/O base ident number is described in the Section Ident Codes for Momentum I/O Bases, p. 68.
Compatibility with TIO Modules
If a TIO (Terminal Block I/O) is replaced with a suitable Momentum module, a reconfiguration of the bus is necessary, (because Momentum module ident numbers differ from those of the TIOs). However, the user files remain the same.
Similarly, I/O errors will be represented differently from standard TIOs. If TIOs are replaced by Momentum modules, the byte must be queried for > 0, in order to remain compatible with standard TIOs (see I/O Error (Diagnostic Byte 8), p. 66).
Environmental Specifications
The communications adapter and the I/O units that can be mounted on it conform to the same environmental specifications. This information about I/O bases can be found in the system data in the user manual I/O Units for Momentum.
709609 11/2007 17

Use of I/O Base and Communications Adapter
Architecture and Functionality of the Communications Adapter for PROFIBUS DP
Hardware Function Blocks
The communications adapter consists of 4 hardware function blocks:RS 485 PROFIBUS DP Interface, p. 18ATI I/O Base Interface, p. 18Protocol Execution, p. 18 (EPROM with firmware)Voltage Supply, p. 18
RS 485 PROFIBUS DP Interface
The communications adapter has a standard fieldbus interface for the
PROFIBUS DP. The interface contains the PROFIBUS protocol chip and complies with the PROFIBUS DP standards per EN 50170 (DIN 19245 Parts 1 and 3 are integrated). The signals are executed as differential signals.
ATI I/O Base Interface
The ATI interface is an internal interface. It allows data exchange between the communications adapter and the I/O base.
Protocol Execution
The firmware for protocol execution is stored in an EPROM. The communications adapter’s firmware executes the protocols between the I/O module and the master. The transfer mode is half-duplex.
Integral functions are:After voltage is applied or reset is activated, the communications adapter receives information about the data size requirement of the I/O base. The communications adapter also receives the I/O base group and code information. This information is provided by the I/O base.The PROFIBUS DP master sends each slave (I/O module) the configuration data specified in the GSD file. Typical configuration data is e.g.: Identification of the I/O base, I/O data size etc. The I/O module compares the configuration data with its own actual data. If the data match, the master parameterizes the I/O module, and communication can be established.If the I/O base detects an I/O error, the error signal is sent to the master as part of a (non-cyclic) diagnostic message (see evaluation of the, I/O Error (Diagnostic Byte 8), p. 66 diagnostic message).
Voltage Supply The internal voltage supply (Vcc) is provided by the I/O base. Vcc is monitored and a reset signal is generated if and when Vcc is not within tolerance. The isolated voltage (Vcx) for the PROFIBUS DP interface is generated via a DC/DC converter and is not monitored.
18 709609 11/2007

Use of I/O Base and Communications Adapter
Message Types and Data Transfer
The 170 DNT 110 00 PROFIBUS DP communications adapter recognizes three types of messages:
USER DATA (input and output data and parameters)Diagnostic dataBus configuration
These messages are transferred in different cycles between the master and theI/O module (slave). The 170 DNT 110 00 communications adapter handles this task for the I/O module:
Error Control A serial microprocessor controls all of the operations within the 170 DNT 110 00
These include:Sending a module error to the master via the PROFIBUS DP whenever an I/O base detects an I/O error.The microprocessor controls a LED, which provides information about the data transfer (BF = Bus Fault), to provide a visual display of a network fault.Setting the Data Control Time (DCT) for the DP master, which must take into consideration all the slave watchdog settings (e.g. if slave timeout is set for 250 ms, the DCT may be set to 1500 ms, a ratio of 6 to 1)
Additional information can be found in the software documentation for your PROFIBUS DP master.
Transfer Cycle Description
Cyclical transfer of the USER DATA A transfer sequence in which input data is read from the DP slave by the master, and then output data is written to the DP slave. The parameters for analog modules are included in the I/O data.
Non-cyclic transfer of status information for diagnostics
If new diagnosis data is detected, a flag is set by the slave. This causes the master to poll the data.
One-time transfer of PROFIBUS DP internal parameters
Bus parameters, e.g. the ident number of the DP master that configures the slaves.
Note: The Data Control Time (DCT) and the watchdog times are entered with the corresponding bus projection tool during bus projection.The master checks whether it had application data transmission with all slaves.The watchdog time is set for each slave. If the slave hadn’t been polled by the master during this time, it sets its outputs to the defined shutdown value.
709609 11/2007 19
Use of I/O Base and Communications Adapter
Potential Isolation of the PROFIBUS DP Bus Interface
Potential Isolation
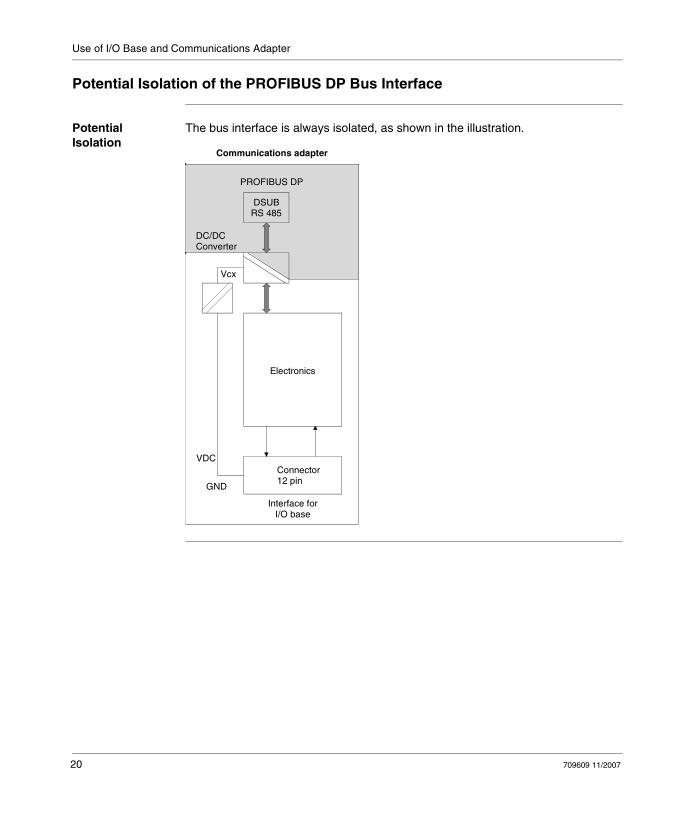
The bus interface is always isolated, as shown in the illustration.
Electronics
Connector12 pin
GND
VDC
DC/DCConverter
Vcx
DSUBRS 485
PROFIBUS DP
Interface forI/O base
Communications adapter
20 709609 11/2007

709609 11/2007
3
Mounting the Components and the Connecting the CablesOverview
Introduction This Chapter describes the mounting of the I/O base and the communications adapter and the connection of the connection cable.
What's in this Chapter?
This chapter contains the following topics:
Topic Page
Mounting of the bus adapter 22
Mounting the I/O Module 24
Connection to the PROFIBUS DP 26
Constructing the Bus Cable for the PROFIBUS DP 27
21
Mounting and Cable Connection
Mounting of the Bus Adapter
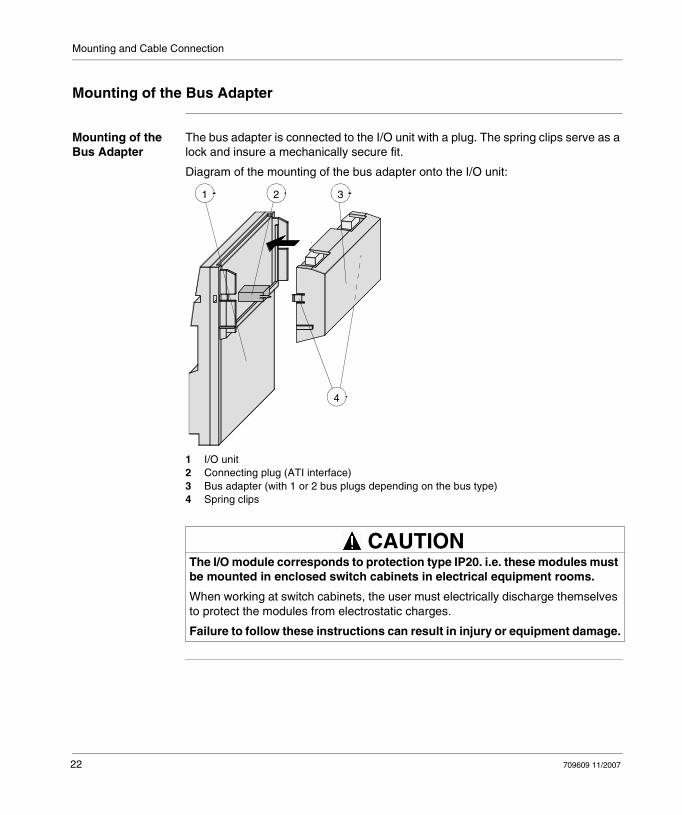
Mounting of the Bus Adapter
The bus adapter is connected to the I/O unit with a plug. The spring clips serve as a lock and insure a mechanically secure fit.
Diagram of the mounting of the bus adapter onto the I/O unit:
1 I/O unit2 Connecting plug (ATI interface)3 Bus adapter (with 1 or 2 bus plugs depending on the bus type)4 Spring clips
The I/O module corresponds to protection type IP20. i.e. these modules must be mounted in enclosed switch cabinets in electrical equipment rooms.
When working at switch cabinets, the user must electrically discharge themselves to protect the modules from electrostatic charges.
Failure to follow these instructions can result in injury or equipment damage.
1 2
4
3
CAUTION
22 709609 11/2007

Mounting and Cable Connection
Disconnection of the Bus Adapter
The adapter can be disconnected using a screwdriver (see arrow).
709609 11/2007 23

Mounting and Cable Connection
Mounting the I/O Module
Dimensions of the I/O Module
The following illustration shows the dimensions of the I/O module with communications adapter:
1
Type of module Depth
Direct Current 60 mm (2.72 inch)
Alternating Current 65 mm (2.53 inch)
min
. 125
mm
62 m
mm
in. 6
0 m
m
(1,1
6 in
)
18 m
m
(4,8
6 in
)(2
,41
in)
(2,3
3 in
)
30 m
m
(0,3
1 in
)
93 m
m (
3,62
in)
141,
5 m
m (
5,5
in)
107 mm (4,162 in)
125 mm (4,86 in) 1
24 709609 11/2007
Mounting and Cable Connection
Mounting the I/O Module
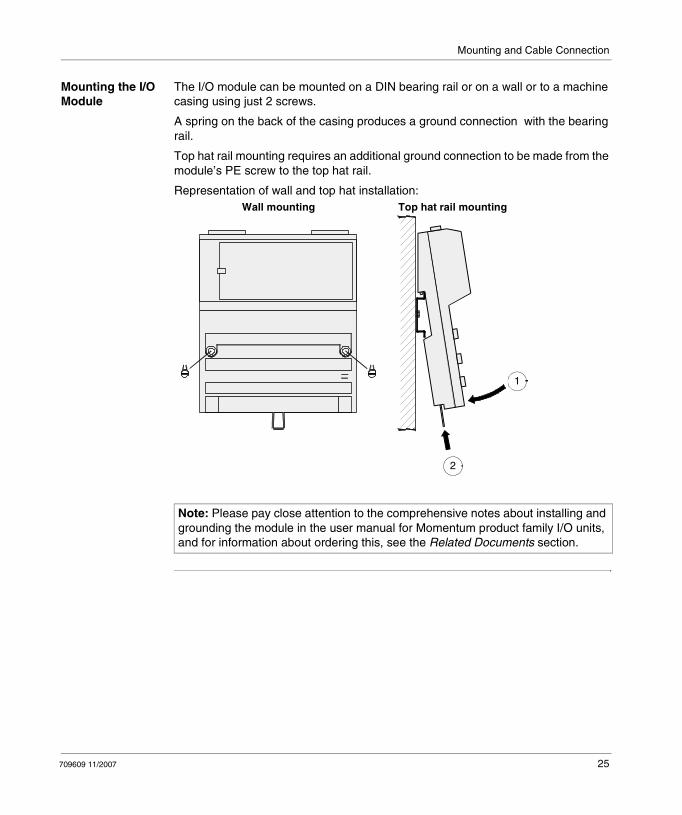
The I/O module can be mounted on a DIN bearing rail or on a wall or to a machine casing using just 2 screws.
A spring on the back of the casing produces a ground connection with the bearing rail.
Top hat rail mounting requires an additional ground connection to be made from the module’s PE screw to the top hat rail.
Representation of wall and top hat installation:
Note: Please pay close attention to the comprehensive notes about installing and grounding the module in the user manual for Momentum product family I/O units, and for information about ordering this, see the Related Documents section.
Wall mounting Top hat rail mounting
1
2
709609 11/2007 25
Mounting and Cable Connection
Connection to the PROFIBUS DP
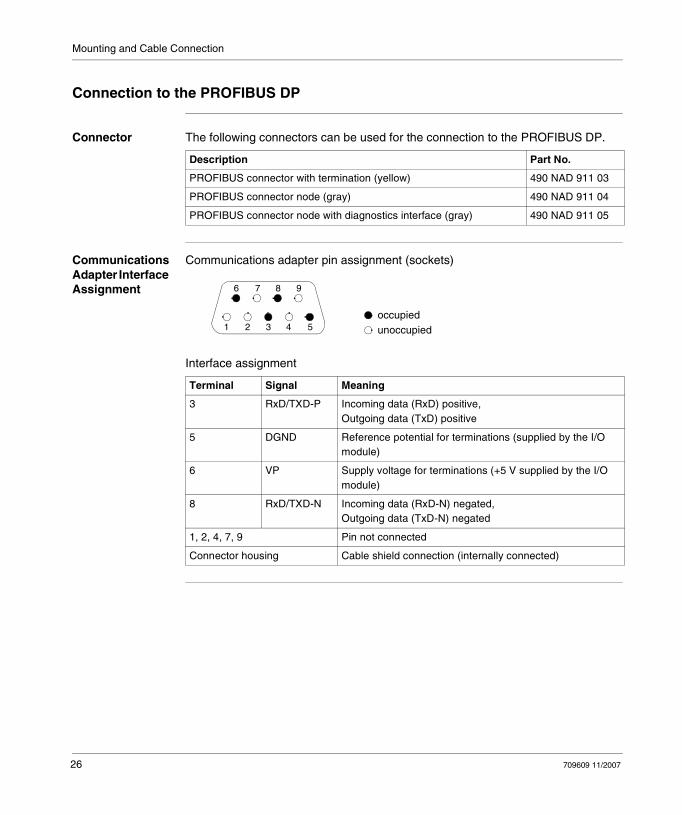
Connector The following connectors can be used for the connection to the PROFIBUS DP.
Communications Adapter Interface Assignment
Communications adapter pin assignment (sockets)
Interface assignment
Description Part No.
PROFIBUS connector with termination (yellow) 490 NAD 911 03
PROFIBUS connector node (gray) 490 NAD 911 04
PROFIBUS connector node with diagnostics interface (gray) 490 NAD 911 05
Terminal Signal Meaning
3 RxD/TXD-P Incoming data (RxD) positive,Outgoing data (TxD) positive
5 DGND Reference potential for terminations (supplied by the I/O module)
6 VP Supply voltage for terminations (+5 V supplied by the I/O module)
8 RxD/TXD-N Incoming data (RxD-N) negated,Outgoing data (TxD-N) negated
1, 2, 4, 7, 9 Pin not connected
Connector housing Cable shield connection (internally connected)
occupiedunoccupied2 3 4 51
7 8 96
26 709609 11/2007

Mounting and Cable Connection
Constructing the Bus Cable for the PROFIBUS DP
Overview The bus cable for connecting PROFIBUS DP devices must be constructed by the user.
A special PROFIBUS cable (2 conductor, shielded) is required, this is available as an individual item from Schneider among others, see Ordering Details for PROFIBUS DP Components, p. 39. Furthermore, three different Connector, p. 26 are available.
Constructing the Bus Cable
To construct the cable, proceed as follows:
Step Action
1 Cut the cable to the required length.
2 Prepare the cable ends as shown in the illustration (dimensions in mm):
J PVC jacketS Braided shielding
3 Remove the PVC jacket J to the length shown.
4 Wrap the supplied copper foil shielding F round the shielded braiding S:
J PVC jacketS Braided shieldingF Copper foil shieldingAdditional foil can be obtained from 3 M, see Ordering Details for PROFIBUS DP Components, p. 39.
20
86
S
J
7.3
S
FJ
709609 11/2007 27

Mounting and Cable Connection
5 Plug the leads of the corresponding cable(s) into the terminals as shown:Green lead in terminal ARed lead in terminal B
Note: Do not screw the corresponding screws in yet.Connection terminal assignment on the PROFIBUS DP(example: 490 NAD 911 04 PROFIBUS connector):
A Incoming cable KAB PROFIBB Outgoing cable KAB PROFIB (not available with 490 NAD 911 03)C Connection terminals (only once (B,A) with 490 NAD 911 03)D Cable cleat for relieving weightE Bus connector screws
Step Action
A B
D
CE
gn
rd gn
B A B A
rd
28 709609 11/2007

Mounting and Cable Connection
Start of Bus and End of Bus
The PROFIBUS connector with termination (490 NAD 911 03) is required for the start and end of the bus. These connectors emulate the line impedance.
It is recommended that at least one connector with diagnostics interface(490 NAD 911 05) is used.
Wiring diagram for a PROFIBUS DP cable
6 Attach the cables with the available cable cleat to create a robust shielded connection and relieve weight as shown:
J PVC jacketS Braided shielding with foil shieldingC Cable cleatNote: Half of the cable jacket must lie under the cable cleat.Pay attention to the installation direction of the cable cleat.
7 The shielding of the two cables are each internally connected with the metal housing of the connector.
8 Close the connector housing.
9 Perform the central discharge function for the shielding in accordance with Central Discharge Function for the PROFIBUS DP, p. 32, before connecting the bus cable to the modules.
10 Plug the PROFIBUS DP connector into the corresponding module and secure it with the screws.
Step Action
J S
C
Start of bus490 NAD 911 03
A
B
Node490 NAD 911 04 / 05
A
B
A
Bgn
rd
gn
rd
Node490 NAD 911 04 / 05
A
B
A
Bgn
rd
End of bus490 NAD 911 03
A
B
709609 11/2007 29

Mounting and Cable Connection
30 709609 11/2007

709609 11/2007
4
EMC Measures for the Communications AdapterOverview
Introduction This Chapter contains notes about the central discharge function of the PROFIBUS DP and surge protection for bus leads.
What's in this Chapter?
This chapter contains the following topics:
Topic Page
Central Discharge Function for the PROFIBUS DP 32
Surge Protection for Bus Leads (Lightning Protection) 33
31

EMC Measures for the Communications Adapter
Central Discharge Function for the PROFIBUS DP
Central Discharge Function
Each cable shield should be galvanically grounded with the earth using FE/PE grounding clamps immediately after the cable has been connected to the cabinet.
Static Discharge In the case of a very long bus cable, which has been installed but not yet connected, you must discharge the static as follows:
Note
Step Action
1 Select the PROFIBUS DP connector closest to the FE/PE grounding clamp.
2 Touch the metal of the connector housing to the cabinet's FE/PE grounding clamp to carry out a static discharge.
3 Now connect the bus connector to the device.
4 Discharge the other PROFIBUS DP cable connectors as described in steps 2 and 3.
Note: During mounting, the metal part of the PROFIBUS DP connector is connected internally to the cable shield. When the bus cable connector is inserted into the module’s PROFIBUS port, a short connection between the shield and the FE/PE is created automatically.
32 709609 11/2007

EMC Measures for the Communications Adapter
Surge Protection for Bus Leads (Lightning Protection)
Surge Protection for Bus Leads up to 12 Mbps Signals
To protect transmission systems from extraneous surges (lightning), the PROFIBUS DP lead should be equipped with suitable surge protection equipment once it extends outside a building.
The nominal discharge current should be at least 5 kA.
Examples of compatible lightning arrestors include Type CT MD/HF5 and Type CT B110 made by the firm Dehn und Söhne GmbH & Co KG. For supplier addresses and order numbers, see Ordering Details for PROFIBUS DP Components, p. 39.
For adequate protection of a PROFIBUS DP cable, two sets of protection equipment are required for each building. The first set of protection devices (type B110), located where the cable enters the building, works as a lightning conductor, the second (type MD/HF5), located near the first device, works as a surge protection device.
Connection Rules for Protection Equipment
Before connecting the protection equipment, please pay close attention to the following rules:
Install a functional ground (potential-equalization rod)Install the protection equipment near the functional ground, to keep surge current path as short as possible.
Keep the lead to the functional earth as short as possible. (minimum 6mm2)The maximum lead length depends on the transfer rate.
Up to 500 kbps you may configure a maximum of 4 outdoor sections with 8 pairs of protection devices (CT B110 and CT MD/HF5).From 1MBaud up to the highest transfer rate you may only configure 1 outdoor section with 2 pairs of protection devices.
Do not mix up the IN and OUT sides of the lightning conductors (IN = outdoor side)Carry out a shield grounding (see Shield Grounding of Surge Protection Devices, p. 35) of the PROFIBUS DP lead according to the type of lightning conductor (type CT B110 or CT MD/HF5) being used.
709609 11/2007 33

EMC Measures for the Communications Adapter
Connection Plan for Protection Devices
Connection plan of the protection devices:
Type and number of lightning conductors made by the firm Dehn und Söhne GmbH &Co KG suitable for a PROFIBUS DP cable
No. Type Number per Group
1 CT MD/HF 5 2
2 CT B110 2
Note: Information about mounting and connecting the leads can be found in the relevant installation instructions, which are enclosed with the lightning conductors.
Outdoors
Building 1 Building 2
Switchcupboard
Switchcupboard
Bus device Bus device
1 2 2 1
34 709609 11/2007

EMC Measures for the Communications Adapter
Shield Grounding of Surge Protection Devices
The protection devices permit direct or indirect shield grounding. The gas-type surge protector acts as an indirect ground.
In both cases EMC spring terminals grasp the input and output sides of the cable shield.
Types of shield grounding assignment
Note: When the system permits it, we recommend you use direct shield grounding.
Type of grounding Assignment
Direct shield grounding Connect the shield of the incoming cable to the IN terminal, and that of the outgoing cable to the OUT terminal. The shields are now galvanically connected to the PE.
Indirect shield grounding via gas-type surge protector
Connect shields as described for direct shield grounding. Insert the gas-type surge protector in the rack beneath the cabinet connection terminals on the input side.
Note: Information about grounding and shield grounding can be found in the relevant installation instructions which are enclosed with the lightning conductors.
709609 11/2007 35

EMC Measures for the Communications Adapter
36 709609 11/2007
709609 11/2007
5
Ordering Details for PROFIBUS DP ComponentsIntroduction
Overview This Chapter contains ordering details for PROFIBUS DP components as well as the necessary accessories.
What's in this Chapter?
This chapter contains the following topics:
Topic Page
Ordering Details 38
Ordering Details for PROFIBUS DP Components 39
37

Ordering Details
Ordering Details
Overview You can order the following PROFIBUS DP products for the Momentum family:Communications AdaptersFile with the Device Data BaseCables and ConnectorsSurge Protection Equipment
38 709609 11/2007

Ordering Details
Ordering Details for PROFIBUS DP Components
Communications Adapter and Device Data Base
The following communications adapters and diskettes containing the device data base are available:
Cables and Connectors
The following cables and connectors are available for the construction of PROFIBUS DP cables:
Description Part No.
Communications Adapter for PROFIBUS DP 170 DNT 110 00
Device data base file 381 SWA 000 00 *)
Label Corresponding to the I/O base in use
*) diskette is part of this manual
Description Part No.
PROFIBUS cable (by the meter) KAB PROFIB
PROFIBUS connector termination 490 NAD 911 03
PROFIBUS connector node 490 NAD 911 04
PROFIBUS connector node with interface for programming unit
490 NAD 911 05
Foil shielding 3M, part no. 1183
Note: Foil shielding supplier:3M Deutschland GmbH, Carl-Schurz-Straße 1, D-41 453 Neuss, Germany
709609 11/2007 39

Ordering Details
Surge Protection Equipment
The following protection equipment and accessories can be connected to the PROFIBUS DP, and are available from the firm Dehn und Söhne GmbH &Co KG.
Description Part No.
Lightning conductor type CT MD/HF 5 Dehn, part no. 919 570
Lightning conductor type CT B 110 Dehn, part no. 919.510
Base component for lightning conductor type CT
Dehn, part no. 919.506
Gas-type surge protector for lightning conductor type CT
Dehn, part no. 919.502
EMC spring terminals Dehn, part no. 919.508
Note: Supplier for the lightning conductors and accessories:Dehn und Söhne GmbH & Co KG, Postfach 1640, D-92306 Neumarkt/Opf, Germany.
40 709609 11/2007

709609 11/2007
II
Module Descriptions for PROFIBUS DP ModulesOverview
Introduction This part contains descriptions of the PROFIBUS DP modules for Modicon Momentum listed in alphabetical order.
What's in this Part?
This part contains the following chapters:
Chapter Chapter Name Page
6 Module Descriptions for the 170 DNT 110 00 Communications Adapter
43
41

Module Descriptions
42 709609 11/2007

709609 11/2007
6
Module Descriptions for the 170 DNT 110 00 Communications AdapterIntroduction
Overview This Chapter describes the 170 DNT 110 00 communications adapter for PROFIBUS DP.
What's in this Chapter?
This chapter contains the following topics:
Topic Page
Brief Description 44
Description of the Display and Operational Control Components 45
Technical Specifications 48
43

170 DNT 110 00
Brief Description
General Information
The 170 DNT 110 communications adapter is the interface between the Momentum I/O bases and the PROFIBUS DP network. It can be connected to any Momentum I/O base.
Physical Structure of the Adapter
The adapter has 1 interface for connection to the PROFIBUS DP and 2 address switches for setting the PROFIBUS DP address.
The operating mode is displayed by 1 LED.
Position of the Adapter Components
Position of the adapter components
1 PROFIBUS DP connector (sockets)2 LED display3 Area for label (near to the I/O base)4 PROFIBUS DP address switch
Software Linkages
A device data base file is needed to integrate the I/O base into the user program. The diskette is part of this manual. A README file with further information is contained on the diskette.
BF
x10
x1
3
1
24
44 709609 11/2007

170 DNT 110 00
Description of the Display and Operational Control Components
Layout of the Components
Layout of the Display and Operational Control Components
1 LED2 Address switch for the PROFIBUS DP address
Status of the LED Display
Status of the LED display:
x10
x1
BF
1
2
LED Status Meaning
BF Red Bus error:The internal watchdog has responded or a reset has occurred.
Off The module is working in a data exchange cycle.
709609 11/2007 45

170 DNT 110 00
Address Settings The user must assign a PROFIBUS DP address to each device. For Momentum family slaves, this address is between 1 and 99. The address allocation is dependent on the physical arrangement of the modules on the PROFIBUS DP.
The address is set on the front side of the communications adapter, and must be identical to the one allocated during bus configuration. This ensures that all outgoing and incoming messages within the network reach the device for which they are intended.
Setting the PROFIBUS DP address to 36
Possible PROFIBUS DP addresses
PROFIBUS DP Address Upper Address Switch (x 10) Lower Address Switch (x 1)
1 ... 9 0 1 ... 9
10 ... 19 1 0 ... 9
20 ... 29 2 0 ... 9
30 ... 39 3 0 ... 9
40 ... 49 4 0 ... 9
50 ... 59 5 0 ... 9
60 ... 69 6 0 ... 9
70 ... 79 7 0 ... 9
80 ... 89 8 0 ... 9
90 ... 99 9 0 ... 9
Addressing on the PROFIBUS DP
Do not begin operating any module before the slave address has been set. See your network administrator to find out the correct device addresses.Should you need to modify the addresses while the module is in operation, the power supply must be switched off and then on again. This is because addresses are only uploaded at the point when voltage is applied. No duplicate addresses may be used with the PROFIBUS, because this can lead to conflicts on the bus.
Failure to follow these instructions can result in injury or equipment damage.
x10
5678
9 01
432
x1
5678
9 01
432
CAUTION
46 709609 11/2007

170 DNT 110 00
Interface Assignment
Communications adapter pin assignment (sockets)
Interface assignment
Terminal Signal Meaning
3 RxD/TXD-P Incoming data (RxD) positive,Outgoing data (TxD) positive
5 DGND Reference potential for terminations, only applies to connectors with termination (supplied by the I/O module)
6 VP Supply voltage for terminations, only applies to connectors with termination (+5 V supplied by the I/O module)
8 RxD/TXD-N Incoming data (RxD-N) negated,Outgoing data (TxD-N) negated
1, 2, 4, 7, 9 Pin not connected
Connector housing Cable shield connection (internally connected)
occupiedunoccupied2 3 4 51
7 8 96
709609 11/2007 47

170 DNT 110 00
Technical Specifications
General Data General technical specifications:
Potential Isolation
Potential isolation bus interface:
Error Detection Error detection
Fuses Fuses:
PROFIBUS DP Data Interface
Interface assignment:
Bus Data Bus length, transfer rate and protocol:
Power supply 5 VDC / 250 mA (from the I/O base)
Power consumption 250 mA at 5 V (supplied by the I/O base)
Power dissipation 1.2 W (type)
RS85 Isolated from remaining logic
Data exchange Red LED for bus error (BF) andI/O Error message at the master for digital inputs and outputs,Parameter Control (prm_control) message at the master for complex I/Os
Supply voltage Vcc Internal (for communications adapter) - none
RS 485 See Connection to the PROFIBUS DP, p. 26
Transfer mode Half-duplex
Protocol transfer PROFIBUS DP as per DIN 19245 parts 1 and 3
Transfer rate as a function of the bus length
Bus Length Transfer Rate
Max 1200 m 9.6 ... 19.2 ... 93.75 kBit/s
Max 1000 m 187.5 kBit/s
Max 400 m 500 kBit/s
Max 200 m 1.5 MBit/s
Max 100 m 3 ... 6 ... 12 MBit/s
48 709609 11/2007

709609 11/2007
III
PROFIBUS DP Module Software LinkageOverview
Introduction This Part contains information about the format, size and mapping of the I/O data when using the communications adapter for PROFIBUS DP. Additionally, it also contains notes about diagnostics and trouble shooting.
What's in this Part?
This part contains the following chapters:
Chapter Chapter Name Page
7 Communications Adapter Data Mapping for PROFIBUS DP 51
8 Diagnostics 61
49

Software Linkage
50 709609 11/2007

709609 11/2007
7
Communications Adapter Data Mapping for PROFIBUS DPOverview
Introduction This Chapter contains information about the format, size and mapping of the I/O data when using the communications adapter for PROFIBUS DP.
What's in this Chapter?
This chapter contains the following topics:
Topic Page
I/O Data Format and Size 52
Data Mapping with I/O Bases 54
Example of a PROFIBUS DP Configuration 56
Example of State Memory Addressing in Concept and Modsoft 58
51

Communications Adapter Data Mapping
I/O Data Format and Size
Overview The I/O data contains discrete I/O points for these modules, as well as analog values and parameters for the complex (analog) I/O bases.
Each I/O unit is identified immediately after voltage is applied. Data exchange can then begin.
I/O modules with discrete, analog or mixed I/O bases are each sent messages using different data formats:
Number of Words for analog I/O Bases
Number of I/O words for analog I/O bases:
Type of I/O Base Data Format
Discrete Byte
Analog Word
Discrete and analog combination / special modules Word
Description Function Input Words Output Words
170 AAI 030 00 8 input channels 8 2
170 AAI 140 00 16 input channels 16 4 (for parameters)
170 AAI 520 40 4 input channels, RTD, thermoelements 4 4 (for parameters)
170 AAO 120 00 4 output channels 0 5 (of which 1 word for parameters)
170 AAO 921 00 4 output channels 0 5 (of which 1 word for parameters)
170 AMM 090 00 4 inputs, 2 outputs (discrete) 1 (8 bits for diagnostics)
1
4 input channels, 2 output channels (analog) 4 4 (of which 2 words for parameters)
170 ANR 120 90 8 inputs, 8 outputs (discrete)6 input channels, 4 output channels (analog)
12 12
52 709609 11/2007

Communications Adapter Data Mapping
Number of Words for Special Modules
Number of I/O words for special modules:
Number of Bytes for discrete I/O Bases, 24 VDC
Number of Bytes for discrete I/O Bases, 24 VDC)
Number of Bytes for discrete I/O Bases, 120/230 VAC
Number of bytes for discrete I/O Bases, 120/230 VAC)
Description Function Input Words Output Words
170 ADM 540 80 6 inputs, 3 outputs (120 VAC)1 Modbus interface
16 16
170 AEC 920 00 Counter 8 8
Description Function Input Byte Output Byte
170 ADI 340 00 16 inputs 2 0
170 ADI 350 00 32 inputs 4 0
170 ADO 340 00 16 outputs 0 2
170 ADO 350 00 32 outputs 0 4
170 ADM 350 10 16 inputs, 16 outputs 2 2
170 ADM 350 11 16 inputs, 16 outputs 2 2
170 ADM 370 10 16 inputs, 8 outputs 2 2
170 ADM 390 10 16 inputs, 12 outputs 6 (2 discrete and 4 diagnostics)
2
170 ADM 390 30 10 inputs, 8 outputs 2 2
Description Function Input Byte Output Byte
170 ADI 540 50 16 inputs / 240 VAC 2 0
170 ADI 740 50 16 inputs / 120 VAC 2 0
170 ADO 530 50 8 outputs / 120 VAC 0 2
170 ADO 540 50 16 outputs / 120 VAC 0 2
170 ADO 730 50 8 outputs / 230 VAC 0 2
170 ADO 740 50 16 outputs / 230 VAC 0 2
170 ADM 690 50 10 inputs, 8 outputs /1 20 VAC 2 2
170 ADM 690 51 10 inputs, 8 outputs / 120 VAC 2 2
170 ARM 370 30 10 inputs (24 V), 8 relay outputs / 120 VAC
2 2
709609 11/2007 53

Communications Adapter Data Mapping
Data Mapping with I/O Bases
Discrete I/O Bases
With discrete Momentum modules, each terminal I/O point is mapped according to the following principle:
Each is mapped to bytes (max 4 bytes for 32 inputs or 32 outputs).The least significant byte (LSB) is sent or received first.The bytes (output words) sent from the communications adapter to the I/O base represent the output values.The bytes (input words) sent from the I/O unit to the communications adapter represent the input values and status statement.The register addressing is compatible with standard TIOs.
The following message structure illustrates the data exchange between the master and the slaves (I/O modules) for 2 discrete I/O bases.
The I/O bits are mapped via the bus as follows:
Byte No. Significance 170 ADI 350 00 input data 170 ADI 350 00 output data
0 LSB Inputs 8...1 Outputs 8 ... 1
1 - Inputs 16 ... 9 Outputs 16 ... 9
2 - Inputs 24 ... 17 Outputs 24 ... 17
3 MSB Inputs 32 ... 25 Outputs 32 ... 25
1 8 7 6 5 4 32345678 2 1
8 9 10 11 12 13 147654321 15 16
Byte 0
Terminal block 1 Terminal block 2
Byte sequence inProfibus message
Bit no. in bytes
Terminal no.
1 8 7 6 5 4 32345678 2 1
8 9 10 11 12 13 147654321 15 16
Byte 1 Byte 2 Byte 3
54 709609 11/2007

Communications Adapter Data Mapping
Analog I/O Bases With analog Momentum modules, each terminal I/O value is mapped according to the following principle:
Each analog value is mapped onto one word.The least significant word (LSW) is sent or received first.The words (output registers) sent to the I/O base represent the output values and the parameters; the words (input registers) sent from the I/O base to the communications adapter represent the field values and status statement.Analog value representation occurs in compliance with IDS 3000. Sign and value are flush left (nominal range is +/- 32,000) The resolution depends on the selected measuring or output range. Negative values are represented as double complements.
The following message structure illustrates the data exchange between the master and the slave (I/O module) for the 170 AMM 090 00 module
Further information is contained in the Momentum I/O Bases user manual.
Word No. Significance Input data Output data
0 LSW Value, input channel 1 Parameter input channels 1 ... 4
1 - Value, input channel 2 Parameter output channels 1,2
2 - Value, input channel 3 Value, output channel 1
3 - Value, input channel 4 Value, output channel 2
3 MSW Discrete inputs Discrete outputs
709609 11/2007 55

Communications Adapter Data Mapping
Example of a PROFIBUS DP Configuration
Example of a PROFIBUS DP Configuration
The following illustration shows an example configuration for the PROFIBUS DP. Only Momentum I/O modules are used:
Note: A PROFIBUS terminating connector (e.g. 490 NAD 911 03) must always be used at the front and back ends of the bus.
CPU
140 CRP 811 00
Quantum with PROFIBUS DP master
170 ADM 350 10
490 NAE 911 00 (TAP)+
490 NAD 911 03
490 NAD 911 04 490 NAD 911 04 490 NAD 911 03
PROFIBUS DP device
170 ADI 350 00 170 AAO 120 10
I/O base with 170 DNT 110 00
170 ADO 340 00170 AAI 140 00170 AMM 090 00
56 709609 11/2007

Communications Adapter Data Mapping
The following tasks must be executed to prepare a PROFIBUS DP network for operation:
Configure the bus by Constructing the Bus Cable for the PROFIBUS DP, p. 27 according to the configuration.Address Settings, p. 46 of the devices
Configure the bus with an appropriate tool, which is independent of the installed system (e.g. SyCon in the case of Modicon Quantum with Concept and Premium with PL7), as well as Installation of the Device Data Base File (GSD), p. 57Allocate the I/O points for state RAM addressing using the relevant software program (e.g. Concept, PL7)
Installation of the Device Data Base File (GSD)
In PROFIBUS DP, the performance features of the devices are documented by the manufacturer and provided for the user in the form of an equipment data sheet and a device data base file (GSD) and are made available to the user. The contents and codification of the device data bases correspond to accepted standards, and are therefore independent of the master. They enable the configuration of any desired number of DP slaves using various manufacturers' configuration equipment.
The device data base file is delivered in the form of a diskette (file ASA_7512.GSD for Momentum modules) and is part of this user manual (see also Ordering Details for PROFIBUS DP Components, p. 39). A README file with further information is contained on this diskette. How to import this GSD file is described in Parameterizing the Master.
Note: Analog Momentum I/O bases only attain data exchange status when a complete set of valid parameters together with the user data are transferred to them.
709609 11/2007 57

Communications Adapter Data Mapping
Example of State Memory Addressing in Concept and Modsoft
Overview PROFIBUS DP slaves require the following different memory areas:for USER DATAfor diagnostic data
Example of User Data
The required bytes and words are provided by the selection of the I/O modules (see I/O Data Format and Size, p. 52).
The following memory assignment was selected for the Example of a PROFIBUS DP Configuration, p. 56:
In the example, memory was allocated when the master was parameterized. The word format (because the I/O base is analog) was also selected when the master was parameterized.
In this example, data transfer via the bus for discrete I/Os occurs in bytes and in accordance with the following rules:
The user data is shifted flush left in the wordByte 0 is the first byte to be sent, followed by bytes 1, 2 and 3 with 32 inputs or outputs
Slave Address
Momentum Module Input Length Output Length
Input Type Address Inputs
Address Outputs
3 170 ADI 350 00 4 bytes 0 bytes BOOL 300 001 - 300 002
-
4 170 ADM 350 10 2 bytes 2 bytes BOOL 300 003 400 001
5 170 ADO 340 00 0 bytes 2 bytes BOOL - 400 002
6 170 AAI 140 00 16 words 4 words UINT16 300 004 - 300 019
400 003 - 400 006
7 170 AMM 090 00 5 words 5 words UINT16 300 020 - 300 024
400 007 - 400 011
8 170 AAO 120 00 0 words 5 words UINT16 - 400 012 - 400 016
Note: For discrete I/O bases, 0x and 1x references can also be selected.
58 709609 11/2007

Communications Adapter Data Mapping
In the example, the bus master converts bytes into words, before they are stored in the PLC memory. For the slave 3 (170 ADI 350 00), the input bits are stored in the words 300 001 and 300 002.
Within the words, the I/O base’s inputs are as follows:
This leads to the following data mapping (input type BOOL):
1 8 7 6 5 4 32345678 2 1
8 9 10 11 12 13 147654321 15 16
8 9 10 11 12 13 147654321 15 16
Byte 0 Byte 1
Bit sequence inword 300 001 and300 002
Bit sequence inProfibus message
Terminal number(Rows 1 and 2)
1 8 7 6 5 4 32345678 2 1
8 9 10 11 12 13 147654321 15 16
8 9 10 11 12 13 147654321 15 16
Byte 2 Byte 3
Byte No. Byte 0 Byte 1
Bits in word 300.001 8 7 6 5 4 3 2 1 16 15 14 13 12 11 10 9
Terminal No.: Row 1 1 2 3 4 5 6 7 8 9 10 11 12 13 14 15 16
Byte No. Byte 2 Byte 3
Bits in word 300 002 8 7 6 5 4 3 2 1 16 15 14 13 12 11 10 9
Terminal No.: Row 2 1 2 3 4 5 6 7 8 9 10 11 12 13 14 15 16
709609 11/2007 59

Communications Adapter Data Mapping
Example of Diagnostic Data
A diagnostic message includes 19 bytes per I/O module. The bytes are mapped onto words.
The meaning of the bytes is described in the Structure of the Diagnostic Message, p. 63 section. Bytes 1 and 8 are required for error evaluation. For complex modules (analog), byte 9 is also required (it displays, among other things, whether a parameter default is valid or invalid).
In the example therefore, only the first 8 or 9 bytes of each module are saved in the controller.
The following memory is reserved:Eight words are required for the discrete modules’ diagnostic data (bytes 1 … 8)Nine words are required for the analog modules’ diagnostic data (bytes 1 … 9).
If the ident code (bytes 18 and 19) is to be likewise evaluated, 19 words must be reserved for 19 bytes. These options must be considered during the para-meterization of the master.
The memory partitions for the example can be constructed as follows:
For example, the following table displays the data mapping for the slave’s diagnostic byte 1 with address 7 (170 ADI 350 00) in word 300 301 (input type UINT8).
Slave Address
Momentum Module Input Length Input Diagnostic Address
3 170 ADI 350 00 8 words 300 301 - 300 308
4 170 ADM 350 10 8 words 300 309 - 300 316
5 170 ADO 340 00 8 words 300 317 - 300 324
6 170 AAI 140 00 9 words 300 325 - 300 333
7 170 AMM 090 00 9 words 300 334 - 300 342
8 170 AAO 120 00 9 words 300 343 - 300 351
Diagnostic Byte No. Byte 1
Bit no. in diagnostic byte 8 7 6 5 4 3 2 1
Bit no. in word 300 301 16 15 14 13 12 11 10 9 8 7 6 5 4 3 2 1
60 709609 11/2007

709609 11/2007
8
DiagnosticsOverview
Introduction This chapter contains information about diagnostics and trouble shooting.
What's in this Chapter?
This chapter contains the following topics:
Topic Page
Evaluation of the PROFIBUS DP Diagnostic Message 62
Ident Codes for Momentum I/O Bases 68
Trouble Shooting via PROFIBUS DP Diagnostic Messages 70
61

Diagnostics
Evaluation of the PROFIBUS DP Diagnostic Message
Overview During the addressing of the PROFIBUS devices, the diagnostic data addresses are given as well as the input and output data addresses.
Input references are assigned to the diagnostic data. These do not have to have any connection to the Momentum module’s input data but can be assigned to any input area in the PLC’s state memory.
If new diagnostic data is issued, a bit is set by the slave (e.g. by a Momentum I/O module). If the master detects this bit, it automatically requests the diagnostics.
62 709609 11/2007

Diagnostics
Structure of the Diagnostic Message
The diagnostic data includes 19 bytes per Momentum module:6 bytes of standard diagnostic data and13 bytes of enhanced diagnostics
The standard diagnostics are identical for all DP slaves, the length and content of the enhanced diagnostics is manufacturer-specific.
Structure of the diagnostic message
Byte No. Diagnostics Type Contents
1 Standard diagnostics Station status 1
2 Station status 2
3 Station status 3
4 Master address
5 Ident no. of the 170 DNT 110 00 (high byte)
6 Ident no. of the 170 DNT 110 00 (low byte)
7 Enhanced diagnostics (specifically for Momentum)
Diagnostics header for I/O bases
8 I/O error
9 Parameter control (prm_control)
10 Firmware version and index of the 170 DNT 110 00
11
12
13
14
15
16 reserved
17 reserved
18 Ident code of the I/O base (high byte)
19 Ident code of the I/O base (low byte)
Note: If you want to save memory, please note that bytes 10 .. 19 do not have to be stored in the PLC’s state memory.
709609 11/2007 63

Diagnostics
Station Byte 1 (Diagnostic Byte 1)
Diagnostic byte 1
Station Byte 2 (Diagnostic Byte 2)
Diagnostic byte 2
Station Byte 3 (Diagnostic Byte 3)
Diagnostic byte 3
7 6 5 4 3 2 1 0
Bit Function Meaning, if Bit = 1
0 Station Non Existent Master cannot establish communication with slave
1 Station Not Ready Slave cannot establish communication with master
2 Config Fault Error in configuration data for slave
3 Extended Diagnosis Slave provides extended diagnostics as well as standard diagnostics
4 Not supported A function has been called that the slave does not support
5 Invalid Slave Response Master received an implausible response from slave
6 PRM Fault Set by the slave in the case of incorrect bus parameters
7 Master Lock The slave was parameterized by another master from the one that provided the diagnostic data
7 6 5 4 3 2 1 0
Bit Function Meaning, if Bit = 1
0 PRM Request Slave requires new bus parameters
1 Static Diagnostics Slave reports that it has received invalid I/O data/parameters
2 Const. 1 Slave reports that it is ready for operation
3 Watchdog On Watchdog is active
4 Freeze Mode Slave received the "freeze" command
5 Sync Mode Slave received the "Sync" command
6 Not used
7 Deactivated Master reports that the slave is inactive
7 6 5 4 3 2 1 0
Bit Function Meaning, if Bit = 1
0... 6 Not used
7 Extended Diagnosis Overflow Set by the master when the diagnostic buffer has overrun.
64 709609 11/2007

Diagnostics
Station Byte 4 (Diagnostic Byte 2)
Diagnostic byte 4
Ident No. of the Slave (Diagnostic Bytes 5 and 6)
Diagnostic bytes 5 and 6
Diagnostic Header 7 (Diagnostic Byte 7)
Diagnostic byte 7
7 6 5 4 3 2 1 0
Bit Meaning
0... 7 Address of the master that parameterized the slave (e.g. 1). In the case of a connection interruption the value here is 255 (decimal) or FF (hex).
7 6 5 4 3 2 1 0
Byte Bit No. Meaning
7 6 5 4 3 2 1 0
5 0 1 1 1 0 1 0 1 The value here must be 75 hexadecimal or 117 decimal (high byte).
6 0 0 0 1 0 0 1 0 The value here must be 12 hexadecimal or 18 decimal (high byte).
Note: If the connection to the master is interrupted, both bytes have the value 0.
7 6 5 4 3 2 1 0
Byte Bit No. Meaning
7 6 5 4 3 2 1 0
7 0 0 0 0 1 1 0 1 The value here must be D hexadecimal or 13 decimal.
709609 11/2007 65
Diagnostics
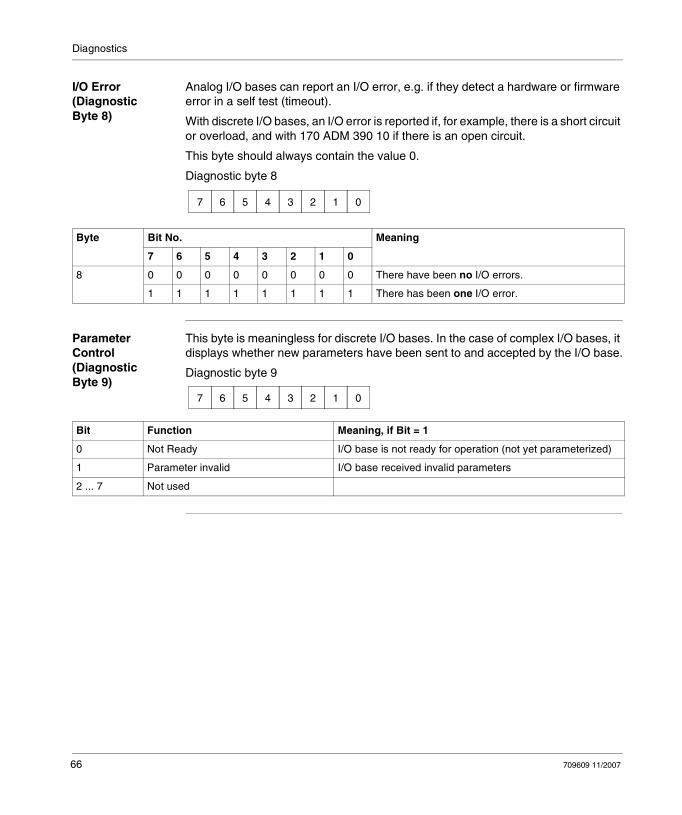
I/O Error (Diagnostic Byte 8)
Analog I/O bases can report an I/O error, e.g. if they detect a hardware or firmware error in a self test (timeout).
With discrete I/O bases, an I/O error is reported if, for example, there is a short circuit or overload, and with 170 ADM 390 10 if there is an open circuit.
This byte should always contain the value 0.
Diagnostic byte 8
Parameter Control (DiagnosticByte 9)
This byte is meaningless for discrete I/O bases. In the case of complex I/O bases, it displays whether new parameters have been sent to and accepted by the I/O base.
Diagnostic byte 9
7 6 5 4 3 2 1 0
Byte Bit No. Meaning
7 6 5 4 3 2 1 0
8 0 0 0 0 0 0 0 0 There have been no I/O errors.
1 1 1 1 1 1 1 1 There has been one I/O error.
7 6 5 4 3 2 1 0
Bit Function Meaning, if Bit = 1
0 Not Ready I/O base is not ready for operation (not yet parameterized)
1 Parameter invalid I/O base received invalid parameters
2 ... 7 Not used
66 709609 11/2007
Diagnostics
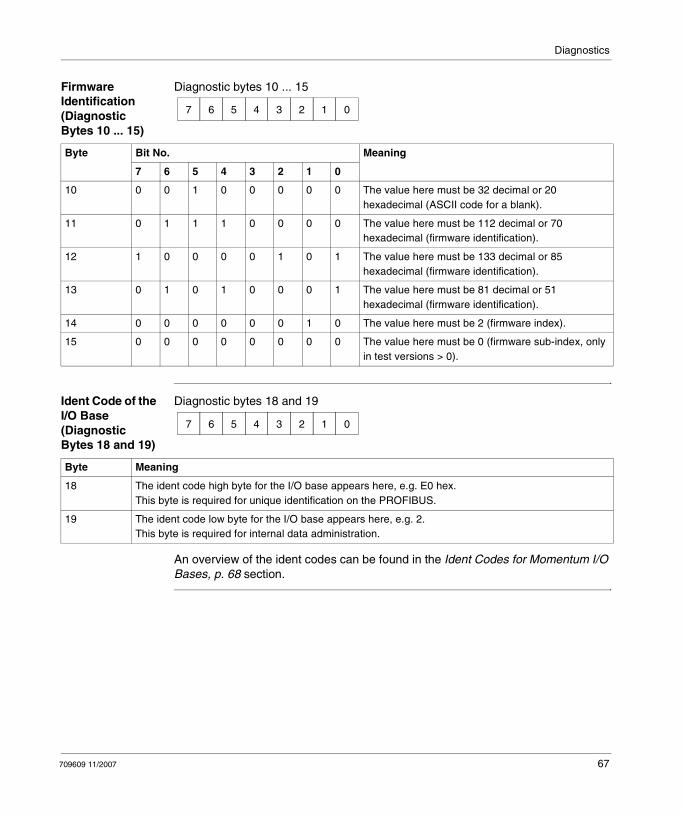
Firmware Identification (Diagnostic Bytes 10 ... 15)
Diagnostic bytes 10 ... 15
Ident Code of the I/O Base (Diagnostic Bytes 18 and 19)
Diagnostic bytes 18 and 19
An overview of the ident codes can be found in the Ident Codes for Momentum I/O Bases, p. 68 section.
7 6 5 4 3 2 1 0
Byte Bit No. Meaning
7 6 5 4 3 2 1 0
10 0 0 1 0 0 0 0 0 The value here must be 32 decimal or 20 hexadecimal (ASCII code for a blank).
11 0 1 1 1 0 0 0 0 The value here must be 112 decimal or 70 hexadecimal (firmware identification).
12 1 0 0 0 0 1 0 1 The value here must be 133 decimal or 85 hexadecimal (firmware identification).
13 0 1 0 1 0 0 0 1 The value here must be 81 decimal or 51 hexadecimal (firmware identification).
14 0 0 0 0 0 0 1 0 The value here must be 2 (firmware index).
15 0 0 0 0 0 0 0 0 The value here must be 0 (firmware sub-index, only in test versions > 0).
7 6 5 4 3 2 1 0
Byte Meaning
18 The ident code high byte for the I/O base appears here, e.g. E0 hex.This byte is required for unique identification on the PROFIBUS.
19 The ident code low byte for the I/O base appears here, e.g. 2.This byte is required for internal data administration.
709609 11/2007 67

Diagnostics
Ident Codes for Momentum I/O Bases
General Information about Ident Codes
All Momentum I/O modules have an internal ident code. It is required so that a DP master can identify the types of connected devices. The master compares byte 1 of the ident code of the connected DP devices with the ident codes in the configuration data provided by the service terminal. Application data transmission begins only when the proper device types with the correct device addresses are connected to the bus. In this way, a relatively high security from configuration errors is achieved.
The ident code is visible to you only if it has been entered in the appropriate files (for Momentum modules, file ASA_7512.GSD on diskette 381 SWA 000 00). The user should always use the current GSD file.
From the ident code you can tell which module type has sent a diagnostics message.
Ident Codes for analog I/O Bases
Ident codes for analog I/O bases can be found here:
Ident codes for special modules
Ident codes for special modules can be found here:
Description Function Ident code byte 18
Ident code byte 19
170 AAI 030 00 8 input channels C0 hex 02 hex
170 AAI 140 00 16 input channels C1 hex 04 hex
170 AAI 520 40 4 input channels, RTD, thermoelements C2 hex 04 hex
170 AAO 120 00 4 output channels C3 hex 01 hex
170 AAO 921 00 4 output channels C4 hex 01 hex
170 AMM 090 00 4 inputs, 2 outputs (discrete)4 input channels, 2 output channels (analog)
E0 hex 02 hex
170 ANR 120 90 8 inputs, 8 outputs (discrete)6 input channels, 4 output channels (analog)
17 hex E3 hex
Description Function Ident code byte 18
Ident code byte 19
170 ADM 540 80 6 inputs, 3 outputs, 120 VAC;1 Modbus interface
E2 hex 11 hex
170 AEC 920 00 Counter A0 hex 04 hex
68 709609 11/2007

Diagnostics
Ident Codes for discrete I/O Bases, 24 VDC
Ident codes for discrete I/O bases can be found here:
Ident Codes for discrete I/O Bases, 120/230 VAC
Ident codes for discrete I/O bases can be found here:
Description Function Ident code byte 18
Ident code byte 19
170 ADI 340 00 16 inputs 02 hex 00 hex
170 ADI 350 00 32 inputs 01 hex 00 hex
170 ADO 340 00 16 outputs 06 hex 00 hex
170 ADO 350 00 32 outputs 09 hex 00 hex
170 ADM 350 10 16 inputs, 16 outputs 08 hex 00 hex
170 ADM 350 11 16 inputs, 16 outputs 08 hex 00 hex
170 ADM 370 10 16 inputs, 8 outputs 0B hex 00 hex
170 ADM 390 10 16 inputs, 12 outputs 0C hex 00 hex
170 ADM 390 30 10 inputs, 8 outputs 0A hex 00 hex
Description Function Ident code byte 18
Ident code byte 19
170 ADI 540 50 16 inputs / 120 VAC 03 hex 00 hex
170 ADI 740 50 16 inputs / 240 VAC 28 hex 00 hex
170 ADO 530 50 8 outputs / 120 VAC 16 hex 00 hex
170 ADO 540 50 16 outputs / 120 VAC 14 hex 00 hex
170 ADO 730 50 8 outputs / 230 VAC 17 hex 00 hex
170 ADO 740 50 16 outputs / 230 VAC 15 hex 00 hex
170 ADM 690 50 10 inputs, 8 outputs, 120 VAC 0A hex 00 hex
170 ADM 690 51 10 inputs, 8 outputs, 120 VAC 09 hex 00 hex
170 ARM 370 30 10 inputs (24 V), 8 relay outputs120 VAC
18 hex 00 hex
709609 11/2007 69

Diagnostics
Trouble Shooting via PROFIBUS DP Diagnostic Messages
Trouble Shooting General Information
In addition to the evaluation of the diagnostic message, there are the following important error possibilities:
Comparison of the configured module typeExamination of the voltage supplies to the modulesComparison of the configured addresses with the specified addresses on the bus adapterExamination of the parameterization in the case of complex (analog) modulesTaking into consideration EMC measures and potential equalizationExamining cabling (bus connector screws, correct cable assignment, terminal resistors, appropriate connectors etc.)General contact problems with connections
Overview of diagnostic Examples
The diagnostic data of a 170 AMM 090 00 in the following cases can be found in the table:
Case No. Meaning
1 Output stateThe I/O base is supplied with voltage, the Profibus is correctly configured and running. The "BF" LED on the communications adapter of the AMM 090 is off. The I/O base has not, however, been parametrized.
2 Error in parameterization.The I/O base was mistakenly parameterized as 170 AAO 921 during the bus configuration. The PROFIBUS is running but the "BF" LED on the communications adapter of the AMM is lit.
3 Slave is not reporting (master diagnostics):One slave was properly configured. However, it cannot be found because the bus connector was disconnected or the voltage supply was interrupted.
4 Valid parameters:One set of valid parameters has been transferred to the AMM 090
5 Invalid parameters:One set of invalid parameters has been transferred to the AMM 090
70 709609 11/2007

Diagnostics
Normal state of the diagnostic data at program start
The normal state of the diagnostic data at program start is displayed in this table.
Position of the bits in the respective diagnostic byte:
7 6 5 4 3 2 1 0
Diagnostic Byte Format Contents
No. Meaning Case 1 Case 2 Case 3
1 Station status 1 Bin 00001000 00000110 00000001
2 Station status 2 Bin 00001100 00000101 00000000
3 Station status 3 Bin 00000000 00000000 00000000
4 Master address Dec 1 255 255
5 Ident no. of the 170 DNT 110 00 (high byte)
Hex 75 75 0
6 Ident no. of the 170 DNT 110 00 (low byte)
Hex 12 12 0
7 Diagnostics header for I/O bases
Hex D D D
8 I/O error Bin 00000000 00000000 00000000
9 Parameter control Bin 00000001 00000000 00000001
10 Firmware version and index of the 170 DNT 110 00
Hex 20 20 20
11 Hex 70 70 70
12 Hex 85 85 85
13 Hex 51 51 51
14 Hex 2 2 2
15 Hex 0 0 0
16 reserved Hex 0 0 0
17 reserved Hex 0 0 0
18 Ident code of the I/O base (high byte)
Hex E0 E0 E0
19 Ident code of the I/O base (low byte)
Hex 2 2 2
709609 11/2007 71

Diagnostics
Status Changes, starting from Normal State
The changes from output status (case 1) to states 3, 4 and 5 are displayed in the table. The changes in comparison with the output status are marked in bold.
Position of the bits in the respective diagnostic byte:
7 6 5 4 3 2 1 0
Diagnostic Byte Format Case 1(Output state)
Case 3(No slaves reporting)
Case 4(Valid parameters)
Case 5(Invalid parameters)
No. Meaning
1 Station status 1 Bin 00001000 00000001 00000000 00001000
2 Station status 2 Bin 00001100 00000000 00001100 00001100
3 Station status 3 Bin 00000000 00000000 00000000 00000000
4 Master address Dec 1 255 1 1
5 Ident no. of the 170 DNT 110 00 (high byte)
Hex 75 0 75 75
6 Ident no. of the 170 DNT 110 00 (low byte)
Hex 12 0 12 12
7 Diagnostics header for I/O bases
Hex D D D D
8 I/O error Bin 00000000 00000000 00000000 00000000
9 Parameter control Bin 00000001 00000001 00000000 00000011
10 Firmware version and index of the 170 DNT 110 00
Hex 20 20 20 20
11 Hex 70 70 70 70
12 Hex 85 85 85 85
13 Hex 51 51 51 51
14 Hex 2 2 2 2
15 Hex 0 0 0 0
16 reserved Hex 0 0 0 0
17 reserved Hex 0 0 0 0
18 Ident code of the I/O base (high byte)
Hex E0 E0 E0 E0
19 Ident code of the I/O base (low byte)
Hex 2 2 2 2
Note: With a change in status from case 4 to case 5, byte 9 has the value 0000 0010 and the I/O base continues to operate with the old parameters.With a change in status from case 4 to case 3, byte 9 has the value 0000 0000.
72 709609 11/2007

CBAIndex
Aadapter components, 43assembly accessories, 37
Ccables, 37central discharge function, 31communication adapters, 21, 37compatibility
TIO modules, 15configuring
example, 51limits, 11
connectors, 21, 37
Ddata transfer, 15device data base file, 37
installation, 51diagnostic data
examples, 51signal memory addressing, 51
diagnostic messages, 61
Eerror control, 15
709609 11/2007
Hhardware structure, 15
Llightning protection, 31
Mmessage types, 15
Pprotocol execution, 15
Sshield grounding
surge protection devices, 31start of bus, 21surge protection equipment, 37
73

Index
74
709609 11/2007