80.10.1456.7 instructionmanual talento smart buch...operation and setting display and function keys...
TRANSCRIPT

09:00
6
Zeitschaltuhr Thermostat ZählerLichtsteuerung
talento smart

Safety Information . . . . . . . . . . . . . . . . . . . . . . . . . . . . . . . . . . . . . . . . . . . . 4
Information about the device . . . . . . . . . . . . . . . . . . . . . . . . . . . . . . . . . . . . 5Description of the device . . . . . . . . . . . . . . . . . . . . . . . . . . . . . . . . . . . . . . . . . . . . . . . . . . . . . . . . . . 5Intended Use . . . . . . . . . . . . . . . . . . . . . . . . . . . . . . . . . . . . . . . . . . . . . . . . . . . . . . . . . . . . . . . . . . . 5Technical Data . . . . . . . . . . . . . . . . . . . . . . . . . . . . . . . . . . . . . . . . . . . . . . . . . . . . . . . . . . . . . . . . . 5Declaration of Conformity . . . . . . . . . . . . . . . . . . . . . . . . . . . . . . . . . . . . . . . . . . . . . . . . . . . . . . . . . 5FCC Certification . . . . . . . . . . . . . . . . . . . . . . . . . . . . . . . . . . . . . . . . . . . . . . . . . . . . . . . . . . . . . . . . 6IC Certification . . . . . . . . . . . . . . . . . . . . . . . . . . . . . . . . . . . . . . . . . . . . . . . . . . . . . . . . . . . . . . . . . 6
Assembly and Installation . . . . . . . . . . . . . . . . . . . . . . . . . . . . . . . . . . . . . . 7Installation on a DIN-rail . . . . . . . . . . . . . . . . . . . . . . . . . . . . . . . . . . . . . . . . . . . . . . . . . . . . . . . . . . 7Circuit diagram . . . . . . . . . . . . . . . . . . . . . . . . . . . . . . . . . . . . . . . . . . . . . . . . . . . . . . . . . . . . . . . . . 7
Operation and Setting . . . . . . . . . . . . . . . . . . . . . . . . . . . . . . . . . . . . . . . . . 8Display and Function Keys . . . . . . . . . . . . . . . . . . . . . . . . . . . . . . . . . . . . . . . . . . . . . . . . . . . . . . . . . 8Overview of menu structure . . . . . . . . . . . . . . . . . . . . . . . . . . . . . . . . . . . . . . . . . . . . . . . . . . . . . . . 9Initial commissioning . . . . . . . . . . . . . . . . . . . . . . . . . . . . . . . . . . . . . . . . . . . . . . . . . . . . . . . . . . . . . 10Programming . . . . . . . . . . . . . . . . . . . . . . . . . . . . . . . . . . . . . . . . . . . . . . . . . . . . . . . . . . . . . . . . . . 11
Information relating to program creation . . . . . . . . . . . . . . . . . . . . . . . . . . . . . . . . . . . . . . . . . . . 11Creating a new switching program . . . . . . . . . . . . . . . . . . . . . . . . . . . . . . . . . . . . . . . . . . . . . . . . 12Using wildcards . . . . . . . . . . . . . . . . . . . . . . . . . . . . . . . . . . . . . . . . . . . . . . . . . . . . . . . . . . . . . . 13Defining prioritisation of programs . . . . . . . . . . . . . . . . . . . . . . . . . . . . . . . . . . . . . . . . . . . . . . . . 22View, edit or delete program . . . . . . . . . . . . . . . . . . . . . . . . . . . . . . . . . . . . . . . . . . . . . . . . . . . . . 22View the date list, edit or delete . . . . . . . . . . . . . . . . . . . . . . . . . . . . . . . . . . . . . . . . . . . . . . . . . . 23View the switching times, edit or delete program . . . . . . . . . . . . . . . . . . . . . . . . . . . . . . . . . . . . . 24Delete all programs . . . . . . . . . . . . . . . . . . . . . . . . . . . . . . . . . . . . . . . . . . . . . . . . . . . . . . . . . . . 25
Configuration . . . . . . . . . . . . . . . . . . . . . . . . . . . . . . . . . . . . . . . . . . . . . . . . . . . . . . . . . . . . . . . . . . 26Backlight . . . . . . . . . . . . . . . . . . . . . . . . . . . . . . . . . . . . . . . . . . . . . . . . . . . . . . . . . . . . . . . . . . . 26Location information (Astro) . . . . . . . . . . . . . . . . . . . . . . . . . . . . . . . . . . . . . . . . . . . . . . . . . . . . . 27Hour-Counter . . . . . . . . . . . . . . . . . . . . . . . . . . . . . . . . . . . . . . . . . . . . . . . . . . . . . . . . . . . . . . . . 28PIN . . . . . . . . . . . . . . . . . . . . . . . . . . . . . . . . . . . . . . . . . . . . . . . . . . . . . . . . . . . . . . . . . . . . . . . . 31Set PIN . . . . . . . . . . . . . . . . . . . . . . . . . . . . . . . . . . . . . . . . . . . . . . . . . . . . . . . . . . . . . . . . . . . . . 31Mode . . . . . . . . . . . . . . . . . . . . . . . . . . . . . . . . . . . . . . . . . . . . . . . . . . . . . . . . . . . . . . . . . . . . . . 32Set mode . . . . . . . . . . . . . . . . . . . . . . . . . . . . . . . . . . . . . . . . . . . . . . . . . . . . . . . . . . . . . . . . . . . 33Bluetooth . . . . . . . . . . . . . . . . . . . . . . . . . . . . . . . . . . . . . . . . . . . . . . . . . . . . . . . . . . . . . . . . . . . 33
Set date and time of day . . . . . . . . . . . . . . . . . . . . . . . . . . . . . . . . . . . . . . . . . . . . . . . . . . . . . . . . . . 35Switching from Summer/Winter time . . . . . . . . . . . . . . . . . . . . . . . . . . . . . . . . . . . . . . . . . . . . . . . . . 36Language Setting . . . . . . . . . . . . . . . . . . . . . . . . . . . . . . . . . . . . . . . . . . . . . . . . . . . . . . . . . . . . . . . 37Automatic/ Manual Mode . . . . . . . . . . . . . . . . . . . . . . . . . . . . . . . . . . . . . . . . . . . . . . . . . . . . . . . . . 38
2

Override mode . . . . . . . . . . . . . . . . . . . . . . . . . . . . . . . . . . . . . . . . . . . . . . . . . . . . . . . . . . . . . . . 38Switching state display . . . . . . . . . . . . . . . . . . . . . . . . . . . . . . . . . . . . . . . . . . . . . . . . . . . . . . . . 39
Maintenance and Service . . . . . . . . . . . . . . . . . . . . . . . . . . . . . . . . . . . . . . . 40Distribution partners . . . . . . . . . . . . . . . . . . . . . . . . . . . . . . . . . . . . . . . . . . . . . . . . . . . . . . . . . . . . .40Software-Update . . . . . . . . . . . . . . . . . . . . . . . . . . . . . . . . . . . . . . . . . . . . . . . . . . . . . . . . . . . . . . . . 40
Disposal and Recycling . . . . . . . . . . . . . . . . . . . . . . . . . . . . . . . . . . . . . . . . 41
3

Safety Information
WARNING
Risk of Fire or Electric ShockZZ Disconnect power at the circuit breaker(s) or disconnect switch(es) before installing or servicing. ZZ Installation and/or wiring must be in accordance with national and local electrical code requirements.ZZ Use supply wires 14-12 AWG, rated 75°C minimum – COPPER conductors ONLY.ZZ KEEP DOOR CLOSED AT ALL TIMES when not servicing.
Please note:• National regulations and safety regulations• Guarantee is invalidated if you tamper with the device or modify it• Minimum diameter of the flexible lines for the connecting terminals: 1 mm2
• Maximum diameter of the flexible lines for the connecting terminals: 2.5 mm2
Read this manual and pay attention to its contents to ensure that the device works perfectly and that you can work safely with it.
4

Information about the deviceDescription of the device
Digital distribution autotimer• Date-independent programming• Date-dependent programming• Pulse, cycle and random programming*• Sunrise/sunset related programming• Program creation by means of PC and mobile devices• Bluetooth low energy interface
Intended Use• The device is suitable for the following applications:− Lighting in private and commercial areas− Advertising signs− Street lighting− Shop lighting− Controlling devices, motors and pumps− Controlling roller blinds and sun blinds− Simulation of home presence
• Only suitable for use on dry premises• Do not use close to devices with inductive discharge (motors, transformers, etc.)• Only install on DIN-rails
Technical DataYou can find the technical data for the devices that are described in this manual at:www.graesslin.de/technical-data
Declaration of ConformityYou can find the declaration of conformity for the devices that are described in this manual at:www.graesslin.de/doc
* These functions depend on variant.
5

FCC CertificationFCC ID: 2AHH7-DGThis device complies with part 15 of FCC Rules . Operation is subject to the following two conditions; (1) This device may not cause harmful interference, and (2) this device must accept any interferencereceived, including interference that may cause undesired operation.Labelling RequirmentsThe Original Equipment Manufacturer (OEM) must ensure that FCC labelling requirements are met.This includes a clearly visible label on the outside of the OEM enclosure specifying the appropriateGrässlin GmbH FCC identifier for this product as well as the FCC Notice above.The FCC identifiers is: 2AHH7-DGThis FCC identifier are valid for Talento Smart x15 and Talento Smart x25, for details. In any case theend product must be labelled exterior with:“Contains FCC: 2AHH7-DG”
IC CertificationIC:21619-DGThis device complies with Industry Canada´s RSS-Standards. Operation is subject to the following two conditions; (1) This device may not cause harmful interference, and(2) this device must accept any interference received, including interference that may causeundesired operation of the device.IC Identifiers is: IC: 21619-DGThis IC identifier are validt for Talento Smart x15 and Talento Smart x25, for details. In any case the endproduct must be labelled exterior with:„Contains IC:21619-DG“
Registration numbers for individual countries can be found on page 559.
6
Assembly and Installation
Risk of death due to electrical shock!
Incorrect assembly and installation of the device can result in life-threatening electrical voltages.ZZ This product should be installed by an electric specialist according to current installation standards.
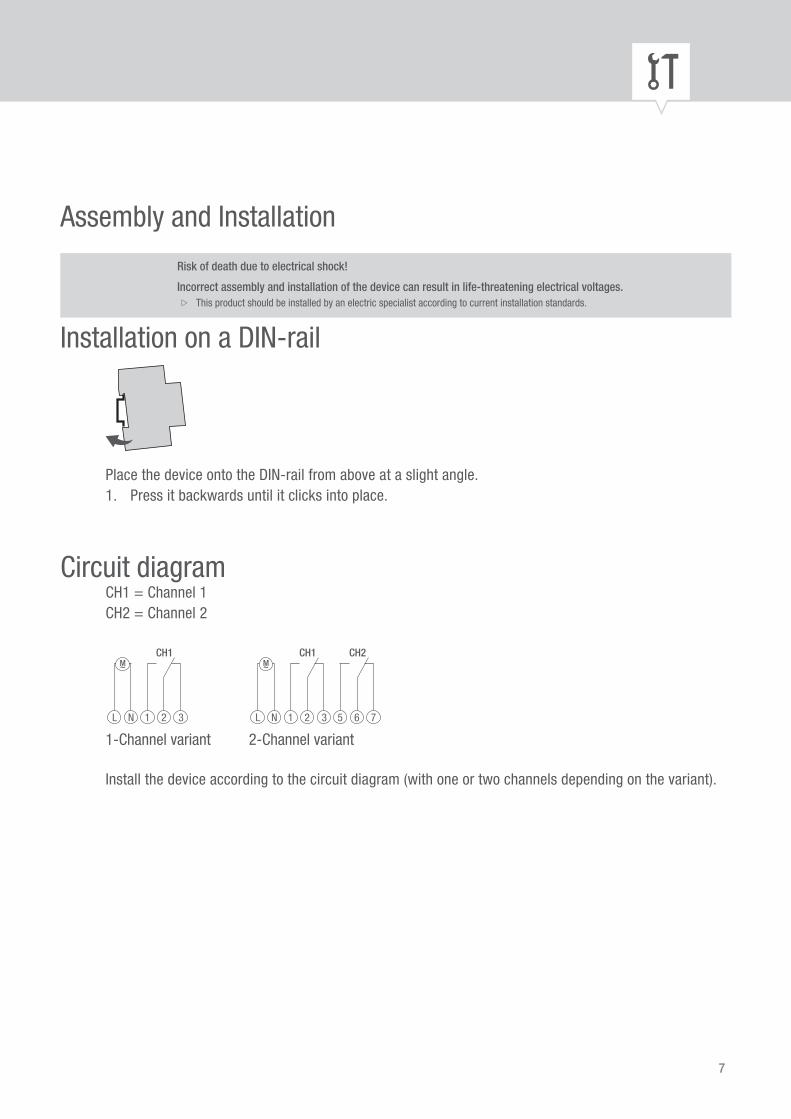
Installation on a DIN-rail
Place the device onto the DIN-rail from above at a slight angle. 1. Press it backwards until it clicks into place.
Circuit diagramCH1 = Channel 1CH2 = Channel 2
L N
M~CH1
1 2 3 L N
M~CH1
1 2 3 5 6 7
CH2
1-Channel variant 2-Channel variant
Install the device according to the circuit diagram (with one or two channels depending on the variant).
7

Operation and SettingDisplay and Function Keys
1 6 12 18 24
Menu
09:00 511 3 . 0 3 . 2 0 1 6
1 2
CH 1 OvrFix
O V RFIX
B
C D
E
GHI
A F
Display:A Function displays of the buttons on the leftB Date and time or menu navigationC Programmed switching timesD Display of summertime/wintertimeE Bluetooth-AnzeigeF Function displays of the buttons on the right
Buttons:G Buttons on rightH Reset-TasteI Buttons on left
Function displays of the two buttons on the right (G):Menu Leave auto mode and enter programming ModeESC Press briefly = Goes back one step
Press for a long time (about 2 sec) = Goes back to auto modeOK Make the selection and apply it< Undo the last input, e.g. when entering the time
Function displays of the two buttons on the left (I):1 Channel status for Channel 12 Channel status for Channel 2
˄ Page upwards in the menu˅ Page downwards in the menu- Press briefly = The displayed value (hour, minute, etc.) is decremented by 1/
Press for a long time (about 2 sec) = fast scrolling+ Press briefly = The displayed value (hour, minute, etc.) is incremented by 1/
Press for a long time (about 2 sec) = fast scrolling
8

Overview of menu structure
Konfig
Licht
Astro*
Stundenzähler
Modus*
PIN
Bluetooth
Programm
Neu
Lesen/Ändern
Alles löschen
Menü
Datum/Zeit
24 Stunden
AM/PM
Sprache
English
Français
Español
Italiano
Português
...
Deutsch
So/Wi-Zeit
Auto
Anpassen 1
Anpassen 2
Nein
* These functions depend on the variant.
Menu
Program
New
View/Edit
Delete All
Config
Light
Astro*
Hour-Counter
PIN
Mode*
Bluetooth
Date/Time
24 Hours
AM/PM
Su/Wi-Time Language
Auto
Calibrate 1
Calibrate 2
No
English
English
French
Spanish
Portuguese
Italian
9

Initial commissioningWhen delivered, the device is in automatic mode with default settings for time, date and language (English).When the menu buttons are first operated, a wizard walks you through the basic settings that you can check during initial commissioning and adjust if necessary.
Language OK
Datum/Zeit OK
Deutsch
12/24 Stunden*24 Stunden
OK
Datum2015.09.28... Tag
OK
Zeit12:10... Minute
OK
Zeitzone+1:00h
OK
Menü
LanguageEnglish
12/24 Hours*24 Hours
Date2015.09.28... Day
Time12:10... Minute
Time Zone+1:00h
Date/Time
Länder*Deutschland
OK
Deutschland*Stadt
OK
Countries*Germany
Germany*City
The following settings are queried during initial commissioning:• Language; see „Language Setting“ auf Seite 77• Date and time of day; refer to „Set date and time of day“ auf Seite 75• Location information (Country, Coordinates) for astro calculations; refer to „Location information (Ast-
ro)“ auf Seite 67
* These functions depend on the variant.
10

ProgrammingSwitch-off commands have priority over switch-on commands.
INFORMATION RELATING TO PROGRAM CREATION
The device is programmed in the following steps:• Setting up data and/or date ranges
You can specify on which day and/or at what time of day (date from ... to) that the device is turned onor off in this menu.
• Setting the function and switching timeUnder this menu item, you specify which switching command is performed at which time (ON, OFF,pulse*, cycle*, random*). This can be specified per channel for different date ranges or as date inde-pendent.
* These functions depend on the variant.
11
CREATING A NEW SWITCHING PROGRAM
Programm OK
Neu OK
Mit Datum?Nein
OK
FKT wählen...
OK
OK
Menü
Program
Menu
NewWith Date?No
Select FNC...
Programm OK
Neu OK
Mit Datum?Ja
OK
Datum von2015.10.01 ... Tag
OK
Datum bis2015.10.02 ... Tag
OK
Weiteres Datum?Nein
OK
FKT wählen...
OK
MenüMenu
ProgramNew
With Date?Yes
Date from2015.10.01 ... Day
Date from2015.10.02 ... Day
Add Date?No
Select FNC...
Programming without date
Programming with date
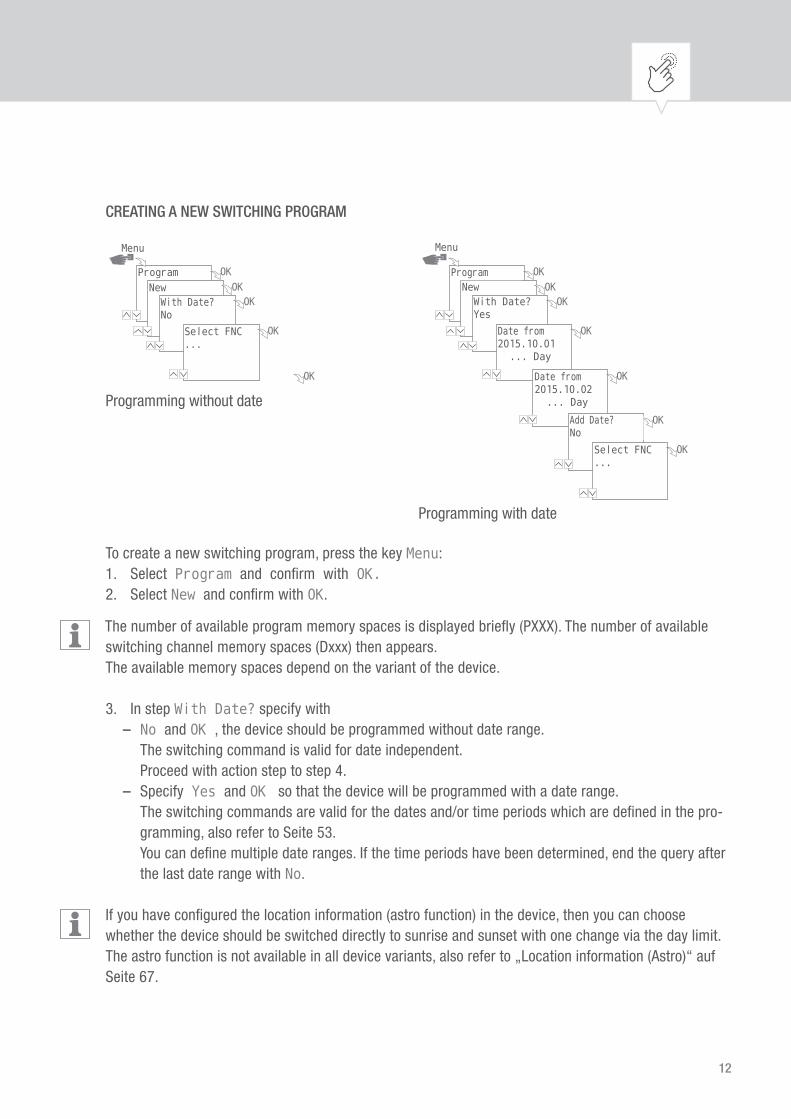
To create a new switching program, press the key Menu:1. Select Program and confirm with OK.2. Select New and confirm with OK.
The number of available program memory spaces is displayed briefly (PXXX). The number of available switching channel memory spaces (Dxxx) then appears.The available memory spaces depend on the variant of the device.
3. In step With Date? specify with– No and OK , the device should be programmed without date range.
The switching command is valid for date independent.Proceed with action step to step 4.
– Specify Yes and OK so that the device will be programmed with a date range.The switching commands are valid for the dates and/or time periods which are defined in the pro-gramming, also refer to Seite 53.You can define multiple date ranges. If the time periods have been determined, end the query afterthe last date range with No.
If you have configured the location information (astro function) in the device, then you can choose whether the device should be switched directly to sunrise and sunset with one change via the day limit. The astro function is not available in all device variants, also refer to „Location information (Astro)“ auf Seite 67.
12

4. In step SELECT FCT (FCT = Function), specify the type of switching command:− ON
Select the times at which a channel should be switched on A .− OFF
Select the times at which a channel should be switched off B .− Pulse
Select the settings for pulse programming C .− Cycle
Select the settings for cycle programming D .− Random ON
Select the settings for random programming ON E .− Random OFF
Select the settings for random programming OFF F .5. Select the desired function and confirm with OK.
The number of available switching command memory spaces appears (CXXX).The available memory spaces depend on the variant of the device.
USING WILDCARDS
You can use wildcards when entering the date. This allows you to program recurring switching times that are always to be carried out, for example, always the first of the month. In place of annual, monthly or daily numbers, choose the wildcards **** for the year and ** for the month and day instead.
Below you see how date entries appear and how you can use wildcards:• 2016.03.13 - 2016.03.13
The switching command is executed only on 13 March 2016.• 2016.03.13 - 2016.03.20
The switching command is executed between 13 March 2016 and 20 March 2016.• 2016.**.13 - 2016.**.13
The switching command is executed the 13th of every month in 2016.• ****.**.01 - ****.**.01
The switching command is always executed annually on the first day of a month.
The wildcards for the year can be found when you scroll through the current year number in the date entry program. The wildcards for the month can be found between December and January.
13

A Programming command ON
Programm OK
Neu OK
Mit Datum?Ja / Nein
OK
MenüMenu
ProgramNew
With Date?Yes/No
OK
Zeit09:01Stunde
OK
Zeit09:50Minuten
OK
Tage12345--Mo-Fr
OK
Select FNCON
Time09:01Hour
Time09:50Minutes
Days12345--Mo-Fr
Kanäle(1)
1CH1
OK
Weitere Schaltzeit?Ja/Nein
OK
Priorität(2)
HochOK
Channels(1)
1
Add Time?Yes/No
CH1
Priority(2)
High
1. Press the Menu button:2. Select Program and confirm with OK.
For clarification of the following action steps, see flow chart.3. Select New and confirm with OK.4. In step With Date? ,specify whether the device is to be activated on a certain date and - if yes -
confirm with OK (also refer to Seite 52).5. Select ON and confirm with OK.6. Enter hour and minute of the switch-on time (+/-) and confirm each with OK.
NOTE: The data for sunrise and sunset should be considered in connection with the astro-variant.The choice of these parameters is between 11 p.m. and midnight.
7. Set the weekday(s) (+/-) to which the switching time should apply, and confirm with OK.NOTE: The weekdays 1-5, 6-7 and 1-7 are preset. Individual weekdays can be set (+/-) under"Select days".
8. Select channel(1) (+/-) for which the switching time should be set, and confirm with OK.NOTE: The plus sign stands for an active, the minus sign for an inactive channel.
9. Select YES to create an additional switching time, or select NO to determine the possiblepriority (2).
(1) The channel selection is only available with 2-channel timers(2) The choice of priority is only possible in advanced mode; refer to „Defining prioritisation of programs“auf Seite 61.
14

B Programming command OFF
Programm OK
Neu OK
Mit Datum?Ja / Nein
OK
MenüMenu
ProgramNew
With Date?Yes/No
FKT wählenAus
OK
Zeit09:01Stunde
OK
Zeit09:50Minuten
OK
Tage12345--Mo-Fr
OK
Select FNCOFF
Time09:01Hour
Time09:50Minutes
Days12345--Mo-Fr
Kanäle(1)
1CH1
OK
Weitere Schaltzeit?Ja/Nein
OK
Priorität(2)
HochOK
Channels(1)
1
Add Time?Yes/No
Priority(2)
High
CH1
1. Press the Menu button:2. Select Program and confirm with OK.
For clarification of the following action steps, see flow chart.3. Select New and confirm with OK.4. In step With Date? ,specify whether the device is to be activated on a certain date and - if yes -
confirm with OK (also refer to Seite 52).5. Select OFF and confirm with OK.6. Enter hour and minute of the switch-off time (+/-) and confirm each with OK.
NOTE: The data for sunrise and sunset should be considered in connection with the astro-variant.The choice of these parameters is between 11 p.m. and midnight.
7. Set the weekday(s) (+/-) to which the switching time should apply, and confirm with OK.NOTE: The weekdays 1-5, 6-7 and 1-7 are preset. Individual weekdays can be set (+/-) under"Select days".
8. Select channel(1) (+/-) for which the switching time should be set, and confirm with OK.NOTE: The plus sign stands for an active, the minus sign for an inactive channel.
9. Select YES to create an additional switching time, or select NO to determinethe possible priority(2) .
(1) The channel selection is only available with 2-channel timers(2) The choice of priority is only possible in advanced mode; refer to „Defining prioritisation of programs“auf Seite 61.
15

C Pulse programming
15:00 h
(2)
(1)
(1) Start time
(2) Duration
This feature is not available in all variants of the device.
A pulse switching command consists of:• Start time• Duration = switching ON
– shortest switching time ON = 1 second– longest switching time ON = max. 2 hours
Example:Channel 1 will be switched daily from Monday to Friday at 15:00 for a duration of 30 seconds.
Programm OK
Neu OK
Mit Datum?Ja / Nein
OK
MenüMenu
Program
NewWith Date?Yes/No
FKT wählenImpuls
OK
Zeit15:00... Minute
OK
Impuls00:00:30... Sekunden
OK
Tage12345--Mo–Fr
OK
Select FNCImpulse
Time15:00... Minutes
Impulse00:00:30... Seconds
Days12345--Mo-Fr
Kanäle(1)
1 –CH1
OK
Weitere Schaltzeit?Ja/Nein
OK
Priorität(2)
NiedrigOK
Channels(1)
1 –
Add Time?Yes/No
Priority(2)
Low
CH1
16

1. Press the Menu button:2. Select Program and confirm with OK.
For clarification of the following action steps, see flow chart.3. Select New and confirm with OK.4. In step With Date? ,specify whether the device is to be activated on a certain date and - if yes -
confirm with OK (also refer to Seite 52).5. Select Impulse and confirm with OK.6. Enter hour and minute of the start time (+/-) and confirm each with OK.
NOTE: The data for sunrise and sunset should be considered in connection with the astro-variant.The choice of these parameters is between 11 p.m. and midnight.
7. Enter hour(s), minute(s) and second(s) of the impulse duration (+/-) and confirm each with OK.8. Set the weekday(s) (+/-) to which the switching time should apply, and confirm with OK.
NOTE: The weekdays 1-5, 6-7 and 1-7 are preset. Individual weekdays can be set (+/-) under"Select days".
9. Select channel(1) (+/-) for which the impulse should be set, and confirm with OK.NOTE: The plus sign stands for active, the minus sign for an inactive channel.
10. Select YES to create an additional switching command or select NO to determine the possiblepriority (2) .
(1) The channel selection is only available with 2-channel timers(2) The choice of priority is only possible in advanced mode; refer to „Defining prioritisation of programs“auf Seite 61.
17

D Cycle programming
19:00 h9:00 h
(2)
(3)
(1)
(1) Start time
(2) Duration ON
(3) Duration OFF
The cycle programming is only possible in advanced mode; refer to „Mode“ auf Seite 72.
A cycle switching command consists of:• Start time• Period ON = Switching ON• Period OFF = Switching OFF
Example:Channel 1 is switched on from Monday 9:00 to Friday 19:00 every 30 minutes for 10 minutes.Start time 9:00Duration ON 10 minutesDuration OFF 20 minutesSeparate OFF command 19:00
To end the cycle, an independent command of OFF must be set. A nesting of cycle programs is not allowed
18

Programm OK
Neu OK
Mit Datum?Ja / Nein
OK
MenüMenu
ProgramNew
With Date?Yes/No
FKT wählenZyklus
OK
Zeit09:00... Minute
OK
Dauer EIN00:10:00. Minuten ..
OK
Dauer AUS00:30:00. Minuten ..
OK
Select FNCCycle
Time09:00... Minutes
Period ON00:10:00. Minutes ..
Period OFF00:20:00. Minutes ..
Tage12345--Mo–Fr
OK
Kanäle(1)
1–CH1
OK
Weitere Schaltzeit?Ja/Nein
OK
Priorität(2)
HochOK
Days12345--Mo-Fr
Channels(1)
1–CH1 Add Time?
Yes/No
Priority(2)
High
1. Press the Menu button:2. Select Program and confirm with OK.
For clarification of the following action steps, see flow chart.3. Select New and confirm with OK.4. In step With date? determine whether the device should be activated on a certain date and - if
yes - confirm with OK (also refer to Seite 52).5. Select Cycle and confirm with OK.6. Enter hour and minute of the start time (+/-) and confirm each with OK.7. Enter period ON (+/-) and confirm each with OK.8. Enter period OFF (+/-) and confirm each with OK.9. Select weekdays (+/-) on which the cycle should be started and confirm with OK.
NOTE: The weekdays 1-5, 6-7 and 1-7 are preset. Individual weekdays can be set (+/-) under"Select days".
10. Select channel(1) (+/-) for which the cycle should be set, and confirm with OK.NOTE: The plus sign stands for active, the minus sign for an inactive channel.
11. And choose possible Priority(2).
Program the command OFF in Menu FKT end the cycle switching command.(1) The channel selection is only available with 2-channel timers(2) The choice of priority is only possible in advanced mode; refer to „Defining prioritisation of programs“auf Seite 61.
19

E Random programming
Programm OK
Neu OK
Mit Datum?Ja / Nein
OK
MenüMenu
ProgramNew
With Date?Yes/No
FKT wählenZufall EIN
OK
Zeit15:00Stunde ...
OK
Zeitraum+02:00Stunde ...
OK
Tage12345--Mo–Fr
OK
Select FNCRandom ON/
Time15:00Hour
Offset+02:00Hour ...
Days12345--Mo-Fr
Kanäle(1)
1 –CH1
OK
Weitere SchaltzeitJa/Nein
OK
Priorität(2)
NiedrigOK
Channels(1)
1 –CH1
Add Time?Yes/No
Priority(2)
Low
Random programming is possible only in advanced mode.
Example: Random 15:00 +02:00 1 2 3 4 5 1Channel 1 is switched on Monday to Friday between 15:00 and 17:00. The exact switch-on time point is random in this range.
1. Press the Menu button:2. Select Program and confirm with OK.
For clarification of the following action steps, see flow chart.3. Select New and confirm with OK.4. In step With date determine whether the device should be activated on a certain date and - if
yes - confirm with OK (also refer to Seite 52).5. Select Random ON or Random OFF and confirm with OK.
NOTE: The period of the random switching is defined with ± 2 hours.6. Enter hour and minute of the start (+/-) and confirm each with OK.7. Enter hour and minute of the range of the random programming (+/-) and confirm each with OK.8. Set weekday on which the device should randomly switch and confirm with OK. NOTE: The weekdays
1-5, 6-7 and 1-7 are preset. Individual weekdays can be set (+/-) under "Select days".9. Set the channel(1) which is to be programmed, and confirm with OK.
NOTE: The plus sign stands for active, the minus sign for an inactive channel.10. And choose possible Priority(2).
(1) The channel selection is only available with 2-channel timers.(2) The choice of priority is only possible in advanced mode; refer to „Defining prioritisation of programs“auf Seite 61.
20

DEFINING PRIORITISATION OF PROGRAMS
You specify the order in which the programs of the device should be run using prioritisation. You can thus execute a daily switching command, but can define via a higher priority, that, for example, other swit-ching times of the device are valid during holidays.
The choice of priority is only possible in advanced mode.
By default, the priority is specified as follows:• Without date very low• With date reference medium• With individual date high
The following priorities can be set:• Very Low• Low• Medium• High• Very High
Example:A daily program switches on the device every day from morning 08:00 to 17:00 in the afternoon. If, for example, you do not want the device to switch on on weekends of a holiday, create a program with a higher priority for these days. This program takes precedence over the other settings.
21

VIEW, EDIT OR DELETE PROGRAM
Programm OK
Lesen/Ändern OK
PRG ListePrg X (1|1)
OK
PRG 1Datumsliste
1/4
OK
MenüMenu
ProgramView/Edit
PRG ListPrg X (1|1)
PRG 1List Dates
1/4
In order to view, edit or delete a program, press the Menukey:1. Select Program and confirm with OK.2. Select View/Edit and confirm with OK.3. Select program and confirm with OK.4. Select the list (Date Entries, Switching Times, Priority) which you want to view or edit
yourself, or select Delete program to delete the selected program.
The choice of priority is only possible in advanced mode.
22

VIEW THE DATE LIST, EDIT OR DELETE
Programm OK
Lesen/Ändern OK
PRG ListePrg X (1|1)
OK
PRG 1Datumsliste
1/4
OK
Datum 1/12015.11.222016.11.23
OK
MenüMenu
ProgramView/Edit
PRG ListPrg X (1|1)
PRG 1List Dates
1/4
Date 1/12015.11.222016.11.23
Datum 1Ändern 1/4
OK
Datum von2015.11.22
OK
Datum bis2016.11.24 ...Tag
OK
Datum 1/12015.11.222016.11.24
OK
Datum 1Ändern
ESC
Date 1Edit
Date from2015.11.22
Date to2016.11.24 ...Day*
Date 1/12015.11.222016.11.24
Date 1Edit
In order to view, edit or delete a program, press the Menu key:1. Select Program and confirm with OK.2. Select View/Edit and confirm with OK.3. Select program and confirm with OK.4. Select List Dates and confirm with OK.5. Select a date which you want to view, edit or delete and confirm with OK.6. Select Edit, Advanced, Delete or All delete and confirm with OK.
Delete: The selected date (from ... to) will be deleted.All delete: All the data in the date list will be deleted.
23

VIEW THE SWITCHING TIMES, EDIT OR DELETE PROGRAM
Programm OK
Lesen/Ändern OK
PRG ListePrg X (1|1)
OK
PRG 1Schaltzeiten
1/4
OK
Zeit 1/1EIN11:30
OK
MenüMenu
Program
PRG ListPrg X (1|1)
View/Edit
PRG 1List Times
1/4
Time 1/1ON11:30
Zeit 1Ändern 1/4
OK
FKT wählenEIN
OK
Zeit11:30 ...Stunde
OK
Tage12345--MO-FR
OK
Kanäle(1)
1 –CH1
OK
Zeit 1/2EIN12:30
ESC
Time 1Edit
Select FNCON
Time11:30
...Hour
Days12345--Mo-Fr
Channels(1)
1 –CH1
Time 1/2ON12:30
In order to view, edit or delete the switching times of a program, press the Menu key:1. Select Program and confirm with OK.2. Select View/Edit and confirm with OK.3. Select program and confirm with OK.4. Select List Times and confirm with OK.5. Select the switching time which you want to view, edit or delete and confirm with OK.6. Select Edit, Advanced, Delete or All delete and confirm with OK.
Delete: The selected switching time (e.g., ON / OFF, time, days, channels(1), impulse or cycle) will be deleted.All delete: All switching times will be deleted.(1) The channel selection is only available with 2-channel timers
24

DELETE ALL PROGRAMS
Programm OK
Alles löschen OK
Löschen Alle?Ja/Nein
OK
Menü
1. Press the Menu button.2. Select Program and confirm with OK.3. Select Delete All and confirm with OK.4. Select Yes and confirm with OK.
25

ConfigurationBACKLIGHTIn the Light menu, you specify how long the backlight stays on after the last key press.
Konfig OK
Licht OK
Licht*2 Min
OK
Menü
The following settings are possible:• Fix ON
The backlight of the display remains on continuously.• 2 Minutes
The backlight of the display is automatically switched off two minutes after the last keystroke.
1. Press the Menu button.2. Select Config and confirm with OK.3. Select Light and confirm with OK.4. Select the desired setting and confirm with OK.
26

LOCATION INFORMATION (ASTRO)You define the location information in the Astro menu.
This feature is not available in all variants of the device.
Konfig OK
AstroLandBreite/Länge
OK
Länder*Deutschland
OK
Deutschland*Stadt
OK
Menü
The following settings are possible:• Country
Country name and city of the location.• Coordinates
Latitude and longitude of the location.
1. Press the Menu button.2. Select Config and confirm with OK.3. Select Astro Menu and confirm with OK.4. Select sub menu Countries or Coordinates and confirm with OK.5. Assume the settings and confirm with OK.
27

HOUR-COUNTERReading hour meterYou can see how many operating hours your distribution switching timer is set for in Menu Read out hour meter .
Konfig OK
Stundenzähler OK
StundenzählerLesen
OK
Kanal(1)
101000.0 h
OK
Menü
1. Press the Menu button.2. Select Config and confirm with OK.3. Select Hour Counter and confirm with OK.4. Select Read out and confirm with OK.5. Select the desired channel.
(1) The channel selection is only available with 2-channel timers
28

Reset hour meterYou can set the hour meter to 0 in the Reset menu.
Konfig OK
Stundenzähler OK
StundenzählerLesen
OK
Kanal(1)
101000.0 h
ESC
Reset?Ja
OK
Menü
1. Press the Menu button.2. Select Config and confirm with OK.3. Select Hour Counter and confirm with OK.4. Select Read out and confirm with OK.5. Select the desired channel.6. Select ESC and confirm the reset with OK.
(1) The channel selection is only available with 2-channel timers
29

Service meterYou can specify the number of operating hours that will pass before a service message will be displayed for a channel in the Hour Counter Service menu. This is shown in the display as soon as the coun-ter has reached the hour value set by you.
Konfig OK
Stundenzähler OK
StundenzählerService
OK Kanal(1)
1 OK
Stunde01000 hService
OK
Menü
1. Press the Menu button.2. Select Config and confirm with OK.3. Select Hour Counter and confirm with OK.4. Select Service and confirm with OK.5. Select the channel(1) and confirm with OK.6. Set count value and confirm with OK.
(1) The channel selection is only available with 2-channel timers
30

PINYou specify whether a PIN entry is required for setting the device in the PIN menu.The following settings are possible:• No PIN
Entering a PIN is not required to change the settings of the device.• PIN Enter
Entering a PIN is required to change settings of the device.
Konfig OK
PIN OK
PINPIN eingeben
OK
PIN eingeben1234
OK
PINPIN-Eingabeerfolgt
OK
Menü
SET PIN
1. Press the Menu button.2. Select Config and confirm with OK.3. Select PIN and confirm with OK.4. Select NO PIN or PIN and confirm with OK.5. For selection ENTER PIN ,enter (+/-) the PIN and confirm with OK.
31

MODEYou specify whether you want to only use the standard functions or the advanced functions of the device in the Mode menu.
Konfig OK
Modus OK
Modus*Standard
OK
Menü
The following settings are possible:• Standard
The following functions are available:− ON / OFF Command− Sunrise and sunset related programming (only for devices with astro function)− Automatic prioritisation
• AdvancedThe following functions are available:− ON / OFF Command− Sunrise and sunset related programming (only for devices with astro function)− Automatic prioritisation− Pulse programming− Cycle programming− Random programming− User-defined prioritization
SET MODE
1. Press the Menu button.2. Select Config and confirm with OK.3. Select Modus and confirm with OK.4. Select Standard or Advanced setting and confirm with OK.
32
BLUETOOTH
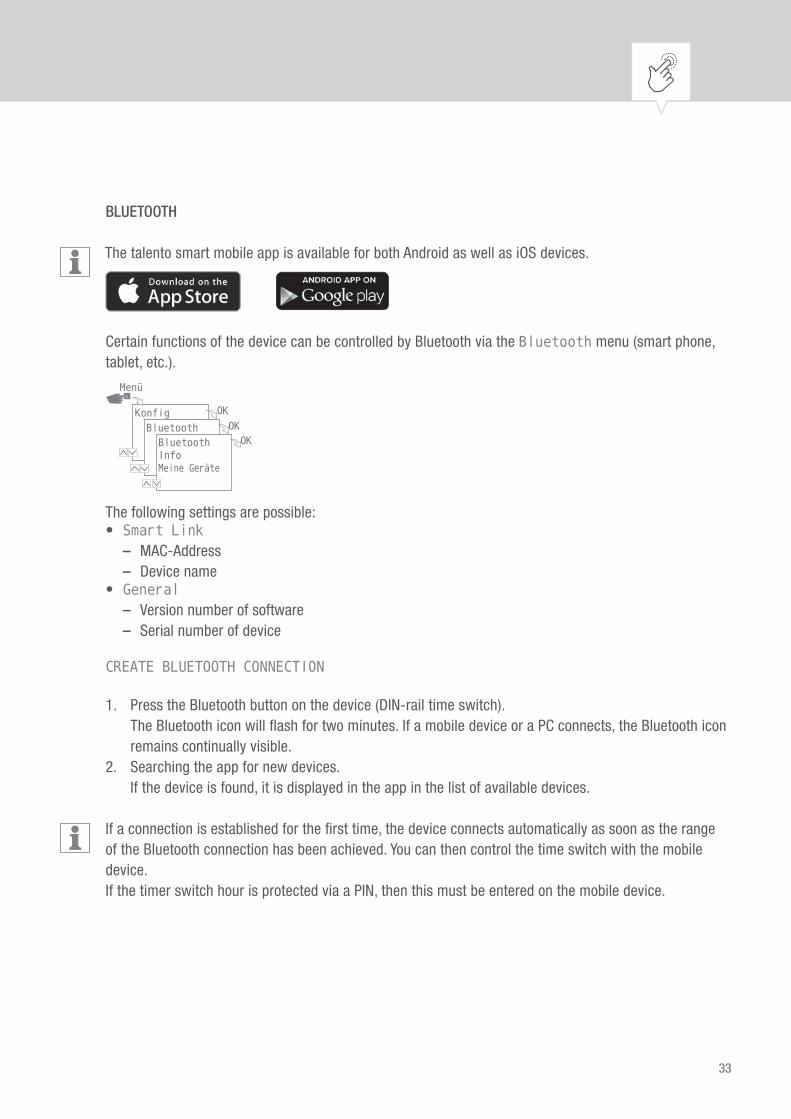
The talento smart mobile app is available for both Android as well as iOS devices.
Certain functions of the device can be controlled by Bluetooth via the Bluetooth menu (smart phone, tablet, etc.).
Konfig OK
Bluetooth OK
BluetoothInfoMeine Geräte
OK
Menü
The following settings are possible:• Smart Link
– MAC-Address– Device name
• General– Version number of software– Serial number of device
CREATE BLUETOOTH CONNECTION
1. Press the Bluetooth button on the device (DIN-rail time switch).The Bluetooth icon will fl ash for two minutes. If a mobile device or a PC connects, the Bluetooth iconremains continually visible.
2. Searching the app for new devices.If the device is found, it is displayed in the app in the list of available devices.
If a connection is established for the fi rst time, the device connects automatically as soon as the range of the Bluetooth connection has been achieved. You can then control the time switch with the mobile device.If the timer switch hour is protected via a PIN, then this must be entered on the mobile device.
33

DISPLAY DURING DATA TRANSMISSION
The following appears on the display of the time switch during the transmission of programs or configu-ration from a mobile device:
34

Set date and time of dayYou specify the format for the display of the time in the Date/Time menu.
Datum/Zeit OK
12H/24H*24 Stunden
OK
Datum2015.09.28... Tag
OK
Zeit12:10... Minuten
OK
Zeitzone* 1h
OK
1. Wochentag* Montag
OK
Menü
The following settings are possible:• 24 Hours
The time is displayed in 24-hour format.• AM/PM
The time is displayed in 12-hour format:− AM = morning− PM = afternoon
1. Press the Menu button.2. Select Date/Time and confirm with OK.3. Select the desired setting (˅/˄) and confirm with OK.4. Enter data according to the setting 24 Hours or AM/PM:− Date− Clock− Time Zone− First weekday
Example:1st day = Sunday ... 1 - 5 = Su - Th1st day = Monday ... 1 - 5 = Mo - Fr
35

Switching from Summer/Winter timeYou can specify the variants for switching from Summer to Winter time in the So/Wi-Time.
So/Wi OK
So/Wi*Auto
OK
So/Wi*EU
OK
Menü
The following settings are possible:• Auto
Factory setting of the legal requirement (USA or EU). This is recalculated each year.
• Adjust 1Automatic programming:The Summer/Winter time is automatically recalculated for each year.− The switchover takes place on the first Sunday of the selected month if the entered date is bet-
ween the 1st and 15th.− The switchover takes place on the last Sunday of the selected month if the entered date is bet-
ween the 16st and 31st.− The changeover takes place on the respective Sunday from 2 to 3 am (summertime) or from 3 to 2
am (wintertime).
• Adjust 2Manual programming:Switching always takes place every year on the same date entered.
• NoNo switching.
1. Press the Menu button.2. Select Su/Wi-Time and confirm with OK.3. Assume the desired setting and confirm with OK.• For selection with Adjust 1 or Adjust 2, enter the data for month and day and confirm with OK.
36

Language SettingYou specify the language of the display texts in the Language menu.
Languages OK
Deutsch OK
Menü
1. Press the Menu button.2. Select Language and confirm with OK.3. Select the desired language and confirm with OK.
37

Automatic/ Manual ModeSet the operating mode in which the device is to be operated via the left function key:
The following settings are possible:• Permanently ON (FIX)• Permanently OFF (FIX)• Override mode (OVR)• Automatic mode
To adjust the channel state for channel 1 or channel 2, press the appropriate left function button until the desired mode is selected.
OVERRIDE MODEThe override mode (temporarily overrides a running program) allows the user to terminate the running program early or to start a later start-up program prematurely. This depends on the current channel status. The override function is valid only for the current program and is retained until the next program change. Then the device will return to automatic mode.
38

SWITCHING STATE DISPLAYAs an example for channel 1, the switching status display appears as follows:
Channel Fix OFF Channel Fix ON Override ON
There is no display via the icon for the channel in automatic mode.
From the automatic mode, you can make the following settings using the corresponding function key for channel 1 or channel 2, taking into account the starting point:• ON
– Press 1x = Override OFF– Press 2x = Channel Fix OFF– Press 3x = Channel Fix ON
• OFF– Press 1x = Override ON– Press 2x = Channel Fix ON– Press 3x = Channel Fix OFF
39

Maintenance and ServiceDistribution partners
You can find our distributor partners at the following address:
www.graesslin.de/distributors
Software-UpdateYou can find current software updates at the following address:
www.graesslin.de/software
The installed version can be found under the Bluetooth settings, refer to „Bluetooth“ auf Seite 73.
40

Disposal and RecyclingYou must correctly dispose of devices, batteries/rechargeable batteries or packaging materials according to legal provisions and ordinances.
Please pay attention to the information below relating to the disposal of defective system components or of the system itself according to the useful product life:• Carry out disposal correctly, i.e. separated according to the material groups of the parts to be dispo-
sed of.• Never put batteries/rechargeable batteries (Directive 2006/66/EC), electrical or
electronic scrap in with domestic refuse. Use appropriate depots.• Always carry out disposal in an environmentally friendly way and in accordance with any local statu-
tes or laws.
41

Registration numbers
• CanadaFCC ID: 2AHH7-DGIC:21619-DG
• ChileSUBTEL: 7665/DO/No° 32967/F26
• IndiaNR-ETA-/4573
• Israel64-04560
• Singapore
• Thailandอุปกรณ์โทรคมนาคมนี้เป็นไปตามข้อก�าหนดของคณะกรรมการกิจการโทรคมนาคมแห่งชาติ
Complies with IDA Standards
N3093-16
42
