a-xmp operation guide...y msi® x370, b350 and a320 series motherboard ... y memory module supports...
TRANSCRIPT


System Requirements y MSI® X370, B350 and A320 series motherboard y Supported AMD® RYZEN series processor y Memory module supports XMP
How to enable A-XMPPower on and press Delete key to enter BIOS Setup menu. Here are two methods below to enable A-XMP.
Method 1. BIOS EZ button Click A-XMP button 1 or 2 to enable XMP profile 1 or profile 2.
Profile1Toggle
A-XMP Indicator
Profile 2Toggle
Method 2. BIOS itemGo to BIOS > OC > A-XMP and change setting to Profile 1 or Profile 2.
Note
y Profile 1 is downgrade profile. y Profile 2 is manufacturer verifies profile. y The A-XMP button and item are only avaliable when the system is supported.

AMD RAID Configuration Guide
RAID ConfigurationBelow are the different types of a RAID.RAID 0 breaks the data into blocks which are written to separate hard drives.
Spreading the hard drive I/O load across independent channels greatly improves I/O performance.
RAID 1 provides data redundancy by mirroring data between the hard drives and provides enhanced read performance.
RAID 10 uses four hard drives to create a combination of RAID 0 and 1 by forming a RAID 0 array from two RAID 1 arrays.
RAID level comparison
RAID 0 RAID 1 RAID 10
Minimum # drives 2 2 4
Data protection None Excellent Excellent
Read performance Excellent OK OK
Write performance Excellent Good Good
Capacity utilization 100% 50% 50%
Important
All the information/ volumes/ pictures listed in your system might differ from the illustrations in this appendix.
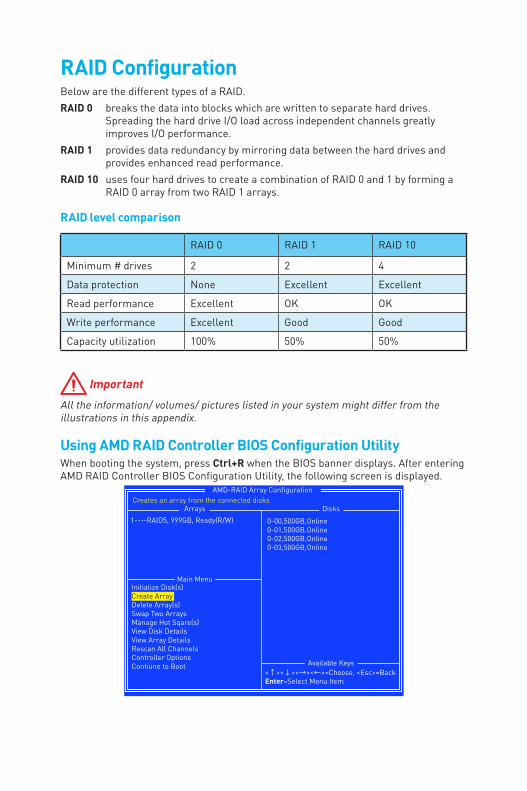
Using AMD RAID Controller BIOS Configuration UtilityWhen booting the system, press Ctrl+R when the BIOS banner displays. After entering AMD RAID Controller BIOS Configuration Utility, the following screen is displayed.
AMD-RAID Array ConfigurationCreates an array from the connected disks
Arrays Disks1----RAID5, 999GB, Ready(R/W) 0-00,500GB,Online
0-01,500GB,Online0-02,500GB,Online0-03,500GB,Online
Main MenuInitialize Disk(s)Create ArrayDelete Array(s)Swap Two ArraysManage Hot Sqare(s)View Disk DetailsView Array DetailsRescan All ChannelsController OptionsContiune to Boot Available Keys
<↑><↓><→><←>=Choose, <Esc>=BackEnter=Select Menu Item

Using the utility to accomplish the procedures y Initialize Disk(s) - To initialize a new disk drive for data storage. y Create Array - Create arrays at different RAID levels (depending on the license level for the system)
y Delete Array(s) - Delete an array. y Swap Two Arrays - Change the array order, especially for the AMD-RAID bootable array.
y Manage Hot Sqare(s) - Allows selection of global and dedicated hot spares. y View Disk Details - View information about each disk. y View Array Details - View information about each array. y Rescan All Channels - Rescan all channels to detect new or removed disks and arrays.
y Controller Options - Change INT13 boot support, turn off Critical arrays or warning for Offline arrays while booting, or change the number of disks that can be spun-up when the system is powered-on.
y Contiune to Boot - Exit the BIOS Configuration Utility and continue booting the system.
Understanding the Colour CodeColour codes indicate the type or status of information at the BIOS Configuration Utility.
y White text - Indicates an available option or informational text. y Black text, yellow highlighting - Indicates an option or device for which action might be taken.
y Yellow text - Indicates information about the yellow-highlighted option. y Green text - Indicates an item that has been selected. y Light blue text - Indicates that the item cannot be selected. y Magenta text - Indicates items that are related to spares or boot options. y Red text - Indicates a failed virtual or physical disk or a warning. For example, informational text might be red if an option is not available.
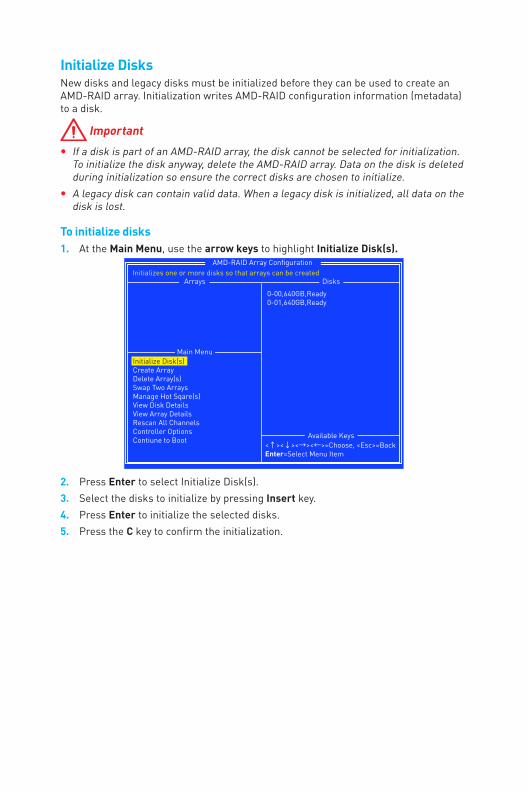
Initialize DisksNew disks and legacy disks must be initialized before they can be used to create an AMD-RAID array. Initialization writes AMD-RAID configuration information (metadata) to a disk.
Important
y If a disk is part of an AMD-RAID array, the disk cannot be selected for initialization. To initialize the disk anyway, delete the AMD-RAID array. Data on the disk is deleted during initialization so ensure the correct disks are chosen to initialize.
y A legacy disk can contain valid data. When a legacy disk is initialized, all data on the disk is lost.
To initialize disks1. At the Main Menu, use the arrow keys to highlight Initialize Disk(s).
AMD-RAID Array ConfigurationInitializes one or more disks so that arrays can be created
Arrays Disks
0-00,640GB,Ready0-01,640GB,Ready
Main MenuInitialize Disk(s)Create ArrayDelete Array(s)Swap Two ArraysManage Hot Sqare(s)View Disk DetailsView Array DetailsRescan All ChannelsController OptionsContiune to Boot Available Keys
<↑><↓><→><←>=Choose, <Esc>=BackEnter=Select Menu Item
2. Press Enter to select Initialize Disk(s).3. Select the disks to initialize by pressing Insert key.4. Press Enter to initialize the selected disks.5. Press the C key to confirm the initialization.
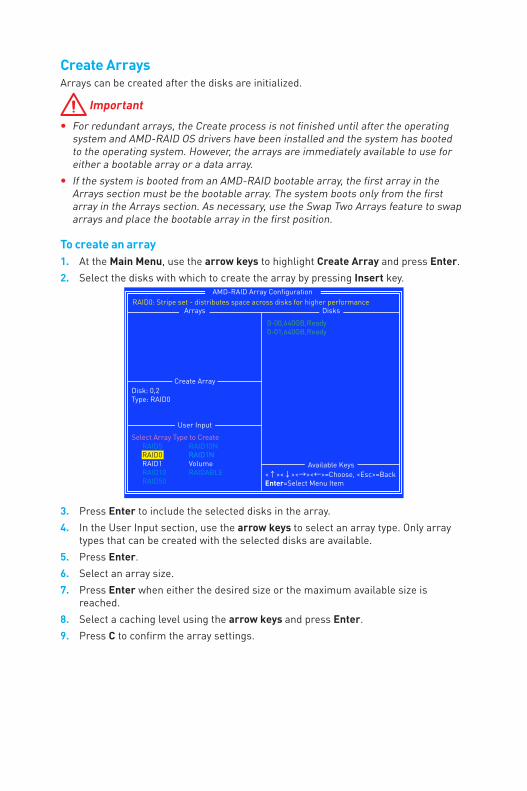
Create ArraysArrays can be created after the disks are initialized.
Important
y For redundant arrays, the Create process is not finished until after the operating system and AMD-RAID OS drivers have been installed and the system has booted to the operating system. However, the arrays are immediately available to use for either a bootable array or a data array.
y If the system is booted from an AMD-RAID bootable array, the first array in the Arrays section must be the bootable array. The system boots only from the first array in the Arrays section. As necessary, use the Swap Two Arrays feature to swap arrays and place the bootable array in the first position.
To create an array1. At the Main Menu, use the arrow keys to highlight Create Array and press Enter.2. Select the disks with which to create the array by pressing Insert key.
AMD-RAID Array ConfigurationRAID0: Stripe set - distributes space across disks for higher performance
Arrays Disks
0-00,640GB,Ready0-01,640GB,Ready
Create Array
User Input
Select Array Type to CreateRAID5 RAID10NRAID0 RAID1N
RAID1 VolumeRAID10 RAIDABLE
RAID50
Disk: 0,2Type: RAID0
Available Keys<↑><↓><→><←>=Choose, <Esc>=BackEnter=Select Menu Item
3. Press Enter to include the selected disks in the array.4. In the User Input section, use the arrow keys to select an array type. Only array
types that can be created with the selected disks are available.5. Press Enter.6. Select an array size.7. Press Enter when either the desired size or the maximum available size is
reached.8. Select a caching level using the arrow keys and press Enter.9. Press C to confirm the array settings.
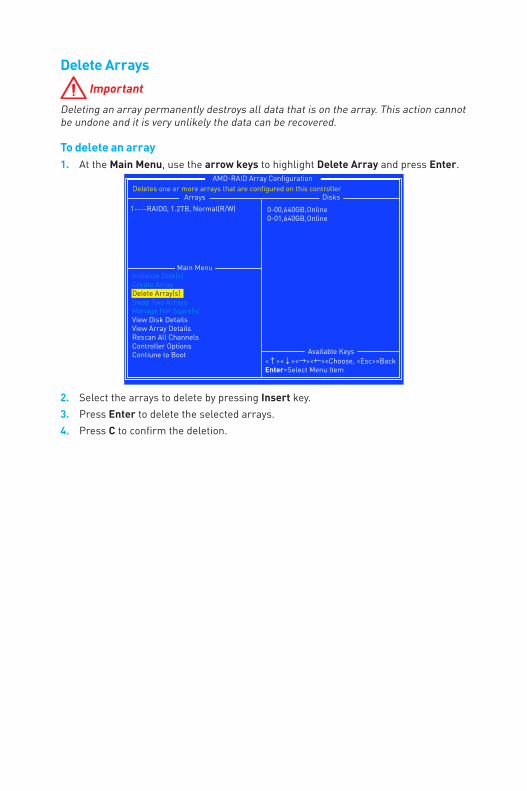
Delete Arrays Important
Deleting an array permanently destroys all data that is on the array. This action cannot be undone and it is very unlikely the data can be recovered.
To delete an array1. At the Main Menu, use the arrow keys to highlight Delete Array and press Enter.
AMD-RAID Array ConfigurationDeletes one or more arrays that are configured on this controller
Arrays Disks1----RAID0, 1.2TB, Normal(R/W) 0-00,640GB,Online
0-01,640GB,Online
Main MenuInitialize Disk(s)Create ArrayDelete Array(s)Swap Two ArraysManage Hot Sqare(s)View Disk DetailsView Array DetailsRescan All ChannelsController OptionsContiune to Boot Available Keys
<↑><↓><→><←>=Choose, <Esc>=BackEnter=Select Menu Item
2. Select the arrays to delete by pressing Insert key.3. Press Enter to delete the selected arrays.4. Press C to confirm the deletion.

Swap ArraysUse the Swap Two Arrays option to arrange arrays in a different order.
Important
If more than one array is created, install the operating system to any of them. However, a small amount of boot information is always written to a disk(s) in the first array (Array 1) of the Array section, regardless on which array the operating system is installed.If anything happens to a disk in Array 1, the system might not be able to boot. It is recommended that the user install the operating system on an AMD-RAID bootable array at a redundant RAID level such as RAID1 or RAID5 and swap the array into the first position, if it is not already Array 1.
To swap arrays1. At the Main Menu, use the arrow keys to highlight “Swap Two Array” and press
Enter.AMD-RAID Array Configuration
Swaps arrays to allow them to load in any order (Boot array is first)Arrays Disks
1----RAID0, 1.2TB, Ready(R/W)2----RAID0, 1.2TB, Ready(R/W)
0-00,640GB,Online0-01,640GB,Online0-02,640GB,Online0-03,640GB,Online
Main MenuInitialize Disk(s)Create ArrayDelete Array(s)Swap Two ArraysManage Hot Sqare(s)View Disk DetailsView Array DetailsRescan All ChannelsController OptionsContiune to Boot Available Keys
<↑><↓><→><←>=Choose, <Esc>=BackEnter=Select Menu Item
2. Select the arrays to swap by pressing Insert key.3. Press Enter to swap the arrays.

Manage SparesThis option allows the user to assign or unassign global or dedicated spares.At the Main Menu, use the arrow keys to highlight Manage Host Spare(s) and press Enter to enter submenu.
AMD-RAID Array ConfigurationAssign Global Hot Spare(s)
Arrays Disks1----RAID0, 999GB, Normal(R/W) 0-00,500GB,Online
0-01,500GB,Online0-02,1000GB,Ready0-03,1000GB,Ready
Manage Hot Spare(s)
Assign Global Hot Spare(s)Assign Dedicated Hot Spare(s)Unassign Hot Spare(s)
Available Keys<↑><↓><→><←>=Choose, <Esc>=BackEnter=Select Menu Item
To assign global spares1. At the Manage Host Spare(s) submenu, use the arrow keys to highlight Assign
Global Hot Spare(s) and press Enter.2. Select the disks to assign as global spares by pressing Insert key.3. Press Enter to assign the selected disks as global spares.
To assign dedicated spares1. At the Manage Host Spare(s) submenu, use the arrow keys to highlight Assign
Dedicated Hot Spare(s) and press Enter.2. Select the disks to assign as dedicated spares by pressing Insert key.3. Press Enter to assign dedicated spares.4. Press C to continue.
To unassign spares1. At the Manage Host Spare(s) submenu, use the arrow keys to highlight Unassign
Hot Spare(s) and press Enter.2. Select the disks to unassign as spares by pressing Insert key.3. Press Enter to unassign the selected disks.4. Press C to continue.

Change the Controller OptionsController Options allows the user to configure options for the boot sequence.At the Main Menu, use the arrow keys to highlight Controller Options and press Enter to enter submenu.
AMD-RAID Array ConfigurationToggles whether BIOS installs INT13 support
Arrays Disks1----RAID0, 999GB, Normal(R/W) 0-00,500GB,Online
0-01,500GB,Online0-02,1000GB,Ready0-03,1000GB,Ready
Controller Options
Toggle INT13 Boot Support [ON]Toggle Pause if Critical [OFF]Toggle Pause if Offline [OFF]Toggle HIPM [OFF]Toggle DIPM [OFF]Set Staggered Spinup Count [2]
Available Keys<↑><↓><→><←>=Choose, <Esc>=BackEnter=Select Menu Item
Booting the system from an arrayThis option allows the user to enable boot support.It is recommended that this option be disabled only if the system is booted from another device.1. At the Controller Options submenu, use the arrow keys to highlight Toggle INT13
Boot Support.2. Press Enter to toggle between On and Off.
Pausing the boot sequence for warning messagesWhen the Pause feature is enabled and an array goes critical, offline, or there is another problem with the system, the boot process stops and an error message is displayed on the screen. The user must press Enter to continue booting.If the Pause feature is disabled, error messages are displayed briefly, but the system continues to boot.1. At the Controller Options submenu, use the arrow keys to highlight Toggle Pause
if Critical and press Enter.2. Set pauses to the boot sequence for critical/ offline warnings. Use the arrow keys
to highlight Toggle Pause if Critical/ Toggle Pause if Offline.3. Press Enter to toggle between On and Off.

Change the Staggered Spinup CountDepending on a system’s power supply load-rating, you might want to limit the number of disks that are spun-up together when a system is powered on.1. At the Controller Options submenu, use the arrow keys to highlight Set Staggered
Spinup Count and press Enter. The number within the brackets changes colour to indicate it is selected.
2. Use the arrow keys to change the number within the brackets. The minimum is 1 and the maximum is 8.
3. Press Enter to save the setting.
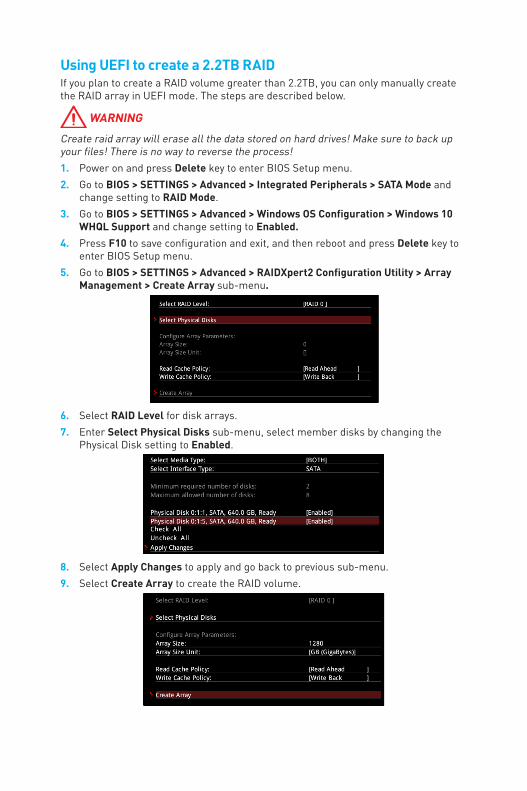
Using UEFI to create a 2.2TB RAIDIf you plan to create a RAID volume greater than 2.2TB, you can only manually create the RAID array in UEFI mode. The steps are described below.
WARNING
Create raid array will erase all the data stored on hard drives! Make sure to back up your files! There is no way to reverse the process!1. Power on and press Delete key to enter BIOS Setup menu.2. Go to BIOS > SETTINGS > Advanced > Integrated Peripherals > SATA Mode and
change setting to RAID Mode. 3. Go to BIOS > SETTINGS > Advanced > Windows OS Configuration > Windows 10
WHQL Support and change setting to Enabled.4. Press F10 to save configuration and exit, and then reboot and press Delete key to
enter BIOS Setup menu.5. Go to BIOS > SETTINGS > Advanced > RAIDXpert2 Configuration Utility > Array
Management > Create Array sub-menu.
6. Select RAID Level for disk arrays.7. Enter Select Physical Disks sub-menu, select member disks by changing the
Physical Disk setting to Enabled.
8. Select Apply Changes to apply and go back to previous sub-menu.9. Select Create Array to create the RAID volume.

Installing RAID Driver
New Operating System InstallationThe following details the installation of the drivers while installing operating system.1. During the operating system installation, after selecting the location to install
Windows click on Load driver button to install a third party RAID driver.2. When prompted, insert the USB flash drive with AMD RAID Drivers and then click
Browse.� To make an AMD RAID Drivers USB flash drive. Insert the MSI Driver Disc into
the optical drive. Copy all the contents in \\Chipset\Packages\Drivers\SBDrv\RAID_AM4
3. Navigate to the directory containing the saved AMD RAID drivers, then click OK.4. Select the (rcbottom.inf) driver, click Next. 5. When prompted, click OK.6. Click Browse and navigate to the directory containing the saved AMD RAID drivers
again, then click OK.7. Select the (rcraid.inf) driver, click Next. 8. You have successfully installed the RAID driver, and Windows setup should
continue. 9. Leave the disk/ USB drive in the computer until the system reboots itself. Windows
setup will need to copy the files after the RAID volume is formatted, and Windows setup starts copying files.
Existing Windows Driver Installation1. Insert the MSI Driver Disc into the optical drive.2. The Disc will auto-run and the setup screen will appear.3. Under the Driver tab, click on AMD chipset drivers by your need. The AMD chipset
drivers includes RAID Driver.4. The drivers will be automatically installed.
Confirming Windows Driver Installation 1. From Windows, open the Control Panel from My Computer followed by the System
icon.2. Choose the Hardware tab, then click the Device Manager tab.3. Click the + in front of the RAID Controllers hardware type. The driver AMD RAID
Controller should appear.
Discover various сomputers and hardware in our online store.