ace kod-6英文说明书 - shop online for karaoke music
TRANSCRIPT
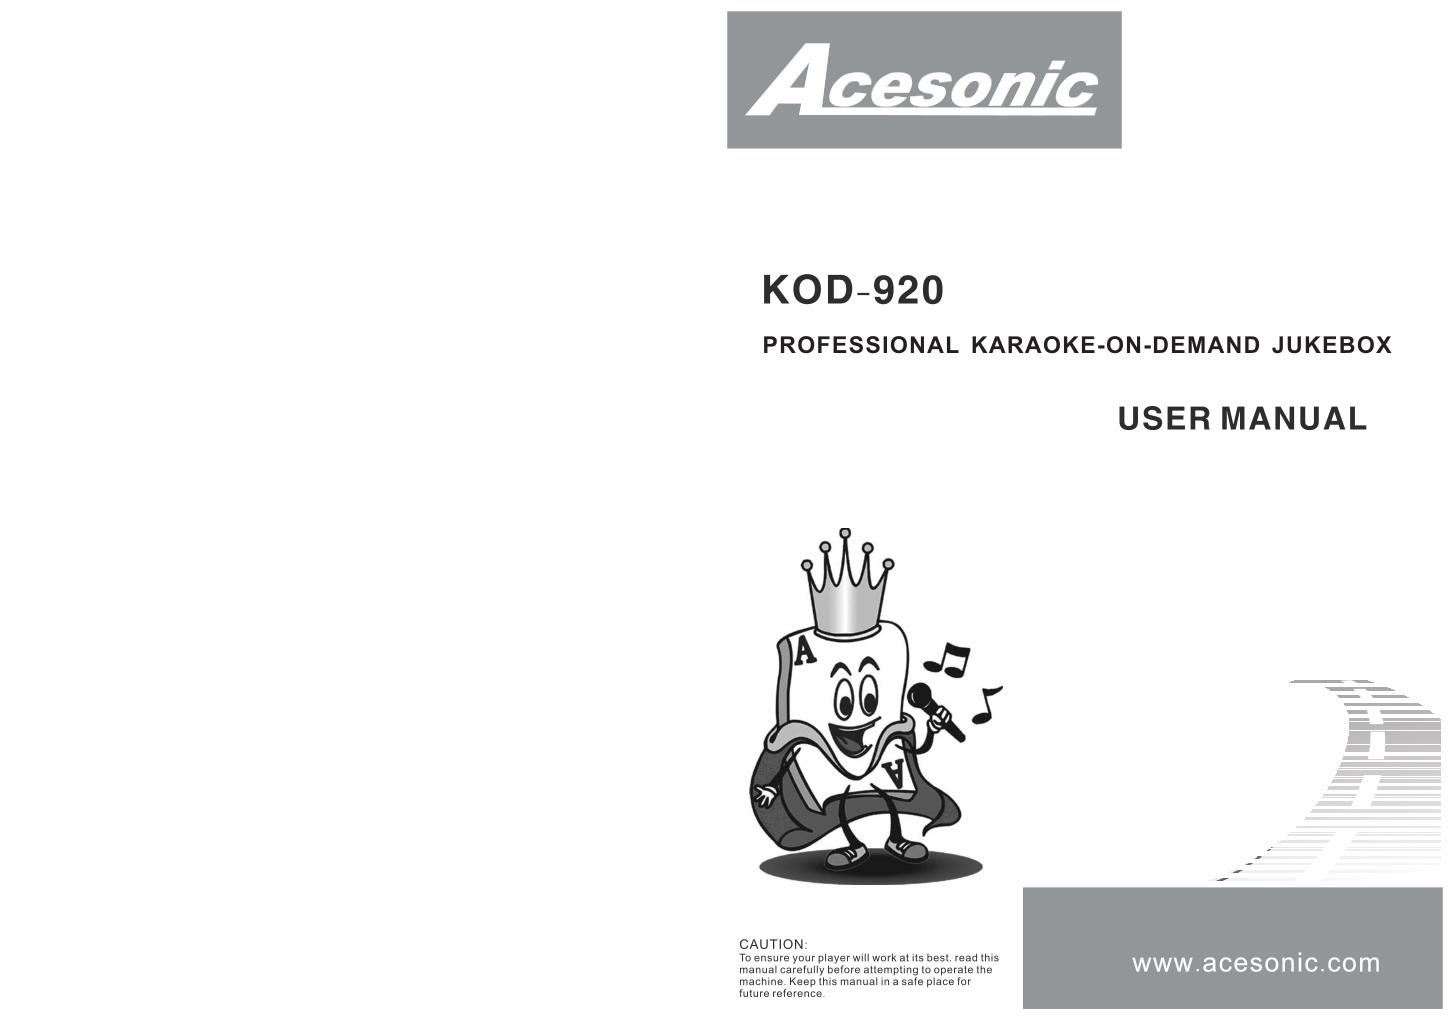
KOD-920PROFESSIONAL KARAOKE-ON-DEMAND JUKEBOX
USER MANUAL
www.acesonic.comCAUTION:To ensure your player will work at its best, read thismanual carefully before attempting to operate themachine. Keep this manual in a safe place forfuture reference.
Contents ------------------------------------------------------------------------------------------- 1
Characteristic ------------------------------------------------------------------------------- 2-3
Accessories ------------------------------------------------------------------------------------- 4
Panel ------------------------------------------------------------------------------------------------ 5
How To Connect ------------------------------------------------------------------------------ 6
Remote Control ------------------------------------------------------------------------------- 7
Dual Screen Mode --------------------------------------------------------------------- 8-12
Single Screen Mode ---------------------------------------------------------------- 12-13
Non-karaoke Play Mode ---------------------------------------------------------- 14-18
How To Add Songs ------------------------------------------------------------------ 19-21
How To Delete Songs -------------------------------------------------------------- 22-23
Trouble Shooting ---------------------------------------------------------------------------- 24
Notes --------------------------------------------------------------------------------------------- 24
Specification ---------------------------------------------------------------------------------- 25
1
CONTENTS

● KOD-920 is a multi-function professional HARD DRIVE karaoke player.
KOD920 maintains ease of use but is much more powerful than ever.The
following Powerful Features will really impress you and make you have never
experienced such easier and faster and humanized operation of the karaoke
machine on the market.
This karaoke machine is Perfect for Club, DJs,KJs,Pub, rentals,
restaurants,other public entertainment or if you simply want to have the
ultimate karaoke system for any occasion!
● High Compability Hard Disk
Support 2000GB or higher hard disk; can store songs and movies in large
quantities; Easy and simple to load hard disk.
● Support Multi-format Media
Support file with MPEG1(dat,mpg), MPEG2(vob, mpg), MPEG4(avi, divx,
xvid)format; In non-karaoke mode, can also support Mp3, JPEG photo.
● Easy add songs by yourself
1.Add songs from internet through provided high-speed USB cable
2.Add songs from SD Card card through built-in card-reader
● Fantastic effect to cheer up: Applause and flower effects etc…
● Theme changes
Able Switch to different display interface when select songs. (Multi-interface
available)
● Support Single-screen mode and dual-screen mode. Easy to switch in
between.
● Professional operations of selecting song / movie
Easy and fast to search/ select Song / movie by “Singer, spell, genres, word
count, language, song number” methods.
● Support SD card
In the non-karaoke mode, allow you playback songs and pictures in the SD
directly.
CHARACTERISTIC
2

● Support mouse, remote control, touch screen
Standard Accessories: mouse and remote control; Option accessory: 17 or
19 inch touch screen or normal computer monitor by using VGA/COM port
to connect.
● Chinese and English operation interface
Allow you switch between Traditional Chinese, Simple Chinese and
English Operation System.
● Advertisement
Allow you to create your own advertisement in the KOD machine and
playback.
● Adjust key function
Allow you to switch male or femal tones by using remote control while
singing.
● My Favorite
You can store your favorite songs into your personal account (by number).
Next time you sing, just login into your account to load your favorite song
list!
3
CHARACTERISTIC

4
Please make sure the following accessories are included in the box:
USB Cable Remote Control
AV Cable User Guide
ACCESSORIES
USER GUIDE

PANEL
5
Front Panel View
1 2 3
1. Power Button - to turn on or off the machine.
2. Remote Signal Sensor - to receive the command signal from remote.
3. SD Card Slot - to insert SD Card. * Might not able to read some of the HDSC cards.
1. Video Output
2. Right Audio Output
3. Left Audio Output
4. USB
5. VGA Output
6. COIN Input
7. MOUSE Input
8. COM1 Input (For touch screen, extra contral panel & MCU update)
9. COM2 Input
1 2 3 4 5 6 7 8
Rear Panel View
PROFESSIONAL KARAOKE-ON-DEMAND JUKEBOX KOD-920
COIN COM1 COM2VGA OUT
MODEL : KOD-920
PROFESSIONAL KARAOKE-ON-DEMAND JUKEBOX
VOLTAGE: 100V-240V~FREQUENCY: 50Hz/60HzPOWER: 35W MAX
Serial Number:
DESIGN IN U.S.A www.acesonic.com
AU
DIO
OU
T
VID
EO
OU
T
VIDEO 2 R
VIDEO 1 L
9

OUTS-VIDEO
IN
Tv's Component
Video Audio-Left Audio-Right
HOW TO CONNECT
6
1. Video, VGA, Mouse,Audio Connection for Dual screen mode:
2. In dual screen mode, the Touch Screen Connection: Please contact ACESONIC to purchase touch screen. *Note: only Acesonic's Touch screen works on KOD-920.
3. USB Connection: to edit/add songs only.
Component
VGA CABLE
VGA
MOUSE
TV
R
VIDEOL
VIDEO USB VGA KEYBOARD
MOUSE
Touch Screen Cable
Touch Screen
PC
Component
PC
Ba
ck Pa
ne
l
Component

POWERAPPLAUSE
VOCAL MUTE
_ +
NEXT REPLAYPLAY/PAUSE
SINGER SPELL
VOL
VOL
TOP HITS
MENU
WORD COUNT
RETURN
TUNING RESERVED LIST
INSERT
PAGE UP
1 2 3ABC DEF
4 5 6
7 8 9
0
GHI JKL MNO
PQRS TUV WXYZ
DELETE RESERVE
ENTER
PAGE DOWN
WORDCOUNT
WORDCOUNT
THEMES
FWDREV
SET UP
KEY
REMOTE CONTROL
7
POWER The machine will turn on /off.
√ √
BUTTON NAME FUNCTION
DOUBIESCREEN
SINGLESCREEN
√ √
× √
√ √
√ √
√ √
√ √
NO.
1
√ √
√ √
√ √
√ √
1
2 3
5
4
86
7
910
11
12 13
1415
16 17
18
19
20 21
2224
23
26
25
28
27
29
30 31
APPLAUSE2 Show the flower picture and applause sound.
3 FACESwitch to different OSD display and different selecting song' s interface of VGA display background. (Multi-interface available).
4 EXIT KARAOKE Switch to non-karaoke mode.
KEY +, - Adjust Key.up/down.
VOCAL Set singer's voice(vocal) on/ off.
MUTE Mutes the songs music.
NEXT Stop the playing song, and play next song.
PLAY/PAUSE
When playing, press this button to pause, when pausing, press this button to play.
5
6
7
8
9
REPLAY Replay the current song.10
SINGER Select/search songs by singer name mode.
SPELLSelect/search songs by initial letters of song name.
11
12
VOL+, - Increase or decrease volume.
WORD COUNT
Select/search songs by word count of song name.
TOPLIST Select/search songs by Top list of song.
MENU Accesses the On-screen Main Stepup Menu.
RETURN Return to the previous Menu.
13
14
15
16
17
ENTER
18
Enter and confirm what you select.
TUNING Open/close tuning menu.
RESERVED LIST
Open/close reserved list, and can change theorder of advance reserve, or delete the songs which you don' t want.
REVAllow you to scan forward when plays MP3,MTV (DAT, MPG, VOB) songs in Non-karaokeMode.
ADVANCEIn "Reserved list", choose the song and press [ADVANCE] to set priority song.
FWDAllow you to scan backward when plays MP3,MTV (DAT, MPG, VOB) songs in Non-karaoke Mode.
PAGE UP Page up.
PAGE DOWN Page down.
WORD COUNT+
In the "word count, singer, spell, song type, language, new songs mode", press this buttton to search up songs by the word count +.
WORD COUNT-
In the "word count, singer, spell, song type, language, new songs mode", press this buttton to search down songs by the word count-.
0-9 (A-Z)
①Press Number Button to select song directly. ②Press Number Button to type initial letter of song name while order song by Spell.③In the menu list, press the corresponding number button to enter to the sub-menu list.
Delete.
In karaoke mode, press this button to reserve songs.
Adjust cursor position by press " , , , ". When display songs list, press[ ] and [ ] button to page up /down.
RESERVE
DELETE
19
20
21
22
23
24
25
26
27
28
29
30
31
SPECIAL STATEMENT: 1. The ID of the Double and Single: √ means having this function, × don't have this function.2. The remote control can be operate according to the menu display on TV screen or on Display Monitor.
√ ×
√ √
√ √
√ √
√ √
√ √
√ √
√ √
√ √
√ √
√ ×
√ √
√ √
√ √
√ √
√ √
√ √
√ √
√ √
√ √

8
On-Screen-Display interface operation
1.Singer: Search /select songs by singer name, search singer by the initial letter of singer name.
1-1
1-2
Press [MENU] button to access main menu, see following picture:
1.1 Press [1] button or click "1 singer", display the type of singers list. For example 1-1 ※ You can also press [SINGER] button on the remote control and enter the type of singers list directly.
1.2 Enter singer list, and click "SEARCH SINGER" ,which can make you find your desired singer quickly by type the initial letter of singer name. For example picture 1-2 and 1-3:
1-3 Warm tips: ① In the picture 1-3, click " " to delete while type a wrong letter. ② When display the singer picture, you can also press "1-8" button on Remote Control directly to enter the song list of the selected singer, One page only display 8 pictures.
2.Spell: Search songs by the Spelling of song name. Follow the steps to select songs.
2.1. Press [2] button or click "2.SPELL" to enter spell menu, for example Picture 2-1:
※ You can also press [SPELL] button on remote control to enter spell menu directly.
2.2 Press [ENTER] button on OSD interface to confirm after click the initial letter of each word for the song name
Dual-Screen mode

9
2-1
Warm tips: ① You can click " " to delete while type a wrong initial letter. ② The above Spell function can be used only on search English/Chinese songs.
3. Kind: Select songs by the songs type.
3.1 Press [3] button or click "3.Kind" to enter songs type menu, as following picture 3-1:
3-1
4. Word count: Search song by the Word count of song name.
4.1 Press [4] button or click "4.Word Count" to enter its menu, as following picture 4-1:
※ You can also press [WORD COUN] button directly on remote control to enter word count menu.
4-15. Language Select songs by Songs Language.
5. 1 Press [ 5 ] button or click "5.Language" to enter its menu, as following picture 5-1:
5-16.Top: In this menu, these songs get most times of reservation ,will be listed in this menu. Only the top 60 songs can be listed in TOP menu.
6.1 Press [6] button or click "6.Top" to enter Top song list menu, as following picture 6-1:
※ You can also press [Top list] on the remote control to enter Top Song List Menu directly.
6-1
Dual-Screen mode
9-1
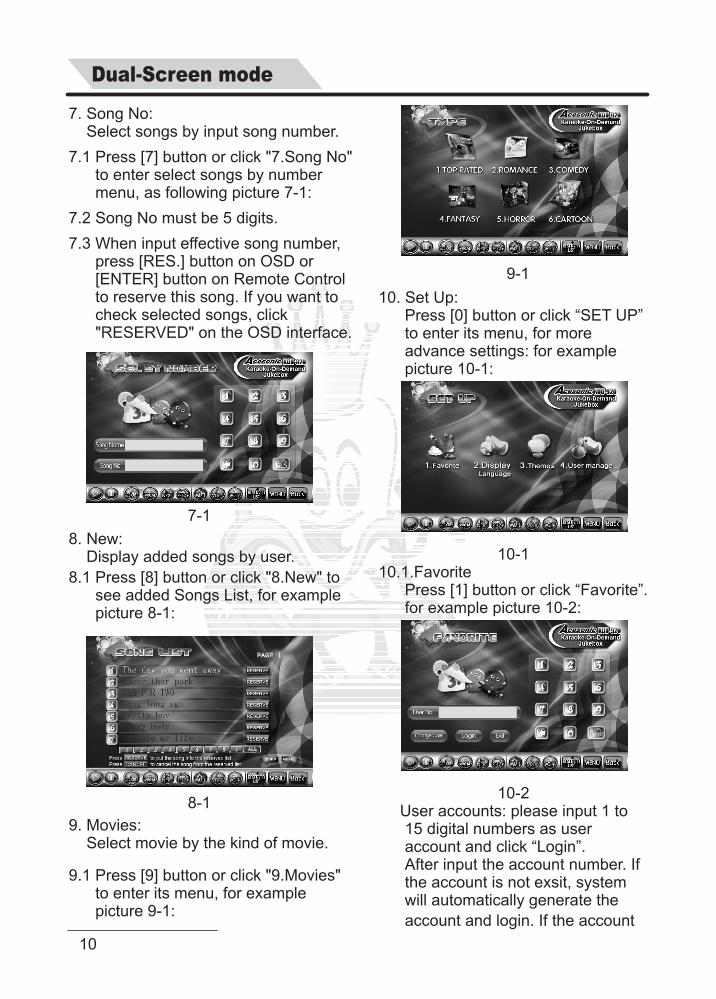
10. Set Up:Press [0] button or click “SET UP” to enter its menu, for more advance settings: for example picture 10-1:
10-110.1.Favorite
Press [1] button or click “Favorite”. for example picture 10-2:
10-2User accounts: please input 1 to 15 digital numbers as user account and click “Login”. After input the account number. If the account is not exsit, system will automatically generate the
account and login. If the account
DOUBLE PLAY MODE
10
7. Song No: Select songs by input song number.
7.1 Press [7] button or click "7.Song No" to enter select songs by number menu, as following picture 7-1:
7.2 Song No must be 5 digits.
7.3 When input effective song number, press [RES.] button on OSD or [ENTER] button on Remote Control to reserve this song. If you want to check selected songs, click "RESERVED" on the OSD interface.
7-1
8. New: Display added songs by user.
8.1 Press [8] button or click "8.New" to see added Songs List, for example picture 8-1:
8-1
9. Movies: Select movie by the kind of movie.
9.1 Press [9] button or click "9.Movies" to enter its menu, for example picture 9-1:
Dual-Screen mode

11. Reserved List:Display reserved list in this menu. You can set songs play prioritys and delete the song you don't want to play freely.
11.1 Click "Reserved List" to see the reserved songs' list, for example picture 11-1:
11-1
11.2 In "Reserved List", you can select one song and then click "Support" on OSD or press [ADVANCE] on Remote Control to move it at the first song in reserved list.
11.3 In "Reserved List", you can select one song and then click "Delete" on OSD or press [DELETE] on Remote Control to delete the selected song in reserved list.
11.4 after login into user account, you can store your favorite song by pressing “Favorite”button. The song will insert into the favorite song list in that account.※without login into any user account, the “Favorite”button wont work.
already exsit, system will login into
this account.
User account switching: Switching to
different user
Exit: to return to previous screen
10.2.Dispay Langurage
In SET UP screen, press [2] or “2.
Display Langurage” to switch amount
English, Simple Chinese or
Traditional Chinese.
10.3 Theme: Switch the themes.
10.4 User account management
press [4] or “4. User manage”. for
example picture:
10.4.1 name of administrator is
“Manager”
10.4.2 Defalt password is 88888888
10.4.3 Changign password: after login as
administrator, press the “Reset
Password” button to input the new
password.
※ If you lost the new password you
set by yourself. Please create a text
file and write down another 8 digit
number. Name this file as “syspass”
and put in the root directory of the
hard drive. The new password will
change to the number you write in
the text file
10.4.4 Administraoter log in- after login
as administraoter, you can see the
list of user account and you can
delete the useless accounts.
Dual-Screen mode
11
: Begins playing a song that is stopped or paused. : Pause a song that is playing. Applause: Press [Applause], applause will be sounded automatically.VOCAL: Open or close singer's voice for MTV songs.NEXT: Press this button to stop current song, and play the next song.REPLAY: Replay the current songs.MUTE: turn on or off the audio.VOL-: Reduce the music volume.VOL+: Increase the music volume.MENU: Press this button to enter main menu.BACK: Return to the previous menu.
Tips: 1. In the main menu interface,each menu has a number, you can press number button directly to select the menu you want. 2. Item number 1 to 9 appear in the menu where involved Song List except appear in the menu "4: Word Count", stand for the related numbers of word count. (1 for one word song name. 2 for two words song name etc.) Default setting: listing all words song name.
Operation on TV screen
Press [MENU] button on the remote control to accesses main menu:Each menu has a number. You can select the number to enter the menu you want to select, or press [ , , , ] button to move cursor to the item you want to select, and press [ENTER] button to accesses this item.
1. Singer: Press [ , ] button to select "Singer", and then press [ENTER] button or press [1] button to enter singer menu. According to the singer name select songs.
2. Spelling:2.1 Press [ , ] button to select "spelling", and then press [ENTER] button or press [2] button to enter spell menu. And then input the initial letters of each word for song name to search songs.
2.2 For example, song name is "Pretty boy", you type PB to search it.
Operation:Step 1: "Pretty" is composed of five letters, and "p" is the initial letter of "Pretty". The [ 7 ] button correspond to 4 letters and "p" is first, and press it one time.
Step 2: "boy" is composed of three letters, and "b" is the initial letter of "boy". The [ 2 ] button correspond to 3 letters and "b" is second, and press it twice.
3. Genres: Press [ , ] button to select “Genres", and press [ENTER] button, or press [3] button to enter song type list directly. Select song by the kind of song.
4. Word count: Press [ , ] button to select "Word count", and press [ENTER] button or press [4] button to enter word count list. Then select song by word count of song name.
5. Language: Press [ , ] button to select "Language", and press [ENTER] button or press [5] button to enter language list. Then select song by language.
Single Screen play mode
12

6. New song: Press [ , ] button to select "New song", and press [ENTER] button or press [3] button to enter new song list. Then display the added songs by user.
Warm tips: In any menu Press [RETURN] to return the previous menu, press [MENU] button to exit directly.
7. Operation of other button:
7.1 Tuning: Press [TUNING] button to open the tuning menu.7.1.1 Press [ , ] button to select any item, and press [ , ] button to adjust volume of MTV songs and key.7.1.2 You can also press [VOL+] button or [VOL-] button to adjust volume directly.
7.2 Reserved List: Press [Reserved List] button to open reserved songs list. Press [ , ] button to select the song in reserved list, and press [ADVANCE] button to set play priority for the song
7.3 Replay: Press [REPLAY] button to replay the current playing songs.
7.4 NEXT: Press [NEXT] button to stop the current playing song and play the next song.
7.5 WORD COUNT+, WORD COUNT - Enter the word count menu and select one word item to enter it, and then press [WORD COUNT+] or [WORD COUNT -] button to search song name.
Single Screen play mode
13

In karaoke mode, press [SETUP] button on remote control and input the password 888888 then press [ENTER] to exit karaoke mode, and then switch to the non-karaoke(SETUP) mode.※ If you what to use a new password
by yourself. Please create a text file
and write down another 8 digit number. Name this file as “PASSWORD” and put in the root directory of the hard drive.
The new password will change to the
number you write in the text file.
●
number in the front of items on TV
Screen or by moving cursor on the
item you want, then press [ENTER]
button to enter different menu.
● If you want to play photos or music or
video directly In "1.PHOTO, 2.MUSIC,
3.VIDEO" menu, firstly, go to the
menu "4.file" to select playing from
HD or playing from SD card. Simple
steps: enter "4.file" menu →press
[ ] button to select HD or SD →
press [ENTER] button to confirm→
press [RETURN] button to exit, then
all photos/music/viedo in HD or SD
will be automaticly play after enter its
menu.
● In "1.PHOTO, 2.MUSIC, 3.VIDEO, 5.SETUP"
menu, press [0] button or [RETURN]
button to return to previous menu; In
"4.file" option, press [ 0 ] button or
According to the corresponding
1. Play the JPEG format images in the Hard Disc and SD card.
1.1 Enter the "1.PHOTO" menu ,pictures will play automatically. Press [ , ] to view the previous picture or the next picture.1.2 Press [PLAY/PAUSE] on remote control to pause the photo that is playing or to play the photo that is paused. Press [RETURN] button to exit photo content.
Warm tips : When preview JPEG photo, if you don't do any operation, the system will round play JPEG photos from HD, SD card automatically.
2. Music: Play MP3 songs file in HD and SD card
※ In "MUSIC" menu, file list is arranged by the initial letters of song name or the sequence number of files.※ If there are MP3 songs both in the sub-folder and the root content of HD or SD card ,the system will list the MP3 songs in the root content at first, and then the songs in the sub-folder.※ The left line of music list displays the songs name, the right line displays the total playing time of song. See following picture for reference.
[RETURN] button to exit "file" menu.
● You can save photos、 music and
video files to the root content of Hard
Disc / SD card, or put them in the
sub-folder. Also allow you to rename
them as you like.
NON-KARAOKE PLAY MODE
14

2.1 Enter "MUSIC" menu, and MP3 songs will play automatically, press [ , ] button to select songs, press [ , ] button to switch to page up or page down.
2.2 You can also press the related item number of the song in song list, then press [ENTER] to play the song you choose. One page only display 8 songs.
2.3 Press [NEXT] button to stop the MP3 song that is playing, press the button [RETURN] or [0] to exit Music menu.
Note: The words "HD" in the top of the OSD interface shows that the MP3 song is playing from Hard Disk, The words "SD" in the top of the OSD interface shows that the MP3 song is playing from SD card.
3. Video: You can play the file of AVI, DAT, MPEG, VOB format from HD and SD, MMC card (Please don't add VOB format songs into SD MMC cards, because the picture might not clear)
3.1 Enter "VDIEO" menu, video files will be play automatically, press [ , ] button to select songs.
3.2 When the video is playing, press [NEXT] button ,TV screen displays the song preview and then press [ , , , ] button and [ENTER] button to select the song.
3.3 When the video is playing, press [VOCAL] button or [TUNING] button to switch to Vocal on/off .3.4 Press [RETURN] button to exit video menu.
4. File: Select "4.File" item to browse files contents in HD and SD, MMC card.
Press [ ] or [ ] button to select HD or SD card, and then press [ENTER] button to enter their content.
HD is the hard disc in which the system has been installed and be able to enterkaraoke mode. There are following. important folders and files in HD root content. (make sure they are always in the HD root content, otherwise, you can't enter Karaoke mode and play normally).
●
songs of AVI, DAT, MPEG, VOB format and background files. In KARAOKVOB folder→there are 00-99 sub-folders: MTV songs will be added to sub-folders which are named by the first two digits of song number of MTV songs. For example: 51001-51999 songs can be put in the
KARAOKVOB folder: mostly includes
NON-KARAOKE PLAY MODE
15

Those background files' name should be 000**.avi / 000**.dat / 000**.mpg / 000**.vob. "**" means a number. These 4 format files are compatible.
● LIST folder: Mostly includes songs index file "list.dat" and added new songs index file "attach_***.dat".
● MOVIE folder: Mostly includes movie program, the movie type includes 6 types:
Create movie types operation:
How to name the folder for different kinds of movie 1_* for OCCIDENT movie 2_* for LOVE movie 3_* for COMEDY movie 4_* for SCI-FI movie 5_* for HORROR movie 6_* for CARTOON movie"*" means the words of movie name.
For instance: Movie <<THE LOST WORLD JURASSIC PARK>> belongsto the HORROR movie, in the movie content, found a new folder and copy this movie file into this new folder, and then namethis folder "5-THE LOST WORLD JURASSIC PARK", it will be displayed at the HORROR movie in the 9.Movie on the karaoke mode.
● ad_pic folder: Includes the data of advertising picture.
● SysPack.sfl: Font file.
● Picpack.dat: is a date file for display pictures on OSD while select songs.
※In HD root content,those JPEG photos saved in the PICTURE folder and those MP3 songs saved in MUSIC folder can be played in karaoke mode. In non-karaoke mode, you also can play them directly in the sub-menu of "1.PHOTO and 2.MUSIC" or at its current directory .
● At the non-karaoke mode, the song (MP3, AVI, DAT, MPEG1 format) and picture(JPEG format)can play directly.
● You can Copy additional new song files to SD card.
4.1 Play operation: ① Press [ ] or [ ] button to select song file, and press [ENTER] or [PLAY/PAUSE] button to play. When playing, press [ ] or [ ] button to play previous or next song. ② When playing, press [FWD] or [REV] button to adjust the playing speed .(When the playing song is AVI format, the [FWD] or [REV] button is invalid.)
4.2 Special function In the file library in "4.file" menu and stop state, press [MENU] button to open "COPY" menu etc, as following:
(1) Copy: Copy files from SD card to HD, or copy files from HD to SD card.
In the KARAOKVOB folder, one of its sub-folder "00" is used for putting those background files that will be playing when Random-Play mode off.
51st folder; 52101-52999 can be put in the 52nd folder and so on. Each folder can be loaded 1000 songs at most. See the detailed instructions in "Chapter 05 Adding songs operation".
● PICTURE folder: save JPEG photos
● MUSIC folder: save MP3 format songs
16
NON-KARAOKE PLAY MODE

Step 2. Press [MENU] button to open copy menu etc., and move cursor to "COPY", and then press [ENTER] button to operate "COPY" function. The right side of interface displays the destination.Step 3. Press [ ] button to move cursor to HD,and then press [ENTER] button,→Press [ ] , [ ] button to select the related destination folder where you want to put songs in. (Default destination is the HD Root Content).Step 4. Press [ ] button to move the file you want to copy, and press [ENTER] button to copy it.Step 5. When copy finished, the word "Finished" will display on the top of TV Screen. Step 6. Press [RETURN] or [0] button to exit current menu.
Warm tips: If the current copy finish and not exit copy interface and you want to copy other songs, you can move cursor to the next file you want to copy, then press[ENTER]button to begin to copy.
(2) Delete: Please read "Instructions of delete songs operation"
(3) Rename: The name can only be numbers or letters.
Step 2. Press [ , , , ] button to move cursor to the number or letter you want to give, then press [ENTER] button to select them.Step 3. After input a new name, move cursor to [OK] button on OSD and press [ENTER] button on Remote Control to confirm the new name.
Step 4. Move cursor to "cancel" to exit rename menu interface.
※ you can move cursor to [ERASE] button on OSD to erase it.
When type a wrong number or letter,
● KARAOKVOB, LIST, MOVIE folder in HD can't be renamed, otherwise system can't identify the corresponding play mode.
(4) New folder: Create a folder
Step 1. Press [MENU] button to open "NEW FOLDER" menu interface, and then move cursor to "NEW FOLDER", and then press [ENTER] button to operate the function of create a folder.
※ Only can copy a single file, not a folder.※ Unable to copy a file that gets the same name in other folder you want to copy to.If there is the same name file in the destination, it will can not be copied successfully.For example: Copy file from SD card to HD.Step 1. Enter into SD card menu and select the song you want to copy.
Step 1. Select the song or folder you want to rename, and press [MENU] button to open "rename" menu interface, and move cursor to "rename", then press [ENTER] button to operate rename function. TV screen displays a rename menu, which shown as following:
NON-KARAOKE PLAY MODE
17

(6) Cancel: Exit the operation menu interface.5. Setup: Function settingPress [ ], [ ] button to move cursor to "5.setup" on OSD, then press [ENTER] button on Remote control toaccess to Setup Menu. Or press[5] on remote control directly to access to Setup Menu. TV displays as following:
※ for each item.※ You can press the corresponding number before item to select what you want to setup.
Please follow instant tips to operate
(2) Screen : dual, Single mode, Coin.dual: All functions information
display on VGA interface when operating remote control, mouse, touch-screen, external control board
Single: All functions information display on TV screen when operating remote control.
Coin machine mode: In karaoke mode, the remote control can not work untill Input 8 digits of password ,follow by press [ENTER] to confirm.
6. Karaoke: Enter karaoke mode.
Step 2. TV screen displays a rename menu, follow above (3) rename steps to rename the new folder. (5) Properties: See attribute of file or folder.Press the button [MENU] to open "properties" menu, and move cursor to "properties", then press [ENTER] button to operate it.
Step 2: exit the Karaoke mode and enter Setup mode
Step 3: select “5. Add song and list” and press Enter button to start loading songs from SD card to KOD-920. the screen will show the complete message while the process done.
(1) Add songs and song list (add songs from SD card to HD)Step 1: use song editing software to build a new song files ( see below).
18
NON-KARAOKE PLAY MODE

You can add songs easilly to KOD machine through SD card and USB Mode.
I. ADD SONGS THROUGH USB MODE
1. Firstly, let machine enter USB MODE. There are two ways to enter USB mode: 1) Enter USB mode in no connection with TV.2) Enter USB mode while machine is in Karaoke Mode. You can follow steps to enter USB mode.
1.1 How to enter USB Mode in no conn ection with TV
1) Connect the machine and computer with USB Cable before turn on the machine. Plug KOD Machine power cable to a power source.2) Turn on the machine and press immediately [MENU] button on remote control once or more times. Wait a moment, when the USB connected successfully, a USB Icon will be displayed on the PC taskbar . If you don't see any USB Icon on your PC, please turn off the KOD machine and then repeat above steps one more time. (To exit USB Mode, press [ENTER] button on remote control directly)3) Follow above steps 2) ,If you connet KOD machine to TV with AV cable, the following picture will be displayed on TV screen.
1.2 How to Enter USB mode while machine is in Karaoke Mode:Make sure the AV cable is connected firmly between KOD machine and TV, Make sure the USB cable is connected properly between KOD machine and your computer.
1) If current mode is in the karaoke mode, please press [EXIT KARAOKE] button on the remote control to switch to non-karaoke mode.2) Press [5] button or [ , ] button to select "5. setup", and enter Setup Menu.3) Press [3] button or [ , ] button to select "3. USB mode", follow instant tips to select "ON Mode", Press [ENTER] button to confirm it.
4) Wait a moment, when the USB connected, a USB Icon will be displayed on the PC taskbar.
2. In root directory in HD,Folder “Toolfile” → Createsonglist&photo.rar, copy it to computer and decompress files. Open folder “Createsonglist&photo”, click file “setup(all).exe” to install. After finish install, desktop display icon , open
Kod6CreateSgList.exe, It will display the following picture.
19
HOW TO ADD SONGS

II OPERATING INSTRUCTIONS OF APPEND SONG FROM SD CARD
3. You can insert SD card directly into the machine under the following mode: 3.1 The machine is off.3.2 In karaoke mode or in non-karaoke mode.
4. If current mode is in Karaoke Mode, Press [EXIT KARAOKE] button on the remote control to switch to non-karaoke mode.
5. Press [5] button or [ , ] button to select "5.setup", then press [ENTER] button to enter setup menu.
6. Press [5] button or [ , ] button to select the item "5. Add song and List Sart", then press [ENTER] button to start it.
Note: Please don't do anything in the replication process! Otherwise, data will be lost easily.
7. Songs are added succesefully as following picture.
8. Press [0] button or [RETURN] button to exit Setup Menu.
1. Operating instructions of append song in SD see file <help-eng.chm>, search "SD card add mode" 2. Operating instructions of append song from SD to HD.
3. Operating instructions of add song” is saved in the folder “Toolfile” that is in root directory of HD. Open the folder→copy the file “Createsonglist&photo.rar” into pc, and decompress it with common software of WINRAR→Open folder "Createsonglist&photo",you can find the file “help-eng.chm”, it is Add song operating instructions.
20
HOW TO ADD SONGS

III.Trouble shooting:
Make sure SD card is connected firmly and properly into KOD machine, Reinsert SD card into KOD machine.There are two ways to check whether SD card is connected firmly and properly: 1) in non-karaoke mode, the picture of main menu will shake for a second while insert SD card,which means that the system is detect the data from SD;2) Ente "4.FILE " menu, if you see HD and SD in device library, means the system has detected SD card successefully. (HD:hard disk: SD: SD card)Check the sticker on SD card to make sure you have insert a standrad SD card . If you see word "SDHC" on it, which means that it is SDHC card, not standrad SD card, KOD machine only support Standrad SD Card. When buying SD card, read its user manual carefully to make sure it is standrad SD card.
Make sure there are KARAOKVOB folder and LIST folder in root content of SD card. Make sure there are related files and folder in the folder. (about the contents in KARAOKVOB AND LIST folder, please refer to “4.file” in the Page 14-15 for details.
Please check whether the original song channel is special or not, if it is special, please add the song again through add-song-tools(Createsonglist&photo), please choose special item while using the tool.
When you append song, use the char "&" to divide singer in singer list.
? Display "Upgrade fail SD card not present" when adding songs through SD card
? Display"Song list Not found"when adding songs through SD card.
? There is novocal or the function of vocal on/off works conversely
? Unable to order such songs of chorus or antiphonal singing by Singer
Phenomenon Solution
? Added songs can't play
Check whether the format of added songs is compatible with KOD Machine Playing format Check whether the song number of added songs in SD is the same as the song number in HD. If it is the same, only one of the song can be play.
21
HOW TO ADD SONGS

There are 2 ways to delete songs: 1) Delete songs by USB mode. 2) Delete songs by KOD machine.
I.DELETE SONGS BY USB MODE:1. You can delete song file of HD in PC.
Step 1. Enter karaokvob folder, open the subfolder to find the song you want to delete, then select them, press [DELETE] button on PC keyboard , then press [ENTER] button to delete this song.
II.DELETE SONGS IN THE MACHINE DIRECTLY
This function is used for delete songs file in HD and SD card directly.1.Press [EXIT KARAOKE] button to switch to the non-karaoke mode.2.Press [4] button or [ , ] button to select "4.FILE" menu, and press [ENTER] button to enter FILE menu; According to need to select HD or SD card, and press [ENTER] button to enter.
HD: Hard disc SD: SD card
3.In the stop state, enter karaokvob folder and open subfolder of the song you want to delete, then select the song you want to delete and press [MENU] button to open the copy menu as following
2. Delete song list and song in add song tools:Step1: Open tools, chick "Connect HDD", after finish import, choose the song name you need delete, chick right button of mouse, choose "Delete".Note: You can delete singer's picture, operating instruction see: the 8th item in help-gb2312.chm, <delete song ,delete singer>
Enter USB mode according to the steps in "Chapter 05 V. Add songs through USB mode operation".
22
HOW TO DELETE SONGS

4.Press [ , ] button to move cursor, and moves the cursor to "Delete".
5.Press [ENTER] button, and then TV screen display the prompt menu.
6.Press [ ] button to move cursor to select "yes" in the prompt menu, then press [ENTER] button to delete.
※If select "No", then press [ENTER] to exit the delete function.
7.Delete completed.
23
HOW TO DELETE SONGS

TROUBLE SHOOTING
? No picture, no color, the picture is rolling vertically
? Remote control doesn't work
Remove the obstacles in the path between of the remote and the player.Point the remote control directly at the remote sensor on the player.Make sure the batteries are inserted,insetted correctly, not out of power.Move closer to the machine.
Make sure there is no defective cablesMake sure everything is connected firmly and properlyMake sure all of your components are turned on.Make sure all of the components(amplifier,TV,KOD mahcine etc)are set to proper inputs.Make sure the KOD machine is set to correct TV system mode(PAL/NTSC/AUTO) .You can follow the simple steps to resetup it:(In non-karaoke mode,→enter [5.setup]menu→go to item [2.TV System] to setup corresponding TV mode)
Make sure everything is connected firmly and properly.Make sure there is no defective cables.Make sure all of your components(TV,amplifier,KOD machine are turned on and the volume is not set to the lowest.)Make sure all of the components (amplifier,TV,player etc) are set to proper inputs.
? No sound
?Unable to enter karaoke mode (The screen display: hard disi select on and enter)
Make sure the folder name "karaokvob" spells correct.Make sure there are MTV songs in the "Karaokvob" folder.Make sure there is a file "Syspack.sfl" in the root content of HD. ( "Syspack.sfl" is a font file, don't delete it )
Make sure songs are put into the right subfolders of KARAOKVOB folder in the root content of HD .(Read this chapter carefully one more time )Make sure the file "ist.dat" is put into "LIST" folder in the root content of HD. ("list.dat" is a songs index file. )
Make sure there is a file "Picpack.dat" in the root content of HD. (File "Picpack.dat" is a data file responsible for display order songs picture . )
The song is playing might be single-track in VOB or MPEG2 format,to solve it, please tryto press [VOCAL] button to switch vocal on.
? song can't play properly
? Don't display order songs picture
? No sound or the picture is unclear while play .
Phenomenon Solution
Safety Instructions:
Please read user mannual carefully and follow all operating and use instructions
To reduce the risk of fire or electric shocks, do not expose the machine to rain or moisture. Do not use it near
water.
Don't put something contains water on top of this unit.
Please do not open the top cover. Leave all servicing to qualified maintenancepersonnel.
Please keep this unit POWER PLUG OFF in case of any damage caused when you don't use it.
When KOD machine connet with external components(such as external control-board,touch-screen, hard
disc, display monitor, TV etc), make sure their connections are firmly.
Please make sure all components are connected firmly and properly before turn on the KOD machine.
Do not shut down the machine when the system is searching. Press [POWER] button on remote control
before switch off [POWER]button on front panel of KOD machine.
Please power off when the machine get problem, then restart it after several minutes.
To keep proper aeration of the machine when use the KOD machine for a long time.
24
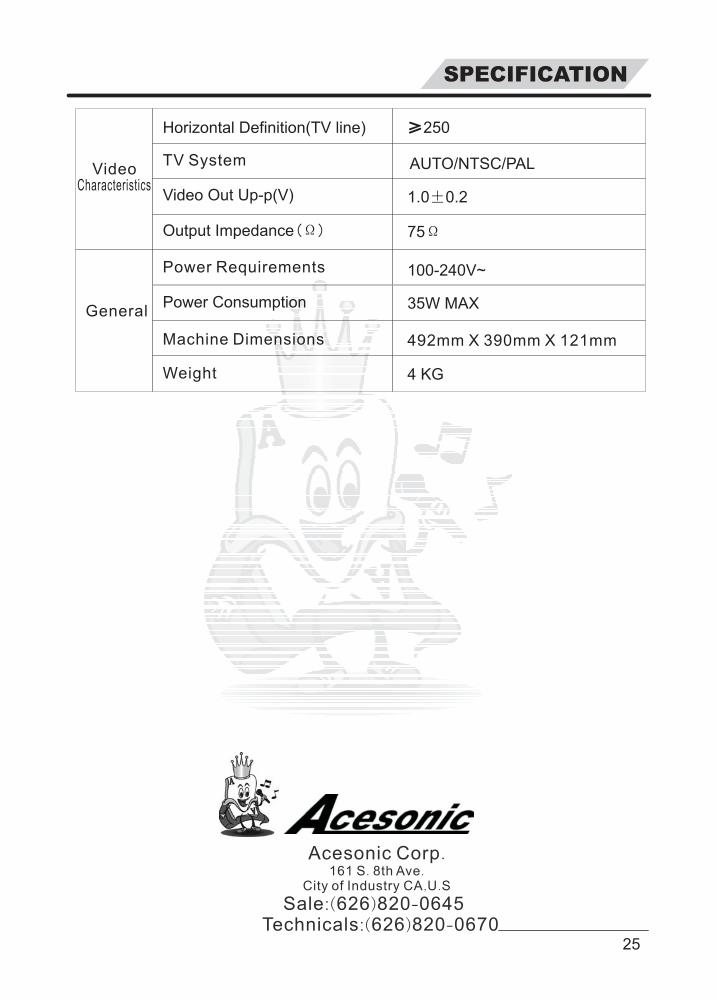
SPECIFICATION
Characteristics
Horizontal Definition(TV line) ≥250
TV System AUTO/NTSC/PAL
Video Out Up-p(V) 1.0 0.2±
Output Impedance(Ω) 75Ω
Power Requirements
Power Consumption
Machine Dimensions
Weight
100-240V~
4 KG
492mm X 390mm X 121mm
35W MAXGeneral
Video
Acesonic Corp.
Sale:(626)820-0645Technicals:(626)820-0670
161 S. 8th Ave.City of Industry CA,U.S
25