acn iris x videophone user...
TRANSCRIPT

ACN IRIS X Videophone USER MANUAL

Table of Contents Installation Instructions ........................................................................................................... 4
Features .................................................................................................................................... 4
Main Screen and Navigation ................................................................................................... 4
Handset, Speaker and Headset Mode .................................................................................... 6
Making a Call .......................................................................................................................... 6
Answering Calls ...................................................................................................................... 8
Call Options ............................................................................................................................ 9
Call Hold (Options menu) ......................................................................................................11
3-Way Conference Calling (Options menu) ...........................................................................12
Mute (Options menu) .............................................................................................................12
PIP Picture-In-Picture (Options menu) ...................................................................................12
Do Not Disturb (Status Bar) ...................................................................................................12
Call Forwarding Activation .....................................................................................................13
Caller ID Blocking ..................................................................................................................13
Additional Feature Code Functions ........................................................................................13
Voice Mail ..............................................................................................................................14
Keyboard Input ......................................................................................................................15
In-built Applications (apps) ....................................................................................................16
Alarm Clock ...........................................................................................................................16
Browser .................................................................................................................................16
Calculator ..............................................................................................................................17
Calendar ................................................................................................................................18
Call History ............................................................................................................................21
Contacts ................................................................................................................................21
File Manager .........................................................................................................................22
Media Player .........................................................................................................................23
Movie Trailer..........................................................................................................................25
Picture-In-Picture (PIP) ..........................................................................................................26
Picture Viewer .......................................................................................................................26
Slide Show ............................................................................................................................29
YouTube ................................................................................................................................29
World Photo...........................................................................................................................30
Widgets ....................................................................................................................................32
Contacts Favourite ................................................................................................................32
Info ........................................................................................................................................32
Photo Frame..........................................................................................................................32
Weather .................................................................................................................................33
World Clock ...........................................................................................................................33
System Settings ......................................................................................................................35
Screen Calibration .................................................................................................................35
Network Settings ...................................................................................................................35
Wi-Fi Settings ........................................................................................................................35
Time Settings ........................................................................................................................37
Display ..................................................................................................................................37
Maintenance ............................................................................................................................38
Reboot...................................................................................................................................38
Backup ..................................................................................................................................39
Factory Functions ..................................................................................................................39
Debug....................................................................................................................................39
Camera .................................................................................................................................40
Screen Saver .........................................................................................................................40
Background ...........................................................................................................................40
Tones Manager .....................................................................................................................41
Language ..............................................................................................................................42
System Info ...........................................................................................................................43
Advanced Features .................................................................................................................45
USB Device Support ..............................................................................................................45
Screen Capture .....................................................................................................................45
Troubleshooting ......................................................................................................................46
ACN IRIS X Videophone Technical Specifications ...............................................................50

Installation Instructions Please refer to the ACN IRIS X Videophone Quick Installation Guide located on your ACN Independent Representative’s Online Shop or www.myacn.eu.
Features
Main Screen and Navigation The ACN IRIS X Videophone has intuitive, powerful touch screen navigation with four desktop screens. To change from screen to screen, swipe the main screen to the left or right; or press the screen switcher icon. The Home button, located on the bottom centre of the phone allows you to easily jump to the Home screen from any screen. If you press Home while running an app, the app will remain open. You can go back to the app by pressing the app indicator on the status bar. Pressing the Home button to return to the Home screen and then holding for 10 seconds will cause the screen calibration to display. The status bar provides a quick view of your phone’s status. If you press the status bar, a number of options become available: Volume, Wi-Fi off/on Network off/on (Ethernet), Do Not Disturb (DND) and Camera off/on. Use the slider switch to turn on or off these features. In addition Settings and Date/Time are available as shortcuts. Please see the chart below for an explanation of the phone status indicator icons:
Type Icon Definition
Network Connected to the network
Failed to connect to the network
Call Related Auto Answer
Call Forward

Ring Volume Ring volume, ranges from 0-9
Phone Status Camera disabled
Do-Not-Disturb (DND)
Missed Call.
Audio Output The headset is in use and is off the hook
The headset is plugged in
The speaker phone is active
The handset is off the hook
Wi-Fi Wi-Fi signal strength, ranging from 0 to 4
Applications Alarm clock
Background running program
External devices SD card
USB flash drive
USB keyboard
USB mouse
USB LED light 1
USB LED light 2

HDMI
The ACN IRIS X Videophone supports up to three inbound or outbound concurrent calls. When the phone is off the hook, users can press Hold then select Line1, Line2 or Line3 to place additional calls
Handset, Speaker and Headset Mode The ACN IRIS X Videophone allows users to switch from handset to speaker by pressing the corresponding icon in the Dial Pad. If a headset is plugged in, the headset icon will be available to select. Standard three-conductor 3.5mm wired headsets are supported.
Making a Call 1. By using Phone in the idle screen
• On the home screen, select the Phone icon in the bottom menu • The dial pad will show up with a dial tone • Dial the number and press Audio Call or Video Call to dial out.
For the last dialled number, press Redial
2. By taking the handset off the hook Users will be able to make a call when the phone is idle or running other applications by taking the handset off the hook.
• Take the handset off the hook then the dial pad will appear • Select Line • Dial the number and press Audio Call or Video Call to dial the number.
For the last dialled number, press Redial
3. By using Call History • Access the phone’s menu by pressing the MENU icon in idle screen and then
select Call History. • The screen will display All, Received, Dialled and Missed. Select the call
history that you wish to view • Press to dial the selected number

Dial by Call History
4. By Contacts • Access the phone’s menu by pressing the MENU icon in idle screen. Then select
Contacts or choose the Contacts icon in the dial pad to access the contact list. • The screen monitor will display the contact list. Scroll to the contact to be dialled • Press to call the selected contact. The default will be the primary contact
number of the contact
Dial by Contact List
Select the contact to view the full contact information screen. There are four number options available to dial: Work, Home, Mobile and Fax. Press to dial the required number.
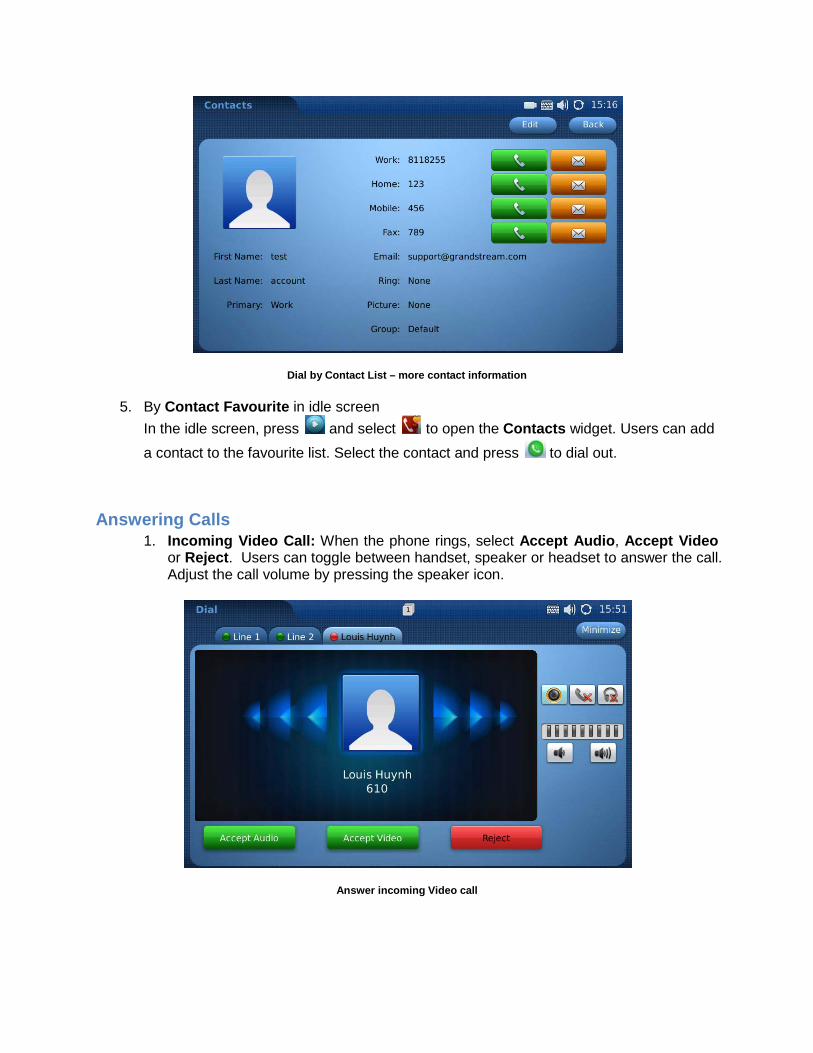
Dial by Contact List – more contact information
5. By Contact Favourite in idle screen In the idle screen, press and select to open the Contacts widget. Users can add a contact to the favourite list. Select the contact and press to dial out.
Answering Calls 1. Incoming Video Call: When the phone rings, select Accept Audio, Accept Video
or Reject. Users can toggle between handset, speaker or headset to answer the call. Adjust the call volume by pressing the speaker icon.
Answer incoming Video call

2. Incoming Audio Call: When an audio only call is coming in, select Accept Audio or Reject.
Answer incoming Audio call
3. Missed Call: If the call is unanswered, a Missed Call message will show up on the
Home screen. Users can press this message to access the detail of the missed call or view missed calls via the Call History option.
Call Options A number of options are available during a call. These include features such as Call Hold, Mute, Volume, and Video Off (Video Privacy). These are accessible through the Options menu. During a video call you can touch the screen to display the Options menu. To open the menu press
. The functions below are available through the Options menu.

Use call Options during a video call
ACN IRIS X Videophone Call Options OPTION MENU FUNCTION DESCRIPTION
Dial Pad Select to enter in touch tone responses or to dial another number
Hold Press to hold the call. To take the call off hold, press Unhold
Mute/Unmute Press to mute or unmute the call
Video off/on Press to switch between Video off and Video on.
Conference Once you have placed another call using another line, press Conference to establish a 3-way conference call
Volume Press to increase or decrease volume
PIP Press to switch the video view between the callers and display full screen. See note below.
Snapshot Press to take a snapshot of the current video. The snapshot will be automatically saved to a folder in Tools > File Manager
Speaker/Handset/Headphone Select the icon for Speakerphone, Handset or Headphone operation
Note: Pressing the PIP button during a call will change the display to one of five different views: ¾ screen called party view, full screen called party view, full screen called party view with self-view in the top right corner, ¾ screen self-view and full screen self-view.

Call Hold (Options menu) Places the incoming call on hold
1. During a call, press the Hold button to place the call on hold. The line icon will become yellow.
Call Hold
2. Press the Unhold button to resume to the call. 3. Multiple Calls: After a call is placed on hold, users can select another line to make a
call. If there is another incoming call, the user will be able to select Accept or Reject in the right-hand side of the screen. Accepting the new incoming call will put the previous call on hold.
Multiple Calls
3-Way Conference Calling (Options menu) Please note only 3-Way Audio Conference Calling is currently available. 3-Way Video Conferencing is not available at this time.
To initiate a 3-Way Audio Conference call, follow the steps below: 1. Initiate a call with the first party 2. While on this call, expand the Options menu on the phone by touching the middle
button of the Options icon
. 3. Press the HOLD button 4. Press the LINE 2 tab at the top of the screen 5. Dial the second party you wish to conference in 6. While on this call, expand the Options menu again by touching the middle button of the
Options icon
. 7. Press the CONF (Conference) button 8. Press YES to confirm the conference call 9. All three calls are now in a 3-Way Conference Call
Mute (Options menu) During a call, this feature turns off the phone’s microphone so that the other calling party does not hear any audio
1. During a call, the screen will display Mute in the Options tool bar on the right hand side of the screen. If it is not visible, press the right-hand side of the screen to restore the Options tool bar. Select the Mute button to mute the call.
2. After the Mute button is pressed, the screen will display Unmute. When this button is pressed, the mute feature is cancelled.
PIP Picture-In-Picture (Options menu) The PIP button can be pressed to change the video display during a call which will change the display to one of five different views: ¾ screen called party view, full screen called party view, full screen called party view with self-view in the top right corner, ¾ screen self-view and full screen self-view.
Do Not Disturb (Status Bar) With this feature enabled, all incoming calls are treated as busy (default is to forward to Voice Mail) without ringing or displaying on the phone.

This feature is accessed by selecting the status bar on the Home page where a number of additional options are available. Slide the DND switch to turn on and turn off the Do Not Disturb function.
Call Forwarding Activation Redirects all incoming calls to another telephone number without it appearing on the screen or ringing. This feature is managed by a feature code. To enable and disable, enter the appropriate code below: Enable: Dial *72 and then the phone or extension number you wish to forward the call to followed by the # key. Wait for a dial-tone and then hang up (a dial-tone means the input is successful). Disable: Dial *73 and wait for a dial-tone before hanging up.
Caller ID Blocking Prevents the display of your number to the called party for all calls until cancelled. This feature is managed by a feature code. To enable and disable, enter the appropriate code below: Enable: Dial *31 and listen for the confirmation message. Disable: Dial *32 and listen for the confirmation message.
Additional Feature Code Functions The ACN IRIS X Videophone has a number of features that can be managed by two or three digit feature codes. To activate (or deactivate), take the handset off the hook and enter the applicable code below. You will hear a confirmation message.
Function Enable Disable Call Forwarding to Voice Mail (all calls)
*21 #21
Caller ID Blocking of your number to all other parties
*31 #31
Call Forwarding to Voice Mail when line is busy
*40 #40
Call Forwarding to Voice Mail when no answer
*41 #41
Call Waiting indication *43 #43 No Answer Timer (change the number of rings before Voice Mail)
*610 n/a

Caller Line ID delivery of your number per call
*65 n/a
Last Number Redial *66 n/a Caller ID Blocking of your number per call
*67 n/a
Call Return *69 n/a Call Forwarding to another phone number or extension for all calls
*72 *73
Call Forwarding to another number or extension when line is busy
*90 *91
Call Forwarding to another number or extension when no answer
*92 *93
Clear Voice Message Waiting Indicator
*99 n/a
Voice Mail Voice Mail allows callers to leave a message when you are busy or not available to take a call. Setup
1. Press the Phone Icon
2. Press the Voice Mail Icon 3. You will be prompted to enter your password (your temporary password is 1234#) 4. Follow the prompts to change your password and record your name
Retrieving Messages When the blue Home button flickers or when you hear a stuttered dial-tone when you lift the receiver, you have Voice Mail messages waiting to be heard.
1. Press the Phone icon located at the bottom right-hand corner of the screen 2. Press the Voice Mail button 3. Press the Options button to see the dial pad 4. Enter your 4-digit access code (default is 1234) and press # 5. Press 1 to retrieve Video Mail messages
a. If you have any messages, the voice prompt will indicate whether it is a voice or video message
6. Press 2 to set up your Busy Greeting video message a. Choose the type of greeting you would like and follow the prompts b. When you are satisfied with your message, press the right-hand side of the
screen and then press Options. Then press # ’to end your recording 7. Press 3 to set up your No Answer Greeting video message.
a. Choose the type of greeting you would like and follow the prompts

b. When you are satisfied with your message, press the right-hand side of the screen and then press Options. Then press # to end your recording
To manage the number of rings before your Voice Greeting answers, simply dial *610 and follow the prompts.
Keyboard Input The ACN IRIS X Videophone comes equipped with a virtual keyboard for entering characters and is an option for a number of apps and Widgets.
ACN IRIS X Videophone Soft Keyboard
Icon Function
Caps Lock
Hide keyboard
Switch to characters with accents
Backspace
Switch between Letters, Numbers or Symbols
NOTE: An external keyboard and a mouse can be used by plugging each device into a USB port on the phone
In-built Applications (apps)
Alarm Clock The ACN IRIS X Videophone includes an alarm clock application that lets you configure a custom alarm tone and alarm time in detail to suit your needs. Access the settings for the Alarm Clock via MENU > Tools > Alarm Clock. Three alarm clock styles are available. Each with the same options. To set the alarm, select Yes in Alarm Enable. You can set Snooze Time Out to None or from 5 Minutes to 30 Minutes. The Alarm Tone can be set using built-in ringtones or customised ring tones (in mp3 format) by pressing Browse to select a file from the phone or from an external storage device. To adjust the alarm tone volume, press to turn down the volume or press to turn up the volume. To set recurring days, press the check box in the left-hand side of the day to check/uncheck this option. After checking it, the icon will become activated as instead of grey.
Browser The ACN IRIS X Videophone has a Web Browser for Internet browsing. Press on the blank area in navigation bar to enter the URL via the soft keyboard and press Enter on the keyboard to visit the website.
• Scroll the web page by pressing and dragging the touch screen
• Press to go back to previous web page and to move forward • To refresh the current page, press • To exit the Web Browser, press • Additional options are available if you expand the red tab. Options include:
− History − Bookmarks
− Importing/Exporting Bookmarks
− Zoom In/Zoom Out
− Return to Normal Size

Calculator The ACN IRIS X Videophone includes also includes a calculator which is accessible by selecting MENU >Tools > Calculator. To operate the calculator, press the corresponding number on the keypad. The arithmetic operations (e.g. add, subtract, multiply, divide) are defined by the corresponding buttons.
There are three categories of calculators available in the application. Press Simple, Science or Finance to select which calculator you wish to use.
Calculator: Simple
\
Calculator: Science

Calculator: Finance
Calendar The Calendar application is accessed by selecting MENU > Tools > Calendar. You can view the calendar and add events to the calendar and synchronise it to an existing Google Calendar account.
Calendar Application
Press and to move and select the month and year. After pressing on a date in the calendar, the date will turn red and will display any event information in the window on the right of the screen.
To add a new event:
• Select a day and then press the button in the right window.

• Enter the event details such as What, Where and Description. • Select the event time. If the check box of All day option is unchecked, there will be a
Time option for you to set the specific time of the day. • In Repeats, you can select Does Not Repeat, Daily, Weekly, Monthly, or Yearly to set
the reminder alarm alert for the event.
Add Event in Calendar
Event Added in Calendar

Holiday Settings in Calendar
To enable the feature to display holidays for different countries, press Settings and select countries from the drop-down list. This function displays holidays for up to three different countries. Press Save after choosing the country.
The ACN IRIS X Videophone can synchronise events with your Google Calendar. To setup this function, press Login at the top of the screen. Enter your Google Calendar account information and press the Login button at the bottom of the window.
Synchronise with Google Calendar
After successfully logging in and setting up with your Google Calendar account, press Sync on the top of the screen to finish the synchronisation.
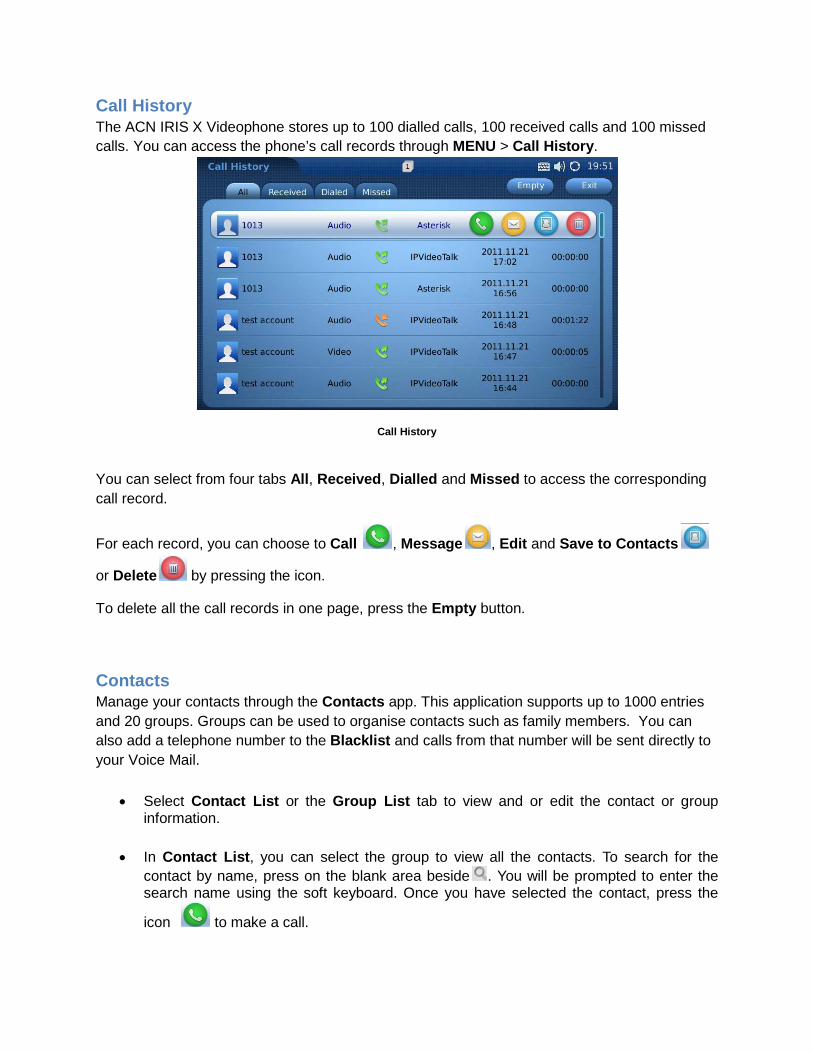
Call History The ACN IRIS X Videophone stores up to 100 dialled calls, 100 received calls and 100 missed calls. You can access the phone’s call records through MENU > Call History.
Call History
You can select from four tabs All, Received, Dialled and Missed to access the corresponding call record.
For each record, you can choose to Call , Message , Edit and Save to Contacts
or Delete by pressing the icon.
To delete all the call records in one page, press the Empty button.
Contacts Manage your contacts through the Contacts app. This application supports up to 1000 entries and 20 groups. Groups can be used to organise contacts such as family members. You can also add a telephone number to the Blacklist and calls from that number will be sent directly to your Voice Mail.
• Select Contact List or the Group List tab to view and or edit the contact or group information.
• In Contact List, you can select the group to view all the contacts. To search for the
contact by name, press on the blank area beside . You will be prompted to enter the search name using the soft keyboard. Once you have selected the contact, press the
icon to make a call.
• If you want to add a contact as a favourite, press .
• To delete a contact, press . • To view the entire contact’s information or to edit, press the contact’s name. • To add new contact, press New.
When adding or editing a contact, the soft keyboard will be activated when you select the field to update. Each contact can be customised with its own unique thumbnail image and ringtone. Thumbnail images and ringtones can also be assigned to groups on the Groups List tab. To import or export contacts to or from an SD card or USB card, select Options > Import/Export. Then, select Import or Export in Operation Mode. Three file types are supported: XML, CSV and VCard. For Import, you can select to Clear The Old List and Replace Duplicate Items in the imported files. If the operation mode is in Import, you will need to press the Browse button to specify the imported file from the external storage device. Press Import/Export to finish the operation. To delete all the contacts, select Options > Delete All.
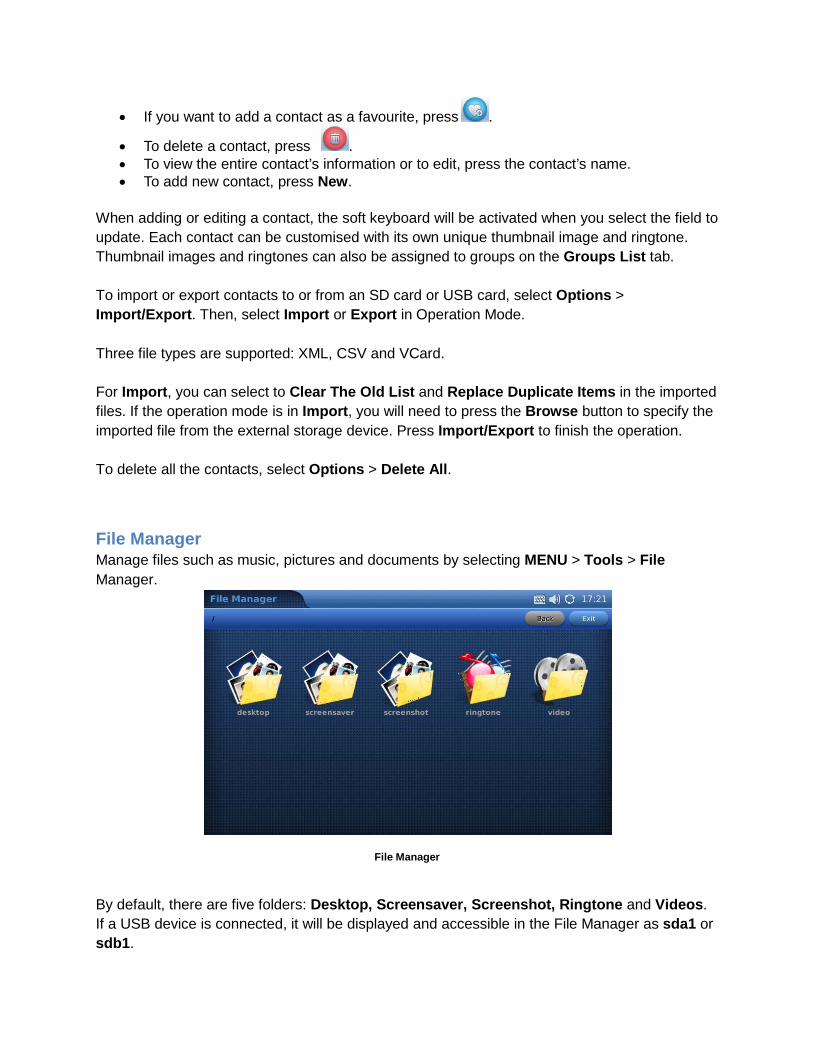
File Manager Manage files such as music, pictures and documents by selecting MENU > Tools > File Manager.
File Manager
By default, there are five folders: Desktop, Screensaver, Screenshot, Ringtone and Videos. If a USB device is connected, it will be displayed and accessible in the File Manager as sda1 or sdb1.

To open the file (for example, a picture or mp3 file) press on the thumbnail of the file.
You can also press and hold (for 2 to 4 seconds) the thumbnail to access additional options including: Open, Cut, Copy, Rename and Delete.
To paste the copied file, press and hold (for 2 to 4 seconds) on the blank area inside a folder. Two options will appear: New Folder and Paste. Select Paste to copy the file inside the folder. You can also create a new directory by selecting New Folder.
Total user capacity is 100MB. User files should be stored in the Screenshot, Ringtone, or Video folders. User files can also be stored directly to USB or SD storage.
Media Player The ACN IRIS X Videophone’s Media Player app allows users to play music and video files. File formats supported are: MP3, ogg, wav, wma, avi, flv (h263/h264/vp6), mp4 and 3gp.
To access the Media Player, select MENU >VIDEO > Media Player.
To play a selected music from local or external storage device, select Options >Open File or Add File to List.
You can choose speaker, headset or stereo in Options > Output.
After adding files to the playlist, press Loop to select the play mode in Single Loop, List Loop or Loop None.
Media Player to Play Music

The following table shows the icons and functions when playing audio files.
Icon Function
Skip to play the next item in the playlist
Play
Skip to play the previous item in the playlist
Pause/Stop
Volume. Slide the volume bar to adjust the volume
Delete the item in the playlist
Scroll to the previous item in the playlist
Scroll to the next item in the playlist
Options: Add File to List, Open File, Open Folder, Output, Clear List
Loop: Single Loop, List Loop, Loop None
If you select a video to play, the video will show in the screen. Please allow some time to load the video.
Media Player to Play Videos

The following table shows the icons and functions when playing video files.
Icon Function
Output option: Stereo
Output option: Headset. It will be available if the headset is plugged in
Output option: Speaker
Stop
Pause
Full screen display
Exit
Movie Trailer The ACN IRIS X Videophone’s Movie Trailer app enables you to access the latest movie information and watch the trailers. Select MENU >VIDEO >Movie Trailer. The screen will display the most recent movies. Select the movie you would like to see by pressing on the image. Press and to scroll through the screens.

Movie Trailer
Select to watch a Trailer
Picture-In-Picture (PIP) You can use the built-in camera to take photo snapshots and record videos. To access, select MENU > PIP. To take a photo, press Snapshot. The photo will be saved in the Snapshot folder in File Manager. To take a video, press Record. The video will be saved in the Video folder in File Manager.
Picture Viewer You can conveniently view your photos by accessing MENU > Photos > Picture Viewer. Supported file formats are: png, jpeg, and gif.
Select the location of the photo file. Files can also be viewed from an external USB flash drive.
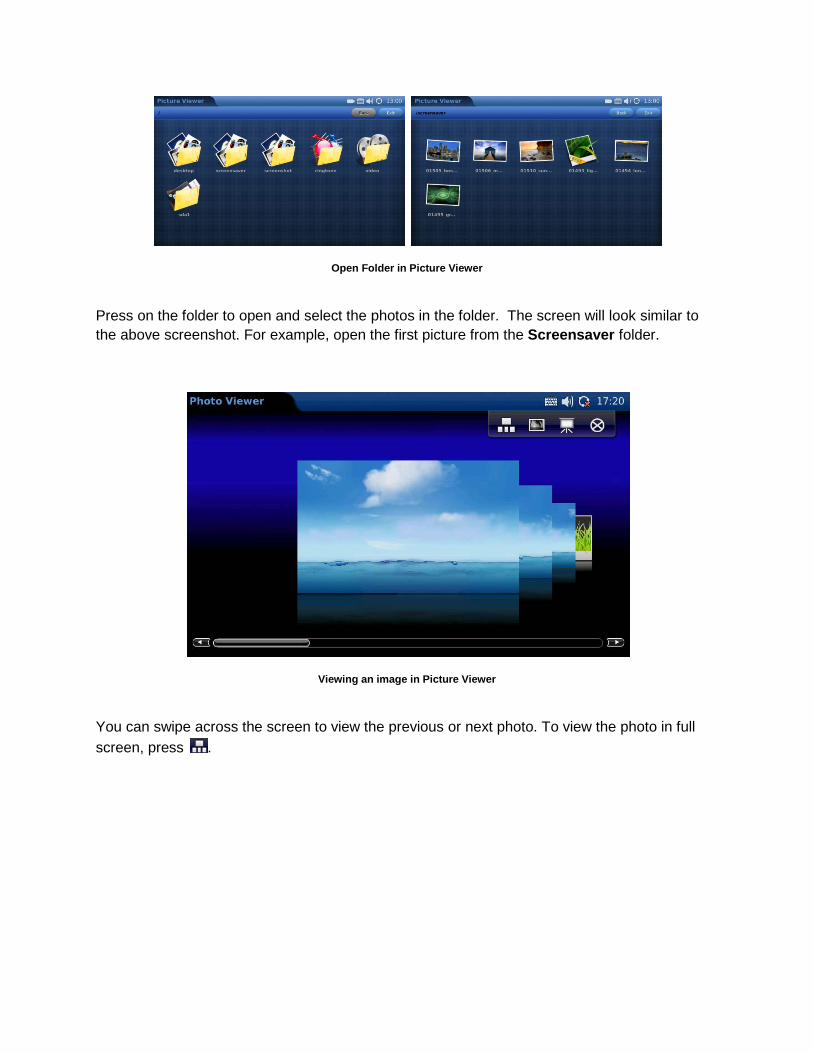
Open Folder in Picture Viewer
Press on the folder to open and select the photos in the folder. The screen will look similar to the above screenshot. For example, open the first picture from the Screensaver folder.
Viewing an image in Picture Viewer
You can swipe across the screen to view the previous or next photo. To view the photo in full screen, press .

Viewing an image in Picture Viewer
You can Zoom (in or out), Rotate (clockwise or counter-clockwise), and Flip (vertical flip or horizontal flip) the pictures or display in a slideshow. If a picture slideshow is selected, the photos will be shown with a selected delay interval (10, 15 or 20 seconds).
Icon Function
View the previous photo
View the next photo
View the photo in Full Screen
View the photo in Slideshow
Exit
View the photo in regular mode
Zoom in
Zoom out
Expand to fit the screen
Expand to fit the screen

Horizontal Flip
Vertical Flip
Rotate in a clockwise direction
Rotate in a counter-clockwise direction
Slide Show The Slide Show application allows you to select a set of photos and display them in a slideshow. Access this application by selecting MENU > Photos > Slide Show.
Slide Show Settings
If Customised Folder is selected in Source, you will need to specify the folder by pressing the Browse button. The folder can be on the phone or external storage device.
YouTube Access the YouTube application through the quick launch bar on the bottom of the Home screen or via MENU > Video > YouTube Besides viewing videos, you can also search for videos according to keyword and preferences. This is done by pressing Options > Search. Enter the keyword in Search Word and press the Search button.

World Photo The World Photos application gives you the ability to view thousands of photos from countries all over the world. To access this application, select MENU > Photos > World Photo. Photos are categorised by geographic location for easy navigation.
World Photo
Select the desired regions and country. Pictures will be shown in the screen. Press to go to the next page and scroll up or down for all available photos. To view the photo in Picture Viewer, press the thumbnail. Refer to the previous section for more details about viewing photos in Picture Viewer.
View Photos from World Photos


Widgets You can customise the look of the Home screen by placing different widgets on the desktop.
To personalise the desktop, press and hold an existing widget for 2 to 4 seconds to activate the Settings and Close options.
You can then adjust the position of the widget by holding and dragging it. The widget can be moved up, down, left or right in the same screen or moved to another screen.
To open new widgets on the desktop, press and the widget menu in the bottom will show including Info, Weather, Contacts, World Clock, Info and Photo Frame. Press to hide the widget menu.
The following sections describe how to configure and utilise these widgets.
Contacts Favourite You can place your frequently used contacts on the desktop. Slide to left or right to select the contact in the list. Select to call.
Refer to the table below for more operations in this widget.
Button Icon Function
Make a call to the selected favourite contact
Send a message to the selected favourite contact
Add a new favourite from the contact list
Remove the selected contact from favourite list
Edit the selected contact
Info The Info menu displays three lines of information. The first line will show the phone’s telephone number and an icon that will turn green if the phone is properly registered. The second line is the phone’s telephone number. The third line is the phone’s IP address.
Photo Frame The Photo Frame widget allows you to play pictures in a window on the main screen. Press the Photo Frame widget to bring it to the main screen. Pressing the widget longer will show the path on the phone where the photos are saved.

Weather The weather information includes humidity, visibility (in miles), wind direction, wind speed (mph) and temperature in units as configured by the users. Press to access the weather settings. Enter the Update Time (m) and select Unit (Fahrenheit or Celsius) according to your preference.
To check the weather in a particular location, you will need to add the city first. Press on the blank area of City Name and enter the name via the soft keyboard. Press Search. The results will appear in Search Result. Select the desired location and press the Add button.
You can add more than one city. To delete the location, select the city in the City box and press the Delete button.
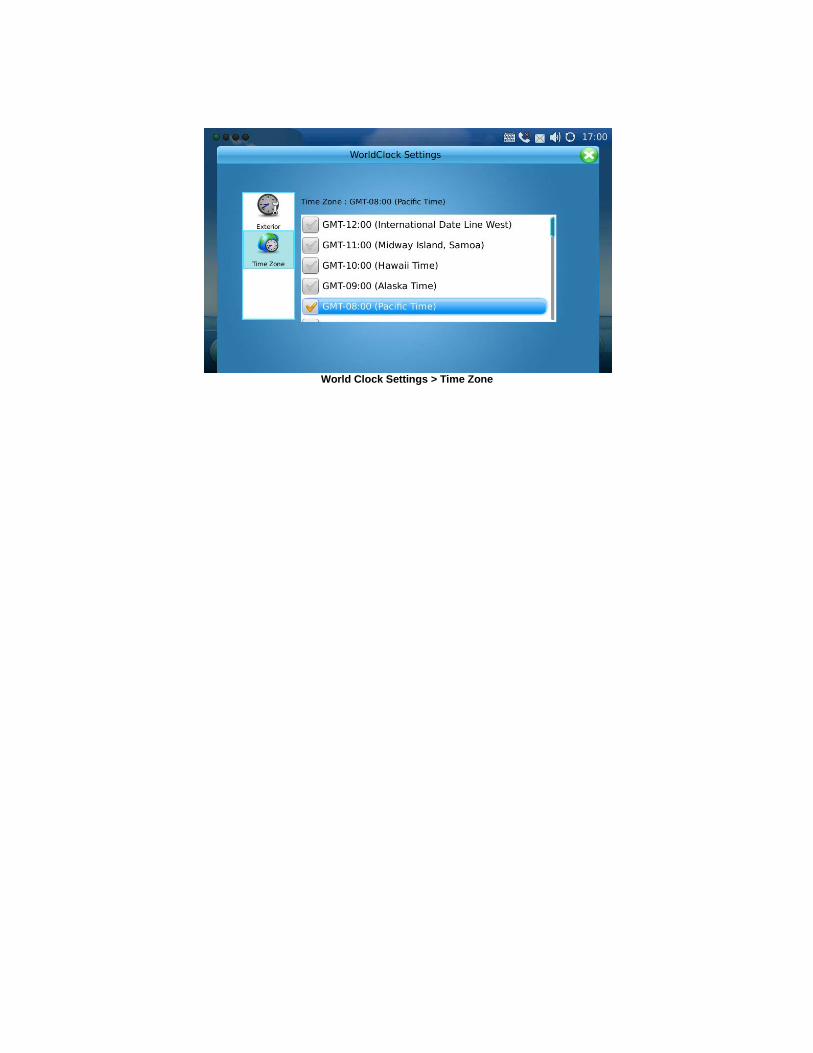
World Clock The World Clock widget will show the current time on the desktop of the time zone of your choice. To set the time on the clock, activate the Settings option by pressing and holding the clock image. Then press . You can change the Name and Style for the clock. The choices will be previewed once selected.
World Clock Settings > Exterior
Press Time Zone to see list of options. After checking the box for the time zone, the time on the clock will be updated.
Note: the time zone applied to the World Clock is independent of the time zone applied in the Time menu of the phone.
World Clock Settings > Time Zone

System Settings
The System Settings allows you to configure the settings for Screen Calibration, Network, Time, Display, Maintenance, Camera, Video, Call Features, Screen Saver, Background, Tones and Language. Most of the settings are located in MENU >System Settings.
Screen Calibration The ACN IRIS X Videophone touch screen can be calibrated to adjust the sensitivity for touch input.
1. Press and hold the Home button for approximately 1 second to return to the Home screen.
2. Press and hold the Home button for 10 seconds. Upon releasing the Home button after the 10 seconds, the Touch Screen Calibration utility will be displayed. (If not displayed, repeat this process again)
3. Once the calibration screen is displayed, touch the cross hairs in each of the five locations presented on the screen with the stylus
4. Press the Home button to complete the calibration
Network Settings The ACN IRIS X Videophone supports Ethernet and Wi-Fi connections. You can access network settings via MENU > System Settings > Network.
In the Ethernet tab, you can set the phone to receive an IP address automatically with the DHCP or set an IP address statically. The recommended setting is the default DHCP setting.
Wi-Fi Settings The ACN IRIS X Videophone supports 802.11b/g/n. By default, the Wi-Fi function on the phone is disabled. You can configure the wireless settings by selecting Enable in the Wi-Fi Function.
There are two methods to configure Wi-Fi:
Method 1: Scan for a Wi-Fi connection: 1. Press the MENU button on the bottom right of the screen 2. Press the Settings button 3. Press the Network button 4. Press the Wi-Fi tab 5. Ensure the Enable button is lit and press Apply 6. Press the Scan button 7. Press twice on the desired ESSID

8. Enter the appropriate key using the on-screen keyboard. Make sure to click the Save Key check box. If no key is required, go to the next step
9. Once the key is entered, press the keyboard button in the bottom left to hide the on-screen keyboard
10. Press Save in the upper right corner to save this connection 11. Press the Home button. You have successfully connected to your Wi-Fi network if the Info
widget has a green icon in the top right corner and an IP address at the bottom Method 2: Manually add a Wi-Fi connection: (useful for Wi-Fi networks with hidden SSID) 1. Press the Menu button on the bottom right of the screen 2. Press the Settings button 3. Press the Network button 4. Press the Wi-Fi tab 5. Ensure the Enable button is lit and click Apply 6. Press the Advanced button 7. Select the Security Mode of the Wi-Fi connection from the dropdown menu on the Wi-Fi
Configure screen. Options included are: WEP/Open
WEP/Shared WPA PSK TKIP
WPA PSK AES WPA2 PSK TKIP WPA2 PSK AES
8. Enter the appropriate key using the onscreen keyboard. Press Show Password to verify the key is correctly typed. If no key is required, go to the next step
9. Once the key is entered, press the keyboard button in the bottom left to hide the on-screen keyboard
10. To type the ESSID (the name of the wireless connection) press the YES check box to the right of the Customised ESSID field then click inside the field to bring up the on-screen keyboard
11. Type the ESSID name 12. Press Save in the upper right corner to save this connection 13. Press the Home button. You have successfully connected to your Wi-Fi network if the Info
widget has a green icon in the top right corner and an IP address at the bottom.
After you have saved the settings, the phone should be able to connect to the Wi-Fi network if the authentication credentials are correct and the Wi-Fi network signal strength is sufficient.
The Wi-Fi network strength icon will be displayed in the top right corner of the screen. Once registered, the phone number will turn green in the Iinfo widget.
NOTE: If you have a connection to the Internet through both the wired network and the Wi-Fi Network, manually select which connection to use via the on/off switches in the drop-down menu in the top right of the screen.

You will see this icon in the top right of the screen if the phone is using the wired network
connection. It will display this icon in the top right of the screen if it is using Wi-Fi.
Time Settings The ACN IRIS X Videophone allows the time to be updated automatically through an NTP Server. You can define the Time Zone or use a Self-defined Time Zone. The display format for the time and date can also be specified by accessing the application and selecting MENU > System Settings >Time.
Time Settings
In Manual you can press on the blank field and edit the time, then press Apply. Press the Save button after changing any settings. The time will display at the right corner of the top status bar in the screen as configured.
NOTE: The Time Zone selected in this menu is independent of the Time Zone selected in the World Clock widget.
Display The Display menu is available in MENU > Settings > Display. You can adjust the screen Backlight brightness by pressing the left or right hand side of the cursor on the brightness bar. The values are from 1 to 10. Press Save after configuration.
You can also change the Font size to Large, Normal (default) or Small.

Display Settings
Maintenance There are four tabs on the Maintenance setting screen under MENU > System Settings > Maintenance: Reboot, Backup, Factory Functions and Debug.
Reboot The Reboot page has the options of rebooting the device or performing a Factory Reset.
To restore the phone to factory default settings through the screen menu, follows these steps:
Step 1: Select MENU to access the phone menu and select System Settings.
Step 2: Select Maintenance and navigate to Reboot tab.
Step 3: Select the Factory Reset option.
Step 4: Press OK. The phone will reboot and perform a Factory Reset.
Warning: Factory resetting will erase all data on the phone including all contact information.

NOTE: After a Factory Reset, one or more calibration operations are required before the phone’s main screen shows up. Please follow the instructions on the screen to finish calibration before using the phone.
Backup The Backup page includes a Backup and Restore functionality making it easy to backup any current configuration settings on a regular interval (daily, weekly or monthly) and restore these settings on the phone if needed. Press on the Down arrow to choose the backup/restore option. Then select the data to be uploaded by checking the box of the corresponding items in the Data Includes option.
Press Upload Now or Restore Now to activate the operation immediately. The file uploaded will be a file associated with the MAC address of the phone.
Maintenance > Backup
Factory Functions In page Factory Functions, the ACN IRIS X Videophone provides several testing diagnostics for the screen, camera and video, audio and touch screen on the device. Press Start and follow the instructions on the screen for each test.
Debug The Debug page contains the built-in debug tools for the ACN IRIS X Videophone. The debug tools make it more convenient to diagnose issues when the system encounters problems. To start capturing traces, enable the Debug application and press the Start button next to the Capture Packets option. To perform a network connection test, enter an IP address in Network Test (Ping) to ‘ping’ the destination. Press Stop to stop the operation.

Camera This Camera setting under MENU > Settings > Camera allows you to modify the camera settings for the ACN IRIS X Videophone. Settings such as Colour Mode (Polychrome Mode, Monochrome Mode), White Balance (Auto, Fixed), Flicker Control (Auto, 50Hz, and 60Hz) and Lens Correction (Disable, Enable) can be configured.
Camera Settings
The default settings should be sufficient for most users.
Screen Saver When the phone is idle, photos will be displayed as configured in Screen Saver. The default folder for the pictures used in the Screen Saver can be accessed from Menu >Tools > File Manager > Screensaver. You can also choose pictures from a local or external folder by selecting Customised Folder in the Screen Saver option. You can set the Interval(s) which defines the interval for the pictures to display in the screen saver mode. Setting the Time Out value, will start to display the pictures after the phone is unused for the specified length of time. The phone will enter into power saving mode if the LCD Auto Power Off Time has been specified. Press Save for the settings to take effect.
Background ACN IRIS X Videophone has four desktops and each desktop can be set with a different background according to your preference. For each desktop, you can select a colour or an image from local or external files to display. After the selection, you can preview the settings. Press Save for the settings to take effect.

Background Settings
Tones Manager The Tones Manager configures the volume and ringtones. The Tones menu is accessible by selecting MENU > System Settings > Tones.
The Volume page allows you to turn the volume and ringing up or by pressing or .
Tones > Volume
In Tones, you can set the Event Alert Tones for the events added in the Calendar application, New Message Tone and Key Tone (when pressing the touchscreen). All the tones can be set to built-in tones or music from local or external storage files once Customised is selected.

In Ring Tones, you can set the ringtone for incoming calls. Press Save for the configuration to take effect.
Ring Tones Settings
Language There are multiple built-in languages available in the ACN IRIS X Videophone. Press on the Down arrow and make the selection in Select Language. Press Save and the phone will prompt you with the alert message: Do you want the reboot to take effect immediately? Select Yes to reboot the phone immediately or No for the change to take effect after rebooting later.

Language Settings
System Info By accessing MENU > System Info, you can view the status about the account, system and network. Account shows the account and registration status on the phone. Note: this screen shows multiple accounts. The ACN IRIS X Videophone supports a single telephone number which can be used to place up to three concurrent calls. This functionally is supported by the appearance of multiple accounts.
Account Information

System shows the product model, hardware version, part number, system up time and software version.
System Information
Network shows the phone’s MAC address, IP address, subnet mask, gateway, DNS server and NAT type.
Network Information

Advanced Features
USB Device Support The ACN IRIS X Videophone supports connections for the following USB devices: Keyboard, Mouse and Flash Drives. If your USB device is supported by the ACN IRIS X Videophone, it will be automatically detected when it is connected.
Screen Capture You can perform screen captures on the ACN IRIS X Videophone using a connected USB keyboard:
1. Press Control, Alt and Enter together on the keyboard to capture the current screen image
2. Go to the File Manager to transfer the screenshot file(s) to an external USB drive or SD card
Troubleshooting The following are some common problems that may occur.
The videophone does not recognise input on the touch screen Screen Calibration allows adjustment of the touch sensitive screen so that when you make a selection on the screen, the phone correctly recognises the selection.
1. Press and hold the Home button for approximately 1 second. You will then be returned to the main menu
2. Press and hold the Home button for 10 seconds. Upon releasing the Home button after 10 seconds, the Touch Screen calibration utility will be displayed
3. Simply touch the cross hairs in each of the five locations presented on the screen with the stylus (recommended) or with your finger
4. Press the Home button to complete the calibration.
I cannot make or receive calls Verify the device was properly installed. (See the ACN IRIS X Videophone Quick Installation Guide)
Check to ensure the power adapter is securely connected to the back of the ACN IRIS X Videophone.
1. If the power adapter is plugged into a surge protector or power strip, make sure the power to the surge protector is switched on. Make sure the Home button light is illuminated or flashing.
2. The ACN IRIS X Videophone requires a router and ACN recommends the Cisco Linksys E-1200. The ACN IRIS X Videophone has two Ethernet ports. One port is labelled Network, the other PC. The Network port should be connected to the your router. A PC or other end device can be connected to the PC port if desired. Verify your Internet connection is working properly by browsing to your favourite website with a computer.
3. Allow sufficient time for initial setup. Initial setup should be performed with the ACN
IRIS X Videophone connected to a wired connection. The initial setup may take up to 10 minutes to complete depending on your Internet speed. The phone may reboot 2 or 3 times. Please do not disconnect your ACN IRIS X Videophone or attempt to make calls during this time. Make sure to complete the initial calibration step as the phone powers up.
I am having problems with Wi-Fi Verify your Internet connection is working properly by browsing to your favourite website with a computer connected by cable to the same network router.
1. Connect your ACN IRIS X Videophone via a wired connection to your network;

ensure your ACN IRIS X Videophone can function via a wired connection
2. If the device works on a wired connection and not via Wi-Fi, verify your Wi-Fi is working and verify you have properly configured the ACN IRIS X Videophone Wi-Fi settings as per the System Settings section in this document.
3. Wi-Fi troubleshooting actions on the ACN IRIS X Videophone:
i. Make sure Wi-Fi is on. Go to the Home screen; click on the top right status bar, slide the Wi-Fi On/Off indicator to On
ii. Reboot the ACN IRIS X Videophone
iii. In the ACN IRIS X Videophone Wi-Fi menu, click Scan, double click the desired ESSID, click Save
iv. In the ACN IRIS X Videophone Wi-Fi menu, click Scan, double click the desired ESSID, uncheck the Save key, re-enter the appropriate security key, check the Save key, click Save
v. In the ACN IRIS X Videophone Wi-Fi menu, disable Wi-Fi then click Apply, then enable Wi-Fi, click Apply again, then click Save.
b. Your Wi-Fi connection is working if you see the Wi-Fi icon on the top of the Home screen, the icon is green on the top right of the Info widget, and you see an IP address in the bottom line of the Info widget.
I want to set-up Mi-Fi or Cradlepoint For the most reliable, consistent performance of the ACN IRIS X Videophone, ACN recommends a wired Internet connection (DSL or Cable Internet – minimum of 384K downstream and upstream). Mi-Fi and Cradlepoint use wireless technology to access the Internet (3G/4G) which can be susceptible to congestion, low signal strength and other factors that may degrade performance. For these reasons, ACN does not recommend or support using these technologies although technically they may work with the ACN IRIS X Videophone.
HDMI (TV Out) does not work This is a future feature. There are certain TVs that may work at this time. ACN is working to expand this capability going forward. What UDP ports does the ACN IRIS X Videophone use? The ACN IRIS X Videophone communicates with the ACN network over UDP ports 5004-5007 and 5065.
ACN IRIS X Videophone bandwidth requirement The ACN IRIS X Videophone default setting requires 384kbps minimum and continuous download and upload bandwidth for an optimal audio and video experience. Bandwidth utilisation is not adjustable.

How do I adjust the camera? The camera on the ACN IRIS X Videophone can be manually rotated into the phone, preventing the transmission of video. You should ensure you can see the camera above the screen. There is a camera adjustment wheel in the top-centre, on the back of the ACN IRIS X Videophone. I can only see myself in a video call Pressing the PIP option during a video call can result in a self-view only. Keep pressing the PIP button to re-establish the far-end video option. The image is too dark For optimal video calls, the subject on both ends of the video call should be well lit, meaning the light source should be placed in front of the person illuminating their face. Screen responsiveness
1. For best performance, use the stylus with the ACN IRIS X Videophone. The stylus is designed to provide an optimal experience with the touch screen.
2. When the ACN IRIS X Videophone has been idle for some time, you may experience a slight delay when you press the screen to initiate an action.
3. If there is no response, it is possible the screen needs calibration which can be performed by following the calibration steps mentioned earlier in this Troubleshooting section.
4. If too many applications or widgets are open, the ACN IRIS X Videophone may become sluggish or lose registration. A maximum of 10 total widgets can be open at any one time. Only three instances of each widget can be open, with the exception of the Contacts widget which only allows one instance to be open. To close a widget, press and hold on the widget until the Close option appears then press the Close option.
Virtual Keyboard There are multiple possible character sets for the virtual keyboard. Pressing either of the two keys in the bottom right of the virtual keyboard will reveal additional characters. Example: press 1/2 while on standard keyboard to reveal the #, ?, * and other characters.

I want to attach a keyboard and/or mouse The addition of a mouse and keyboard improves ease of use across many functions of the phone. Simply attach a device in the USB port of the phone. Compatible devices will register automatically.
How do I factory reset my ACN IRIS X Videophone? Warning: Factory resetting will permanently erase all your data including contacts, photos, videos, and calendar information. You should only perform this function if advised by ACN Technical Support. See the Systems Setting section for more details.
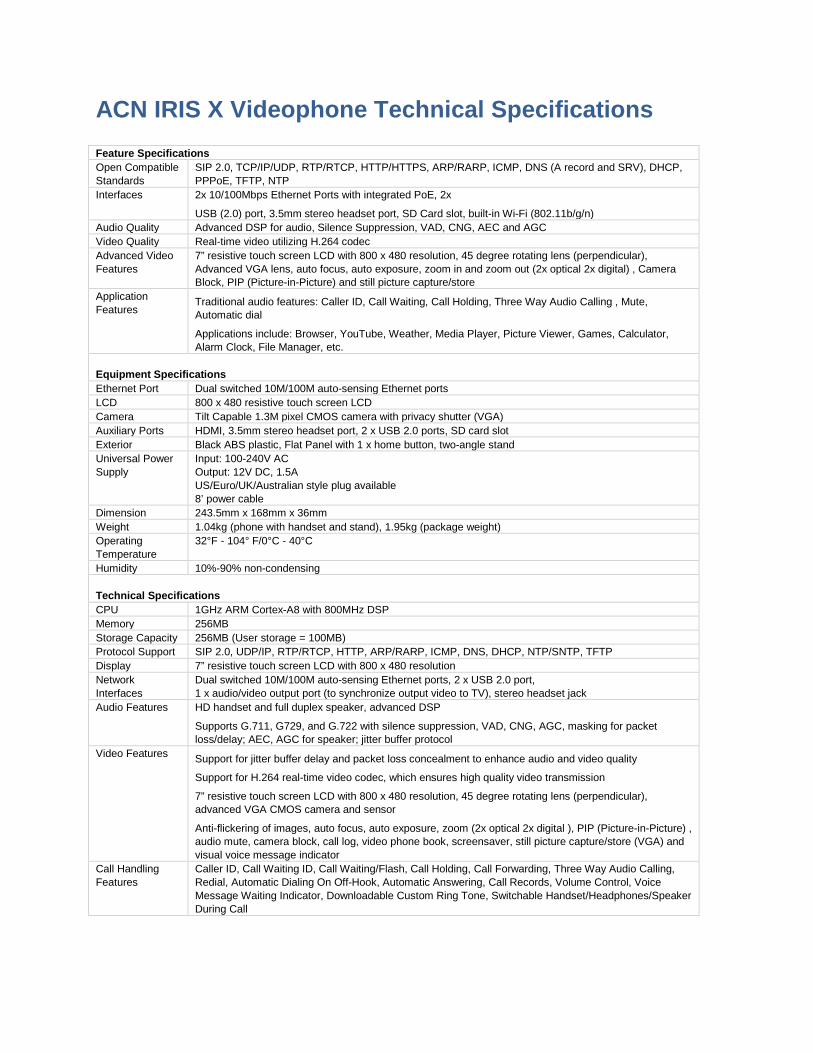
ACN IRIS X Videophone Technical Specifications Feature Specifications Open Compatible Standards
SIP 2.0, TCP/IP/UDP, RTP/RTCP, HTTP/HTTPS, ARP/RARP, ICMP, DNS (A record and SRV), DHCP, PPPoE, TFTP, NTP
Interfaces 2x 10/100Mbps Ethernet Ports with integrated PoE, 2x
USB (2.0) port, 3.5mm stereo headset port, SD Card slot, built-in Wi-Fi (802.11b/g/n) Audio Quality Advanced DSP for audio, Silence Suppression, VAD, CNG, AEC and AGC Video Quality Real-time video utilizing H.264 codec Advanced Video Features
7” resistive touch screen LCD with 800 x 480 resolution, 45 degree rotating lens (perpendicular), Advanced VGA lens, auto focus, auto exposure, zoom in and zoom out (2x optical 2x digital) , Camera Block, PIP (Picture-in-Picture) and still picture capture/store
Application Features
Traditional audio features: Caller ID, Call Waiting, Call Holding, Three Way Audio Calling , Mute, Automatic dial
Applications include: Browser, YouTube, Weather, Media Player, Picture Viewer, Games, Calculator, Alarm Clock, File Manager, etc.
Equipment Specifications Ethernet Port Dual switched 10M/100M auto-sensing Ethernet ports LCD 800 x 480 resistive touch screen LCD Camera Tilt Capable 1.3M pixel CMOS camera with privacy shutter (VGA) Auxiliary Ports HDMI, 3.5mm stereo headset port, 2 x USB 2.0 ports, SD card slot Exterior Black ABS plastic, Flat Panel with 1 x home button, two-angle stand Universal Power Supply
Input: 100-240V AC Output: 12V DC, 1.5A US/Euro/UK/Australian style plug available 8’ power cable
Dimension 243.5mm x 168mm x 36mm Weight 1.04kg (phone with handset and stand), 1.95kg (package weight) Operating Temperature
32°F - 104° F/0°C - 40°C
Humidity 10%-90% non-condensing Technical Specifications CPU 1GHz ARM Cortex-A8 with 800MHz DSP Memory 256MB Storage Capacity 256MB (User storage = 100MB) Protocol Support SIP 2.0, UDP/IP, RTP/RTCP, HTTP, ARP/RARP, ICMP, DNS, DHCP, NTP/SNTP, TFTP Display 7” resistive touch screen LCD with 800 x 480 resolution Network Interfaces
Dual switched 10M/100M auto-sensing Ethernet ports, 2 x USB 2.0 port, 1 x audio/video output port (to synchronize output video to TV), stereo headset jack
Audio Features HD handset and full duplex speaker, advanced DSP
Supports G.711, G729, and G.722 with silence suppression, VAD, CNG, AGC, masking for packet loss/delay; AEC, AGC for speaker; jitter buffer protocol
Video Features Support for jitter buffer delay and packet loss concealment to enhance audio and video quality
Support for H.264 real-time video codec, which ensures high quality video transmission
7” resistive touch screen LCD with 800 x 480 resolution, 45 degree rotating lens (perpendicular), advanced VGA CMOS camera and sensor
Anti-flickering of images, auto focus, auto exposure, zoom (2x optical 2x digital ), PIP (Picture-in-Picture) , audio mute, camera block, call log, video phone book, screensaver, still picture capture/store (VGA) and visual voice message indicator
Call Handling Features
Caller ID, Call Waiting ID, Call Waiting/Flash, Call Holding, Call Forwarding, Three Way Audio Calling, Redial, Automatic Dialing On Off-Hook, Automatic Answering, Call Records, Volume Control, Voice Message Waiting Indicator, Downloadable Custom Ring Tone, Switchable Handset/Headphones/Speaker During Call