acs 600 hardware manual acs/acc/acp 601 ac drives
TRANSCRIPT

ACS/ACC/ACP 601 AC Drives3 to 150 Hp
(2.2 to 110 kW)
ACT PAR FUNC DRIVE
ENTER
LOC
REM
RESET REF
ACS 600
ACS 600 Hardware Manual
This manual includes• Safety • Installation • Maintenance• Product Information


1998 ABB Industrial Systems. All Rights Reserved.
ACS/ACC/ACP 601 AC Drives3 to 150 Hp
(2.2 to 110 kW)
Hardware Manual
This manual concerns the ACS 601, ACC 601 and ACP 601 AC Drives. In the text, they are collectively referred to as ACx 601.
ACS601-5.0-US-043AUA 489002B4973 R0101 REV A
EFFECTIVE: 10/1/98SUPERSEDES: NONE
ACS601 Installation & Start-up Manual


ACS/ACC/ACP 601 Drives ACx=ACS/ACC/ACP iii
Safety Instructions
Overview This chapter states the safety instructions which must be followed when installing, operating and servicing the ACx 600. If neglected, physical injury and death may follow, or damage may occur to the AC drive, the motor and driven equipment. The material in this chapter must be studied before attempting any work on, or with, the unit.
Warnings and Notes This manual distinguishes two sorts of safety instructions. Warnings are used to inform of conditions which can, if proper steps are not taken, lead to a serious fault condition, physical injury and death. Notes are used when the reader is required to pay special attention or when there is additional information available on the subject. Notes are less crucial than Warnings, but should not be disregarded.
Warnings Warnings are provided in the instruction manuals and on labels attached to the AC drive. Readers are informed of situations that can result in serious physical injury and/or serious damage to equipment with the following symbols:
Notes Notes are provided in the instruction manuals to notify readers of the need for special attention or additional information available on the subject with the following symbols:
Dangerous Voltage Warning: warns of situations in which a high voltage can cause physical injury and/or damage equipment. The text next to this symbol describes ways to avoid the danger.
General Warning: warns of situations which can cause physical injury and/or damage equipment by means other than electrical. The text next to this symbol describes ways to avoid the danger.
Electrostatic Discharge Warning: warns of situations in which an electrostatic discharge can damage equipment. The text next to this symbol describes ways to avoid the danger.
CAUTION! Caution aims to draw special attention to a particular issue.
Note: Note gives additional information or points out more information available on the subject.

Safety Instructions
iv ACx=ACS/ACC/ACP ACS/ACC/ACP 601 Drives
Installation andMaintenance Safety
These safety instructions are intended for all work on the ACx 600. In addition to the instructions given below, there are more safety instructions on the first pages of the appropriate hardware manual.
WARNING! All electrical installation and maintenance work on the ACS 600 should be carried out by qualified electricians.
The ACS 600 and adjoining equipment must be properly grounded.
Do not attempt any work on a powered ACS 600. After switching off the power, always allow the intermediate circuit capacitors 5 minutes to discharge before working on the drive, the motor or the motor cable. It is good practice to check (with a voltage indicating instrument) that the drive is in fact discharged before beginning work.
The ACS 600 motor cable terminals are at a dangerously high voltage when power is applied, regardless of motor operation.
The brake control terminals (UDC+, UDC-, R+ and R- terminals) carry a dangerous DC voltage (over 500V).
There can be dangerous voltages inside the ACx 600 from external control circuits when the ACx 600 input power is shut off. Exercise appropriate care when working with the unit. Neglecting these instructions can cause physical injury and death.
WARNING! The ACS 600 introduces electric motors, drive train mechanisms and driven machines to an extended operating range. The ACS 600 can be adjusted to operate the motor at speeds above and below the speed provided by connecting the motor directly to the power line. Before adjusting the drive and putting it into service, make sure that the motor and all driven equipment is suitable for operation throughout the speed range provided by the AC drive.
WARNING! If an external source for start command is selected and it is ON, the ACS 600 will start immediately after fault reset unless the drive is configured for 3-wire Start/Stop.
WARNING! When the control location is not set to Local (L not shown in the status line of the display), the Stop key on the Control Panel will not stop the drive. To stop the drive using the Control Panel you must press the LOC/REM key and then the Stop key .
WARNING! The printed circuit boards contain integrated circuits that are extremely sensitive to electrostatic discharge. Exercise appropriate care when working on the unit to avoid permanent damage to the circuits. Do not touch the boards unnecessarily.

Safety Instructions
ACS/ACC/ACP 601 Drives ACx=ACS/ACC/ACP v
WARNING! There are several automatic reset functions in the ACx 600. If selected, they reset the unit and resume operation after a fault. These functions should not be selected if other equipment is not compatible with this kind of operation, or dangerous situations can be caused by such action.
Supply Connections The ACx 601 does not include a disconnecting means. An input power disconnecting means must be installed between the AC power source and the ACx 601. The disconnecting means must conform to the applicable safety regulations. The disconnecting means must be locked in the open position during installation and maintenance work.
The motor must not be controlled with the supply disconnecting means; instead, the and keys of the Control Panel or commands via the I/O board of the ACx 600 should be used. The maximum number of charging cycles of the d.c. capacitors of ACx 600 (i.e. power-ups by applying power) is five in ten minutes.
WARNING! Never connect the line power to the ACx 600 output terminals U2, V2, or W2. If frequent bypassing is required, mechanically interlocked switches or contactors should be employed. Line voltage applied to the output can result in permanent damage to the unit.
Operation outside the nominal input line voltage range should not be attempted, as overvoltages can result in permanent damage to the ACx 600.
If an ACx 601 with the integrated EMC filter (code 0 in the type code for EMC Filters) is connected to an ungrounded power system or high resistance grounded power system (over 30 Ohms), the power line will be connected to ground potential through the EMC filter capacitors of the ACx 601. This may cause danger or damage the unit. Disconnect the EMC filter capacitors before connecting the ACx 601 to an ungrounded power system. For detailed instructions on how to do this, please contact your local ABB distributor.
Ground Fault Protective Function
The ACx 600 (with Standard and Motion Control Application Programs) is equipped with an internal ground fault protective function to protect the unit against ground faults in the drive, the motor and the motor cable. This is not a personal safety or a fire protection feature. The ground fault protective function of the ACS/ACP 600 can be disabled by Parameter 30.17 (ACC: 30.11).
The EMC filter of the ACx 600 includes capacitors connected between the power circuit and the chassis. These capacitors increase the ground leakage current from the AC line through the ground (PE) connection and may cause some ground fault current circuit breakers to trip.

Safety Instructions
vi ACx=ACS/ACC/ACP ACS/ACC/ACP 601 Drives
Emergency Stop Devices
The person responsible for the overall design and operation of the driven process must make sure that the installation includes emergency stop devices and any other safety equipment that may be needed. Pressing the STOP key on the Control Panel of ACx 600 does not generate an emergency stop of the motor or separate the drive from dangerous potential. A Line Contactor with provisions for a remote power cut-off switch is available as a factory installed option for the ACx 607. Cutting off power to the drive allows the motor to coast to a stop.
Ground Connections The ACS 600 and adjoining equipment must be properly grounded.
The ACS 600 and the motor must be grounded at the installation site to ensure personnel safety in all circumstances and in addition to reduce electromagnetic emission and pick-up. Make sure that grounding conductors are adequately sized as required by safety regulations.
In CE compliant installations and in other installations where EMC emissions must be minimized, 360 degree high frequency grounding of cable entries is done in order to suppress electromagnetic disturbances. In addition, power cable shields must be connected to the ground (PE) in order to meet safety regulations. Power cable shields are suitable for use as equipment grounding conductors only when the shield conductors are adequately sized as required by safety regulations.
The ACS 600 ground terminals should not be connected in series in case of a multiple installation. Incorrect grounding can cause physical injury, death or equipment malfunction and increase electromagnetic interference.
Motor Connections
WARNING! Operation is not allowed if the motor nominal voltage is less than one half of (ACP: 0.4 times) the ACx 600 nominal input voltage, or the motor nominal current is less than 1/6 of the ACx 600 nominal output current.
WARNING! Do not make any voltage tolerance or insulation resistance test (Hi-Pot or Megger) on any part of the ACx 600. Disconnect motor wires before making any tests of the motor or the cables between the drive and motor.
Motor InsulationRequirements
As with all AC drives employing the most modern IGBT invertor technology, the output waveform of the ACx 600 consists of a series of rectangular voltage pulses. Regardless of the output frequency, the

Safety Instructions
ACS/ACC/ACP 601 Drives ACx=ACS/ACC/ACP vii
voltage of the pulses is approximately 1.35 times the input line voltage with a very short rise time.
The voltage of the pulses can be almost double at the motor terminals, depending on the properties of the cable between the drive and the motor. This in turn can cause additional stress to the motor insulation. The motor manufacturer should be consulted regarding the characteristics of the motor insulation system. Failure of the motor to fulfill the following requirements may shorten its life.
The following table lists the insulation requirements for motors used with ACx 600 AC drives.
Motor TypeNominal
AC Line VoltageMotor Insulation Requirement
ABB Motors(manufactured from beginning of 1998)
VN < 500 V Standard insulation system
525 V < VN ≤ 690 V Standard insulation and dv/dt filter or special insulation system
Random-wound Motors
VN ≤ 420 V Motor insulation system must withstand VPK = 1300 V.
420 V < VN ≤ 500 V If motor insulation system withstands VPK = 1600 V and 0.2 µs rise time, a dv/dt filter is not needed.
With a dv/dt filter at the output of the ACx 600, motor insulation system must withstand VPK = 1300 V.
500 V < VN ≤ 600 V Motor insulation system must withstand VPK = 1600 V. A dv/dt filter must be used at the output of the ACx 600.
600 V < VN ≤ 690 V Motor insulation system must withstand VPK = 1800 V. A dv/dt filter must be used at the output of the ACx 600.
Form-wound Motors
VN ≤ 690 V If motor insulation system withstands VPK = 2000 V and rise time 0.3 µs, no dv/dt filter is needed.
Symbol Definition
VN nominal power line voltage
VPK peak line to line voltage at motor terminals
Rise time:
t = 0.8 · VPK/(dv/dt)
Rise time is line to line voltage change rate at motor terminals (the interval during which the voltage changes from 10 % to 90 % of the whole voltage range)
VPK and t depend on cable length. Read the values of VPK and dv/dt from the diagrams below.

Safety Instructions
viii ACx=ACS/ACC/ACP ACS/ACC/ACP 601 Drives
Without FilterBelow is a diagram of VPK and dv/dt as a function of cable length when no dv/dt filter is used.
With dv/dt Filter Below is a diagram of VPK and dv/dt as a function of cable length with dv/dt filter at the output of the ACx 600.
Power FactorCorrection Capacitors
Power factor correction capacitors and surge absorbers must not be connected between the drive and the motor. These devices are not designed to be used with AC drives, and will degrade motor control accuracy. They can cause permanent damage to the ACx 600 or themselves due to the rapid changes in the ACx 600 output voltage.
If there are power factor correction capacitors in parallel with the ACx
0
0,5
1
1,5
2
2,5
3
3,5
4
4,5
5
0 50 100 150 200 250 300
dv/dt / (kV/µs)
VPK / VN
Cable length0 1000 500
(m)
(feet)
0
0,5
1
1,5
2
2,5
3
3,5
4
4,5
5
0 50 100 150 200 250 300
dv/dt / (kV/µs)
VPK / VN
0 1000 500 (feet)
(m)
Cable length

Safety Instructions
ACS/ACC/ACP 601 Drives ACx=ACS/ACC/ACP ix
600 make sure that the capacitors and the ACx 600 are not charged simultaneously to avoid voltage surges which might damage the unit.
Output Contactors If a contactor is used between the output of the ACx 600 and the motor with DTC control mode selected, the output voltage of the ACx 600 must be controlled to zero before the contactor is opened: ACS 600 units via parameter 21.3 (ACP: 10.4), choose COAST. If RAMP is selected, the output of the ACS/ACP 600 must be reduced to zero using Parameter 16.1 by giving zero V DC to the selected digital input. Otherwise the contactor will be damaged. In scalar control the contactor can be opened with ACS/ACC 600 running.
Varistors or RC networks (AC) or diodes (DC) should be used to protect against voltage transients generated by contactor coils. The protective components should be mounted as close as possible to the contactor coils. Protective components should not be installed at the NIOC board terminal block.
EMC When used with inductive loads (relays, contactors, motors), the relay contacts of ACx 600 must be protected with varistors or RC networks (AC) or diodes (DC) against voltage transients. The protective components should not be installed at the NIOC board terminal block.
Installing control devices (contactors or relays) or control cables other than those of the ACS 600 inside the drive enclosure is not acceptable.
Note: If safety switches, contactors, connection boxes or similar equipment are installed between the drive and the motor, they should be installed in a metal enclosure in a way that the conduit or motor cable shielding runs consistently without breaks from the drive to the motor, so the emission level will be minimized.
Mechanical Installation CAUTION! The ACx 601 weighs a considerable amount, and should not be handled by the front cover. The unit should only be placed on its back. Exercise appropriate care when maneuvering the unit to avoid damage and injury. Lifting the ACx 601 is much easier and safer with two people working together.
CAUTION! Make sure that dust from drilling does not enter the ACx 600 when installing. Electrically conductive dust inside the unit may cause damage or lead to malfunction.
CAUTION! Do not fasten the ACx 600 by riveting or welding.
WARNING! The cooling air flows and space requirements must be fulfilled. Special attention must be paid to cooling if units are installed in confined spaces and user defined cabinets.

Safety Instructions
x ACx=ACS/ACC/ACP ACS/ACC/ACP 601 Drives

ACS/ACC/ACP Drives ACx=ACS/ACC/ACP xi
Table of Contents
Safety Instructions
Warnings and Notes . . . . . . . . . . . . . . . . . . . . . . . . . . . . . . . . . . . . . . . . . . . . . . . . . . . . . . . . . . . . . iiiWarnings . . . . . . . . . . . . . . . . . . . . . . . . . . . . . . . . . . . . . . . . . . . . . . . . . . . . . . . . . . . . . . . . . . . . iiiNotes . . . . . . . . . . . . . . . . . . . . . . . . . . . . . . . . . . . . . . . . . . . . . . . . . . . . . . . . . . . . . . . . . . . . . . . iii
Supply Connections . . . . . . . . . . . . . . . . . . . . . . . . . . . . . . . . . . . . . . . . . . . . . . . . . . . . . . . . . . . . . . vGround Fault Protective Function . . . . . . . . . . . . . . . . . . . . . . . . . . . . . . . . . . . . . . . . . . . . . . . . . . . . vEmergency Stop Devices . . . . . . . . . . . . . . . . . . . . . . . . . . . . . . . . . . . . . . . . . . . . . . . . . . . . . . . . . viGround Connections . . . . . . . . . . . . . . . . . . . . . . . . . . . . . . . . . . . . . . . . . . . . . . . . . . . . . . . . . . . . viMotor Connections . . . . . . . . . . . . . . . . . . . . . . . . . . . . . . . . . . . . . . . . . . . . . . . . . . . . . . . . . . . . . . vi
Motor Insulation Requirements . . . . . . . . . . . . . . . . . . . . . . . . . . . . . . . . . . . . . . . . . . . . . . . . . . . viPower Factor Correction Capacitors . . . . . . . . . . . . . . . . . . . . . . . . . . . . . . . . . . . . . . . . . . . viiiOutput Contactors . . . . . . . . . . . . . . . . . . . . . . . . . . . . . . . . . . . . . . . . . . . . . . . . . . . . . . . . . . . . . ix
EMC . . . . . . . . . . . . . . . . . . . . . . . . . . . . . . . . . . . . . . . . . . . . . . . . . . . . . . . . . . . . . . . . . . . . . . . . . ix Mechanical Installation . . . . . . . . . . . . . . . . . . . . . . . . . . . . . . . . . . . . . . . . . . . . . . . . . . . . . . . . . ix
Table of Contents
Chapter 1 – Introduction
General . . . . . . . . . . . . . . . . . . . . . . . . . . . . . . . . . . . . . . . . . . . . . . . . . . . . . . . . . . . . . . . . . . . . . . 1-1Delivery Check . . . . . . . . . . . . . . . . . . . . . . . . . . . . . . . . . . . . . . . . . . . . . . . . . . . . . . . . . . . . . . . . 1-1
Nameplate . . . . . . . . . . . . . . . . . . . . . . . . . . . . . . . . . . . . . . . . . . . . . . . . . . . . . . . . . . . . . . . . . .1-1Type Code . . . . . . . . . . . . . . . . . . . . . . . . . . . . . . . . . . . . . . . . . . . . . . . . . . . . . . . . . . . . . . . . . .1-1Frame Size . . . . . . . . . . . . . . . . . . . . . . . . . . . . . . . . . . . . . . . . . . . . . . . . . . . . . . . . . . . . . . . . .1-1Serial Number . . . . . . . . . . . . . . . . . . . . . . . . . . . . . . . . . . . . . . . . . . . . . . . . . . . . . . . . . . . . . . .1-1
ACx 601 Type Code . . . . . . . . . . . . . . . . . . . . . . . . . . . . . . . . . . . . . . . . . . . . . . . . . . . . . . . . . . . . 1-2Inquiries . . . . . . . . . . . . . . . . . . . . . . . . . . . . . . . . . . . . . . . . . . . . . . . . . . . . . . . . . . . . . . . . . . . . . 1-3
Chapter 2 – Mechanical Installation
Check The Installation Site . . . . . . . . . . . . . . . . . . . . . . . . . . . . . . . . . . . . . . . . . . . . . . . . . . . . . . . 2-1Installation Site Checklist . . . . . . . . . . . . . . . . . . . . . . . . . . . . . . . . . . . . . . . . . . . . . . . . . . . . . .2-1
Installation Procedure . . . . . . . . . . . . . . . . . . . . . . . . . . . . . . . . . . . . . . . . . . . . . . . . . . . . . . . . . . . 2-2Installation in a Cooling Air Duct . . . . . . . . . . . . . . . . . . . . . . . . . . . . . . . . . . . . . . . . . . . . . . . . . . 2-2
Chapter 3 – Electrical Installation
Insulation Checks . . . . . . . . . . . . . . . . . . . . . . . . . . . . . . . . . . . . . . . . . . . . . . . . . . . . . . . . . . . . . . 3-1Disconnecting Means . . . . . . . . . . . . . . . . . . . . . . . . . . . . . . . . . . . . . . . . . . . . . . . . . . . . . . . . . . . 3-2Input Line Fuses . . . . . . . . . . . . . . . . . . . . . . . . . . . . . . . . . . . . . . . . . . . . . . . . . . . . . . . . . . . . . . . 3-2Motor Overload Protection . . . . . . . . . . . . . . . . . . . . . . . . . . . . . . . . . . . . . . . . . . . . . . . . . . . . . . . 3-2Power Cables . . . . . . . . . . . . . . . . . . . . . . . . . . . . . . . . . . . . . . . . . . . . . . . . . . . . . . . . . . . . . . . . . 3-2
Cable Insulation Voltage Ratings . . . . . . . . . . . . . . . . . . . . . . . . . . . . . . . . . . . . . . . . . . . . . . . .3-2Wiring Practices. . . . . . . . . . . . . . . . . . . . . . . . . . . . . . . . . . . . . . . . . . . . . . . . . . . . . . . . . . . . . .3-3

ACS/ACC/ACP Drives ACx=ACS/ACC/ACP xii
Conduit . . . . . . . . . . . . . . . . . . . . . . . . . . . . . . . . . . . . . . . . . . . . . . . . . . . . . . . . . . . . . . . . . . . .3-4Armored Cable . . . . . . . . . . . . . . . . . . . . . . . . . . . . . . . . . . . . . . . . . . . . . . . . . . . . . . . . . . . . . .3-4
Control Cables . . . . . . . . . . . . . . . . . . . . . . . . . . . . . . . . . . . . . . . . . . . . . . . . . . . . . . . . . . . . . . . . 3-4Wiring Connections . . . . . . . . . . . . . . . . . . . . . . . . . . . . . . . . . . . . . . . . . . . . . . . . . . . . . . . . . . . . 3-5
Cover Removal . . . . . . . . . . . . . . . . . . . . . . . . . . . . . . . . . . . . . . . . . . . . . . . . . . . . . . . . . . . . . .3-6Conduit Plate . . . . . . . . . . . . . . . . . . . . . . . . . . . . . . . . . . . . . . . . . . . . . . . . . . . . . . . . . . . . . . . .3-6Wiring Connections . . . . . . . . . . . . . . . . . . . . . . . . . . . . . . . . . . . . . . . . . . . . . . . . . . . . . . . . . . .3-6Option Modules . . . . . . . . . . . . . . . . . . . . . . . . . . . . . . . . . . . . . . . . . . . . . . . . . . . . . . . . . . . . . .3-6Cover Replacement. . . . . . . . . . . . . . . . . . . . . . . . . . . . . . . . . . . . . . . . . . . . . . . . . . . . . . . . . . .3-6
Pulse Encoder Insulation (ACP 600) . . . . . . . . . . . . . . . . . . . . . . . . . . . . . . . . . . . . . . . . . . . . . . 3-10Installation of Optional Modules and DriveWindow . . . . . . . . . . . . . . . . . . . . . . . . . . . . . . . . . . . .3-10
Braking Chopper . . . . . . . . . . . . . . . . . . . . . . . . . . . . . . . . . . . . . . . . . . . . . . . . . . . . . . . . . . . .3-13
Chapter 4 – Installation Checklist
Installation Checklist . . . . . . . . . . . . . . . . . . . . . . . . . . . . . . . . . . . . . . . . . . . . . . . . . . . . . . . . . . . . 4-1
Chapter 5 – Maintenance
Heatsink . . . . . . . . . . . . . . . . . . . . . . . . . . . . . . . . . . . . . . . . . . . . . . . . . . . . . . . . . . . . . . . . . . . . . 5-1Fan . . . . . . . . . . . . . . . . . . . . . . . . . . . . . . . . . . . . . . . . . . . . . . . . . . . . . . . . . . . . . . . . . . . . . . . . . 5-1Capacitors . . . . . . . . . . . . . . . . . . . . . . . . . . . . . . . . . . . . . . . . . . . . . . . . . . . . . . . . . . . . . . . . . . . 5-1
Reforming . . . . . . . . . . . . . . . . . . . . . . . . . . . . . . . . . . . . . . . . . . . . . . . . . . . . . . . . . . . . . . . . . .5-1
Appendix A – ACS/ACC/ACP 601 Technical Data
IEC Ratings for IP2/22 Enclosures . . . . . . . . . . . . . . . . . . . . . . . . . . . . . . . . . . . . . . . . . . . . . . . . . A-1Output Current Temperature Derating . . . . . . . . . . . . . . . . . . . . . . . . . . . . . . . . . . . . . . . . . . . . . . A-3
Output Current Ratings for IP54 Enclosures . . . . . . . . . . . . . . . . . . . . . . . . . . . . . . . . . . . . . . A-4Fuses . . . . . . . . . . . . . . . . . . . . . . . . . . . . . . . . . . . . . . . . . . . . . . . . . . . . . . . . . . . . . . . . . . . . . . . A-4
Example. . . . . . . . . . . . . . . . . . . . . . . . . . . . . . . . . . . . . . . . . . . . . . . . . . . . . . . . . . . . . . . . . . . A-6Cable Entries . . . . . . . . . . . . . . . . . . . . . . . . . . . . . . . . . . . . . . . . . . . . . . . . . . . . . . . . . . . . . . . . . A-6External Control Connections (NIOC) . . . . . . . . . . . . . . . . . . . . . . . . . . . . . . . . . . . . . . . . . . . . . . A-7External Control Connections (NIOCP) . . . . . . . . . . . . . . . . . . . . . . . . . . . . . . . . . . . . . . . . . . . . . A-8Enclosures, Space Requirements . . . . . . . . . . . . . . . . . . . . . . . . . . . . . . . . . . . . . . . . . . . . . . . . . A-9
Heat DIssipation Requirements . . . . . . . . . . . . . . . . . . . . . . . . . . . . . . . . . . . . . . . . . . . . . . . . A-9Cooling Air Flow Requirements . . . . . . . . . . . . . . . . . . . . . . . . . . . . . . . . . . . . . . . . . . . . . . . . . . A-10
Cooling Air Duct. . . . . . . . . . . . . . . . . . . . . . . . . . . . . . . . . . . . . . . . . . . . . . . . . . . . . . . . . . . . A-10Dimensions and Weights . . . . . . . . . . . . . . . . . . . . . . . . . . . . . . . . . . . . . . . . . . . . . . . . . . . . . . . A-11Input Power Connection . . . . . . . . . . . . . . . . . . . . . . . . . . . . . . . . . . . . . . . . . . . . . . . . . . . . . . . . A-11Motor Connection . . . . . . . . . . . . . . . . . . . . . . . . . . . . . . . . . . . . . . . . . . . . . . . . . . . . . . . . . . . . . A-11Efficiency and Cooling . . . . . . . . . . . . . . . . . . . . . . . . . . . . . . . . . . . . . . . . . . . . . . . . . . . . . . . . . A-12Ambient Conditions . . . . . . . . . . . . . . . . . . . . . . . . . . . . . . . . . . . . . . . . . . . . . . . . . . . . . . . . . . . A-13External Control Connections . . . . . . . . . . . . . . . . . . . . . . . . . . . . . . . . . . . . . . . . . . . . . . . . . . . . A-14
Encoder Signals . . . . . . . . . . . . . . . . . . . . . . . . . . . . . . . . . . . . . . . . . . . . . . . . . . . . . . . . . . . A-16Application Program . . . . . . . . . . . . . . . . . . . . . . . . . . . . . . . . . . . . . . . . . . . . . . . . . . . . . . . . . . . A-17
Application Macros . . . . . . . . . . . . . . . . . . . . . . . . . . . . . . . . . . . . . . . . . . . . . . . . . . . . . . . . . A-17Languages. . . . . . . . . . . . . . . . . . . . . . . . . . . . . . . . . . . . . . . . . . . . . . . . . . . . . . . . . . . . . . . . A-18Protection Features . . . . . . . . . . . . . . . . . . . . . . . . . . . . . . . . . . . . . . . . . . . . . . . . . . . . . . . . . A-19
Applicable Standards . . . . . . . . . . . . . . . . . . . . . . . . . . . . . . . . . . . . . . . . . . . . . . . . . . . . . . . . . . A-20
ACS/ACC/ACP Drives ACx=ACS/ACC/ACP xiii
Materials . . . . . . . . . . . . . . . . . . . . . . . . . . . . . . . . . . . . . . . . . . . . . . . . . . . . . . . . . . . . . . . . . . . . A-20Disposal . . . . . . . . . . . . . . . . . . . . . . . . . . . . . . . . . . . . . . . . . . . . . . . . . . . . . . . . . . . . . . . . . . . . A-20CE Marking . . . . . . . . . . . . . . . . . . . . . . . . . . . . . . . . . . . . . . . . . . . . . . . . . . . . . . . . . . . . . . . . . . A-20
Compliance with the EMC Directive . . . . . . . . . . . . . . . . . . . . . . . . . . . . . . . . . . . . . . . . . . . . A-20Machinery Directive . . . . . . . . . . . . . . . . . . . . . . . . . . . . . . . . . . . . . . . . . . . . . . . . . . . . . . . . . A-22
UL/CSA Markings . . . . . . . . . . . . . . . . . . . . . . . . . . . . . . . . . . . . . . . . . . . . . . . . . . . . . . . . . . . . . A-22UL . . . . . . . . . . . . . . . . . . . . . . . . . . . . . . . . . . . . . . . . . . . . . . . . . . . . . . . . . . . . . . . . . . . . . . A-23
Equipment Warranty and Liability . . . . . . . . . . . . . . . . . . . . . . . . . . . . . . . . . . . . . . . . . . . . . . . . . A-23Limitation of Liability . . . . . . . . . . . . . . . . . . . . . . . . . . . . . . . . . . . . . . . . . . . . . . . . . . . . . . . . A-23
Appendix B – ACS/ACC/ACP 601 Dimensional Drawings
Gland Plate Holes (IEC Units) . . . . . . . . . . . . . . . . . . . . . . . . . . . . . . . . . . . . . . . . . . . . . . . . . . . . B-1Frame R2 . . . . . . . . . . . . . . . . . . . . . . . . . . . . . . . . . . . . . . . . . . . . . . . . . . . . . . . . . . . . . . . . . . . . B-2Frame R2 Flange Mounting . . . . . . . . . . . . . . . . . . . . . . . . . . . . . . . . . . . . . . . . . . . . . . . . . . . . . . B-3Frame R3 Flange Mounting . . . . . . . . . . . . . . . . . . . . . . . . . . . . . . . . . . . . . . . . . . . . . . . . . . . . . . B-3Frame R3 . . . . . . . . . . . . . . . . . . . . . . . . . . . . . . . . . . . . . . . . . . . . . . . . . . . . . . . . . . . . . . . . . . . . B-4Frame R4 . . . . . . . . . . . . . . . . . . . . . . . . . . . . . . . . . . . . . . . . . . . . . . . . . . . . . . . . . . . . . . . . . . . . B-5Frame R4 Flange Mounting . . . . . . . . . . . . . . . . . . . . . . . . . . . . . . . . . . . . . . . . . . . . . . . . . . . . . . B-6Frame R5/R6 Flange Mounting . . . . . . . . . . . . . . . . . . . . . . . . . . . . . . . . . . . . . . . . . . . . . . . . . . . B-6Frame R5/R6 . . . . . . . . . . . . . . . . . . . . . . . . . . . . . . . . . . . . . . . . . . . . . . . . . . . . . . . . . . . . . . . . . B-7Frame R7 . . . . . . . . . . . . . . . . . . . . . . . . . . . . . . . . . . . . . . . . . . . . . . . . . . . . . . . . . . . . . . . . . . . . B-8Conduit Plates (USA Version) . . . . . . . . . . . . . . . . . . . . . . . . . . . . . . . . . . . . . . . . . . . . . . . . . . . . . . . . . . . . . . . . B-9ACP 601 Control Cable Connections . . . . . . . . . . . . . . . . . . . . . . . . . . . . . . . . . . . . . . . . . . . . . . B-11
ACP 601 Frame R4 . . . . . . . . . . . . . . . . . . . . . . . . . . . . . . . . . . . . . . . . . . . . . . . . . . . . . . . . . B-12ACP 601 Frame R5/R6 . . . . . . . . . . . . . . . . . . . . . . . . . . . . . . . . . . . . . . . . . . . . . . . . . . . . . . B-13
Appendix C – IEC Installation
IEC Installations . . . . . . . . . . . . . . . . . . . . . . . . . . . . . . . . . . . . . . . . . . . . . . . . . . . . . . . . . . . . . . .C-1Power Cables . . . . . . . . . . . . . . . . . . . . . . . . . . . . . . . . . . . . . . . . . . . . . . . . . . . . . . . . . . . . . . . . . C-1
Alternative Power Cable Types . . . . . . . . . . . . . . . . . . . . . . . . . . . . . . . . . . . . . . . . . . . . . . . . C-1Motor Cable Shield . . . . . . . . . . . . . . . . . . . . . . . . . . . . . . . . . . . . . . . . . . . . . . . . . . . . . . . . . . C-2
Cable Routing . . . . . . . . . . . . . . . . . . . . . . . . . . . . . . . . . . . . . . . . . . . . . . . . . . . . . . . . . . . . . . . . . C-2Components Connected to Digital/Analog Inputs . . . . . . . . . . . . . . . . . . . . . . . . . . . . . . . . . . . . . C-4

xiv ACx=ACS/ACC/ACP ACS/ACC/ACP Drives

ACS/ACC/ACP 601 Drives ACx=ACS/ACC/ACP 1-1
Chapter 1 – Introduction
General The ACS 600 product family of three phase AC drives includes
• the ACS 600 (for most applications)
• the ACP 600 (for positioning, synchronizing and other high-precision control applications)
• the ACC 600 (for crane drive applications)
• the ACS 600 MultiDrive (for multidrive applications)
The application programs are introduced in Appendix – A.
Study this manual carefully before installing, commissioning, operating or servicing the drive. We expect that you have a basic knowledge of physical and electrical fundamentals, electrical wiring practices, electrical components and electrical schematic symbols.
Delivery Check Check that there are no signs of damage. Before attempting installation and operation, check the information on the drive nameplate to verify that the unit is of the correct model.
Nameplate Each ACx 600 has a nameplate for identification purposes. See Figure 1-1. The nameplate data includes a type code and a serial number, which allow individual recognition of each unit.
Type Code The ACx 600 Type Code contains information on the properties and configuration of the drive. The Type Code Chart explains the significance of each digit or character in the Type Code.
Frame Size ACx 600 drives are manufactured in several different chassis sizes that are designated as Frame R2, R3, etc. Drives of several different ratings are manufactured in the same frame. The ACx 600 rating tables on page A-1 in Appendix A list the Frame Size used for each Type Code. The Frame Size is not marked on the nameplate.
Serial Number The first digit of the serial number refers to the manufacturing plant. The next three digits refer to the units manufacturing year and week, respectively. The remaining digits complete the serial number so that there are no two units with the same serial number.

Chapter 1 – Introduction
1-2 ACx=ACS/ACC/ACP ACS/ACC/ACP 601 Drives
Figure 2-1. ACX 601 Nameplate
ACx 601 Type Code The meaning of main selections of ACx 601 type code characters is given in the table below. Not all selections are available for all types. More information on selections is available in ACS 600 price list.
Character no.
Meaning Refer to
Example: ACS60701003000B1200901
1 Product CategoryA = AC Drive
2...3 Product TypeCS = Standard, CC = Crane Drive, CP = MotionControl
4 Product Family6 = ACS 600
5 Input Bridge0 = 6-pulse rectifier, 2 = 12-pulse rectifier, 7 = Regenerative 4Q thyristor bridge
6 Construction1 = Wall mounted, 4 = Module, 7 = Drives-MNS Cabinet
7...10 Power Rating (kVA) Appendix A: Ratings
11 Voltage Rating3 = 380/400/415 VAC4 = 380/400/415/440/460/480/500 VAC5 = 380/400/415/440/460/480/500 VAC6 = 525/550/575/600/660/690 VAC
12...14 Option 1, Option 2, Option 315 Application Software Appendix A:
Application Programs
x = Languages and Application Macro Options
16 Control Panel0 = None, 1 = CDP 312 Control Panel included, 4 = Customer I/O Terminal Block X2, 5 = 1 + 4
U1 3-380...500VU2 3-0...U1I1n/I1nsq 168/198AI2n/I2nsq 164/193Af1 48...63Hzf2 0...300HzACS60101405...
U1 3-380...480VU2 3-0...U1I1hd/I1n 143/184AI2hd/I2n 141/180Af1 57...63Hzf2 0...300HzACS60101404...
ABB Industry Oy
Serno *1983509999*
000C150001
IEC RatingsCE MarkingFIIND Type Code
NEMA RatingsUL, cUL & CSA MarkingsUSINY Type Code
Serial NumberBar CodeType Code continued

Chapter 1 – Introduction
ACS/ACC/ACP 601 Drives ACx=ACS/ACC/ACP 1-3
Inquiries Any inquiries about the product should be addressed to the local distributor or ABB representative, quoting the type code and the serial number of the unit. If the local ABB representative cannot be contacted, inquiries should be directed to the address and phone numbers on the back cover of this manual.
17 Degree of Protection Appendix A: Enclosures0 = IP 00 (chassis), A = IP 21, 2 = IP 22, 4 = IP 42,
5 = IP 54, 6 = IP 00 with Coated Boards,7 = IP 22 with Coated Boards,8 = IP 42 with Coated Boards9 = IP 54 with Coated BoardsB = IP 21 with Coated Boards
18 Line Input and Protection Options19 Starter for Auxiliary Motor Fan20 Filters Appendix A:
CE marking0 = CE with EMC Filters (not for 690V or 12-pulse rectifier)
3 = CE with output dv/dt Filters + EMC Filters (not for 690V)
5 = Output dv/dt Filters + no EMC Filters8 = US Standard, US conduit: No CE, no EMC filters, 9 = CE Low Voltage and Machinery Directives; No EMC
(ACS 607 only, secondary of all transformers 220 VAC)
21 Braking Chopper and Cabling Direction0 = No Brake Chopper - Bottom Entry / Bottom Exit (BE/
BE1 = Brake Chopper (BE / BE)3 = Input Power Top Entry / Output Power Bottom Exit 4 = Input / Output Power Top Entry / Exit 5 = Option 1 and 36 = Option 1 and 4
22 Other Options0 = None, 1 = Version 5.0 Software
Character no.
Meaning Refer to

Chapter 1 – Introduction
1-4 ACx=ACS/ACC/ACP ACS/ACC/ACP 601 Drives

ACS/ACC/ACP 601 Drives ACx=ACS/ACC/ACP 2-1
Chapter 2 – Mechanical Installation
The ACx 601 should be installed in an upright position with the cooling section mounted against a flat surface. The mounting surface should be as close to vertical as possible and of non-flammable material.
Sufficient room around the ACx 601 is required to enable cooling air flow, service and maintenance. Refer to Enclosure space Requirements in Appendix A on page A-9. Be sure to also observe all requirements of applicable safety regulations.
Check The Installation Site
Check the intended installation site to make sure that the environment is suitable. The service life and performance of the ACx 600 can be adversely affected if the drive is subjected to unsuitable environmental conditions. Complete environmental rating specifications are listed in Appendix A.
If unsuitable conditions are found at the intended installation site, select a different location, improve the environment at the selected site, or provide additional protection for the ACx 601.
Installation SiteChecklist
Make sure that the ambient temperature is suitable for the type of enclosure provided and the output current required. (pages A-3 & A-4 and A-12)
Make sure that the installation site altitude is suitable for the output current required. (A-12)
Make sure that the ambient air is sufficiently clean and dry or that the drive is adequately protected from contaminants. (A-12)
Make sure that the enclosure selected is adequate to protect the drive considering site conditions regarding access by unauthorized persons, liquids that might be splashed, sprayed or fall on the enclosure, or any other foreign material that might get into the enclosure.
Do not mount the drive on any surface with temperature exceeding the allowable air temperature.
Do not mount the drive in direct sunlight.
Do not mount the drive where it will be subjected to excessive vibration. (A-12)

Chapter 2 – Mechanical Installation
2-2 ACx=ACS/ACC/ACP ACS/ACC/ACP 601 Drives
Installation Procedure Appendix B contains detailed dimensional drawings showing the overall dimensions of the ACx 601 drives and the sizes and locations of the mounting bolt holes or slots. The drives have four mounting holes or slots as shown in Figure 2-1.
CAUTION! Lift the ACx 601 by its chassis and not by its cover. (Frame R7 has lifting lugs to allow the use of a suitable lifting device).
1. Mark the locations of the mounting bolts by measuring to the dimensions shown in the drawings or by using the drive as a template.
2. Drill and tap or install appropriate anchors in the mounting surface.
3. Install the mounting bolts.
4. Position the ACx 601 onto the mounting bolts.
5. Tighten the bolts securely.
Figure 2-1 Installing the ACx 601 on a wall.
Installation in a Cooling Air Duct
The ACx 601 design allows the unit to be recessed into a wall with the cooling section protruding into a special cooling air duct (frames R2 to R6). The cooling air grates in the bottom and the top of the unit must not be blocked by the wall or any other structure. Steps should be taken to enable service and maintenance access for the unit.
Refer to pages A-9 and A-10 for cooling air flow requirements and heat dissipation data.
The air in the cooling duct must meet the requirements stated on page
Air flowor
(R7)

Chapter 2 – Mechanical Installation
ACS/ACC/ACP 601 Drives ACx=ACS/ACC/ACP 2-3
A-12 for ambient air. If the air in the cooling duct is not clean the enclosure class of the ACx 601 must be IP 54. Note the power ratings of the IP 54 units given on page A-4.
To install the ACx 601 in a cooling air duct, carry out the following steps:
1. See Appendix B – Dimensional Drawings for dimensions of the opening in the duct.
2. Cut the opening.
3. Drill and tap or install appropriate anchors in the mounting bolt locations at the top and bottom of the opening. It may be necessary to install angle iron or similar stiffeners to provide mounting points of sufficient strength and thickness.
4. Frame R2 and R3: Remove the two screws at the lower front edge of the unit. Lift the front cover somewhat and disconnect the Control Panel cable from the board fitted on the inside of the cover. Remove the front and top covers. (See Figure 3-1)
5. Frames R4 to R6: Remove the Control Panel. Remove the telephone connector. Remove the two screws at the lower front edge of the unit. Remove the front and top covers. (See Figure 3-2)
6. Follow the installation procedure in Figure 2-2.
Figure 2-2 Installation procedure of the ACx 601 in a cooling air duct.
Step 1 Step 2 Step 3
Lower screws first
Upper screwsAir flowout
Air flowin
Mounting flange
Max 3/8”

Chapter 2 – Mechanical Installation
2-4 ACx=ACS/ACC/ACP ACS/ACC/ACP 601 Drives

ACS/ACC/ACP 601 Drives ACx=ACS/ACC/ACP 3-1
Chapter 3 – Electrical Installation
WARNING! The electrical installation described in this chapter should only be carried out by a qualified electrician. The Safety Instructions on the first pages of this manual must be followed. Negligence of these instructions can cause injury or death.
Note: The information presented in this chapter is primarily directed towards the North American market. For IEC installations, refer to Appendix C for additional information. For installations requiring CE compliance, refer also to the section entitled CE Marking in Appendix A.
Insulation Checks Before connecting the motor to the drive, check the insulation of the motor and the cable between the drive and the motor.
WARNING! Do not make any voltage tolerance or insulation resistance test (Hi Pot or Megger) on any part of the ACx 600.
A test (2500V rms, 50 Hz, 1 second) has been performed at the factory on every ACx 600 drive to verify the integrity of the insulation between the power circuitry and the chassis. To avoid damaging sensitive circuitry, this test is performed using a special procedure that can not easily be performed outside the factory.
Use the following procedure to check the insulation of the motor and the cable between the drive and the motor.
1. Disconnect all sources of power from the drive and motor.
WARNING! Before proceeding with the insulation checks, make sure that the motor is disconnected from all sources of power including the drive and any bypass circuitry.
2 Check that the motor cable is disconnected from the ACx 601 output terminals U2, V2, and W2.
3 Check that the motor cable is disconnected from the motor and remove bridging connections at the motor.
4. Measure the insulation resistances of the motor between the phases and between each phase and Ground (PE). The voltage range of the resistance meter must be at least equal to the line voltage, but not higher than 1000V. The insulation resistance must

Chapter 3 – Electrical Installation
3-2 ACx=ACS/ACC/ACP ACS/ACC/ACP 601 Drives
be greater than 1 MΩ.
5. Measure the insulation resistance of the motor cable between the phases and between each phase and Ground (PE). The insulation resistance must be greater than 1 MΩ.
Disconnecting Means The ACx 601 does not include a disconnecting means. An input power disconnecting means must be installed between the AC power source and the ACx 601. The disconnecting means must conform to the applicable safety regulations. The disconnecting means must be locked in the open position during installation and maintenance work.
The motor must not be controlled with the supply disconnecting means; instead, the and keys of the Control Panel or commands via the I/O board of the ACx 600 should be used. The maximum number of charging cycles of the d.c. capacitors of ACx 600 (i.e. power-ups by applying power) is five in ten minutes.
The drive disconnecting means can serve as the motor disconnecting means if it complies with applicable safety regulations.
Input Line Fuses Input line fuses are required to protect the input bridge of the ACx 600 in the event of an internal short circuit or ground fault. Fuses are not included in the drive and must be installed externally. The recommended ultrarapid fuses are listed in Appendix A. To ensure that adequate protection is maintained do not install slower types of fuses and do not allow blown fuses to be replaced with slower types.
The fuses recommended for input bridge protection can be installed as drive and motor branch-circuit short-circuit and ground fault protection if they comply with applicable safety regulations.
Motor Overload Protection
The ACx 601 can provide overload protection for the motor by monitoring a thermostat or thermistor in the motor or by calculating the motor temperature from measured operating data. The overload protection provided by the drive complies with the requirements of UL508c. Additional overload protection is not required unless more than one motor is connected to the drive or unless additional protection is required by applicable safety regulations.
Power Cables The input power, motor and ground cables must be sized according to local regulations:
1. The cable must carry the ACx 600 load current.
2. The cable terminals of the ACx 600 warm up to 60 °C in use. The cable must be rated for at least 60 °C maximum operating temperature.
Cable InsulationVoltage Ratings
As a minimum requirement, cable insulation voltage ratings must conform to all applicable safety regulations. In addition, motor

Chapter 3 – Electrical Installation
ACS/ACC/ACP 601 Drives ACx=ACS/ACC/ACP 3-3
connecting cable insulation must accommodate the voltage peaks described under Motor Insulation Requirements on page vi of the Safety Instructions.
For drives that are rated up to 500 V, cables that have a 600 VAC insulation rating are suitable for both input power and motor wiring.
For drives that are rated over 500 V up to 600 V, cables that have a 600 VAC insulation rating are suitable for input power wiring. The motor wiring requires a higher voltage rating to accommodate the voltage peaks described under Motor Insulation Requirements on page vi of the Safety Instructions. As a general rule, the motor cable insulation should be rated for a minimum of 1000 V.
For drives that are rated over 600 V up to 690 V, cables that have a 1000 VAC insulation rating are suitable for both input power and motor wiring.
Wiring Practices
NOTE! When installing the ACx 600 wiring, it is important to carefully follow the wiring practice recommendations presented in the following paragraphs. Following these recommendations will ensure reliable long term operation of the ACx 600 drive. If these recommendations are not followed, the drive may experience various problems such as:
• Improper drive performance
• Nuisance shutdown trips
• Damage to drive electronic circuits
Incorrect installation practices can also cause malfunctions or damage to other equipment through electromagnetic interference (EMI) and noise injected into the grounding system.
The drive warranty does not cover problems caused by improper installation.
When installing AC drive power wiring, wiring methods that provide shielding for the power cables reduce the possibility of electromagnetic interference (EMI). It is also important to ground the motor frame using a ground conductor connected to the grounding terminal in the drive. EMI reduction measures are most important for the motor wiring but are also applicable to the input power wiring.
Any wiring method that is in conformance with applicable safety regulations is acceptable for input power wiring. Metallic conduit or armored cable must be used for motor wiring. Detailed conduit and armored cable wiring practice guidelines are provided below.
Type MC continuous corrugated aluminum armor cable with

Chapter 3 – Electrical Installation
3-4 ACx=ACS/ACC/ACP ACS/ACC/ACP 601 Drives
symmetrical grounds is the best type of wiring to provide a good low impedance high frequency ground return path between the motor and the drive. This helps to prevent high frequency ground current from flowing in a potentially damaging path through the motor bearings and connected load bearings. Type MC continuous corrugated aluminum armor cable with symmetrical grounds is highly recommended for motor connections to drives rated 490 KVA and larger.
Conduit Metallic conduit must be used for motor wiring unless armored cable is used. Where conduits must be coupled together, the joint must be bridged with a ground conductor bonded to the conduit on each side of the joint. The conduits must also be bonded to the drive enclosure. Use separate conduits for input power, motor, brake resistors and control wiring. The recommended wiring configuration is shown on page 3-8. Do not run motor wiring from more than one drive in the same conduit.
Armored Cable If metallic conduit is not used, type MC continuous corrugated aluminum armor cable with symmetrical grounds must be used for the motor cables. If type MC armor cables are used, the motor cables can be run in the same cable tray as other 480V or 600V power wiring. Control and signal cables must not be run in the same tray as power cables.
Six conductor (3 phases and 3 grounds) type MC continuous corrugated aluminum armor cable with symmetrical grounds is available from the following suppliers. Trade names are in parentheses.
Anixter Wire & Cable (Philsheath)BICC Cables Corp. (Philsheath)Rockbestos Co. (Gardex)Oaknite (CLX)
Control Cables All control cables must be shielded. As a general rule, the control signal cable shield should be grounded directly in the ACx 600. The other end of the shield should be left unconnected. Twisting the signal wire with its return wire reduces disturbances caused by inductive coupling. Pairs should be twisted as close to terminals as possible.
A double shielded twisted pair cable (Figure a, e.g. Belden 9729) must be used for analog signals and is recommended for the pulse encoder signals. Employ one individually shielded pair for each signal. Do not use common return for different analog signals.
A double shielded cable is the best alternative for low voltage digital signals but single shielded twisted multipair cable (Figure b) is also usable.

Chapter 3 – Electrical Installation
ACS/ACC/ACP 601 Drives ACx=ACS/ACC/ACP 3-5
The analog and digital input signals should be run in separate, shielded cables.
Relay-controlled signals, providing their voltage does not exceed 48 V, can be run in the same cables as digital input signals. It is recommended that the relay-controlled signals be run as twisted pairs.
Never mix 24 VDC and 115 / 230 VAC signals in the same cable.
Encoder Cable (ACP 600) Min. 4 x 0.25 mm2 (#22 AWG) + 2 x 0.5 mm2 (#20AWG) min. single shielded twisted multipair cable, optical coverage > 91 %. The maximum cable length is 150 m (500 ft.). Suitable cable recommendation is available from ABB.
Control Panel Cable In remote use the cable connecting the Control Panel to the ACx 600 must not exceed 3 meters (10 ft). The cable type tested and approved by ABB is provided in Control Panel option kits.
Wiring Connections
WARNING! This work should only be carried out by a qualified electrician. The Safety Instructions on the first pages of this manual must be followed. Negligence of these instructions can cause injury or death.
The input power and motor cables connect to the terminal block of the ACx 601 in the lower part of the frame. The control cables pass in front of the power terminals to the NIOC/NIOCP board.
To connect the input power, motor and control cables carry out the following procedure.
WARNING! Make sure that the ACx 601 is disconnected from the power network during installation. If the ACx 601 is already connected to the power, wait for 5 minutes after disconnecting power.
aA double shielded twisted pair cable
bA single shielded twisted multipair cable

Chapter 3 – Electrical Installation
3-6 ACx=ACS/ACC/ACP ACS/ACC/ACP 601 Drives
Cover Removal Remove the cover as illustrated in Figure 3-1 on page 3-6 (Frames R2 and R3), Figure 3-2 on page 3-7 (Frames R4 to R6), or Figure 3-3 on page 3-7 (Frame R7).
Conduit Plate Attach conduits to the conduit entry plate at the bottom of the drive. Knockout sizes and locations are shown on pages B-9 and B-10 in Appendix B. Terminal locations are shown on the dimensioned drawings in Appendix A. Select locations for input power, motor, brake resistor and control wiring according to terminal locations and size requirements.
Wiring Connections Connect the input power, motor, brake resistor and ground wires first and then connect the control wiring. Refer to Figure 3-4 on page 3-8 for the recommended wiring configuration. See Appendix B - ACS 601 Dimensional Drawings to locate the terminals on each ACS 601 type. See Appendix A page A-7 and A-8 for control connection details. Refer to the ACx 600 Firmware Manual for control I/O programming information.
Option Modules General installation instructions are provided on page 3-9. For specific instructions, refer to the Installation and Start-Up Guide for the option module.
Cover Replacement Replace the cover as shown in Figure 3-6 on page 3-9.
Figure 3-1 Frames R2 and R3: Removal of the cover
1. Undo the two screws at the lower front edge of the unit.
2. Lift the lower edge of the cover to gain access to board A6. Disconnect the cable from connector X2.
3. Remove the cover.
4. After connecting the input power, motor and control cables, replace the front cover as shown in Figure 3-6 on page 3-9.)
Chapter 3 – Electrical Installation
ACS/ACC/ACP 601 Drives ACx=ACS/ACC/ACP 3-7
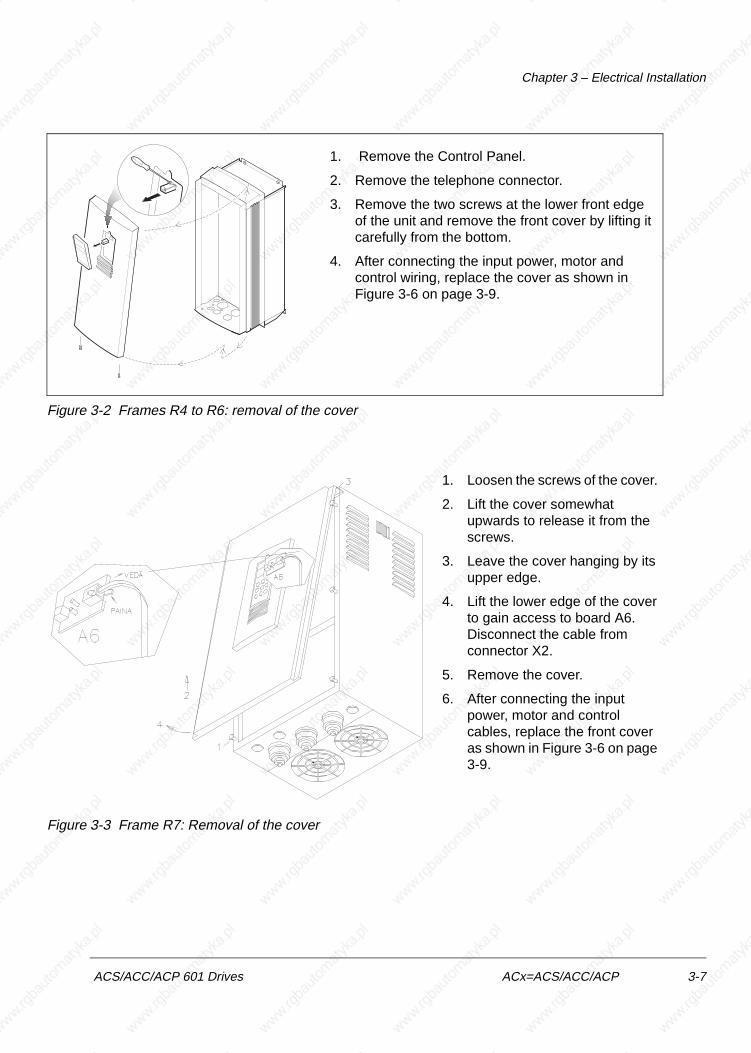
Figure 3-2 Frames R4 to R6: removal of the cover
Figure 3-3 Frame R7: Removal of the cover
1. Remove the Control Panel.
2. Remove the telephone connector.
3. Remove the two screws at the lower front edge of the unit and remove the front cover by lifting it carefully from the bottom.
4. After connecting the input power, motor and control wiring, replace the cover as shown in Figure 3-6 on page 3-9.
1. Loosen the screws of the cover.
2. Lift the cover somewhat upwards to release it from the screws.
3. Leave the cover hanging by its upper edge.
4. Lift the lower edge of the cover to gain access to board A6. Disconnect the cable from connector X2.
5. Remove the cover.
6. After connecting the input power, motor and control cables, replace the front cover as shown in Figure 3-6 on page 3-9.

Chapter 3 – Electrical Installation
3-8 ACx=ACS/ACC/ACP ACS/ACC/ACP 601 Drives
Figure 3-4 A view of the recommended wiring configuration.
Figure 3-5 Frame R7: Ring Lugs
T2T3T1
Signals
MetallicConduit
In the R7 Frame, bolt connections are provided for connecting wires with ring lugs. Crimp ring lugs onto the phase conductors. Insulate the ends of the lugs using self-fusing (self-amalgam-ating) tape or shrink tubing.

Chapter 3 – Electrical Installation
ACS/ACC/ACP 601 Drives ACx=ACS/ACC/ACP 3-9
Figure 3-6 Replacing the front cover
Control Panel inRemote Use
Connect the Control Panel cable to terminal X19 of the NAMC-11, or with NAMC-03 board to terminal X28 of the NIOC board (X300 of the NIOCP board).
Frames R4 to R6
1. Replace the front cover.
2. Replace the telephone connector.
3. Attach the Control Panel by pushing it softly down onto the connector in the front cover hollow.
Frames R2 to R3 Frame R7
Connect the Control Panel cable to the connector X2, and replace the front cover.
NIOCP board
X300
X19
NAMC-11 with NDCO
X19
NAMC-11
ACx 601/604 with NAMC-11 boardACx 601/604 with NAMC-3 board and ACx 607
NIOCX28
Ground the cable screen at the near Grounding screw.

Chapter 3 – Electrical Installation
3-10 ACx=ACS/ACC/ACP ACS/ACC/ACP 601 Drives
Pulse Encoder Insulation (ACP 600)
The pulse encoder shall be insulated electrically from stator or rotor to prevent forming of current path through the pulse encoder. The usual coupling-type encoder must have an electrically insulating coupling. When a hollow-shaft type pulse encoder is used, the insulation can be implemented by insulating the ball joints of the engaging arm, or insulating the bar of the engaging arm. Shield of the encoder cable should be insulated from the encoder frame. See Appendix B for grounding of the other end of the encoder cable shield.
Installation of Optional Modules and DriveWindow
This section gives general installation instructions for DriveWindow PC tool and ACx 600 optional modules, such as fieldbus adapters, I/O extension modules and the pulse encoder interface. Connection examples are given at the end of the section.
Placement The module should be installed inside the unit on the location shown in the dimensional drawings (Appendix B). Option modules for the frame sizes R2 and R3 are installed outside the frequency converter. Follow the instructions given in the Mechanical Installation chapter of the module manual.
Power Supplyfor the Module
The 24 V d.c. supply for one optional module is provided by the NIOC/NIOCP board of the converter (NIOC: terminal X23, NIOCP: terminal X4). The location of the NIOC/NIOCP board is shown in the dimensional drawings (Appendix B).
Fiber Optic Link Optional modules are connected via a DDCS fiber optic link to the NAMC board or NDCO board (both mounted on top of the NIOC board). The terminals on the NAMC/NDCO board to which the cables are connected are given in the table below. Channel CH1 is on NAMC-11 board. Channels CH0, CH2 and CH3 are on NDCO board. NAMC-3 board includes channels CH0 to CH3.
* on NDCO board when NAMC-11 board is used.
Observe color codes when installing fiber optic cables. Blue connectors should go to blue terminals, and grey connectors to grey terminals.
In case multiple modules are installed on the same channel, they must be connected in a ring.
Module Type Channel Terminals
Fieldbus Adapter Modules CH0* V13*, V14*
I/O Extension Modules CH1 V15, V16
Pulse Encoder Interface Module CH2* with ACS 600 Standard Application Program 5.0
V17*, V18*
CH1 with ACS 600 Crane Application Program 5.x
V15, V16
Double Pulse Encoder Interface Module (for ACP 600 only)
CH2* V17*, V18*
DriveWindow CH3* V19*, V20*

Chapter 3 – Electrical Installation
ACS/ACC/ACP 601 Drives ACx=ACS/ACC/ACP 3-11
Connection Examples
TXD
RXD
T R
Fieldbus Adapter ModuleACx 600
CH0
TXD
RXD
NAMC
RT
NIOC/
The terminals forthe power supplyconnection vary.Consult adaptermodule manual.
T R
I/O Extension ModuleACx 600
NAMC NIOC
NIOC Terminal X23
The terminals forthe power supplyconnection vary.Consult module
manual.
CH1
RT
RT
CH1
NIOCP
Not supported by ACP 600
NIOC Terminal X23NIOCP Terminal X4
NDCO
NDCO
Pulse Encoder Module withACS 600 Crane, System, Master/Follower and Template Application Programs

Chapter 3 – Electrical Installation
3-12 ACx=ACS/ACC/ACP ACS/ACC/ACP 601 Drives
Connection Examples
TXD
RXD
T R
ACS 600*
NAMC NIOC
NIOC Terminal X23
The terminals forthe power supplyconnection vary.Consult module
manual.
CH2
* The ACP 600 supports the NTACP Double Pulse Encod-er instead. See NTACP Instal-lation and Start-up Guide.
Pulse Encoder Module (NTAC) withACS 600 Standard Application Program
NDCOCH1
RTRT
T R
DriveWindowACx 600
NAMC
R
NIOC/
CH3
NIOCP
RT
NDCOCH1
RT
NDPA
NDPC
R T

Chapter 3 – Electrical Installation
ACS/ACC/ACP 601 Drives ACx=ACS/ACC/ACP 3-13
Braking Chopper Refer to the Braking Choppers Installation and Start-Up Guide for braking chopper installation and application information.
WARNING! The brake control terminals (UDC+, UDC-, R+ and R- terminals) carry a dangerous DC voltage (over 500V).
An external braking resistor must be connected to a terminal block that is supplied with the braking chopper.

Chapter 3 – Electrical Installation
3-14 ACx=ACS/ACC/ACP ACS/ACC/ACP 601 Drives

ACS/ACC/ACP 601 Drives ACx=ACS/ACC/ACP 4-1
Chapter 4 – Installation Checklist
Installation Checklist The ACx 600 mechanical and electrical installation should be checked before start-up. It is advisable to go through the checklist below together with another person. Study carefully the Safety Instructions on the first pages of this manual before attempting any work on, or with, the unit.
MECHANICAL INSTALLATION
Check that the ambient operating conditions are suitable (see Appendix A: environmental limits, cooling air flow requirements, free space requirements).
Check that the unit is mounted properly on a vertical non-flammable wall (see Chapter 2 – Mechanical Installation).
Check that cooling air flows freely.
Check the applicability of the motor and the driven equipment (see Appendix A: Motor Connection).
ELECTRICAL INSTALLATION (see Chapter 3 – Electrical Installation)
If the ACx 600 is connected to an ungrounded power system or a high resistance grounded power system (over 30 Ohms), check that the EMC filter capacitors are disconnected.
Check that the drive is grounded properly.
Check that the input voltage matches the drive nominal input voltage.
Check that input power connections at U1, V1 and W1 are OK.
Check that appropriate input line fuses are installed.
Check that motor connections at U2, V2 and W2 are OK.
Check motor cable routing.
Check that there are no power factor compensation capacitors connected between the drive and the motor.
Check that control connections inside the drive are OK.
Check that there are no tools or other foreign objects inside the drive.
With bypass connection, check that input line voltage cannot be applied to the output of the ACx 600.

Chapter 4 – Installation Checklist
4-2 ACx=ACS/ACC/ACP ACS/ACC/ACP 601 Drives

ACS/ACC/ACP 601 Drives ACx=ACS/ACC/ACP 5-1
Chapter 5 – Maintenance
The ACx 600 requires minimum maintenance.
WARNING! The Safety Instructions on the first pages of this manual must be followed.
Heatsink The heatsink fins pick up dust from the cooling air. The ACx 600 can run into overtemperature Warnings and Faults if the heatsink is not cleaned regularly. In a normal environment, the heatsink should be checked and cleaned annually.
The dust should be removed gently with a soft brush if the cleaning is carried out in the same room where the unit is normally operated. Compressed air should not be used for cleaning unless the installation can be taken apart and the cleaning is carried out in another room (or outdoors). Fan rotation should be prevented (in order to prevent bearing wear) when using compressed air for heatsink cleaning.
Fan The cooling fan lifespan of ACx 601 units is about 60,000 hours. The actual lifespan depends on the AC drive usage and ambient temperature.
Fan failure can be predicted by the increasing noise from fan bearings and the gradual rise in the heatsink temperature in spite of heatsink cleaning. If the drive is operated in a critical part of a process, fan replacement is recommended once these symptoms start appearing. The fan can be withdrawn by removing the bottom of the frame.
Replacement fans are available from ABB. Do not attempt operation with other than ABB specified spare parts.
Capacitors The ACx 600 intermediate circuit employs several electrolytic capacitors. Their lifespan is approximately 100,000 hours, but dependent on the drive loading and the ambient temperature.
Capacitor life can be prolonged by lowering the ambient temperature. It is not possible to predict capacitor failure.
Capacitor failure is usually followed by an input line fuse failure or a Fault trip. Contact ABB if capacitor failure is suspected. Replacements are available from ABB. Do not attempt operation with other than ABB specified spare parts.
Reforming For more information on reforming (re-aging) spare part capacitors, contact Technical Support.

Chapter 5 – Maintenance
5-2 ACx=ACS/ACC/ACP ACS/ACC/ACP 601 Drives

ACS/ACC/ACP 601 Drives ACx=ACS/ACC/ACP A-1
Appendix A – ACS/ACC/ACP 601 Technical Data
IEC Ratings for IP2/22 Enclosures
Below are the IEC ratings for ACS/ACC/ACP 601 with 50 Hz and 60 Hz supplies. ACx = ACS/ACC/ACP. The 690 V series is not available for ACP 600. Symbols are described following the table.
The table continues on the next page
Normal Use Heavy-duty Use
ACx 601Type
Duty Cycle 1/10 min
Duty Cycle 1/10 min
Duty Cycle 1)
2/15 sFrameSizeI2N
9/10min[A]
I2Nmax
1/10min[A]
SN
[kVA]
PN
[kW]
PN
[HP]
I2hd
9/10min[A]
I2hdmax
1/10min[A]
I2hd
13/15s[A]
I2hdmax
2/15s[A]
Shd
[kVA]
Phd
[kW]
Phd
[HP]
Three-phase supply voltage 380 V, 400 V or 415 V ACx 601-0005-3 7.6 8.4 5 3 3 6.2 9.3 6.2 12.4 4 2.2 3 R2ACx 601-0006-3 11 12 6 4 5 7.6 11 7.6 15.2 5 3 3ACx 601-0009-3 15 17 9 5.5 7.5 11 17 11 22 6 4 5ACx 601-0011-3 18 20 11 7.5 10 15 23 15 30 9 5.5 7.5 R3ACx 601-0016-3 24 26 16 11 15 18 27 18 36 11 7.5 10ACx 601-0020-3 32 35 20 15 20 24 36 24 48 16 11 15 R4ACx 601-0025-3 41 45 25 18.5 25 32 48 32 64 20 15 20ACx 601-0030-3 47 52 30 22 30 41 62 41 82 25 18.5 25 R5ACx 601-0040-3 62 68 40 30 40 47 71 47 94 30 22 30ACx 601-0050-3 76 84 50 37 50 62 93 62 124 40 30 40ACx 601-0060-3 89 98 60 45 60 76 114 76 152 50 37 50 R6ACx 601-0070-3 112 123 70 55 75 89 134 89 178 60 45 60ACx 601-0100-3 147 162 100 75 100 112 168 112 224 70 55 75 R7ACx 601-0120-3 178 196 120 90 125 147 221 147 294 100 75 100
Three-phase supply voltage 380 V, 400 V, 415 V, 440 V, 460 V, 480 V or 500 V ACx 601-0006-5 7.6 8.4 6 4 5 6.2 9.3 6.2 12.4 5 3 3 R2ACx 601-0009-5 11 12 9 5.5 7.5 7.6 11 7.6 15.2 6 4 5ACx 601-0011-5 15 17 11 7.5 10 11 17 11 22 9 5.5 7.5ACx 601-0016-5 18 20 16 11 10 15 23 15 30 11 7.5 10 R3ACx 601-0020-5 24 26 20 15 15 18 27 18 36 16 11 10ACx 601-0025-5 31 34 25 18.5 20 24 36 24 48 20 15 15 R4ACx 601-0030-5 41 45 30 22 30 31 47 31 62 25 18.5 20ACx 601-0040-5 47 52 40 30 30 41 62 41 82 30 22 30 R5ACx 601-0050-5 58 64 50 37 40 47 71 47 94 40 30 30ACx 601-0060-5 65 72 60 45 50 58 87 58 116 50 37 40ACx 601-0070-5 84 92 70 55 60 65 98 65 130 60 45 50 R6ACx 601-0100-5 112 123 100 75 75 84 126 84 168 70 55 60ACx 601-0120-5 135 149 120 90 100 112 168 112 224 100 75 75 R7ACx 601-0140-5 164 180 140 110 125 135 203 135 270 120 90 100
Three-phase supply voltage 525 V, 550 V, 575 V, 600 V, 660 V or 690 V ACx 601-0009-6 7.6 11 9 5.5 7.5 6.2 9 6.2 9 6 4 5.0
R3ACx 601-0011-6 11 12 11 7.5 10 7.6 11 7.6 11 9 5.5 7.5ACx 601-0016-6 15 17 16 11 15 11 17 11 17 11 7.5 10ACx 601-0020-6 20 22 20 15 20 15 23 15 23 16 11 15ACx 601-0025-6 25 28 25 18.5 25 20 30 20 30 20 15 20 R4ACx 601-0030-6 28 31 30 22 30 25 38 25 38 25 18.5 25ACx 601-0040-6 36 40 40 30 40 28 42 28 42 30 22 30 R5ACx 601-0050-6 44 48 50 37 50 36 54 36 54 40 30 40ACx 601-0060-6 52 57 60 45 60 44 66 44 66 50 37 50 R6ACx 601-0070-6 65 72 70 55 75 52 78 52 78 60 45 60ACx 601-0100-6 88 97 100 75 100 65 98 65 98 70 55 75 R7ACx 601-0120-6 105 116 120 90 125 88 132 88 132 100 75 100

Appendix A – ACS/ACC/ACP 601 Technical Data
A-2 ACx=ACS/ACC/ACP ACS/ACC/ACP 601 Drives
Rating table continuedPump and Fan Use
(Squared Load)
ACx 601Type
I2Nsq
[A]
SN
[kVA]
PN
[kW]
PN
[HP]
Frame SIze
Three-phase supply voltage 380 V, 400 V or 415 V ACx 601-0005-3 7.6 5 3 3 R2ACx 601-0006-3 11 6 4 5ACx 601-0009-3 15 9 5.5 7.5ACx 601-0011-3 18 11 7.5 10 R3ACx 601-0016-3 24 16 11 15ACx 601-0021-3 41 20 15 20 R4ACx 601-0026-3 47 25 18.5 25ACx 601-0031-3 62 30 22 30 R5ACx 601-0041-3 76 40 30 40ACx 601-0051-3 89 50 37 50ACx 601-0061-3 112 60 45 60 R6ACx 601-0071-3 124 70 55 75ACx 601-0101-3 178 100 75 100 R7ACx 601-0121-3 200 120 90 125
Three-phase supply voltage 380 V, 400 V, 415 V, 440 V, 460 V, 480 V or 500 V ACx 601-0006-5 7.6 6 4 5 R2ACx 601-0009-5 11 9 5.5 7.5ACx 601-0011-5 15 11 7.5 10ACx 601-0016-5 18 16 11 10 R3ACx 601-0020-5 24 20 15 15ACx 601-0026-5 41 25 18.5 20 R4ACx 601-0031-5 47 30 22 30ACx 601-0041-5 58 40 30 30 R5ACx 601-0051-5 65 50 37 40ACx 601-0061-5 84 60 45 50ACx 601-0071-5 112 70 55 60 R6ACx 601-0101-5 124 100 75 75ACx 601-0121-5 164 120 90 100 R7ACx 601-0141-5 200 140 110 125
Normal use (10 % overload capacity): Heavy-duty use (50 % or 100 % overload capacity):
I2N rated RMS output current I2hd rated RMS output current
I2Nmax short term rms overload current (allowed for one minute every 10 minutes).
I2hdmax rms overload current (allowed for one minute every 10 minutes or 2 seconds every 15 seconds) Maximum current depends on parameter setting, refer to Firmware Manual.
SN rated apparent output power Shd rated apparent output power
PN typical motor power. The power ratings in kW apply to most IEC 34 motors. The power ratings in HP apply to most four pole NEMA rated motors.
Phd typical motor power. The power ratings in kW apply to most IEC 34 motors. The power ratings in HP apply to most four pole NEMA rated motors..
Pump and Fan use (squared load): no overload capacity
I2Nsq rated RMS output current
SN rated apparent output power
PN typical motor power. The power ratings in kW apply to most IEC 34 motors. The power ratings in HP apply to most four pole NEMA rated motors.
Current ratings are for drives in IP 20/21 enclosures. For drives in IP 54 enclosures, see page A-4. For output current temperature derating, see page A-3.
The current ratings are the same regardless of the supply voltage within one voltage range. The rated current of the ACx 60x must be higher than or equal to the rated motor current to achieve the rated motor power given in the table.
Note 1: The maximum allowed motor shaft power is limited to 1.5 · Phd. If the limit is exceeded, the motor torque and the Ihdmax 2 s current is automatically restricted. The function protects the input bridge of the ACS 600 against overload.
Note 2: The load capacity (current and power) decreases if the installation site altitude exceeds 1000 meters (3300 ft.), or if the ambient temperature exceeds 40 °C (104 °F(35 °C/95 °F for ACx 601-0120-03 units).
Note 3: The Pump and Fan rating is not to be used with du/dt filters.
Usually dv/dt filters are needed at the output of 525 V to 690 V units with random wound motors. No dv/dt filters are usually required with form wound motors.

Appendix A – ACS/ACC/ACP 601 Technical Data
ACS/ACC/ACP 601 Drives ACx=ACS/ACC/ACP A-3
Rating table continued
Note: The US manufactured units are labeled as -4 types. The information in this manual concerning the corresponding -5 types applies to them.
Output Current Temperature Derating
The output current is calculated by multiplying the current given in the rating table by the derating factor.
Temperature derating factor for degree of protection IP 21/22:
• General rule: Above +40 °C (104 °F), the rated output current is decreased 3.5 % for every additional 1 °C up to +50 °C (1.94% for every additional 1 °F up to 122 °F).
• Example 1. If the ambient temperature is 50 °C the derating factor is 100 % - 3.5 · 10 °C = 65 % or 0.65. The output current is then 0.65 · I2N or I2hd.
Derating factor for ACx 600 in Pump and Fan Use (INsq rating):
• Above +40 °C (104 °F) (+35 °C/95 °F for ACx 601-120-03 units), the rated output current is decreased 5 % for every additional 1 °C up to +50 °C (2.78% for every additional 1 °F up to 122 °F).
Derating factor for ACx 601 with degree of protection IP 54:
• From +25 °C (77°F) to +40 °C (104 °F), the output current is calculated using the table below.
• Above +40 °C (104 °F), the output current is decreased 3.5 % for every additional 1 °C up to +50 °C (1.94% for every additinoal 1 °F up to 122 °F).
• Example 1. If the ambient temperature is 38 °C, the derating factor for ACx 601-0006-3 is 95 % or 0.95 (Curve 2). The output current is then 0.95 · I2N or I2hd.
Normal Use Heavy-duty Use
ACx 601Type
Duty Cycle 1/10 min
Duty Cycle 1/10 min
Duty Cycle 1)
2/15 sFrameTypeI2N
9/10min[A]
I2Nmax
1/10min[A]
PN
[HP]
I2hd
9/10min[A]
I2hdmax
1/10min[A]
I2hd
13/15s[A]
I2hdmax
2/15s[A]
Phd
[HP]
Three-phase supply voltage 380 V, 400 V, 415 V, 440 V, 460 V, 480 V or 500 V ACx 601-0006-4 7.6 8.4 5 6.2 9.3 6.2 12.4 3 R2ACx 601-0009-4 11 12 7.5 7.6 11 7.6 15.2 5ACx 601-0011-4 15 17 10 11 17 11 22 7.5ACx 601-0016-4 21 23 15 15 23 15 30 10 R3ACx 601-0020-4 27 30 20 19 27 19 36 10ACx 601-0025-4 34 37 25 24 36 24 48 15 R4ACx 601-0030-4 41 45 30 31 47 31 62 20ACx 601-0040-4 52 57 40 41 62 41 82 30 R5ACx 601-0050-4 65 72 50 47 71 47 94 30ACx 601-0060-4 77 85 60 58 87 58 116 40ACx 601-0070-4 96 106 75 68 98 68 130 50 R6ACx 601-0100-4 124 136 100 86 126 86 168 60ACx 601-0120-4 156 172 125 113 168 113 224 75 R7ACx 601-0140-4 180 198 150 141 203 141 270 100
%°C

Appendix A – ACS/ACC/ACP 601 Technical Data
A-4 ACx=ACS/ACC/ACP ACS/ACC/ACP 601 Drives
• Example 2. If the ambient temperature is 122 °F, the output current for ACx 601-0006-3 is first calculated at 104 °F (derating factor 92 % or 0.92 from Curve 2) and the result is multiplied by factor 0.65 (See Example 1 (IP 21/22)). The output current is then 0.92 · 0.65 · I2N or 0.92 · 0.65 · I2hd.
Output Current Ratingsfor IP54 Enclosures
Output current for ACS/ACC/ACP 601 with degree of protection IP 54 and with ambient temperature from 25 °C to 40 °C is presented in the diagram below. I2N total rms output current for normal use, I2hd total rms output current for heavy-duty use, t ambient temperature.
Fuses Recommended input fuse ratings of the ACS/ACC/ACP 601 are below. A minimum rated current in amperes, A2s maximum I2t value, V rated voltage in volts. Only ultra rapid fuses guarantee proper protection for the rectifier semiconductors.
24 26 28 30 32 34 36 38 40 77 86 95 104
1009590858075706560
Curve 1 (100 %
no derating)Curve 2 Curve 3 Curve 4 Curve 5
ACx 601-0005-3 ACx 601-0006-3 ACx 601-0011-3 ACx 601-0009-3 ACx 601-0016-3
ACx 601-0006-5 ACx 601-0009-5 ACx 601-0020-3 ACx 601-0040-3 ACx 601-0070-3
ACx 601-0009-6 ACx 601-0025-5 ACx 601-0025-3 ACx 601-0050-3 ACx 601-0020-5
ACx 601-0011-6 ACx 601-0070-5 ACx 601-0030-3 ACx 601-0011-5 ACx 601-0100-5
ACx 601-0100-6 ACx 601-0016-6 ACx 601-0060-3 ACx 601-0050-5 ACx 601-0070-6
ACx 601-0120-6 ACx 601-0016-5 ACx 601-0060-5
ACx 601-0030-5 ACx 601-0040-6
ACx 601-0040-5 ACx 601-0050-6
ACx 601-0020-6
ACx 601-0025-6
ACx 601-0030-6
ACx 601-0060-6
% of I2N and I2hd
2
3 4
5
1
°C°F

Appendix A – ACS/ACC/ACP 601 Technical Data
ACS/ACC/ACP 601 Drives ACx=ACS/ACC/ACP A-5
ACx 601 Type
Fuses
A A2s V ManufacturerType
DIN 43620Size
Type DIN 43653
Size
ACx 601-0005-3ACx 601-0006-4ACx 601-0006-5
16 48 660 Bussmann 170M1559 000 170M1359 000/80
ACx 601-0006-3ACx 601-0009-4ACx 601-0009-5
16 48 660 Bussmann 170M1559 000 170M1359 000/80
ACx 601-0009-3ACx 601-0011-4ACx 601-0011-5
25 130 660 Bussmann 170M1561 000 170M1361 000/80
ACx 601-0011-3ACx 601-0016-4ACx 601-0016-5
32 270 660 Bussmann 170M1562 000 170M1362 000/80
ACx 601-0016-3ACx 601-0020-4ACx 601-0020-5
40 460 660 Bussmann 170M1563 000 170M1363 000/80
ACx 601-0020-3ACx 601-0025-4ACx 601-0025-5
50 770 660 Bussmann 170M1564 000 170M1364 000/80
ACx 601-0025-3ACx 601-0030-4ACx 601-0030-5
63 1450 660 Bussmann 170M1565 000 170M1365 000/80
ACx 601-0030-3ACx 601-0040-3ACx 601-0040-4ACx 601-0040-5ACx 601-0050-5
80 1250 660 Bussmann 170M3811 1 170M3011 1/80
ACx 601-0050-3ACx 601-0050-4ACx 601-0060-5
125 3700 660 Bussmann 170M3813 1 170M3013 1/80
ACx 601-0060-3ACx 601-0070-5
160 7500 660 Bussmann 170M3814 1 170M3014 1/80
ACx 601-0060-4ACx 601-0070-3ACx 601-0070-4ACx 601-0100-4ACx 601-0100-5
200 28000 660 Bussmann 170M1570 000 170M1370 000/80
ACx 601-0100-3ACx 601-0120-3ACx 601-0120-4ACx 601-0120-5ACx 601-0140-4ACx 601-0140-5
400 105000 660 Bussmann 170M3819 1 170M3019 1/80
ACx 601-0009-6 16 48 660 Bussmann 170M1559 000 170M1359 000/80
ACx 601-0011-6 16 48 660 Bussmann 170M1559 000 170M1359 000/80
ACx 601-0016-6 16 48 660 Bussmann 170M1559 000 170M1359 000/80
ACx 601-0020-6 25 130 660 Bussmann 170M1561 000 170M1361 000/80
ACx 601-0025-6 40 460 660 Bussmann 170M1563 000 170M1363 000/80
ACx 601-0030-6 50 770 660 Bussmann 170M1564 000 170M1364 000/80

Appendix A – ACS/ACC/ACP 601 Technical Data
A-6 ACx=ACS/ACC/ACP ACS/ACC/ACP 601 Drives
Note: Fuses from other manufacturers can be used if they meet the ratings given in the table. Only ultra rapid fuses guarantee the proper protection for the rectifier semiconductors. The fuses recommended in the table are UL recognized.
Example For ACS 601-0120-3, the recommended fuses for the input bridge protection are 400 A ultrarapid fuses.
The values I1N and I1hd for ACS 601-0120-3 are 175 A and 145 A respectively. 1.1 · 175 A = 192.5 A and 1.5 · 145 A = 217 A. Normal fuses with nominal currents higher than 192.5 A or 217 A can be used to protect the input cable; thus, 200 A or 250 A fuses are selected depending on the use (normal or heavy-duty, respectively).
Cable Entries Power and motor cable terminal sizes and tightening torques for the ACS/ACC/ACP 601 with cable diameters accepted by the rubber glands are given below. All power wiring must be rated for 60 °C minimum.
1)The terminals are 10mm (13/32”) bolts for attaching ring lugs (lugs not furnished).
2)IEC version. Range of cable diameters accepted by gland plate holes. For USA version conduit plate drawings, see pages B-9 and B-10.
ACx 601-0040-6 50 770 660 Bussmann 170M1564 000 170M1364 000/80
ACx 601-0050-6 63 1450 660 Bussmann 170M1565 000 170M1365 000/80
ACx 601-0060-6 100 4650 660 Bussmann 170M1567 000 170M1367 000/80
ACx 601-0070-6 100 4650 660 Bussmann 170M1567 000 170M1367 000/80
ACx 601-0100-6 125 8500 660 Bussmann 170M1568 000 170M1368 000/80
ACx 601-0120-6 200 28000 660 Bussmann 170M1570 000 170M1370 000/80
ACx 600 Type
U1,V1,W1 / U2,V2,W2 Ground (PE)
Maximum WIre Size
Cable Ø
mm2)
Tightening Torque
Maximum WIre Size
Cable Ø
mm
ACx 601-0005-3/0006-56mm2
#10 AWG
14...20
1.5...1.8 Nm13-18 lb.-in.
6mm2
#10 AWG
10...14
ACx 601-0006-3/0009-5 14...20 10...14
ACx 601-0009-3/0011-5 14...20 10...14
ACx 601-0009-6/0011-610mm2
#8 AWG
14...2010mm2
#8 AWG
10...14
ACx 601-0011-3/0016-5/0016-6 14...20 10...14
ACx 601-0016-3/0020-5/0020-6 14...20 10...14
ACx 601-0020-3/0025-5/0025-6 16mm2
#6 AWG
14...20 16mm2
#6 AWG
10...14
ACx 601-0025-3/0030-5/0030-6 14...20 10...14
ACx 601-0030-3/0040-5/0040-6 Cu 35mm2
#2 AWGAl 50mm2
#1 AWG
20...26
8Nm5.9 lb.-ft.
35mm2
#2 AWG
10...14
ACx 601-0040-3/0050-5/0050-6 20...26 10...14
ACx 601-0050-3/0060-5 20...26 10...14
ACx 601-0060-3/0070-5/0060-6 70mm2
#00 AWG
26...35 10...14
ACx 601-0070-3/0100-5/0070-6 26...35 10...14
ACx 601-0100-3/0120-5/0100-61) 30 Nm
22 lb.-ft.70mm2
#00 AWGACx 601-0120-3/0140-5/0120-6
ACx 601 Type
Fuses
A A2s V ManufacturerType
DIN 43620Size
Type DIN 43653
Size

Appendix A – ACS/ACC/ACP 601 Technical Data
ACS/ACC/ACP 601 Drives ACx=ACS/ACC/ACP A-7
External Control Connections (NIOC)
External control connections of ACS 600 with standard application software (Factory Macro) are below. External control connections are different with other application macros and softwares (see Firmware Manual).
AC
S 6
01/6
04/6
07N
IOC
Bo
ard
(A2)
Programmable I/O Factory Settings
X21
1 VREF Reference voltage 10 V d.c. 1 kΩ < RL < 10 kΩ2 GND
3 AI1+ Speed reference 0(2) ... 10 VRin > 200 kΩ4 AI1-
5 AI2+ By default, not in use.0(4)... 20 mA, Rin = 100 Ω6 AI2-
7 AI3+ By default, not in use.0(4)... 20 mA, Rin = 100 Ω8 AI3-
9 AO1+ Motor speed 0(4)...20 mA0...motor nom. speed, RL < 700 Ω10 AO1-
11 AO2+ Output current 0(4)...20 mA0...motor nom. current, RL < 700 Ω12 AO2-
X22
1 DI1 Start
2 DI2 Stop
3 DI3 Forward / Reverse1)
4 DI4 ACCEL/DECEL 1/2
5 DI5 Constant speed select 2)
6 - Constant speed select 2)
7 +24V +24 V d.c. max. 100 mA
8 +24V
9 DGND Digital Ground
X23
1 +24 V Auxiliary voltage output, non-isolated, 24 V d.c. 250 mA2 GND
X25
1 RO11 Relay output 1Ready2 RO12
3 RO13
X26
1 RO21 Relay output 2Running2 RO22
3 RO23
X27
1 - Relay output 3Fault (-1)2 -
3 -
=
=
2) Operation: 0 = Open, 1 = Closed
DI 5 DI 6 Output
0
1
0
1
0
0
1
1
Set speed through AI1
Constant Speed 1
Constant Speed 2
Constant Speed 3
1
2
3
5
6
TRANS
Power to link
Link ConnectionsB-
A+
GND
+24 V
Connector X29 for RS 485 connection
4
FAULT
1
2
3
4
5
6
TRANS
Power to link
Link ConnectionsGND
B-
A+
GND
+24 V
Connector X28 for RS 485 connection
1) Parameter 10.3 must be set to REQUEST.
Terminal Block SizeX21, X22, X23, X25, X26, X27: cables 0.5 to 1.5 mm2
(#20 to #16 AWG)X2: cables 0.5 to 2.5 mm2 (#20 to #14 AWG)Control Cable Lead-through Size: Ø: 2 x 3x2...11 mm (IEC units)
Factory settings of application software selection B (type code):DI1: Start, DI2: Stop, DI3: Reverse, DI4: Acc/Dec 2, DI5,6: Constant speed 1 to 3 select.
Fault
A
rpm

Appendix A – ACS/ACC/ACP 601 Technical Data
A-8 ACx=ACS/ACC/ACP ACS/ACC/ACP 601 Drives
External Control Connections (NIOCP)
External control connections of ACP 600 with NIOCP board are below.
Terminal Block X1 Function Specifications
1 +10 V Reference Voltage +10 VDC2 kΩ ≤ RLOAD ≤ 10 kΩ max. 10 mA
2 AGND Analog Ground
3 –10 V Reference Voltage –10 VDC
4 AI1+ External Reference 1: Speed Reference
Analog input signals 1 and 2, signal level ±10 V, input impedance ≥ 20 kΩ, resolution 12 bit
5 AI1–
6 AI2+ External Reference 2: Not defined7 AI2–
8 AO1+SPEED ACT 1
Signal level ±10 V,RLOAD ≥ 1 kΩ ,resolution 8 bit
9 AO1–
Terminal Block X21 DI1 START/STOP
12 digital inputs for different control configurations. Signal level 24 VDC, typical input current 8 mA, opto-isolated as a group, ≤ 8 V = “0”; ≥ 12 V = “1”
2 DI2 RAPID STOP NOT
3 DI3 FAULT RESET
4 DI4 SPEED REF SWITCH
5 DI5 ACC/DEC 1/2 SEL
6 DI6
Not defined
7 DI7
8 DI8
9 DI9
10 DI10
11 DI11
12 DI12
13 +24 DV
Control Voltage Output +24 VDC,total max 135 mA
14 +24 DV
15 +24 DV
16 DGND Digital Ground
Terminal Block X41 +24 V Auxiliary Voltage Output
+24 V2 DGND 0 V
Terminal Block X51 +24 DV Control Voltage Input
2 DO1 ACT SPEED=0 Voltage 24 V, current 10 mA each (internal supply) and 100 mA each (external supply), optoisolated as a group,≤ 8 V = “0”; ≥ 12 V = “1”
3 DO2 RUNNING
4 DO3 FAULT (-1)
5 DO4 ACT SPEED=REF
6 DGND Digital Ground
Terminal Block X7
1 RO1 NCC
1 Relay Output, READY Signal
Max. switching voltage 120 VDC/250 VAC, max switching current/power 2 A at 24 VDC or 250 VAC, 0.4 A at 120 VDC, 500 VA
2 RO1 CM
3 RO1 NOC
Terminal Block X81 UENC+ Power Supply SUBD X6:4
2 SENSE+ Sense+ SUBD X6:5
3 SENSE– Sense– SUBD X6:13
4 UENC– 0 V SUBD X6:12
5 A+ Channel A+ SUBD X6:1
6 A– Channel A– SUBD X6:9
7 B+ Channel B+ SUBD X6:2
8 B– Channel B– SUBD X6:10
9 Z+ Channel Z+ SUBD X6:3
10 Z– Channel Z– SUBD X6:11
rpm

Appendix A – ACS/ACC/ACP 601 Technical Data
ACS/ACC/ACP 601 Drives ACx=ACS/ACC/ACP A-9
Enclosures, Space Requirements
The cabinets, degrees of protection and free space requirements of ACx 600 types are given below.
1) not for ACP 601 units2) The degrees of protection is specified by listing the IEC standard IP (Ingress Protection) number. The first digit of the IP number specifies the protection against solid objects and dirt. The second digit specifies the protection against liquids. IP 00 s an open chassis. NEMA 1 enclosures are comparable to approximately IP 20 and IP 33. NEMA 3R enclosures are comparable to IP 32. NEMA 12 and NEMA 13 enclosures are cmparable to IP 54 to IP 65. NEMA 4 enclosures are comparable to IP 65 or 66.
Heat DIssipationRequirements
ACx 601 drives are self-cooled. The table below gives the heat dissipated into the hot air exhausted from the drives. If the drives are installed in a confined space, the heat must be removed from the area by ventilation or air conditioning equipment.
ACx 600 Type EnclosureDegree of
Protection2)Spaceabove
Spacebelow
Space onleft/right
Space in front/back
601 wall-mounted metal frame IP 22 /IP 541) 12in / 300mm 12in / 300mm 2/2in 50/50mm 0.8/0in 20/0mm
First digit of IP number (protection against solid objects) Second digit of IP number (protection against liquids)0 Not protected Not protected1 Protected against solid objects larger than 50 mm (2 in.) dia. Protected against dripping water2 Protected against solid objects larger than 12 mm (1/2 in.) dia. Protected against downward sprays of water up to 15 degrees
from vertical.3 Protected against solid objects larger than 2.5 mm (0.1 in.) dia. Protected against downward sprays of water up to 60 degrees
from vertical.4 Protected against solid objects larger than 1.0 mm (0.04 in.) dia. Protected against light sprays or splashing water from all
directions - water shall not enter the enclosure in harmful quantities.
5 Dust protected - dust shall not enter the enclosure in sufficient quantity to interfere with satisfactory operation of equipment.
Protected against low pressure sprays of water from all directions - water shall not enter the enclosure in harmful quantities.
6 Dust tight Protected against heavy seas on shipdecks or strong sprays of water from all directions - water shall not enter the enclosure in harmful quantities.
ACx 601 TypeHeat Dissipation
Watts BTU/Hr
ACx 601-0005 150 512
ACx 601-0006 180 615
ACx 601-0009 270 922
ACx 601-0011 330 1130
ACx 601-0016 480 1640
ACx 601-0020 600 2050
ACx 601-0025 750 2560
ACx 601-0030 900 3070
ACx 601-0040 1200 4100
ACx 601-0050 1500 5120
ACx 601-0060 1800 6150
ACx 601-0070 2100 7170
ACx 601-0100 3000 10200
ACx 601-0120 3600 12300
ACx 601-0140 4200 14300

Appendix A – ACS/ACC/ACP 601 Technical Data
A-10 ACx=ACS/ACC/ACP ACS/ACC/ACP 601 Drives
Cooling Air Flow Requirements
Cooling air flow requirements are given below.
Cooling Air Duct Heat dissipations and cooling air flows of ACx 601 in a cooling air duct installation are below.
ACx 601Flow m3/h
Flowft3/h
ACx 601-0005-3/0006-5 40 25
ACx 601-0006-3/0009-5 40 25
ACx 601-0009-3/0011-5 40 25
ACx 601-0011-3/0016-5/0009-6/0011-6 60 35
ACx 601-0016-3/0020-5/0016-6/0020-6 60 35
ACx 601-0020-3/0025-5/0025-6 70 40
ACx 601-0025-3/0030-5/0030-6 100 60
ACx 601-0030-3/0040-5/0040-6 260 155
ACx 601-0040-3/0050-5/0050-6 260 155
ACx 601-0050-3/0060-5 260 155
ACx 601-0060-3/0070-5/0060-6 280 165
ACx 601-0070-3/0100-5/0070-6 280 165
ACx 601-0100-3/0120-5/0100-6 660 390
ACx 601-0120-3/0140-5/0120-6 660 390
Degree of protection
Heat Dissipation Degree of protection
Cooling Air Flow Out
Heatsink Front Section Heatsink Front Section
IP 22 85 % ofACx 600 losses
15 % ofACx 600 losses
IP 22 80 % of air flow 20 % of air flow
IP 54 90 % ofACx 600 losses
10 % ofACx 600 losses
IP 54 100 % of air flow 0 % of air flow

Appendix A – ACS/ACC/ACP 601 Technical Data
ACS/ACC/ACP 601 Drives ACx=ACS/ACC/ACP A-11
Dimensions and Weights
Dimensions and weights of the wall-mounted ACS/ACC/ACP 601 units are given below.
Input Power Connection
Voltage (U1):380/400/415 VAC 3-phase ± 10 % for 400 VAC units380/400/415/440/460/480/500 VAC 3-phase ± 10 % for 500 VAC units525/550/575/600/660 VAC 3-phase ± 10 % for 690 VAC units 690 VAC 3-phase ± 5 % for ACx 607 units
Short Circuit Capability: The rated short time withstand current of ACx 600 is 50 kA 1s.
Frequency: 48 to 63 Hz, maximum rate of change 17 %/s
Imbalance: Max. ± 3 % of nominal phase to phase input voltage
Fundamental Power Factor (cos ϕ1): 0.97 (at nominal load)
Motor Connection Voltage (U2): 0 to U1, 3-phase symmetrical
Frequency: DTC mode: 0 to 3.2 · fFWP . Maximum frequency 300 Hz.
fFWP =
fFWP: Frequency at field weakening point; UNmains: Mains voltage;
ACS 601 TypeHeightmm/in
Widthmm/in
Depthmm/in
Weightkg/lb
0005-3 0006-5 420/16.5 220/8.7 292/11.5 14/31
0006-3 0009-5 420/16.5 220/8.7 292/11.5 14/31
0009-3 0011-5 420/16.5 220/8.7 292/11.5 14/31
0011-3 0016-5 0009-6/0011-6 420/16.5 260/10.2 298/11/7 17.5/39
0016-3 0020-5 0016-6/0020-6 420/16.5 260/10.2 298/11.7 17.5/39
0020-3 0025-5 0025-6 526/20.7 306/12.0 310/12.2 25/55
0025-3 0030-5 0030-6 526/20.7 306/12.0 310/12.2 25/55
0030-3 0040-5 0040-6 715/27.8 306/12.0 360/14.2 35/77
0040-3 0050-5 0050-6 715/27.8 306/12.0 360/14.2 35/77
0050-3 0060-5 715/27.8 306/12.0 360/14.2 35/77
0060-3 0070-5 0060-6 715/27.8 306/12.0 432/17.0 50/110
0070-3 0100-5 0070-6 715 306/12.0 432/17.0 50/110
0100-3 0120-5 0100-6 860/33.9 480/18.9 428/16.9 88/194
0120-3 0140-5 0120-6 860/33.9 480/18.9 428/16.9 88/194
ACT PAR FUNC DRIVE
E NTE R
L OC
R EM
RES ET REF
ACS 600
UNmains
UNmotor· fNmotor

Appendix A – ACS/ACC/ACP 601 Technical Data
A-12 ACx=ACS/ACC/ACP ACS/ACC/ACP 601 Drives
UNmotor: Rated motor voltage; fNmotor: Rated motor frequency
Scalar Control mode (not for ACP 600): 0 to 300 HzWith du/dt Filter (DTC and Scalar Control modes): 0 to 120 Hz
Frequency Resolution: 0.01 Hz
Continuous Current: 1.0 · I2N (normal use)1.0 · I2hd (heavy-duty use)
Short Term Overload Capacity (1 min/10 min): I2Nmax = 1.1 · I2N I2hdmax = 1.5 · I2hd
Peak Overload Capacity (2 s/15 s): 1.5 · I2N (400 and 500 VAC units)2.0 · I2hd (400 and 500 VAC units)1.5 · I2hd (690 VAC units)
1.0 · INSQ
Power Limit: 1.5 · Phd
Overcurrent Trip: 3.5 · I2hd
Field Weakening Point: 8 to 300 Hz
Switching Frequency: 3 kHz (average). In 690 V units 2 kHz (average).
Maximum Recommended Motor Cable Length: 300 m (980 ft.). This is the cumulative length in case of parallel connected motors. For ACx 601-0005-3 to ACx 601-0016-3, ACx 601-0006-5 to ACx 601-0020-5, ACx 601-0009-6 to ACx 601-0020-6, if the motor cable length exceeds 70 meters (230 ft.), an ABB representative should be consulted.
Bearings of motors larger than 90 kW (125 Hp): Insulated bearing at non-driven end is recommended.
Efficiency and Cooling Efficiency: Approximately 98 % at nominal power level
Cooling Method: Internal fan, flow direction from the bottom to the top

Appendix A – ACS/ACC/ACP 601 Technical Data
ACS/ACC/ACP 601 Drives ACx=ACS/ACC/ACP A-13
Ambient Conditions ACx 600 AC drives are to be used in a heated, indoor controlled environment as specified below.
1) At sites over 1000 m (3300 ft) above sea level, the maximum output current is derated 1 % for every additional 100 m (330 ft). If the installation site is higher than 2000 m (6600 ft) above sea level, please contact your local ABB distributor or office for further information.2) See subsection Output Current Temperature Derating, page A-3.
ACS/ACC/ACP 600 Operation installed for stationary use
Storagein the protective package
Transportationin the protective package
Installation Site Altitude
Nominal output power at 0 to 1000 m (3300’) above sea level. 1)
- -
Air Temperature 0 to +40 °C (32 to 104 °F) 2) (IP 21/22 and ACx 607 with IP 54) 0 to +25 °C (32 to 77 °F) 2) (ACx 601 with IP 54)
-40 to +70 °C
-40 to +158 °F
-40 to +70 °C
-40 to +158 °F
Relative Humidity 5 to 95 % Max. 95 % Max. 95 %
No condensation allowed. Maximum allowed relative humidity is 60 % in the presence of corrosive gases.
Contamination Levels(IEC 721-3-3)
No conductive dust allowed.
Boards without coating: Chemical gases: Class 3C2Solid particles: Class 3S2
Boards with coating: Chemical gases: Class 3C3Solid particles: Class 3S2
Boards without coating: Chemical gases: Class 1C2Solid particles: Class 1S3
Boards with coating: Chemical gases: Class 1C2Solid particles: Class 1S3
Boards without coating: Chemical gases: Class 2C2Solid particles: Class 2S2
Boards with coating: Chemical gases: Class 2C2Solid particles: Class 2S2
Atmospheric Pressure
70 to 106 kPa 0.7 to 1.05 atmospheres
70 to 106 kPa 0.7 to 1.05 atmospheres
60 to 106 kPa 0.6 to 1.05 atmospheres
Vibration(IEC 68-2-6)
Max. 0.3 mm (0.01 in) (2 to 9 Hz), max. 1 m/s2 (3.3 ft/s2)(9 to 200 Hz) sinusoidal
Max. 1.5 mm (0.06 in) (2 to 9 Hz), max. 5 m/s2 (16.4 ft/s2) (9 to 200 Hz) sinusoidal
Max. 3.5 mm (0.14 in) (2 to 9 Hz), max. 15 m/s2 49.2 ft/s2) (9 to 200 Hz) sinusoidal
Shock(IEC 68-2-29)
Not allowed Max. 100 m/s2, 11 ms (330 ft/s2)
Max. 100 m/s2, 11 ms (330 ft/s2)
Free Fall Not allowed 250 mm (10in) (weight under 100 kg) (220 lbs)100 mm (4 in)(weight over 100 kg) (220 lbs)
250 mm (10in) (weight under 100 kg) (220 lbs)100 mm (4 in)(weight over 100 kg) (220 lbs)

Appendix A – ACS/ACC/ACP 601 Technical Data
A-14 ACx=ACS/ACC/ACP ACS/ACC/ACP 601 Drives
External Control Connections
Data of the external control connection boards of the ACS 600 product family are given below.
ACS/ACC/ACP 600NIOC-01 Board
ACP 600NIOCP-01 Board
Analog Inputs
The advantage of the differential analog input is that the ground potential of the device or transmitter sending an analog signal can differ up to ± 15 V from the ground potential of the ACx 600 chassis without disturbing the signal. Differential input also efficiently attenuates common mode disturbances coupled to control cables.
ACS 600: Two Programmable Differential Current Inputs: 0 (4) to 20 mA, Rin = 100 Ω
ACC 600: Two Differential Current Inputs: 0 to 20 mA, Rin = 100 Ω
ACP 600: One Programmable Differential Current Input: 0 to 20 mA, Rin = 100 Ω
ACS/ACP 600: One Programmable Differential Voltage Input: ACS 600: 0 (2) to 10 V, Rin > 200 kΩ; ACP 600: 0 to 10 V, Rin > 200 kΩ
ACC 600: One Differential Voltage Input: 0 to 10 V, Rin > 200 kΩ
Common Mode Voltage: ± 15 VDC, max.
Common Mode Rejection Ratio: > 60 dB at 50 Hz
Resolution: 0.1 % (10 bit)
Inaccuracy: ± 0.5 % (Full Scale Range) at 25 °C (77 °F). Temperature Coefficient: ± 100 ppm/°C (56 ppm/ °F), max.
Input Updating Time: 12 ms (ACS 600), 44 ms (ACC 600), 1 ms (ACP 600)
Two Bipolar Differential Voltage Inputs: ± 10 V, Rin = 20 kΩ
Common Mode Voltage: ± 20 VDC, max.
Common Mode Rejection Ratio: > 60 dB at 50 Hz
Resolution: 0.02 % (12 bit)
Accuracy: 11 bit
Inaccuracy: ± 0.1 % (Full Scale Range) at 25 °C (77 °F). Temperature Coefficient: ± 100 ppm/°C (56 ppm/ °F), max.
Input Updating Time: 1 ms
Constant Voltage Output
Voltage: 10 VDC ± 0.5 % (Full Scale Range) at 25 °C (77 °F). Temperature Coefficient: ± 100 ppm/°C (56 ppm/ °F), max.
Maximum Load: 10 mA
Applicable Potentiometer: 1 kΩ to 10 kΩ
Voltage: ± 10 VDC ± 0.5 % (Full Scale Range) at 25 °C ( °F). Temperature Coefficient: ± 100 ppm/°C (56 ppm/ °F), max.
Maximum Load: 10 mA
Applicable Potentiometer: > 1 kΩAuxiliary Power Output
Voltage: 24 VDC ± 10 %, Short circuit proof
Maximum Current: 250 mA (130 mA with NLMD-01 option)
Voltage: 24 VDC ± 10 %, Short circuit proof
Maximum Current: 250 mA
Analog Outputs ACS/ACC 600: Two Programmable Current Outputs: 0 (4) to 20 mA, RL < 700 Ω
ACP 600: One Programmable Current Output: 0 to 20 mA, RL < 700 Ω
Resolution: 0.1 % (10 bit)
Inaccuracy: ± 1 % (Full Scale Range) at 25 °C. Temperature Coefficient: ± 200 ppm/°C (110 ppm/ °F), max.
Output Updating Time: 24 or 100 ms (ACS 600), 44 ms (ACC 600), 8 ms (ACP 600)
One Bipolar Programmable Voltage Output: + 10 V, RL > 10 kΩ
Resolution: 0.02 % (12 bit)
Accuracy: 10 bit
Inaccuracy: ± 0.1 % (Full Scale Range) at 25 °C (77 °F). Temperature Coefficient: ± 200 ppm/°C (110 ppm/ °F), max.
Output Updating Time: 2 ms

Appendix A – ACS/ACC/ACP 601 Technical Data
ACS/ACC/ACP 601 Drives ACx=ACS/ACC/ACP A-15
Digital Inputs ACS/ACP 600: Six Programmable Digital Inputs (Common Ground): 24 VDC, -15 % to +20 %
ACC 600: Six Digital Inputs (Common Ground): 24 VDC, -15 % to +20 %
Logical Thresholds: < 8 VDC “0”, > 12 VDC “1”
Input Current: DI1 to DI 5: 10 mA, DI6: 5 mA
Filtering Time Constant: 1 ms
Thermistor Input: 5 mA, < 1.5 kΩ “1” (normal temperature), > 4 kΩ “0” (high temperature), Open Circuit “0” (high temperature)
Internal Supply For Digital Inputs (+24 VDC): Short circuit proof, group isolated
Isolation Test Voltage: 500 VAC, 1 minute
Input Updating Time: 12 ms (ACS 600), 44 ms (ACC 600), 4 ms (ACP 600)
An external 24 VDC supply can be used instead of the internal supply.
12 Programmable Digital Inputs (Common Ground): 24 VDC, -15 % to +20 %
Logical Thresholds: < 8 VDC “0”, > 12 VDC “1”
Filtering Time Constant: ≤ 50 µs
DI 11 and DI 12 can be used for time measurement between two external events (PROBE1 and PROBE2).
Internal Supply For Digital Inputs (+24 VDC): Short circuit proof, group isolated
Isolation Test Voltage: 500 VAC, 1 minute
Input Updating Time: 1 ms
An external 24 VDC supply can be used instead of the internal supply.
Digital Outputs Four Programmable Digital Outputs: Short circuit proof, Overload protection
Maximum Load: 10 mA with internal 24 V supply, 100 mA with external supply
Output Updating Time: 2 ms
Relay Outputs Three Programmable Relay Outputs
Switching Capacity: 8 A at 24 VDC or 250 VAC, 0.4 A at 120 VDC
Maximum Continuous Current: 2 A rms
Contact Material: Silver Cadmium Oxide (AgCdO)
Isolation Test Voltage: 4 kVAC, 1 minute
Output Updating Time: 100 ms (ACS 600), 44 ms (ACC 600), 8 ms (ACP 600)
One Relay Output
Switching Capacity: 8 A at 24 VDC or 250 VAC, 0.4 A at 120 VDC
Max Continuous Current: 2 A rms
Contact Material: Silver Cadmium Oxide (AgCdO)
Isolation Test Voltage: 4 kVAC, 1 minute
Output Updating Time: 2 ms
DDCS Fiber Optic Link
Protocol: DDCS (ABB Distributed Drives Communication System)
ACS/ACC/ACP 600NIOC-01 Board
ACP 600NIOCP-01 Board

Appendix A – ACS/ACC/ACP 601 Technical Data
A-16 ACx=ACS/ACC/ACP ACS/ACC/ACP 601 Drives
Encoder Signals Characteristic of incremental encoder signals in applications using the incremental encoder (for clockwise rotation, viewed from the drive end) is presented below.
Encoder Input One Encoder Input: 3 channel differential, +5 V encoder supply, frequency ≤ 200 kHz, supply cable resistance compensation. COMBICON connector, 15 pins. Meets the EIA standard RS 422.
Required Encoder Type: Contact ABB Application Engineer or your local ABB Representative fo assistance.
Encoder Signals: Signal level/Load capacity: 5 V rectangular-pulse signals;Time between edges: a > 0,8 µs at fmax ;Edge steepness: tv ≤ 120 ns;Delay of reference signal Z (zero pulse): td ≤ 60 ns;Sampling frequency: fmax = 200 kHz.
ACS/ACC/ACP 600NIOC-01 Board
ACP 600NIOCP-01 Board
a a a a
A+5 V
5 V
5 V
5 V
5 V
5 V
B+
Z+
A-
B-
Z-
a a a a
tv tv
td
td
td
td
tv tv

Appendix A – ACS/ACC/ACP 601 Technical Data
ACS/ACC/ACP 601 Drives ACx=ACS/ACC/ACP A-17
Application Program Various application programs are available for the ACS 600 AC drives. In the tables of this section, the ACS 600 product family program selections are referred to with the following abbreviations. Not all selections are available for all types. One application program at a time can be loaded in the memory of the drive.
Application Macros The macros of the ACS/ACC/ACP application programs are below.
ACS 600 Application Program Abbreviation
Standard ACS
CraneDrive ACC
MotionControl ACP
System MultiDrive
ACS ACC ACP
FACTORY for basic industrial applications
CRANE for normal crane drive SPEED CONTROL for closed loop speed control
HAND/AUTO for local and remote operation
M/F CTRL for two crane drive applications with Master/Follower operation
POSITIONING for point-to-point positioning
PID CONTROL for closed loop processes
USER MACRO 1 & 2 for user’s own customized parameter settings
SYNCHRONIZING for positioning to moving target
TORQUE CONTROL for processes that require torque control
TORQUE CONTROL for processes that require torque control
SEQUENTIAL CONTROL for operation at preset constant speeds
USER MACRO 1 & 2 for user’s own customized parameter settings
USER MACRO 1 & 2 for user’s own customized parameter settings

Appendix A – ACS/ACC/ACP 601 Technical Data
A-18 ACx=ACS/ACC/ACP ACS/ACC/ACP 601 Drives
Languages Languages and application macros included in the ACx 600 software are shown below. Not all selections are available for all types.
*This selection is for the North American market. The default parameter settings in the standard application macros include minor changes to fulfil the local regulations.
Code Application Macros Languages
B* Factory, Hand/Auto, PID Control, Torque Control, Sequential Control
English (UK & Am), French, Spanish, Portuguese
C Factory, Hand/Auto, PID Control, Torque Control, Sequential Control
English (UK & Am), German, Italian, Dutch
D Factory, Hand/Auto, PID Control, Torque Control, Sequential Control
English (UK & Am), Danish, Swedish, Finnish
E Factory, Hand/Auto, PID Control, Torque Control, Sequential Control
English (UK & Am), French, Spanish, Portuguese
F PFC (Pump and Fan Control) English (UK & Am), German, Italian, Dutch
G PFC (Pump and Fan Control) English (UK & Am), Danish, Swedish, Finnish
H PFC (Pump and Fan Control) English (UK & Am), French, Spanish, Portuguese
J Master/Follower + Macros included in selection C
English (UK & Am), German, Italian, Dutch
K Master/Follower + Macros included in selection D
English (UK & Am), Danish, Swedish, Finnish
L Master/Follower + Macros included in selection E
English (UK & Am), French, Spanish, Portuguese
M* Master/Follower + Macros included in selection B
English (UK & Am), French, Spanish, Portuguese
N System application (ACS 600 MultiDrive software)
English
P ACP 600: Torque Control, Speed Control, Positioning, Synchronizing
English, German
Q ACP 600: Torque Control, Speed Control
English, German
S ACC 600 software English
T Template application(FCB Programmable)
English
Y Special software English

Appendix A – ACS/ACC/ACP 601 Technical Data
ACS/ACC/ACP 601 Drives ACx=ACS/ACC/ACP A-19
Protection Features Application program dependent features of the ACx 600 are listed below. available as standard, optional
Preprogrammed Warnings: ACS 600 temperature, Motor Identification Run, Drive Identification Number change, User Macro, Target position (ACP), Positioning speed (ACP).
Programmable Automatic Reset Functions (ACS 600 only): after overcurrent, overvoltage, undervoltage and analog input below minimum value
Information Functions: ACx 600 control software version, ACx 600 application software version, ACx 600 test date.
Preprogrammed Faults
ACS
ACC ACP
MultiDrive
Programmable Fault Functions
ACS
ACC ACP
MultiDrive
Programm. Supervision Functions
ACS
ACC ACP
MultiDrive
ACx 600 temperature Analog input below minimum value
Speed 2 2
Overcurrent Loss of Control Panel Motor current
Short circuit External fault Motor torque 2 2
DC overvoltage Motor overtemperature
Motor speed
Supply phase Thermistor/Pt 100 Reference 1
DC undervoltage Motor stalled Reference 2
Overfrequency Motor underload Actual value 1
Overspeed Loss of motor phase Speed threshold
Internal fault Ground fault Torque threshold
Internal fault on theI/O control board
Speed measurement Position error
Ambient temperature Motor overspeed Position threshold
User Macro Torque Joystick
Braking chopper (in fieldbus mode)
Torque proving Brake long falling time
Inverter overload Brake
No motor data Communication test
ID Run fail Following error
Position limits
Maximum speed alteration
Speed difference
Communication errorEncoder interface module

Appendix A – ACS/ACC/ACP 601 Technical Data
A-20 ACx=ACS/ACC/ACP ACS/ACC/ACP 601 Drives
Applicable Standards The ACS 600 complies with the following standards:
• EN 60204-1: 1992 + Corr. 1993 (IEC 204-1). Safety of machinery. Electrical equipment of machines. Part 1: General requirements. Provisions for compliance: The final assembler of the machine is responsible for installing - an emergency-stop device - a supply disconnecting device (ACx 601 and ACx 604) - the ACx 604 (IP 00) into a separate casing.
• EN 60529: 1991 (IEC 529), IEC 664-1: 1992. Degrees of protection provided by enclosures (IP code).
• EN 61800-3 (1996): EMC product standard including specific test methods.
Materials
Disposal ACx 600 contains raw materials that should be recycled, thus preserving energy and natural resources. Package materials of ACx 600 units and options are environmentally compatible and recyclable. All metal parts can be recycled. The plastic parts can either be recycled or burned under controlled circumstances, according to local regulations. If recycling is not feasible, all parts excluding electrolytic capacitors can be landfilled. The DC capacitors of the unit contain electrolyte which is classified as hazardous waste. (Location of the electrolytic capacitors is shown on a sticker in the back of the front cover, C11 to C13.) They must be removed and handled according to local regulations.
For further information on environmental aspects, please contact your local ABB distributor.
CE Marking A CE mark is attached to ACx 601/607 drives to verify that the unit follows the provisions of the European Low Voltage and EMC Directives (Directive 73/23/EEC, as amended by 93/68/EEC and Directive 89/336/EEC, as amended by 93/68/EEC).
Compliance with theEMC Directive
EMC stands for Electromagnetic Compatibility. It is the ability of electrical/electronic equipment to operate without problems within an electromagnetic environment. Likewise, the equipment must not disturb or interfere with any other product or system within its locality.
Enclosure (ACx 601)Thickness of Coating
Color
PS (polystyrene) 3 mm (0.12 in) NCS 1502-Y (RAL 90021 / PMS 420 C)
hot-dip zinc coated steel sheet 1.5 to 2 mm(0.06 to 0.08 in) painted with epoxy polyester powder paint
60 µm NCS 8502-Y (RAL 9004 / PMS 426 C) semigloss
anodized aluminium profile (R2 to R6) black ES 900
Package (ACx 601)
corrugated board (frames R2 to R5 and option modules), plywood (R6). Plastic covering of the package: PE-LD, bands PP or steel.

Appendix A – ACS/ACC/ACP 601 Technical Data
ACS/ACC/ACP 601 Drives ACx=ACS/ACC/ACP A-21
The EMC Directive defines the requirements for immunity and emissions of electrical equipment used in European Economic Area. The EMC product standard EN 61800-3 covers the requirements stated for drives.
The ACx 601 drives comply with the EMC Directive in industrial low-voltage network, public low-voltage network (restricted distribution) and IT networks (ungrounded power) with the following provisions:
Industrial Low-VoltageNetwork
1. It is ensured that no excessive emission is propagated to neighboring low-voltage networks. In some cases, the natural suppression in transformers and cables is sufficient. If in doubt, the ACx 600 can be equipped with EMC filtering (refer to Table A-1) or the supply transformer with static shielding between the primary and secondary windings can be used.
2. The ACx 601 is installed with motor and control cables as specified in this manual.
Note: It is recommended to equip the ACx 600 with the EMC filtering if there is equipment sensitive to conducted emission connected to the same supply transformer as the ACx 600.
Table A-1 The EMC filtering of the ACx 600 units is marked in the type code as follows. * du/dt Filters + EMC Filters, ** du/dt Filters + No EMC Filters, *** EMC Cabinet with EMC Filters.
ACS 600 TypeType Code
Character no. EMC Filter Selections
No EMC Filter Selections
ACS/ACC/ACF/ACP 601 ACxxxxxxxxxxxxxxxxxxxx
20
0 9
ACS/ACC/ACF/ACP 604 ACxxxxxxxxxxxxxxxxxxxx
20
0 9
ACS/ACC/ACF/ACP 607(55 to 630 kW)
ACxxxxxxxxxxxxxxxxxxxx
20
0, 3* 5**, 9
ACS/ACC 607(630 to 3000 kW)
ACxxxxxxxxxxxxxxxxxxxxxxxxx...
26
1, 2*** 0,
ACS 600 MultiDriveSupply Section ACA63xxxxxxxxxxxxx...
16
1, 2*** 0
Drive Section ACA610xxxxxxxxxxxx...
16
1 0

Appendix A – ACS/ACC/ACP 601 Technical Data
A-22 ACx=ACS/ACC/ACP ACS/ACC/ACP 601 Drives
Use of the ACx 600 in Second Environment without EMC filtering (EN 61800-3: second environment includes all establishments other than those directly connected to a low-voltage power supply network which supplies buildings used for domestic purposes.)
Public Low-VoltageNetwork
1. The ACx 600 is equipped with EMC filtering (refer to Table A-1).
2. The ACx 601 is installed with motor and control cables as specified in this manual.
3. Maximum cable length is 100 meters.
Without considering the EMC requirements, do not use the ACx 600 on a low voltage public network supplying domestic premises. This kind of use might cause radio frequency interference.
Ungrounded Power(IT Network)
1. It is ensured that no excessive emission is propagated to neighboring low-voltage networks. In some cases, the natural suppression in transformers and cables is sufficient. If in doubt, the supply transformer with static shielding between the primary and secondary windings can be used.
2. The ACx 601 is installed with motor and control cables as specified in this manual.
Note: The ACx 600 must not be equipped with EMC filtering (refer to Table A-1) when installed to floating networks. The power becomes connected to ground potential through the EMC filter capacitors. In floating networks this may cause danger or damage the unit.
Machinery Directive ACx 601/604/607 drives comply with the European Union Machinery Directive (89/392/EEC) requirements for an equipment intended to be incorporated into machinery.
UL/CSA Markings The UL/ULC/CSA markings of the ACS 600 drives are listed below (x).
1) the approval is valid up to 600 V
ACx 600 Type UL ULC CSA
ACS 601 (IP 22) 400 V, 500 V and 6001) V ranges
x x x
ACS 601 (IP 54) x x pendingACS 604 frame sizes R7 to R9400 V, 500 V and 6001) V ranges
x x x
ACS 604 600 V parallel connected units
pending pending pending
Low voltage
Equipment
Low voltage
Equipment
Equipment(victim)
Supply transformer
Medium voltage network
Static shield
Point of measurement
ACx 600
Neighboring network

Appendix A – ACS/ACC/ACP 601 Technical Data
ACS/ACC/ACP 601 Drives ACx=ACS/ACC/ACP A-23
UL ACS 600 is suitable for use in a circuit capable of delivering not more than 65 kA rms symmetrical amperes at 480 V maximum (500 V units), and at 600 V maximum (690 V units).
ACS 600 provides overload protection (if selected) in accordance with the National Electrical Code (US). See ACS 600 Firmware Manual
ACS 600 drives are to be used in a heated indoor controlled environment. See subsection Ambient Conditions for specific limits.
Equipment Warranty and Liability
General: ABB warrants the Equipment supplied by ABB against defects in material and workmanship for a period of twelve (12) months after installation or twenty four (24) months from date of shipment from factory, whichever first occurs.
Should any failure to conform with the applicable warranties appear during the specified periods under normal and proper use and provided the Equipment has been properly stored, installed, operated and maintained, and if given prompt notice by Purchaser, ABB shall correct such nonconformity, at its option; by (1) repair or replacement of the nonconforming equipment or parts thereof. Repairs or replacements pursuant to warranty shall not renew or extend the applicable original equipment warranty period, provided however, that any such repairs or replacement of equipment or parts thereof shall be warranted for the time remaining of the original warranty period or 30 days, whichever is longer.
ABB shall not be responsible for providing working access to the defect, including disassembly and reassembly of equipment or for providing transportation to and from repair or factory facility, all of which shall be at Purchaser’s risk and expense.
These warranties shall not apply to any Equipment or parts thereof which (1) have been improperly repaired or altered; (2) have been subjected to misuse, negligence or accident; (3) have been used in a manner contrary to ABB’s instructions; (4) are comprised of materials provided or designed stipulated by Purchaser; or (5) are used equipment.
The foregoing warranties are exclusive and in lieu of all other warranties of quality and performance, written, oral or implied, and all other warranties including any implied warranties of merchantability or fitness for a particular purpose are hereby disclaimed by ABB and all equipment manufacturers.
Correction of nonconformities in the manner and for the period of time provided above shall be the Purchaser’s exclusive remedy and shall constitute fulfilment of all liabilities of ABB and any Equipment manufacturer (including any liability for direct, indirect, special, incidental or consequential damages) whether in warranty, contract, negligence, tort, strict liability, or otherwise with respect to any nonconformance of or defect or deficiency in the equipment supplied or services furnished hereunder.
Limitation of Liability IN NO EVENT SHALL ABB, ITS SUPPLIERS OR SUBCONTRACTORS BE LIABLE FOR SPECIAL, INDIRECT, INCIDENTAL OR CONSEQUENTIAL DAMAGES, WHETHER IN CONTRACT, WARRANTY, TORT, NEGLIGENCE, STRICT LIABILITY OR OTHERWISE, including, but not limited to loss of profits or revenue, loss of use of the Equipment or any associated equipment, cost of capital, cost of substitute equipment, facilities or services, downtime costs, delays, or claims of customers of the Purchaser or other third parties for such or other damages. ABB’s liability on any claim whether in contract, warranty, negligence, tort, strict liability, or otherwise for any loss or damage arising out of, connected with, or resulting from the contract or the performance or breach thereof, or from the design, manufacture, sale, delivery, resale, repair, replacement, installation, technical direction of installation, inspection, operation or use of any equipment covered by or in connection therewith, shall in no case exceed the purchase price of the Equipment or part thereof or services which give rise to the Claim.
All clauses of action against ABB arising out of or relating to the contract or the

Appendix A – ACS/ACC/ACP 601 Technical Data
A-24 ACx=ACS/ACC/ACP ACS/ACC/ACP 601 Drives
performance or breach hereof shall expire unless brought within one year of the time of accrual thereof.
In no event, regardless of cause, shall ABB assume responsibility for or be liable for penalties or penalty clauses of any description or for indemnification of customer or others for costs, damages, or expenses each arising out of or related to the goods or services of the order.
Your local distributor or ABB office may hold different guarantee details, which are specified in the sales terms, conditions, or guarantee terms. These terms are available on request.
If you have any questions concerning your ABB drive, please contact the local distributor or ABB office. The technical data, information and specifications are valid at the time of printing. The manufacturer reserves the right to modifications without prior notice.

ACS/ACC/ACP 601 Drives ACx=ACS/ACC/ACP B-1
Appendix B – ACS/ACC/ACP 601Dimensional Drawings
The following drawing package is effective from 5/10/98.
Gland Plate Holes (IEC Units)Frame R2
ACx = ACS/ACC/ACP
R3ACx =
ACS/ACC/ACP
R4ACx =
ACS/ACC/ACP
R5ACx =
ACS/ACC/ACP
R6ACx =
ACS/ACC/ACP
R7ACx =
ACS/ACC/ACP
Hole ACx 601-0005-3ACx 601-0006-3ACx 601-0009-3ACx 601-0006-5ACx 601-0009-5ACx 601-0011-5
mm
ACx 601-0009-6ACx 601-0011-3/-6ACx 601-0016-3ACx 601-0016-5/-6ACx 601-0020-5/-6
mm
ACx 601-0020-3ACx 601-0025-3/-6ACx 601-0025-5ACx 601-0030-5/-6
mm
ACx 601-0030-3ACx 601-0040-3ACx 601-0050-3ACx 601-0040-5/-6ACx 601-0050-5/-6ACx 601-0060-5
mm
ACx 601-0060-3/-6ACx 601-0070-3ACx 601-0070-5/-6ACx 601-0100-5
mm
ACx 601-0100-3/-6ACx 601-0120-3ACx 601-0120-5/-6ACx 601-0140-5
mm
SIGN 23 23 29 29 29 29
IN/OUT 29 29 37 37 48 60
BR 29 29 29 37 37 60
23 23 23 23 23 29

Appendix B – ACS/ACC/ACP 601 Dimensional Drawings
B-2 ACx=ACS/ACC/ACP ACS/ACC/ACP 601 Drives
Frame R2
Air out Main air out
Air out
Air in Air in
TYPE (ACx = ACS/ACC/ACP) WEIGHT
ACx 601-0005-3 14 kg
ACx 601-0006-3 14 kg
ACx 601-0009-3 14 kg
ACx 601-0006-5 14 kg
ACx 601-0009-5 14 kg
ACx 601-0011-5 14 kg
Fla
nge
mou
ntin
g
Wal
l mou
ntin
g

Appendix B – ACS/ACC/ACP 601 Dimensional Drawings
ACS/ACC/ACP 601 Drives ACx=ACS/ACC/ACP B-3
Frame R2 Flange Mounting
Frame R3 Flange Mounting

Appendix B – ACS/ACC/ACP 601 Dimensional Drawings
B-4 ACx=ACS/ACC/ACP ACS/ACC/ACP 601 Drives
Frame R3
TYPE (ACx = ACS/ACC/ACP) WEIGHT
ACx 601-0011-3 17.5 kg
ACx 601-0016-3 17.5 kg
ACx 601-0016-5 17.5 kg
ACx 601-0020-5 17.5 kg
ACx 601-0009-6/0011-6 17.5 kg
ACx 601-0009-6/0020-6 17.5 kg
Air out
Air in Air in
Air outAir out
Bottom view
Flange m
ounting
Wall m
ounting

Appendix B – ACS/ACC/ACP 601 Dimensional Drawings
ACS/ACC/ACP 601 Drives ACx=ACS/ACC/ACP B-5
Frame R4
TYPE (ACx = ACS/ACC/ACP) WEIGHT
ACx 601-0020-3 25 kg
ACx 601-0025-3 25 kg
ACx 601-0025-5 25 kg
ACx 601-0030-5 25 kg
ACx 601-0025-6 25 kg
ACx 601-0030-6 25 kg

Appendix B – ACS/ACC/ACP 601 Dimensional Drawings
B-6 ACx=ACS/ACC/ACP ACS/ACC/ACP 601 Drives
Frame R4 Flange Mounting
Frame R5/R6 Flange Mounting

Appendix B – ACS/ACC/ACP 601 Dimensional Drawings
ACS/ACC/ACP 601 Drives ACx=ACS/ACC/ACP B-7
Frame R5/R6
TYPE (ACx = ACS/ACC/ACP) WEIGHT L1
ACx 601-0030...0050-3 35 kg 190.5
ACx 601-0040...0060-5 35 kg 190.5
ACx 601-0040-6/-0060-6 35 kg 190.5
ACx 601-0060...0070-3 50 kg 262.5
ACx 601-0070...0100-5 50 kg 262.5
ACx 601-0060-6/-0070-6 50 kg 262.5

Appendix B – ACS/ACC/ACP 601 Dimensional Drawings
B-8 ACx=ACS/ACC/ACP ACS/ACC/ACP 601 Drives
Frame R7
TYPE (ACx = ACS/ACC/ACP) WEIGHT
ACx 601-0100-3/-6 88 kg
ACx 601-0120-3 88 kg
ACx 601-0120-5/-6 88 kg
ACx 601-0140-5 88 kg
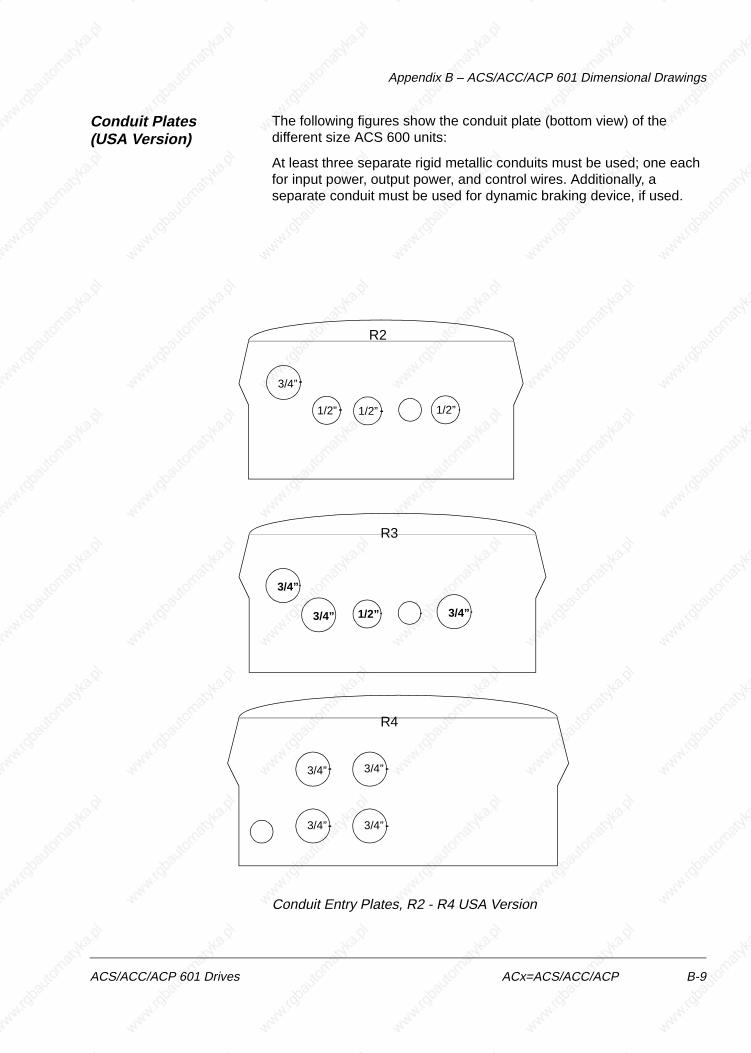
Appendix B – ACS/ACC/ACP 601 Dimensional Drawings
ACS/ACC/ACP 601 Drives ACx=ACS/ACC/ACP B-9
Conduit Plates (USA Version)
The following figures show the conduit plate (bottom view) of the different size ACS 600 units:
At least three separate rigid metallic conduits must be used; one each for input power, output power, and control wires. Additionally, a separate conduit must be used for dynamic braking device, if used.
Conduit Entry Plates, R2 - R4 USA Version
R4
R3
R2
3/4”
1/2”
3/4”3/4”
3/4” 3/4”
1/2” 1/2”
3/4”
1/2”3/4” 3/4”

Appendix B – ACS/ACC/ACP 601 Dimensional Drawings
B-10 ACx=ACS/ACC/ACP ACS/ACC/ACP 601 Drives
Figure 2-1 Conduit Entry Plates, R5- R7 USA Version
R7
R5
3/4”
1-1/4” 1-1/4”
1-1/4”
R6
3/4”
1-1/2” 1-1/2”
1-1/4”
2-1/2” 2-1/2” 2-1/2”

Appendix B – ACS/ACC/ACP 601 Dimensional Drawings
ACS/ACC/ACP 601 Drives ACx=ACS/ACC/ACP B-11
ACP 601 Control Cable Connections
The deliveries include a bag with four clamps, screws and copper tape (frame size R4 also an assembly plate). Clamp the control and encoder cables as explained below. If more than four cables are needed, connect the twisted screen (grounding wires) of the additional cables as short as possible to the grounding rail next to the NIOC(P) board. Clamping is very important with the encoder cable but less so with relay and other digital signal cables.
1. Strip the cable according to figure below.
2. Frame size R4 only: fasten the assembly plate with screws to the frame.
3. Connect the conductors to the appropriate terminals on the NIOC/NIOCP board.
4. Ensure 360 degrees grounding by coiling copper tape onto the stripped part of the cable undereneath the clamp.
5. Fasten the clamps to the frame with screws.
6. Twist the screen (grounding wires) of the outer shield and connect it through the shortest possible route (max. 2 cm) to the nearest grounding terminal. With double shielded cables, connect each conductor shield (twisted grounding wires) separately to the nearest grounding terminal. Conductor shields of other than encoder cables can be twisted together.
Single shielded cable
Double shielded cable

Appendix B – ACS/ACC/ACP 601 Dimensional Drawings
B-12 ACx=ACS/ACC/ACP ACS/ACC/ACP 601 Drives
ACP 601 Frame R4
Clamp
Assembly plate
Stripped part of cable
Grounding rail
Encoder cable
Screw for encoder cable grounding

Appendix B – ACS/ACC/ACP 601 Dimensional Drawings
ACS/ACC/ACP 601 Drives ACx=ACS/ACC/ACP B-13
ACP 601 Frame R5/R6
Clamp
Stripped part of cable
Grounding rail
Encoder cable
Screw for encoder cable grounding

Appendix B – ACS/ACC/ACP 601 Dimensional Drawings
B-14 ACx=ACS/ACC/ACP ACS/ACC/ACP 601 Drives

ACS/ACC/ACP 601 Drives ACx=ACS/ACC/ACP C-1
Appendix C – IEC Installation
IEC Installations This appendix is a supplement to Chapter 3 – Electrical Installation. It contains additional information to be used in IEC installations. For installations requiring CE compliance, refer also to the section entitled CE Marking in Appendix A.
Power Cables For ACx 601 frame size R5 and larger or larger 30 kW motors symmetrical shielded motor cable must be used (figure below). A four-conductor system can be used up to frame size R4 with up to 30 kW motors, but shielded symmetrical motor cable is recommended.
A four-conductor system is allowed for power cabling, but shielded symmetrical cable is recommended. To operate as a protective conductor, the shield conductivity must be at least 50 % of the conductivity of the phase lead.
Compared to a four-conductor system, the use of symmetrical shielded cable reduces electromagnetic emission of the whole drive system as well as motor bearing currents and wear.
The motor cable and its PE pigtail should be kept as short as possible in order to reduce electromagnetic emission as well as capacitive current.
Alternative Power CableTypes
Power cable types that can be used with ACx 600 are represented below.
Symmetrical shielded cable: three phase conductors and a concentric or otherwise symmetrically constructed PE conductor, and a shield
Recommended
PE conductor and shield
Shield Shield
A separate PE conductor is required if the conductivity of the cable shield is < 50 % of the conductivity of the phase conductor.
A four-conductor system: three phase conductors and a protective conductor.
Shield
PE
PE
PE
Not allowed for motor cables larger than 10 mm2 (motors > 30 kW).
Not allowed for motor cables

Appendix C – IEC Installation
C-2 ACx=ACS/ACC/ACP ACS/ACC/ACP 601 Drives
Motor Cable Shield To effectively supress radiated and conducted radio-frequency emissions, the shield conductivity must be at least 1/10 of the phase conductor conductivity. One way of evaluating the effectiveness of the shield is the shield inductance, which must be low and only slightly dependent on the frequency. These requirements are easily met with a copper or aluminium shield. The minimum requirement of the motor cable shield of the ACx 600 is shown below. It consists of a concentric layer of copper wires with an open helix of copper tape. The better and tighter the shield is, the lower is the emission level and the bearing currents.
Cable Routing The motor cable should be installed away from other cable routes. Motor cables of several drives can be run in parallel installed next to each other. It is recommended that the motor cable, power cable and control cables be installed on separate trays (minimum distance 500 mm (20”)). Long parallel runs of motor cable with other cables should be avoided in order to decrease electromagnetic interference caused by the rapid changes in the frequency converter output voltage.
Where control cables must cross power cables make sure they are arranged at an angle as near to 90 degrees as possible. Extra cables should not be run through the ACx 600.
The cable trays have good electrical bonding to each other and to the grounding electrodes. Aluminium tray systems can be used to improve local equalizing of potential.
Below is a diagram of cable routing.
Insulation jacket Copper wire screen Helix of copper tape
Cable core
Inner insulation
ACT PAR FUNC DRIVE
ENTER
LOC
REM
RESET REF
ACS 600
90 ° min 500 mm (20”)
Motor cable Power cable
Control cables
min 300 mm (12”)

Appendix C – IEC Installation
ACS/ACC/ACP 601 Drives ACx=ACS/ACC/ACP C-3
Earthing, Power, andMotor Cable Connections
1. Lead the power cable through the INPUT cable entry, and the motor cable through the OUTPUT entry into the unit. Frame R7: Remove the rubber grommets from the INPUT and OUTPUT entries and cut them to adequate diameter for the power and the motor cable. To ensure proper sealing cut along the diameter marking which corresponds to the cable diameter.
2. Connect the phase conductors of the power cable to the U1, V1 and W1 terminals and the phase conductors of the motor cable to the U2, V2 and W2 terminals.
3. Connect the twisted screen of the power cable to the grounding terminal. Perform the same with the motor cable screen.
Connect the additional PE conductors (if present) of the power and motor cables to the grounding terminal. Connect the separate PE conductor (if used) to the grounding terminal.
Control CableConnections
1. Lead the cable inside the unit through the SIGN entry.
Connect the conductor in appropriate terminal at the NIOC/NIOCP board (A2, refer Appendix A and Firmware Manual) and tighten screw to secure connection. Connect the twisted screen (grounding wires) to
1) Alternative to earthing of the ACx 601 and the motor through the cable screen. Note: Connecting the fourth conductor of the motor cable at the motor end increases bearing currents, thus causing extra wear.
2) Used if the conductivity of the cable screen is < 50 % of the conductivity of the phase conductor.
For minimum radio frequency interference (RFI) at the motor end, earth the cable screen 360 degrees at the lead-through of the motor terminal box or earth the cable by twisting the screen (flattened width > 1/5 · length).
Earth the other end of the mains cable at the distribution board.
Recommended earthing, mains and motor cable connections are presentedbelow. See Appendix B – Dimensional Drawings to locate the terminals
Cable Connections

Appendix C – IEC Installation
C-4 ACx=ACS/ACC/ACP ACS/ACC/ACP 601 Drives
the grounding rail next to the NIOC/NIOCP board.
Components Connected to Digital/Analog Inputs
WARNING! IEC 664 requires double or reinforced insulation between live parts and the surface of accessible parts of electrical equipment which are either non-conductive or conductive but not connected to the ground (PE).
To fulfil this requirement, the connection of a thermistor (and other similar components) to the digital inputs of ACx 600 can be implemented in three alternate ways:
1. There is double or reinforced insulation between the thermistor and live parts of the motor.
2. Circuits connected to all digital and analog inputs of the ACx 600
are protected against contact, and
insulated with basic insulation (the same voltage level as the converter main circuit) from other low voltage circuits.
3. An external thermistor relay is used. The insulation of the relay must be rated for the same voltage level as the converter main circuit.


ABB Industrial Systems, Inc. 16250 W. Glendale DriveNew Berlin, WI 53151
Telephone (414) 785-3416Fax (414) 785-8525
Service (800) 243-4384
AC
S 6
01-5
.0-U
S-0
43A
UA
4890
02B
4973
R01
01 R
EV
AE
FF
EC
TIV
E:
1
0/1/
98S
UP
ER
SE
DE
S:
NO
NE