adding and mapping to hosts with storage networking...
TRANSCRIPT

Adding and Mapping to Hosts with Storage Networking (SNW).docx p.1
Adding and Mapping to Hosts with Storage Networking (SNW)
A feature of the Scalar i2000 and i6000 Intelligent Libraries in their Advanced Configuration installation is to make administration of the library and its presentation of library resources to various host computers on your SAN much easier than the standard configuration as all that is necessary at your SAN infrastructure level is to ensure the library and its SAN connected ports are in the same zone as all hosts that will see some or all of the library resources. Which resources the host will see is performed through the library interface.
Before following the instructions in this document you will need to verify that the host computer you wish to provide library
access to has been added to the same zones as the library’s SAN connected ports. This document covers the steps
necessary for adding hosts in to a Scalar i2000 or Scalar i6000 library in which you are using the Storage Networking
licensed feature. If your library is configured for IO Blades to provide connectivity to your SAN you will want to refer to the
document, ‘Adding and Mapping to Hosts with Fibre Channel IO Blades’.
If you are uncertain of what hardware you have available in your library you can login to the library interface and using the
top level menu bar go to ‘Monitor’ and ‘Drives’. Each row of the displayed table will represent a single drive. There is an ‘IO
Blade’ column and an ‘EEB’ Column (You may need to scroll the table to see these columns as they are on the left side of
the table). If the tape drive is connected through an IO Blade it will have the library coordinates for the IO Blade listed in
this column. If the tape drive is a SNW drive it will show ‘Connected’ in the EEB column.
Note: IO Blades and Ethernet Expansion Blades (EEB) that are used for SNW drives can exist together in the same
library but tape drives must be connected to one or the other, never both.
The following instructions presume that you are adding host access to an existing library. If this is your initial configuration
of the library we recommend you work with your Quantum Engineer if configuration assistance was purchased. If
configuration assistance was not purchased please refer to your User’s Guide for initial configuration instructions.
Please Note: The Scalar i6000 and Scalar i2000 Library often provide more than one
method to accomplish a user action. We often provide a Wizard for ease of use and
quick setup using the most popular default options but many times we also provide a
more advanced method of manual configuration.
Your firmware revision as well may affect the method in which you are able to
perform actions. Before reading on, please refer to the Knowledge Base article Scalar
i2000 and Scalar i6000: Determining Your Library Firmware Revision to assist you in
determining your firmware revision to assist you in determining which steps below to
perform to accomplish your goal.

Adding and Mapping to Hosts with Storage Networking (SNW).docx p.2
i10 Family of firmware:
Quantum Scalar i2000 and i6000 Intelligent Libraries using HP LTO-5 and HP LTO-6 tape drives have several possible
configurations and considerations in order to properly present the library partitions (logical libraries) and the tape drives to
the hosts. Before reading on you will want to confirm your purchased licenses for the Scalar Library.
Using the library control panel (either remotely or physically) login and using the top menu bar go to ‘Setup’ and ‘Licenses’.
If you see licenses for Storage Networking (SNW) you will be able to control which tape drives the hosts are able to see
from the library interface using our Storage Networking features. If you do not have SNW licenses your only method to
control which HP LTO-5 and HP LTO-6 SNW drives are seen at the host is through your san switch and zoning unless these
drives are connected to a Fibre Channel IO Blade. If that is the case please refer to the document, ‘Adding and Mapping to
Hosts with Fibre Channel IO Blades’.
Note: If you have connected your tape drives to the san before applying your Storage Networking Licenses all hosts
that can see the tape drives will no longer be able to see the tape drives once a SNW license is applied to the tape
drive. This is due to the library assuming control of drive presentation to hosts.
Providing a Control Path for the logical library or providing host access to SNW Licenses tape drives will only be
accomplished with the Storage Networking Wizard. Instructions for both processes follow.
Configuring a Robotics Control Path with Storage Networking (SNW)Tape Drives
With a library partition configured for Storage Networking, each partition will need to have a defined control path. Absent a SNW license, only a single tape drive can be used to provide the Control Path bridging to the host. With a SNW license you can provide both Data path and Control path failover allowing for either the secondary fibre port on the HP LTO-5 or HP LTO-6 tape drive to become active should the primary fail or for another HP LTO-5 or LTO-6 tape drive become the Control path for the library partition should the primary control path drive fail.
Caution: When connecting a Scalar Intelligent Library to a san with multiple hosts and using the control path
functionality it is important to note that if you do not have a Storage Networking license every host that can see
the defined Control Path Tape Drive will also see, and have the potential to control, the presented logical library
robotics.
You can configure HP LTO-5 or LTO-6 FC drives as the control path for a partition. The drive must not be connected to an FC I/O blade, but it must be connected to an Ethernet Expansion Blade (EEB).
Note: The control path drive and control path failover settings are configured on the same screen. You do not need an SNW license to configure a drive for control path.
1. Log on as an administrator. 2. Access the appropriate screen in one of two ways:
Select Setup > Partitions > Control Path from the main console.

Adding and Mapping to Hosts with Storage Networking (SNW).docx p.3
Select Setup > Drives > Access > SNW Wizard. Click Next. From the Select Storage Networking Option screen, select Control Path and click Next.
The Storage Networking Partitions dialog box appears, displaying all partitions that contain drives eligible to for control path bridging (HP LTO-5 or LTO-6 drives connected to an Ethernet Expansion blade).
3. Click to highlight the row containing the partition whose control path settings you want to configure. 4. Click OK.
The Control Path dialog box appears.
5. Click the Enable Control Path check box. 6. A check box appears and the CP Drive drop-down list is enabled. 7. From the CP Drive drop-down list select the drive you want to configure as the control path. 8. The primary CP drive you selected is highlighted in yellow. 9. If you want to configure control path failover, you must have a SNW license with sufficient licensed drive
counts to configure a CPF drive. 10. Click OK.

Adding and Mapping to Hosts with Storage Networking (SNW).docx p.4
11. An Operation in Progress dialog box appears. 12. The control path drive is configured.
Configuring Host Access with Storage Networking (SNW) Tape Drives
This section presumes that you are adding a host to an existing library and configuration. As such we only touch lightly on
the Storage Networking configuration options. Before continuing on you will want to be certain you aware of the Host
Access Group you will want to add the new host to. Generally, a Host Access Group consists of a number of hosts that will
be using the same backup tape drives in a partition. If you are wanting to create a new Host Access Group or present a new
partition to one or more hosts you will want to refer to the Scalar i6000 User’s Guide or the document, ‘Scalar Intelligent
Library Storage Networking Primer’.
The SNW Host Access feature provides a way to limit host access to specific SNW tape drives and partitions via the library interface.
This section covers:
Viewing All Access Groups on page 4
Requirements for Host Access on page 5
Configuring Hosts on page 5
Modifying Host Access Groups on page 11
Without host access restrictions, all hosts can view all drives connected to the SAN and all partitions to which there is a library control path. Host access gives you the ability to deny/restrict access to specific hosts.
Details about host access include:
If a control path drive has an SNW license applied to it, it will not be seen by external applications until you create an access group and add the host and partition to the access group.
Access is granted using “access groups.” An access group is made up of partitions, drives, and hosts. Drives and partitions can be in multiple access groups, but each host can only be in one access group.
A partition can be assigned to a host access group if its control path is through an SNW-licensed tape drive.
Drives must be licensed for SNW before they can be added to access groups. Once a drive has been licensed for SNW, it is inaccessible to hosts until they are granted access via the host access feature.
Tape drives that are licensed for SNW can only be accessed by hosts that are in the same host access group as the drives.
Tape drives that are not licensed for SNW can be accessed by all hosts. If the control path and any control path failover tape drives for a partition are licensed for SNW, then only
the hosts in the same access group as that partition will be able to send medium changer commands to that partition. Hosts not in the same access group as a partition will not be able to send medium changer commands to that partition. However, hosts that are not in the same access group as a partition do still have access and can send commands to any non-SNW-enabled tape drives in that partition.
Host access to a partition means the host can issue media changer commands to the partition. Host access to a drive means the host can issue SCSI commands to the drive.
Viewing All Access Groups
If you want to see all of the access groups you configured: 1. Select Setup > Drives > Access > SNW Wizard to display the SNW Wizard. 2. Click Next.

Adding and Mapping to Hosts with Storage Networking (SNW).docx p.5
3. Select the Host Access radio button and click Next. 4. Select the Host Access Configuration radio button. 5. Click Next to display the Select the Group to configure screen. 6. Select the Expand Tree box to list all items in the Access Group Hosts and Devices section of the dialog box. 7. Click Cancel to exit. 8. Click Yes.
Requirements for Host Access
To use host access, you need the following:
A Storage Networking license on the library.
Drives licensed for Storage Networking.
To add a partition to a host access group, the partition must have its control path via a SNW drive.
Hosts configured.
Host access groups configured.
Configuring Hosts
All hosts that are connected to your SAN are available to be assigned to host access groups. You may wish to modify existing hosts to make their names more “user friendly” for when you add them to access groups. You may wish to delete hosts that are no longer connected to the SAN or have been removed from the zoning that includes the Scalar Library and its san connected components. Using the host configuration option, you can do the following:
Create Host: You can add hosts that are not currently connected to the SAN (i.e., “prep” your library for a future host). These are hosts that you plan to add to the SAN later, but want to pre-configure in host access groups now. If you don’t eventually add the hosts to the SAN, they will not be able to access the drives/partitions you choose. In most cases, you will not need to create hosts in this way.
Modify Host: You can modify the name, type, port, or WWPN of a visible host. Unmodified hosts that are connected to the SAN have no predefined name and are named “Unknown” by default. You may wish to change the name to a more “user friendly” name to distinguish one host from another.
Delete Host: You can delete hosts that are no longer connected to the SAN. You can only delete hosts whose state is offline (i.e., not connected to the SAN). Any time you delete a host you remove all host mappings configured for that host.
In most cases you will be Modifying an existing host as you should see an entry for ‘Unknown’ with your new host’s WWN
listed. This is automatically populated when the library discovers the device through the SAN. If you have not yet added the
new host into the same switch zone you can still manually create the host so that as soon as the library sees the host it will
be configured. To create a host in this way you will need to know the WWN of the host you will be adding.
It is recommended that you delete hosts that are ‘Offline’ at the library and are no longer going to be used in your san. This
can shorten the list of hosts considerably and reduce the number of hosts in the available hosts list making the library easier
to manage.
Create Host
To create a host: 1. Select Setup > Drives > Access > SNW Wizard to display the SNW Wizard. 2. Click Next to display the Select Storage Networking Option screen.

Adding and Mapping to Hosts with Storage Networking (SNW).docx p.6
3. Select Host Access and click Next to display the Select Host Access Options screen. 4. Select Host Configuration and click Next to display the Select Hosts Configuration Options screen.
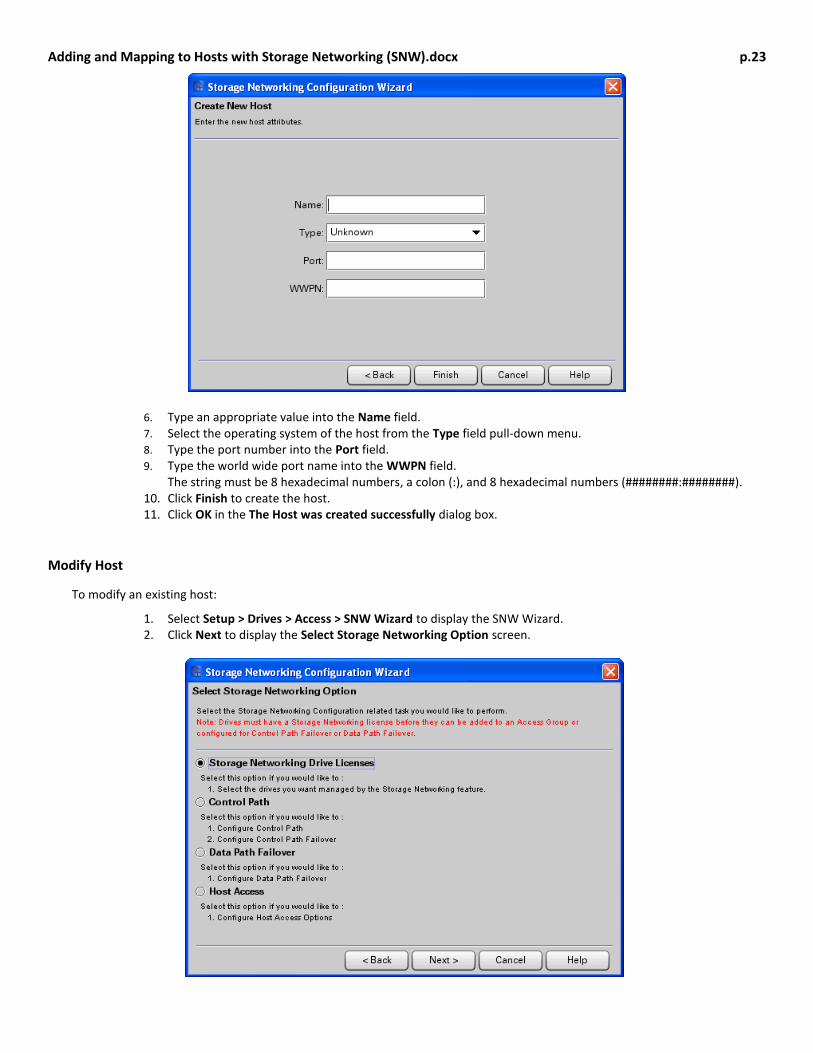
5. Select Create Host and click Next to display the Create New Host dialog box.

Adding and Mapping to Hosts with Storage Networking (SNW).docx p.7
6. Type an appropriate value into the Name field. 7. Select the operating system of the host from the Type field pull-down menu. 8. Type the port number into the Port field. 9. Type the world wide port name into the WWPN field.
The string must be 8 hexadecimal numbers, a colon (:), and 8 hexadecimal numbers (########:########). 10. Click Finish to create the host. 11. Click OK in the The Host was created successfully dialog box.
Modify Host
To modify an existing host:
1. Select Setup > Drives > Access > SNW Wizard to display the SNW Wizard. 2. Click Next to display the Select Storage Networking Option screen.

Adding and Mapping to Hosts with Storage Networking (SNW).docx p.8
3. Select Host Access and click Next to display the Select Host Access Options screen. (See Chapter 10: “Storage
Networking Configuring Host Access to Storage Networking Drives and Partitions” in the Quantum Scalar i6000 User’s Guide.)
4. Select Host Configuration and click Next to display the Select Hosts Configuration Options screen.
5. Select Modify Host. 6. Click the appropriate box in the Select column to select the host to modify. 7. Click Next to access the Modify Existing Host dialog box, which displays current information for the host.
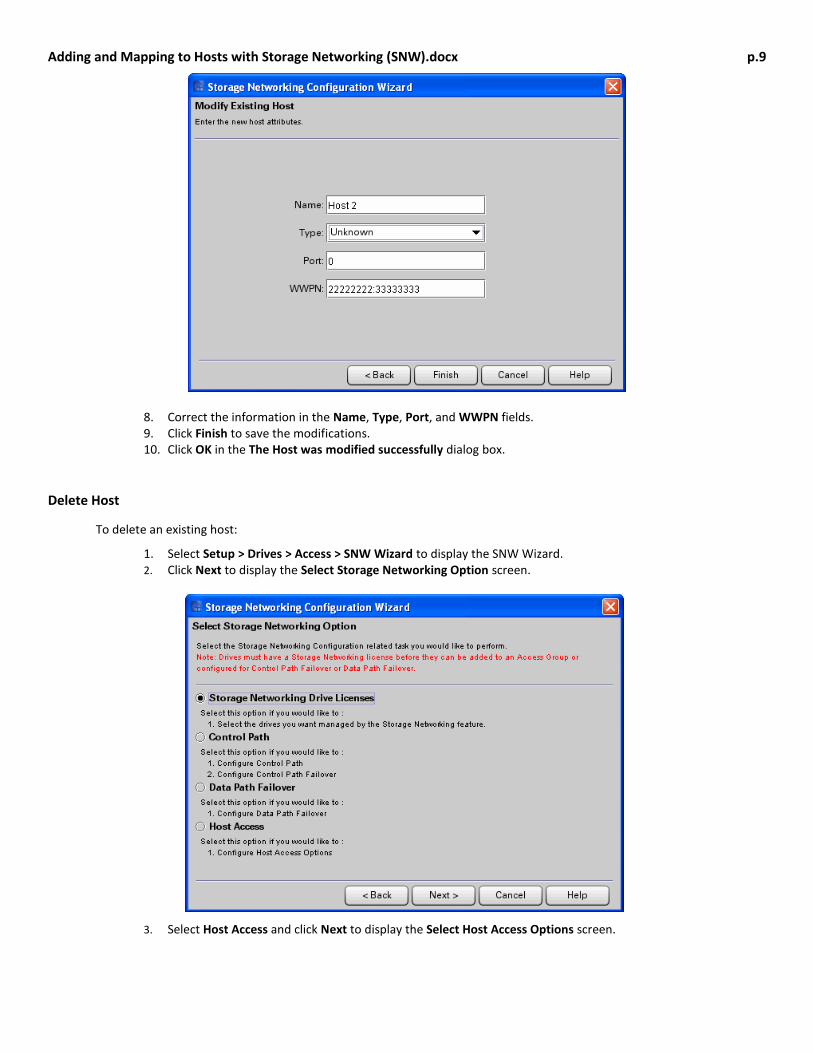
Adding and Mapping to Hosts with Storage Networking (SNW).docx p.9
8. Correct the information in the Name, Type, Port, and WWPN fields. 9. Click Finish to save the modifications. 10. Click OK in the The Host was modified successfully dialog box.
Delete Host
To delete an existing host:
1. Select Setup > Drives > Access > SNW Wizard to display the SNW Wizard. 2. Click Next to display the Select Storage Networking Option screen.
3. Select Host Access and click Next to display the Select Host Access Options screen.

Adding and Mapping to Hosts with Storage Networking (SNW).docx p.10
4. Select Host Configuration and click Next to display the Select Hosts Configuration Options screen.
5. Select Delete Host. 6. Click the appropriate box in the Select column to select the host to delete. 7. Click Finish to delete the host.
A warning message appears letting you know that deleting the host will remove all host mappings configured for the host.
8. Click Yes to continue. 9. Click OK in the The Host was deleted successfully dialog box. 10. If necessary, click Cancel then Yes to exit the dialog box.

Adding and Mapping to Hosts with Storage Networking (SNW).docx p.11
Modifying Host Access Groups
If necessary, you can make the following modifications to host access groups:
Adding a Host to an Access Group on page 11
Removing a Host from an Access Group on page 13
Adding and Removing Drives and Partitions to/from Host Access Groups on page 14
Adding a Host to an Access Group
To add a host or hosts to a host access group: 1. Select Setup > Drives > Access > SNW Wizard to display the SNW Wizard. 2. Click Next. 3. Select the Host Access radio button and click Next. 4. Select the Host Access Configuration radio button. 5. Click Next to display the Select the Group to configure screen. 6. Select the Add Host to Group radio button. 7. Click Next to display the Select Group Access dialog box.
8. Select the Expand Tree box to list all items in the Access Group Hosts and Devices section of the dialog box.

Adding and Mapping to Hosts with Storage Networking (SNW).docx p.12
9. Select the box corresponding to the Access Group to modify. 10. Click Next to display the Select Group Access Hosts to Add dialog box.
11. Select the box in the Select column to indicate which host or hosts to add to the group, or select the Select All Hosts box to add all of the hosts in the group.
12. Click Finish to save the modification. 13. Click OK in the The Group Access was updated successfully dialog box.

Adding and Mapping to Hosts with Storage Networking (SNW).docx p.13
Removing a Host from an Access Group
Caution: Deleting a host from an access group will remove all host mappings configured for the host.
To remove a host from a host access group: 1. Select Setup > Drives > Access > SNW Wizard to display the SNW Wizard. 2. Click Next. 3. Select the Host Access radio button and click Next. 4. Select the Host Access Configuration radio button. 5. Click Next to display the Select the Group to configure screen. 6. Select the Remove Host from Group radio button. 7. Click Next to display the Select Group Access dialog box.
8. Select the Expand Tree box to list all items in the Access Group Hosts and Devices section of the dialog box. 9. Select the box corresponding to the Access Group from which to remove a host. 10. Click Next to display the Select Group Access Hosts to Remove dialog box.

Adding and Mapping to Hosts with Storage Networking (SNW).docx p.14
11. Select the box in the Select column to indicate which host or hosts to remove from the group, or select the Select All Hosts box to remove all of the hosts from the group.
12. Click Finish to save the modification. 13. Click Yes in the Warning dialog box. 14. Click OK in the The Group Access was updated successfully dialog box.
Adding and Removing Drives and Partitions to/from Host Access Groups
To add devices to or remove devices from an existing group, or to select which ports the hosts will use to access devices, use the Host Access Configuration option. To do so:
1. Select Setup > Drives > Access > SNW Wizard to display the SNW Wizard. 2. Click Next to display the Select Storage Networking Option screen.

Adding and Mapping to Hosts with Storage Networking (SNW).docx p.15
3. Select Host Access and click Next to display the Select Host Access Options screen.
4. Select the Host Access Configuration radio button. 5. Click Next to display the Select the Group to modify screen
6. Select the Expand Tree box to list all items in the Access Group Hosts and Devices section of the dialog box.
Adding and Mapping to Hosts with Storage Networking (SNW).docx p.16
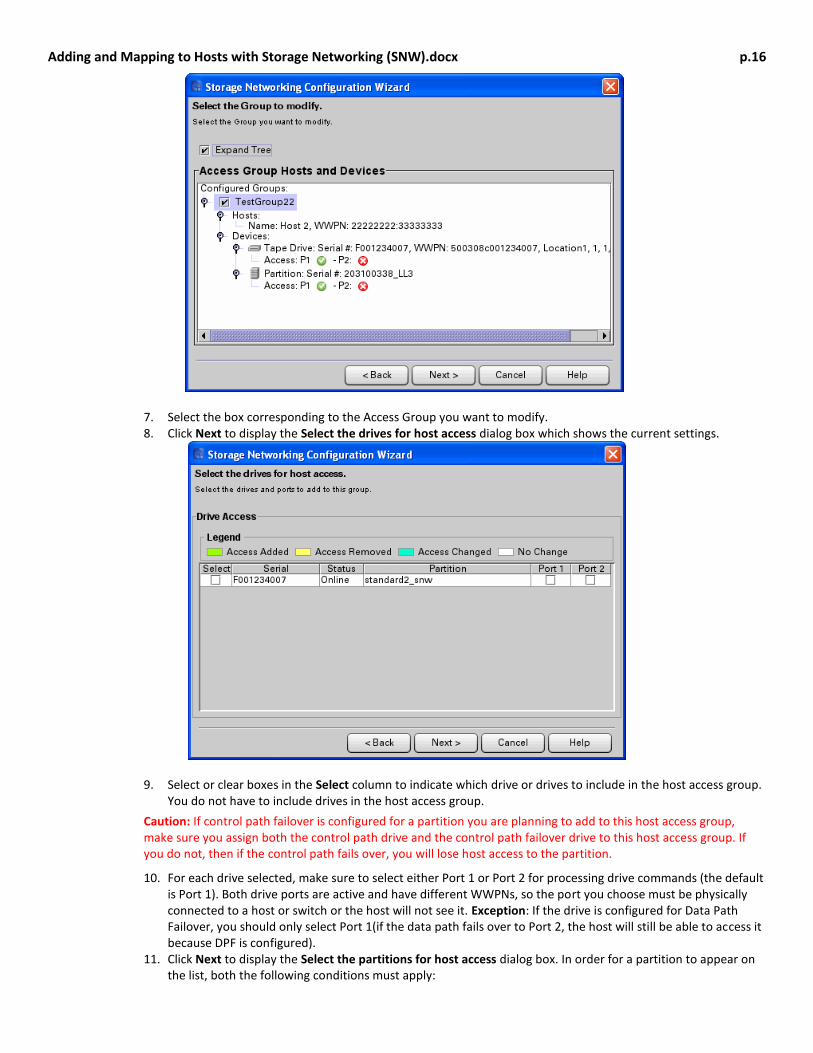
7. Select the box corresponding to the Access Group you want to modify. 8. Click Next to display the Select the drives for host access dialog box which shows the current settings.
9. Select or clear boxes in the Select column to indicate which drive or drives to include in the host access group. You do not have to include drives in the host access group.
Caution: If control path failover is configured for a partition you are planning to add to this host access group, make sure you assign both the control path drive and the control path failover drive to this host access group. If you do not, then if the control path fails over, you will lose host access to the partition.
10. For each drive selected, make sure to select either Port 1 or Port 2 for processing drive commands (the default is Port 1). Both drive ports are active and have different WWPNs, so the port you choose must be physically connected to a host or switch or the host will not see it. Exception: If the drive is configured for Data Path Failover, you should only select Port 1(if the data path fails over to Port 2, the host will still be able to access it because DPF is configured).
11. Click Next to display the Select the partitions for host access dialog box. In order for a partition to appear on the list, both the following conditions must apply:

Adding and Mapping to Hosts with Storage Networking (SNW).docx p.17
the partition has its control path configured via control path bridging (meaning, the control path is via an HP LTO-5 or LTO-6 drive connected to an Ethernet Expansion blade); and
the control path drive has an SNW license applied to it.
12. Select or clear boxes in the Select column to indicate which partitions to include in the host access group. 13. For each partition selected, make sure to select either Port 1 or Port 2 for processing host medium changer
commands (the default is Port 1). Both drive ports are active and have different WWPNs, so the port you choose must be physically connected to a host or switch or the host will not see it. The port you choose depends on which ports on the control path drive are physically cabled.
14. Click Finish to update host access. 15. Click OK in the The Host Access was updated successfully dialog box.

Adding and Mapping to Hosts with Storage Networking (SNW).docx p.18
i11 Family of firmware:
Quantum Scalar i2000 and i6000 Intelligent Libraries using HP LTO-5 and HP LTO-6 tape drives have several possible
configurations and considerations in order to properly present the library partitions (logical libraries) and the tape drives to
the hosts. Before reading on you will want to confirm your purchased licenses for the Scalar Library.
Using the library control panel (either remotely or physically) login and using the top menu bar go to ‘Setup’ and ‘Licenses’.
If you see licenses for Storage Networking (SNW) you will be able to control which tape drives the hosts are able to see
from the library interface using our Storage Networking features. If you do not have SNW licenses your only method to
control which HP LTO-5 and HP LTO-6 SNW drives are seen at the host is through your san switch and zoning unless these
drives are connected to a Fibre Channel IO Blade. If that is the case please refer to the document, ‘Adding and Mapping to
Hosts with Fibre Channel IO Blades’.
Note: If you have connected your tape drives to the san before applying your Storage Networking Licenses all hosts
that can see the tape drives will no longer be able to see the tape drives once a SNW license is applied to the tape
drive. This is due to the library assuming control of drive presentation to hosts.
Providing a Control Path for the logical library or providing host access to SNW Licenses tape drives will only be
accomplished with the Storage Networking Wizard. Instructions for both processes follow.
Configuring a Robotics Control Path with Storage Networking (SNW)Tape Drives
With a library partition configured for Storage Networking, each partition will need to have a defined control path. Absent a SNW license, only a single tape drive can be used to provide the Control Path bridging to the host. With a SNW license you can provide both Data path and Control path failover allowing for either the secondary fibre port on the HP LTO-5 or HP LTO-6 tape drive to become active should the primary fail or for another HP LTO-5 or LTO-6 tape drive become the Control path for the library partition should the primary control path drive fail.
Caution: When connecting a Scalar Intelligent Library to a san with multiple hosts and using the control path
functionality it is important to note that if you do not have a Storage Networking license every host that can see
the defined Control Path Tape Drive will also see, and have the potential to control, the presented logical library
robotics.
You can configure HP LTO-5 or LTO-6 FC drives as the control path for a partition. The drive must not be connected to an FC I/O blade, but it must be connected to an Ethernet Expansion Blade (EEB).
Note: The control path drive and control path failover settings are configured on the same screen. You do not need an SNW license to configure a drive for control path.
1. Log on as an administrator. 2. Access the appropriate screen in one of two ways:
Select Setup > Partitions > Control Path from the main console.
Select Setup > Drives > Access > SNW Wizard. Click Next. From the Select Storage Networking Option screen, select Control Path and click Next.
The Storage Networking Partitions dialog box appears, displaying all partitions that contain drives eligible to for control path bridging (HP LTO-5 or LTO-6 drives connected to an Ethernet Expansion blade).

Adding and Mapping to Hosts with Storage Networking (SNW).docx p.19
3. Click to highlight the row containing the partition whose control path settings you want to configure. 4. Click OK.
The Control Path dialog box appears.
5. Click the Enable Control Path check box. 6. A check box appears and the CP Drive drop-down list is enabled. 7. From the CP Drive drop-down list select the drive you want to configure as the control path. 8. The primary CP drive you selected is highlighted in yellow. 9. If you want to configure control path failover, you must have a SNW license with sufficient licensed drive
counts to configure a CPF drive. 10. Click OK. 11. An Operation in Progress dialog box appears. 12. The control path drive is configured.

Adding and Mapping to Hosts with Storage Networking (SNW).docx p.20
Configuring Host Access with Storage Networking (SNW) Tape Drives
This section presumes that you are adding a host to an existing library and configuration. As such we only touch lightly on
the Storage Networking configuration options. Before continuing on you will want to be certain you aware of the Host
Access Group you will want to add the new host to. Generally, a Host Access Group consists of a number of hosts that will
be using the same backup tape drives in a partition. If you are wanting to create a new Host Access Group or present a new
partition to one or more hosts you will want to refer to the Scalar i6000 User’s Guide or the document, ‘Scalar Intelligent
Library Storage Networking Primer’.
The SNW Host Access feature provides a way to limit host access to specific SNW tape drives and partitions via the library interface.
This section covers:
Viewing All Access Groups on page 20
Requirements for Host Access on page 21
Configuring Hosts on page 21
Modifying Host Access Groups on page 26
Without host access restrictions, all hosts can view all drives connected to the SAN and all partitions to which there is a library control path. Host access gives you the ability to deny/restrict access to specific hosts.
Details about host access include:
If a control path drive has an SNW license applied to it, it will not be seen by external applications until you create an access group and add the host and partition to the access group.
Access is granted using “access groups.” An access group is made up of partitions, drives, and hosts. Drives and partitions can be in multiple access groups, but each host can only be in one access group.
A partition can be assigned to a host access group if its control path is through an SNW-licensed tape drive.
Drives must be licensed for SNW before they can be added to access groups. Once a drive has been licensed for SNW, it is inaccessible to hosts until they are granted access via the host access feature.
Tape drives that are licensed for SNW can only be accessed by hosts that are in the same host access group as the drives.
Tape drives that are not licensed for SNW can be accessed by all hosts. If the control path and any control path failover tape drives for a partition are licensed for SNW, then only
the hosts in the same access group as that partition will be able to send medium changer commands to that partition. Hosts not in the same access group as a partition will not be able to send medium changer commands to that partition. However, hosts that are not in the same access group as a partition do still have access and can send commands to any non-SNW-enabled tape drives in that partition.
Host access to a partition means the host can issue media changer commands to the partition. Host access to a drive means the host can issue SCSI commands to the drive.
Viewing All Access Groups
If you want to see all of the access groups you configured:
1. Select Setup > Drives > Access > SNW Wizard to display the SNW Wizard. 2. Click Next. 3. Select the Host Access radio button and click Next. 4. Select the Host Access Configuration radio button. 5. Click Next to display the Select the Group to configure screen. 6. Select the Expand Tree box to list all items in the Access Group Hosts and Devices section of the dialog box. 7. Click Cancel to exit.

Adding and Mapping to Hosts with Storage Networking (SNW).docx p.21
8. Click Yes.
Requirements for Host Access
To use host access, you need the following:
A Storage Networking license on the library.
Drives licensed for Storage Networking.
To add a partition to a host access group, the partition must have its control path via a SNW drive.
Hosts configured.
Host access groups configured.
Configuring Hosts
All hosts that are connected to your SAN are available to be assigned to host access groups. You may wish to modify existing hosts to make their names more “user friendly” for when you add them to access groups. You may wish to delete hosts that are no longer connected to the SAN or have been removed from the zoning that includes the Scalar Library and its san connected components. Using the host configuration option, you can do the following:
Create Host: You can add hosts that are not currently connected to the SAN (i.e., “prep” your library for a future host). These are hosts that you plan to add to the SAN later, but want to pre-configure in host access groups now. If you don’t eventually add the hosts to the SAN, they will not be able to access the drives/partitions you choose. In most cases, you will not need to create hosts in this way.
Modify Host: You can modify the name, type, port, or WWPN of a visible host. Unmodified hosts that are connected to the SAN have no predefined name and are named “Unknown” by default. You may wish to change the name to a more “user friendly” name to distinguish one host from another.
Delete Host: You can delete hosts that are no longer connected to the SAN. You can only delete hosts whose state is offline (i.e., not connected to the SAN). Any time you delete a host you remove all host mappings configured for that host.
In most cases you will be Modifying an existing host as you should see an entry for ‘Unknown’ with your new host’s WWN
listed. This is automatically populated when the library discovers the device through the SAN. If you have not yet added the
new host into the same switch zone you can still manually create the host so that as soon as the library sees the host it will
be configured. To create a host in this way you will need to know the WWN of the host you will be adding.
It is recommended that you delete hosts that are ‘Offline’ at the library and are no longer going to be used in your san. This
can shorten the list of hosts considerably and reduce the number of hosts in the available hosts list making the library easier
to manage.
Create Host
To create a host: 1. Select Setup > Drives > Access > SNW Wizard to display the SNW Wizard. 2. Click Next to display the Select Storage Networking Option screen.

Adding and Mapping to Hosts with Storage Networking (SNW).docx p.22
3. Select Host Access and click Next to display the Select Host Access Options screen. 4. Select Host Configuration and click Next to display the Select Hosts Configuration Options screen.
5. Select Create Host and click Next to display the Create New Host dialog box.
Adding and Mapping to Hosts with Storage Networking (SNW).docx p.23
6. Type an appropriate value into the Name field. 7. Select the operating system of the host from the Type field pull-down menu. 8. Type the port number into the Port field. 9. Type the world wide port name into the WWPN field.
The string must be 8 hexadecimal numbers, a colon (:), and 8 hexadecimal numbers (########:########). 10. Click Finish to create the host. 11. Click OK in the The Host was created successfully dialog box.
Modify Host
To modify an existing host:
1. Select Setup > Drives > Access > SNW Wizard to display the SNW Wizard. 2. Click Next to display the Select Storage Networking Option screen.

Adding and Mapping to Hosts with Storage Networking (SNW).docx p.24
3. Select Host Access and click Next to display the Select Host Access Options screen. (See Chapter 10: “Storage
Networking Configuring Host Access to Storage Networking Drives and Partitions” in the Quantum Scalar i6000 User’s Guide.)
4. Select Host Configuration and click Next to display the Select Hosts Configuration Options screen.
5. Select Modify Host. 6. Click the appropriate box in the Select column to select the host to modify. 7. Click Next to access the Modify Existing Host dialog box, which displays current information for the host.

Adding and Mapping to Hosts with Storage Networking (SNW).docx p.25
8. Correct the information in the Name, Type, Port, and WWPN fields. 9. Click Finish to save the modifications. 10. Click OK in the The Host was modified successfully dialog box.
Delete Host
To delete an existing host:
1. Select Setup > Drives > Access > SNW Wizard to display the SNW Wizard. 2. Click Next to display the Select Storage Networking Option screen.
3. Select Host Access and click Next to display the Select Host Access Options screen.
Adding and Mapping to Hosts with Storage Networking (SNW).docx p.26
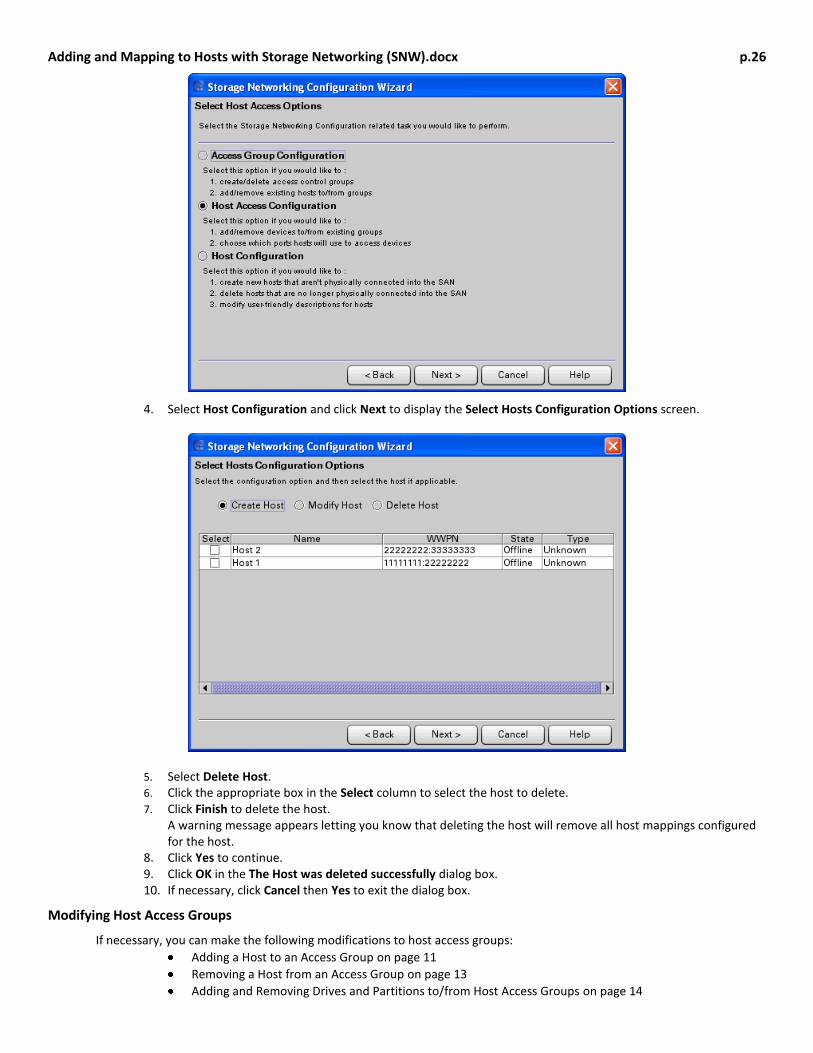
4. Select Host Configuration and click Next to display the Select Hosts Configuration Options screen.
5. Select Delete Host. 6. Click the appropriate box in the Select column to select the host to delete. 7. Click Finish to delete the host.
A warning message appears letting you know that deleting the host will remove all host mappings configured for the host.
8. Click Yes to continue. 9. Click OK in the The Host was deleted successfully dialog box. 10. If necessary, click Cancel then Yes to exit the dialog box.
Modifying Host Access Groups
If necessary, you can make the following modifications to host access groups:
Adding a Host to an Access Group on page 11
Removing a Host from an Access Group on page 13
Adding and Removing Drives and Partitions to/from Host Access Groups on page 14

Adding and Mapping to Hosts with Storage Networking (SNW).docx p.27
Adding a Host to an Access Group
To add a host or hosts to a host access group: 1. Select Setup > Drives > Access > SNW Wizard to display the SNW Wizard. 2. Click Next. 3. Select the Host Access radio button and click Next. 4. Select the Host Access Configuration radio button. 5. Click Next to display the Select the Group to configure screen. 6. Select the Add Host to Group radio button. 7. Click Next to display the Select Group Access dialog box.
8. Select the Expand Tree box to list all items in the Access Group Hosts and Devices section of the dialog box.
9. Select the box corresponding to the Access Group to modify.

Adding and Mapping to Hosts with Storage Networking (SNW).docx p.28
10. Click Next to display the Select Group Access Hosts to Add dialog box.
11. Select the box in the Select column to indicate which host or hosts to add to the group, or select the Select All Hosts box to add all of the hosts in the group.
12. Click Finish to save the modification. 13. Click OK in the The Group Access was updated successfully dialog box.
Removing a Host from an Access Group
Caution: Deleting a host from an access group will remove all host mappings configured for the host.
To remove a host from a host access group:
1. Select Setup > Drives > Access > SNW Wizard to display the SNW Wizard. 2. Click Next. 3. Select the Host Access radio button and click Next. 4. Select the Host Access Configuration radio button. 5. Click Next to display the Select the Group to configure screen. 6. Select the Remove Host from Group radio button. 7. Click Next to display the Select Group Access dialog box.

Adding and Mapping to Hosts with Storage Networking (SNW).docx p.29
8. Select the Expand Tree box to list all items in the Access Group Hosts and Devices section of the dialog box. 9. Select the box corresponding to the Access Group from which to remove a host. 10. Click Next to display the Select Group Access Hosts to Remove dialog box.
11. Select the box in the Select column to indicate which host or hosts to remove from the group, or select the Select All Hosts box to remove all of the hosts from the group.
12. Click Finish to save the modification. 13. Click Yes in the Warning dialog box. 14. Click OK in the The Group Access was updated successfully dialog box.
Adding and Removing Drives and Partitions to/from Host Access Groups
To add devices to or remove devices from an existing group, or to select which ports the hosts will use to access devices, use the Host Access Configuration option. To do so:

Adding and Mapping to Hosts with Storage Networking (SNW).docx p.30
1. Select Setup > Drives > Access > SNW Wizard to display the SNW Wizard. 2. Click Next to display the Select Storage Networking Option screen.
3. Select Host Access and click Next to display the Select Host Access Options screen.
4. Select the Host Access Configuration radio button. 5. Click Next to display the Select the Group to modify screen

Adding and Mapping to Hosts with Storage Networking (SNW).docx p.31
6. Select the Expand Tree box to list all items in the Access Group Hosts and Devices section of the dialog box.
7. Select the box corresponding to the Access Group you want to modify. 8. Click Next to display the Select the drives for host access dialog box which shows the current settings.

Adding and Mapping to Hosts with Storage Networking (SNW).docx p.32
9. Select or clear boxes in the Select column to indicate which drive or drives to include in the host access group. You do not have to include drives in the host access group.
Caution: If control path failover is configured for a partition you are planning to add to this host access group, make sure you assign both the control path drive and the control path failover drive to this host access group. If you do not, then if the control path fails over, you will lose host access to the partition.
10. For each drive selected, make sure to select either Port 1 or Port 2 for processing drive commands (the default is Port 1). Both drive ports are active and have different WWPNs, so the port you choose must be physically connected to a host or switch or the host will not see it. Exception: If the drive is configured for Data Path Failover, you should only select Port 1(if the data path fails over to Port 2, the host will still be able to access it because DPF is configured).
11. Click Next to display the Select the partitions for host access dialog box. In order for a partition to appear on the list, both the following conditions must apply:
the partition has its control path configured via control path bridging (meaning, the control path is via an HP LTO-5 or LTO-6 drive connected to an Ethernet Expansion blade); and
the control path drive has an SNW license applied to it.

Adding and Mapping to Hosts with Storage Networking (SNW).docx p.33
12. Select or clear boxes in the Select column to indicate which partitions to include in the host access group. 13. For each partition selected, make sure to select either Port 1 or Port 2 for processing host medium changer
commands (the default is Port 1). Both drive ports are active and have different WWPNs, so the port you choose must be physically connected to a host or switch or the host will not see it. The port you choose depends on which ports on the control path drive are physically cabled.
14. Click Finish to update host access. 15. Click OK in the The Host Access was updated successfully dialog box.