advanced diagnostics honeywell expirion pks...
TRANSCRIPT

A P P L I C A T I O N N O T E
Advanced Diagnostic Honeywell Experion PKS Integration
28
/07
/20
11
TD
OCT
-25
27
_EN
G

Advanced Diagnostic Honeywell Experion PKS Integration
Table of Contents
1 About ........................................................................................................................................................ 3
2 Installation ............................................................................................................................................... 4
2.1 Overview............................................................................................................................................ 4
Installation of FieldConnex Diagnostic Server (FDS)................................................................................. 5
2.2 ADM Project Builder Honeywell........................................................................................................ 8
2.3 Mapping File for Experion Server..................................................................................................... 8
2.4 Detail Display and FieldConnex Diagnostic ActiveX........................................................................ 8
3 Initial Configuration.................................................................................................................................. 9
3.1 Project Export and Conversion......................................................................................................... 9
3.2 Experion Server Configuration .......................................................................................................14
3.3 FDS Configuration...........................................................................................................................17
4 Modify Configuration.............................................................................................................................. 19
4.1 Export and Conversion ...................................................................................................................19
4.2 Experion Server Configuration .......................................................................................................21
4.3 FDS Configuration...........................................................................................................................21
5 Operation ............................................................................................................................................... 22
6 Annex: Adding a link from FFLINK detail display to ADM detail display ............................................... 25
2/28
1 About This document describes how to integrate the Pepperl+Fuchs Advanced Diagnostics into Honeywell Expe-rion PKS environment. It also gives a brief overview about the integration concept and the included and required components to get a general idea of the system as a whole.
The integration concept comprises several software components:
- ADM Project Builder Honeywell The ADM Project Builder Honeywell is a software tool that allows importing of the Fieldbus Topology Information from Experion to generate the FDS OPC Server and the Experion OPC Client configura-tion.
- FieldConnex Diagnostic Server with included OPC AE/DA server The FieldConnex Diagnostic Server (FDS) includes an OPC DA and OPC AE Server. This server pro-vides events and information about the physical layer status of the segments monitored by the Ad-vanced Diagnostic Module.
- Detail Display A Detail Display for Experion showing the general status of the Physical Layer for the segments monitored by the Advanced Diagnostic Module.
- FieldConnex Diagnostic ActiveX The FieldConnex Diagnostic ActiveX is a component running within the Detail Display for Experion. It is used to configure the Pepperl+Fuchs ADM System and to monitor and analyze Physical Layer details.
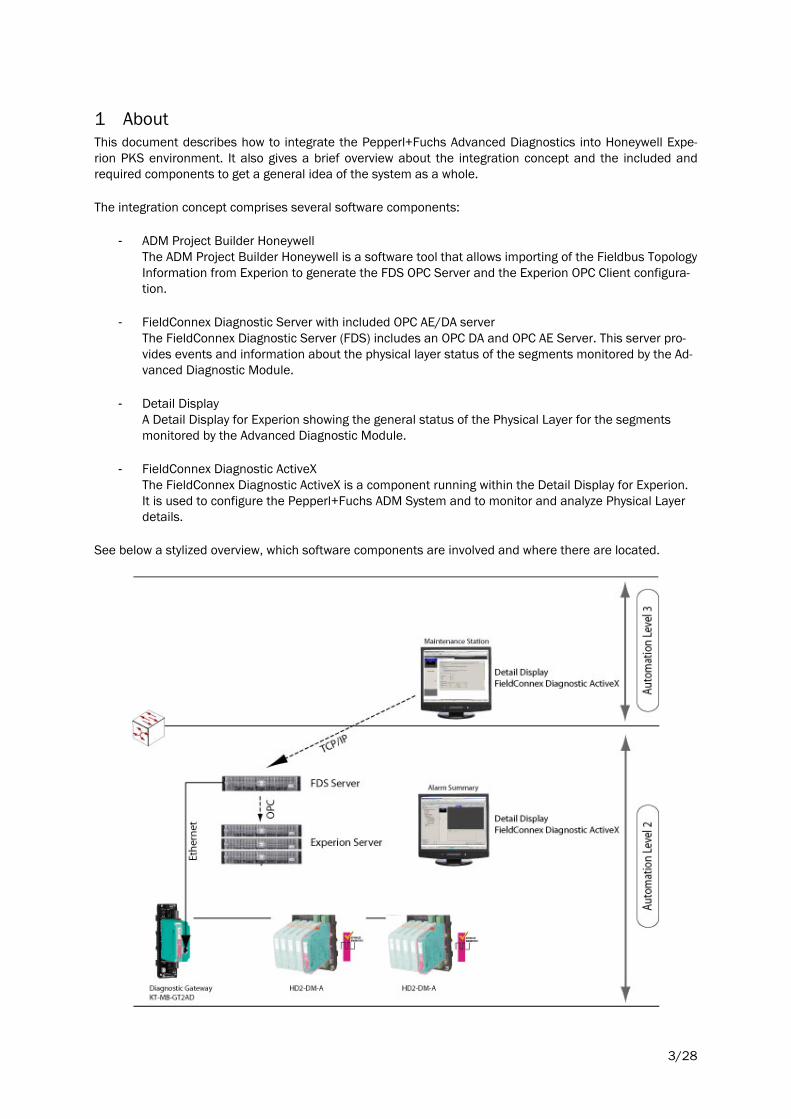
See below a stylized overview, which software components are involved and where there are located.
3/28

The FDS runs on Automation Level 2 and receives diagnostic information of the ADMs via the FieldConnex Diagnostic Gateways. This Information is provided to the Experion Server using OPC AE and DA. This means: If the ADM detects a change of Physical Layer status an OPC AE event will be sent out from the FDS via OPC AE. This event will be shown as a system alarm within the alarm summary view.
The user gets more information like the cause of the problem and proposals how to solve the problem by using the Detail Display. On a maintenance tab the FieldConnex Diagnostic ActiveX will provide all features from the ADM like Expert System, Measurement, Diagnostic, Alarm History, Oscilloscope, etc.
2 Installation
2.1 Overview Required Software
Honeywell: Experion Release R400.1 or later
Honeywell: ExperionPKS.R400.Server.Patch107.PAR1-GWBCY1
Pepperl+Fuchs: ADM Integration Package Honeywell 1.0.0.* or later
The Pepperl+Fuchs ADM Integration Package Honeywell includes the following components:
1) FieldConnex Diagnostic Server (FDS)
2) ADM Project Builder Honeywell
3) Mapping File for Experion Server
4) Detail Display and FieldConnex Diagnostic ActiveX
These components may be running on one PC or on several different PCs as required.
4/28

Installation of FieldConnex Diagnostic Server (FDS) Preconditions:
An account named mngr is required on the PC the FDS is running on. This account should have the same password as on the Experion Server to provide OPC access. This account must be a member of the Administrators group.
1) Install FieldConnexDiagnosticServerSetup.exe on a Server PC located at automation level 2.
2) Open the Start Menu and start Pepperl+Fuchs\FDS Control Center
3) From the Tools menu, select Settings…
a. Check the checkbox Adjust firewall to allow remote access. If this checkbox is greyed-out the Windows Firewall service is not running. In this case, remote access is possible as if the fire-wall was adjusted.
b. In the textbox Hostname for OPC clients, enter a hostname or IP address through which re-mote clients are able to connect to the FDS. Local IP addresses are shown in the main window of FDS Control Center
4) Press OK to apply the changed settings.
5) From the Tools menu, select OPC Remote Access… . This opens the FDS OPC Remote Access Wizard that configures remote access to FDS.
5/28

6) Press Next
7) Choose user mngr. Untick checkbox Allow anonymous access. Tick checkbox Execute FDS under the selected account.
8) Press Next
6/28
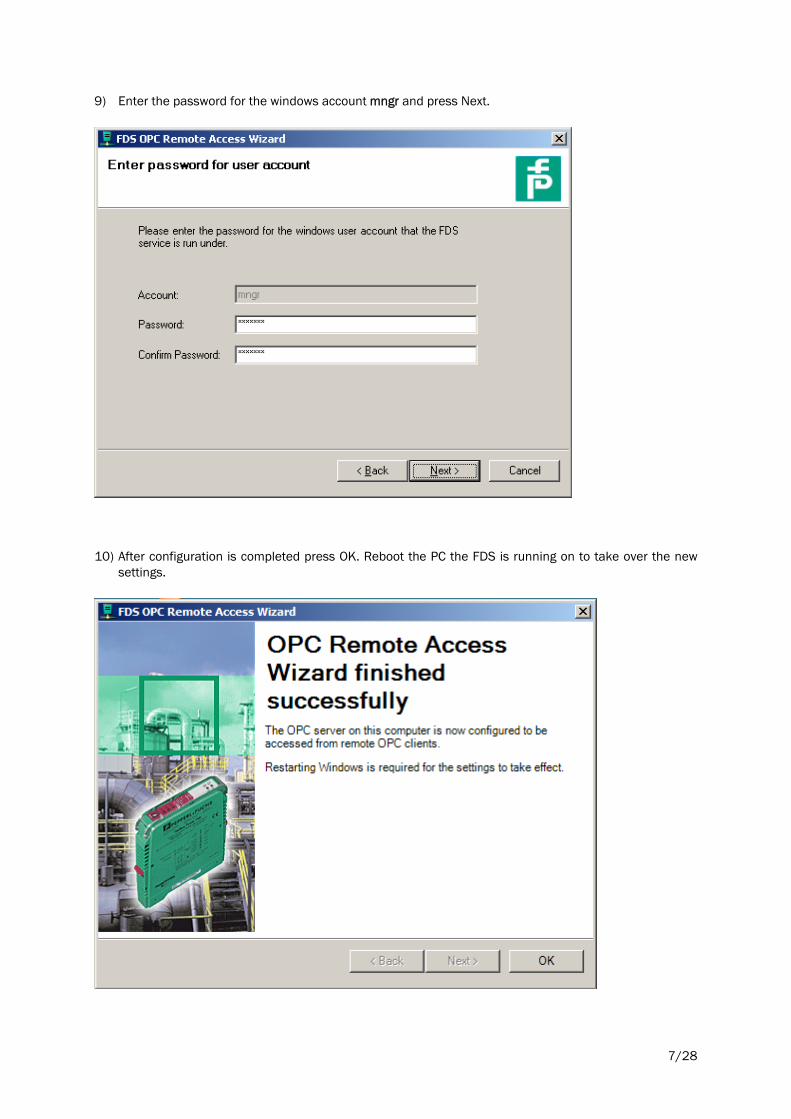
9) Enter the password for the windows account mngr and press Next.
10) After configuration is completed press OK. Reboot the PC the FDS is running on to take over the new settings.
7/28
2.2 ADM Project Builder Honeywell The ADM Project Builder Honeywell is a software tool that allows importing of the Fieldbus Topology Infor-mation from Experion to generate the configuration for the FDS OPC Server and the Experion OPC Client. This Program can be installed on any PC of your choice. Pepperl+Fuchs suggest to install it on the same PC as the FDS.
For installation execute ADMProjectBuilderHoneywellSetup.exe and proceed with the Installation Wizard.
2.3 Mapping File for Experion Server Copy the file FDSOPC.xml supplied by Pepperl+Fuchs to the Experion PKS Server data mapping directory (e.g. “C:\ProgramData\Honeywell\Experion PKS\Server\Data\mapping\”)
2.4 Detail Display and FieldConnex Diagnostic ActiveX On each PC station install the detail display. To be able to access more advanced information beside the basic status, also install the FieldConnex Diagnostic ActiveX.
1) Copy the P+F detail display files to a folder where Experion PKS can find it (e.g. “c:\Program Data\Honeywell\Experion PKS\Client\Abstract\”)
2) Execute the FieldConnexDiagnosticActiveXSetup.exe and proceed with the Installation Wizard
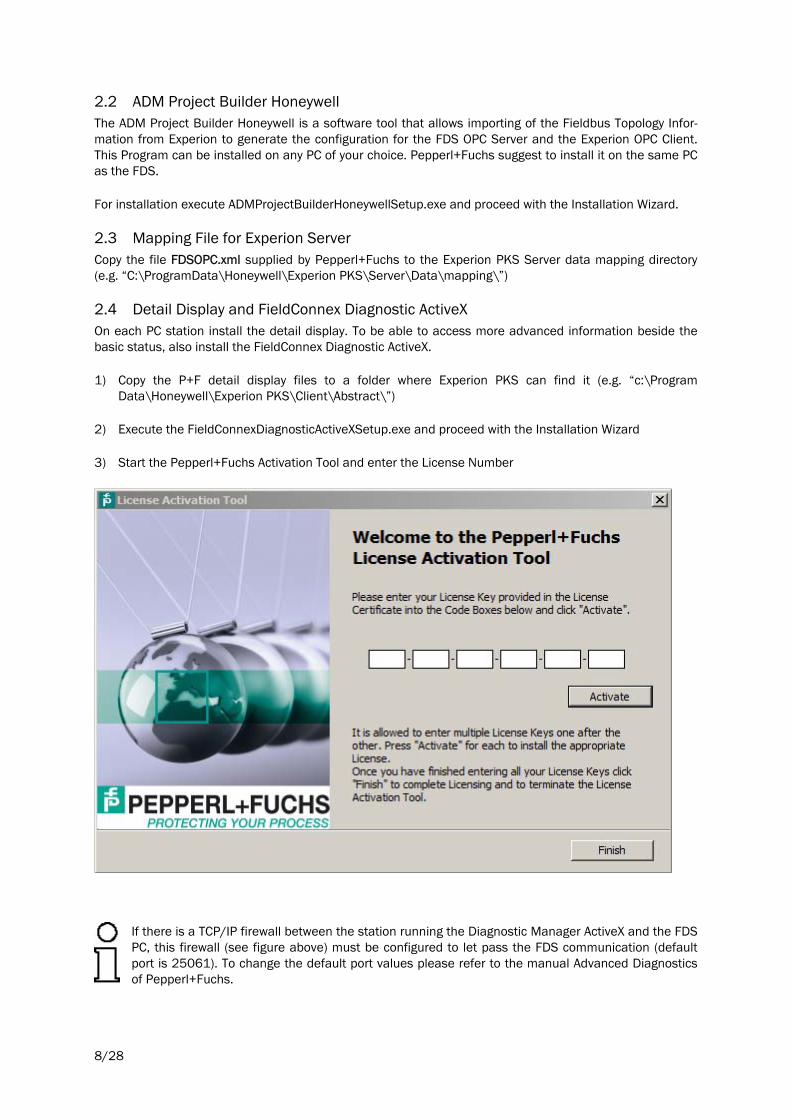
3) Start the Pepperl+Fuchs Activation Tool and enter the License Number
If there is a TCP/IP firewall between the station running the Diagnostic Manager ActiveX and the FDS PC, this firewall (see figure above) must be configured to let pass the FDS communication (default port is 25061). To change the default port values please refer to the manual Advanced Diagnostics of Pepperl+Fuchs.
8/28
3 Initial Configuration To get a general idea of the integration process the required steps are listed below in short:
Export the Fieldbus Part of Project data from Experion
Import this data into ADM Project Builder Honeywell. This tool creates two specific files for configu-ration of FDS and Points for integration of the Advanced Diagnostic into Experion PKS.
Configure the FDS.
Import the Points to the Experion configuration
3.1 Project Export and Conversion 1. On Experion Server, open Configuration Studio and select Control Strategy > Configure process control
strategies to open the Control Builder.
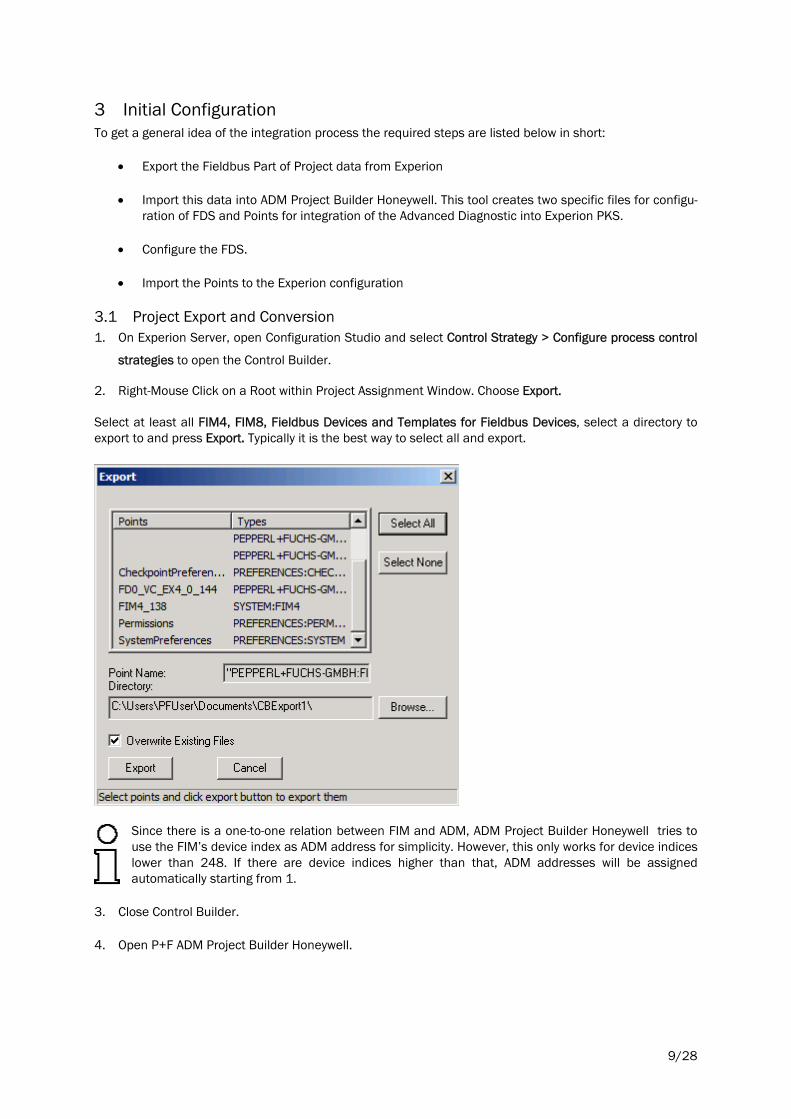
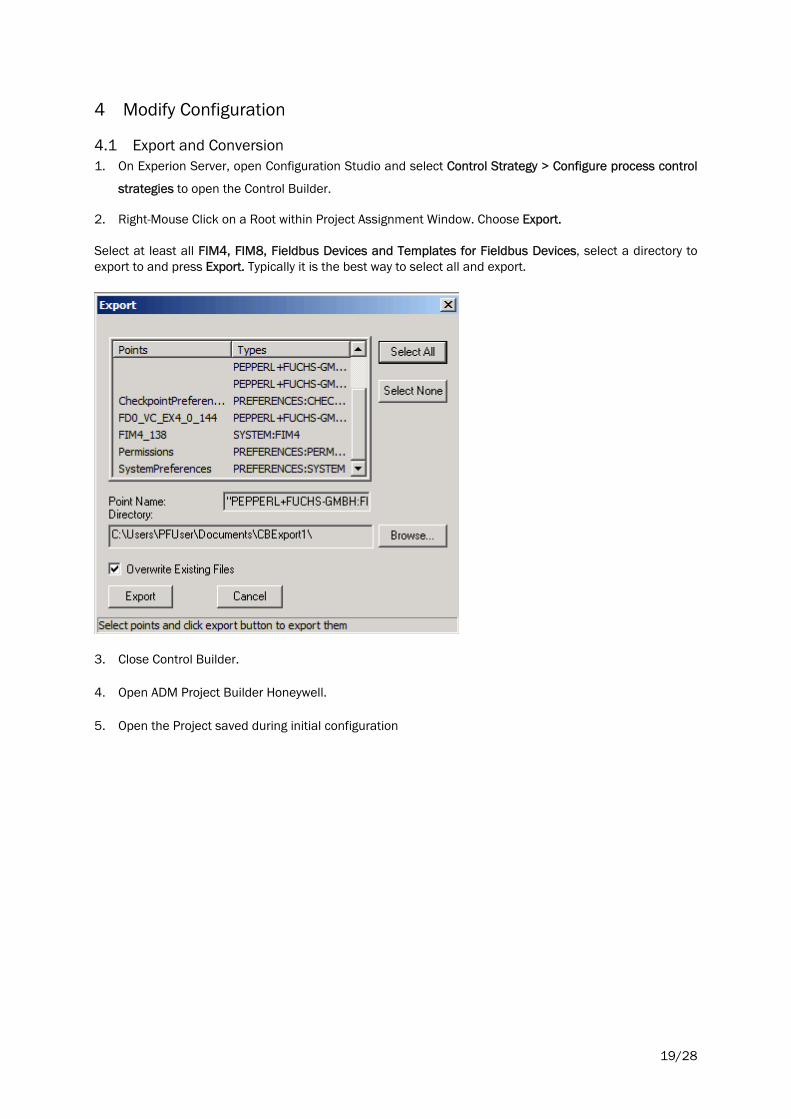
2. Right-Mouse Click on a Root within Project Assignment Window. Choose Export.
Select at least all FIM4, FIM8, Fieldbus Devices and Templates for Fieldbus Devices, select a directory to export to and press Export. Typically it is the best way to select all and export.
Since there is a one-to-one relation between FIM and ADM, ADM Project Builder Honeywell tries to use the FIM’s device index as ADM address for simplicity. However, this only works for device indices lower than 248. If there are device indices higher than that, ADM addresses will be assigned automatically starting from 1.
3. Close Control Builder.
4. Open P+F ADM Project Builder Honeywell.
9/28

5. Press Button Import from Experion, browse to the directory containing the exported FIM data and choose the file “Export.sl” to import the FIM data created before.
6. Accept the imported data by clicking OK in the Merge Result dialog.
10/28

7. Drag&Drop the FIMs to the FDS Server node. For each FIM4 one entry with the TAG of the FIM is cre-ated. For each FIM8 two entries with the TAG of the FIM8 and the suffix A and B are created. Link 1-4 are connected to the entry with suffix A and 5-8 to the one with suffix B.
11/28

8. To set topology data: Right-Mouse Click on the FDS Port node. Choose Change Address/Change Tag and adjust FDS Port and network settings. Before exporting, all addresses must be assigned so that no warnings are shown.
9. Configure Assets
Without any further action all FF-H1 Segments monitored by the ADM belong to the system. If required it is also possible to assign them to Assets. Right-Mouse Click on an ADM or Segment node and select Change Asset. It is possible to enter an Asset here to create a scope of responsibility also for segments monitored by an ADM. If an Asset is set for an ADM this Asset is also valid for all of its segments.
12/28

10. Press Button Export Project.
11. Export setting window appears. Choose Output folder.
Within the Experion tab you may adjust the server alias (although it is recommended to use the default setting).
12. Press Export
13/28

13. Save the Project Builder file for later changes (File Menu, save project file).
14. Close Honeywell Project Builder
3.2 Experion Server Configuration 1. At the Experion Server, open Configuration Studio. Choose System Interfaces > Configure system inter-
faces.
2. Double Click the Alias box within the System display tab.
14/28

3. From the System Interface Type drop down box, choose OPCADVNCE and press Configure.
4. On tab Attribute Mapping, enter FDSOPC as Mapping File.
5. On tab Configuration, enter Server Alias, Network Name and adjust Server ProgID settings.
Server Alias: Same entry as in the P+F Project Builder Software before (see step 11, default value is PF_ADM). Network Name: IP-address of the FDS Server, the same entry as the Hostname for OPC Clients entered in FDS Control Center (see chapter 0).
15/28
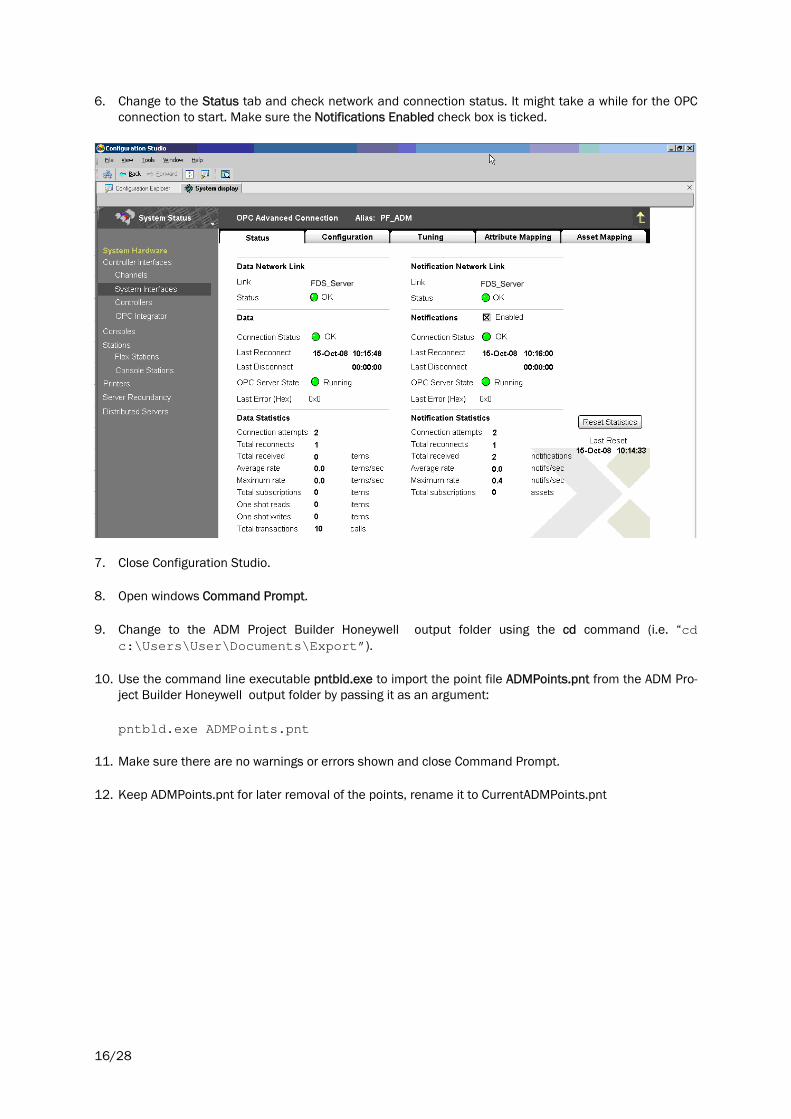
6. Change to the Status tab and check network and connection status. It might take a while for the OPC connection to start. Make sure the Notifications Enabled check box is ticked.
7. Close Configuration Studio.
8. Open windows Command Prompt.
9. Change to the ADM Project Builder Honeywell output folder using the cd command (i.e. “cd c:\Users\User\Documents\Export”).
10. Use the command line executable pntbld.exe to import the point file ADMPoints.pnt from the ADM Pro-ject Builder Honeywell output folder by passing it as an argument:
pntbld.exe ADMPoints.pnt
11. Make sure there are no warnings or errors shown and close Command Prompt.
12. Keep ADMPoints.pnt for later removal of the points, rename it to CurrentADMPoints.pnt
16/28

3.3 FDS Configuration 1. On the PC the FDS is installed, open FDS Control Center.
2. Make sure FDS is running, if not, click Start FDS to start it.
3. Choose Import Config… from the Tools menu in the toolbar.
17/28

4. Browse to the output folder of the ADM Project Builder Honeywell (see chapter 3.1) and open file Con-fig.xml.
Confirm the dialog box by clicking OK.
18/28
4 Modify Configuration
4.1 Export and Conversion 1. On Experion Server, open Configuration Studio and select Control Strategy > Configure process control
strategies to open the Control Builder.
2. Right-Mouse Click on a Root within Project Assignment Window. Choose Export.
Select at least all FIM4, FIM8, Fieldbus Devices and Templates for Fieldbus Devices, select a directory to export to and press Export. Typically it is the best way to select all and export.
3. Close Control Builder.
4. Open ADM Project Builder Honeywell.
5. Open the Project saved during initial configuration
19/28
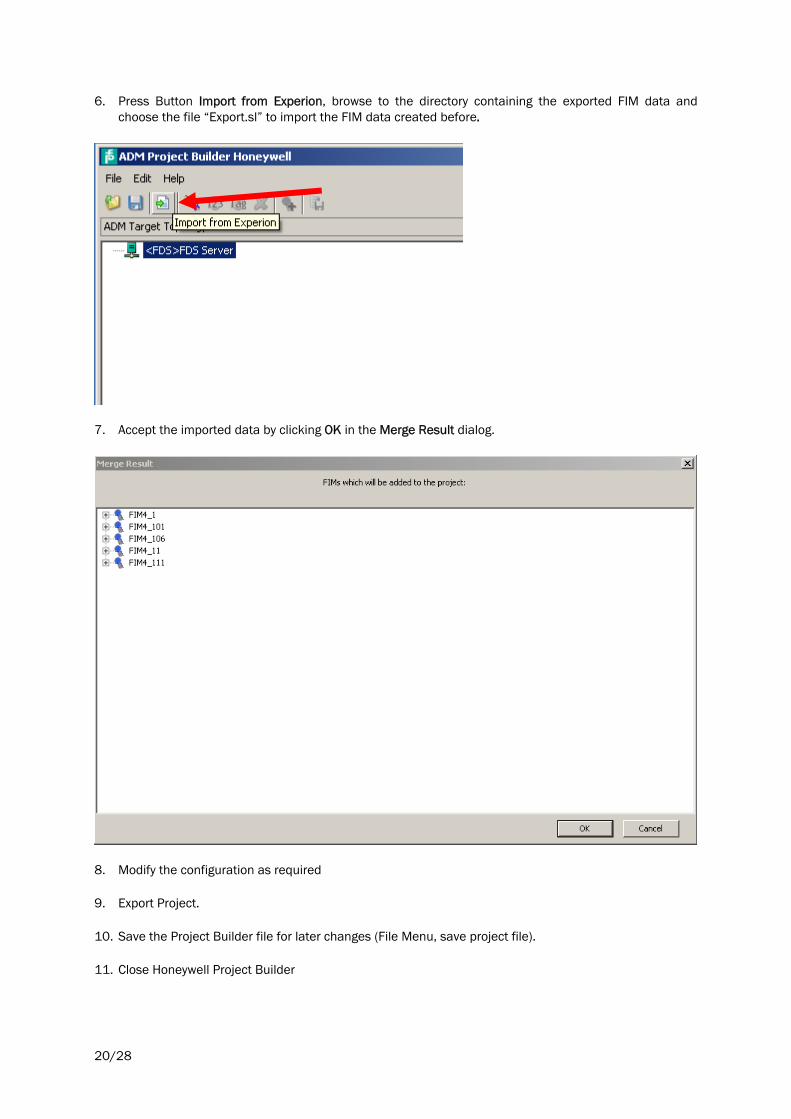
6. Press Button Import from Experion, browse to the directory containing the exported FIM data and choose the file “Export.sl” to import the FIM data created before.
7. Accept the imported data by clicking OK in the Merge Result dialog.
8. Modify the configuration as required
9. Export Project.
10. Save the Project Builder file for later changes (File Menu, save project file).
11. Close Honeywell Project Builder
20/28

4.2 Experion Server Configuration 1. Open windows Command Prompt.
2. Change to the ADM Project Builder Honeywell output folder using the cd command (i.e. “cd c:\Users\User\Documents\Export”).
3. Use the command line executable pntbld.exe to remove old points import the point file ADMPoints.pnt from the ADM Project Builder Honeywell output folder by passing it as an argument:
pntbld.exe CurrentADMPoints.pnt –DEL
pntbld.exe ADMPoints.pnt
4. Make sure there are no warnings or errors shown and close Command Prompt.
5. Delete old CurrentADMPoints.pnt
6. Keep ADMPoints.pnt for later removal of the points, rename it to CurrentADMPoints.pnt
4.3 FDS Configuration Proceed as described in chapter 3.3
21/28

5 Operation 1. If alarm message occurs with Location Tag PF_ADM
2. Right-Mouse Click on the appropriate message and choose Detail Display.
22/28
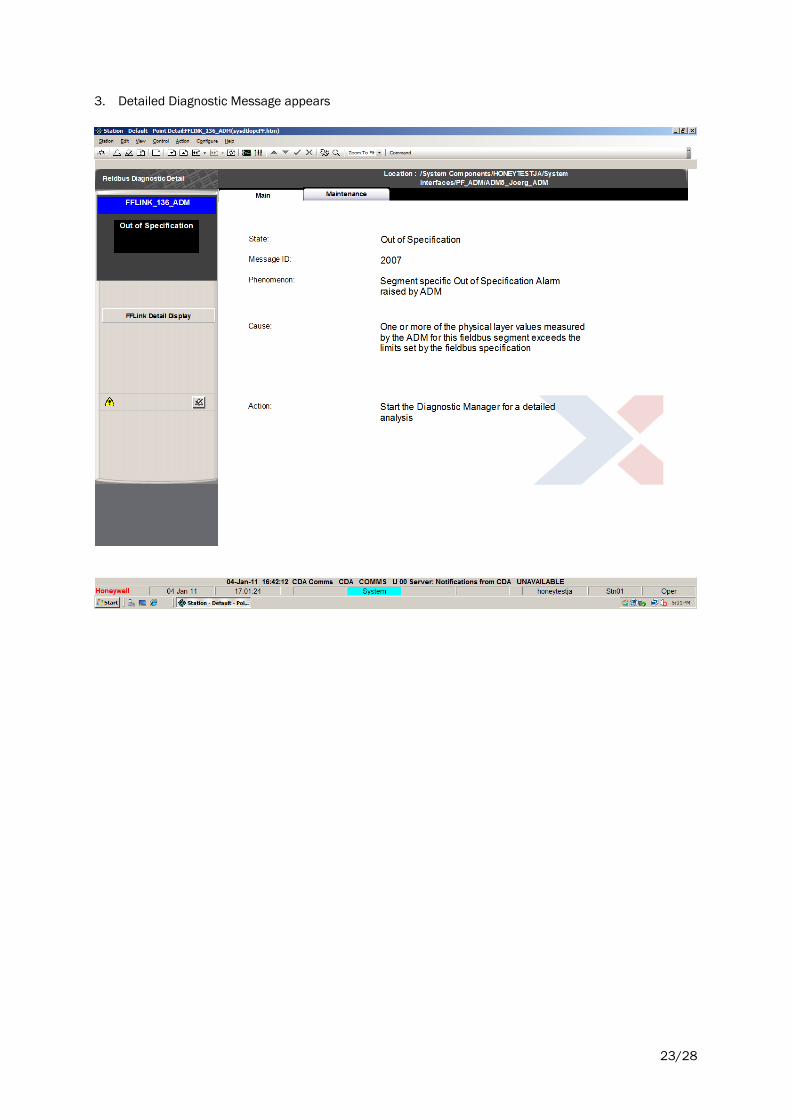
3. Detailed Diagnostic Message appears
23/28

4. To start the FieldConnex Diagnostic ActiveX, open the Maintenance tab
24/28
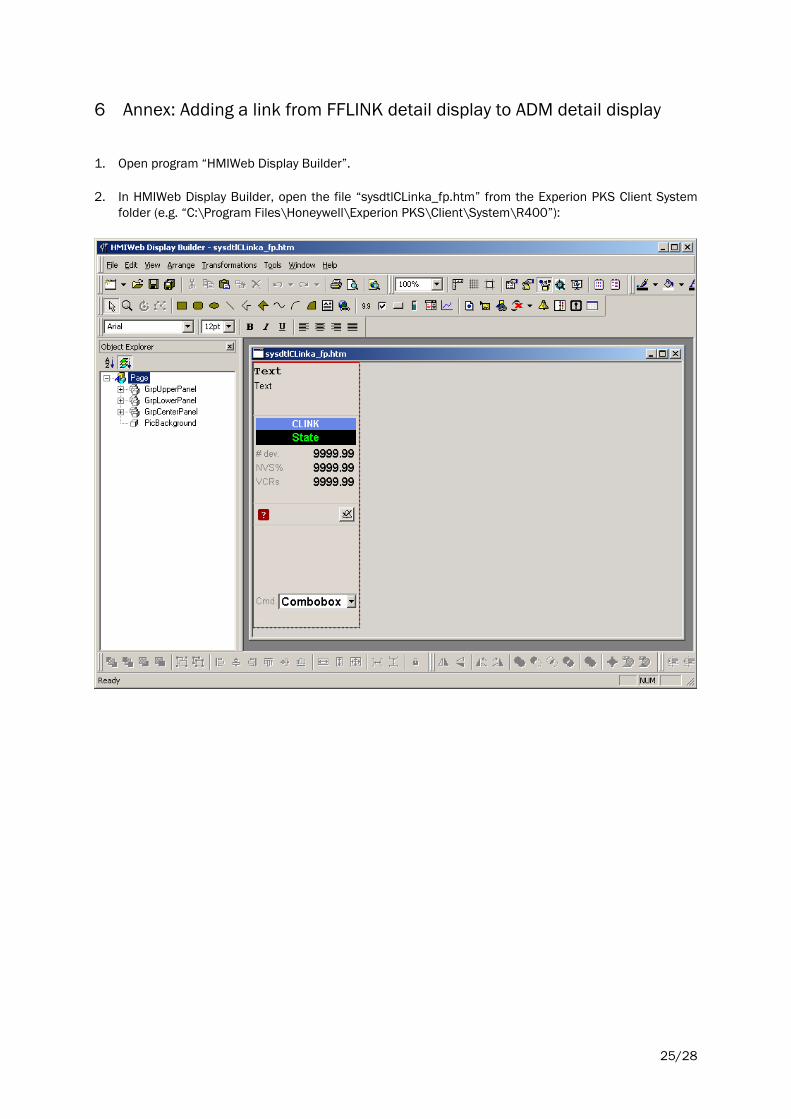
6 Annex: Adding a link from FFLINK detail display to ADM detail display
1. Open program “HMIWeb Display Builder”.
2. In HMIWeb Display Builder, open the file “sysdtlCLinka_fp.htm” from the Experion PKS Client System folder (e.g. “C:\Program Files\Honeywell\Experion PKS\Client\System\R400”):
25/28
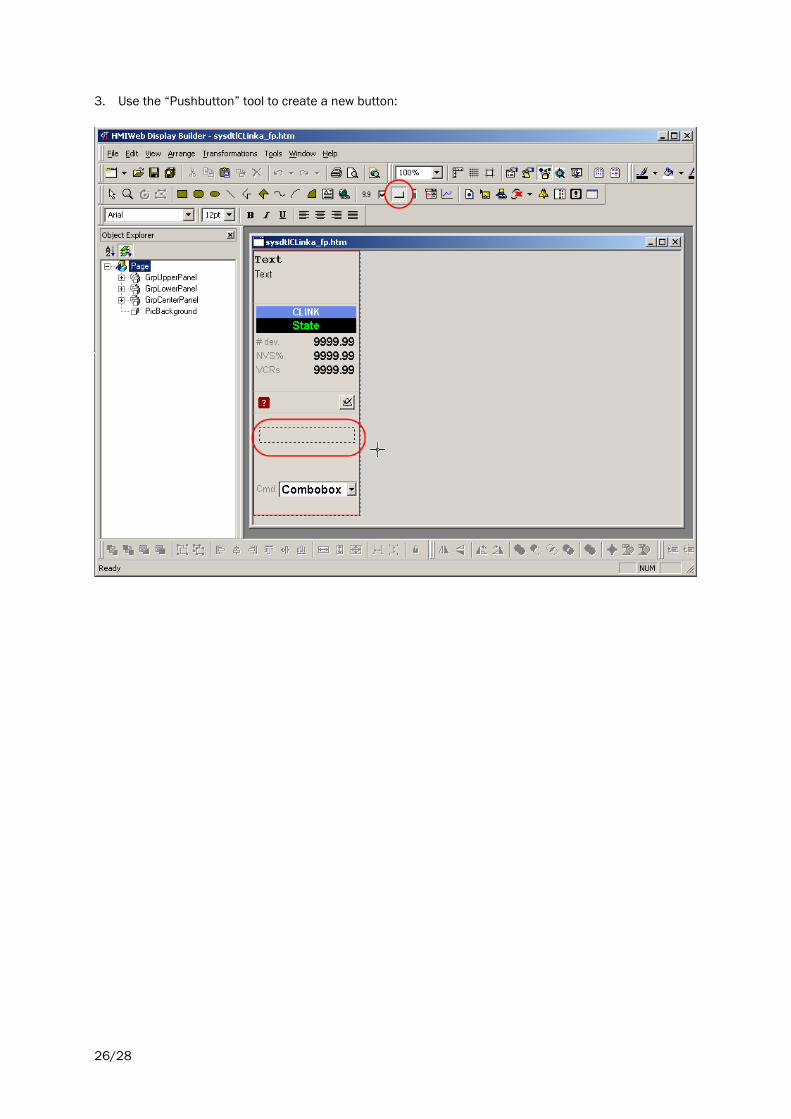
3. Use the “Pushbutton” tool to create a new button:
26/28

4. Right-click the new button and select “Property Pages…” Change the button’s properties:
5. Right-click the new button and select “Edit Script…”
27/28
28/28
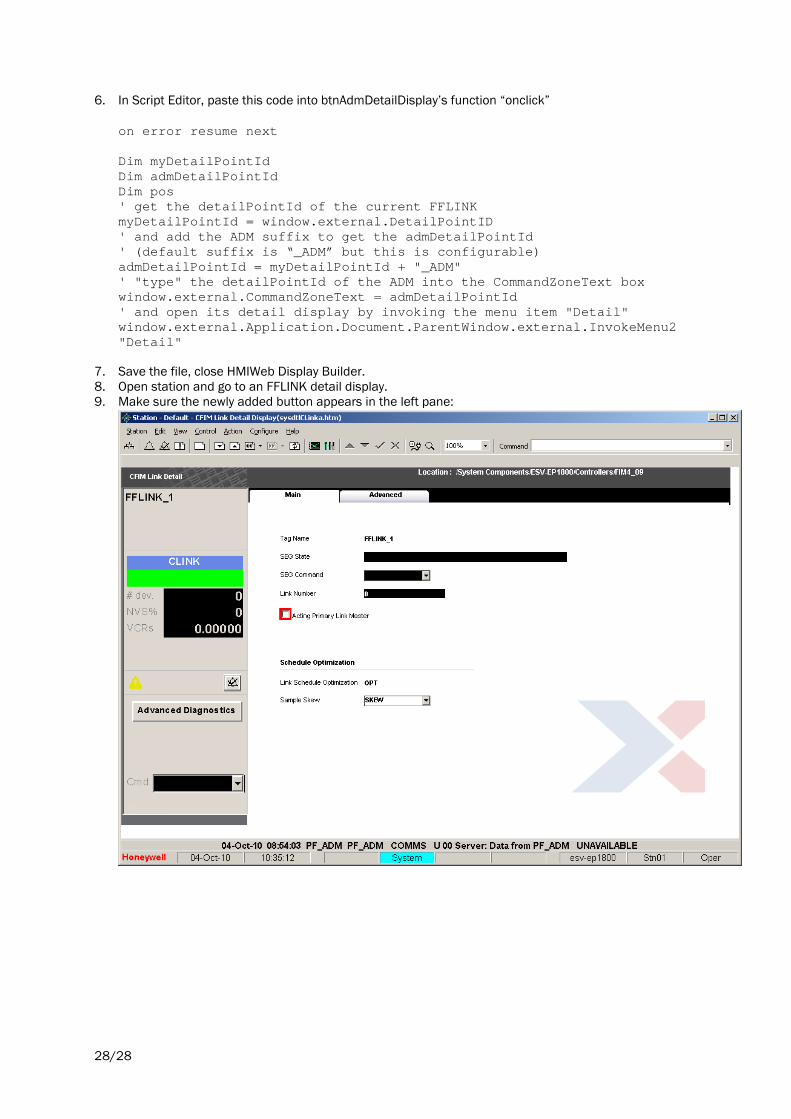
6. In Script Editor, paste this code into btnAdmDetailDisplay’s function “onclick” on error resume next Dim myDetailPointId Dim admDetailPointId Dim pos ' get the detailPointId of the current FFLINK myDetailPointId = window.external.DetailPointID ' and add the ADM suffix to get the admDetailPointId ' (default suffix is “_ADM” but this is configurable) admDetailPointId = myDetailPointId + "_ADM" ' "type" the detailPointId of the ADM into the CommandZoneText box window.external.CommandZoneText = admDetailPointId ' and open its detail display by invoking the menu item "Detail" window.external.Application.Document.ParentWindow.external.InvokeMenu2 "Detail"
7. Save the file, close HMIWeb Display Builder. 8. Open station and go to an FFLINK detail display. 9. Make sure the newly added button appears in the left pane: