anitas lace tutorial
DESCRIPTION
nice instruction machine embroiderieTRANSCRIPT
HOME DECORHOME DECOR
Anita’s Lace
Tutorial
Anita’s Lace
Tutorial
Coordinating Embroidery Designs for the HomeCoordinating Embroidery Designs for the Home
Anita Goodesign’sAnita Goodesign’s
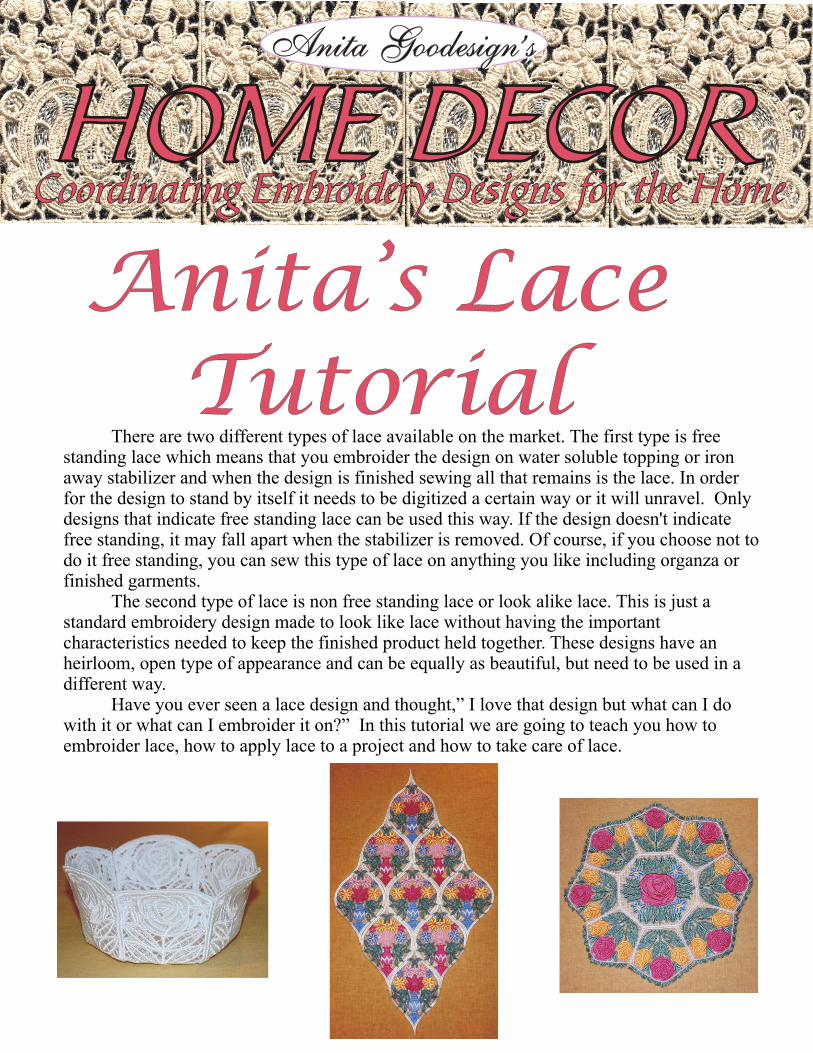
There are two different types of lace available on the market. The first type is free standing lace which means that you embroider the design on water soluble topping or iron away stabilizer and when the design is finished sewing all that remains is the lace. In order for the design to stand by itself it needs to be digitized a certain way or it will unravel. Only designs that indicate free standing lace can be used this way. If the design doesn't indicate free standing, it may fall apart when the stabilizer is removed. Of course, if you choose not to do it free standing, you can sew this type of lace on anything you like including organza or finished garments.
The second type of lace is non free standing lace or look alike lace. This is just a standard embroidery design made to look like lace without having the important characteristics needed to keep the finished product held together. These designs have an heirloom, open type of appearance and can be equally as beautiful, but need to be used in a different way.
Have you ever seen a lace design and thought,” I love that design but what can I do with it or what can I embroider it on?” In this tutorial we are going to teach you how to embroider lace, how to apply lace to a project and how to take care of lace.

Anita Goodesign’sAnita Goodesign’s
Anita’s Lace TutorialAnita’s Lace TutorialEmbroidering LaceEmbroidering Lace
The first step in embroidering successful lace is choosing the proper stabilizer. There are a few different stabilizers on the market which work really well. Essentially there are two types available that can be removed after embroidering. One is an iron away type, and the other will dissolve away in water. Water soluble topping is available in different weights. If what you have is very thin, you may need to use three or four sheets of it. There are a number of brands on the market that are single layers of a heavier weight such as “Badgemaster”. This type of water soluble stabilizer is somewhat clear, like a plastic bag. There are also wash away brands that are white and have a texture similar to a paper towel. When this type is immersed in water, it falls apart like bathroom tissue. The second type of stabilizer is designed to dissipate when hit with a hot iron. One brand is called “Miracle film” and it comes in different thicknesses like water soluble. We prefer the thicker type because it can handle more thread without perforating or warping. “Miracle Film” irons away so it is much more durable than water soluble. It does not harm your iron. Test the different types to see which is your preference. Water soluble sometimes has to be soaked for quite a while to remove the stiffness completely, but it could be what is needed if you are doing more sculptural lace projects such as bowls. At Anita Goodesign we always recommend asking your local sewing machine dealer for their guidance when doing a new embroidery project with unfamiliar products.
This example shows one piece of “iron away” stabilizer being hooped.
This example shows four pieces of water soluble stabilizer being hooped.
This is what the lace will look like when it is sewing on your embroidery machine. We suggest running the lace at approx 500-600 stitches per minute.
If you see holes start to appear in the lace you need to use more stabilizer. The thicker or larger and more involved the lace is, the more stabilizer you will need.
Anita Goodesign’sAnita Goodesign’s
Anita’s Lace TutorialAnita’s Lace TutorialLace QuiltLace Quilt
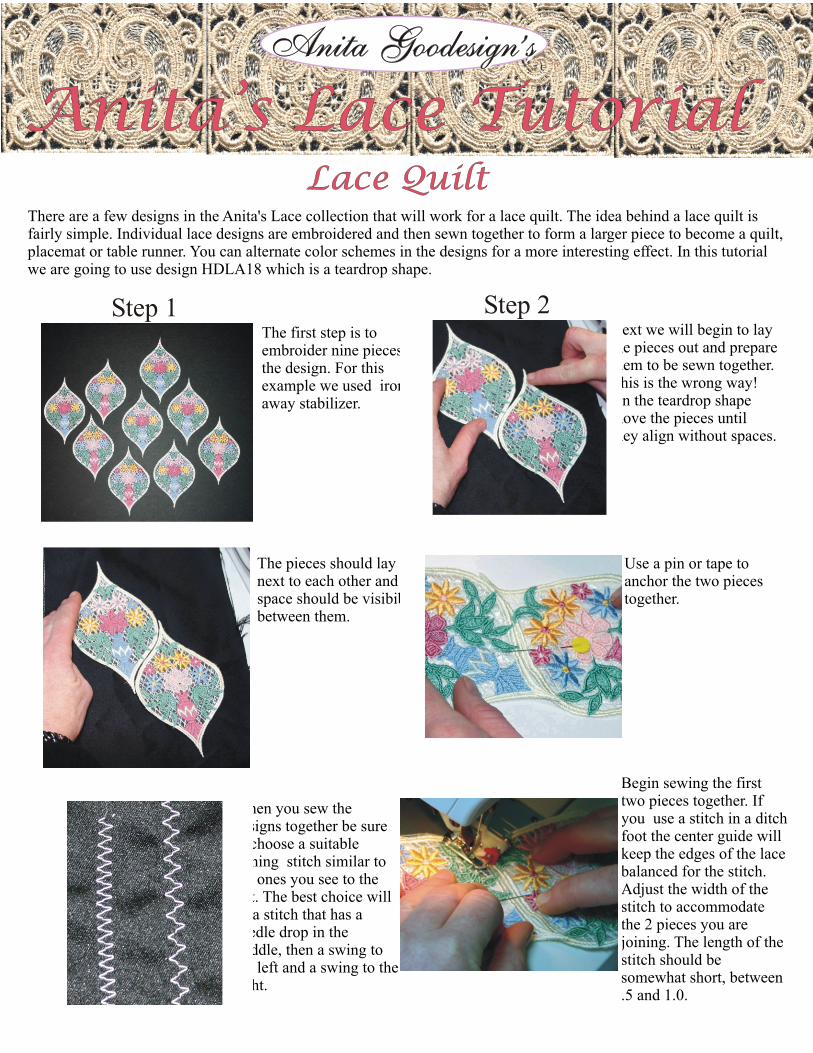
There are a few designs in the Anita's Lace collection that will work for a lace quilt. The idea behind a lace quilt is fairly simple. Individual lace designs are embroidered and then sewn together to form a larger piece to become a quilt, placemat or table runner. You can alternate color schemes in the designs for a more interesting effect. In this tutorial we are going to use design HDLA18 which is a teardrop shape.
The first step is to embroider nine pieces of the design. For this example we used iron-away stabilizer.
Next we will begin to lay the pieces out and prepare them to be sewn together. This is the wrong way! On the teardrop shape move the pieces until they align without spaces.
The pieces should lay next to each other and no space should be visibible between them.
When you sew the designs together be sure to choose a suitable joining stitch similar to the ones you see to the left. The best choice will be a stitch that has a needle drop in the middle, then a swing to the left and a swing to the right.
Begin sewing the first two pieces together. If you use a stitch in a ditch foot the center guide will keep the edges of the lace balanced for the stitch. Adjust the width of the stitch to accommodate the 2 pieces you are joining. The length of the stitch should be somewhat short, between .5 and 1.0.
Use a pin or tape to anchor the two pieces together.
Step 1 Step 2
Step 3 Step 4
Step 5 Step 6
Anita Goodesign’sAnita Goodesign’s
Anita’s Lace TutorialAnita’s Lace TutorialLace QuiltLace Quilt
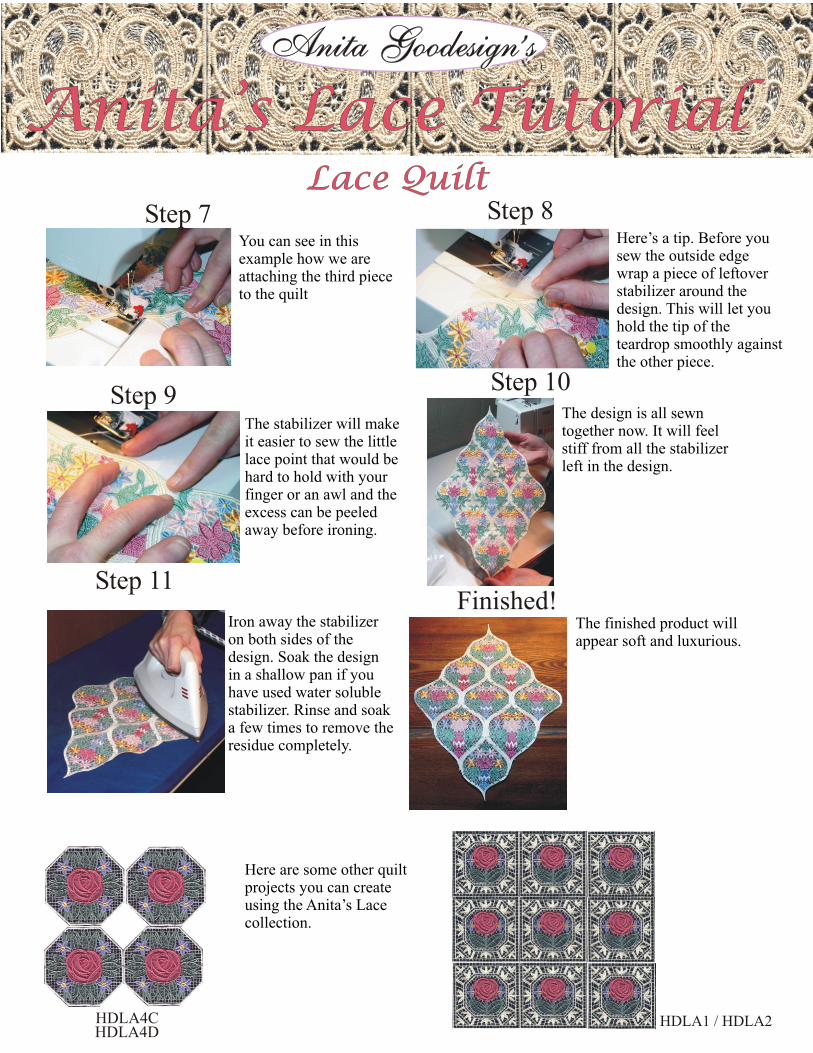
You can see in this example how we are attaching the third piece to the quilt
Here’s a tip. Before you sew the outside edge wrap a piece of leftover stabilizer around the design. This will let you hold the tip of the teardrop smoothly against the other piece.
The stabilizer will make it easier to sew the little lace point that would be hard to hold with your finger or an awl and the excess can be peeled away before ironing.
The design is all sewn together now. It will feel stiff from all the stabilizer left in the design.
Iron away the stabilizer on both sides of the design. Soak the design in a shallow pan if you have used water soluble stabilizer. Rinse and soak a few times to remove the residue completely.
The finished product will appear soft and luxurious.
Here are some other quilt projects you can create using the Anita’s Lace collection.
Step 7 Step 8
Step 9Step 10
Step 11Finished!
HDLA4CHDLA4D
HDLA1 / HDLA2
Anita Goodesign’sAnita Goodesign’s
Anita’s Lace TutorialAnita’s Lace TutorialBordersBorders
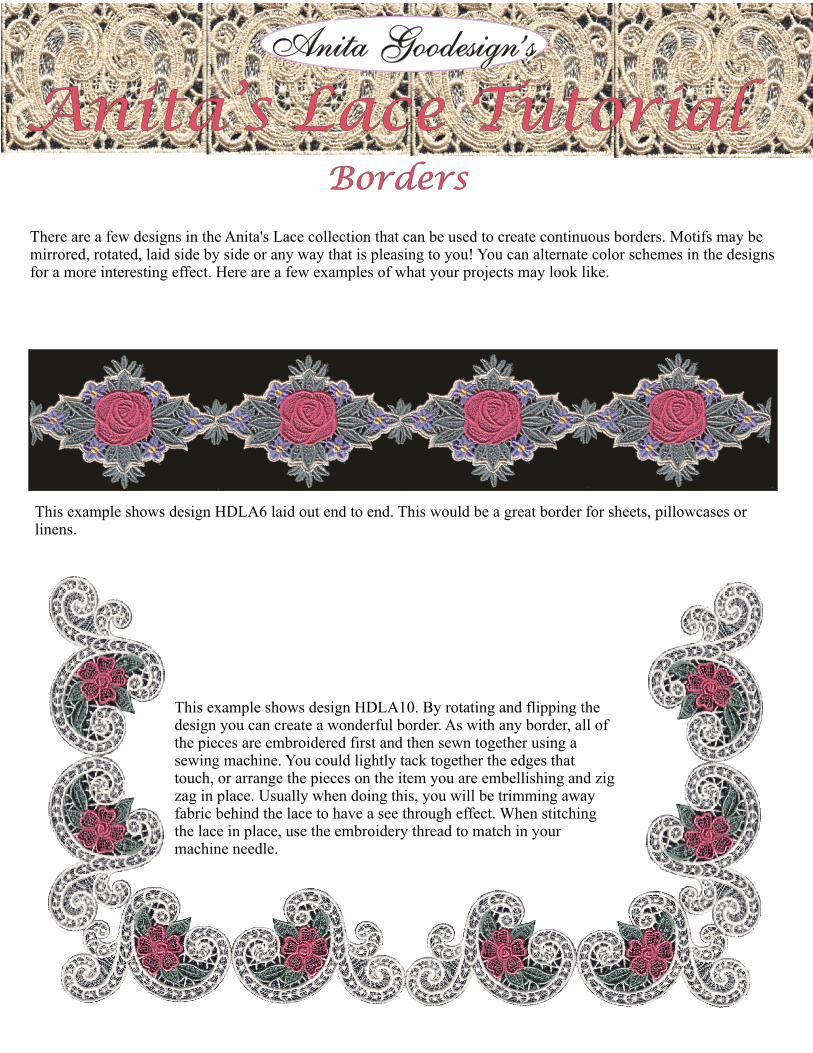
There are a few designs in the Anita's Lace collection that can be used to create continuous borders. Motifs may be mirrored, rotated, laid side by side or any way that is pleasing to you! You can alternate color schemes in the designs for a more interesting effect. Here are a few examples of what your projects may look like.
This example shows design HDLA6 laid out end to end. This would be a great border for sheets, pillowcases or linens.
This example shows design HDLA10. By rotating and flipping the design you can create a wonderful border. As with any border, all of the pieces are embroidered first and then sewn together using a sewing machine. You could lightly tack together the edges that touch, or arrange the pieces on the item you are embellishing and zig zag in place. Usually when doing this, you will be trimming away fabric behind the lace to have a see through effect. When stitching the lace in place, use the embroidery thread to match in your machine needle.

Anita Goodesign’sAnita Goodesign’s
Anita’s Lace TutorialAnita’s Lace TutorialThree Dimensional LaceThree Dimensional Lace
This is an interesting technique to give your lace more pizzazz. To do three dimensional lace you need to embroider two different designs, the lace design itself and the dimensional motif to add to it. We've included a few dimensional elements that you can add to some of the Anita’s Lace motifs in this collection. The first step is to embroider both designs. Make sure you match the color of the dimensional motif with the element it is going to be sewn on top of. The next step is to position and sew on the dimensional element on top of the lace design. The final step is to complete your project With some creative editing you can create your own dimensional embroidery. Make sure you choose designs that will work and always be sure you test sew the design element first. If the design is completely surrounded by a satin stitch it will probably work.
Step 1 Step 2
Step 3 Step 4 Step 5
Embroider all of the individual designs needed to create the project. For this example we are using HDLA3 with HDLA13,HDLA14, and HDLA15 as the dimensional elements.
The next step is to lay out your project. This design is going to be an embellishment on a pillowcase.
Place your dimensional objects on top of the base object to make sure they fit into place. Be sure to match your thread color to the motif you are preparing to stitch!
Stitch the dimensional motif down onto the base embroidery using a wide zig-zag as a tacking stitch. A built in button sewing program is perfect for this task because it stitches securely in one place without moving the feed dogs.
This example shows the finished product.

Anita Goodesign’sAnita Goodesign’s
Anita’s Lace TutorialAnita’s Lace TutorialLace DoilyLace Doily
Creating a doily is great way to showcase beautiful lace. In the Anita’s Lace collection we have included the two designs you need to create a floral doily. They are designs HDLA4C, this is the base of the doily, and design HDLA4, this is the sides of the doily. This is a great first project to try.
Step 1 Step 2
Step 3 Step 4
Step 5 Step 6 Finished
The first step is to embroider one base and eight side pieces. When they are finished do not remove the stabilizer. Leaving the stabilizer in will make it easier to sew the product.
The next step is to start joining the sides to the base. Use a joining stitch on your sewing machine. For best results use the embroidery thread in your sewing machine to match the thread used in the design.
Continue around the base sewing each side piece down.
When the side pieces are all secured, the next step is to stitch the side pieces to each other. You will use the same joining stitch to accomplish this.
Step 5 displays the finished project all sewn together. Since we used iron-away stabilizer, the final step is to remove it using an iron.
Anita Goodesign’sAnita Goodesign’s
Anita’s Lace TutorialAnita’s Lace TutorialLace BowlLace Bowl
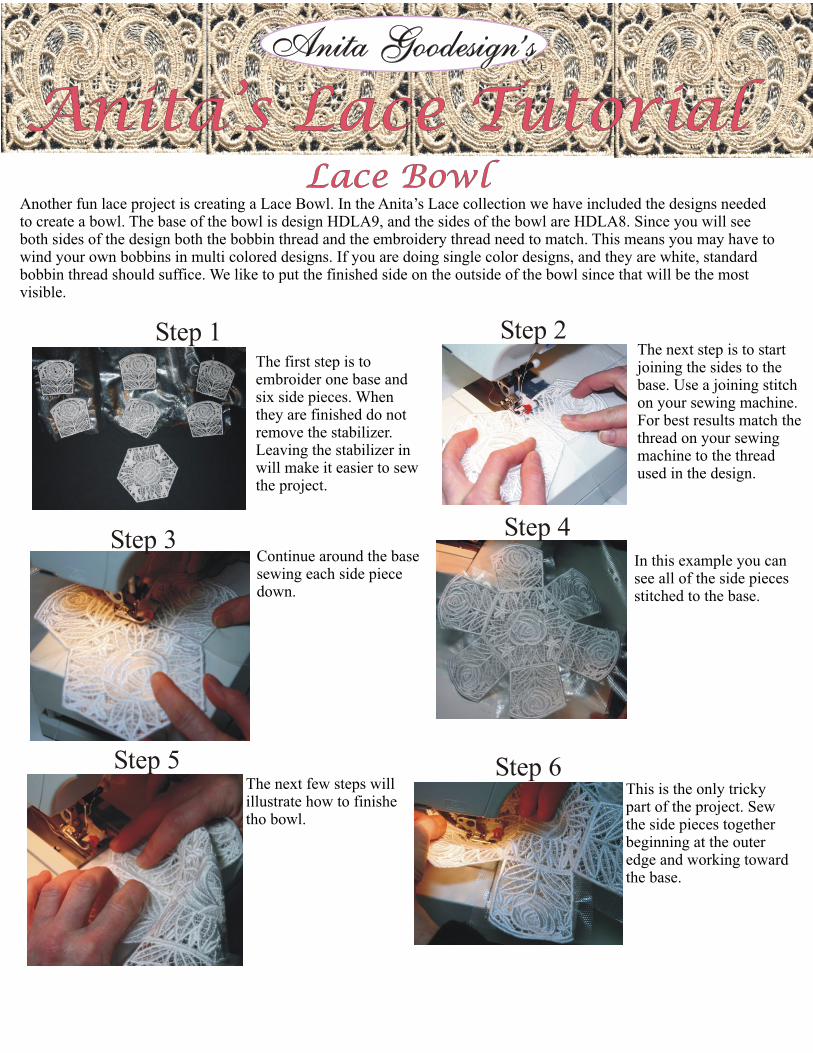
Another fun lace project is creating a Lace Bowl. In the Anita’s Lace collection we have included the designs needed to create a bowl. The base of the bowl is design HDLA9, and the sides of the bowl are HDLA8. Since you will see both sides of the design both the bobbin thread and the embroidery thread need to match. This means you may have to wind your own bobbins in multi colored designs. If you are doing single color designs, and they are white, standard bobbin thread should suffice. We like to put the finished side on the outside of the bowl since that will be the most visible.
Step 1The first step is to embroider one base and six side pieces. When they are finished do not remove the stabilizer. Leaving the stabilizer in will make it easier to sew the project.
Step 2
Step 3
The next step is to start joining the sides to the base. Use a joining stitch on your sewing machine. For best results match the thread on your sewing machine to the thread used in the design.
Continue around the base sewing each side piece down.
Step 5 Step 6
Step 4
This is the only tricky part of the project. Sew the side pieces together beginning at the outer edge and working toward the base.
The next few steps will illustrate how to finishe tho bowl.
In this example you can see all of the side pieces stitched to the base.
Anita Goodesign’sAnita Goodesign’s
Anita’s Lace TutorialAnita’s Lace TutorialLace BowlLace Bowl
Step 7 Step 8
Step 9 Step 10
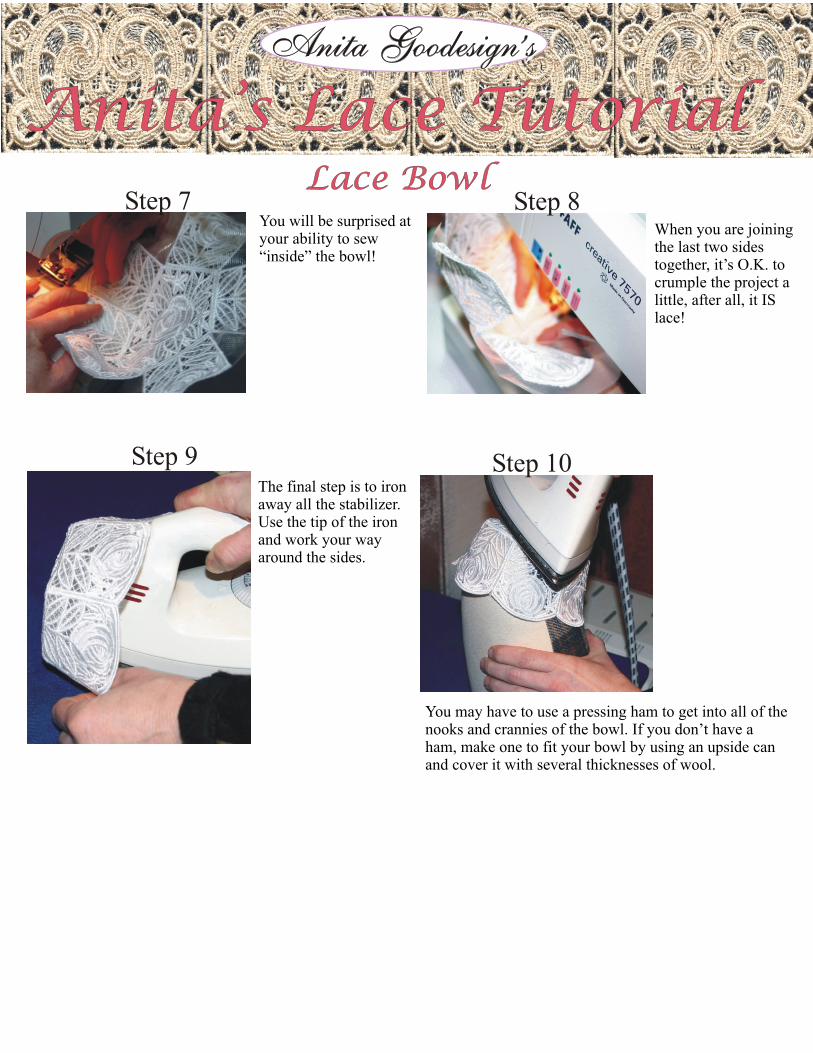
You will be surprised at your ability to sew “inside” the bowl!
When you are joining the last two sides together, it’s O.K. to crumple the project a little, after all, it IS lace!
The final step is to iron away all the stabilizer. Use the tip of the iron and work your way around the sides.
You may have to use a pressing ham to get into all of the nooks and crannies of the bowl. If you don’t have a ham, make one to fit your bowl by using an upside can and cover it with several thicknesses of wool.
Anita Goodesign’sAnita Goodesign’s
Anita’s Lace TutorialAnita’s Lace TutorialLace Tablecloth EdgingLace Tablecloth Edging
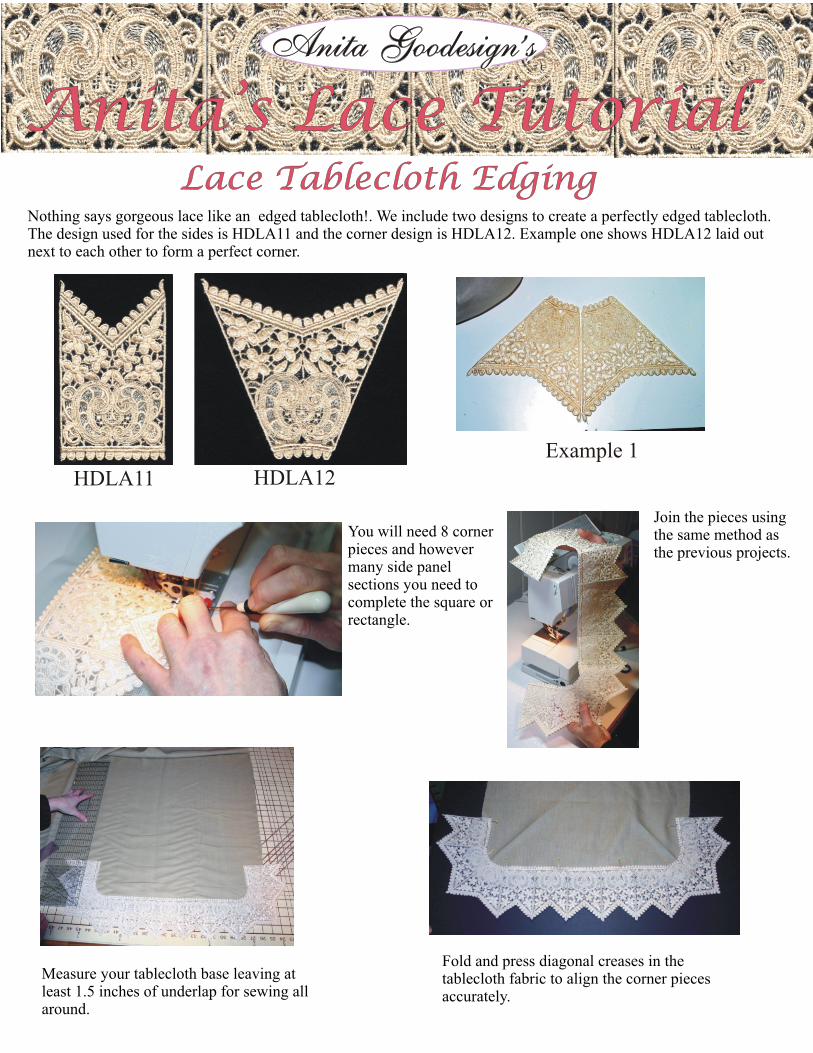
Nothing says gorgeous lace like an edged tablecloth!. We include two designs to create a perfectly edged tablecloth. The design used for the sides is HDLA11 and the corner design is HDLA12. Example one shows HDLA12 laid out next to each other to form a perfect corner.
HDLA11 HDLA12
Example 1
You will need 8 corner pieces and however many side panel sections you need to complete the square or rectangle.
Join the pieces using the same method as the previous projects.
Measure your tablecloth base leaving at least 1.5 inches of underlap for sewing all around.
Fold and press diagonal creases in the tablecloth fabric to align the corner pieces accurately.
Anita Goodesign’sAnita Goodesign’s
Anita’s Lace TutorialAnita’s Lace TutorialLace Tablecloth EdgingLace Tablecloth Edging
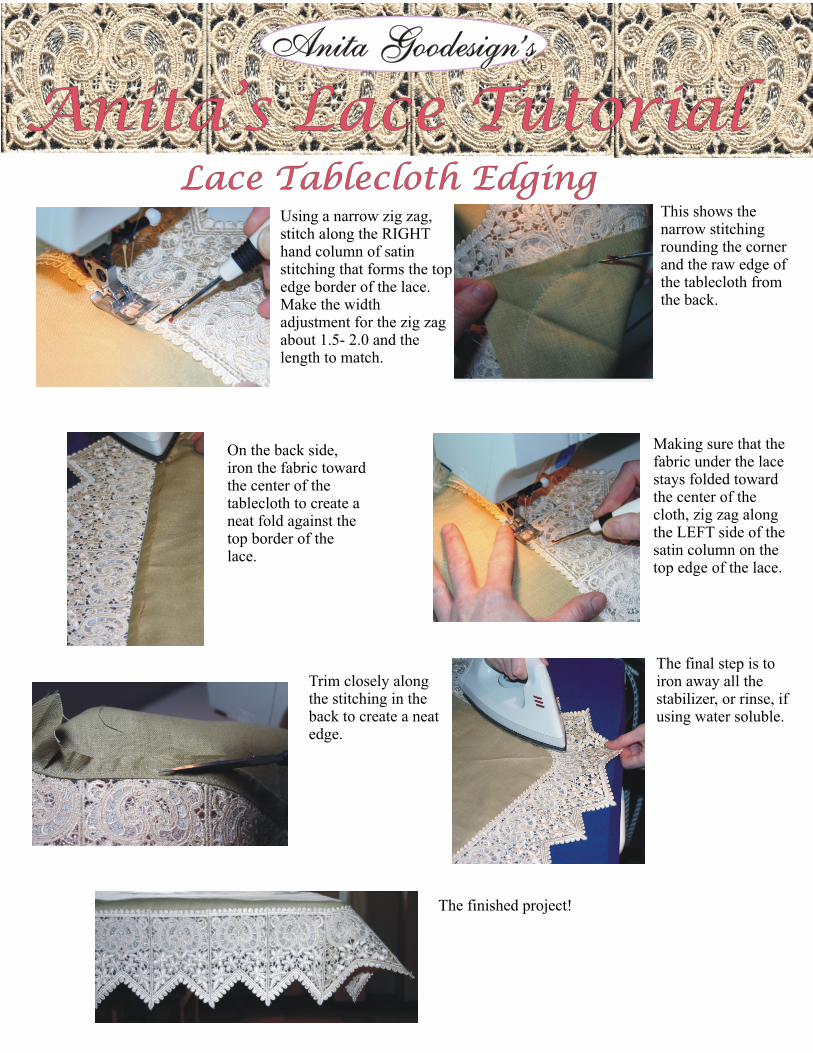
Using a narrow zig zag, stitch along the RIGHT hand column of satin stitching that forms the top edge border of the lace. Make the width adjustment for the zig zag about 1.5- 2.0 and the length to match.
This shows the narrow stitching rounding the corner and the raw edge of the tablecloth from the back.
On the back side, iron the fabric toward the center of the tablecloth to create a neat fold against the top border of the lace.
Making sure that the fabric under the lace stays folded toward the center of the cloth, zig zag along the LEFT side of the satin column on the top edge of the lace.
Trim closely along the stitching in the back to create a neat edge.
The final step is to iron away all the stabilizer, or rinse, if using water soluble.
The finished project!
Anita Goodesign’sAnita Goodesign’s
Anita’s Lace TutorialAnita’s Lace TutorialTips for LaceTips for Lace
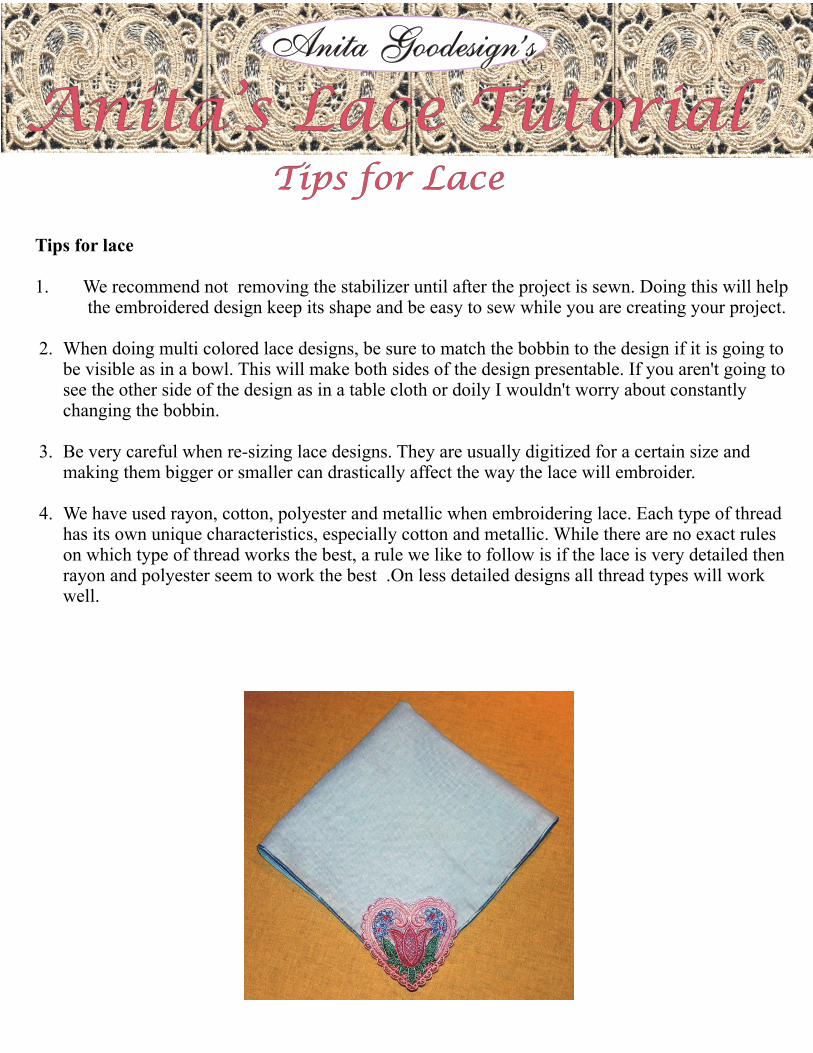
Tips for lace
1. We recommend not removing the stabilizer until after the project is sewn. Doing this will help the embroidered design keep its shape and be easy to sew while you are creating your project.
2. When doing multi colored lace designs, be sure to match the bobbin to the design if it is going to be visible as in a bowl. This will make both sides of the design presentable. If you aren't going to see the other side of the design as in a table cloth or doily I wouldn't worry about constantly changing the bobbin.
3. Be very careful when re-sizing lace designs. They are usually digitized for a certain size and making them bigger or smaller can drastically affect the way the lace will embroider.
4. We have used rayon, cotton, polyester and metallic when embroidering lace. Each type of thread has its own unique characteristics, especially cotton and metallic. While there are no exact rules on which type of thread works the best, a rule we like to follow is if the lace is very detailed then rayon and polyester seem to work the best .On less detailed designs all thread types will work well.

Thirty Three DesignsThirty Three DesignsThirty Three DesignsThirty Three Designs4x4 - 5x7
Extra Large and Jumbo
Designs
On CD-Rom
Lace Doily Lace Quilt
Lace Tablecloth Edge
Dimensional Elements Connecting Borders
Lace Basket
COMPATIBLE WITH THE FOLLOWING HOUSEHOLD SEWING SYSTEMS:ARTISTA (.ART), DECO / BROTHER / BABY LOCK (.PES ), HUSQVARNA / VIKING(.HUS ), JANOME / ELNA / KENMORE (.SEW), PFAFF (PCS), SINGER (.XXX), MELCO EXPANDED (.EXP),HUSQVARNA / VIKING / PFAFF (.VIP), TAJIMA (.DST)
These are licensed designs and can be sewn for personal use and as gifts. If you wish to sell these designs on embroidered items conditions apply. Details are in the package.
www.anita-goodesign.com
HDLA8
HDLA4
HDLA4C
HDLA18
HDLA2
HDLA16
HDLA17
HDLA6
HDLA3
HDLA13
HDLA15
HDLA14
HDLA3CHDLA3B
HDLA3D
HDLA10HDLA10BHDLA6B
HDLA5
HDLA7
HDLA7B
HDLA5B
HDLA17B
HDLA16B
HDLA1
HDLA18B
HDLA4D
HDLA4B
HDLA9
HDLA11 HDLA12
HDLA9B
HDLA8BH= 2.80 X W= 2.86”
H= 3.31 X W= 3.56”
H= 4.46 X W= 4.46”
H= 5.91 X W= 3.54”
H= 4.10 X W= 4.10”
H= 3.92 X W= 3.90”
H= 3.14 X W= 4.44
H= 3.80 X W= 5.33
H= 6.42 X W= 4.58
H= 1.43 X W= 1.43
H= 1.26 X W= 1.34
H= 1.37 X W= 1.25
H= 6.42 X W= 4.58H= 6.92 X W= 4.93
H= 6.92 X W= 4.93
H= 3.10 X W= 4.54H= 3.10 X W= 4.54H= 3.80 X W= 5.33
H= 3.52 X W= 3.60
H= 2.89 X W= 3.36
H= 2.89 X W= 3.36
H= 3.52 X W= 3.60
H= 3.14 X W= 4.44
H= 3.92 X W= 3.90”
H= 4.10 X W= 4.10”
H= 5.91 X W= 3.54”
H= 4.46 X W= 4.46”
H= 3.31 X W= 3.56”
H= 4.79 X W= 4.18”
H= 4.81 X W= 2.79” H= 4.81 X W=4.35”
H= 4.79 X W= 4.18”
H= 2.80 X W= 2.86”
Design 8B is the same using only one color
Design 4B is the same using only one color
Design 4D is the same using only one color
Design 18B is the same using only one color
Design 1 is the same using only one color
Design 16B is the same using only one color
Design 17B is the same using only one color
Design 6B is the same using only one color
Designs 3C & 3D are the same using only one color
Design 10B is the same using only one color
Design 5B is the same using only one color
Design 7B is the same using only one color
Design 9B is the same using only one color
2 Sizes