apogee.agfa.net · 3:apogee prepress 7.0 tutorial. end user license agreement. 1. important notice....
TRANSCRIPT

:APOGEE Prepress 7.0
for Windows and Macintosh
Tutorial
Document version 7.0.1

2 TRADEMARKS, COPYRIGHT AND EULA
Trademarks, Copyright and EULA
Agfa and the Agfa rhombus are trademarks of Agfa-Gevaert N.V. or its affiliates.
:APOGEE is a trademark of Agfa Graphics N.V.
Those names and product names not mentioned here are trademarks or registered trademarks of their respective owners.
For more information about Agfa Graphics products, visit www.agfa.com or contact us at the following address:
Date of Issue: 2010
Copyright © 2010 Agfa Graphics N.V., Belgium
All software and hardware described in this document are subject to change without notice.
Agfa Graphics N.V.Septestraat 27B-2640 Mortsel, BelgiumTel: (+)32 3 444 2111
:APOGEE Prepress 7.0 Tutorial
3
End User License Agreement
1. IMPORTANT NOTICE
This package includes one or more diskette(s), CD-ROM(s), and/or DVD(s) containing copies of :APOGEE™ software programs and documentation relating thereto, and an associated dongle.
You should carefully read the following terms and conditions before accepting this License Agreement, and installing and using this Software (as defined below). This License Agreement ("Agreement") is a legal agreement between You and Agfa Graphics NV, Septestraat 27, B-2640 Mortsel, Belgium ("AGFA"), and describes the terms and conditions pursuant to which AGFA shall license to You this Software, provided however that in the event a hardcopy license agreement with respect to the Software is signed by or on behalf of both You and AGFA whose terms vary from this Agreement, then such signed hardcopy license agreement shall govern Your Use of the Software. In this License Agreement "You" means, and "Your" refers to, the corporation or other entity that obtains the Software and enters into this Agreement, including both the reader and any corporate licensee.
BY INSTALLING, COPYING OR OTHERWISE USING THE SOFTWARE, YOU ACCEPT, AND AGREE TO BE BOUND BY, THE TERMS AND CONDITIONS OF THIS LICENSE AGREEMENT. IF YOU DO NOT AGREE WITH THESE TERMS, DO NOT INSTALL, COPY OR OTHERWISE USE THE SOFTWARE, AND YOU MAY RETURN THE SOFTWARE, WITH PROOF OF PAYMENT, FOR A FULL REFUND TO THE PLACE OF PURCHASE WITHIN THIRTY (30) DAYS OF THE PURCHASE DATE.
You are licensed to use the Software on the following terms and conditions:
2. DEFINITIONS
2.1 "AGFA order form" means the electronic or hard copy order form by which You have ordered the Software.
2.2 "Authorised Users" means the number of users who concurrently may have access to the Software at any one time, as specified in the AGFA order form that is incorporated and made part of this Agreement by reference.
2.3 "Confidential Information" means this Agreement, including all of its terms, and all its amendments and addenda, all Software listings, Documentation, information, data, tests, specifications, trade secrets, object code and machine-readable copies of the Software, and any other proprietary information supplied to You by AGFA, or by You to AGFA and clearly marked as "confidential information", including all items defined as "confidential information" in any other agreement between You and AGFA executed prior to the date of this Agreement.
2.4 "Designated Output Device" means an Output Device that has been designated by You to be managed by the Software.
2.5 "Documentation" means any instruction manuals, operating instructions, user manuals, online help, tutorials and specifications provided by AGFA which describe the use of the Software and which either accompany the Software or are provided to You at any time.
2.6 "Dongle" means a small hardware device that connects to a computer and acts as an authentication key for the licensed Software.
2.7 "Effective Date" means the date on which You have accepted to be bound by the terms of this Agreement by installing, copying or otherwise using the Software.
2.8 "Font Programs" means the digitally encoded, machine readable outline programs for certain typefaces.
2.9 "Modules" means the modules elected by You as being part of the Software, as listed in the AGFA order form that is incorporated and made part of this Agreement by reference.
2.10 "Output Device" means a device that is capable of outputting logical pages, such as, without limitation, a platesetter or imagesetter.
2.11 "Processor" means one (1) single processor core that forms part of a desktop computer or server, as the case may be, on which the Software is installed or executed. For those processors that have multiple execution cores, each such core shall be considered a distinct Processor.
2.12 "Software" means :APOGEE™ computer software program, all or part of which are owned by AGFA or other parties whereby the license is owned by AGFA ("Other Owners"), consisting of any of the Modules elected by You, provided and licensed to You pursuant to this Agreement.
2.13 "Storage Device" means the diskette(s), CD-ROM(s), DVD(s) and/ or other device on which AGFA distrib-utes copies of the Software.
:APOGEE Prepress 7.0 Tutorial

4
2.14 "System" means one or more Processors on which the Software is installed or run, and located at the System Location. The number of Processors on which You are authorised to install or run the Software is set forth in the AGFA order form that is incorporated and made part of this Agreement by reference.
2.15 "System Location" means, with respect to the System and any part thereof, the address at which the System, and any part thereof, is physically located, as identified in the AGFA order form that is incorporated and made part of this Agreement by reference.
2.16 "Updates" shall mean updates, if any, to the Software as commercially released by AGFA at any given time, including, but not limited to, updates, small enhancements, additions, modifications, deletions, incorpora-tion of patches, and/ or error corrections to any previously delivered version of the Software, as designated in AGFA's sole determination.
2.17 "Upgrades" shall mean a new and enhanced release of the Software as commercially released by AGFA at any given time and that, when made or added, materially changes its utility, efficiency, functional capability or application, as designated in AGFA's sole determination.
2.18 "Use" means loading, utilisation, running, storage or display of the Software by Authorised Users on Your System in connection with a Designated Output Device only, and solely for Your own internal business operations.
2.19 "Warranty Period" means the period ending ninety (90) days after the Effective Date during which the Software is covered by AGFA's warranty as set forth in this Agreement, provided however that in no event the Warranty Period shall exceed a period of one hundred and twenty (120) days after the date You have purchased the Software.
3. LICENSE AND COPIES
3.1 GRANT OF LICENSE. Subject to the terms and conditions of this Agreement, AGFA hereby grants to You a perpetual, non-exclusive, non-sublicensable and non-transferable limited right and license to (a) Use the Software on the System, and (b) use the Documentation in connection with the Use of the Software. You acknowledge that the License Fee paid by You for the Use of Software is determined by the Designated Output Device. For each Output Device with which You Use the Software different from the Designated Output Device You will have to purchase a license upgrade for the Software or, with respect to additional Output Devices in connection with which You Use the Software, one or more additional licensed copies of the Software. In addition, specific terms and conditions shall apply to the use of Font Programs, as further set out in the about-box of the Software.
3.2 This license transfers to You neither title nor any proprietary or intellectual property rights to the Software, Documentation, or any copyrights, patents, or trademarks, embodied or used in connection therewith, except for the limited rights expressly granted herein. You acknowledge that the Software and any copies thereof are licensed and not sold, and all right, title and interest in and to the Software are and shall remain with AGFA and/ or the Other Owners.
3.3 COPIES. During the term of this Agreement, You will be entitled to make a reasonable number of machine-readable copies of the Software for backup or archival purposes only. You may not copy the Software, except as permitted by this Agreement. You shall maintain accurate and up-to-date records of the location of all copies of the Software and inform AGFA in writing of such location(s) upon AGFA's request. All copies of the Software will be subject to all terms and conditions of this Agreement. Whenever You are permitted to copy or reproduce all or any part of the Software, all titles, trademark symbols, copyright symbols and legends, and other proprietary markings must be reproduced.
4. LICENSE RESTRICTIONS
You agree that You are granted a limited right to Use only, and that You will not Yourself, or through any parent, subsidiary, affiliate, agent or other third party:
(a) lease, license or sub-license the Software or the Documentation;
(b) sell or otherwise transfer the Software or Documentation, unless, subject to Article 9.4, You transfer your rights under this Agreement to a corporation or other entity and that at the time of transfer You pass the Software (and any and all copies in Your control) to such corporation or other entity and such corporation or other entity agrees to be bound by the terms and conditions of this Agreement;
(c) decompile, disassemble, or reverse engineer the Software, in whole or in part;
(d) modify the Software or any part thereof, except to the extent that the Software provides for user-modifiable components and such modification is necessary to Use the Software;
(e) write or develop any derivative software or any other software program based upon the Software or any part thereof, or any Confidential Information;
:APOGEE Prepress 7.0 Tutorial

5
(f) use the Software to provide software related services; or
(g) provide, disclose, divulge or make available to, or permit use of the Software by any unauthorised third party without AGFA's prior written consent.
(h) If the Software is used within a country of the European Community, nothing in this Agreement shall be construed as restricting or prejudicing any imperative rights available under the European Community Software Directive, O.J.Eur.Comm. (No.L.122/42, 1991).
5. LICENSE FEE
5.1 LICENSE FEE. You shall pay the license fees for the Software applicable at the time of purchase (the "License Fee"). All fees hereunder exclude all applicable sales, use, value-added, property and other taxes, including duties and similar mandatory payments, and You will be responsible for payment of all such.
5.2 NO OFFSET. License Fees due from You under this Agreement may not be withheld or offset by You against other amounts due to You for any reason.
6. INSTALLATION - UPDATES - UPGRADES - MAINTENANCE AND SUPPORT
6.1 You shall be responsible for the installation of the Software on the System, in accordance with the Documentation.
6.2 As from the Effective Date, You may elect to purchase support and maintenance services in connection with the Software. In the event such maintenance and support agreement entitles You to Updates and Upgrades of the Software, if, and as from the date that, any such Update or Upgrade is installed on the System, it shall be an integral part of the Software. An Upgrade is covered by the warranty pursuant to paragraph 6.1 during a period of ninety (90) days as from the date of installation of the Upgrade, which in no event shall exceed a period of 120 days after the Upgrade has been shipped by AGFA.
6.3 Notwithstanding the foregoing, AGFA shall have no obligation to offer, or continue to offer, to You the opportunity to purchase such support and maintenance services with respect to a given release (Updates or Upgrades) of the Software for a period exceeding two (2) years from the date of such release.
7. LIMITED WARRANTY AND LIMITATION OF LIABILITY
7.1 LIMITED WARRANTY. AGFA warrants that during the Warranty Period (a) the Software will perform in substantial accordance with the Documentation and (b) the Storage Device on which the Software is distributed will be free from defects in materials and workmanship under normal use. If during the Warranty Period the Software or the Storage Device on which it is distributed do not perform as warranted, AGFA at its sole and exclusive option shall use commercially reasonable efforts to correct such non-conformance of the Software or to provide a reasonable workaround, or replace the Storage Device free of charge, or, if neither of those remedies are commercially practicable, terminate this Agreement and repay to You the License Fee. The warranty set forth above is made to and for the benefit of You only. The warranty will apply only if: (a) the Software has been properly installed and used at all times and in accor-dance with the Documentation or other instructions for Use, and (b) no modification, alteration or addition has been made to the Software by persons other than AGFA or AGFA's authorised representative, except as authorised in writing by AGFA, and (c) the defect, error or problem does not result from any cause within the control of You. Any supplements or Updates to the Software, including without limitation, any service packs or hot fixes provided to you after the expiration of the Warranty Period are not covered by any warranty or condition, express, implied or statutory. AGFA warrants that it possesses all of the right, title, interest and authority to enter into this Agreement with You. AGFA also warrants that no lawsuit or claim concerning the Software is currently pending.
7.2 EXCEPT FOR THE ABOVE EXPRESS LIMITED WARRANTIES, AGFA MAKES NO WARRANTIES, WHETHER EXPRESS, IMPLIED, OR STATUTORY REGARDING OR RELATING TO THE SOFTWARE OR THE DOCUMENTATION, OR ANY MATERIALS OR SERVICES FURNISHED OR PROVIDED TO YOU UNDER THIS AGREEMENT. AGFA SPECIFICALLY DISCLAIMS ALL IMPLIED WARRANTIES OF MERCHANT-ABILITY AND FITNESS FOR A PARTICULAR PURPOSE WITH RESPECT TO THE SOFTWARE, DOCUMENTATION AND SAID OTHER MATERIALS AND SERVICES, AND WITH RESPECT TO THE USE OF ANY OF THE FOREGOING. WITHOUT LIMITING THE GENERALITY OF THE FOREGOING, AGFA DOES NOT WARRANT THAT OPERATION OF THE SOFTWARE WILL BE UNINTERRUPTED OR ERROR-FREE, OR THAT DATA WILL NOT BE LOST IF FOR ANY REASON OPERATIONS ARE INTERRUPTED.
7.3 LIMITATION OF LIABILITY. TO THE MAXIMUM EXTENT PERMITTED BY LAW, IN NO EVENT WILL AGFA BE LIABLE FOR ANY COMMERCIAL LOSS, LOSS OF PROFITS, LOSS OF AN OPPORTUNITY, LOSS OF USE, BUSINESS INTERRUPTION, LOSS OF DATA, COST OF COVER OR INDIRECT, SPECIAL, INCIDENTAL OR CONSEQUENTIAL DAMAGES OF ANY KIND IN CONNECTION WITH OR ARISING OUT OF THE FURNISHING, PERFORMANCE OR USE OF THE SOFTWARE OR SERVICES PERFORMED
:APOGEE Prepress 7.0 Tutorial

6
HEREUNDER, WHETHER ALLEGED AS A BREACH OF CONTRACT OR TORTIOUS CONDUCT, INCLUDING NEGLIGENCE (BUT NOT GROSS NEGLIGENCE OR FRAUD), EVEN IF AGFA HAS BEEN ADVISED OF THE POSSIBILITY OF SUCH DAMAGES. IN ADDITION, AGFA WILL NOT BE LIABLE FOR ANY DAMAGES CAUSED BY DELAY IN DELIVERY OR FURNISHING THE SOFTWARE OR SAID SERVICES. AGFA'S LIABILITY UNDER THIS AGREEMENT FOR DIRECT, INDIRECT, SPECIAL, INCIDENTAL AND/OR CONSEQUENTIAL DAMAGES OF ANY KIND, INCLUDING, WITHOUT LIMITATION, RESTITUTION, WILL NOT, IN ANY EVENT, EXCEED THE LICENSE FEE PAID BY YOU TO AGFA UNDER THIS AGREEMENT.
7.4 ALLOCATION OF RISK. The provisions of this Section 6 allocate risks under this Agreement between You and AGFA. You acknowledge and recognise that AGFA's pricing reflects this allocation of risks and limita-tion of liability accordingly.
8. INDEMNIFICATION
8.1 INFRINGEMENT INDEMNITY. AGFA represents it has no reason to believe that the Software infringes upon any copyright or any other intellectual property right of any third party. In the event of a claim that the Software infringes upon, or violates, a third party's copyright AGFA will indemnify and hold You harmless against any action brought against You based on a claim that the unmodified Software, when used in accor-dance with this Agreement, infringes a European copyright, patent or other proprietary rights, and AGFA shall pay all costs, settlements and damages finally awarded, except for consequential damages. However, AGFA will not be obligated to indemnify or hold You harmless from any such action unless You (i) notify AGFA in writing of any claim within 10 (ten) business days after You learn of such a claim, (ii) give AGFA sole control of the defence and settlement thereof, (iii) provide all reasonable assistance in connection with the defence and settlement thereof, and (iv) have not yet compromised or settled in any way any such losses, claims or damages for which indemnity is sought. If the Software is finally adjudged to so infringe, or in AGFA's opinion is likely to become the subject of such a claim, AGFA shall, at its sole option expense, either (1) apply its best efforts to procure for You the right to continue using the Software, or (2) apply its best efforts to modify or replace the Software to make it non-infringing, or, if neither (1) or (2) is commer-cially practicable (3) terminate this Agreement, and repay to You a portion of the License Fee equal to the amount paid by You less reasonable depreciation. AGFA shall have no liability regarding any infringement claim arising out of: (i) use of other than a current, unaltered release of the Software; (ii) Use of the Software in combination with non-AGFA software, data or equipment, if the infringement was caused by the Use of such combination; (iii) any modification or derivation of the Software not specifically authorised in writing by AGFA; or (iv) use of third party software.
8.2 EXCLUSIVE REMEDY. The foregoing states the entire liability of AGFA and the exclusive remedy for You with respect to infringement of any patent, copyright, trade secret or other proprietary right.
9. CONFIDENTIALITY
9.1 CONFIDENTIAL INFORMATION. Each party acknowledges that the Confidential Information constitutes valuable trade secrets and each party agrees that it shall use Confidential Information solely in accordance with the provisions of this Agreement and will not disclose, or permit to be disclosed, the same, directly or indirectly, to any third party without the other party's prior written consent. Each party agrees to exercise due care in protecting the Confidential Information from unauthorised use and disclosure. However, neither party bears any responsibility for safeguarding information that (i) is publicly available, (ii) already in the other party's possession and not subject to a confidentiality obligation, (iii) obtained by the other party from third parties without restrictions on disclosure, (iv) independently developed by the other party without reference to Confidential Information, or (v) required to be disclosed by order of a court or other governmental entity.
9.2 INJUNCTIVE RELIEF. In the event of actual or threatened breach of the provisions of Section 8.1, the non-breaching party will have no adequate remedy at law and will be entitled to immediate and injunctive and other equitable relief, without bond and without the necessity of showing actual money damages.
10. TERM AND TERMINATION
10.1 TERM. This Agreement will take effect on the Effective Date and will remain in force for as long as any copyright in the Software exist, subject to termination in accordance with Article 9.2
10.2 TERMINATION. This Agreement may be terminated by AGFA upon written notice to You if (i) You fail to pay any undisputed amount due within thirty (30) days after You have been given written notice of such non-payment; (ii) You are in material breach of any non-monetary term, condition or provision of Agree-ment, which breach, if capable of being cured, is not cured within thirty (30) days after You have been given written notice of such breach; or (iii) AGFA elects to do so in accordance with Article 6.1 or 7.1. Except for a termination pursuant to Articles 6.1 or 7.1, no such termination will entitle You to a refund of any portion of the License Fee. You may terminate this Agreement at any time for any reason by submitting written notice to that effect to AGFA.
:APOGEE Prepress 7.0 Tutorial

7
10.3 EFFECT OF TERMINATION. Upon expiration or termination of this Agreement, You shall promptly uninstall and return to AGFA the Software, any derivative works, all copies thereof, including computer memory or storage copies, the associated Dongle, all related Documentation and all copies thereof, and any other Confidential Information in Your possession. You shall furnish AGFA with a certificate signed by an executive officer verifying that the same has been done. Termination or Expiration will not affect the provi-sions regarding the treatment of Confidential Information, provisions relating to the payment of amounts due, or provisions limiting or disclaiming AGFA's liability, which provisions will survive termination of this Agreement.
10.4 NON-ASSIGNMENT. Neither this Agreement nor any rights under this Agreement may be assigned or otherwise transferred by You, in whole or in part, whether voluntary or by operation of law, including by way of sale of assets, merger or consolidation, without the prior written consent of AGFA, which consent will not be unreasonably withheld or delayed. Subject to the foregoing, this Agreement will be binding upon and will inure to the benefit of the parties and their respective successors and assigns.
11. MISCELLANEOUS
11.1 WAIVER. Any waiver of the provisions of this Agreement or of a party's rights or remedies under this Agree-ment must be in writing to be effective. Failure, neglect, or delay by a party to enforce the provisions of this Agreement or its rights or remedies at any time, will not be construed and will not be deemed to be a waiver of such party's rights under this Agreement and will not in any way affect the validity of the whole or any part of this Agreement or prejudice such party's right to take subsequent action. Except as expressly stated in this Agreement, no exercise or enforcement by either party of any right or remedy under this Agreement will preclude the enforcement by such party of any other right or remedy under this Agreement or that such party is entitled by law to enforce.
11.2 SEVERABILITY. If any provision, or part of any provision, of this Agreement is invalidated by operation of law or otherwise, that provision or part will to that extent be deemed omitted and the remainder of this Agreement, or applicable attachment, will remain in full force and effect. In place of any such invalid provi-sion or part thereof, the parties hereto undertake to agree on a similar but valid provision the effect of which is as close as possible to that of the invalid provision or part thereof. If the parties fail to agree on such an amendment, such invalid term, condition or provision will be severed from the remaining terms, conditions and provisions, which will continue to be valid and enforceable to the fullest extent permitted by law.
11.3 STANDARD TERMS. No terms, provisions or conditions of any purchase order, acknowledgement or other business form that You may use in connection with the licensing of the Software will have any effect on the rights, duties or obligations of the parties under, or otherwise modify, this Agreement, regardless of any failure of AGFA to object to such terms, provisions or conditions.
11.4 RIGHT TO AUDIT. AGFA shall have the right upon its expense to inspect compliance of You with this Agree-ment, upon a ten (10) working days prior written notice. Such audit shall not be more frequently than once per year, during normal business hours by an accounting firm designated by AGFA. In the event such audit should reveal a substantial non-compliance with this Agreement, You shall reimburse AGFA for the full out-of-pocket costs in respect of any professional charges incurred for such audit or inspection, in addition to any other right or remedy available to AGFA hereunder.
11.5 AMENDMENTS TO THIS AGREEMENT. This Agreement may not be amended, except by a writing signed by both parties.
11.6 HEADINGS: Headings to the sections of this Agreement are for convenience only and shall not affect the interpretation or construction of this Agreement. Use of the singular includes the plural and vice versa.
11.7 AGFA'S PRIOR CONSENT. Unless expressly provided otherwise in this Agreement, any prior consent of AGFA that is required before You may take an action may be granted or withheld in AGFA's sole and absolute discretion.
11.8 THIRD PARTY BENEFICIARY. If and insofar parts of the Software are supplied and licensed to AGFA by Other Owners, such Other Owners are third party beneficiaries of this Agreement and are with respect to such parts of the Software entitled to enforce directly against You the terms and conditions of this License Agreement.
11.9 APPLICABLE LAW. This Agreement is made in Belgium and shall be governed by and construed in accor-dance with the laws of Belgium, excluding its rules for choice of law.
11.10 PUBLIC ANNOUNCEMENTS. You acknowledge that AGFA may desire to use Your name in press releases, product brochures and financial reports indicating that You are a customer of AGFA, and You agree that AGFA may use Your name in such a manner.
11.11 ENTIRE AGREEMENT. This Agreement (including any addenda hereto signed by both parties) contains the entire agreement of the parties with respect to the subject matter of this Agreement and supersedes all previous communications, representations, understandings and agreements, either oral or written, between the parties with respect to said subject matter.
:APOGEE Prepress 7.0 Tutorial

8
:APOGEE Prepress 7.0 Tutorial

Contents
Welcome ................................................................................................................................... 15
Lesson 1: Welcome ..................................................................................................... 15
What is :APOGEE Prepress?.............................................................................................. 16 :APOGEE Prepress Products ............................................................................................ 17 Apogee Render ............................................................................................................. 18 Apogee Control ............................................................................................................ 18 Apogee Manage ........................................................................................................... 18 Apogee Automate ........................................................................................................ 18 Apogee PlateMaker .................................................................................................... 18 Apogee Proof ................................................................................................................. 18 Apogee PDF&Proof ...................................................................................................... 19
Options ................................................................................................................................... 19 How to Use this Tutorial .................................................................................................. 20 Scope and Structure .......................................................................................................... 21 Conventions Used .............................................................................................................. 22 Typographical Conventions ..................................................................................... 22 Keyboard Conventions ............................................................................................... 22 Mouse Conventions .................................................................................................... 23 Contact Us ...................................................................................................................... 23
Lesson 2: Quick Tour .................................................................................................. 25
Starting :APOGEE Prepress ............................................................................................. 25 User Access Level .............................................................................................................. 26 Navigating the Three Main Windows ......................................................................... 28 The Jobs Window ......................................................................................................... 29 The Hot Tickets Window ........................................................................................... 31 The System Overview Window ............................................................................... 33
The Window Menu ............................................................................................................. 34 Customizing your :APOGEE Prepress Interface ....................................................... 34 Hiding Panes ................................................................................................................. 35 Resizing Panes ............................................................................................................. 36 Changing the Appearance of the Job List ........................................................... 36
Using the :APOGEE Prepress Online Help ................................................................. 38
Lesson 3: Ticket Templates ............................................................................... 39
What are Ticket Templates? ........................................................................................... 39 Displaying the Ticket Template Categories ............................................................. 39
9

10
Lesson 4: Working with Hot Tickets ....................................................... 41
What are Hot Tickets? ...................................................................................................... 41 Opening the Tutorial Hot Ticket Template ............................................................... 41 Hot Ticket Details .............................................................................................................. 44 Administration Tab ...................................................................................................... 45 Options Tab .................................................................................................................... 46 Plan Tab .......................................................................................................................... 47
Looking at the Production Plan .................................................................................... 48 Hot Folder ....................................................................................................................... 49 PDF Render .................................................................................................................... 50 TIFF Platesetter ............................................................................................................ 51 Press ................................................................................................................................. 51
Inputting a Document ..................................................................................................... 52 Looking at the Jobs Window ......................................................................................... 53 Checking the Job Results ............................................................................................... 54 Job Status Icon ............................................................................................................. 56
Lesson 5: Creating Hot Tickets ..................................................................... 57
Getting Started ................................................................................................................... 57 Entering the Administration Information ................................................................. 58 Building a Production Plan ............................................................................................ 59 What is a Production Plan? ..................................................................................... 59 Looking at the Plan Components Panes ............................................................ 59 Building the Production Plan ................................................................................. 61
Configuring the Production Plan Components ...................................................... 64 Configuring the Hot Folder ...................................................................................... 64 Looking at the PDF Render Screen Settings ..................................................... 65 Configuring the PDF Render Screen Settings .................................................. 67
Submitting the Hot Ticket .............................................................................................. 68 Using the Hot Ticket to Process a Job ....................................................................... 69
Lesson 6: Editing Hot Tickets .......................................................................... 73
Getting Started ................................................................................................................... 73 Looking at the Flow Identifier(s) .................................................................................. 75 Flow Identifier Types .................................................................................................. 76
Adding a Flow to Your Production Plan .................................................................... 77 Inputting a Document ..................................................................................................... 81
Lesson 7: Working with Filters ...................................................................... 85
Using the Quick Filter ...................................................................................................... 85 Displaying the Job List Filter ......................................................................................... 86
:APOGEE PREPRESS 7.0 Tutorial

11
Activating the Job List Filter .......................................................................................... 87 Looking at the Message Board Filter .......................................................................... 89 Filtering with the Output Devices Pane...................................................................... 90
Lesson 8: Working with Messages ........................................................... 93
Message Types .................................................................................................................... 93 Information .................................................................................................................... 93 User Interaction Required ......................................................................................... 93 Warning ........................................................................................................................... 94 Error ................................................................................................................................... 94
The Message Indicator ..................................................................................................... 94 Problem Reports ................................................................................................................. 95 Creating a Hot Ticket ........................................................................................................ 96 Generating Messages ....................................................................................................... 98 Wrong Input Format ................................................................................................... 98 Information Message .................................................................................................. 99 User Interaction Required .........................................................................................100
Lesson 9: Working with Job Tickets ........................................................103
What are Job Tickets? .......................................................................................................103 Opening the Tutorial Job Ticket Template ................................................................103 Job Ticket Details ...............................................................................................................104 Administration Tab ......................................................................................................105 Options Tab ....................................................................................................................105 Product Tab ....................................................................................................................106 Plan Tab ...........................................................................................................................106 Pages Tab ........................................................................................................................107 Results Tab .....................................................................................................................108
Looking at the Production Plan ....................................................................................109 Normalizer ......................................................................................................................109 Run List ............................................................................................................................110
Inputting a Document ......................................................................................................110
Lesson 10: Creating and Editing Job Tickets ................................115
Getting Started ....................................................................................................................115 Editing the Blank Ticket Template ...............................................................................115 Looking at the Production Plan Components ..........................................................116 The Normalize Plan Component ............................................................................117 The Preflight Plan Component ................................................................................119 The Run List Plan Component .................................................................................119
Inputting a Document ......................................................................................................121 Checking the Preflight Status ........................................................................................121
:APOGEE PREPRESS 7.0 Tutorial
12
Creating a Run List ............................................................................................................ 122 Manipulating the Run List .............................................................................................. 124
Lesson 11: Working with PJTF Imposition ...................................... 127
What is PJTF Imposition? ................................................................................................ 127 Opening the PJTF Imposition Template .................................................................... 127 Configuring the Production Plan Components ...................................................... 128 Configuring the Impose Plan Component ......................................................... 128 Configuring the Collect for Output Action ......................................................... 129
Inputting a Document ..................................................................................................... 129 Adding Pages to the Run List ........................................................................................ 130 Completing the Job .......................................................................................................... 131
Lesson 12: Packaging ............................................................................................... 133
Before You Begin ............................................................................................................... 133 Creating a Basic Production Plan for Packaging ................................................... 133 Configuring the Production Plan Components ................................................ 135 Inputting a Document ............................................................................................... 135
Creating an Advanced Production Plan for Packaging ........................................ 137 Configuring the Production Plan Components ................................................ 138 Inputting a Document ............................................................................................... 139
Lesson 13: Exporting Documents .............................................................. 141
What is Export? ................................................................................................................... 141 Creating a Parameter Set for Export ........................................................................... 141 Creating a Production Plan for Export ....................................................................... 143 Building the Production Plan ................................................................................. 143
Configuring the Production Plan Components ...................................................... 144 Inputting a Document ..................................................................................................... 146
Lesson 14: Basic Administrative Tasks .............................................. 147
Starting and Stopping your :APOGEE Prepress System ....................................... 147 Monitoring the :APOGEE Prepress System ............................................................... 149 Managing Task Processors ............................................................................................. 149 Task Processor Status ................................................................................................ 149 Stopping and Starting Task Processors ............................................................... 151 Putting Output Devices Online or Offline ............................................................ 152
Parameter Sets ................................................................................................................... 152 About Parameter Sets ............................................................................................... 152 Creating Parameter Sets .......................................................................................... 153 Managing Parameter Sets ........................................................................................ 156
:APOGEE PREPRESS 7.0 Tutorial
13
Managing Ticket Templates ...........................................................................................158 Variables Overview ............................................................................................................164 Providing Support Information ......................................................................................164 Troubleshooting the System ....................................................................................164 Troubleshooting the Client .......................................................................................166
:APOGEE PREPRESS 7.0 Tutorial

14
:APOGEE PREPRESS 7.0 Tutorial

Welcome
Welcome to the :APOGEE Prepress Tutorial, an introduction to the key features of :APOGEE Prepress. :APOGEE Prepress is the next generation of Agfa's acclaimed Apogee workflow system for the Commercial and Packaging printing industries. :APOGEE Prepress allows you to automate and distribute prepress processes using JDF, PDF and Digital Film in an integrated all-digital workflow.
15

16 WELCOME
What is :APOGEE Prepress?
:APOGEE Prepress is a fully integrated, digital workflow solution that brings together a wide range of sophisticated, easy-to-use capabilities in a single appli-cation. :APOGEE Prepress uses a client/server architecture, and consists of:
The :APOGEE Prepress System, which runs on a dedicated Windows 2003/2008 server, and manages all data and processing functionality.
The :APOGEE Prepress Client application, which allows you to access and control the :APOGEE Prepress System remotely from any Macintosh or PC on the network.
:APOGEE Prepress 7.0 Tutorial

WELCOME 17
The :APOGEE Prepress System
The :APOGEE Prepress System handles all resources, processes, and events, and acts as the centralized database of job and system data. The System provides feedback on system events and job processes to all Clients that are currently logged in. All interaction with the :APOGEE Prepress System is performed via the Client application, running on a local system on the Windows 2003/2008 network.
The :APOGEE Prepress Client
The graphically rich and intuitive Client user interface adopts a highly visual design approach, using icons to represent elements in the system and in your workflow. A set of tools and commands allows you to control and interact with all aspects of job production.
:APOGEE Prepress Products
Depending on what you have purchased, your :APOGEE Prepress solution will comprise one of the following products, possibly enhanced with one or more of the available options:
Apogee Render
Apogee Control
Apogee Manage
Apogee Automate
Apogee PlateMaker
Apogee Proof
Apogee PDF&Proof
:APOGEE Prepress 7.0 Tutorial

18 :APOGEE PREPRESS PRODUCTS
Apogee Render Apogee Render is a single-platform ripping solution designed for simplified output on plate or film. This is the most basic and easy-to-use solution for quality output at high resolution. You simply define your output engine, select the right parameters and output your jobs. The user interface allows you to interact with your jobs in real-time, stop or start output, change output priority, view digital film before imaging to plate or remake a plate if required.
Apogee Control Apogee Control is designed for operations that rely on off-the-shelf applications to produce pages or fully imposed flats. It takes PS, EPS, and PDF files and renders them for output to Agfa's range of platesetters, filmsetters and proofing devices. Setup and configuration is simple: the user interface helps you manage and track print jobs, control output queues, request plate remakes, generate page and imposition proofs, or soft proof screened and trapped digital films.
Apogee Manage Apogee Manage provides advanced tools for handling PDF creation, preflighting, page management, imposition, plate making, proofing and trapping, allowing you to manage your complete prepress workflow simply and reliably.
Apogee Automate Apogee Automate can process PDF, JDF, and Digital Film, connecting prepress production with business processes and other JDF-aware applications for seamless, end-to-end workflow automation. As well as automating prepress production, this package gives you an overview of the actual processing and job status. It also includes a set of tools to interact with jobs at any time and modify the automated processing.
Apogee PlateMaker Apogee PlateMaker is a dedicated solution for plate output that guarantees efficient and continuous plate production. It acts as a buffer between the prepress department and the printing presses, providing the pressroom with the necessary plates and ink key files. All necessary production information is communicated using JMF. As a digital film buffer, Apogee PlateMaker can receive input through multiple input channels, but will load balance the jobs towards several CtP devices. The user interface allows you to view the status of all jobs, as well as manipulate and manage the output timing and priorities. Press operators can use Apogee PlateMaker for plate remakes: a fully imposed plate preview and quick search function allow for fast plate identification.
Apogee Proof Apogee Proof provides reliable and predictable proofing, system wide. It can be set-up as a simple RIP or as an advanced proofing workflow system. Apogee Proof can be used with Sherpa and SherpaProof systems as well as a range of 3rd party printers.
:APOGEE Prepress 7.0 Tutorial

WELCOME 19
Apogee PDF&Proof Apogee PDF&Proof helps you manage the PDF creation, preflighting, proofing, and the export of workflow optimised PDF files, all from one central place. An integrated Flattener automatically resolves transparencies that are found in PDF1.4/PDF1.5/PDF1.6, and lets you generate and export Certified PDF files to remote production facilities in either PDF, PDF/X-1, PDF/X-1a or PDF/X-3 format. It also allows you to export JDF files for reliable exchange of the PDF pages with remote production centers.
Options
Many options have been made available to enrich the capabilities of the standard :APOGEE Prepress products. Consult your local reseller or support person for information on these options. You can also refer to the :APOGEE Prepress Online Help. Additionally, you can subscribe to the advanced training courses for more information and dedicated lessons.
Intended Audience
This Tutorial is designed for users who need to input documents into the :APOGEE Prepress System and create and submit Hot Tickets and Job Tickets.
As a user, it is assumed that you are already familiar with your front-end workstations, output devices, and desktop software applications, as well as prepress processing methods, printing procedures, and network traffic. If this is not the case, please refer to the relevant user or operator manuals.
Before You Begin
Before you begin, your :APOGEE Prepress administrator must have already installed, licensed and configured the :APOGEE Prepress System and the :APOGEE Prepress Client.
Also, the following steps need to be performed in order to have the correct setup for Lesson 1 of this Tutorial.
To create the Quick Tour Hot Ticket
1 In the Hot Tickets window, choose File > New from Templates.
2 In the Hot ticket tab, select the Tutorial Category and open the ABS150-2400DPI-POS Template.
:APOGEE Prepress 7.0 Tutorial

20 HOW TO USE THIS TUTORIAL
3 Choose File > Submit.
The ABS150-2400DPI-POS Hot Ticket is added to the Hot Ticket list.
NOTE: You do not need to create the Quick Tour Hot Ticket if you are installing a Create Product.
To create the Quick Tour Job Ticket
1 Context-click the ABS150-2400DPI-POS Hot Ticket, and select Upload Document from the context menu.
2 Locate the Quick Tour job.pdf file in the shared SampleFiles folder and click Open.
The processing of the job begins and the job appears in the Jobs window.
How to Use this Tutorial
This step-by-step Tutorial is designed to get you up and running as quickly as possible. Depending on which :APOGEE Prepress product you purchased, you can complete a different number of lessons:
Lessons 1 to 7 are designed for users of all :APOGEE Prepress products.
Lessons 8 to 10 are designed specifically for users of the :APOGEE Prepress Manage or Automate products.
Lesson 11 is designed for users of the :APOGEE Prepress Manage + Step&Repeat or Automate + Step&Repeat products.
Lesson 12 is designed for users of the :APOGEE Prepress Manage, Automate or PDF&Proof products.
Regardless of the :APOGEE Prepress product you have purchased, make sure you also complete Lesson 13 if you are the :APOGEE Prepress administrator.
:APOGEE Prepress 7.0 Tutorial

WELCOME 21
Scope and Structure
Below you will find a short description of the goal for each lesson in the Tutorial.
Lesson 1: “Quick Tour” on page 25
In this lesson you will execute a number of exercises that will guide you through the :APOGEE Prepress user interface.
Lesson 2: “Ticket Templates” on page 39
In this lesson you will be introduced to the concept of Ticket Templates. These Ticket Templates are the starting point for working with :APOGEE Prepress.
Lesson 3: “Working with Hot Tickets” on page 41
In this lesson you will explore the Hot Tickets window. You will learn what Hot Tickets are and when you should use them.
Lesson 4: “Creating Hot Tickets” on page 57
In this lesson you will learn how to create your own Hot Ticket starting from a Blank Hot Ticket Template.
Lesson 5: “Editing Hot Tickets” on page 73
In this lesson you will learn how you can edit an existing Hot Ticket.
Lesson 6: “Working with Filters” on page 85
In this lesson you will create a new Hot Ticket and examine the types of messages that can appear in the Message Board.
Lesson 7: “Working with Messages” on page 93
In this lesson you will be introduced to how filters work in :APOGEE Prepress.
Lesson 8: “Working with Job Tickets” on page 103
In this lesson you will learn what Job Tickets are and how you can use them.
Lesson 9: “Creating and Editing Job Tickets” on page 115
In this lesson you will learn how to create your own Job Ticket starting from a Blank Job Ticket Template.
:APOGEE Prepress 7.0 Tutorial

22 CONVENTIONS USED
Lesson 10: “Working with PJTF Imposition” on page 127
In this lesson you will learn how to use PJTF Imposition in your :APOGEE Prepress workflow.
Lesson 11: “Packaging” on page 133
In this lesson you will be introduced to the Packaging options in :APOGEE Prepress.
Lesson 12: “Exporting Documents” on page 141
In this lesson you will learn how to use the Export Task Processor.
Lesson 13 : “Basic Administrative Tasks” on page 147
In this lesson you will find a number of lessons that are relevant for :APOGEE Prepress administrators.
Conventions Used
This section describes the conventions used in this Tutorial.
Typographical Conventions
The following typographical conventions are used:
NOTE: A note is used to give you additional information.
CAUTION: A caution warns you against potential danger.
1 A numbered step describes the actions you must take to perform a task.
Keyboard Conventions
The following keyboard conventions are used:
All key names are shown in capital letters. For example, the Control key is shown as CTRL.
Keys are frequently used in combinations or sequences as shortcut keys. For example, SHIFT+F3 means that you have to hold down the SHIFT key while pressing F3.
:APOGEE Prepress 7.0 Tutorial

WELCOME 23
Mouse Conventions The following mouse conventions are used:
Contact Us Agfa welcomes your suggestions, questions or comments about this documenta-tion. You can send e-mail feedback by using the following link: [email protected].
To ... Do this ...
Click Point to an item, and then quickly press and release the mouse button without moving the mouse.
Double-click Point to an item, and then quickly press and release the mouse button twice.
Context-click on Windows Click the right mouse button.
Context-click on Macintosh Hold down the CTRL key while clicking the mouse button.
Drag Point to an item. Press and hold down the mouse button as you move the mouse to a new location, then release the mouse but-ton.
:APOGEE Prepress 7.0 Tutorial

24 CONVENTIONS USED
:APOGEE Prepress 7.0 Tutorial
LESSON
1 Quick Tour
In this lesson you will execute a number of exercises that will guide you through the :APOGEE Prepress user interface. Take some time to work your way through this chapter and you will learn how to navigate the application.
This lesson is designed for users of all :APOGEE Prepress products.
Starting :APOGEE Prepress
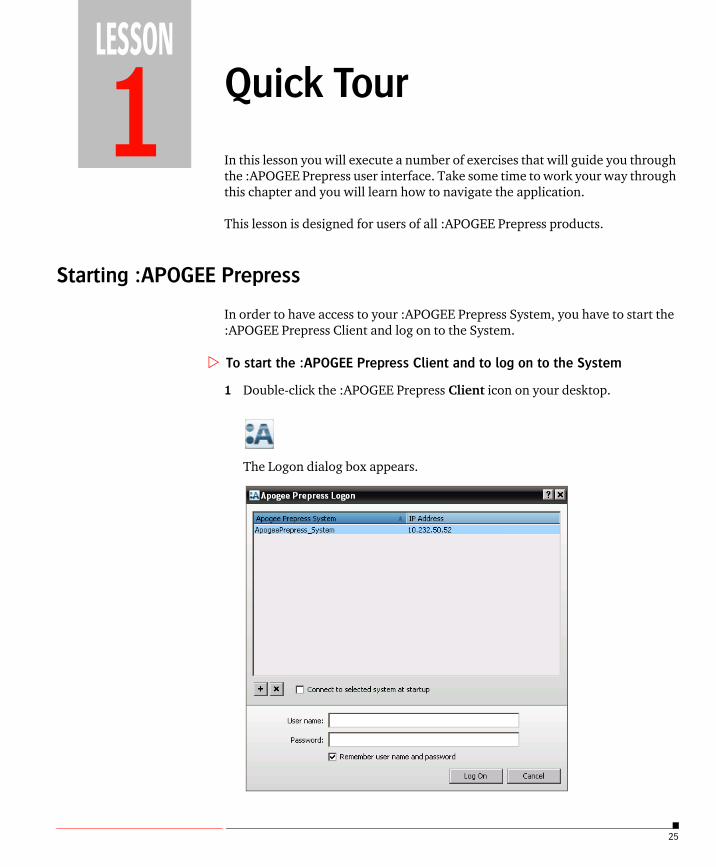
In order to have access to your :APOGEE Prepress System, you have to start the :APOGEE Prepress Client and log on to the System.
To start the :APOGEE Prepress Client and to log on to the System
1 Double-click the :APOGEE Prepress Client icon on your desktop.
The Logon dialog box appears.
25

26 USER ACCESS LEVEL
2 Select your System from the System list.
3 Select the Connect to selected system at startup check box.
The next time you start the :APOGEE Prepress Client, the Logon dialog box will be bypassed.
4 Select the Remember user name and password check box.
The next time you log on, you will not need to type this information.
5 Type your User name and Password in the corresponding text boxes.
The user name must already be a valid Windows account on the :APOGEE Prepress Server or on your network: These user names and passwords cannot be configured in the :APOGEE Prepress Client.
6 Click Log On.
The :APOGEE Prepress Client starts up and the Jobs window appears.
User Access Level
The :APOGEE Prepress Client can be used with different access levels:
Operator (basic) access level.
Administrator (advanced) access level.
Service (the most advanced) access level.
The access level can be defined in the :APOGEE Prepress Preferences.
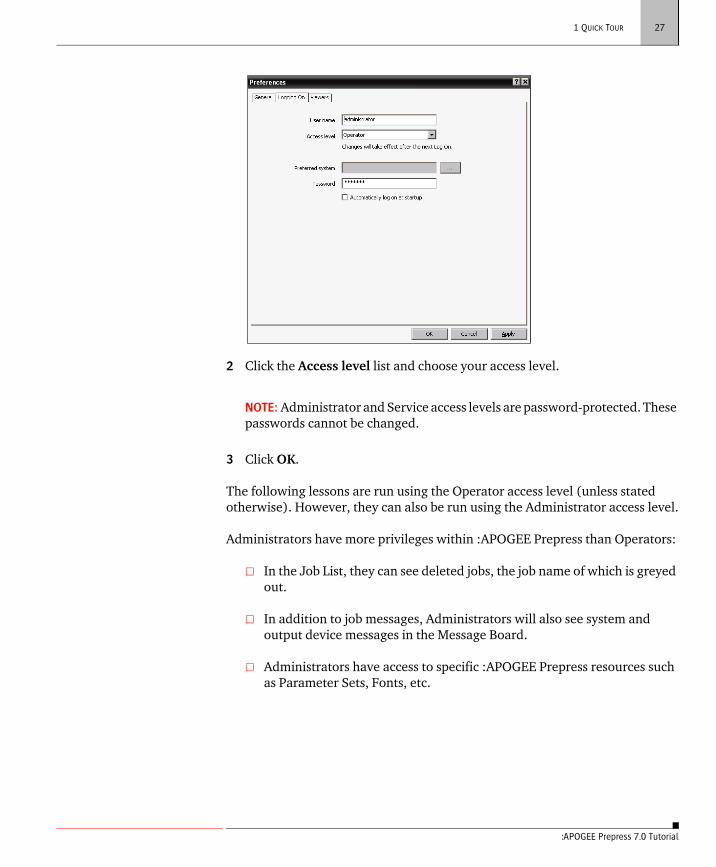
To change the user access level
1 Choose the Edit > Preferences > Logging On tab (on a Macintosh, select :APOGEE Prepress > Preferences).
:APOGEE Prepress 7.0 Tutorial
1 QUICK TOUR 27
2 Click the Access level list and choose your access level.
NOTE: Administrator and Service access levels are password-protected. These passwords cannot be changed.
3 Click OK.
The following lessons are run using the Operator access level (unless stated otherwise). However, they can also be run using the Administrator access level.
Administrators have more privileges within :APOGEE Prepress than Operators:
In the Job List, they can see deleted jobs, the job name of which is greyed out.
In addition to job messages, Administrators will also see system and output device messages in the Message Board.
Administrators have access to specific :APOGEE Prepress resources such as Parameter Sets, Fonts, etc.
:APOGEE Prepress 7.0 Tutorial

28 NAVIGATING THE THREE MAIN WINDOWS
Navigating the Three Main Windows
:APOGEE Prepress is built around three main windows:
The Jobs window
The Hot Tickets window
The System Overview window
You can easily switch between these windows by clicking the names in the navigation bar. You can find the navigation bar at the bottom of each of the three main windows.
In the next section, you will learn what you can find in the three main windows.
1 Navigation bar
1
:APOGEE Prepress 7.0 Tutorial

1 QUICK TOUR 29
The Jobs Window The Jobs window is the window that appears when you start the :APOGEE Prepress Client. It is your Job Manager, through which you will monitor, view, and manage the jobs that were submitted to the :APOGEE Prepress System.
The Jobs window is divided into three main panes:
Output Devices: On the left side of the window, you see a list of installed output devices. These can be both physical and generic output devices, e.g. Palladio, Sherpa, TIFF Imagesetter or TIFF Proofer etc.
Job List: This list displays the jobs that were submitted to the :APOGEE Prepress System along with their current status and Flow Identifier(s).
Selected Job Details: The large pane on the right side of the window displays information on the selected job. This information is arranged into five tabs.
To look at the job details
1 In the Job List, click the + sign in front of the Order number ABS150-2400DPI-POS.
NOTE: Macintosh Client users click the expansion triangle in front of the Order number.
2 Select the Quick Tour Job name to display the information in the tabs.
The job data is loaded from the :APOGEE Prepress Server. This is visualized by the Activity Indicator, which becomes active in the bottom right corner of the window.
:APOGEE Prepress 7.0 Tutorial
30 NAVIGATING THE THREE MAIN WINDOWS
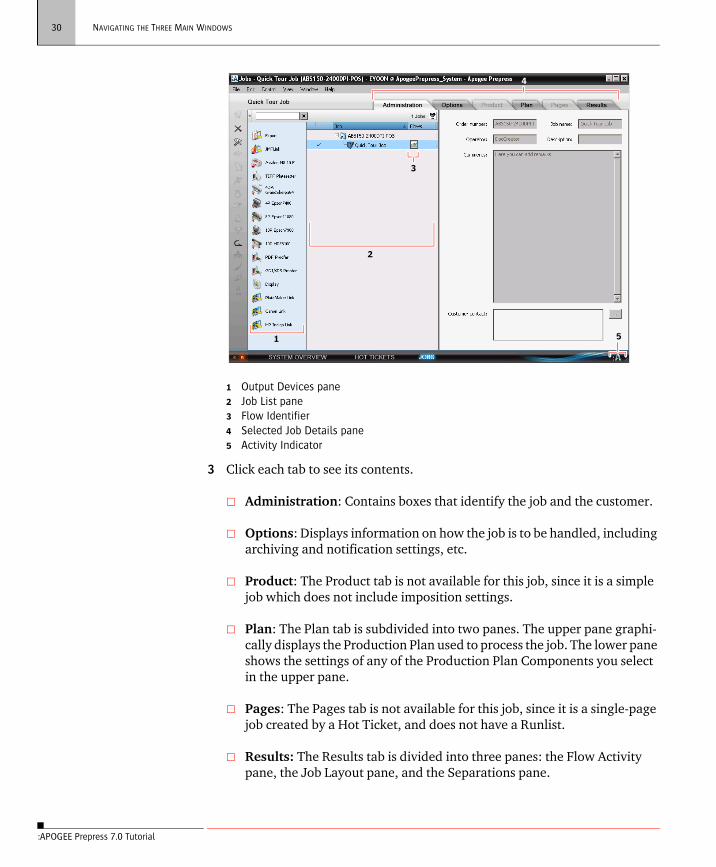
3 Click each tab to see its contents.
Administration: Contains boxes that identify the job and the customer.
Options: Displays information on how the job is to be handled, including archiving and notification settings, etc.
Product: The Product tab is not available for this job, since it is a simple job which does not include imposition settings.
Plan: The Plan tab is subdivided into two panes. The upper pane graphi-cally displays the Production Plan used to process the job. The lower pane shows the settings of any of the Production Plan Components you select in the upper pane.
Pages: The Pages tab is not available for this job, since it is a single-page job created by a Hot Ticket, and does not have a Runlist.
Results: The Results tab is divided into three panes: the Flow Activity pane, the Job Layout pane, and the Separations pane.
1 Output Devices pane2 Job List pane3 Flow Identifier4 Selected Job Details pane5 Activity Indicator
1
2
4
5
3
:APOGEE Prepress 7.0 Tutorial

1 QUICK TOUR 31
The Hot Tickets Window
The Hot Tickets window is very similar to the Jobs window. You use the Hot Tickets window to monitor, view, and manage the Hot Tickets that you create. The Hot Tickets window does not contain Pages or Results tabs.
Click Hot Tickets in the Navigation bar.
The Hot Tickets window appears.
The Hot Tickets window is divided into the following three panes:
Output Devices: On the left side of the window, you see a list of all installed output devices. These can be both physical and generic output devices, e.g. Avantra, Sherpa, TIFF Imagesetter or TIFF Proofer etc.
Hot Ticket List: This list displays the Hot Tickets that were submitted to the :APOGEE Prepress System along with their current status and Flow Identifier(s).
Selected Hot Ticket Details: The large pane on the right side of the window displays information on the selected Hot Ticket. This information is arranged into three tabs.
:APOGEE Prepress 7.0 Tutorial

32 NAVIGATING THE THREE MAIN WINDOWS
To look at the Hot Ticket details
Click the Hot Ticket name ABS150-2400DPI-POS in the Hot Ticket List to display the information in the different tabs.
Administration: Contains boxes that identify the job and the customer.
Options: Displays information on how the job is to be handled, including archiving and notification settings, etc.
Product: The Product tab is not available for this job, since it is a simple job which does not include imposition settings.
Plan: The Plan tab is subdivided into two panes: The upper pane graphi-cally displays the Production Plan used to process the job. The lower pane shows the settings of any of the Production Plan Components you select in the upper pane.
1 Output Devices pane2 Hot Ticket List pane3 Selected Hot Ticket Details pane
1
2
3
:APOGEE Prepress 7.0 Tutorial

1 QUICK TOUR 33
The System Overview Window
The System Overview window is your :APOGEE Prepress control panel. It provides you with an overview of all System components that are running on the :APOGEE Prepress System.
Click System Overview in the Navigation bar.
The System Overview window appears.
The System Overview window consists of three panes:
Hardware pane: The top pane of the System Overview window contains all Hardware Systems that are running Task Processors, and the :APOGEE Prepress System itself.
:APOGEE Prepress_System is the name of the :APOGEE Prepress System.
SERVERNAME is the computer name (or hostname) of the :APOGEE Prepress Server.
Task Processors pane: The middle pane of the System Overview window displays all Task Processors residing on the :APOGEE Prepress System. The Task Processors are divided by category: Input, Process, Output and Print.
1 Hardware pane 2 Task Processors pane3 Resources pane
1
3
2
:APOGEE Prepress 7.0 Tutorial

34 THE WINDOW MENU
The available Task Processors will depend on the installed :APOGEE Prepress Product (see “:APOGEE Prepress Products” on page 17).
Resources pane: Depending on which Task Processor you select, you will see the corresponding Resource(s) in the bottom pane of the System Overview window.
NOTE: For a full explanation of the System Overview window, refer to the :APOGEE Prepress Online Help.
The Window Menu
The Window menu offers you an alternate way of switching between the main windows.
1 In any of the main windows, click Window on the menu bar.
2 Select System Overview, Hot Tickets or Jobs.
NOTE: You can open several instances of the Jobs window only, by choosing Window > New Window in the Jobs window.
In the following section, you will learn how you can resize these windows and the various panes within the windows in order to optimize your view.
Customizing your :APOGEE Prepress Interface
The :APOGEE Prepress windows contain a lot of information. Some of this infor-mation may not be required all of the time. Additionally, the panes may sometimes be too small to show all of the information without scrolling.
In this section, you will learn how to customize your :APOGEE Prepress interface by hiding and resizing the panes.
:APOGEE Prepress 7.0 Tutorial

1 QUICK TOUR 35
Hiding Panes :APOGEE Prepress allows you to hide panes in some windows. A number of panes, such as the Output Device pane, do not need to be visible all the time. These panes can take up space that prevent you from seeing other panes.
The following procedure on hiding panes is valid for any of the :APOGEE Prepress windows.
To hide and display the Output Device pane
1 In the Jobs window, select View > Panes, and deselect the Devices option.
The Output Device pane is collapsed.
2 In order to redisplay the Output Device pane, select View > Panes, and select the Devices option.
You can also use this menu to hide or display the Job List pane (hiding the Job List pane will also automatically hide the Devices pane).
:APOGEE Prepress 7.0 Tutorial

36 CUSTOMIZING YOUR :APOGEE PREPRESS INTERFACE
Resizing Panes You can resize the panes in the :APOGEE Prepress windows.
To resize the Job List pane
1 Move your pointer over one of the separation lines between two panes until it takes the form of a double-sided arrow.
2 Press and hold the mouse button and drag the separation line left or right until the pane has the required size.
Changing the Appearance of the Job List
By default, job names are only displayed after you expand the jobs order number. However, you can change this setting in your Preferences.
To display job names in a separate column
1 Choose Edit > Preferences > General tab (on a Macintosh, select :APOGEE Prepress > Preferences).
2 Select the Show Order Number check box.
3 Select the As extra column button.
1 Pointer to resize panes
1
:APOGEE Prepress 7.0 Tutorial

1 QUICK TOUR 37
4 Click OK.
In the Job List, an extra Job column is displayed next to the Order Number column.
NOTE: Any Language changes you make in your Preferences will only take effect after restarting the :APOGEE Prepress Client.
To resize job list columns
1 Move your cursor over the column separator line in the Job List header until it takes the form of a double sided arrow.
2 Press and hold the mouse button and drag the column separator line left or right to change the column size.
:APOGEE Prepress 7.0 Tutorial

38 USING THE :APOGEE PREPRESS ONLINE HELP
Using the :APOGEE Prepress Online Help
:APOGEE Prepress includes context-sensitive Online Help. This is a reference that offers you both theoretical information on all topics and links to relevant procedures.
When :APOGEE Prepress is running, you can access the Online Help by doing one of the following:
Press F1 - Macintosh users press the Command + ?key.
Choose Help > :APOGEE Prepress Help
Context-click the icon or pane in the interface for which you want informa-tion and select Help from the context menu. The relevant Online Help page for this item appears.
The :APOGEE Prepress Online Help also contains overviews of all icons, short-cuts and variables that are used throughout the application.
To access and print the icon, shortcut and variable overviews
1 Choose Help > Icons.
A new Help window opens, containing an overview of all icons.
2 Click the Print button in the top right corner.
You can use the printed version of the Icon Overview as a Quick Reference Card. It is recommended to print the overview on a color printer.
You can use this same procedure to view and print the Keyboard Shortcuts and Variables overviews.
In the next lesson, you will be introduced to the concept of Ticket Templates, the starting point for working with :APOGEE Prepress.
NOTE: This Tutorial is also available in HTML format. Choose Help > Tutorial.
:APOGEE Prepress 7.0 Tutorial

LESSON
2 Ticket Templates
In this lesson you will be introduced to the concept of Ticket Templates. Ticket Templates are the starting point for working with :APOGEE Prepress.
This lesson is designed for users of all :APOGEE Prepress products.
What are Ticket Templates?
:APOGEE Prepress uses Job Tickets and Hot Tickets to process a job through the System. Both types of Tickets are thoroughly discussed in the next lessons.
In order to create and use a Ticket to process a job, you first need a Ticket Template. :APOGEE Prepress includes a number of Ticket Templates that you can edit to create your own Ticket Templates.
Ticket Templates are the foundation of the :APOGEE Prepress workflow. A Ticket Template must be used as a starting point to create a new Ticket.
Displaying the Ticket Template Categories
Ticket Templates are organized by categories. When :APOGEE Prepress is installed, several Ticket Template categories are automatically created. Template categories are folders that contain the Template files.
To display the Ticket Template categories
1 From the Hot Tickets window, choose File > New from Templates.
The Templates window appears. The two tabs Job Tickets and Hot Tickets represent the two types of Ticket Templates. The Job Tickets tab contains the Job Ticket Templates and the Hot Tickets tab contains the Hot Ticket Templates.
39

40 DISPLAYING THE TICKET TEMPLATE CATEGORIES
The Category list contains the following predefined items:
All: Click All to see all available Templates at once, regardless of their category.
Blank: Click the Blank category to see the Blank Templates in the Template list. A Blank Template contains no predefined information.
D&P: Click the D&P category to see the Distribute and Print templates.
Font Download: Click the Font Download category to see the Templates that will be used for jobs with after-market fonts.
Tutorial: Click the Tutorial category to see the predefined Templates that will be used for the lessons in this Tutorial.
The Quick Fill options (Order Number, Job Name and Number of Pages) can be used to override the settings in the Ticket Templates. This is explained later on in this Tutorial.
2 Close the Templates window.
:APOGEE Prepress 7.0 Tutorial
LESSON
3 Working with Hot Tickets
In this lesson you will explore the Hot Tickets window. You will learn what Hot Tickets are and when you should use them.
This lesson is designed for users of all :APOGEE Prepress products.
What are Hot Tickets?
A Hot Ticket is a setup file that is attached to an Input Channel, such as a Hot Folder. The Hot Ticket contains the processing information that is required to automatically output jobs.
You will typically use a Hot Ticket for jobs that are always processed using the same settings.
Opening the Tutorial Hot Ticket Template
A Hot Ticket Template was created for this Tutorial.
NOTE: For information on Ticket Templates, see “Ticket Templates” on page 39.
To open the Hot Ticket Template
1 In the Hot Tickets window, choose File > New from Templates.
2 From the Category list, select Tutorial.
3 From the Template list, select Working with Hot Tickets.
41

42 OPENING THE TUTORIAL HOT TICKET TEMPLATE
For this exercise, you will not use the Quick Fill options.
4 Click Open.
The Ticket Editor appears. This is used to create and edit Job and Hot Tickets. The Plan tab is selected by default.
5 Select the Administration tab.
You will see that the Hot Ticket name has been automatically entered, since this information was saved inside the Ticket Template.
NOTE: If the Hot Ticket name was not saved inside the Ticket Template, then the default tab that appears when you open the Ticket Template would be the Administration tab instead of the Plan tab.
:APOGEE Prepress 7.0 Tutorial

3 WORKING WITH HOT TICKETS 43
NOTE: Do not change any of the settings in this Hot Ticket Template.
6 Choose File > Submit Hot Ticket.
This process creates an active Hot Ticket from the Template, which you can use to process jobs. This Hot Ticket becomes available in the Hot Ticket List.
The Ticket Editor is automatically closed. In the Hot Tickets window, you can see that the Working with Hot Tickets Hot Ticket has been added to the Hot Ticket List.
In the next section, the Hot Ticket details are discussed.
1
:APOGEE Prepress 7.0 Tutorial
44 HOT TICKET DETAILS
Hot Ticket Details
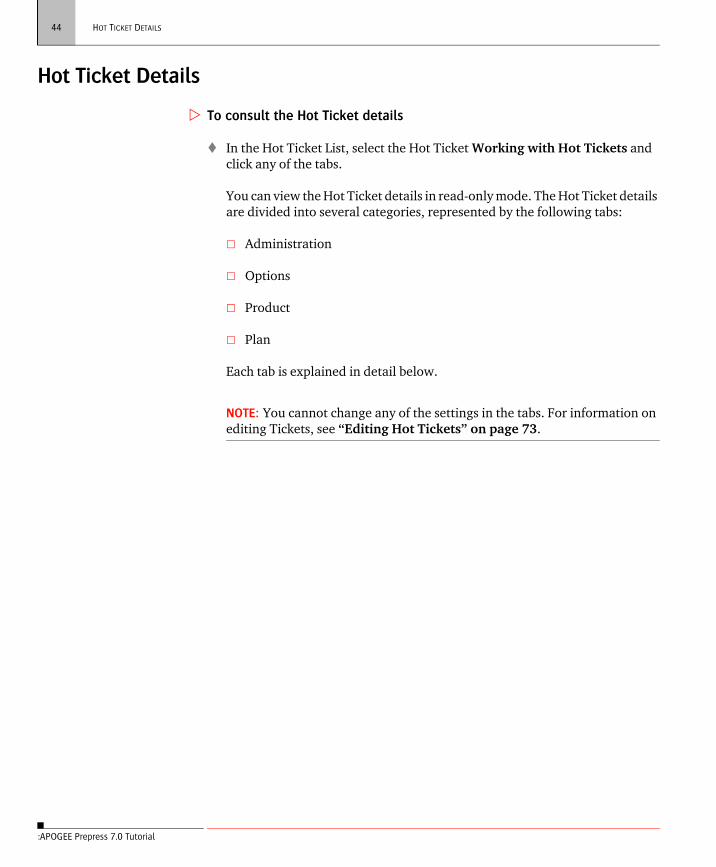
To consult the Hot Ticket details
In the Hot Ticket List, select the Hot Ticket Working with Hot Tickets and click any of the tabs.
You can view the Hot Ticket details in read-only mode. The Hot Ticket details are divided into several categories, represented by the following tabs:
Administration
Options
Product
Plan
Each tab is explained in detail below.
NOTE: You cannot change any of the settings in the tabs. For information on editing Tickets, see “Editing Hot Tickets” on page 73.
:APOGEE Prepress 7.0 Tutorial

3 WORKING WITH HOT TICKETS 45
Administration Tab
To open the Hot Ticket and display the Administration information
In the Hot Ticket List, select the Working with Hot Tickets Hot Ticket.
The Administration tab information appears.
The following Job Information boxes are available:
Hot Ticket name: This box contains the name of the Hot Ticket.
Operator: This box can contain the name of the person who created the Hot Ticket. If it is left blank, then this field will represent the document author for jobs created by this Hot Ticket (for example: the document author is “DocCreator” for the Quick Tour Job.pdf sample file).
Remarks: This box can contain any remarks that are relevant for this partic-ular Hot Ticket.
Customer contact: This box can contain customer information.
:APOGEE Prepress 7.0 Tutorial

46 HOT TICKET DETAILS
Options Tab
To display the Options tab in the Hot Tickets window
Click the Options tab.
The Options tab specifies how the jobs that are based on the Hot Ticket Working with Hot Tickets are to be handled.
The Options tab is divided into the following four panes:
Job Priority: Defines the priority of the job (High, Normal or Low).
When Job is Finished: Defines what should happen with the completed jobs. They can be automatically archived to a specified folder or automat-ically deleted. If the Notify option is selected, the System will send a message to the operator when the job is complete.
Input Channels: Defines when the input is deactivated. You can have :APOGEE Prepress deactivate the input either when the Run List is complete or when a job is finished.
Notifications: All messages related to this job will be sent to the E-mail address in this box if an E-mail server is available. The connection to the E-mail server will be configured by your :APOGEE Prepress administrator.
NOTE: The Product tab is grayed out because this ticket does not provide any imposition information.
:APOGEE Prepress 7.0 Tutorial

3 WORKING WITH HOT TICKETS 47
Plan Tab
The Plan tab shows you a graphical representation of the Production Plan. The Production Plan consists of Plan Components that describe the intended flow of the job through the :APOGEE Prepress System.
NOTE: For more information on Production Plans, see “What is a Production Plan?” on page 59.
To display the Plan tab
1 Click the Plan tab.
2 Maximize the window so that you can see the complete Production Plan.
You may still need to use the scroll bar. In this case, you can resize or collapse the Hot Ticket List pane and/or the Output Devices pane to see the complete Production Plan.
3 Click the first icon in the Production Plan, this is the Hot Folder Plan Component.
:APOGEE Prepress 7.0 Tutorial

48 LOOKING AT THE PRODUCTION PLAN
The Hot Folder Initial Settings are displayed in the Settings pane.
Looking at the Production Plan
A Production Plan always consists of a number of Production Plan Compo-nents. These components contain the necessary information and processing parameters that will be used to successfully process the job. Each Production Plan component is assigned specific tasks for which you can define the settings.
Every Task Processor is installed with a set of Initial Settings. These are the factory default settings. You cannot change or delete the initial settings.
The Production Plan contains the following components:
Hot Folder
PDF Render
TIFF Platesetter
Press
1 Production Plan, Hot Folder selected2 Initial Settings for Hot Folder3 Settings pane for Hot Folder
1
2
3
:APOGEE Prepress 7.0 Tutorial

3 WORKING WITH HOT TICKETS 49
Hot Folder
The Hot Folder acts as an input channel in which the files to be processed are dropped.
The Hot Folder, and all the other input channels, always contains a Keep Results Action. This ensures that your original input files are stored on the System so that you can reuse them at any time.
A Parameter Set is a group of settings that determine the behavior of a Task Processor.
1 Hot Folder2 PDF Render3 TIFF Platesetter4 Press
1 3 42
1 Keep Results Action2 Parameter Set name
1
2
:APOGEE Prepress 7.0 Tutorial
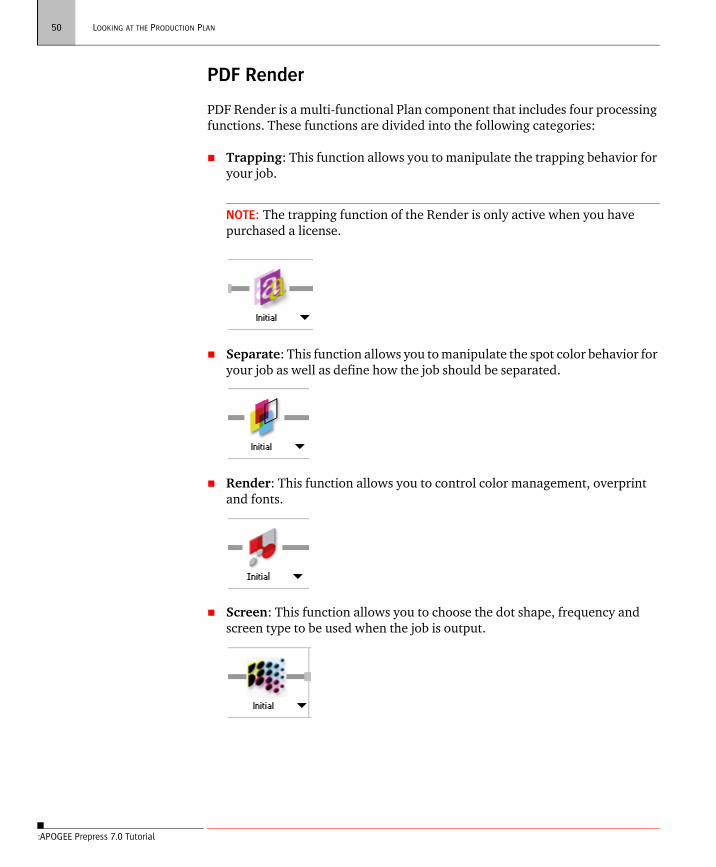
50 LOOKING AT THE PRODUCTION PLAN
PDF Render
PDF Render is a multi-functional Plan component that includes four processing functions. These functions are divided into the following categories:
Trapping: This function allows you to manipulate the trapping behavior for your job.
NOTE: The trapping function of the Render is only active when you have purchased a license.
Separate: This function allows you to manipulate the spot color behavior for your job as well as define how the job should be separated.
Render: This function allows you to control color management, overprint and fonts.
Screen: This function allows you to choose the dot shape, frequency and screen type to be used when the job is output.
:APOGEE Prepress 7.0 Tutorial

3 WORKING WITH HOT TICKETS 51
TIFF Platesetter
The TIFF Platesetter is a multi-functional output Plan component that includes the following two functions:
Image: This function allows the operator to determine which separations will be output and in which order. Other settings are available, depending on the type of output device.
Output: This function is used to select the media in the Output Device and to set the resolution at which the job should be output. Other settings are avail-able, depending on the type of output device.
Press
The final Plan component is the Press. This component is used to describe the characteristics of the press on which the job will be printed. It allows you to set certain parameters that are relevant for the other Plan components.
The Press Plan component must be attached to the high-resolution output device at the end of the Production Plan.
:APOGEE Prepress 7.0 Tutorial

52 INPUTTING A DOCUMENT
Inputting a Document
Follow the procedure below to input a sample PDF file.
To locate the sample files
1 Browse via your network to the :APOGEE Prepress Server (this is the computer which is shown in the hardware pane of the System Overview).
2 Open the SupportFiles folder on the :APOGEE Prepress Server.
You will see a SampleFiles subfolder. All sample files required for this Tutorial are located in this SampleFiles folder.
To input a sample PDF file and start processing a job
1 Context-click the Working with Hot Tickets Hot Ticket and select Upload Document from the context menu.
2 Select Apogee Render 4Pages.PDF from the SampleFiles folder.
3 Click Open.
The processing begins and the job appears in the Jobs window.
4 Select the Jobs window to see the new job.
NOTE: Macintosh users will see that the document upload will automatically mount the HOTFOLDERROOT share on their desktop. The input document is copied to this folder.
:APOGEE Prepress 7.0 Tutorial

3 WORKING WITH HOT TICKETS 53
Looking at the Jobs Window
In the Jobs window, you can monitor, view, and manage the jobs that are submitted to the :APOGEE Prepress System. The Job List now contains the job that you have just submitted (by uploading the Apogee Render 4Pages.PDF file to the Working with Hot Tickets Hot Folder). The job name is the name of your input document, in this case Apogee Render 4Pages.
To look at the Job List
Select the Working with Hot Tickets - Apogee Render 4Pages job.
When the PDF file is input, :APOGEE Prepress performs the following processing steps:
PDF Rendering: Trapping (if activated and licensed), color separation handling, rendering and screening.
Outputting, i.e. imaging.
1. The Apogee Render 4Pages job in the Job List.
1
:APOGEE Prepress 7.0 Tutorial
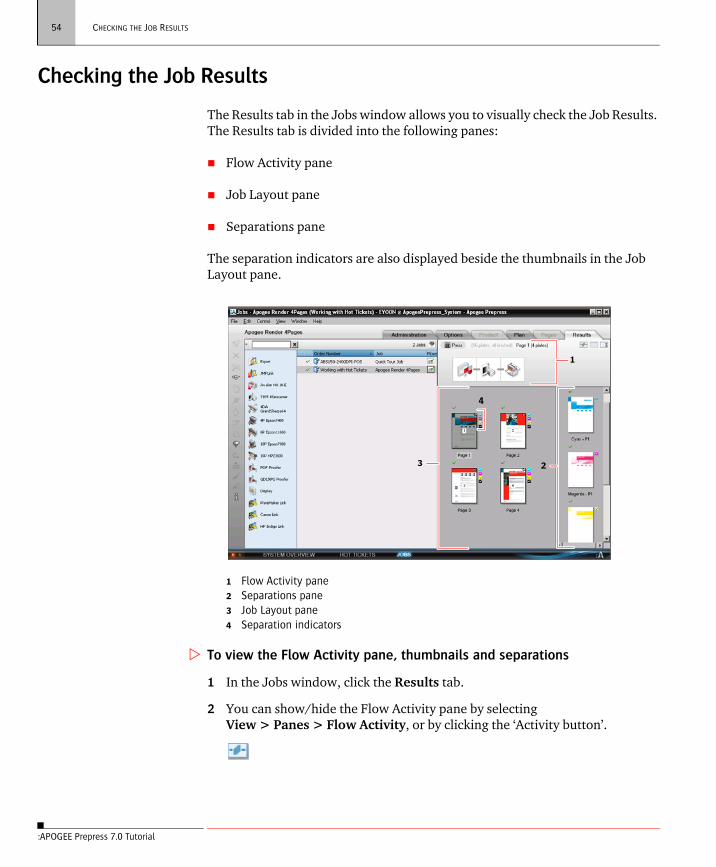
54 CHECKING THE JOB RESULTS
Checking the Job Results
The Results tab in the Jobs window allows you to visually check the Job Results. The Results tab is divided into the following panes:
Flow Activity pane
Job Layout pane
Separations pane
The separation indicators are also displayed beside the thumbnails in the Job Layout pane.
To view the Flow Activity pane, thumbnails and separations
1 In the Jobs window, click the Results tab.
2 You can show/hide the Flow Activity pane by selecting View > Panes > Flow Activity, or by clicking the ‘Activity button’.
1 Flow Activity pane2 Separations pane3 Job Layout pane4 Separation indicators
1
2
4
3
:APOGEE Prepress 7.0 Tutorial

3 WORKING WITH HOT TICKETS 55
In the Flow Activity pane, you can follow the processing of the job. The Flow Activity pane shows you the Production Plan, without the Input Channel. Any active Task Processor has a green border to show that it is active.
NOTE: Depending on the performance of your hardware system(s), the processing of the document may already be finished. In this case, upload the Apogee Render 4Pages.PDF again to the Working with Hot Tickets Hot Ticket and watch the Activity window.
3 In the Flow Activity pane, double-click PDF Render (the first icon in the Flow Activity pane) while it is active.
The Activity Monitor window for PDF Render appears. This window gives you detailed information on the status of the PDF Render.
4 Close the Activity Monitor window.
5 Look at the Job Layout pane.
The Job Layout pane displays the thumbnails of all pages that have been processed. When a page has been separated, a separation indicator in the form of a small square filled with C, M, Y, K or a circle filled with a spot color appears next to the thumbnail. A check mark is added to the separation indicator when the corresponding separation has been output correctly. When all separations of a page are successful, a green check mark is displayed above that page in the Job Layout pane.
6 Click the thumbnail of page 1 to view the separation results in the Separa-tions pane.
7 You can show/hide the Separations pane by selecting View > Panes > Separations, or by clicking the ‘Separations’ button in the Flow Activity pane.
:APOGEE Prepress 7.0 Tutorial

56 CHECKING THE JOB RESULTS
The Separations pane displays all separations for the selected thumbnail.
To adjust the Results view
The arrangement of the page thumbnails in the Results tab can be adjusted.
1 Select View > Columns > 2 to view 2 page thumbnails next to each other in the Job Layout pane.
2 Select View > Scale > Fit to Window to expand the 2 thumbnails as much as possible, but still fit in the Job Layout pane.
NOTE: View > Columns > Fill Width can only be selected when using a fixed scale size (Small, Normal or Large).
Job Status Icon
In the Job List, you can see the status of your jobs. An icon is displayed at the left of the job name. This icon indicates the current or last activity associated with the corresponding job. The Job Status icon for this job indicates that the job was completed successfully.
NOTE: Refer to the icon overview in the Online Guide for information on icons.
1. Job Status icon
1
:APOGEE Prepress 7.0 Tutorial
LESSON
4 Creating Hot Tickets
In this lesson you will learn how to create your own Hot Ticket starting from a Blank Hot Ticket Template. You will also be introduced to the various Actions you can use in a Production Plan. Finally, you will submit the Hot Ticket to the :APOGEE Prepress System and use it to process a job.
This lesson is designed for users of all :APOGEE Prepress products.
Getting Started
To create a new Hot Ticket
1 In the Hot Tickets window, choose File > New from Templates.
The Templates window appears.
2 From the Category list, select Blank.
3 From the Template list, select Blank Hot Ticket.
NOTE: Do not use any of the Quick Fill options.
4 Click Open.
The Ticket Editor appears.
You have opened a blank template, which you can now customize.
57

58 ENTERING THE ADMINISTRATION INFORMATION
Entering the Administration Information
To enter the job information in the Administration tab
1 In the Administration tab of the Ticket Editor, enter the following job information:
Hot Ticket name: Create Hot Ticket-student
This name will also be shown in the Hot Ticket List.
NOTE: For each of the lessons in this Tutorial replace student with your own name.
Operator: student
Comments: This is my first Hot Ticket.
In the Comments text box, you can type any information that will be relevant for a Hot Ticket and its future use.
2 Click Browse (next to the Customer contact text box).
The Customer Contact Details window appears.
3 Enter your personal information in the boxes.
The company name, contact person first and last names, E-mail address and phone number will be displayed in the Customer contact box of the Adminis-tration tab.
4 Click OK.
:APOGEE Prepress 7.0 Tutorial

4 CREATING HOT TICKETS 59
In the following section, you will learn about Production Plans and build your own Production Plan.
Building a Production Plan
Building a Production Plan is the most important part of creating a Ticket. The Production Plan contains the processing information required to output your job.
What is a Production Plan?
A Production Plan is a series of components linked together to form one or more processing flows. Each of these components can be configured to define exactly how your job is to be input, processed and output. A Production Plan will contain one or more input channels, one or more process Task Processors, one or more output devices, and possibly some Actions.
Looking at the Plan Components Panes
To display the Plan Components panes
1 In the Ticket Editor, click the Plan tab.
On the left side, you see the Plan Components pane. You will use this pane to select the various components that will make up your Production Plan.
:APOGEE Prepress 7.0 Tutorial
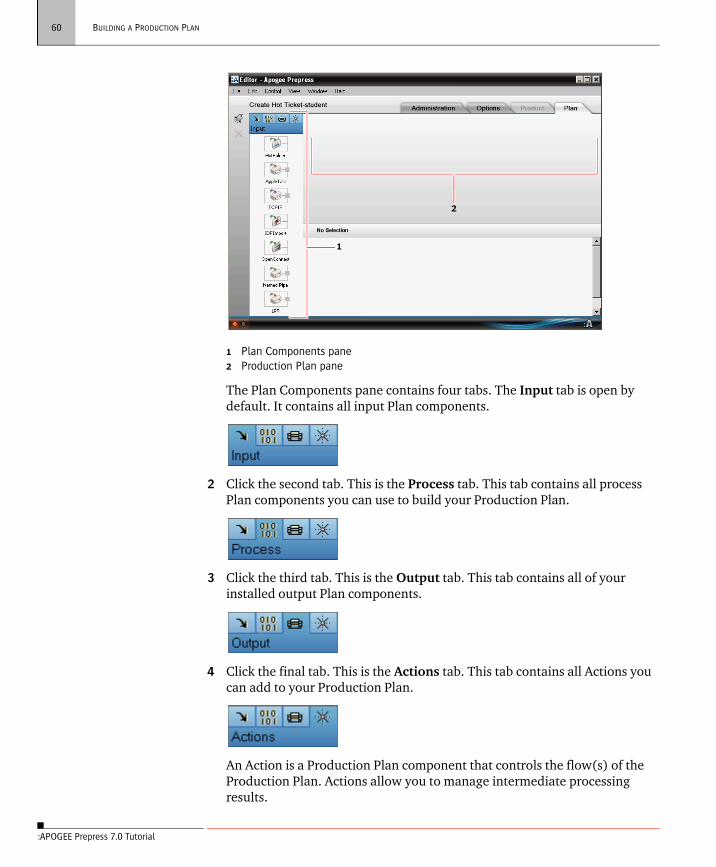
60 BUILDING A PRODUCTION PLAN
The Plan Components pane contains four tabs. The Input tab is open by default. It contains all input Plan components.
2 Click the second tab. This is the Process tab. This tab contains all process Plan components you can use to build your Production Plan.
3 Click the third tab. This is the Output tab. This tab contains all of your installed output Plan components.
4 Click the final tab. This is the Actions tab. This tab contains all Actions you can add to your Production Plan.
An Action is a Production Plan component that controls the flow(s) of the Production Plan. Actions allow you to manage intermediate processing results.
1 Plan Components pane2 Production Plan pane
1
2
:APOGEE Prepress 7.0 Tutorial

4 CREATING HOT TICKETS 61
There are two types of Actions:
Flow Control Actions: These Actions interrupt the flow. They are: Discard, Soft Proof, Hard Copy Proof, Wait for Results, Collect for Output and After Hours. Flow Control Actions are always placed between two Plan components.
Result Actions: These Actions do not interrupt the flow. They are: Keep Result, Archive Result, Notify and Milestone. Result Actions control the result of the Plan component.
Building the Production Plan
To build a Production Plan for your Hot Ticket
1 Click the Input Plan Components tab.
2 Select the Hot Folder Plan component and drag it to the Production Plan pane.
Every input channel contains a Keep Result Action. This Action ensures that the original input file is saved on your System in the event you need to process it again.
3 Click the Process tab. This is the second tab in the Plan Components pane.
The process Plan components appear.
:APOGEE Prepress 7.0 Tutorial

62 BUILDING A PRODUCTION PLAN
4 Select the PDF Render Plan component, drag it to the Production Plan pane and drop it next to the Hot Folder.
You will see that :APOGEE Prepress automatically makes a connection between the two Plan components. The line between the two Plan compo-nents is green. The color changes to gray when you release the mouse button.
CAUTION: Do not drop PDF Render before you see the green connection line.
5 Click the Output tab.
All the available output Plan components are listed.
6 Select the TIFF Platesetter and drag it next to PDF Render.
You will see that the Collect for Output Action appears between PDF Render and the TIFF Platesetter.
7 Select the Collect for Output Action and click the Delete button (X button) in the :APOGEE Prepress toolbar.
:APOGEE Prepress 7.0 Tutorial

4 CREATING HOT TICKETS 63
8 Scroll to the bottom of the Plan Components pane, select the Press, and drag it next to the TIFF Platesetter.
The Press allows you to set certain parameters that are relevant for other Plan components.
NOTE: The Press Plan component must always be attached to a high-resolution output device.
You have now built your Production Plan. The next step is to configure the components that make up the Production Plan.
:APOGEE Prepress 7.0 Tutorial
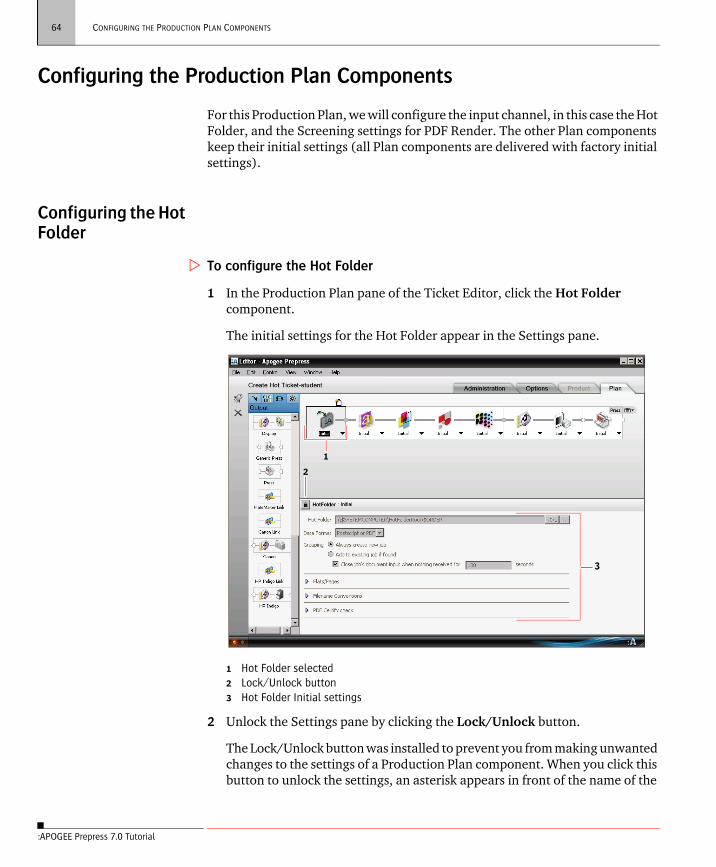
64 CONFIGURING THE PRODUCTION PLAN COMPONENTS
Configuring the Production Plan Components
For this Production Plan, we will configure the input channel, in this case the Hot Folder, and the Screening settings for PDF Render. The other Plan components keep their initial settings (all Plan components are delivered with factory initial settings).
Configuring the Hot Folder
To configure the Hot Folder
1 In the Production Plan pane of the Ticket Editor, click the Hot Folder component.
The initial settings for the Hot Folder appear in the Settings pane.
2 Unlock the Settings pane by clicking the Lock/Unlock button.
The Lock/Unlock button was installed to prevent you from making unwanted changes to the settings of a Production Plan component. When you click this button to unlock the settings, an asterisk appears in front of the name of the
1 Hot Folder selected2 Lock/Unlock button3 Hot Folder Initial settings
1
2
3
:APOGEE Prepress 7.0 Tutorial

4 CREATING HOT TICKETS 65
Parameter Set (in this case, you will see * initial). The asterisk indicates that changes have been made to these settings.
The default location to save your Hot Folders is the HotFolderRoot on the :APOGEE Prepress Server (which is referenced by a variable called $SYSTEMCOMPUTER). There are two ways to specify the Hot Folder name:
By typing the Hot Folder name in the location box.
By using variables such as $TICKETNAME, $CUSTOMER, $ORDER, etc.
NOTE: For more information on variables, refer to the :APOGEE Prepress Online Help.
3 Replace $ORDER by Create Hot Ticket-student in the location path.
The system will automatically create a new Hot Folder in the HotFolderRoot called ‘Create Hot Ticket-student’. Adding your name allows several students to do the exercises in this Tutorial at the same time.
Looking at the PDF Render Screen Settings
Screening allows you to select the dot shape, the line frequency and the screen type to be used when the job is output.
To display the PDF Render Screen Settings
1 In the Production Plan pane of the Ticket Editor, click the PDF Render - Screen component.
:APOGEE Prepress 7.0 Tutorial

66 CONFIGURING THE PRODUCTION PLAN COMPONENTS
General Options
Use separate settings for Objects and Images: Select this option if you want to apply a different line screen to objects and images in the document.
Use single settings for all content: Select this option if you want to use the same line screen throughout the entire job.
Screen Tab
Fixed Screen: Select this option if you want to set the Screen Type, Frequency and Dot Shape in this menu.
Honor Application: Select this option if you want to use the screening settings that are defined in your front-end application, such as QuarkXPress.
The screen tab contains the following options:
Screen Type: By default, the following screen types are available:
1 Screening Operation in PDF Render2 Screening Initial settings
2
1
:APOGEE Prepress 7.0 Tutorial

4 CREATING HOT TICKETS 67
ABS: Agfa Balanced Screening guarantees visually and mathematically moiré-free screens, which are based on Agfa proprietary screening technology.
Adobe Accurate: This screening method provides a close approximation to the standard screen angles for color separations and frequencies.
Rational Tangent: This is standard PostScript screening technology implemented by Adobe. Standard screening produces a lower output quality than either Agfa Balanced Screening or Adobe Accurate Screening.
Frequency: Refers to the line screen you want to apply to the job. The list of options will change depending on the resolution you have set for your high-resolution output device.
Dotshape: The selections in this box refer to the screening technology that you selected. If you selected Agfa Balanced Screening, for example, you can choose between round and elliptical dot shapes.
Configuring the PDF Render Screen Settings
To configure the PDF Render Screen settings
1 In the Production Plan pane of the Hot Ticket Editor, unlock the PDF Render - Screen: Initial settings.
2 Ensure that the Use single settings for all content option is selected.
This is the default option.
3 Select the following options:
Screen Type: ABS
Frequency: 120
Dotshape: Round
The next step is to submit the Hot Ticket. This creates an active Hot Ticket that can be used to process jobs.
:APOGEE Prepress 7.0 Tutorial

68 SUBMITTING THE HOT TICKET
Submitting the Hot Ticket
When you have finished creating your Production Plan and configuring its components, you must submit the Ticket. By submitting your Ticket, you store it on the :APOGEE Prepress System. All :APOGEE Prepress users can then use this Hot Ticket to automatically process incoming jobs.
To submit the Hot Ticket
1 In the Ticket Editor, choose File > Submit Hot Ticket.
The Ticket Editor is automatically closed. You will see your Hot Ticket appear in the Hot Ticket List of the Hot Tickets window.
2 Select the new Hot Ticket.
The Hot Tickets window contains all available Hot Tickets, in alphabetical order. When you drop a document into the Hot Ticket’s Input Channel (or directly onto the Hot Ticket), a job is created that will appear in the Job List.
In the next section, you will process a job using the Create Hot Ticket-student Hot Ticket.
1 New Hot Ticket
1
:APOGEE Prepress 7.0 Tutorial

4 CREATING HOT TICKETS 69
Using the Hot Ticket to Process a Job
To use the Hot Ticket to process a job
1 Drag the Apogee Control 4Pages.PDF file from the shared SampleFiles folder, and drop it on the Create Hot Ticket-student Hot Ticket.
The processing of the job will begin and the job will appear in the Jobs window.
2 In the Jobs window, select the Apogee Control 4Pages job.
3 Select the Results tab.
:APOGEE Prepress 7.0 Tutorial

70 USING THE HOT TICKET TO PROCESS A JOB
4 In the Results tab, monitor the processing of Apogee Control 4Pages.PDF.
Look at the Flow Activity pane. The component that is processing the job has a green border.
Look at the Job Layout pane. It shows you which separations are being made. Every time a color is output successfully, the corresponding separa-tion indicator is checked.
Look in the Job List. The job’s flow icon becomes white with a green check mark. A green check mark status icon also appears, indicating that the job has been completed successfully.
:APOGEE Prepress 7.0 Tutorial

4 CREATING HOT TICKETS 71
5 Click one of the page thumbnails to view the separations.
1 Job Status icon2 Flow Status icon: flow has been completed successfully3 Result Status icon4 Thumbnail with checked separation indicators5 Result Status icon
1
4
2 3
5
:APOGEE Prepress 7.0 Tutorial

72 USING THE HOT TICKET TO PROCESS A JOB
:APOGEE Prepress 7.0 Tutorial

LESSON
5 Editing Hot Tickets
In this lesson you will learn how to edit an existing Hot Ticket by adding a flow to the Production Plan. You will also be introduced to the various types of flow identifiers. Finally, you will submit the edited ticket and use it to process a job.
This lesson is designed for users of all :APOGEE Prepress products.
Getting Started
There are two ways to access the Hot Ticket Editor:
In the Hot Tickets window, you can context-click a Hot Ticket and select Edit Hot Ticket from the context menu.
You can also start from a Hot Ticket template.
To edit a Hot Ticket
1 In the Hot Tickets window, context-click the Working with Hot Tickets Hot Ticket and select Edit Hot Ticket from the context menu.
2 In the Hot Ticket name box of the Administration tab, change the name to Working with Hot Tickets-student.
3 Click the Plan tab.
4 Click the Output operation of the TIFF Platesetter, and unlock the settings.
5 In the Imaging pane, change the Resolution from 1200 to 2400 dpi.
NOTE: You can also add, remove or replace Plan components.
6 Choose File > Submit Changes.
You have now edited your Hot Ticket by changing the settings for one of the components.
73

74 GETTING STARTED
To edit a Hot Ticket which was opened from a Hot Ticket template
1 In the Hot Tickets window, choose File > New from Templates.
The Templates window appears.
2 From the Category list, select Tutorial.
3 From the Template list, select the Working with Hot Tickets Template.
4 In the Quick Fill pane, enter Editing Hot Tickets-student as Job Name and click Open.
5 Select the Administration tab.
You will see that the Hot Ticket name is Editing Hot Tickets-student.
:APOGEE Prepress 7.0 Tutorial

5 EDITING HOT TICKETS 75
Looking at the Flow Identifier(s)
A flow identifier is a name and an icon that are associated with a flow. For each ticket you create, you define one or more output paths in the Production Plan. For example, you may want to output jobs to a proofing device and to a plate-setter. When you create a Production Plan for this purpose, you can select a specific flow identifier at the end of each flow in your Production Plan.
Click the Plan tab of the Editing Hot Tickets-student ticket.
NOTE: Do not confuse flow with Production Plan. Every Production Plan contains at least one flow.
1 Flow identifier2 Single-flow Production Plan
1
2
:APOGEE Prepress 7.0 Tutorial

76 LOOKING AT THE FLOW IDENTIFIER(S)
Flow Identifier Types
There are several types of flow identifiers. Depending on which type of flow you have created, you can choose the corresponding flow identifier.
To select a flow identifier type
1 In the Plan tab, click the Flow Identifier icon.
A menu appears, containing all the flow identifier types.
The following flow identifier types are available:
2 Select the Main Output flow identifier.
The menu closes and the Main Output flow identifier is used.
Main Output: Identifies the flow that leads to the high-resolution output device.
Imposition Proof: Identifies the flow to which your Imposition Proofer is linked.
Page Proof: Identifies the flow to which your Page Proofer is linked.
Export: Identifies the flow you will use for exporting files.
Public Page Store: Identifies the flow you will use for PDF pages that need to be accessible for multiple jobs.
PrintDrive DQS: Identifies the flow you will use for creating Digital Quick Strip jobs.
Display: Identifies the flow you will use for Color-Managed Soft proofing purposes.
Automatic: Automatically selects the best flow identifier based on the output Plan compo-nent in your Production Plan.
:APOGEE Prepress 7.0 Tutorial

5 EDITING HOT TICKETS 77
Adding a Flow to Your Production Plan
In this section, you will learn how to add another flow to your Production Plan.
To add a second flow to your Production Plan
1 Click the Output Plan Components tab.
2 Select the Press, drag it to the Production Plan pane and drop it under the Press of the Main Output Flow.
3 Select and drag the PDF Proofer from the Output Plan Components tab and join it to the Press in the second flow.
The flow identifier next to the Press automatically becomes a Page Proof Flow Identifier.
4 Click the Process tab in the Plan Components pane.
5 Drag PDF Render to the Production Plan pane and drop it in front of the PDF Proofer when you see a green connector line appear.
:APOGEE Prepress 7.0 Tutorial

78 ADDING A FLOW TO YOUR PRODUCTION PLAN
6 In the Page Proof Flow, click the connector in front of PDF Render, and without releasing the mouse button drag the pointer to the Main Output Flow between the Hot Folder and PDF Render.
A green connector line appears between the Hot Folder and the PDF Render of the Page Proof flow. The green connector line indicates that this is a valid connection. The color changes to gray when you release the mouse button.
7 Click the Actions tab in the Plan Components pane.
:APOGEE Prepress 7.0 Tutorial

5 EDITING HOT TICKETS 79
8 Drag the Hard Copy Proof Action to the Production Plan pane and drop it between the Hot Folder and PDF Render components in the Main Output flow.
The Hard Copy Proof Action interrupts the Main Output flow and will prevent the document from proceeding to PDF Render in the Main Output flow. The document will first be processed by the Page Proof flow.
Note that the Main Output flow is interrupted.
9 In the Actions tab, select the Notify Action, drag it to the PDF Proofer and drop it.
The Notify settings appear in the Settings pane.
10 Ensure that the only when all results are ready and Send as notification options are selected.
NOTE: Sending the notification as e-mail requires a mail server to be specified in the :APOGEE Prepress System Configuration.
11 In the Additional text box, type the text ‘your proof results are ready’.
You will receive a message when the proofs are ready.
1 Hard Copy Proof Action2 Interrupted Main Output flow3 Notify Action on Page Proofer4 Notify ‘only when all results are ready’ selected
1
23
4
:APOGEE Prepress 7.0 Tutorial

80 ADDING A FLOW TO YOUR PRODUCTION PLAN
12 Choose File > Submit Hot Ticket.
The Ticket Editor is automatically closed and your Hot Ticket appears in the Hot Ticket List of the Hot Tickets window.
13 Select the new Hot Ticket and click the Plan tab.
You will see a second flow identifier appear next to the Main Flow identifier. This is the Page Proof flow identifier, indicating that your Production Plan now contains two flows.o
1 Two Flow identifiers: Main Output Flow identifier and Page Proof Flow identifier
1
:APOGEE Prepress 7.0 Tutorial

5 EDITING HOT TICKETS 81
Inputting a Document
In this section, you will use the edited Hot Ticket to process a document.
To input a document and monitor the processing
1 Context-click the Editing Hot Tickets-student Hot Ticket, and select Upload Document from the context menu.
2 Locate the Apogee Control 4Pages.PDF file in the shared SampleFiles folder and click Open.
The processing of the job begins and the job appears in the Jobs window.
3 In the Jobs window, select the Editing Hot Tickets-student - Apogee Control 4Pages job to view the information in the tabs.
4 Click the Results tab.
:APOGEE Prepress 7.0 Tutorial

82 INPUTTING A DOCUMENT
5 In the Flow Activity pane, click the flow identifier icons in the upper left corner to switch between the two flows.
Based on the flow you select, you can see the different activities. In the Page Proof Flow, you can see that all four pages are being made and sent to the proofer.
When the Page Proof has finished successfully, its flow identifier receives a green checkmark. An Information message is displayed in front of the job name, as a result of the Notify Action on the PDF Proofer. Next to this Infor-mation message, a Job Status icon indicates that the job is waiting for a Hard Proof.
Because of the Hard Copy Proof Action between the Hot Folder and PDF Render components, the Main Output flow is on hold. This is indicated by a blue flow identifier.
1 Main Output Flow2 Main Output Flow identifier3 Page Proof Flow4 Page Proof Flow identifier
1
2
3
4
:APOGEE Prepress 7.0 Tutorial

5 EDITING HOT TICKETS 83
6 Click the Information Message Icon to open the Problem Report window.
7 Select your message and click Acknowledge.
NOTE: For more information on messages, see the lesson “Working with Messages” on page 93.
8 Close the Problem Report window.
9 In the Flow Activity pane, click the Main Output flow icon.
10 In the Job Layout pane, select the first three pages by clicking them while holding down the CTRL key (on a Macintosh, hold down the Command key).
1 Information Message icon2 Job Status icon, indicating that the job is waiting for a hard proof3 Main Output Flow identifier4 Page Proof Flow identifier
21 43
:APOGEE Prepress 7.0 Tutorial

84 INPUTTING A DOCUMENT
11 Context-click the selected thumbnails and choose Continue Pages from the context menu.
NOTE: You can only continue pages that are on hold.
The ‘approved’ pages will now proceed through the Main Output Flow and will be output on your high-resolution output device.
:APOGEE Prepress 7.0 Tutorial

LESSON
6 Working with Filters
In this lesson you will be introduced to how filters work in :APOGEE Prepress. The exercises in this lesson will help you to understand filter options. You will work with the following three filters:
Quick filter: allows you to customize the content of the Job List using basic filtering options.
Job List filter: allows you to customize the content of the Job List using advanced filtering options.
Message Board filter: allows you to customize the content of the Message Board.
This lesson is designed for users of all :APOGEE Prepress products.
Using the Quick Filter
The Quick filter allows you to specify which jobs you see in the Job List. By default, the Quick filter is empty and all jobs are displayed.
To activate the Quick filter
1 Type the text ‘ticket-’ in the Quick filter box.
As you type, the Job List is dynamically filtered, and the number of matches is progressively narrowed down.
The Job List now only displays the ‘Create Hot Ticket-student - Apogee Control 4Pages’ job, because the text ‘ticket-’ can be found in the Order Number of the job.
The Filter pane is colored green to indicate that the filter is active.
2 Delete the text from the Quick filter, or click the X button next to the Quick filter box.
The Quick filter is removed, and the complete list of jobs is displayed again.
85

86 DISPLAYING THE JOB LIST FILTER
NOTE: The Quick filter also searches on the Job Name and Description fields (from the Administration tab).
Displaying the Job List Filter
The Job List Filter allows you to specify which jobs you see in the Job List. By default no filters are applied, and all jobs are shown in the Job List.
To display the Job List filter
Click the Filter button above the Job List.
The Job Filter window appears.
The Job Filter window is divided into the following four panes:
Filter On/Off
Status
Administration
Date
:APOGEE Prepress 7.0 Tutorial

6 WORKING WITH FILTERS 87
Activating the Job List Filter
To activate the Job List filter
1 Click the Filter button.
The Job Filter window appears.
2 Select the On radio button to activate the Filter.
The Filter is active and the Job Filter window stays open. You can see the Job List change as soon as you select different filter criteria and click Apply. Any type of filter you apply is immediately reflected in the Job List.
The Job Filter button turns green when there is a filter active.
The header area above the Job List becomes green.
You can also see (Filter Applied) in parentheses next to the Job List Filter button.
To apply a filter on the Job List
1 Move the Job Filter window to the side of your screen so that you can see both the Job List and the Job Filter window.
2 In the Status pane, select the Is archived option.
3 Click Apply.
:APOGEE Prepress 7.0 Tutorial

88 ACTIVATING THE JOB LIST FILTER
You immediately see that all jobs disappear from the Job List. This is because none of the jobs have been archived yet.
4 Deselect the Is archived check box.
5 Click Apply.
All the jobs reappear in the Job List.
6 In the Administration pane, you can filter on the same boxes that you can find in the Administration tab of the Ticket Editor. In the Job Name contains box, type “Apogee Control”.
NOTE: Do not forget the quotation marks. Words enclosed in double quotes will appear together in all results exactly as typed. The Filter boxes are not case-sensitive. If you leave a box blank, it is ignored.
7 Click Apply.
Only two jobs are displayed, both of which have “Apogee Control 4Pages” as job name.
8 Disable the filter by selecting the Off radio button and click OK.
The Job Filter window is closed, and all the jobs reappear in the Job List.
:APOGEE Prepress 7.0 Tutorial

6 WORKING WITH FILTERS 89
Looking at the Message Board Filter
The Message Board Filter allows you to specify which system messages you see in the Message Board. By default no filters are applied, and all messages are shown.
To display the Message Board filter
1 Click the Message Indicator in the Jobs window.
The Message Indicator is represented by two lights in the left bottom corner of each of the main :APOGEE Prepress windows.
2 In the Message Board, click the Filter button at the top right of the window.
The Message Board Filter window appears. This window is divided into the following four panes:
Filter: On/Off
From
Level
1 Message Indicator
1
:APOGEE Prepress 7.0 Tutorial

90 FILTERING WITH THE OUTPUT DEVICES PANE
Date
NOTE: By default, the Message Board Filter does not display job messages. As an Operator or Administrator, however, you can adapt the filter to display job messages.
3 Close the Message Board Filter window.
4 Close the Message Board.
Filtering with the Output Devices Pane
You can filter your Job List per output device.
To filter the Job List using the Output Devices pane
1 In the Output Devices pane, select the PDF Proofer.
Only the jobs that have the PDF Proofer in their Production Plan are shown. In this case, only the Editing Hot Tickets-student job remains visible in the Job List.
The Job Filter button area above the Job List turns green, indicating that the filter is active.
:APOGEE Prepress 7.0 Tutorial

6 WORKING WITH FILTERS 91
2 To disable the filter, click in the blank area at the bottom of the Output Devices pane.
All jobs reappear in the Job List.
:APOGEE Prepress 7.0 Tutorial

92 FILTERING WITH THE OUTPUT DEVICES PANE
:APOGEE Prepress 7.0 Tutorial

LESSON
7 Working with Messages
In this lesson you will create a new Hot Ticket and examine the types of messages that can be reported in :APOGEE Prepress. A message can be an error, a warning or simply information. A message always requires the user’s attention.
This lesson is designed for users of all :APOGEE Prepress products.
Message Types
Messages can be generated by an individual job, the :APOGEE Prepress System, or any of the output devices.
Job messages are reported through Problem Reports, and are indicated by message icons in the Job List, in the first column in front of the job name.
System messages and output device messages are reported through the Message Board.
NOTE: You need administrator access to see the System and output device messages.
There are four types of messages, which are discussed below.
Information
This type of message gives you information on an event that was requested by the operator. An information message is usually the result of a Notify Action in the Production Plan. This type of message does not require you to take immediate action.
User Interaction Required
This message requires a decision from the operator during the processing of a job.
93

94 THE MESSAGE INDICATOR
Warning
This type of message informs you that there is a situation of which you should be aware, but which does not affect the successful processing of the job. This message does not require your immediate attention, but it might in the near future.
Error
This type of message informs you that there is a processing error and that you need to take immediate action. An error causes the processing of the job to cease.
The Message Indicator
The Message Indicator is represented by two lights located in the bottom left corner of the main :APOGEE Prepress windows (i.e. the System Overview window, the Hot Tickets window and the Jobs window).
The Message Indicator lights flash when a System or output device message is generated.
1 Message Indicator
1
:APOGEE Prepress 7.0 Tutorial

7 WORKING WITH MESSAGES 95
The Message Indicator lights have three statuses:
Gray lights: The Message Board contains no messages.
Red lights are alternatively flashing: A new message has arrived or there are messages that you have not yet acknowledged. The lights will continue to flash until you acknowledge the message.
Red lights are on but not flashing: There are messages in the Message Board and they have all been acknowledged.
To open the Message Board
Do one of the following to open the Message Board:
Click the Message Indicator in any of the main windows (i.e. the System Overview window, the Hot Tickets window, or the Jobs window).
Choose Window > Message Board.
The Message Board opens.
Problem Reports
Whereas System and output device messages are reported through the Message Board, job messages are reported through Problem Reports. By clicking a job message icon in the Job List, you can open the corresponding Problem Report to have a look at the message.
In this lesson you will create a new Hot Ticket and manipulate the Production Plan settings so that a number of messages are generated.
:APOGEE Prepress 7.0 Tutorial

96 CREATING A HOT TICKET
Creating a Hot Ticket
This section describes how to create the Hot Ticket that will be used in this lesson.
To create a Hot Ticket
1 From the Hot Tickets window, choose File > New from Templates.
The Templates window appears.
2 From the Category list, select Blank.
3 From the Template list, select Blank Hot Ticket.
4 Click Open.
The Ticket Editor opens, showing the Administration tab.
5 In the Hot Ticket name box, type Messages-student.
6 Click the Options tab.
7 In the When Job is Finished pane, select Notify.
This will result in an information message as soon as the job is finished.
To build the Production Plan
1 Click the Plan tab.
2 Select the Hot Folder and drag it to the Production Plan pane.
NOTE: You can only input PostScript and PDF files in Hot Folders. In order to generate an error message, you will input a PJTF file in this Hot Folder.
3 Click the Process tab.
4 Select PDF Render and drag it next to the Hot Folder.
5 Click the Output tab.
6 Select the TIFF Platesetter and drag it next to PDF Render.
7 Delete the Collect for Output Action between both components.
8 Select the Press and drag it next to the TIFF Platesetter.
You have created the Production Plan for the Messages-student Hot Ticket.
:APOGEE Prepress 7.0 Tutorial

7 WORKING WITH MESSAGES 97
To configure the Production Plan components
1 Click the Hot Folder icon to display the settings.
2 Unlock the Hot Folder settings.
3 Replace $ORDER by Messages-student in the location path.
The system will automatically create a new Hot Folder in the HotFolderRoot named Messages-student.
4 Click the PDF Render - Separate icon, and unlock the settings.
5 In the Color Policy pane, do the following:
Deselect the Application decides option.
Ensure that the Notify option is selected from the colors not yet listed above list.
When the System detects a spot color in your job, you will receive a User Interaction Required message. You can then decide how you want to handle the separation of the spot colors.
6 Choose File > Submit Hot Ticket.
The Messages-student Hot Ticket is added to the Hot Ticket List in the Hot Tickets window.
:APOGEE Prepress 7.0 Tutorial

98 GENERATING MESSAGES
You will now use this Hot Ticket to process a number of jobs. As a result of the processing, you will receive a number of messages.
Generating Messages
In this section, you will execute a number of exercises that will generate different types of messages.
Wrong Input Format
In this exercise, the error message will be caused by inputting a PJTF file in a Hot Folder that is set up to receive PS/PDF input only.
To input the PJTF file
1 Context-click the Messages-student Hot Ticket and select Upload Document from the context menu.
2 Select A4 Tutorial PB 4Pages WT.pjtf from the SampleFiles/PJTF files subfolder.
3 Click Open.
4 Open the Jobs window.
You will see an error message icon in front of the Messages-student Order number.
5 Click the error message icon.
A Problem Report window appears containing the error message.
6 Click the message to see the details.
:APOGEE Prepress warns you that the input file is not the correct format. The files will not be processed.
:APOGEE Prepress 7.0 Tutorial

7 WORKING WITH MESSAGES 99
7 Click Acknowledge.
8 Close the Problem Report window.
9 In the Job List, context-click the Messages-student job and select Delete Job from the context menu.
10 Click Delete to confirm.
11 The Messages-student job is removed from the Job List.
Information Message
In this exercise, you will input a PDF file. An information message will be gener-ated as a result of the Notify option.
To generate an information message
1 Context-click the Messages-student Hot Ticket and select Upload Document from the context menu.
2 Select Apogee Manage 4Pages.PDF from the SampleFiles folder.
3 Click Open.
4 Open the Jobs window.
The processing of the job begins, and the PDF file is rendered. When the job has been output, an information message icon appears in front of the Messages-student Order number. This is because of the Notify option that you selected in the Options tab.
5 Click the information message icon.
A Problem Report window appears containing the information message.
:APOGEE Prepress 7.0 Tutorial
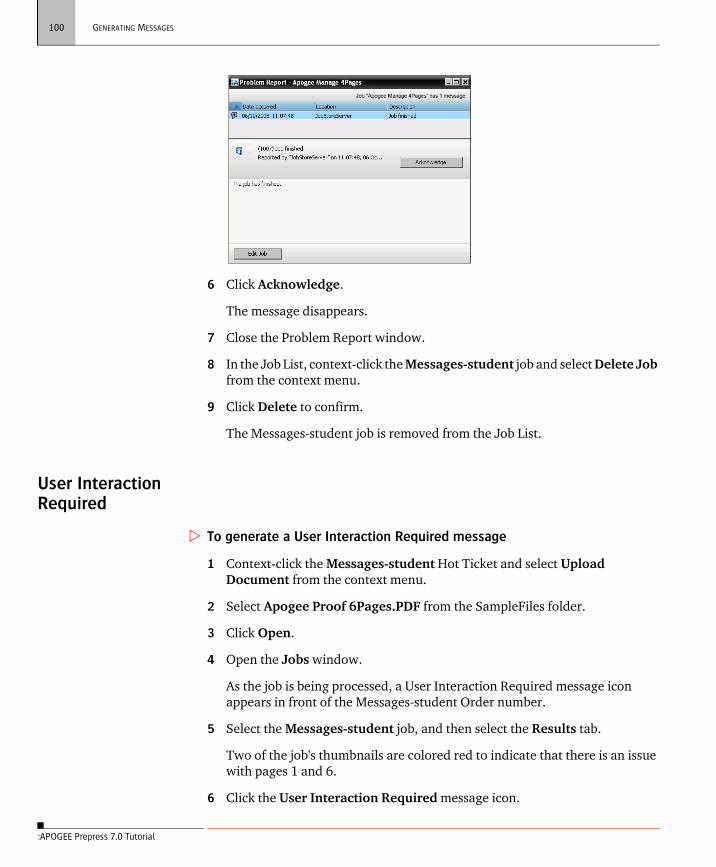
100 GENERATING MESSAGES
6 Click Acknowledge.
The message disappears.
7 Close the Problem Report window.
8 In the Job List, context-click the Messages-student job and select Delete Job from the context menu.
9 Click Delete to confirm.
The Messages-student job is removed from the Job List.
User Interaction Required
To generate a User Interaction Required message
1 Context-click the Messages-student Hot Ticket and select Upload Document from the context menu.
2 Select Apogee Proof 6Pages.PDF from the SampleFiles folder.
3 Click Open.
4 Open the Jobs window.
As the job is being processed, a User Interaction Required message icon appears in front of the Messages-student Order number.
5 Select the Messages-student job, and then select the Results tab.
Two of the job's thumbnails are colored red to indicate that there is an issue with pages 1 and 6.
6 Click the User Interaction Required message icon.
:APOGEE Prepress 7.0 Tutorial

7 WORKING WITH MESSAGES 101
7 Click one of the two messages in the Problem Report to display its details.
You can see that the processing of the job was stopped because an unknown spot color was detected. User interaction is required here to define if this spot color needs to be converted to a process color or if it needs to be printed.
8 Click Edit Job.
The Job is opened in the Ticket Editor with the PDF Render - Separate operation selected.
9 In the Color Policy pane, context-click the Pantone 102 C spot color and select Keep as Spot Color from the context menu.
10 Choose File > Submit changes.
The remaining pages are processed with 5 color separations.
When the job has been output the Jobs window is displayed, and you will see an information message icon and finished icon in front of the Messages-student job.
11 Click the information message icon.
A Problem Report window appears indicating that the job has finished.
12 Click Acknowledge.
The message disappears.
13 Close the Problem Report window.
14 In the Job List, context-click the Messages-student job and select Delete Job from the context menu.
15 Click Delete to confirm.
The Messages-student job is removed from the Job List.
:APOGEE Prepress 7.0 Tutorial

102 GENERATING MESSAGES
:APOGEE Prepress 7.0 Tutorial

LESSON
8 Working with Job Tickets
In this lesson you will learn what Job Tickets are and how you can use them. You will be introduced to a number of new Task Processors that are part of the :APOGEE Prepress Commercial product.
This lesson is designed for users of the following :APOGEE Prepress products:
Apogee Manage
Apogee Automate
What are Job Tickets?
A Job Ticket defines how a job is to be assembled and processed. It contains processing information that is required for a particular job. You will typically use a Job Ticket when you know in advance how your job should be processed.
The advantage of using a Job Ticket is that you can combine several documents into one job. For example, for magazines, you may not have all input available at once and need to add pages at a later date.
Opening the Tutorial Job Ticket Template
A Job Ticket Template was created for this Tutorial.
To open the Job Ticket Template
1 From the Jobs window, choose File > New from Templates.
The Templates window appears, showing the Job Tickets tab.
2 From the Category list, select Tutorial.
3 From the Template list, select Working with Job Tickets.
4 In the Quick Fill pane, enter the following:
Order Number: 000-0008-student
Job Name: Working with Job Tickets
103

104 JOB TICKET DETAILS
Number of Pages: 4
This information will be used in the Administration tab of the Ticket.
5 Click Open.
The Administration tab is skipped and the Plan Tab is displayed.
In the next section, the Job Ticket details are discussed.
Job Ticket Details
The Job Ticket details are divided into several categories, represented by tabs.
Administration
Options
Product
Plan
Pages
Results
Each tab is explained in detail below.
NOTE: Do not change any of the settings in the tabs.
:APOGEE Prepress 7.0 Tutorial

8 WORKING WITH JOB TICKETS 105
Administration Tab
To display the Administration tab in the Job Ticket Editor
Click the Administration tab.
The information in the Administration tab is the same as for the Hot Tickets, except for the following items:
Order number: The Order number (000-0008-student) replaces the Hot Ticket name. The Order number was entered via the Quick Fill options.
Job name: Unlike with Hot Tickets, where the Job name is automatically the name of the input document, you can fill in the Job name (Working with Job Tickets) here. The Job name was entered via the Quick Fill options.
The Operator is automatically filled in, based on the logon user name.
You can also fill in a Description for the job.
Options Tab
To display the Options tab in the Job Ticket Editor
Click the Options tab.
This tab is divided into 5 panes. The Options tab for Job Tickets is very similar to the Options tab for Hot Tickets, except for the following pane:
Milestones: The :APOGEE Prepress System can warn you if the Run List is not complete or if the job is not finished before a given date.
:APOGEE Prepress 7.0 Tutorial

106 JOB TICKET DETAILS
For this Job Ticket, the input channel will be disabled when the Run List is complete.
NOTE: The Options tab of a Job Ticket will also display the Archive location. Whether or not this location is displayed immediately after job creation depends on your archive settings.
Product Tab The Product tab allows you to create job parts (such as ‘cover’ and ‘body’), and is only enabled when the Production Plan contains an Impose Task Processor.
Plan Tab
To display the Plan tab in the Job Ticket Editor
Click the Plan tab.
The Plan tab for Job Tickets is the same as the Plan tab for Hot Tickets.
To check the Hot Folder settings
1 Click the Hot Folder icon in the Production Plan.
:APOGEE Prepress 7.0 Tutorial

8 WORKING WITH JOB TICKETS 107
The Hot Folder settings appear in the Settings pane.
2 Ensure that the variable $ORDER is in the Hot Folder location box.
When you submit your Job Ticket, $ORDER will be replaced by the Order number (000-0008-student) as specified in the Administration information.
Pages Tab
To display the Pages tab in the Job Ticket Editor
Click the Pages tab.
The Pages tab contains the Page Store and the Run List.
Page Store: The Page Store is a repository of documents that are available to this job. When the job is processed, its documents will appear in the Page Store.
Run List: The Run List is the ordered list of pages that will make up the job.
In this job, we have defined a Run List of 4 pages (Quick Fill options - Number of Pages).
:APOGEE Prepress 7.0 Tutorial

108 JOB TICKET DETAILS
Results Tab
To display the Results tab in the Job Ticket Editor
Click the Results tab.
The Results tab for Job Tickets is the same as the Results tab for jobs based on Hot Tickets.
NOTE: For more information on the Results tab, see also “Checking the Job Results” on page 54.
To submit the Job Ticket
3 Choose File > Submit Job.
This process creates a Job Ticket from the Template that you can use to process jobs. The Job Ticket Editor is automatically closed. In the Jobs window, you can see that the job 000-0008-student is added to the Job List.
000-0008-student is the Order number
Working with Job Tickets is the Job name
4 Select the Job name Working with Job Tickets.
1 The Working with Job Tickets job in the Job List.
1
:APOGEE Prepress 7.0 Tutorial

8 WORKING WITH JOB TICKETS 109
5 Click the Plan tab.
6 Click the Hot Folder icon to check the settings.
You will see that the variable $ORDER is replaced with 000-0008-student.
Looking at the Production Plan
To display the Production Plan
1 In the Job List, select the Working with Job Tickets job.
2 Click the Plan tab.
The Production Plan for this lesson contains the following new Production Plan Components:
Normalizer
Run List
Normalizer
The Normalize Plan Component converts PostScript or EPS files to standardized or “normalized” PDF documents that are suitable for reliable high-end prepress production. The Normalizer also creates PDF thumbnails of your PostScript, EPS and PDF documents.
Click the Normalizer icon.
1 Normalizer2 Run List
1 2
:APOGEE Prepress 7.0 Tutorial

110 INPUTTING A DOCUMENT
The Normalizer settings appear in the Settings pane.
NOTE: For more information on the Normalizer settings, see “The Normalize Plan Component” on page 117.
Run List
In the Run List, you place the total number of pages that is required for your job. The number of pages will also be the number of placeholders that are available to the job. Placeholders are reserved places for individual pages or artwork obtained from the Page Store.
In this job, the number of pages was automatically entered from the Quick Fill options.
Click the Run List icon.
The Run List settings appear in the Settings pane.
Inputting a Document
For this exercise, you will input a PDF document. You can find this file in the shared SampleFiles folder.
To input a document
1 Context-click the 000-0008-student - Working with Job Tickets job and select Upload Document from the context menu.
2 Select Apogee Manage 4Pages.PDF from the SampleFiles folder.
3 Click Open.
The processing of the job starts and the Flow icon next to the job name becomes green. Also note the Unplaced pages job status icon in the Job list.
4 In the Jobs window, click the Pages tab, and look at the following items:
:APOGEE Prepress 7.0 Tutorial

8 WORKING WITH JOB TICKETS 111
In the Page Store, wait until the Apogee Manage 4Pages.PDF name is no longer displayed in italics. This indicates that the PDF file has been created and that it can be viewed in your PDF viewer.
You can see a number in parentheses after the document name. This indicates the number of pages in the document. In this case, 4 pages.
5 In the Page Store, double-click Apogee Manage 4Pages.PDF.
The PDF page will open in your PDF Viewer (the PDF Viewer application can be selected in the Viewers tab of your :APOGEE Prepress Preferences).
NOTE: Macintosh users will see that the APOGEEDATASTORE share will be automatically mounted on their desktop. This folder contains the document you are opening in a PDF Preview application, and therefore must be mounted.
6 Minimize the PDF Viewer and return to the Jobs window.
7 In the Page Store, click the + sign in front of the Apogee Manage 4Pages.PDF to open the document.
NOTE: Macintosh Client users should click the expansion triangle in front of Apogee Manage 4Pages.PDF.
The 4 pages of the document are listed.
8 Select page 1 and drag it to the first placeholder in the Run List
:APOGEE Prepress 7.0 Tutorial

112 INPUTTING A DOCUMENT
Pages that are placed in the Run List are dimmed in the Page Store. The document name will also be dimmed and the number between parentheses has changed into 1/4 indicating that 1 of the 4 pages is placed in the Run List.
You will see that the Job Status icon reflects that you are editing the Run List.
NOTE: If the Job Status column is wide enough, it will display multiple job status icons. However, the first icon is always the most important.
9 Choose File > Submit Changes to resume the job.
The page you placed in the Run List will be rendered and output.
10 Hold down the SHIFT key and select pages 2 to 4 of the PDF document.
11 Drag the three pages to the blank placeholders in the Run List.
The Run List is now complete.
12 Choose File > Submit Changes to resume the job.
TIP: Typically, you deactivate input channels to prevent operators from uploading documents to jobs which are already complete.
The pages you added are rendered and output. The input channel for this job is now disabled due to the Deactivate input when Run list is complete setting in the Options tab.
1 Deactivated input channel icon.
1
:APOGEE Prepress 7.0 Tutorial

8 WORKING WITH JOB TICKETS 113
To input a second document
1 Context-click the 000-0008-student - Working with Job Tickets job and select Upload Document from the context menu.
2 Select Apogee Automate 4Pages.PDF from the SampleFiles folder.
3 Click Open.
The Document Upload will generate a message informing you that the job inputs need to be enabled.
4 Click Enable Inputs.
You will see that the document is uploaded, and Apogee Automate 4Pages.PDF appears in the Page Store.
:APOGEE Prepress 7.0 Tutorial

114 INPUTTING A DOCUMENT
:APOGEE Prepress 7.0 Tutorial

LESSON
9 Creating and Editing Job Tickets
In this lesson you will learn how to create your own Job Ticket starting from a Blank Job Ticket template. You will submit the Job Ticket to the :APOGEE Prepress System and then use it to process a job. You will also learn how to manipulate the Run List.
This lesson is designed for users of the following :APOGEE Prepress products:
Apogee Manage
Apogee Automate
Getting Started
To create a new Job Ticket
1 In the Jobs window, choose File > New from Templates.
The Templates window appears.
2 From the Category list, select Blank.
3 From the Template list, select Blank Job.
4 Click Open.
The Ticket Editor appears.
You have opened a blank template, which you can customize for your job.
Editing the Blank Ticket Template
To enter the administration information
1 In the Order number text box, type 000-0009-student.
2 In the Job name text box, type Create Job Tickets.
115

116 LOOKING AT THE PRODUCTION PLAN COMPONENTS
NOTE: In the Operator text box, the name you used when you started the :APOGEE Prepress Client and logged on to the :APOGEE Prepress System is automatically filled in.
3 In the Comments text box, you can type any information that will be relevant for this Job Ticket and its future use. Type the text ‘This is my first Job Ticket’.
To build the Production Plan
1 Click the Plan Tab.
2 Build a Production Plan that consists of the following components:
Hot Folder
Normalize
Preflight
Run List
PDF Render
TIFF Platesetter
Press
3 Select the Collect for Output Action and press Delete.
The next step is to configure the components that make up the Production Plan.
Looking at the Production Plan Components
In this section, you will learn about the following Production Plan components:
Normalize
Preflight
Run List
For the Hot Folder, ensure that the variable $ORDER is in the Hot Folder location path.
:APOGEE Prepress 7.0 Tutorial

9 CREATING AND EDITING JOB TICKETS 117
The Normalize Plan Component
This section introduces you to the Normalizer settings.
NOTE: For a complete guide to the Normalizer settings, consult the :APOGEE Prepress Online Help.
Click the Normalize icon.
The Normalizer settings appear in the Settings pane.
NOTE: Do not change the Initial Settings.
The Normalizer settings are divided into four tabs:
PDF Generation
Images
Application Settings
PDF Processing
You will now take a closer look at these settings.
PDF Generation
In the PDF Generation tab, you can set the following:
General: The General pane allows you to customize the way in which the Normalizer produces PDF files.
Pages: The Pages pane comprises the following:
The Default page size specifies the fallback page width and height that the Normalizer will use when no page size is specified in the incoming job. Search for ‘BoundingBox’ should be selected when you want to search the incoming document for a specific page size. Fallback specifies the
:APOGEE Prepress 7.0 Tutorial

118 LOOKING AT THE PRODUCTION PLAN COMPONENTS
default page size (width and height) if no Bounding Box information can be extracted from the document.
The Bleed amount is the amount that an image or color extends to the trimmed edge of the printed page. This value will always be used in your PDF document. The bleed information coming from the PostScript document will be stripped out and replaced by this setting.
Images
The Images tab allows you to downsample and/or compress the images in your PDF document in order to reduce the file size. You can differentiate between monochrome, grayscale and color images.
Application Settings
The Application Settings tab contains the following settings:
General: These settings allow you to preserve, remove or apply the general settings of the incoming PostScript file.
Overprint: These settings allow you to determine which objects will be overprinted.
PDF Processing
In the PDF Processing tab, you can set the following:
File Format: Here you can select ASCII as your file format.
Fonts: You can configure the Normalize to produce PDFs, even if documents are input with missing fonts, and the font is not available as an :APOGEE Prepress font resource. The Normalizer will then substitute any missing fonts with the substitution font that you specify. To embed only a subset of the fonts, select ‘Subset all embedded fonts below’ and specify a threshold percentage.
n Pantone Conversion: These settings allow you to specify how :APOGEE Prepress should handle Pantone color names.
Page Thumbnails: If this option is selected, the Normalizer generates thumbnails for every file it successfully delivers. If this option is not selected, the Normalizer does not generate thumbnails, and any thumbnails that are present in the incoming PDF file are preserved.
:APOGEE Prepress 7.0 Tutorial

9 CREATING AND EDITING JOB TICKETS 119
The Preflight Plan Component
When your documents have been processed by the Normalizer, you can use Preflight Action Lists and/or Job Profiles to ensure that the PDF will be output correctly.
To configure the Preflight Plan component
1 Click the Prefight icon.
The Preflight settings appear in the Settings pane.
2 Unlock the Settings.
3 In the Actions pane, keep the initially selected Action List:
Hairline=.25pts
This Action List enables automatic correction of your PDF documents.
4 In the Job Profiles pane, select the Use Job Profile option and select PDF X-1a PLUS Commercial v3 from the Use Job Profile list.
This profile specifies a number of user-defined criteria that ensure correct printing of the document. The PDF document is checked against these criteria.
NOTE: The Preflight warnings produce notifications option can be deselected to prevent the appearance of Preflight warnings in the Page Store. However, for this exercise, make sure this option remains selected.
The Run List Plan Component
CAUTION: A Job Ticket always requires a Run List. You cannot submit a Job Ticket without a Run List.
:APOGEE Prepress 7.0 Tutorial

120 LOOKING AT THE PRODUCTION PLAN COMPONENTS
To configure the Run List
1 Click the Run List icon.
The Run List settings appear in the Settings pane.
2 Unlock the settings.
3 Type 8 in the Number of pages box.
This will also be the number of placeholders that are available to the job. Placeholders are reserved places for individual pages or artwork obtained from the Page Store.
4 Ensure that the First page starts at box contains the number 1.
5 Ensure that the Place pages in run list option is set to Manually.
Manually means that you will manually drag pages from the Page Store to the Run List. After completing the Run List, you need to submit the job to continue the processing.
Automatically means that the System will automatically place the pages in the Run List. You do not need to submit the job, it will continue processing automatically.
6 Choose File > Submit Job to store your Job Ticket on the :APOGEE Prepress System.
:APOGEE Prepress 7.0 Tutorial

9 CREATING AND EDITING JOB TICKETS 121
Inputting a Document
In this section, you will use the Create Job Tickets Job Ticket to process several documents.
To input a document to the Create Job Tickets job
1 Context-click the 000-0009-student - Create Job Tickets job and select Upload Document from the context menu.
2 Select ApogeePrepress Brochure.PDF from the SampleFiles folder.
3 Click Open.
The processing of the job begins. This is indicated by the green flow icon next to the Job name.
Checking the Preflight Status
The Preflight Plan component will generate an error indicating that the input document does not fully comply with the criteria specified in the Preflight Profile.
1 In the Job List, select the Create Job Tickets job.
2 Click the Pages tab.
NOTE: Next to the Error message icon in the Page Store, you will see a Preflight Report icon. If you click this icon, the report is opened in Acrobat.
3 In the Page Store, click the Error message icon.
A Problem Report window appears, containing the Preflight details.
:APOGEE Prepress 7.0 Tutorial

122 CREATING A RUN LIST
4 Expand the Problem Report window to view the details.
For this exercise we will ignore the error.
5 Click the Yes button at the bottom of the Problem Report to continue processing the file with the Preflight error.
6 Close the Problem Report window.
NOTE: The Error icon disappears, but in the Page Store the Preflight Report icon will keep indicating that there was a Preflight Error in this document.
Creating a Run List
To create a Run List
1 In the Job List, select the Job name Create Job Tickets.
2 Click the Pages tab.
You will see the Page Store, and the Run List with 8 placeholders.
3 In the Page Store, expand ApogeePrepress Brochure.PDF by clicking the + sign next to it.
:APOGEE Prepress 7.0 Tutorial

9 CREATING AND EDITING JOB TICKETS 123
NOTE: Macintosh Client users click the expansion triangle in front of ApogeePrepress Brochure.PDF.
The 32 pages of the PDF document are listed. You can place pages in the Run List using either of the following methods:
If you want all of the pages in the document, select the document name and drag it to the Run List. The placeholders in the Run List are automat-ically filled.
If you want to use a selection of the pages, expand the document, select individual pages and drop them on placeholders in the order of your choice.
4 Select the first 8 pages and drag them to the 8 placeholders in the Run List.
All of the placeholders in the Run List are filled.
5 Choose File > Submit Changes.
The processing of the job continues. You can watch its progress by switching to the Results tab.
:APOGEE Prepress 7.0 Tutorial

124 MANIPULATING THE RUN LIST
Manipulating the Run List
There are several ways of letting the System know which pages you want to process and in which order. If you want to manipulate the Run List, you must edit the Job Ticket.
In this section, you will learn how to rearrange the Run List and how to add placeholders to it.
To rearrange the Run List
1 In the Job List, context-click the Create Job Tickets job and select Edit Job from the context menu.
2 In the Ticket Editor, click the Pages tab.
You will see the Page Store and the Run List.
3 In the Run List, select page 1, drag it to position 8 and drop it while holding down the SHIFT key.
Page 8 is replaced by page 1. The page 1 position is now an empty place-holder. Notice that the total number of empty placeholders is summarized in the Run List header.
4 Point your cursor over the empty placeholder icon in the Run List header.
A Tooltip appears, summarizing the current status of the Run List place-holders (1 empty, 7 placed, 0 blank, Total:8).
The first empty placeholder in the Run List is selected when you click on the empty placeholder icon in the Run List header. This is very useful when using long Run Lists.
5 In the Page Store, expand ApogeePrepress Brochure.PDF by clicking the + sign next to it.
:APOGEE Prepress 7.0 Tutorial

9 CREATING AND EDITING JOB TICKETS 125
NOTE: Macintosh Client users click the expansion triangle in front of ApogeePrepress Brochure.PDF.
6 In the Page Store, select page 9 and drag it to the empty placeholder.
All placeholders are now filled.
7 In the Page Store, select page 10, drag it to position 5 in the Run List and drop it while holding down the SHIFT key.
Page 5 is replaced by page 10.
:APOGEE Prepress 7.0 Tutorial

126 MANIPULATING THE RUN LIST
To add placeholders to the Run List
1 In the Page Store, select pages 11 to 14 and drag them below placeholder 8 in the Run List.
TIP: For information on Run List keyboard shortcuts, refer to the Shortcut Overview in the :APOGEE Prepress Help.
This extends the Run List to 12 placeholders.
2 Choose File > Submit Changes to continue the processing of the job.
:APOGEE Prepress 7.0 Tutorial

LESSON
10 Working with PJTF Imposition
In this lesson you will learn how to use PJTF Imposition in your :APOGEE Prepress workflow.
This lesson is designed for users of the following :APOGEE Prepress products:
Apogee Manage
Apogee Automate
What is PJTF Imposition?
Imposition is the arrangement of pages on the press sheet so that the pages can be correctly folded and read consecutively. How you arrange the pages on the sheet depends on the sizes of the press sheet and the pages, and how the job will be folded and bound. All imposition information can be gathered in one PJTF file (Portable Job Ticket Format). The PJTF file defines the complete imposition for your job.
NOTE: You can make your own PJTF files with various applications such as Preps, Dynastrip, Signastation, Facilis, Impostrip, etc.
Opening the PJTF Imposition Template
A Job Ticket Template was created for this lesson, named Imposition. You will customize this template for your imposition workflow.
To open the Job Ticket Template
1 In the Jobs window, choose File > New from Templates.
2 Click the Job Tickets tab.
3 From the Category list, select Tutorial.
4 From the Template list, select Imposition.
127

128 CONFIGURING THE PRODUCTION PLAN COMPONENTS
5 In the Quick Fill pane, enter the following:
Order Number: 000-00010-student
Job Name: Imposition
Number of Pages: 32
6 Click Open.
The Production Plan contains the following Task Processors: Hot Folder - Normalizer - Run List - Imposition - PDF Render - TIFF Platesetter - Press.
There is also a Collect for Output Action between PDF Render and the TIFF Platesetter.
Configuring the Production Plan Components
In this section, you will configure the following:
Impose Plan component
Collect for Output Action
Configuring the Impose Plan Component
The number of pages in the job is automatically filled in using the Quick Fill options. However, the number of pages is automatically adjusted if you select a PJTF file with a different number of pages in the Impose settings.
To configure the Impose Plan component
1 Unlock the Impose settings in the Plan tab.
2 Ensure that From file is selected from the Imposition Selection list.
3 In the File Selection box, browse to the shared SampleFiles folder and open the PJTF folder.
4 Select A4 Tutorial PB 4X8Pages SW.pjtf and click Open.
:APOGEE Prepress 7.0 Tutorial

10 WORKING WITH PJTF IMPOSITION 129
Configuring the Collect for Output Action
To configure the Collect for Output Action
1 Click the Collect for Output Action in the Production Plan.
2 From the Group and print by list, select Job.
This setting ensures that all output for this job will be kept together.
3 Select the option Automatically start printing when group is complete.
To submit the Job Ticket
Choose File > Submit Job to store the Job Ticket on the :APOGEE Prepress System.
The Imposition job is added to the Job List.
Inputting a Document
To process a document using the Imposition Job Ticket
1 Context-click the 000-0010-student - Imposition job and select Upload Document from the context menu.
2 Select ApogeePrepress Brochure.PDF from the SampleFiles folder.
3 Click Open.
4 Select the Imposition job and click the Results tab.
You will see that ApogeePrepress Brochure.PDF is being processed.
:APOGEE Prepress 7.0 Tutorial

130 ADDING PAGES TO THE RUN LIST
Adding Pages to the Run List
To add pages to the Run List
1 Click the Pages tab.
You will see the Page Store and the Run List for this job. The Run List is still empty.
2 In the Page Store, expand the ApogeePrepress Brochure.PDF document by clicking the + sign next to it.
3 Select the first 8 pages and drop them on the first placeholder in the Run List.
NOTE: You will see signature indicators next to the pages in the Run List (1F: 1 Front - 1B: 1 Back).
4 Click the Results tab to see how the pages are placed.
The information for these signatures comes from the pjtf file.
5 Choose File > Submit changes.
The first signature is rendered. However, it will not yet be output. This is due to the Collect for Output Action.
This job will not be output until all signatures are rendered, because the Collect for Output Action was set to Job.
:APOGEE Prepress 7.0 Tutorial

10 WORKING WITH PJTF IMPOSITION 131
In the following section, you will complete the job.
Completing the Job
To complete the job
1 In the Jobs window, click the Pages tab.
2 In the Page Store, select pages 9 to 32 and drag them to position 9 in the Run List.
The last pages in the Run List are filled.
A new spot color is detected, as you will see indicated in the Run List header.
If you click on the spot color icon in the Run List header, you will see the Separate settings of the PDF Renderer, indicating that there is now a spot color present.
Before continuing, you will need to define the spot color behavior.
To define the spot color behavior
1 Edit the 000-0010-student - Imposition job.
2 Unlock the Separation settings, context-click the PANTONE 102 C spot color, and select Keep as Spot Color from the context menu.
3 Submit your changes.
4 Check your imposition in the Results tab.
All pages of all flats are now available. After rendering all flats, the job will start output due to the Collect for Output action (‘Automatically continue printing when group is complete’).
:APOGEE Prepress 7.0 Tutorial

132 COMPLETING THE JOB
:APOGEE Prepress 7.0 Tutorial

LESSON
11 Packaging
In this lesson you will be introduced to the Packaging options in :APOGEE Prepress. You will create two Production Plans for packaging: a basic plan and an advanced plan.
This lesson is designed for users of the following :APOGEE Prepress products:
Apogee Manage + StepAndRepeat
Apogee Automate+ StepAndRepeat
Before You Begin
In order to execute the exercises in this lesson, check your SampleFiles folder for the following files:
YD Label.eps
Young Designer Box.mim
In the shared PJTF folder: StepAndRepeat.pjtf
Creating a Basic Production Plan for Packaging
In this section, you will learn how to build a basic Packaging Job Ticket that you can use to process a job, and that does not require extra Step and Repeat software (such as Plato) to position and /or adapt the artwork.
This basic Job Ticket will typically be used to process ‘label jobs’. You can step and repeat the label elements in your front-end application, such as QuarkXPress. You can also step and repeat the label elements within :APOGEE Prepress, in which case you need the step and repeat information in the form of an imposition template. You can make your own imposition templates in a third-party application such as Preps, Dynastrip, Signastation, Facilis, Impostrip, etc.
133

134 CREATING A BASIC PRODUCTION PLAN FOR PACKAGING
To create a basic Job Ticket for Packaging
1 In the Jobs window, choose File > New from Templates.
2 From the Category list, select Blank.
3 From the Template list, select Blank Packaging Job.
You can easily recognize a Packaging Job Ticket by the packaging icon in front of it.
4 Click Open.
5 In the Administration tab, type 000-00011-student in the Order number box and Packaging1 in the Job name box.
6 In the Plan tab, build a Production Plan that consists of the following components:
Hot Folder
Normalize
Run List
Step and Repeat
PDF Render
TIFF Platesetter
Press
The Collect for Output Action is set automatically between PDF Render and the TIFF Platesetter.
NOTE: For Packaging jobs, the Step and Repeat Task Processor replaces the Imposition Task Processor.
:APOGEE Prepress 7.0 Tutorial

11 PACKAGING 135
Configuring the Production Plan Components
In this section, you will define the settings of the various components in your Production Plan.
NOTE: The number of pages is set automatically when you select a PJTF file in the Step and Repeat settings.
Step and Repeat: Unlock the settings and select From file from the Imposi-tion Selection list. In the File Selection pane, browse to the shared SampleFiles folder and open the PJTF folder. Select the StepAndRepeat.pjtf file and click Open. This PJTF file defines the complete imposition for your job.
Collect for Output Action: Select Job from the Group and print by list. Also ensure that the ‘Automatically start printing when group is complete’ option is not selected.
To submit the Job Ticket
Choose File > Submit Job.
The 000-00011-student - Packaging1 job is added to the Job List.
Inputting a Document
You will use the Packaging1 job to process an EPS document.
To input an EPS document
1 Context-click the 000-00011-student - Packaging1 job and select Upload Document from the context menu.
2 Select YD Label.eps from the SampleFiles folder.
3 Click Open.
The processing of the job begins.
4 In the Job List, select the 000-00011-student - Packaging1 job.
You will notice the following differences with a Commercial job:
The Packaging icon in front of the Job name. This way, you can easily distinguish between Commercial jobs and Packaging jobs.
:APOGEE Prepress 7.0 Tutorial

136 CREATING A BASIC PRODUCTION PLAN FOR PACKAGING
The Pages tab is replaced by the Artwork tab. Packaging jobs are always based on artwork, not on pages.
5 Click the Artwork tab.
6 Drag the YD Label.eps file to the Run List.
7 Choose File > Submit Changes.
When the job is rendered, the Collect for Output icon appears in front of the job name in the Job List. The job is now ready for output.
8 In the Results tab, context-click the flat and select Continue Flat from the context menu.
NOTE: You need to click the flat - not on one of the pages. The easiest way to select the flat is to click on the flat name: Sig 1 Front.
The job is output.
:APOGEE Prepress 7.0 Tutorial

11 PACKAGING 137
Creating an Advanced Production Plan for Packaging
Advanced Production Plans for Packaging offer you more possibilities for automation, more positioning options and more artwork editing. When working with Hot Tickets for your Packaging workflow, you can keep your workflow as automated as possible.
You will work with standard JDF input documents. You can generate these files with a Packaging application such as Plato. :APOGEE Prepress offers you a dedicated input channel: Packaging JDF.
A typical example of an advanced Packaging Production Plan is a job for which the artwork consists of folding cardboard elements.
NOTE: For more information on how to generate JDF files with Plato, refer to the Plato manual.
To create an advanced Hot Ticket for Packaging
1 In the Hot Tickets window, choose File > New from Templates.
2 From the Category list, select Blank.
3 From the Template list, select Blank Packaging Hot Ticket.
You can recognize a Packaging Hot Ticket by the packaging icon in front of it.
4 Click Open.
5 In the Administration tab, type Packaging2-student in the Hot Ticket name box.
6 In the Plan tab, build a Production Plan that consists of the following components:
Packaging JDF
Normalize
Run List
Step and Repeat
PDF Render
TIFF Platesetter
:APOGEE Prepress 7.0 Tutorial

138 CREATING AN ADVANCED PRODUCTION PLAN FOR PACKAGING
Press
The Collect for Output Action is set automatically between PDF Render and the TIFF Platesetter.
Configuring the Production Plan Components
In this section, you will define the settings of the various Plan components in your Production Plan.
NOTE: Do not forget that you need to unlock the Settings before you can configure the Production Plan components.
Packaging JDF: Make sure that the Hot Folder path uses the variable $TICKETNAME (and not $ORDER).
Run List: The Number of pages is automatically set to N/A. The JDF input document contains all information.
Step and Repeat: Ensure that From input is selected from the Imposition Selection list. The input JDF (*.mim) document contains all information on how to step and repeat the artwork.
PDF Render: Select the Separate Operation. In the Color Policy pane, ensure that the Application decides option is selected.
Collect for Output Action: Select Job from the Group and print by list, and ensure that the Automatically start printing when group is complete option is not selected.
NOTE: 4-up license users need to scale the output of this job because the image size of the Young Designer Box.mim is 1045 x 800 mm. Open the Image settings of the TIFF Platesetter, select the Image tab, set Scale content to Manual, and type 50% in the Width and Height boxes.
:APOGEE Prepress 7.0 Tutorial

11 PACKAGING 139
To submit the Hot Ticket
Choose File > Submit Hot Ticket.
The Packaging2-student Hot Ticket is added to the Hot Ticket List.
Inputting a Document
You will use the Packaging2-student Hot Ticket to process a *.mim file.
To input the *.mim file
1 Context-click the Packaging2-student Hot Ticket and select Upload Document from the context menu.
2 Select Young Designer Box.mim from the SampleFiles folder.
3 Click Open.
The job is processed and appears in the Jobs window.
4 In the Job List, select the Young Designer Box job, and click the Artwork tab.
You will see that the artwork consists of a single page, which is automatically placed in the Run List. Because of the Collect for Output Action, the job has been placed on hold.
5 Click the Results tab.
You will see that the single Artwork page is repeatedly placed on the signa-ture. This is defined by the JDF document (*.mim).
:APOGEE Prepress 7.0 Tutorial

140 CREATING AN ADVANCED PRODUCTION PLAN FOR PACKAGING
6 Choose View > Show and deselect the Hold States option.
7 Click the signature to view all separations in the Separations pane.
You will see that there is an extra separation: Pantone 1585 C.
8 In the Plan tab, click the Image icon of the TIFF Platesetter.
In the Separation Output and Order tab, you will see that the Die Line color separation is automatically disabled and will not be output.
9 In the Results tab, select the flat.
NOTE: Ensure you click the flat and not one of the pages.
10 Choose Control > Continue Flat to continue the processing of the job.
The job is output.
:APOGEE Prepress 7.0 Tutorial

LESSON
12 Exporting Documents
In this lesson you will learn how to use the Export Task Processor. You will learn how to make a Parameter Set for export and you will build a simple Production Plan for export.
This lesson is designed for users of the following :APOGEE Prepress products:
Apogee Manage
Apogee Automate
Apogee PDF&Proof
What is Export?
The Export Task Processor allows you to create PostScript and PDF documents that will be exported for use in soft proofing, for four-color proofing, or for third-party workflows.
The exported document can be a single page or an imposed document.
Creating a Parameter Set for Export
In this section, you will learn how to make a Parameter Set for Export.
NOTE: Creating Parameter Sets is only possible when you have Administrator access.
To create a Parameter Set for Export
1 Open the System Overview window.
2 In the Output Task Processor pane, select Export.
3 In the Resources pane, double-click Parameter Sets.
The Parameter Sets window for Export appears.
4 Click New (+ button) to create a new Parameter Set.
141

142 CREATING A PARAMETER SET FOR EXPORT
5 Type PDFtoFile-student in the Name text box.
6 In the Export tab, ensure that the Save result as option is set to PDF.
You can output PostScript or PDF. Depending on which format you choose, different options become available.
7 Click the Destination tab.
8 Ensure that Single file per job is selected from the Group content list.
This will generate a PDF document that is written to a hard disk. The file will be located in the Export directory, as specified below.
TIP: Select this variable using the Variables list button. This list displays all supported :APOGEE Prepress variables for this specific function.
9 In the Base folder box, add the variable \$TICKETNAME to the ExportRoot path.
The default Export directory is ExportRoot. By using the $TICKETNAME variable, a folder with the name of your Ticket will be created in the ExportRoot. :APOGEE Prepress will export your PDF file to that folder.
10 Click OK.
:APOGEE Prepress 7.0 Tutorial

12 EXPORTING DOCUMENTS 143
Your Parameter Set PDFtoFile-student is visible in the Export Parameter Sets window.
NOTE: For more information on creating a Parameter Set, see “Parameter Sets” on page 152.
11 Close the Parameter Sets window.
Creating a Production Plan for Export
In this exercise, you will use the Export Task Processor in a Production Plan. You will also use this Production Plan to process a document.
Building the Production Plan
To create a new Hot Ticket
1 In the Hot Tickets window, choose File > New from Templates.
2 From the Category list, select Blank.
3 From the Template list, select Blank Hot Ticket.
4 Click Open.
The Ticket Editor appears.
5 In the Administration tab, enter Export-student in the Hot Ticket name box.
6 In the Plan tab, build a Production Plan using the following components:
Hot Folder
Normalize
Export
:APOGEE Prepress 7.0 Tutorial

144 CONFIGURING THE PRODUCTION PLAN COMPONENTS
Configuring the Production Plan Components
In this section, you will define the settings for the Production Plan components.
To configure the Hot Folder
1 Click the Hot Folder.
2 Unlock the Settings.
3 In the Settings pane, replace $ORDER by Export-student in the Hot Folder path.
To configure the Normalizer
1 Click the Normalizer.
2 Unlock the Settings.
3 In the Settings pane, click the PDF Processing tab.
4 In the Pantone conversion pane, select Coated from the Convert all Pantone color names to list.
CAUTION: Ensure that Follow paper type is not selected from the Convert all Pantone color names to list. This is because the paper type is defined in the Press settings, and this Production Plan does not contain a Press.
To configure the Export Plan component
1 In the Export Plan component, click the expansion triangle at the right-hand side of the Initial settings to open the Parameter Sets list.
2 Select PDFtoFile-student from the Parameter Set list.
This is the Parameter Set that you created in the previous exercise.
:APOGEE Prepress 7.0 Tutorial

12 EXPORTING DOCUMENTS 145
To submit the Hot Ticket
Choose File > Submit Hot Ticket.
The Export-student Hot Ticket is added to the Hot Ticket List.
:APOGEE Prepress 7.0 Tutorial

146 INPUTTING A DOCUMENT
Inputting a Document
To input a document in the Export-student Hot Folder
1 Context-click the Export-student Hot Ticket and select Upload Document from the context menu.
2 Select Apogee PDFProof 4Pages.ps from the SampleFiles folder.
3 Click Open.
The processing of the job will begin and the job will appear in the Jobs window.
4 In the Job List, select the Export-student - Apogee PDFProof 4Pages job.
5 Click the Results tab.
In the Flow Activity pane, you can see that the four pages of the PDF document are being processed.
6 When the job has been successfully processed, browse for the shared ExportRoot folder on the :APOGEE Prepress Server, and look for the Export-student folder.
This simple Production Plan does not allow for changes in the color informa-tion of the PDF documents. It has remained the same as the color information that was specified in the front-end application. Also, the page size is equal to the size that is defined in the source document. If you want to change the color information and/or page size of your exported documents, you should work with advanced Production Plans.
:APOGEE Prepress 7.0 Tutorial

LESSON
13 Basic Administrative Tasks
In this lesson you will learn about a number of basic tasks that are relevant for :APOGEE Prepress administrators.
Starting and Stopping your :APOGEE Prepress System
Monitoring the :APOGEE Prepress System
Managing Task Processors
Parameter Sets
Managing Ticket Templates
Providing Support Information
NOTE: You need administrator access to complete the exercises in this lesson.
Starting and Stopping your :APOGEE Prepress System
You start and stop the :APOGEE Prepress System with the :APOGEE Prepress Manager. This Manager is installed on the :APOGEE Prepress Server.
To start your :APOGEE Prepress System
1 Click the Windows Start button and select Programs > Agfa > PrepressManager.
The :APOGEE Prepress Manager starts but the :APOGEE Prepress System components are not active yet.
2 Click the :APOGEE Prepress Manager Start button to start the :APOGEE Prepress components.
3 Click the expansion triangle next to Show Components to display a list of the :APOGEE Prepress components and their status.
147

148 STARTING AND STOPPING YOUR :APOGEE PREPRESS SYSTEM
When all :APOGEE Prepress components are running and have a green check mark, you can close the Manager window. Closing the Manager will not stop the :APOGEE Prepress System.
NOTE: Items displayed in italics indicate that these :APOGEE Prepress components are running on :APOGEE Prepress Satellite(s).
To stop your :APOGEE Prepress System
1 Click the Windows Start button and select Programs > Agfa > PrepressManager.
2 Click the Shut Down button.
You will see a message, warning you that all tasks in process will be stopped.
:APOGEE PREPRESS 7.0 Tutorial

13 BASIC ADMINISTRATIVE TASKS 149
Monitoring the :APOGEE Prepress System
The System Overview window is the Administrator’s general control panel. It provides an overview of the overall configuration of your :APOGEE Prepress System and the Hardware System(s).
Open the System Overview window.
The top pane of the System Overview window contains an icon for the :APOGEE Prepress System and for every hardware system that runs the system software.
Managing Task Processors
In this section, the following topics are discussed:
Task Processor Status
Stopping and Starting Task Processors
Task Processor Status
The color and background of a Task Processor reflect its status. A Task Processor can have one of the following conditions:
Active but not processing any jobs
Active and processing a job
Stopped
:APOGEE PREPRESS 7.0 Tutorial

150 MANAGING TASK PROCESSORS
Starting up (the lines are moving on the icon)
In error
Not licensed
Only administrators can see the Task Processors that are not licensed.
Output device not found
User interaction required
Output device is paused
If the Task Processor is an output device, you can also see whether it is online or offline. An output device that is offline is blue.
:APOGEE PREPRESS 7.0 Tutorial

13 BASIC ADMINISTRATIVE TASKS 151
Stopping and Starting Task Processors
To stop and (re)start a Task Processor
1 In the System Overview window, select the Task Processor you want to stop.
2 Do one of the following:
Context-click the Task Processor and select Stop from the context menu.
Choose Processor > Stop.
3 Click Yes to confirm.
You will see that the Task Processor is stopped.
4 To restart the Task Processor, select it and do one of the following:
Context-click the Task Processor and select Start from the context menu.
Choose Processor > Start.
NOTE: You can also restart active Task Processors.
You will see moving white lines on the Task Processor while it is restarting. It takes some time to (re)start a Task Processor because a number of checks are made during the start-up.
:APOGEE PREPRESS 7.0 Tutorial

152 PARAMETER SETS
Putting Output Devices Online or Offline
Output Devices can be put offline or online using the context menu. This allows you to disable an output device temporarily.
When an output device is offline, the icon becomes blue.
When you put your output device offline using its control panel, the icon will also become blue.
Parameter Sets
In this section, you will learn what Parameter Sets are and how to create one for the PDF Render Task Processor.
About Parameter Sets
A Parameter Set is a group of settings that determine the behavior of a Task Processor. You can create a Parameter Set for each of the Task Processors.
In the System Overview window, you find all the Task Processors installed on the :APOGEE Prepress System. These Task Processors are divided into four catego-ries: Input, Processing, Output and Print.
You can create as many Parameter Sets as you need and manage them from the System Overview window. Once created, you can access the Parameter Sets in the System Overview window as well as in the Production Plan of the Job Ticket or Hot Ticket. You can immediately select the Parameter Set you need for the Production Plan you are building.
:APOGEE PREPRESS 7.0 Tutorial

13 BASIC ADMINISTRATIVE TASKS 153
All Task Processors are installed with Initial Settings. These are factory settings that cannot be changed or deleted. You can define additional Parameter Sets and save them under different names. Only administrators can create or edit Parameter Sets.
Creating Parameter Sets
To create a Parameter Set from the System Overview
1 Open the System Overview window.
2 In the Task Processors pane, select PDF Render.
The PDF Render resources appear in the Resources pane. As administrator you can see more resources than the operators.
3 Double-click the Parameter Sets icon.
The Parameter Sets window for PDF Render appears. The top half of this window displays a diagram of the PDF Render. The bottom half displays the name of the selected PDF Render Operation and its Initial settings. Depending on which Operation you select in the upper part, you will see the corresponding Parameter Set in the bottom part.
:APOGEE PREPRESS 7.0 Tutorial
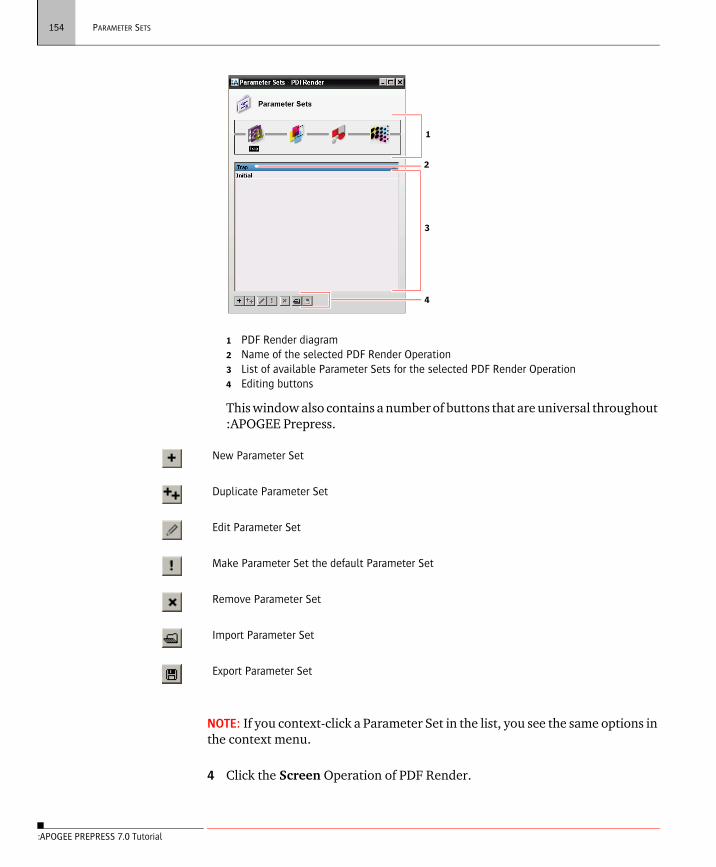
154 PARAMETER SETS
This window also contains a number of buttons that are universal throughout :APOGEE Prepress.
NOTE: If you context-click a Parameter Set in the list, you see the same options in the context menu.
4 Click the Screen Operation of PDF Render.
1 PDF Render diagram2 Name of the selected PDF Render Operation3 List of available Parameter Sets for the selected PDF Render Operation4 Editing buttons
1
2
3
4
New Parameter Set
Duplicate Parameter Set
Edit Parameter Set
Make Parameter Set the default Parameter Set
Remove Parameter Set
Import Parameter Set
Export Parameter Set
:APOGEE PREPRESS 7.0 Tutorial

13 BASIC ADMINISTRATIVE TASKS 155
5 Click New to create a Parameter Set.
The Parameter Set window for the Screen Operation appears.
TIP: You can control if this Parameter Set is locked or unlocked when used in Tickets using the Lock in Production Plan option.
6 In the Name box, type ABS140ELL.
You will create a Parameter Set that includes Agfa Balanced Screening with a line frequency of 140 and an elliptical dot shape.
7 Ensure that the Use single settings for all content option is selected.
8 In the Screen tab, ensure that the Fixed Screen option is selected, and set the following:
Screen type: ABS (Agfa Balanced Screening)
Frequency: 140
Dot Shape: Elliptical
NOTE: The availability of line screens depends on the resolution of your output device.
9 Click OK.
:APOGEE PREPRESS 7.0 Tutorial

156 PARAMETER SETS
The new Parameter Set is immediately added to the list. The next time you create a new Ticket or edit an existing Ticket, this Parameter Set will be avail-able in the Ticket Editor.
10 Context-click the new Parameter Set in the list and select Set Default from the context menu to set this Parameter Set as the default Parameter Set.
11 Close the Parameter Sets window.
Managing Parameter Sets
To edit an existing Parameter Set from within the System Overview
1 Open the System Overview window.
2 In the Task Processors pane, select Export.
3 Double-click the Parameter Sets icon in the Resources pane.
4 Edit the PDF2File-student Parameter Set.
5 Click the Thumbnails list and select Exclude thumbnails.
6 Click OK to save your changes.
7 Close the Parameter Sets window.
Currently, all Hot Tickets and Ticket Templates which use the PDF2File-student Parameter Set are out of date (the Thumbnails As is option is still selected). You therefore need to update these tickets as described below.
:APOGEE PREPRESS 7.0 Tutorial

13 BASIC ADMINISTRATIVE TASKS 157
To update a Parameter Set used in Hot Tickets and Ticket Templates
1 From the System Overview, select File > Check Consistency.
2 Click the Verify and Update button.
As indicated in the Consistency Report, the Export Hot Ticket is updated to match the new PDF2File-student Parameter Set settings.
3 Close the Consistency Report and Consistency Check windows.
To create a Parameter Set from within the Job Ticket Editor
1 Select File > New From Templates.
2 From the Category list, select Blank.
3 From the Template list, select Blank Job.
4 Click Open.
The Ticket Editor appears.
5 Select the Plan tab.
6 Drag the Hot Folder to the plan, select the Hot Folder and unlock the settings.
7 Change the Hot Folder path to $JOB.
8 Change the Parameter Set name from *Initial to JOB.
9 Lock the Parameter settings again.
10 In the Production Plan, click the expansion triangle below the Hot Folder Task Processor and select Save As from the list of options.
:APOGEE PREPRESS 7.0 Tutorial

158 MANAGING TICKET TEMPLATES
11 Click Save to save the current Hot Folder settings as a Parameter Set with the name JOB.
To make a Parameter Set the default
1 In the Production Plan, click the expansion triangle below the Hot Folder Task Processor and select Manage Parameter Sets from the list of options.
The Hot Folder Parameter Sets dialog box is displayed.
2 Select the JOB Parameter Set and click the Make Default button.
The Parameter Set name is highlighted in bold to indicate that this is the default Parameter Set. This Parameter Set will be automatically selected when you drag this Task Processor to a Production Plan.
3 Close the Parameter Sets window and quit the Ticket Editor without submit-ting the job.
Managing Ticket Templates
You can create a Ticket Template, starting from either an existing ticket or an empty ticket. You can save your ticket as a template that will become available to all :APOGEE Prepress Clients. Ticket Templates are saved in a dedicated direc-tory that is accessible to all :APOGEE Prepress users.
:APOGEE PREPRESS 7.0 Tutorial

13 BASIC ADMINISTRATIVE TASKS 159
To create a Ticket Template
1 From the Hot Tickets window, choose File > New From Templates.
2 From the Category list, select Blank.
3 From the Template list, select Blank Hot Ticket.
4 Click Open.
5 In the Administration tab, type Template_1-student in the Hot Ticket name box.
6 In the Plan tab, build a Production Plan containing the following components:
Hot Folder
PDF Render
TIFF Platesetter
Press
7 Do not submit the Hot Ticket. Follow the procedure below to create a Template from the ticket.
To save the Hot Ticket as a Hot Ticket Template
1 In the Ticket Editor window, choose File > Save as Template.
2 In the Template window, click the New button to create a new entry in the Category list.
3 In the Hot Ticket Template Category dialog box, type My Templates and click OK.
4 Click the My Templates Category to open it.
5 In the Template dialog box, enter the following information:
Name: My first template
Description: Use this template for customer X.
:APOGEE PREPRESS 7.0 Tutorial

160 MANAGING TICKET TEMPLATES
6 Click Save.
Your template is now available on the system.
7 Close the Ticket Editor window without submitting the Template_1-student Hot Ticket.
To create a Ticket Template from an existing job
1 In the Job List, context-click the 000-0009-student - Create Job Tickets job and select Save as Template from the context menu.
2 In the Template window, select Tutorial from the Category list.
:APOGEE PREPRESS 7.0 Tutorial

13 BASIC ADMINISTRATIVE TASKS 161
3 Click Save.
The Create Job Tickets job is now available as a template.
To edit an existing Ticket Template
1 Open the System Overview window.
2 In the Hardware pane, click the :APOGEE Prepress System icon.
3 In the Resources pane, double-click the Templates Resource.
4 Click the Job Tickets tab.
5 Select Tutorial from the Category list.
:APOGEE PREPRESS 7.0 Tutorial
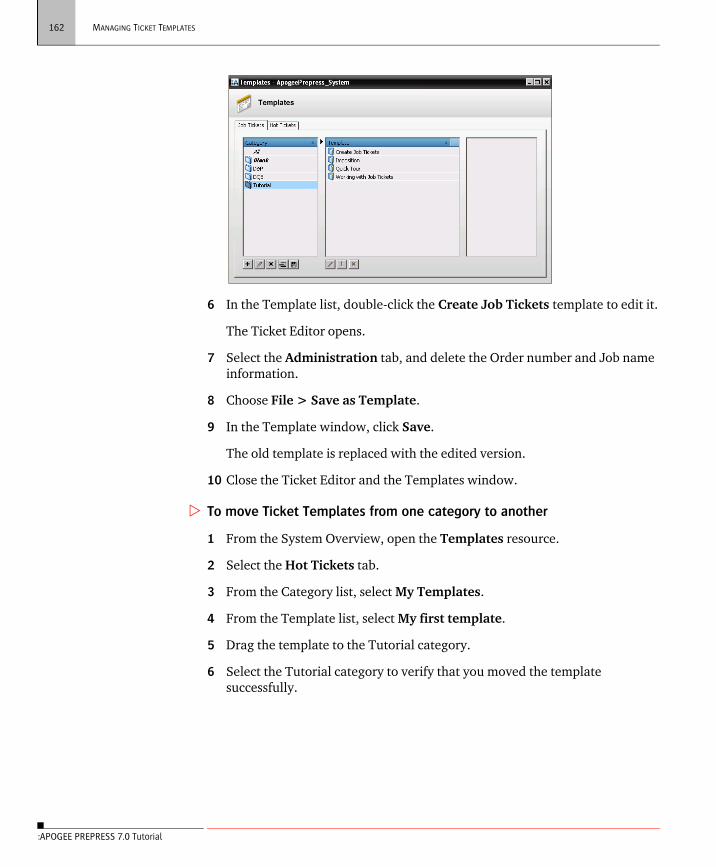
162 MANAGING TICKET TEMPLATES
6 In the Template list, double-click the Create Job Tickets template to edit it.
The Ticket Editor opens.
7 Select the Administration tab, and delete the Order number and Job name information.
8 Choose File > Save as Template.
9 In the Template window, click Save.
The old template is replaced with the edited version.
10 Close the Ticket Editor and the Templates window.
To move Ticket Templates from one category to another
1 From the System Overview, open the Templates resource.
2 Select the Hot Tickets tab.
3 From the Category list, select My Templates.
4 From the Template list, select My first template.
5 Drag the template to the Tutorial category.
6 Select the Tutorial category to verify that you moved the template successfully.
:APOGEE PREPRESS 7.0 Tutorial

13 BASIC ADMINISTRATIVE TASKS 163
7 Close the Templates window.
To delete Ticket Templates and categories
1 From the System Overview, open the Templates resource.
2 Select the Hot Tickets tab.
3 From the Category list, select Tutorial.
4 From the Template list, select My first template.
5 Click the Delete button on the keyboard, or click the Delete button in the Template window.
6 Click Yes to confirm.
7 Select and delete the My Templates category.
8 Close the Templates window.
:APOGEE PREPRESS 7.0 Tutorial

164 VARIABLES OVERVIEW
Variables Overview
The Variables overview is an additional and very useful Help menu item, which is especially interesting for System Administrators. This document provides an overview of all :APOGEE Prepress variables, and explains where they can be used within the :APOGEE Prepress application.
To access the Variables overview
Choose Help > Variables.
Providing Support Information
In this section, the following topics are discussed:
Troubleshooting the system
Troubleshooting the client
Troubleshooting the System
In the event that you experience any problems with your :APOGEE Prepress System, you can create a profile that provides the system information that the Agfa Support Staff need.
To generate a System Report
1 In the System Overview window, choose: Help > :APOGEE Prepress Report > Extended.
For Macintosh 10.x users, go to :APOGEE Prepress > :APOGEE Prepress Report > Extended.
The report is created. Your Web browser opens and displays the report. You can save the report and e-mail it to the support staff.
:APOGEE PREPRESS 7.0 Tutorial

13 BASIC ADMINISTRATIVE TASKS 165
2 Close the System report.
To dump a job
If your problems are related to a specific job, you can create a dump of that job. By dumping a job you create a snapshot of all the job information, which will help the support department to locate the problem.
In the Job List, context-click the Export-student - Apogee PDFProof 4Pages job, and select Export > Job Dump from the context menu.
An Archive job icon appears in front of the job name.
When the Archive icon disappears, the job is dumped. You can find the archived job in the shared ArchiveRoot.
The format of a job dump is different from the Archive format: A job dump is a single zip file containing the job archive, all used job resources, the Job Ticket, extended report, debug info, JobLog, Windows Event Viewer logs and used Task Processor configuration settings. Because of the extra information that is included, Agfa strongly recommends that you provide job dumps (instead of Job Archives) when reporting problems.
NOTE: Creating a job dump does not mark the job as archived: When the job is finished, regular job archival settings will still be functional.
:APOGEE PREPRESS 7.0 Tutorial

166 PROVIDING SUPPORT INFORMATION
Troubleshooting the Client
In the event that you experience any problems with your :APOGEE Prepress Client, the support staff may need to know the Client installation details.
To consult the Client installation information
Choose Help > About :APOGEE Prepress.
For Macintosh 10.x users: go to :APOGEE Prepress Menu > About :APOGEE Prepress.
You will find the Client installation information on the splash screen.
:APOGEE PREPRESS 7.0 Tutorial

Index
A
access level 26Actions
flow control Actions 61result Actions 61
Activityindicator 29monitor 55pane 54
adding placeholders to Run List 126
Administration tabfilling in 58
administrator information 147
APOGEE Prepressdefinition 16Online Help 38options 19starting 25
APOGEE Prepress Clientinstallation
information 166troubleshooting 166
Apogee Prepress Clientdescription 17
APOGEE Prepress ProductsAutomate 18Control 18Manage 18PDF&Proof 19PlateMaker 18Proof 18Render 18
APOGEE Prepress Systemmonitoring 149starting 147stopping 148troubleshooting 164
Artwork tab 136Automate Product 18
C
Collect For Outputconfiguring 129
configuringCollect For Output 129Hot Folder 64Impose 128PDF Render 67Run List 119
consulting APOGEE Prepress Client installation information 166
Control Product 18creating
a new Hot Ticket 57a Parameter Set 152a Run List 122Job Tickets 115
D
dumping a job 165
E
editingHot Tickets 73Job Tickets 115
error messages 94Export
creating a Parameter Set 141
creating a Production Plan 143
definition 141ExportRoot 142
F
FiltersJob List 86Message Board 89Output Devices 90Quick 85
flow
adding to Plan 77Flow Identifiers
definition 75types 76
G
generating a System Report 164
H
Help online 38hiding panes 35Hot Folder
configuring 64definition 49
Hot Ticketsadministration 45create new 57definition 41editing 73options tab 46plan tab 47using 69
Hot Tickets window 31administration tab 32Options tab 32plan tab 32
I
icon overview 38Impose
configuring 128information message 93inputting a document 52installation information
APOGEE Prepress Client 166
J
jobdumping 165priority 46
167

168
Job Layout pane 54Job List
filtering with Output Devices pane 90
Job List filteractivating 87definition 86displaying 86
Job Status icon 56Job Tickets
administration 105creating and
editing 115definition 103Options tab 105Pages tab 107Plan tab 106Results tab 108
Jobs window 29Administration tab 30job details 29job list 29Options tab 30pages tab 30Plan tab 30product tab 30, 32Results tab 30
L
Logging on to APOGEE Prepress 25
M
Manage Product 18manipulating the Run
List 124Message Board
opening 95Message Board filter
displaying 89message indicator 94messages
error 94information 93types 93user interaction
required 93warning 94
monitoring the APOGEE
Prepress System 149
N
navigation bar 28Normalizer
definition 109settings explained 117
notifications 46
O
Online Helphow to use 38
options 19output devices
setting offline 152setting online 152
Output Devices pane filter 90
P
Packagingadvanced Production
Plan 137basic Production
Plan 133Packaging JDF 137panes
hiding 35resizing 36
Parameter Setcreating 152creating for Export 141definition 152
PDF Renderconfiguring 67definition 50Render 50Screen 50Separate 50settings explained 65Trapping 50
PDF&Proof Product 19PJTF imposition
definition 127using in a Job
Ticket 127working with 127
placeholdersadding to Run List 126
PlateMaker Product 18Preflight
checking the Preflight status 121
configuring 119Press
definition 51Problem Reports 95Production Plan
adding a flow 77building 59, 61definition 48, 59
Proof Product 18providing support
information 164
Q
Quick filter 85Quick Tour 25
R
rearranging the Run List 124
Render Product 18resizing panes 36Results tab
job results 54Run List
adding pages 130adding
placeholders 126configuring 119creating 122definition 110manipulating 124rearranging 124
S
separationsviewing 71
Separations pane 54shortcuts
overview 38starting
APOGEE Prepress System 147
Task Processors 151status
Task Processors 149
:APOGEE PREPRESS 7.0 Tutorial

169
Step and Repeat 135stopping
APOGEE Prepress System 148
Task Processors 151support information
providing 164System Overview
window 33hardware pane 33resources 34task processors 33
System Reportgenerating 164
T
Task Processor
starting and stopping 151
status 149Ticket Templates
categories 39definition 39managing 158
TIFF Platesetter 51image 51output 51
troubleshootingAPOGEE Prepress
Client 166APOGEE Prepress
System 164Tutorial
how to use 20
U
user interaction required messages 93
V
variables 164Variables overview 38, 164
W
warning messages 94welcome 15Window menu 34
:APOGEE PREPRESS 7.0 Tutorial

170
:APOGEE PREPRESS 7.0 Tutorial