app inventor tut o r i a l: r o ck pa p e r s ci s s o r s...
TRANSCRIPT

App Inventor Tutorial: Rock Paper Scissors
Introduction Rock Paper Scissors on an app will just exactly what it will do in a game with your friend, except instead of a friend, you’ll be playing with a computer instead! Now, all we have to do is to program the computer to learn how to play this game. So how does computers work? Computers follow commands. Think of it like a student, with you being the teacher. You must give a set of instructions for the computer to understand and follow. For example, you must tell the computer it has to put out a either a rock, paper, or scissors so the winner between the two of you can be determined!
MIT App Inventor 2 Interface Now, let’s familiarise ourselves with the MIT App Inventor 2 Interface.
Rock Paper Scissors Tutorial By Carly Lam, Australia [email protected]
1

Here is the Designer view:
- Palette: This part allows the user to put features onto their Screen by dragging it onto the part of the Screen you want it go. It includes features like textbook, button, checkbox, password inputer… etc.
- Screen/Viewer: The Screen is a view of what will appear on your phone screen when you open this
app that you have created.
- Components: This is a list of what you have on your Screen.
- Properties: This displays a list of properties of whatever you have clicked on in Components. For example, if you select ‘Screen 1’, it will give you options to edit the background colour, alignment, description... etc.
Visible and Non-Visible Components: As you know, when you click a button, a non-visible set of commands are ran to ensure that what is supposed to happen when you click a button will happen. The command part is known as the non-visible components, while the button itself would be a visible component.
Rock Paper Scissors Tutorial By Carly Lam, Australia [email protected]
2

Block View: If you follow the prompt “Click This” to select “Blocks”, you will open up Block View. In this view you will be inputting the programming behind the app itself. From the left box of “Blocks” you can drag in command lines to compile your program. There will be more details on how to create ‘Rock Paper Scissors’ further down.
Rock Paper Scissors Tutorial By Carly Lam, Australia [email protected]
3

Layout Here are the basic design of the game itself. You should be aware of including the following features on the pages!
Here are some sample interface designs:
Rock Paper Scissors Tutorial By Carly Lam, Australia [email protected]
4

As you can see, the start screen is made up of (from top to bottom) an image, choice of gamemode (3 buttons). The play-screen also consists of a screen showing the players’ choices, 3 images of the 3 choices. Here is a close look at the layout arrangements:
Rock Paper Scissors Tutorial By Carly Lam, Australia [email protected]
5
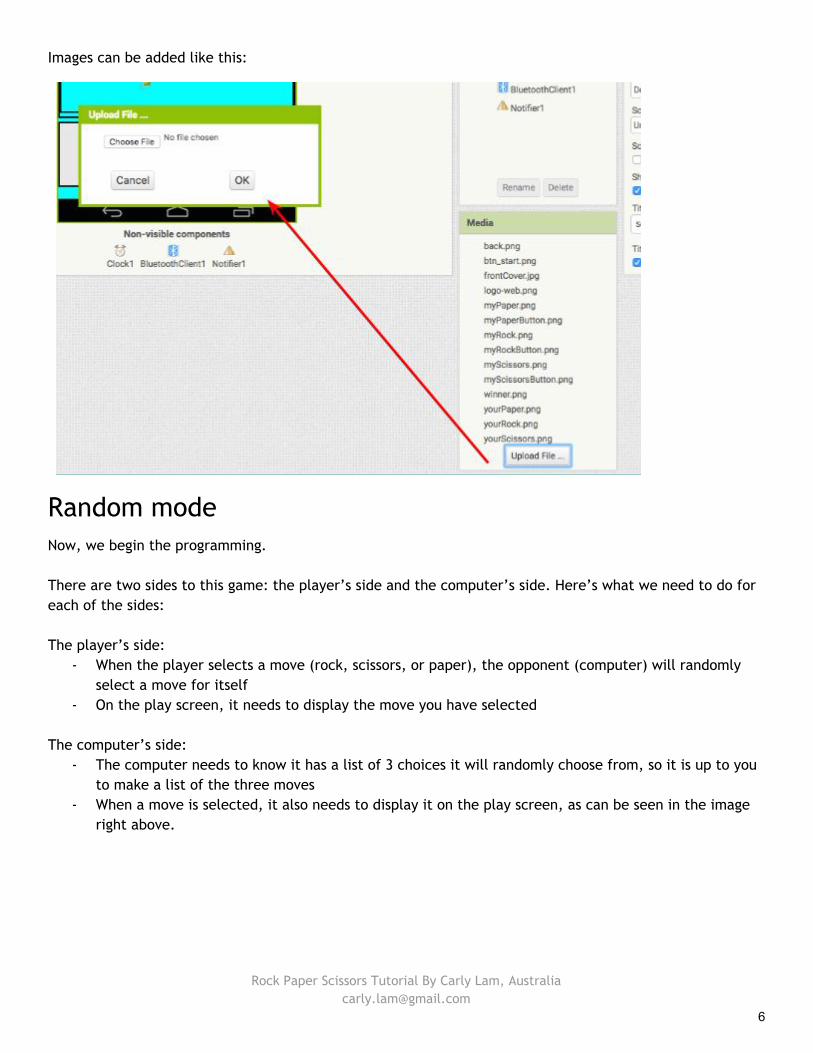
Images can be added like this:
Random mode Now, we begin the programming. There are two sides to this game: the player’s side and the computer’s side. Here’s what we need to do for each of the sides: The player’s side:
- When the player selects a move (rock, scissors, or paper), the opponent (computer) will randomly select a move for itself
- On the play screen, it needs to display the move you have selected The computer’s side:
- The computer needs to know it has a list of 3 choices it will randomly choose from, so it is up to you to make a list of the three moves
- When a move is selected, it also needs to display it on the play screen, as can be seen in the image right above.
Rock Paper Scissors Tutorial By Carly Lam, Australia [email protected]
6

Let’s begin writing the programming behind the buttons of this game.
With this rock button, we want the App to register that when it is clicked, it is the move selected by the player and now the computer opponent must make its move. What you want would be something like this: when click on rock do set myMove’s image to “myRock.png” set opponent’s image to item randomly picked from opponent’s list set opponent’s image to “your____.png” (whatever the opponent ended up selecting, e.g. your Rock.png) In ‘Blocks View’, it’ll look like this:
Part 1: This section give the opponents their list of choices (rock, paper, and scissors). Part 2: This initialises the opponent’s move, so that when the game begins, the opponent’s move would be set back to nothing - it won’t make a move until the player has made theirs.
Rock Paper Scissors Tutorial By Carly Lam, Australia [email protected]
7

Part 3: This section is the player’s move, where upon selection of a move, the correct image correlating to the choice would be selected, and the computer opponent would be prompted to make a move. The next step is to determine who the winner is. We’ll do this by giving the winner a winner label. The logic behind this is also quite simple: If the player had chosen paper, and Opponent chooses paper: result = tie
- Do nothing Opponent chooses scissors: result = opponent win
- Show a winner label on opponent’s side Opponent chooses rock: result = player win
- Show a winner label on player’s side In ‘Blocks View’, it’ll look like this:
Rock Paper Scissors Tutorial By Carly Lam, Australia [email protected]
8
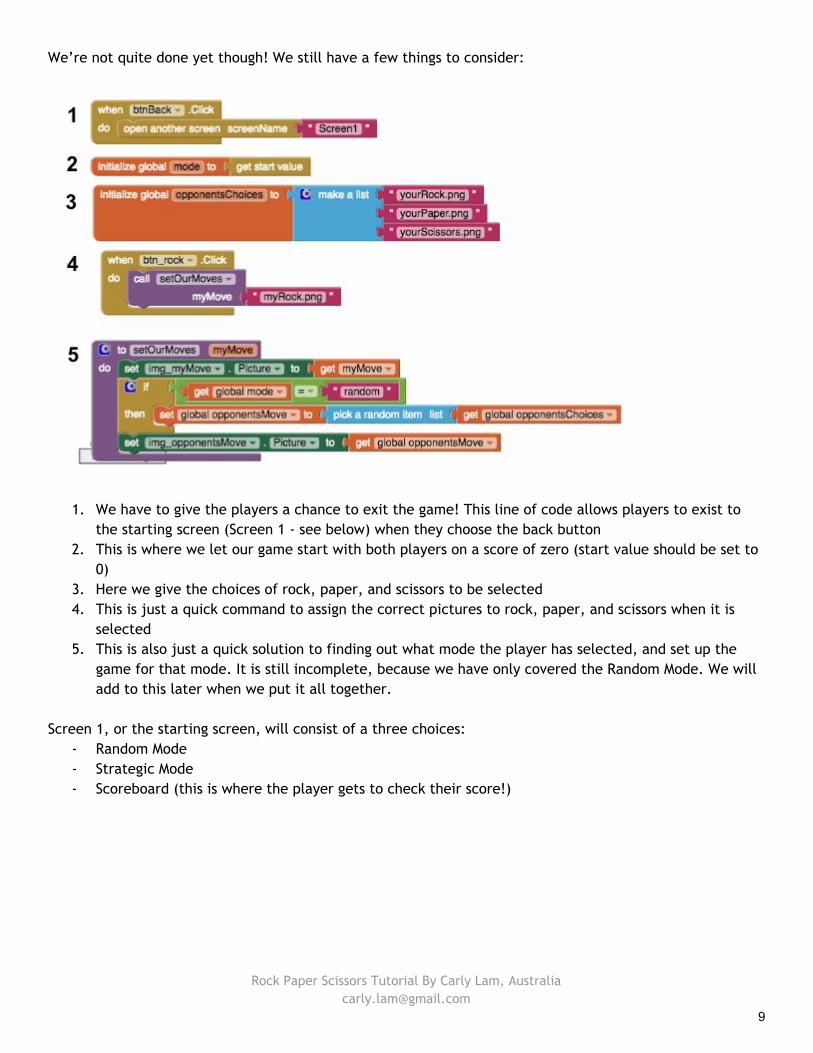
We’re not quite done yet though! We still have a few things to consider:
1. We have to give the players a chance to exit the game! This line of code allows players to exist to the starting screen (Screen 1 - see below) when they choose the back button
2. This is where we let our game start with both players on a score of zero (start value should be set to 0)
3. Here we give the choices of rock, paper, and scissors to be selected 4. This is just a quick command to assign the correct pictures to rock, paper, and scissors when it is
selected 5. This is also just a quick solution to finding out what mode the player has selected, and set up the
game for that mode. It is still incomplete, because we have only covered the Random Mode. We will add to this later when we put it all together.
Screen 1, or the starting screen, will consist of a three choices:
- Random Mode - Strategic Mode - Scoreboard (this is where the player gets to check their score!)
Rock Paper Scissors Tutorial By Carly Lam, Australia [email protected]
9

They should be written as the following:
To add a new screen, you’ll need to do this (you will need to have a separate screen for Screen 1 so the computer knows that these are for the two different screens you have: a starting screen and the game screen):
Rock Paper Scissors Tutorial By Carly Lam, Australia

Strategic Mode Strategic Mode differs from Random Mode in that the programmer (you!) get to make up a sequence of moves in a list for the computer opponent to execute. You can then memorise this list and be able to beat the computer opponent every round! An example would look something like this:
1. Paper 2. Scissors 3. Scissors 4. Paper 5. Rock 6. Paper 7. Rock
But before we give this sequence to the computer, let’s consider a few questions first: How many moves should be in the list?’ How are you retrieving items (a single section of the sequence) from the list? How do you know which item you’ve already gone past and move onto the next item on the list? How do you check that you've reached the end the list so you can go back to the beginning? Solutions: To begin solving these above questions, we can first make the physical list of your pattern, as can be seen below:
Part 1: Is the physical list itself Part 2: Like the one we have seen in Random Mode, this also initialises the list so that it will start on 1
Rock Paper Scissors Tutorial By Carly Lam, Australia [email protected]
11

Part 3: This section tells the computer to keep going down the list so it doesn’t get stuck in one place and knows exactly where to go
Putting it All Together Now that you have the components to both Random Mode and Strategic Mode, let’s put it all together and add more so that the game functions. We’ll begin with programming what happens on our first screen, when the player either selects Random Mode or Strategic Mode:
Rock Paper Scissors Tutorial By Carly Lam, Australia [email protected]
12

Next, let’s keep track of our scores:
Rock Paper Scissors Tutorial By Carly Lam, Australia [email protected]
13

This part, when recognising a win on either player or opponent side, will increment the score by 1. Next, we will keep track of the scores by assigning a tag called ‘MY_SCORE’ and ‘OPPONENT_SCORE’ for the player and the computer opponent which calls the result we get from the game. If there is no tag, then it is automatically assigned a 0.
Now, we can program the reset score button, which will clear the score completely:
Finally, when we initialise the game, we will have to hide away a few things, like scoreboard (because no one has any score yet!).
Rock Paper Scissors Tutorial By Carly Lam, Australia [email protected]
14

We will also prepare for the screen with just the scoreboard, which will just have the scoreboard visible with the appropriate scores and text shown.
Rock Paper Scissors Tutorial By Carly Lam, Australia [email protected]
15