applying decals · 2019-10-22 · applying decals ed mate - september 2019 what follows are the...
TRANSCRIPT

Applying Decals Ed Mate - September 2019
What follows are the techniques I’ve developed for applying decals. I’ll start with telling you that I hate decals (yes, hate; that probably should be spelled with a capital H). If I have an opportunity to paint a marking reasonably easily and it will look just as good or better than a decal, I’ll paint it. A good example of this are stripes – see another of my “how to” articles on painting Invasion Stripes. I can’t imagine why anybody would take on all of the frustrations decals can generate to apply Invasion Stripes to a model. So, knowing my true feelings about decals, you’ll understand that these techniques were developed through many trials and tribulations.
The first step for applying decals is planning. I try to find photos of the subject I am modeling and I compare the decals to the photos to get an idea about how they will fit. Some decal markings are too big or too small or don’t have the correct lettering font or shape or even color. Sometimes you will need to make a copy of the decal on paper and cut it out to see how it will fit on your model. Many times I’ve used the paper copy to make sure camouflage paint or ID bands or other markings will fit with the decal. This is especially true of artwork on P-47 cowls with color theatre bands on the front. It is better to know where to paint rather than have to repaint to allow a decal to fit. …and if you find the issue when your decal is wet and applied to the model, you’ll really be kicking yourself.

Notice how tightly the Dallas Blonde artwork decal fits on the cowl of this model. I had originally painted the yellow strip behind the panel line with the red reaching the panel line. Fortunately I discovered how tight the fit was with a paper copy of the decal – just wish I had done the work before painting. I sanded off the original red and yellow paint, re-primed with white and did the work a second time to move the yellow strip forward to straddle the panel line. That’s a Barracudacal decal on a Tamiya P-47. The black and yellow cowl checks are painted.

Here is another one with Super Scale decals. Notice how tightly Penny fits on the nose of this Trumpeter kit. The “Rescue” button is a fixed detail on the fuselage. The space between “AIR” and “FORCE” accommodates the rescue markings. The whole strip of “U. S. AIR” had to be checked to make sure there was room enough for Penny. Things are a bit tighter than the real thing.

So plan ahead and save yourself some headaches (or expletives that can be heard throughout the house). If available, you might choose a different brand of decal markings for your model because the size, or color, or font are better for your project. There have been times that the markings on my model are a mix-n-match of various brands of decals.
OK on to the work! Like many modelers, after I am done painting the model, I spray a coat of Future to prepare the surface for decals. To avoid the dreaded “silvering”, decals must be applied to a smooth surface so that no air gets trapped underneath. However, just because a coat of Future has been applied, it does not mean the surface is smooth enough. I’ve noticed especially with grays and greens that one coat of Future isn’t enough. This will vary with the brands of paints you use. I never converted to the various types of acrylic paints so all of my experience is with enamels. Once the first coat of Future is dry, I wet-sand all of the locations the decals will be applied with a 6000 grit sanding pad. Clean the residue off as you go as it can be much harder to remove if it has dried on the model. After the sanding is done, I spray another coat of Future and check things again. You will develop a feel for smoothness eventually – start with checking the smoothness after the first coat of Future and compare it to the feel right after sanding.

Photo of painted wing coated with Future:
Photo of painted wing coated with Future and sanded:
Can you see the difference? No? You’re not going to see much difference; that’s the point, you have to feel the difference.

Wet sand the Future coated surface with a 6000 grit sanding pad. Sometimes you think the surface was smooth enough, but after several decals silver, you conclude it wasn’t enough. If you have spare decals, you can remove them and start over. However, most of us don’t have that option so another technique to salvage the project is to apply the remaining decals onto a spot of wet Future. Put down a thin coat of Future with a brush, then apply the decal on top of it. If you use this technique do not use decal solvents! Future does not play nice with Micro-Set and it is even worse with Micro-Sol. I don’t use this technique as a standard procedure, but I’ve used it to salvage some F-15 Eagle and A-4 Skyhawk projects where the surfaces were not as smooth as I thought.

For most decals I use a shallow plastic tray with luke-warm tap water about ½” deep. For thicker Japanese decals that come in Hasegawa and Tamiya kits, I first try to avoid them altogether; but when there is no other choice, I use a different technique that uses hot tap water. Hold a decal in a tweezers and dip it in the water; make sure the entire decal gets wet. Roll or submerge deeper for those decals that curl upon hitting the water. Keep the decal in the water for about 15 seconds to make sure the decal paper has soaked up the water. Take the decal out of the water and place it on a clean spot on your bench while you wait for the decal to come free. When I have decals that take a long time to come free, I’ll dip about 3 decals to speed things along. Just take care if you do this to not misplace one and find it later applied to the outside of your hand (look at the location where you rest your hand on your bench). I use the opposite end of the brush I use for applying the decals to gently push on the decal to see when it will move freely on the paper.

Photo of dipping decal showing curl – be sure to get the entire decal wet.
When I’m ready to move the wet decal on the paper to the model, I dip my brush in Micro Set and “paint” it around the location for the decal. The wet spot won’t stay uniform and will start beading up on the smooth surface, but that’s OK; just make sure there is plenty of Set on the model to help float the decal so it can move on the surface. Pick up the wet decal on the paper with a tweezers and hold it above the spot it will go on the model. Use the brush wet with Set to move the decal to the edge of the paper. Place that edge on the model and slide the decal partially off the paper onto the model. Use the brush to hold the part of the decal on the model and pull the paper out from under the decal with the tweezers. Now with the decal on the model, position it to the final location with the wet brush. Sometimes, more water or more Set is needed to help float the decal so it moves easier. Once the decal is where I want, I’ll use a bit of paper towel to wick up the extra water or Set (most brands will do; you don’t have to have Bounty – the quicker picker-upper). At this point, on large decals, I may gently brush from center toward the outside edges to help remove any trapped air bubbles.
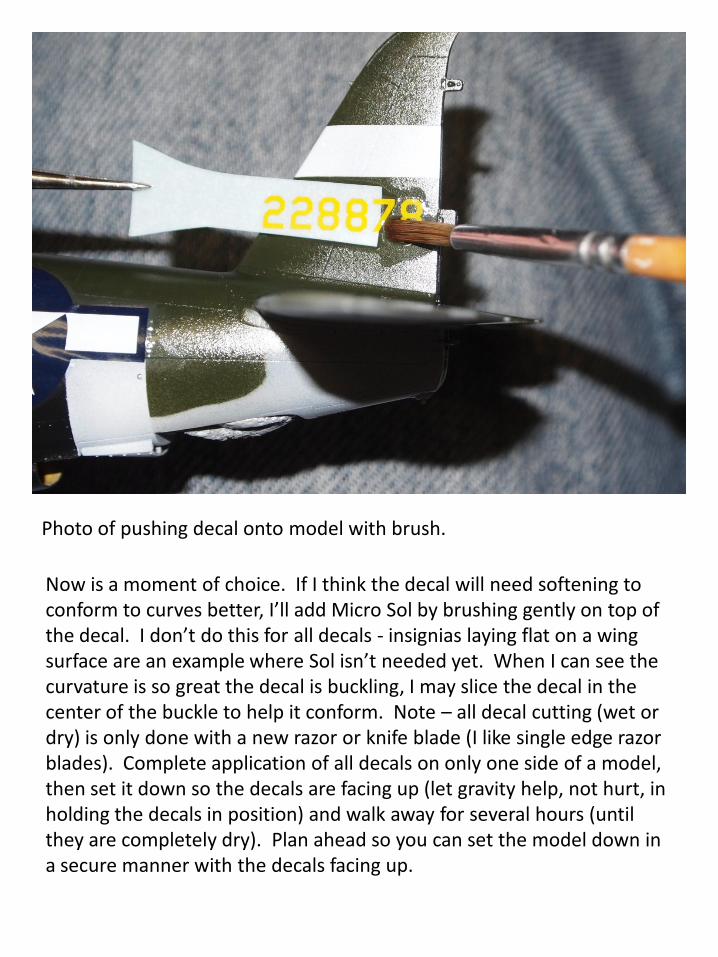
Photo of pushing decal onto model with brush.
Now is a moment of choice. If I think the decal will need softening to conform to curves better, I’ll add Micro Sol by brushing gently on top of the decal. I don’t do this for all decals - insignias laying flat on a wing surface are an example where Sol isn’t needed yet. When I can see the curvature is so great the decal is buckling, I may slice the decal in the center of the buckle to help it conform. Note – all decal cutting (wet or dry) is only done with a new razor or knife blade (I like single edge razor blades). Complete application of all decals on only one side of a model, then set it down so the decals are facing up (let gravity help, not hurt, in holding the decals in position) and walk away for several hours (until they are completely dry). Plan ahead so you can set the model down in a secure manner with the decals facing up.
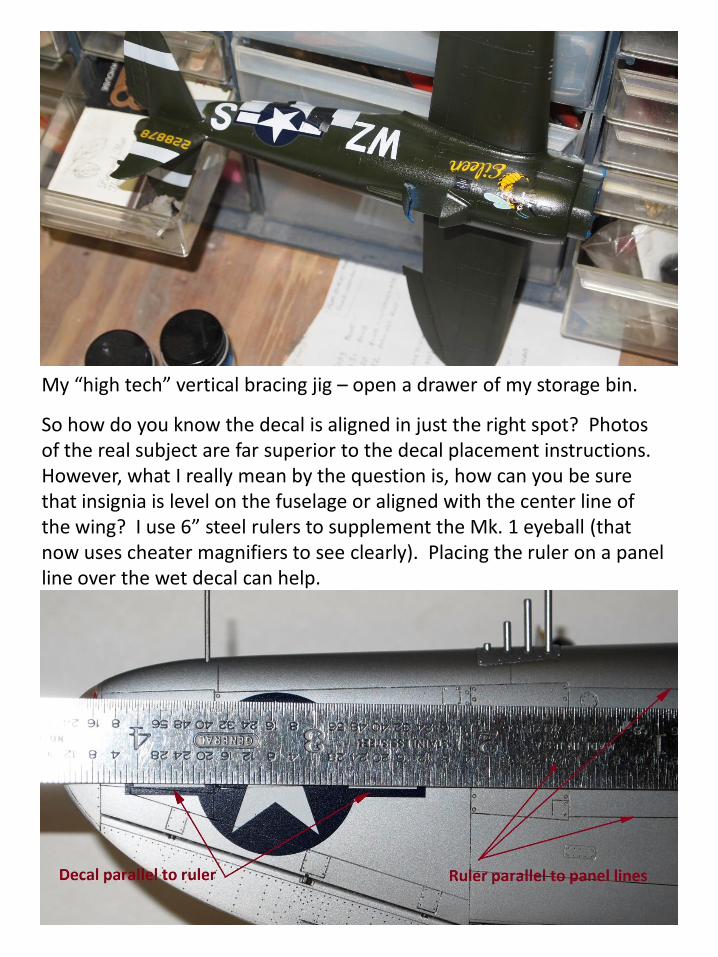
My “high tech” vertical bracing jig – open a drawer of my storage bin.
So how do you know the decal is aligned in just the right spot? Photos of the real subject are far superior to the decal placement instructions. However, what I really mean by the question is, how can you be sure that insignia is level on the fuselage or aligned with the center line of the wing? I use 6” steel rulers to supplement the Mk. 1 eyeball (that now uses cheater magnifiers to see clearly). Placing the ruler on a panel line over the wet decal can help.
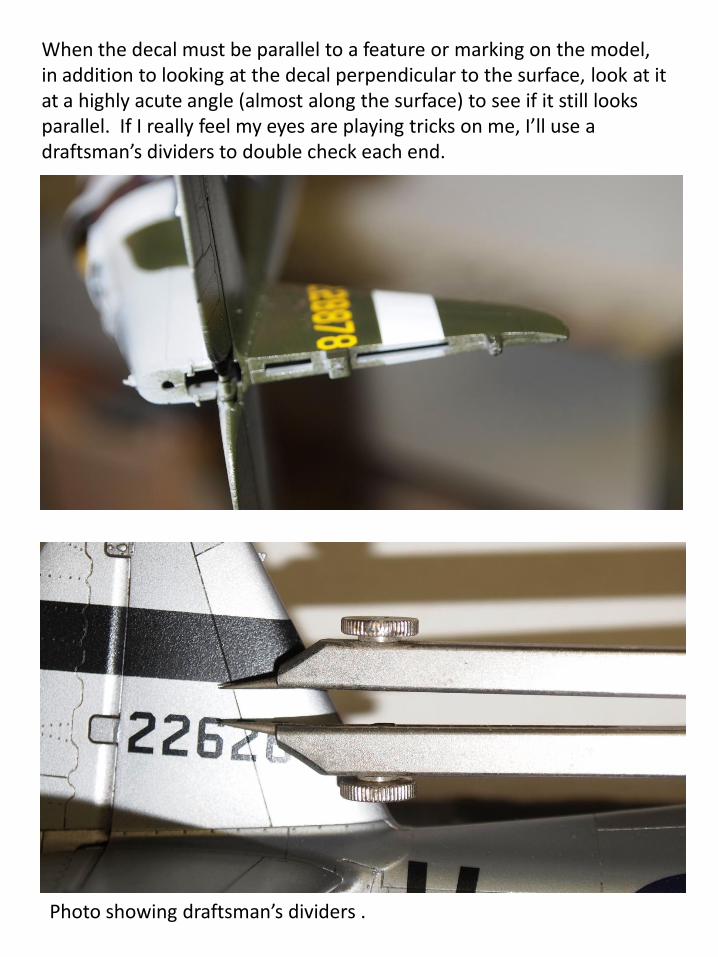
Photo showing draftsman’s dividers .
When the decal must be parallel to a feature or marking on the model, in addition to looking at the decal perpendicular to the surface, look at it at a highly acute angle (almost along the surface) to see if it still looks parallel. If I really feel my eyes are playing tricks on me, I’ll use a draftsman’s dividers to double check each end.

The decals are on the model and now dry, but rarely at this point am I happy with what I see. Issues to deal with are wrinkles, air bubbles, the decal didn’t sink into panel lines or other depressions, the decal is being held up by a bump underneath, or the dreaded silvering.
Wrinkles – slice along the wrinkle with a new blade, apply Sol, and wait to see how well things improve. Repeat if necessary.
Air bubbles – same as wrinkles; slice, Sol, wait, repeat.
Panel lines – much like the wrinkle, but I’ve added another technique to help get the decal to conform. After applying Sol, tap along the panel line with the ends of the bristles of the brush. I also back-drag my UMM scribing tool down the panel line over the decal – do not push, use only the weight of the tool!
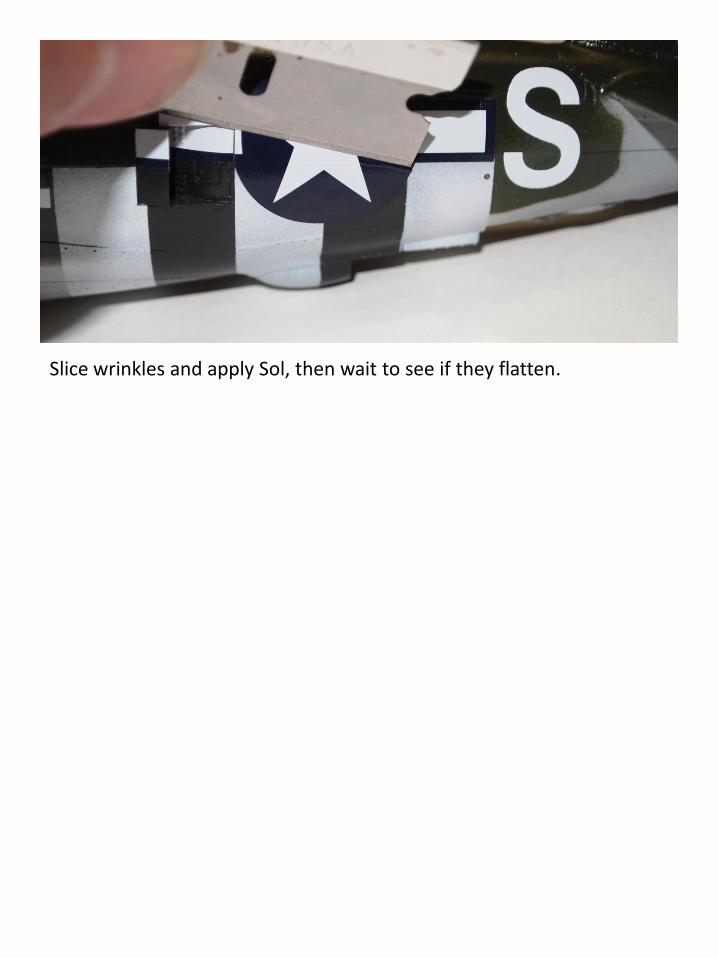
Slice wrinkles and apply Sol, then wait to see if they flatten.
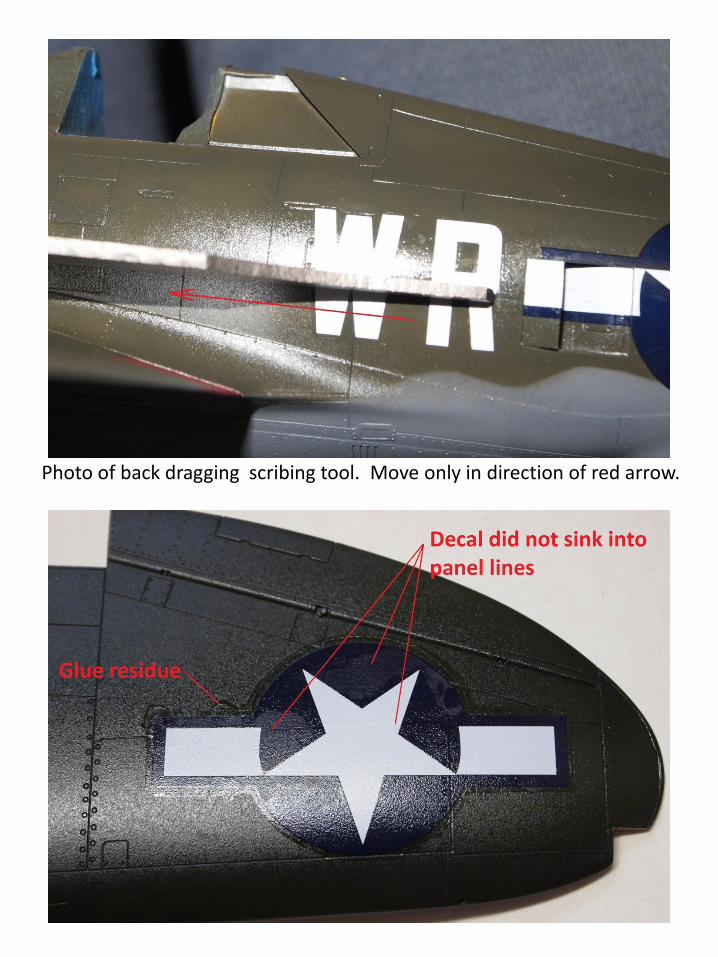
Photo of back dragging scribing tool. Move only in direction of red arrow.

Bumps – are always a pain. The general solution is a slice with a new blade, apply Sol, and wait to see how well things improve. This almost always includes dealing with a color gap by painting with matching paint or covering with bits of extra decal. The real question is where and when to slice, and the answer comes from experience. Sometimes I slice at the high spot of the bump during the original application while the decal is wet. If I’ve waited for the decal to dry then it is more practical to slice into the middle of the highest spot the decal is held off the model. The turbulators on the upper wing of the A-4 Skyhawk are an extreme challenge and I developed a plan ahead of time.
Photo showing a trapped air bubble under the decal. Also note how the decal now has sunken into the panel line after Sol and back dragging the scribing tool.
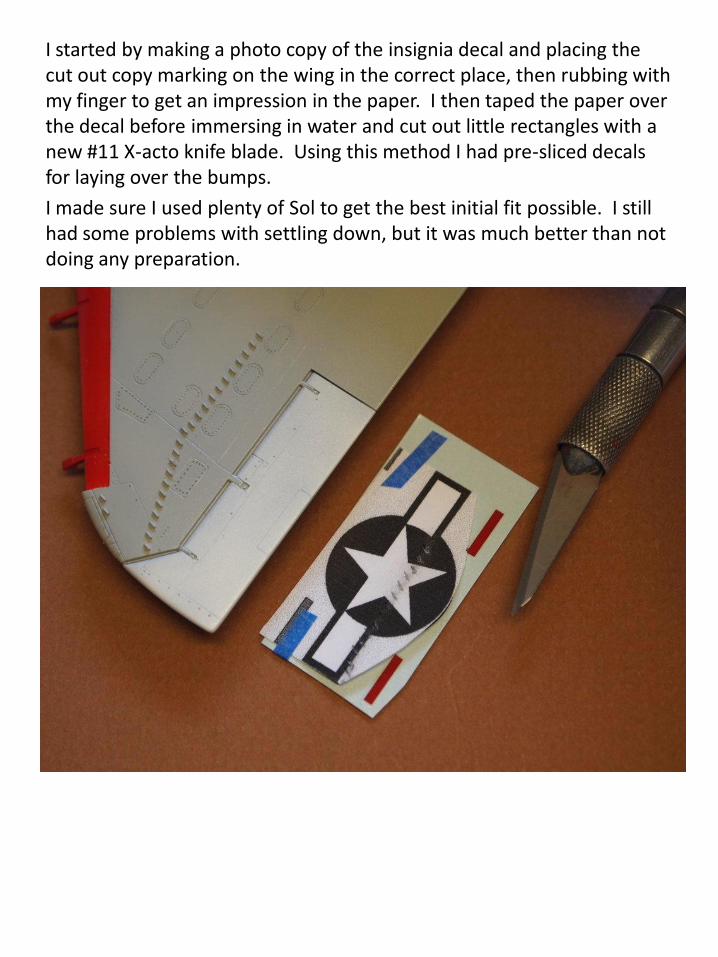
I started by making a photo copy of the insignia decal and placing the cut out copy marking on the wing in the correct place, then rubbing with my finger to get an impression in the paper. I then taped the paper over the decal before immersing in water and cut out little rectangles with a new #11 X-acto knife blade. Using this method I had pre-sliced decals for laying over the bumps.
I made sure I used plenty of Sol to get the best initial fit possible. I still had some problems with settling down, but it was much better than not doing any preparation.

An underside insignia on P-47s creates another bump issue. The identification lights must be painted and one of them always falls inside the insignia. The light rims are raised and don’t create much of an issue, but getting a sharp circular edge for the light can be a slicing frustration. I have paper templates for various sizes of under-wing insignias for use with a Waldron punch. I paint the light before decals, punch a hole in the insignia decal in just the right location, then apply the insignia with the hole over the light.

Silvering – arrrrrggh!!! (Good grief Charlie Brown) The general solution is a slice with a new blade, apply Sol, and wait to see how well things improve. I don’t have any special tricks over what anybody else may have written. Hopefully, you’ve come to understand that the best way to deal with silvering is to prepare carefully so it doesn’t show up at all. A smooth surface is critical. Remove what clear carrier you can ahead of time. Apply decal in a pool of Future to salvage a project when an epidemic breaks out.
Silvering or air bubbles – make multiple slices and apply Sol, then wait to see if it disappears. If not, repeat.

On this model of Dahlberg’s Thunderbolt, there was a fair amount of clear film in the code letters on the Super Scale decal sheet. I used a Waldron hole punch to clean out the clear film in the center of the “O”. I also cut apart the “FT” to remove most of the clear film between the “F” and the “T”. More care was needed to align the “F” and the “T”, but I found that much easier than dealing with silvering under the clear film. Note – when trimming the clear film away, leave some clear outside the ink to avoid the ink flaking away when wet. Having a little clear film will help later when I describe how to make the edges of the clear film disappear.
There ought to be some formula that describes the likelihood of silvering based on the percentage of clear carrier film. As the percentage of clear film grows compared to the area of ink, the higher the likelihood of silvering issues. For this reason I eliminate large areas of clear film when I can.

Eventually I get to the point where I’m done tinkering with the decals on the model. Wipe away any residue on the decal or model with warm water and a soft cloth. Sometimes I use a little Set or Sol to help remove the residue. Check to make sure there isn’t any lint on the model and spray another coat of Future to seal the decals.
Now let’s make the edges of the clear carrier film disappear. Gently wet sand the edges of the decals with a 8000 grit sanding pad. Work slowly and wipe away the water to check the progress. The idea is to sand the Future and perhaps a bit of the clear carrier film, but never sand so deep as to reach the ink.
Photo of decal after application and cleaning of residue.
Photo of decal after sealing with Future. Note that the carrier film edges are still prominent.
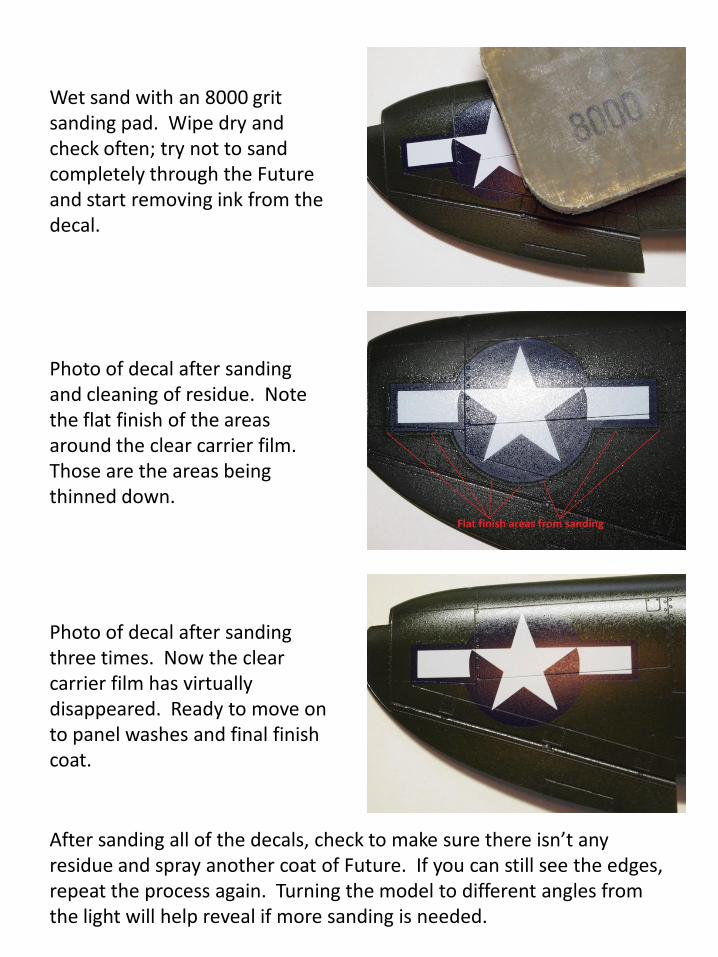
After sanding all of the decals, check to make sure there isn’t any residue and spray another coat of Future. If you can still see the edges, repeat the process again. Turning the model to different angles from the light will help reveal if more sanding is needed.
Wet sand with an 8000 grit sanding pad. Wipe dry and check often; try not to sand completely through the Future and start removing ink from the decal.
Photo of decal after sanding and cleaning of residue. Note the flat finish of the areas around the clear carrier film. Those are the areas being thinned down.
Photo of decal after sanding three times. Now the clear carrier film has virtually disappeared. Ready to move on to panel washes and final finish coat.
Natural metal finished models will be more finicky than camouflage paint. I once used some Hasegawa decals on a natural metal finish Starfighter and had to repeat the process about 5 times to get the edges to disappear.
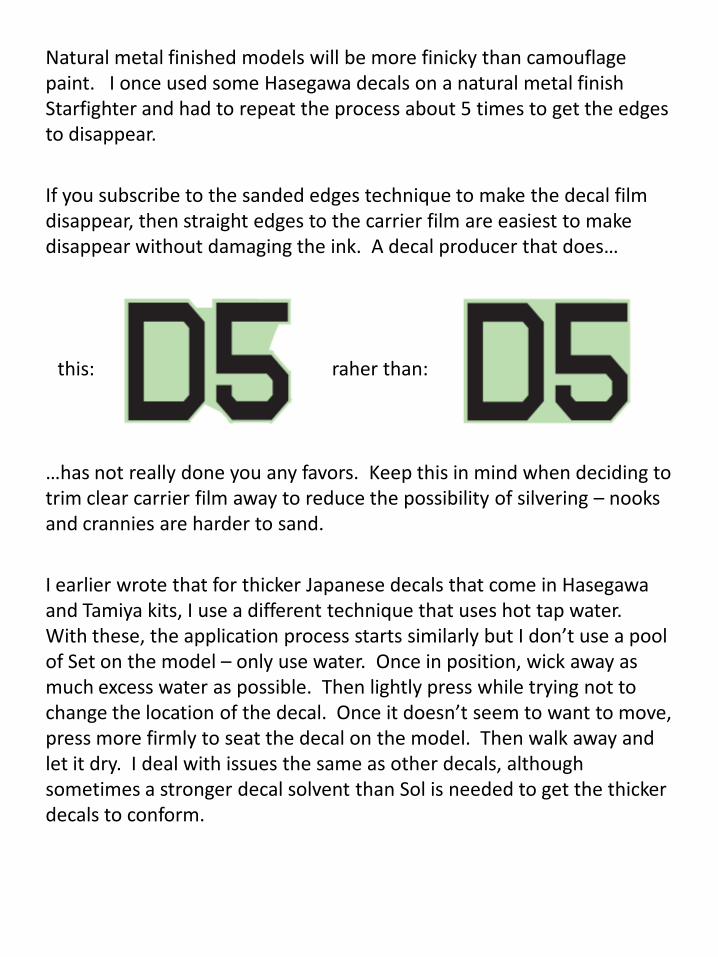
If you subscribe to the sanded edges technique to make the decal film disappear, then straight edges to the carrier film are easiest to make disappear without damaging the ink. A decal producer that does…
…has not really done you any favors. Keep this in mind when deciding to trim clear carrier film away to reduce the possibility of silvering – nooks and crannies are harder to sand.
I earlier wrote that for thicker Japanese decals that come in Hasegawa and Tamiya kits, I use a different technique that uses hot tap water. With these, the application process starts similarly but I don’t use a pool of Set on the model – only use water. Once in position, wick away as much excess water as possible. Then lightly press while trying not to change the location of the decal. Once it doesn’t seem to want to move, press more firmly to seat the decal on the model. Then walk away and let it dry. I deal with issues the same as other decals, although sometimes a stronger decal solvent than Sol is needed to get the thicker decals to conform.
raher than: this: