arduino® coding kit
TRANSCRIPT

i
ARDUINO® CODING KITINVENTION GUIDE


littleBits Basics
30 Second Quick Start
BIT™ INDEXPOWERp1 power
INPUTi3 button i6 dimmer
OUTPUT o9 bargraph o11 servo
WIRE w7 fork w6 Arduino® Bit
ACCESS ORIES a19 servo hub a23 mechanical arm a24 servo mount a26 mounting board micro USB cable
02–03
04–07
08–2008
09–10
11–12
13–15
16–20
ARDUINO® CODING KITINVENTION GUIDE

2
BASICSANATOMY OF A BIT
Learn how you can tell top from bottom.A
BOTTOM
TOP
OPEN HARDWARE SYMBOL & LITTLEBITS LOGO
COLOR-CODED BY FUNCTIONBitsTM are grouped into four different categories, which are color-coded.
B BUILD DIRECTION BIT NAME
BIT FEET
BITSNAPS (“X” ICONS)
POWER (BLUE): Power Bits, plus a power supply, run power through your circuit.
INPUT (PINK): Input Bits accept input from you or the environment and send signals that affect the Bits that follow.
OUTPUT (GREEN): Output Bits do some-thing – light up, buzz, move…
WIRE (ORANGE): Wire Bits connect to other systems and let you build circuits in new directions.

3
MAGNET MAGIC! Bits snap together with magnets. The magnets are always right – you can’t snap them together the wrong way.
C
ARROWS SHOULD POINT IN THE SAME DIRECTION
IF THE BITS WON’T SNAP TOGETHER, TRY SPINNING ONE AROUND AND MAKE SURE THE ARROWS POINT IN THE SAME DIRECTION
ORDER IS IMPORTANTPOWER BITS always come first and INPUT BITS only affect the OUTPUT BITS that come after them.
D
WITH NO OUTPUT BIT AFTER IT, THE INPUT BIT HAS NOWHERE TO SEND ITS SIGNAL
THE INPUT BIT AFFECTS THE OUTPUT BITS THAT FOLLOW

4
POWER: ON
TWISTING THE DIMMER RAISES AND LOWERS THE SIGNAL GOING THROUGH YOUR CIRCUIT.
1 BUILD AND PLAY WITH THIS CIRCUIT FIRST.
30 SECOND QUICK START
you'v built your f rst circuit!

5
2 ADD THE ARDUINO® BIT TO YOUR CIRCUIT AND PLAY WITH IT. The Arduino Bit changes how your circuit works because of the code loaded on it. You can change what the Arduino Bit does by changing that code.
ADJUSTING THE DIMMER TELLS THE CODE HOW FAST TO RAISE AND LOWER THE SIGNAL GOING TO THE BARGRAPH.
TRY BOTH MODES: LEARN MORE ABOUT THESE MODES AT LITTLEBITS.CC/ARDUINO
i12 temp.sensor:
Fahrenheitmode
i13 lightsensor:
light mode
o11 servo:swing mode
Makey Makey:click mode
THE PRE-LOADED CODE ON THE ARDUINO REPEATEDLY RAISES AND LOWERS THE SIGNAL GOING TO THE BARGRAPH.
next step, learn how to c a ge t code o t Arduino Bit!

6
LITTLEBITS.CC/ARDUINO
FIND INVENTIONS & TUTORIALS AT LiTTLEBiTS.CC/ARDUiNO

7
DIY DRAWING MACHINE. Use two dimmers to draw on your computer screen, just like an Etch A Sketch®.
ONLINE INVENTION 1 ONLINE INVENTION 3ONLINE INVENTION 2
ANALOG PONG. Play Pong on your computer screen using two input Bits.
DIY COMPUTER MOUSE. Control your mouse (computer, not pet) with your Arduino Bit!
Learn how to code your Arduino Bit with one of the many tutorials on the website.
Learn about all of the different features of the Arduino Bit and how you can use them to add interactivity or complexity to your inventions.
FIND THESE INVENTIONS ONLINE
CODING TUTORIALS ARDUINO BIT TUTORIALS
//This is a comment! Comments start with double backslashes on each line
//This is the start of our program void setup() { //Set up Serial Communication Serial.begin(9600);}
void loop() {//See the magic happen! Serial.println("hello littleWorld!");}

8
PHONE CHARGER
p1 POWER MEET THE BIT
Every circuit starts with power. It provides the juice that makes your Bits™ spin, buzz, blink, and shine.
The power Bit converts the 9 volts of electricity in the battery to the 5 volts that littleBits™ circuits run on. The power Bit also sends a signal through your circuit. Manipulating this signal with inputs is how you control your circuit.
The p1 power is for use only with a 9 volt battery.
HOW IT WORKS
REAL WORLD ANALOGIES
SAMPLE CIRCUIT
On light
MODE: on/off
p1 POWER
o9 BARGRAPH
™

9
VIDEO GAME CONTROLLER
SAMPLE CIRCUIT
MEET THE BIT
The button Bit is a classic: big, round, and springy for comfortable pressing! Push it to turn something on and release it to turn it off.
The button is like a door. When you press it, the door opens, letting the signal pass through the Bit and on to the next Bits in the circuit. The button is a momentary switch, you must continue to press it for the signal to flow. When you release the button, the door closes, stopping the signal from passing on to other Bits.
HOW IT WORKS SAMPLE CIRCUIT
i3 BUTTON
p1 POWER
i3 BUTTON
o9 BARGRAPH
GAME SHOW BUZZER
ELEVATOR BUTTON
REAL WORLD ANALOGIES

10
HOUSEHOLD DIMMER SWITCH
STEREO VOLUME CONTROL
i6 DIMMER
SAMPLE CIRCUIT
MEET THE BIT
Twist this dimmer back and forth to control your circuit. As you twist the knob clockwise, more signal goes to the Bits that follow, brightening lights, speeding up motors, or raising the volume on buzzers.
The dimmer is like the knob on a water faucet. The more you turn the knob, the more the water flows from the faucet. The dimmer is similar – the more you twist it clockwise, the more electrical signal it lets through.
HOW IT WORKS
REAL WORLD ANALOGIES
SAMPLE CIRCUIT
i6 DIMMER
o9 BARGRAPH
p1 POWER
TWIST

11
MUSIC VISUALIZER TV VOLUME
o9 BARGRAPH MEET THE BIT
HOW IT WORKS
REAL WORLD ANALOGIES
SAMPLE CIRCUIT
The bargraph shows you how much signal the Bit is receiving with a display of five light-emitting diodes (LEDs) in different colors. Try it with a dimmer to make your own adjustable lamp.
The bargraph uses five LEDs to turn electricity into light. Each LED on the board needs a certain amount of signal in order to light up. As you increase the signal sent to the bargraph, more LEDs will shine.
i6 DIMMER
o9 BARGRAPH
p1 POWER

12TRUCK CRANE
o11 SERVO MEET THE BIT
HOW IT WORKS
REAL WORLD ANALOGIES
The servo is a motor that can swing back and forth or be turned to a specific position.
There are a few accessories you can use with the servo (like the mechanical arm). You can find out how to use those on pages 16–18.
The servo has two modes. In TURN mode, the input from other Bits determines the position of the arm – try using a dimmer to set the angle you want. In SWING mode, the servo will move back and forth on its own like a pair of windshield wipers – the input signal controls the speed of the swing.
The arc of the servo’s swing is about 110 degrees from one end to the other.
SAMPLE CIRCUIT
i6 DIMMER
p1 POWER
MODE: turn or swing
o11 SERVO
WINDSHIELD WIPERS
Attach the servo hub. See pg 16.
CA
REFU
LLY
REM
OV
E TH
IS P
OST
ER

i
WE IN
VEN
T TH
E WO
RLD
WE W
AN
T TO
LIVE IN
.
CA
REFU
LLY
REM
OV
E TH
IS P
OST
ER

ii

iii
AR
DU
INO
CO
DIN
G K
IT

iv
WE IN
VEN
T TH
E WO
RLD
WE W
AN
T TO
LIVE IN
.

13
® MEET THE BIT w7 FORK The fork gives you more options for connecting your Bits; it lets you connect a single Bit to as many as three others. If you place an input before the fork, it will control all three outputs at once, such as light, sound, and motion.
The fork takes the incoming signal and sends it to all three output bitSnaps.
HOW IT WORKS SAMPLE CIRCUIT
POWER STRIPFORK IN THE
ROAD
p1 POWER
w7 FORK
o9 BARGRAPH
o11 SERVO
REAL WORLD ANALOGIES
WE IN
VEN
T TH
E WO
RLD
WE W
AN
T TO
LIVE IN
.

14
w6 ARDUINO BIT MEET THE BIT
BIT BREAKDOWN
The Arduino Bit brings the power of programing to your littleBits circuits, allowing you to create complex sequences of actions and explore new levels of logic and timing. It also connects your Bits to programs like Processing and Minecraft.
®
input bitSnaps: d0/rx, a0, a1
output bitSnaps: d1/tx, d5, d9
MODE: analog, pwm
micro USB to computer
serial status lights: tx, rx

15BRAIN
The Arduino Bit is a tiny computer called a microcontroller. The code on the Arduino Bit tells it what to do. You can program your Arduino Bit to do different things by loading different code onto it.
To load code onto your Arduino Bit, connect it to your computer with the included micro USB cable. Once you’ve loaded the code, it will stay on the Arduino Bit, even if you disconnect it from the computer. If you leave it connected, you can also use it to send messages back to your littleBits circuit and your computer.
COMPUTER
SAMPLE CIRCUIT
HOW IT WORKS
REAL WORLD ANALOGIES
Just like all other Bits, the Arduino Bit needs to be connected to a power Bit in order to work. If you turn the power off, the Bit will stop working, but the code will still be on there when you turn the power back on.
To learn more about how to use the Arduino Bit, check out our Arduino resources page at littleBits.cc/Arduino
If you’re having trouble using your Arduino Bit, check out littleBits.cc/troubleshoot/ack
p1 POWER
w6 ARDUINO o9 BARGRAPH
i6 DIMMER

16
a19 SERVO HUB MEET THE ACCESSORY
HOW IT WORKS
The servo hub lets you easily attach materials to your servo motor and add more complex movements to your littleBits inventions.
The servo hub can be removed by gently pulling it off the servo motor. This is helpful if you need to change how the holes are positioned for an invention.
BE SURE TO ALIGN THE TEETH ON THE SHAFT WITH THE TEETH IN THE HUB HOLE

17
Fits a SharpieTM-sized marker.
Fits a pen
a23 MECHANICAL ARM MEET THE ACCESSORY
The mechanical arm attaches to both the servo hub and the DC motor (not included) shaft, offering lots of leverage for pushing, pulling, and throwing.
HOW IT WORKS
To attach the mechanical arm to the servo hub, use two of the #6 screws (included) and a Phillips-head screwdriver (not the purple screwdriver). Be sure to screw through the holes on the servo hub.
The two large holes on the end are perfect for holding pens and markers in place.
USE A PHILLIPS-HEAD SCREWDRIVERConnect to servo hub
with included #6 screws.
18
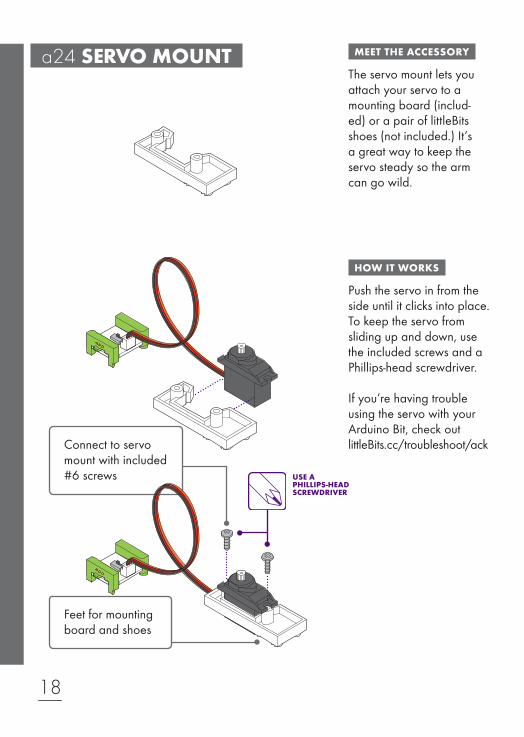
USE A PHILLIPS-HEAD SCREWDRIVER
Feet for mounting board and shoes
Connect to servo mount with included #6 screws
a24 SERVO MOUNT MEET THE ACCESSORY
The servo mount lets you attach your servo to a mounting board (includ-ed) or a pair of littleBits shoes (not included.) It’s a great way to keep the servo steady so the arm can go wild.
HOW IT WORKS
Push the servo in from the side until it clicks into place. To keep the servo from sliding up and down, use the included screws and a Phillips-head screwdriver.
If you’re having trouble using the servo with your Arduino Bit, check out littleBits.cc/troubleshoot/ack

19
a26 MOUNTING BOARD MEET THE ACCESSORY
The mounting board is like the backbone of some of your inventions. It allows you to keep your circuit intact and move it around with ease! It also provides structure, which is helpful for building out inventions, like a vehicle.
HOW IT WORKS
Snap together your littleBits circuit and press the feet of your Bits into the holes of the mounting board.
NOTE: Your circuit must be complete before you press it onto the board. You won’t be able to add Bits one at a time.
PRESS DOWN ON BITSNAPS, NOT WHITE CIRCUIT BOARD

20
The small plug connects to the Arduino Bit
MEET THE ACCESSORY
Use the micro USB cable to connect the Arduino Bit to your computer.
HOW IT WORKS
The micro USB cable sends signal information between the Arduino Bit and the computer.
MICRO USB CABLE
The large plug connects to your computer

21
INVENTION NOTES

22
INVENTION NOTES
23
INVENTION NOTES

24
WARNING• This product contains small magnets. Swallowed magnets can stick together across intestines causing serious infections and death. Seek immediate medical attention if magnets are swallowed or inhaled.• Most modules are small parts. DO NOT allow children under 3 years old to play with or be near this product.• NEVER connect any modules or circuits to any AC electrical outlet.• Do not touch or hold any moving parts of modules while they are operating.• Keep conductive materials (such as aluminum foil, staples, paper clips, etc.) away from the circuit and the connector terminals.• Always turn off circuits when not in use or when left unattended.• Never use modules in or near any liquid.• Never use in any extreme environments such as extreme hot or cold, high humidity, dust or sand.• Modules are subject to damage by static electricity. Handle with care.• Some modules may become warm to the touch when used in certain circuit designs. This is normal. Rearrange modules or discontinue using if they become excessively hot.• Discontinue use of any modules that malfunction, become damaged or broken.CAUTION: Parental Supervision and assistance may be required for use of components
VERY IMPORTANT NOTE• Several inventions in this Kit involve the use of sharp objects. These tools should be used ONLY under direct adult supervision.
BATTERIES• Non-rechargeable batteries are not to be recharged.• Rechargeable batteries are to be removed from the product before being charged.
• Rechargeable batteries are only to be charged under adult supervision. INSTRUCTIONSWe recommend using littleBits brand 9-volt batteries, but standard alkaline or standard rechargeable batteries may also be used. Properly discard and replace exhausted batteries.• Do not connect the two battery terminals to any conducting material.
CARE AND CLEANINGClean modules ONLY by wiping with a dry cloth. If necessary, isopropyl alcohol on a cloth may be used sparingly, and then wipe with a dry cloth.
DO NOT use any other cleaning products on modules.
RADIO AND TELEVISION INTERFERENCE This device complies with the limits for a Class B digital device, pursuant to Part 15 of the FCC rules. Operation is subject to the following two conditions: 1) This device may not cause harmful interference, and2) this device must accept any interference received, including interference that may cause undesired operation.These limits are designed to provide reasonable protection against harmful interference in a residential installation. This equipment generates, uses and can radiate radio frequency energy and, if not installed and used in accordance with the instructions, may cause harmful interference to radio communications. However, there is no guarantee that interference will not occur in a particular installation. If this equipment does cause harmful interference to radio or television reception, which can be determined by turning the equipment off and on, the user is encouraged to try to correct the interference by one or more of the following measures:
• Reorient or relocate the receiving antenna.• Increase the separation between the equipment and the receiver.• Connect the equipment into an outlet on a circuit different from that to which the receiver is connected.• Consult the dealer or an experienced radio/TV technician for help.
Changes and modifications not expressly approved by the manufacturer or registrant of this equipment can void your authority to operate this equipment under Federal Communications Commissions rules.
GOT A QUESTION?Visit littleBits.cc/faq for troubleshooting and additional support.
littleBits Electronics Inc. 601 W 26th Street, M274NY, NY 10001 (917)464-4577
www.littleBits.cc
Released under CERN Open Hardware License, Version 1.2Designed By: littleBits Electronics, Inc.
© 2016 littleBits Electronics, Inc. All rights reserved.Made in China
littleBits, the littleBits logo, Bit, Bits, and bitSnaps are trademarks of littleBits Electronics, Inc. in the United States, other countries, or both.
Arduino is a trademark of Arduino, LLC.
Etch A Sketch is a registered trademark of Spin Master Ltd.
Other company, product, and service names may be trademarks or service marks of others.


w7 FORK
i6 DIMMER
w6 ARDUINO® BITTM
o9 BARGRAPH o11 SERVO
ARDUINO® CODING KIT
p1 POWER
ACCESSORIES9V battery & cableservo hub mechanical armservo mount mounting boards (×2)micro USB cable#6 screws (×4)
i3 BUTTON
i6 DIMMER
700-
0141