art and design unit 5c - two temple place
TRANSCRIPT


- To investigate and combine visual and tactile qualities of materials and processes
and to match these qualities to the purpose of the work. [Lesson 3 – trying out
techniques, Lessons 4 & 5 – making final piece]
- To compare ideas, methods and approaches in their own and others’ work.
To adapt their work according to their views and describe how they would develop
it further. [During lessons 4 & 5, Final evaluation in Lesson 6]
Lesson Variations
The lesson plans for this unit are detailed.
Suggestions have been made about how to differentiate activities for children with
Special Educational Needs (SEN), children with English as an Additional Language
(EAL), and children who are Gifted and Talented (G&T).
Each lesson has a resource list which makes it clear which resources have been
included in this pack in bold, and which need to be sourced at school.
Example of finished ‘Talking Textile’ by year 5 pupils, Essex Primary School, Newham.
Written by Matilda Maxwell. Copyright © 2011 TWO TEMPLE PLACE
Permission granted to reproduce for personal and educational use only.
Commercial copying, hiring, lending is prohibited.
Art and Design Unit 5C. Lesson 1Talking Textiles (with a focus on William Morris). Duration 1 hour. Date:
Main teaching CCL Geography (textiles from around the world), Literacy (figurative language)
Activities - Differentiation Plenary
LO: To question and make thoughtful observations about starting points for our work
Explain to the children that in Art & Design this half term, they will be learning about talking textiles.
What is a textile?Where have you seen textiles in real life? (On clothes, fabrics, furniture, cushions etc)How might a textile talk? Do you think it means literally talk? What aspect of literacy does this link to? (Similes and metaphor where language is figurative rather than literal).How does figurative language like similes and metaphors improve your writing? So how might a textile ‘talking’ improve it?
Show ‘Talking Textile’ link from website below. Take them through all aspects stopping for discussion and paired talk where appropriate. [How do textiles talk, textiles through time, cultural clues, travelling textiles – interactive website]
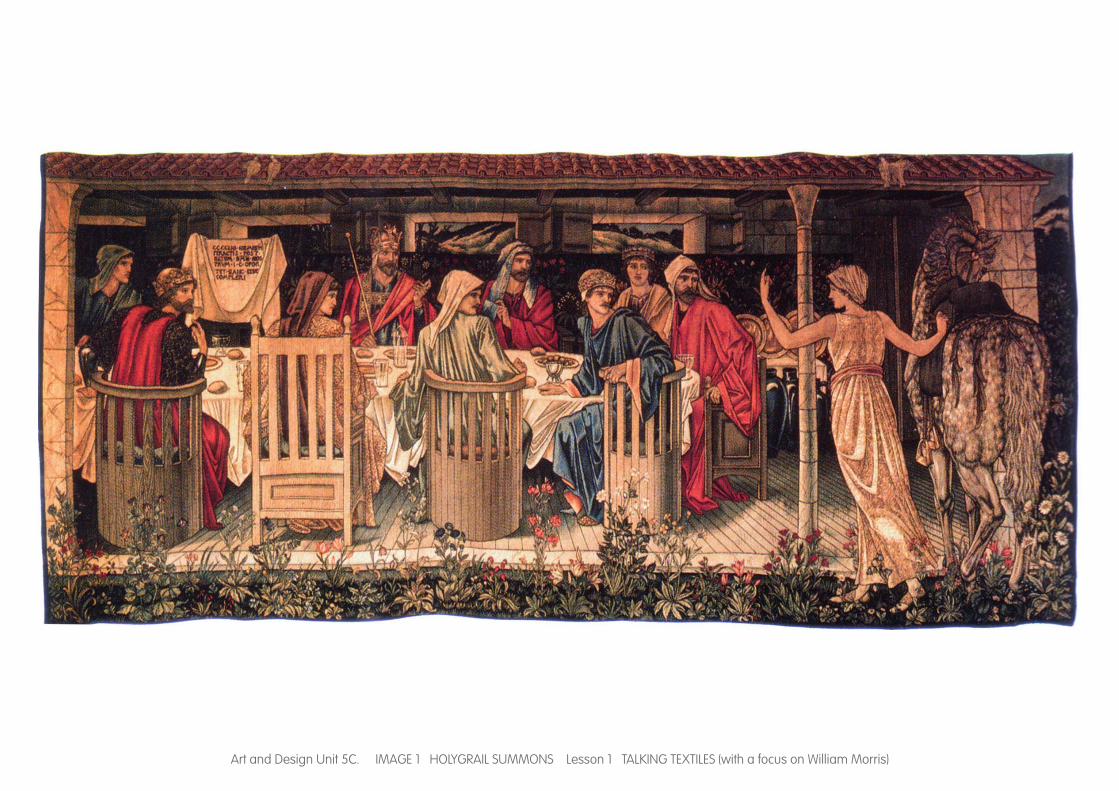
Show the children “The Knights of the Round Table Summoned to the Quest by a Strange Damsel” designed by William Morris and Edward Burne Jones. Don’t tell them who designed it, or when. Ask them the questions from the Main Activity (see right). Allow children to discuss in talk partners. Don’t tell them anything, just guide their discussion. Model recording note answers for what they say on paper flipchart. Explain the main activity to the children. Say that they will be answering the same questions about different textiles on their tables.
Tell them that some of the images are paintings of textiles – this could be an extension element for G&T – why would the image of Ancient Egyptian textile design be a painting? They should answer the questions about the textile in the painting rather than about the painting itself.
Activity 1 (in mixed ability groups):
Print image files for main activity.
Children to discuss the key questions in groups.
What do you think of when you see this textile?
Does the design tell a story?
What country do you think it is from? Why?
When do you think it was made?
What do you think it was used for?
Does this textile tell you anything about the culture it came from?
Depending on the ability of the class they could complete a
worksheet each.
Alternatively, one child could scribe answers onto one sheet
photocopied onto A3.
Activity 2:
When children have discussed and compared the patterns,
they can copy aspects of any designs which they like into their
sketchbooks, or make notes on colours they used that they like.
Alternatively, they could do this onto paper to be displayed
through the unit as their work progresses.
HA: To look in detail at how textiles designs could have been
made through different techniques. What techniques were used?
What impact does this have?
SEN: Could group images together according to similarities
and differences. E.g. Collect all images which have been
embroidered, or which have other objects attached to it.
Show children the William Morris image from the beginning
of the lesson (Image 3)
Looking at this again, which of the images you had on your
tables might you guess were also by William Morris?
Why do you think that?
Tell the children they will be learning more about William Morris
in their next lesson.
Resources ( Bold included in pack )
Image for main teaching (put on interactive white board)
Images for main activity
Image 1: Holy Grail Summons (Morris, London)
Image 2: Nefertiti dress (Ancient Egypt)
Image 3: Departure of the Knights (Morris, London)
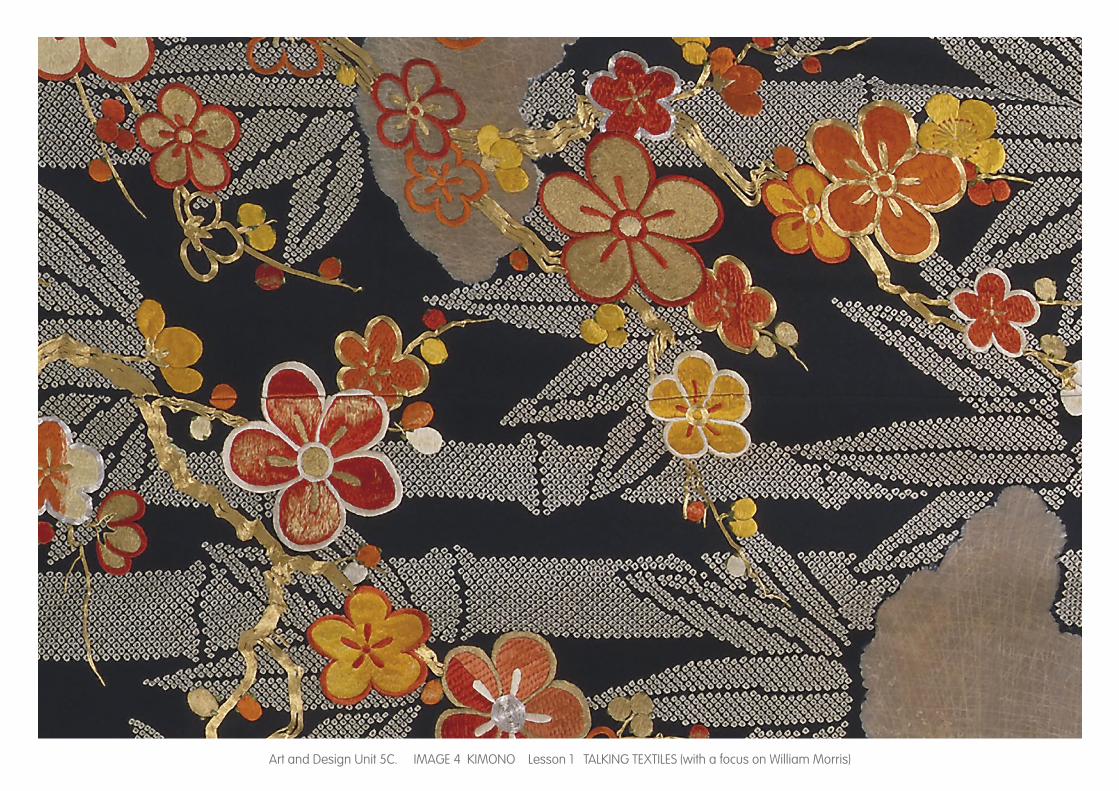
Image 4: Kimono silk, tie-dyed with applied gold leaf and
embroidery (Japan, 1910-30)
Image 5: Bayeux Tapestry (France after 1066)
Image 6: Appliqued owls. USA
(1 set per table + extra for SEN children)
Worksheet
Prompt questions for tables
Sketchbooks or paper
Pencils
Optional:
Laminate images on table for future use

Art and Design Unit 5C. Lesson 1 ( continued )
Talking Textiles (with a focus on William Morris). Duration 1 hour. Date:
Main teaching Activities - Differentiation
ICT: http://www.childrensuniversity.manchester.ac.uk/interactives/artanddesign/talkingtextiles/talkingtextiles.aspEAL: modeling, visual scaffolding, mixed ability grouping Every Child Matters: Enjoy and Achieve
Success criteria
I can identify and comment on the content, ideas and ways
that stories are communicated visually.
I can describe different ways that textiles are made.
I can identify materials and techniques and how these are
used in textile design.
Art and Design Unit 5C. Lesson 2Talking Textiles (with a focus on William Morris). Duration 1 hour. Date:
Main teaching CCL History (William Morris, Victorians), PHSCE (rights), Literacy (myths and legends)
Activities - Differentiation Plenary
L.O.: To collect visual and other information to help develop our ideas.
Tell the children that today they are going to be learning more about William Morris, and how he created his designs.Show children a photo of William Morris – e.g. from www.wikipedia.org (see link below)
Tell the children: William Morris was born in Walthamstow in East London in 1834 and he died in 1896.
Do you know what we call that time? (The Victorian Era)Do you know why we call it that? (Because Queen Victoria was on the throne at that time)Do you know of any major changes which happened then, or any important inventions? (industrialisation, steam engine – trains)
William Morris always wanted to learn how things were made. He liked more old-fashioned techniques – such as colouring fabrics with natural dyes, block printing from wood, and weaving things by hand. He valued good craftsmanship.What is a craftsman? What do you think craftsmanship means?Thinking back to the designs by him which you saw in Lesson 1 (you could show them again here) what do you think inspired William Morris? (the natural world – he used wild flowers, leaves, seed heads, fruits and animals in his designs) What do you notice about the colours in his designs? (they are all natural colours, made from natural dyes – rather than using chemical dyes)He also wrote lots of speeches and articles about the rights of workers to try to make a happier society.What are rights? (rights are things that you should give to people, regardless of whether they are men, women, old, young etc. for example ‘the right to an education’ or ‘the right to a safe working environment’.
Activity 1(individual on mixed ability tables).
In sketchbooks or on whiteboards. As you read the story, children
to record key scenes or events that could be represented in
textile on their whiteboards or sketchbooks.
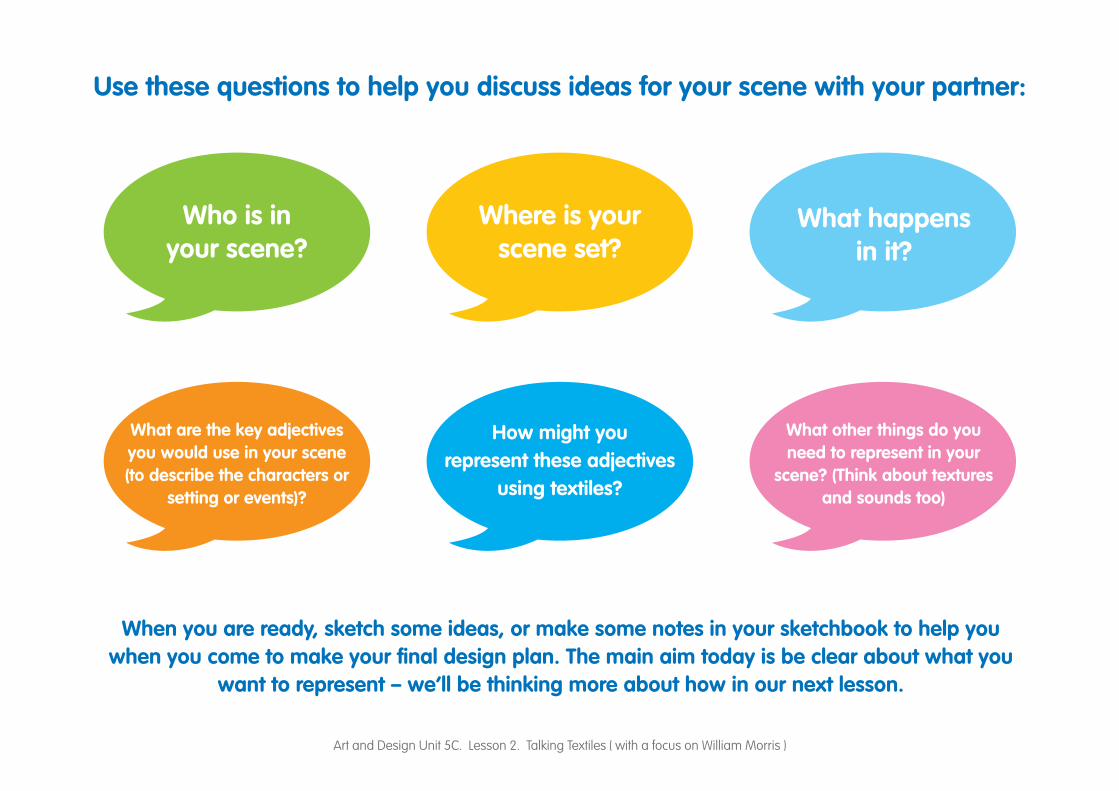
Activity 2 (mixed ability pairs)
Put images from Lesson 1 on the tables, and any other books/
images of textile design to support the children’s ideas. Look for
picture books as many of them use photographs of textile art for
illustrations. Ask children to discuss their scene with their partner
and sketch ideas into their sketchbooks.
Who is in your scene?
Where is your scene set?
What happens in it?
What are the key adjectives you would use in your scene (to
describe the characters, setting or events)?
How might you represent these adjectives using textiles?
What other things do you need to represent in your scene?
(Think about textures and sounds too)
The emphasis is on what they want in their scene rather than
how at this stage.
SEN: Supported by partner and images on table.
G&T: To start thinking about how they will create their design.
Some children to share their ideas with the rest of the class,
explaining the reasoning behind their choices.
Children could use 2 stars and a wish strategy to evaluate
their friends’ work.
I really liked how they…
To improve it they could…
Resources ( Bold included in pack )
Images from Lesson 1
Additional visual sources e.g. picture books
Sketchbooks
Pencils
Prompt questions for tables
Example picture
King Arthur story:
Recommended is King Arthur and the Knights
of the Round Table by Marcia Williams
(written in comic book style)

Art and Design Unit 5C. Lesson 2 ( continued )
Talking Textiles (with a focus on William Morris). Duration 1 hour. Date:
Main teaching Activities - Differentiation
William Morris fought for better working environments and shorter working hours so people had time to enjoy their lives, and to produce goods that were useful and beautiful. Explain that William Morris and his friends were inspired by lots of things including the natural world, and ancient legends – in particular the legend of King Arthur. In 1858 he said “My work is the embodiment of dreams.” What do you think this means?What do you already know about King Arthur? (Possibly sword in the stone, Merlin, knights of the round table)Explain that in Victorian times, a lot of upper and middle class people became very interested in the romantic legends connected to King Arthur, and William Morris used scenes from the legend in his art and designs.What do you associate with legends and fairy tales? (Witches, knights, dragons, castles, jousting, swords)Read the legend of King Arthur and ask children to complete Activity 1. How could we represent the scenes from this story in textile work? (1 big panel, series of horizontal panels, series of vertical panels) Tell children that as a class, they will make 1 big panel, made up of smaller panels, to tell the story.How could we incorporate sound? (Use a mixture of materials)Record children’s ideas for key scenes from story which they recorded onto whiteboards. You need one scene between 2 children. Model brainstorming ideas for a particular scene going through key questions on right, using books and images for support e.g. I think the use of detail in the flowers here is effective – I would like to use that in my panel. Show them example images from ‘Resource Pack’. Allocate scenes to pairs. Ask them to complete Activity 2.
ICT: Link to portrait: http://en.wikipedia.org/wiki/File:George_Frederic_Watts_portrait_of_William_Morris_1870_v2.jpgEAL: modeling, visual scaffolding, mixed ability groupingEvery Child Matters: Enjoy and Achieve
Success criteria
I know that William Morris was inspired by nature and the
legend of King Arthur.
I can collect ideas to represent my own Arthurian scene.

Art and Design Unit 5C. Lesson 3Talking Textiles (with a focus on William Morris). Duration 1 - 1.5 hours. Date:
Main teaching CCL – Literacy (myths and legends), Science (insulation, properties of materials)
Activities - Differentiation Plenary
LO: To investigate and combine visual and tactile qualities of materials / processes and to match these qualities to the purpose of the work.
Tell the children that today they will try out different techniques involving textiles. They will then be able to apply these techniques to the preliminary plans they put together in the previous lesson.
Ask children to complete Activity 1. Show them Main Teaching Image 1 of St George and the Dragon.
How could you use textiles to represent this image? What might you like to use? (e.g. sequins for scales on dragon, shiny silver material for the sword and knight’s armour, rough wool for rocks etc)
What different textile techniques do you know about?Tell the children that they will learn about 5 today:
1. Colouring the fabric2. Layering fabric3. Stitching fabric4. Quilting fabric5. Adding other objects (e.g. buttons, sequins, wool etc)
Go through each technique and model it to the children. After each technique, ask them to have a go at that technique at their table. Remember – they are just having a go at this stage.
They will have one piece of calico each and need to show all techniques on that piece – like a sample of their skills. They should write their names on the back in pencil first.
Activities - Differentiation
Activity 1 (mixed ability pairs):
Children to quickly remind themselves which scene they are
doing, and what ideas they had in the previous lesson. Return to
carpet.
Main activity is trying out each technique after teacher has
modelled it to the class.
SEN – Will probably need help with threading needles and
carrying out the techniques correctly.
G&T – Encourage children to make their stitches neat and even.
They should work as accurately as possible, understanding in
detail the impact of the techniques.
Success criteria
I know there is a range of techniques used in textile design.
I have had a go at different techniques.
I have thought about when these techniques might be
useful in my design.
Which technique did you find easiest? Why?
Which technique did you find most challenging? Why?
Show George & Dragon image again.
How would you apply the techniques you learned today
to this image?
Resources ( Bold included in pack )
St George image
1 piece of calico per child (A4 should be fine)
Paints
Paintbrushes
PVA glue
Sequins
Buttons
Various fabrics
Needles
Thread
Scissors

Art and Design Unit 5C. Lesson 3 ( continued )
Talking Textiles (with a focus on William Morris). Duration 1 - 1.5 hours. Date:
Main teaching
1. Colouring the fabric - watercolour paints work very effectively.
2. Layering fabric – show how you can cut out a flower shape of one colour, and then a smaller flower shape in another colour, and glue the smaller one onto the top. What effect does this have?
3. Stitching fabric – show them they can make long and short stitches, do lots on top of each other, stitch shapes etc. Ask children to try stitching their names, or a shape. depending on your prior experience of the class, you will need to go through health and safety re using needles, how to thread a needle etc.
4. Quilting fabric – explain that quilting is when two pieces of fabric are sewn to each other with some kind of padding between them. Explain that in a quilt, this padding is normally soft and adds extra insulation and warmth. For their purpose, they may want to pad it with something that makes a sound (e.g bits of plastic bags) so that when people touch their textile, it makes a noise. Model quilting a hedge with crinkly plastic inside it.
5. Adding other objects – this can be done with stitching or glue.
Model adding a button to the middle of your layered flower.
ICT: Showing images on interactive whiteboardEAL: modeling, visual scaffolding, mixed ability grouping Every Child Matters: Enjoy and Achieve

Art and Design Unit 5C. Lesson 4Talking Textiles (with a focus on William Morris). Duration 1 - 1.5 hours. Date:
Main teaching
CCL Literacy (Myths and Legends)
Activities - Differentiation Plenary
LO: To design our own talking textile.
What textile techniques did we learn about in our last lesson?Ask children to get the samples they made to remind themselves about what they learned and achieved last lesson. Explain that today they will be completing the design for their own panel. Explain that the design plan will be the same size as their final piece (A3 landscape).
Tell the children what resources will be available to them – make a list visible throughout the lesson and remind them to take note of it (there is no point in them planning to use things you don’t have!)
Since some of us will be representing the same character in different scenes, how do you think we should make our meanings clear to our audience? (e.g. a clue for each character – eg. Arthur always depicted with a large crown) Go through each main character and identify how the children should signify it is them in the scene.
Model drawing a sketched design on the interactive whiteboard. Model thinking about composition (the lay out of the scene).Put everything in one corner of your paper – Is this good composition? Why not? And scale (the size of things in the scene). Make the horse much smaller than St George. Is this good scaling? Why not? Model labelling the techniques used e.g. colour the sky pale blue using paint. Clouds labelled as cotton wool glued on. Castle to be made of grey felt with bricks sewn on for detail. If additional adult in the class, (or use G&T child), model having a discussion as a pair about how best to represent a chosen feature, making a fair decision, and recording that on the A3 paper. [e.g. I really like that idea! Since we used your idea for the clouds, can we use my idea for the rocks?]
Activity (mixed ability pairs)
Children to complete their design plan for their scene on A3
paper. They need to include as many of the techniques as they
can from Lesson 3.
SEN – may need additional support.
G&T – to include quite complex design and level of detail
in their plan.
Success criteria
I can imagine the impact of different textile techniques.
I can consider composition when designing my scene.
I can consider scale when designing my scene.
I can choose appropriate techniques to make my design
as effective as possible.
Some children to share their design and the reasoning
for their choices.
If possible, teacher to transfer their design plan onto
interactive whiteboard to support them talking to the class.
Resources ( Bold included in pack )
1 x A3 paper per child
Pencils
Images from Lesson 1
Additional books for ideas

Art and Design Unit 5C. Lesson 4 ( continued )
Talking Textiles (with a focus on William Morris). Duration 1 - 1.5 hours. Date:
Main teaching
Remind the children they should include as many of the techniques as they can from their sample of techniques from Lesson 3.
They should also use their ideas from Lesson 2 to support them.
When they finish the design plan, they can make a list as a pair of what they will need in the next lesson.
ICT: Showing images on interactive whiteboardEAL: modeling, visual scaffolding, mixed ability grouping Every Child Matters: Enjoy and Achieve

Art and Design Unit 5C. Lesson 5 / 6Talking Textiles (with a focus on William Morris). Duration 1 - 1.5 hours. Date:
Main teaching
CCL Literacy (Myths and Legends)
Activities - Differentiation Plenary
LO: To complete our own talking textile, and evaluate our work.
An additional adult will be invaluable in this lesson.
The children may require more than one lesson to finish their design – especially if they are using lots of techniques, and they need to work on their needlework skills.What did we do in our last lesson? (Design our scene using talking textile techniques).Ask children to look at their designs.What do you think our mission today will be?Today you will be making your own talking textile scene.What materials are you going to need? What techniques are you going to use?What health and safety rules do we need to remember?What should you do if you need help?How can you make sure both of you are doing something? E.g. if one is sketching design onto the calico, the other could be making the rock using quilting techniques.
Model using the design plan to lightly sketch your scene onto your calico.
What would be a sensible order to do things in? Why? E.g. do painting first, then leave that to dry and while it’s drying start making the other bits you’ll be adding.
Model making things and then applying them to the calico when you are happy with them. (You could use your crinkly hedge from Lesson 3 – model attaching it in the correct place to your calico)
Some things can be glued on successfully eg sequins. Larger 3D items like quilted hedges should be sewn on securely. ICT: Showing images of children’s work on interactive whiteboardEAL: modeling, visual scaffolding, mixed ability grouping Every Child Matters: Enjoy and Achieve
Activity 1:
Children to write their names and scene number onto the
back of their calico in pencil – this will make it easier for you
when you are putting the display together.
Children to carry out their design, working collaboratively with
their partner.
Activity 2:
Complete pupil self-evaluation of unit and final piece.
SEN: May need support threading needles etc. May need
support writing self-evaluation.
G&T: Encourage children to make their stitches neat and even.
They should work as accurately as possible understanding in
detail the impact of the techniques.
Success criteria
I can design a scene inspired by the Arthurian legend,
like William Morris did.
I can make and evaluate the scene, based upon my design.
Photograph some children’s work and display on the whiteboard.
Who can describe the techniques in this child’s work?
How have they used colour effectively?
How have they included sound in their design?
Resources ( Bold included in pack )
Pupil self-evaluation
1 piece of calico per child (A3)
Paints
Paintbrushes
PVA glue
Sequins
Buttons
Various fabrics
Needles
Thread
Scissors

Art and Design Unit 5C. Medium-term planTalking Textiles (with a focus on William Morris). For end of unit expectations, please see the Teacher Assessment Grid.
Lesson Key ideas and enquiry questions
Learning objectives
National Curriculum Link
Teaching and learning suggestions
Learning outcomes
Cross-curricular links
Assessment evidence
1 How have textiles been used
in different countries?
To question and make
thoughtful observations
about starting points for our
work.
Unit 5C Children investigate 5
patterns from around the
world and identify key
features, and compare
them.
Children identify details
in textiles. They identify
materials and techniques
and how they are used.
Geography
Maths
Worksheets
showing
children’s
comparison.
Discussion.
2 How did William Morris tell
stories in his textiles?
To collect visual and other
information to help develop
our ideas.
Unit 5C Children begin to think about
the design for their own
scene.
Children know Morris was
inspired by Arthurian legend
and can use his work as
inspiration for designing their
own scene.
History
Maths
Children’s scene
designs in
sketchbook.
3 What techniques did William
Morris use?
To investigate and combine
visual and tactile qualities of
materials / processes and to
match these qualities to the
purpose of the work.
Unit 5C Children to try out different
methods of textile, inspired
by William Morris’ designs.
Children are able to use a
range of sewing techniques.
History Children’s
sewing samples.
4 How can we design an
effective talking textile?
To design my own talking
textile inspired by William
Morris’ designs.
Unit 5C Children to design their
own scene thinking about
composition, scale and
effective techniques.
Children have designed an
effective scene showing
awareness of composition,
scale and technique.
Maths Children’s
designs.
5/6 How did William Morris create
his main designs?
To make my own talking
textile inspired by William
Morris’ designs, and evaluate
by comparing ideas,
methods and approaches.
Unit 5C Children to complete their
design on their calico.
Able to make appropriate
colour and composition
choices to create a talking
textile.
History Children’s
finished designs.
Children’s
self-evaluation
sheets.

Art and Design Unit 5C. Assessment grid Talking Textiles (with a focus on William Morris). Based on QCA expectations for the unit.
Teachers to fill in the names of children in their class under the appropriate heading for assessment purposes at the end of the unit.
Some children will not have made so much progress. They will be able to:
investigate and use textile materials / processes to communicate ideas; comment on differences in their own and others’ work; suggest ways of improving their own work.
Most children will be able to:
Explore ideas and collect materials and information to support their work; investigate colour, shape and texture in textile materials / processes and use these to communicate ideas in a story; comment on similarities and differences in how events in a story are communicated in their own and others’ work; adapt and improve their own work.
Some children will have made more progress. They will be able to:
Collect visual and other information to help them develop ideas; investigate, combine and organise visual and tactile qualities and apply their knowledge of materials and processes to communicate their ideas; compare and comment on ideas, methods and approaches in their own and others’ work in the context of the events of the story; adapt and improve their work to realise their intentions.
UNIT 5C RESOURCES
Art and Design Unit 5C. Lesson 1. Talking Textiles ( with a focus on William Morris )
Does this textile tell you anything about the culture it came from?
When do you think it was made?
What do you think of when you see
this textile?
Does the design tell a story?
What do you think it was used for?
What country do you think it is from? Why?
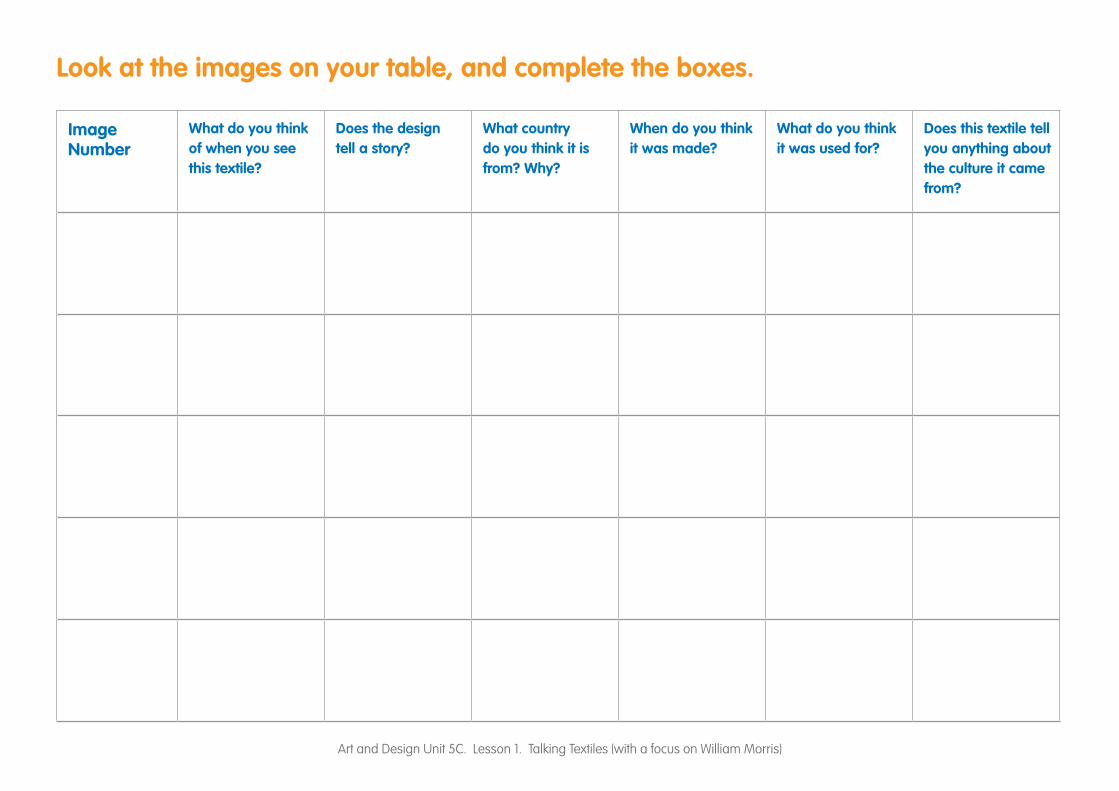
Use these questions to help you discuss the images on your table:

Look at the images on your table, and complete the boxes.
Image Number
What do you think of when you see this textile?
Does the design tell a story?
What country do you think it is from? Why?
When do you think it was made?
What do you think it was used for?
Does this textile tell you anything about the culture it came from?
Art and Design Unit 5C. Lesson 1. Talking Textiles (with a focus on William Morris)

Art and Design Unit 5C. IMAGE 1 HOLYGRAIL SUMMONS Lesson 1 TALKING TEXTILES (with a focus on William Morris)
Art and Design Unit 5C. IMAGE 2 NEFERTITI DRESS Lesson 1 TALKING TEXTILES (with a focus on William Morris)

Art and Design Unit 5C. IMAGE 3 DEPARTURE OF KNIGHTS Lesson 1 TALKING TEXTILES (with a focus on William Morris)

Art and Design Unit 5C. IMAGE 4 KIMONO Lesson 1 TALKING TEXTILES (with a focus on William Morris)
Art and Design Unit 5C. IMAGE 5 BAYEUX TAPESTRY Lesson 1 TALKING TEXTILES (with a focus on William Morris)

Art and Design Unit 5C. IMAGE 6 OWLS Lesson 1 TALKING TEXTILES (with a focus on William Morris)

Art and Design Unit 5C. Lesson 2. Talking Textiles ( with a focus on William Morris )
What are the key adjectives you would use in your scene (to describe the characters or
setting or events)?
Who is in your scene?
Where is your scene set?
How might you represent these adjectives
using textiles?
What happens in it?
Use these questions to help you discuss ideas for your scene with your partner:
When you are ready, sketch some ideas, or make some notes in your sketchbook to help you when you come to make your final design plan. The main aim today is be clear about what you
want to represent – we’ll be thinking more about how in our next lesson.
What other things do you need to represent in your
scene? (Think about textures and sounds too)

Art and Design Unit 5C. TALKING TEXTILES EXAMPLE QUILT Lesson 2 TALKING TEXTILES (with a focus on William Morris)

Art and Design Unit 5C. SAINT GEORGE IMAGE 7. Lesson 3 TALKING TEXTILES (with a focus on William Morris)

Art and D
esign Unit 5C
. Lesson 5-6 Talking Textiles (with focus a on W
illiam M
orris)
Well d
one for creating
your own ta
lking textile insp
ired b
y the leg
end of K
ing A
rthur, just like Willia
m M
orris did
!
Wha
t is simila
r ab
out your desig
n, idea
s or method
s and
those
of Willia
m M
orris?
Wha
t is different a
bout your d
esign, id
eas or m
ethods a
nd those
of Willia
m M
orris?
Which textile techniq
ues did
you use?
Wha
t do you think w
orked p
articula
rly well? W
hy?
Wha
t would
you do d
ifferently next time? W
hy?
Wha
t have you lea
rned tha
t you did
n’t know b
efore?
Wha
t did
you enjoy most a
nd w
hy?