auditorium maker 2019 help - makersoftwarecompany.com fileauditorium maker help july 8, 2018 plane...
TRANSCRIPT

Auditorium Maker Help July 8, 2018
AUDITORIUM MAKER 2019
HELP For Revit ® 2016, 2017, 2018 & 2019 About Auditorium Maker
The process of Auditorium seating layout and design can be time
consuming. Every time a layout changes, one must be able to see how
those changes impact the spectators. Even though there
are tools like the array tool, this still leaves a lot to be desired when
editing or creating a seating layout.
Auditorium Maker Help. © Maker Software LLC �1
Auditorium Maker greatly reduces the amount of time for seating layouts and other seating design
tasks.

Auditorium Maker Help July 8, 2018
Auditorium Maker allows you to sketch a layout for seating and optimize the layout for maximum
efficiency. It can automatically label seats, rows, seating sections. It supports varying seat widths
in the same row. It can easily create a camera view from the spectators' seat and label the view
for client presentations and design testing.
The software includes the necessary families. You can customize them to your needs and use
your own as you wish. With a simple sketch using model lines, you can generate and lay out
seating much faster than possible manually or using the array tool.
*New: Supports Revit 2018 and 2019.
Before Using Auditorium Maker Project Parameters Auditorium maker needs its parameters to function properly. The parameters will be
automatically added to your Revit ® project. When you run Auditorium Maker for the first time, it
creates these parameters. Auditorium Maker needs to know the width of each of your seats, so it
creates a shared parameter which tells the software how wide each seat is. There are also other
parameters that label each seat number, row number and seating section.
Auditorium Maker Help. © Maker Software LLC �2

Auditorium Maker Help July 8, 2018
Load a Seating Tag (optional) To label the seats, there is a tag family that is included with
Auditorium Maker. This tag will be loaded automatically if
you would like. You can also customize it as needed. It is
only there as a basis for your own custom tags.
Prepare your families to use. Auditorium Maker comes with sample families that you can use. They are loaded automatically
and you are prompted to load them. If you would like to use your own, ensure the families you
plan to use for the seating are of the "Furniture" category. This can be checked by placing your
seating family into the project and hover your mouse on the family that is placed. It must say it is
of the "Furniture" category. If not, edit the family and change it. See below.
The “Furniture” category is the only category of
objects Auditorium Maker supports at the moment.
You may use a level based or a Work Plane based
furniture family. When creating a seating section,
Auditorium Maker will look at your sketch lines and
determine what level/Work Plane to host your
seating family onto based on sketch lines' Work
Plane.
The base point for the seating family should be
right in the center of the family. You can open the
sample files folder: “%Programdata%
\Autodesk\ApplicationPlugins” folder or if you
installed the Autodesk Exchange or - “C:\Program
Files\Auditorium Maker 2019\" if you purchased Auditorium Maker elsewhere. Go to "...\Families"
folder and load the sample seat family into your project, insert the family into a floor plan and and
click on the family instance. Do not modify the families in the folder above. Save a copy and
modify the copy. These families are used internally by the software when starting a new project.
Make sure the furniture family contains an “Offset” parameter. See below.
If the family doesn’t have this “Offset” parameter, Auditorium Maker will lay out your rows at the
same Z-height above Work Plane. If you start a furniture family using the “Furniture.rft” template,
the family will have this parameter which allows you to control the Z-height above the Work
Auditorium Maker Help. © Maker Software LLC �3
Base Point of Family Should always be in the
center.

Auditorium Maker Help July 8, 2018
Plane where to place the
family. Auditorium needs this in
order to adjust the height of
each seat above the Work
Plane. If the family was created
in a more recent version of
Revit (2015 and above), it
should contain this parameter
already. Don't use Revit's
default Seating-Auditorium
family. This family does not
contain the "Offset" instance
parameter that is needed for
Auditorium Maker to function
normally. Even on Revit 2017 the family has not been updated. Download a furniture family from a
manufacturer via http://www.Seek.Autodesk.com. Families can also be found by searching your
manufacturer’s website for Revit seating families. Many
manufacturers provide ready to use seating families.
There is also an adaptive family which is used by
Auditorium Maker to create a sight line which you can use
for clash detecting against other seats. This can be
customized, but must be a 2 point adaptive, otherwise,
Auditorium Maker will not run the Sight Line tool.
Sketch Creation Draw the sketch for the seating section. For Arc Seating Layout:
open your project file. Use the “Set Work Plane” tool
to set your Work Plane to any reference plane that is
parallel to your levels. Sketch your model lines. Use
model lines to create your sketch. Auditorium
Maker will host your seats to the same work plane/
level that your model lines are hosted to. Make sure
sketch contains an arc as the inner row. This arc will
Auditorium Maker Help. © Maker Software LLC �4
All seats will point to this point.
Sight Line Family

Auditorium Maker Help July 8, 2018
tell Auditorium Maker where the center point of your seating is
located. See the image.
The arc will also tell Auditorium Maker where to start placing
seating. All other rows will use the same center point location
and point the seating towards this center point. You can turn on
the arc center point in Revit by clicking on the arc in the sketch
and checking the "Center Mark Visible" check box in the family
instance properties dialogue box. Important - all of your sketch
lines must be assigned to the same work plane. Failure to do
this will result in Auditorium Maker canceling the seating section
creation.
*New: Linear Seating Sections are supported
For Straight Seating Layouts:
Go to Auditorium Maker Settings> Seating Section Tab> Select
“Straight Rows”
Similar to above, draw your seating section and use a line
instead of an arc as the first layout line.
Note: Auditorium Maker looks for straight lines as the
first row of seating. It will not allow you to select arcs if
your settings are set to “Straight” as the row seating. Fix
your settings before editing/creating a seating section
or row.
Set your options in the Auditorium Maker Settings dialogue.
Auditorium Maker Help. © Maker Software LLC �5

Auditorium Maker Help July 8, 2018
When laying out your seats for the first time, you can choose 3 different families per row. The
“Left Aisle” and “Right Aisle” seating type are the seats that are
located along the aisle. The “Inner” seating type are the seats in the
middle of the row. After creating the seating section, when you edit
the row, you can create rows with almost any seating arrangement.
Make Seating Section To use the tool, hover your mouse on a sketch line and hit tab key. Revit
should highlight all line work as a loop. If it doesn't, your sketch
needs to be closed. Once you have the sketch loop selected, click
the "Make Seating Section" tool. Then, select your sketch arc that
represents the layout line of your first row of seating. This is the
same arc as the one that determines the center point of your
seating section. Once selected, Auditorium Maker asks the section
number/letter of the new seating section. Entering this is optional.
Auditorium Maker then asks you how you want to number your
rows. This can allow for “New York” numbering as needed.
Auditorium Maker Help. © Maker Software LLC �6
Seats are created in a counter clockwise
fashion.

Auditorium Maker Help July 8, 2018
Select Seating Tools Select Row/Section/Aisle Seats After your seats are labeled properly and they are laid out by
Auditorium Maker, you may then use the “Select Seating”
tools. The “Select Seating” tools should work as long as
Auditorium Maker tools were used to lay out the seats.
One way to use the select seating tools is for example: Hold
down the CTRL Key and Select some seats first and then click
on “Select Row of Seats”. This will select the rows of those
particular seats from that particular seating section. Just as shown
in the image above.
Another way is to select the “Select Row of Seats” tool first, then select all of the seats of the rows
you would like to select, then press “Finish” button on the top left of the user interface. In other
Auditorium Maker Help. © Maker Software LLC �7
Curved seating sections created.
Linear seating sections created.

Auditorium Maker Help July 8, 2018
words, you should be able to select the seats first or select the tool first, similar to how the rest of
the Revit® tools are designed.
Keep in mind, the select seating tools will not select the row layout lines. Those are left in place
in case the rows have to be modified with the modify rows tool.
Modify Seating Section Tool The modify seating section tool will redo your seating according to your current settings. Before
using this tool, you should check that your settings are the way you would like them by going to
the “Auditorium Maker Settings” button. Auditorium Maker will use the settings that have been set
in the settings dialogue. Once you have the settings you would like, click the “Modify Seating
Section” tool and follow the prompts at the bottom of the screen.
Modify Row Tool The modify row tool works much the same way as the modify seating section tool. When
modifying a row, you would need an arc that represents you new row layout line. This arc may be
the one generated by Auditorium Maker or a new one you draw. It must be: an arc, a model line,
and it should be on the same sketch plane as the existing sketch of the seating section. This is
because the seat elevations will be replaced for the same seat elevations.
Also, If you create your own row layout line, you will need to delete the existing (orange) layout
line Auditorium Maker has generated.
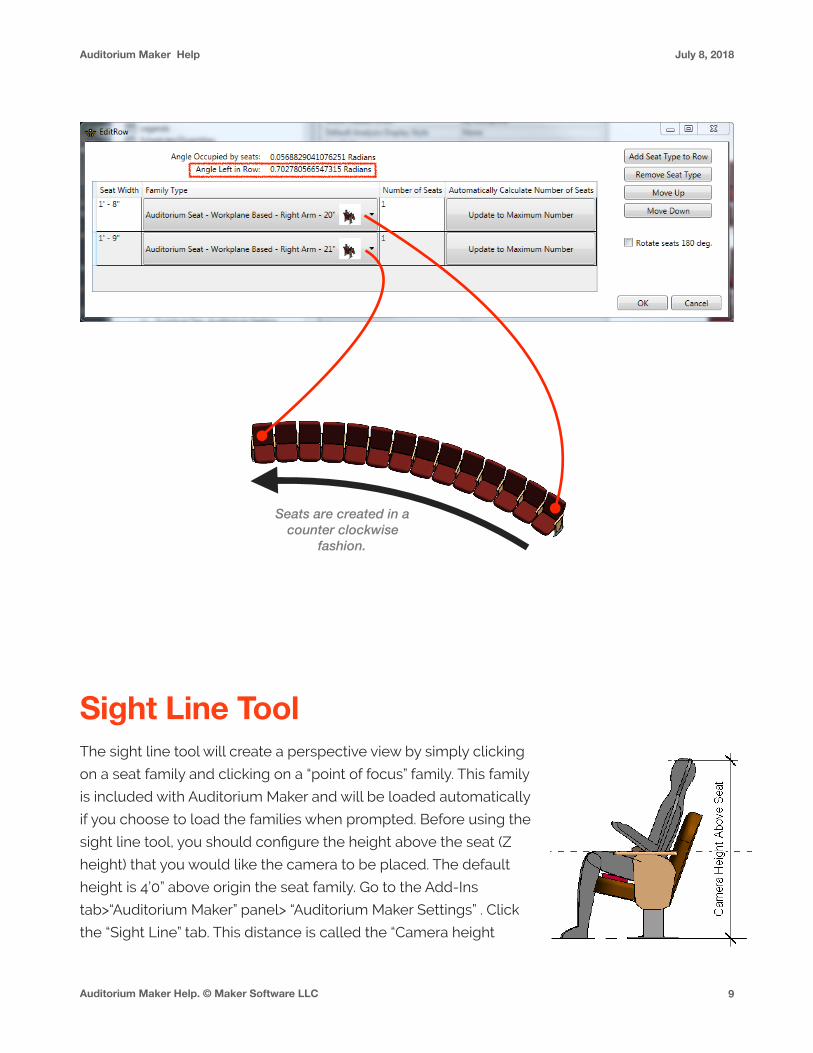
Once you have selected a seat and a row layout line, you will be presented with the dialogue to
customize your row. Your row may include as many seating widths as you desire, as long as it fits
inside that row. The “Angle Left in Row” must be greater than zero. See image below.
The seats are created in a counter-clockwise fashion. For example: the seats on the top line of
the table would be the seats most clockwise. The last row in the table would be the seats most
counter clockwise. See illustration below.
Auditorium Maker Help. © Maker Software LLC �8
Auditorium Maker Help July 8, 2018
Sight Line Tool The sight line tool will create a perspective view by simply clicking
on a seat family and clicking on a “point of focus” family. This family
is included with Auditorium Maker and will be loaded automatically
if you choose to load the families when prompted. Before using the
sight line tool, you should configure the height above the seat (Z
height) that you would like the camera to be placed. The default
height is 4’0” above origin the seat family. Go to the Add-Ins
tab>“Auditorium Maker” panel> “Auditorium Maker Settings” . Click
the “Sight Line” tab. This distance is called the “Camera height
Auditorium Maker Help. © Maker Software LLC �9
Seats are created in a counter clockwise
fashion.

Auditorium Maker Help July 8, 2018
above seat”. See image.
You must also configure how far back from the center of the chair the camera will be placed. This
distance is called the “Camera set back distance from seat”. See image below.
The “Seat Family Orientation” is a setting that flips the X axis and Y axis directions when placing
the camera. The reason why this option exists is because some Revit families are created facing
South in plan view and others are created facing north in plan view. See images.
It ensures that the “Camera set back from the seat” always places the camera towards the rear of
the seat when a user enters a negative number for that distance. If this option did not exist,
certain families would cause the Sightline tool to place the camera forward from the seat instead
of backwards.
Auditorium Maker loads a family called “Point of Focus”. This family is intended to be used for
pointing the camera towards this point. You can customize this family or use another one, such as
a person. As long as the family is a type that can be placed by a single point. See illustration.
Auditorium Maker Help. © Maker Software LLC �10
If in family editor, seating family faces south, use the “South”
option.
If in family editor, your seating family faces north, use the
“North” option.

Auditorium Maker Help July 8, 2018
*New: Sightline and view will update if the seat has been moved. If a sight line is created for a
seat, the row or seating section is edited, the previous created views will be removed as well as
the previous created sight line elements.
Worksharing with Auditorium Maker Auditorium Make has been tested with Worksharing enabled. Because of the way it edits the
seating arrangements, for best performance, it is recommended you check out the workset that
you are placing your seats onto. This will greatly speed up the process of editing rows and
seating sections.
Manual Installation Instructions 1. Download manual install files from Makersoftwarecompany.com/download
2. Close out of Revit.
3. Create a folder on your hard drive called “C:\Program Files\Auditorium Maker 2019” (you may
place this on another folder or drive letter as needed). Make sure this folder is not read-
only. Auditorium Maker needs to be able to write to the configuration.xml file regularly to
update the options.
4. Unzip all install files into this folder.
5. To register Auditorium Maker, copy the license.license file that you received from Maker
Software and replace the existing license.license file in the existing installation folder (usually
“C:\Program Files\Auditorium Maker 2019\license.license”) Note: This license file must
match the hardware ID of the machine that you are installing onto.
6. Open the “Auditorium Maker 2019.addin” file in a text editor. Edit it to point to the location of
the Auditorium Maker 2019.dll file. For example, if you copied all the files to the “C:\Program
Files\Auditorium Maker 2019” folder you need to make sure your addin file says this for the
“<Assembly>” portion:
<Assembly>C:\Auditorium Maker 2019\Auditorium Maker\Auditorium Maker 2019.dll</
Assembly>
7. Save the text file.
8. Copy the “Auditorium Maker 2019.addin” file to the addins directory, this should be in this
folder:
Auditorium Maker Help. © Maker Software LLC �11

Auditorium Maker Help July 8, 2018
“C:\ProgramData\Autodesk\Revit\Addins\2016\Auditorium Maker 2019.addin”
9. the folder for 2016 above will be according to the version of Revit you would like to install the
software to. If you want the software to be in 2016, 2017. 2018 and 2019 please copy this
“Auditorium Maker 2019.addin” file to all of the respective folders for each Revit version.
10. Restart Revit to make sure registration/registration goes through.
Auditorium Maker Help. © Maker Software LLC �12