automated lubrication system - lincoln farms lubrication system working properly. this kit also...
TRANSCRIPT

Automated Lubrication System
Installation/Operator Instructions
John Deere 70 Series STS Combine

Contents Pages Introduction 3 Preparation 4 Bill of Material 5 Component Appendix 6 - 10 System Operation 11 Valve Operation 12 - 13 System Schematic (Overview) 14 Lubrication Point Overview 15 Component Installation Detail 16 - 31 Timer Operation and Settings 32-33 System Start-up 34 System Inspection 35 Troubleshooting 36 – 38 Off Season Maintenance Procedure 39 – 40
2

Introduction Thank you for purchasing the Quicklub® On Board Grease System for your John Deere 70 Series STS Combine. The system has been designed to increase the component life and overall productivity of your equipment, while reducing labor costs related to the traditional method of point-by-point manual lubrication. The system consists of the Quicklub® progressive metering valves that positively displace and meter precise amounts up to N.L.G.I. #2 shop grease down to -13°F temperature. Grease is distributed to each connected point through high-pressure tube and hose. This Quicklub® kit is designed to work with your John Deere 70 Series STS Combine. This is a fully automated lubrication system utilizing a 12 volt DC heavy duty electric pump with integrated timer that dispenses lubricant to the progressive metering valves at timed intervals. The lubricant is pumped to the primary metering valve, which distributes it to secondary metering valves in specific zones of service. The secondary metering valves deliver measured amounts of lubricant proportional to each lube point in its zone. The components are connected with lengths of high-pressure hose and tubing that are included in the kit. Contents of the kit are specifically marked to coincide with this instruction manual to achieve a consistent and quality installation. This manual has been included with the system as an easy-to-follow guide for installation and operation. Keep it with the equipment, as it is also a trouble-shooting manual to keep your automated lubrication system working properly. This kit also contains Installation and Operation Instructions for the 203 series system supply pump. Please refer to this manual for detailed information on operations, maintenance, trouble shooting and technical data. If missing, please contact Lincoln and request service page form #403301.Durable and reliable, the Quicklub® On Board Grease System has been carefully designed using industry proven products to provide long and trouble-free life under the most severe farming conditions. For further information on this system please contact Lincoln Technical Services at 1-314-679-4200 ext. 4782# or fax 1-314-679-4357. THIS DOCUMENT (INSTALLATION INSTRUCTIONS) IS THE EXCLUSIVE PROPERTY OF LINCOLN INDUSTRIAL CORPORATION (‘LINCOLN’). IT CONTAINS PROPRIETARY DATA AND INFORMATION DEVELOPED AT LINCOLN’S EXPENSE AND IS FURNISHED UPON THE EXPRESS CONDITION, ACKNOWLEDGED BY THE RECIPIENT, THAT IT’S CONTENTS SHALL NOT BE DISCLOSED, COPIED OR DUPLICATED, DISSEMINATED, OR USED, EXCEPT FOR THE PURPOSES ESTABLISHED BY WRITTEN CONTRACT OR OTHERWISE AUTHORIZED BY LINCOLN IN WRITING. LINCOLN RESERVES ALL RIGHTS UNDER PATENT, COPYRIGHT, TRADE SECRET AND OTHER APLICABLE LAWS.® Quicklub is a registered trademark of Lincoln.
3

Preparation/Installation Overview The following steps will assist the installer with a systematic approach for installing the Quicklub Automated lube system on the John Deere 70 Series STS Combine. By following the steps outlined, a successful installation will be achieved and will increase the service life of all pins and bearings connected to the lube system. Preparation • Compare the bill of material with the kit contents • Clean machine thoroughly • Survey the equipment and locate all lubrication points to be serviced by the lubrication
system • Lubricate each point with a grease gun prior to removing grease fittings to assure grease
acceptance. Any points that will not accept grease must be repaired prior to system installation.
• After confirming all points will accept grease, remove all grease fittings. Installation Overview • Install appropriate adapters and tube fittings in lube points. • Position valve mounting brackets on machine. • Attach metering valves to previously mounted brackets. • Using tubing cutters, cut to length individual tubing feed lines from secondary valves to lube
points and make connections. • When installing feed line tubing into the Quicklinc fittings, push until firmly seated. • Neatly bundle, loom with spiral wrap provided and tie strap feed lines wherever possible to
protect from abrasion. • Size, cut and attach appropriate hose ends to all supply lines. The high-pressure hose is
used as supply lines from the pump to the primary valve and the primary to the secondary valves. It is recommended that the supply lines be routed and cut only after all valves and the electric pump have been attached to the machine. This assures the supply line is cut to the proper length. Also, allow for unrestricted movement while the machine is in motion.
• Route supply lines from the pump to primary valve and from the primary valve to the secondary valves and make connections.
• Secure supply/feed lines with tie straps, so not in harms way. • Mount pump and make electrical connections (electrical diagram included with the pump).
4

Bill of Material Part # Qty
Pump/Acc 94012 1
275542 1
Valves/Acc 619-27122-1 1 619-26396-2 2 619-26398-2 1
67448 5 700506 4 242125 4 246416 4
51304 8 247023 8 272658 3
303-17499-3 12 404-22581-2 1
239857 1 244883 22
Hose/Tube/Fittings
241288 5 272427 4 272394 2 272401 2 246002 2 241289 4 274048 20 244054 3 243699 2 244053 10 244055 1 244048 1 244047 3
20026 3 20028 1 10181 1 20029 2
Mount/Protection 249913 3 241110 6 241054 1
226-12528-3 1
5

Component Appendix
QUICKLUB COMPONENT GLOSSARY
PART NUMBER (LINCOLN) and DESCRIPTION
- Divider valve SSV12 with 12 port outlets
619-26396-2
619-26398-2
- Divider valve SSV8 with 8 port outlets.
619-27122-1 - Divider valve SSV6 with 6 port outlets.
- Valve closure plug for Black divider valves.303-17499-3
700506 - Straight leak-proof grease fitting.
242125 - Plastic Grease fitting cap.
- Male run tee.67448
- 203 2 Liter Pump, 12 Volt / 3.5 Amps...94012
6

- 90° Swivel quicklinc fitting.244053
244883 - 1/4" tube Quicklinc valve outlet fitting.
- 1/4-28 X 1/8" Adapter, 90° Degree...20026
- 1/8" NPT Swedge on hose stud...241289
- 1/8" NPT 45° Adapter...20028
272401 - HOSE STUD, STRAIGHT.
272394 - HOSE STUD, 90°.
- VALVE, OUTLET FITTING.272658
246002 - 1/8" NPT field installable hose coupling.
- THREADED SLEEVE.272427
PART NUMBER (LINCOLN) and DESCRIPTION
QUICKLUB COMPONENT GLOSSARY
7

241288
QUICKLUB COMPONENT GLOSSARY
PART NUMBER (LINCOLN) and DESCRIPTION
- 90° Swivel quicklinc fitting.
244054
244055
- QL Fitting 1/4 X 1/4 90 Degree.
- QL Fitting 1/4 X 1/4 Straight.
244048 -1/4" Tubing x 1/8" NPT Male 90° Fitting .
244047 - QL Fitting 1/4 X 1/8 Straight.
- .375 P-style clamp for 12mm bolt...249913
- 1/8" Grease filled high pressure hose (40 ft. coil).
- Mounting bracket assembly.275542
243699
- 1/8" Straight adapter.10181
8

QUICKLUB COMPONENT GLOSSARY
303-17499-3
- 1/4" tube Quicklinc valve outlet fitting...
- Valve closure plug for Black divider valves...
51304
242125
246416 - Valve mounting bracket...
- 1/4" Nylon locknut for valve mounting...
- Plastic Grease fitting cap...
241054 - Nylon Ties (100 count poly bag) 7" Length...
241110 - Feed Line Bundling Spiral Wrap (10ft.) ...
PART NUMBER (LINCOLN) and DESCRIPTION
- Male run tee...67448
247023 - Grade 8 - 1/4" valve mounting bolt.
244883
9

QUICKLUB COMPONENT GLOSSARY
PART NUMBER (LINCOLN) and DESCRIPTION
- Valve outlet adapter... - Clamping ring (ferrule)...404-22581-2
239857
- 1/4" Grease filled Nylon Tubing (50 ft. coil).274048
10

System Operation The key components of the Quicklub system are: 1. Pump with Integrated Timer 2. Divider valve network consisting of a Primary Valve and Secondary Valves with attached
Cycle Indicator Pin. 3. A lubrication event is initiated by actuating the pump via the Integrated Timer based on a
preset “pause time” or time between lubrication events. 4. The Pump dispenses lubricant to the primary divider valve 5. The Primary Valve distributes the lubricant to the secondary valves 6. The Secondary Valves distribute and dispense lubricant to the lubrication points. 7. Lubricant flow through the divider valves actuates the Cycle Indicator Pin for a visual
inspection pf proper operation. The pump will run for the preset On-Time 8. The controller now begins countdown for the next lubrication event.
Cycle Indicator Pin
R2 ValveR3 Valve
PrimaryValve
SecondaryValves
Pump
Hose
Tubing
Lube Point
11

Divider Valve Operation At the heart of every Quicklub System is the metering valve or progressive distributor block, designed to positively meter the input of lubricant (oil up to NLGI #2 greases) out to the connected number of lubrication points irrespective of distance and back pressure. The inlet passageway is connected to all piston chambers at all times with only one piston free to move at any one time.
• With all pistons at the far right, lubricant from the inlet flows against the right end of piston A (fig. 1). • Lubricant flow shifts piston A from right to left, dispensing piston A output through connecting
passages to outlet 2. Piston A shift directs flow against right side of piston B (fig. 2). • Lubricant flow shifts piston B from right to left, dispensing piston B output through valve ports of
piston A and through outlet 7 (fig. 3). • Lubricant flow shifts piston C from right to left dispensing piston C output through valve ports of
piston B and through outlet 5. • Piston C shift directs lubricant flow against right side of piston D (not illus.) • Lubricant flow shifts piston D from right to left, dispensing piston D output through valve ports of
piston C and through outlet 3. • Piston D shift directs lubricant through connecting passage to the left side of piston A (fig. 4). • Lubricant flow against left side of piston A begins the second half cycle which shifts pistons from left
to right, dispensing lubricant through outlets 1, 8, 6 and 4 of the divider valve.
12

13
Cross-porting (Divider Valve) Installing a closure plug in one or more outlets may combine outputs from adjacent outlets. Lubricant from a plugged outlet is redirected to the next adjacent outlet in descending numerical order. Outlets 1 and 2 must not be plugged since they have no cross-port passage to the next adjacent outlet. In figure 5 outlets 5 and 3 are cross-ported and directed through outlet 1. In this example, outlet 1 will dispense three times as much lubricant as outlet 7. The tube ferrules in outlets 1 and 7 block the cross-port passage so that lubricant flow is directed through the outlets.

PrimaryValve
LeftValve
RearValve
RightValve
619-27122-1
Plug - 303-17499-3
Plug - 303-17499-3
303-17499-3 PLUG
303-17499-3 PLUG
Pump
619-26396-2
303-17499-3 PLUG
303-17499-3 PLUG
619-26396-2
Plug - 303-17499-3303-17499-3 - Plug
Plug - 303-17499-3303-17499-3 - Plug
619-26398-2
System Schematic (Overview)

Lubrication Point Overview The following lube points on your John Deere combine are not covered by this lubrication system as they are rotating. Please follow your John Deere supplied Operator’s Manual for lubrication requirements and procedures for these specific lubrication points only. Description Freq. (hrs) Feeder House Reverser Drive Gearcase (2 fittings) 50 Feeder House Upper Drive Sheaves (2 fittings) 50 Cleaning Fan Variable Sheave (driver) 50 Cleaning Fan Variable Sheave (driven) 50 STS Variable Speed Driven Sheave 400 STS Variable Speed Driver Sheave 400 STS Variable Speed Driven Sheave (plug) 400 Separator Countershaft U-Joint Driveshaft slip-spline 400 Chopper/Unloader Driveshaft Bearing 400 *Spreader Disks (both sides) 400 Tailings Drive Slip Clutch 400 Conveyor Auger Drive Slip Clutch 400 Upper Feeder house Slip Clutch 400 *Omit if equipped with chopper

Right Side Grease Fittings The Lincoln Quicklub Lubrication System automatically lubricates the following lube points on the John Deere 70 Series STS Combine: 1 Final Drive Outer Bearing 2 Feed Accelerator Bearing 3 Cleaning Fan Shaft Bearing 4 STS Separator Bearing 5 Discharge Beater 6 Primary Countershaft Bearing
1 23
5
4 6
16

Right Side Secondary Valve Assembly and Feed Line Detail
17

Right Side Chassis Lubrication Point Detail
Mount Right Secondary Valve to the left of the Feed Accelerator Bearing as shown in the picture above. Use existing hardware for mounting valve bracket. Use spiral wrap to bundle/protect lines in both directions.
Install one # 243699, replacing grease zerk for Final Drive Outer Bearing. Route/install tubing to outlet 1. Use spiral wrap to protect line.
Install #20026 and #244047 fitting in Feed Accelerator Bearing port. Rout/install tubing from outlet 8.
Install #244053 fitting in Cleaning Fan Shaft Bearing port. Route/install tubing from outlet 7.
Route supply line from valve inlet, S. T. S. Separator Bearing feed line and Primary Countershaft feed line together. Use spiral wrap to protect the lines.
Install #20026 and #244047 fitting in S.T.S. Separator Bearing port. Route/install tubing from outlet 6. Install one 244053 fitting in Primary Countershaft Bearing. Route/install tubing from outlet 4.
18

Right Side Chassis Lubrication Point Detail
Route feed line for Discharge Beater Bearing through oval cut-out and follow hydraulic hoses to top of machine.
Combine supply line and Discharge Beater Bearing lines at top of machine behind belt pulleys. Route lines along existing hydraulic lines.
Continue routing across the top of the machine along hydraulic lines.
Continue routing.
Split lines above the Discharge Beater Bearing. Install #244053 fitting in Discharge Beater Bearing port. Install tubing.
Continue supply line to pump area to be connected later.
19

Left Side Grease Fittings The Lincoln Quicklub Lubrication System automatically lubricates the following lube points on the John Deere 70 Series STS Combine: 1 Final Drive Outer Bearing 2 Unloader Auger Gear Case 3 Cleaning Fan Shaft Bearing 4 Reel Drive Pump 5 Feed Accelerator Bearing 6 Discharge Beater Bearing 7 Chopper & Discharge Beater Counter Shaft 8 Chopper & Discharge Beater Counter Shaft Note: Chopper & Discharge Counter Shaft lube points are covered by the rear valve.
1
2
3
4 5
6
7 8
20

Left Side Secondary Valve Assembly and Feed Line Detail
21

Left Side Chassis Lubrication Point Detail
Mount Left Front Secondary Valve below separator covers as shown in picture above. Use existing hardware for mounting valve bracket.
Install one 243699 fitting in Final Drive Outer Bearing port. Route/install tubing from outlet 1.
Install one 10181, 20028, and one 244048 fitting into Unloader Auger Gear Case port. Route/install tubing from outlet 4.
Install #20026 and 244047 into Cleaning Fan Shaft Bearing port. Route/install tubing from outlet 2.
Close-up of line routing. Keep line tight to frame. Install one 244054 fitting into Reel Drive Pump port.
Route/install tubing from outlet 7. 22
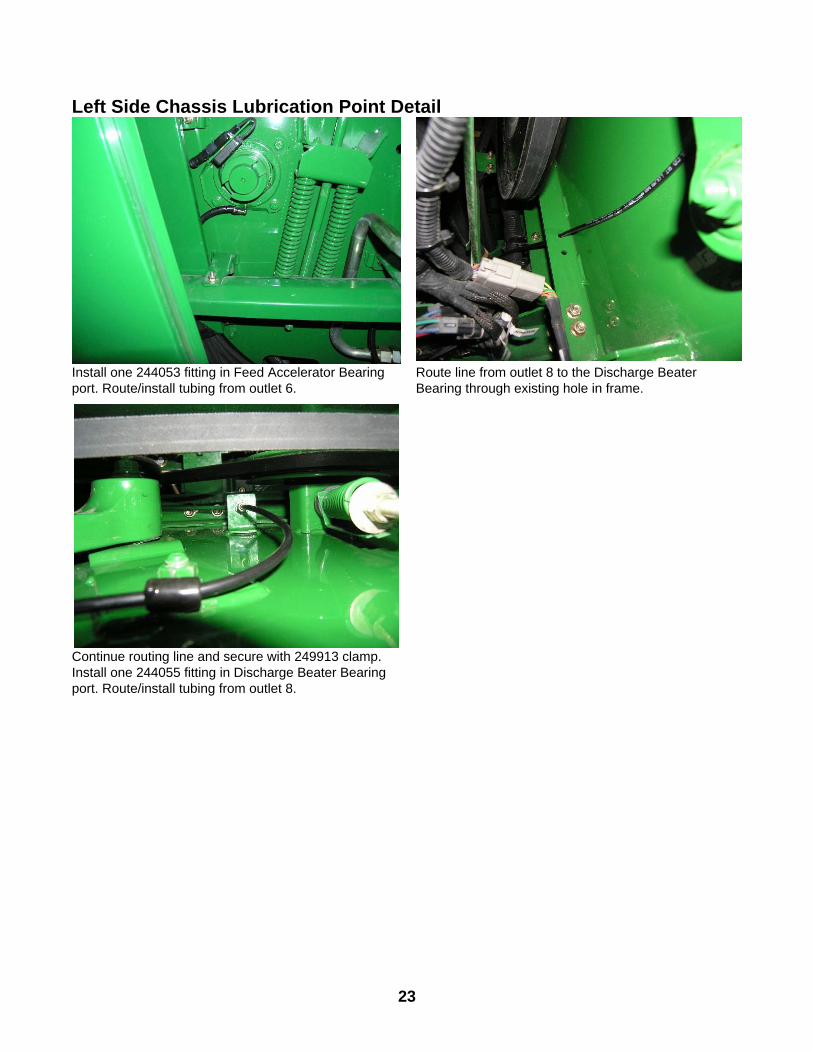
Left Side Chassis Lubrication Point Detail
Install one 244053 fitting in Feed Accelerator Bearing port. Route/install tubing from outlet 6.
Route line from outlet 8 to the Discharge Beater Bearing through existing hole in frame.
Continue routing line and secure with 249913 clamp. Install one 244055 fitting in Discharge Beater Bearing port. Route/install tubing from outlet 8.
23

Rear Grease Fittings The Lincoln Quicklub Lubrication System automatically lubricates the following lube points on the John Deere 70 Series STS Combine: Lube System Service Points 1 Lower Rear Axle Spindle - left 2 Lower Rear Axle Spindle - right 3 Upper Rear Axle Spindle - left 4 Upper Rear Axle Spindle - right 5 Chopper Bearing –left (shown on left side view) 6 Rear Axle Spindle Bearing – right (shown on left side view) 7 Power Steering Rod End Ball Joint - left 8 Power Steering Rod End Ball Joint - right
7 1 3 6 2 8
24

Rear Secondary Valve Assembly and Feed Line Detail
25

Rear Lubrication Point Detail
Mount Rear End Valve on the right rear of combine, directly above rear axle. Use existing hardware for mounting valve bracket. Note lines should be spiral wrapped where possible for protection. Outlets 11 and 12 may be removed and plugged with 303-17499-2 plug if required for combine rear end configuration.
Route tubing bundle towards center of axel and bring lines for the right side back through the hose tube (Axle spindles), above the axle (Chopper Bearing) and along tie rod (Tie rod end).
Follow rear axle and route lines to left side similar to the right side for Upper and Lower Axle Spindles, Chopper Bearing and Tie Rod End.
Secure feed line for Tie Rod to the connecting rod. Install one 244054 into Tie Rod port. Route/install tubing from outlet 11 to the left side and outlet 12 to the right side. Install protective guard over port.
Route lines for Upper and lower Axle Spindles along the existing hydraulic hoses securing with zip ties.
Follow same routing on both sides. Protect lines with spiral wrap.
26

Rear Lubrication Point Detail
Install #244053 into Upper and Lower Spindle ports. Route/install tubing from outlet 6 to the Upper Right Spindle and outlet 2 to the Lower Right Spindle. Protect lines with Spiral Wrap and assure tubing will not rub on tire.
Install #244053 into Upper and Lower Spindle ports. Route/install tubing from outlet 5 to the Upper Left Spindle and outlet 1 to the Lower Right Spindle. Protect lines with Spiral Wrap and assure tubing will not rub on tire.
27

Primary Valve Assembly and Supply Line Detail
Mount Primary Valve on the back of 203 mounting bracket using existing bolt and nut and one 246416 bracket, two 247023 bolts and two 51304 locknuts. Install hose assemblies that feed the secondary valves into the primary valve located on the back of the 203 pump. Install hoses, by simply pushing the hose fitting into the valve fitting, using locations described on the drawing (previous page). Install one end first to the appropriate secondary valve. Route hose allowing for movement and servicing if necessary. Cut hose to the required length and install 246002 hose end. Install pressure relief valve into pump outlet (as shown above). Insert push-in adapter into the bottom of relief valve. Attach one 272658 to adapter just installed into relief valve. Assemble hose assembly that connects the pump to the primary valve, using excess hose and two each 272394 and 272427 hose fittings (as shown above).
28

Pump and Primary Valve Detail
Install hose from outlet 1 to Rear Secondary Valve. Continue routing down the frame, securing to the
existing lines. Connect to Rear Secondary Valve.
Route line from inlet of Left Side Secondary Valve to outlet 3.
Route line from inlet of Left Side Secondary Valve to outlet 5.
Follow existing lines down to primary valve. 29

Pump Mounting Detail
Install the 203 Pump to the rear right side of combine above the rear tire, as indicated above. To accomplish this you will need to use mounting bracket supplied. Secure with hardware supplied in pump box. 30

Electrical connections Note: disconnect the combine battery wires before proceeding with the electrical connections.
Route electrical line along same path as the ride side secondary supply line (see page 18).
Continue routing to the electrical panel on the right side of the cab. Install #RE67013 John Deere auxiliary electrical connector to the power bus below the seat and route to the inside compartment. he remaining knock-out blank on the electrical panel, install #275603 stress relief connector and route wiring harness from the pump the stress relief. Connect wires in the following order: red wire from the pump to the red wire in the John Deere wiring adapter, blue wire from pump to orange wire in the adapter and the white wire from the pump to the brown wire in the adapter.
Replace panel and secure stress relief around wiring harness.
31

ELECTRICAL CONNECTIONS Connect black power cord as follows: Red wire connects to 8amp fuse then to battery (+) hot. White wire connects to battery (-) ground. Blue wire connects to 8 amp fuse, to ignition switch, then to battery (+) switched.
OPERATION • The off timer begins accumulating time when the ignition switch closes. When the off timer reaches
the preset value the pump will turn on. The pump remains activated for the period of time that is preset on the ON timer.
• Remove Access Sealing Plug on front of pump to access manual lube switch, timer adjustments or to view the system LED’s.
• When switching off the ignition voltage and/or the operating voltage the time already used is saved for an unlimited duration.
• When the power supply is switched on again the printed circuit board continues to operate from the point where it had been interrupted.
32

Timer Settings and Adjustment
Remove cover to access the timer. The Pause time is set by the blue rotary switch
The pump on-time is set by the red rotary switch Timer Operation 1. The LED marked “battery” lights when power is applied to the PC board. 2. The LED marked “motor” lights when pumping lubricant. 3. Depressing pushbutton for 2 seconds will initiate a manual lube event. 4. Off timer rotary switch, can be adjusted to 15 values, (do not set to “0” ) 5. On time rotary switch, can be adjusted to 15 values, (do not use “0” ) IMPORTANT: Do not use the zero position located on the ON or Off timer switch. Rotary Switch Values
Switch Position 1 2 3 4 5 6 7 8 9 A B C D E F Pause Time (Hours) 1 2 3 4 5 6 7 8 9 10 11 12 13 14 15
Switch Position 1 2 3 4 5 6 7 8 9 A B C D E F On-Time (Minutes) 2 4 6 8 10 12 14 16 18 20 22 24 26 28 30
Timer Setting For the John Deere 70 Series STS Combine, set the Pause Time for two hours (switch position “2”) and the On-Time for 4 minutes (Switch Position 2)
33

System Start-up The following checklist has been developed as an aid in verifying proper installation and operation of the Quicklub® Onboard Grease System. By completing the steps outlined below, the operational readiness of the system and resulting extension of the component life of all points connected to the system will be insured.
• Apply grease gun (manual or pneumatic) to the grease fitting located on the Primary valve and each secondary valve inlet. While pumping grease through the system, cycle the indicator pin on the primary metering valve a minimum of 15 times. NOTE: Grease gun nozzle and grease fitting should be thoroughly cleaned before lubricating to prevent flow of contaminants into the lube system.
• Inspect primary valve supply and outlets for grease discharge. If leakage is detected, tighten the fittings.
• Continue to cycle the system until fresh grease appears at each lube point.
• Inspect each lube point fitting for leaks. Correct any leaks by firmly pushing tube into the fitting until seating occurs, or tighten the threaded fittings for components connected with hose.
• Operate the equipment through its complete range of motion, inspecting for unrestricted movement of tube and hose. Correct any problems of rubbing, chaffing or kinking.
• Inspect all hose and tube that is not covered with some type of protective wrap. Wrap any tube or hose that would be susceptible to damage from rubbing or chaffing.
• Inspect all hose and tube connected to moving components. Insure that adequate hose or tube is provided to allow unrestricted movement to these moving lube points.
• Verify proper pump operation and verify time setting by activating pump with the green activation button located on the face of the pump control panel. Activate the pump at least three times to insure proper operation.
• After the machine is in operation for a period of time (approx. 80 hours), you may find you need to adjust timing to a shorter or longer period based on the operating conditions.
• Fill the reservoir with selected grease by filling at the grease fitting located on the face of the pump reservoir.
34

Daily Walk-Around Inspection The Lincoln Industrial Quicklub automated lube system components are designed, engineered, manufactured and assembled to the highest quality standards. This lube system requires little maintenance, however, to ensure maximum reliability and to realize maximum service life of all components, it is highly recommended that a daily walk-around inspection be performed. The daily walk-around inspection should include the following: NOTE: Operator to confirm operation of electric pump while machine is in service. • Observe lubricant level in reservoir. Fill reservoir if it is low. • Inspect the relief valve for excess purge of grease. Refer to the trouble shooting guide on
next page. • Inspect all valves and lube point connections to verify that no leaks are occurring. • Inspect supply/feed lines to insure that no breaks or leaks have occurred. • Inspect lube points so that all lube points have a “fresh grease appearance.”
35

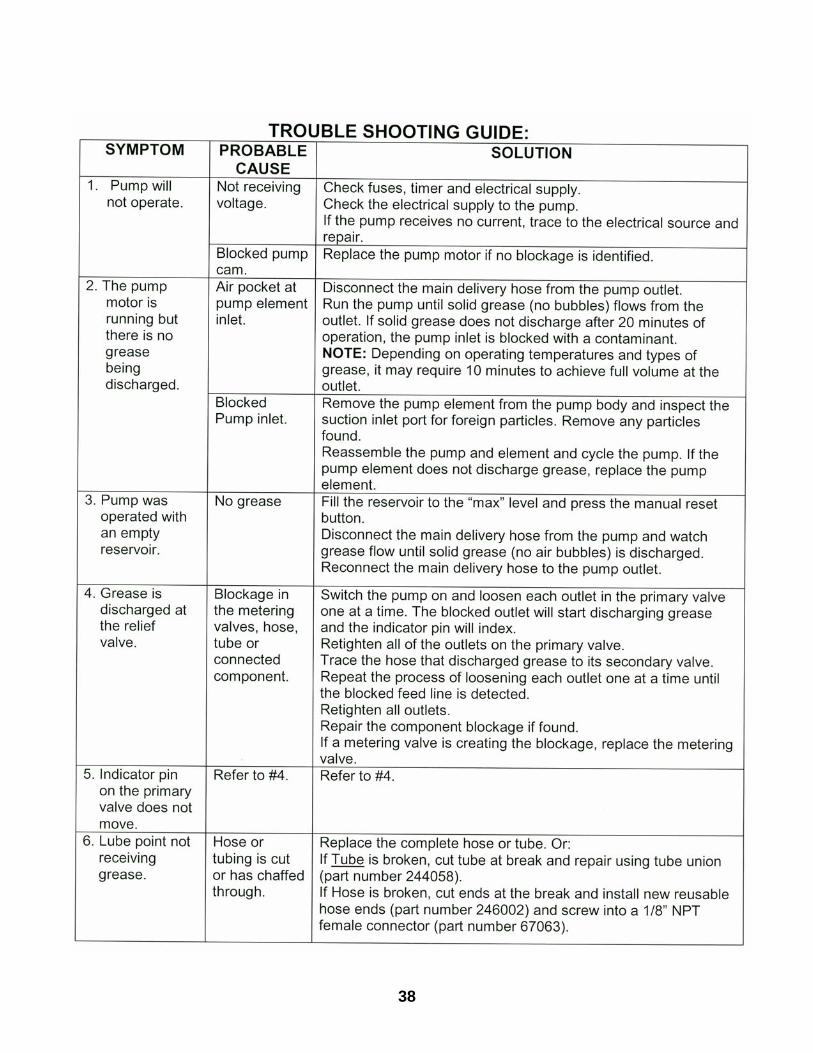
Troubleshooting
Locating Blockage in Lincoln Quicklub Systems
Description In a Lincoln Quicklub Lubrication System, free flow of lubricant from the pump through the transmission system and the bearings is necessary. If any portion of this transmission system (a divider valve, line fitting or any bearing) does not freely accept and pass its portion of the lubricant a blockage has occurred. This blockage will cause a higher than normal pumping pressure to be developed by the pump. Depending on the application or system design, this blockage with its resultant high pump pressure will usually cause a complete loss of lubricant flow into the total system and no bearing will be receiving lubricant. The loss of flow due to a blockage is first indicated with the higher than normal system pressure that is developed by the pump as it attempts to overcome this blockage. This abnormally higher pressure that is a result of a blockage is limited, isolated, and signaled through the use of various performance indicators, reset and relief, incorporated into the system design. Divider Valve A Quicklub divider valve is a proportioning device consisting of a minimum of three pistons. A primary divider valve is the first divider valve downstream from the lube pump. A secondary divider valve is any divider valve receiving lubricant from the primary divider valve. Outlets Each outlet on a Quicklub divider valve dispenses .012 in³ per cycle. If an outlet is plugged, the lubricant will be diverted to the next outlet down allowing proper proportioning of lubricant to all lubrication points. Warning —Never block lube outlets numbered one and two. Locating Blockage If a blockage exists in a Quicklub lubrication system it is caused by one of the following reasons: (1) Crushed transmission line in the System. (2) Blocked bearing in the system. (3) Improperly drilled fitting in the system. (4) Blocked divider valve in the system. All servicing and disassembling should be carried out under the cleanest conditions possible. A blockage in a Quicklub system will be indicated by the fault light and by the pump element relief indicator, exhausting lubricant to atmosphere. Before proceeding as outlined, make a visual inspection of the system and check for crushed lines or improper divider valve installation. Verify that each divider valve outlet required to discharge lubricant can do so and that no plugs have been installed in an outlets one and two of any valve. Use Filtered Lubricant Only.
36

Note: Dirt and foreign material are the worst enemies of any lubricating system. Procedure 1. Use a manual pump with a gauge. Fill the pump with clean, filtered lubricant common to the
system. Connect the manual pump into the inlet of the primary divider valve and slowly operate pump. If system will not cycle freely below 1,500 PSI, see Step 2.
2. With pressure on the primary as outlined in step 1, remove one at a time each supply line
(if the supply lines cannot be removed, remove outlet fittings starting from the bottom and working towards the valve inlet) and attempt to operate manual pump after each line is removed. Do not exceed 2,000 PSI. If pressure drops and primary cycles freely after a line is removed then blockage is downstream in the area that is being served from that outlet. See Step 3. If all feed lines are removed and primary will not cycle, blockage is in this divider valve. Note: When a feed line of a blocked area is removed a small shot of trapped lubricant will usually surge out of this outlet as the inlet pressure on the divider valve drops. If testing in Step 2 indicates a blockage in the primary divider valve, this divider valve must be replaced.
3. Testing accomplished in Step 2 has indicated the blockage is downstream of the primary
divider valve. Reinstall the feed line into the primary valve and proceed to downstream secondary divider valve and repeat step 2 on the secondary valve. If lubricant can be discharged freely through the secondary valve, the blockage is in the supply line between the primary and the secondary valve.
4. If high pressure exists on one of the secondary outlets, blockage has been located. Look
for crushed line, tight bearing, improperly drilled fittings and/or lube inlet port. Correct as necessary.
Contamination If dirt, foreign material or any other form of contamination is found as the source of the blockage, clearing the blockage will only temporarily solve contamination blockage problems. The source of the contamination must be eliminated for satisfactory service. The reservoir must be inspected and cleaned if necessary. The reservoir filling method should be reviewed to eliminate any chance of foreign material entering the reservoir during filling. All lubricating systems require filtered lubricant. Grease Separation Blockage If a hard wax or soap like material is found in the valve outlets, grease separation is occurring. This means that the oil is being squeezed from the grease at normal system operating pressure and the grease thickener is being deposited in the divider valve. Cleaning the divider valve will usually result in only temporarily solving the problem. Consult your lubricant supplier for recommendations on alternate lubricants and your local Lincoln Distributor to verify compatibility with centralized lubricating systems
37
38

Off-Season Maintenance Procedure for Lincoln Quicklub Automatic Lubrication System-203 Style Pumps Most farm machinery is purchased for specific needs and is only used at certain times of the year. Machinery equipped with Lincoln 203 Style Automatic Lubrication Systems most commonly sit idle for many months of the year. In the past several months, during machinery start up, we received a few calls regarding lube system start up issues. Our research of the reported issues determined that most were related to the grease being used. Greases react in different manners to various pressures and temperatures they are exposed to. Some grease’s tend to separate over time due to inactivity. We recommend that you look to your grease supplier for a recommendation of a grease that is less likely to separate under your specific conditions. Grease “pump-ability” and “flow-ability” are key factors in making sure the Lincoln Automatic Lubrication system works as expected. We have found that after startup of the equipment and the lube system, and after the lube system is cycling periodically, we receive very few reports of system issues. In an effort to prevent issues during the next season start-up, we have developed the following “Off Season Maintenance Procedure” that we feel will better insure the results that you expect the next time you use your equipment. PLEASE NOTE:
- You must perform this procedure on a monthly basis to prevent system issues during the next usage.
- Leave only enough grease in the pump to perform Step #1. DO NOT FILL THE
RESERVOIR AFTER THE LAST USAGE OF THE YEAR.
Off Season Maintenance Procedure 1. Turn the machinery ignition switch on and manually cycle the lubrication system by depressing the “manual lube” button located directly under the red and blue rotary timer switches on the front of the pump housing under the timer access cover. Depressing the button for 2 seconds will initiate a manual lube event. Cycle the system at least two more times to insure the grease is cycled through the primary valve.
39

2. Using a Lincoln PowerLuber or a manual grease gun, cycle the primary valve (first valve from the pump element) via the grease fitting. Pump grease for 10 seconds with the PowerLuber or 10 strokes of a standard grease gun.
Grease Fitting
3. The last step would be to cycle each secondary valve, again using the PowerLuber or manual grease gun. You should refer to your owner’s manual to determine the number and location of the secondary valves. Cycle each valve until fresh grease is seen at a visible grease point.
Grease Fittings-Top of each Secondary Valve
40