avaya one-x® mobile installation guide - telesavers mobile installation --- 1... · avaya one-x®...
TRANSCRIPT

Avaya one-X® Mobile Installation Guide
Release 5.2January 2010
0.4
© 2009 Avaya Inc.All Rights Reserved.
NoticeWhile reasonable efforts were made to ensure that the information in this document was complete and accurate at the time of printing, Avaya Inc. can assume no liability for any errors. Changes and corrections to the information in this document may be incorporated in future releases.
For full support information, please see the complete document,Avaya Support Notices for Software Documentation, document number03-600758.To locate this document on our Web site, simply go to http://www.avaya.com/support and search for the document number in the search box.
Documentation disclaimerAvaya Inc. is not responsible for any modifications, additions, or deletions to the original published version of this documentation unless such modifications, additions, or deletions were performed by Avaya. Customer and/or End User agree to indemnify and hold harmless Avaya, Avaya's agents, servants and employees against all claims, lawsuits, demands and judgments arising out of, or in connection with, subsequent modifications, additions or deletions to this documentation to the extent made by the Customer or End User.
Link disclaimerAvaya Inc. is not responsible for the contents or reliability of any linked Web sites referenced elsewhere within this documentation, and Avaya does not necessarily endorse the products, services, or information described or offered within them. We cannot guarantee that these links will work all of the time and we have no control over the availability of the linked pages.
WarrantyAvaya Inc. provides a limited warranty on this product. Refer to your sales agreement to establish the terms of the limited warranty. In addition, Avaya’s standard warranty language, as well as information regarding support for this product, while under warranty, is available through the following Web site:http://www.avaya.com/support.
CopyrightExcept where expressly stated otherwise, the Product is protected by copyright and other laws respecting proprietary rights. Unauthorized reproduction, transfer, and or use can be a criminal, as well as a civil, offense under the applicable law.Cisco is a registered trademark of Cisco Systems, Inc.
Avaya supportAvaya provides a telephone number for you to use to report problems or to ask questions about your product. The support telephone number is 1-800-242-2121 in the United States. For additional support telephone numbers, see the Avaya Web site: http://www.avaya.com/support.

Avaya one-X® Mobile Installation Guide January 2010 3
Chapter 1: Introduction . . . . . . . . . . . . . . . . . . . . . . . . . . . . . . . . . . . . . 5About This Guide . . . . . . . . . . . . . . . . . . . . . . . . . . . . . . . . . . . . . . 5Intended Audience . . . . . . . . . . . . . . . . . . . . . . . . . . . . . . . . . . . . . 5Document Organization . . . . . . . . . . . . . . . . . . . . . . . . . . . . . . . . . . . 5Conventions . . . . . . . . . . . . . . . . . . . . . . . . . . . . . . . . . . . . . . . . . 6Customer Support . . . . . . . . . . . . . . . . . . . . . . . . . . . . . . . . . . . . . 6
Chapter 2: Pre-Installation Requirements . . . . . . . . . . . . . . . . . . . . . . . . . . . 7Required Documents . . . . . . . . . . . . . . . . . . . . . . . . . . . . . . . . . . . . 7System Requirements . . . . . . . . . . . . . . . . . . . . . . . . . . . . . . . . . . . . 7
Hardware Requirements. . . . . . . . . . . . . . . . . . . . . . . . . . . . . . . . . 7Software Requirements . . . . . . . . . . . . . . . . . . . . . . . . . . . . . . . . . 8
Supported Backend Requirements . . . . . . . . . . . . . . . . . . . . . . . . . . . . . 8Voicemail Platforms . . . . . . . . . . . . . . . . . . . . . . . . . . . . . . . . . . . 9Directories . . . . . . . . . . . . . . . . . . . . . . . . . . . . . . . . . . . . . . . . 9
Chapter 3: Avaya one-X Mobile Server Installation . . . . . . . . . . . . . . . . . . . . . . 11Single Server Installation . . . . . . . . . . . . . . . . . . . . . . . . . . . . . . . . . . 12Split Server Installation . . . . . . . . . . . . . . . . . . . . . . . . . . . . . . . . . . . 12Common Installation Steps for all Installation Types . . . . . . . . . . . . . . . . . . . 14
License Agreement . . . . . . . . . . . . . . . . . . . . . . . . . . . . . . . . . . . 14Customer Information . . . . . . . . . . . . . . . . . . . . . . . . . . . . . . . . . . 14Choose Destination Location . . . . . . . . . . . . . . . . . . . . . . . . . . . . . . 14Ready To Install Avaya one-X Mobile . . . . . . . . . . . . . . . . . . . . . . . . . 14Installation Wizard Complete . . . . . . . . . . . . . . . . . . . . . . . . . . . . . . 14
Administration and End User Web Pages . . . . . . . . . . . . . . . . . . . . . . . . . 15
Chapter 4: Avaya one-X Mobile Server Upgrade . . . . . . . . . . . . . . . . . . . . . . . 17Before You Begin . . . . . . . . . . . . . . . . . . . . . . . . . . . . . . . . . . . . . . 17Upgrade the Avaya one-X Mobile Server. . . . . . . . . . . . . . . . . . . . . . . . . . 18
Restore to the earlier version of one-X Mobile server. . . . . . . . . . . . . . . . . 19
Chapter 5: Network Configuration . . . . . . . . . . . . . . . . . . . . . . . . . . . . . . . 21General Topology Recommendations . . . . . . . . . . . . . . . . . . . . . . . . . . . 21Topology One: Avaya one-X Mobile in a Reverse Proxy Configuration . . . . . . . . . 22Topology Two: Avaya one-X Mobile Server in a Split Server Configuration . . . . . . . 23Topology Three: Avaya one-X Mobile Server in the DMZ . . . . . . . . . . . . . . . . . 24
Topology Four: Avaya one-X Mobile Server in the Same Network as other Servers 26Benefits of the Reverse Proxy Configuration . . . . . . . . . . . . . . . . . . . . . 27Benefits of the Split Server Configuration . . . . . . . . . . . . . . . . . . . . . . . 28
Contents

Contents
4 Avaya one-X® Mobile Installation Guide January 2010
Appendix A: Avaya one-X Mobile Documentation. . . . . . . . . . . . . . . . . . . . . . . 29
Appendix B: Installation and Upgrade Checklists. . . . . . . . . . . . . . . . . . . . . . . 31Checklist for a new Avaya one-X Mobile Installation . . . . . . . . . . . . . . . . . . . 32Checklist for an Avaya one-X Mobile Upgrade. . . . . . . . . . . . . . . . . . . . . . . 34
Appendix C: Installing Windows Server Components . . . . . . . . . . . . . . . . . . . . 37

Avaya one-X® Mobile Installation Guide January 2010 5
Chapter 1: Introduction
About This GuideThe Avaya one-X® Mobile Installation Guide describes the physical connections, networking, and integration with the call server. Included in this document are procedures to perform a new installation and an upgrade installation of the Avaya one-X Mobile application on the server.
Intended Audience This document is intended for personnel who install and administer the Avaya one-X Mobile Server.
Document OrganizationThis guide contains the following chapters:
Chapter Description
Chapter 1: Introduction Provides an overview of this guide
Chapter 2: Pre-Installation Requirements
Provides system requirements, backend supported requirements, and a reference to worksheets that must be completed prior to installation
Chapter 3: Avaya one-X Mobile Server Installation
Provides instructions to perform a new installation of the Avaya one-X Mobile Server software using the installation wizard
Chapter 4: Avaya one-X Mobile Server Upgrade
Provides instructions to upgrade the Avaya one-X Mobile Server software
Chapter 5: Network Configuration Describes the Network Configuration and Topography options
Appendix A: Avaya one-X Mobile Documentation
Lists all Avaya one-X Mobile documentation.

Chapter 1: Introduction
6 Avaya one-X® Mobile Installation Guide January 2010
ConventionsThe following conventions appear in this guide:
Customer Support The support number for the customer and installer of the Avaya one-X Mobile Server is: 1-800-242-2121
For worldwide support, see http://www.avaya.com/gcm/master-usa/en-us/tasks/connect/contacts/worldwide/worldwide.htm.
Avaya documents and information about Avaya products can be obtained at the following URL: http://www.avaya.com/support.
Appendix B: Installation and Upgrade Checklists
Provides checklists to help guide you through the installation and upgrade tasks.
Appendix C: Installing Windows Server Components
Provides the procedure to install the Windows server components, ASP.NET and Internet Information Services (IIS).
Chapter Description
Convention Description
Bold font Keywords and names of text fields are in boldface font.
Italic font Values that you must enter into text fields are in italic font.
Courier Font Text which must be entered into a terminal session is in courier font.
Menu Font Menu Items are in Bold Font

Avaya one-X® Mobile Installation Guide January 2010 7
Chapter 2: Pre-Installation Requirements
Required DocumentsThe worksheets in the Avaya one-X Mobile Site Survey/Pre-Installation Checklist, must be completed before installing the Avaya one-X Mobile Server:
Avaya documents are available on the Avaya Support Web site at http://www.avaya.com/support/. For an overview of the tasks required to install or upgrade the Avaya one-X Mobile Server software, see Appendix B: Installation and Upgrade Checklists on page 31.
System RequirementsThere are basic hardware and software requirements that need to be in place in order to install the Avaya one-X Mobile Server software. Before you install, verify that you adhere to the following hardware and software requirements.
Hardware RequirementsHardware requirements for the installation of the Avaya one-X Mobile Server are:
Avaya Provided Equipment
● Server should have a minimum of 6 GB RAM
● 2.27 GHz quad core processor (CPU)
● S8800 1U (optional Avaya provided hardware)
Customer Provided Equipment
● Server should have a minimum of 4 GB RAM
● 2.27 GHz quad core processor (CPU)
Common Hardware Requirements

Chapter 2: Pre-Installation Requirements
8 Avaya one-X® Mobile Installation Guide January 2010
● The free space on the target drive should be at least 6 GB and should not be a multiple of 4 GB*
● 100 MB Ethernet
● At least 40 GB of free disk space
● Redundant Array of Inexpensive Disks (RAID) (Raid 0 and Raid 1) (Avaya recommends for customer-provided servers)
Note:Note: * If the disk space on your server is an even multiple of 4GB, either decrease or
increase the space available before attempting to install one-X Mobile. This is a known issue affecting Microsoft Windows Server 2003. For more information, see http://support.microsoft.com/kb/189787.
Software RequirementsThe following items must be installed or configured before installation:
● Microsoft Windows 2003 Server 32-bit Standard Edition Service Pack 2 or higher
Note:Note: Microsoft Windows 2003 Server Standard or Enterprise Edition must be installed
as a standard image without any hardening.
● Windows components of IIS and ASP.NET (See Appendix C: Installing Windows Server Components on page 37 for more information.)
● Supported versions of IIS are 5.0 and 6.0
● Supported version of ASP.NET is v 1.1.4
● The Avaya one-X Mobile Server and the voicemail platform should individually be synchronized to a time source.
● Host machine must run the J2SE JDK version 1.5.0_10.
Note:Note: Microsoft SQL Server (complete version) is required for installations with more
than 500 users. For larger installations, it is recommended that you upgrade from the Microsoft SQL Server Desktop Engine (MSDE) version of Microsoft SQL server to the Standard edition. For more information, see www.microsoft.com.
Supported Backend RequirementsThis section identifies the supported telephone communication systems, voicemail, and directory servers necessary for Avaya one-X Mobile.

Supported Backend Requirements
Avaya one-X® Mobile Installation Guide January 2010 9
Voicemail Platforms● Modular Messaging 5.0 or higher with MSS backend
● MS Exchange 2003 or 2007 message store
● Modular Messaging 5.0 or higher with MS Exchange 2000, 2003, and 2007 backend
Note:Note: This configuration works only with Communication Manager (CM) Release 5.2.1
and later. It does not work with the previous Communication Manager releases.
Directories● Novell eDirectory
● Microsoft Active Directory (2000, 2003, 2007, and 2008)
● SunOne
● Netscape_iPlanet
● Message Storage Server (MSS) LDAP v3

Chapter 2: Pre-Installation Requirements
10 Avaya one-X® Mobile Installation Guide January 2010
Avaya one-X® Mobile Installation Guide January 2010 11
Chapter 3: Avaya one-X Mobile Server Installation
This chapter provides instructions to perform a new installation of the Avaya one-X Mobile Server software. If an earlier version of the Avaya one-X Mobile Server software is already installed on the server and you want to install a newer release, see Chapter 4: Avaya one-X Mobile Server Upgrade on page 17.
You can install the Avaya one-X-Mobile Server software from the CD, or by downloading from the Product Licensing and Delivery System (PLDS). You can only download from PDLS if you have a valid sales order number. Before you install the Avaya one-X-Mobile Server software, perform the following steps:
● See Checklist for a new Avaya one-X Mobile Installation on page 32 and print a copy of the checklist. Use this checklist to check off the steps as you complete them to ensure that you do not overlook any important tasks.
● Review Chapter 2: Pre-Installation Requirements on page 7.
● Know the IP address for the internal server.
● Know the IP address for the external server (optional) as applicable.
● Connect Avaya one-X Mobile server to the company domain.
● Connect Avaya one-X Mobile server to the work group.
Note:Note: Ensure that IIS and ASP.NET is installed and running. For more information, see
Appendix C Installing Windows Server Components.
Once the application is loaded on the computer and setup.exe is run, the installation wizard directs you through the installation process.
Note:Note: If you are performing a split server installation, you will install the software on both
the internal and external server.
1. In the Choose Setup Language dialog box, select the appropriate language, and then click Next.
2. In the Welcome dialog box, click the Next button.
3. Do one of the following:
● For a single server installation, see Single Server Installation on page 12.
● For a split server installation, see Split Server Installation on page 12.

Chapter 3: Avaya one-X Mobile Server Installation
12 Avaya one-X® Mobile Installation Guide January 2010
Single Server Installation1. To install the software on one server, select Single Server Installation, and then click the
Next button.
2. Complete the following screens provided by the installation wizard:
● License Agreement
● Customer Information
- User Name
- Company Name
● Choose Destination Location
● Ready to Install
See Common Installation Steps for all Installation Types on page 14 for more information about these screens.
Split Server Installation1. To install the software on two servers, select Split Server Installation, and then click the
Next button on the Select an Installation Type dialog box.
2. In the Select Server Type dialog box, select External Server Installation, and then click the Next button.
3. Click the Yes button.
Note:Note: Installing the End User Web on the internal server is optional.
4. In the Internal Server Information dialog box, enter the IP Address of the internal server for the ODBC data source.
5. Click the Next button.
6. Continue with the installation and complete the following screens for the external server:
● License Agreement
● Customer Information
- User Name
- Company Name
● Choose Destination Location

Split Server Installation
Avaya one-X® Mobile Installation Guide January 2010 13
● Ready to Install
See Common Installation Steps for all Installation Types on page 14 for more information about these screens.
7. In the Select Server Type dialog box, select Internal Server Installation, and then click the Next button.
The system displays a dialog box asking if you want to install the User Web on the internal server.
8. Click the Yes button.
Note:Note: Installing the End User Web on the internal server is optional.
9. In the Internal Server Information dialog box, enter the internal server IP address as it appears to the external server.
10. Click the Next button.
11. Continue with the installation and complete the following screens for the internal server:
● License Agreement
● Customer Information
- User Name
- Company Name
● Choose Destination Location
● Ready to Install
See Common Installation Steps for all Installation Types on page 14 for more information about these screens.

Chapter 3: Avaya one-X Mobile Server Installation
14 Avaya one-X® Mobile Installation Guide January 2010
Common Installation Steps for all Installation TypesThe following installation steps are used in both the Single Server and Split Server installations. For the Split Server installation, these steps are used once for the external server, and again for the internal server.
License AgreementRead the License Agreement and then click the I accept the terms of the license agreement button. You must click Next to proceed with the installation.
Customer InformationIn the Customer Information dialog box, enter the User Name and the Company Name and click Next.
Choose Destination LocationThe system selects a folder on the C drive by default (C:\Edge) for the Avaya one-X Mobile. Avaya recommends you to install Avaya one-X Mobile server on the C drive.
Ready To Install Avaya one-X MobileWhen the installation settings are complete, click Install to begin the installation.
Upon completion of these entries, if the available disk space in the target drive is less than 6 GB, the system displays a message window advising that at least 6 GB is required for installation of this software and the installation will be aborted.
Once the Installation is started, the system displays a progress message on the progress bar that identifies what is occurring in each stage of the installation.
Installation Wizard CompleteWhen installation is complete, the system displays a screen that prompts you to restart your computer.
Administration and End User Web Pages
Avaya one-X® Mobile Installation Guide January 2010 15
Make sure Yes, I want to restart my computer now is selected, and then click the Finish button.
A status bar appears to indicate the progress of the Installation.
● Single Server Installation takes more than 10 minutes to load and more than 1 hour 40 minutes to install. An upgrade takes approximately an hour and 15 minutes.
● Split Server installation takes approximately the same time.
● The installation continues for several minutes after clicking the Finish button.
The system will reboot. After the reboot, you are prompted to log in again. The installation wizard restarts by itself and finishes the installation. The system will reboot again after completion of the installation.
Once the installation is complete, see the Avaya one-X® Mobile Integration, Administration and Maintenance Guide, for information on how to integrate, administer, and configure the Avaya one-X Mobile Server.
Administration and End User Web PagesAfter the Avaya one-X Mobile Server software is installed, you can access the administration and end-user Web pages. The Avaya one-X Mobile Server administrative Web site is available at http(s)://<internal server IP address/admin>. The Avaya one-X Mobile Server end-user Web site is available at http(s)://<server IP address>.

Chapter 3: Avaya one-X Mobile Server Installation
16 Avaya one-X® Mobile Installation Guide January 2010
Avaya one-X® Mobile Installation Guide January 2010 17
Chapter 4: Avaya one-X Mobile Server Upgrade
This chapter provides instructions to upgrade the Avaya one-X Mobile Server software from release 1.1.X to release 5.2, and release 5.2 to 5.2.X.
Note:Note: If you have Avaya one-X Mobile Server Release 1.0, you must first upgrade to R
1.1 and then upgrade to 5.2. If you are upgrading from a 1.1 system to a 5.2 system, the system will not be available after the reboot. You must do additional configuration to get the system into a working state such as configuring SIP.
To perform a new installation, see Chapter 3: Avaya one-X Mobile Server Installation on page 11.
The upgrade process affects service and requires system down time. Prior to upgrading the Avaya one-X Mobile Server, be sure to inform subscribers that the system will be unavailable during the upgrade.
Before You BeginBefore you begin the upgrade, do the following:
● See Checklist for an Avaya one-X Mobile Upgrade on page 34 and print a copy of the checklist. Use this checklist to check off the steps as you complete them to ensure that you do not overlook any important tasks.
● Ensure that you have downloaded the one-X Mobile server software from http://plds.avaya.com or have obtained a CD
● Ensure that you have taken a backup of the one-X Mobile server
● Do not set any screen saver and do not leave the system unattended
● Ensure that on the Power Options Properties window, Always On is selected in the Power schemes drop-down list.
● Ensure that all the fields in the Settings for Always On power scheme group box are set to Never on the Power Options Properties window.

Chapter 4: Avaya one-X Mobile Server Upgrade
18 Avaya one-X® Mobile Installation Guide January 2010
Upgrade the Avaya one-X Mobile ServerIf Avaya one-X Mobile is configured in a two-server configuration, the upgrade procedure is identical for both the internal and external servers. The external server will generally complete the upgrade process quicker than the internal server. The order in which the servers are upgraded does not have any relevance. However, both servers should be upgraded and be running the same version of the Avaya one-X Mobile application.
To upgrade the Avaya one-X Mobile Server, perform the following steps:
1. Open your Web browser, and go to the Avaya Support Web site at http://www.avaya.com/support.
2. Download the Avaya one-X Mobile upgrade file setup.exe.
Note:Note: Do not rename or delete the setup.exe during the install.
3. Save the file to a storage location on the network and to the Avaya one-X Mobile Server.
4. Navigate to the location of the setup.exe file.
5. Double-click setup.exe.
6. In the Choose Setup Language dialog box, select the appropriate language, and then click Next.
7. In the Preparing Setup dialog box, verify the versions and click Yes or No to confirm that you want to install a different version of the software.
8. In the Welcome dialog box, click Next.9. In the License Agreement dialog box, click I accept the terms of the license
agreement. 10. Click the Next button.
Note:Note: It may take 10 minutes or more for the status bar to begin moving. This is normal.
Do not click Cancel and do not close the Setup Status dialog box.
When the upgrade is complete, the system displays the Update Complete dialog box.
11. Leave the Yes, I want to restart my computer now selected and click Finish.
Your system will not restart at this time. The system displays the installation progress window.
Note:Note: It may take 10 minutes or more for the status bar to begin moving. This is normal.
When the upgrade is complete, the system displays the Patch Installation is Done message.
12. Click OK to restart your system.

Upgrade the Avaya one-X Mobile Server
Avaya one-X® Mobile Installation Guide January 2010 19
13. When the system restarts, inform the subscribers that the one-X Mobile server is available for use.
Note:Note: For more information regarding configuring the Communication Manager for SIP,
dial plans, and profile changes, see the Avaya one-X® Mobile Integration, Administration and Maintenance Guide.
Restore to the earlier version of one-X Mobile serverYou can restore to the earlier version of one-X Mobile server if you have backed up the one-X Mobile server as mentioned in Before You Begin on page 17.

Chapter 4: Avaya one-X Mobile Server Upgrade
20 Avaya one-X® Mobile Installation Guide January 2010

Avaya one-X® Mobile Installation Guide January 2010 21
Chapter 5: Network Configuration
! Important:Important: During the installation, the one-X Mobile internal server can have only one
Network Interface Card enabled. If the machine has multiple NICs, then the administrator enables the NIC that is used to connect to the Communication Manager.
General Topology RecommendationsThe Avaya one-X Mobile Server makes connections to the following servers in the Enterprise:
● Avaya Communication Manager
● Voice mail server
● LDAP Server
● Mail Server (Microsoft Exchange Mail Server)
● Modular Messaging
For more information on the split server installation, see the one-X Mobile 5.2 Security White Paper on the Avaya Support Web site at http://www.avaya.com/support/.
The Avaya one-X Mobile Server receives inbound connections from the internet. Typically, port 80 or port 443 are used for this.
In general, Avaya recommends you to place the Avaya one-X Mobile Server in close proximity to the Avaya Communication Manager. This will help to reduce any network latency. In particular, Avaya recommends that the Avaya one-X Mobile Server and Avaya Communication Manager should be placed on the same VLAN to reduce routing requirements.
Depending on the configuration of your network, you can configure four different network topologies:
● Avaya one-X Mobile Server in a reverse proxy configuration
● Avaya one-X Mobile Server in a split server configuration
● Avaya one-X Mobile Server in the DMZ
● Avaya one-X Mobile Server in the same network as other servers
These four topologies are further described in the following sections.

Chapter 5: Network Configuration
22 Avaya one-X® Mobile Installation Guide January 2010
Topology One: Avaya one-X Mobile in a Reverse Proxy Configuration
The following diagram illustrates a topology where a reverse proxy infrastructure is used to hide the location of the Avaya one-X Mobile Server and the internal network structure from exposure to the internet.
Topology Two: Avaya one-X Mobile Server in a Split Server Configuration
Avaya one-X® Mobile Installation Guide January 2010 23
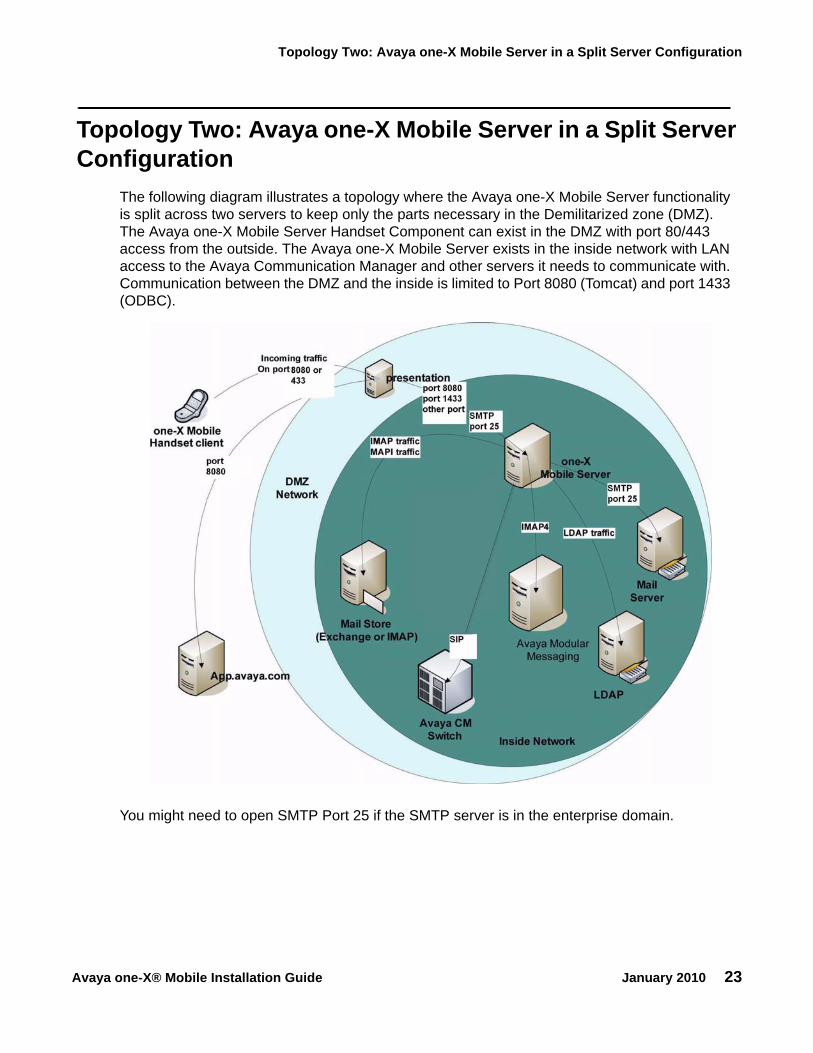
Topology Two: Avaya one-X Mobile Server in a Split Server Configuration
The following diagram illustrates a topology where the Avaya one-X Mobile Server functionality is split across two servers to keep only the parts necessary in the Demilitarized zone (DMZ). The Avaya one-X Mobile Server Handset Component can exist in the DMZ with port 80/443 access from the outside. The Avaya one-X Mobile Server exists in the inside network with LAN access to the Avaya Communication Manager and other servers it needs to communicate with. Communication between the DMZ and the inside is limited to Port 8080 (Tomcat) and port 1433 (ODBC).
You might need to open SMTP Port 25 if the SMTP server is in the enterprise domain.

Chapter 5: Network Configuration
24 Avaya one-X® Mobile Installation Guide January 2010
Topology Three: Avaya one-X Mobile Server in the DMZThe following diagram illustrates a topology where the Avaya one-X Mobile Server is homed inside the DMZ. Typically, servers that are kept in the DMZ have inbound connections from the outside, and outbound connections to the inside on specific ports.
The following firewall modifications are necessary for this topology:
● Allow port 80 or 443 traffic inbound from any IP address to the Avaya one-X Mobile Server. Note that it is problematic to restrict access-list entries to certain IP ranges for wireless networks as these networks are constantly changing their IP address ranges.
● Allow outbound traffic from the Avaya one-X Mobile Server to the Avaya Communication Manager Cluster Nodes. The required ports are as follows:
- Port 80 for AXL needs to be opened to every Node in the Avaya Communication Manager cluster.
- Port 8080 or 1443 needs to be open for the internal server and DMZ traffic.
Topology Three: Avaya one-X Mobile Server in the DMZ
Avaya one-X® Mobile Installation Guide January 2010 25
- Port 8404 for Avaya Communication Manager LDAP needs to be opened to every Node in the Communication Manager cluster.
- Port 389 for Microsoft Active Directory needs to be opened to the Active Directory Server.
- Port 143 and 993 for IMAP needs to be opened to the Modular Messaging and Microsoft Exchange Servers which host Avaya one-X Mobile users.
- Port 135 needs to be opened to the Microsoft Exchange Servers which host Avaya one-X Mobile users. This allows the MAPI protocol to access the Exchange Servers.
- Additionally, users in the inside network should be able to reach the DMZ via HTTP. This is typically allowed by default on most fire walls.

Chapter 5: Network Configuration
26 Avaya one-X® Mobile Installation Guide January 2010
Topology Four: Avaya one-X Mobile Server in the Same Network as other Servers
The following diagram illustrates a topology where the Avaya one-X Mobile Server is homed in the inside network and has unfettered access to the internal servers including Avaya Communication Manager.
The only firewall modification necessary for this configuration is to allow port 80 or port 443 traffic to access the Avaya one-X Mobile Server from the outside. Note that it is problematic to restrict access-list entries to certain IP ranges for wireless networks as these networks are constantly changing their IP address ranges.

Topology Three: Avaya one-X Mobile Server in the DMZ
Avaya one-X® Mobile Installation Guide January 2010 27
Benefits of the Reverse Proxy ConfigurationThe Reverse Proxy configuration provides the following security benefits:
● Only the external IP address of the Reverse Proxy is exposed to the Internet. Note that the DMZ address is still hidden.
● Using statically NAT’d addresses make it much more difficult for hackers to gather real information about the network.
● Reverse proxy infrastructure narrows the HTTP/HTTPS traffic origination to one server; the reverse proxy. Traffic can be monitored from one point.
● In order to hack into the internal network, a hacker will have to break through the following checkpoints:
- outside firewall interface- Reverse Proxy- DMZ firewall interface- Avaya one-X Mobile Server
● If the Reverse Proxy is compromised, the hacker can only gain access to servers on the DMZ.

Chapter 5: Network Configuration
28 Avaya one-X® Mobile Installation Guide January 2010
Benefits of the Split Server ConfigurationThe Split Server configuration provides the following advantages:
● Access to port 80 and 443 is limited to the DMZ only.
● Firewall modifications to the inside interface is limited to 8080 and 1433.
● Critical Call Control functionality still resides on the inside next to the Avaya Communication Manager. This is important in load situations.
● VPN software may be installed on the Mobile Handset Components.
● In order to break into the network, a hacker would have to cross the following checkpoints:
- outside firewall interface- Avaya one-X Mobile handset component- DMZ interface on port 8080 and port 1433- Avaya one-X Mobile Server
Avaya one-X® Mobile Installation Guide January 2010 29
Appendix A: Avaya one-X Mobile Documentation
Avaya documents are available on the Avaya Support Web site at http://www.avaya.com/support/.The documents listed below are part of the Avaya one-X Mobile documentation set.
● Avaya one-X Mobile Site Survey/Pre-Installation Checklist (for Avaya Communication Manager Environment)
● Avaya one-X Mobile Installation Guide
● Avaya one-X Mobile Integration, Administration, and Maintenance Guide
● Avaya one-X Mobile User Guide for J2ME
● Avaya one-X Mobile User Guide for RIM Blackberry
● Avaya one-X Mobile User Guide for Palm Treo
● Avaya one-X Mobile User Guide for iPhone
● Avaya one-X Mobile User Guide for Windows Mobile
● Avaya one-X Mobile Web User Guide

Appendix A: Avaya one-X Mobile Documentation
30 Avaya one-X® Mobile Installation Guide January 2010
Avaya one-X® Mobile Installation Guide January 2010 31
Appendix B: Installation and Upgrade Checklists
This appendix contains checklists to help guide you through the installation and upgrade tasks. Before starting a new Avaya one-X Mobile installation or upgrade, print the relevant checklist. Then check off the steps as you complete them to ensure that you do not overlook any important tasks.
Depending on whether you are performing a new installation or an upgrade, see one of the following sections:
● Checklist for a new Avaya one-X Mobile Installation on page 32
● Checklist for an Avaya one-X Mobile Upgrade on page 34

Appendix B: Installation and Upgrade Checklists
32 Avaya one-X® Mobile Installation Guide January 2010
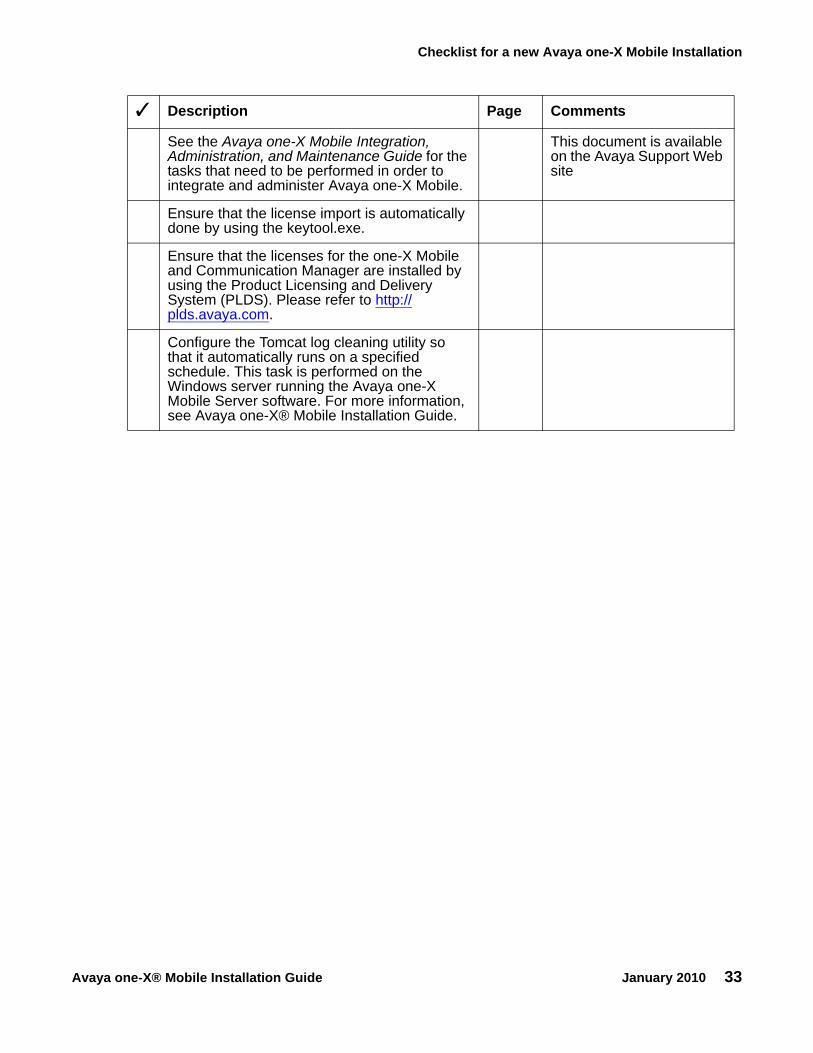
Checklist for a new Avaya one-X Mobile InstallationUse this checklist to perform a new installation of Avaya one-X Mobile. After you complete a task, make a check mark in the ✓ column.
Note:Note: Avaya is not responsible for the installation, administration, and testing of
communication between client systems and the LAN.
✓ Description Page Comments
Complete the worksheets in Avaya one-X Mobile Site Survey/Pre-Installation Checklist.
This document is available on the Avaya Support Web site.
Ensure that you can access the internet from a browser before running the installation.
Confirm that basic hardware and software requirements have been met.
7
Confirm requirements for the supported telephone communication systems, voicemail, and directory servers necessary for Avaya one-X Mobile functionality have been met.
8
Identify the network topology appropriate for your installation.
21
License the Avaya one-X Mobile system
Install the Avaya one-X Mobile Server software.
11
Ensure the Avaya one-X Mobile system is registered.
Ensure that you request a server certificate.Account for the additional time required to secure a certificate.
Set up a reverse proxy (if reverse proxy is implemented)
Install the server certificate.
If a Reverse Proxy is implemented, arrange for updated administration because an updated certificate might be required.
Ensure Web pages are accessible. 15
Checklist for a new Avaya one-X Mobile Installation
Avaya one-X® Mobile Installation Guide January 2010 33
See the Avaya one-X Mobile Integration, Administration, and Maintenance Guide for the tasks that need to be performed in order to integrate and administer Avaya one-X Mobile.
This document is available on the Avaya Support Web site
Ensure that the license import is automatically done by using the keytool.exe.
Ensure that the licenses for the one-X Mobile and Communication Manager are installed by using the Product Licensing and Delivery System (PLDS). Please refer to http://plds.avaya.com.
Configure the Tomcat log cleaning utility so that it automatically runs on a specified schedule. This task is performed on the Windows server running the Avaya one-X Mobile Server software. For more information, see Avaya one-X® Mobile Installation Guide.
✓ Description Page Comments
Appendix B: Installation and Upgrade Checklists
34 Avaya one-X® Mobile Installation Guide January 2010
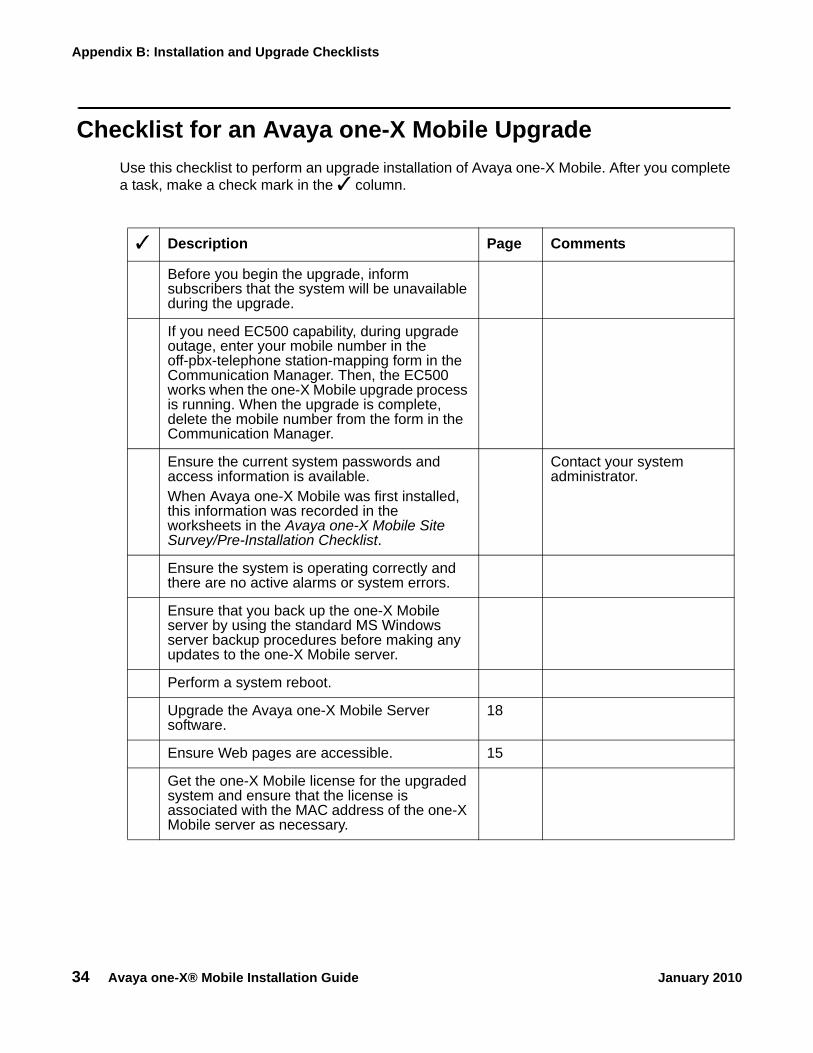
Checklist for an Avaya one-X Mobile UpgradeUse this checklist to perform an upgrade installation of Avaya one-X Mobile. After you complete a task, make a check mark in the ✓ column.
✓ Description Page Comments
Before you begin the upgrade, inform subscribers that the system will be unavailable during the upgrade.
If you need EC500 capability, during upgrade outage, enter your mobile number in the off-pbx-telephone station-mapping form in the Communication Manager. Then, the EC500 works when the one-X Mobile upgrade process is running. When the upgrade is complete, delete the mobile number from the form in the Communication Manager.
Ensure the current system passwords and access information is available.When Avaya one-X Mobile was first installed, this information was recorded in the worksheets in the Avaya one-X Mobile Site Survey/Pre-Installation Checklist.
Contact your system administrator.
Ensure the system is operating correctly and there are no active alarms or system errors.
Ensure that you back up the one-X Mobile server by using the standard MS Windows server backup procedures before making any updates to the one-X Mobile server.
Perform a system reboot.
Upgrade the Avaya one-X Mobile Server software.
18
Ensure Web pages are accessible. 15
Get the one-X Mobile license for the upgraded system and ensure that the license is associated with the MAC address of the one-X Mobile server as necessary.

Checklist for an Avaya one-X Mobile Upgrade
Avaya one-X® Mobile Installation Guide January 2010 35
Note:Note: Upgrades are only supported from the 1.1.X release to 5.2 and 5.2.X releases.
Note:Note: After installation or upgrade is complete, ensure that you provide the Users group
with the permissions to the Edge folder and all the sub folders.
Ensure that the EC500 entry in off-pbx-telephone station-mapping form is blanked out for all the one-X Mobile users.
When the upgrade is complete, inform the subscribers that the system is available.
✓ Description Page Comments

Appendix B: Installation and Upgrade Checklists
36 Avaya one-X® Mobile Installation Guide January 2010

Avaya one-X® Mobile Installation Guide January 2010 37
Appendix C: Installing Windows Server Components
This appendix provides the procedure to install two Windows components — ASP.NET and Internet Information Services (IIS).
Note:Note: Ensure that you back up the one-X Mobile server by using the standard MS
Windows server backup procedures before making any updates to the one-X Mobile server.
Note:Note: It is a general security recommendation that you turn off FTP after completing the
one-X Mobile installation.
To install these components, you will need the Windows Server 2003 SP2 CD.
Note:Note: Ensure that .NET Framework 3.5.1 SP1 is installed on the system during the
installation of one-X Mobile client. If .NET Framework 3.5.1 SP1 is not installed, the administrator might run into the .W2k3 SP2 installation issue where the one-X Mobile client installer installs .NET 3.0 and then the installer does not update from .NET 3.0 to the .Net 3.5.1 version.
Note:Note: Ensure that ASP.NET and IIS are running and set to auto at startup.
To install IIS and ASP.NET, follow these steps:
1. Go to Start > Control Panel > Add Remove Programs and then click on the Add/Remove Windows Components icon.
2. In the Windows Components Wizard dialog box, highlight Application Server and click Details.
3. In the Application Server dialog box, select the ASP.NET check box and highlight Internet Information Services (IIS).
4. Click the Details button.
The system displays the Internet Information Services (IIS) window.
5. Make sure the check boxes for the following IIS components are selected:
● File Transfer Protocol (FTP) service
● Internet Information Services Manager
● NNTP Service
Appendix C: Installing Windows Server Components
38 Avaya one-X® Mobile Installation Guide January 2010
● SMTP Service
● World Wide Web Service
Select the World Wide Web Service, to enable the Details button.
6. Click the Details button for World Wide Web Service.
7. In the World Wide Web Service dialog box, select the Active Server Pages check box.
8. Select the World Wide Web Service check box.
9. Click OK. The system displays the Windows Components dialog box.
10. Insert the Windows Server 2003 CD to install the components.
11. In the Windows Components Wizard window, click the Next button.
The Windows Components Wizard window indicates the components are being configured.
The system displays a dialog box requesting you for the iisback.bs file.
12. Browse to the i386 folder on the Windows Server 2003 CD, and click the OK button.
The wizard continues the installation of the Windows components.