avaya visualization performance and fault manager vpfm
TRANSCRIPT

Avaya Visualization Performance and FaultManager VPFM SCOM ConnectorInstallation
Release 3.0.2NN48014-301
Issue 04.01March 2013

© 2013 Avaya Inc.
All Rights Reserved.
Notice
While reasonable efforts have been made to ensure that theinformation in this document is complete and accurate at the time ofprinting, Avaya assumes no liability for any errors. Avaya reserves theright to make changes and corrections to the information in thisdocument without the obligation to notify any person or organization ofsuch changes.
Documentation disclaimer
“Documentation” means information published by Avaya in varyingmediums which may include product information, operating instructionsand performance specifications that Avaya generally makes availableto users of its products. Documentation does not include marketingmaterials. Avaya shall not be responsible for any modifications,additions, or deletions to the original published version ofdocumentation unless such modifications, additions, or deletions wereperformed by Avaya. End User agrees to indemnify and hold harmlessAvaya, Avaya's agents, servants and employees against all claims,lawsuits, demands and judgments arising out of, or in connection with,subsequent modifications, additions or deletions to this documentation,to the extent made by End User.
Link disclaimer
Avaya is not responsible for the contents or reliability of any linkedwebsites referenced within this site or documentation provided byAvaya. Avaya is not responsible for the accuracy of any information,statement or content provided on these sites and does not necessarilyendorse the products, services, or information described or offeredwithin them. Avaya does not guarantee that these links will work all thetime and has no control over the availability of the linked pages.
Warranty
Avaya provides a limited warranty on its hardware and Software(“Product(s)”). Refer to your sales agreement to establish the terms ofthe limited warranty. In addition, Avaya’s standard warranty language,as well as information regarding support for this Product while underwarranty is available to Avaya customers and other parties through theAvaya Support website: http://support.avaya.com. Please note that ifyou acquired the Product(s) from an authorized Avaya reseller outsideof the United States and Canada, the warranty is provided to you bysaid Avaya reseller and not by Avaya. “Software” means computerprograms in object code, provided by Avaya or an Avaya ChannelPartner, whether as stand-alone products or pre-installed on hardwareproducts, and any upgrades, updates, bug fixes, or modified versions.
Licenses
THE SOFTWARE LICENSE TERMS AVAILABLE ON THE AVAYAWEBSITE, HTTP://SUPPORT.AVAYA.COM/LICENSEINFO AREAPPLICABLE TO ANYONE WHO DOWNLOADS, USES AND/ORINSTALLS AVAYA SOFTWARE, PURCHASED FROM AVAYA INC.,ANY AVAYA AFFILIATE, OR AN AUTHORIZED AVAYA RESELLER(AS APPLICABLE) UNDER A COMMERCIAL AGREEMENT WITHAVAYA OR AN AUTHORIZED AVAYA RESELLER. UNLESSOTHERWISE AGREED TO BY AVAYA IN WRITING, AVAYA DOESNOT EXTEND THIS LICENSE IF THE SOFTWARE WAS OBTAINEDFROM ANYONE OTHER THAN AVAYA, AN AVAYA AFFILIATE OR ANAVAYA AUTHORIZED RESELLER; AVAYA RESERVES THE RIGHTTO TAKE LEGAL ACTION AGAINST YOU AND ANYONE ELSEUSING OR SELLING THE SOFTWARE WITHOUT A LICENSE. BYINSTALLING, DOWNLOADING OR USING THE SOFTWARE, ORAUTHORIZING OTHERS TO DO SO, YOU, ON BEHALF OFYOURSELF AND THE ENTITY FOR WHOM YOU ARE INSTALLING,DOWNLOADING OR USING THE SOFTWARE (HEREINAFTERREFERRED TO INTERCHANGEABLY AS “YOU” AND “END USER”),AGREE TO THESE TERMS AND CONDITIONS AND CREATE ABINDING CONTRACT BETWEEN YOU AND AVAYA INC. OR THEAPPLICABLE AVAYA AFFILIATE (“AVAYA”).
Avaya grants you a license within the scope of the license typesdescribed below, with the exception of Heritage Nortel Software, forwhich the scope of the license is detailed below. Where the orderdocumentation does not expressly identify a license type, theapplicable license will be a Designated System License. The applicablenumber of licenses and units of capacity for which the license is grantedwill be one (1), unless a different number of licenses or units of capacityis specified in the documentation or other materials available to you.“Designated Processor” means a single stand-alone computing device.“Server” means a Designated Processor that hosts a softwareapplication to be accessed by multiple users.
Licence types
Designated System(s) License (DS). End User may install and useeach copy of the Software only on a number of Designated Processorsup to the number indicated in the order. Avaya may require theDesignated Processor(s) to be identified in the order by type, serialnumber, feature key, location or other specific designation, or to beprovided by End User to Avaya through electronic means establishedby Avaya specifically for this purpose.
Heritage Nortel Software
“Heritage Nortel Software” means the software that was acquired byAvaya as part of its purchase of the Nortel Enterprise SolutionsBusiness in December 2009. The Heritage Nortel Software currentlyavailable for license from Avaya is the software contained within the listof Heritage Nortel Products located at http://support.avaya.com/LicenseInfo under the link “Heritage Nortel Products”. For HeritageNortel Software, Avaya grants Customer a license to use HeritageNortel Software provided hereunder solely to the extent of theauthorized activation or authorized usage level, solely for the purposespecified in the Documentation, and solely as embedded in, forexecution on, or (in the event the applicable Documentation permitsinstallation on non-Avaya equipment) for communication with Avayaequipment. Charges for Heritage Nortel Software may be based onextent of activation or use authorized as specified in an order or invoice.
Copyright
Except where expressly stated otherwise, no use should be made ofmaterials on this site, the Documentation, Software, or hardwareprovided by Avaya. All content on this site, the documentation and theProduct provided by Avaya including the selection, arrangement anddesign of the content is owned either by Avaya or its licensors and isprotected by copyright and other intellectual property laws including thesui generis rights relating to the protection of databases. You may notmodify, copy, reproduce, republish, upload, post, transmit or distributein any way any content, in whole or in part, including any code andsoftware unless expressly authorized by Avaya. Unauthorizedreproduction, transmission, dissemination, storage, and or use withoutthe express written consent of Avaya can be a criminal, as well as acivil offense under the applicable law.
Third Party Components
“Third Party Components” mean certain software programs or portionsthereof included in the Software that may contain software (includingopen source software) distributed under third party agreements (“ThirdParty Components”), which contain terms regarding the rights to usecertain portions of the Software (“Third Party Terms”). Informationregarding distributed Linux OS source code (for those Products thathave distributed Linux OS source code) and identifying the copyrightholders of the Third Party Components and the Third Party Terms thatapply is available in the Documentation or on Avaya’s website at: http://support.avaya.com/Copyright. You agree to the Third Party Terms forany such Third Party Components.
Preventing Toll Fraud
“Toll Fraud” is the unauthorized use of your telecommunications systemby an unauthorized party (for example, a person who is not a corporateemployee, agent, subcontractor, or is not working on your company'sbehalf). Be aware that there can be a risk of Toll Fraud associated with
2 Avaya VPFM SCOM Connector Installation March 2013Comments? [email protected]

your system and that, if Toll Fraud occurs, it can result in substantialadditional charges for your telecommunications services.
Avaya Toll Fraud intervention
If you suspect that you are being victimized by Toll Fraud and you needtechnical assistance or support, call Technical Service Center TollFraud Intervention Hotline at +1-800-643-2353 for the United Statesand Canada. For additional support telephone numbers, see the AvayaSupport website: http://support.avaya.com. Suspected securityvulnerabilities with Avaya products should be reported to Avaya bysending mail to: [email protected].
Trademarks
Avaya Aura® is a registered trademark of Avaya Inc.
The trademarks, logos and service marks (“Marks”) displayed in thissite, the Documentation and Product(s) provided by Avaya are theregistered or unregistered Marks of Avaya, its affiliates, or other thirdparties. Users are not permitted to use such Marks without prior writtenconsent from Avaya or such third party which may own the Mark.Nothing contained in this site, the Documentation and Product(s)should be construed as granting, by implication, estoppel, or otherwise,any license or right in and to the Marks without the express writtenpermission of Avaya or the applicable third party.
Avaya is a registered trademark of Avaya Inc.
All non-Avaya trademarks are the property of their respective owners,and “Linux” is a registered trademark of Linus Torvalds.
Downloading Documentation
For the most current versions of Documentation, see the AvayaSupport website: http://support.avaya.com.
Contact Avaya Support
See the Avaya Support website: http://support.avaya.com for productnotices and articles, or to report a problem with your Avaya product.For a list of support telephone numbers and contact addresses, go tothe Avaya Support website: http://support.avaya.com, scroll to thebottom of the page, and select Contact Avaya Support.
Avaya VPFM SCOM Connector Installation March 2013 3

4 Avaya VPFM SCOM Connector Installation March 2013Comments? [email protected]

Contents
Chapter 1: Introduction...................................................................................................... 7Purpose..................................................................................................................................................... 7Related resources..................................................................................................................................... 7
Chapter 2: New in this release........................................................................................... 11Features.................................................................................................................................................... 11Other information...................................................................................................................................... 12
Chapter 3: Overview........................................................................................................... 13Chapter 4: Installation fundamentals................................................................................ 15
VPFM SCOM Connector........................................................................................................................... 15Installation process................................................................................................................................... 15Uninstallation process............................................................................................................................... 16
Chapter 5: VPFM SCOM Connector installation............................................................... 17Installing VPFM SCOM Connector............................................................................................................ 17Deploying Avaya VPFM MP...................................................................................................................... 21Starting or restarting VPFM SCOM Connector service............................................................................. 23Verifying installation.................................................................................................................................. 23
Chapter 6: VPFM SCOM Connector uninstallation.......................................................... 25Deleting Avaya VPFM MP......................................................................................................................... 25Uninstalling VPFM SCOM Connector....................................................................................................... 26
Chapter 7: Troubleshooting............................................................................................... 27Unable to view campus............................................................................................................................. 27Troubleshooting device health status........................................................................................................ 29
Avaya VPFM SCOM Connector Installation March 2013 5

6 Avaya VPFM SCOM Connector Installation March 2013

Chapter 1: Introduction
PurposeThis document provides information to install Avaya Visualization Performance and FaultManager (VPFM) System Center Operations Manager (SCOM) Connector on SCOM 2007server and deploy Avaya VPFM Management Pack (MP) in your existing SCOMenvironment.
This document is intended for administrators to be able to troubleshoot and isolate problemsin your Avaya Visualization Performance and Fault Manager (VPFM) System CenterOperations Manager (SCOM) Connector and SCOM 2007.
Related resources
Related topics:Documentation on page 7Training on page 8Avaya Mentor videos on page 8Support on page 9
DocumentationSee the following related documents:
Title Purpose LinkAvaya Visualization Performance andFault Manager — Common ServicesFundamentals Unified CommunicationsManagement (NN48014–100)
Fundamentals http://support.avaya.com
Avaya VPFM SCOM Connector Installation March 2013 7

Title Purpose LinkAvaya Visualization Performance andFault Manager VPFM SCOM ConnectorFundamentals (NN48014–101)
Fundamentals http://support.avaya.com
Avaya VPFM Traps and Trends(NN48014–103)
Reference http://support.avaya.com
Avaya VPFM Supported Devices,Device MIBs, and Legacy Devices(NN48014–104)
Reference http://support.avaya.com
Avaya Visualization Performance andFault Manager Discovery Best Practices(NN48014–105)
Best Practices http://support.avaya.com
Avaya Visualization Performance andFault Manager Installation (NN48014–300)
Installation http://support.avaya.com
Avaya Visualization Performance andFault Manager Quick Start (NN48014–302)
Quick Start http://support.avaya.com
Avaya Visualization Performance andFault Manager Configuration(NN48014–500)
Administration http://support.avaya.com
Avaya Visualization Performance andFault Manager Using UnifiedCommunications Management toManage the Converged Voice and DataNetwork (NN48014–501)
Deployment http://support.avaya.com
Avaya Visualization Performance andFault Manager Fault and PerformanceManagement (NN48014–700)
Administration http://support.avaya.com
TrainingOngoing product training is available. For more information or to register, you can access theWeb site at http://avaya-learning.com/.
Avaya Mentor videosAvaya Mentor is an Avaya-run channel on YouTube that includes technical content on how toinstall, configure, and troubleshoot Avaya products.
Introduction
8 Avaya VPFM SCOM Connector Installation March 2013Comments? [email protected]

Go to http://www.youtube.com/AvayaMentor and perform one of the following actions:
• Enter a key word or key words in the Search Channel to search for a specific productor topic.
• Scroll down Playlists, and click the name of a topic to see the available list of videosposted on the site.
SupportVisit the Avaya Support website at http://support.avaya.com for the most up-to-datedocumentation, product notices, and knowledge articles. You can also search for releasenotes, downloads, and resolutions to issues. Use the online service request system to createa service request. Chat with live agents to get answers to questions, or request an agent toconnect you to a support team if an issue requires additional expertise.
Related resources
Avaya VPFM SCOM Connector Installation March 2013 9


Chapter 2: New in this release
This is the initial release of the Avaya Visualization Performance and Fault Manager (VPFM) SystemCenter Operations Manager (SCOM) Connector. It is a part of the Avaya Unified Branch Office Solution(UBS).
FeaturesSee the following sections for information about feature changes.
New and updated device supportThe following Avaya Aura Virtual Environment (Aura VE) devices are added or updated:
• Presence Service (PS) release 6.2
• Secure Access Link (SAL) gateway (ASG support only) release 2.2
• Agile Communication Environment (ACE/AIE) release 6.2
• Application Enablement Service (AES) release 6.2
• Avaya CM simplex release 6.2
• Session Manager release 6.2
• System Manager release 6.2
• Web License Manager standalone (WebLM) release 6.2
• Utility Services (US) release 6.2
• Avaya IDE Ignition Server release 8.0
The following Avaya Networking devices are added or updated:
• ERS 4500 series v5.6
• ERS 4800 series v5.6, v5.6.2
- ERS4826GTS
- ERS4826GTS-PWR-PLUS
- ERS4850GTS
Avaya VPFM SCOM Connector Installation March 2013 11

- ERS4850GTS-PWR-PLUS
• VSP 7000 series v10.2
• ERS 8300 v4.2.3.7
• VSP 9000 series v3.3
The following third party devices are added or updated:
• EMC VNX 5300 series
• Lenovo RD530
• VMware ESXi v5.0
• VMware VSphere v5.0
• VMware VCenter v5.0
Other informationSee the following sections for information about changes that are not feature-related.
Introduction chapterThe Introduction chapter replaces the Purpose of this document chapter.
New in this release
12 Avaya VPFM SCOM Connector Installation March 2013Comments? [email protected]

Chapter 3: Overview
This document provides information to install Avaya Visualization Performance and Fault Manager(VPFM) System Center Operations Manager (SCOM) Connector on SCOM 2007 server and deploy AvayaVPFM Management Pack (MP) in your existing SCOM environment. The VPFM SCOM Connector,shipped with Avaya network management solution VPFM, monitors performance, propagates events anddevice information from Avaya VPFM to SCOM 2007 console.
This document provides information about the following:
• Installing VPFM SCOM Connector
• Modifying VPFM SCOM Connector settings
• Deploying Avaya VPFM MP
• Uninstalling VPFM SCOM Connector
Navigation
• Installation fundamentals on page 15
• VPFM SCOM Connector installation on page 17
• VPFM SCOM Connector uninstallation on page 25
• Troubleshooting on page 27
Avaya VPFM SCOM Connector Installation March 2013 13


Chapter 4: Installation fundamentals
This chapter provides the basic installation information specific to Avaya Visualization Performance andFault Manager (VPFM) System Center Operations Manager (SCOM) Connector.
Navigation
• VPFM SCOM Connector on page 15
• Installation process on page 15
• Uninstallation process on page 16
VPFM SCOM ConnectorVPFM SCOM Connector is a service on SCOM server bridging the connection between AvayaVPFM and SCOM 2007 console.
The following products MPs are included in the VPFM SCOM Connector software package:
• Avaya Communication Server 1000 (Avaya CS 1000)
• Avaya Secure Router 4134 (Avaya SR 4134)
Following are limitations of Avaya VPFM SCOM Connector:
• Scope of monitoring is limited to Avaya CS 1000 and Avaya SR 4134 for this release.
• Supports only Unified Branch Office Solution (UBS) for this release.
• VPFM-Lite does not support Avaya VPFM integration with Microsoft SCOM throughVPFM SCOM Connector. Install VPFM 3.0 license.
Installation processVPFM SCOM Connector is installed through a wizard based installer. Installer can be run fromDVD or can be copied to hard drive and run from there.
VPFM SCOM Connector is installed on the SCOM server. SCOM server is the machine onwhich Microsoft SCOM 2007 is installed with Service Pack (SP) 1. VPFM server is the machineon which VPFM 3.0.2 software is installed on the Windows or Linux.
Avaya VPFM SCOM Connector Installation March 2013 15

For more information about VPFM SCOM Connector installation, see VPFM SCOM Connectorinstallation on page 17.
Uninstallation processUninstallation of VPFM SCOM Connector is done through the wizard based installer.
For more information, see .VPFM SCOM Connector uninstallation on page 25
Installation fundamentals
16 Avaya VPFM SCOM Connector Installation March 2013Comments? [email protected]

Chapter 5: VPFM SCOM Connectorinstallation
This chapter provides procedure to install Avaya Visualization Performance and Fault Manager (VPFM)System Center Operations Manager (SCOM) Connector on SCOM server and deploy VPFM ManagementPack (MP) into your existing SCOM 2007 console.
Navigation
• Installing VPFM SCOM Connector on page 17
• Deploying Avaya VPFM MP on page 21
• Starting or restarting VPFM SCOM Connector service on page 23
• Verifying installation on page 23
Prerequisites
• Ensure Microsoft SCOM 2007 is installed on a machine running Windows 2003 with Service Pack(SP) 1.
• Ensure at least one VPFM discovery domain is defined to cover the supported devices, AvayaCommunication Server 1000 (Avaya CS 1000) or Avaya Secure Router 4134 (Avaya SR 4134).
Important:VPFM SCOM Connector can connect to only one VPFM discovery domain.
Installing VPFM SCOM ConnectorUse the following procedure to install VPFM SCOM Connector.
Before you begin
• Ensure Microsoft SCOM 2007 is installed on a machine running Windows 2003 withService Pack (SP) 1.
• Ensure to install VPFM 1.0 license for Avaya VPFM integration with Microsoft SCOM.
Procedure
1. Run the DVD or double-click on the installer saved on hard-drive.The initial installation dialog box appears.
2. Click Next.
Avaya VPFM SCOM Connector Installation March 2013 17
License Agreement dialog box appears.
3. Select I accept the terms of the license agreement.
4. Click Next.Choose Install Folder dialog box appears.
5. Select Restore Default FolderOrclick Choose to select the storage space.
Important:The path name cannot contain spaces.
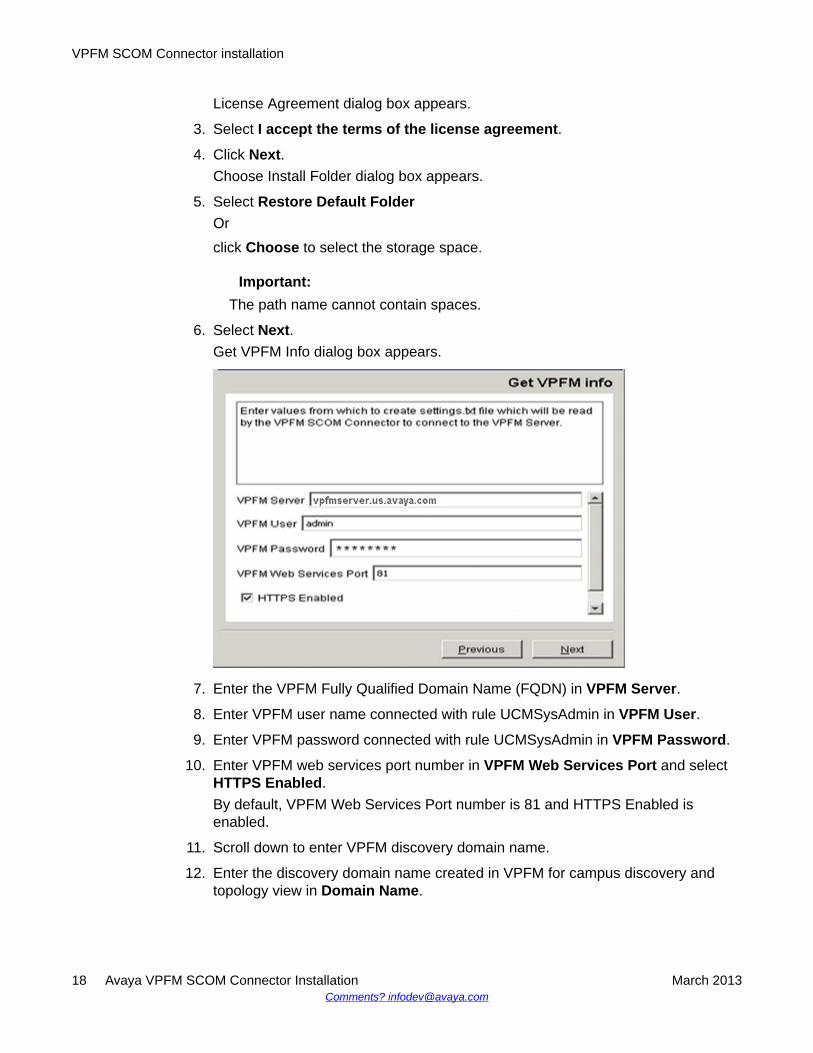
6. Select Next.Get VPFM Info dialog box appears.
7. Enter the VPFM Fully Qualified Domain Name (FQDN) in VPFM Server.
8. Enter VPFM user name connected with rule UCMSysAdmin in VPFM User.
9. Enter VPFM password connected with rule UCMSysAdmin in VPFM Password.
10. Enter VPFM web services port number in VPFM Web Services Port and selectHTTPS Enabled.By default, VPFM Web Services Port number is 81 and HTTPS Enabled isenabled.
11. Scroll down to enter VPFM discovery domain name.
12. Enter the discovery domain name created in VPFM for campus discovery andtopology view in Domain Name.
VPFM SCOM Connector installation
18 Avaya VPFM SCOM Connector Installation March 2013Comments? [email protected]

13. Click Next.Get SCOM Info dialog box appears.
14. Enter the SCOM server domain name in SCOM Server.By default, the SCOM server name is localhost.
15. Enter user name with SCOM write permissions in SCOM User.
16. Enter password with SCOM write permissions in SCOM Password.
17. Click Next.
Installing VPFM SCOM Connector
Avaya VPFM SCOM Connector Installation March 2013 19

Pre-Installation Summary dialog box appears.
18. Click Install.The Install Complete dialog box appears after installation.
19. Click Done to exit the installer.The SCOM and VPFM values provided during the installation are stored insettings.txt. By default, the file is located in C:\Program Files\Avaya\UCM\VPFMConnector\services. These configuration values can be modified. For more
VPFM SCOM Connector installation
20 Avaya VPFM SCOM Connector Installation March 2013Comments? [email protected]

information, see Avaya Visualization Performance and Fault Manager VPFM SCOMConnector Fundamentals (NN48014-101).
Variable Definitions
Variable DefinitionVPFM Server FDQN of the VPFM Server.
VPFM User VPFM user name connected with rule UCMSysAdmin.
VPFM Password VPFM password connected with rule UCMSysAdmin.
VPFM Web ServicePort
VPFM Web server port number provided during VPFM serverinstallation. By default, the port is 81.
HTTPS Enabled Enable the HTTPS.
Domain Name Discovery domain name created in VPFM for campus discovery andtopology view.
SCOM Server Domain name of the SCOM server. By default, the domain name islocalhost.
SCOM User User name with SCOM write permissions.
SCOM Password Password with SCOM write permissions.
Deploying Avaya VPFM MPUse the following procedure to deploy the Avaya VPFM Management Pack (MP) on SCOM2007 Operations Console.
Before you begin
• VPFM SCOM Connector must be installed on SCOM server.
Procedure
1. Launch the SCOM Operations Console.Select Start > All Programs > System Center Operations Manager 2007 >Operations Console.
2. In Operations Console, click Administration.
3. In Administration pane, expand Administration.
Deploying Avaya VPFM MP
Avaya VPFM SCOM Connector Installation March 2013 21

4. Right-click on Management Packs and then click Import Management PacksOrSelect Import Management Pack, from Actions.Select Management Pack to Import dialog appears.
5. Browse to the directory where VPFM connector is saved.By default, the location is C:\Program Files\Avaya\UCM\VPFM Connector.
6. Select AvayaVPFM.mp and click Open to import.Import Management Packs dialog box appears.
7. Click Import.After the import process is complete, and the dialog box displays an icon next tothe Management Pack indicating success or failure of the importation.
8. Click Close.
9. The content area lists VPFM library under the Management Packs.
VPFM SCOM Connector installation
22 Avaya VPFM SCOM Connector Installation March 2013Comments? [email protected]

10. Start/restart the VPFM SCOM Connector service after importing the ManagementPack.For more information, see Starting or restarting VPFM SCOM Connector service onpage 23.
Starting or restarting VPFM SCOM Connector serviceUse the following procedure to start or restart VPFM SCOM Connector service.
Procedure
1. On the SCOM server where VPFM SCOM Connector is installed, select Start >Control Panel.
2. Double-click Administrative Tools, and then double-click Services.Services window appears.
3. In details panel, do one of the following:
• Click VPFM Connector, and then, on Actions menu select Start to start theservice after installing VPFM MP or Restart to restart the VPFM SCOMConnector service.
• Right-click VPFM Connector and then click Start or Restart.
The VPFM Connector service is started or restarted according to your selection.
Verifying installationAfter completing the installation, use the following procedure to check deployment of AvayaVPFM Connector in SCOM 2007 console.
Procedure
1. Launch the SCOM Operations Console.Select Start > All Programs > System Center Operations Manager 2007 >Operations Console.
2. In Operations Console, click Monitoring.
3. In Monitoring pane, expand Monitoring.VPFM appears in the Monitoring pane.
Starting or restarting VPFM SCOM Connector service
Avaya VPFM SCOM Connector Installation March 2013 23

For more information about VPFM SCOM Connector operation details, see AvayaVisualization Performance and Fault Manager VPFM SCOM ConnectorFundamentals (NN48014-101).
VPFM SCOM Connector installation
24 Avaya VPFM SCOM Connector Installation March 2013Comments? [email protected]

Chapter 6: VPFM SCOM Connectoruninstallation
This chapter describes how to uninstall Avaya Visualization Performance and Fault Manager (VPFM)System Center Operations Manager (SCOM) Connector.
Uninstallation of VPFM SCOM Connector software does not delete the Avaya VPFM Management Pack(MP) from SCOM 2007 console. It is necessary to delete the Avaya VPFM MP from SCOM 2007 consoleand then uninstall the software.
The log, event, and setting files are not deleted during uninstallation. You can delete them manually. Iffiles are not deleted, the event and setting files are replaced with data provided during the next installationand log file is appended with new logs.
Navigation
• Deleting Avaya VPFM MP on page 25
• Uninstalling VPFM SCOM Connector on page 26
Deleting Avaya VPFM MPAbout this taskUse the following procedure to delete the VPFM MP from SCOM 2007 console.
Procedure
1. Launch the SCOM Operations Console.Select Start > All Programs > System Center Operations Manager 2007 >Operations Console.
2. In Operations Console, click Administration.
3. In Administration pane, expand Administration.
4. Select Management Packs.The Management Packs appear.
5. Navigate to select VPFM Library.
6. Right-click on VPFM Library and then click DeleteOr
Avaya VPFM SCOM Connector Installation March 2013 25

Select Delete, from Actions.VPFM MP is deleted.
Uninstalling VPFM SCOM ConnectorAbout this taskUse the following procedure to uninstall VPFM SCOM Connector.
Procedure
1. Navigate to the location C:\Program Files\Avaya\UCM\VPFM connector\Uninstall_SCOM-Connector.
2. Double-click Uninstall SCOM-Connector.exe.The Uninstall SCOM Connector dialog box appears.
3. Click Uninstall.The uninstallation process may take several minutes.
VPFM SCOM Connector uninstallation
26 Avaya VPFM SCOM Connector Installation March 2013Comments? [email protected]

Chapter 7: Troubleshooting
This chapter provides procedural information to troubleshoot and isolate problems in your AvayaVisualization Performance and Fault Manager (VPFM) System Center Operations Manager (SCOM)Connector and SCOM 2007.
Navigation
• Unable to view campus on page 27
• Troubleshooting device health status on page 29
Unable to view campusUse the following procedure when VPFM discovery domain does not appear in CampusView.
Before you begin
• Ensure you install a VPFM 3.0.2 license for Avaya VPFM integration with MicrosoftSCOM.
• Ensure VPFM SCOM Connector is installed on the SCOM server.
Procedure
1. Launch SCOM 2007 console.Select Start > All Programs > System Center Operations Manager 2007 >Operations Console.
2. In Operations console, select Administration.
3. In Administration pane, select Management Packs.
4. In results pane, navigate to check VPFM Library. Go to step 6 on page 27 if VPFMLibrary appears.
5. Import VPFM Connector Management Pack (MP).For more information to import Management Pack, see Deploying Avaya VPFMMP on page 21.
6. Launch Services.Navigate to select Start > Control Panel > Administrative Tools > Services.
7. Navigate to locate VPFM Connector.
Avaya VPFM SCOM Connector Installation March 2013 27

8. Ensure VPFM Connector is started.For more information, see Starting or restarting VPFM SCOM Connector service onpage 23.
9. Log on to VPFM.
10. Ensure you discover domain in VPFM.For more information to discover VPFM domain discovery, see Avaya VisualizationPerformance and Fault Manager Configuration (NN48014-500).
11. Open log.txt file in text editor.By default, the location is C:\Program files\Avaya\UCM\VPFM Connector\Services\logs
12. In logs file, check event severities. Go to step 14 on page 28 if there are noseverities.
13. Check VPFM SCOM Connector or VPFM server configuration.
14. Open status.txt file with text editor.By default, the location is C:\Program files\Avaya\UCM\VPFM Connector\Services
15. Check the status message. Go to step 17 on page 28 if OK appears.
16. Check VPFM and VPFM SCOM Connector configuration according to the errordescription.
17. Open settings.txt file with text editor.By default, location is C:\Program files\Avaya\UCM\VPFM Connector\Services.
18. Check VPFM and SCOM server configuration details. Go to step 21 on page 29if the configurations are correct.Initial values in settings.txt file contains the VPFM and SCOM sever detailsprovided during VPFM SCOM Connector installation.
19. Update the VPFM and SCOM server changes in settings.txt file.The editting-settings.txt file, in the same location, can be used as reference whilemodifying settings.txt file.
Important:Before making the changes, rename or save settings.txt file for laterreference.
20. Prefix user name and password with plaintext:.The entries in settings.txt file prefixed with plaintext: are encrypted afterrestarting VPFM Connector in Services.
Important:The scomManagementPackName value must not be changed.
Troubleshooting
28 Avaya VPFM SCOM Connector Installation March 2013Comments? [email protected]

21. In Services, restart VPFM Connector to apply changes saved in settings.txtfile.For more information, see Starting or restarting VPFM SCOM Connector service onpage 23.
Troubleshooting device health statusIn SCOM 2007, Managed Devices display device health status. The status of the device isHealthy if the device is working correctly, else the status changes. Use the following procedureto troubleshoot Avaya VPFM server health status.
Before you begin
• Ensure SCOM 2007 console is working correctly.
Procedure
1. Open status.txt file with text editor.By default, the location is C:\Program Files\Avaya\UCM\VPFM Connector\Services
2. Check the status message. Go to step 4 on page 29 if OK appears.
3. Check the configuration according to the error description.
4. Open log.txt file in text editor.By default, the location is C:\Program Files\Avaya\UCM\VPFM Connector\Services\logs
5. In logs file, check event severities. Go to step 7 on page 29 if there are noseverities.
6. Check the configurations accordingly.
7. In Services, restart VPFM Connector.For more information, see Starting or restarting VPFM SCOM Connector service onpage 23.
8. Open status.txt file.
9. Check the status message. Go to step 11 on page 30 if OK appears.
Important:The status.txt file is written with a new value only when the VPFM SCOMConnector service is restarted, or when settings.txt file is manually modified andVPFM SCOM Connector service is restarted.
10. Check the configuration if there is any error description.
Troubleshooting device health status
Avaya VPFM SCOM Connector Installation March 2013 29

11. Check health status of VPFM server in Managed Devices.It may take few minutes and the VPFM server status appears healthy.
Troubleshooting
30 Avaya VPFM SCOM Connector Installation March 2013Comments? [email protected]