aviagen | aviagen - fertility problem...
TRANSCRIPT
ENTER
Fertility Problem SolvingInteractive PDF
®

- 2 -
INTRODUCTION
This interactive pdf is designed to be used as a smart tool, offering a quick reference guide to get to key parts of existing literature to help you identify the causes of infertility issues you may be experiencing with your flocks.
NAVIGATION
On each page you will see specific questions that you will be prompted to answer. On answering each question, you will ultimately be led to a solutions table and links to relevant literature and specific areas to investigate.
Within each table you will see links to specific references for support-ing literature. Clicking on these links takes you directly to that piece of literature, giving more detail and solutions to infertility issues.
Each page has repeated icons that will always take you back to the same place:
An Egg – Takes you back to this page (the introduction)
A back button – Takes you to the previous question
End – Takes you out of the PDF
Please Note: This document is not intended for scroll-through use. Each Question links to specific information.
BACK
END
- 3 -
ESTABLISHING THE PROBLEM
A. Are your hatchability levels lower than normally expected?
YES NO
- 4 -
ESTABLISHING THE PROBLEM
B. Have you confirmed that this is an infertility issue?
YES NO
- 5 -
ESTABLISHING THE PROBLEM
Hatchability levels are not lower thanexpected.
Continue monitoring and analyzing hatchability performance.
Discuss any concerns with your local Aviagenrepresentative.
BACK
- 6 -
ESTABLISHING THE PROBLEM
How to confirm this is an infertility issue.
Put in place a program for routinely recording, monitoring, and analyzing infertility.
Information on how to monitor infertility is available in these resources.
Aviagen Hatchery How To #4: Identifying Infertile Eggs and Early Deads
Aviagen Hatchery How To #5: Break Out and Analyze Hatch Debris
BACK
- 7 -
ESTABLISHING THE PROBLEM
C. Has there been a sudden unexpected increase in infertile levels between hatches?
YES NO
- 8 -
ESTABLISHING THE PROBLEM
BACK
C. Have you established it is not a disease -or nutrition-related issue?
YES NO
- 9 -
ESTABLISHING THE PROBLEM
It is difficult to determine to what extent that disease directly affects fertility levels. Diseases that would have an effect on fertility would mainly be respiratory related, which are more dif-ficult to diagnose and tend to spread unnoticed. For instance Infectious Bronchitis (IBV), Mycoplasma Gallisepticum/Myco-plasma Synoviae (MG/MS), Avian Metapneumovirus (aMPV), Avian Influenza (AI) low and high path. Non-respiratory diseas-es that also may reduce fertility are Cholera and Coryza Egg Drop Syndrome (EDS). A regular monitoring program should be implemented to ensure that the disease status of every flock is well documented and may be treated if necessary.
Please see the Disease-Related Issues chart for details.
- 10 -
ESTABLISHING THE PROBLEM
Chronic higher than expected infertile levels.
At which age do you see the higher than expected infertile levels?
Early Infertility: 27 weeks to 31 weeks of age
Mid Infertility: 32 weeks to 41 weeks of age
Late Infertility: 42 weeks of age and over
High Infertility throughout the life of flock
- 11 -
ESTABLISHING THE PROBLEM
No disease- or nutrition-related issue attributed to causing sudden increase in flock infertility.
Assume a chronic issue exists.
BACK
- 12 -
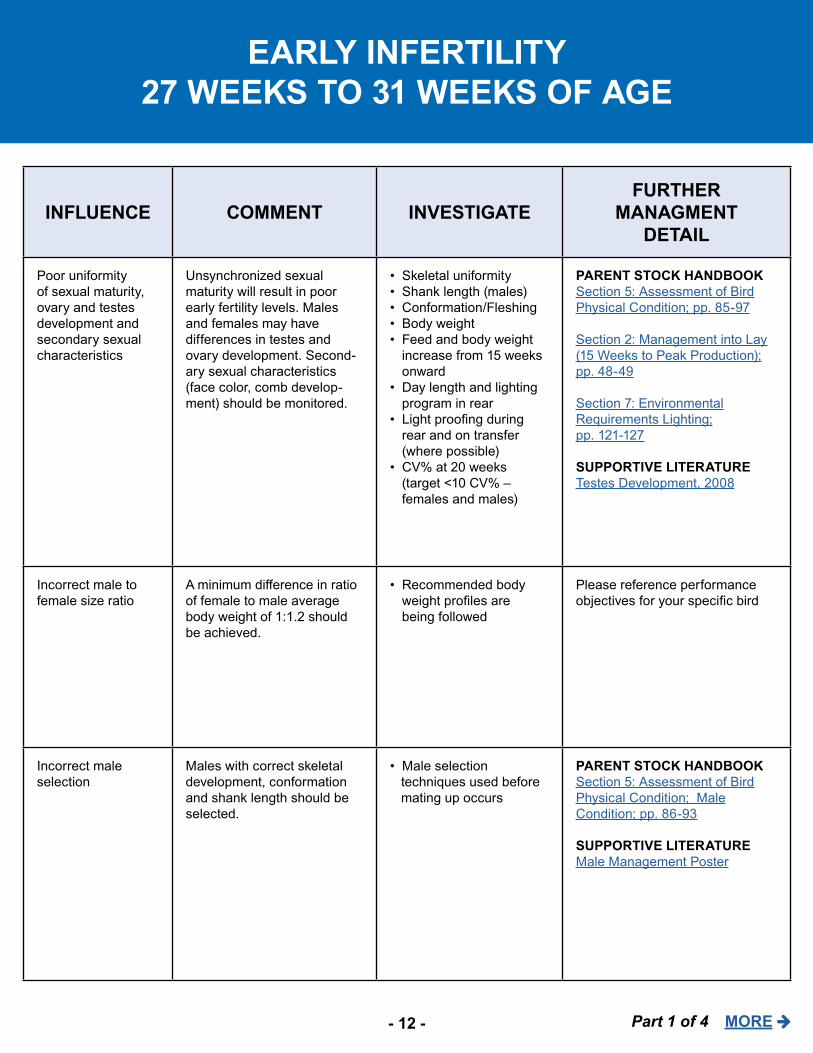
EARLY INFERTILITY27 WEEKS TO 31 WEEKS OF AGE
INFLUENCE COMMENT INVESTIGATEFURTHER
MANAGMENT DETAIL
Poor uniformity of sexual maturity, ovary and testes development and secondary sexual characteristics
Unsynchronized sexual maturity will result in poor early fertility levels. Males and females may have differences in testes and ovary development. Second-ary sexual characteristics (face color, comb develop-ment) should be monitored.
• Skeletal uniformity• Shank length (males)• Conformation/Fleshing • Body weight• Feed and body weight
increase from 15 weeks onward
• Day length and lighting program in rear
• Light proofing during rear and on transfer (where possible)
• CV% at 20 weeks (target <10 CV% – females and males)
PARENT STOCK HANDBOOKSection 5: Assessment of BirdPhysical Condition; pp. 85-97
Section 2: Management into Lay(15 Weeks to Peak Production);pp. 48-49
Section 7: EnvironmentalRequirements Lighting;pp. 121-127
SUPPORTIVE LITERATURETestes Development, 2008
Incorrect male to female size ratio
A minimum difference in ratio of female to male average body weight of 1:1.2 should be achieved.
• Recommended body weight profiles are being followed
Please reference performance objectives for your specific bird
Incorrect male selection
Males with correct skeletal development, conformation and shank length should be selected.
• Male selection techniques used before mating up occurs
PARENT STOCK HANDBOOKSection 5: Assessment of BirdPhysical Condition; MaleCondition; pp. 86-93
SUPPORTIVE LITERATUREMale Management Poster
Part 1 of 4 MORE
- 13 -
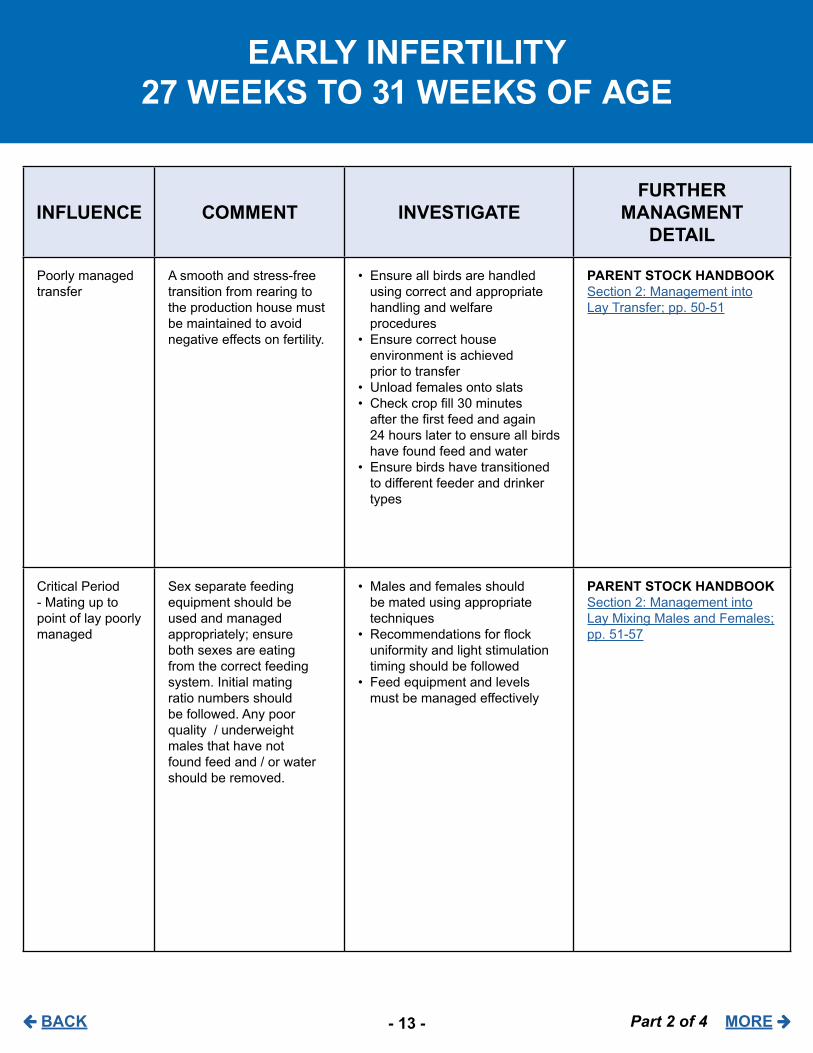
EARLY INFERTILITY27 WEEKS TO 31 WEEKS OF AGE
INFLUENCE COMMENT INVESTIGATEFURTHER
MANAGMENT DETAIL
Poorly managed transfer
A smooth and stress-free transition from rearing to the production house must be maintained to avoid negative effects on fertility.
• Ensure all birds are handled using correct and appropriate handling and welfare procedures
• Ensure correct house environment is achieved prior to transfer
• Unload females onto slats• Check crop fill 30 minutes
after the first feed and again 24 hours later to ensure all birds have found feed and water
• Ensure birds have transitionedto different feeder and drinker types
PARENT STOCK HANDBOOKSection 2: Management intoLay Transfer; pp. 50-51
Critical Period - Mating up to point of lay poorly managed
Sex separate feeding equipment should be used and managed appropriately; ensure both sexes are eating from the correct feeding system. Initial mating ratio numbers should be followed. Any poor quality / underweight males that have not found feed and / or water should be removed.
• Males and females should be mated using appropriate techniques
• Recommendations for flock uniformity and light stimulation timing should be followed
• Feed equipment and levels must be managed effectively
PARENT STOCK HANDBOOKSection 2: Management intoLay Mixing Males and Females;pp. 51-57
Part 2 of 4 MORE BACK
- 14 -
EARLY INFERTILITY27 WEEKS TO 31 WEEKS OF AGE
INFLUENCE COMMENT INVESTIGATEFURTHER
MANAGMENT DETAIL
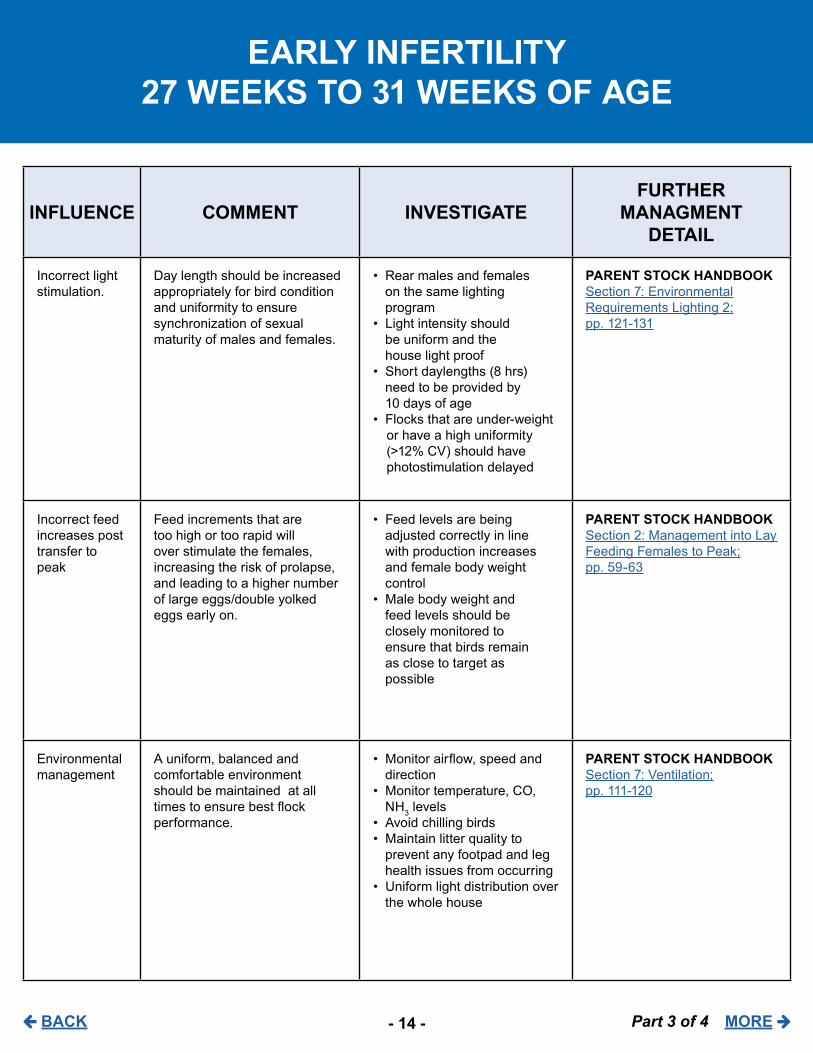
Incorrect light stimulation.
Day length should be increased appropriately for bird condition and uniformity to ensure synchronization of sexual maturity of males and females.
• Rear males and females on the same lighting program
• Light intensity should be uniform and the house light proof
• Short daylengths (8 hrs) need to be provided by 10 days of age
• Flocks that are under-weight or have a high uniformity (>12% CV) should havephotostimulation delayed
PARENT STOCK HANDBOOKSection 7: EnvironmentalRequirements Lighting 2;pp. 121-131
Incorrect feed increases post transfer to peak
Feed increments that are too high or too rapid will over stimulate the females, increasing the risk of prolapse, and leading to a higher number of large eggs/double yolked eggs early on.
• Feed levels are being adjusted correctly in line with production increases and female body weight control
• Male body weight and feed levels should be closely monitored to ensure that birds remain as close to target as possible
PARENT STOCK HANDBOOKSection 2: Management into Lay Feeding Females to Peak;pp. 59-63
Environmental management
A uniform, balanced and comfortable environment should be maintained at all times to ensure best flock performance.
• Monitor airflow, speed and direction
• Monitor temperature, CO,NH3 levels
• Avoid chilling birds • Maintain litter quality to
prevent any footpad and leg health issues from occurring
• Uniform light distribution over the whole house
PARENT STOCK HANDBOOKSection 7: Ventilation;pp. 111-120
Part 3 of 4 MORE BACK
- 15 -
EARLY INFERTILITY27 WEEKS TO 31 WEEKS OF AGE
INFLUENCE COMMENT INVESTIGATEFURTHER
MANAGMENT DETAIL
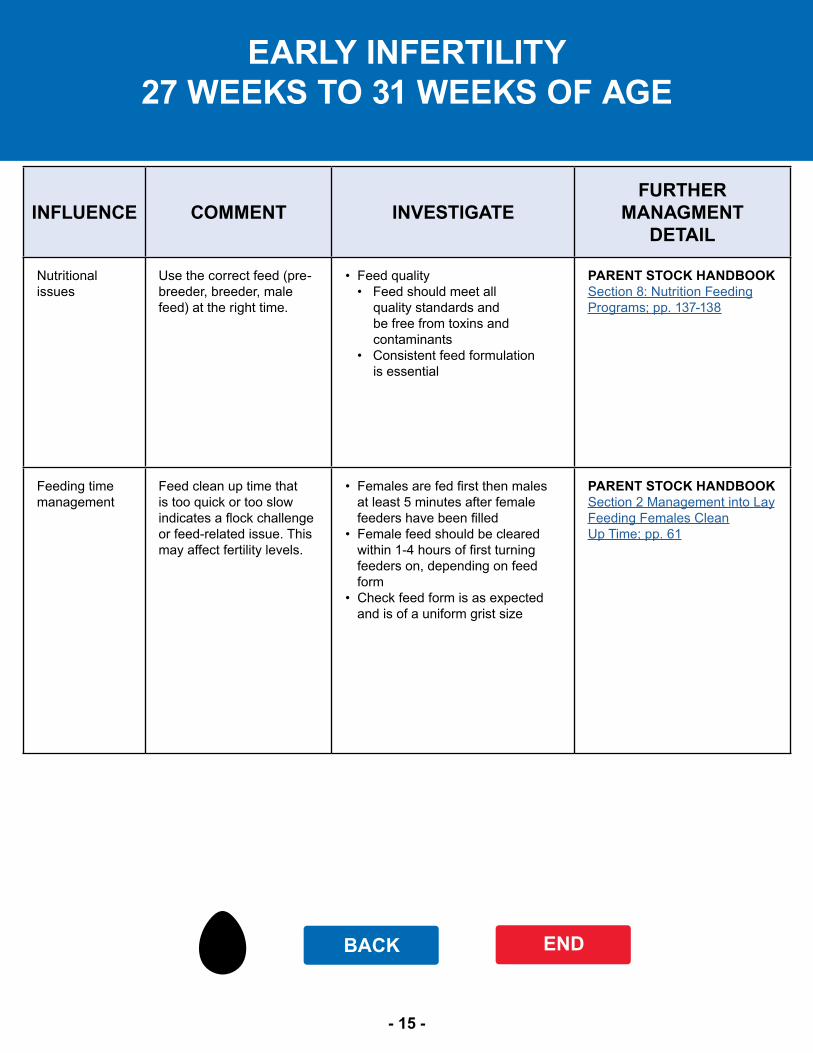
Nutritionalissues
Use the correct feed (pre-breeder, breeder, male feed) at the right time.
• Feed quality• Feed should meet all
quality standards and be free from toxins andcontaminants
• Consistent feed formulation is essential
PARENT STOCK HANDBOOKSection 8: Nutrition FeedingPrograms; pp. 137-138
Feeding time management
Feed clean up time that is too quick or too slow indicates a flock challenge or feed-related issue. This may affect fertility levels.
• Females are fed first then males at least 5 minutes after female feeders have been filled
• Female feed should be cleared within 1-4 hours of first turning feeders on, depending on feed form
• Check feed form is as expected and is of a uniform grist size
PARENT STOCK HANDBOOKSection 2 Management into LayFeeding Females CleanUp Time; pp. 61
BACK END
- 16 -
MID INFERTILITY32 WEEKS TO 41 WEEKS OF AGE
INFLUENCE COMMENT INVESTIGATEFURTHER
MANAGMENT DETAIL
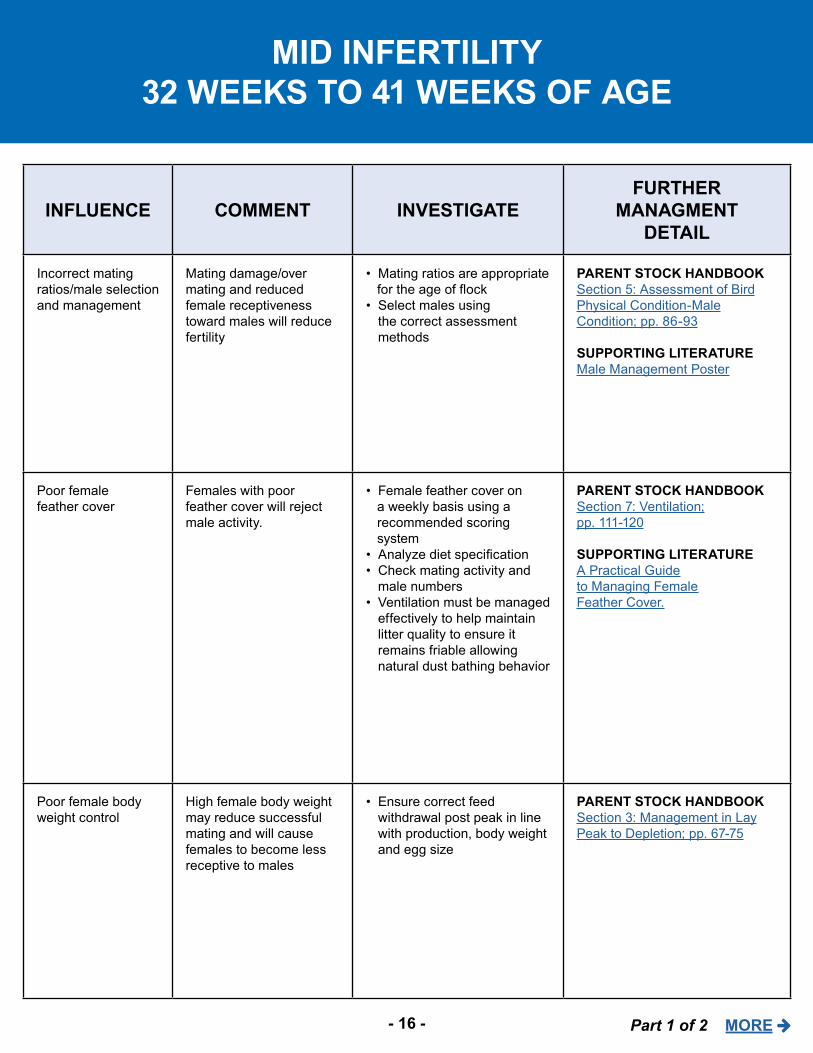
Incorrect mating ratios/male selection and management
Mating damage/over mating and reduced female receptiveness toward males will reduce fertility
• Mating ratios are appropriate for the age of flock• Select males using
the correct assessment methods
PARENT STOCK HANDbOOKSection 5: Assessment of BirdPhysical Condition-MaleCondition; pp. 86-93
SUPPORTING LITERATUREMale Management Poster
Poor female feather cover
Females with poor feather cover will reject male activity.
• Female feather cover on a weekly basis using a recommended scoring system• Analyze diet specification• Check mating activity and
male numbers • Ventilation must be managed
effectively to help maintain litter quality to ensure it remains friable allowing natural dust bathing behavior
PARENT STOCK HANDbOOKSection 7: Ventilation;pp. 111-120
SUPPORTING LITERATUREA Practical Guideto Managing FemaleFeather Cover.
Poor female body weight control
High female body weight may reduce successful mating and will cause females to become less receptive to males
• Ensure correct feed withdrawal post peak in line with production, body weight and egg size
PARENT STOCK HANDbOOKSection 3: Management in LayPeak to Depletion; pp. 67-75
Part 1 of 2 MORE
- 17 -
MID INFERTILITY32 WEEKS TO 41 WEEKS OF AGE
INFLUENCE COMMENT INVESTIGATEFURTHER
MANAGMENT DETAIL
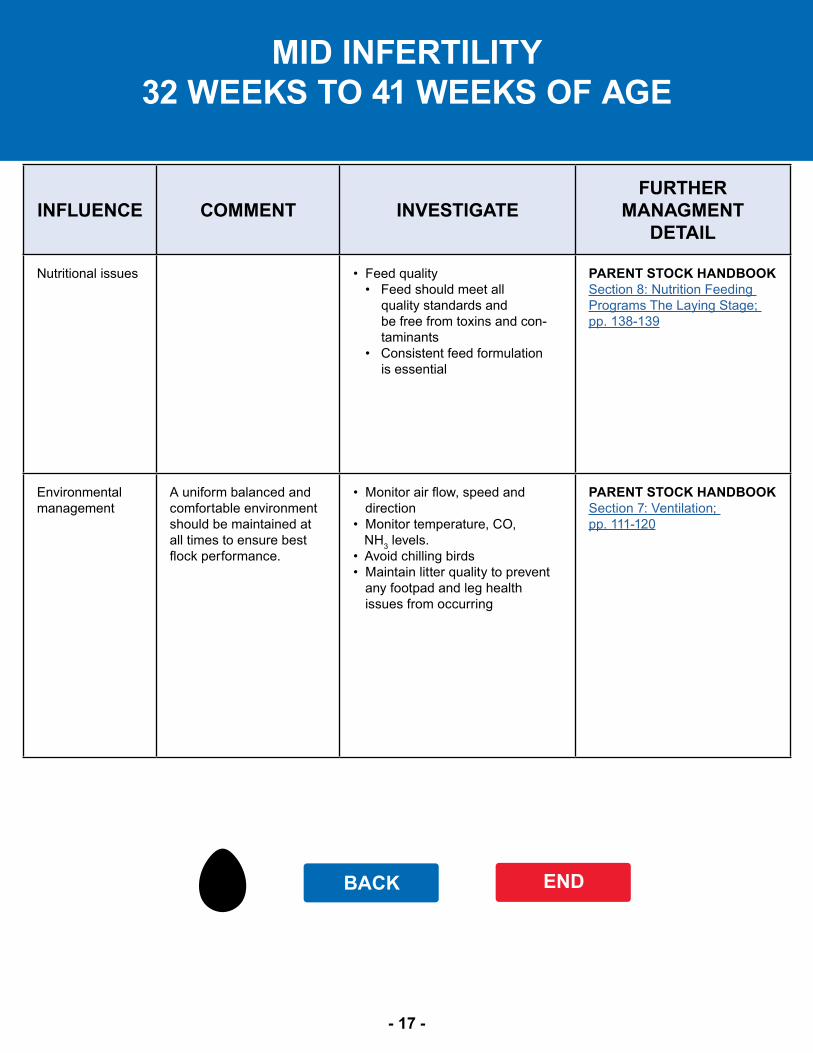
Nutritional issues • Feed quality• Feed should meet all
quality standards and be free from toxins and con-taminants
• Consistent feed formulation is essential
PARENT STOCK HANDBOOKSection 8: Nutrition Feeding Programs The Laying Stage; pp. 138-139
Environmental management
A uniform balanced and comfortable environment should be maintained at all times to ensure best flock performance.
• Monitor air flow, speed and direction
• Monitor temperature, CO, NH3 levels.• Avoid chilling birds• Maintain litter quality to prevent
any footpad and leg health issues from occurring
PARENT STOCK HANDBOOKSection 7: Ventilation; pp. 111-120
BACK END
- 18 -
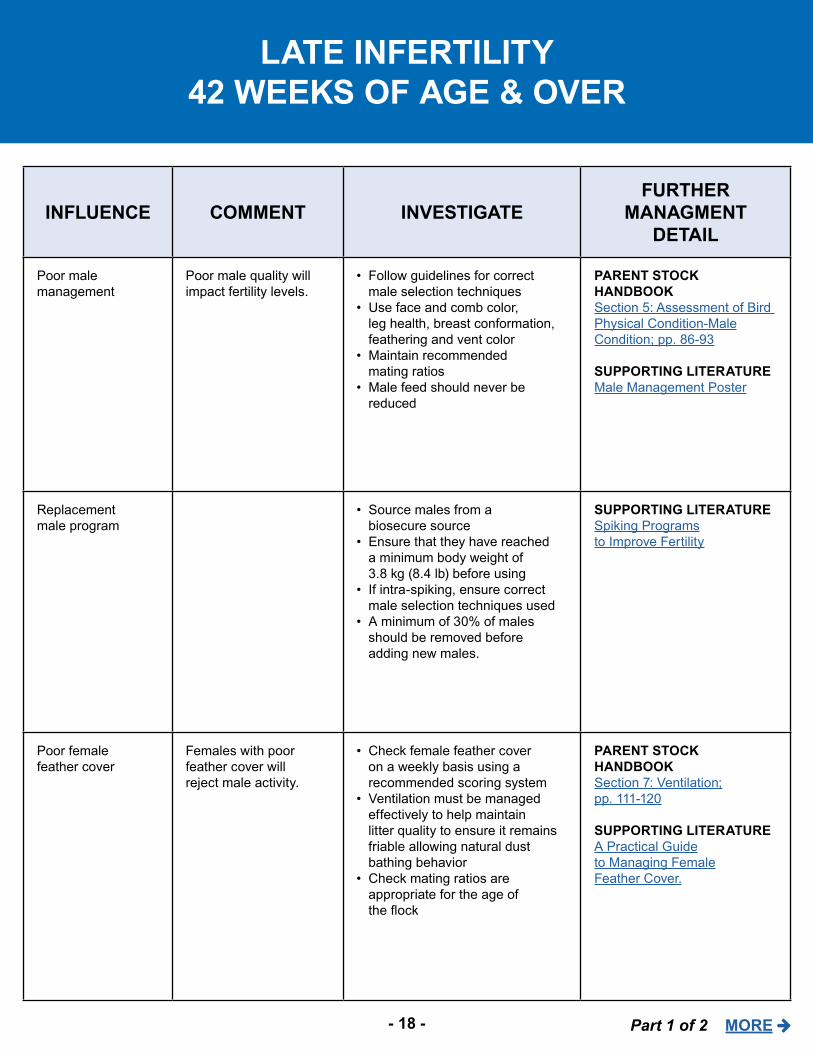
LATE INFERTILITY42 WEEKS OF AGE & OVER
INFLUENCE COMMENT INVESTIGATEFURTHER
MANAGMENT DETAIL
Poor male management
Poor male quality will impact fertility levels.
• Follow guidelines for correct male selection techniques
• Use face and comb color, leg health, breast conformation, feathering and vent color
• Maintain recommended mating ratios
• Male feed should never be reduced
PARENT STOCK HANDbOOKSection 5: Assessment of Bird Physical Condition-MaleCondition; pp. 86-93
SUPPORTING LITERATUREMale Management Poster
Replacement male program
• Source males from a biosecure source
• Ensure that they have reached a minimum body weight of 3.8 kg (8.4 lb) before using
• If intra-spiking, ensure correct male selection techniques used
• A minimum of 30% of males should be removed before adding new males.
SUPPORTING LITERATURESpiking Programsto Improve Fertility
Poor female feather cover
Females with poor feather cover will reject male activity.
• Check female feather cover on a weekly basis using a recommended scoring system
• Ventilation must be managed effectively to help maintain litter quality to ensure it remains friable allowing natural dust bathing behavior
• Check mating ratios are appropriate for the age of the flock
PARENT STOCK HANDbOOKSection 7: Ventilation;pp. 111-120
SUPPORTING LITERATUREA Practical Guideto Managing FemaleFeather Cover.
Part 1 of 2 MORE
- 19 -
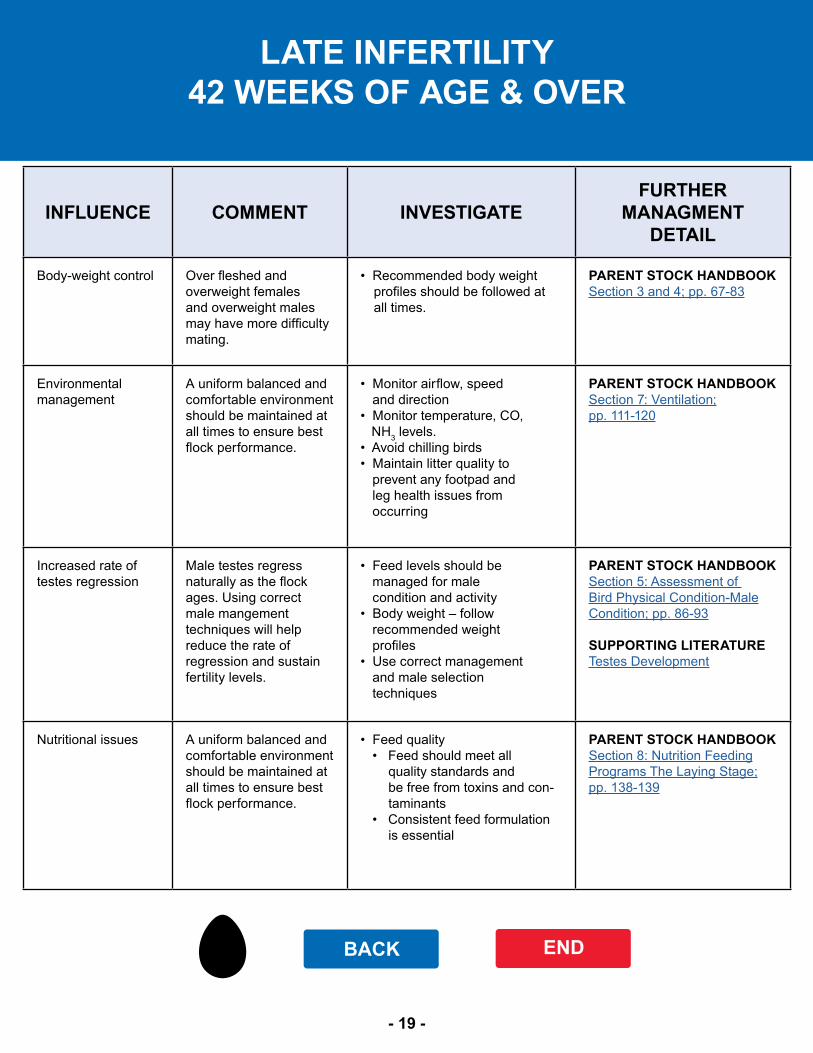
LATE INFERTILITY42 WEEKS OF AGE & OVER
INFLUENCE COMMENT INVESTIGATEFURTHER
MANAGMENT DETAIL
Body-weight control Over fleshed and overweight females and overweight males may have more difficulty mating.
• Recommended body weight profiles should be followed at all times.
PARENT STOCK HANDbOOKSection 3 and 4; pp. 67-83
Environmental management
A uniform balanced and comfortable environment should be maintained at all times to ensure best flock performance.
• Monitor airflow, speed and direction
• Monitor temperature, CO, NH3 levels.• Avoid chilling birds• Maintain litter quality to
prevent any footpad and leg health issues from occurring
PARENT STOCK HANDbOOKSection 7: Ventilation;pp. 111-120
Increased rate of testes regression
Male testes regress naturally as the flock ages. Using correct male mangement techniques will help reduce the rate of regression and sustain fertility levels.
• Feed levels should be managed for male condition and activity
• Body weight – follow recommended weight profiles
• Use correct management and male selection techniques
PARENT STOCK HANDbOOKSection 5: Assessment of Bird Physical Condition-MaleCondition; pp. 86-93
SUPPORTING LITERATURETestes Development
Nutritional issues A uniform balanced and comfortable environment should be maintained at all times to ensure best flock performance.
• Feed quality• Feed should meet all
quality standards and be free from toxins and con-taminants
• Consistent feed formulation is essential
PARENT STOCK HANDbOOKSection 8: Nutrition FeedingPrograms The Laying Stage;pp. 138-139
bACK END
- 20 -
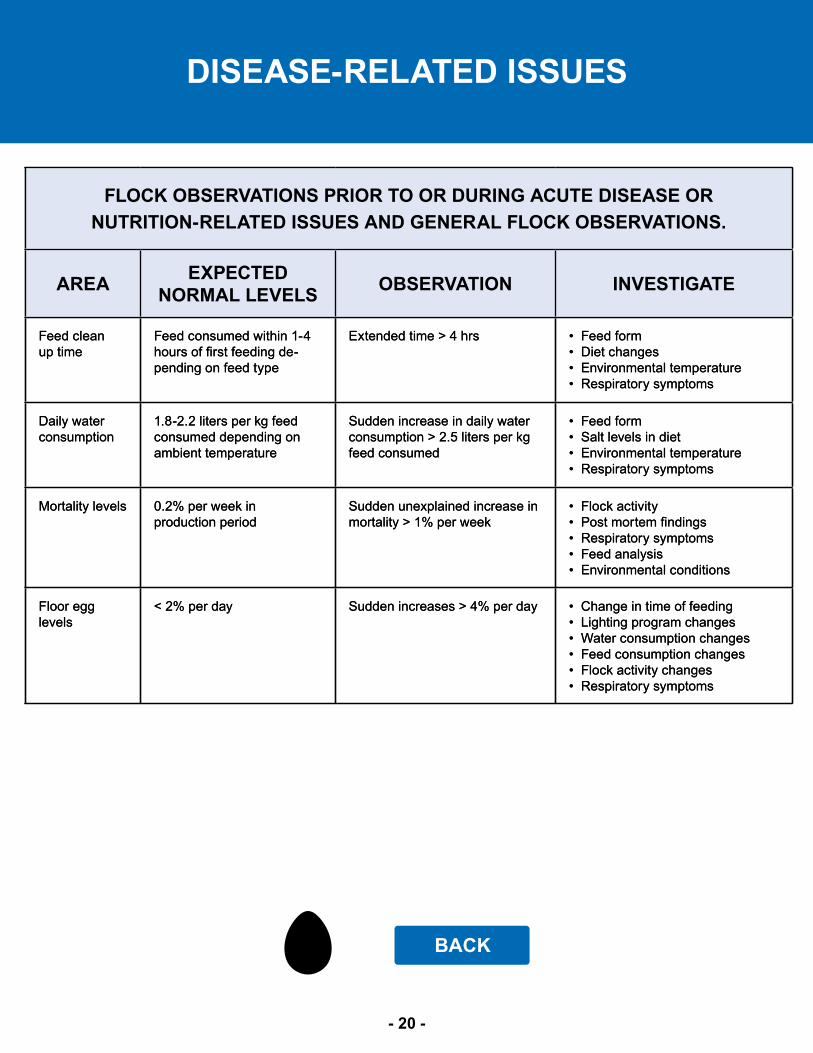
DISEASE-RELATED ISSUES
FLOCK OBSERVATIONS PRIOR TO OR DURING ACUTE DISEASE- OR NUTRITION-RELATED ISSUES AND GENERAL FLOCK OBSERVATIONS.
AREA EXPECTED NORMAL LEVELS OBSERVATION INVESTIGATE
Feed clean up time
Feed consumed within 1-4 hours of first feeding de-pending on feed type
Extended time > 4 hrs • Feed form• Diet changes• Environmental temperature• Respiratory symptoms
Daily water consumption
1.8-2.2 liters per kg feed consumed depending on ambient temperature
Sudden increase in daily water consumption > 2.5 liters per kg feed consumed
• Feed form• Salt levels in diet• Environmental temperature• Respiratory symptoms
Mortality levels 0.2% per week in production period
Sudden unexplained increase in mortality > 1% per week
• Flock activity• Post mortem findings• Respiratory symptoms• Feed analysis• Environmental conditions
Floor egg levels
< 2% per day Sudden increases > 4% per day • Change in time of feeding• Lighting program changes• Water consumption changes• Feed consumption changes• Flock activity changes• Respiratory symptoms
FLOCK OBSERVATIONS PRIOR TO OR DURING ACUTE DISEASE OR NUTRITION-RELATED ISSUES AND GENERAL FLOCK OBSERVATIONS.
AREA EXPECTED NORMAL LEVELS OBSERVATION INVESTIGATE
Feed clean up time
Feed consumed within 1-4 hours of first feeding de-pending on feed type
Extended time > 4 hrs • Feed form• Diet changes• Environmental temperature• Respiratory symptoms
Daily water consumption
1.8-2.2 liters per kg feed consumed depending on ambient temperature
Sudden increase in daily water consumption > 2.5 liters per kg feed consumed
• Feed form• Salt levels in diet• Environmental temperature• Respiratory symptoms
Mortality levels 0.2% per week in production period
Sudden unexplained increase in mortality > 1% per week
• Flock activity• Post mortem findings• Respiratory symptoms• Feed analysis• Environmental conditions
Floor egg levels
< 2% per day Sudden increases > 4% per day • Change in time of feeding• Lighting program changes• Water consumption changes• Feed consumption changes• Flock activity changes• Respiratory symptoms
BACK
- 21 -
NUTRITION-RELATED ISSUES
Most of the nutrition related-hatchability issues are the result of increased embryo mortality during incubation not increased infertility levels as such. Increases in true infertility levels are generally caused by a deficiency in either Vitamin A, Vitamin E or Selenium levels and affect males rather than females. Analysis of diets to check levels of these products should be completed and manipulation of the diet to increase these levels back to recommended if they are found to be insufficient will usually alleviate the problem.

- 22 -
HIGH INFERTILITY THROUGHOUT LIFE OF FLOCK
High levels of infertility throughout the life of a flock indicate an ongoing issue with management (rearing and production), nutrition or environment or may be due to an underlying chronic disease issue. Following the guidelines listed in the other sections of this application for each age range given should alleviate an ongoing infertility issue, but further investigation may be needed. Discuss this with your local Aviagen representative.
BACK
- 23 -
DISEASE- / NUTRITION-RELATED ISSUES
BACK
Contact a vet to determine if there are any disease-related issues: Disease-related issues to review
Contact a nutritionist to confirm any dietary issues:Nutrition-related issues to review
Confirm if the sudden drop is due to infertilityor a hatchery- or hatchability-related issue;check candling and end of hatch breakout results.
Section 2
Management Into Lay (15 Weeks to Peak Production)
Target weight
2013
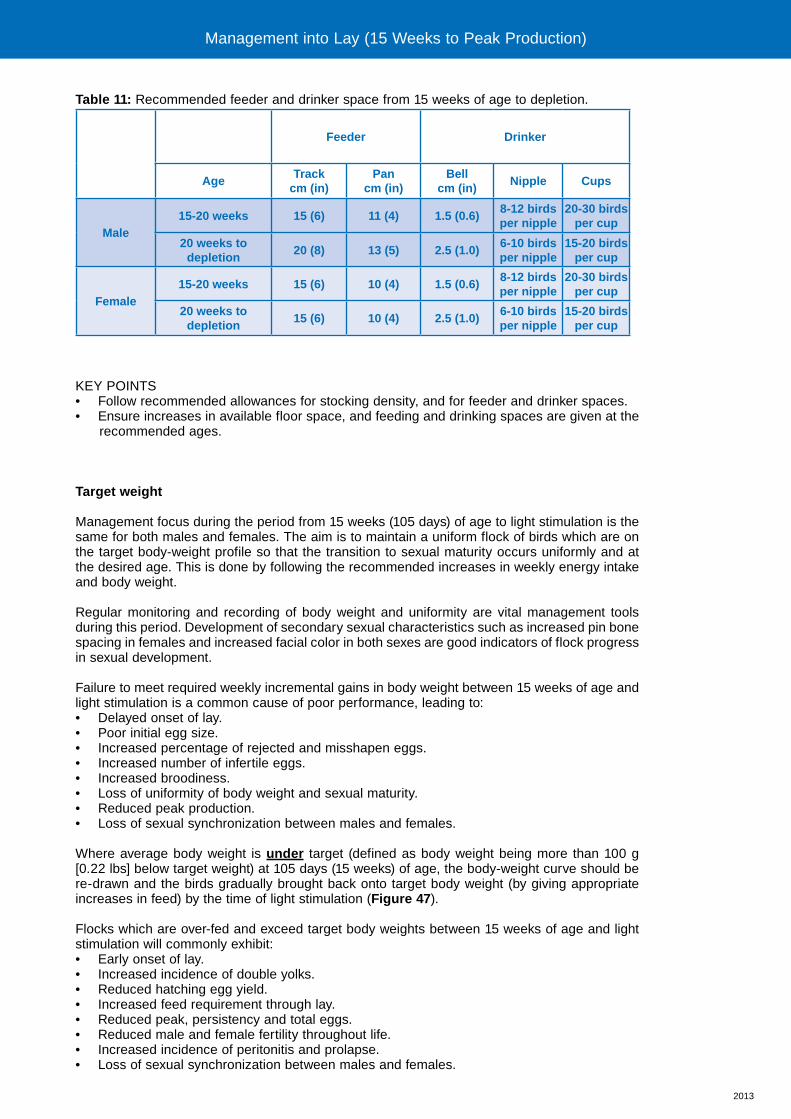
Table 11: Recommended feeder and drinker space from 15 weeks of age to depletion.
Feeder Drinker
AgeTrack
cm (in)Pan
cm (in)Bell
cm (in)Nipple Cups
Male15-20 weeks 15 (6) 11 (4) 1.5 (0.6)
8-12 birds per nipple
20-30 birds per cup
20 weeks to depletion
20 (8) 13 (5) 2.5 (1.0)6-10 birds per nipple
15-20 birds per cup
Female15-20 weeks 15 (6) 10 (4) 1.5 (0.6)
8-12 birds per nipple
20-30 birds per cup
20 weeks to depletion
15 (6) 10 (4) 2.5 (1.0)6-10 birds per nipple
15-20 birds per cup
KEY POINTS• Follow recommended allowances for stocking density, and for feeder and drinker spaces.• Ensure increases in available floor space, and feeding and drinking spaces are given at the
recommended ages.
Target weight
Management focus during the period from 15 weeks (105 days) of age to light stimulation is the same for both males and females. The aim is to maintain a uniform flock of birds which are on the target body-weight profile so that the transition to sexual maturity occurs uniformly and at the desired age. This is done by following the recommended increases in weekly energy intake and body weight.
Regular monitoring and recording of body weight and uniformity are vital management tools during this period. Development of secondary sexual characteristics such as increased pin bone spacing in females and increased facial color in both sexes are good indicators of flock progress in sexual development.
Failure to meet required weekly incremental gains in body weight between 15 weeks of age and light stimulation is a common cause of poor performance, leading to: • Delayed onset of lay.• Poor initial egg size.• Increased percentage of rejected and misshapen eggs.• Increased number of infertile eggs.• Increased broodiness.• Loss of uniformity of body weight and sexual maturity.• Reduced peak production.• Loss of sexual synchronization between males and females.
Where average body weight is under target (defined as body weight being more than 100 g [0.22 lbs] below target weight) at 105 days (15 weeks) of age, the body-weight curve should be re-drawn and the birds gradually brought back onto target body weight (by giving appropriate increases in feed) by the time of light stimulation (Figure 47).
Flocks which are over-fed and exceed target body weights between 15 weeks of age and light stimulation will commonly exhibit:• Early onset of lay.• Increased incidence of double yolks.• Reduced hatching egg yield.• Increased feed requirement through lay.• Reduced peak, persistency and total eggs.• Reduced male and female fertility throughout life.• Increased incidence of peritonitis and prolapse.• Loss of sexual synchronization between males and females.
Management into Lay (15 Weeks to Peak Production)
2013
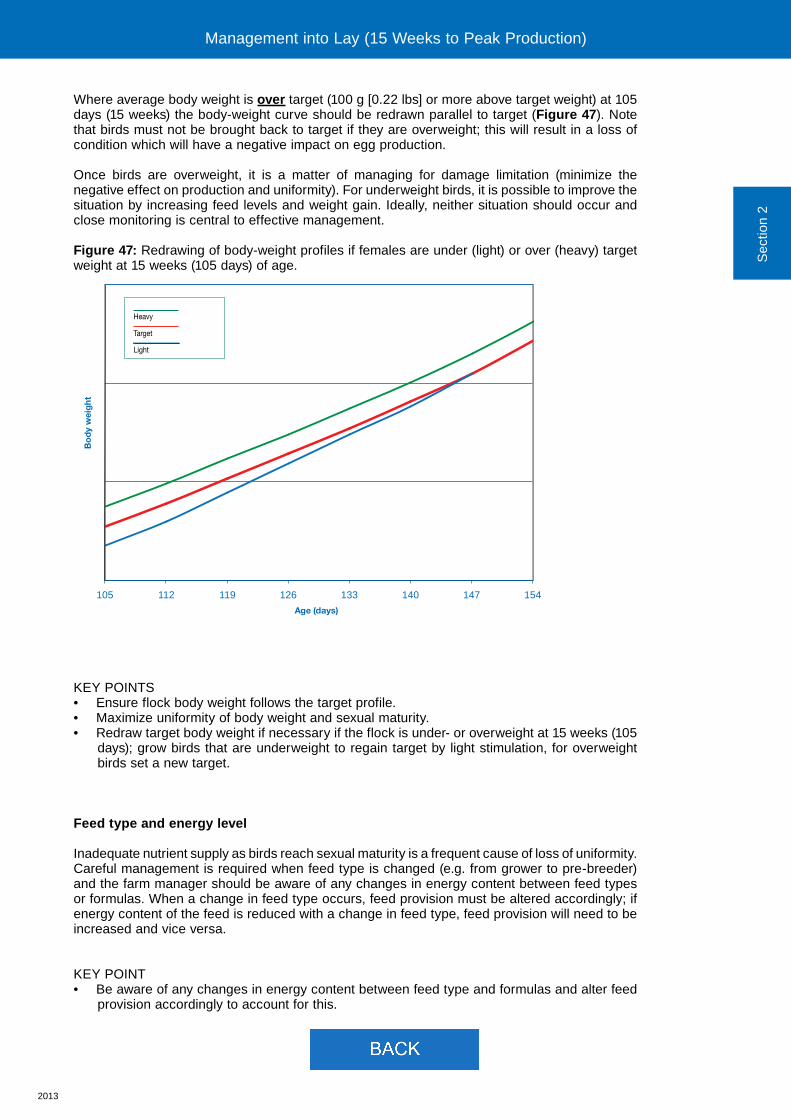
Where average body weight is over target (100 g [0.22 lbs] or more above target weight) at 105 days (15 weeks) the body-weight curve should be redrawn parallel to target (Figure 47). Note that birds must not be brought back to target if they are overweight; this will result in a loss of condition which will have a negative impact on egg production.
Once birds are overweight, it is a matter of managing for damage limitation (minimize the negative effect on production and uniformity). For underweight birds, it is possible to improve the situation by increasing feed levels and weight gain. Ideally, neither situation should occur and close monitoring is central to effective management.
Figure 47: Redrawing of body-weight profiles if females are under (light) or over (heavy) target weight at 15 weeks (105 days) of age.
105 112 119 126 133 140 147 154
Age (days)
Bo
dy
wei
ght
Heavy
Target
Light
KEY POINTS• Ensure flock body weight follows the target profile. • Maximize uniformity of body weight and sexual maturity. • Redraw target body weight if necessary if the flock is under- or overweight at 15 weeks (105
days); grow birds that are underweight to regain target by light stimulation, for overweight birds set a new target.
Feed type and energy level
Inadequate nutrient supply as birds reach sexual maturity is a frequent cause of loss of uniformity. Careful management is required when feed type is changed (e.g. from grower to pre-breeder) and the farm manager should be aware of any changes in energy content between feed types or formulas. When a change in feed type occurs, feed provision must be altered accordingly; if energy content of the feed is reduced with a change in feed type, feed provision will need to be increased and vice versa.
KEY POINT• Be aware of any changes in energy content between feed type and formulas and alter feed
provision accordingly to account for this.
Sec
tion
2
Management into Lay (15 Weeks to Peak Production)

Section 2
Management Into Lay (15 Weeks to Peak Production)
Transfer
2013
Lighting
In the period from 15 weeks of age to light stimulation, it is important that a constant 8 hours of light is maintained so that birds can respond appropriately to the light stimulation when it occurs (see section on Lighting).
KEY POINT• Follow recommended lighting programs.
Rear and move facilities
It is common practice to move birds from rearing facilities to separate laying facilities. Age at which transfer to the laying facilities occurs can vary depending on housing type. For light proof laying facilities, transfer should not occur later than 21 weeks (147 days) of age. For open-sided laying facilities, transfer may need to be later than 21 weeks (depending on season and natural daylength). Regardless of what type of housing is used, transfer should not be completed before 18 weeks (126 days) or after 23 weeks (161 days) of age. It is recommended that males are moved before the females (at least one day before) to allow them to find the feeders and drinkers.
An additional increase in feed quantity (approximately 50% more) on the day before and the day of transfer will help compensate for moving stress. Birds should not be fed on the morning they are due to be moved. Feeders in the laying facility should be fully charged so that birds have immediate access to feed on arrival. Feed levels should be returned to normal on the first or possibly second day after transfer. The exact amount of extra feed given and the length of time over which it is given after transfer will depend on season, environmental temperature, and transport duration.
It is important that feeding space is not reduced and that lighting programs and biosecurity are synchronized between rearing and laying houses.
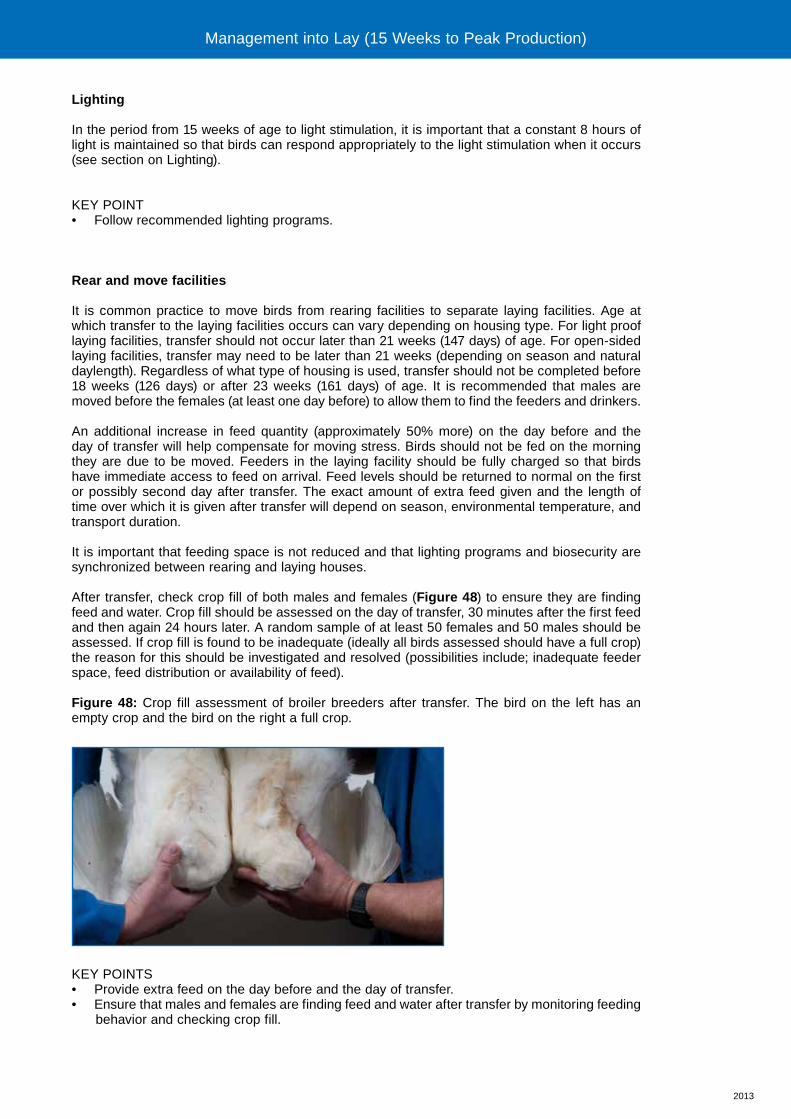
After transfer, check crop fill of both males and females (Figure 48) to ensure they are finding feed and water. Crop fill should be assessed on the day of transfer, 30 minutes after the first feed and then again 24 hours later. A random sample of at least 50 females and 50 males should be assessed. If crop fill is found to be inadequate (ideally all birds assessed should have a full crop) the reason for this should be investigated and resolved (possibilities include; inadequate feeder space, feed distribution or availability of feed).
Figure 48: Crop fill assessment of broiler breeders after transfer. The bird on the left has an empty crop and the bird on the right a full crop.
KEY POINTS• Provide extra feed on the day before and the day of transfer.• Ensure that males and females are finding feed and water after transfer by monitoring feeding
behavior and checking crop fill.
Management into Lay (15 Weeks to Peak Production)
2013
Day-old to depletion facilities
In day-old to depletion facilities where the feeding system is changed between rear and lay, transferring birds to the new feeding system must be managed carefully. New feeders must be introduced so that birds are able to access them and find feed easily. For example, where birds are floor fed in rear and then transferred to track feeders in lay, the track feeders should initially be set at a low height (low enough to allow the birds to see feed within the feeder) for the first 1-2 days. Check crop fill to determine that all birds have found the new feeders and are managing to access feed.
KEY POINT• Where there is a change in feeding system between rear and lay, manage this transfer
carefully by ensuring that birds can easily find and get access to the new feeders.
Mixing males and females
At the time of mixing males and females, additional management techniques are needed. Attention must be paid to mating-up procedure, identification of sexing errors, management of separate-sex feeding and male: female ratio.
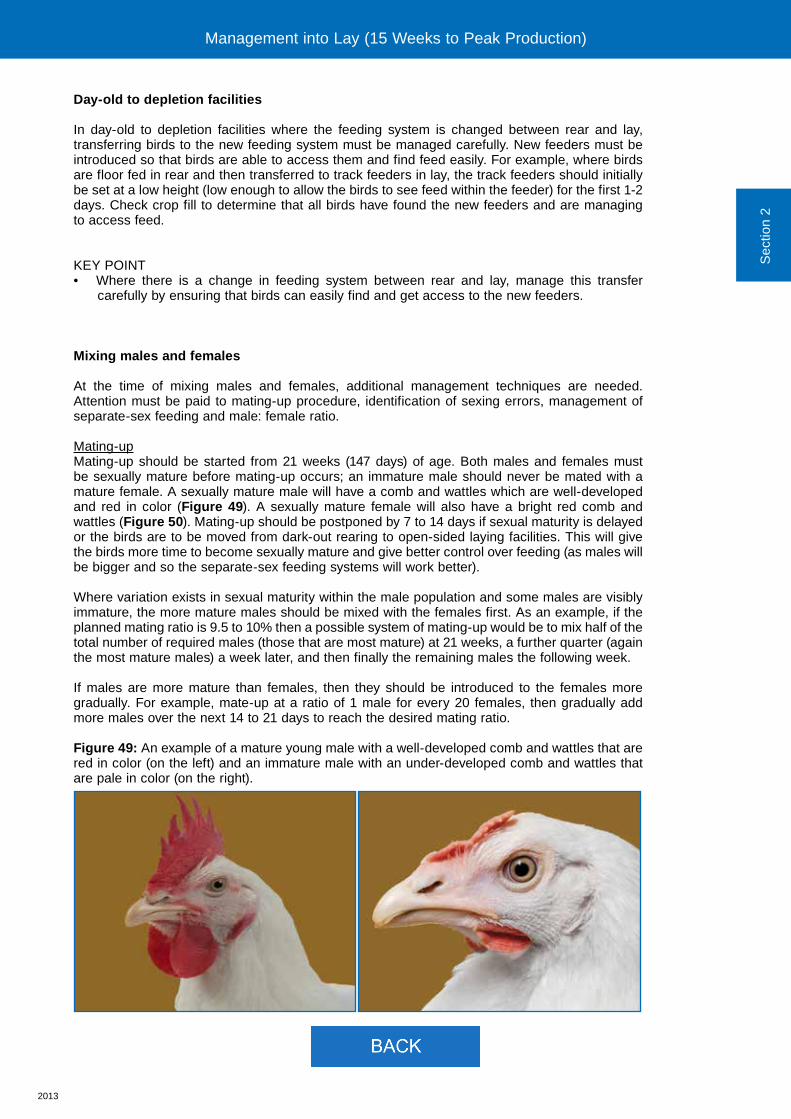
Mating-upMating-up should be started from 21 weeks (147 days) of age. Both males and females must be sexually mature before mating-up occurs; an immature male should never be mated with a mature female. A sexually mature male will have a comb and wattles which are well-developed and red in color (Figure 49). A sexually mature female will also have a bright red comb and wattles (Figure 50). Mating-up should be postponed by 7 to 14 days if sexual maturity is delayed or the birds are to be moved from dark-out rearing to open-sided laying facilities. This will give the birds more time to become sexually mature and give better control over feeding (as males will be bigger and so the separate-sex feeding systems will work better).
Where variation exists in sexual maturity within the male population and some males are visibly immature, the more mature males should be mixed with the females first. As an example, if the planned mating ratio is 9.5 to 10% then a possible system of mating-up would be to mix half of the total number of required males (those that are most mature) at 21 weeks, a further quarter (again the most mature males) a week later, and then finally the remaining males the following week.
If males are more mature than females, then they should be introduced to the females more gradually. For example, mate-up at a ratio of 1 male for every 20 females, then gradually add more males over the next 14 to 21 days to reach the desired mating ratio.
Figure 49: An example of a mature young male with a well-developed comb and wattles that are red in color (on the left) and an immature male with an under-developed comb and wattles that are pale in color (on the right).
Sec
tion
2
Management into Lay (15 Weeks to Peak Production)
Section 2
Management Into Lay (15 Weeks to Peak Production)
Mixing of Males and
Females
2013
Day-old to depletion facilities
In day-old to depletion facilities where the feeding system is changed between rear and lay, transferring birds to the new feeding system must be managed carefully. New feeders must be introduced so that birds are able to access them and find feed easily. For example, where birds are floor fed in rear and then transferred to track feeders in lay, the track feeders should initially be set at a low height (low enough to allow the birds to see feed within the feeder) for the first 1-2 days. Check crop fill to determine that all birds have found the new feeders and are managing to access feed.
KEY POINT• Where there is a change in feeding system between rear and lay, manage this transfer
carefully by ensuring that birds can easily find and get access to the new feeders.
Mixing males and females
At the time of mixing males and females, additional management techniques are needed. Attention must be paid to mating-up procedure, identification of sexing errors, management of separate-sex feeding and male: female ratio.
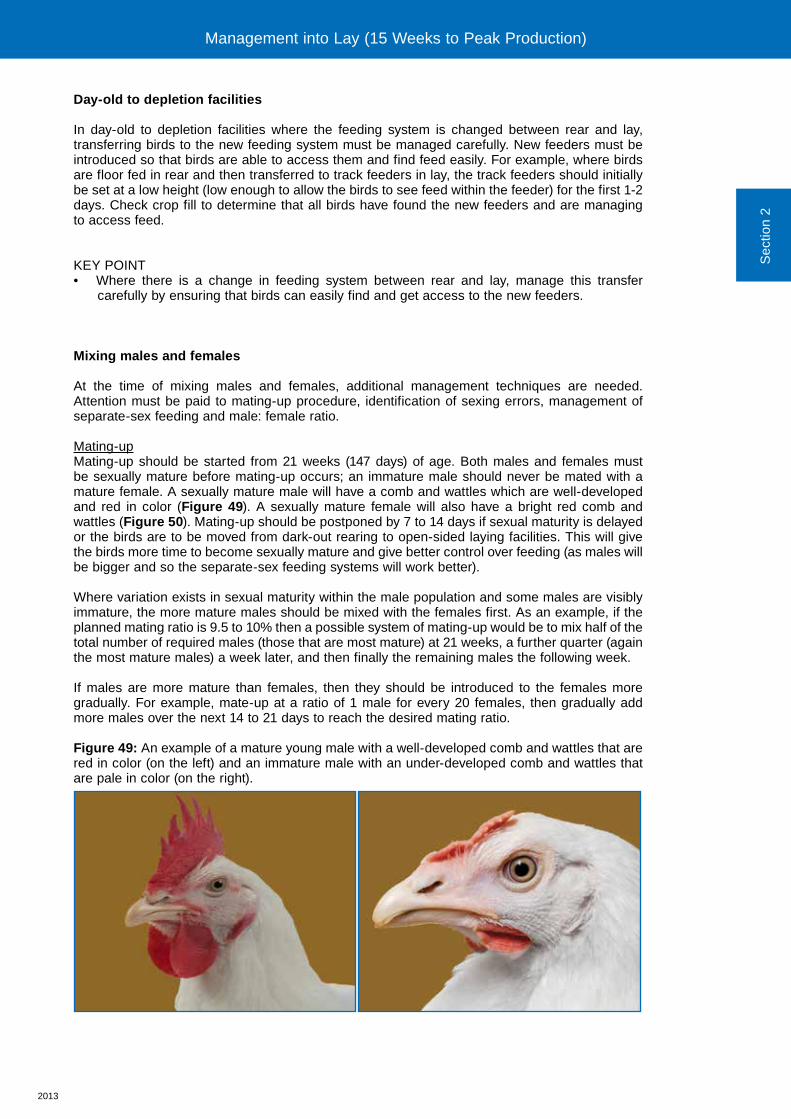
Mating-upMating-up should be started from 21 weeks (147 days) of age. Both males and females must be sexually mature before mating-up occurs; an immature male should never be mated with a mature female. A sexually mature male will have a comb and wattles which are well-developed and red in color (Figure 49). A sexually mature female will also have a bright red comb and wattles (Figure 50). Mating-up should be postponed by 7 to 14 days if sexual maturity is delayed or the birds are to be moved from dark-out rearing to open-sided laying facilities. This will give the birds more time to become sexually mature and give better control over feeding (as males will be bigger and so the separate-sex feeding systems will work better).
Where variation exists in sexual maturity within the male population and some males are visibly immature, the more mature males should be mixed with the females first. As an example, if the planned mating ratio is 9.5 to 10% then a possible system of mating-up would be to mix half of the total number of required males (those that are most mature) at 21 weeks, a further quarter (again the most mature males) a week later, and then finally the remaining males the following week.
If males are more mature than females, then they should be introduced to the females more gradually. For example, mate-up at a ratio of 1 male for every 20 females, then gradually add more males over the next 14 to 21 days to reach the desired mating ratio.
Figure 49: An example of a mature young male with a well-developed comb and wattles that are red in color (on the left) and an immature male with an under-developed comb and wattles that are pale in color (on the right).
Sec
tion
2
Management into Lay (15 Weeks to Peak Production)

2013
Figure 50: An example of a young female with a well-developed comb and wattles that are red in color (on the left) and an immature female with an under-developed comb and wattles (on the right).
In the period from mating-up until all males have become sufficiently large to be physically excluded from the female feeders (approximately 26 weeks of age), feeding behavior should be carefully monitored (at least twice a week). This is necessary to check that the separate-sex feeding systems are working properly and that feed is being distributed correctly and evenly around the shed.
KEY POINTS• Ensure both males and females are sexually mature at mating-up.• Immature males should not be mated up to mature females. • Begin mating-up at 147 days (21 weeks).• Monitor feeding behavior.
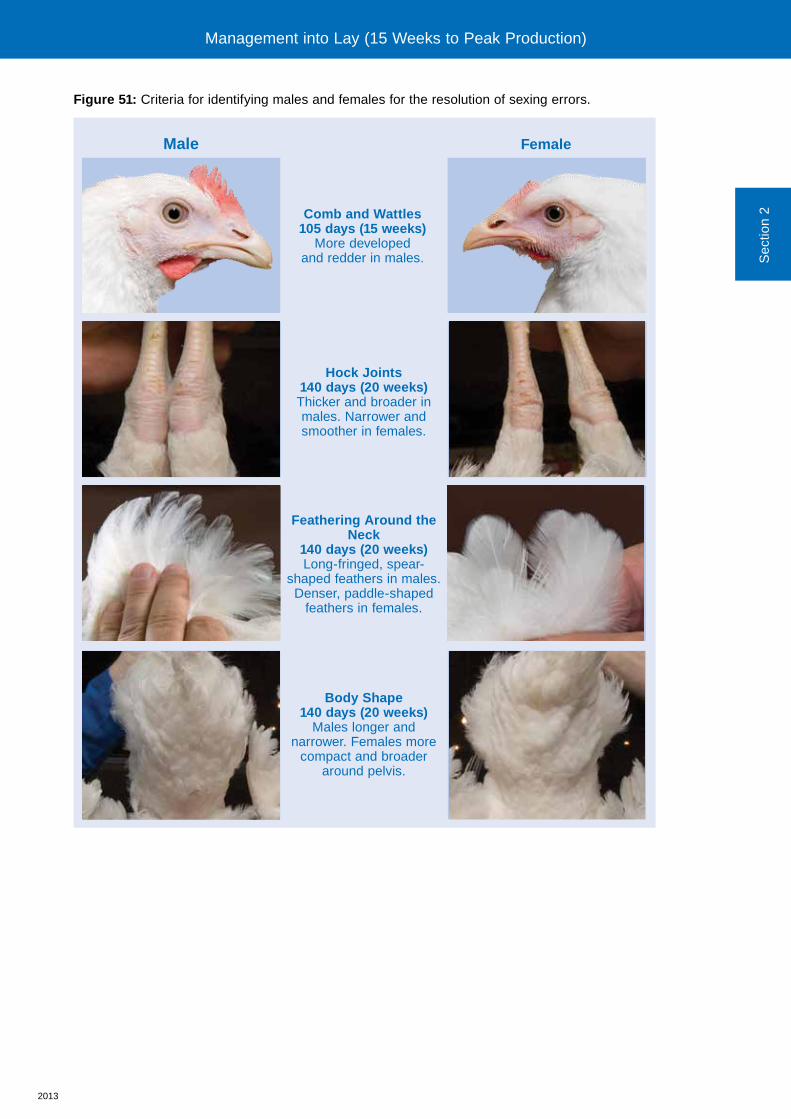
Sexing errorsIdentifying sexing errors (males present in female pens and females present in male pens) can be difficult at early ages, but it is good practice to remove these birds whenever they are identified during the life of the flock. Ideally, all sexing errors should be removed before mating-up. The criteria for doing this are illustrated in Figure 51.
Management into Lay (15 Weeks to Peak Production)
2013
Figure 51: Criteria for identifying males and females for the resolution of sexing errors.
Male Female
Comb and Wattles 105 days (15 weeks)
More developed and redder in males.
Hock Joints 140 days (20 weeks)Thicker and broader in males. Narrower and smoother in females.
Feathering Around the Neck
140 days (20 weeks)Long-fringed, spear-
shaped feathers in males. Denser, paddle-shaped
feathers in females.
Body Shape 140 days (20 weeks)
Males longer and narrower. Females more
compact and broader around pelvis.
Sec
tion
2
Management into Lay (15 Weeks to Peak Production)
2013
Separate-sex feeding equipment
After mating-up, males and females should be fed from separate feeding systems (Figure 52).
Separate-sex feeding takes advantage of differences in head size between males and females and allows more effective control of body weight and uniformity of each sex. Separate-sex feeding requires especially careful management, and feeding behavior should be monitored regularly throughout lay. At a minimum, feeding behavior should be monitored twice weekly up to 26 weeks of age. Complete exclusion of all males from the female feeders normally occurs around 26 weeks of age. Up to this point some males may still be able to access the female feeding system and steal female feed. Careful monitoring of body weight and feeding behavior is necessary at this time to ensure that both males and females are receiving enough feed to maintain target increases in body weight. After 26 weeks of age, monitoring of feeding behavior can be reduced to once a week. Feeding equipment must be properly adjusted and maintained; poorly managed and badly maintained feeding equipment gives uneven feed distribution which is a major cause of depressed egg production and fertility.
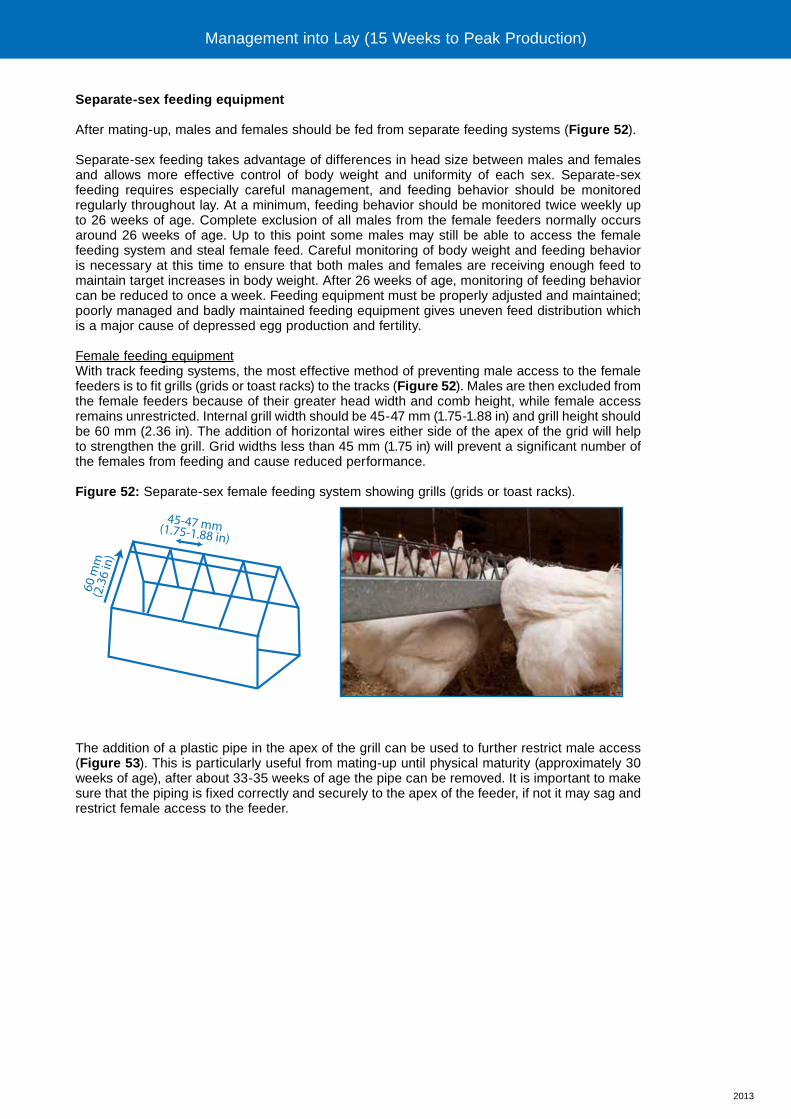
Female feeding equipmentWith track feeding systems, the most effective method of preventing male access to the female feeders is to fit grills (grids or toast racks) to the tracks (Figure 52). Males are then excluded from the female feeders because of their greater head width and comb height, while female access remains unrestricted. Internal grill width should be 45-47 mm (1.75-1.88 in) and grill height should be 60 mm (2.36 in). The addition of horizontal wires either side of the apex of the grid will help to strengthen the grill. Grid widths less than 45 mm (1.75 in) will prevent a significant number of the females from feeding and cause reduced performance.
Figure 52: Separate-sex female feeding system showing grills (grids or toast racks).
The addition of a plastic pipe in the apex of the grill can be used to further restrict male access (Figure 53). This is particularly useful from mating-up until physical maturity (approximately 30 weeks of age), after about 33-35 weeks of age the pipe can be removed. It is important to make sure that the piping is fixed correctly and securely to the apex of the feeder, if not it may sag and restrict female access to the feeder.
60 m
m(2
.36
in)
45-47 mm (1.75-1.88 in)
Management into Lay (15 Weeks to Peak Production)
2013
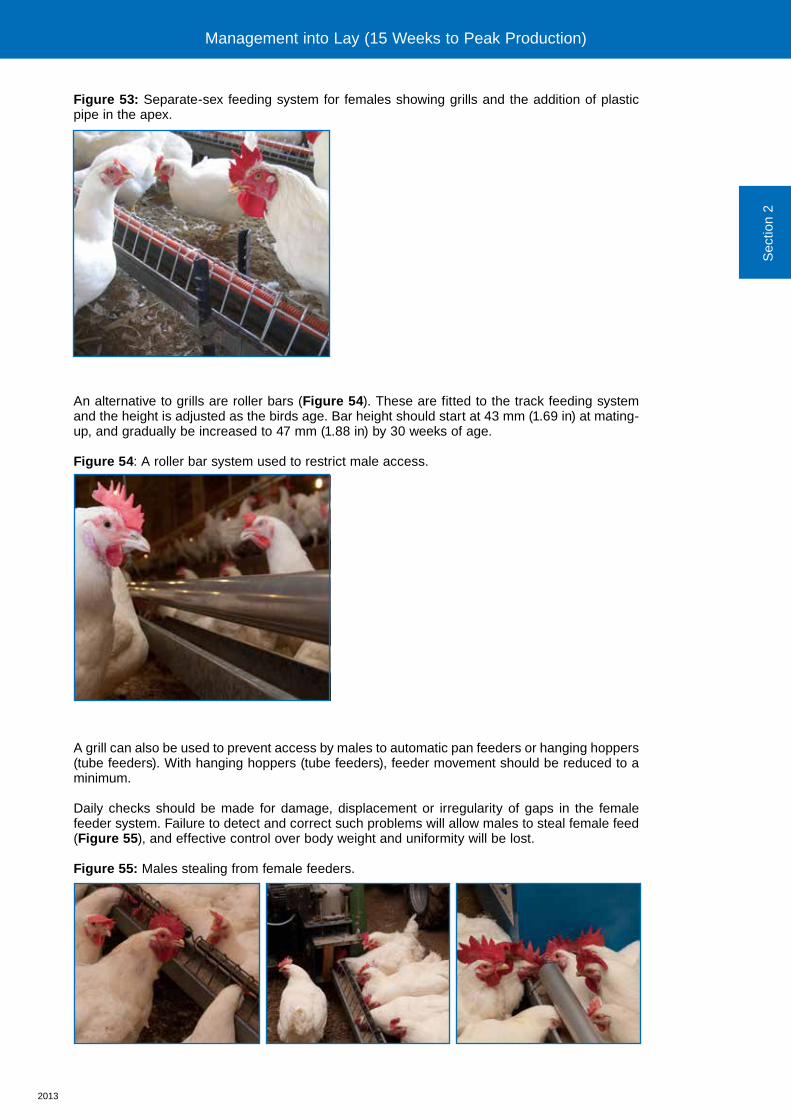
Figure 53: Separate-sex feeding system for females showing grills and the addition of plastic pipe in the apex.
An alternative to grills are roller bars (Figure 54). These are fitted to the track feeding system and the height is adjusted as the birds age. Bar height should start at 43 mm (1.69 in) at mating-up, and gradually be increased to 47 mm (1.88 in) by 30 weeks of age.
Figure 54: A roller bar system used to restrict male access.
A grill can also be used to prevent access by males to automatic pan feeders or hanging hoppers (tube feeders). With hanging hoppers (tube feeders), feeder movement should be reduced to a minimum.
Daily checks should be made for damage, displacement or irregularity of gaps in the female feeder system. Failure to detect and correct such problems will allow males to steal female feed (Figure 55), and effective control over body weight and uniformity will be lost.
Figure 55: Males stealing from female feeders.
Sec
tion
2
Management into Lay (15 Weeks to Peak Production)
2013
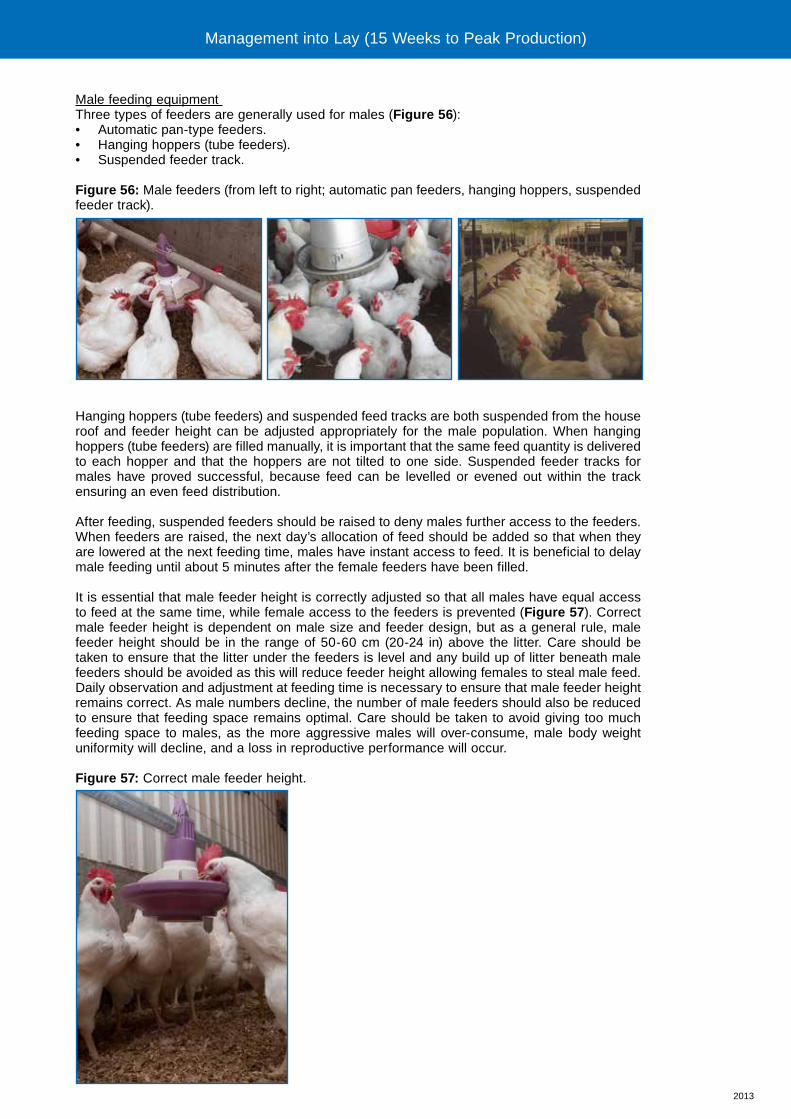
Male feeding equipment Three types of feeders are generally used for males (Figure 56):• Automatic pan-type feeders.• Hanging hoppers (tube feeders).• Suspended feeder track.
Figure 56: Male feeders (from left to right; automatic pan feeders, hanging hoppers, suspended feeder track).
Hanging hoppers (tube feeders) and suspended feed tracks are both suspended from the house roof and feeder height can be adjusted appropriately for the male population. When hanging hoppers (tube feeders) are filled manually, it is important that the same feed quantity is delivered to each hopper and that the hoppers are not tilted to one side. Suspended feeder tracks for males have proved successful, because feed can be levelled or evened out within the track ensuring an even feed distribution.
After feeding, suspended feeders should be raised to deny males further access to the feeders. When feeders are raised, the next day’s allocation of feed should be added so that when they are lowered at the next feeding time, males have instant access to feed. It is beneficial to delay male feeding until about 5 minutes after the female feeders have been filled.
It is essential that male feeder height is correctly adjusted so that all males have equal access to feed at the same time, while female access to the feeders is prevented (Figure 57). Correct male feeder height is dependent on male size and feeder design, but as a general rule, male feeder height should be in the range of 50-60 cm (20-24 in) above the litter. Care should be taken to ensure that the litter under the feeders is level and any build up of litter beneath male feeders should be avoided as this will reduce feeder height allowing females to steal male feed. Daily observation and adjustment at feeding time is necessary to ensure that male feeder height remains correct. As male numbers decline, the number of male feeders should also be reduced to ensure that feeding space remains optimal. Care should be taken to avoid giving too much feeding space to males, as the more aggressive males will over-consume, male body weight uniformity will decline, and a loss in reproductive performance will occur.
Figure 57: Correct male feeder height.
Management into Lay (15 Weeks to Peak Production)
2013
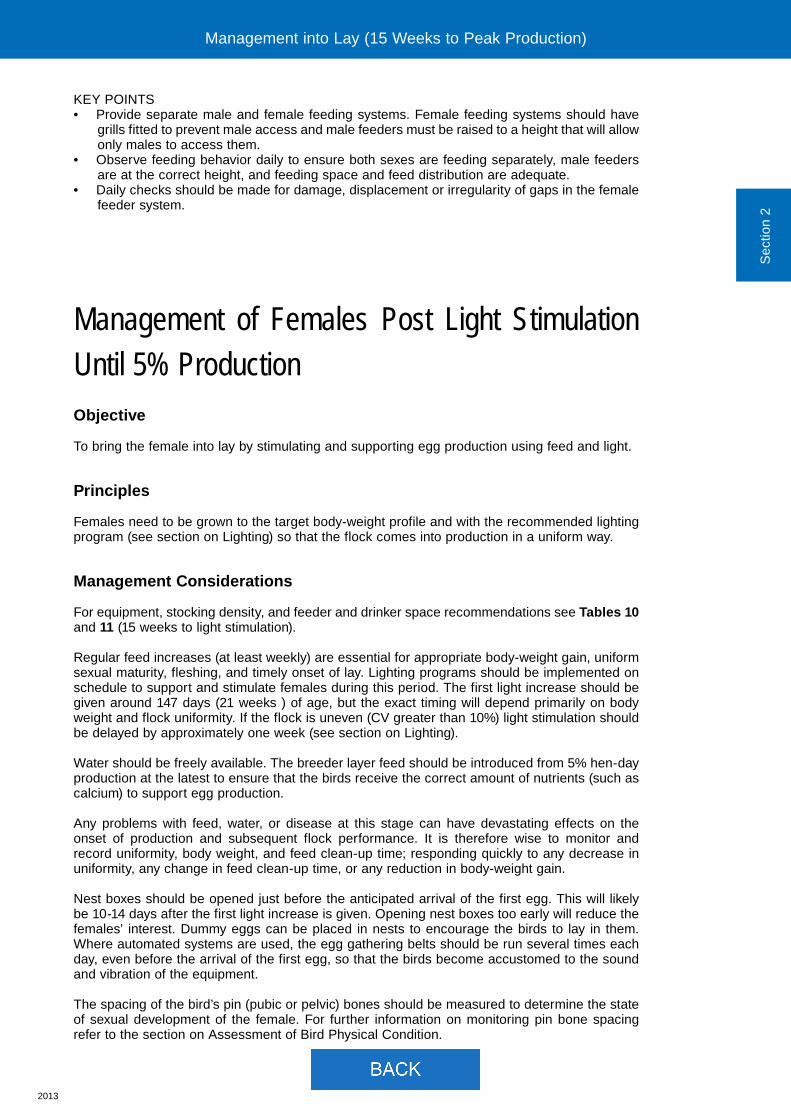
KEY POINTS• Provide separate male and female feeding systems. Female feeding systems should have
grills fitted to prevent male access and male feeders must be raised to a height that will allow only males to access them.
• Observe feeding behavior daily to ensure both sexes are feeding separately, male feeders are at the correct height, and feeding space and feed distribution are adequate.
• Daily checks should be made for damage, displacement or irregularity of gaps in the female feeder system.
Management of Females Post Light Stimulation Until 5% ProductionObjective
To bring the female into lay by stimulating and supporting egg production using feed and light.
Principles
Females need to be grown to the target body-weight profile and with the recommended lighting program (see section on Lighting) so that the flock comes into production in a uniform way.
Management Considerations
For equipment, stocking density, and feeder and drinker space recommendations see Tables 10 and 11 (15 weeks to light stimulation).
Regular feed increases (at least weekly) are essential for appropriate body-weight gain, uniform sexual maturity, fleshing, and timely onset of lay. Lighting programs should be implemented on schedule to support and stimulate females during this period. The first light increase should be given around 147 days (21 weeks ) of age, but the exact timing will depend primarily on body weight and flock uniformity. If the flock is uneven (CV greater than 10%) light stimulation should be delayed by approximately one week (see section on Lighting).
Water should be freely available. The breeder layer feed should be introduced from 5% hen-day production at the latest to ensure that the birds receive the correct amount of nutrients (such as calcium) to support egg production.
Any problems with feed, water, or disease at this stage can have devastating effects on the onset of production and subsequent flock performance. It is therefore wise to monitor and record uniformity, body weight, and feed clean-up time; responding quickly to any decrease in uniformity, any change in feed clean-up time, or any reduction in body-weight gain.
Nest boxes should be opened just before the anticipated arrival of the first egg. This will likely be 10-14 days after the first light increase is given. Opening nest boxes too early will reduce the females’ interest. Dummy eggs can be placed in nests to encourage the birds to lay in them. Where automated systems are used, the egg gathering belts should be run several times each day, even before the arrival of the first egg, so that the birds become accustomed to the sound and vibration of the equipment.
The spacing of the bird’s pin (pubic or pelvic) bones should be measured to determine the state of sexual development of the female. For further information on monitoring pin bone spacing refer to the section on Assessment of Bird Physical Condition.
Sec
tion
2
Management into Lay (15 Weeks to Peak Production)
Section 2
Management Into Lay (15 Weeks to Peak Production)
Feed Clean Up Time
2013
KEY POINTS• Monitor and achieve target body weight and body-weight gains.• Monitor daily egg production and egg weight.• Stimulate egg numbers from 5% production by giving programmed increases in feed
allocation.• Follow the recommended lighting programs.• Define the program of feed increases based on feed amount prior to production, dietary
energy level, ambient temperature and expected flock productivity.• Use small but frequent feed increases.
Feed Clean-up Trends
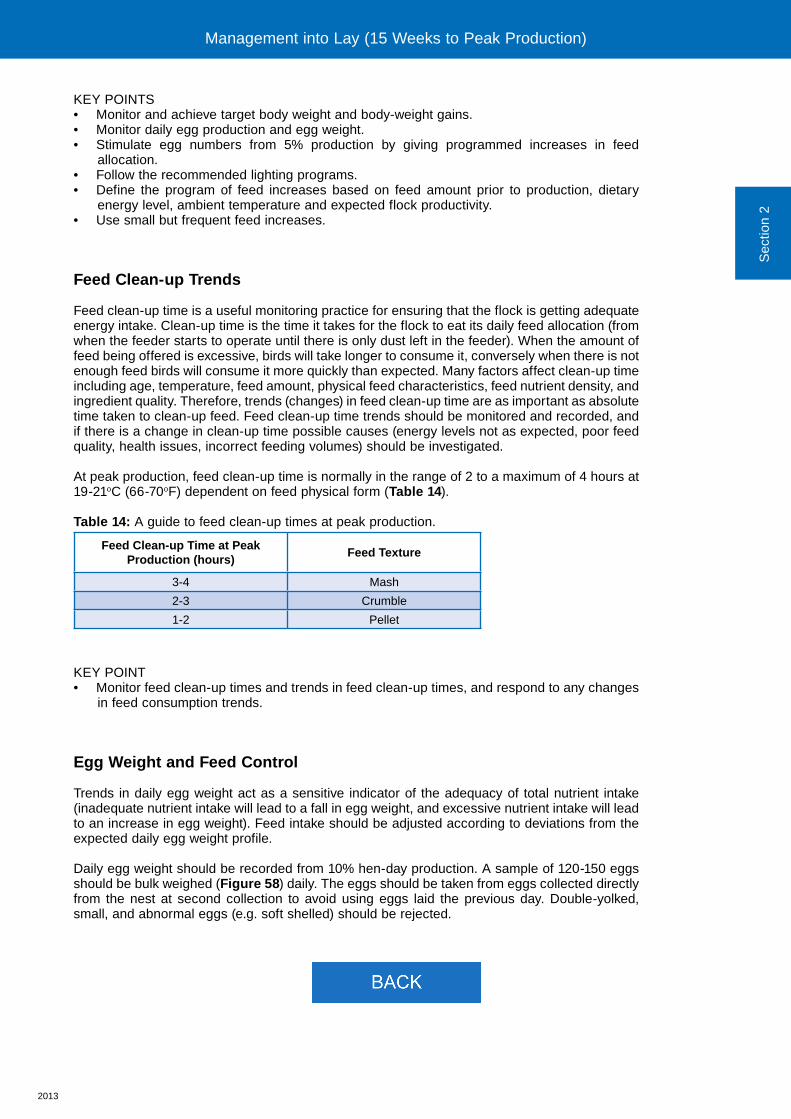
Feed clean-up time is a useful monitoring practice for ensuring that the flock is getting adequate energy intake. Clean-up time is the time it takes for the flock to eat its daily feed allocation (from when the feeder starts to operate until there is only dust left in the feeder). When the amount of feed being offered is excessive, birds will take longer to consume it, conversely when there is not enough feed birds will consume it more quickly than expected. Many factors affect clean-up time including age, temperature, feed amount, physical feed characteristics, feed nutrient density, and ingredient quality. Therefore, trends (changes) in feed clean-up time are as important as absolute time taken to clean-up feed. Feed clean-up time trends should be monitored and recorded, and if there is a change in clean-up time possible causes (energy levels not as expected, poor feed quality, health issues, incorrect feeding volumes) should be investigated.
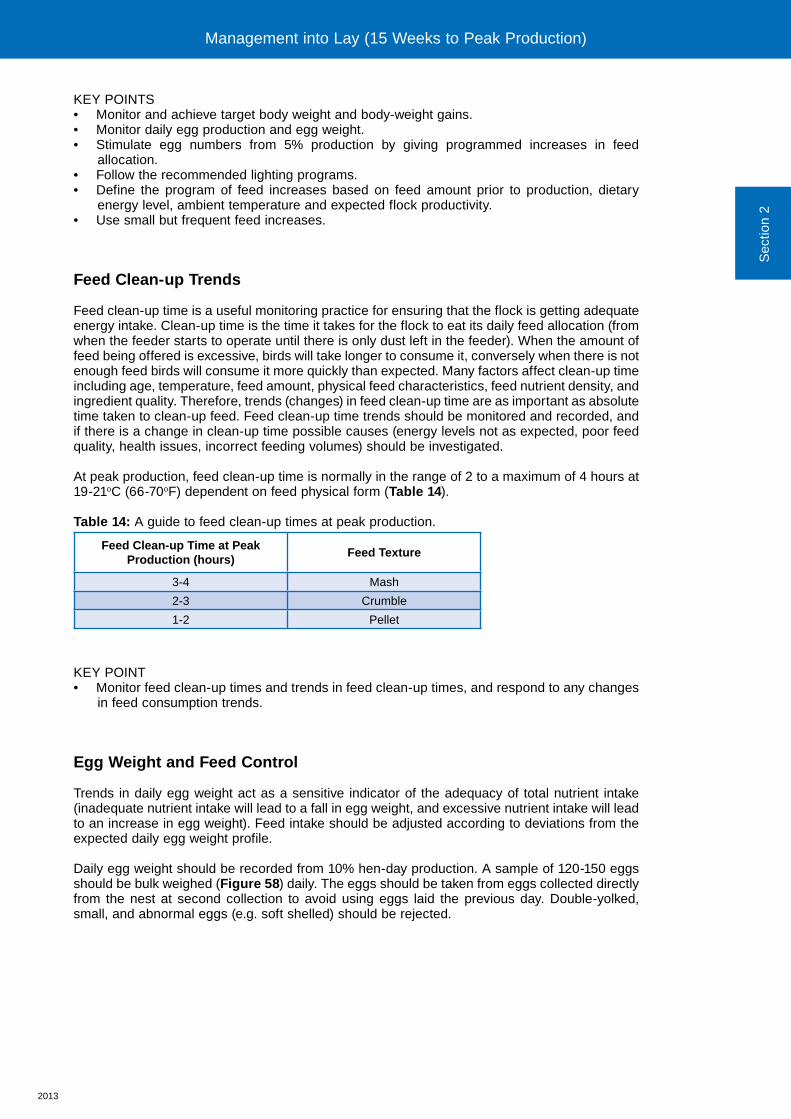
At peak production, feed clean-up time is normally in the range of 2 to a maximum of 4 hours at 19-21oC (66-70oF) dependent on feed physical form (Table 14).
Table 14: A guide to feed clean-up times at peak production.
Feed Clean-up Time at Peak Production (hours)
Feed Texture
3-4 Mash
2-3 Crumble
1-2 Pellet
KEY POINT• Monitor feed clean-up times and trends in feed clean-up times, and respond to any changes
in feed consumption trends.
Egg Weight and Feed Control
Trends in daily egg weight act as a sensitive indicator of the adequacy of total nutrient intake (inadequate nutrient intake will lead to a fall in egg weight, and excessive nutrient intake will lead to an increase in egg weight). Feed intake should be adjusted according to deviations from the expected daily egg weight profile.
Daily egg weight should be recorded from 10% hen-day production. A sample of 120-150 eggs should be bulk weighed (Figure 58) daily. The eggs should be taken from eggs collected directly from the nest at second collection to avoid using eggs laid the previous day. Double-yolked, small, and abnormal eggs (e.g. soft shelled) should be rejected.
Sec
tion
2
Management into Lay (15 Weeks to Peak Production)

Section 2
Management Into Lay (15 Weeks to Peak Production)
Management of Females
from 5% Hen-day Production Until Peak Egg
Production
2013
Management of Females from 5% Hen-day Production Until Peak Egg ProductionObjective
To promote and support female reproductive performance throughout the laying cycle.
Principles
Hatching egg production performance is affected by early egg size, egg quality, and level of peak production. Correct body weight during early lay can be achieved by providing females with feed levels that will meet the increased demands of egg production and growth.
Management Considerations
For equipment, stocking density, and feeder and drinker space recommendations, see Tables 10 and 11 (15 weeks to light stimulation).
Females must continue to gain weight during early lay to maximize egg production and hatchability. Birds should be fed to meet the increased demands of egg production and growth; but over-feeding must be avoided. Birds that receive more feed than required for egg production will develop an abnormal ovarian structure and gain excess weight - resulting in poor quality eggs, low hatchability, and increased risk of peritonitis and prolapse.
The difference in feed quantity allocated prior to first egg and the target feed level given at peak (see the Parent Stock Performance Objectives for more details) allows a feed allocation schedule to be established. Amounts of feed given up to and at peak should then be adjusted for each individual flock depending on:• Hen-day production.• Daily egg weight and change in egg weight trend.• Body weight and body-weight gain trend.• Feed clean-up time.• Dietary energy density.• Operational environmental temperature. • Degree of body fleshing and fatness.
Responsive management of birds coming into production requires frequent observation and measurement of the production parameters given above. These parameters are not used in isolation but rather in combination to determine whether or not the feed allocation for an individual flock is correct. Both the absolute and trend data should be taken in to account. For example, if there is an unexpected change or deviation from target in hen-day production, egg weight, body weight, or feed clean-up time, then feed allocation should be reviewed. However, in order for the manager to make informed decisions on feed quantity, dietary energy content and environment temperature must also be known. The frequency with which each of those parameters should be measured is given in Table 12. Monitoring of body weight, daily egg production and daily egg weight are key when determining feed allocations.
Sec
tion
2
Management into Lay (15 Weeks to Peak Production)
2013
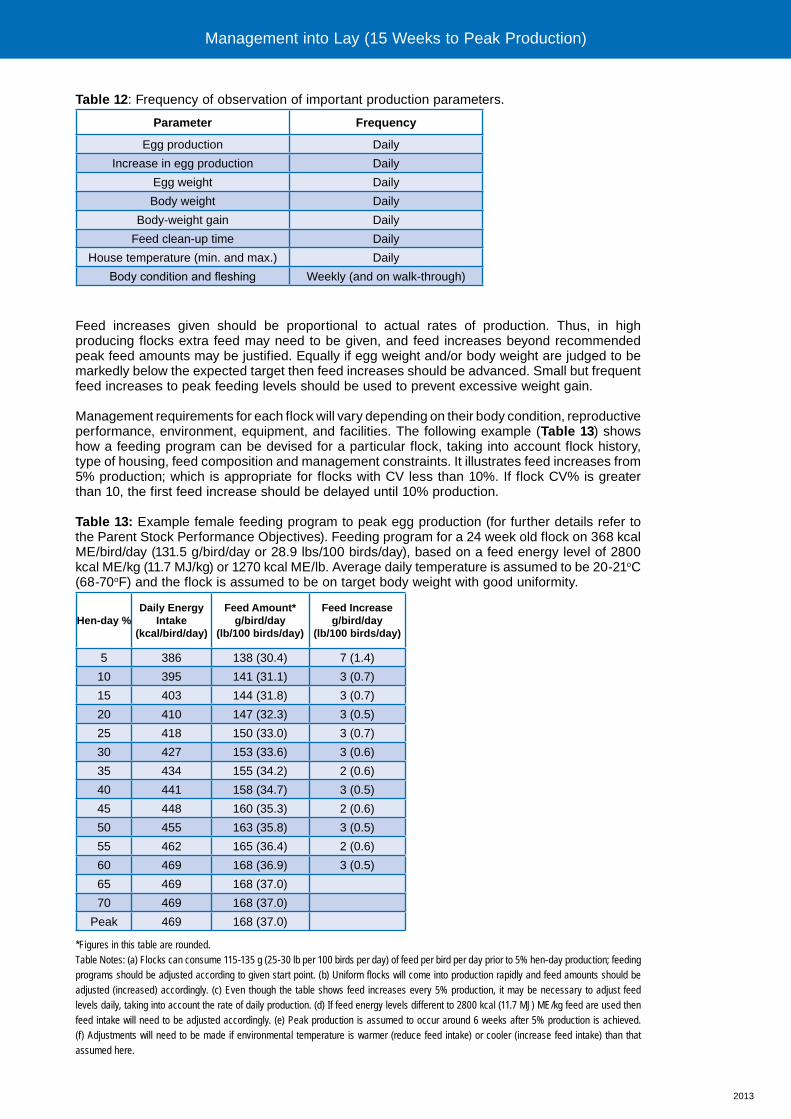
Table 12: Frequency of observation of important production parameters.
Parameter Frequency
Egg production Daily
Increase in egg production Daily
Egg weight Daily
Body weight Daily
Body-weight gain Daily
Feed clean-up time Daily
House temperature (min. and max.) Daily
Body condition and fleshing Weekly (and on walk-through)
Feed increases given should be proportional to actual rates of production. Thus, in high producing flocks extra feed may need to be given, and feed increases beyond recommended peak feed amounts may be justified. Equally if egg weight and/or body weight are judged to be markedly below the expected target then feed increases should be advanced. Small but frequent feed increases to peak feeding levels should be used to prevent excessive weight gain.
Management requirements for each flock will vary depending on their body condition, reproductive performance, environment, equipment, and facilities. The following example (Table 13) shows how a feeding program can be devised for a particular flock, taking into account flock history, type of housing, feed composition and management constraints. It illustrates feed increases from 5% production; which is appropriate for flocks with CV less than 10%. If flock CV% is greater than 10, the first feed increase should be delayed until 10% production.
Table 13: Example female feeding program to peak egg production (for further details refer to the Parent Stock Performance Objectives). Feeding program for a 24 week old flock on 368 kcal ME/bird/day (131.5 g/bird/day or 28.9 lbs/100 birds/day), based on a feed energy level of 2800 kcal ME/kg (11.7 MJ/kg) or 1270 kcal ME/lb. Average daily temperature is assumed to be 20-21oC (68-70oF) and the flock is assumed to be on target body weight with good uniformity.
Hen-day %Daily Energy
Intake(kcal/bird/day)
Feed Amount*g/bird/day
(lb/100 birds/day)
Feed Increase g/bird/day
(lb/100 birds/day)
5 386 138 (30.4) 7 (1.4)
10 395 141 (31.1) 3 (0.7)
15 403 144 (31.8) 3 (0.7)
20 410 147 (32.3) 3 (0.5)
25 418 150 (33.0) 3 (0.7)
30 427 153 (33.6) 3 (0.6)
35 434 155 (34.2) 2 (0.6)
40 441 158 (34.7) 3 (0.5)
45 448 160 (35.3) 2 (0.6)
50 455 163 (35.8) 3 (0.5)
55 462 165 (36.4) 2 (0.6)
60 469 168 (36.9) 3 (0.5)
65 469 168 (37.0)
70 469 168 (37.0)
Peak 469 168 (37.0)
*Figures in this table are rounded.Table Notes: (a) Flocks can consume 115-135 g (25-30 lb per 100 birds per day) of feed per bird per day prior to 5% hen-day production; feeding programs should be adjusted according to given start point. (b) Uniform flocks will come into production rapidly and feed amounts should be adjusted (increased) accordingly. (c) Even though the table shows feed increases every 5% production, it may be necessary to adjust feed levels daily, taking into account the rate of daily production. (d) If feed energy levels different to 2800 kcal (11.7 MJ) ME/kg feed are used then feed intake will need to be adjusted accordingly. (e) Peak production is assumed to occur around 6 weeks after 5% production is achieved. (f) Adjustments will need to be made if environmental temperature is warmer (reduce feed intake) or cooler (increase feed intake) than that assumed here.
Management into Lay (15 Weeks to Peak Production)Management into Lay (15 Weeks to Peak Production)
2013
KEY POINTS• Monitor and achieve target body weight and body-weight gains.• Monitor daily egg production and egg weight.• Stimulate egg numbers from 5% production by giving programmed increases in feed
allocation.• Follow the recommended lighting programs.• Define the program of feed increases based on feed amount prior to production, dietary
energy level, ambient temperature and expected flock productivity.• Use small but frequent feed increases.
Feed Clean-up Trends
Feed clean-up time is a useful monitoring practice for ensuring that the flock is getting adequate energy intake. Clean-up time is the time it takes for the flock to eat its daily feed allocation (from when the feeder starts to operate until there is only dust left in the feeder). When the amount of feed being offered is excessive, birds will take longer to consume it, conversely when there is not enough feed birds will consume it more quickly than expected. Many factors affect clean-up time including age, temperature, feed amount, physical feed characteristics, feed nutrient density, and ingredient quality. Therefore, trends (changes) in feed clean-up time are as important as absolute time taken to clean-up feed. Feed clean-up time trends should be monitored and recorded, and if there is a change in clean-up time possible causes (energy levels not as expected, poor feed quality, health issues, incorrect feeding volumes) should be investigated.
At peak production, feed clean-up time is normally in the range of 2 to a maximum of 4 hours at 19-21oC (66-70oF) dependent on feed physical form (Table 14).
Table 14: A guide to feed clean-up times at peak production.
Feed Clean-up Time at Peak Production (hours)
Feed Texture
3-4 Mash
2-3 Crumble
1-2 Pellet
KEY POINT• Monitor feed clean-up times and trends in feed clean-up times, and respond to any changes
in feed consumption trends.
Egg Weight and Feed Control
Trends in daily egg weight act as a sensitive indicator of the adequacy of total nutrient intake (inadequate nutrient intake will lead to a fall in egg weight, and excessive nutrient intake will lead to an increase in egg weight). Feed intake should be adjusted according to deviations from the expected daily egg weight profile.
Daily egg weight should be recorded from 10% hen-day production. A sample of 120-150 eggs should be bulk weighed (Figure 58) daily. The eggs should be taken from eggs collected directly from the nest at second collection to avoid using eggs laid the previous day. Double-yolked, small, and abnormal eggs (e.g. soft shelled) should be rejected.
Sec
tion
2
Management into Lay (15 Weeks to Peak Production)
2013
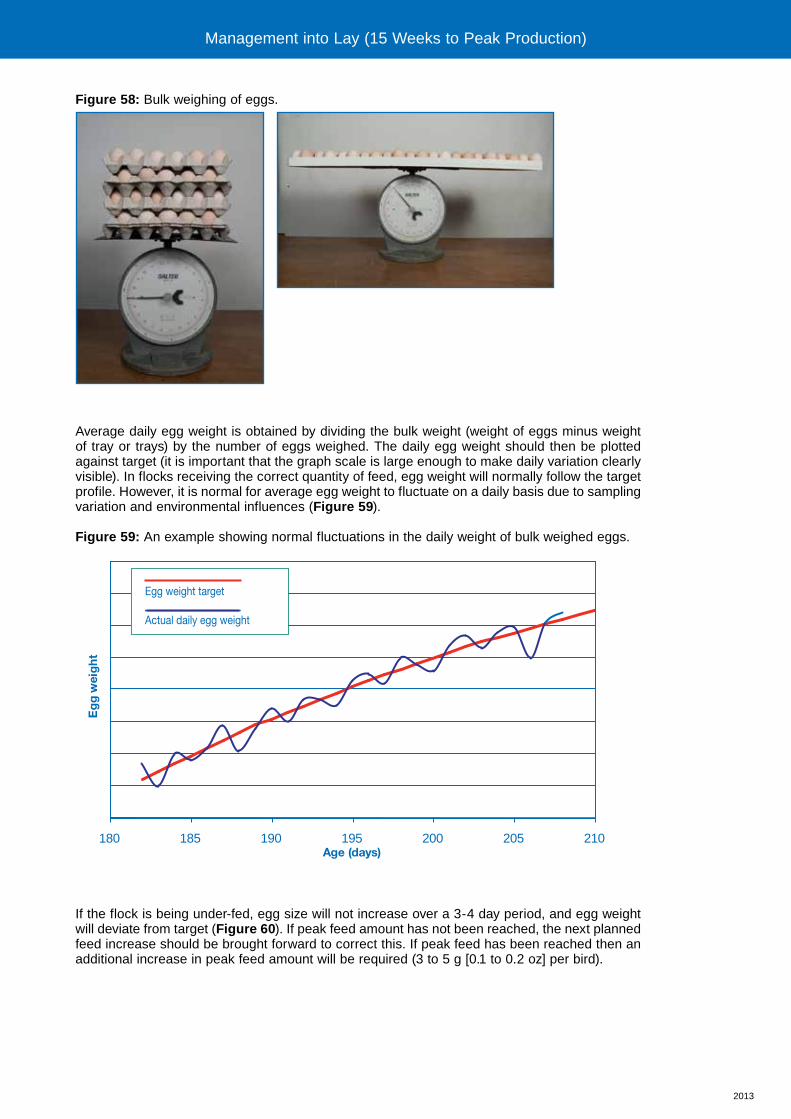
Figure 58: Bulk weighing of eggs.
Average daily egg weight is obtained by dividing the bulk weight (weight of eggs minus weight of tray or trays) by the number of eggs weighed. The daily egg weight should then be plotted against target (it is important that the graph scale is large enough to make daily variation clearly visible). In flocks receiving the correct quantity of feed, egg weight will normally follow the target profile. However, it is normal for average egg weight to fluctuate on a daily basis due to sampling variation and environmental influences (Figure 59).
Figure 59: An example showing normal fluctuations in the daily weight of bulk weighed eggs.
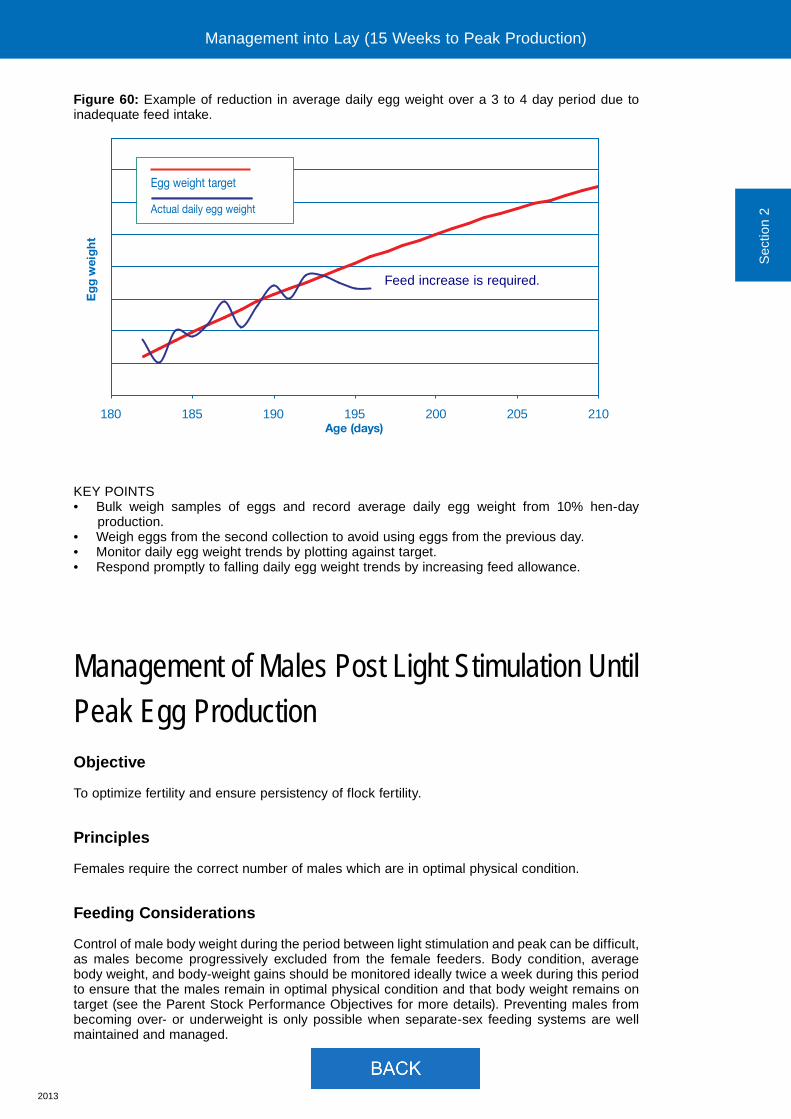
If the flock is being under-fed, egg size will not increase over a 3-4 day period, and egg weight will deviate from target (Figure 60). If peak feed amount has not been reached, the next planned feed increase should be brought forward to correct this. If peak feed has been reached then an additional increase in peak feed amount will be required (3 to 5 g [0.1 to 0.2 oz] per bird).
180 185 190 195 200 205 210Age (days)
Egg weight target
Actual daily egg weight
Eg
g w
eig
ht
Management into Lay (15 Weeks to Peak Production)
2013
Figure 60: Example of reduction in average daily egg weight over a 3 to 4 day period due to inadequate feed intake.
KEY POINTS• Bulk weigh samples of eggs and record average daily egg weight from 10% hen-day
production. • Weigh eggs from the second collection to avoid using eggs from the previous day.• Monitor daily egg weight trends by plotting against target.• Respond promptly to falling daily egg weight trends by increasing feed allowance.
Management of Males Post Light Stimulation Until Peak Egg ProductionObjective
To optimize fertility and ensure persistency of flock fertility.
Principles
Females require the correct number of males which are in optimal physical condition.
Feeding Considerations
Control of male body weight during the period between light stimulation and peak can be difficult, as males become progressively excluded from the female feeders. Body condition, average body weight, and body-weight gains should be monitored ideally twice a week during this period to ensure that the males remain in optimal physical condition and that body weight remains on target (see the Parent Stock Performance Objectives for more details). Preventing males from becoming over- or underweight is only possible when separate-sex feeding systems are well maintained and managed.
180 185 190 195 200 205 210
Eg
g w
eig
ht
Age (days)
Egg weight target
Actual daily egg weight
Sec
tion
2
Management into Lay (15 Weeks to Peak Production)
Feed increase is required.
Section 3
Management In Lay (Peak to Depletion)
Management of Females After Peak Production Through to Depletion
2013
Sec
tion
3
Management of Females After Peak Production Through to DepletionObjective
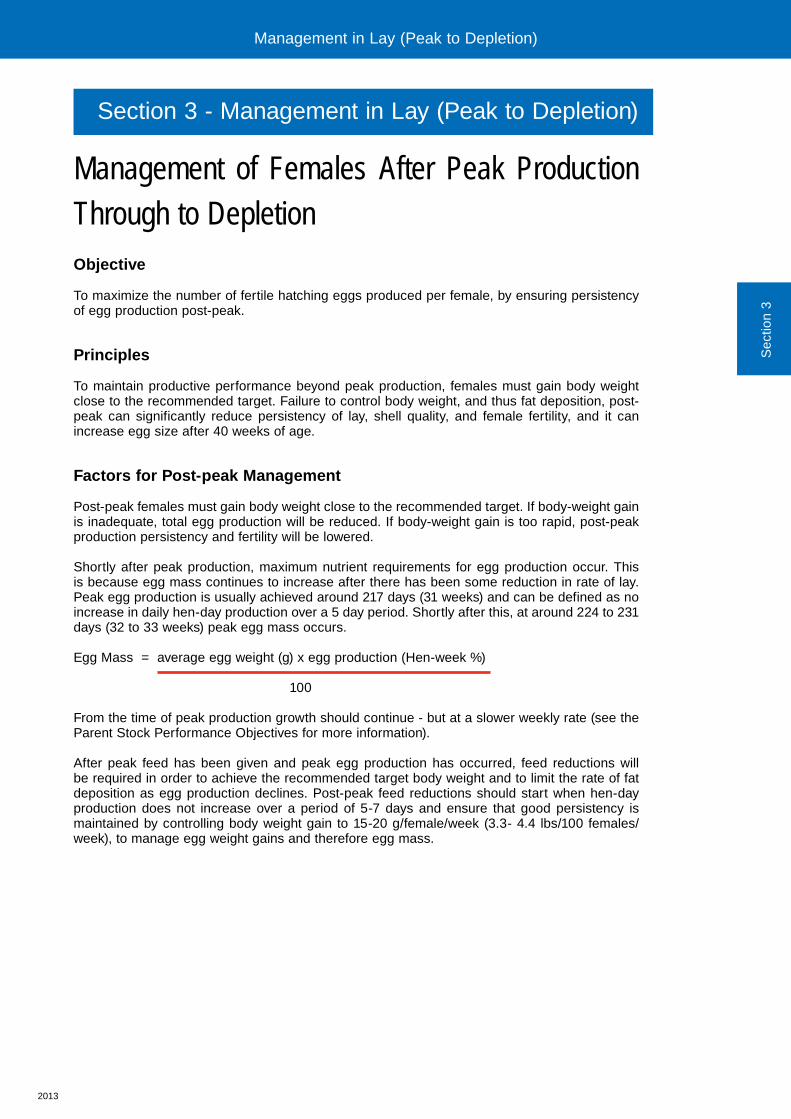
To maximize the number of fertile hatching eggs produced per female, by ensuring persistency of egg production post-peak.
Principles
To maintain productive performance beyond peak production, females must gain body weight close to the recommended target. Failure to control body weight, and thus fat deposition, post-peak can significantly reduce persistency of lay, shell quality, and female fertility, and it can increase egg size after 40 weeks of age.
Factors for Post-peak Management
Post-peak females must gain body weight close to the recommended target. If body-weight gain is inadequate, total egg production will be reduced. If body-weight gain is too rapid, post-peak production persistency and fertility will be lowered.
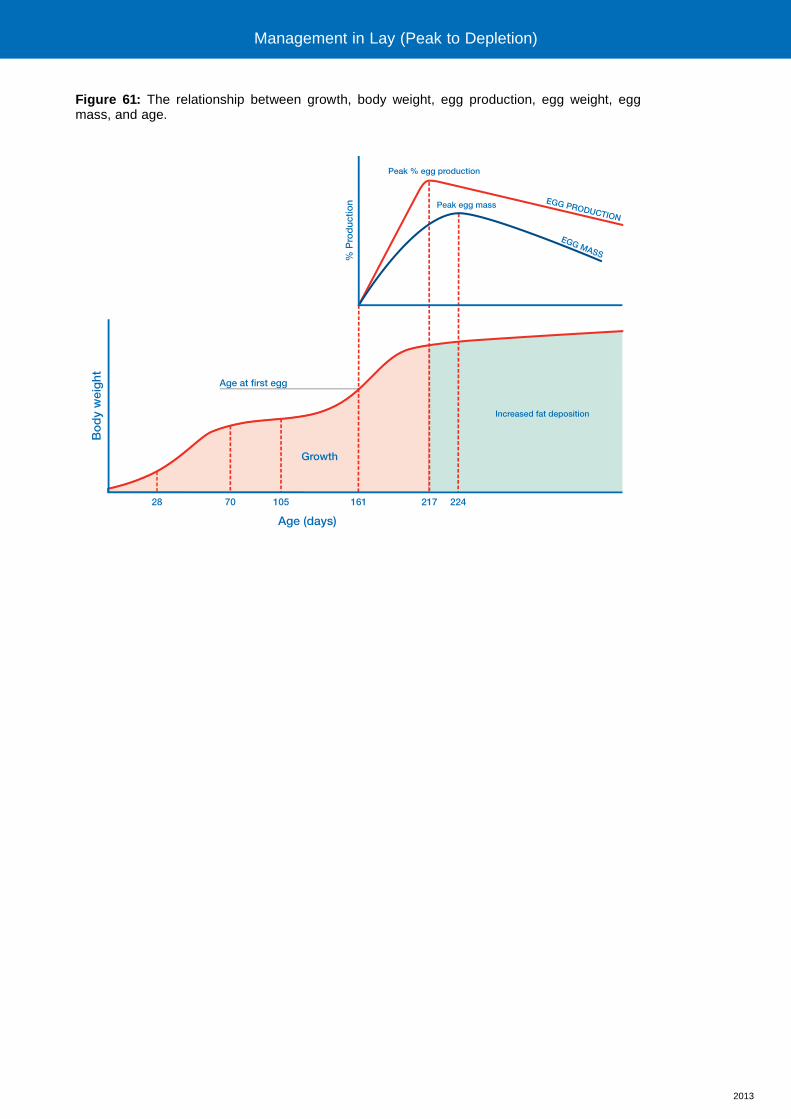
Shortly after peak production, maximum nutrient requirements for egg production occur. This is because egg mass continues to increase after there has been some reduction in rate of lay. Peak egg production is usually achieved around 217 days (31 weeks) and can be defined as no increase in daily hen-day production over a 5 day period. Shortly after this, at around 224 to 231 days (32 to 33 weeks) peak egg mass occurs.
Egg Mass = average egg weight (g) x egg production (Hen-week %)
100
From the time of peak production growth should continue - but at a slower weekly rate (see the Parent Stock Performance Objectives for more information).
After peak feed has been given and peak egg production has occurred, feed reductions will be required in order to achieve the recommended target body weight and to limit the rate of fat deposition as egg production declines. Post-peak feed reductions should start when hen-day production does not increase over a period of 5-7 days and ensure that good persistency is maintained by controlling body weight gain to 15-20 g/female/week (3.3- 4.4 lbs/100 females/week), to manage egg weight gains and therefore egg mass.
Section 3 - Management in Lay (Peak to Depletion)
Management in Lay (Peak to Depletion)

2013
Figure 61: The relationship between growth, body weight, egg production, egg weight, egg mass, and age.
Management in Lay (Peak to Depletion)
28 70 105
Age (days)
Increased fat deposition
Growth
161 217 224
Peak % egg production
Peak egg mass EGG PRODUCTION
EGG MASS
Age at first egg
Bo
dy
wei
ght
% P
rod
uctio
n
2013
Procedures
Many factors are involved in determining the exact timing of the initial feed reduction post-peak. Timing and amount of feed reduction may be affected by:• Body weight and body-weight change from the start of production.• Daily egg production and the hen-day production trend.• Daily egg weight and egg weight trend.• Egg mass trend.• Health status of the flock and feathering condition.• Ambient environmental temperature.• Feed energy and protein levels.• Feed texture.• Feed quantity consumed at peak (energy intake).• Flock history (rearing and pre-peak performance).• Changes in feed clean-up time.• Feather cover.
Due to variation between flocks in the characteristics given above, the program of feed reduction will vary for each flock. To enable the farm manager to monitor and establish an appropriate feed reduction program, it is critical that the following characteristics are measured and recorded, and graphed onto a chart:• Daily (or weekly) body weight and body-weight change relative to the target (see the
Performance Objectives for more details on target body weights). Accurate body weight monitoring is critical during the post-peak period (see section on Monitoring Broiler Breeder Growth).
• Daily egg weight and egg weight change relative to the target (can be obtained from the Performance Objectives booklet).
• Daily changes in feed clean-up time. Clean-up time is the time between feeder switch-on and trough clearance; at peak these are normally 3-4 hours for mash, 2-3 hours for crumbles, 1-2 hours for pellets. If clean-up time is more or less than the times indicated it suggests that feed levels may be too high or too low respectively.
In addition, the farm manager should routinely handle and examine the birds to ensure they are in good physical condition (see section on Assessment of Bird Physical Condition for more information).
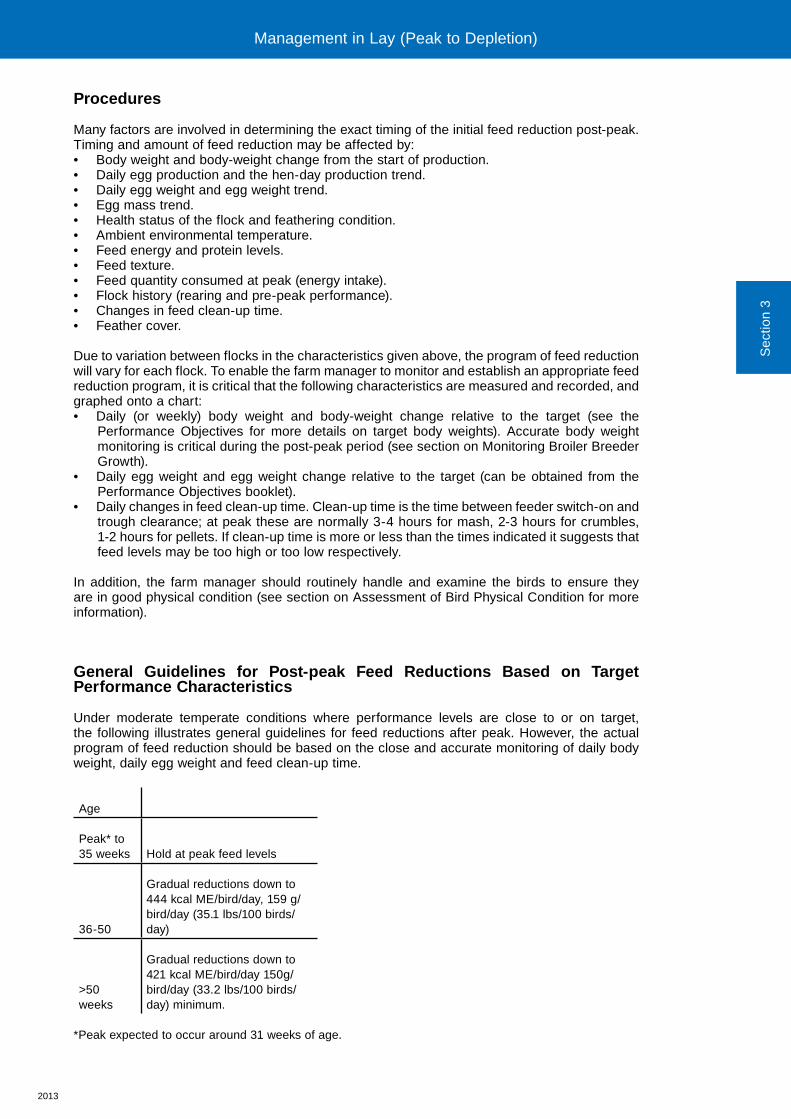
General Guidelines for Post-peak Feed Reductions Based on Target Performance Characteristics
Under moderate temperate conditions where performance levels are close to or on target, the following illustrates general guidelines for feed reductions after peak. However, the actual program of feed reduction should be based on the close and accurate monitoring of daily body weight, daily egg weight and feed clean-up time.
Age
Peak* to 35 weeks Hold at peak feed levels
36-50
Gradual reductions down to 444 kcal ME/bird/day, 159 g/bird/day (35.1 lbs/100 birds/day)
>50 weeks
Gradual reductions down to 421 kcal ME/bird/day 150g/bird/day (33.2 lbs/100 birds/day) minimum.
*Peak expected to occur around 31 weeks of age.
Sec
tion
3
Management in Lay (Peak to Depletion) Management in Lay (Peak to Depletion)
2013
There will be situations where flock performance differs markedly from the published performance targets and the feed reduction program will need to be altered accordingly to account for this. The following are examples of 2 specific field situations illustrating suggested feed reduction strategies where performance differs from published targets.
Flocks performing above target recommendations
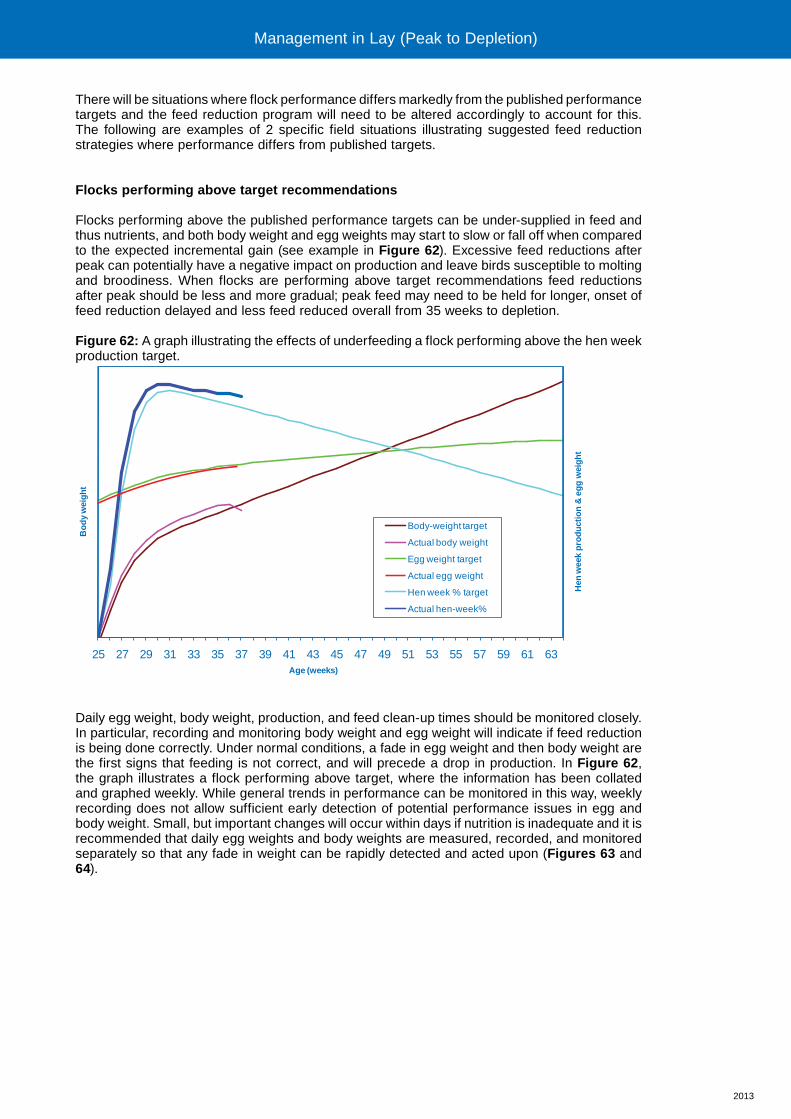
Flocks performing above the published performance targets can be under-supplied in feed and thus nutrients, and both body weight and egg weights may start to slow or fall off when compared to the expected incremental gain (see example in Figure 62). Excessive feed reductions after peak can potentially have a negative impact on production and leave birds susceptible to molting and broodiness. When flocks are performing above target recommendations feed reductions after peak should be less and more gradual; peak feed may need to be held for longer, onset of feed reduction delayed and less feed reduced overall from 35 weeks to depletion.
Figure 62: A graph illustrating the effects of underfeeding a flock performing above the hen week production target.
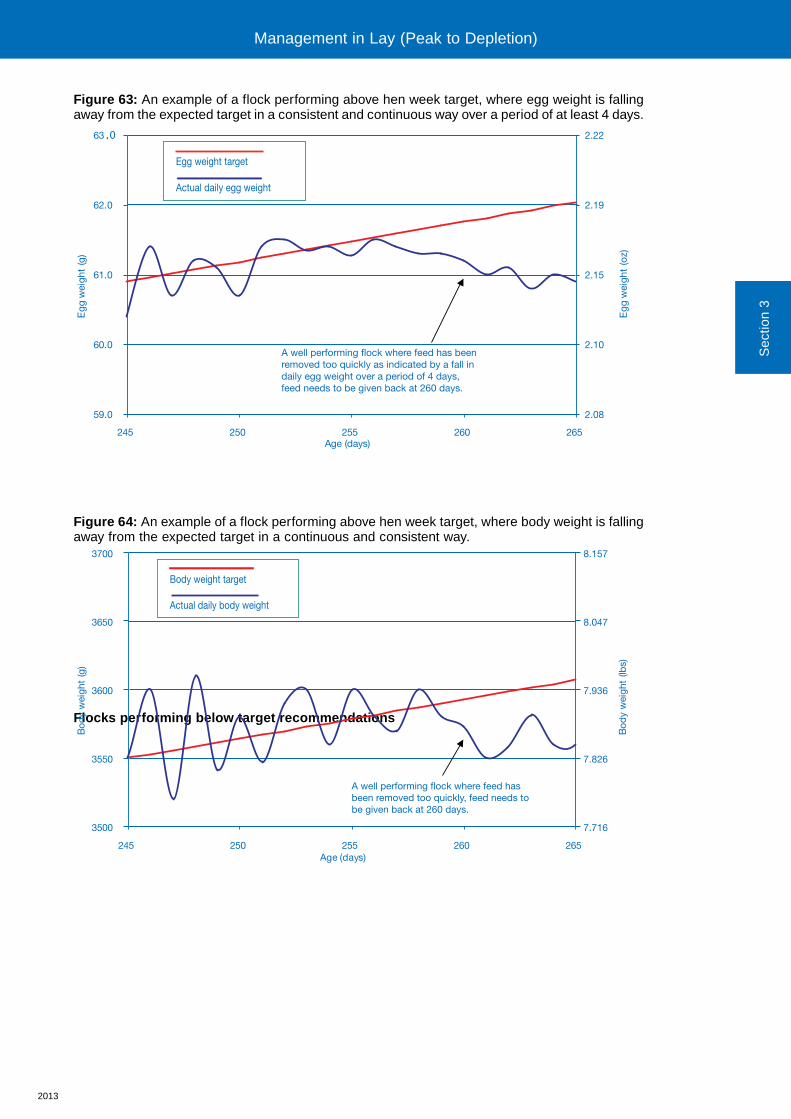
Daily egg weight, body weight, production, and feed clean-up times should be monitored closely. In particular, recording and monitoring body weight and egg weight will indicate if feed reduction is being done correctly. Under normal conditions, a fade in egg weight and then body weight are the first signs that feeding is not correct, and will precede a drop in production. In Figure 62, the graph illustrates a flock performing above target, where the information has been collated and graphed weekly. While general trends in performance can be monitored in this way, weekly recording does not allow sufficient early detection of potential performance issues in egg and body weight. Small, but important changes will occur within days if nutrition is inadequate and it is recommended that daily egg weights and body weights are measured, recorded, and monitored separately so that any fade in weight can be rapidly detected and acted upon (Figures 63 and 64).
25 27 29 31 33 35 37 39 41 43 45 47 49 51 53 55 57 59 61 63
Hen
wee
k p
rod
uct
ion
& e
gg
wei
gh
t
Bo
dy
wei
gh
t
Age (weeks)
Body-weight target
Actual body weight
Egg weight target
Actual egg weight
Hen week % target
Actual hen-week%
Management in Lay (Peak to Depletion)
2013
Figure 63: An example of a flock performing above hen week target, where egg weight is falling away from the expected target in a consistent and continuous way over a period of at least 4 days.
Figure 64: An example of a flock performing above hen week target, where body weight is falling away from the expected target in a continuous and consistent way.
Flocks performing below target recommendations
59.0
60.0
61.0
62.0
63
2.08
2.10
2.15
2.19
2.22.0
245 250 255 260 265
Egg
wei
ght
(g)
Egg
wei
ght
(oz)
Age (days)
A well performing flock where feed has beenremoved too quickly as indicated by a fall indaily egg weight over a period of 4 days,feed needs to be given back at 260 days.
Egg weight target
Actual daily egg weight
3500
3550
3600
3650
3700
7.716
7.826
7.936
8.047
8.157
245 250 255 260 265
Bod
y w
eigh
t (g
)
Bod
y w
eigh
t (lb
s)
Age (days)
A well performing flock where feed hasbeen removed too quickly, feed needs tobe given back at 260 days.
Body weight target
Actual daily body weight
Sec
tion
3
Management in Lay (Peak to Depletion) Management in Lay (Peak to Depletion)
2013
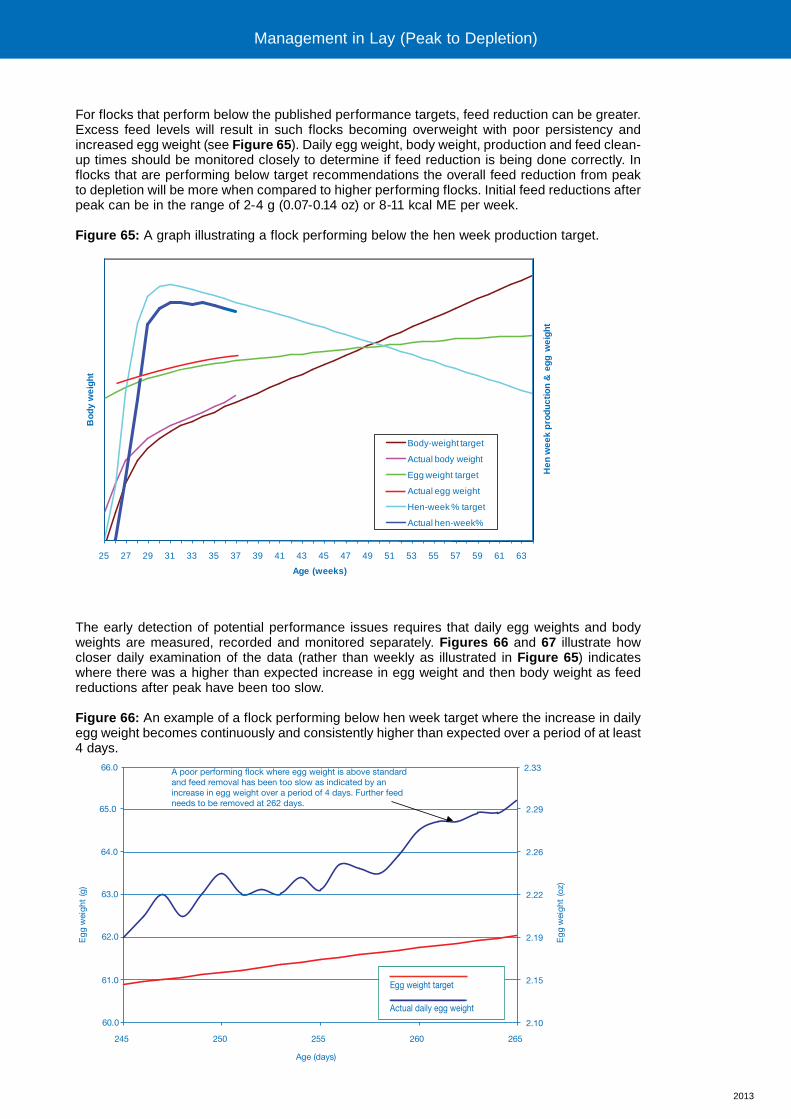
For flocks that perform below the published performance targets, feed reduction can be greater. Excess feed levels will result in such flocks becoming overweight with poor persistency and increased egg weight (see Figure 65). Daily egg weight, body weight, production and feed clean-up times should be monitored closely to determine if feed reduction is being done correctly. In flocks that are performing below target recommendations the overall feed reduction from peak to depletion will be more when compared to higher performing flocks. Initial feed reductions after peak can be in the range of 2-4 g (0.07-0.14 oz) or 8-11 kcal ME per week. Figure 65: A graph illustrating a flock performing below the hen week production target.
The early detection of potential performance issues requires that daily egg weights and body weights are measured, recorded and monitored separately. Figures 66 and 67 illustrate how closer daily examination of the data (rather than weekly as illustrated in Figure 65) indicates where there was a higher than expected increase in egg weight and then body weight as feed reductions after peak have been too slow.
Figure 66: An example of a flock performing below hen week target where the increase in daily egg weight becomes continuously and consistently higher than expected over a period of at least 4 days.
25 27 29 31 33 35 37 39 41 43 45 47 49 51 53 55 57 59 61 63H
en w
eek
pro
duct
ion
& e
gg w
eigh
t
Bod
y w
eigh
t
Age (weeks)
Body-weight target
Actual body weight
Egg weight target
Actual egg weight
Hen-week % target
Actual hen-week%
65.0
2.10
2.15
2.19
2.22
2.26
2.29
245 250 255 260 265
Egg
wei
ght
(g)
Egg
wei
ght
(oz)
Age (days)
A poor performing flock where egg weight is above standard and feed removal has been too slow as indicated by an increase in egg weight over a period of 4 days. Further feed needs to be removed at 262 days.
Egg weight target
Actual daily egg weight
64.0
63.0
62.0
61.0
60.0
66.0 2.33
Management in Lay (Peak to Depletion)
2013
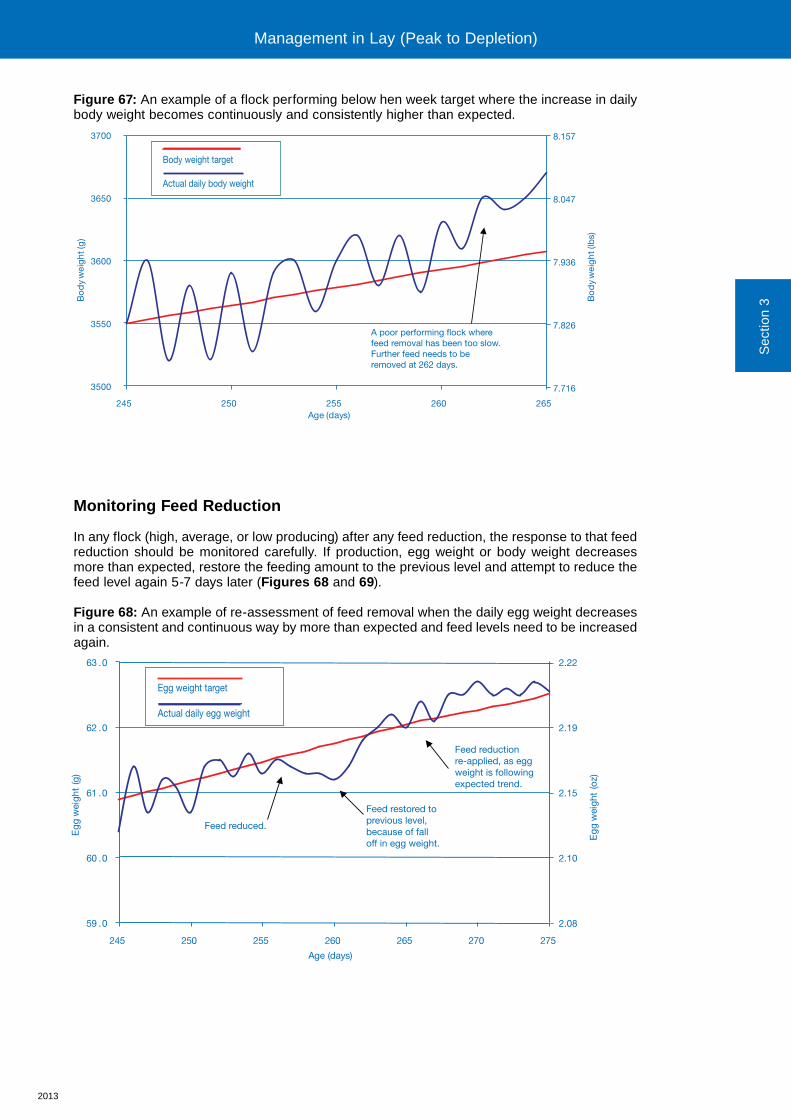
Figure 67: An example of a flock performing below hen week target where the increase in daily body weight becomes continuously and consistently higher than expected.
Monitoring Feed Reduction
In any flock (high, average, or low producing) after any feed reduction, the response to that feed reduction should be monitored carefully. If production, egg weight or body weight decreases more than expected, restore the feeding amount to the previous level and attempt to reduce the feed level again 5-7 days later (Figures 68 and 69).
Figure 68: An example of re-assessment of feed removal when the daily egg weight decreases in a consistent and continuous way by more than expected and feed levels need to be increased again.
3500
3550
3600
3650
3700
245 250 255 260 265
Bo
dy
wei
gh
t (g
)
Bo
dy
wei
gh
t (lb
s)
Age (days)
7.716
7.826
7.936
8.047
8.157
A poor performing flock wherefeed removal has been too slow.Further feed needs to beremoved at 262 days.
Body weight target
Actual daily body weight
59 .0
60 .0
61 .0
62 .0
63
2.08
2.10
2.15
2.19
2.22.0
245 250 255 260 265 270 275
Egg
wei
ght
(g)
Age (days)
Egg
wei
ght
(oz)
Feed reduced.
Feed restored toprevious level,because of falloff in egg weight.
Egg weight target
Actual daily egg weight
Feed reduction re-applied, as egg weight is following expected trend.
Sec
tion
3
Management in Lay (Peak to Depletion)

2013
Figure 69: An example of re-assessment of feed removal when the daily body weight decreases in a consistent and continuous way by more than expected and feed levels need to be increased again.
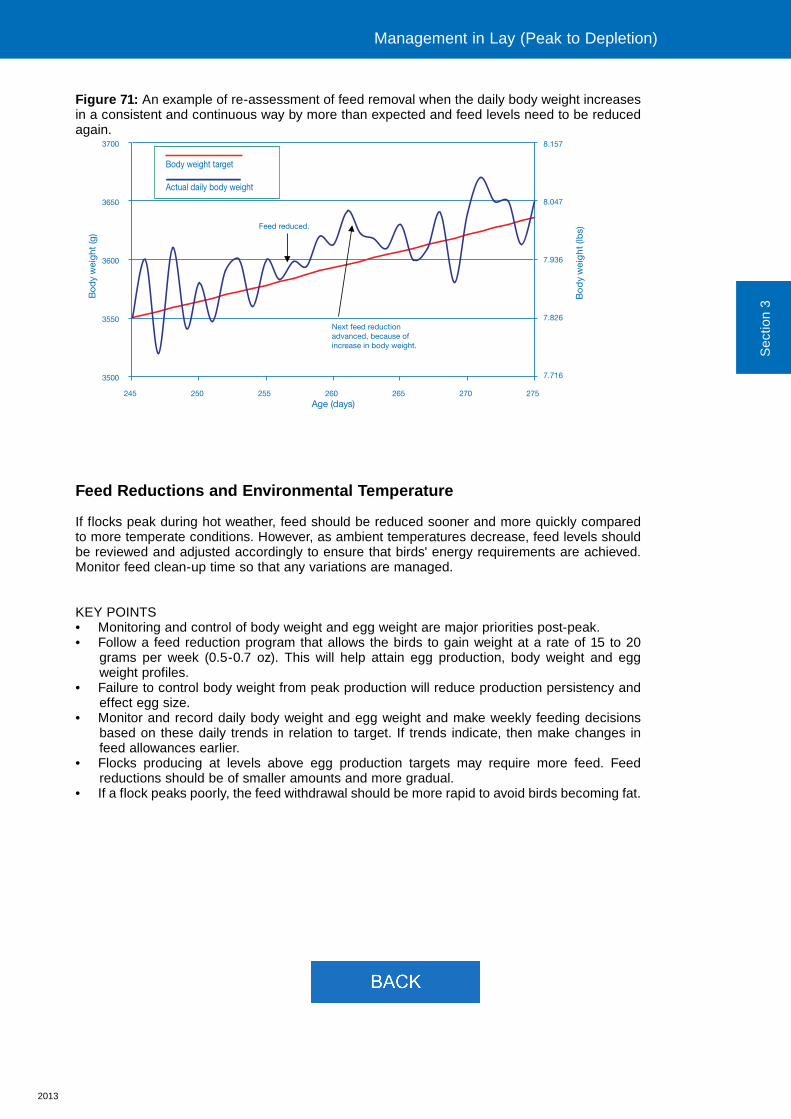
If egg weight or body weight increases more than expected and a fall off in persistency occurs the next feed reduction should be advanced (Figures 70 and 71).
Figure 70: An example of re-assessment of feed removal when the daily egg weight increases in a consistent and continuous way by more than expected and feed levels need to be reduced again.
3500
3550
3600
3650
3700
245 250 255 260 265 270 275
Bo
dy
wei
gh
t (g
)
Age (days)
Bo
dy
wei
gh
t (lb
s)
7.716
7.826
7.936
8.047
8.157
Feed reduced.
Feed restored toprevious level, becauseof fall off in body weight.
Feed reduction re-applied,as body weight is followingexpected trend.
Body weight target
Actual daily body weight
59 .0
60 .0
61 .0
62 .0
63 .0
245 250 255 260 265 270 275
Egg
wei
ght
(g)
Age (days)
Feed reduced.
Next feed reductionadvanced, because ofincrease in egg weight.
2.08
2.10
2.15
2.19
2.22E
gg w
eigh
t (o
z)
Egg weight target
Actual daily egg weight
Management in Lay (Peak to Depletion)
2013
Figure 71: An example of re-assessment of feed removal when the daily body weight increases in a consistent and continuous way by more than expected and feed levels need to be reduced again.
Feed Reductions and Environmental Temperature
If flocks peak during hot weather, feed should be reduced sooner and more quickly compared to more temperate conditions. However, as ambient temperatures decrease, feed levels should be reviewed and adjusted accordingly to ensure that birds' energy requirements are achieved. Monitor feed clean-up time so that any variations are managed.
KEY POINTS• Monitoring and control of body weight and egg weight are major priorities post-peak.• Follow a feed reduction program that allows the birds to gain weight at a rate of 15 to 20
grams per week (0.5-0.7 oz). This will help attain egg production, body weight and egg weight profiles.
• Failure to control body weight from peak production will reduce production persistency and effect egg size.
• Monitor and record daily body weight and egg weight and make weekly feeding decisions based on these daily trends in relation to target. If trends indicate, then make changes in feed allowances earlier.
• Flocks producing at levels above egg production targets may require more feed. Feed reductions should be of smaller amounts and more gradual.
• If a flock peaks poorly, the feed withdrawal should be more rapid to avoid birds becoming fat.
3500
3550
3600
3650
3700
245 250 255 260 265 270 275
Bod
y w
eigh
t (g
)
Age (days)
Bo
dy
wei
gh
t (lb
s)
7.716
7.826
7.936
8.047
8.157
Feed reduced.
Next feed reductionadvanced, because ofincrease in body weight.
Body weight target
Actual daily body weight
Sec
tion
3
Management in Lay (Peak to Depletion)
Section 3
Management In Lay (Peak to Depletion)
Male and Females

2013
Sec
tion
3
Management of Females After Peak Production Through to DepletionObjective
To maximize the number of fertile hatching eggs produced per female, by ensuring persistency of egg production post-peak.
Principles
To maintain productive performance beyond peak production, females must gain body weight close to the recommended target. Failure to control body weight, and thus fat deposition, post-peak can significantly reduce persistency of lay, shell quality, and female fertility, and it can increase egg size after 40 weeks of age.
Factors for Post-peak Management
Post-peak females must gain body weight close to the recommended target. If body-weight gain is inadequate, total egg production will be reduced. If body-weight gain is too rapid, post-peak production persistency and fertility will be lowered.
Shortly after peak production, maximum nutrient requirements for egg production occur. This is because egg mass continues to increase after there has been some reduction in rate of lay. Peak egg production is usually achieved around 217 days (31 weeks) and can be defined as no increase in daily hen-day production over a 5 day period. Shortly after this, at around 224 to 231 days (32 to 33 weeks) peak egg mass occurs.
Egg Mass = average egg weight (g) x egg production (Hen-week %)
100
From the time of peak production growth should continue - but at a slower weekly rate (see the Parent Stock Performance Objectives for more information).
After peak feed has been given and peak egg production has occurred, feed reductions will be required in order to achieve the recommended target body weight and to limit the rate of fat deposition as egg production declines. Post-peak feed reductions should start when hen-day production does not increase over a period of 5-7 days and ensure that good persistency is maintained by controlling body weight gain to 15-20 g/female/week (3.3- 4.4 lbs/100 females/week), to manage egg weight gains and therefore egg mass.
Section 3 - Management in Lay (Peak to Depletion)
Management in Lay (Peak to Depletion)
2013
Figure 61: The relationship between growth, body weight, egg production, egg weight, egg mass, and age.
Management in Lay (Peak to Depletion)
28 70 105
Age (days)
Increased fat deposition
Growth
161 217 224
Peak % egg production
Peak egg mass EGG PRODUCTION
EGG MASS
Age at first egg
Bo
dy
wei
ght
% P
rod
uctio
n

2013
Procedures
Many factors are involved in determining the exact timing of the initial feed reduction post-peak. Timing and amount of feed reduction may be affected by:• Body weight and body-weight change from the start of production.• Daily egg production and the hen-day production trend.• Daily egg weight and egg weight trend.• Egg mass trend.• Health status of the flock and feathering condition.• Ambient environmental temperature.• Feed energy and protein levels.• Feed texture.• Feed quantity consumed at peak (energy intake).• Flock history (rearing and pre-peak performance).• Changes in feed clean-up time.• Feather cover.
Due to variation between flocks in the characteristics given above, the program of feed reduction will vary for each flock. To enable the farm manager to monitor and establish an appropriate feed reduction program, it is critical that the following characteristics are measured and recorded, and graphed onto a chart:• Daily (or weekly) body weight and body-weight change relative to the target (see the
Performance Objectives for more details on target body weights). Accurate body weight monitoring is critical during the post-peak period (see section on Monitoring Broiler Breeder Growth).
• Daily egg weight and egg weight change relative to the target (can be obtained from the Performance Objectives booklet).
• Daily changes in feed clean-up time. Clean-up time is the time between feeder switch-on and trough clearance; at peak these are normally 3-4 hours for mash, 2-3 hours for crumbles, 1-2 hours for pellets. If clean-up time is more or less than the times indicated it suggests that feed levels may be too high or too low respectively.
In addition, the farm manager should routinely handle and examine the birds to ensure they are in good physical condition (see section on Assessment of Bird Physical Condition for more information).
General Guidelines for Post-peak Feed Reductions Based on Target Performance Characteristics
Under moderate temperate conditions where performance levels are close to or on target, the following illustrates general guidelines for feed reductions after peak. However, the actual program of feed reduction should be based on the close and accurate monitoring of daily body weight, daily egg weight and feed clean-up time.
Age
Peak* to 35 weeks Hold at peak feed levels
36-50
Gradual reductions down to 444 kcal ME/bird/day, 159 g/bird/day (35.1 lbs/100 birds/day)
>50 weeks
Gradual reductions down to 421 kcal ME/bird/day 150g/bird/day (33.2 lbs/100 birds/day) minimum.
*Peak expected to occur around 31 weeks of age.
Sec
tion
3
Management in Lay (Peak to Depletion) Management in Lay (Peak to Depletion)

2013
There will be situations where flock performance differs markedly from the published performance targets and the feed reduction program will need to be altered accordingly to account for this. The following are examples of 2 specific field situations illustrating suggested feed reduction strategies where performance differs from published targets.
Flocks performing above target recommendations
Flocks performing above the published performance targets can be under-supplied in feed and thus nutrients, and both body weight and egg weights may start to slow or fall off when compared to the expected incremental gain (see example in Figure 62). Excessive feed reductions after peak can potentially have a negative impact on production and leave birds susceptible to molting and broodiness. When flocks are performing above target recommendations feed reductions after peak should be less and more gradual; peak feed may need to be held for longer, onset of feed reduction delayed and less feed reduced overall from 35 weeks to depletion.
Figure 62: A graph illustrating the effects of underfeeding a flock performing above the hen week production target.
Daily egg weight, body weight, production, and feed clean-up times should be monitored closely. In particular, recording and monitoring body weight and egg weight will indicate if feed reduction is being done correctly. Under normal conditions, a fade in egg weight and then body weight are the first signs that feeding is not correct, and will precede a drop in production. In Figure 62, the graph illustrates a flock performing above target, where the information has been collated and graphed weekly. While general trends in performance can be monitored in this way, weekly recording does not allow sufficient early detection of potential performance issues in egg and body weight. Small, but important changes will occur within days if nutrition is inadequate and it is recommended that daily egg weights and body weights are measured, recorded, and monitored separately so that any fade in weight can be rapidly detected and acted upon (Figures 63 and 64).
25 27 29 31 33 35 37 39 41 43 45 47 49 51 53 55 57 59 61 63
Hen
wee
k p
rod
uct
ion
& e
gg
wei
gh
t
Bo
dy
wei
gh
t
Age (weeks)
Body-weight target
Actual body weight
Egg weight target
Actual egg weight
Hen week % target
Actual hen-week%
Management in Lay (Peak to Depletion)

2013
Figure 63: An example of a flock performing above hen week target, where egg weight is falling away from the expected target in a consistent and continuous way over a period of at least 4 days.
Figure 64: An example of a flock performing above hen week target, where body weight is falling away from the expected target in a continuous and consistent way.
Flocks performing below target recommendations
59.0
60.0
61.0
62.0
63
2.08
2.10
2.15
2.19
2.22.0
245 250 255 260 265
Egg
wei
ght
(g)
Egg
wei
ght
(oz)
Age (days)
A well performing flock where feed has beenremoved too quickly as indicated by a fall indaily egg weight over a period of 4 days,feed needs to be given back at 260 days.
Egg weight target
Actual daily egg weight
3500
3550
3600
3650
3700
7.716
7.826
7.936
8.047
8.157
245 250 255 260 265
Bod
y w
eigh
t (g
)
Bod
y w
eigh
t (lb
s)
Age (days)
A well performing flock where feed hasbeen removed too quickly, feed needs tobe given back at 260 days.
Body weight target
Actual daily body weight
Sec
tion
3
Management in Lay (Peak to Depletion) Management in Lay (Peak to Depletion)

2013
For flocks that perform below the published performance targets, feed reduction can be greater. Excess feed levels will result in such flocks becoming overweight with poor persistency and increased egg weight (see Figure 65). Daily egg weight, body weight, production and feed clean-up times should be monitored closely to determine if feed reduction is being done correctly. In flocks that are performing below target recommendations the overall feed reduction from peak to depletion will be more when compared to higher performing flocks. Initial feed reductions after peak can be in the range of 2-4 g (0.07-0.14 oz) or 8-11 kcal ME per week. Figure 65: A graph illustrating a flock performing below the hen week production target.
The early detection of potential performance issues requires that daily egg weights and body weights are measured, recorded and monitored separately. Figures 66 and 67 illustrate how closer daily examination of the data (rather than weekly as illustrated in Figure 65) indicates where there was a higher than expected increase in egg weight and then body weight as feed reductions after peak have been too slow.
Figure 66: An example of a flock performing below hen week target where the increase in daily egg weight becomes continuously and consistently higher than expected over a period of at least 4 days.
25 27 29 31 33 35 37 39 41 43 45 47 49 51 53 55 57 59 61 63H
en w
eek
pro
duct
ion
& e
gg w
eigh
t
Bod
y w
eigh
t
Age (weeks)
Body-weight target
Actual body weight
Egg weight target
Actual egg weight
Hen-week % target
Actual hen-week%
65.0
2.10
2.15
2.19
2.22
2.26
2.29
245 250 255 260 265
Egg
wei
ght
(g)
Egg
wei
ght
(oz)
Age (days)
A poor performing flock where egg weight is above standard and feed removal has been too slow as indicated by an increase in egg weight over a period of 4 days. Further feed needs to be removed at 262 days.
Egg weight target
Actual daily egg weight
64.0
63.0
62.0
61.0
60.0
66.0 2.33
Management in Lay (Peak to Depletion)

2013
Figure 67: An example of a flock performing below hen week target where the increase in daily body weight becomes continuously and consistently higher than expected.
Monitoring Feed Reduction
In any flock (high, average, or low producing) after any feed reduction, the response to that feed reduction should be monitored carefully. If production, egg weight or body weight decreases more than expected, restore the feeding amount to the previous level and attempt to reduce the feed level again 5-7 days later (Figures 68 and 69).
Figure 68: An example of re-assessment of feed removal when the daily egg weight decreases in a consistent and continuous way by more than expected and feed levels need to be increased again.
3500
3550
3600
3650
3700
245 250 255 260 265
Bo
dy
wei
gh
t (g
)
Bo
dy
wei
gh
t (lb
s)
Age (days)
7.716
7.826
7.936
8.047
8.157
A poor performing flock wherefeed removal has been too slow.Further feed needs to beremoved at 262 days.
Body weight target
Actual daily body weight
59 .0
60 .0
61 .0
62 .0
63
2.08
2.10
2.15
2.19
2.22.0
245 250 255 260 265 270 275
Egg
wei
ght
(g)
Age (days)
Egg
wei
ght
(oz)
Feed reduced.
Feed restored toprevious level,because of falloff in egg weight.
Egg weight target
Actual daily egg weight
Feed reduction re-applied, as egg weight is following expected trend.
Sec
tion
3
Management in Lay (Peak to Depletion)
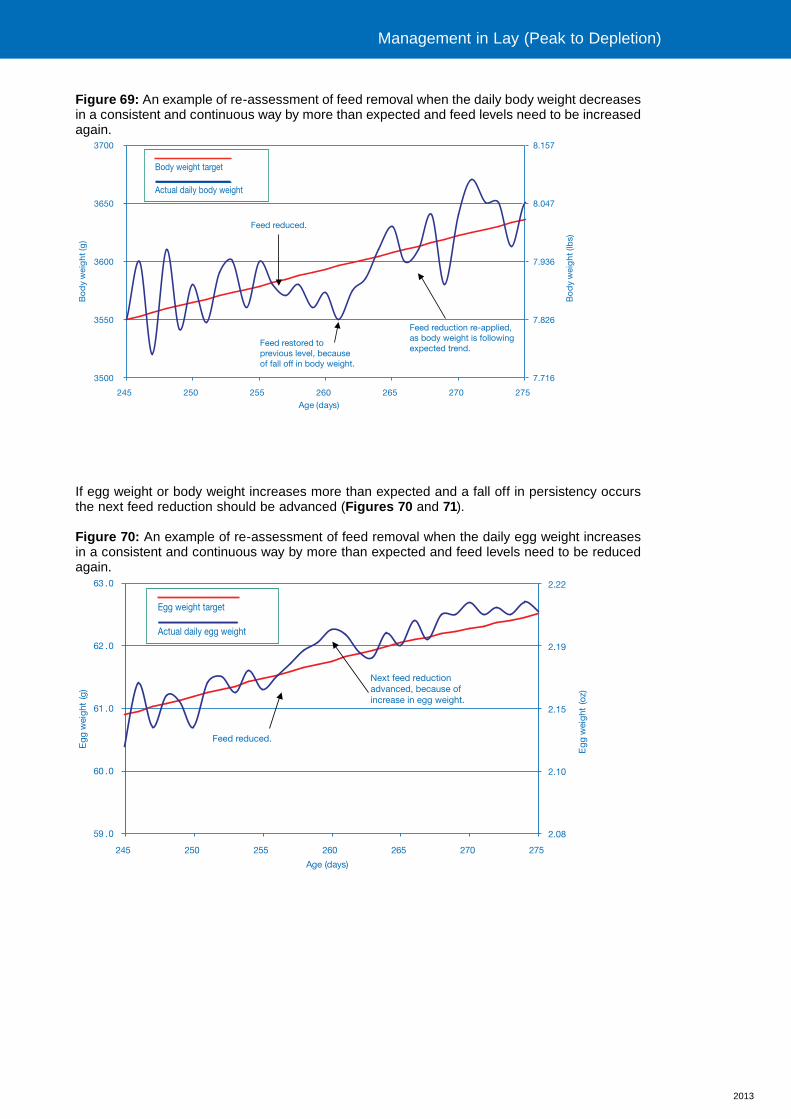
2013
Figure 69: An example of re-assessment of feed removal when the daily body weight decreases in a consistent and continuous way by more than expected and feed levels need to be increased again.
If egg weight or body weight increases more than expected and a fall off in persistency occurs the next feed reduction should be advanced (Figures 70 and 71).
Figure 70: An example of re-assessment of feed removal when the daily egg weight increases in a consistent and continuous way by more than expected and feed levels need to be reduced again.
3500
3550
3600
3650
3700
245 250 255 260 265 270 275
Bo
dy
wei
gh
t (g
)
Age (days)
Bo
dy
wei
gh
t (lb
s)
7.716
7.826
7.936
8.047
8.157
Feed reduced.
Feed restored toprevious level, becauseof fall off in body weight.
Feed reduction re-applied,as body weight is followingexpected trend.
Body weight target
Actual daily body weight
59 .0
60 .0
61 .0
62 .0
63 .0
245 250 255 260 265 270 275
Egg
wei
ght
(g)
Age (days)
Feed reduced.
Next feed reductionadvanced, because ofincrease in egg weight.
2.08
2.10
2.15
2.19
2.22E
gg w
eigh
t (o
z)
Egg weight target
Actual daily egg weight
Management in Lay (Peak to Depletion)
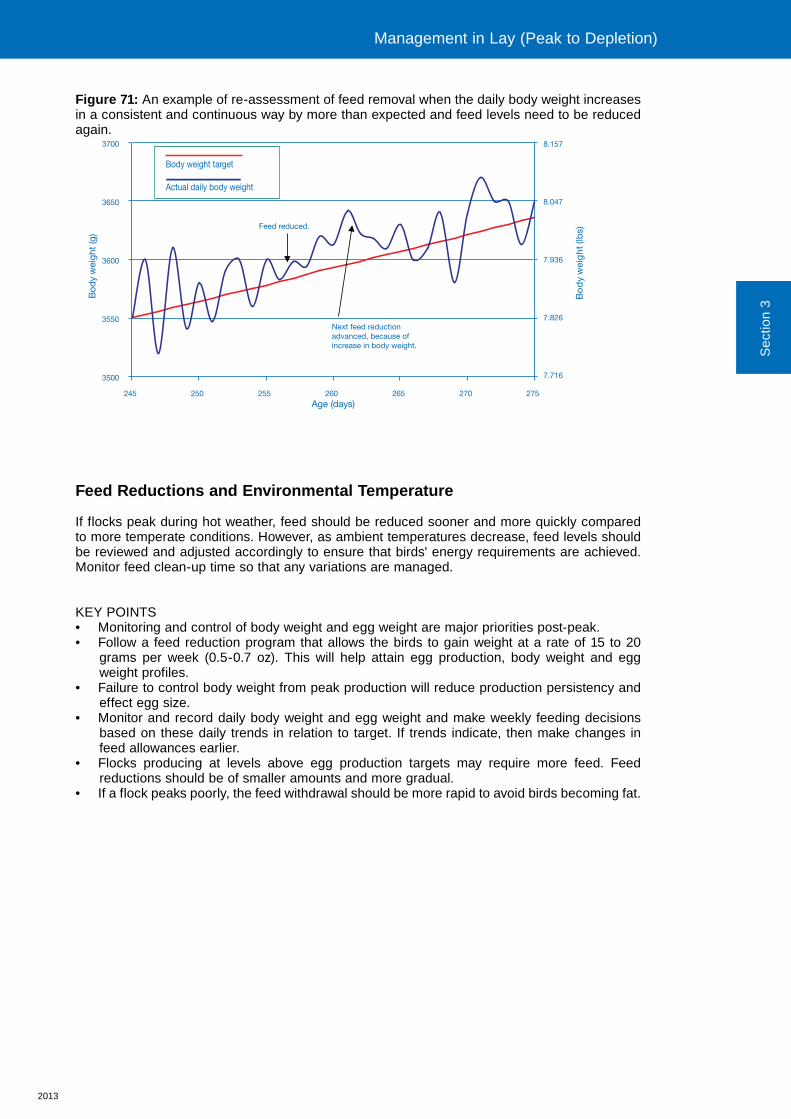
2013
Figure 71: An example of re-assessment of feed removal when the daily body weight increases in a consistent and continuous way by more than expected and feed levels need to be reduced again.
Feed Reductions and Environmental Temperature
If flocks peak during hot weather, feed should be reduced sooner and more quickly compared to more temperate conditions. However, as ambient temperatures decrease, feed levels should be reviewed and adjusted accordingly to ensure that birds' energy requirements are achieved. Monitor feed clean-up time so that any variations are managed.
KEY POINTS• Monitoring and control of body weight and egg weight are major priorities post-peak.• Follow a feed reduction program that allows the birds to gain weight at a rate of 15 to 20
grams per week (0.5-0.7 oz). This will help attain egg production, body weight and egg weight profiles.
• Failure to control body weight from peak production will reduce production persistency and effect egg size.
• Monitor and record daily body weight and egg weight and make weekly feeding decisions based on these daily trends in relation to target. If trends indicate, then make changes in feed allowances earlier.
• Flocks producing at levels above egg production targets may require more feed. Feed reductions should be of smaller amounts and more gradual.
• If a flock peaks poorly, the feed withdrawal should be more rapid to avoid birds becoming fat.
3500
3550
3600
3650
3700
245 250 255 260 265 270 275
Bod
y w
eigh
t (g
)
Age (days)
Bo
dy
wei
gh
t (lb
s)
7.716
7.826
7.936
8.047
8.157
Feed reduced.
Next feed reductionadvanced, because ofincrease in body weight.
Body weight target
Actual daily body weight
Sec
tion
3
Management in Lay (Peak to Depletion)
2013
Management of Males After Peak Production Through to DepletionObjective
To maintain persistency of fertility.
Principles
Maintaining male condition and feeding, and appropriately managing male numbers in lay are key for maintaining male fertility post-peak.
Procedures
Management principles and procedures for males in the post-peak period are similar to those used in the pre-peak period. Adjusting feed quantity to achieve a gradual but constant increase in weight as the male ages is the most effective means of controlling body weight and body condition. Thus persistency of fertility can be maintained. Mating ratios must also be optimized and managed.
Males should be weighed frequently (at least once a week) to ensure this is achieved. At the same time as each male is weighed, they should be evaluated to determine if they are maintaining ideal body condition, fleshing, and vent coloration. Maintaining these characteristics supports active mating activity throughout the flock’s life. It is important that an adequate sample size is weighed and assessed. A sample size that is too small (less than 10% of the population) can mislead the farm manager (for more information, refer to the section on Monitoring Broiler Breeder Growth).
Changes in male feed quantities should be made based on the sample evaluated, using both body weight data and other husbandry information (such as body condition and fleshing). After 28 weeks of age, male weekly body-weight gain should be approximately 30 g (0.06 lb) per week. When males are on target body weight, and assuming that the separate-sex feeding is working correctly, the energy allowance post-peak is normally in the range of 375-425 kcal ME per bird per day; depending on feed energy density, environmental temperature and bird age (refer to the Parent Stock Performance Objectives for more information).
Male feed allocations should continue to increase throughout the life of the flock. They should never be decreased. From around 30 weeks of age, males generally require one small feed increase approximately every 2 weeks to achieve the desired average weekly body-weight gain of 30 g (0.06 lbs).
A planned mating ratio reduction program should be followed to maintain persistency of fertility (see section on Management into Lay). The optimum mating ratio should be maintained by removing males according to their physical condition (see section on Assessment of Bird Physical Condition).
Flocks with footpad problems have reduced mating and lower fertility. Litter condition and slat construction have a major effect on male footpad health and ultimately on the ability to mate. If litter becomes wet, compacted, or of inadequate volume, additional litter must be added to give males (and females) a comfortable area to walk on and mate.
KEY POINTS• Never decrease male feed allocation.• Ensure sufficient sample size is weighed.• Feed increases should account for body weight, fleshing and physical condition to maintain
growth and persistency of fertility.• Maintain adequate quantities of dry litter to promote good footpad health. • Follow a planned male reduction program.
Management in Lay (Peak to Depletion)
Section 4
Monitoring Broiler Breeder Growth
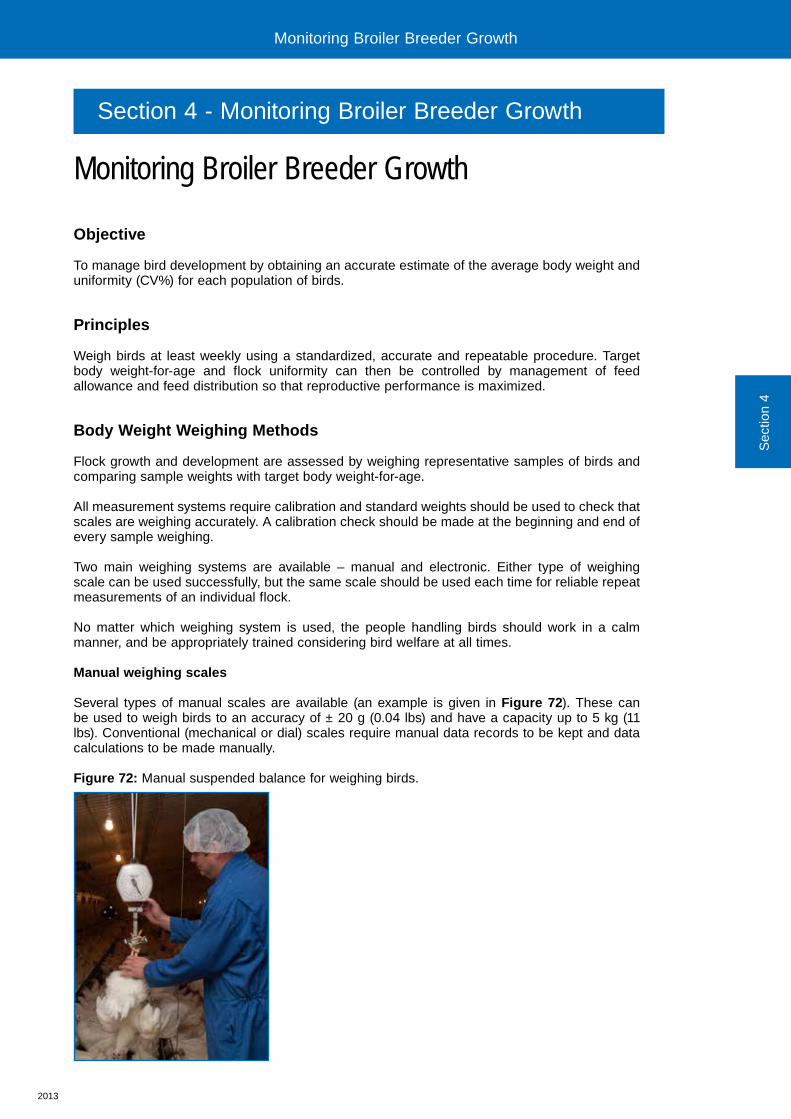
2013
Sec
tion
4
Monitoring Broiler Breeder Growth
Objective
To manage bird development by obtaining an accurate estimate of the average body weight and uniformity (CV%) for each population of birds.
Principles
Weigh birds at least weekly using a standardized, accurate and repeatable procedure. Target body weight-for-age and flock uniformity can then be controlled by management of feed allowance and feed distribution so that reproductive performance is maximized.
Body Weight Weighing Methods
Flock growth and development are assessed by weighing representative samples of birds and comparing sample weights with target body weight-for-age.
All measurement systems require calibration and standard weights should be used to check that scales are weighing accurately. A calibration check should be made at the beginning and end of every sample weighing.
Two main weighing systems are available – manual and electronic. Either type of weighing scale can be used successfully, but the same scale should be used each time for reliable repeat measurements of an individual flock.
No matter which weighing system is used, the people handling birds should work in a calm manner, and be appropriately trained considering bird welfare at all times.
Manual weighing scales
Several types of manual scales are available (an example is given in Figure 72). These can be used to weigh birds to an accuracy of ± 20 g (0.04 lbs) and have a capacity up to 5 kg (11 lbs). Conventional (mechanical or dial) scales require manual data records to be kept and data calculations to be made manually.
Figure 72: Manual suspended balance for weighing birds.
Section 4 - Monitoring Broiler Breeder Growth
Monitoring Broiler Breeder Growth
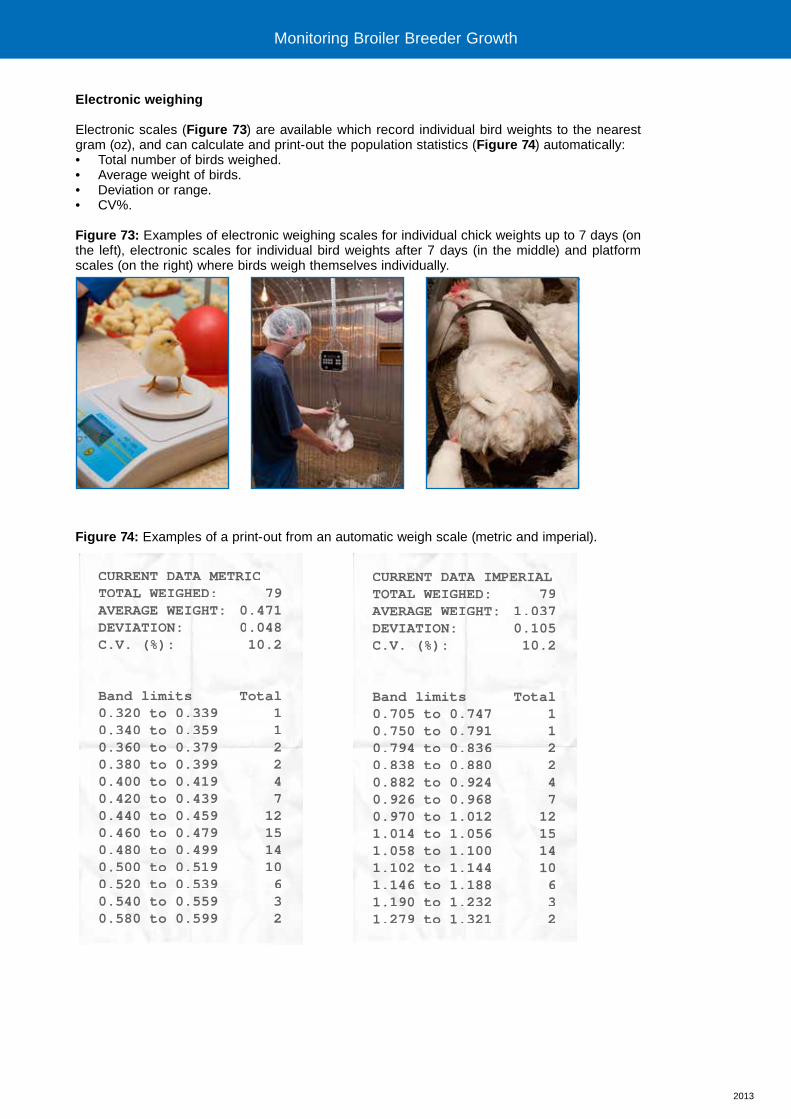
2013
Electronic weighing
Electronic scales (Figure 73) are available which record individual bird weights to the nearest gram (oz), and can calculate and print-out the population statistics (Figure 74) automatically: • Total number of birds weighed.• Average weight of birds.• Deviation or range.• CV%.
Figure 73: Examples of electronic weighing scales for individual chick weights up to 7 days (on the left), electronic scales for individual bird weights after 7 days (in the middle) and platform scales (on the right) where birds weigh themselves individually.
Figure 74: Examples of a print-out from an automatic weigh scale (metric and imperial).
Monitoring Broiler Breeder Growth
CURRRRRENENTT DAD TATTTTTTT METE RICTOOOTATT L WEWEIGII HEHHHHED:D 79AVERAGAGA E WEW IGIIIIIII HTT: 0.471DEVIATION: 000.048888C.V. (%):: 10.2
Band llimits sssssssss Total0.0 320 to 0.3. 39 10.340 to 0.3.33359 10.000000 3636363636636363633666600000000000 tototototottooooo 000000000000.33333333379797797979777797779777997997 22222222222222220.380 to 0.3999 20.400 to 0.4191 40.420 to 0.4393 7770...44440 to 0.44599 120.0 460 to 0.47999 1150.480 to 00.4999 114440.50500 ttototot 000.5. 19 1000.000 5200 toto 0.539 60.545455 0 totoo 0.555595 30.58800000 too 0.59999 2
CUURRRRRRRENT DAD TATATATTTT IMPERIALTOTATTTTTAL WEEIGIII HEHHHH D: 79AVERAGGE WEW IGIII HT: 1.1 0337DEVIATTION: 00.110505C.V. (%): 10.2
Band limits ssssssss Total0.00 705 to 0.747 10.750 to 0.7..7791 10.000000 79797979797979779799944444444444 tototototttoooooooo 000000000000.88888888836363633663636333633333333666 22222222222222220.838 to 0.8800 20.8882 to 00.9. 242 440.926 to 0.96886 770..97970 totoo 1.00122 11121.014 to 1.005666 151.058 totoo 11.1000 1114441.1..101 2 tot 111.1.. 44 101.1 1466 tototo 1.188 61.19191190 too 1.2.2.2323 31.2799999 tooo 1.32121 2
2013
Methodology for Sample Weighing
Birds should be weighed weekly from placement (day 0). At 0, 7 and 14 days of age, samples can be weighed in bulk. After 14 days of age, individual bird weights should be taken.
At placement (day 0), at least 3 boxes of chicks should be bulk weighed per pen. The number of live chicks in each box and the weight of the chick box must be known in order to accurately calculate average chick weight. In addition, it is recommended to individually weigh the chicks in one box per pen at placement to assess chick quality and help determine initial early chick management procedures.
From 7 days onward, a minimum sample of 2% or 50 birds whichever is greater should be weighed per population. At 7 and 14 days of age, bulk weigh 10-20 birds at a time until the entire sample (a minimum of 2% or 50 birds) has been weighed.
Bulk weighing allows the determination of average bird weight. Comparison of average bird weight to target weight, facilitates feeding decisions. However, for the determination of uniformity (CV%), birds need to be weighed individually.
Recording of individual bird body weights should occur as early as is practically possible, generally that is between 14 and 21 days (2 and 3 weeks) of age. A minimum sample of 2% or 50 birds (whichever is the greater) per population should be caught using catching frames, and then individually weighed. All birds captured in the sample must be weighed in order to eliminate any selective bias. In rear, if the individual population exceeds 1,000 birds, 2 sample weighings should be taken from different locations in the pen or house. In lay, samples should be taken from a minimum of 3 different locations within the population. In this way samples will be as representative as possible and estimates of body weight will have increased accuracy.
Birds for sample weighing should be caught towards the middle of the pen away from any doors or the sides of the pen. Weighing needs to be completed on the same day each week and at the same hour of the day (4-6 hours after feeding).
Procedures for Manual Scales
When manual scales are used individual bird weights should be recorded on a weight recording chart (Figures 75 and 76) as the birds are weighed.
Sec
tion
4
Monitoring Broiler Breeder Growth Monitoring Broiler Breeder Growth
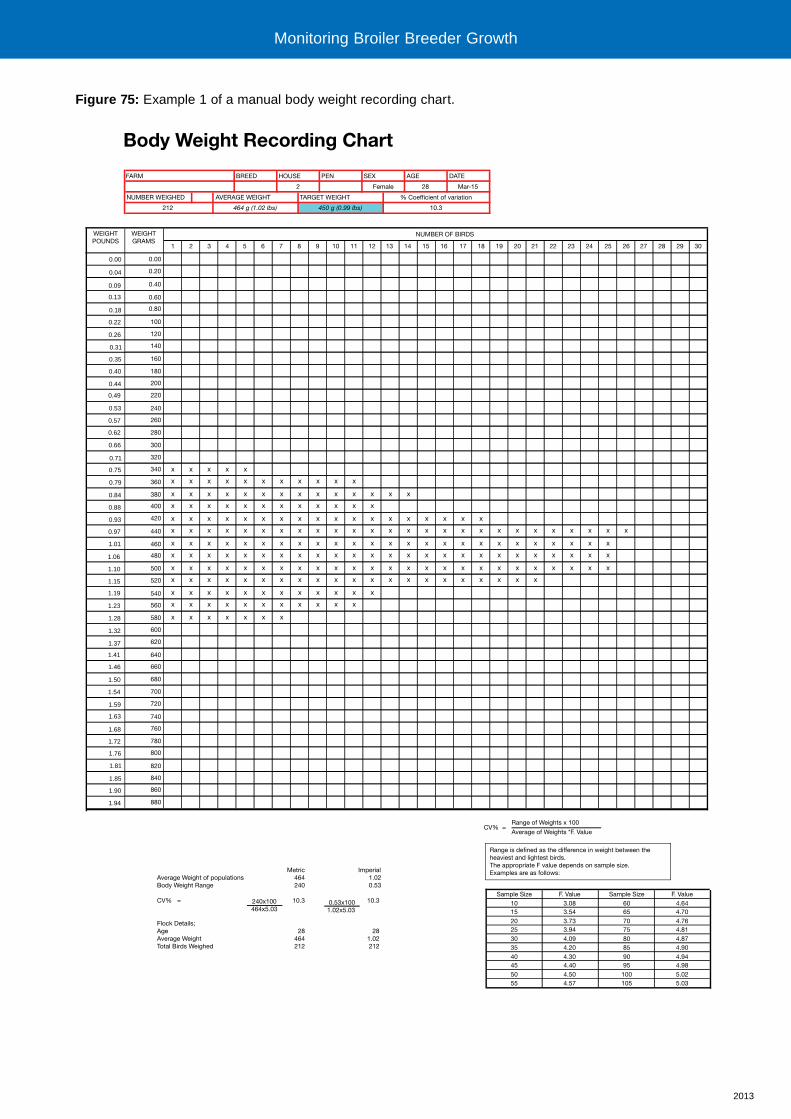
2013
Figure 75: Example 1 of a manual body weight recording chart.
Body Weight Recording Chart
FARM BREED HOUSE
Metric ImperialAverage Weight of populations 464 1.02Body Weight Range 240 0.53
CV% = 10.3 10.3
Flock Details;Age 28 28 Average Weight 464 1.02Total Birds Weighed 212 212
2
212 464 g (1.02 lbs) 450 g (0.99 lbs)
Female 28 Mar-15
% Coefficient of variationTARGET WEIGHT
NUMBER OF BIRDS
1
WEIGHTGRAMS
0.00
0.20
0.40
0.60
0.80
160
180
100
120
140
260
280
200
220
240
360
380
300
320
340
460
480
400
420
440
560
580
500
520
540
660
680
600
620
640
760
780
700
720
740
860
880
800
820
840
2 3 4 5 6 7 8 9 10 11 12 13 14 15 16 17 18 19 20 21 22 23 24 25 26 27 28 29 30
AVERAGE WEIGHTNUMBER WEIGHED
10.3
PEN SEX AGE DATE
Range of Weights x 100
Average of Weights *F. Value
Sample Size F. Value Sample Size F. Value10 3.08 60 4.6415 3.54 65 4.7020 3.73 70 4.7625 3.94 75 4.8130 4.09 80 4.8735 4.20 85 4.9040 4.30 90 4.9445 4.40 95 4.9850 4.50 100 5.0255 4.57 105 5.03
Range is defined as the difference in weight between theheaviest and lightest birds.The appropriate F value depends on sample size.Examples are as follows:
CV% =
0.53x1001.02x5.03
240x100464x5.03
WEIGHTPOUNDS
0.00
0.04
0.09
0.13
0.18
0.22
0.26
0.31
0.35
0.40
0.44
0.49
0.53
0.57
0.62
0.66
0.71
0.75
0.79
0.84
0.88
0.93
0.97
1.01
1.06
1.10
1.15
1.19
1.23
1.28
1.32
1.37
1.41
1.46
1.50
1.54
1.59
1.63
1.68
1.72
1.76
1.81
1.85
1.90
1.94
Monitoring Broiler Breeder Growth
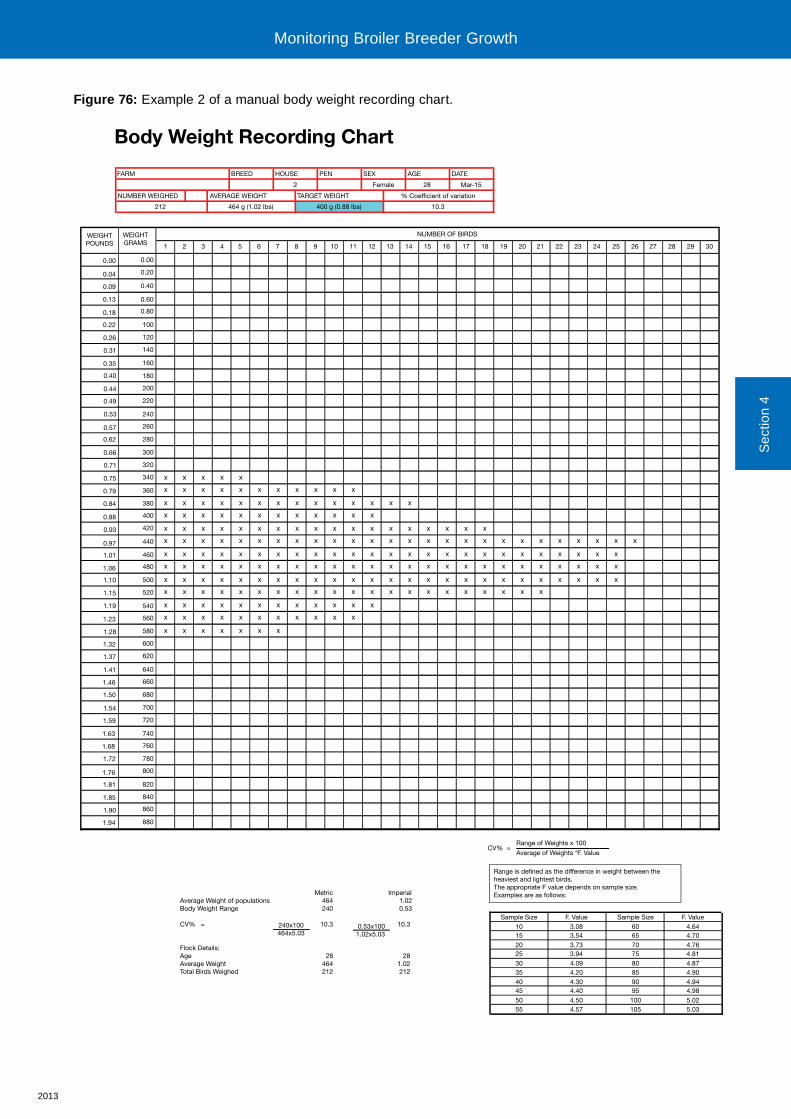
2013
Figure 76: Example 2 of a manual body weight recording chart.
Body Weight Recording Chart
FARM BREED HOUSE
2
212 464 g (1.02 lbs) 400 g (0.88 lbs)
Female 28 Mar-15
% Coefficient of variationTARGET WEIGHT
NUMBER OF BIRDS
1
WEIGHTGRAMS
0.00
0.20
0.40
0.60
0.80
160
180
100
120
140
260
280
200
220
240
360
380
300
320
340
460
480
400
420
440
560
580
500
520
540
660
680
600
620
640
760
780
700
720
740
860
880
800
820
840
2 3 4 5 6 7 8 9 10 11 12 13 14 15 16 17 18 19 20 21 22 23 24 25 26 27 28 29 30
AVERAGE WEIGHTNUMBER WEIGHED
10.3
PEN SEX AGE DATE
Range of Weights x 100
Average of Weights *F. Value
Sample Size F. Value Sample Size F. Value10 3.08 60 4.6415 3.54 65 4.7020 3.73 70 4.7625 3.94 75 4.8130 4.09 80 4.8735 4.20 85 4.9040 4.30 90 4.9445 4.40 95 4.9850 4.50 100 5.0255 4.57 105 5.03
Range is defined as the difference in weight between theheaviest and lightest birds.The appropriate F value depends on sample size.Examples are as follows:
CV% =
Metric ImperialAverage Weight of populations 464 1.02Body Weight Range 240 0.53
CV% = 10.3 10.3
Flock Details;Age 28 28 Average Weight 464 1.02Total Birds Weighed 212 212
0.53x1001.02x5.03
240x100464x5.03
WEIGHTPOUNDS
0.00
0.04
0.09
0.13
0.18
0.22
0.26
0.31
0.35
0.40
0.44
0.49
0.53
0.57
0.62
0.66
0.71
0.75
0.79
0.84
0.88
0.93
0.97
1.01
1.06
1.10
1.15
1.19
1.23
1.28
1.32
1.37
1.41
1.46
1.50
1.54
1.59
1.63
1.68
1.72
1.76
1.81
1.85
1.90
1.94
Sec
tion
4
Monitoring Broiler Breeder Growth Monitoring Broiler Breeder Growth
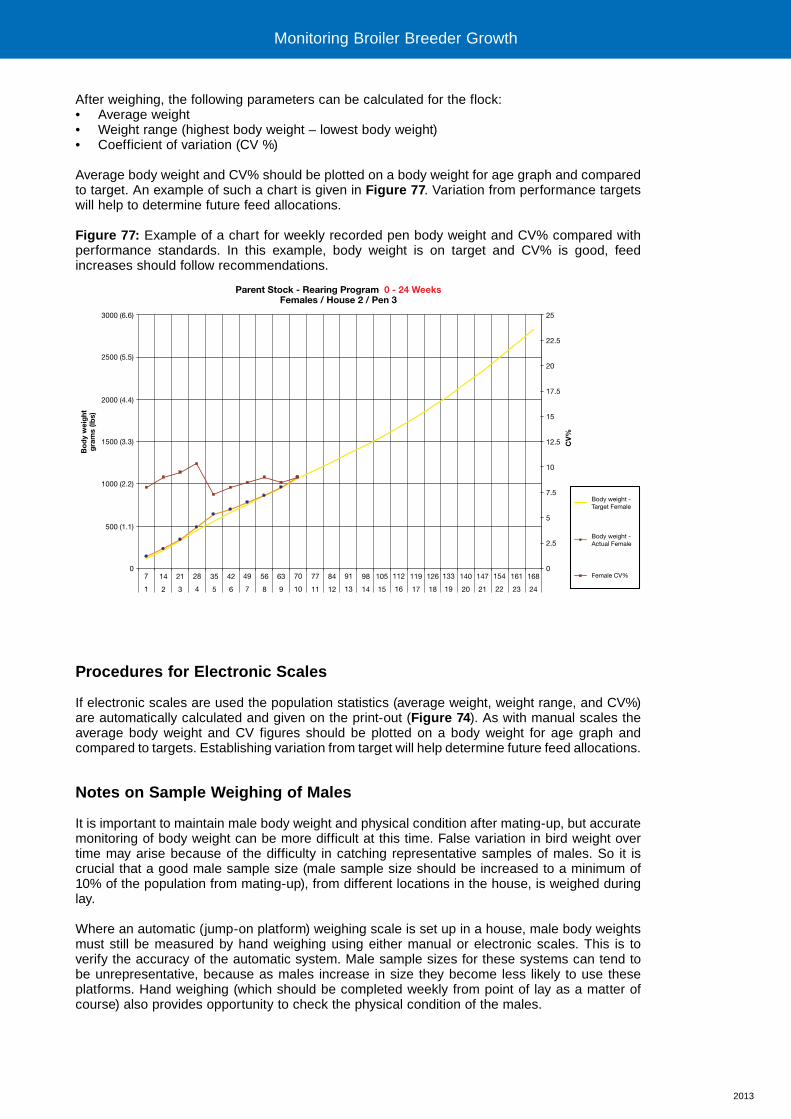
2013
After weighing, the following parameters can be calculated for the flock:• Average weight• Weight range (highest body weight – lowest body weight)• Coefficient of variation (CV %)
Average body weight and CV% should be plotted on a body weight for age graph and compared to target. An example of such a chart is given in Figure 77. Variation from performance targets will help to determine future feed allocations.
Figure 77: Example of a chart for weekly recorded pen body weight and CV% compared with performance standards. In this example, body weight is on target and CV% is good, feed increases should follow recommendations.
Procedures for Electronic Scales
If electronic scales are used the population statistics (average weight, weight range, and CV%) are automatically calculated and given on the print-out (Figure 74). As with manual scales the average body weight and CV figures should be plotted on a body weight for age graph and compared to targets. Establishing variation from target will help determine future feed allocations.
Notes on Sample Weighing of Males
It is important to maintain male body weight and physical condition after mating-up, but accurate monitoring of body weight can be more difficult at this time. False variation in bird weight over time may arise because of the difficulty in catching representative samples of males. So it is crucial that a good male sample size (male sample size should be increased to a minimum of 10% of the population from mating-up), from different locations in the house, is weighed during lay.
Where an automatic (jump-on platform) weighing scale is set up in a house, male body weights must still be measured by hand weighing using either manual or electronic scales. This is to verify the accuracy of the automatic system. Male sample sizes for these systems can tend to be unrepresentative, because as males increase in size they become less likely to use these platforms. Hand weighing (which should be completed weekly from point of lay as a matter of course) also provides opportunity to check the physical condition of the males.
7
1
0
500 (1.1)
1000 (2.2)
1500 (3.3)
2500 (5.5)
3000 (6.6)
0
25
22.5
20
17.5
15
Body weight - Target Female
Body weight - Actual Female
Female CV%
12.5
10
7.5
5
2.5
2000 (4.4)
Bo
dy
wei
ght
gra
ms
(lbs)
14
2
21
3
28
4
35
5
42
6
49
7
56
8
63
9
70
10
77
11
84
12
91
13
98
14
105
15
112
16
119
17
126
18
133
19
140
20
147
21
154
22
161
23
168
24
Parent Stock - Rearing Program 0 - 24 WeeksFemales / House 2 / Pen 3
CV
%
Monitoring Broiler Breeder Growth
2013
Note on Sample Weighing of Females
Where automatic (jump-on platform) weigh scales are used and the female weights from these indicate an unexpected variation or deviation from the expected target, a sample of birds should be reweighed by hand weighing. If the variation is confirmed the platform scales should be recalibrated to check they are working correctly. Additional hand weighing of females is only required in such situations and not routinely, as with males.
Inconsistent Weight Data
If a sample weighing produces data that is inconsistent with the previous weights or expected gains, a second sample of birds should be weighed immediately as a check before any decisions on feed allowances are made. This will identify potential problems (e.g. improper sampling procedure, feed allowance errors, drinker failures, or disease) which may need to be rectified.
KEY POINTS• Growth and development in a flock are assessed and managed by weighing representative
samples of birds and comparing them with target weight for age.• Sample weighing should start at day-old and continue at least weekly.• Individual bird weights should be taken from 14-21 days of age for calculation of CV%.• A minimum of 50 birds or 2% of the female population (10% of the male population) should
be weighed but all birds caught in the sample must be weighed.• Weigh birds at the same time each week using the same set of scales.• Scale accuracy should be checked regularly.• Record and plot average body weight and CV% on a body weight-for-age chart.• If sample weighing produces data inconsistent with previous weights or expected gains
weigh a second sample immediately.
Sec
tion
4
Monitoring Broiler Breeder Growth Monitoring Broiler Breeder Growth
Section 5
Assessment of Bird Physical Condition
Assessment of Male Condition
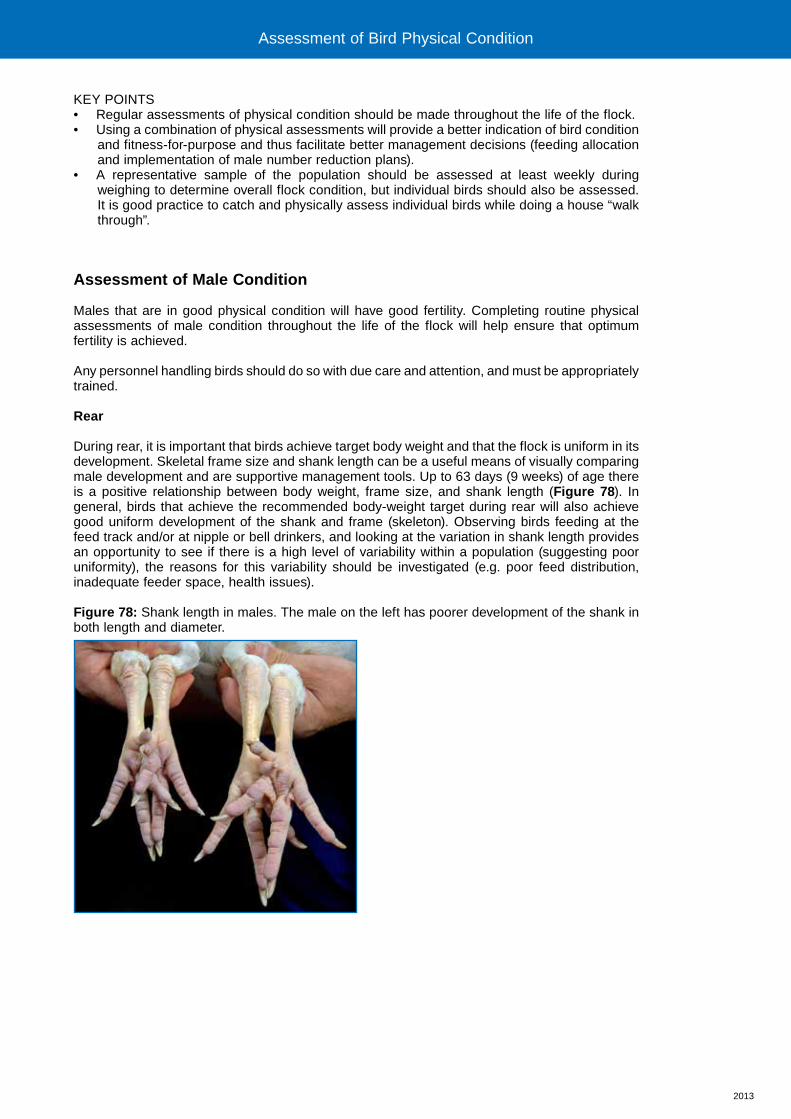
2013
KEY POINTS• Regular assessments of physical condition should be made throughout the life of the flock.• Using a combination of physical assessments will provide a better indication of bird condition
and fitness-for-purpose and thus facilitate better management decisions (feeding allocation and implementation of male number reduction plans).
• A representative sample of the population should be assessed at least weekly during weighing to determine overall flock condition, but individual birds should also be assessed. It is good practice to catch and physically assess individual birds while doing a house “walk through”.
Assessment of Male Condition
Males that are in good physical condition will have good fertility. Completing routine physical assessments of male condition throughout the life of the flock will help ensure that optimum fertility is achieved.
Any personnel handling birds should do so with due care and attention, and must be appropriately trained. Rear
During rear, it is important that birds achieve target body weight and that the flock is uniform in its development. Skeletal frame size and shank length can be a useful means of visually comparing male development and are supportive management tools. Up to 63 days (9 weeks) of age there is a positive relationship between body weight, frame size, and shank length (Figure 78). In general, birds that achieve the recommended body-weight target during rear will also achieve good uniform development of the shank and frame (skeleton). Observing birds feeding at the feed track and/or at nipple or bell drinkers, and looking at the variation in shank length provides an opportunity to see if there is a high level of variability within a population (suggesting poor uniformity), the reasons for this variability should be investigated (e.g. poor feed distribution, inadequate feeder space, health issues).
Figure 78: Shank length in males. The male on the left has poorer development of the shank in both length and diameter.
Assessment of Bird Physical Condition Assessment of Bird Physical Condition
2013
Birds that follow the recommended body-weight profile in rear should also achieve a body condition that is acceptable. However, regular and routine monitoring of male fleshing in conjunction with measurement of body weight can provide a more accurate indicator of overall body condition, and establish more appropriate management and feeding strategies. To achieve this, males should be handled regularly (at least weekly during weighing) from placement, paying particular attention between 15 weeks of age and the start of production, in preparation for sexual maturity. It is also important to be aware of general health, alertness and activity.
Lay
Physical assessment of male condition for removing males as part of a male reduction planA planned mating ratio reduction program (Table 16) should be followed to maintain persistency of fertility. The optimum mating ratio is maintained by removing males from the flock that are in poor physical condition and not working.
Table 16: A guide to typical mating ratios as a flock ages.
Days WeeksNumber of Good Quality
Males/100 Females
154-168 22-24 9.50-10.00
168-210 24-30 9.00-10.00
210-245 30-35 8.50-9.75
245-280 35-40 8.00-9.50
280-350 40-50 7.50-9.25
350 to depletion 50 to depletion 7.00-9.00
Assessment of male condition for managing mating ratios should be routinely made during weighing, but can also be done on individual males when ‘walking’ through the flock.
Physical assessment of male condition must be comprehensive and include: • Alertness and activity.• Body condition (fleshing) - shape and softness or hardness of breast muscle tone.• Legs and feet - the legs should be straight with no bent toes, and the footpads should be
free from abrasions.• Head - males should have a uniform, intense red color around the comb, wattle, and eye
area. Beaks should be uniform in shape.• Feathering - a good quality male will exhibit some partial feather loss, especially around the
shoulders and thighs.• Vent - should show some feather wear, be large and moist, with good (red) coloration.• Body weight - according to target.
Alertness and activityThe flock should be observed throughout the day to monitor mating activity, feeding, resting location, daytime distribution, and distribution immediately prior to lights out. Males should be alert and active, and evenly distributed over the litter (scratch) area for most of the light period (Figure 79). They should not be concentrated on the slats, or hiding under equipment. Males identified as not being alert and active should be removed. If the mating activity of the flock is observed to be lower than expected, the reason for this should be investigated (e.g. poor male condition, sexual maturity between males and females not synchronized, inadequate feed distribution, and male feed allocation).
Sec
tion
5
Assessment of Bird Physical Condition Assessment of Bird Physical Condition

2013
Figure 79: Good distribution of alert males within a flock.
Monitoring body condition (breast shape or fleshing) in malesBreast shape or fleshing is a good indicator of bird condition and is particularly useful for males. Birds that are over- or under-fleshed are more likely to have problems with mating and fertility at some point. Traditionally, body weight has been the main driver for male broiler breeder management decisions, but using body weight alone can be misleading. For example, it is possible to have 2 birds of the same age and body weight that differ in physical appearance and body condition (one could be skeletally smaller or larger, and fatter or leaner - Figure 80), such birds would require different management, namely feed levels and timing, to achieve good levels of fertility.
Figure 80: An example of 2 adult male birds of the same weight and age but differing body condition. The bird on the left is shorter and fatter, and the bird on the right taller and leaner, but the body weight of the 2 birds is equal.
Observing and awareness of male condition is important throughout the bird's entire life. Achieving the optimum condition, maintaining it, and ensuring that there is no deterioration in it at any stage is key to male performance. However, particular attention is recommended: • At the onset of physical mating activity to ensure that early flock fertility and productivity
are maximized.• Post-peak to optimize lifetime flock fertility.
Assessment of Bird Physical Condition
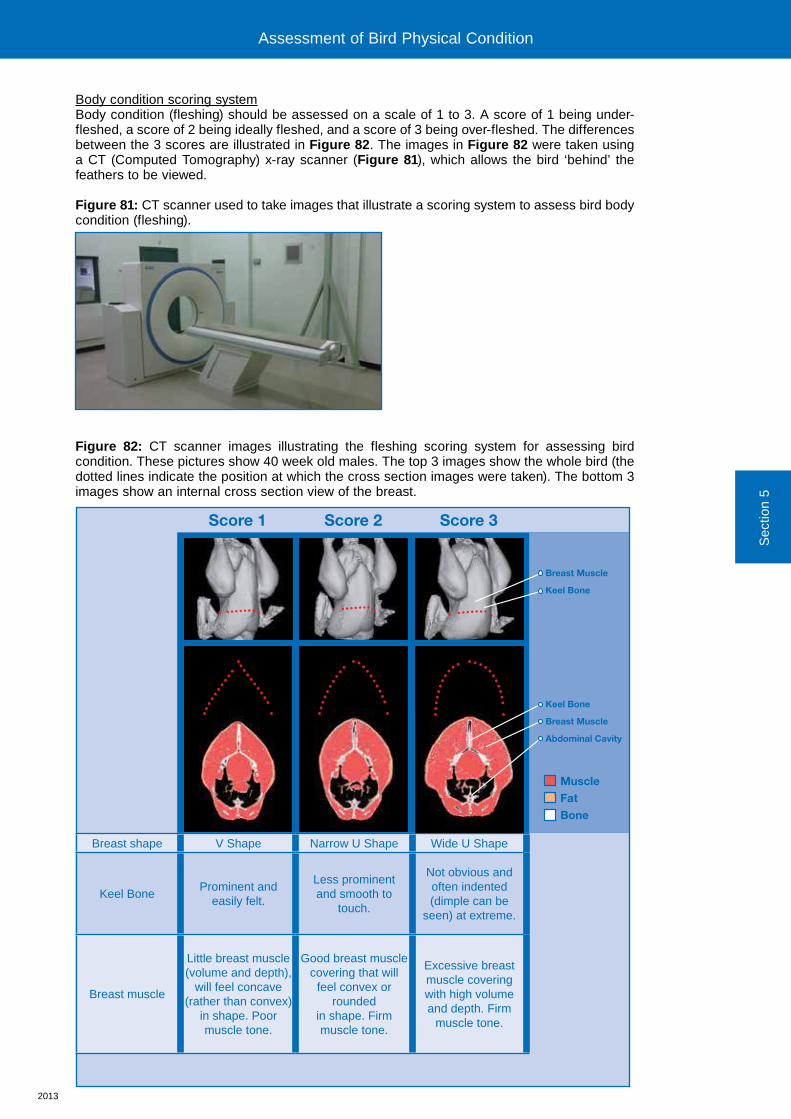
2013
Body condition scoring systemBody condition (fleshing) should be assessed on a scale of 1 to 3. A score of 1 being under-fleshed, a score of 2 being ideally fleshed, and a score of 3 being over-fleshed. The differences between the 3 scores are illustrated in Figure 82. The images in Figure 82 were taken using a CT (Computed Tomography) x-ray scanner (Figure 81), which allows the bird ‘behind’ the feathers to be viewed.
Figure 81: CT scanner used to take images that illustrate a scoring system to assess bird body condition (fleshing).
Figure 82: CT scanner images illustrating the fleshing scoring system for assessing bird condition. These pictures show 40 week old males. The top 3 images show the whole bird (the dotted lines indicate the position at which the cross section images were taken). The bottom 3 images show an internal cross section view of the breast.
Breast shape V Shape Narrow U Shape Wide U Shape
Keel BoneProminent and
easily felt.
Less prominent and smooth to
touch.
Not obvious and often indented (dimple can be
seen) at extreme.
Breast muscle
Little breast muscle (volume and depth),
will feel concave (rather than convex)
in shape. Poor muscle tone.
Good breast muscle covering that will
feel convex or rounded
in shape. Firm muscle tone.
Excessive breast muscle covering with high volume and depth. Firm
muscle tone.
Breast Muscle
Keel Bone
Keel Bone
Breast Muscle
Abdominal Cavity
Score 1 Score 2 Score 3
MuscleFatBone
Sec
tion
5
Assessment of Bird Physical Condition

2013
Procedure for assessing body condition (breast shape or fleshing)Breast shape and fleshing should be assessed at least once a week during weighing. All birds being sampled weighed should be assessed.
To assess fleshing, run the hand along the length of the breast (over the keel bone), feeling the shape, volume, and tone of the breast muscle (Figure 83).
A score of 1, 2 or 3 indicating the amount and shape of breast should be given to each bird. Scores should be recorded, and the average score for the flock determined each week. The trend in bird condition over time should also be monitored.
Figure 83: Assessing male condition. While holding the bird by both legs, the hand is run over the keel bone, and the prominence of the keel bone, and the amount, shape, and firmness of the breast on either side of the keel assessed. The male in the picture is 26 weeks old and the keel bone should be easily felt (but not prominent). The breast should be firm and rounded to touch, filling the space on either side of the keel bone (condition score 2).
Body condition scores should be taken into consideration, along with body weight and uniformity, to provide the basis for appropriate adjustments in bird management. Examples of how body condition assessments might be used in this way are given in Table 17.
Assessment of Bird Physical Condition

2013
Table 17: Examples of how male condition can be used in conjunction with body weight to determine appropriate flock management strategies.
Flock AgeAverage Body
Weight
Average Condition
Score Week 38*
Average Condition
Score Week 39*
Average Condition
Score Week 40*
Management Strategy
Sample 1 40 weeks Target 2.0 2.0 2.2
Body weight on target, condition good.
Give recommended feed increase.
Sample 2 40 weeks Target 2.0 1.9 1.8
Body weight on target but condition score
falling. Consider giving additional
feed increase above recommendation, and investigate reason for declining condition.
Sample 3 40 weeks200 g (0.4 lbs) below target
1.9 1.8 1.4
Body weight below target, condition score low (birds thin). Check
condition score is correct. If confirmed, give additional feed increase. Investigate
feed volumes, uniformity of feed distribution, and effectiveness of
separate-sex feeding.
Sample 4 40 weeks200 g (0.4 lbs) above target
2.0 2.2 2.5
Body weight over target and condition
score high (birds fat). Verify that feed
distribution and separate-sex feeding systems are working
optimally. Feed to maintain increased
body weight.
* Average condition score corresponds to group of males sample weighed.
The assessment of body condition score will differ slightly between individuals. Ideally, body condition should be assessed by the same person each week. In addition, while the average condition score for the males in a flock is ‘2’, the optimum condition score for individual flocks may vary slightly around the ideal.
KEY POINTS• Body condition (fleshing) should be assessed at least weekly during weighing.• All birds being weighed should be assessed and their condition given a score of 1, 2 or 3 (1
being under-fleshed, 2 being ideal and 3 being over-fleshed).• Condition scores should be recorded and the average for the flock calculated. The trend over
time should also be monitored.• Use body condition in conjunction with body weight and uniformity to determine appropriate
management and feeding strategies.
Sec
tion
5
Assessment of Bird Physical Condition

2013
Legs and feet To maintain high fertility levels within a flock, males must have good feet and legs (Figure 84). Legs should be straight with no bent toes. The footpads should be clean and free from physical damage. Abrasions and cracks on the feet may lead to infection and discomfort that will reduce welfare and mating activity. Any male showing poor feet and leg condition should be removed from the flock.
Figure 84: Good leg health in males.
Head Males in good condition that are working well will have a uniform, intense red color around the comb, wattle, and eye area (Figure 85). Under normal conditions, the face of a healthy, well conditioned male will redden up from the face in towards the eye. Conversely, the face of a male in poorer condition will start to loose color from the eye outwards. Males with low face color may have a low mating activity, and should be considered for removal.
Figure 85: A healthy, active male showing a red face and comb (on the left), and a male in poorer condition, showing paleness around the eye (on the right).
Assessment of Bird Physical Condition
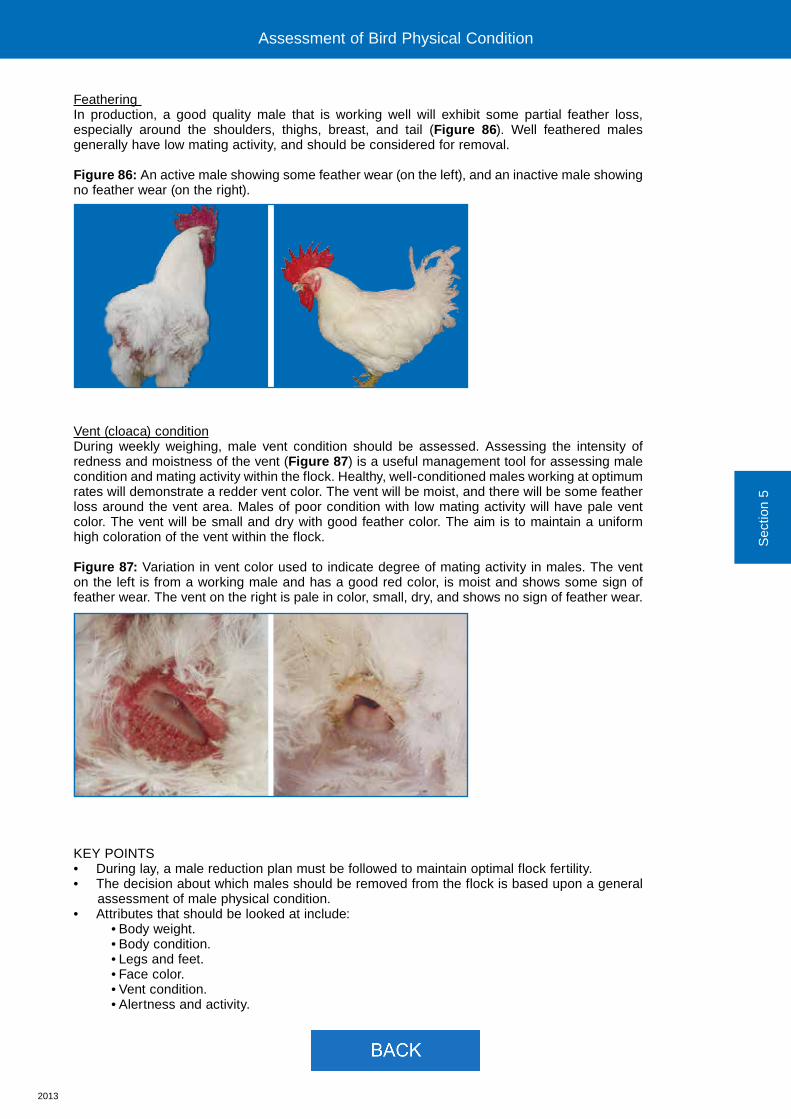
2013
Feathering In production, a good quality male that is working well will exhibit some partial feather loss, especially around the shoulders, thighs, breast, and tail (Figure 86). Well feathered males generally have low mating activity, and should be considered for removal.
Figure 86: An active male showing some feather wear (on the left), and an inactive male showing no feather wear (on the right).
Vent (cloaca) conditionDuring weekly weighing, male vent condition should be assessed. Assessing the intensity of redness and moistness of the vent (Figure 87) is a useful management tool for assessing male condition and mating activity within the flock. Healthy, well-conditioned males working at optimum rates will demonstrate a redder vent color. The vent will be moist, and there will be some feather loss around the vent area. Males of poor condition with low mating activity will have pale vent color. The vent will be small and dry with good feather color. The aim is to maintain a uniform high coloration of the vent within the flock.
Figure 87: Variation in vent color used to indicate degree of mating activity in males. The vent on the left is from a working male and has a good red color, is moist and shows some sign of feather wear. The vent on the right is pale in color, small, dry, and shows no sign of feather wear.
KEY POINTS• During lay, a male reduction plan must be followed to maintain optimal flock fertility.• The decision about which males should be removed from the flock is based upon a general
assessment of male physical condition.• Attributes that should be looked at include:
• Body weight.• Body condition.• Legs and feet.• Face color.• Vent condition.• Alertness and activity.
Sec
tion
5
Assessment of Bird Physical Condition
Section 5
Assessment of Bird Physical Condition
2013
Assessment of Bird Physical Condition
Objective
To ensure persistency of fertility and egg production by achieving optimum physical condition of males and females.
Principles
Regular physical assessment of birds provides additional information for guidance on required adjustments in management practices to ensure persistency of reproductive performance. The physical assessment of birds within a flock involves monitoring a number of factors (including body weight, body condition (breast shape and degree of fleshing), and skeletal frame size) to get a good overall view of bird condition, health, and reproductive potential.
Assessing Bird Condition
Assessments of bird condition (e.g. fleshing, legs and feet) should be completed, at least weekly, from placement through to depletion. This should be done as part of the routine flock management procedures, and will help to develop good stockmanship techniques in farm personnel. From these regular assessments, an awareness of what birds should both look and feel like at any given age can be developed. This will support management decisions and help recognize and solve problems. There are 2 opportunities to assess the flock - when birds are being weighed, or when doing a house ‘walk through’.
It is important that the flock is maintained in optimal condition throughout its life. However, it should be recognized that the optimum will vary slightly at different times during the production cycle, depending on, for example, whether or not the flock is approaching sexual maturity, is at peak production, or is established in lay. At any point in time, an inadequate (under-fleshed or thin), or excessive (over-fleshed or fat) condition will have a negative impact on flock performance and should be avoided. Particular attention to bird condition should be paid:• In the period leading up to the start of egg production (19-24 weeks of age) for females.• Throughout lay for males when a male reduction plan is being followed.
Weighing provides the ideal opportunity to assess bird physical condition. As a general rule, a minimum of 50 birds or 2% of the population (whichever is the greater) should be sampled for females and a minimum of 10% of the population should be sampled for males (for more information see the section on Monitoring Broiler Breeder Growth). Physical condition should be routinely assessed and recorded on all birds sampled for weighing.
In addition, it is good management practice to ‘walk through’ the flock at least once a week, picking up a selection of individual birds to assess their physical condition. As a guide, a minimum of 20-30 females and 15 males should be selected at random, and their physical condition assessed.
Section 5 - Assessment of Bird Physical Condition
Sec
tion
5
Monitoring Broiler Breeder Growth Assessment of Bird Physical Condition

2013
KEY POINTS• Regular assessments of physical condition should be made throughout the life of the flock.• Using a combination of physical assessments will provide a better indication of bird condition
and fitness-for-purpose and thus facilitate better management decisions (feeding allocation and implementation of male number reduction plans).
• A representative sample of the population should be assessed at least weekly during weighing to determine overall flock condition, but individual birds should also be assessed. It is good practice to catch and physically assess individual birds while doing a house “walk through”.
Assessment of Male Condition
Males that are in good physical condition will have good fertility. Completing routine physical assessments of male condition throughout the life of the flock will help ensure that optimum fertility is achieved.
Any personnel handling birds should do so with due care and attention, and must be appropriately trained. Rear
During rear, it is important that birds achieve target body weight and that the flock is uniform in its development. Skeletal frame size and shank length can be a useful means of visually comparing male development and are supportive management tools. Up to 63 days (9 weeks) of age there is a positive relationship between body weight, frame size, and shank length (Figure 78). In general, birds that achieve the recommended body-weight target during rear will also achieve good uniform development of the shank and frame (skeleton). Observing birds feeding at the feed track and/or at nipple or bell drinkers, and looking at the variation in shank length provides an opportunity to see if there is a high level of variability within a population (suggesting poor uniformity), the reasons for this variability should be investigated (e.g. poor feed distribution, inadequate feeder space, health issues).
Figure 78: Shank length in males. The male on the left has poorer development of the shank in both length and diameter.
Assessment of Bird Physical Condition Assessment of Bird Physical Condition

2013
Birds that follow the recommended body-weight profile in rear should also achieve a body condition that is acceptable. However, regular and routine monitoring of male fleshing in conjunction with measurement of body weight can provide a more accurate indicator of overall body condition, and establish more appropriate management and feeding strategies. To achieve this, males should be handled regularly (at least weekly during weighing) from placement, paying particular attention between 15 weeks of age and the start of production, in preparation for sexual maturity. It is also important to be aware of general health, alertness and activity.
Lay
Physical assessment of male condition for removing males as part of a male reduction planA planned mating ratio reduction program (Table 16) should be followed to maintain persistency of fertility. The optimum mating ratio is maintained by removing males from the flock that are in poor physical condition and not working.
Table 16: A guide to typical mating ratios as a flock ages.
Days WeeksNumber of Good Quality
Males/100 Females
154-168 22-24 9.50-10.00
168-210 24-30 9.00-10.00
210-245 30-35 8.50-9.75
245-280 35-40 8.00-9.50
280-350 40-50 7.50-9.25
350 to depletion 50 to depletion 7.00-9.00
Assessment of male condition for managing mating ratios should be routinely made during weighing, but can also be done on individual males when ‘walking’ through the flock.
Physical assessment of male condition must be comprehensive and include: • Alertness and activity.• Body condition (fleshing) - shape and softness or hardness of breast muscle tone.• Legs and feet - the legs should be straight with no bent toes, and the footpads should be
free from abrasions.• Head - males should have a uniform, intense red color around the comb, wattle, and eye
area. Beaks should be uniform in shape.• Feathering - a good quality male will exhibit some partial feather loss, especially around the
shoulders and thighs.• Vent - should show some feather wear, be large and moist, with good (red) coloration.• Body weight - according to target.
Alertness and activityThe flock should be observed throughout the day to monitor mating activity, feeding, resting location, daytime distribution, and distribution immediately prior to lights out. Males should be alert and active, and evenly distributed over the litter (scratch) area for most of the light period (Figure 79). They should not be concentrated on the slats, or hiding under equipment. Males identified as not being alert and active should be removed. If the mating activity of the flock is observed to be lower than expected, the reason for this should be investigated (e.g. poor male condition, sexual maturity between males and females not synchronized, inadequate feed distribution, and male feed allocation).
Sec
tion
5
Assessment of Bird Physical Condition Assessment of Bird Physical Condition
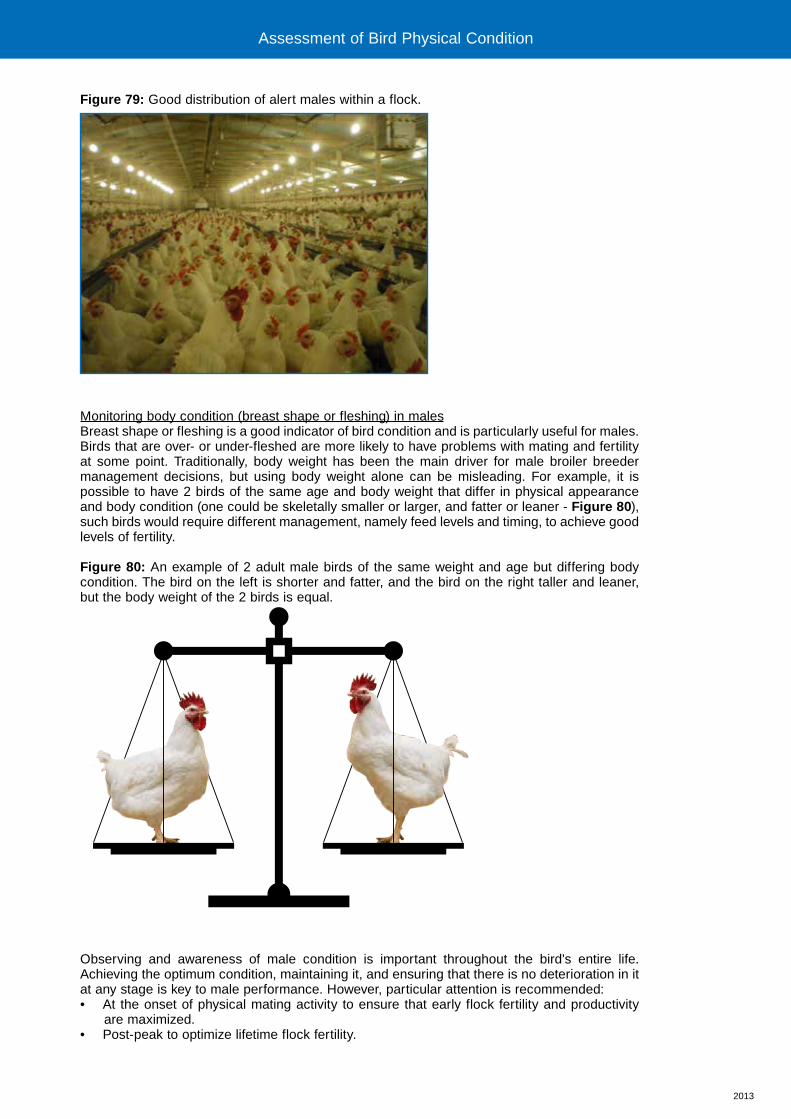
2013
Figure 79: Good distribution of alert males within a flock.
Monitoring body condition (breast shape or fleshing) in malesBreast shape or fleshing is a good indicator of bird condition and is particularly useful for males. Birds that are over- or under-fleshed are more likely to have problems with mating and fertility at some point. Traditionally, body weight has been the main driver for male broiler breeder management decisions, but using body weight alone can be misleading. For example, it is possible to have 2 birds of the same age and body weight that differ in physical appearance and body condition (one could be skeletally smaller or larger, and fatter or leaner - Figure 80), such birds would require different management, namely feed levels and timing, to achieve good levels of fertility.
Figure 80: An example of 2 adult male birds of the same weight and age but differing body condition. The bird on the left is shorter and fatter, and the bird on the right taller and leaner, but the body weight of the 2 birds is equal.
Observing and awareness of male condition is important throughout the bird's entire life. Achieving the optimum condition, maintaining it, and ensuring that there is no deterioration in it at any stage is key to male performance. However, particular attention is recommended: • At the onset of physical mating activity to ensure that early flock fertility and productivity
are maximized.• Post-peak to optimize lifetime flock fertility.
Assessment of Bird Physical Condition

2013
Body condition scoring systemBody condition (fleshing) should be assessed on a scale of 1 to 3. A score of 1 being under-fleshed, a score of 2 being ideally fleshed, and a score of 3 being over-fleshed. The differences between the 3 scores are illustrated in Figure 82. The images in Figure 82 were taken using a CT (Computed Tomography) x-ray scanner (Figure 81), which allows the bird ‘behind’ the feathers to be viewed.
Figure 81: CT scanner used to take images that illustrate a scoring system to assess bird body condition (fleshing).
Figure 82: CT scanner images illustrating the fleshing scoring system for assessing bird condition. These pictures show 40 week old males. The top 3 images show the whole bird (the dotted lines indicate the position at which the cross section images were taken). The bottom 3 images show an internal cross section view of the breast.
Breast shape V Shape Narrow U Shape Wide U Shape
Keel BoneProminent and
easily felt.
Less prominent and smooth to
touch.
Not obvious and often indented (dimple can be
seen) at extreme.
Breast muscle
Little breast muscle (volume and depth),
will feel concave (rather than convex)
in shape. Poor muscle tone.
Good breast muscle covering that will
feel convex or rounded
in shape. Firm muscle tone.
Excessive breast muscle covering with high volume and depth. Firm
muscle tone.
Breast Muscle
Keel Bone
Keel Bone
Breast Muscle
Abdominal Cavity
Score 1 Score 2 Score 3
MuscleFatBone
Sec
tion
5
Assessment of Bird Physical Condition
2013
Procedure for assessing body condition (breast shape or fleshing)Breast shape and fleshing should be assessed at least once a week during weighing. All birds being sampled weighed should be assessed.
To assess fleshing, run the hand along the length of the breast (over the keel bone), feeling the shape, volume, and tone of the breast muscle (Figure 83).
A score of 1, 2 or 3 indicating the amount and shape of breast should be given to each bird. Scores should be recorded, and the average score for the flock determined each week. The trend in bird condition over time should also be monitored.
Figure 83: Assessing male condition. While holding the bird by both legs, the hand is run over the keel bone, and the prominence of the keel bone, and the amount, shape, and firmness of the breast on either side of the keel assessed. The male in the picture is 26 weeks old and the keel bone should be easily felt (but not prominent). The breast should be firm and rounded to touch, filling the space on either side of the keel bone (condition score 2).
Body condition scores should be taken into consideration, along with body weight and uniformity, to provide the basis for appropriate adjustments in bird management. Examples of how body condition assessments might be used in this way are given in Table 17.
Assessment of Bird Physical Condition
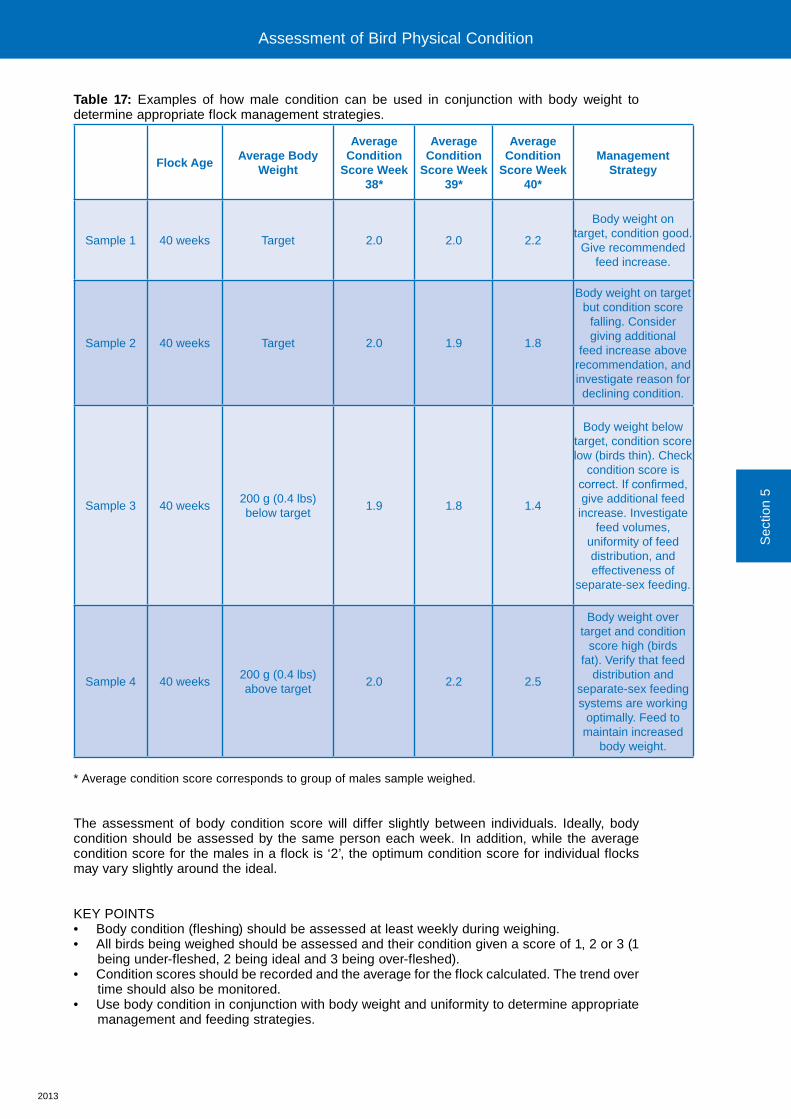
2013
Table 17: Examples of how male condition can be used in conjunction with body weight to determine appropriate flock management strategies.
Flock AgeAverage Body
Weight
Average Condition
Score Week 38*
Average Condition
Score Week 39*
Average Condition
Score Week 40*
Management Strategy
Sample 1 40 weeks Target 2.0 2.0 2.2
Body weight on target, condition good.
Give recommended feed increase.
Sample 2 40 weeks Target 2.0 1.9 1.8
Body weight on target but condition score
falling. Consider giving additional
feed increase above recommendation, and investigate reason for declining condition.
Sample 3 40 weeks200 g (0.4 lbs) below target
1.9 1.8 1.4
Body weight below target, condition score low (birds thin). Check
condition score is correct. If confirmed, give additional feed increase. Investigate
feed volumes, uniformity of feed distribution, and effectiveness of
separate-sex feeding.
Sample 4 40 weeks200 g (0.4 lbs) above target
2.0 2.2 2.5
Body weight over target and condition
score high (birds fat). Verify that feed
distribution and separate-sex feeding systems are working
optimally. Feed to maintain increased
body weight.
* Average condition score corresponds to group of males sample weighed.
The assessment of body condition score will differ slightly between individuals. Ideally, body condition should be assessed by the same person each week. In addition, while the average condition score for the males in a flock is ‘2’, the optimum condition score for individual flocks may vary slightly around the ideal.
KEY POINTS• Body condition (fleshing) should be assessed at least weekly during weighing.• All birds being weighed should be assessed and their condition given a score of 1, 2 or 3 (1
being under-fleshed, 2 being ideal and 3 being over-fleshed).• Condition scores should be recorded and the average for the flock calculated. The trend over
time should also be monitored.• Use body condition in conjunction with body weight and uniformity to determine appropriate
management and feeding strategies.
Sec
tion
5
Assessment of Bird Physical Condition
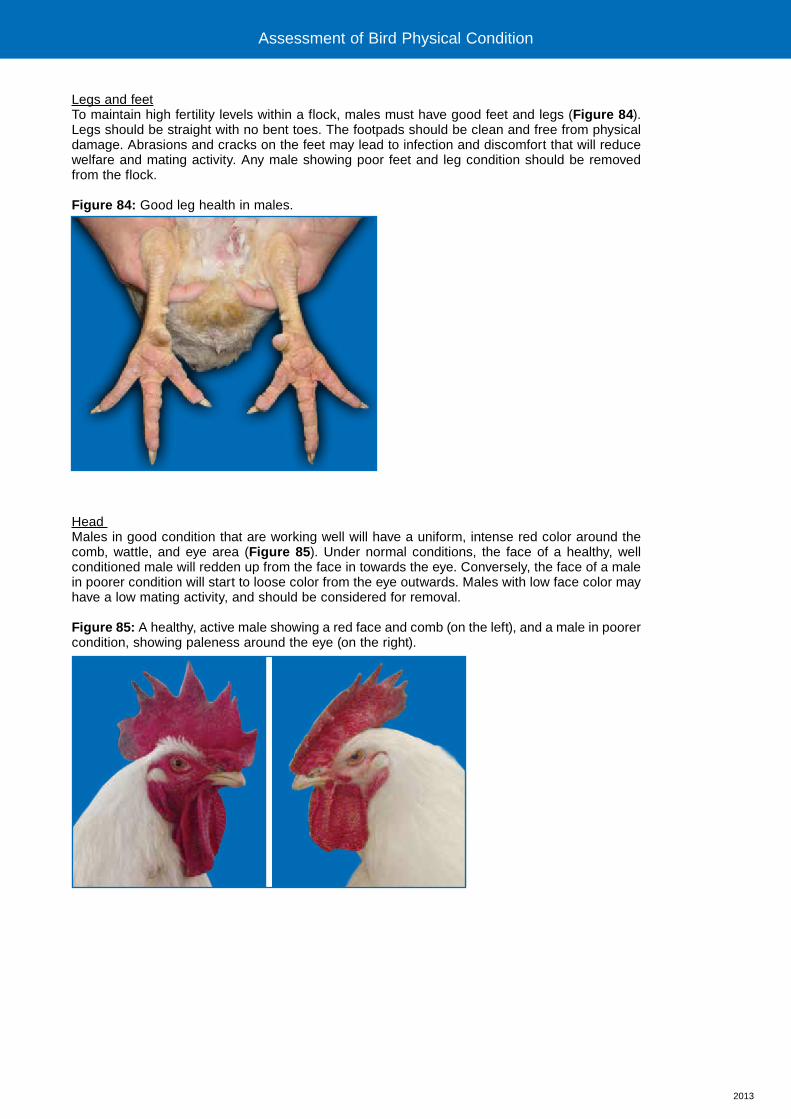
2013
Legs and feet To maintain high fertility levels within a flock, males must have good feet and legs (Figure 84). Legs should be straight with no bent toes. The footpads should be clean and free from physical damage. Abrasions and cracks on the feet may lead to infection and discomfort that will reduce welfare and mating activity. Any male showing poor feet and leg condition should be removed from the flock.
Figure 84: Good leg health in males.
Head Males in good condition that are working well will have a uniform, intense red color around the comb, wattle, and eye area (Figure 85). Under normal conditions, the face of a healthy, well conditioned male will redden up from the face in towards the eye. Conversely, the face of a male in poorer condition will start to loose color from the eye outwards. Males with low face color may have a low mating activity, and should be considered for removal.
Figure 85: A healthy, active male showing a red face and comb (on the left), and a male in poorer condition, showing paleness around the eye (on the right).
Assessment of Bird Physical Condition
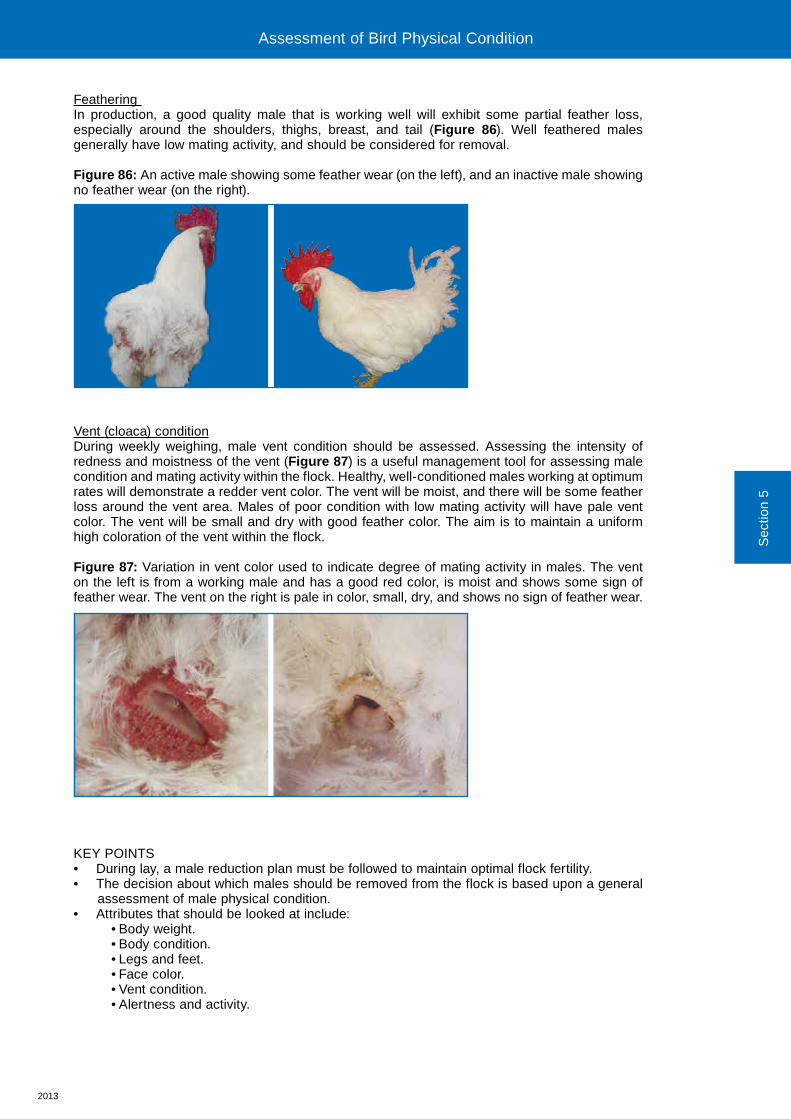
2013
Feathering In production, a good quality male that is working well will exhibit some partial feather loss, especially around the shoulders, thighs, breast, and tail (Figure 86). Well feathered males generally have low mating activity, and should be considered for removal.
Figure 86: An active male showing some feather wear (on the left), and an inactive male showing no feather wear (on the right).
Vent (cloaca) conditionDuring weekly weighing, male vent condition should be assessed. Assessing the intensity of redness and moistness of the vent (Figure 87) is a useful management tool for assessing male condition and mating activity within the flock. Healthy, well-conditioned males working at optimum rates will demonstrate a redder vent color. The vent will be moist, and there will be some feather loss around the vent area. Males of poor condition with low mating activity will have pale vent color. The vent will be small and dry with good feather color. The aim is to maintain a uniform high coloration of the vent within the flock.
Figure 87: Variation in vent color used to indicate degree of mating activity in males. The vent on the left is from a working male and has a good red color, is moist and shows some sign of feather wear. The vent on the right is pale in color, small, dry, and shows no sign of feather wear.
KEY POINTS• During lay, a male reduction plan must be followed to maintain optimal flock fertility.• The decision about which males should be removed from the flock is based upon a general
assessment of male physical condition.• Attributes that should be looked at include:
• Body weight.• Body condition.• Legs and feet.• Face color.• Vent condition.• Alertness and activity.
Sec
tion
5
Assessment of Bird Physical Condition
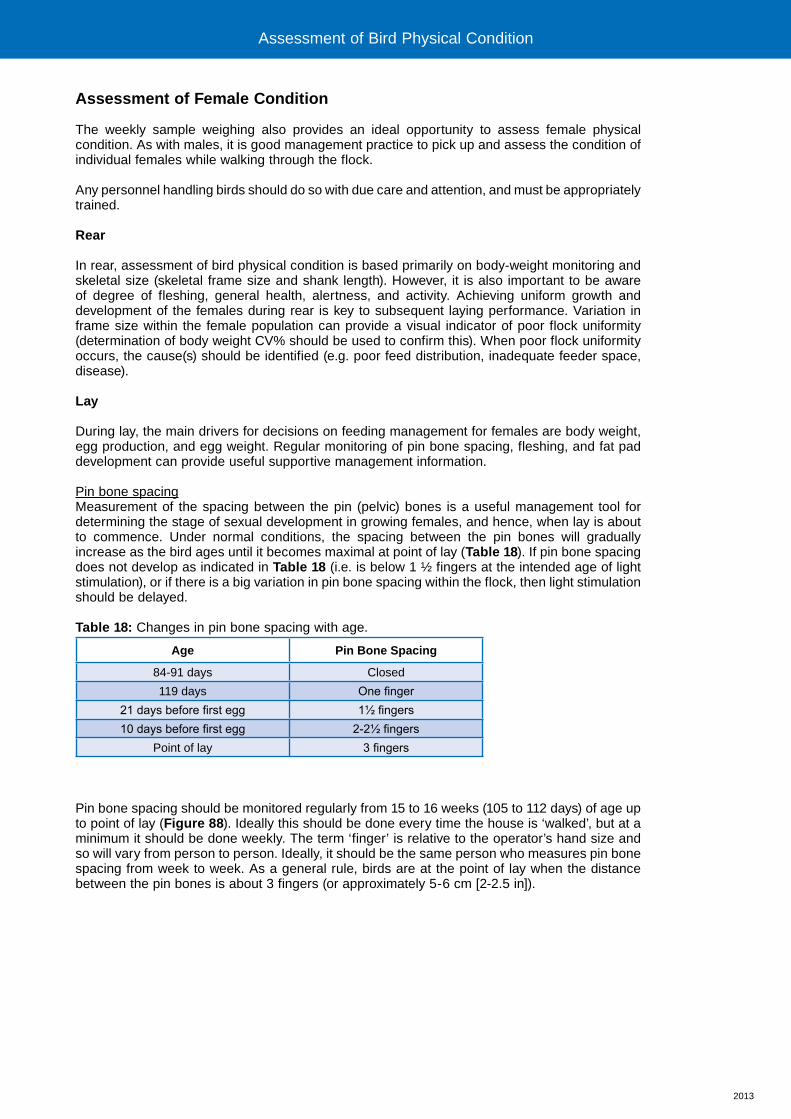
2013
Assessment of Female Condition
The weekly sample weighing also provides an ideal opportunity to assess female physical condition. As with males, it is good management practice to pick up and assess the condition of individual females while walking through the flock.
Any personnel handling birds should do so with due care and attention, and must be appropriately trained.
Rear
In rear, assessment of bird physical condition is based primarily on body-weight monitoring and skeletal size (skeletal frame size and shank length). However, it is also important to be aware of degree of fleshing, general health, alertness, and activity. Achieving uniform growth and development of the females during rear is key to subsequent laying performance. Variation in frame size within the female population can provide a visual indicator of poor flock uniformity (determination of body weight CV% should be used to confirm this). When poor flock uniformity occurs, the cause(s) should be identified (e.g. poor feed distribution, inadequate feeder space, disease).
Lay
During lay, the main drivers for decisions on feeding management for females are body weight, egg production, and egg weight. Regular monitoring of pin bone spacing, fleshing, and fat pad development can provide useful supportive management information.
Pin bone spacingMeasurement of the spacing between the pin (pelvic) bones is a useful management tool for determining the stage of sexual development in growing females, and hence, when lay is about to commence. Under normal conditions, the spacing between the pin bones will gradually increase as the bird ages until it becomes maximal at point of lay (Table 18). If pin bone spacing does not develop as indicated in Table 18 (i.e. is below 1 ½ fingers at the intended age of light stimulation), or if there is a big variation in pin bone spacing within the flock, then light stimulation should be delayed.
Table 18: Changes in pin bone spacing with age.
Age Pin Bone Spacing
84-91 days Closed
119 days One finger21 days before first egg 1½ fingers10 days before first egg 2-2½ fingers
Point of lay 3 fingers
Pin bone spacing should be monitored regularly from 15 to 16 weeks (105 to 112 days) of age up to point of lay (Figure 88). Ideally this should be done every time the house is ‘walked’, but at a minimum it should be done weekly. The term ‘finger’ is relative to the operator’s hand size and so will vary from person to person. Ideally, it should be the same person who measures pin bone spacing from week to week. As a general rule, birds are at the point of lay when the distance between the pin bones is about 3 fingers (or approximately 5-6 cm [2-2.5 in]).
Assessment of Bird Physical Condition
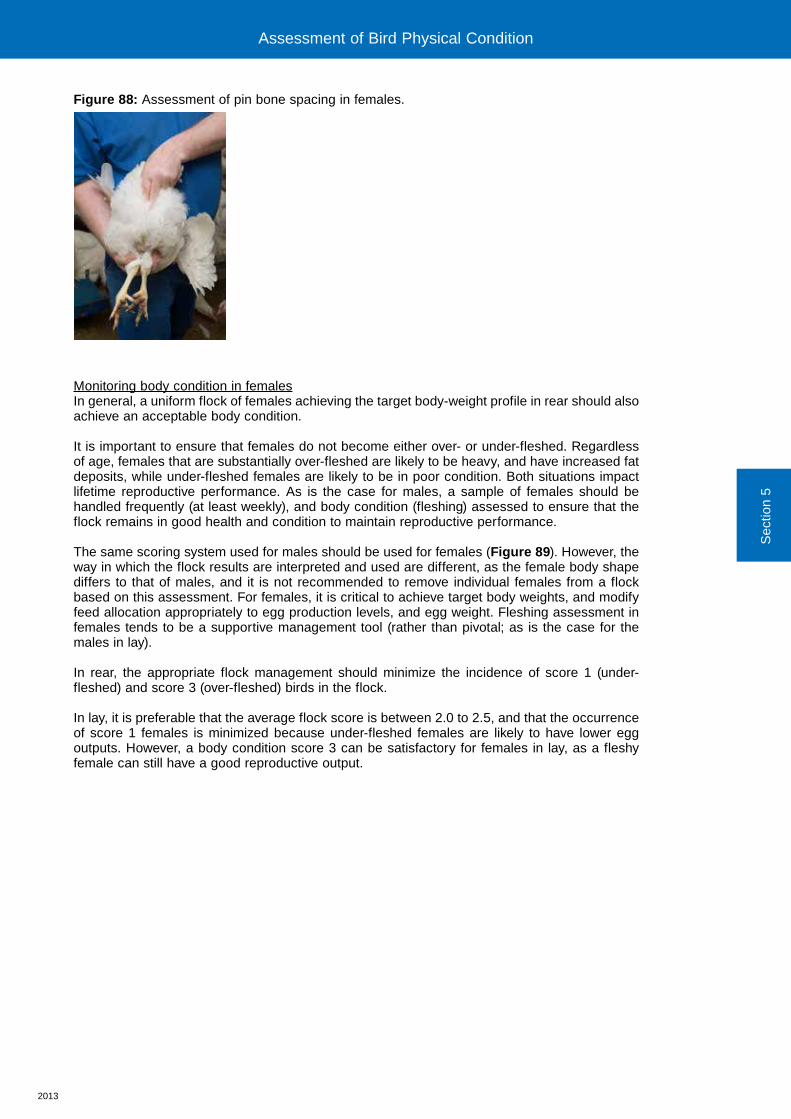
2013
Figure 88: Assessment of pin bone spacing in females.
Monitoring body condition in femalesIn general, a uniform flock of females achieving the target body-weight profile in rear should also achieve an acceptable body condition.
It is important to ensure that females do not become either over- or under-fleshed. Regardless of age, females that are substantially over-fleshed are likely to be heavy, and have increased fat deposits, while under-fleshed females are likely to be in poor condition. Both situations impact lifetime reproductive performance. As is the case for males, a sample of females should be handled frequently (at least weekly), and body condition (fleshing) assessed to ensure that the flock remains in good health and condition to maintain reproductive performance.
The same scoring system used for males should be used for females (Figure 89). However, the way in which the flock results are interpreted and used are different, as the female body shape differs to that of males, and it is not recommended to remove individual females from a flock based on this assessment. For females, it is critical to achieve target body weights, and modify feed allocation appropriately to egg production levels, and egg weight. Fleshing assessment in females tends to be a supportive management tool (rather than pivotal; as is the case for the males in lay).
In rear, the appropriate flock management should minimize the incidence of score 1 (under-fleshed) and score 3 (over-fleshed) birds in the flock.
In lay, it is preferable that the average flock score is between 2.0 to 2.5, and that the occurrence of score 1 females is minimized because under-fleshed females are likely to have lower egg outputs. However, a body condition score 3 can be satisfactory for females in lay, as a fleshy female can still have a good reproductive output.
Sec
tion
5
Assessment of Bird Physical Condition Assessment of Bird Physical Condition
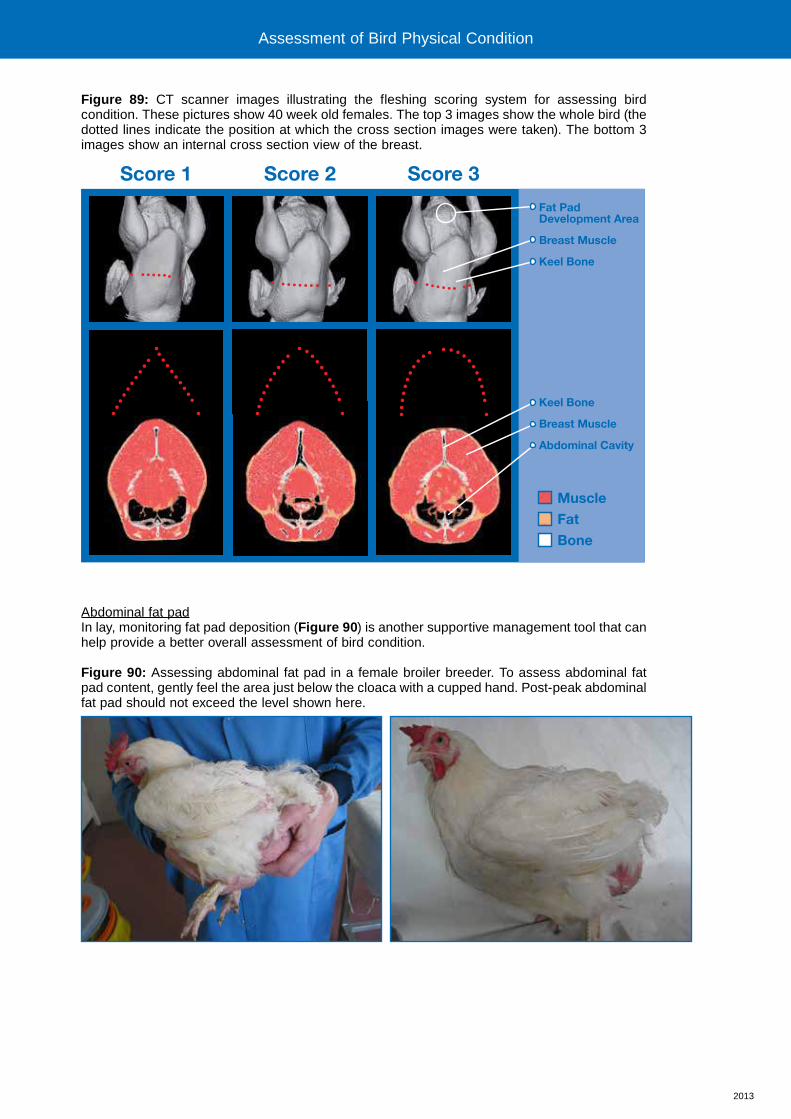
2013
Figure 89: CT scanner images illustrating the fleshing scoring system for assessing bird condition. These pictures show 40 week old females. The top 3 images show the whole bird (the dotted lines indicate the position at which the cross section images were taken). The bottom 3 images show an internal cross section view of the breast.
Abdominal fat padIn lay, monitoring fat pad deposition (Figure 90) is another supportive management tool that can help provide a better overall assessment of bird condition.
Figure 90: Assessing abdominal fat pad in a female broiler breeder. To assess abdominal fat pad content, gently feel the area just below the cloaca with a cupped hand. Post-peak abdominal fat pad should not exceed the level shown here.
Fat Pad Development Area
Breast Muscle
Keel Bone
Keel Bone
Breast Muscle
Abdominal Cavity
MuscleFatBone
Score 1 Score 2 Score 3
Assessment of Bird Physical Condition
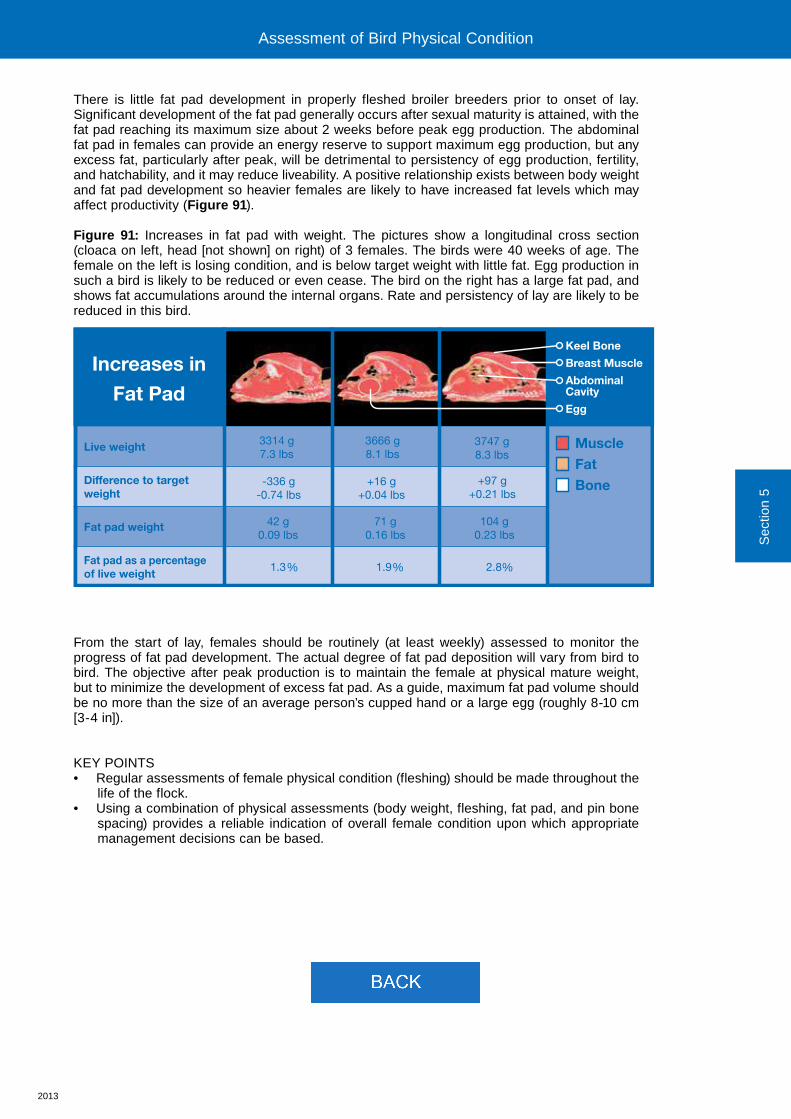
2013
There is little fat pad development in properly fleshed broiler breeders prior to onset of lay. Significant development of the fat pad generally occurs after sexual maturity is attained, with the fat pad reaching its maximum size about 2 weeks before peak egg production. The abdominal fat pad in females can provide an energy reserve to support maximum egg production, but any excess fat, particularly after peak, will be detrimental to persistency of egg production, fertility, and hatchability, and it may reduce liveability. A positive relationship exists between body weight and fat pad development so heavier females are likely to have increased fat levels which may affect productivity (Figure 91).
Figure 91: Increases in fat pad with weight. The pictures show a longitudinal cross section (cloaca on left, head [not shown] on right) of 3 females. The birds were 40 weeks of age. The female on the left is losing condition, and is below target weight with little fat. Egg production in such a bird is likely to be reduced or even cease. The bird on the right has a large fat pad, and shows fat accumulations around the internal organs. Rate and persistency of lay are likely to be reduced in this bird.
From the start of lay, females should be routinely (at least weekly) assessed to monitor the progress of fat pad development. The actual degree of fat pad deposition will vary from bird to bird. The objective after peak production is to maintain the female at physical mature weight, but to minimize the development of excess fat pad. As a guide, maximum fat pad volume should be no more than the size of an average person’s cupped hand or a large egg (roughly 8-10 cm [3-4 in]).
KEY POINTS• Regular assessments of female physical condition (fleshing) should be made throughout the
life of the flock.• Using a combination of physical assessments (body weight, fleshing, fat pad, and pin bone
spacing) provides a reliable indication of overall female condition upon which appropriate management decisions can be based.
Sec
tion
5
Assessment of Bird Physical Condition
Live weight 3314 g7.3 lbs
3666 g8.1 lbs
3747 g8.3 lbs
Difference to target weight
-336 g-0.74 lbs
+16 g+0.04 lbs
+97 g+0.21 lbs
Fat pad weight 42 g0.09 lbs
71 g0.16 lbs
104 g0.23 lbs
Fat pad as a percentageof live weight
1.3 1.9 2.8
Increases in
Fat Pad
MuscleFatBone
Keel Bone
Breast Muscle
Abdominal Cavity
Egg
% % %
Section 7
Environment Requirements
Ventilation
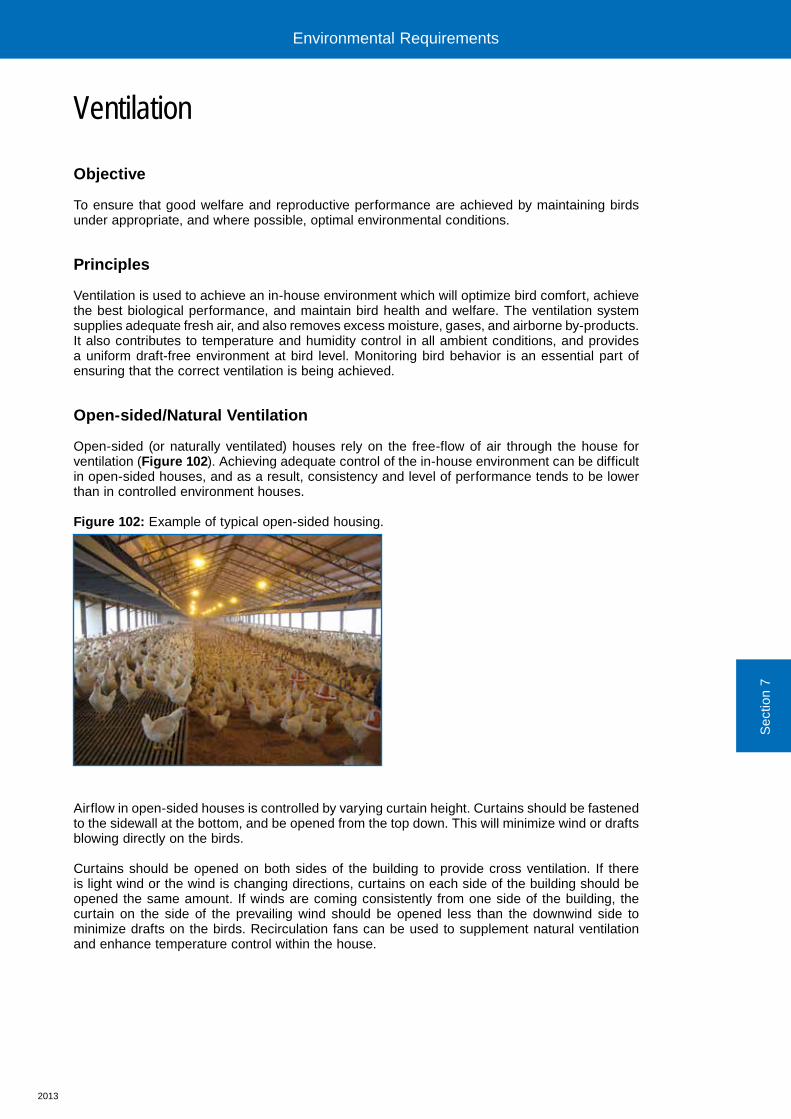
2013
Ventilation
Objective
To ensure that good welfare and reproductive performance are achieved by maintaining birds under appropriate, and where possible, optimal environmental conditions.
Principles
Ventilation is used to achieve an in-house environment which will optimize bird comfort, achieve the best biological performance, and maintain bird health and welfare. The ventilation system supplies adequate fresh air, and also removes excess moisture, gases, and airborne by-products. It also contributes to temperature and humidity control in all ambient conditions, and provides a uniform draft-free environment at bird level. Monitoring bird behavior is an essential part of ensuring that the correct ventilation is being achieved.
Open-sided/Natural Ventilation
Open-sided (or naturally ventilated) houses rely on the free-flow of air through the house for ventilation (Figure 102). Achieving adequate control of the in-house environment can be difficult in open-sided houses, and as a result, consistency and level of performance tends to be lower than in controlled environment houses.
Figure 102: Example of typical open-sided housing.
Airflow in open-sided houses is controlled by varying curtain height. Curtains should be fastened to the sidewall at the bottom, and be opened from the top down. This will minimize wind or drafts blowing directly on the birds.
Curtains should be opened on both sides of the building to provide cross ventilation. If there is light wind or the wind is changing directions, curtains on each side of the building should be opened the same amount. If winds are coming consistently from one side of the building, the curtain on the side of the prevailing wind should be opened less than the downwind side to minimize drafts on the birds. Recirculation fans can be used to supplement natural ventilation and enhance temperature control within the house.
Sec
tion
7
Environmental Requirements Environmental Requirements
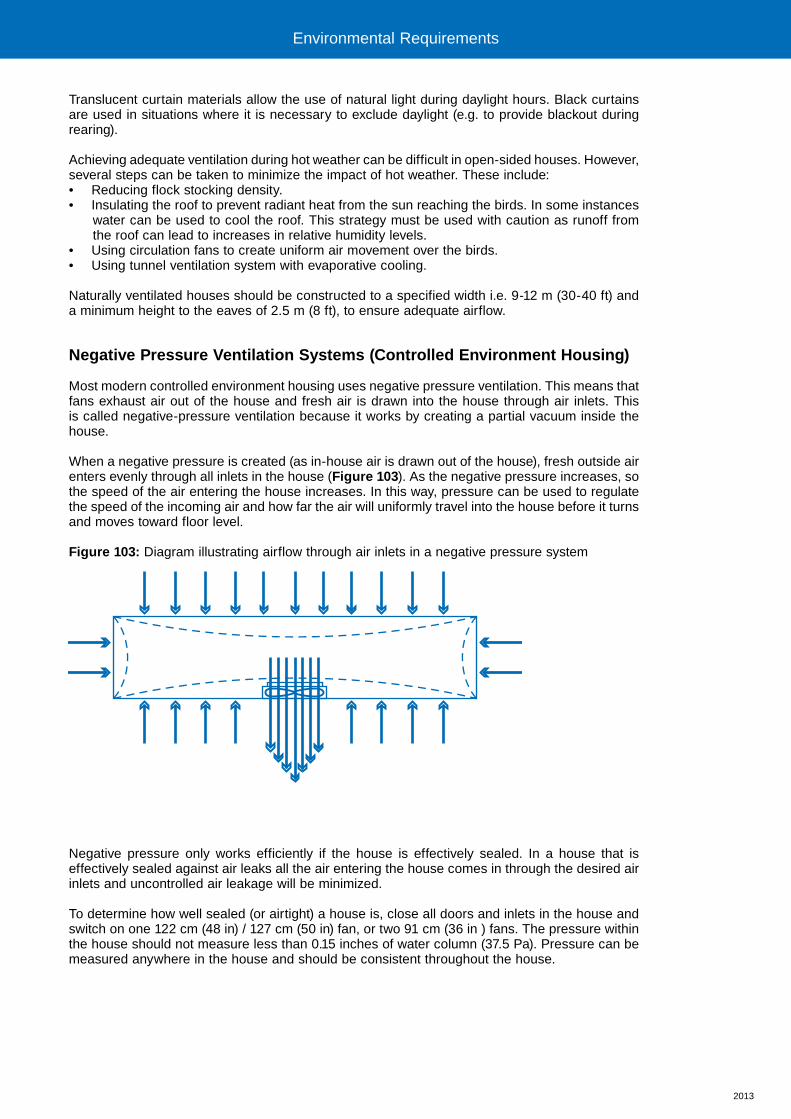
2013
Translucent curtain materials allow the use of natural light during daylight hours. Black curtains are used in situations where it is necessary to exclude daylight (e.g. to provide blackout during rearing).
Achieving adequate ventilation during hot weather can be difficult in open-sided houses. However, several steps can be taken to minimize the impact of hot weather. These include:• Reducing flock stocking density.• Insulating the roof to prevent radiant heat from the sun reaching the birds. In some instances
water can be used to cool the roof. This strategy must be used with caution as runoff from the roof can lead to increases in relative humidity levels.
• Using circulation fans to create uniform air movement over the birds. • Using tunnel ventilation system with evaporative cooling.
Naturally ventilated houses should be constructed to a specified width i.e. 9-12 m (30-40 ft) and a minimum height to the eaves of 2.5 m (8 ft), to ensure adequate airflow.
Negative Pressure Ventilation Systems (Controlled Environment Housing)
Most modern controlled environment housing uses negative pressure ventilation. This means that fans exhaust air out of the house and fresh air is drawn into the house through air inlets. This is called negative-pressure ventilation because it works by creating a partial vacuum inside the house.
When a negative pressure is created (as in-house air is drawn out of the house), fresh outside air enters evenly through all inlets in the house (Figure 103). As the negative pressure increases, so the speed of the air entering the house increases. In this way, pressure can be used to regulate the speed of the incoming air and how far the air will uniformly travel into the house before it turns and moves toward floor level.
Figure 103: Diagram illustrating airflow through air inlets in a negative pressure system
Negative pressure only works efficiently if the house is effectively sealed. In a house that is effectively sealed against air leaks all the air entering the house comes in through the desired air inlets and uncontrolled air leakage will be minimized.
To determine how well sealed (or airtight) a house is, close all doors and inlets in the house and switch on one 122 cm (48 in) / 127 cm (50 in) fan, or two 91 cm (36 in ) fans. The pressure within the house should not measure less than 0.15 inches of water column (37.5 Pa). Pressure can be measured anywhere in the house and should be consistent throughout the house.
Environmental Requirements
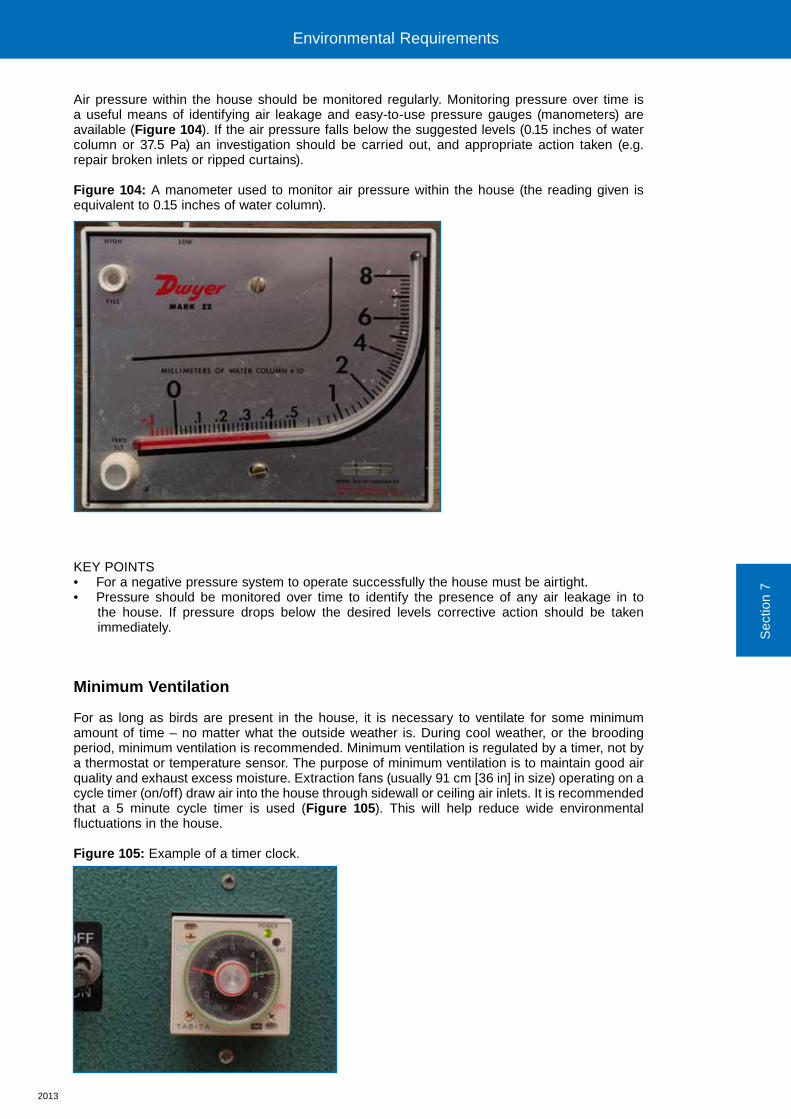
2013
Air pressure within the house should be monitored regularly. Monitoring pressure over time is a useful means of identifying air leakage and easy-to-use pressure gauges (manometers) are available (Figure 104). If the air pressure falls below the suggested levels (0.15 inches of water column or 37.5 Pa) an investigation should be carried out, and appropriate action taken (e.g. repair broken inlets or ripped curtains).
Figure 104: A manometer used to monitor air pressure within the house (the reading given is equivalent to 0.15 inches of water column).
KEY POINTS• For a negative pressure system to operate successfully the house must be airtight.• Pressure should be monitored over time to identify the presence of any air leakage in to
the house. If pressure drops below the desired levels corrective action should be taken immediately.
Minimum Ventilation
For as long as birds are present in the house, it is necessary to ventilate for some minimum amount of time – no matter what the outside weather is. During cool weather, or the brooding period, minimum ventilation is recommended. Minimum ventilation is regulated by a timer, not by a thermostat or temperature sensor. The purpose of minimum ventilation is to maintain good air quality and exhaust excess moisture. Extraction fans (usually 91 cm [36 in] in size) operating on a cycle timer (on/off) draw air into the house through sidewall or ceiling air inlets. It is recommended that a 5 minute cycle timer is used (Figure 105). This will help reduce wide environmental fluctuations in the house.
Figure 105: Example of a timer clock.
Sec
tion
7
Environmental Requirements
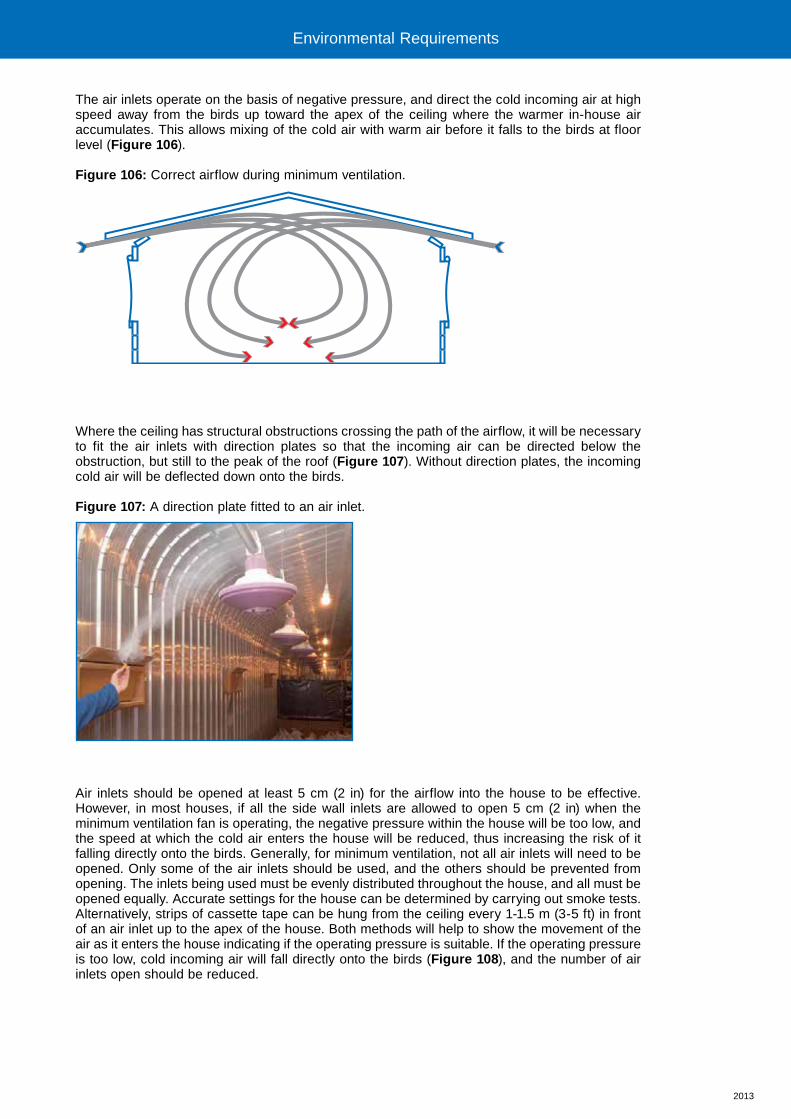
2013
The air inlets operate on the basis of negative pressure, and direct the cold incoming air at high speed away from the birds up toward the apex of the ceiling where the warmer in-house air accumulates. This allows mixing of the cold air with warm air before it falls to the birds at floor level (Figure 106).
Figure 106: Correct airflow during minimum ventilation.
Where the ceiling has structural obstructions crossing the path of the airflow, it will be necessary to fit the air inlets with direction plates so that the incoming air can be directed below the obstruction, but still to the peak of the roof (Figure 107). Without direction plates, the incoming cold air will be deflected down onto the birds.
Figure 107: A direction plate fitted to an air inlet.
Air inlets should be opened at least 5 cm (2 in) for the airflow into the house to be effective. However, in most houses, if all the side wall inlets are allowed to open 5 cm (2 in) when the minimum ventilation fan is operating, the negative pressure within the house will be too low, and the speed at which the cold air enters the house will be reduced, thus increasing the risk of it falling directly onto the birds. Generally, for minimum ventilation, not all air inlets will need to be opened. Only some of the air inlets should be used, and the others should be prevented from opening. The inlets being used must be evenly distributed throughout the house, and all must be opened equally. Accurate settings for the house can be determined by carrying out smoke tests. Alternatively, strips of cassette tape can be hung from the ceiling every 1-1.5 m (3-5 ft) in front of an air inlet up to the apex of the house. Both methods will help to show the movement of the air as it enters the house indicating if the operating pressure is suitable. If the operating pressure is too low, cold incoming air will fall directly onto the birds (Figure 108), and the number of air inlets open should be reduced.
Environmental Requirements
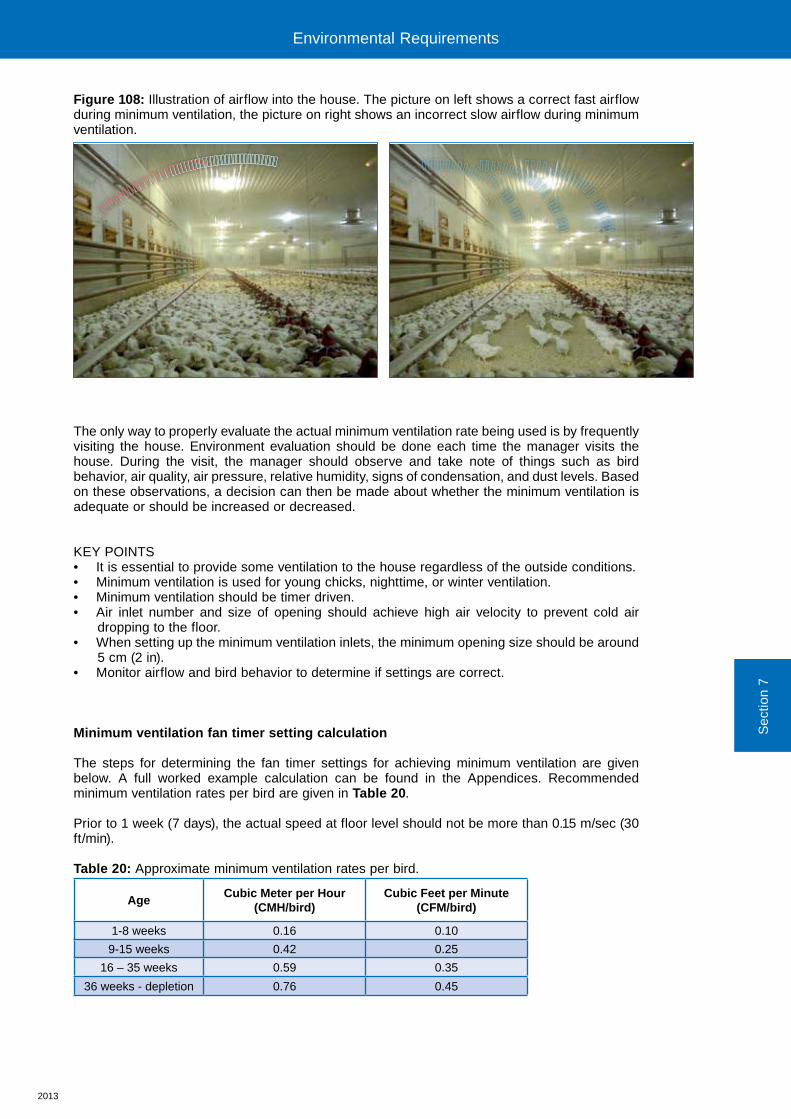
2013
Figure 108: Illustration of airflow into the house. The picture on left shows a correct fast airflow during minimum ventilation, the picture on right shows an incorrect slow airflow during minimum ventilation.
The only way to properly evaluate the actual minimum ventilation rate being used is by frequently visiting the house. Environment evaluation should be done each time the manager visits the house. During the visit, the manager should observe and take note of things such as bird behavior, air quality, air pressure, relative humidity, signs of condensation, and dust levels. Based on these observations, a decision can then be made about whether the minimum ventilation is adequate or should be increased or decreased.
KEY POINTS• It is essential to provide some ventilation to the house regardless of the outside conditions.• Minimum ventilation is used for young chicks, nighttime, or winter ventilation.• Minimum ventilation should be timer driven.• Air inlet number and size of opening should achieve high air velocity to prevent cold air
dropping to the floor. • When setting up the minimum ventilation inlets, the minimum opening size should be around
5 cm (2 in).• Monitor airflow and bird behavior to determine if settings are correct.
Minimum ventilation fan timer setting calculation
The steps for determining the fan timer settings for achieving minimum ventilation are given below. A full worked example calculation can be found in the Appendices. Recommended minimum ventilation rates per bird are given in Table 20.
Prior to 1 week (7 days), the actual speed at floor level should not be more than 0.15 m/sec (30 ft/min).
Table 20: Approximate minimum ventilation rates per bird.
AgeCubic Meter per Hour
(CMH/bird)Cubic Feet per Minute
(CFM/bird)
1-8 weeks 0.16 0.10
9-15 weeks 0.42 0.25
16 – 35 weeks 0.59 0.35
36 weeks - depletion 0.76 0.45
Sec
tion
7
Environmental Requirements Environmental Requirements
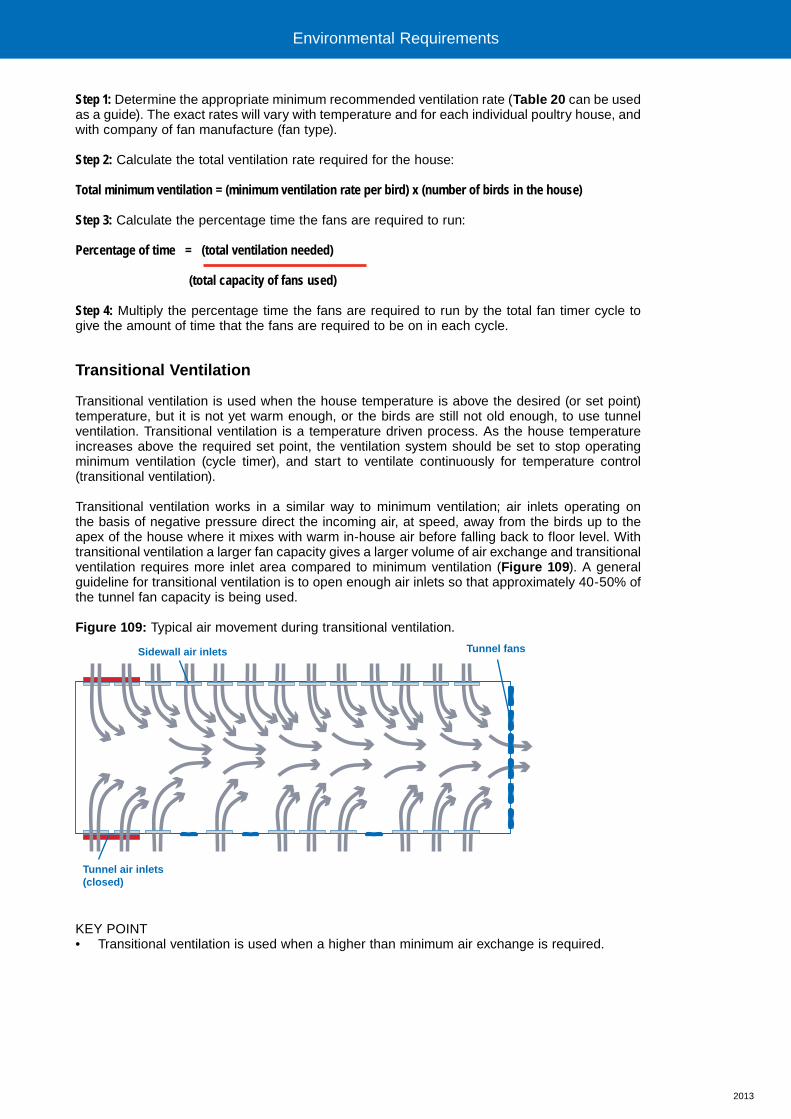
2013
Step 1: Determine the appropriate minimum recommended ventilation rate (Table 20 can be used as a guide). The exact rates will vary with temperature and for each individual poultry house, and with company of fan manufacture (fan type).
Step 2: Calculate the total ventilation rate required for the house:
Total minimum ventilation = (minimum ventilation rate per bird) x (number of birds in the house)
Step 3: Calculate the percentage time the fans are required to run:
Percentage of time = (total ventilation needed)
(total capacity of fans used)
Step 4: Multiply the percentage time the fans are required to run by the total fan timer cycle to give the amount of time that the fans are required to be on in each cycle.
Transitional Ventilation
Transitional ventilation is used when the house temperature is above the desired (or set point) temperature, but it is not yet warm enough, or the birds are still not old enough, to use tunnel ventilation. Transitional ventilation is a temperature driven process. As the house temperature increases above the required set point, the ventilation system should be set to stop operating minimum ventilation (cycle timer), and start to ventilate continuously for temperature control (transitional ventilation).
Transitional ventilation works in a similar way to minimum ventilation; air inlets operating on the basis of negative pressure direct the incoming air, at speed, away from the birds up to the apex of the house where it mixes with warm in-house air before falling back to floor level. With transitional ventilation a larger fan capacity gives a larger volume of air exchange and transitional ventilation requires more inlet area compared to minimum ventilation (Figure 109). A general guideline for transitional ventilation is to open enough air inlets so that approximately 40-50% of the tunnel fan capacity is being used.
Figure 109: Typical air movement during transitional ventilation.
KEY POINT• Transitional ventilation is used when a higher than minimum air exchange is required.
Tunnel air inlets(closed)
Tunnel fansSidewall air inlets
Environmental Requirements
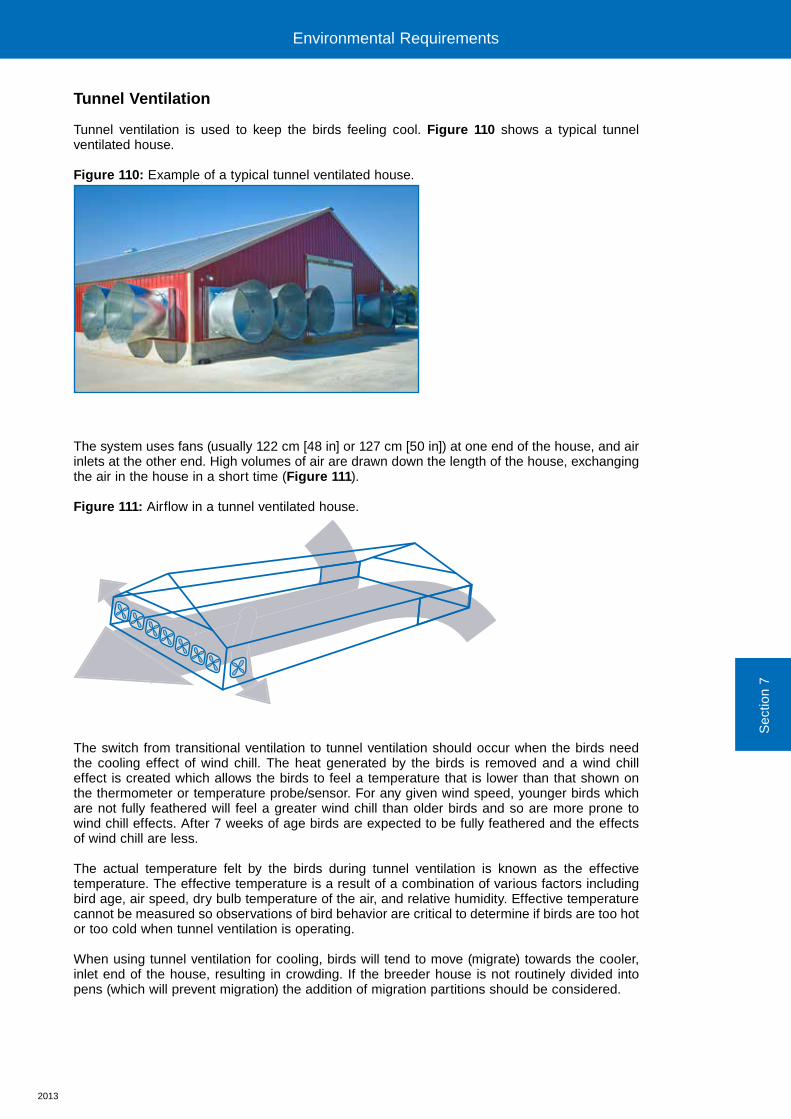
2013
Tunnel Ventilation
Tunnel ventilation is used to keep the birds feeling cool. Figure 110 shows a typical tunnel ventilated house.
Figure 110: Example of a typical tunnel ventilated house.
The system uses fans (usually 122 cm [48 in] or 127 cm [50 in]) at one end of the house, and air inlets at the other end. High volumes of air are drawn down the length of the house, exchanging the air in the house in a short time (Figure 111).
Figure 111: Airflow in a tunnel ventilated house.
The switch from transitional ventilation to tunnel ventilation should occur when the birds need the cooling effect of wind chill. The heat generated by the birds is removed and a wind chill effect is created which allows the birds to feel a temperature that is lower than that shown on the thermometer or temperature probe/sensor. For any given wind speed, younger birds which are not fully feathered will feel a greater wind chill than older birds and so are more prone to wind chill effects. After 7 weeks of age birds are expected to be fully feathered and the effects of wind chill are less.
The actual temperature felt by the birds during tunnel ventilation is known as the effective temperature. The effective temperature is a result of a combination of various factors including bird age, air speed, dry bulb temperature of the air, and relative humidity. Effective temperature cannot be measured so observations of bird behavior are critical to determine if birds are too hot or too cold when tunnel ventilation is operating.
When using tunnel ventilation for cooling, birds will tend to move (migrate) towards the cooler, inlet end of the house, resulting in crowding. If the breeder house is not routinely divided into pens (which will prevent migration) the addition of migration partitions should be considered.
Sec
tion
7
Environmental Requirements Environmental Requirements
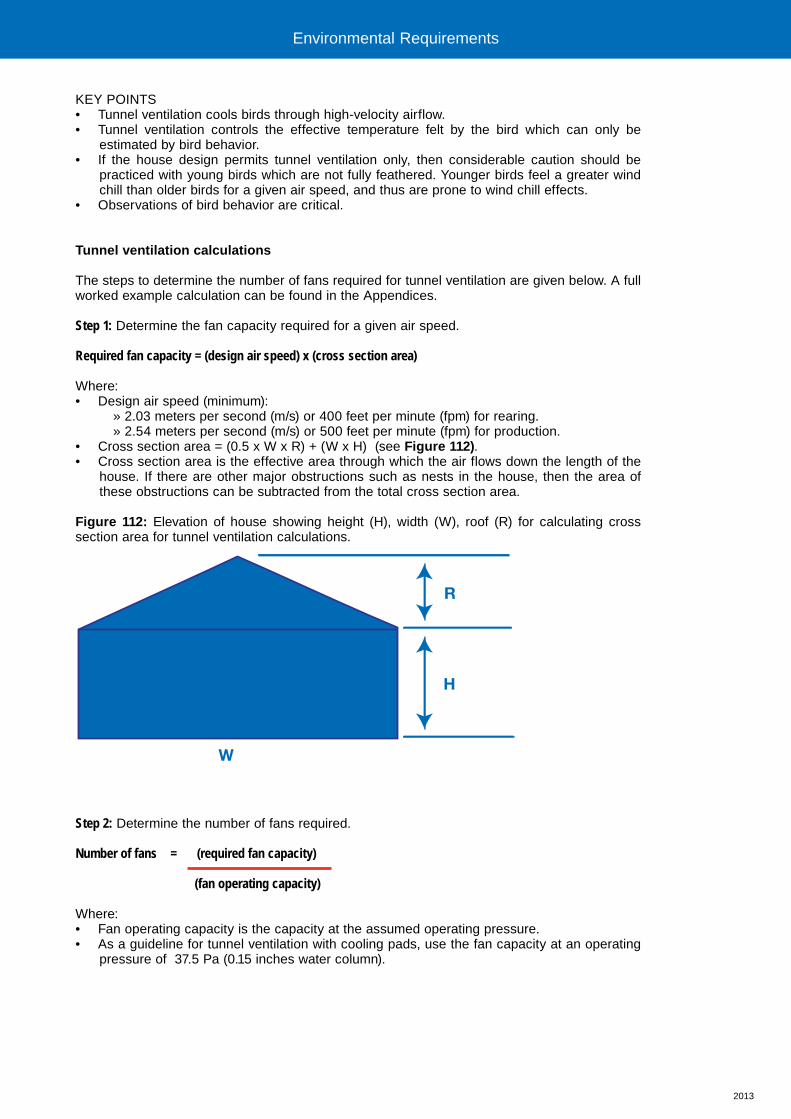
2013
KEY POINTS• Tunnel ventilation cools birds through high-velocity airflow.• Tunnel ventilation controls the effective temperature felt by the bird which can only be
estimated by bird behavior.• If the house design permits tunnel ventilation only, then considerable caution should be
practiced with young birds which are not fully feathered. Younger birds feel a greater wind chill than older birds for a given air speed, and thus are prone to wind chill effects.
• Observations of bird behavior are critical.
Tunnel ventilation calculations
The steps to determine the number of fans required for tunnel ventilation are given below. A full worked example calculation can be found in the Appendices.
Step 1: Determine the fan capacity required for a given air speed.
Required fan capacity = (design air speed) x (cross section area) Where:• Design air speed (minimum):
» 2.03 meters per second (m/s) or 400 feet per minute (fpm) for rearing.» 2.54 meters per second (m/s) or 500 feet per minute (fpm) for production.
• Cross section area = (0.5 x W x R) + (W x H) (see Figure 112).• Cross section area is the effective area through which the air flows down the length of the
house. If there are other major obstructions such as nests in the house, then the area of these obstructions can be subtracted from the total cross section area.
Figure 112: Elevation of house showing height (H), width (W), roof (R) for calculating cross section area for tunnel ventilation calculations.
Step 2: Determine the number of fans required.
Number of fans = (required fan capacity)
(fan operating capacity)
Where:• Fan operating capacity is the capacity at the assumed operating pressure.• As a guideline for tunnel ventilation with cooling pads, use the fan capacity at an operating
pressure of 37.5 Pa (0.15 inches water column).
W
R
H
Environmental Requirements
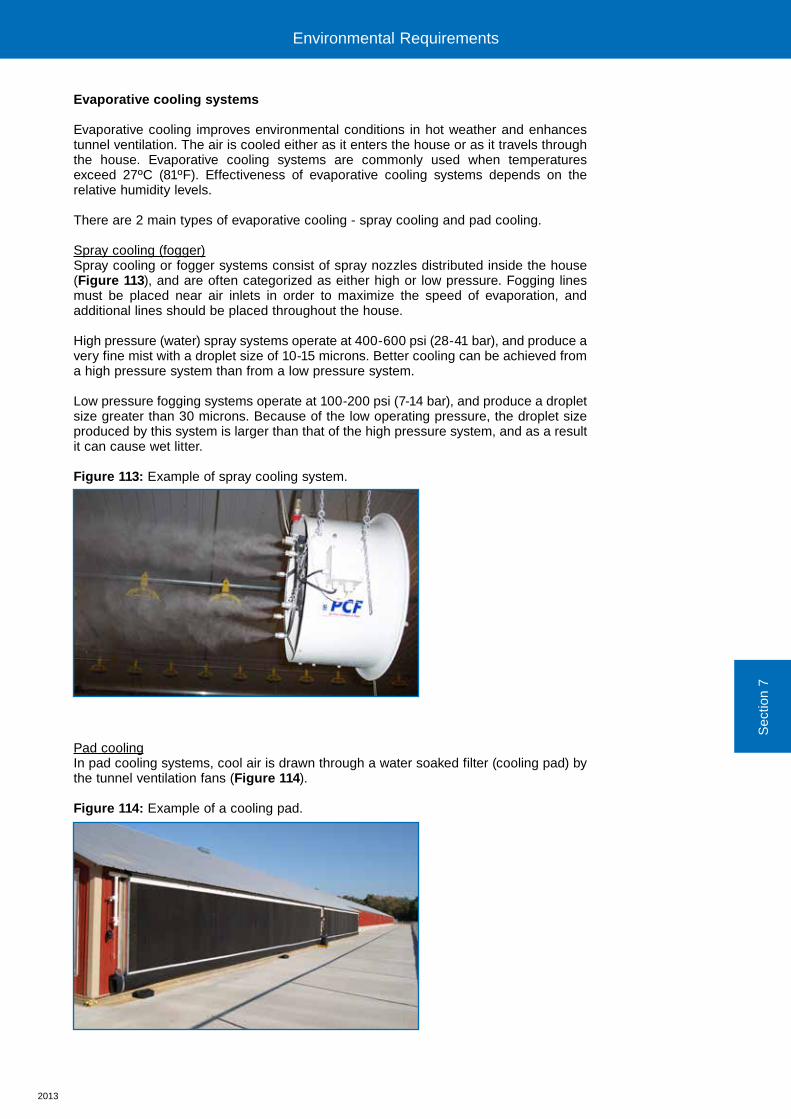
2013
Evaporative cooling systems
Evaporative cooling improves environmental conditions in hot weather and enhances tunnel ventilation. The air is cooled either as it enters the house or as it travels through the house. Evaporative cooling systems are commonly used when temperatures exceed 27ºC (81ºF). Effectiveness of evaporative cooling systems depends on the relative humidity levels.
There are 2 main types of evaporative cooling - spray cooling and pad cooling.
Spray cooling (fogger)Spray cooling or fogger systems consist of spray nozzles distributed inside the house (Figure 113), and are often categorized as either high or low pressure. Fogging lines must be placed near air inlets in order to maximize the speed of evaporation, and additional lines should be placed throughout the house.
High pressure (water) spray systems operate at 400-600 psi (28-41 bar), and produce a very fine mist with a droplet size of 10-15 microns. Better cooling can be achieved from a high pressure system than from a low pressure system.
Low pressure fogging systems operate at 100-200 psi (7-14 bar), and produce a droplet size greater than 30 microns. Because of the low operating pressure, the droplet size produced by this system is larger than that of the high pressure system, and as a result it can cause wet litter.
Figure 113: Example of spray cooling system.
Pad coolingIn pad cooling systems, cool air is drawn through a water soaked filter (cooling pad) by the tunnel ventilation fans (Figure 114).
Figure 114: Example of a cooling pad.
Sec
tion
7
Environmental Requirements Environmental Requirements
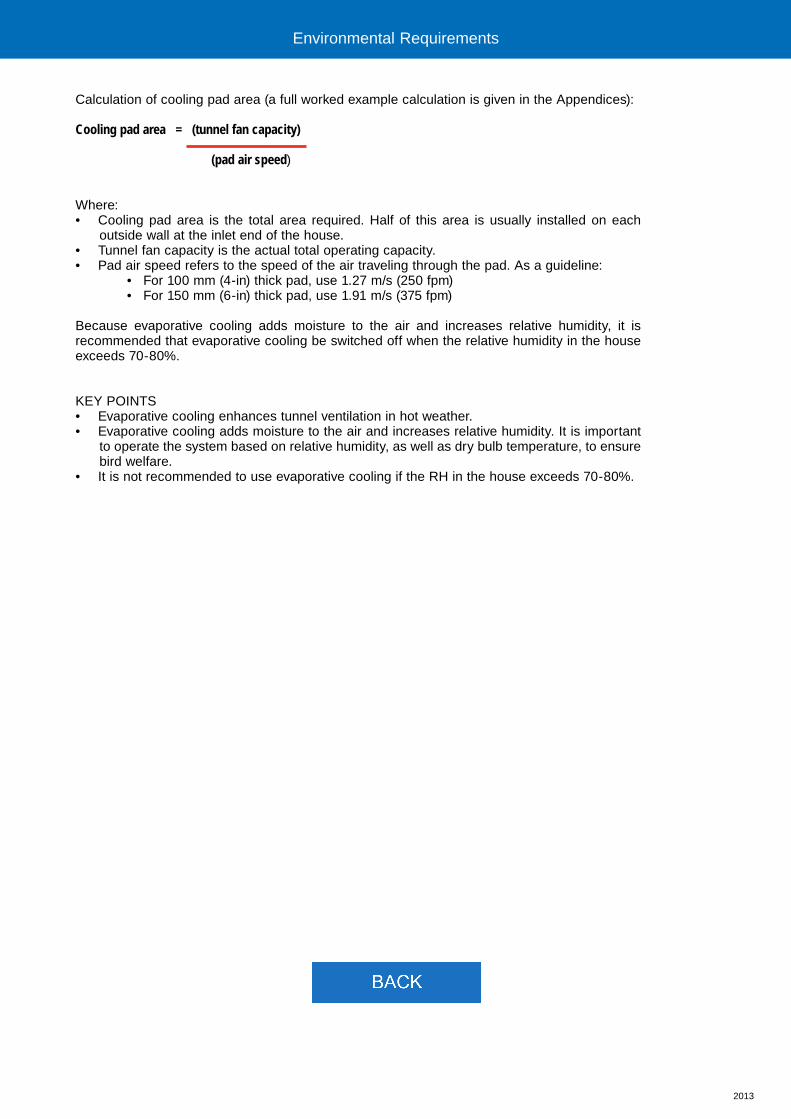
2013
Calculation of cooling pad area (a full worked example calculation is given in the Appendices):
Cooling pad area = (tunnel fan capacity) (pad air speed)
Where:• Cooling pad area is the total area required. Half of this area is usually installed on each
outside wall at the inlet end of the house.• Tunnel fan capacity is the actual total operating capacity.• Pad air speed refers to the speed of the air traveling through the pad. As a guideline:
• For 100 mm (4-in) thick pad, use 1.27 m/s (250 fpm)• For 150 mm (6-in) thick pad, use 1.91 m/s (375 fpm)
Because evaporative cooling adds moisture to the air and increases relative humidity, it is recommended that evaporative cooling be switched off when the relative humidity in the house exceeds 70-80%.
KEY POINTS• Evaporative cooling enhances tunnel ventilation in hot weather.• Evaporative cooling adds moisture to the air and increases relative humidity. It is important
to operate the system based on relative humidity, as well as dry bulb temperature, to ensure bird welfare.
• It is not recommended to use evaporative cooling if the RH in the house exceeds 70-80%.
Environmental Requirements Environmental Requirements

Section 7
Environment Requirements
Lighting

2013
Sec
tion
7
Lighting
Objective
To achieve optimal reproductive performance through appropriate illumination (daylength and light intensity) and photostimulation (increase in daylength) at the correct age and body weight.
Principles
All broiler breeders are hatched photorefractory. This means that they are unable to respond positively to a stimulatory (long or ≥ 11 hours) daylength. The ability to respond to a stimulatory daylength depends upon birds being exposed first to a period of neutral or short days (8 hours); at least 18 weeks for typically grown broiler breeders. Long daylengths (≥ 11 hours) during the rearing period should be avoided as they will delay sexual development, reduce egg numbers, and increase egg weight.
After prolonged exposure to long daylengths, birds become adult photorefractory. This means they are no longer responsive to a long stimulatory daylength, and production begins to decline.
Lighting for broiler breeders aims to dissipate juvenile photorefractoriness, and ensure that all birds are photosensitive and can positively respond to stimulatory daylengths in ways that optimize lay.
Lighting During Brooding
Regardless of housing type, for the first 2 days after placement birds should be given 23 hours of light and 1 hour of dark a day. This will help appetite development and promote feeding activity. Where closed (controlled environment) housing is used during rear, daylength should be gradually reduced to 8 hours by 10 days of age.
Light intensity in the brooding area during the first few days should be bright (80-100 lux [8-10 foot candles]) to ensure that the birds find feed and water, but from 6 days of age this should be reduced to between 30 and 60 lux (3-6 foot candles) in controlled environment housing, and 60-80 lux (6-8 foot candles) in open-sided housing.
Lighting Programs and Housing Type
Different types of housing in the rearing and/or laying periods mean that there are 3 common combinations of lighting environment:1. Closed rearing house (controlled environment), and closed laying house (controlled
environment).2. Closed (controlled environment) or blackout rearing house, and open-sided (natural
environment) laying house.3. Open-sided rearing house (natural environment), and open-sided laying house (natural
environment).
The recommended lighting programs for each of these 3 environments are given on the next page. All lighting programs will achieve 5% production at 25 weeks of age. If the target for production is different to 5% at 25 weeks, then the age at which first light increase is given should be altered accordingly. Typically, it will take between 14 and 21 days from photostimulation to 5% egg production, with lighter birds taking longer to start laying eggs than heavier ones.
Environmental Requirements Environmental Requirements
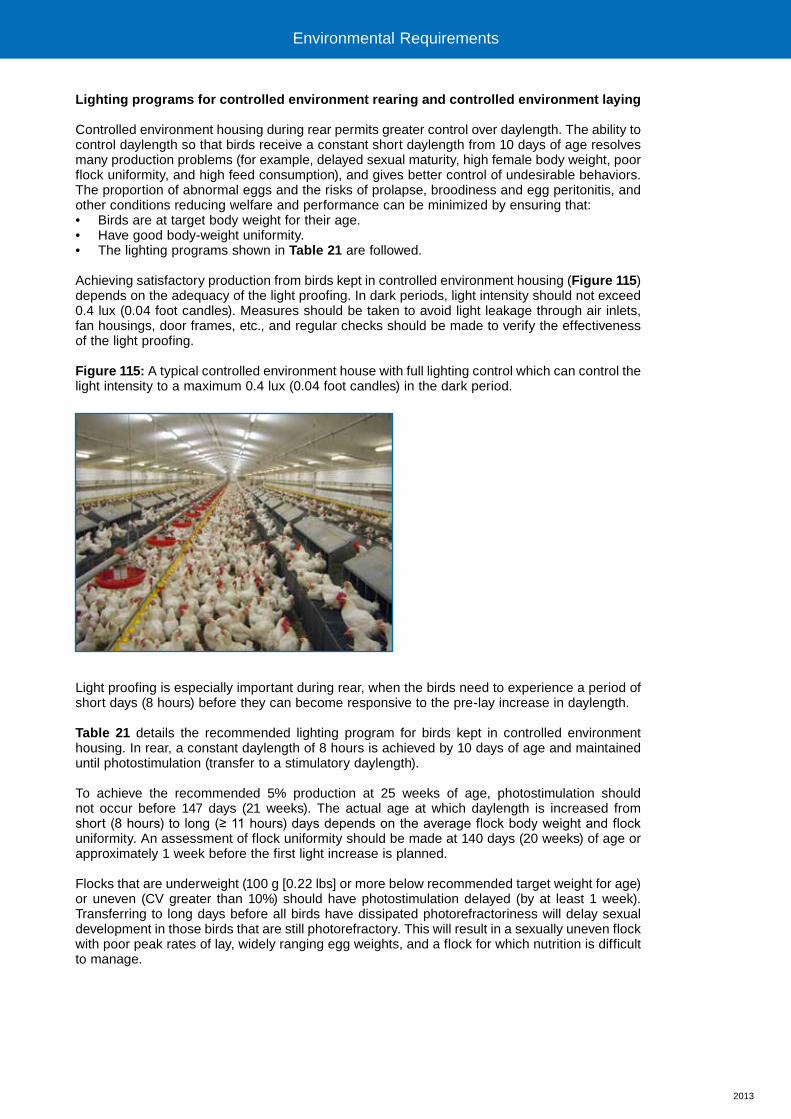
2013
Lighting programs for controlled environment rearing and controlled environment laying
Controlled environment housing during rear permits greater control over daylength. The ability to control daylength so that birds receive a constant short daylength from 10 days of age resolves many production problems (for example, delayed sexual maturity, high female body weight, poor flock uniformity, and high feed consumption), and gives better control of undesirable behaviors. The proportion of abnormal eggs and the risks of prolapse, broodiness and egg peritonitis, and other conditions reducing welfare and performance can be minimized by ensuring that:• Birds are at target body weight for their age. • Have good body-weight uniformity.• The lighting programs shown in Table 21 are followed.
Achieving satisfactory production from birds kept in controlled environment housing (Figure 115) depends on the adequacy of the light proofing. In dark periods, light intensity should not exceed 0.4 lux (0.04 foot candles). Measures should be taken to avoid light leakage through air inlets, fan housings, door frames, etc., and regular checks should be made to verify the effectiveness of the light proofing.
Figure 115: A typical controlled environment house with full lighting control which can control the light intensity to a maximum 0.4 lux (0.04 foot candles) in the dark period.
Light proofing is especially important during rear, when the birds need to experience a period of short days (8 hours) before they can become responsive to the pre-lay increase in daylength.
Table 21 details the recommended lighting program for birds kept in controlled environment housing. In rear, a constant daylength of 8 hours is achieved by 10 days of age and maintained until photostimulation (transfer to a stimulatory daylength).
To achieve the recommended 5% production at 25 weeks of age, photostimulation should not occur before 147 days (21 weeks). The actual age at which daylength is increased from short (8 hours) to long (≥ 11 hours) days depends on the average flock body weight and flock uniformity. An assessment of flock uniformity should be made at 140 days (20 weeks) of age or approximately 1 week before the first light increase is planned.
Flocks that are underweight (100 g [0.22 lbs] or more below recommended target weight for age) or uneven (CV greater than 10%) should have photostimulation delayed (by at least 1 week). Transferring to long days before all birds have dissipated photorefractoriness will delay sexual development in those birds that are still photorefractory. This will result in a sexually uneven flock with poor peak rates of lay, widely ranging egg weights, and a flock for which nutrition is difficult to manage.
Environmental Requirements
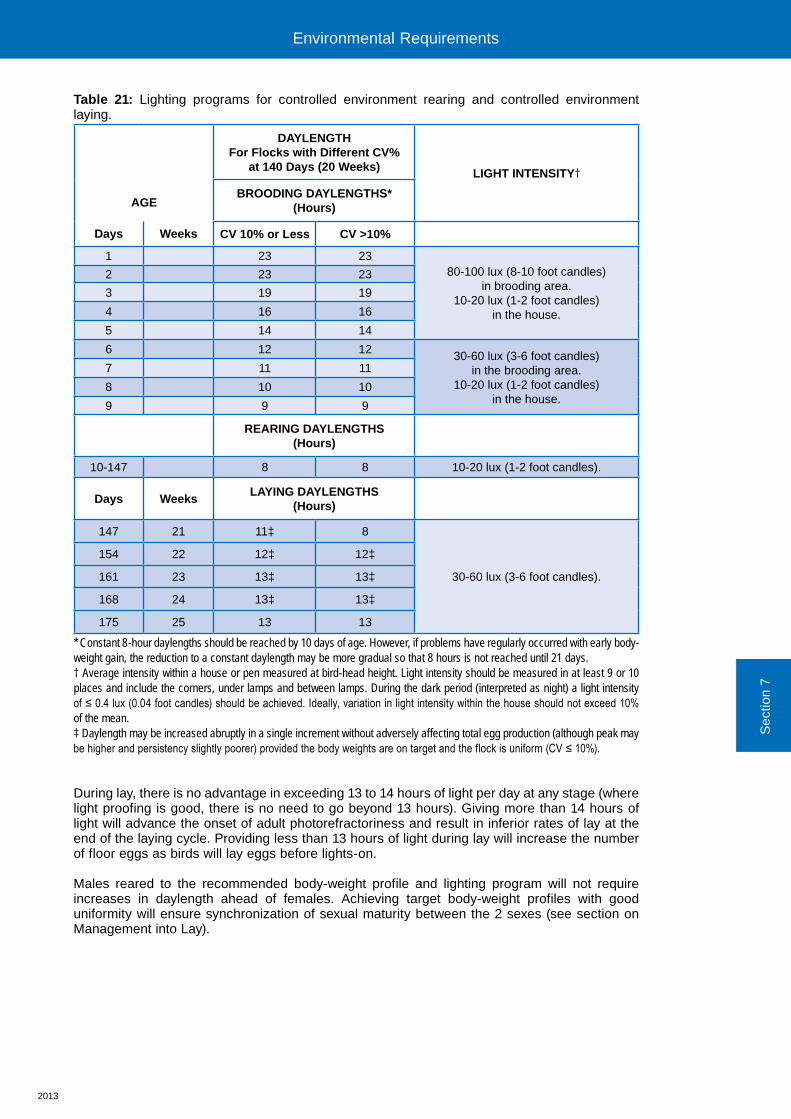
2013
Table 21: Lighting programs for controlled environment rearing and controlled environment laying.
AGE
DAYLENGTHFor Flocks with Different CV%
at 140 Days (20 Weeks) LIGHT INTENSITY†BROODING DAYLENGTHS*
(Hours)
Days Weeks CV 10% or Less CV >10%
1 23 2380-100 lux (8-10 foot candles)
in brooding area.10-20 lux (1-2 foot candles)
in the house.
2 23 23
3 19 19
4 16 16
5 14 14
6 12 12 30-60 lux (3-6 foot candles) in the brooding area.
10-20 lux (1-2 foot candles) in the house.
7 11 11
8 10 10
9 9 9
REARING DAYLENGTHS(Hours)
10-147 8 8 10-20 lux (1-2 foot candles).
Days WeeksLAYING DAYLENGTHS
(Hours)
147 21 11‡ 8
30-60 lux (3-6 foot candles).
154 22 12‡ 12‡
161 23 13‡ 13‡
168 24 13‡ 13‡
175 25 13 13
* Constant 8-hour daylengths should be reached by 10 days of age. However, if problems have regularly occurred with early body-weight gain, the reduction to a constant daylength may be more gradual so that 8 hours is not reached until 21 days.† Average intensity within a house or pen measured at bird-head height. Light intensity should be measured in at least 9 or 10 places and include the corners, under lamps and between lamps. During the dark period (interpreted as night) a light intensity of ≤ 0.4 lux (0.04 foot candles) should be achieved. Ideally, variation in light intensity within the house should not exceed 10% of the mean.‡ Daylength may be increased abruptly in a single increment without adversely affecting total egg production (although peak may be higher and persistency slightly poorer) provided the body weights are on target and the flock is uniform (CV ≤ 10%).
During lay, there is no advantage in exceeding 13 to 14 hours of light per day at any stage (where light proofing is good, there is no need to go beyond 13 hours). Giving more than 14 hours of light will advance the onset of adult photorefractoriness and result in inferior rates of lay at the end of the laying cycle. Providing less than 13 hours of light during lay will increase the number of floor eggs as birds will lay eggs before lights-on.
Males reared to the recommended body-weight profile and lighting program will not require increases in daylength ahead of females. Achieving target body-weight profiles with good uniformity will ensure synchronization of sexual maturity between the 2 sexes (see section on Management into Lay).
Sec
tion
7
Environmental Requirements
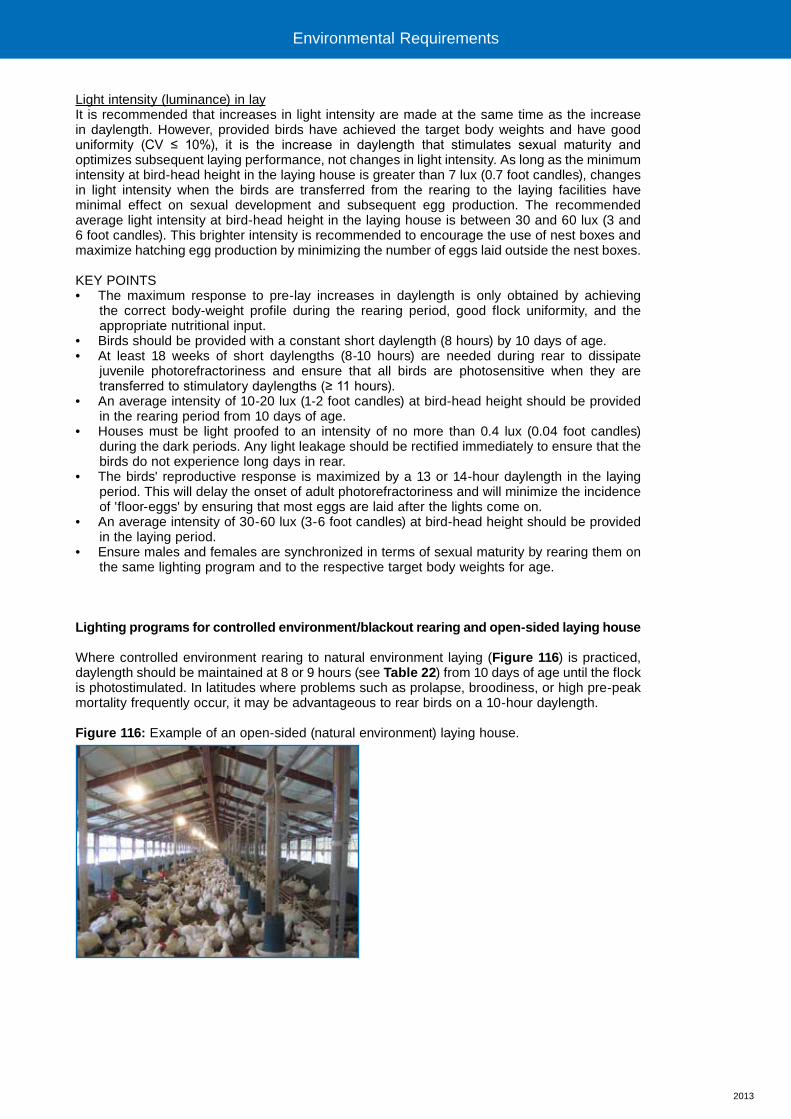
2013
Light intensity (luminance) in layIt is recommended that increases in light intensity are made at the same time as the increase in daylength. However, provided birds have achieved the target body weights and have good uniformity (CV ≤ 10%), it is the increase in daylength that stimulates sexual maturity and optimizes subsequent laying performance, not changes in light intensity. As long as the minimum intensity at bird-head height in the laying house is greater than 7 lux (0.7 foot candles), changes in light intensity when the birds are transferred from the rearing to the laying facilities have minimal effect on sexual development and subsequent egg production. The recommended average light intensity at bird-head height in the laying house is between 30 and 60 lux (3 and 6 foot candles). This brighter intensity is recommended to encourage the use of nest boxes and maximize hatching egg production by minimizing the number of eggs laid outside the nest boxes.
KEY POINTS• The maximum response to pre-lay increases in daylength is only obtained by achieving
the correct body-weight profile during the rearing period, good flock uniformity, and the appropriate nutritional input.
• Birds should be provided with a constant short daylength (8 hours) by 10 days of age.• At least 18 weeks of short daylengths (8-10 hours) are needed during rear to dissipate
juvenile photorefractoriness and ensure that all birds are photosensitive when they are transferred to stimulatory daylengths (≥ 11 hours).
• An average intensity of 10-20 lux (1-2 foot candles) at bird-head height should be provided in the rearing period from 10 days of age.
• Houses must be light proofed to an intensity of no more than 0.4 lux (0.04 foot candles) during the dark periods. Any light leakage should be rectified immediately to ensure that the birds do not experience long days in rear.
• The birds' reproductive response is maximized by a 13 or 14-hour daylength in the laying period. This will delay the onset of adult photorefractoriness and will minimize the incidence of 'floor-eggs' by ensuring that most eggs are laid after the lights come on.
• An average intensity of 30-60 lux (3-6 foot candles) at bird-head height should be provided in the laying period.
• Ensure males and females are synchronized in terms of sexual maturity by rearing them on the same lighting program and to the respective target body weights for age.
Lighting programs for controlled environment/blackout rearing and open-sided laying house
Where controlled environment rearing to natural environment laying (Figure 116) is practiced, daylength should be maintained at 8 or 9 hours (see Table 22) from 10 days of age until the flock is photostimulated. In latitudes where problems such as prolapse, broodiness, or high pre-peak mortality frequently occur, it may be advantageous to rear birds on a 10-hour daylength.
Figure 116: Example of an open-sided (natural environment) laying house.
Environmental Requirements
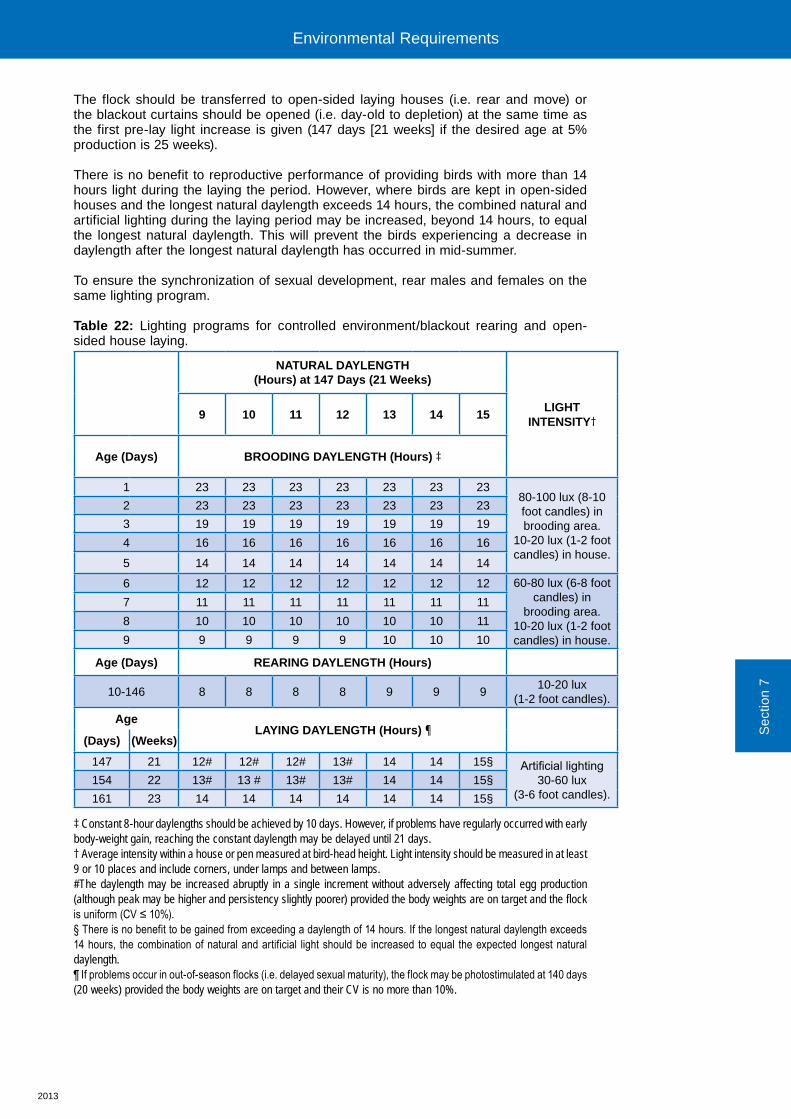
2013
The flock should be transferred to open-sided laying houses (i.e. rear and move) or the blackout curtains should be opened (i.e. day-old to depletion) at the same time as the first pre-lay light increase is given (147 days [21 weeks] if the desired age at 5% production is 25 weeks).
There is no benefit to reproductive performance of providing birds with more than 14 hours light during the laying the period. However, where birds are kept in open-sided houses and the longest natural daylength exceeds 14 hours, the combined natural and artificial lighting during the laying period may be increased, beyond 14 hours, to equal the longest natural daylength. This will prevent the birds experiencing a decrease in daylength after the longest natural daylength has occurred in mid-summer.
To ensure the synchronization of sexual development, rear males and females on the same lighting program.
Table 22: Lighting programs for controlled environment/blackout rearing and open- sided house laying.
NATURAL DAYLENGTH(Hours) at 147 Days (21 Weeks)
LIGHT INTENSITY†9 10 11 12 13 14 15
Age (Days) BROODING DAYLENGTH (Hours) ‡
1 23 23 23 23 23 23 2380-100 lux (8-10 foot candles) in brooding area.
10-20 lux (1-2 foot candles) in house.
2 23 23 23 23 23 23 23
3 19 19 19 19 19 19 19
4 16 16 16 16 16 16 16
5 14 14 14 14 14 14 14
6 12 12 12 12 12 12 12 60-80 lux (6-8 foot candles) in
brooding area.10-20 lux (1-2 foot candles) in house.
7 11 11 11 11 11 11 11
8 10 10 10 10 10 10 11
9 9 9 9 9 10 10 10
Age (Days) REARING DAYLENGTH (Hours)
10-146 8 8 8 8 9 9 910-20 lux
(1-2 foot candles).
AgeLAYING DAYLENGTH (Hours) ¶
(Days) (Weeks)
147 21 12# 12# 12# 13# 14 14 15§ Artificial lighting30-60 lux
(3-6 foot candles).154 22 13# 13 # 13# 13# 14 14 15§
161 23 14 14 14 14 14 14 15§
‡ Constant 8-hour daylengths should be achieved by 10 days. However, if problems have regularly occurred with early body-weight gain, reaching the constant daylength may be delayed until 21 days. † Average intensity within a house or pen measured at bird-head height. Light intensity should be measured in at least 9 or 10 places and include corners, under lamps and between lamps.#The daylength may be increased abruptly in a single increment without adversely affecting total egg production (although peak may be higher and persistency slightly poorer) provided the body weights are on target and the flock is uniform (CV ≤ 10%). § There is no benefit to be gained from exceeding a daylength of 14 hours. If the longest natural daylength exceeds 14 hours, the combination of natural and artificial light should be increased to equal the expected longest natural daylength.¶ If problems occur in out-of-season flocks (i.e. delayed sexual maturity), the flock may be photostimulated at 140 days (20 weeks) provided the body weights are on target and their CV is no more than 10%.
Sec
tion
7
Environmental Requirements

2013
KEY POINTS• The maximum response to the pre-lay increase in daylength is only obtained by achieving
the correct body-weight profile during rear, good flock uniformity, and the appropriate nutritional input.
• Provide birds with a constant short daylength (8 or 9 hours) by 10 days of age.• During rear, ensure that houses are light proofed to an intensity of no more than 0.4 lux (0.04
foot candles) during the dark period.• Where birds are kept in open-sided housing during lay, and the longest natural daylength
exceeds 14 hours, the combined artificial and natural lighting may be extended beyond 14 hours to equal the longest natural daylength.
• Ensure males and females are synchronized in terms of sexual maturity by rearing them on the same lighting program and to the respective target body weights for age.
Lighting programs for open-sided house rearing – open-sided house laying
There are 4 lighting situations in open-sided house rearing (Figure 117):1. Natural daylength increasing throughout the rearing period.2. Natural daylength increasing at the beginning, but decreasing towards the end of the rearing
period.3. Natural daylength decreasing throughout the rearing period.4. Natural daylength decreasing at the beginning, but increasing towards the end of the rearing
period.
Figure 117: Example of an open-sided rearing house where there is no control over the ambient lighting conditions.
These changes in natural daylength patterns are illustrated in Figure 118. For each month of placement, different shading/colors indicate the pattern of increasing or decreasing hours of daylight during rear. For example, a flock placed at the start of October in the Northern Hemisphere, or April in the Southern Hemisphere will have decreasing natural daylight up to 10-12 weeks, and then increasing natural daylight.
Environmental Requirements
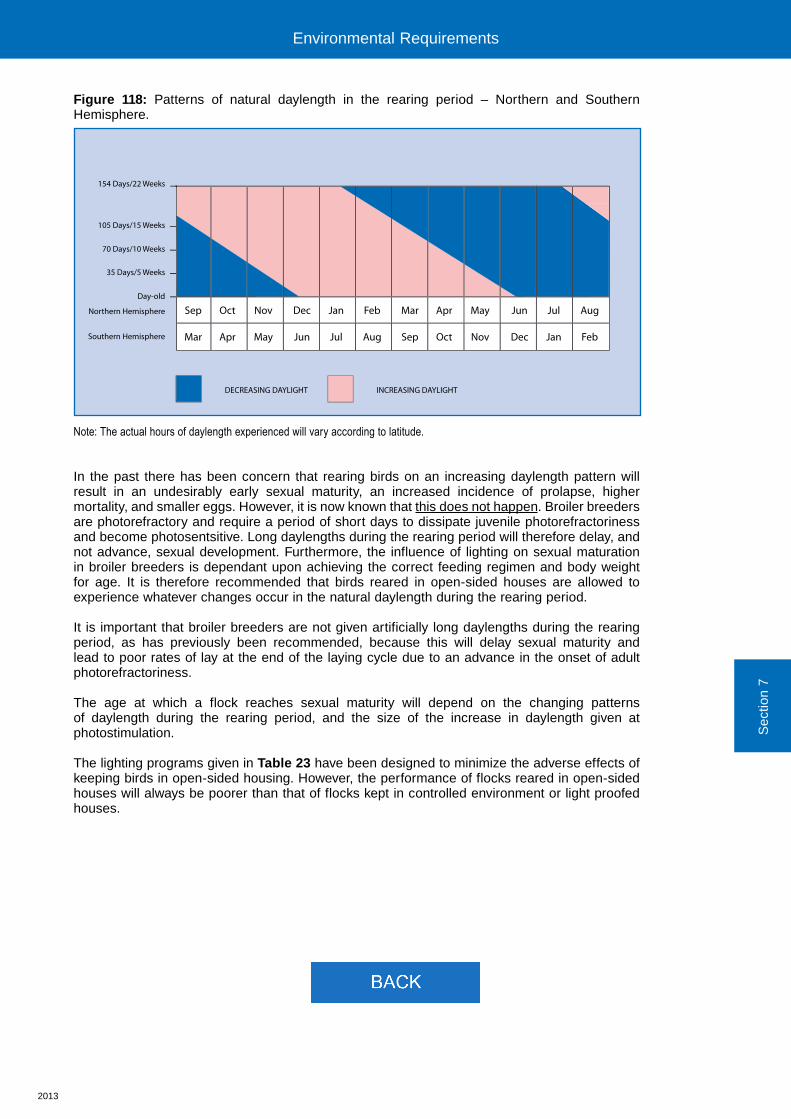
2013
Figure 118: Patterns of natural daylength in the rearing period – Northern and Southern Hemisphere.
Note: The actual hours of daylength experienced will vary according to latitude.
In the past there has been concern that rearing birds on an increasing daylength pattern will result in an undesirably early sexual maturity, an increased incidence of prolapse, higher mortality, and smaller eggs. However, it is now known that this does not happen. Broiler breeders are photorefractory and require a period of short days to dissipate juvenile photorefractoriness and become photosentsitive. Long daylengths during the rearing period will therefore delay, and not advance, sexual development. Furthermore, the influence of lighting on sexual maturation in broiler breeders is dependant upon achieving the correct feeding regimen and body weight for age. It is therefore recommended that birds reared in open-sided houses are allowed to experience whatever changes occur in the natural daylength during the rearing period.
It is important that broiler breeders are not given artificially long daylengths during the rearing period, as has previously been recommended, because this will delay sexual maturity and lead to poor rates of lay at the end of the laying cycle due to an advance in the onset of adult photorefractoriness.
The age at which a flock reaches sexual maturity will depend on the changing patterns of daylength during the rearing period, and the size of the increase in daylength given at photostimulation.
The lighting programs given in Table 23 have been designed to minimize the adverse effects of keeping birds in open-sided housing. However, the performance of flocks reared in open-sided houses will always be poorer than that of flocks kept in controlled environment or light proofed houses.
Sec
tion
7
Environmental Requirements Environmental Requirements
154 Days/22 Weeks
105 Days/15 Weeks
Day-old
Northern Hemisphere
DECREASING DAYLIGHT
Sep Oct Nov Dec Jan Feb Mar Apr May Jun Jul Aug
Mar Apr May Jun Jul Aug Sep Oct Nov Dec Jan Feb
INCREASING DAYLIGHT
Southern Hemisphere
70 Days/10 Weeks
35 Days/5 Weeks

Section 7
Environment Requirements
Lighting
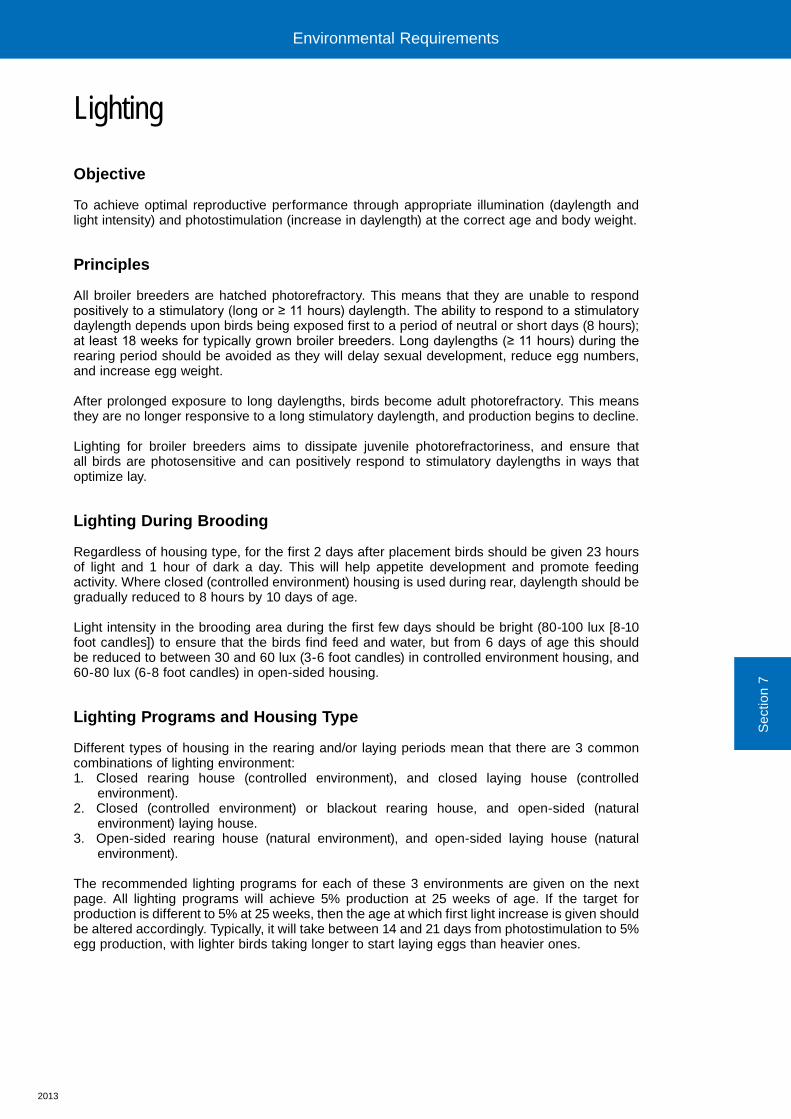
2013
Sec
tion
7
Lighting
Objective
To achieve optimal reproductive performance through appropriate illumination (daylength and light intensity) and photostimulation (increase in daylength) at the correct age and body weight.
Principles
All broiler breeders are hatched photorefractory. This means that they are unable to respond positively to a stimulatory (long or ≥ 11 hours) daylength. The ability to respond to a stimulatory daylength depends upon birds being exposed first to a period of neutral or short days (8 hours); at least 18 weeks for typically grown broiler breeders. Long daylengths (≥ 11 hours) during the rearing period should be avoided as they will delay sexual development, reduce egg numbers, and increase egg weight.
After prolonged exposure to long daylengths, birds become adult photorefractory. This means they are no longer responsive to a long stimulatory daylength, and production begins to decline.
Lighting for broiler breeders aims to dissipate juvenile photorefractoriness, and ensure that all birds are photosensitive and can positively respond to stimulatory daylengths in ways that optimize lay.
Lighting During Brooding
Regardless of housing type, for the first 2 days after placement birds should be given 23 hours of light and 1 hour of dark a day. This will help appetite development and promote feeding activity. Where closed (controlled environment) housing is used during rear, daylength should be gradually reduced to 8 hours by 10 days of age.
Light intensity in the brooding area during the first few days should be bright (80-100 lux [8-10 foot candles]) to ensure that the birds find feed and water, but from 6 days of age this should be reduced to between 30 and 60 lux (3-6 foot candles) in controlled environment housing, and 60-80 lux (6-8 foot candles) in open-sided housing.
Lighting Programs and Housing Type
Different types of housing in the rearing and/or laying periods mean that there are 3 common combinations of lighting environment:1. Closed rearing house (controlled environment), and closed laying house (controlled
environment).2. Closed (controlled environment) or blackout rearing house, and open-sided (natural
environment) laying house.3. Open-sided rearing house (natural environment), and open-sided laying house (natural
environment).
The recommended lighting programs for each of these 3 environments are given on the next page. All lighting programs will achieve 5% production at 25 weeks of age. If the target for production is different to 5% at 25 weeks, then the age at which first light increase is given should be altered accordingly. Typically, it will take between 14 and 21 days from photostimulation to 5% egg production, with lighter birds taking longer to start laying eggs than heavier ones.
Environmental Requirements Environmental Requirements

2013
Lighting programs for controlled environment rearing and controlled environment laying
Controlled environment housing during rear permits greater control over daylength. The ability to control daylength so that birds receive a constant short daylength from 10 days of age resolves many production problems (for example, delayed sexual maturity, high female body weight, poor flock uniformity, and high feed consumption), and gives better control of undesirable behaviors. The proportion of abnormal eggs and the risks of prolapse, broodiness and egg peritonitis, and other conditions reducing welfare and performance can be minimized by ensuring that:• Birds are at target body weight for their age. • Have good body-weight uniformity.• The lighting programs shown in Table 21 are followed.
Achieving satisfactory production from birds kept in controlled environment housing (Figure 115) depends on the adequacy of the light proofing. In dark periods, light intensity should not exceed 0.4 lux (0.04 foot candles). Measures should be taken to avoid light leakage through air inlets, fan housings, door frames, etc., and regular checks should be made to verify the effectiveness of the light proofing.
Figure 115: A typical controlled environment house with full lighting control which can control the light intensity to a maximum 0.4 lux (0.04 foot candles) in the dark period.
Light proofing is especially important during rear, when the birds need to experience a period of short days (8 hours) before they can become responsive to the pre-lay increase in daylength.
Table 21 details the recommended lighting program for birds kept in controlled environment housing. In rear, a constant daylength of 8 hours is achieved by 10 days of age and maintained until photostimulation (transfer to a stimulatory daylength).
To achieve the recommended 5% production at 25 weeks of age, photostimulation should not occur before 147 days (21 weeks). The actual age at which daylength is increased from short (8 hours) to long (≥ 11 hours) days depends on the average flock body weight and flock uniformity. An assessment of flock uniformity should be made at 140 days (20 weeks) of age or approximately 1 week before the first light increase is planned.
Flocks that are underweight (100 g [0.22 lbs] or more below recommended target weight for age) or uneven (CV greater than 10%) should have photostimulation delayed (by at least 1 week). Transferring to long days before all birds have dissipated photorefractoriness will delay sexual development in those birds that are still photorefractory. This will result in a sexually uneven flock with poor peak rates of lay, widely ranging egg weights, and a flock for which nutrition is difficult to manage.
Environmental Requirements

2013
Table 21: Lighting programs for controlled environment rearing and controlled environment laying.
AGE
DAYLENGTHFor Flocks with Different CV%
at 140 Days (20 Weeks) LIGHT INTENSITY†BROODING DAYLENGTHS*
(Hours)
Days Weeks CV 10% or Less CV >10%
1 23 2380-100 lux (8-10 foot candles)
in brooding area.10-20 lux (1-2 foot candles)
in the house.
2 23 23
3 19 19
4 16 16
5 14 14
6 12 12 30-60 lux (3-6 foot candles) in the brooding area.
10-20 lux (1-2 foot candles) in the house.
7 11 11
8 10 10
9 9 9
REARING DAYLENGTHS(Hours)
10-147 8 8 10-20 lux (1-2 foot candles).
Days WeeksLAYING DAYLENGTHS
(Hours)
147 21 11‡ 8
30-60 lux (3-6 foot candles).
154 22 12‡ 12‡
161 23 13‡ 13‡
168 24 13‡ 13‡
175 25 13 13
* Constant 8-hour daylengths should be reached by 10 days of age. However, if problems have regularly occurred with early body-weight gain, the reduction to a constant daylength may be more gradual so that 8 hours is not reached until 21 days.† Average intensity within a house or pen measured at bird-head height. Light intensity should be measured in at least 9 or 10 places and include the corners, under lamps and between lamps. During the dark period (interpreted as night) a light intensity of ≤ 0.4 lux (0.04 foot candles) should be achieved. Ideally, variation in light intensity within the house should not exceed 10% of the mean.‡ Daylength may be increased abruptly in a single increment without adversely affecting total egg production (although peak may be higher and persistency slightly poorer) provided the body weights are on target and the flock is uniform (CV ≤ 10%).
During lay, there is no advantage in exceeding 13 to 14 hours of light per day at any stage (where light proofing is good, there is no need to go beyond 13 hours). Giving more than 14 hours of light will advance the onset of adult photorefractoriness and result in inferior rates of lay at the end of the laying cycle. Providing less than 13 hours of light during lay will increase the number of floor eggs as birds will lay eggs before lights-on.
Males reared to the recommended body-weight profile and lighting program will not require increases in daylength ahead of females. Achieving target body-weight profiles with good uniformity will ensure synchronization of sexual maturity between the 2 sexes (see section on Management into Lay).
Sec
tion
7
Environmental Requirements

2013
Light intensity (luminance) in layIt is recommended that increases in light intensity are made at the same time as the increase in daylength. However, provided birds have achieved the target body weights and have good uniformity (CV ≤ 10%), it is the increase in daylength that stimulates sexual maturity and optimizes subsequent laying performance, not changes in light intensity. As long as the minimum intensity at bird-head height in the laying house is greater than 7 lux (0.7 foot candles), changes in light intensity when the birds are transferred from the rearing to the laying facilities have minimal effect on sexual development and subsequent egg production. The recommended average light intensity at bird-head height in the laying house is between 30 and 60 lux (3 and 6 foot candles). This brighter intensity is recommended to encourage the use of nest boxes and maximize hatching egg production by minimizing the number of eggs laid outside the nest boxes.
KEY POINTS• The maximum response to pre-lay increases in daylength is only obtained by achieving
the correct body-weight profile during the rearing period, good flock uniformity, and the appropriate nutritional input.
• Birds should be provided with a constant short daylength (8 hours) by 10 days of age.• At least 18 weeks of short daylengths (8-10 hours) are needed during rear to dissipate
juvenile photorefractoriness and ensure that all birds are photosensitive when they are transferred to stimulatory daylengths (≥ 11 hours).
• An average intensity of 10-20 lux (1-2 foot candles) at bird-head height should be provided in the rearing period from 10 days of age.
• Houses must be light proofed to an intensity of no more than 0.4 lux (0.04 foot candles) during the dark periods. Any light leakage should be rectified immediately to ensure that the birds do not experience long days in rear.
• The birds' reproductive response is maximized by a 13 or 14-hour daylength in the laying period. This will delay the onset of adult photorefractoriness and will minimize the incidence of 'floor-eggs' by ensuring that most eggs are laid after the lights come on.
• An average intensity of 30-60 lux (3-6 foot candles) at bird-head height should be provided in the laying period.
• Ensure males and females are synchronized in terms of sexual maturity by rearing them on the same lighting program and to the respective target body weights for age.
Lighting programs for controlled environment/blackout rearing and open-sided laying house
Where controlled environment rearing to natural environment laying (Figure 116) is practiced, daylength should be maintained at 8 or 9 hours (see Table 22) from 10 days of age until the flock is photostimulated. In latitudes where problems such as prolapse, broodiness, or high pre-peak mortality frequently occur, it may be advantageous to rear birds on a 10-hour daylength.
Figure 116: Example of an open-sided (natural environment) laying house.
Environmental Requirements

2013
The flock should be transferred to open-sided laying houses (i.e. rear and move) or the blackout curtains should be opened (i.e. day-old to depletion) at the same time as the first pre-lay light increase is given (147 days [21 weeks] if the desired age at 5% production is 25 weeks).
There is no benefit to reproductive performance of providing birds with more than 14 hours light during the laying the period. However, where birds are kept in open-sided houses and the longest natural daylength exceeds 14 hours, the combined natural and artificial lighting during the laying period may be increased, beyond 14 hours, to equal the longest natural daylength. This will prevent the birds experiencing a decrease in daylength after the longest natural daylength has occurred in mid-summer.
To ensure the synchronization of sexual development, rear males and females on the same lighting program.
Table 22: Lighting programs for controlled environment/blackout rearing and open- sided house laying.
NATURAL DAYLENGTH(Hours) at 147 Days (21 Weeks)
LIGHT INTENSITY†9 10 11 12 13 14 15
Age (Days) BROODING DAYLENGTH (Hours) ‡
1 23 23 23 23 23 23 2380-100 lux (8-10 foot candles) in brooding area.
10-20 lux (1-2 foot candles) in house.
2 23 23 23 23 23 23 23
3 19 19 19 19 19 19 19
4 16 16 16 16 16 16 16
5 14 14 14 14 14 14 14
6 12 12 12 12 12 12 12 60-80 lux (6-8 foot candles) in
brooding area.10-20 lux (1-2 foot candles) in house.
7 11 11 11 11 11 11 11
8 10 10 10 10 10 10 11
9 9 9 9 9 10 10 10
Age (Days) REARING DAYLENGTH (Hours)
10-146 8 8 8 8 9 9 910-20 lux
(1-2 foot candles).
AgeLAYING DAYLENGTH (Hours) ¶
(Days) (Weeks)
147 21 12# 12# 12# 13# 14 14 15§ Artificial lighting30-60 lux
(3-6 foot candles).154 22 13# 13 # 13# 13# 14 14 15§
161 23 14 14 14 14 14 14 15§
‡ Constant 8-hour daylengths should be achieved by 10 days. However, if problems have regularly occurred with early body-weight gain, reaching the constant daylength may be delayed until 21 days. † Average intensity within a house or pen measured at bird-head height. Light intensity should be measured in at least 9 or 10 places and include corners, under lamps and between lamps.#The daylength may be increased abruptly in a single increment without adversely affecting total egg production (although peak may be higher and persistency slightly poorer) provided the body weights are on target and the flock is uniform (CV ≤ 10%). § There is no benefit to be gained from exceeding a daylength of 14 hours. If the longest natural daylength exceeds 14 hours, the combination of natural and artificial light should be increased to equal the expected longest natural daylength.¶ If problems occur in out-of-season flocks (i.e. delayed sexual maturity), the flock may be photostimulated at 140 days (20 weeks) provided the body weights are on target and their CV is no more than 10%.
Sec
tion
7
Environmental Requirements
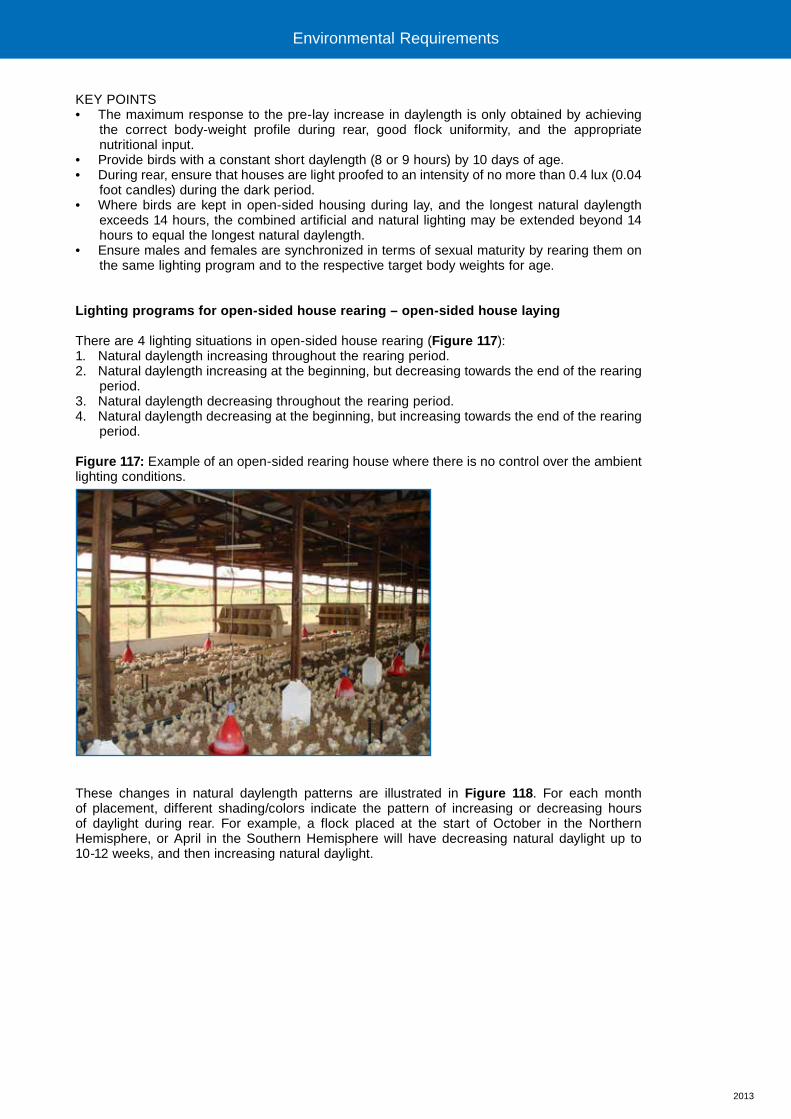
2013
KEY POINTS• The maximum response to the pre-lay increase in daylength is only obtained by achieving
the correct body-weight profile during rear, good flock uniformity, and the appropriate nutritional input.
• Provide birds with a constant short daylength (8 or 9 hours) by 10 days of age.• During rear, ensure that houses are light proofed to an intensity of no more than 0.4 lux (0.04
foot candles) during the dark period.• Where birds are kept in open-sided housing during lay, and the longest natural daylength
exceeds 14 hours, the combined artificial and natural lighting may be extended beyond 14 hours to equal the longest natural daylength.
• Ensure males and females are synchronized in terms of sexual maturity by rearing them on the same lighting program and to the respective target body weights for age.
Lighting programs for open-sided house rearing – open-sided house laying
There are 4 lighting situations in open-sided house rearing (Figure 117):1. Natural daylength increasing throughout the rearing period.2. Natural daylength increasing at the beginning, but decreasing towards the end of the rearing
period.3. Natural daylength decreasing throughout the rearing period.4. Natural daylength decreasing at the beginning, but increasing towards the end of the rearing
period.
Figure 117: Example of an open-sided rearing house where there is no control over the ambient lighting conditions.
These changes in natural daylength patterns are illustrated in Figure 118. For each month of placement, different shading/colors indicate the pattern of increasing or decreasing hours of daylight during rear. For example, a flock placed at the start of October in the Northern Hemisphere, or April in the Southern Hemisphere will have decreasing natural daylight up to 10-12 weeks, and then increasing natural daylight.
Environmental Requirements
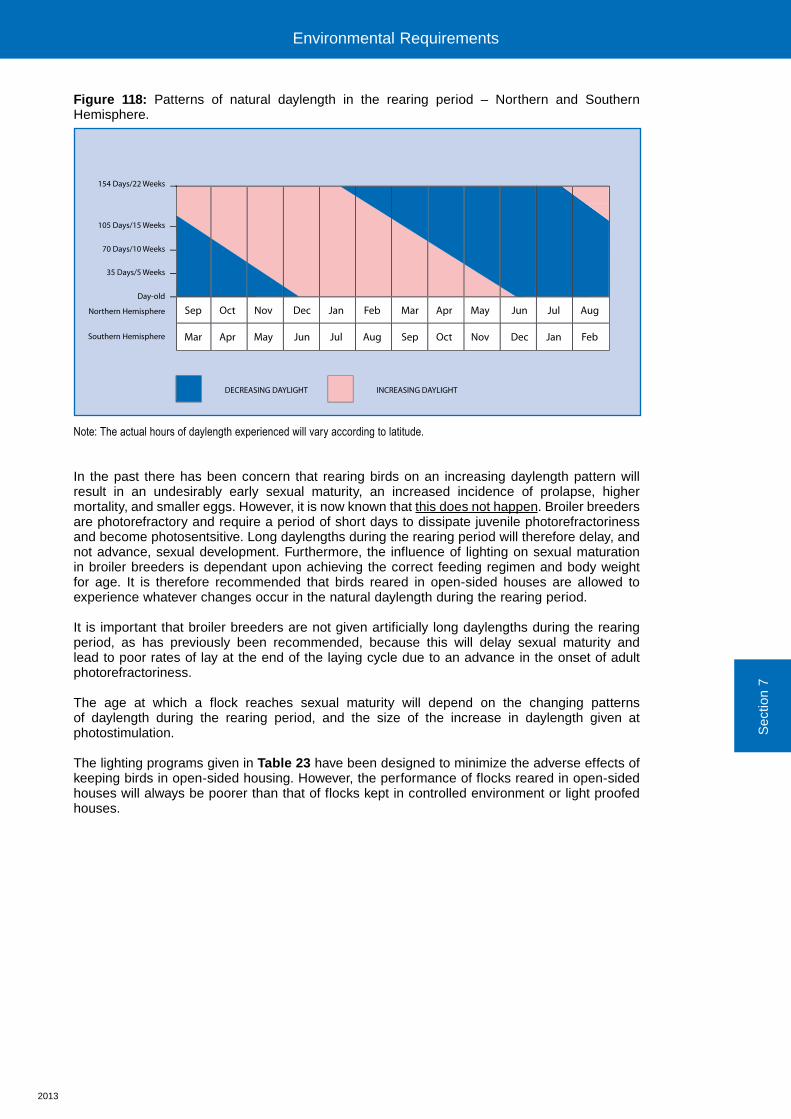
2013
Figure 118: Patterns of natural daylength in the rearing period – Northern and Southern Hemisphere.
Note: The actual hours of daylength experienced will vary according to latitude.
In the past there has been concern that rearing birds on an increasing daylength pattern will result in an undesirably early sexual maturity, an increased incidence of prolapse, higher mortality, and smaller eggs. However, it is now known that this does not happen. Broiler breeders are photorefractory and require a period of short days to dissipate juvenile photorefractoriness and become photosentsitive. Long daylengths during the rearing period will therefore delay, and not advance, sexual development. Furthermore, the influence of lighting on sexual maturation in broiler breeders is dependant upon achieving the correct feeding regimen and body weight for age. It is therefore recommended that birds reared in open-sided houses are allowed to experience whatever changes occur in the natural daylength during the rearing period.
It is important that broiler breeders are not given artificially long daylengths during the rearing period, as has previously been recommended, because this will delay sexual maturity and lead to poor rates of lay at the end of the laying cycle due to an advance in the onset of adult photorefractoriness.
The age at which a flock reaches sexual maturity will depend on the changing patterns of daylength during the rearing period, and the size of the increase in daylength given at photostimulation.
The lighting programs given in Table 23 have been designed to minimize the adverse effects of keeping birds in open-sided housing. However, the performance of flocks reared in open-sided houses will always be poorer than that of flocks kept in controlled environment or light proofed houses.
Sec
tion
7
Environmental Requirements Environmental Requirements
154 Days/22 Weeks
105 Days/15 Weeks
Day-old
Northern Hemisphere
DECREASING DAYLIGHT
Sep Oct Nov Dec Jan Feb Mar Apr May Jun Jul Aug
Mar Apr May Jun Jul Aug Sep Oct Nov Dec Jan Feb
INCREASING DAYLIGHT
Southern Hemisphere
70 Days/10 Weeks
35 Days/5 Weeks
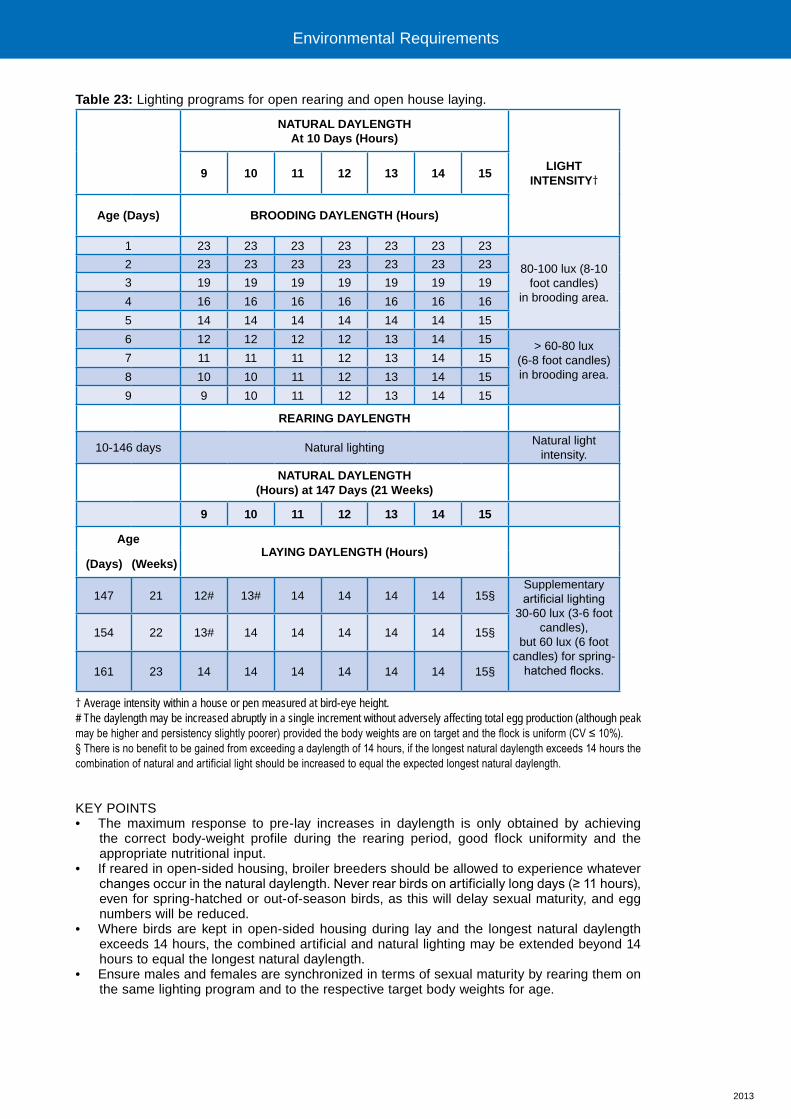
2013
Table 23: Lighting programs for open rearing and open house laying.
NATURAL DAYLENGTHAt 10 Days (Hours)
LIGHT INTENSITY†9 10 11 12 13 14 15
Age (Days) BROODING DAYLENGTH (Hours)
1 23 23 23 23 23 23 23
80-100 lux (8-10 foot candles)
in brooding area.
2 23 23 23 23 23 23 23
3 19 19 19 19 19 19 19
4 16 16 16 16 16 16 16
5 14 14 14 14 14 14 15
6 12 12 12 12 13 14 15 > 60-80 lux (6-8 foot candles)in brooding area.
7 11 11 11 12 13 14 15
8 10 10 11 12 13 14 15
9 9 10 11 12 13 14 15
REARING DAYLENGTH
10-146 days Natural lightingNatural light
intensity.
NATURAL DAYLENGTH (Hours) at 147 Days (21 Weeks)
9 10 11 12 13 14 15
AgeLAYING DAYLENGTH (Hours)
(Days) (Weeks)
147 21 12# 13# 14 14 14 14 15§Supplementary artificial lighting
30-60 lux (3-6 foot candles),
but 60 lux (6 foot candles) for spring-
hatched flocks.
154 22 13# 14 14 14 14 14 15§
161 23 14 14 14 14 14 14 15§
† Average intensity within a house or pen measured at bird-eye height.# The daylength may be increased abruptly in a single increment without adversely affecting total egg production (although peak may be higher and persistency slightly poorer) provided the body weights are on target and the flock is uniform (CV ≤ 10%). § There is no benefit to be gained from exceeding a daylength of 14 hours, if the longest natural daylength exceeds 14 hours the combination of natural and artificial light should be increased to equal the expected longest natural daylength.
KEY POINTS• The maximum response to pre-lay increases in daylength is only obtained by achieving
the correct body-weight profile during the rearing period, good flock uniformity and the appropriate nutritional input.
• If reared in open-sided housing, broiler breeders should be allowed to experience whatever changes occur in the natural daylength. Never rear birds on artificially long days (≥ 11 hours), even for spring-hatched or out-of-season birds, as this will delay sexual maturity, and egg numbers will be reduced.
• Where birds are kept in open-sided housing during lay and the longest natural daylength exceeds 14 hours, the combined artificial and natural lighting may be extended beyond 14 hours to equal the longest natural daylength.
• Ensure males and females are synchronized in terms of sexual maturity by rearing them on the same lighting program and to the respective target body weights for age.
Environmental Requirements
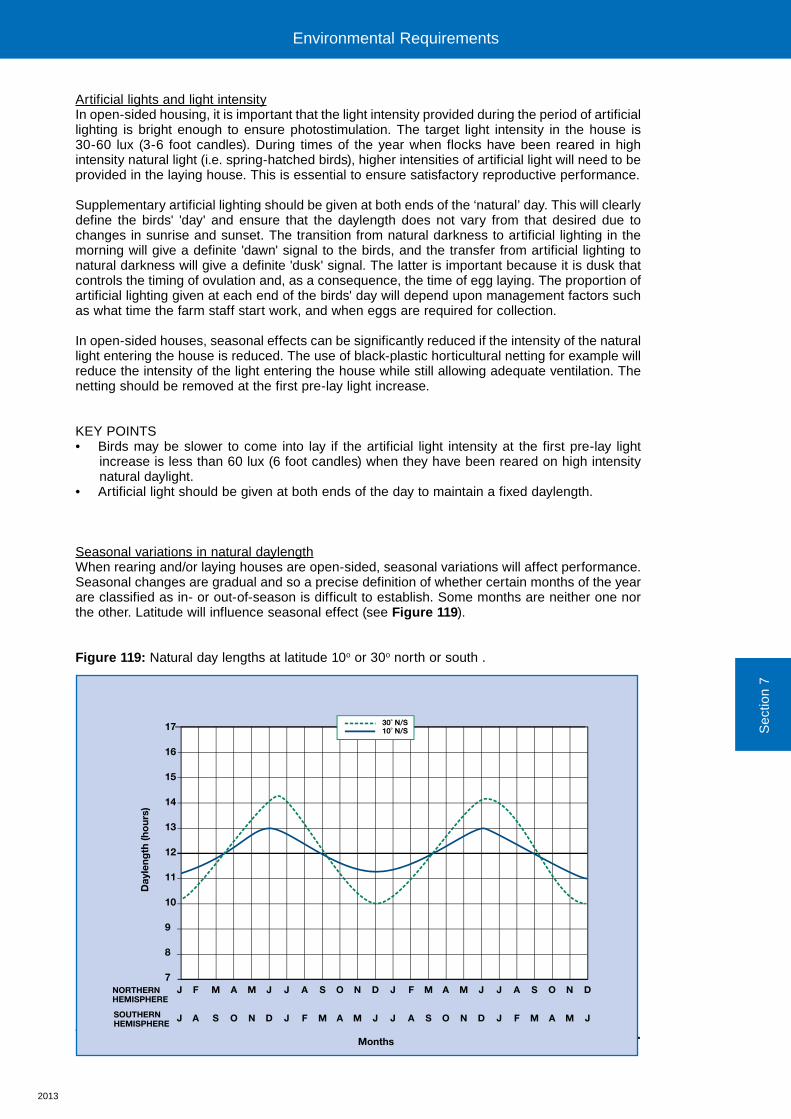
2013
Artificial lights and light intensityIn open-sided housing, it is important that the light intensity provided during the period of artificial lighting is bright enough to ensure photostimulation. The target light intensity in the house is 30-60 lux (3-6 foot candles). During times of the year when flocks have been reared in high intensity natural light (i.e. spring-hatched birds), higher intensities of artificial light will need to be provided in the laying house. This is essential to ensure satisfactory reproductive performance.
Supplementary artificial lighting should be given at both ends of the ‘natural’ day. This will clearly define the birds' 'day' and ensure that the daylength does not vary from that desired due to changes in sunrise and sunset. The transition from natural darkness to artificial lighting in the morning will give a definite 'dawn' signal to the birds, and the transfer from artificial lighting to natural darkness will give a definite 'dusk' signal. The latter is important because it is dusk that controls the timing of ovulation and, as a consequence, the time of egg laying. The proportion of artificial lighting given at each end of the birds' day will depend upon management factors such as what time the farm staff start work, and when eggs are required for collection.
In open-sided houses, seasonal effects can be significantly reduced if the intensity of the natural light entering the house is reduced. The use of black-plastic horticultural netting for example will reduce the intensity of the light entering the house while still allowing adequate ventilation. The netting should be removed at the first pre-lay light increase.
KEY POINTS• Birds may be slower to come into lay if the artificial light intensity at the first pre-lay light
increase is less than 60 lux (6 foot candles) when they have been reared on high intensity natural daylight.
• Artificial light should be given at both ends of the day to maintain a fixed daylength.
Seasonal variations in natural daylengthWhen rearing and/or laying houses are open-sided, seasonal variations will affect performance. Seasonal changes are gradual and so a precise definition of whether certain months of the year are classified as in- or out-of-season is difficult to establish. Some months are neither one nor the other. Latitude will influence seasonal effect (see Figure 119).
Figure 119: Natural day lengths at latitude 10o or 30o north or south .
The months in which the birds are placed are classified as in-season, or out-of-season in Table 24.
Sec
tion
7
17
16
15
14
13
12
11
10
9
8
7
30˚ N/S10˚ N/S
SOUTHERNHEMISPHERE
NORTHERN J F M A M J J A S O N D J F M A M J J A S O N D
J A S O N D J F M A M J J A S O N D J F M A M J
HEMISPHERE
Months
Day
leng
th (h
our
s)
Environmental Requirements
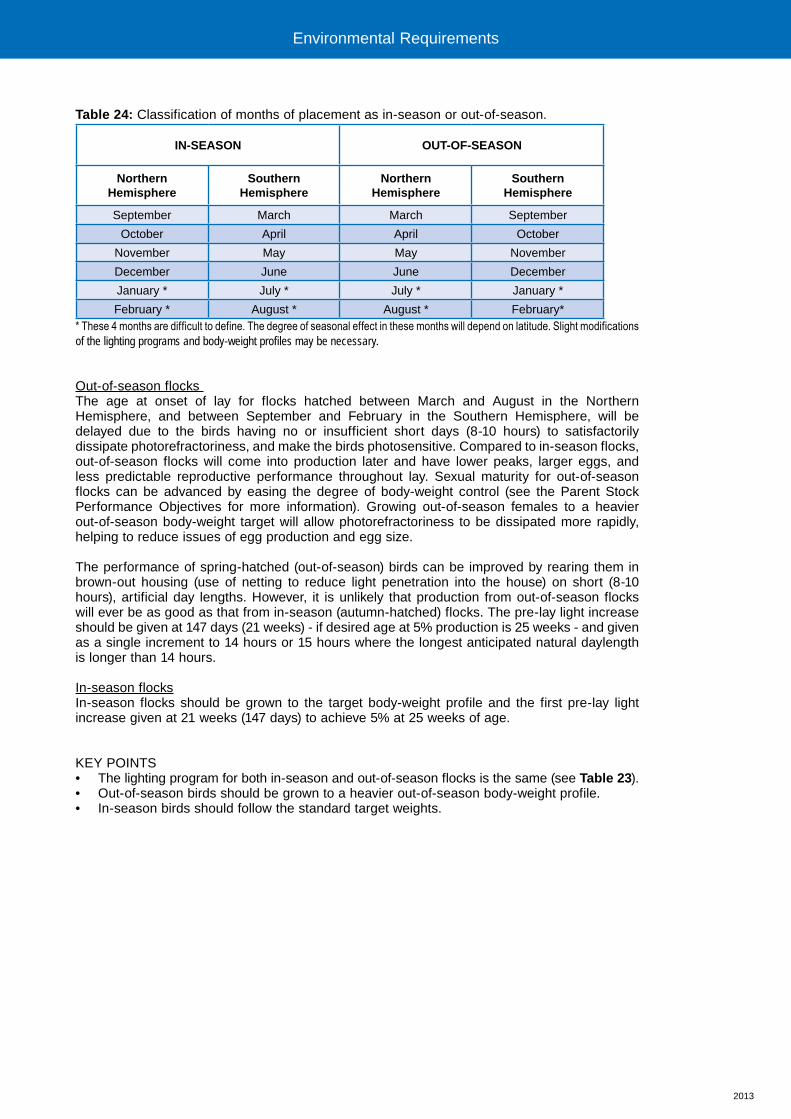
2013
Table 24: Classification of months of placement as in-season or out-of-season.
IN-SEASON OUT-OF-SEASON
Northern Hemisphere
Southern Hemisphere
Northern Hemisphere
Southern Hemisphere
September March March September
October April April October
November May May November
December June June December
January * July * July * January *
February * August * August * February** These 4 months are difficult to define. The degree of seasonal effect in these months will depend on latitude. Slight modifications of the lighting programs and body-weight profiles may be necessary.
Out-of-season flocks The age at onset of lay for flocks hatched between March and August in the Northern Hemisphere, and between September and February in the Southern Hemisphere, will be delayed due to the birds having no or insufficient short days (8-10 hours) to satisfactorily dissipate photorefractoriness, and make the birds photosensitive. Compared to in-season flocks, out-of-season flocks will come into production later and have lower peaks, larger eggs, and less predictable reproductive performance throughout lay. Sexual maturity for out-of-season flocks can be advanced by easing the degree of body-weight control (see the Parent Stock Performance Objectives for more information). Growing out-of-season females to a heavier out-of-season body-weight target will allow photorefractoriness to be dissipated more rapidly, helping to reduce issues of egg production and egg size.
The performance of spring-hatched (out-of-season) birds can be improved by rearing them in brown-out housing (use of netting to reduce light penetration into the house) on short (8-10 hours), artificial day lengths. However, it is unlikely that production from out-of-season flocks will ever be as good as that from in-season (autumn-hatched) flocks. The pre-lay light increase should be given at 147 days (21 weeks) - if desired age at 5% production is 25 weeks - and given as a single increment to 14 hours or 15 hours where the longest anticipated natural daylength is longer than 14 hours.
In-season flocksIn-season flocks should be grown to the target body-weight profile and the first pre-lay light increase given at 21 weeks (147 days) to achieve 5% at 25 weeks of age.
KEY POINTS• The lighting program for both in-season and out-of-season flocks is the same (see Table 23).• Out-of-season birds should be grown to a heavier out-of-season body-weight profile.• In-season birds should follow the standard target weights.
Environmental Requirements

2013
Wavelength (Light Color) and Lamp Type
There is no strong scientific evidence to show that one particular color of light gives better performance than white light, which contains all colors of the light spectrum.
There may be some beneficial effects on fertility from providing UV-A in addition to white light (natural light has about 7% UV-A). Broiler breeders have UV-A reflective markings on their plumage, and the provision of UV-A light may aid bird recognition. There is some evidence that females use this factor to choose individual males, while males are more active and perform a greater number of attempted matings when UV-A light is provided.
There are no data to show that one type of lamp induces better performance than any other, and so lamp choice will depend on availability, capital outlay, running costs, and the ability to dim using conventional voltage-reduction equipment.
KEY POINTS• There is no need to provide broiler breeders with anything other than white light.• Lamp type does not have an effect on reproductive performance.
Sec
tion
7
Environmental Requirements Environmental Requirements
Section 8
Nutrition
Feeding Programs and Diet Specifications
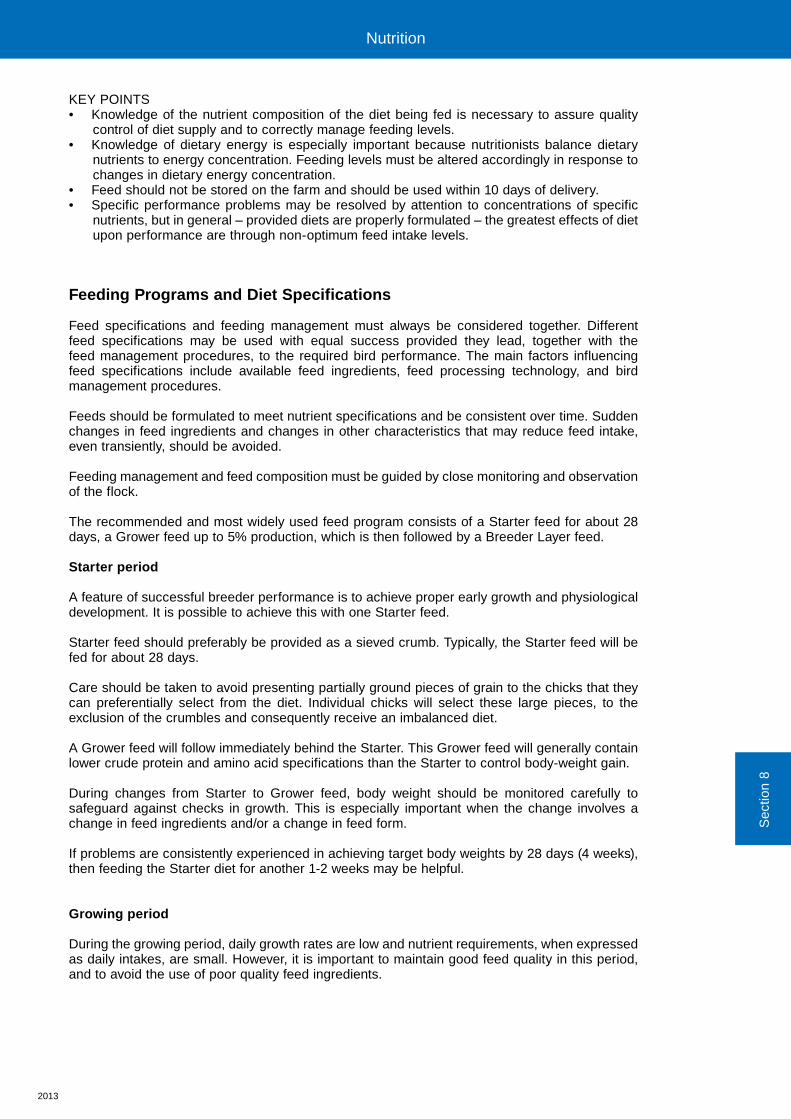
2013
KEY POINTS• Knowledge of the nutrient composition of the diet being fed is necessary to assure quality
control of diet supply and to correctly manage feeding levels.• Knowledge of dietary energy is especially important because nutritionists balance dietary
nutrients to energy concentration. Feeding levels must be altered accordingly in response to changes in dietary energy concentration.
• Feed should not be stored on the farm and should be used within 10 days of delivery.• Specific performance problems may be resolved by attention to concentrations of specific
nutrients, but in general – provided diets are properly formulated – the greatest effects of diet upon performance are through non-optimum feed intake levels.
Feeding Programs and Diet Specifications
Feed specifications and feeding management must always be considered together. Different feed specifications may be used with equal success provided they lead, together with the feed management procedures, to the required bird performance. The main factors influencing feed specifications include available feed ingredients, feed processing technology, and bird management procedures.
Feeds should be formulated to meet nutrient specifications and be consistent over time. Sudden changes in feed ingredients and changes in other characteristics that may reduce feed intake, even transiently, should be avoided.
Feeding management and feed composition must be guided by close monitoring and observation of the flock.
The recommended and most widely used feed program consists of a Starter feed for about 28 days, a Grower feed up to 5% production, which is then followed by a Breeder Layer feed.
Starter period
A feature of successful breeder performance is to achieve proper early growth and physiological development. It is possible to achieve this with one Starter feed.
Starter feed should preferably be provided as a sieved crumb. Typically, the Starter feed will be fed for about 28 days.
Care should be taken to avoid presenting partially ground pieces of grain to the chicks that they can preferentially select from the diet. Individual chicks will select these large pieces, to the exclusion of the crumbles and consequently receive an imbalanced diet.
A Grower feed will follow immediately behind the Starter. This Grower feed will generally contain lower crude protein and amino acid specifications than the Starter to control body-weight gain.
During changes from Starter to Grower feed, body weight should be monitored carefully to safeguard against checks in growth. This is especially important when the change involves a change in feed ingredients and/or a change in feed form.
If problems are consistently experienced in achieving target body weights by 28 days (4 weeks), then feeding the Starter diet for another 1-2 weeks may be helpful.
Growing period
During the growing period, daily growth rates are low and nutrient requirements, when expressed as daily intakes, are small. However, it is important to maintain good feed quality in this period, and to avoid the use of poor quality feed ingredients.
Sec
tion
8
Nutrition
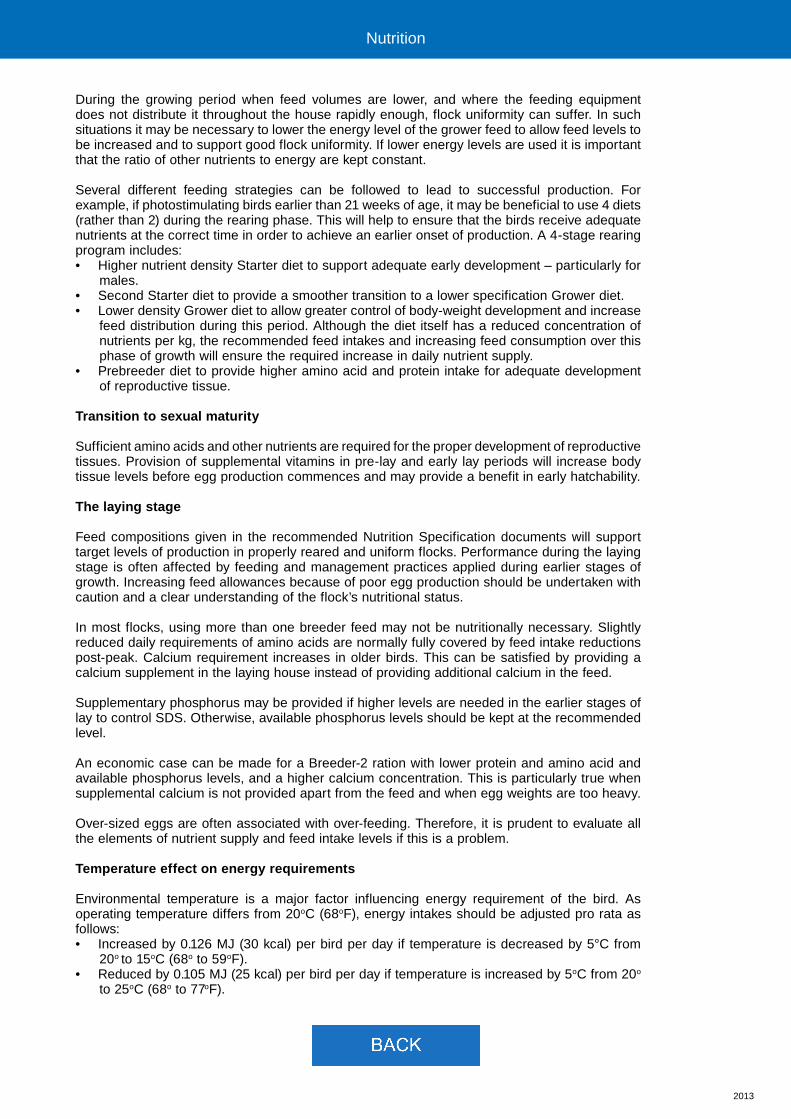
2013
During the growing period when feed volumes are lower, and where the feeding equipment does not distribute it throughout the house rapidly enough, flock uniformity can suffer. In such situations it may be necessary to lower the energy level of the grower feed to allow feed levels to be increased and to support good flock uniformity. If lower energy levels are used it is important that the ratio of other nutrients to energy are kept constant.
Several different feeding strategies can be followed to lead to successful production. For example, if photostimulating birds earlier than 21 weeks of age, it may be beneficial to use 4 diets (rather than 2) during the rearing phase. This will help to ensure that the birds receive adequate nutrients at the correct time in order to achieve an earlier onset of production. A 4-stage rearing program includes:• Higher nutrient density Starter diet to support adequate early development – particularly for
males. • Second Starter diet to provide a smoother transition to a lower specification Grower diet.• Lower density Grower diet to allow greater control of body-weight development and increase
feed distribution during this period. Although the diet itself has a reduced concentration of nutrients per kg, the recommended feed intakes and increasing feed consumption over this phase of growth will ensure the required increase in daily nutrient supply.
• Prebreeder diet to provide higher amino acid and protein intake for adequate development of reproductive tissue.
Transition to sexual maturity
Sufficient amino acids and other nutrients are required for the proper development of reproductive tissues. Provision of supplemental vitamins in pre-lay and early lay periods will increase body tissue levels before egg production commences and may provide a benefit in early hatchability.
The laying stage
Feed compositions given in the recommended Nutrition Specification documents will support target levels of production in properly reared and uniform flocks. Performance during the laying stage is often affected by feeding and management practices applied during earlier stages of growth. Increasing feed allowances because of poor egg production should be undertaken with caution and a clear understanding of the flock’s nutritional status.
In most flocks, using more than one breeder feed may not be nutritionally necessary. Slightly reduced daily requirements of amino acids are normally fully covered by feed intake reductions post-peak. Calcium requirement increases in older birds. This can be satisfied by providing a calcium supplement in the laying house instead of providing additional calcium in the feed.
Supplementary phosphorus may be provided if higher levels are needed in the earlier stages of lay to control SDS. Otherwise, available phosphorus levels should be kept at the recommended level.
An economic case can be made for a Breeder-2 ration with lower protein and amino acid and available phosphorus levels, and a higher calcium concentration. This is particularly true when supplemental calcium is not provided apart from the feed and when egg weights are too heavy. Over-sized eggs are often associated with over-feeding. Therefore, it is prudent to evaluate all the elements of nutrient supply and feed intake levels if this is a problem.
Temperature effect on energy requirements
Environmental temperature is a major factor influencing energy requirement of the bird. As operating temperature differs from 20oC (68oF), energy intakes should be adjusted pro rata as follows: • Increased by 0.126 MJ (30 kcal) per bird per day if temperature is decreased by 5°C from
20o to 15oC (68o to 59oF).• Reduced by 0.105 MJ (25 kcal) per bird per day if temperature is increased by 5oC from 20o
to 25oC (68o to 77oF).
Nutrition
Section 8
Nutrition
Feeding Programs and Diet Specifications
The Laying Stage
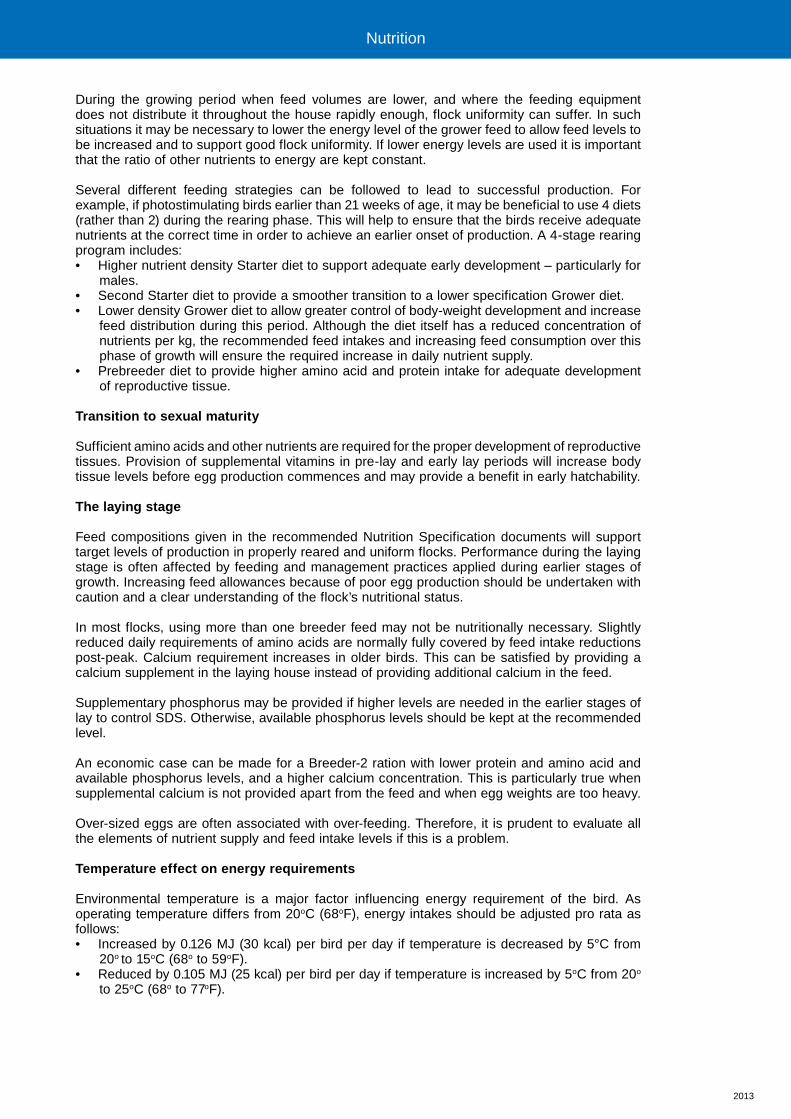
2013
During the growing period when feed volumes are lower, and where the feeding equipment does not distribute it throughout the house rapidly enough, flock uniformity can suffer. In such situations it may be necessary to lower the energy level of the grower feed to allow feed levels to be increased and to support good flock uniformity. If lower energy levels are used it is important that the ratio of other nutrients to energy are kept constant.
Several different feeding strategies can be followed to lead to successful production. For example, if photostimulating birds earlier than 21 weeks of age, it may be beneficial to use 4 diets (rather than 2) during the rearing phase. This will help to ensure that the birds receive adequate nutrients at the correct time in order to achieve an earlier onset of production. A 4-stage rearing program includes:• Higher nutrient density Starter diet to support adequate early development – particularly for
males. • Second Starter diet to provide a smoother transition to a lower specification Grower diet.• Lower density Grower diet to allow greater control of body-weight development and increase
feed distribution during this period. Although the diet itself has a reduced concentration of nutrients per kg, the recommended feed intakes and increasing feed consumption over this phase of growth will ensure the required increase in daily nutrient supply.
• Prebreeder diet to provide higher amino acid and protein intake for adequate development of reproductive tissue.
Transition to sexual maturity
Sufficient amino acids and other nutrients are required for the proper development of reproductive tissues. Provision of supplemental vitamins in pre-lay and early lay periods will increase body tissue levels before egg production commences and may provide a benefit in early hatchability.
The laying stage
Feed compositions given in the recommended Nutrition Specification documents will support target levels of production in properly reared and uniform flocks. Performance during the laying stage is often affected by feeding and management practices applied during earlier stages of growth. Increasing feed allowances because of poor egg production should be undertaken with caution and a clear understanding of the flock’s nutritional status.
In most flocks, using more than one breeder feed may not be nutritionally necessary. Slightly reduced daily requirements of amino acids are normally fully covered by feed intake reductions post-peak. Calcium requirement increases in older birds. This can be satisfied by providing a calcium supplement in the laying house instead of providing additional calcium in the feed.
Supplementary phosphorus may be provided if higher levels are needed in the earlier stages of lay to control SDS. Otherwise, available phosphorus levels should be kept at the recommended level.
An economic case can be made for a Breeder-2 ration with lower protein and amino acid and available phosphorus levels, and a higher calcium concentration. This is particularly true when supplemental calcium is not provided apart from the feed and when egg weights are too heavy. Over-sized eggs are often associated with over-feeding. Therefore, it is prudent to evaluate all the elements of nutrient supply and feed intake levels if this is a problem.
Temperature effect on energy requirements
Environmental temperature is a major factor influencing energy requirement of the bird. As operating temperature differs from 20oC (68oF), energy intakes should be adjusted pro rata as follows: • Increased by 0.126 MJ (30 kcal) per bird per day if temperature is decreased by 5°C from
20o to 15oC (68o to 59oF).• Reduced by 0.105 MJ (25 kcal) per bird per day if temperature is increased by 5oC from 20o
to 25oC (68o to 77oF).
Nutrition
2013
The influence of temperatures above 25oC (77oF) on energy requirement is not as straight forward as the effect of cold. At temperatures above 25oC (77oF), feed composition, feed amount, and environmental management should be controlled to reduce heat stress. Providing correct nutrient levels and using feed ingredients with higher digestibilities will help to minimize the effect of heat stress. Increasing the proportion of the feed energy that comes from feed fats (rather than carbohydrates) may also be beneficial.
In addition to absolute temperature measurement, the effective temperature of birds can be monitored by measurement of bird performance against target and observation of bird behavior.
Male nutrition
Separate control of male feeding level using separate-sex feeding systems is essential for successful broiler breeder production. The use of a separate feed (a separate diet formulation with different nutrient concentrations) for males is not as clear-cut but may provide improvements in flock fertility.
The use of a single feed for both sexes is a widespread practice; however, the use of specific male diet in the laying period has been shown to be beneficial to the maintenance of male physiological condition and fertility. A separate male diet with lower protein and amino acid levels can prevent excessive breast muscle development, while adequate dietary supplementation of vitamin E and selenium (Se) are critical for sperm quality. The use of an organic chelated form of Se should be considered.
If a separate male diet is used, it should be introduced when birds are moved to the laying house or at light stimulation. When switching to a separate male diet, ensure caloric intake is not reduced if the male diet is lower in energy density than the diet currently being fed (dietary energy levels for a separate male diet should be between 10.9 and 11.7 MJ (2600 and 2800 kcal ME per kg).
KEY POINTS• Birds respond to daily intakes of nutrients, therefore feeding programs (and feed levels) must
relate to dietary nutrient content; especially energy and the nutritional requirements of the bird at a given age.
• Economic and management practices may demand flexibility in diet nutrient concentration, but in general variability in nutrient specification should be avoided.
• Nutritional problems will be observed as failures to achieve production and welfare targets and should be discussed with the nutritionists at the earliest opportunity.
• Diets need to be regularly sampled and the samples analyzed to ensure that the diet is as it should be.
Feed Manufacturing
Following good feed manufacturing practices will ensure that parent stock receive diets with adequate nutrient fortification, while minimizing potential contaminants. Unseen variations in feed ingredient quality and nutrient content are possible causes of bird failure to attain production targets. Frequent and routine control checks upon the physical quality and nutrient content of feed should therefore be completed.
Feeds should be regularly handled and examined by nose and eye (and if necessary microscope). Sub-sampling and analysis of feeds is essential to detection of anti-nutritional factors and ensuring that requirements for specific nutrients are being met.
Sec
tion
8
Nutrition