bally - 1992 creature from the black lagoon (cftbl) retro snackbar mod v2.0... · 2016-01-08 ·...
TRANSCRIPT

Bally - 1992!Creature From The Black Lagoon (CFTBL)!!
Creature “Snackbar Mod v2.0”!
!The Creature “Snackbar Mod” is a mod that is hand crafted in Australia by a CFTBL owner for all the other CFTBL owners around the world that love their game and want to capture that classic 50’s / 60’s feeling of NEON as seen on the playfield art in the image above to the middle above the Mega Menu insert. This mod is also a relative simple one to fit - no
soldering, no complex tools and no removal of ramps - just follow the detailed instructions to remove the Snack Bar plastic and replace it with the Creature “Snackbar v2.0 Mod”!Thank you for your support and I hope you will enjoy this mod for many years to come.!!
Proudly Designed and Manufactured by!!!!!!!!!!!!� of �1 20manual V-01 (8-01-16)

Note: These instructions are specific for the 2016 release Snackbar v2.0 Mod with LED edge lit acrylic light blades. The original design referred to as the Snackbar Mod is now referred to as the Snackbar Mod v1.0 has el wire as well as a full wiring power harness where this mod is powered
by the games 6.8 vac GI socket under the mod.!!Fitting and Assembly Manual!
photo 1 - mod components!!Parts!When you unpack your mod, you will find the following with a majority of the mod already pre-assembled (see photo 1 above):!! 1 x Stainless Steel Snack Bar Base (with the “FILM” decal pre-applied)!! 3 x 3D printed pillars - may vary in colour (BLUE in the 6 prototypes Snackbar v1.0, !! ! ORANGE in the 99 productions ones Snackbar v1.0, SEMI TRANSPARENT CLEAR ! ! for the Snackbar v2.0 kit)!! 1 x Snack Bar Top fitted (with the “Snackbar” decal pre-applied)!! 1 x Red Dome Cover (fitted to snap on locators and hot glued in place)!! 1 x 10 x SMD LED strip!! 1 x flex LED for under the dome!! 1 x flex Domed LED with a double adaptor led for the LED Strip!! 2 x clear acrylic light blades!! 5 x M4 x 10mm button socket screws - Black Finish (3 already fitted to semi transparent !! posts)!! 1 x M4 Stainless Steel Washers!! 1 x Allen Key (metric 2.5) to suit the above screws as not all countries will have metric tools ! ! available (ensure you store this tool in a safe place in case it’s needed at a later !! ! point in time).!!! SS = Stainless Steel (hereby referred as ‘SS’ throughout the rest of the manual).!
� of �2 20manual V-01 (8-01-16)
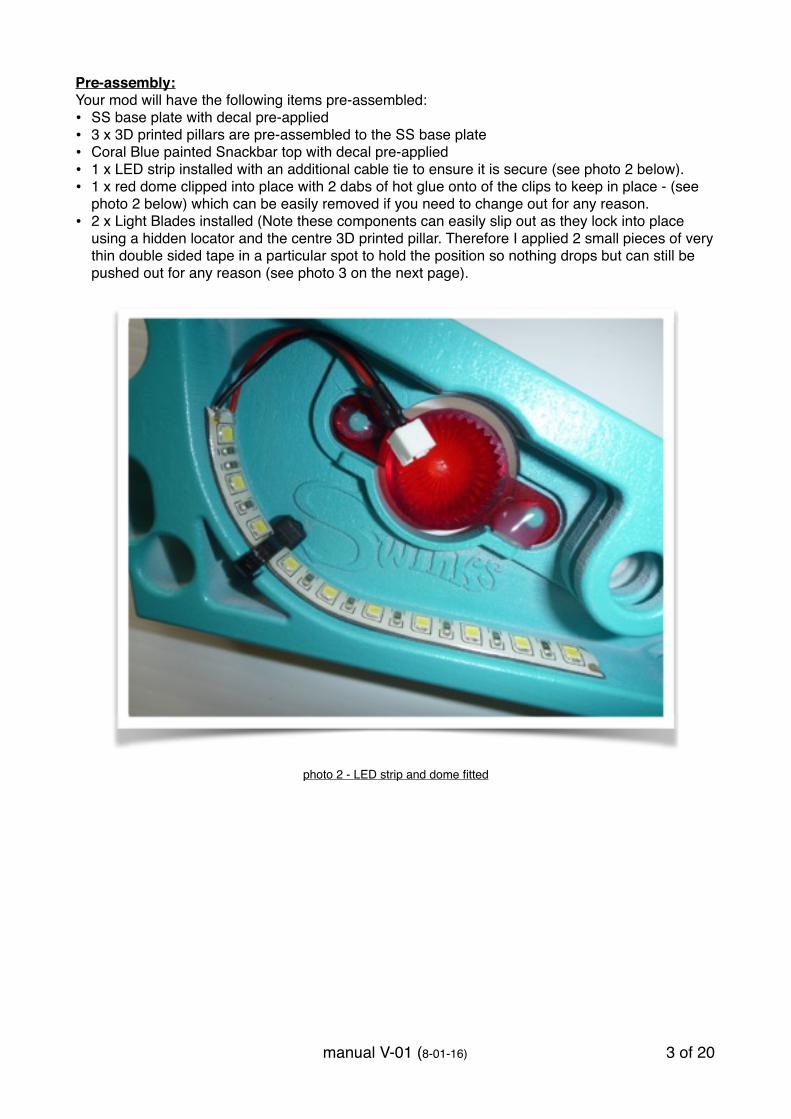
Pre-assembly:!Your mod will have the following items pre-assembled:!• SS base plate with decal pre-applied !• 3 x 3D printed pillars are pre-assembled to the SS base plate!• Coral Blue painted Snackbar top with decal pre-applied!• 1 x LED strip installed with an additional cable tie to ensure it is secure (see photo 2 below).!• 1 x red dome clipped into place with 2 dabs of hot glue onto of the clips to keep in place - (see
photo 2 below) which can be easily removed if you need to change out for any reason.!• 2 x Light Blades installed (Note these components can easily slip out as they lock into place
using a hidden locator and the centre 3D printed pillar. Therefore I applied 2 small pieces of very thin double sided tape in a particular spot to hold the position so nothing drops but can still be pushed out for any reason (see photo 3 on the next page).!
photo 2 - LED strip and dome fitted!!!!!!!!!!!!!!!!� of �3 20manual V-01 (8-01-16)

photo 3 - location of small double sided tape to secure in place - black outline!!!!!!!!!!!!Note: since some people have expressed a desire to experiment with different colour LED’s (refer page 17 for purchase links to pick a new colour), the pre-installed White LED Strip will be held in place but can be easily swapped over in less than 5 minutes at a cost for $5 USD for a different colour strip from Comet Pinball.!!• The remaining parts will be in a “goodie” bag ready to be used during the assembly.!!! !!!!!!!!
� of �4 20manual V-01 (8-01-16)

Fitting the Mod!!Tools necessary to install the mod!1 x Phillips screwdriver (is not provided)!1 x 5/16” or adjustable wrench / spanner / shifter (called different things in different countries - is not provided)!1 x 2.5mm metric allen key (provided in the kit)!
photo 4 - required tools!!!SAFETY NOTE: Before you begin remove all the balls as you will need to lift the playfield for the installation and then make sure that your machine is powered off and the power cord running from your machine to the wall outlet has been disconnected.!!Read through these instructions carefully & completely before attempting the installation of this enhancement. Although you may know your machine inside and out, there are a few things to consider before proceeding.!!!!!!!
� of �5 20manual V-01 (8-01-16)

!VERY IMPORTANT NOTE: for those valued supporters that purchased the Snackbar Mod v1.0 and then Snackbar Mod v2.0 please ensure that you have disconnected the Snackbar Mod v1.0 power lead at the board set before you remove the v1.0 mod so you don’t forget. Because in just disconnecting el wire of the v1.0 mod from the power lead / inverter under the play field and still powering up the v2.0 you will FRY the inverter from the v1.0 mod. I understand you maybe keen to test and compare but please do perform this change before power up.!!!!Step 1!• Ignore this step if you do not have a Snackbar Mod v1.0 installed. !• If you have a Snackbar Mod v1.0 please use those instruction and follow in reverse to remove
the mod and power supply lead and return the game back to the factory setup especially in the backbox.!!!
Step 2!• Remove the lock down bar and playfield glass.!• Slide the playfield out so that the service brackets are sitting on the locking bar as shown in the
image below.!
photo 5 - play field slide out to service position!!!!!!!� of �6 20manual V-01 (8-01-16)

!!Step 3!• Remove the centre signpost bracket (the one with the 'super jackpot', 'jackpot', 'rescue' and
'multi-ball restart' plastic attached to it). Keep the nut as you'll be re-attaching it after you complete installing the new Snackbar piece.!
photo 6 - remove the signpost temporary!!!!!!!!!!!!!� of �7 20manual V-01 (8-01-16)
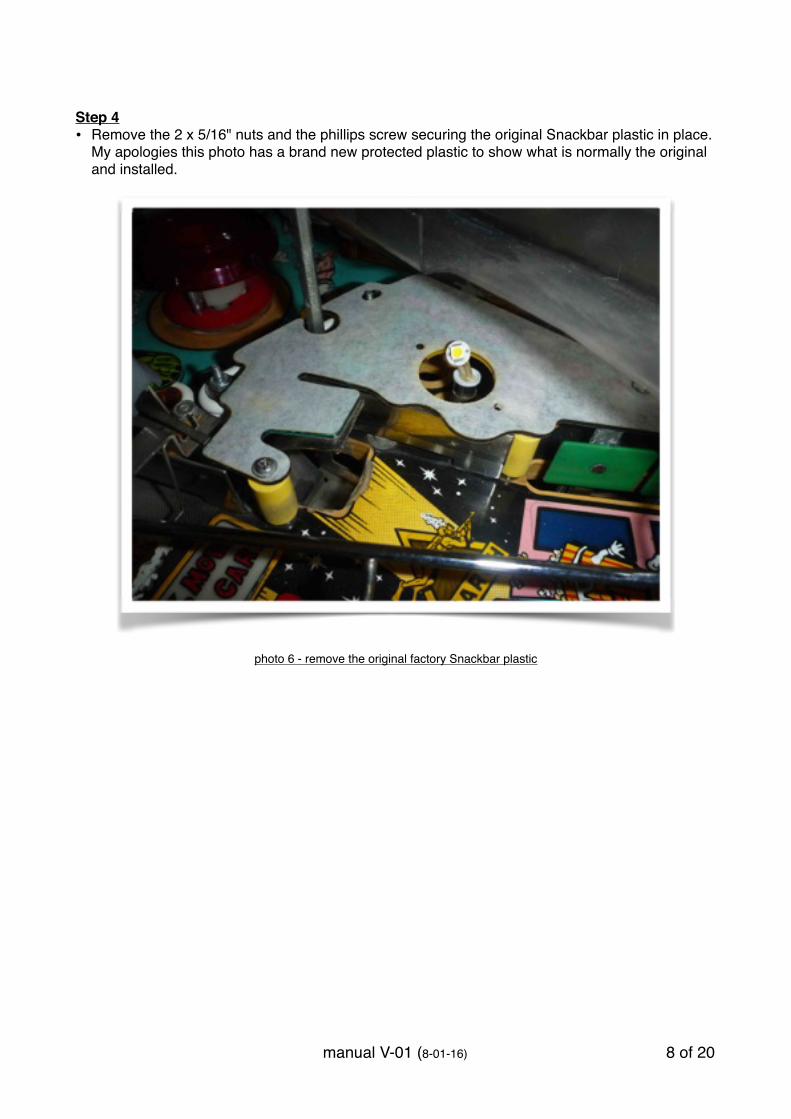
!!Step 4!• Remove the 2 x 5/16" nuts and the phillips screw securing the original Snackbar plastic in place.
My apologies this photo has a brand new protected plastic to show what is normally the original and installed.!
photo 6 - remove the original factory Snackbar plastic!!!!!!!!!!!!!!!!!!!!!!� of �8 20manual V-01 (8-01-16)
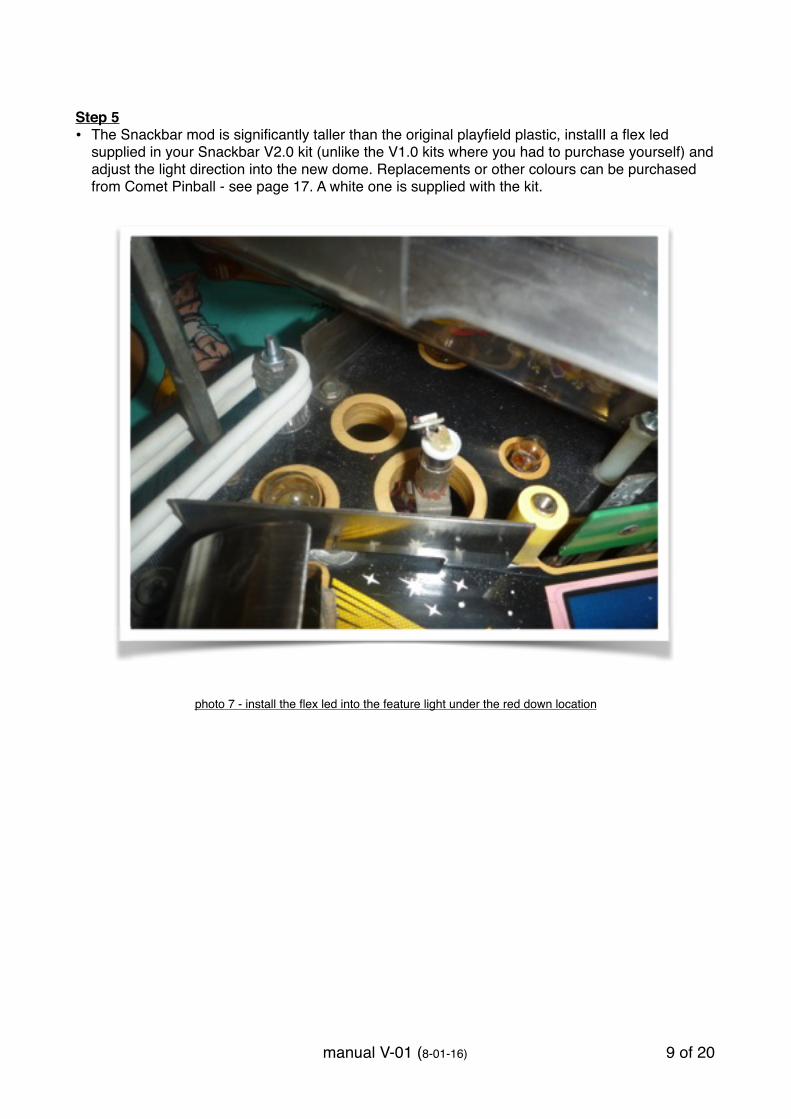
!! !Step 5!• The Snackbar mod is significantly taller than the original playfield plastic, installI a flex led
supplied in your Snackbar V2.0 kit (unlike the V1.0 kits where you had to purchase yourself) and adjust the light direction into the new dome. Replacements or other colours can be purchased from Comet Pinball - see page 17. A white one is supplied with the kit.!
!photo 7 - install the flex led into the feature light under the red down location!!!!!!!!!!!!!!!!!!!!
� of �9 20manual V-01 (8-01-16)

!!Step 6 - not currently applicable - continue to Step 7!• This step is what is supposed to happen but due to the current length (too short) of the double
adaptor lead coming off the new GI bulb this bulb can not be installed in this sequence as it was something that I realised a little too late in the piece but did not want to delay the sending out of the 4 launch units to my customers. Ignore this step if you are part of the launch batch units 1-5. This manual will be amended in a few weeks time when addition parts come from Comet Pinball and I can document properly. But do not worry as there is another technique to installing this globe.!
• This step would be to install an extension lead (3” long) to the the double adaptor lead of the new GI globe.!
• Install the new globe into the GI globe holder under the the new Snackbar Mod v2.0.!!
photo 8 - install the replacement GI globe which has a double adaptor lead also coming out of it.!!!!!!!!!!!!� of �10 20manual V-01 (8-01-16)

!!!Step 7!• Install the SS base plate into the location over the 3 available screws - see photo 9.!
photo 9 - install the snackbar SS base plate over the 3 available screws.!!• Fasten the original nut over the screw with the red arrow.!• Install the single supplied screw over the screw with the blue arrow - see photo 10 below.!• Install the original nut over the same screw that the washer was placed on. The washer is
required to file up a small space as with out it the nut would NOT bottom out and the SS base plate would still be loose.!
• Install the original screw into the post (if available) with the green arrow.!• Note: for later install the sign plastic and bracket with lights in the original location with the yellow
arrow.!
� of �11 20manual V-01 (8-01-16)

photo 10 - washer location!Step 8 - is to change with a manual revision soon linked with Step 6.!• Because the current flex LED with the addition adaptor lead is too short to install the snack bar
mod you will need to perform this step for the interim which will only effect the the customer who purchased the launch units 1-5 including my own mod. My apologies once again. All future models will come with a supplied 3 inch extension lead cancelling out the the current Steps.!
• Remove this GI socket from the playfield and remove the bulb and let it just hang for the moment and continue to the next step. The screw to remove is highlighted with a red arrow - refer to photo 11 & 12.!
photo 11 & 12 - show the screw to remove and the hanging the globe holder!!!!� of �12 20manual V-01 (8-01-16)

!Step 9!• Get you Snackbar top ready with the led installed as per photo 13 below - will be supplied fitted.!• In the next production release, this bulb will be installed into the mounted GI bulb holder but this
is the best alternative for the moment.!• Then line up your mod as displayed in photo 14 below and then feed the the bulb through the GI
hole.!
photo 13 & 14 - line up and pass through the GI bulb through the GI hole.!
� of �13 20manual V-01 (8-01-16)

!Step 10!• locate the mod then over the 3 locator pins.!• Then loosely fasten 2 of the black supplied screws through the top holes but only fasten enough
to pick up a thread - only because during this technique the bulb may fall back out of the hole while lifting the playfield and you don’t want the mod to fall off the locator pins if you have no screws installed.!
• Lift up the playfield and pull through the bulb - though you won’t have a lot of slack in the wire so we had to hold the bulb with a set of needle nose players and then installed the bulb into the hanging freely GI socket - see photo 15 below.!
• Then refasten the GI socket back to the original location.!• No lower the playfield back to the playing position.!!
photo 15 - install the bulb into the hanging bulb socket!!!!!!!!!!!!!!� of �14 20manual V-01 (8-01-16)

!Step 11!• Since the installation of the bulb into the socket under the playfield was successful you can now
screw down the 2 black screws with the supplied allen key. !!Note: ensure to tension the 2 screws enough so the snackbar top is not loose but not too tight to twist your decal.!!Note 2: ensure if you still have a Snackbar Mod v1.0 power lead connected to the circuit boards in the backboard you must disconnect before powering up your game.!!• Turn the machine on to ensure the bulbs and light blades light up and then off again - see photo
16 below. You will be able to see the GI globe through the side of the ramp.!• Lastly re-install the light plastic near the snack bar hole to the SS plate with the original screw -
refer to the last point of Step 7 on page 11.!
photo 16 - light test!!!!!!!!!!!� of �15 20manual V-01 (8-01-16)

!Now your mod is installed and can be enjoyed and since the light blades and the 10 SMD led strip is hooked up to GI it will pulse slightly only when the game is in attract mod otherwise will be on all the time.!!Enjoy.!
!!!!!!!!!!!!!!!!!!!!!!� of �16 20manual V-01 (8-01-16)

Spare Lighting Parts!!- Lighting is supplied by Comet Pinball based in Florida in the USA using a new products from
their new Matrix range. See a coloured arrows referencing the components!
!!
! ! !!! !
!!!
!!!!!!To find these parts:!!
http://www.cometpinball.com/MATRIX-1-SMD-5050-FLEX-6-3V-QUICK-CONNECT-p/mtx1smdflex.htm!!http://www.cometpinball.com/MATRIX-Wires-p/mtxconnect.htm!!http://www.cometpinball.com/MATRIX-10-SMD-5050-6-3V-LIGHTED-STRIPS-p/10smd6.3vstrip.htm!!
alternatively if you want to customise the brightness, instead of the extension lead (blue dot) you could use a brightness adjustment lead - see below (but this is a purchase between you and Comet Pinball as I will not be supplying these.!!
http://www.cometpinball.com/product-p/mtxbriteadj.htm!!!• Lastly the globe that goes into the feature light socket and lights up the dome is one of these.! http://www.cometpinball.com/product-p/1smdflex.htm!!• to change / customise to a different colour for the light blades all you need to do is purchase a
different colour 10 SMD LED strip - green dot item. At this stage all units will be supplied with Natural White LED strips. I will be sampling ice Blue when they arrive roughly Feb / March 2016.!
� of �17 20manual V-01 (8-01-16)

!!Historical Data - Snackbar Revisions!!!
I like stats, as fun to look back and know where things are in years to come and it may help people determine what they have once a mod is on sold or someone buys a game with a Snackbar Mod in it. !!The stats for this mod in general currently are:!!Snackbar Mod v1.0 - is a mod with El Wire, inverter and dedicated power lead back to a 12 vdc source on the boards in the back box.!!Snackbar Mod v2.0 - is a revision of the Snackbar Mod v1.0 which is now improved as it now only uses the GI power for lighting up the light blades to get a very similar look, though brighter and much easier to install removing the 12 vdc power drain due to so many mods available running on 12 vdc.!!!
Snackbar Mod v1.0!• Snackbar Mod v1.0 - 6 prototypes (September 2014) built with the el wire looping around at the
outside turn junction (front tip) and does not have an el wire tension post underneath so relies on using cable ties to hold in place within the mod and these have BLUE 3D printed posts attached to the SS base plate.!
• Snackbar Mod v1.0 - 96 production (December 2014 through to October 2015) have the new el wire loop around post and tension holding post (no glue or cable ties required) designed into the top, hidden underneath for the Elwire and all these have ORANGE 3D printed posts fastened to the SS plate. No reason for the colour change other than to aid in quickly defining what version the mod is.!
• In total out of the 102 units made (proto’s and production) with 8 units were supplied with pink elwire and remaining 94 units went out with white elwire - though the colour appeared slightly blue due to the mods blue paint job.!
• Sold to customers based in Australia, Germany, France, Norway, Sweden, Canada and with the largest number heading to the USA. !
• Head to this thread to find a manual and other information for interest.!!! https://pinside.com/pinball/forum/topic/creature-cftbl-retro-building-neon-mod!!!
Snackbar Mod v2.0!• Snackbar Mod v2.0 - 5 launch units (December 2015) (not prototypes as could not determine
anything to improve on so official production units) with the differences compared to v1.0’s being no El wire, inverter or dedicated power lead to the back box required, reduced screws on top from 5 to 2, revised decal to suit the 2 holes on top. The top was heavily revised more underneath to incorporate a new holder for the dome as well as support for the LED strip, 2 light blades, Swinks Logo inside and a few tweaks to the outer look. This still uses the same SS base plate but the 3D printed posts are now translucent clear as we did not want the colour of the post to influence the colour coming out of the light blade.!!
• Head to this thread to find a manual and other information.!!! https://pinside.com/pinball/forum/topic/cftbl-creature-snackbar-mod-v20!!!!
� of �18 20manual V-01 (8-01-16)

RETURN POLICY: !Approval from Swinks Pinball must be received before any items can be returned for repair or replacement. All materials, boards, cables, etc. must be included when the product is returned. We will repair or replace/exchange components based on our analysis of the problem. Swinks Pinball reserves the right to deny any return or exchange. Refunds are not given. Freight will be covered by Swinks Pinball on the return trip back to you only. Though please contact us as we will be proactive to try and quickly resolve any problems so to avid sending the mod back.!!PRODUCT DISCLAIMER: !Please remember that this is a “MOD.” We took great effort in designing and testing our system in order to produce a high quality product, but it is not a factory original or an approved part for your pinball machine. There is the risk of unwanted side effects with any modification to a factory game and there are many factors that can cause undesirable side effects after installation of such a modification. As such, we cannot assume responsibility for game malfunction, damage to the game or surroundings, unwanted electrical emissions, personal injury, or other adverse effects caused by the installation of our MOD.!!PRODUCT QUALITY DISCLAIMER: !All parts are made to the highest quality possible. The hidden pillars and Snackbar Top are 3D printed and some sections that are not clearly seen may have some visible print lines. You may notice these print lines when handling but once the mod is installed they will not be clearly visible from the players perspective as we make sure the finish to the front face with the edge lit light blades and the top is to the highest possible quality. In downloading this manual and purchasing the mod you are accepting the finish quality of this relatively affordable mod.!!!!!!!!!!!!!!!!!!!!!!!!!!!!!!!!
� of �19 20manual V-01 (8-01-16)

Buyers Feedback!!I am always open to constructive criticism as I want this product to be as user friendly to install, last a very long time and be enjoyable to look at so please share your thoughts with me - good and bad.!!Snackbar Mod v1.0 owners shared these thoughts with me - thanks to those people.!!• “Well I received my snack bar mod today and was impressed before I’d even assembled it the
aqua moulding and decals look like a factory add on Jady had already won me on this mod just from that”!!
• “It looks absolutely shit hot, well made and very professional - cannot wait to get it in the machine!!”!!
• “it looks brilliant mate! Can’t fault you or your product: very professional on all levels”!!• “You certainly see the quality and engineering that went in to this.”!!• “the quality and the engineering are top rate, very professional. Love the redesign above the
scoop too where the original plastic used to bend up (and usually break). A lot of thought, time and effort have obviously gone into this mod to make it look like it should of been there from day one - worth EVERY cent. Every CFTBL should have this mod.”!!
• “This mod is built like a brick sh%t house! Unbelievable! If you were thinking of getting this.....GET IT! Perfect communication, perfect shipping, and a perfect mod! Easy install and this bad boy is built to last!”!!
• “Looks great, very nice work on your part man…”!!• “remembered as one of the classic mods in the hobby”!!• “wow I was impressed with how well its made”!!• “Great work very well made!!!”!!• “Really nice work and I appreciate your attention to detail, both functionally and aesthetically!
Super nice quality.”!!• “You are my god”!! !!!
� of �20 20manual V-01 (8-01-16)