basic indesign tutorial in creating your first book layout
DESCRIPTION
Basic InDesign Tutorial in Creating Your First Book LayoutTRANSCRIPT

Basic InDesign Tutorial in Creating Your First Book Layout – Part 1InDesign Tutorials
10th August 2011 - By Graphire
48
A lot of people are still clueless on how to use Adobe InDesign to do book or multi-page document layouts. If you’re coming from laying out documents using MS Word or other word processing software, using Adobe InDesign for the first time may be a little bit intimidating. Sure there are tons of Adobe InDesign tutorials, guides, and tips around but most of them are bits and pieces of everything. So I decided to create something that will teach newbie InDesign users straight up the very basics of how to create their first book layout.
1. Planning
When creating any complex document, layout and organization should be planned before you dive in and execute the layout. Below are some of the basic things you need to think about before designing any publication.
Document size (Page size) Content organization (Order of content) Margins, columns and other white spaces Repeating elements (Running hearders and footers, repeating backgrounds, etc.) Typefaces and fonts to be used (The simpler the better. Avoid script or fancy typefaces or other difficult to read
typefaces) Font sizes (For titles, headers, sub-headers, body text, tables, footnotes, charts, etc.) Graphics and images (How do you want to present them and placed along with the text) Colors (The less color you use, the less expensive your printing cost will be) Other print production considerations like binding, paper stocks for cover and inside pages, etc.
2. Creating New Document and Setting Master Pages
To create a new document, you click File menu and select New Document. You will then be viewing the New Document window which looks like the one shown below.

Right now you’ll just worry filling up options for your page size, column size, and margins. Leave the other options in their default values.
First thing you’ll do after you create a new document in InDesign is set your Master Pages. Every new InDesign document comes with a set of blank Master Pages. A Master Page is a template page that we can apply to individual pages in our document. All objects that we put in the Master Page will appear on any pages that we apply the Master Page. Usual elements that we put in the Master Page are running header and footer, page numbers, and some non-printing items like column and margin guides. You can create as many Master Page sets as you want, but typically you create Master Pages for each section, or chapter of your book, or just one Master Page for a short and simple book layout.
You access the Master Pages in the Pages palette. It is located on the bar of palettes at the upper right of your InDesign screen. If it is not showing up, go to “Window” > “Pages” to open it. The diagram below shows the Pages palette.
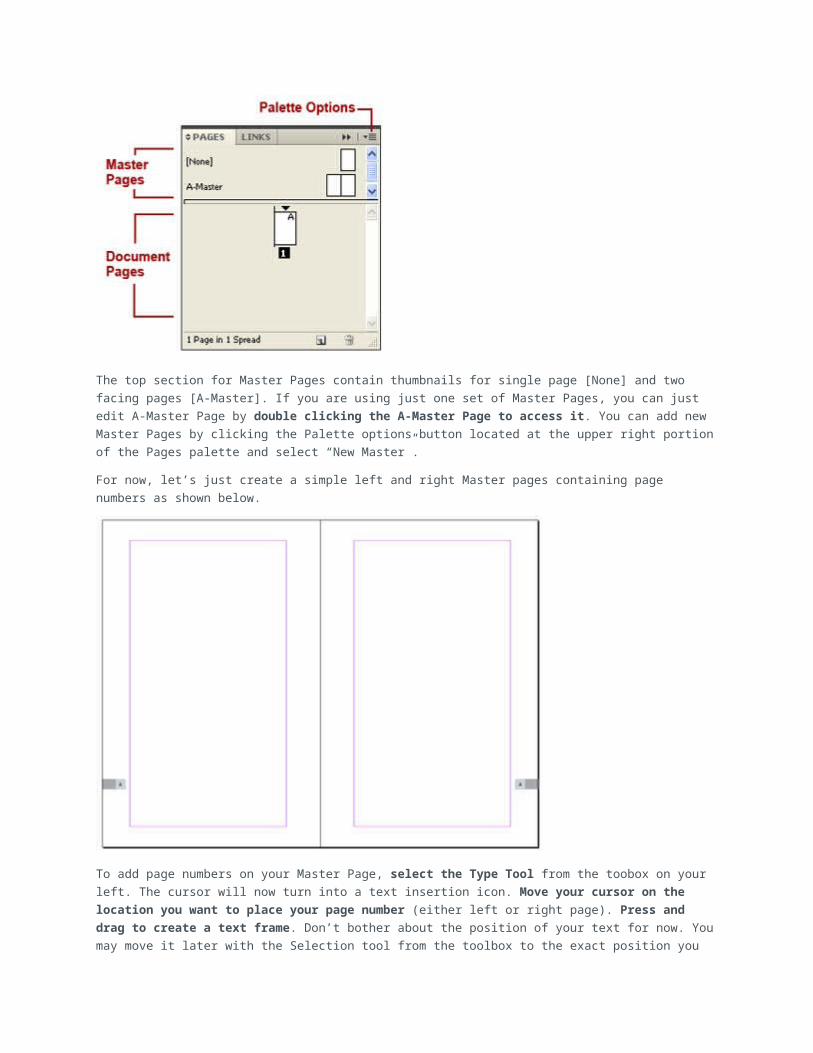
The top section for Master Pages contain thumbnails for single page [None] and two facing pages [A-Master]. If you are using just one set of Master Pages, you can just edit A-Master Page by double clicking the A-Master Page to access it. You can add new Master Pages by clicking the Palette options button located at the upper right portion of the Pages palette and select “New Master”.
For now, let’s just create a simple left and right Master pages containing page numbers as shown below.
To add page numbers on your Master Page, select the Type Tool from the toobox on your left. The cursor will now turn into a text insertion icon. Move your cursor on the location you want to place your page number (either left or right page). Press and drag to create a text frame. Don’t bother about the position of your text for now. You may move it later with the Selection tool from the toolbox to the exact position you want it to be. At this point you can now type any text you want on your text frame. But for now, we only want to insert page numbers. So instead of typing text, you will press right click, and from the right click menu select “Insert Special Characters” > “Markers” > “Current Page Number”. You will then see the “A” symbol written on your text frame. The “A” mark will appear as

page number on every page in your document associated with that particular Master Page. To style it with the gray boxes similar with the sample above. You may use the Rectangle tool from the drawing tool set in the toolbox and adjust it with your desired size and color or gray fill.
If you’re not familiar with InDesign toolbox, you may refer to the toolbox overview illustration below.
To copy the same page number element on the opposite page, you may select the page number and boxes you created using the Selection tool and copy it by holding the “Alt” (Windows) or “Option” (Mac) button then drag it over the opposite page. You may want to hold the “Shift” button to constrain movement and keep its alignment.
You have now created your first Master Page set.
To apply the Master Page on a particular page or spread, simply drag the Master Page icon towards the document page or spread icon of your choice in the Pages palette. To apply a Master Page to multiple pages, select the pages you want to apply the Master page in the Pages palette then press “Alt” (Windows) or “Option” (Mac) as you click the Master page icon.
3. Using Grids

Using grids in book layout or any design helps us create and impose order, precision and consistency in our layout. Learning and adopting grid based design early on for beginning designers may prove beneficial in the long run. And as you gain more design experience, you’ll also learn instinctively when to use effectively and when to break the rules of grid-based design system.
For now, let’s learn some basic things about grid in InDesign for book layout. We will simply use baseline grid to align our text line per line.
While we are on the Master Pages, we can set our grids on them and use it all throughout our document. In this sample layout, I created my margins with the following settings shown below. To open the margins and columns dialog box, click “Layout” > “Margins and Columns”.
To properly setup your horizontal baseline grids, we need to think ahead what will be the font size and leading of our body text. Let’s say we use Times New Roman, 11 points with 14 points leading. With a 14 point leading, we can say that our baseline grids will also have increment every 14 points.
To setup our baseline grid, we go to the top bar menu once more and choose “Edit” > “Preferences” > “Grid”. The following menu box will appear.
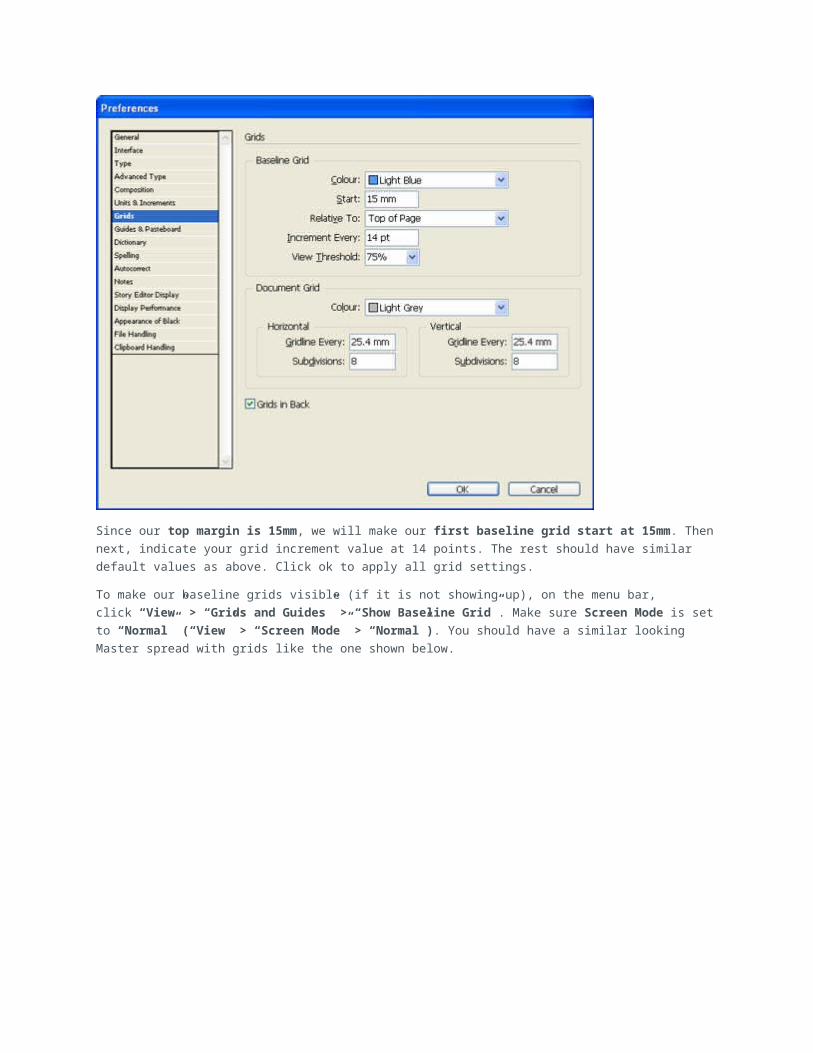
Since our top margin is 15mm, we will make our first baseline grid start at 15mm. Then next, indicate your grid increment value at 14 points. The rest should have similar default values as above. Click ok to apply all grid settings.
To make our baseline grids visible (if it is not showing up), on the menu bar, click “View” > “Grids and Guides” > “Show Baseline Grid”. Make sure Screen Mode is set to “Normal” (“View” > “Screen Mode” > “Normal”). You should have a similar looking Master spread with grids like the one shown below.

4. Importing Text to Add Content
Before we place the actual text content of our book, let’s take a look first on how our simple book page structure will look like. I made this very simple page structure for our basic book layout tutorial. A typical book may contain more than what is shown below. It may include other pages like Foreword, Preface, Acknowledgement, References, Index, etc. But just to illustrate and cover the basics, we can just use the sample page structure shown below.


These are just the inside pages of our book. It is best to create the book cover separately as it has different page size because it is in spread format and may be wider than your actual book spread because it might contain a spine which will vary in size depending on the number of pages you’ll have and thickness of the entire book.
For the title page, you can create this manually and easily. Since this is just one page, you can use the Type tool straight up and type and set your own title. It is also advisable that you just copy the same title or type style from your cover to your title page for consistency.
The table of contents will be discussed on part 2 of our InDesign Book Layout Tutorial.
I won’t be showing you how to layout every page but I will just show you how to format one page and the rest will just be the same.
Assuming we have a separate text document in MS Word format for our content. We will then import and place it in our InDesign document.
To import your document file, follow the steps below:
Go to “File” menu, then select “Place”. Or press “Ctrl+D” (Windows) or “Command+D” (Mac). Locate and select your file when the Place document dialog box appears. If you want to specify other file importing options, check the “Show Import Options” check box. Click Open to import the selected file.If you created a text frame and selected it prior to importing a text file, the content of your file will automatically be placed inside that text frame. If none, you can just click or drag inside your page to place the content. Alternately, you can “Autoflow” your content by pressing the Shift key with the Place cursor. Holding down the shift key changes the placement of your content from a single text frame to automatically flowing your text adding pages to your document as needed.
Navigate through your files, then find and select your Word document. Click Open and you will see your cursor change into a place document icon. Point it on your document page and click. The first text frame of your content will be placed over your selected page.
Shown below is how the Autoflow place cursor looks like and the page containing the imported and placed text.

5. Formatting Text with Paragraph stylesThere are several ways that you can format your text in InDesign but the most efficient way is to use Paragraph Styles. Using paragraph styles allows you to dramatically cut the amount of time formatting text particularly with long documents containing long stretches of text. With paragraph styles, appying text formatting to selected paragraphs is just a click away.
There are three ways to create paragraph styles. First method is to create an entirely new paragraph style from the paragraph style palette. Second method is to format the paragraph first then base the new paragraph style from that paragraph. Third method is to import styles from other InDesign documents. In this tutorial, let’s use the first and most common method.
Let us now define paragraph style for our heading.
Open the “Paragraph Styles” palette by clicking “Window” > “Type & Tables” > “Paragraph Styles”. From the Paragraph Styles palette click the options button and select “New Paragraph Style” as shown below.

Change the Style Name to “Heading 1″ or any name you want that will describe the paragraph you want to attach it to.

Next, click Basic Character Formats. Now change Font Family, Font Style, Size and Leading. I choose Times New Roman Bold, 26 pt with 28 pt leading which is a multiple of 14 to match our 14 pt increment baseline grid. The rest you can leave in their default values.

Lastly, go to Indents and Spacing. Set Align to Grid to “All Lines”. This tells InDesign to align all lines of text from that paragraph with the baseline grid. You can also choose “First Line Only” and succeeding lines will still follow and align with the grid because our leading matches our baseline grid increment.

Click OK and we have our first Paragraph Style for Heading 1. Place your Text tool cursor on the heading line and click “Heading 1″ from the Paragraph Styles palette to apply the Heading 1 style.
Next thing you want to do is format the rest of the text by creating new paragraph styles for them. For our body text, follow the same procedure we did with our Heading 1 paragraph style. You may name it“body”, format characters with Times New Roman regular, 11 pt with 12 pt leading. Then set againAlign to Grid to “All Lines”. You may also want to set Alignment to “Left Justify” (also from “Indents and Spacing” tab), but that’s a matter of preference.
Applying our body text paragraph style gives us something like the one shown below.

With baseline grid shown (View > Screen Mode > Normal):

Baseline grid and margins hidden (View > Screen Mode > Normal):
Enhance it a bit if you feel that your page looks bare or too boring with too much text. I added some background boxes behind the heading to match the page number.

Continue adding new paragraph styles and apply them as needed with the rest of your document.
Basic InDesign Tutorial in Creating Your First Book Layout – Part 2InDesign Tutorials
30th March 2013 - By Graphire
23
After long delay, I finally got to continue this InDesign book layout tutorial. Previously in Part 1, we discussed creating a book layout from planning to using all the basic features in InDesign in placing your text manuscript to formatting them with paragraph styles. With part 1, you’ll basically have a pretty much decent looking book layout. But two

things are still left out, footnotes and table of contents. Thus, we promised to give you part 2 so you could learn how to add and format footnotes, and create table of contents.
Adding and formatting footnotes
When you import your Word document file to InDesign (File > Place), you’ll have the option to include footnotes or endnotes from your document. To do that, you’ll have to tick the “Show Import Options” in the Import dialogue box (see figure below).
From the Word document Import Options, you’ll find options to import both footnotes and endnotes. Check only the options you need. In our case, we will choose footnotes only. The press OK.
InDesign will import footnotes as dynamic footnotes, except for footnotes in tables and endnotes. Dynamic footnotes retain interconnection between reference footnote number and footnote text. InDesign automatically applies superscript to the footnote marker or reference number (see sample figure below). The footnote text will also automatically import Microsoft Word’s footnote style named “Footnote Text” and character style “Footnote Reference”.

You may edit the “Footnote Text” paragraph style to your preference. We discussed about paragraph styles in Part 1 of our InDesign book tutorial. On a regular sized book, I would normally set my footnote to 8 pts. in size. You may also customize the default “Footnote Reference” character style if you want.
After editing your footnote paragraph style, you may now globally format your footnotes by invoking the Document Footnote options (Type > Document Footnote Options).

The Numbering options are pretty much basic, you use it if you want to change numbering style and starting footnote reference number. In the Formatting options, you may change the Character Style from “none” to the “Footnote Reference” Character style or leave it as is. Then change the Footnote Formatting, Paragraph Style from “Basic Paragraph” to the one you just customized which is the “Footnote Text” paragraph style.
Next, click the Layout tab to format your footnotes’ appearance further. Under the Layout tab, I would just set the Minimum Space Before First Footnote to 3mm, then set the footnote line separator to just 0.25 pts. because the default line separator of 1 pt. is just too thick. All other options can be adjusted based on your preferences.

A sample of how our footnote looks like is shown below.

Adding footnotes inside InDesign is as simple as positioning your text cursor on the location of the footnote reference number, then right click and select Insert Footnote. After which, a footnote reference number will automatically be added and you will be prompted below to insert your footnote text.
Adding and formatting table of contents
Adding table of contents (TOC) on long documents like books can tasking if done manually. I know how hard it is. I was doing it manually before when I was still beginning to use InDesign and haven’t discovered yet its TOC feature. And yes, thankfully, InDesign has it. The TOC featute of InDesign offers a lot of flexibility and many options which you can explore on your own. But for this tutorial, we will just cover the basic things we need to create a simple TOC for our book.
To prepare our TOC, you’ll need a page or two to contain it. Then while you’re on your TOC page, go to Layout > Table of Contents. When the Table of Contents dialogue box shows up, do the following steps.
1. Click the “More Options” button on the right to display additional options.
2. Change your TOC title to your preferred title like “Table of Contents”, instead of the default “Content”.
3. From the “Other Styles” column, select the paragraph styles you want to include in your table of contents. Ex. “Heading 1″, “Heading 2″, etc.
4. Change the entry style to any style you want or a special TOC paragraph style you may have created prior to adding the TOC. By default they are set to “Same Style” which means same paragraph style of your TOC entry. You may not want it that way (default) if you want to have a consistent style throughout your TOC.

5. Click OK then click and drag the loaded text cursor onto your TOC page.
The new table of contents may appear a little like the one shown below. You will need to format it further to have a better looking table of contents.

Fix it by adding line spaces between main sections (front matters, chapters, references, etc.). Fix also the tabs, especially tabs between entry text and page number. To fix tab the tab alignment between entry text and page numbers, open the tabs dialog box (Type > Tabs) then do the following steps.
1. Position your page number tab to where you want it to align.
2. Select and enable the “Right align” tab option to make your page numbers right aligned.
3. type a period character in the leader box to create a dotted line between the entry text and page numbers.
Once your TOC is properly formatted, it may look a little something like the one shown below.
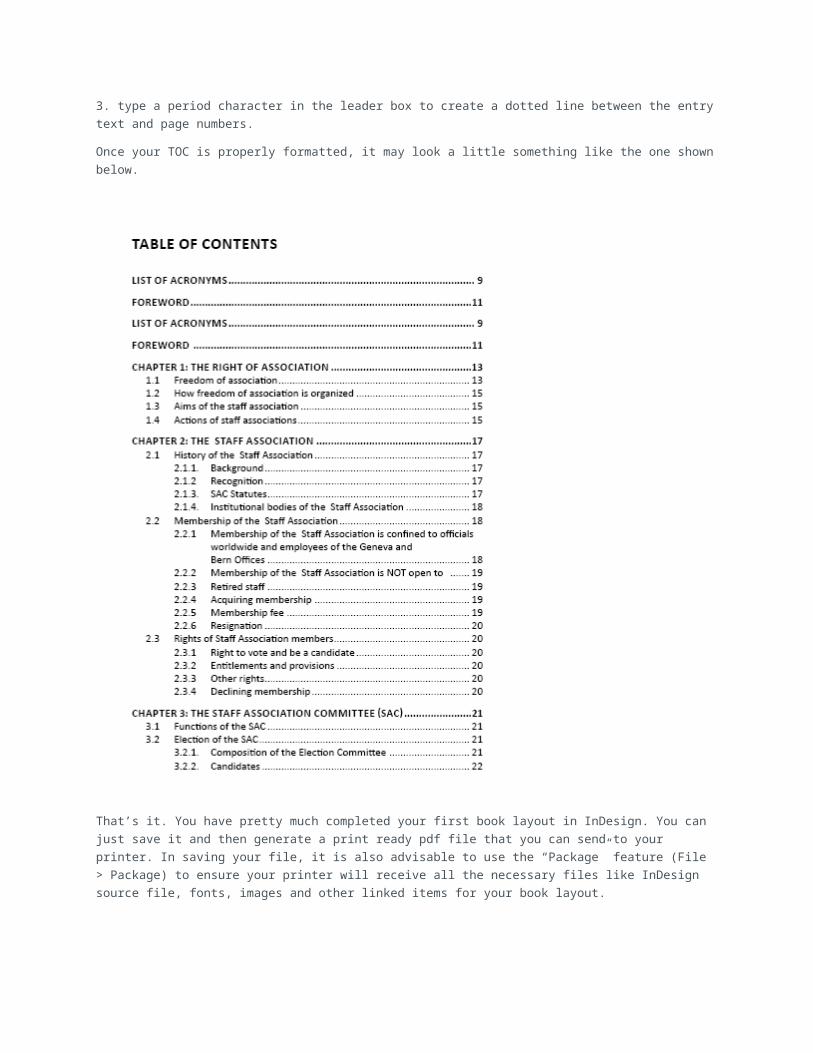
That’s it. You have pretty much completed your first book layout in InDesign. You can just save it and then generate a print ready pdf file that you can send to your printer. In saving your file, it is also advisable to use the “Package” feature (File > Package) to ensure your printer will receive all the necessary files like InDesign source file, fonts, images and other linked items for your book layout.
In exporting print ready pdf file, I recommend using the preset designated PDF/X-1a: 2001. This is the industry pdf standard that has been put together specifically meant for print pdfs.
I hope readers will find these two part basic InDesign book layout tutorials helpful, especially beginners starting to learn using InDesign for long document layout like books.