basic photoshop levels - arctic climate...
TRANSCRIPT

ACMP ©2006-2008 UAF Geophysical Institute C-1 Basic Photoshop
III-IV
Grades 5-8
LevelsBasic Photoshop
Overview:Photoshop is one of the most common computer programs used to work with digital images. In this lesson, students use Photoshop to enhance a photo of Brevig Mission School, so that it could be included in a presentation.
Objectives:The student will:• downloadanimagefromtheInternet;and• usePhotoshoptostraighten,crop,enhance,andresizeadigitalimage.
Alaska Content Standards:TechnologyA1 A student should be able to operate technology-based tools. A student who meets the content
standard should use a computer to enter and retrieve information.
Materials:• ComputerwithAdobePhotoshopandanInternetconnection• Printer(optional)• STUDENTWORKSHEET:“LearningtoUsePhotoshop”(ThankstoMollieSmithfromBrevigMissionforprovidingthephoto.)
IT Basics:Photoshop is photo editing software.
Part of learning Photoshop is knowing what order the changes should be made in. For example, you wouldnotwanttocropaphotobeforeitisstraightened;doingitinreverseorderwouldresultinaddi-tionalcroppingmodificationsafter thephoto isstraightened.The laststep indigitalenhancementsshouldbesharpening.Sharpeningbeforeaphotoisresizedcancausethesharpeningeffecttolookdramaticallydifferentafterithasbeenresized.
Activity Procedure:1. Guidestudentsthroughdownloadingthephoto“BrevigMission.jpg”fromtheACMPwebsite(www.
ArcticClimateModeling.org)intheClassroomLessonssection.Askstudentstosavethephotoonthedesktop or in their own folder.
2. Ask students to launch Photoshop and open the Brevig Mission photo.
3. Ask students to look at the photo, and make a list of changes they think should be made to improve thephoto.Discussasaclass.
4. Explaininthislesson,thephotowillbestraightened,cropped,brightness/contrastenhanced,resized,and thensharpened.Therearealsooptional steps foradjusting theperspectiveand resizing theimage.
5. DistributetheSTUDENTWORKSHEET:“LearningtoUsePhotoshop.”Guidestudentsthroughtheworksheet
Extension Idea: Ask students to locate an image online that relates to a weather or climate topic. Ask studentstomodifythephotographinoneofthefollowingways:1)foruseinapresentationor2)todemonstrate a prediction or physical processes.

ACMP ©2006-2008 UAF Geophysical Institute C-2 Basic Photoshop
Name:____________________________________
III-IV
Grades 5-8
Levels
Directions:
STEP 1. Open the application Adobe Photoshop. It may be on the dock or in the applications folder.
STEP 2. Open the BrevigMission.jpg photo that was downloaded by selecting File → Openandnavigatingtothephotograph.Clickonthefilenameofthephotograph, and then click Open. It will be found on the desktop if that is where it was saved.
Straightening Photos
This photo looks like it is tilted slightly to the left, or counter clockwise, so it needs to be rotated clockwise, or to the right. There are several ways to rotate photos. For this photo we will use the measuring tool.
STEP 3. Clickandholdontheeyedroppertool.Aflyoutmenuwillallowyoutoselect the measuring tool. Move the pointer to the measure tool or mouse and release the mouse. The cursor should resemble a ruler.
STEP 4. Click and drag a vertical line along the new addition to the school as shown below. It is where the light gray and blue sides meet.
STEP 5. Select Image → Rotate Canvas → Arbitrary.
STEP 6. A dialog screen will come up. Photoshop is assuming that the line should be vertical and is asking if you want to rotate the photo by the amount necessary to make the line vertical.
In this example the rotation should be about 2 degrees clockwise. Click OK and the photo will rotate.
(NOTE:Draggingalinealongthehorizonofaphotothen rotating it the same way can also be done with this method. Photoshopwillcorrecttheimagetothenearesthorizontal orverticalline.)
Cropping the Photo
Cropping is a way to remove unwanted parts of a photo. The power lines in the photo are distracting so they will be cropped out along with some of the foreground.
Learning to Use PhotoshopStudentWorksheet(page1of4)

ACMP ©2006-2008 UAF Geophysical Institute C-3 Basic Photoshop
Name:____________________________________
III-IV
Grades 5-8
Levels
STEP 7. Select the crop tool.
STEP 8. Move the cursor to the upper left of the photo where the crop will begin. Click and drag to the lower right.
STEP 9.Usetheresizehandlesto“finetune”thecrop,sothe power lines are cropped out. Be sure to leave the top of the school.
STEP 10. Press[Return]tocropthephoto.
Adjusting Perspective
Eventhoughtheschoolhasbeenstraightened,thestraightlinesofthebuildingnear the edges of the photo make it look like it is tilting away from the camera. Correcting this used to require taking the photo with an expensive camera. Photoshop has made it easy.
STEP 11. Make the workspace larger by dragging the handle at the lower right of the photo.
STEP 12. Select all by pressing command-A or choosing Select → All from the menu. The image should have a dotted line around it.
STEP 13. Select Edit → Transform → Perspective.
STEP 14. Adjustingthephotobyclickinganddraggingtheresizehandleatthetop rightcornerofthephoto.Dragthehandleuntilthelinesofthewindoware parallel with edge of the photo.
Learning to Use PhotoshopStudentWorksheet(page2of4)
ACMP ©2006-2008 UAF Geophysical Institute C-4 Basic Photoshop
Name:____________________________________
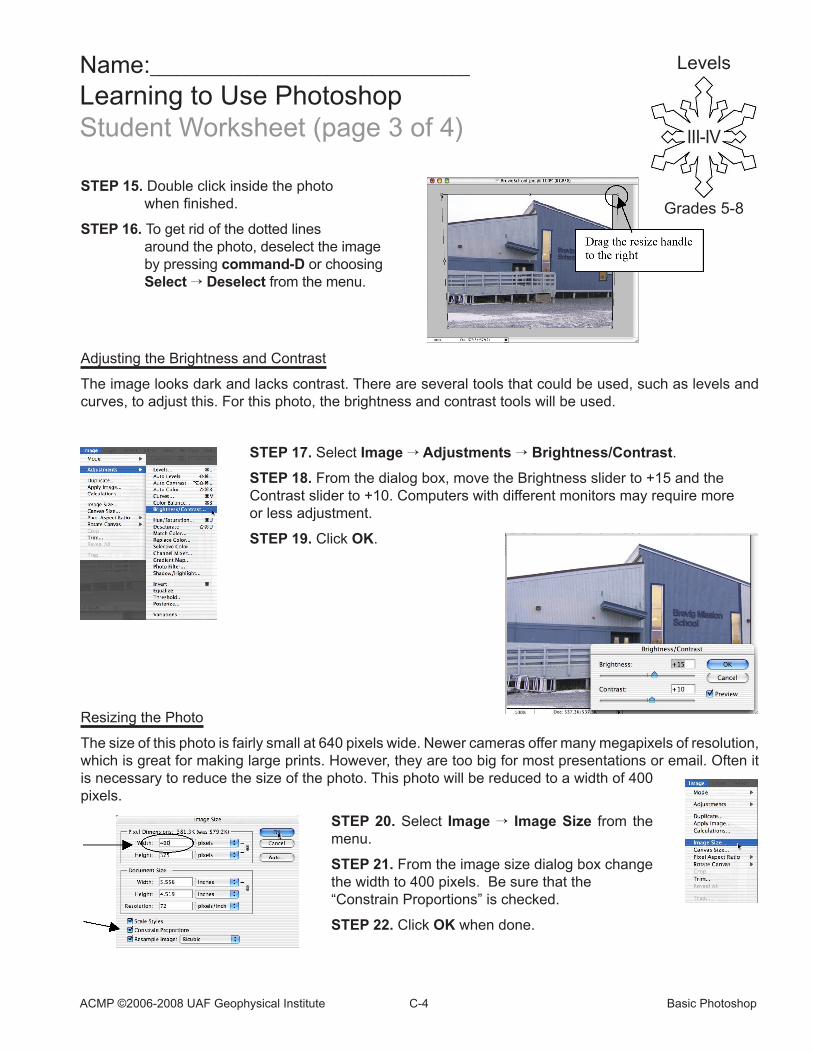
STEP 15. Doubleclickinsidethephoto whenfinished.
STEP 16. To get rid of the dotted lines around the photo, deselect the image by pressing command-D or choosing Select → Deselect from the menu.
Adjusting the Brightness and Contrast
The image looks dark and lacks contrast. There are several tools that could be used, such as levels and curves, to adjust this. For this photo, the brightness and contrast tools will be used.
STEP 17. Select Image → Adjustments → Brightness/Contrast.
STEP 18. From the dialog box, move the Brightness slider to +15 and the Contrast slider to +10. Computers with different monitors may require more or less adjustment.
STEP 19. Click OK.
ResizingthePhoto
Thesizeofthisphotoisfairlysmallat640pixelswide.Newercamerasoffermanymegapixelsofresolution,whichisgreatformakinglargeprints.However,theyaretoobigformostpresentationsoremail.Oftenitisnecessarytoreducethesizeofthephoto.Thisphotowillbereducedtoawidthof400pixels.
STEP 20. Select Image → Image Size from the menu.
STEP 21.Fromtheimagesizedialogboxchangethe width to 400 pixels. Be sure that the “ConstrainProportions”ischecked.
STEP 22. Click OK when done.
Learning to Use PhotoshopStudentWorksheet(page3of4) III-IV
Grades 5-8
Levels
ACMP ©2006-2008 UAF Geophysical Institute C-5 Basic Photoshop
Name:____________________________________
III-IV
Grades 5-8
Levels
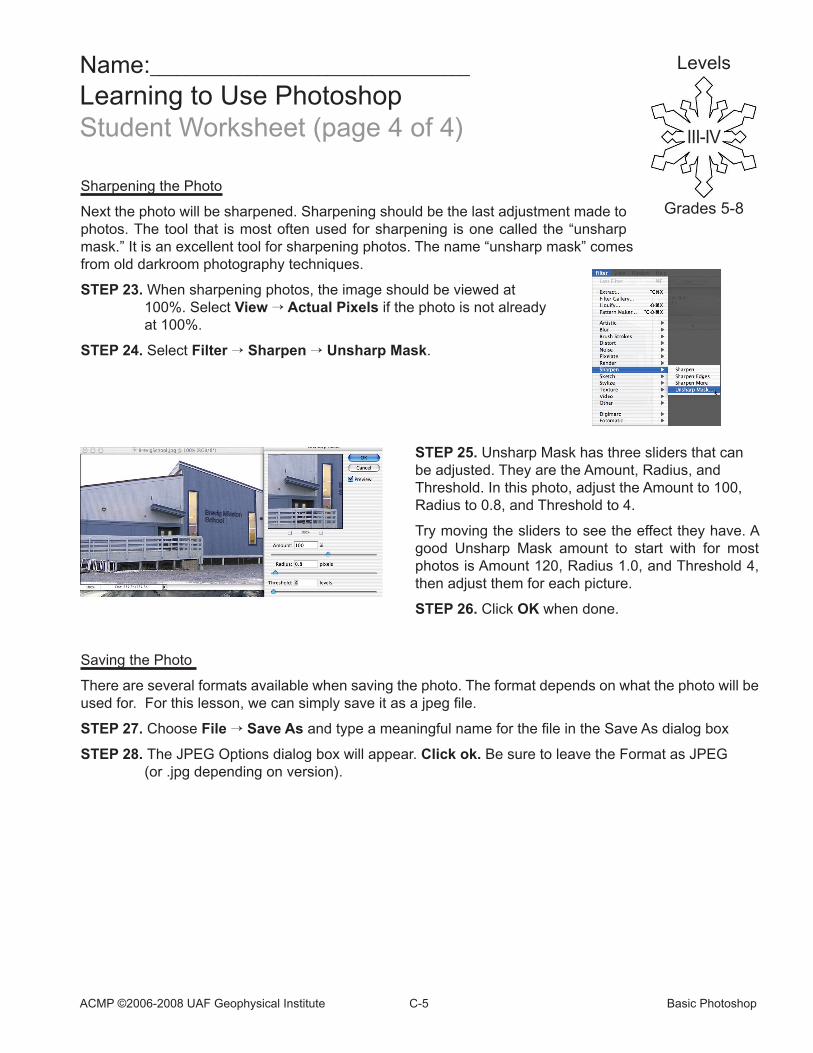
Sharpening the Photo
Nextthephotowillbesharpened.Sharpeningshouldbethelastadjustmentmadetophotos.Thetool that ismostoftenused forsharpening isonecalled the“unsharpmask.”Itisanexcellenttoolforsharpeningphotos.Thename“unsharpmask”comes from old darkroom photography techniques.
STEP 23.Whensharpeningphotos,theimageshouldbeviewedat 100%. Select View → Actual Pixels if the photo is not already at 100%.
STEP 24. Select Filter → Sharpen → Unsharp Mask.
STEP 25. Unsharp Mask has three sliders that can beadjusted.TheyaretheAmount,Radius,andThreshold. In this photo, adjust the Amount to 100, Radiusto0.8,andThresholdto4.
Try moving the sliders to see the effect they have. A good Unsharp Mask amount to start with for most photosisAmount120,Radius1.0,andThreshold4,then adjust them for each picture.
STEP 26. Click OK when done.
Saving the Photo
There are several formats available when saving the photo. The format depends on what the photo will be usedfor.Forthislesson,wecansimplysaveitasajpegfile.
STEP 27. Choose File → Save AsandtypeameaningfulnameforthefileintheSaveAsdialogbox
STEP 28. TheJPEGOptionsdialogboxwillappear.Click ok. BesuretoleavetheFormatasJPEG (or.jpgdependingonversion).
Learning to Use PhotoshopStudentWorksheet(page4of4)