basic steel rollator with 6 wheels knockdown rolling walker
TRANSCRIPT

MDS86850ESKD
Basic Steel Rollator with 6" Wheels
Knockdown Rolling Walker
User Instructions & Warranty
Latex Free
Click here to view detailed product descriptions and prices. Call 800-397-5899 to order today!

GPI171-IM27 MDS86850ESKD
Revised: 04/10/20142

Table of Contents
Safety Instructions ................................................................. 4
Rollator Parts List ................................................................. 5
Assembly Instructions .......................................................... 6
Operating Instructions ......................................................... 9
Maintenance ......................................................................... 9
Warranty ............................................................................. 12
GPI171-IM27 MDS86850ESKD
Revised: 04/10/20144
Safety Instructions
To ensure your safety in using the Medline rollator, the following safety information and all instructions must be followed.
GENERAL CAUTIONS:
DO NOT use this product without first reading and understanding the instructions contained in this manual. If you are unable to understand the warnings, cautions, or instruc-tions, contact a healthcare professional, dealer, or technical personnel before use. Failure to do this may result in bodily injury or damage to the device.
DO NOT self-propel the rollator while seated.
Rollators are intended for individual use only and are NOT TO BE USED AS A WHEELCHAIR. Serious injury to the user and/or damage to the rollator’s frame or wheels may result from improper use.
DO NOT use the rollator to walk backwards, down gradients or to climb stairs, curbs, or to go over obstacles. Serious risk of fall or injury may occur.
√ The backrest is intended to provide back support while seated. The backrest is not intended to support full body weight. Avoid leaning while sitting as this may result in fall.
√ All wheels must be in contact with the floor and/or ground at ALL TIMES. This will ensure the rollator is properly balanced.
DO NOT exceed the maximum weight capacity (including bag contents) or serious injury could result. Maximum weight capacity: 350 lbs (159 kg)
√ Items should be placed completely in bag and should not protrude. Excess weight may cause the rollator to tip, resulting in bodily injury or rollator damage
√ The bag located under the seat has a weight limitation of 10 lbs (4.5 kg).
√ Before each use make sure the rollator frame is fully opened.
√ Periodically wipe down the rollator with a soft cloth and nonabrasive cleaner.
SEAT CAUTIONS:
√ The brakes MUST be in the locked position BEFORE sitting on the seat.
DO NOT sit on the rollator while it is being loaded into a vehicle or while it is being transported in a vehicle.
DO NOT use the seat to transport people or objects.
DO NOT sit on the seat when the rollator is on an incline.
BRAKE CAUTIONS:
Check the brakes for proper operation. Make sure that all parts are secure and that the moving parts are in good working order.
Wheels should roll easily and not wobble.
When rising from a lower position, DO NOT use the rollator to provide assistance to the user. If the rollator is used to pull the user up to a standing position, the rollator may move even if the brakes are in the locked position and this could result in a fall.
DO NOT push the rollator while brakes are enabled. Brakes are to be used to keep the wheels from rolling. However, it may not prevent the rollator from moving if it is pushed.
Note: Only use accessories and spare parts authorized by Medline Industries

GPI171-IM27 MDS86850ESKDRevised: 04/10/2014
5
Rollator Parts List
Note: You may wish to request a set up and operating demonstration with your local Medical Equipment provider or pharmacy.
Figure 1: Assembled Rollator
Assembled RollatorA. HandgripsB. Adjustable HandlebarsC. Four Point KnobsD. Backrest E. Backrest AttachmentF. SeatG. Brake LockH. Brake CablesI. Folding Support BracketJ. 6" (15.2 cm) Front WheelsK. 6" (15.2 cm) Back WheelsL. Triangular KnobsM. Brake Shoe
1 Rollator Frame1 Backrest with Pad2 Handlebars with Brake Assembly1 Bag2 Front Wheels2 Rear Wheels2 Four Point Knobs2 Screws and Curved Washers4 Triangular Knobs
AB
D
H
E
F
J
K
C
M
G
I
GPI171-IM27 MDS86850ESKD
Revised: 04/10/20146
Assembly Instructions
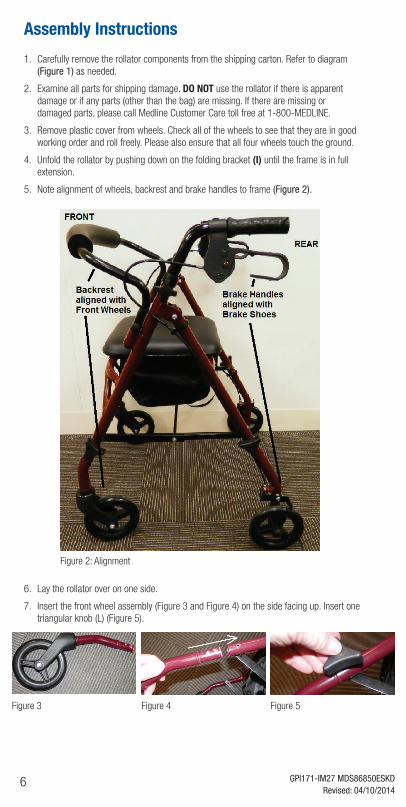
1. Carefully remove the rollator components from the shipping carton. Refer to diagram (Figure 1) as needed.
2. Examine all parts for shipping damage. DO NOT use the rollator if there is apparent damage or if any parts (other than the bag) are missing. If there are missing or damaged parts, please call Medline Customer Care toll free at 1-800-MEDLINE.
3. Remove plastic cover from wheels. Check all of the wheels to see that they are in good working order and roll freely. Please also ensure that all four wheels touch the ground.
4. Unfold the rollator by pushing down on the folding bracket (I) until the frame is in full extension.
5. Note alignment of wheels, backrest and brake handles to frame (Figure 2).
6. Lay the rollator over on one side.
7. Insert the front wheel assembly (Figure 3 and Figure 4) on the side facing up. Insert one triangular knob (L) (Figure 5).
Figure 2: Alignment
Figure 3 Figure 4 Figure 5
GPI171-IM27 MDS86850ESKDRevised: 04/10/2014
7
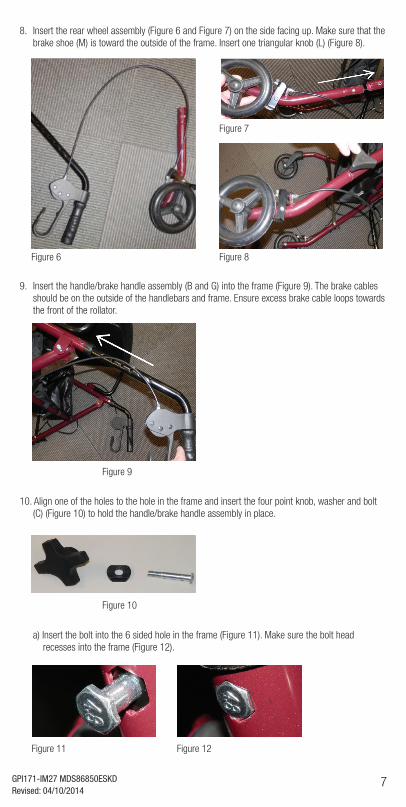
8. Insert the rear wheel assembly (Figure 6 and Figure 7) on the side facing up. Make sure that the brake shoe (M) is toward the outside of the frame. Insert one triangular knob (L) (Figure 8).
9. Insert the handle/brake handle assembly (B and G) into the frame (Figure 9). The brake cables should be on the outside of the handlebars and frame. Ensure excess brake cable loops towards the front of the rollator.
10. Align one of the holes to the hole in the frame and insert the four point knob, washer and bolt (C) (Figure 10) to hold the handle/brake handle assembly in place.
a) Insert the bolt into the 6 sided hole in the frame (Figure 11). Make sure the bolt head recesses into the frame (Figure 12).
Figure 6
Figure 9
Figure 7
Figure 10
Figure 8
Figure 11 Figure 12
GPI171-IM27 MDS86850ESKD
Revised: 04/10/20148
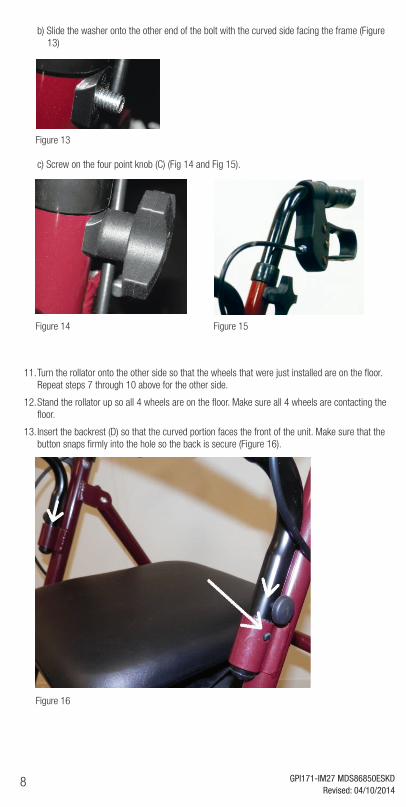
b) Slide the washer onto the other end of the bolt with the curved side facing the frame (Figure 13)
c) Screw on the four point knob (C) (Fig 14 and Fig 15).
11. Turn the rollator onto the other side so that the wheels that were just installed are on the floor. Repeat steps 7 through 10 above for the other side.
12. Stand the rollator up so all 4 wheels are on the floor. Make sure all 4 wheels are contacting the floor.
13. Insert the backrest (D) so that the curved portion faces the front of the unit. Make sure that the button snaps firmly into the hole so the back is secure (Figure 16).
Figure 16
Figure 14 Figure 15
Figure 13
GPI171-IM27 MDS86850ESKDRevised: 04/10/2014
9
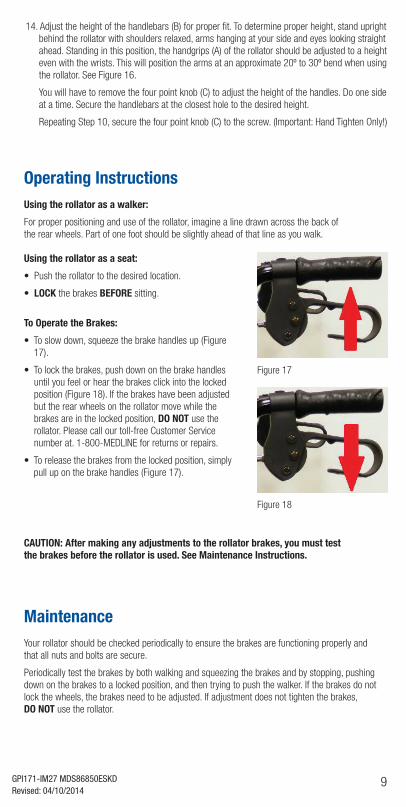
To Operate the Brakes:
• To slow down, squeeze the brake handles up (Figure 17).
• To lock the brakes, push down on the brake handles until you feel or hear the brakes click into the locked position (Figure 18). If the brakes have been adjusted but the rear wheels on the rollator move while the brakes are in the locked position, DO NOT use the rollator. Please call our toll-free Customer Service number at. 1-800-MEDLINE for returns or repairs.
• To release the brakes from the locked position, simply pull up on the brake handles (Figure 17).
CAUTION: After making any adjustments to the rollator brakes, you must test the brakes before the rollator is used. See Maintenance Instructions.
MaintenanceYour rollator should be checked periodically to ensure the brakes are functioning properly and that all nuts and bolts are secure.
Periodically test the brakes by both walking and squeezing the brakes and by stopping, pushing down on the brakes to a locked position, and then trying to push the walker. If the brakes do not lock the wheels, the brakes need to be adjusted. If adjustment does not tighten the brakes, DO NOT use the rollator.
Operating InstructionsUsing the rollator as a walker:
For proper positioning and use of the rollator, imagine a line drawn across the back of the rear wheels. Part of one foot should be slightly ahead of that line as you walk. Using the rollator as a seat:
• Push the rollator to the desired location.
• LOCK the brakes BEFORE sitting.
14. Adjust the height of the handlebars (B) for proper fit. To determine proper height, stand upright behind the rollator with shoulders relaxed, arms hanging at your side and eyes looking straight ahead. Standing in this position, the handgrips (A) of the rollator should be adjusted to a height even with the wrists. This will position the arms at an approximate 20º to 30º bend when using the rollator. See Figure 16.
You will have to remove the four point knob (C) to adjust the height of the handles. Do one side at a time. Secure the handlebars at the closest hole to the desired height.
Repeating Step 10, secure the four point knob (C) to the screw. (Important: Hand Tighten Only!)
Figure 17
Figure 18
GPI171-IM27 MDS86850ESKD
Revised: 04/10/201410
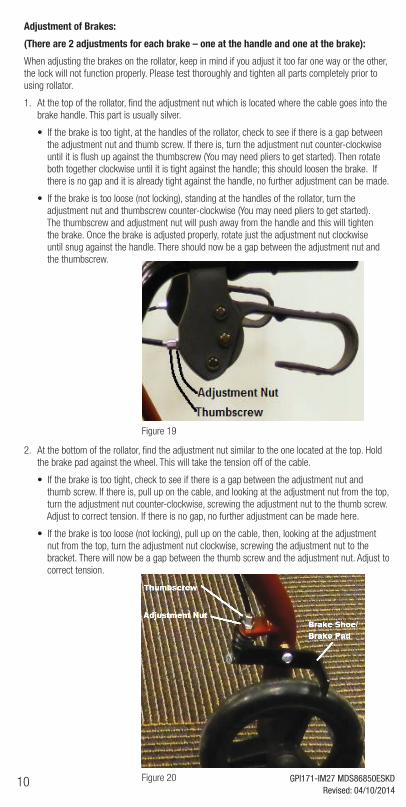
Adjustment of Brakes:
(There are 2 adjustments for each brake – one at the handle and one at the brake):
When adjusting the brakes on the rollator, keep in mind if you adjust it too far one way or the other, the lock will not function properly. Please test thoroughly and tighten all parts completely prior to using rollator.
1. At the top of the rollator, find the adjustment nut which is located where the cable goes into the brake handle. This part is usually silver.
• If the brake is too tight, at the handles of the rollator, check to see if there is a gap between the adjustment nut and thumb screw. If there is, turn the adjustment nut counter-clockwise until it is flush up against the thumbscrew (You may need pliers to get started). Then rotate both together clockwise until it is tight against the handle; this should loosen the brake. If there is no gap and it is already tight against the handle, no further adjustment can be made.
• If the brake is too loose (not locking), standing at the handles of the rollator, turn the adjustment nut and thumbscrew counter-clockwise (You may need pliers to get started). The thumbscrew and adjustment nut will push away from the handle and this will tighten the brake. Once the brake is adjusted properly, rotate just the adjustment nut clockwise until snug against the handle. There should now be a gap between the adjustment nut and the thumbscrew.
2. At the bottom of the rollator, find the adjustment nut similar to the one located at the top. Hold the brake pad against the wheel. This will take the tension off of the cable.
• If the brake is too tight, check to see if there is a gap between the adjustment nut and thumb screw. If there is, pull up on the cable, and looking at the adjustment nut from the top, turn the adjustment nut counter-clockwise, screwing the adjustment nut to the thumb screw. Adjust to correct tension. If there is no gap, no further adjustment can be made here.
• If the brake is too loose (not locking), pull up on the cable, then, looking at the adjustment nut from the top, turn the adjustment nut clockwise, screwing the adjustment nut to the bracket. There will now be a gap between the thumb screw and the adjustment nut. Adjust to correct tension.
Figure 19
Figure 20

GPI171-IM27 MDS86850ESKDRevised: 04/10/2014
11
GPI171-IM27 MDS86850ESKD
Revised: 04/10/201412
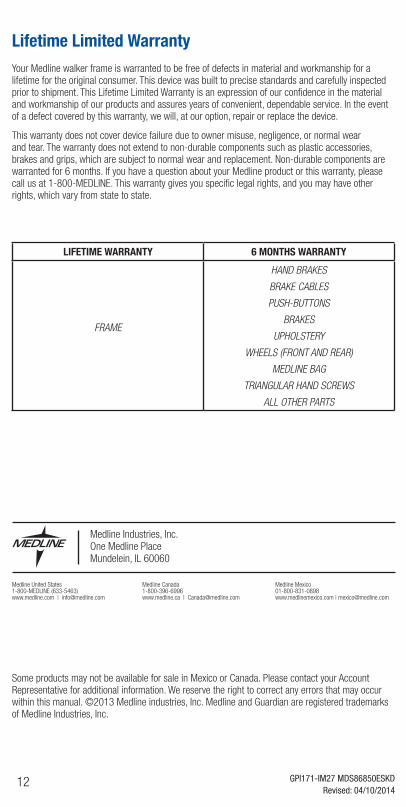
Lifetime Limited WarrantyYour Medline walker frame is warranted to be free of defects in material and workmanship for a lifetime for the original consumer. This device was built to precise standards and carefully inspected prior to shipment. This Lifetime Limited Warranty is an expression of our confidence in the material and workmanship of our products and assures years of convenient, dependable service. In the event of a defect covered by this warranty, we will, at our option, repair or replace the device.
This warranty does not cover device failure due to owner misuse, negligence, or normal wear and tear. The warranty does not extend to non-durable components such as plastic accessories, brakes and grips, which are subject to normal wear and replacement. Non-durable components are warranted for 6 months. If you have a question about your Medline product or this warranty, please call us at 1-800-MEDLINE. This warranty gives you specific legal rights, and you may have other rights, which vary from state to state.
LIFETIME WARRANTY 6 MONTHS WARRANTY
FRAME
HAND BRAKES
BRAKE CABLES
PUSH-BUTTONS
BRAKES
UPHOLSTERY
WHEELS (FRONT AND REAR)
MEDLINE BAG
TRIANGULAR HAND SCREWS
ALL OTHER PARTS
Some products may not be available for sale in Mexico or Canada. Please contact your Account Representative for additional information. We reserve the right to correct any errors that may occur within this manual. ©2013 Medline industries, Inc. Medline and Guardian are registered trademarks of Medline Industries, Inc.
Medline United States Medline Canada Medline Mexico1-800-MEDLINE (633-5463) 1-800-396-6996 01-800-831-0898www.medline.com | [email protected] www.medline.ca | [email protected] www.medlinemexico.com | [email protected]
Medline Industries, Inc.One Medline PlaceMundelein, IL 60060