beekeeping in tennessee
TRANSCRIPT

1
BeekeepinginTennessee
PB1745
$10.00
2 3
BeekeepinginTennessee
Authors:
John A. Skinner, Professor and Extension Apiculture Specialist, University of Tennessee
James P. Parkman, Adjunct Assistant Professor and IPM Coordinator, University of Tennessee
Michael D. Studer, Senior Laboratory Technician, University of Tennessee
Harry E. Williams, Professor Emeritus (Deceased), University of Tennessee
Dedication:Mr.HarryE.Williams
The authors dedicate this publication in fondest memory of Professor Harry Williams, who retired from the university in 1995 after serving as entomologist and apiculturist for 30 years. Harry received a bachelor’s degree in biology from Middle Tennessee State University, followed by a master’s degree in entomology from the University of Tennessee. He acquired much of his extensive training in entomology while doing the job he loved. Harry’s training in beekeeping began one day when he was informed that he was the new apiculturist. After determining what that word meant, he studied hard and learned from knowledgeable beekeepers including Leslie Little, Charles Pless, Carl Johanson, Roger Morse and many others. The most important attribute of Harry Williams was not based on academic pursuits including publications, knowledge or experience. His main attribute was that he simply cared deeply about people and helped them in every way he could. He assisted numerous beekeepers in Tennessee and throughout the Southeast to better understand how to care for their bees, from the beginner to the experienced person. Harry would appreciate this gesture and we are pleased to dedicate this publication in his memory.
Acknowledgements:
Aurora Canaday for two photographs in Basic Anatomy: bee ingesting honey and three bees with pollen.
Laura Bryant for line drawing of ideal apiary.
Ken Lorenzen and Robin Thorp for several bee anatomy photographs.
To many Tennessee beekeepers who improved our knowledge, encouraged our efforts and were patient with the long time required to bring this publication to completion.

2 3
TableofContents
Getting Started in Beekeeping Why Beekeeping? Is Beekeeping for You? What Is Beekeeping All About?Many Sources of Beekeeping Information Are Available Beekeeping Literature Beekeeping Web Sites Beekeeping Organizations Educational Courses University of Tennessee Beemaster Program Hobbyist Level Inspector Training Level Finding a MentorBeginning Beekeeping BasicsHoney Bee StingsBeekeeping Regulations in TennesseeLocating an Apiary Essential Elements of an Apiary Include:Bee Biology and Behavior Basic Anatomy The Honey Bee Colony The Queen Bee The Queen Is a Prolic Egg Layer Bee Development Fertilized Eggs Develop into Females The Drone Bee The Worker Bee Worker “Job Description” and Behavior Early Duties Include Wax Production and Comb Building Older Bees Are Field Bees: Scouts or Foragers Propolis Collection Colony Performance StandardsRaces of Bees The Italian Honey Bee The Carniolan Honey Bee The Caucasian Honey Bee Hybrid Bees The Buckfast Hybrid The Starline Hybrid Italian Cordovans Carniolan Hybrids The Russian Bee The SMRT HybridBeekeeping Protective Gear Veils Helmets Clothing/ Bee Suits GlovesHardware and Tools Hive Tools SmokerWooden Equipment Bee Space Is Important The Parts of a Standard Hive Area for Brood Chambers and SupersWorking with a Honey Bee ColonyInspecting a Colony
5555555667777778889910101011111111111112131313131414141414151515151515151516161616171717172121

4 5
Starting Your Colony Installing a Package of Honey Bees Receiving a Package Installation Other Methods of Bee Installation Starting by Collecting a Swarm What Is a Swarm? Preparing for a “Swarm Call” How to Collect a Swarm Splitting or Dividing a Colony Why Divide? When Should a Colony Be Divided? Divide a Colony with Queen Cells Divide a Colony and Produce a Queen from Eggs Divide a Colony and Requeen with Purchased QueenQueen Marking How to Mark a QueenRequeening Why Requeen? When to Requeen? Queen Introduction – Direct or Indirect? Installing a Queen in a Shipping Cage Installing a Queen using Press-in CagesMoving a Colony To Move a Colony a Short Distance Secure the Colony before Moving Ventilate the Bees for the Move When to Move a ColonyRemoving Surplus Honey Methods to Remove Bees from Honey Supers Bee Repellants Air Blower Bee Escapes If You Find Brood in the Honey Supers Avoid RobbingOverwintering a Honey Bee Colony Prepare the Colony Provide Adequate Honey for Survival Minimize Inspections in Cold Weather Ventilate if Needed Reduce Airow if NeededPests of Honey Bees Tracheal Mites Acarapis woodi Biology Symptoms Detection and Diagnosis Sampling for Varroa and Tracheal Mites Dissection Treatments for Tracheal Mites Varroa Mites, Varroa destructor Economic Damage Biology Detection Sensitivity of Method Treatments Parasitic Mite Syndrome Small Hive Beetle Aethina tumida American FoulbroodSeasonal Management
2222222323242424252525262626262727272727282829293030303030313131313131313131323232323232323333333334343535363737383940
4 5
GettingStartedinBeekeeping
WhyBeekeeping? Most people realize that beekeeping is important to world-wide agricultural production, because bees pollinate fruits and vegetables valued in billions of dollars. Without the honey bee, our food supply could be in serious jeopardy. The economic value of honey, wax and other hive products is continually increasing as we nd new uses for bee-related products. People of either sex or any age can keep bees almost anywhere. When asked why they become beekeepers, people’s responses are variable, including “to pollinate my garden,” “to make honey to sell,” “to teach my children something useful,” “to put honey on my biscuits,” “as therapy,” to understand “what makes bees tick,” because they thought it would be fun and “because I just like foolin’ with ‘em.”
IsBeekeepingforYou? There are many factors to consider before becoming a beekeeper and setting up your own honey bee colonies. This section contains information on the more important ones and may help you decide if beekeeping is right for you.
WhatIsBeekeepingAllAbout? The rst step in becoming a beekeeper is deciding if you actually want to be one. It would be a shame to commit a lot of time, effort and money in setting up a few bee colonies only to discover that you really don’t enjoy beekeeping. There are several good ways to nd out what’s in store for you as a beekeeper. These include reading some of the vast amount of literature on the subject; attending local, regional or state beekeeping association meetings; attending beekeeping educational classes; visiting beekeeping Web sites; and establishing a relationship with an experienced beekeeper.
ManySourcesofBeekeepingInformationAreAvailable
BeekeepingLiterature Many good textbooks on beekeeping are available, including several suited for beginners. Although they vary in style and content, these books will provide adequate introductory information for any novice. Because of the differences in subject content, you may want to read at least two of these books. In the USA, there are two major monthly periodicals devoted to beekeeping: The American Bee
Journal and Bee Culture. These contain a variety of information, from articles of popular interest to those reporting research results from beekeeping scientists. Reading them is a good way to nd out about current beekeeping trends and issues. Information about these and other beekeeping periodicals is available on the Web at http://eppserver.ag.utk.edu/Bees/test/organizations.html University of Tennessee Extension has several beekeeping publications. They are available from your county Extension ofce and also can be downloaded and printed from the UT Beekeeping Web page:http://eppserver.ag.utk.edu/Bees/test/publications.html Catalogues of beekeeping product suppliers may also provide useful information to the would-be and beginning beekeeper. You can familiarize yourself with the variety of available equipment and you can estimate the nancial costs associated with becoming a beekeeper and maintaining bee colonies. The UT Beekeeping Web site http://eppserver.ag.utk.edu/Bees/test contains contact information, including Web site addresses, if available, for many beekeeping product suppliers.
BeekeepingWebSites-BeekeepingWebPages The UT Beekeeping Web site has links to a variety of helpful Web sites. The inclusion of these sites does not imply endorsement or recommendation of these sites or the products and services found at the sites. They are included to provide easily accessible resources to beekeepers. They include addresses, phone numbers, fax numbers, e-mail links and Web site links, where available. The Beekeeping Equipment Suppliers list includes local and national suppliers. It is divided into three categories: General Beekeeping Equipment, Containers and Labels, and Candle Making. The Queen and Package Producers list is designed to make it easier to nd the race of bees you wish to purchase. This page lists all of the known producers of queens and packages by the race of bees that they offer. The Association lists will allow you to nd a local association in your area, the Tennessee Beekeeping Association and other state associations, along with national and international associations. These are good sources of information if you are interested in joining an organized group or just interested in talking to other beekeepers in your area. Links to the Journals and Newsletters list and the USDA Bee Research Labs allows you to keep up-to-date with current research and news. The National Honey Board

6 7
is a good source of general information and a valuable resource for many producers. The Beekeeping Links for Kids provide a variety of fun and educational sites for youth and teachers. A list of current UT Beekeeping Publications links to on-line publications and includes a list of hard copy publications available through UT. A link for the Tennessee state apiarist is also included, which allows you to register your bees and read the state apiary laws.
BeekeepingOrganizations Tennessee beekeeping associations: Tennessee has one state beekeeping association, the Tennessee Beekeeper’s Association (TBA). The objectives of the TBA include the promotion of modern, scientic beekeeping throughout Tennessee, encouraging youth in the art of beekeeping and informing the public of the importance of the honey bee. The organization’s membership has increased to more than 450 beekeepers throughout Tennessee. Their board of directors includes representatives from 19 local associations (soon to be 21). They encourage mentoring for youth and for new beekeepers; support the 4-H program; publish an award-winning, bi-monthly newsletter; and enthusiastically host meetings where speakers from all over the country are invited to share new discoveries. Their meetings are very well-organized and always have a wonderful balance of educational subjects and “just plain fun.” Check their Web page, http://www.tnbeekeepers.org/, to learn all about their organization. Nineteen local beekeeping associations exist throughout Tennessee. They usually meet monthly and dues are very reasonable. Many of these groups host short courses about beekeeping that are very worthwhile to the new beekeeper. If your county has no association, you may consider joining the association nearest you. Regional associations are also available. The Eastern Apicultural Society (EAS) serves beekeepers throughout the eastern United States. Their annual meeting is held in the summer at different locations throughout the eastern US. The Heartland Apicultural Society (HAS), a new organization, serves states farther north, from Tennessee and Kentucky to Ohio, Indiana and Illinois. National organizations also exist, such as the American Beekeeping Federation and the American Honey Producers Association. You may want to get a few years of beekeeping experience before joining a national organization. Another national source
Figure 1. Beemaster classroom instruction.
Figure 2. Beemaster field training.
of information is the National Honey Board, which has an attractive and highly informative Web site. Information for contacting all these organizations appears on the UT Beekeeping Web site: http://eppserver.ag.utk.edu/Bees/test.
EducationalCourses Many beekeeping associations, including county associations, conduct educational “shortcourses” or workshops on an annual or biannual basis. Many of the presentations made at TBA meetings are educational in nature. A portion of the annual EAS meeting consists of intensive training sessions, with some of the classes designed for the beginning beekeeper. University of Tennessee Extension offers a beekeeping educational program that educates at several levels.

6 7
UniversityofTennesseeBeemasterProgram The Tennessee Beemaster Program is a training program developed to improve the knowledge of Tennessee beekeepers. An additional goal is to train a group of master beekeepers to serve as instructors, thereby extending beekeeping information to others throughout the state. The program has improved Tennessee’s beekeeping industry and public relations concerning beekeeping, and has benetted the state’s agriculture. When asked to evaluate the program, participants recommended the class for “beeginners” and for experienced beekeepers in need of a refresher. Since 1991, more than 500 people from 60 counties have successfully completed the Hobbyist Level Program. To date, there have been 22 Hobbyist Level Programs and six Inspector Training Level Programs conducted in 13 locations in Tennessee.
ProgramAchievementLevels The program is organized into two achievement levels based on the skill and knowledge of the participant, including 1) Hobbyist and 2) Inspector Training. Two additional levels are in preparation, including 3) Sideliner and 4) Master. Each level builds upon knowledge acquired at the previous level, with the Hobbyist being the entry level. Hobbyist – This entry-level program requires no previous training to enroll. Completion of this level requires passing a simple written test, which is necessary to objectively assess the skills acquired. There is no mandatory “years of beekeeping” requirement for this level. This level emphasizes a general understanding of topics that will serve as a foundation to expand and build upon in the Sideliner and Master levels. Ten lectures are presented, covering such subjects as sources of beekeeping information for the “beeginner,” basic bee biology and behavior, seasonal management, bee diseases and pests, and processing of honey and wax. An information packet containing 24 publications is provided. The nal class includes a trip to an apiary to gain some hands-on experience. Inspector Training Level – This level is designed to teach the experienced beekeeper how to recognize bee diseases and pests, including detection, diagnosis and treatments. Diseases covered include American and European Foulbrood, Nosema, Sacbrood, Chalkbrood and Bee Paralysis. Pests to be studied include tracheal and Varroa mites, small hive beetles, wax moths and the Africanized bee. The training includes two classroom sessions with handouts, demonstrations, slides, videos and laboratory preparations and at least one hands-on
training session outside with bee gear in a bee hive. A test will be conducted at the conclusion of the course. Individuals attending the sessions who pass the test will be given a certicate of training competence.
ProgramAvailability The Hobbyist Level Class is offered each spring at the University of Tennessee in Knoxville. Classes are offered in other locations in Tennessee as needed. For more information about the program and class offerings, please contact the Department of Entomology and Plant Pathology at (865) 974-7138.
FindingaBeekeepingMentor A mentor is an experienced beekeeper who can guide you by answering your questions and showing you how to do procedures that you may not understand without experience. You can nd a mentor through an association, Extension ofce or state apiculturist. Although literature can provide a plethora of beekeeping advice, reading is no substitute for actually working with the bees.
BeginningBeekeepingBasics
• Start small. Two colonies is an ideal number for an inexperienced person to keep for one or two years.• Expand as your experience and condence grow.• Start right. Avoid discouraging mistakes at the very beginning by thorough preparation. Read, read, read and ask questions of beekeepers and Extension staff.• Buy new equipment. The experience of assembling new hives is very informative for the inexperienced beginner.• Plan ahead. Order your bees, hives and tools in the fall. The hives and tools should be delivered in time to be assembled before your bees arrive the following April.• Be ready. When the packaged bees arrive, your hives should be assembled and located on the site selected for your apiary.
HoneyBeeStings
The would-be beekeeper should realize that, as a beekeeper, he or she will occasionally be stung. Stinging is the bees’ way of defending their colony. Honeybee stings are not a major medical problem for more than 99 percent of our population. Most people do not experience anything other than localized swelling, redness and pain as the result of being stung. Being stung could be considered a learning experience. It’s often an indication that the beekeeper

8 9
is doing something wrong. Most stings can be avoided by using protective equipment (page 15) and acquiring experience in gentle handling of frames containing live bees.
BeekeepingRegulationsinTennessee
• All honeybee colonies are required to be registered with the state apiarist of the Tennessee Department of Agriculture, according to the Tennessee Apiary Act of 1995. http://eppserver.ag.utk.edu/Bees.• All equipment or colonies purchased from another beekeeper must be inspected by a bee inspector from the Tennessee Department of Agriculture. Please call Gray Haun at (615)-837-5338 or e-mail at [email protected].• All hive equipment should be of the modern Langstroth type with hanging, movable frames, as required by the Tennessee Apiary Act of 1995.
LocatinganApiary
A site where honeybee colonies are located is called either an apiary or bee yard. You should plan the location of the apiary before obtaining colonies. An ideal location should include as many essential elements as possible for maximum performance by your colonies.
Essentialelementsofanapiaryinclude:• Abundant sources of nectar and pollen located within a mile of the apiary. A variety of plants will increase the availability of nectar and pollen year-round. Bees need pollen for brood rearing and surplus honey made from nectar for successful over-wintering.
Figure 3. The ideal apiary.
• A good source of clean water should be available within one-quarter of a mile. If clean fresh water is not available, a container of water can be provided. Be sure to include a landing support surface to allow the bees to stand on without drowning. Wood blocks, cork blocks, rocks, gravel or burlap cloth can be used in the container to provide dry support.• Good air circulation with no stagnant air pockets. A location with a gentle slope is suitable, but avoid placing colonies in low areas with poor air circulation. • Good water drainage in an area above ood level.• Flooding quickly kills colonies and can literally oat them away.• Provide morning sun and afternoon shade for colonies, if possible. Eastern entrance exposure for morning sun is great. Be careful not to place colonies in locations that are shaded most of the time. Total sun exposure would be better for colonies than total shade.• Protection from direct winds, especially in winter. Trees or shrubs are good wind breaks.• Orient multiple colonies in a “U” or “S” shape rather then in a straight line. When colonies are placed in a straight line, bees tend to drift to colonies at the ends of the line, which weakens colonies in the middle.• Ready access – The apiary must be easy to get to with a vehicle. Bee colonies are heavy. You do not want to carry heavy equipment up hills, through mud holes or across drainage ditches. Avoid locked gates unless you have a key. The apiary should be near a hard-surface road. It will be necessary to visit your apiary in all kinds of weather. Although the apiary should be near a road, it is best if it is not easily seen from the road, especially if the road is open to the public. Vandalism and theft may occur.• Good neighbor beekeeping – keep your neighbors happy. A present of a jar of honey may help. Reduce interactions between your bees and your neighbors as well as with pets or livestock. Locate your bee yard where human interactions are minimal. Don’t locate your bees where humans can walk into the bees’ ight path to and from the hive. Fences of wood or shrubbery can be used to direct ight up and away. Provide water sources closer than a neighbor’s water source. Some people are frightened of bees and no amount of education will allay their fears. If you are planning to keep bees in your backyard, and your subdivision or homeowners’ association has a set of by-laws, read them to determine if there may be legal conicts.

8 9
BeeBiologyandBehavior
BasicAnatomy Like all segmented insects, honey bees have three major body regions: a head, a thorax and an abdomen.
The primary function of the head is to receive sensory stimulation via eyes, antennae and mouthparts. The thorax functions in locomotion with legs and wings. The abdomen functions in reproduction, digestion and defense. On the head are ve eyes (three simple and two compound) and two sensory antennae that receive stimuli for hearing, taste, smell and touch. The mouthparts include the tongue (proboscis) used for
Figure 4. Honeybee eyes. A – Two compound eyes. B – Three simple eyes.
Figure 5. Sensory structures on worker honey bee antennae.
lapping and sucking uids and the jaws (mandibles) used for shaping beeswax and other solids such as pollen. The thorax or middle region contains the muscles of the two pairs of wings and for the three pairs of legs. The legs have structures that function like a comb and brush, allowing bees to groom pollen they have collected from plants and to carry pollen back to the colony. The mass of pollen moistened with honey or nectar is packed into the pollen basket on the hind legs. “Breathing” holes called spiracles are found on the sides of the thorax. The abdomen is the largest region. It also contains important structures and organs. Like the thorax, there are spiracles on the sides of the abdomen. The stinger is found on the tip of the abdomen of female bees. Worker bees’ abdomens contain wax-secreting glands and the scent gland. The queen’s abdomen contains ovaries that produce eggs, a storage organ for drone (male bee) sperm called the spermatheca, pheromone-producing glands and a stinger. The drone’s abdomen contains reproductive organs but no stinger or wax glands.
Figure 6. Honeybee feeding.
Figure 7. Three bees with pollen in their “pollen” baskets on hind legs. Note the bee on the right with orange pollen on its head.

10 11
TheHoneyBeeColony Honeybees are social insects. They live in colonies that can grow to more than 60,000 individual bees. Each colony may be considered a model of social order in which every member has its appointed task. A colony consists of the queen, who lays and fertilizes the eggs; the drones, whose only function is the fertilization of a virgin queen; and the workers, whose lives are devoted to the survival and welfare of the colony. Let’s take a closer look at each of these members of a bee colony – their appearance, their development patterns and their functions in the hive.
TheQueenBee The queen is the most important member of the hive. She is reared in a special cell, shaped like a peanut, which is usually suspended vertically from the lower part of the comb. Queen cells are larger than regular cells. The queen develops from a fertilized egg (as do the workers), but she is fed throughout her larval life with royal jelly, a glandular food secreted by young workers known as nurse bees. She is given ample feedings of this jelly, which causes her to develop differently than workers and more quickly than either workers or drones. Normally, the egg-laying queen is much longer than the workers or the drones. Because she has a
longer abdomen, her wings appear shorter and her thorax slightly larger than the same parts on workers’ bodies. Her thorax, however, is smaller than that of a drone. She does not have pollen baskets or wax glands. Her sting is stouter than the workers’, has fewer and shorter barbs and is curved. She rarely uses her sting except when she emerges from her cell and encounters other queens in the colony. In this event, the young queens battle until only one remains. The queen bee has fully developed ovaries and is the only bee in a colony that is capable of fertilizing the eggs she lays. Five to 10 days after emerging from her cell, the queen takes one or more ights and mates with drones, normally 12-14, in the air. She mates with enough drones to provide her with a sufcient quantity of sperm. The sperm she receives from the drones is stored within the spermatheca. Once her spermatheca is full of sperm, she will never mate again. The queen is a prolic egg layer. At rst, the queen lays only a few hundred eggs each day. Later in the spring or early summer, she can lay up to 2,000 eggs or more in a single day. She deposits the eggs in cells in a circular pattern, radiating out from the center of the brood frame. Worker bees reach maturity in 21 days. As workers mature, the cells are cleaned and the queen deposits new eggs. Drone eggs are laid early enough in the spring and summer to provide adult drones by the time a colony normally would swarm. The queen can lay worker or drone eggs at will. But when there is a shortage of nectar and/or pollen, the egg-laying is slowed down or even stopped.
Figure 8.
Queen
Worker
Drone
Figure 9. Queen cell.
10 11
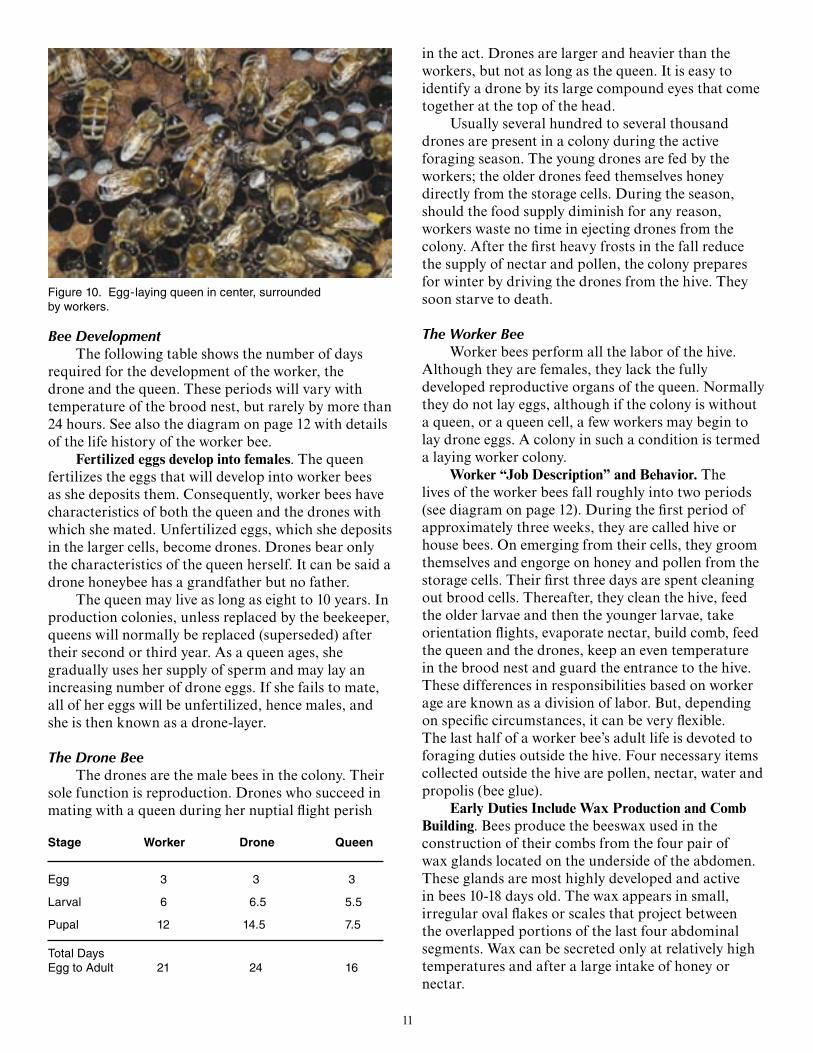
BeeDevelopment The following table shows the number of days required for the development of the worker, the drone and the queen. These periods will vary with temperature of the brood nest, but rarely by more than 24 hours. See also the diagram on page 12 with details of the life history of the worker bee. Fertilized eggs develop into females. The queen fertilizes the eggs that will develop into worker bees as she deposits them. Consequently, worker bees have characteristics of both the queen and the drones with which she mated. Unfertilized eggs, which she deposits in the larger cells, become drones. Drones bear only the characteristics of the queen herself. It can be said a drone honeybee has a grandfather but no father. The queen may live as long as eight to 10 years. In production colonies, unless replaced by the beekeeper, queens will normally be replaced (superseded) after their second or third year. As a queen ages, she gradually uses her supply of sperm and may lay an increasing number of drone eggs. If she fails to mate, all of her eggs will be unfertilized, hence males, and she is then known as a drone-layer.
TheDroneBee The drones are the male bees in the colony. Their sole function is reproduction. Drones who succeed in mating with a queen during her nuptial ight perish
Figure 10. Egg-laying queen in center, surrounded by workers.
in the act. Drones are larger and heavier than the workers, but not as long as the queen. It is easy to identify a drone by its large compound eyes that come together at the top of the head. Usually several hundred to several thousand drones are present in a colony during the active foraging season. The young drones are fed by the workers; the older drones feed themselves honey directly from the storage cells. During the season, should the food supply diminish for any reason, workers waste no time in ejecting drones from the colony. After the rst heavy frosts in the fall reduce the supply of nectar and pollen, the colony prepares for winter by driving the drones from the hive. They soon starve to death.
TheWorkerBee Worker bees perform all the labor of the hive. Although they are females, they lack the fully developed reproductive organs of the queen. Normally they do not lay eggs, although if the colony is without a queen, or a queen cell, a few workers may begin to lay drone eggs. A colony in such a condition is termed a laying worker colony. Worker “Job Description” and Behavior. The lives of the worker bees fall roughly into two periods (see diagram on page 12). During the rst period of approximately three weeks, they are called hive or house bees. On emerging from their cells, they groom themselves and engorge on honey and pollen from the storage cells. Their rst three days are spent cleaning out brood cells. Thereafter, they clean the hive, feed the older larvae and then the younger larvae, take orientation ights, evaporate nectar, build comb, feed the queen and the drones, keep an even temperature in the brood nest and guard the entrance to the hive. These differences in responsibilities based on worker age are known as a division of labor. But, depending on specic circumstances, it can be very exible. The last half of a worker bee’s adult life is devoted to foraging duties outside the hive. Four necessary items collected outside the hive are pollen, nectar, water and propolis (bee glue). Early Duties Include Wax Production and Comb Building. Bees produce the beeswax used in the construction of their combs from the four pair of wax glands located on the underside of the abdomen. These glands are most highly developed and active in bees 10-18 days old. The wax appears in small, irregular oval akes or scales that project between the overlapped portions of the last four abdominal segments. Wax can be secreted only at relatively high temperatures and after a large intake of honey or nectar.
Stage Worker Drone Queen
Egg 3 3 3
Larval 6 6.5 5.5
Pupal 12 14.5 7.5
Total DaysEgg to Adult 21 24 16

12 13
Older Bees Are Field Bees: Scouts or Foragers (Collectors). During the active season, the lifetime of a worker is ve to six weeks. Overwintering worker bees may, however, live for four to six months. Whatever their life span, worker bees usually conne themselves to one task at a time, working without pause. If they
Figure 11.
are eld bees, they may be scouts or collectors. Scouts look for sources of nectar and pollen. Once suitable sources are located, the scouts recruit additional foragers. Nectar collectors, pollen foragers, water gatherers or propolis gatherers work so single-mindedly at their

12 13
jobs, they will not stop even to collect honey placed before them. During the day, one may see hundreds of spent workers, wings ragged, returning wearily to the hive. Worker bees are aptly named as they literally work themselves to death. Death occurs following approximately 500 miles of ight. Propolis Collection. Propolis, also known as bee glue, is a resinous, reddish-brown substance gathered by the bees from gum found on trees and buds and is used to close small crevices in the hive. It is very sticky in warm weather and brittle in cold weather.
ColonyPerformanceStandardsA strong colony has these characteristics:1. Bee Population A. Prolic queen (1) Full brood pattern on frame (2) Few skipped cells (3) 8 to 16 or more frames of brood (beginning of honey ow from April 10-21) B. Worker bees (1) 60,000 to 100,000 bees (2) 30,000 to 40,000 or more eld bees (3) 3,500 bees per pound or frame (4) 20 full frames of bees in brood chambers (5) 10 frames of super (extra chamber) covered with bees C. Drone bees (1) 1,000 or more in strong colony (a) Appear in March (b) Disappear in October (c) Seasonal (45-day life span) for individual drones
2. Disposition – Gentle bees that are easy to work with; very little tendency to sting under good ight conditions.
3. Low-Level Swarming Instinct – Very few or no swarm cells. Swarm prevention can be a major problem. Colonies with a low-level swarming instinct are most desirable.
4. Resistance to Mites – New stock is showing resistance to tracheal and Varroa mites.
5. Honey Production – Colonies that produce 100 pounds or more of surplus honey are most desirable. This is above the 40 to 60 pounds of stores for the bees to use. Productive colonies can do extremely well if moved to the mountains from low elevation areas by July 1. Double cropping of productive colonies is denitely recommended for increasing your honey production per colony.
Figure 12. Italian queen with Italian workers.
RacesofBees
Honeybees exhibit many geographical variations in color and behavior. Several of these have become well-known and are the most common honeybees. The Italian, Carniolan and German black bees originated in Europe, while the Caucasian bee came from western Asia near the Black Sea. Almost all modern-day hybrids were developed from these races. German black bees were the rst brought to the New World by European colonists. However, because of their highly defensive nature, inferior reproductive capacity and susceptibility to diseases, they were generally replaced by the superior Italian race, which was rst brought to America in the mid-1800s.
TheItalianHoneyBee Originating in southern Italy, the Italian is the most widely used bee in the Western Hemisphere. They have from three to ve bands of yellow on the abdomen, bordered with black. The rest of their body is colored by varying shades of yellow. Those with three bands are sometimes called leather-colored Italians; those with ve bands, golden. Italian bees are prolic, industrious and generally have a gentle disposition.
Advantages• Compact brood pattern, producing a large workforce
for nectar and pollen collection.• Excellent foragers.• Do not readily swarm or propolize hive parts
together.• Relatively gentle and calm.• Light color makes queen easy to nd.Disadvantages• Population builds up slowly in spring; may not
adequately harvest early honey ow.• Greater tendency to rob weaker colonies.

14 15
• Greater tendency to drift, with the potential of spreading diseases and pests, and causing uneven colony populations.
• Brood rearing continues after end of major honeyow. If this occurs in late fall, colony may starve due to overabundance of brood and lack of honey.
• May be susceptible to many diseases and pests.
TheCarniolanHoneyBee Carniolans are a variety of Italian bee, but have grayish-black bodies with light hairs. Queens and drones are darker than workers. They originated in Yugoslavia and Austria and perform better than other races at cooler temperatures. Carniolans have become more popular in the USA in recent years.
TheCaucasianHoneyBee Caucasians bees are dark with gray or brown spots and short, gray hairs. They have the longest tongue of the European races, making them better pollinators of certain plants and better foragers in areas where forage is marginal.Advantages• Build large colonies.• Very gentle.• Forage at cooler temperatures.• Brood production ceases earlier in the fall,
conserving stores and enhancing winter survival.• Reduced tendency to swarm.Disadvantages• Heavy propolizers.• Population builds up slowly in spring; not best for
early honey ow or early spring pollination.• Although generally gentle, are persistently defensive
if aroused.• Dark queen is difcult to nd.• Potential to drift to other colonies, and to rob weak
colonies.• May require more medication due to greater
susceptibility to nosema disease.
HybridBees In recent years, crosses between races or between selected strains of a race have produced numerous hybrids, some of which have gained widespread acceptance with beekeepers. Unfortunately, the progeny of outcrossed daughter queens of the hybrid mother (those daughters mated with drones of unknown genetic origin) may not exhibit the desired characteristics or may have undesirable characteristics, such as being overly defensive. Therefore, requeening every year or every other year may be necessary to insure the colony is headed by a pure hybrid queen. Some of the commercially available hybrids are discussed below. The Buckfast hybrid was developed by Brother Adam of the Buckfast Abbey in the United Kingdom to exhibit several desirable characteristics. It is tolerant of tracheal mites, relatively gentle, has a low tendency to swarm and to propolize, overwinters well and is resistant to diseases. However, its population builds slowly in the spring unless there is a good honeyow, and outcrossed progeny may be overly defensive. The Starline hybrid was produced from Italian lines. They build up rapidly in the spring, producing a strong population that makes them popular for commercial uses. They are gentle and do not overly
Figure 13. Carnolian queen, marked with red paint, with Italian workers.
Advantages• Populations increase rapidly in early spring; best for
spring pollination and early honey ows.• Brood rearing is reduced when available forage
decreases; honey stores are conserved.• Very gentle.• They overwinter well because the queen ceases egg
laying earlier in the fall than those of other races and they are frugal honey consumers. Therefore, more bees can survive on less food stores.
• Less tendency to rob.• Forage earlier in the morning and later in the
evening, and on cool, wet days.Disadvantages• Greater tendency to swarm if overcrowded.• Strength of broodnest more dependent on
availability of pollen.• Dark queen is difcult to nd.

14 15
propolize. However, large populations in late fall make them susceptible to winter starvation. Italian Cordovans are reddish-brown and are bred for gentleness, disease resistance and superior production. Their attractive color and gentle nature make them popular for observation hives. Carniolan hybrids include the Yugo bee (also known as ARS Y-C-1), which was developed by the U.S. Department of Agriculture for resistance to tracheal mites. The New World Carniolan strain also exhibits resistance to tracheal mites. The Russian bee was brought from far eastern Russia by the USDA to provide a hybrid with partial resistance to Varroa mites. The SMRT hybrid, developed by the USDA, exhibits genetic traits that suppress mite reproduction, which reduces the severity of Varroa mite infestations.
BeekeepingProtectiveGear
Some beekeepers wear as much protective gear as possible to reduce the number of stings they receive. Others wear very little protection and do not worry about stings. This is your choice. However, as a new beekeeper, you may want to start by wearing a full coverall and gloves. As you become more skillful and condent, wear less and take the gloves off. The amount of protection varies with the activity being done and with the temperament of the bees. Veils – A veil should be worn at all times to avoid stings on the face that are painful and dangerous, especially near the eye, in the nose and in the ears. Types of veils: Folding and round veils are made of wire mesh that t over a helmet worn on the head and are secured in place with drawstrings tied around the waist. An Alexander-type veil requires no helmet, usually attaching to the head with an elastic band. The lightweight “tulle” veil is made of ne nylon mesh that is worn with a helmet or other hat. There are also veils made with combinations of cloth, nylon or wire mesh that zip onto a coverall (Visit the UT Beekeeping Web site http://eppserver.ag.utk.edu/Bees/test for Bee Suppliers and look in beekeeping catalogs for specic details). Helmets – Helmets are usually adjustable to head size. They are made of metal, plastic or a “breathable” tight-weave mesh. Helmets support veils that t over them and provide space that keeps the veil away from the face. Clothing/ Bee Suits – Choose loose-tting, long pants and a light-colored, long-sleeved shirt with a smooth nish. Khaki or chambray material works
Figure 14. Beekeepers wearing different types of protective gear.
Figure 16. Alexander-type veil.
Figure 15. Folding veil.

16 17
well for the shirt and khaki or faded jeans work ne as pants. Avoid textured materials and animal-origin materials like wool, fur or feathers, because the odor may cause defensive behavior. Wear boots that come over the ankle. It is quite a sensation to feel a bee crawling up your leg under your pants. Secure the bottom of the pants over the boots and the sleeve cuffs over the wrist with straps, tape or rubber bands to prevent bees from entering. Gloves – Although most experienced beekeepers do not wear them most of the time, gloves can be valuable for the beginner to start with. Most stings a beekeeper will receive are on the hands when picking up frames covered with bees. Bees can sting through gloves, even ones made from leather. Gloves are made of cloth, leather or plastic and often have a gauntlet base that extends almost to the elbow, usually ending with an elastic band. Choose a pair of gloves that t well, otherwise they will be so awkward that clumsy movements may increase stinging.
HardwareandTools
Hive Tools – There are two types of metal hive tools used to pry apart hive parts that bees regularly glue together. The traditional hive tool resembles a pry bar with a at end and a bent scraper end. The other tool is called a frame lifter (or Maxant tool) because one end is inserted under a frame end bar while resting on the adjacent frame. The downward motion of the tool uses leverage to loosen that end of the frame. These work very well to remove the rst frame during an inspection.
Figure 18. When smoking a colony, position the smoker spout at the colony entrance.
Figure 19. Use small puffs of smoke.
Smoker – A smoker is a very useful tool, allowing the beekeeper to produce smoke that “calms” the bees. A smoker has a cylindrical chamber with a bellows attached, topped with a hinged lid formed into a spout. The chamber, where a re is built, is made of metal, usually stainless steel. When the lid is closed, and the bellows compressed, a stream of smoke can be directed wherever it is needed. We suspect the calming effect occurs because smoke causes bees to engorge with honey, then they are less likely to be defensive. In addition, the smoke may disorient and confuse the bees by interfering with sensory reception, especially for odor.
Figure 17. Standard hive tool on top. Maxant tool on bottom
Smoke can also be used in small amounts to direct bee movements. For example, a few small, well-placed puffs will cause bees to move away from the end bars long enough for the beekeeper to remove the frame without crushing a bee or two in the process.
16 17
Excessive smoke disrupts the colony, causing too much bee movement on the frames. This makes some activities, such as queen nding, much more dif cult.
Pine needles, wood chips or shavings, dried grass or leaves, burlap fabric or cotton cloth may be used as fuel in the smoker. Use what works best for you and is readily available. If you use burlap or cloth, make sure it hasn’t been treated with any pesticides or other chemicals. Do not use materials of animal origin, such as wool fabric, fur or feathers.
WoodenEquipment
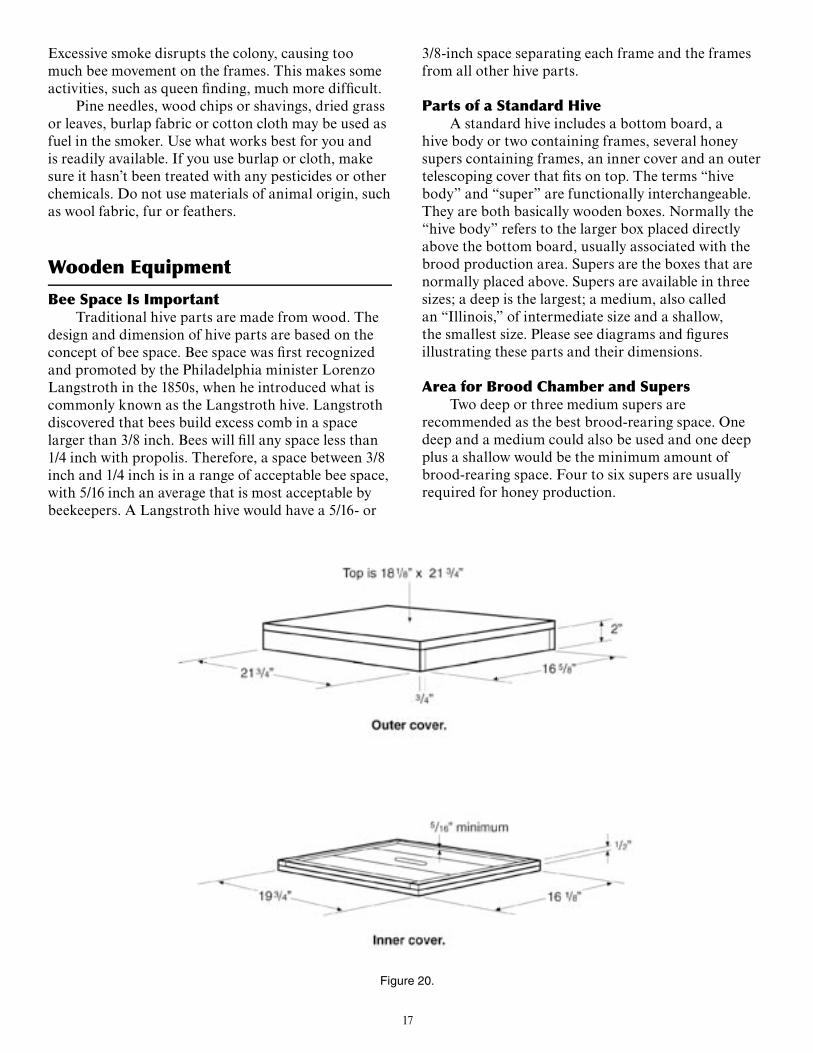
BeeSpaceIsImportantTraditional hive parts are made from wood. The
design and dimension of hive parts are based on the concept of bee space. Bee space was rst recognized and promoted by the Philadelphia minister Lorenzo Langstroth in the 1850s, when he introduced what is commonly known as the Langstroth hive. Langstroth discovered that bees build excess comb in a space larger than 3/8 inch. Bees will ll any space less than 1/4 inch with propolis. Therefore, a space between 3/8 inch and 1/4 inch is in a range of acceptable bee space, with 5/16 inch an average that is most acceptable by beekeepers. A Langstroth hive would have a 5/16- or
3/8-inch space separating each frame and the frames from all other hive parts.
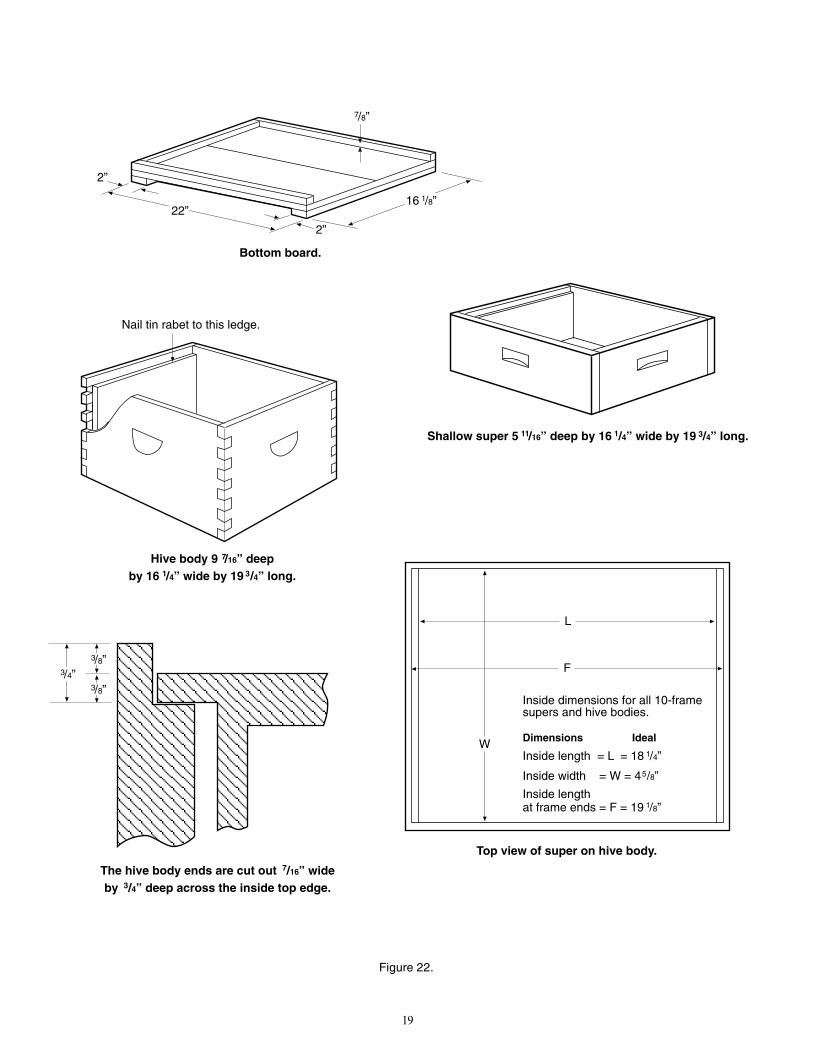
PartsofaStandardHive A standard hive includes a bottom board, a hive body or two containing frames, several honey supers containing frames, an inner cover and an outer telescoping cover that ts on top. The terms “hive body” and “super” are functionally interchangeable. They are both basically wooden boxes. Normally the “hive body” refers to the larger box placed directly above the bottom board, usually associated with the brood production area. Supers are the boxes that are normally placed above. Supers are available in three sizes; a deep is the largest; a medium, also called an “Illinois,” of intermediate size and a shallow, the smallest size. Please see diagrams and gures illustrating these parts and their dimensions.
AreaforBroodChamberandSupers Two deep or three medium supers are recommended as the best brood-rearing space. One deep and a medium could also be used and one deep plus a shallow would be the minimum amount of brood-rearing space. Four to six supers are usually required for honey production.
Figure 20.

18 19
Figure 21. The parts of a modern honey bee hive.
7 /4”1
21 /4”3
2”
16 /8”5
19 /4”3
/2”1
16 /8”1
19 /4”3
6 /16”9
5 /16”11
14 /8”5
19 /4”3 14 /8”5
14 /8”5
/4”3
19 /4”3
19 /4”3
14 /8”5
22” 14 /8”5
15 /8”3
2 /8”3
9 /16”7
Equipment and dimensions for a standard Langstroth hive
Outer Telescoping Cover
3 pieces 7 /4” x /4” x 18 /8” (top)2 pieces 21 /4” x /4” x 2” (sides)2 pieces 16 /8” x /4” x 2” (ends)
1 13
3 3
5 3
Inner Cover
2 pieces /2” x /4” x 16 /8”2 pieces /2” x /4” x 18 /4”2 pieces 6” x /8” x 19 /4”1 piece 4 /8” x /8” x 19 /4”
1 13
3
3
3
1 13
31
Medium Depth “Illinois” Super
2 pieces 19 /4” x /4” x 6 /16” (sides)2 pieces 14 /8” x /4” x 6 /16” (ends)
9
9
3
5
3
3
Shallow Extracting Super
2 pieces 19 /4” x /4” x 5 /16” (sides)2 pieces 14 /8” x /4” x 5 /16” (ends)
113
5
3
3 11
Queen Extracting
2 pieces 19 /4” x /4” x 5 /4” (sides)2 pieces 14 /8” x /4” x 5 /4” (ends)
33
5
3
3 3
Full Depth Hive Body
2 pieces 19 /4” x /4” x 9 /16” (sides)2 pieces 14 /8” x /4” x 9 /16” (ends)
73
5
3
3 7
Bottom Board
3 pieces 7 /8” x /4” x 15 /8” (floor)2 pieces 2 /8” x /4” x 22” (sides)1 piece 2 /8” x /4” x 14 /8” (ends)
1 33
3 3
533
18 19
Figure 22.
The hive body ends are cut out /16” wideby /4” deep across the inside top edge.
Inside dimensions for all 10-framesupers and hive bodies.
Inside length = L = 18 /4”
Inside width = W = 4 /8”
Inside lengthat frame ends = F = 19 /8”1
1
5
Dimensions IdealW
F
L
Top view of super on hive body.7
3
Hive body 9 /16” deepby 16 /4” wide by 19 /4” long.
7
31
Nail tin rabet to this ledge.
22”
2”
2”
16 /8”1
/8”7
Bottom board.
Shallow super 5 /16” deep by 16 /4” wide by 19 /4” long.311 1
/8”3
/8”3
/4”3
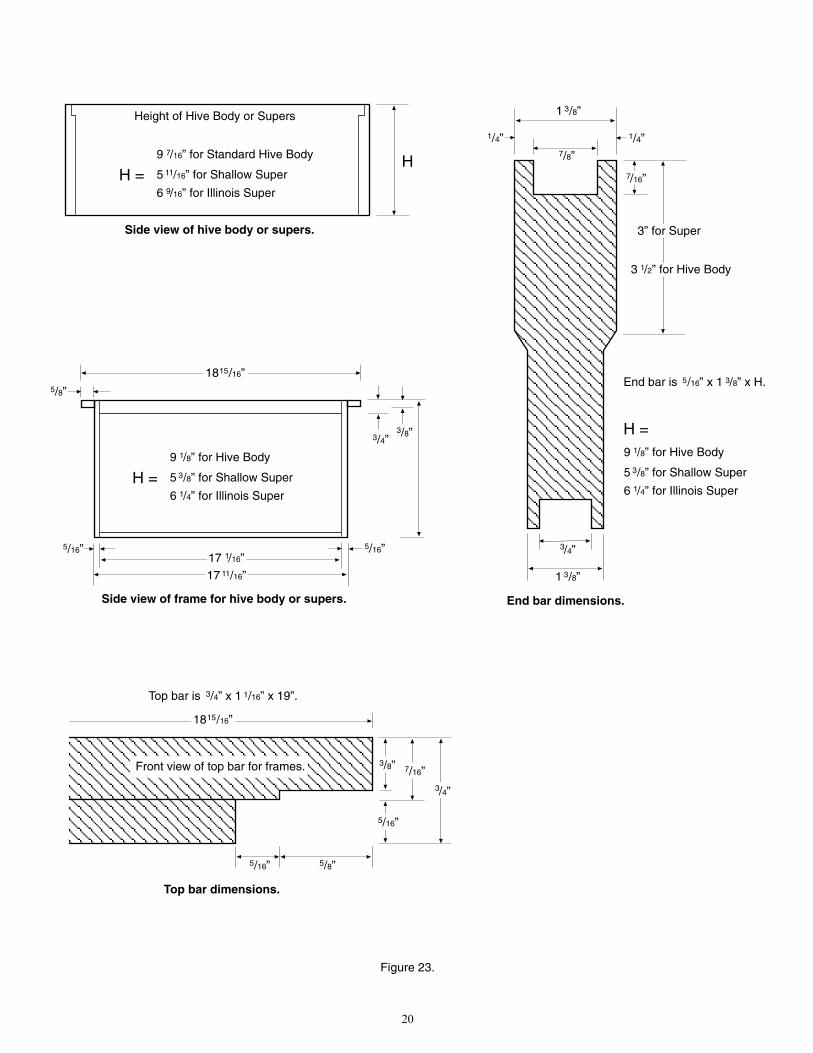
20 21
9 /16” for Standard Hive Body7
H = 5 /16” for Shallow Super11
6 /16” for Illinois Super9
H
Height of Hive Body or Supers
Side view of hive body or supers.
9 /8” for Hive Body1
H = 5 /8” for Shallow Super3
6 /4” for Illinois Super1
Side view of frame for hive body or supers.
Front view of top bar for frames.
18 /16”15
/8”5
/8”3/4”3
/16”5 /16”5
17 /16”1
17 /16”11
18 /16”15
/16”5 /8”5
/8”7
/4”1 /4”1
1 /8”3
/16”7
3 /2” for Hive Body1
3” for Super
9 /8” for Hive Body1
H =
5 /8” for Shallow Super3
6 /4” for Illinois Super1
/4”3
1 /8”3
End bar is /16” x 1 /8” x H.35
End bar dimensions.
/16”7
/4”3
/8”3
/16”5
Top bar dimensions.
Top bar is /4” x 1 /16” x 19”.3 1
Figure 23.

20 21
Figure 24. Inspecting a frame of brood.
WorkingwithaHoneyBeeColony
Before entering the apiary, suit up in appropriate attire. If not wearing a bee suit (see equipment section), dress in light-colored, cotton or rip-stop nylon clothing. Always wear a veil. Wrap the bottoms of your pants’ legs around the top of your boots and secure them in place with a rubber band or tape. Bees drop from handled frames to the ground and may crawl up your legs as you work around the hive. Gloves are optional. Beginners should wear gloves until they feel condent without them.
Light your smoker and ll the chamber with fuel.
Approach the colony from the rear or the side. Always work the colony from the rear or the side. Apply two gentle puffs of smoke into the entrance. Pry the outer cover up 2 to 3 inches along one side. Lightly puff under the outer space and replace it. Wait about 30 seconds before removing the outer and inner covers.
Gently remove the outer cover and place it on the ground, upside down, near the colony. It can be used as a base for stacking supers or brood chambers that you remove as you inspect the colony. Gently remove the inner cover and lean it near the entrance so that clinging bees can reenter the hive. Do not block the entrance with the inner cover.
When removing and handling frames, work with slow, steady movements. Avoid bumping or shaking motions that may shake bees off the frame. Lightly smoke bees to manipulate their movement, such as when you need to examine frames for eggs. Before replacing a frame, smoke the bees out of the way to avoid crushing them.
Do not leave colonies open for too long. Bees may get overly defensive and an open hive may initiate robbing behavior. Before closing the hive, use smoke to move bees back onto the frames from the edge and outside walls of hive bodies.
Open a colony when the temperature is 55 degrees F or warmer, the sun is shining, the bees are ying and the wind is calm. Open and inspect colonies once a week during spring build-up and honey production. Colonies should be opened and inspected one or more times each month from February through November.
InspectingaColony
Pry the outside frame of the brood chamber loose. Remove the frame from the body and hold it in front of you with one hand on each end of the top bar. If possible, position yourself so that the sun is shining over your shoulder and onto the frame. Observe the bees and the frame.
Inspect the brood frames for:• Healthy larvae. Larvae should be pearly white. Gray,
yellow, brown or black larvae are diseased, chilled or injured.
• Eggs standing in the bottom of cells. Recently laid eggs will be standing on end in the bottom of cells, one egg per cell. As they age, they gradually fall to one side. Two or more eggs on the sides of the cell are from a laying worker.
• Cell caps of healthy brood. These will be convex and tan. Cell caps of unhealthy brood are often concave and perforated with small holes.
• Area of cells with brood. A prolic queen will have a laying pattern of brood with very few skipped cells over most of the frame. The pattern should be compact and in a semicircle, usually occurring over the bottom half of the frame.

22 23
• Honey and pollen stores. Honey should appear adjacent to the brood pattern. Adequate honey stores will vary with colony size. Pollen is stored in cells adjacent to honey.
Remove and inspect all of the frames that contain brood. After inspection of a frame, place it in the hive body toward the side from which you removed the outside frame. After completing your inspection, replace the frames in their original order and close the hive. When you open a colony for inspection, you can also perform other tasks necessary for colony maintenance, such as feeding, treating with antibiotics or miticides, replacing damaged combs with frames containing new foundation, adding an empty super or removing a super of honey. Prepare the items you need in advance and have them near when you open the colony.
Figure 25. Honeybee eggs and young larvae.
Figure 26. A healthy brood frame.
Items you should bring to the apiary or that you should keep on hand:• Extra hive tool or tools, gloves, veil, bee suit and
smoker.• Matches or lighter.• Dry smoker fuel.• Extra frames with drawn comb or new foundation,
and extra hive bodies.• Container to collect wax scrapings or propolis.• Jars or sealable bags to collect bees for mite testing
or comb for disease identication.• Queen excluders.• Entrance reducers.• Heavy fabric, such as burlap, or extra inner or outer
covers to protect uncovered colonies or supers from robbing bees.
• Newspaper for uniting colonies.• Permanent marking pen or pencil. • Extra queen cages and queen marking paint.• A sting kit for those allergic to bees (Epipen™), rst
aid kit and other medications for the beekeeper.
StartingYourColony
There are several methods to acquire bees, including buying an existing colony, starting from a small “nucleus” colony purchased from another beekeeper, installing a package purchased from a supplier, capturing a swarm and splitting an existing colony. Let’s look closely at the latter three possibilities.
InstallingaPackageofHoneyBees Starting a honey bee colony with a package purchased from a reputable producer is a good way to insure the colony you have is healthy and of a particular race or hybrid. A package should be installed in the early spring to take advantage of the nectar ow. A package consists of a known amount (by weight) of bees and a caged queen shipped in a screen box containing a feeder can of sugar syrup. Packages can be bought in 2-, 3- and 5-pound sizes. One pound contains about 4000 bees. They should be ordered long before you want to receive them, ideally in the fall.
Receiving a Package Inspect the package. If the majority of the workers are dead or the queen is dead, contact your supplier for instructions and possible replacement. If all is well, place the bees in a cool, dark place until early evening.

22 23
Figure 28. Installing a package of bees.
Mix a 1:1 (by weight) sugar/water solution and spray it lightly on the wire of the package. (Note: a gallon of water weighs 8.3 lbs.)
Installation The cage should be installed into one single deep or two medium hive bodies. You can use all new foundation, drawn comb or a mixture. If using a mixture, put the drawn comb in the center to facilitate egg-laying there. Make sure the drawn comb was taken from healthy colonies. In the early evening, take the package to the apiary. Spray more sugar solution onto the sides of the package. Remove the outer and inner covers from the hive. Remove four or ve frames from one end of the hive body or both bodies (medium body). Spray sugar solution lightly onto the remaining frames and on the inner walls of the hive body. Remove the top cover and feeder can from the package. Remove the queen cage from the package and cover the opening of the package. Remove the cork from the end of the queen cage plugged with candy and use a nail to poke a hole in the candy, being careful not to harm the queen. Suspend the cage, candy end up, between the two center frames of those remaining in the hive body. For medium hive bodies, suspend the cage within the bottom hive body. Remove the cover from the hole in the top of the package, shake about a cupful of bees onto the queen cage then place the package, with the hole end up, in the open space within the hive. Replace the inner cover and place a feeder can with a 2:1 sugar solution and Fumidil-BTM(according to label directions) over the opening in the inner cover. (Be sure the queen cage is not directly below the inner cover opening.) Place an empty super on the inner cover around the feeder can and cover this with the outer cover. Partially block the hive entrance with a entrance reducer or grass and leave it blocked for about a month. Check the queen cage in three days to see if the queen has been released. If she has not been released, remove the screen and let her walk into the colony. Then, do not disturb the colony for 10 days. At this time, examine the frames for a brood pattern. If a brood pattern and eggs are found, then you have successfully installed the package. Remove the package container and replace the frames removed earlier. Close the colony.
OtherMethodsofBeeInstallation There are variations of the installation method mentioned above, including differences in releasing the queen and the workers. After suspending the queen cage, gently shake the bees from the package onto the bottom board. Lightly mist the bees with sugar solution. Replace the frames, being careful
Figure 27. A nuc with a moving strap in place.

24 25
not to crush any bees. Close the hive and proceed as above. Another method of queen introduction is to place the queen cage on the bottom board, shake a cupful of bees onto the cage, then shake the remaining bees onto the bottom board. Also, the queen may be released more immediately by removing the cork-only plug end of queen cage. But likelihood of queen acceptance is reduced using this method of release.
Starting by Collecting a SwarmWhat Is a Swarm? Swarming is the natural mode of reproduction for a honey bee colony in spring. Swarming is induced as bees increase their population size and require more space. A swarm usually consists of the old queen (sometimes a new one) and 50 to 60 percent of the worker bees in the swarming colony. Workers preparing to swarm engorge themselves on honey and force the old queen out of the hive. Changing weather conditions from cool and rainy to warm and sunny seem to stimulate the natural urge of bees to swarm. Most swarms leave the colony in good weather between 10 a.m. and 2 p.m., y to a nearby tree or bush and land on a limb. Immediately after landing and for the next 24 to 36 hours, the bees are very docile; they are interested in swarming, not in defending their colony. Scout bees come out of the cluster of the swarm and search the local area for a protected location for the colony. The scout bees communicate the information to the swarm and a
“decision” is made, whereupon the bees leave the branch and proceed to their new location. After arriving at the new location, or rarely if the swarming bees have failed to nd a location (see Figure 30), the bees start to build wax comb and the queen lays eggs to start a new brood nest. After brood production commences, the new colony will become defensive of its new home.
Preparing for a “Swarm Call” As a beekeeper you may be contacted by neighbors, businesses and the county Extension ofce as early as the month of March to go out and collect a swarm. This request is a “swarm call.” Collecting a swarm can be exciting, fun and a good way to start a new colony with less expense. However, you must be prepared to go and get the swarm at a moment’s notice, because the swarm may depart quickly, not “waiting” for you to get ready. You may want to give your name and phone number to your county Extension ofce so that your name can be put on a list of beekeepers who are willing to retrieve swarms.• Anticipate the call by nding a container to hold
the swarm (a cardboard box will do, but a hive body with bottom and top works better); prepare sugar syrup (1:1 sugar/water) in a squirt bottle; collect smoker, fuel and matches, a strap to hold lid/top on Figure 29. A swarm in a pine tree.
Figure 30. Bees on exposed comb.

24 25
Figure 31. Swarm that’s easy to collect.
container, bee veil and a ladder. • When the person calls announcing he or she needs
someone to retrieve a swarm, you should tell the caller not to disturb the swarm or spray it with water, soap or pesticide.
• The caller may be excited or even alarmed. Calm the caller by explaining what is happening and that swarming honey bees are not defensive or dangerous unless disturbed.
• Explain that a swarm will usually move from the original location within 24 to 48 hours; therefore, if a beekeeper is not available to collect the bees from a homeowner’s property, the bees will normally leave without causing a problem.
• Ask questions to improve your chance of success in collecting the swarm.
Questions to Ask about Swarms:1. Are these really honey bees? Ask them what the
“cluster looks like.” You do not want yellowjackets or hornets. Has anyone disturbed the cluster?
2. Get permission from the landowner/homeowner to collect the swarm from his or her property.
3. Be sure to write down the name, address and phone number, including work number of the homeowner or someone who will be on site.
4. Ask for directions of how to nd the swarm location, including where on the property.
5. How long have the bees been there?6. How high off the ground are they? Will you need a
ladder?7. How big is the swarm (beach ball, football size,
etc.)?8. Ask the caller if it’s all right (or acceptable) if
you snip a branch of the tree or bush holding the swarm.
How to Collect a Swarm – This Is the Fun Part! Let’s start with an “ideal swarm” example to start with. This swarm has formed in a small tree, 5 feet above level ground in a fenced yard. The homeowner reports the swarm has been there only 20 minutes.
• Place the whole cluster of bees, including the queen, directly into an empty hive body or nucleus (smaller version). This way frames can be gradually added to this “colony” and there is no need to shift the bees into a hive later. Some beekeepers like to lay the cluster down on a sheet in front of the hive and let the bees walk into the hive on their own. This is your choice.
• Mist the hanging cluster of bees lightly as well as the inside surfaces of the hive body and frames (those that can t in easily with the swarm) with 1:1 sugar:water syrup.
• If the bees are clustered on a low branch, snip it and carefully lower the branch and bees into the hive.
• If it’s not possible to cut the branch, then place the hive body below and surrounding the bottom of the cluster, if possible. Then shake the branch to dislodge the bees into the hive body. If shaking isn’t an option, then gently brush or scoop the bees with a gloved hand down into the hive body.
• Add frames gradually to the middle area to ll the box as bees move up onto frame surfaces.
• Carefully look on the branch for a missed queen and scoop any clusters gently into the box.
• Crack the lid on the box for a few minutes to allow stragglers to nd the new colony.
You may need to leave the new colony in this location overnight if many bees are ying around. In other situations everything happens quickly and you can put them in and leave within a few minutes. This may depend, in part, on how long the swarm has been in this location. Attach the top to the hive body and secure window screen in the entrance with staples to keep bees inside while providing ventilation. Strap the unit together and move it to the new location. You will need to modify this method to t your unique situation. Not all swarms cluster this close to the ground on an easy-to-reach branch. You will need to decide if the swarm is too high or on a structure that is out of reach for safe retrieval. We have collected swarms from interesting places such as vehicles, grocery shopping carts, mailboxes, statues and from eaves of buildings.
Splitting or Dividing a Colony Why Divide? The most common reasons for dividing a colony are swarm prevention and the need to increase colony numbers. A strong colony can be divided into two or three colonies (splits). The number of splits will depend on the amount of brood present in the parent colony. For each split, you need three to ve frames

26 27
of brood and a couple of food frames with pollen and honey. Be careful not to split a colony too many times or wait until it’s too late in the year, because the small colony needs time to build up for winter. Tip: Lightly misting the frames and bees in the splits with a 1:1 sugar:water solution will calm the bees, and occupy them while they get acquainted with their new home, especially if you intend to mix brood from one or more colonies to form the split.
When Should a Colony Be Divided? A colony can be divided when it has a large population of bees, at least 10 frames of brood and appears overcrowded. When you open a crowded colony, bees tend to “pour over” the top of the frames. In the spring, a large colony preparing to swarm is an excellent candidate to divide. Prior to swarming, a colony produces many (sometimes 10 or more) queen cells (called swarm cells) on the bottom portion of frames in the brood area. Once the queen cells are capped, swarming is imminent unless you act quickly to “convince” the bees that they have already swarmed. Dividing the colony is one method to reduce overcrowding in the brood area and in the honey storage area as well. Prior to making the divides you need to determine how many can be made and how to provide queens for the parent colony and/or splits. To provide a queen you can use queen cells or eggs from the parent colony or purchase queens from a queen producer. (See the UT Web site at http://eppserver.ag.utk.edu/Bees/test/packageproducer.html).
To Divide a Colony with Queen Cells:1) Set up hive stands and organize all equipment to be used for the new colony(ies). You will need bottom, inner and top covers, supers and frames. If using foundation when there is no honey ow, you will need to feed sugar syrup (see section on feeding bees).
2) Open the parent colony with minimum smoke and nd the queen. Place the frame with her in the new colony. This will give the parent colony the illusion that the queen has swarmed. Determine the number of frames of brood and food in the colony being divided.
3) Place the split without the old queen in the location of the parent colony. The older foraging workers will return to the parent colony.
4) Carefully remove brood frames that contain queen cells to an empty hive body. Queen cells are easily damaged. Do not leave the frame exposed to sun and do not turn the queen cells upside down.
5) Place a frame having two or three large, well-shaped queen cells into the queenless split adjacent to other brood combs and destroy the queen cells that you do not need.
6) Place three to ve frames of brood near the center of the super in each new colony and provide enough bees to completely cover the brood.
7) Add at least one frame of pollen and one frame of honey, placing them outside the brood.
8) Provide at least two frames of empty drawn comb (preferred) or two frames of foundation on the outside of the brood area.
9) Place a super, containing drawn comb or foundation, above the brood chamber.
10) Add a top feeder if there is no honey ow (see section on feeding bees).
11) Do not disturb for 14 days. At this point, check for a laying queen in both splits.
To Divide a Colony and Produce a Queen from Eggs: Follow the procedure above; however, rather than providing splits with queen cells, you will be giving them frames with eggs to make their own queen. Eight to 10 days later, check for queen cell formation. Be careful not to damage the queen cells. At this time, destroy all but two or three of the largest, best-shaped, capped queen cells. Do not disturb for 14 days. Then check for a laying queen.
Dividing a Colony and Requeening with Purchased Queens. Follow the procedure for dividing as explained above with these changes/options:
1) If you plan to put new queens in both splits, order new queens in advance. Place the queen shipping cage, with the cork removed from the candy end, between two frames of capped brood in each queenless colony (see section on requeening). Return in three days to see if the queen has been released. If she has been released, do not disturb for 10 days, then check for a laying queen. If she is still in the cage, poke a hole through the candy to speed up her release and check again in three days.

26 27
Figure 32. Marking a queen.
2) If you want to save the old queen, leave her in the original location and move the split to another location. When you divide the brood, give the split more capped brood, because these newly emerged bees will accept a new queen more readily than will older workers.
QueenMarking We feel that the advantages of marking the queen outweigh the disadvantages. A queen marked with bright colored paint is easier to nd. You know the marked queen is one you introduced, not a supersedure of unknown quality. You also know her age. Younger queens are more prolic layers and produce more pheromone that maintains colony cohesion, thus making the colony less prone to swarming and less susceptible to stressful conditions.
• Release wings with left hand. • If alone, daub the paint onto the center of the thorax
only and hold her gently for 30 seconds to one minute before putting her back on the frame from which she was taken. Insert the frame back into the colony.
• If a helper is available to daub paint, add your left thumb to trap additional legs of the queen (left side) and have the helper daub the paint on the queen’s thorax.
RequeeningWhy Requeen? Better Performance – Better Production Most beekeepers requeen every year to take advantage of the better egg-laying performance and productivity of the young queen. A queen may lay for several years, but 99 per cent of queens are most prolic for the rst year and decline during the second year, with performance falling drastically thereafter. A colony with an older queen is more likely to swarm than one with a young queen. Colonies with more prolic, young queens are less likely to be overwhelmed by parasitic mites. An inferior queen results in an inferior colony. If you let the colony requeen itself, you may end up with an inferior queen. Smaller, less vigorous queens usually hatch out rst and destroy larger queens in their queen cells before they emerge. A queen needs to mate with 12 or more drones over a one- or two-day period to accumulate the 5 million sperm she will need throughout her life. If the weather during her mating ights is cold or rainy, then drones may be scarce, resulting in less mating. This queen may run out of sperm later in the season and no longer lay worker eggs. A virgin queen may mate with drones of inferior stock, resulting in a colony with poor honey production, increased tendency to swarm or one that exhibits excessive defensive behavior. Consider requeening if the colony exhibits one or more of the following: unexplained low bee population, excessive propolis production, laying workers, defensiveness, high swarming tendency, poor honey production or excessive drone production.
When to Requeen? A colony can be requeened at any time during the warm season, but requeening is most successful when a nectar ow is on. Routine requeening is usually done in spring or late summer. We suggest requeening early in August, but let’s examine why spring requeening is also an option.
HowtoMarkaQueen• Practice with drones until you have condence that
you can do it without damaging the drone. You do not want to squeeze the abdomen or thorax and you do not want to drop the queen.
• Be prepared: have enamel paint and a helper’s extra pair of hands ready, if needed, to hold the frame, unscrew cap from paint bottle, etc. If alone, shake paint and unscrew cap.
• Grasp queen by the wings between forenger and thumb of left hand so that her legs are suspended.
• Place the forenger of the right hand (nail side down) below her legs and she will quickly rest her legs on it.
• Move the thumb of right hand on top of and trapping at least two legs (right side) with enough pressure to hold her (see photo). If you have the legs secure she will stop moving.

28 29
The advantages of spring requeening:• The old queen is easier to nd due to smaller bee
populations. • Nectar/honey ows usually occur in spring.
Requeening during a honey ow increases acceptance, and reduces robbing and defensiveness.
The disadvantages of spring requeening:• Inclement spring weather in Tennessee may conne
bees, causing them to eat their stores and increase chance of queen supersedure.
• Spring rains and cool temperatures may prohibit opening the colony to install a new queen.
• If swarming has begun, you can miss capped queen cells as well as virgin queens that may be present or may be returning from mating.
• Queens from queen producers may be of inferior quality due to poor weather conditions for mating in queen production areas.
The advantages of August requeening:• Colony starts the winter with young healthy bees and
a new queen.• Colony less likely to swarm next spring with a young
queen.• Spring population should be higher with a younger
queen laying more in late winter and early spring than an old queen.
• Queens are less expensive to purchase than in spring.• There is a break in the brood cycle, which can reduce
disease and pest problems.• If this queen fails, then you still have time to try
again before cool fall weather.
The disadvantages of August requeening:• Harder to nd old queen with large bee population.• If no honey ow is on, then bees will be more
defensive and prone to robbing.• If no honey ow is on, then you need to feed all
colonies in the apiary where you are requeening. If you feed only the requeened colonies, the strong colonies nearby will rob them.
• May take more time if bees start robbing the colony being requeened, because you must stop working and come back later after robbing ceases.
Queen Introduction – Direct or Indirect? Although many procedures have been described about how to install a queen, they can be classied as either direct or indirect. With direct methods the queen is released directly into the colony, usually in combination with smoke, scented sugar syrup or honey. The new queen and the colony to receive the queen are both treated with
smoke, scented sugar syrup or honey to mask any difference in odor between her and the colony. Indirect methods of queen introduction using shipping cages are more preferred by most beekeepers. Some beekeepers use push-in cages and others use a division screen method. Many queen producers still ship their queens to beekeepers in the wooden “Benton cage.” This cage has three circular cavities covered by screen, openings on either end that are plugged by corks. The cavity on one end of the cage is lled with sugar candy (fondant, a mixture of powdered sugar and water in a dough-like consistency). The plastic “JZ BZ” queen cage is preferred by some queen package producers. The new laying queen is normally shipped with six attendant bees inside the cage to take care of her. When you receive the queens in the mail, inspect them to make sure they are alive. Add a couple drops of water to each cage on the screen, away from the candy end, to let the bees get water. New research suggests that the attendants should be removed before introducing the queen because they interfere with acceptance. One way to safely remove attendants is to do it in a closed room with a window. You can wrap the cage except for the corked end without candy with a cloth, then remove the cork, making this opening the only place where light can enter. The workers and sometimes the queen will be attracted to light and come out. The quickest method is to turn off room lights, remove the screen and let all bees y to the “lighted” window. Then replace the screen and put only the queen back inside.
Installing a Queen in a Shipping Cage:• Locate the old queen and remove her from the
colony. If you have difculty nding queens, place queen excluders between supers with brood for four days before requeening. This will conne the queen to one box. While searching for the queen, search also for eggs. The queen will be in the box where you nd eggs, because eggs laid before you added excluders have hatched.
Figure 33. Benton cage and JZ BZ cage.

28 29
Figure 35. Wire press-in queen introduction cage.
Figure 34. Installing a queen in a shipping cage.
Figure 36. Colony secured with a locking strap.
• Remove the cork from the candy end of the cage. One purpose of the candy is to delay immediate release of the new queen. In the two days (usually) that the workers take to eat the candy and release the queen, her odors and that of her attendants have blended in with that of the colony. A new queen and her attendants have a different odor than that of the new colony and they may be treated aggressively if they are released too soon.
• Press the side of the cage with the candy end up vertically into the middle of a frame of brood and move the adjacent frame of brood to “sandwich” the cage perpendicular, in between.
• Putting the candy end up keeps any attendant bees (if included) from blocking the hole if they should die. If the candy end were down, dead attendants could block the queen’s exit.
• Wait three days before inspecting to determine if the queen is released. If she is not out and much candy remains or it is too hard, carefully poke a small hole through the candy to speed the process.
• Wait 10 days to search for her, and more importantly, for eggs, which indicate she is laying and has been accepted into the colony.
Installing a Queen Using Press-in Cages. A press-in cage is a screen box with an open side made of eight-mesh (1/8- inch squares) screen, 4 inches by 4 inches, with each edge bent upward at a 90-degree angle to form a side that is 1 inch wide. The open side of the box is pressed over the queen on a capped brood frame that is about to emerge. No adult bees should be trapped under the cage with the queen. A few cells of honey should also be under the cage. New workers hatch out under the cage, take care of the queen and clean cells where she lays eggs. The cage is removed when eggs are found. During this several-day process, the queen and workers acclimate to one another and
the queen is readily accepted. Caution: Make sure you put the cage over comb without holes. Workers can crawl through holes to get inside the cage before it’s time to release the queen.
MovingaColony
On occasion, you may need to move a honeybee colony. The move may be small, such as to another location in your apiary. Or it may cover a greater distance, such as to another apiary location, perhaps to take advantage of a particular nectar ow.
ToMoveaColonyaShortDistance Two methods may be used. The simplest method is to move the colony in small increments, about one yard each day. If a colony is moved more than a yard per day, returning foragers will be confused and you will lose some of the eld bees. The second method involves removing the colony to a site several miles away for several days to allow foraging bees

30 31
to “forget” the old location. Then return the colony to the new site in the original apiary where they will “learn,” and become oriented to, the new location.
Secure the Colony before Moving Locking straps can be used to secure the colony for moving. A strap should be placed around an entire individual colony and tightened rmly. Additional strapping to secure the colonies within the transporting vehicle or trailer will be necessary to prevent movement or shifting during the move. For ease of use, strapping is the preferred method. Stapling is another method of securing colonies for transport. All the outside parts of a beehive are stapled together with 2 3/4-inch hive staples. Drive the staples in at the four corners, fastening each part to the part above and below. This can be done during the day in preparation for moving in the evening after dark. Using staples, however, will damage hive bodies, promote wood decay and agitate the bees during stapling. Before moving a hive, remove the surplus supers of honey down to the brood chamber(s) and one empty super. Excess honey supers increase weight and make strapping more difcult.
Ventilate the Bees for the Move Remove the inner cover and nail a screened cooling board over the top to close and ventilate the top of the hive. A cooling board is a plywood panel the size of an inner cover with a large, centrally located, screened window. An inner cover with the center hole screened can be used for a short distance move. In cool weather, a cooling board may not be necessary. To screen the entrance for a short-distance move, plastic window screen may be stapled across the entrance. For longer distances, an entrance screen can
be made by constructing a frame with 11⁄2-inch by 1⁄2-inch pieces of wood that will t between the bottom board cleats, against the front of the hive body to cover the entrance. The bottom of the frame is made with a 3/4-inch piece to cover without blocking the entrance. The frame is covered with metal window screen wire. The screened frame encloses a screened porch on the front of the hive. Air will circulate through the entrance and out the top to keep the bees cool in transit.
WhentoMoveaColony Moving at nighttime is best, because all the eld bees should be in the colony. A daytime move, especially a long-distance one, would result in the loss of foraging bees returning to the old location. The bees will return to the hive at dusk or a little later. Have everything in place except the entrance screen. Attach the entrance screen with two wood screws through the two end bars and load the colony for moving to a new location. Place the colony on a base at the new location. Smoke the entrance and remove the screen. Place the inner and outer covers on the hive.
RemovingSurplusHoney
The bees will ll the combs and cap the honey when they have cured it to approximately 18 percent or less water. Some of the frames of honey may not be capped until several days after the nectar ow has stopped. The frames and supers of honey that are capped can be removed from the colony. Avoid harvesting honey in uncapped cells. It is likely to be too high in moisture content and will ferment in storage without additional drying. Extract soon after removing super from the hive. Honey must be extracted within three to four days after removal from the hive to prevent damage by wax moths or small hive beetles. Be prepared to extract the honey when you remove the super from the hive. If extraction is not possible within three or four days, frames of honey can be stored below 32 degrees F for long periods of time without danger of crystallization. Open the colony and inspect the supers of honey. Frames of capped and uncapped honey can be exchanged between supers. The super of honey may contain many bees. Do not use smoke to drive the bees out of the super; excessive use of smoke may taint the avor of the honey.
Figure 37. Entrance screen for moving bees.

30 31
MethodstoRemoveBeesfromHoneySupers To harvest a small amount of honey, you can simply shake bees from individual frames. On the ground near the colony, place an empty super inside an outer cover turned bottom side up. An inner cover with a bee escape (see Bee Escapes below), a at piece of plywood or an outer cover is needed to cover the super as you place the frames of honey that are free of bees into the super. Remove a frame of honey from the super of honey taken from the colony. Hold the frame by the ends of the top bar in front of the colony a short distance above the entrance. One or two short, strong shakes will dislodge all the bees. Immediately place the frame into the empty super and cover the super to prevent the bees from returning to the frame. Shake the bees from the remaining frames and load the super, keeping it completely covered except to insert the frames of honey. This method can be used very effectively with a small number of colonies. To remove bees from entire supers, you can use a bee repellent, a blower or bee escapes.
Bee Repellants These repellents, such as Bee Go™, are aromatic liquids of butyric anhydride that are sprinkled in small quantities onto a fume board, which is placed on the top of supers. As the repellent evaporates, the odor will drive the bees out of the super within minutes. The fume board consists of an absorbent cloth or pad stapled onto a wooden frame or spare inner cover. The cloth side is placed on top of the super. Warming an outer cover for a few minutes in the sun before covering the fume board will accelerate the process.
Air Blowers Blowers may be purchased from beekeeping supply vendors to remove bees from honey supers. A blower is made for this purpose. Or, you can use a blower made for home and garden use. A super must be held upright on its side while air is blown between the frames. Bees may be difcult to dislodge. Also, the noise and smell of the blower may irritate bees and make them more defensive.
Bee Escapes Escapes provide a more passive method of bee removal. The Porter® bee escape ts into the center hole of an inner cover to allow bees to exit a super, but not to re-enter it. The inner cover with bee escape is placed between the honey supers and the brood nest. This method works best on cool nights when bees move down to the brood nest. Escapes usually must be left on colonies for at least two days to insure all or most bees have been removed.
IfYouFindBroodinHoneySupers A queen may expand the brood nest up into the honey supers. Check all supers of honey to be removed for presence of brood. Locate the queen and return her to the brood nest below. Exchange frames with brood for frames of capped honey, consolidating all of the brood into one super. Honey stored in brood frames is food for the bees and should not be packed for human consumption. Place the super with brood on top of the brood chamber. Place a queen excluder over the hive bodies containing brood to prevent the queen from re-entering honey supers.
AvoidRobbing Keep all frames and supers of honey sealed during honey removal. During removal, stack supers lled with honey between outer covers on top and bottom to prevent robbing bees and other insects from reaching the honey. For transport, honey supers should be well secured. Locking straps work well for transporting supers.
OverwinteringaHoneyBeeColony
PreparetheColony A colony of honeybees will overwinter well when you prepare them for winter conditions. The colony must have enough bees to cover ve or more deep brood frames or eight or more medium brood frames. Smaller colonies may have difculty surviving the winter. To insure a colony enters the winter with enough bees, requeen in August. A young, prolic queen introduced into the colony in August lays a large number of eggs during September and October. Make sure mite treatments have been made, if needed, in August. You want large numbers of young healthy bees that emerge without mite damage to maintain the colony through the winter.
ProvideAdequateHoneyforSurvival Provide the bees comb space for storing nectar and pollen in September and October. Empty supers should be removed after mid-October and properly stored to prevent wax moth damage. A colony can be overwintered in one or two deep hive bodies, or two or three medium hive bodies. To survive the winter, each colony should contain at least 40 to 50 pounds of honey. Most of the honey should be stored in a second brood chamber or in supers above the brood chamber, although some may be in frames holding, or adjacent to, the brood. To help you estimate the amount of honey a colony contains, remember that a shallow

32 33
hive body lled with honey weighs approximately 35 pounds, a medium hive body weighs approximately 45 pounds and a deep hive body weighs 60 to 75 pounds.
MinimizeInspectionsinColdWeather Before cold weather arrives, check the brood chamber for a laying queen and healthy brood. If the colony must be opened to make fall medication applications, this should be done when the temperature is at least 55 degrees F. This may take some forethought if you are making dust applications of terramycin to be applied over the course of three weeks.
VentilateIfNeeded Colonies can be ventilated to remove excess moisture during the winter months. Inner covers with an additional opening that provides ventilation and a second exit can be purchased. A twig the diameter of a pencil can be placed between the inner and outer cover to provide an additional ventilation space. For winter, reverse the inner cover so the cleated side and ventilation exit are down. The outer cover is placed over the inner cover in a normal manner.
ReduceAirFlowIfNeeded To reduce airow and further protect the colony, an entrance reducer can be inserted during times of extreme cold weather; however, this is usually not necessary for most of Tennessee.
PestsofHoneyBees
Trachealmite,Acarapiswoodi Tracheal mites have spread throughout Tennessee since their introduction in 1987. In some years, this parasite is believed responsible for 50 percent of the losses of bee colonies statewide, with local losses reaching 100 percent. The mite has become a severe problem, in part due to the difculty in detecting the minute parasite and the ease with which contaminated bees can spread the mites. The mites are spread among colonies by drifting bees, or among apiaries by any activities of beekeepers involved in moving adult bees. Other sources of contaminated bees include bee swarms and from package and queen bee producers.
Biology The oblong mites are microscopic, averaging 160 microns long by 75 microns wide, about 1.5 times as long and 0.75 times wide as the diameter of a human hair (100 microns = 1/250”) [Fig., Morse, Gleanings
in Bee Culture, Jan. 1991, pg. 27]. They live and breed inside the trachea or breathing tubes of the bee, especially in the large tubes in the prothoracic region. The mite penetrates the tracheal wall with its piercing mouthparts and feeds on hemolymph (bee blood). The effects of feeding, opening the tracheal surface to pathogens, and the reduced capacity of air ow to the wing muscles are the suspected damaging factors that kill bees.
Symptoms The wings of infested bees are often unhooked, with one wing projecting 90 degrees from the axis of the body. These bees (crawlers) are unable to y and crawl about the hive entrance. Numerous bees have been observed on occasion to crawl out of the colony and die. Population levels of mites are usually highest early in spring when bee population levels are low. As bees cluster in winter, the mite population builds up in the old bees and as brood rearing commences, mites move to young bees. If the wintering colony is weak due to food shortage or disease, the effect of mites is increased. Mite populations are lowest during summer when bee populations are high.
Figure 38. Adult tracheal mite.
Figure 39. Adult tracheal mites and eggs in the breathing tube of a bee.

32 33
Detection and Diagnosis To diagnose tracheal mites, the bees must be dissected and examined under a microscope.
Sampling for Varroa and Tracheal Mites This method allows a single sample to be collected to detect both mites.
1. Select a frame from the brood area with bees on it.
2. Position the frame on end and scoop bees into the mouth of a quart Mason® jar until the jar is one third full. Make sure the queen bee is NOT in the sample.
3. Spray a rapid burst of ether (starting uid) into the jar of bees, cap the jar quickly and roll the mass of bees inside the jar.
4. Observe the inside jar surface for dark brown, oval, pin-head-size Varroa mites. If you have many, this technique will reveal them in the eld.
5. Add enough rubbing alcohol to half ll the jar, cap it tight and seal it with tape, if necessary.
6. Send the sample to the ofce of your county Extension agent and include your name, address, phone number and the number of colonies in apiary. Also, include the date of last re-queening and source of bees, if obtained commercially. You may also send a sample to:
The University of Tennessee Bee Disease Lab Entomology and Plant Pathology 2431 Joe Johnson Dr., 205 PSB Knoxville, TN 37996-4560
Dissection Bee dissections will be made by UT personnel or can be made by a beekeeper using the following method: Fifty bees are randomly selected and placed on their backs. The front legs and head are removed with the edge of a razor blade and a thin cross-section of the prothorax containing the major tracheal trunks is made. The section is soaked overnight in an 8 percent solution of potassium hydroxide in water to dissolve muscle tissue. The tracheae are observed at 20 to 40X magnication under a dissecting microscope for mites. Infested trachea are usually discolored and darkened in the areas mites have fed.
Treatments for Tracheal Mites: Resistant Stock: Recently, several newly developed genetic stocks of honeybees have shown some resistance to the effects of tracheal mites. This resistance is not 100 percent; however, research indicated signicant improvement when compared to non-resistant lines. One stock, the BUCKFAST bee, can be purchased from Weaver Apiaries in Navasota, Texas. Additional stocks of the “Yugo” bee, tested by the USDA, have been released to queen producers to breed and sell. The New World Carniolan stock is also reported to express partial resistance to tracheal mite. Some queen producers are advertising “resistant” bees. We do not know whether these stocks are resistant or not; therefore, beekeepers should be careful when purchasing stock that claims to be resistant. It still may be necessary to apply additional treatments as explained below. Menthol: This treatment is a crystal with fumigant action that kills tracheal mites. Temperatures must exceed 60 degrees F for proper fumigation. Application: Menthol should be applied after honey has been removed, because it gives the honey a menthol avor. Fifty grams, (1.8 ozs.) of crystals in a “bag” are placed at inside the colony on the frame top bars above and to one side of the brood area if temperatures are below 80 degrees F. If temperatures exceed 80 degrees F, the bag should be placed on the bottom board below the brood chamber. Menthol is a fumigant that is not effective until air temperature is above 60 degrees F. Although temperatures vary across Tennessee, a general “window” for treatment starts in late spring (May-June) and ends in early fall (August). We recommend early fall as a rst choice, because most honey ows have ended. Menthol can be purchased in individual pre-packaged “tea-bags” or 50 grams can be placed into a window screen bag secured by staples. Leave the bag in place for four to six weeks. Do not leave menthol in place all winter, because it reduces brood rearing and may affect clustering behavior. Apicure® is a new treatment containing a formic acid-impregnated gel. It should be applied in late winter, before the end of February, and in late summer, in early to mid September, when daytime temperatures are between 45 and 95 degrees F. Application: Apicure® should not be in the colonies during honey ow. One pack is applied per hive, placed on the top bars of the frames of the brood chamber. Packets should be removed in 21 days. The Apicure® label states that this product should be removed from colonies 28 days prior to the beginning

34 35
of the surplus honey ow to prevent contamination of marketable honey.
Contaminated honey should not be eaten. Treatments for mites, including menthol and Apicure®, Checkmite+TM and Apistan® for the Varroa mite, should not be made when producing honey. The chemicals can be absorbed into the honey. Remove Apistan® strips or menthol packets prior to adding supers to collect honey. To treat for Varroa mites, use Apistan® strips after all honey has been removed. Do not eat contaminated honey. This honey could be left in the comb and fed to the bees in late fall for over-winter food.
Sources of MentholA. Bee supply companies include:
Walter T. Kelley Co. 3107 Elizabethtown Rd.Clarkson, KY 42726(502) 242-2021
Mann Lake SupplyCounty Road 40 & First StreetHackensack, MN 56452(800) 233-6663
Dadant & Sons2425 Carroll Ave.Lynchburg, VA 24501(804) 846-0666
Brushy Mountain Bee FarmRt. 1 Box 135Moravian Falls, NC 28654(800) 233-7929
A.I Root Co.623 W. Liberty St.Medina, OH 44256(800) 289-7668
B. Agricultural co-ops and local bee suppliers in several counties.
C. Local bee associations supply their members. For example, Knox County residents can purchase medications from the Knox County Bee Association.
Sources of Apicure®
Apicure® is available from several, but not all, beekeeping supply companies. It is produced (and sold) by BetterBee, 8 Meader Road, Greenwich, NY
12834, (518) 692-9802. Contact BetterBee for a list of suppliers.
Vegetable Shortening Vegetable oil/shortening has shown promise as a treatment against mites, probably by reducing the ability of the mite to detect young bees as hosts. A patty containing three parts granulated sugar and one part shortening plus terramycin will prevent American Foulbrood and combat tracheal mites. This treatment (one per deep brood chamber) is applied after honey has been removed in the fall and again early in spring. Additional patties of sugar and shortening without terramycin can be applied later for treatment of mites only. The patty should be placed at on the top bars in the brood chamber.
Varroamites,Varroadestructor The Varroa mite, Varroa destructor, was discovered in Tennessee in November 1990. This infestation originated from contaminated honey bee queens and packages of bees shipped from producers in South Georgia to beekeepers in more than 50 Tennessee counties. Currently, Varroa mites are found throughout Tennessee. After being discovered in 1987 in Wisconsin and Florida, they spread rapidly throughout North America. Varroa mites have a worldwide distribution, and are found on all continents except Australia. This parasite is so damaging because only recently has it come into contact with a new host, the European honeybee [Apis mellifera L. (EHB)]. The EHB has no natural defenses to this parasite. The original host, the Asian honey bee (A. cerana), has established an “equilibrium” with its parasite because, among other factors, it can physically remove mites and kill them.
Economic Damage This lethal, pin-head size parasite is causing severe economic loss by killing thousands of honey bee colonies annually. It has contributed to widespread death of one-half the colonies in Tennessee, with severe losses in some locations of 100 percent. Colonies of EHB infested with Varroa almost always die unless the beekeeper uses effective measures to kill the mites. Colonies infested with the mites can die within one year. Losses of bee colonies in Tennessee are believed to be affecting pollination of vegetable and orchard crops. Reductions in crop yields are suspected to be related to reduced numbers of pollinators. In some areas, growers are making contracts with beekeepers to provide adequate numbers of bees for pollination.

34 35
Figure 40. Adult female varroa mite.
Figure 41. Varroa mite on honey bee larva.
more than two mites may die before emerging, or if they do emerge, they weigh less, may appear deformed and seldom leave the colony. The number of bees in the colony diminishes steadily as the number of mites increases. Less nurse bees are produced to feed the brood, and brood production ceases. At this stage, the entire colony collapses. All remaining adults usually leave the colony at one time, with each bee carrying numerous mites. These heavily infested bees often y into nearby colonies and transfer mites in the process. The total collapse of a colony usually comes as a complete shock to the beekeeper. One day the colony appears “strong” (many bees), and two weeks later, the colony is dead, without a single live bee present. Mites can be dispersed quickly whenever infested bees come in contact with uninfested ones. This can happen easily when infested bees (especially drones) drift (enter a colony that is not their own) into an uninfested colony, or during robbing, as uninfested bees remove honey from a colony occupied by infested bees.
Detection Several methods can be used to detect Varroa mites: (Please see Sensitivity below). 1. Observing pupae – In this method, pupae are
examined for mites by uncapping the cells, extracting the pearly white pupae and looking for the dark brown mites adhering to the surface. Use a capping scratcher or table fork to uncap several cells at a time, and spear the pupae beneath. A pair of tweezers can also be used to extract a single pupa from its cell. Select pupae with pigmented eyes, because these can be extracted from the cell without breaking apart. Select drone pupae if they are present, because Varroa prefer drones. If drone pupae are unavailable, then look at worker pupae. Sample at least 25 drone or 50 worker pupae to determine infestation level.
2. A sticky board trap is used to sample a whole colony for mites. A sticky board trap is placed on the bottom board inside the entrance of the bee colony. The board can be used alone or in combination with a treatment to detect mites. Mites die from natural causes, fall off the bees and land on the sticky board. A sticky board is made using stiff cardboard with a smooth, light-colored surface that is cut to t inside the hive. A sticky substance such as TanglefootTM, clear “contact” shelving paper or spray cooking oil is applied to the upper surface to catch and hold mites. A metal screen made from eight-mesh (per inch)
Biology The Varroa mite is an external parasite of honey bee larvae, pupae and adults. The life cycle of the mite generally takes 11 days to complete, with female mite longevity of four to eight weeks. The infestation starts when a pregnant female mite enters the colony, attached to a returning bee. The adult female mite is oval (ca 1.2 X 1.6 mm), brown, with eight legs and is about the size of a pin-head. She searches for a larva with preference for drones>workers>queens, and crawls into the cell in the comb containing the larva. The cell is then capped over by workers. The female mite lays eggs that hatch and begin to feed on the bee larva. The mites literally suck the life out of the host bee by penetrating its internal membranes with their mouthparts and withdrawing uids. The puncture wounds can become the entry points for disease organisms. Bees that emerge after being parasitized by a single female and her offspring have a shorter life span than do nonparasitized bees. Bees parasitized by
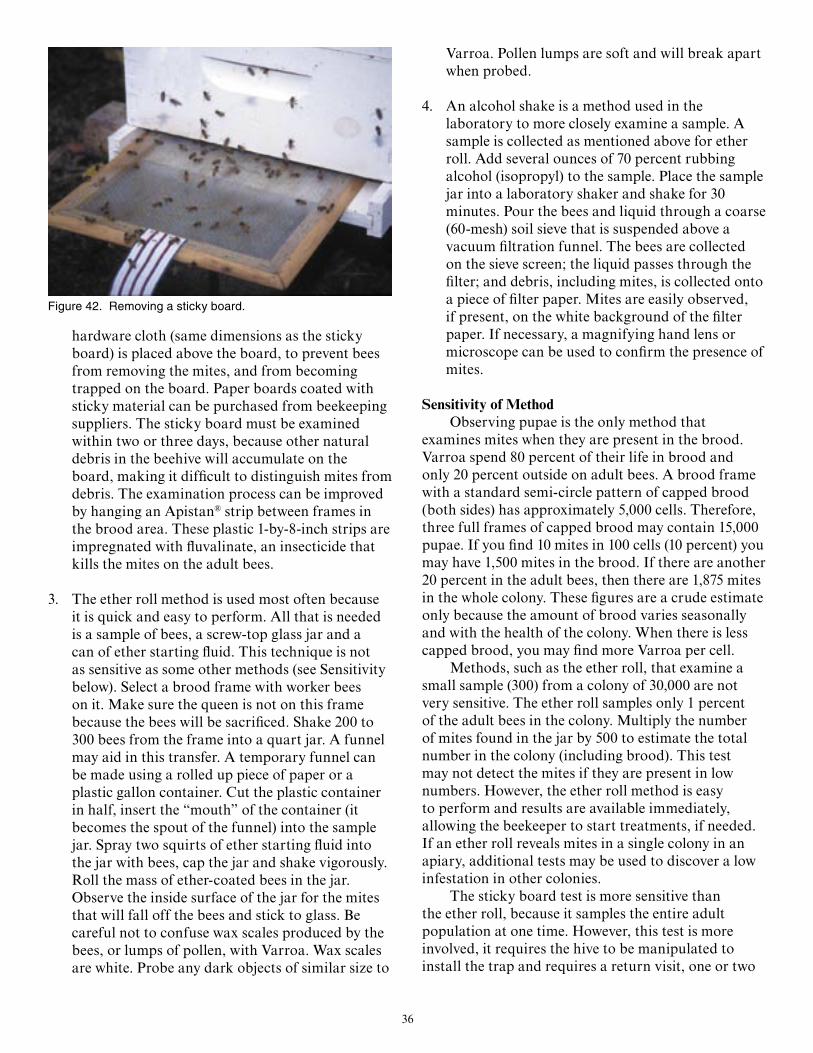
36 37
hardware cloth (same dimensions as the sticky board) is placed above the board, to prevent bees from removing the mites, and from becoming trapped on the board. Paper boards coated with sticky material can be purchased from beekeeping suppliers. The sticky board must be examined within two or three days, because other natural debris in the beehive will accumulate on the board, making it difcult to distinguish mites from debris. The examination process can be improved by hanging an Apistan® strip between frames in the brood area. These plastic 1-by-8-inch strips are impregnated with uvalinate, an insecticide that kills the mites on the adult bees.
3. The ether roll method is used most often because it is quick and easy to perform. All that is needed is a sample of bees, a screw-top glass jar and a can of ether starting uid. This technique is not as sensitive as some other methods (see Sensitivity below). Select a brood frame with worker bees on it. Make sure the queen is not on this frame because the bees will be sacriced. Shake 200 to 300 bees from the frame into a quart jar. A funnel may aid in this transfer. A temporary funnel can be made using a rolled up piece of paper or a plastic gallon container. Cut the plastic container in half, insert the “mouth” of the container (it becomes the spout of the funnel) into the sample jar. Spray two squirts of ether starting uid into the jar with bees, cap the jar and shake vigorously. Roll the mass of ether-coated bees in the jar. Observe the inside surface of the jar for the mites that will fall off the bees and stick to glass. Be careful not to confuse wax scales produced by the bees, or lumps of pollen, with Varroa. Wax scales are white. Probe any dark objects of similar size to
Varroa. Pollen lumps are soft and will break apart when probed.
4. An alcohol shake is a method used in the laboratory to more closely examine a sample. A sample is collected as mentioned above for ether roll. Add several ounces of 70 percent rubbing alcohol (isopropyl) to the sample. Place the sample jar into a laboratory shaker and shake for 30 minutes. Pour the bees and liquid through a coarse (60-mesh) soil sieve that is suspended above a vacuum ltration funnel. The bees are collected on the sieve screen; the liquid passes through the lter; and debris, including mites, is collected onto a piece of lter paper. Mites are easily observed, if present, on the white background of the lter paper. If necessary, a magnifying hand lens or microscope can be used to conrm the presence of mites.
Sensitivity of Method Observing pupae is the only method that examines mites when they are present in the brood. Varroa spend 80 percent of their life in brood and only 20 percent outside on adult bees. A brood frame with a standard semi-circle pattern of capped brood (both sides) has approximately 5,000 cells. Therefore, three full frames of capped brood may contain 15,000 pupae. If you nd 10 mites in 100 cells (10 percent) you may have 1,500 mites in the brood. If there are another 20 percent in the adult bees, then there are 1,875 mites in the whole colony. These gures are a crude estimate only because the amount of brood varies seasonally and with the health of the colony. When there is less capped brood, you may nd more Varroa per cell. Methods, such as the ether roll, that examine a small sample (300) from a colony of 30,000 are not very sensitive. The ether roll samples only 1 percent of the adult bees in the colony. Multiply the number of mites found in the jar by 500 to estimate the total number in the colony (including brood). This test may not detect the mites if they are present in low numbers. However, the ether roll method is easy to perform and results are available immediately, allowing the beekeeper to start treatments, if needed. If an ether roll reveals mites in a single colony in an apiary, additional tests may be used to discover a low infestation in other colonies. The sticky board test is more sensitive than the ether roll, because it samples the entire adult population at one time. However, this test is more involved, it requires the hive to be manipulated to install the trap and requires a return visit, one or two
Figure 42. Removing a sticky board.

36 37
days later, before mites can be discovered. The number of mites on the board should be multiplied by ve to provide a crude estimate of the total mite population in the colony. Varroa spend only 20 percent of their time on adult bees.
Treatments Apistan® is the most widely used miticide registered for management of Varroa in the United States. It consists of a pyrethroid chemical, uvalinate, impregnated in plastic strips. Apistan® is available in several dosages for treatment of queen bee cages, packages of bees and whole colonies. The 1 percent active ingredient (AI) formulation for queen cages is called a queen tab and is placed into the queen cage with attendant bees for three days prior to shipping. This treatment has been shown to be 100 percent effective. A 21⁄2 percent AI Apistan® strip for packaged bee treatment is placed inside the cage with bees for ve days prior to shipping. To treat a whole colony with Apistan®, use one 10 percent AI Apistan® strip (8 X 1 inch) for every ve frames of bees. Suspend strips within the brood cluster for at least 45 and no more than 56 days. Remove the strips after 56 days. Wear plastic gloves (e.g., latex) while handling the strips. Beekeepers should insist that any queens or packages they order be treated with Apistan® before shipment. Be sure to check the packages at a later date for any mites not killed with the rst treatment. Varroa mites resistant to Apistan® have been found in Tennessee and several other states. We suspect that resistant mites are not widely distributed in Tennessee, but this has not been scientically veried. Therefore, beekeepers should be advised that they may discover colonies that have mites not controlled by Apistan®. A test has been devised to detect resistant mites by the USDA. Please contact the UT Bee Disease Lab to conduct the test if you suspect resistant mites are present. Resistant mites can be controlled by coumaphos (CheckMite+TM) as described below. Unless resistant mites are found, however, we recommend using Apistan® for Varroa control. Apicure® (see Tracheal Mite Treatments), a new treatment containing formic acid, was made available in early 2000. It suppresses Varroa populations, but not as well as Apistan®. The label states that Apicure® should be applied for 21 days. A second pack may be applied after this time to lengthen the treatment period and provide better control. In warm weather, the packs may dry up rapidly; therefore, a pack may have to be replaced before 21 days. Monitor the status
of packs applied in hot or warm weather for drying, but be careful not to breathe in the formic acid vapors. Formic acid is highly caustic, so take care in handling Apicure®. Wear rubber gloves when applying and removing Apicure®. The Environmental Protection Agency (EPA) granted a section 18 emergency exemption label for use of coumaphos (CheckMite+TM) to control the Varroa mite and small hive beetle. CheckMite+TM
strips are similar physically to Apistan® mentioned above. Remove honey supers before application of CheckMite+TM and do not replace until 14 days after the control period. Chemically resistant gloves (e.g., latex) must be worn when handling the strips. To use the strips, bend the hanger portion (found at one end of the strip) horizontally before hanging the strip between frames of bees. Use one strip per ve frames of bees. Hang the strips within two combs of the edge of the bee cluster. If two deep supers are used for the brood nest, hang CheckMite+TM strips in alternate corners of the cluster, in the top and bottom super. Leave the strips in place for at least 42 days but no longer than 45 days. Discard used strips and do not reuse. No more than two treatments of coumaphos for Varroa are allowed in Tennessee per year. The label is the law. CheckMite+TM can be purchased from Mann Lake Ltd. (800) 233-6663. Pesticide caution: Fluvalinate, formic acid and coumaphos can cause health risks by being absorbed in honey and beeswax if not applied according to the label directions. The treatment should not be applied during a honey ow or when supers of honey are present. Please read the label and follow instructions closely. The Apicure® label states that this product should be removed from colonies 28 days prior to the beginning of the surplus honey ow to prevent contamination of marketable honey.
ParasiticMiteSyndrome USDA scientists discovered this new malady in 1995. This syndrome is not dened as a disease because no causative agent has been isolated. Detection of the syndrome is based on presence of symptoms identied in adult or larval (brood) bees listed below:
Adult Symptoms:1. Varroa destructor is present.2. Reduction in adult bee population.3. Evacuation of hive by crawling adult bees.4. Queen supersedure.5. Acarapis woodi may or may not be present.

38 39
Brood Symptoms: Some of the more puzzling aspects of this syndrome are observed as the affected brood is examined.1. Varroa destructor is present.2. Spotty brood pattern.3. Symptoms resembling European Foulbrood,
American Foulbrood and sacbrood disease may be present. These symptoms may disappear following feeding of oxytetracycline, sugar syrup and the use of uvalinate strips.
4. The age of affected brood can vary from “C”-stage larva to prepupa. As a result, the affected brood may be seen anywhere on the comb.
5. Individual larva may appear in the “C”-stage, twisted in the cell, “molten” to the bottom of the cell and light brown as in the early stages of American Foulbrood disease.
6. The affected individuals do not display any ropiness.
7. Some scale formation has been noted. Scales are not brittle as with American Foulbrood disease and are easy to remove.
8. No typical odor can be associated with the syndrome.
9. Microscopically, the affected larva has no characteristic microbial ora. The ora is variable but no one bacterial type predominates.
10. To date, no known bee pathogen has been isolated from the affected brood with parasitic mite syndrome.
Tracheal and Varroa mites are believed to carry and spread the unknown agent, probably a virus, from colony to colony. Treatments for this syndrome are based on controlling mites and reducing other stresses to the bees. The syndrome is more common when bees are under stress. Maintaining young queens (less than 2 years old), feeding the colony with sugar/water syrup containing Fumadil-B® and preventative treating with terramycin for American Foulbrood will help reduce stress.
TheSmallHiveBeetle A new pest of honeybees was found in Tennessee (2000) where a beekeeper discovered beetles damaging beehives. The beetles were identied as Aethina tumida Murray, the small hive beetle, a pest from South Africa. The adults are 6 mm (1/4 inch) long, dark brown to black, attened, oval to oblong, with the head often “tucked” below the thorax. If the head is in view, the short antennae have a conspicuous club on the last segment. The larvae are elongate, whitish
grubs, tapered at front and rear ends, which under magnication have rows of spines on the dorsum. Adults and larvae inhabit beehives, where they feed on larvae, stored honey and pollen. As they feed, the brood and honeycombs are damaged, especially as the beetle larvae burrow through it. As the infestation increases, the honey ferments and bubbles out of the cells. Brood rearing stops when beetle numbers are high. Honeybees have been observed to abandon colonies infested by the beetles. As the infestation builds, honey is observed to run out of the hive; this is often the rst external symptom that is noticed. Pupae of the beetles are white to brown and can be found in the soil beneath and near the hive. The development of the beetle from egg to adult in South Africa requires 38 to 81 days, with ve generations possible during warm months. Small hive beetles are most likely to be found in colonies that have been weakened by something else, usually mites. Larvae congregate in corners, possibly to cluster together to retain heat. This clustering distinguishes the beetle larvae from wax moth larvae that are found scattered throughout weak colonies. Hive beetle larvae make a slime as they feed. This slime acts as a repellent to the bees. When the larvae become numerous, the slime is believed to cause the bees to leave the hive. Honeybees will not reenter “slimy” comb. The slime must be washed off with water. To detect the beetles, use corrugated cardboard squares (4 by 4 inches) with one surface peeled to expose the ridges inside. The cardboard is placed ridge side down on the bottom board of the hive. The next day the cardboard is removed and adult beetles, if present, should be found under it. The adults hide in dark, moist places. Adults do not get caught on sticky boards. The Section 18 emergency exemption for use of CheckMite+TM for Varroa mentioned earlier also included treatment for the small hive beetle. To treat for small hive beetle, prepare a cardboard square as mentioned above for detection. Cut a CheckMite+TM strip in half (crossways), staple the pieces to the ridged side of the cardboard and place this side down in the center of the bottom board. Leave in place at least three days and remove after seven days. Do not treat more than four times per year. CheckMite+TM can be purchased from Mann Lake Ltd. (800) 233-6663. Beekeepers located in areas where beetles have been found are advised not to store honey in comb for long periods, especially if pollen is present. Also, they should be careful about stacking weak colonies and extracted supers onto strong colonies. Freezing combs will kill A. tumida eggs, larvae and adults.

38 39
The beetles have been found in several states, including Georgia, South and North Carolina. The original source of infestation may have been South Carolina, but the rst conrmed nd was in Florida. Major infestations appear to be conned to the Southeastern coastal plain, where soil moisture and makeup may be optimal for beetle pupation and survival. The beetle has been found in several counties in Tennessee Beekeepers should be made aware of this pest and any suspected “nds” should be forwarded to the Bee Disease Lab for conrmation. Please call before sending a sample. Samples of adults or larvae can be sent in vials containing alcohol.
AmericanFoulbrood American foulbrood is a disease of honeybee brood caused by the bacterium Paenobacillus larvae. Symptoms of the disease include a spotty brood pattern; concave, punctured capped brood cells; discolored larvae; dried, shrunken brood (called scales) stuck tightly onto the bottom of cells; and an unpleasant odor. The disease is spread by long-lived, hardy spores transmitted by bees, on beekeeping equipment, in honey and in other ways. Because of the persistence of spores and the devastating effects of the disease, the recommended action for American foulbrood is burning of the infested colony, including bees and woodenware. Once an infestation is detected, the bees in the affected colony should be killed (one way to do this is by spraying ether starter uid in the entrance). Plug the entrance, then burn the entire colony in a hole in the ground. After burning, the remains should be covered
with soil. Tools coming into contact with the hive should be sterilized. American foulbrood can be prevented with treatments of the antibiotic terramycin. Terramycin can be applied as a powder or in sugar/shortening patties. To apply as a powder, mix terramycin powder with powdered confectioners sugar. Dust 1 oz. (= 1/3 cup or 5 & 1/3 tablespoons) of the mixture over the top of the outside frames in the brood chamber. Apply this mixture three times at 4- to 5-day intervals in February/March.
MixingTerramycin For TM25®: TM25® is sold in 6.4 oz. packets, each containing 10,000 mg oxytetracycline. Eight hundred mg oxytetracycline is applied per honeybee colony. To produce dust containing 267 mg oxytetracycline/oz., combine entire packet with 2 lbs. powdered sugar to produce enough dust to treat 12 colonies (3 dustings of 1 oz. each). For TM50®: TM50® contains oxytetracycline at 50 g/lb. (=3125 mg/oz.). To prepare theTM50®+powdered sugar dust (267 mg oxytetracycline/oz.) add 3 oz. of TM50® to 2 lbs. powdered sugar to produce enough dust to treat 11 colonies (3 dustings of 1 oz. each).
TerramycinExtenderPatties Colonies can be treated with terramycin in extender patties, one treatment in March and another in October. Due to increasing incidence of foulbrood resistance to terramycin, we caution the routine use of this material as a preventative when there has not been any recent incidence of foulbrood in the local area.
TerramycinExtenderPattyRecipes
TM25 6.4 oz. only Shortening Granulated Sugar No. Patties
4 teaspoons 0.9 oz.* (1/8 cup) 2.7 oz.* (2/5 cup) 1
1 6.4 oz. pkg. 11 oz.(1 1⁄2 cups) 2 lbs. 1 oz.(4 3/4 cups) 12
3 6.4 oz. pkgs. 2 lbs. 1 oz.(4 1⁄2 cups) 6 lbs. 3 oz.(14 1/4 cups) 36
TM50D + Powdered sugar Shortening Granulated Sugar No. Patties
1 lb. 10 oz. + 6 lbs. 5 lbs. 10 oz. 11 lbs. 12 oz. 100
8 lbs. + 30 lbs. 29 lbs. 4 oz. 57 lbs. 12 oz. 500
16 lbs. + 60 lbs. 58 lbs. 8 oz. 115 lbs. 8 oz. 1000
* = weight

40 41
First mix the terramycin (TM25®, TM50®) and powdered sugar thoroughly with granulated sugar. Then add vegetable shortening, mix and atten over wax paper into 1/4 lb. patties. These can be frozen in plastic bags for later use. Feed the antibiotics 30 days or more before a honey ow. Do not treat honey-producing colonies during the nectar ow.
SeasonalManagement
WinterSeasonDecember • Repair and paint equipment. • Apply Apistan® or CheckMite+TM strips, if not
done in November, when temperatures are as warm as possible.
• Clean supers, hive bodies, covers and frames of burr comb and propolis.
• Cull combs. Cut all combs with more than 2 square inches of drone cells from the frames.
• Render (if equipped) or pack all old comb or beeswax into a shipping container. Old comb or wax can be exchanged for foundation.
January • Clean, paint and repair equipment. • Check the apiary for wind damage. • Check the apiary for skunk damage. • Feed a pollen substitute, if needed. • Check the honey stores and feed any colonies
that have less than 15 pounds (six frames of capped honey in a shallow super or 2-3 frames in
a deep super).February • Open colonies on a warm day and check for
laying queen, brood and diseases. • Check amount of honey stores. • Feed all colonies with less than 15 pounds of
honey. • Feed pollen substitute, if needed. • Unite weak or queenless colonies with another
colony (bees should cover ve or more frames). • Select the best of the two queens before uniting
the two colonies. Remove one of the two queens before uniting.
• Feed one gallon of a 2:1 sugar syrup containing one tsp. of Fumidol-B®.
• Treat colonies with Apicure® (formic acid gel packs) for Varroa and tracheal mites.
SpringSeasonMarch
• Check brood chambers. If all of the brood is in the upper part of the brood chamber, reverse the upper and lower brood chamber units. Reversing the chambers will cause the queen to use both units for egg laying.
• In two weeks, the upper unit should be lled with brood. Reverse the units again.
• Repeat, reversing the units every two weeks or as often as necessary until the honey ow begins.
• Check the brood for diseases and mites each time you open the colony. Treat with Apistan® if damaging levels of Varroa are detected.
• Feed the antibiotic terramycin to the colony during this heavy brood-rearing period. This may be done by either adding terramycin to a shortening/ sugar patty (see above) or by adding the antibiotic to powdered sugar. Use one ounce of this mixture, sprinkling it on the tops of the outside frames in each of the two brood chamber units.
• If the powder method is used, repeat the use of the antibiotics at 4- to 5-day intervals until you have treated a colony three times.
• Check the honey stores. Feed all colonies that have less than 15 pounds of honey stores.
• Feed pollen substitute to all colonies that are low on pollen reserves.
• Prepare supers with foundation in a warm room and store under fumigation (para-di-chloro-benzene crystals).
April• Strong colonies will consume large amounts of
honey stores in April. If all reserves have been used up, the colonies will starve just prior to the honey ow.
• Check stores and feed all colonies that have less than 15 pounds of honey.
• Check brood chamber for diseases and mites.• Install package bees in April. Package bees will
do well when installed on all new foundation in the hive. When drawn comb and two frames of brood are available, packages get off to a better start.
• Add new foundation for drawing comb in upper hive body during a honey ow. Slatted bottom boards and entrance reducers also reduce degree of light and aid in producing better drawn comb.
• Wings of the queen may be clipped to prevent her leaving the hives with swarms. Clipping also aids in identication in event of supersedure.

40 41
• Colonies with prolic queens and ample food will be strong in population and may need room. Add a super of drawn comb to relieve crowding.
• By April, you should have developed colony strength to 80,000 worker bees to produce a maximum honey crop.
• Add supers for honey storage by April 15.• Check for the development of the swarming
instinct. Raise the super just above the brood chamber and check for swarm cells along the bottom bars of the frames. If cells are present, all frames containing brood should be checked thoroughly for swarm cells. Remove all queen cells. Give additional room by adding one or two supers of drawn comb.
• Top-ventilate the colony to prevent overheating the colony.
• Recheck for swarm cells every seven days.• Feed package bees two gallons of a 2:1 sugar
syrup containing one tsp. of Fumidol-B® per gallon.
• Colonies that continue to build swarm cells should be divided to prevent swarming.
• Colonies that develop a strong swarming impulse will swarm if you permit the cells to be capped before removing.
• Prepare supers with foundation in a warm room and store under fumigation with para-di-chloro-benzene.
• Prepare supers with cut comb foundation just prior to using them.
• Store supers of prepared foundation in plastic bags to prevent drying out prior to use.
• Remove entrance reducer from overwintered strong colonies by mid-April.
• Remove entrance reducers from colonies installed in April by mid-June.
May• It is time to add another super when the honey
super on a colony is one-half to two-thirds lled (6-7 frames).
• Raise the partially lled super and place the empty super on top of the brood chamber. Place the partially lled super on top of the empty super.
• Supers of cut comb honey foundation should be added on top of the honey super, which is on top of the brood chamber, to reduce the amount of pollen in the cut comb honey.
• Continue to check for swarm cells every seven days. Remove all swarm cells from the colony.
• Keep empty storage space in the supers on all colonies until the honey ow has ended.
• Remove and extract capped supers from your colonies if you need additional supers.
SummerSeasonJune
• Swarms may be infested with tracheal mites.• Combine all swarms issuing after June 1 with
weak colonies. Continue to check for swarm cells every seven days.
• Continue to add supers of drawn comb as needed until the honey ow ends.
• Remove the capped honey after June 15.• Uncapped honey can be removed two weeks after
the honey ow ends.• Prepare to move your bees to the mountains or
to lima bean-, soybean- and cotton-growing areas from the second honey ow if you want maximum production.
• Store all supers of honey in a warm, 90 degrees F, dust-free, screened room.
• Extract the honey as soon as possible.July
• Have your bees in their new location by the rst week of July.
• Extract honey you removed in June to have the supers available for the sourwood honey ow.
• Return extracted supers to the colonies just before dark to prevent robbing.
• Fumigate all supers of extracted combs that will be off the colonies for more than four days.
• Pack honey in a quality, attractive package – all new, clean glassware or plasticware and lids.
• Continue to check for swarms in mountain areas; combine swarms issuing after July 15 with weak colonies.
• Check for Varroa mites.August
• Check brood nest for diseases and mites.• If 10 Varroa mites are found per 100 pupae or
six mites from ether roll (see Detection), apply Apistan® strips.
• Check for swarm cells in mountain areas.• Remove surplus honey, leaving some space in
supers for later summer and fall ow.• Treat colonies of honey bees with 1.6 ozs. of
menthol crystals enclosed in a screen wire pouch to suppress tracheal mites. Treat when temperature is in the 70 degrees F range.
• Colonies will need 40-60 pounds of honey for overwintering.

42 43
• Extract supers of honey removed from colonies.• Return extracted supers to colony for cleaning
just before dark to prevent robbing by colonies.• Remove cleaned supers from colony, and store
under para-di-chloro-benzene fumigation to prevent wax moth damage.
• Requeen all colonies every year that you double crop. All colonies that you do not move with honey ows should be requeened every two years.
• Before placing new caged queen in the colony, remove the old queen and all queen cells. Check the brood chamber and make sure you have two or more frames of sealed brood in the colony. Place the caged queen over the frames of brood.
• Recheck the requeened colonies in 10 days for a laying queen. If eggs are present, do not disturb the colony.
• Requeen colonies every other year unless they are used for double cropping on the valley and mountain honey ows.
• Order your queens clipped and marked for easy location and identication. This can also aid in swarm prevention.
FallSeasonSeptember
• Check colony for Varroa. If numerous (see Sensitivity of Method), apply Apistan® strips for mite control.
• Treat colonies with Apicure® (formic acid gel packs) for Varroa and tracheal mites, if needed.
• Requeen colonies that you did not requeen in August or that rejected the introduced queen in August.
• Consolidate frames in supers that may have some empty space for storage of fall nectar ow. Fill supers with capped frames. Partially lled supers can be rearranged with empty frames in the center and the lled and capped frames on the outside.
• Remove all empty supers and store under fumigation.
• Replace all hive parts that need repairing or painting with reconditioned parts. Repair and painting can be done much more easily in the shop.
October• Check colony for Varroa. If numerous (see
Sensitivity of Method), apply Apistan® strips for mite control.
• Place entrance reducers in the entrance.• Check each colony for a laying queen.
• Treat with antibiotics every four to ve days until three treatments are completed to prevent diseases (powder method).
• Leave one shallow super completely full of honey plus the honey in the brood chambers.
• Feed all colonies that do not have at least 40 pounds of honey stored. (A deep-brood frame holds 6 to 7 pounds of honey; a medium frame holds 41⁄2 pounds; a shallow super frame holds 31⁄2 pounds.)
• Feed a mixture of 2 parts of sugar to 1 part water (measured by weight).
November• Check colony for Varroa. If numerous (see
Sensitivity of Method), apply Apistan® strips for mite control.
• Rake all leaves and dead grass away from around the colony to prevent re. Cut tall grass.
• Feed Fumidol-B® to prevent Nosema disease.• Fence apiary to protect the colonies from
livestock.• Check all tops to be sure they are waterproof.• Place a weight on the outer cover to prevent the
wind from blowing the top off the hive.• Top ventilate all colonies. Cut two or three 5/8-
inch slots out of the rim of the inner cover. Invert the inner cover and place the openings in the rim to the front of the hive. Place the outer cover over the inner cover, sliding the outer cover forward; and secure the cover in place with a weight on top of the cover.
• Sample a colony for tracheal mites by collecting 100 bees in a jar containing alcohol. Forward to state bee inspector or UT Bee Disease Laboratory.

44
Visit the UT Extension Web site athttp://www.utextension.utk.edu/
Programs in agriculture and natural resources, 4-H youth development, family and consumer sciences, and resource development.University of Tennessee Institute of Agriculture, U.S. Department of Agriculture and county governments cooperating. UT Extension provides equal opportunities
in programs and employment.
05-0015 PB1745-6M-8/04 E12-4615-00-002-05
Copyright 2004 The University of Tennessee. All rights reserved. This document may be reproduced and distributed for nonprofi t educational purposes providing that credit is given to University of Tennessee Extension.