berryremote 1.00 installation instructions...berryremote installation instructions introduction...
TRANSCRIPT

For external employees
Doc.Version 1.00
29.07.2014
FIIN1 dept.
BerryRemote 1.00 Installation Instructions

BerryRemote Installation Instructions
Introduction
2 Introduction
Contents Introduction 3 1.
1.1. Comment 3
1.2. Possible installation versions 3
1.3. Installation file 3
1.3.1. Softwareversion 3
1.4. Hardware requirements for 32 + 64 bit operating systems 4
Junos Pulse Client 4 2.
2.1. Installation using command lines 4
2.2. Installation with ADDLOCAL – install. parameter 5
2.3. Start of the Junos Pulse installation 5
2.4. User Account Control 5
2.5. Junos Pulse: Deactivate program start 6
2.6. Deactivation and restart of Junos Pulse 6
2.7. Junos connection window view with the dialing profiles 7
2.8. Program list after installation and reorganisation 7
2.9. Completion of the installation 8
2.10. Important configuration settings 8
2.11. Junos Pulse Client uninstallation 8
RSA – Client (SecurID token software) (If ZF Network access necessary) 9 3.
3.1. "RSA SecurID" – installation 9
3.2. Selection of order region 10
3.3. Confirmation of license agreement 10
3.4. Confirmation of the standard installation 10
3.5. User Account Control 11
3.6. Installation started 11
3.7. Start RSA – soft token – program 11
3.8. Completion of the installation 12
3.9. Important configuration settings 12
3.10. Completion of the Program list 12
3.11. "RSA SecurID" uninstallation 12
WINDOWS 7 – MTU setting (Not mandatory) 13 4.
4.1. Determining adapter settings 13
4.2. Modify MTU 13
WINDOWS 7 – Installation Certificates (Not mandatory) 14 5.

BerryRemote Installation Instructions
Introduction
3 Introduction
Introduction 1.
Target group of the application are external users. This document describes the installation and setup of the standard parameters for Remote access client “BerryRemote” to connect to the Network of Boge Elastmetall GmbH and if necessary also to the ZF Network via “ZF Net Remote” with additional links. Operation, expanded configuration, and troubleshooting are explained in the current operating instructions.
1.1. Comment
1.2. Possible installation versions
The software clients are compatible with Windows 7 32/64 (SP1). Windows 7 32/64 bit (SP1)
1.3. Installation file
The software is the same for all domains. The respective current version of the software is provided with the packet request. Please copy the file below and unzip to e.g. c:\Ablage >>> BerryRemote_V1.01_Externs.zip
Comment: These instructions and its screenshots were created using a 64bit WIN7 system.
1.3.1. Softwareversion
Junos Pulse 5.0.4.1.44471
RSA SecureID Token 4.1.1.836
Attention: The software must be installed "as administrator"!
Other VPN-Clients must be de-installed prior to the installation.
Previous program versions must be de-installed prior to the installation.
The computer must be restarted after the installation.
Junos Pulse 32 / 64bit
RSA 32 / 64bit

BerryRemote Installation Instructions
Junos Pulse Client
4 Junos Pulse Client
1.4. Hardware requirements for 32 + 64 bit operating systems
Minimum 1 GB with Windows XP; 2GB with Windows 7
Minimum 1 GHz CPU
Minimum 4 GB available hard drive space
Junos Pulse Client 2.
SSL VPN client for dialing into the Telekom ZF-Juniper-SSL system Software and setup files 32 bit Systeme: j-pulse-win-5.0r4.1-b47117-32bitinstaller.msi 64 bit Systeme: j-pulse-win-5.0r4.1-b47117-64bitinstaller.msi 32+64 bit systems: ZFNR_Berry.jnprpreconfig A ready-to-install Junos Pulse client must be installed via CMD command lines for embedding the prepared configuration file1) and parameterization2), see following information. Prior to this, the required files: Junos Pulse, MS-Installer (respective operating system), and Junos configuration should have been placed in the corresponding directory (here, for example, c:\Ablage).
2.1. Installation using command lines
Open a command line via the Start Run menu. Then enter the CMD command. In the open command line, enter one of the following commands, depending on the operating system. WIN 7 643 msiexec /i C:\Ablage\j-pulse-win-5.0r4.1-b47117-64bitinstaller.msi CONFIGFILE=C:\Ablage\ZFNR_Berry.jnprpreconfig ADDLOCAL=PulseSA /qb WIN 7 323 msiexec /i C:\Ablage\j-pulse-win-5.0r4.1-b47117-32bitinstaller.msi CONFIGFILE=C:\Ablage\ZFNR_Berry.jnprpreconfig ADDLOCAL=PulseSA /qb 1) ZFNR_Berry.jnprpreconfig EMEA/AMERICA/APA dialing profiles 2) ADDLOCAL=PulseSA /qb Connection window view reduced to dialing profiles 3) To avoid typos an additional bat-file “Berry_Externs.bat” is included in the zip file to
install the Junos Pulse. Please start this file instead of the above CMD- line entry.

BerryRemote Installation Instructions
Junos Pulse Client
5 Junos Pulse Client
2.2. Installation with ADDLOCAL – install. parameter
2.3. Start of the Junos Pulse installation
2.4. User Account Control
Installation begins after switch to admin context
NOTE: During the installation, the Ethernet connection is temporarily disrupted due to the installation and the incorporation of a virtual network adapter, in order to integrate the virtual network adapter!!!

BerryRemote Installation Instructions
Junos Pulse Client
6 Junos Pulse Client
2.5. Junos Pulse: Deactivate program start
Reason for deactivation: The Junos Pulse client exists in the current version and an auto-update is not required. Later updates are effected by means of manual subsequent installations. Remove following entry in the auto-run registration of the Windows registration: For 64 bit systems: [Computer\HKEY_LOCAL_MACHINE\SOFTWARE\Wow6432Node\Microsoft\Windows\ CurrentVersion\Run] Junos Pulse = C:\Program Files (x86)\Common Files\ Juniper Networks\JamUI\Pulse.exe -tray For 32 bit systems: [Computer\HKEY_LOCAL_MACHINE\SOFTWARE\Microsoft\Windows\ CurrentVersion\Run] JunosPulse=C:\Program Files\Common Files\Juniper Networks\JamUI\Pulse.exe -tray Background: The Junos Pulse would occupy the SysTray already at Windows start, which is not desired and impedes operation.
2.6. Deactivation and restart of Junos Pulse
After the installation the Junos Pulse client is active in the tray bar. After Windows reboot the Junos Pulse client does not start automatically and cannot launched from tray bar in this state.
The Junos Pulse client can now be opened for initializing the first VPN-client connection by using the corresponding program icon under start → programs → Junos Pulse.
BerryRemote Installation Instructions
Junos Pulse Client
7 Junos Pulse Client
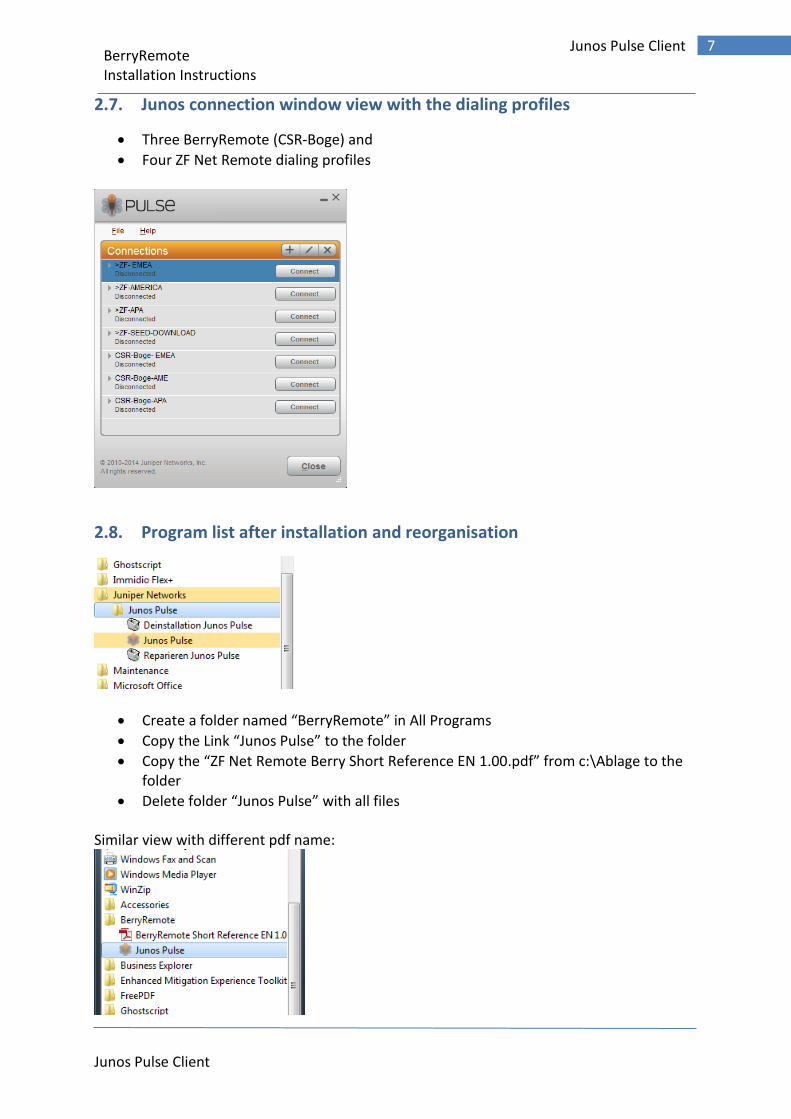
2.7. Junos connection window view with the dialing profiles
Three BerryRemote (CSR-Boge) and
Four ZF Net Remote dialing profiles
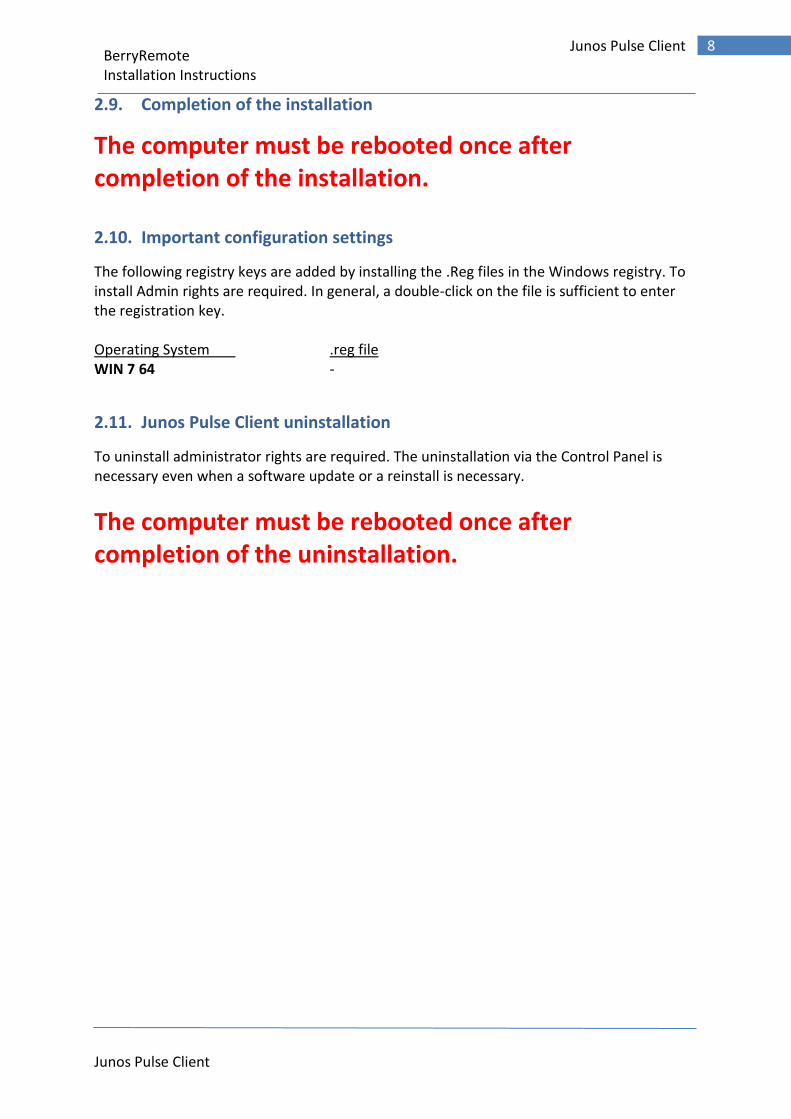
2.8. Program list after installation and reorganisation
Create a folder named “BerryRemote” in All Programs
Copy the Link “Junos Pulse” to the folder
Copy the “ZF Net Remote Berry Short Reference EN 1.00.pdf” from c:\Ablage to the folder
Delete folder “Junos Pulse” with all files
Similar view with different pdf name:
BerryRemote Installation Instructions
Junos Pulse Client
8 Junos Pulse Client
2.9. Completion of the installation
The computer must be rebooted once after completion of the installation.
2.10. Important configuration settings
The following registry keys are added by installing the .Reg files in the Windows registry. To install Admin rights are required. In general, a double-click on the file is sufficient to enter the registration key. Operating System .reg file WIN 7 64 -
2.11. Junos Pulse Client uninstallation
To uninstall administrator rights are required. The uninstallation via the Control Panel is necessary even when a software update or a reinstall is necessary.
The computer must be rebooted once after completion of the uninstallation.

BerryRemote Installation Instructions
RSA – Client (SecurID token software)
9 RSA – Client (SecurID token software)
RSA – Client (SecurID token software) 3.
The RSA Client software is need if you need access to ZF Friedrichshafen AG (ZF). The "SecurID Token" program saves and manages the soft token. The soft token is required for 2-factor SSL VPN authentication to access to the ZF Network. In order to initialize the token, a seed file is needed, which is securely saved in the RSA client and personalizes this application by tying it to the user. The automation version of the "SecurID Token" software is installed, i.e. the currently generated token can be prompted and accepted during login by the "Junos Pulse SSL VPN client" via a corresponding application interface. Software and setup files 32+64 bit systems: RSASecurIDTokenAuto411.msi
3.1. "RSA SecurID" – installation
NOTE: Installation of the RSA SecurID client is executed in admin context! Before installation please uninstall old software versions (Refer chapter 3.9). Installation start of the automation version.

BerryRemote Installation Instructions
RSA – Client (SecurID token software)
10 RSA – Client (SecurID token software)
3.2. Selection of order region
3.3. Confirmation of license agreement
3.4. Confirmation of the standard installation
BerryRemote Installation Instructions
RSA – Client (SecurID token software)
11 RSA – Client (SecurID token software)
3.5. User Account Control
Switching to admin context
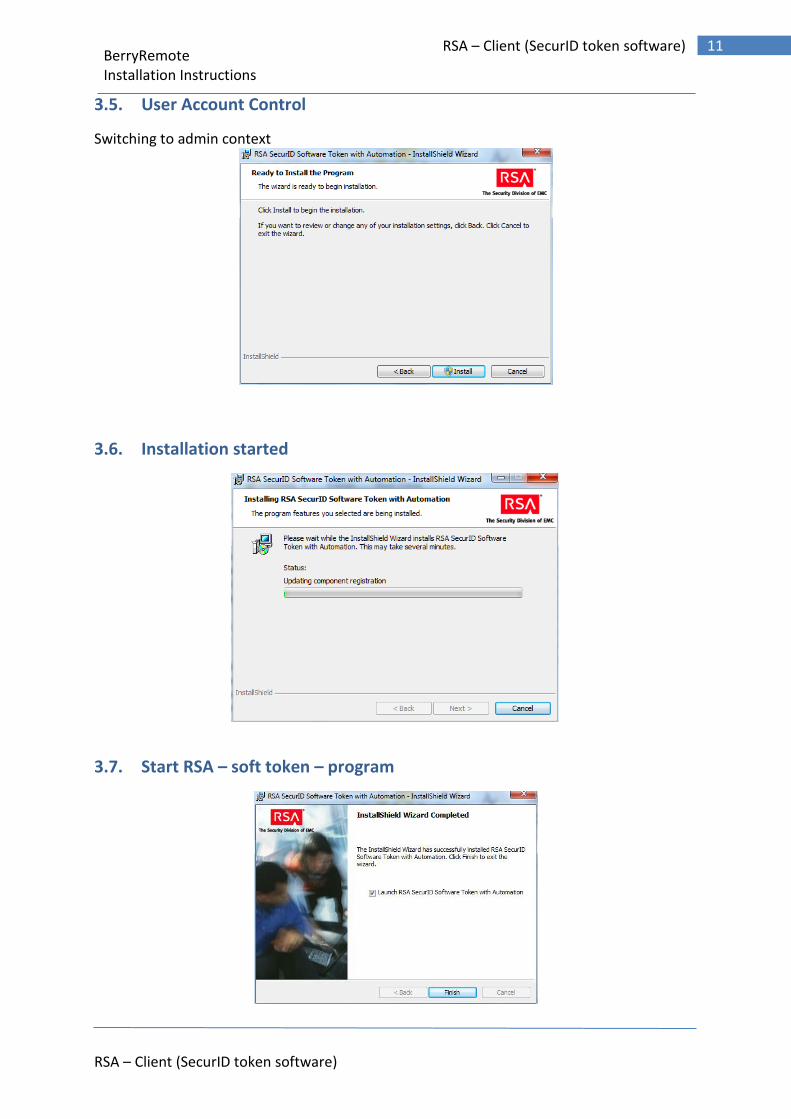
3.6. Installation started
3.7. Start RSA – soft token – program

BerryRemote Installation Instructions
RSA – Client (SecurID token software)
12 RSA – Client (SecurID token software)
3.8. Completion of the installation
The installation can be aborted at the prompting of the token. The soft token seed is uploaded to the computer by the user at a later step of the process. The software has been completely installed, also after the abort.
3.9. Important configuration settings
The following registry keys are added by installing the .Reg files in the Windows registry. To install Admin rights are required. In general, a double-click on the file is sufficient to enter the registration key. Operating System .reg file WIN 7 32 ZFNRKey32_Ext_1.xx.reg WIN 7 64 ZFNRKey64_Ext_1.xx.reg The settings will cause:
The software "RSA SecureID token" is called up on the foreground.
In the software "RSA SecureID token" the URL for the seed is permanently - Download entered.
3.10. Completion of the Program list
Move the link “RSA SecurID Token” to folder BerryRemote in the start menue.
3.11. "RSA SecurID" uninstallation
To uninstall administrator rights are required. The uninstallation via the Control Panel is necessary even when a software update or a reinstall is necessary. A reboot after installation is not required.

BerryRemote Installation Instructions
WINDOWS 7 – MTU setting
13 WINDOWS 7 – MTU setting
WINDOWS 7 – MTU setting 4.
Installation NOT mandatory: The settings are need in some cases if network recources cannot reach
(local admin rights required)
The most secure method is the establishment of a smaller MTU directly at the connection partners. With
Windows 7, this can be achieved with the help of the NETSH.EXE command line instruction. For this, a prompt
as administrator is started. In the [Start] menu, CMD.EXE is entered into the text field and started by pressing
the CTRL+SHIFT and Enter keys. Thereafter it is determined which network adapters exist and which index they
possess.
4.1. Determining adapter settings
>> netsh.exe interface ipv4 show interfaces
One receives a list of the network adapters existing in the system
Idx Met MTU State Name
--- ---------- ---------- ------------ ---------------------------
1 50 1400 connected Loopback Pseudo-Interface 1
11 5 1400 disconnected Wireless Network Connection
12 20 1500 connected Local Area Connection
4.2. Modify MTU
Then set the required MTU size for the network adapter handling the connection, e.g. for Idx 1:
>> netsh interface ipv4 set subinterface interface=1 mtu=1280 store=persistent
If the MTU must be modified for all connections:
netsh interface ipv4 set subinterface interface=1 mtu=1280 store=persistent
netsh interface ipv4 set subinterface interface=11 mtu=1280 store=persistent
netsh interface ipv4 set subinterface interface=12 mtu=1280 store=persistent
The option store=persistent ensures that the setting is preserved, also after a restart. The change is
effective immediately.
Idx Met MTU State Name
--- ---------- ---------- ------------ ---------------------------
1 50 1280 connected Loopback Pseudo-Interface 1
11 5 1280 disconnected Wireless Network Connection
12 20 1280 connected Local Area Connection
I believe that only Idx 11+12 must be modified for ZF. The Idx index is potentially different. Source of the basic settings: Internet

BerryRemote Installation Instructions
WINDOWS 7 – Installation Certificates
14 WINDOWS 7 – Installation Certificates
WINDOWS 7 – Installation Certificates 5.
Installation NOT mandatory: The settings are need in some cases if the gateway ask for certificates.
For Activation and SSL.VPN-Connection ZFNR-Client needs following Certificates at Windows Client System, have to install additive according to certain Certificate error messages. Check of Certificates can be done with IE-Browser menu under [Tools – Internet options – Content – Certificates in Certificates-Store : „Trusted Root Certification Authorities“ and “Intermediate Certification Authorities”].
DigiCert High Assurance EV Root CA
DigiCert SHA2 High Assurance Server CA
RSA Authentication Manager Root CA Certificates can be found under “C:\Ablage” (s. section 1.3) and can be installed as follows, if required.
a. Certificate Files: - DigiCertHighAssuranceEVRootCA.cer - DigiCertSHA2HighAssuranceServerCA.cer - RSAAuthenticationManagerRootCA.cer
b. Install both Certificates each with double click to
DigiCertHighAssuranceEVRootCA.cer

BerryRemote Installation Instructions
WINDOWS 7 – Installation Certificates
15 WINDOWS 7 – Installation Certificates
DigiCertSHA2HighAssuranceServerCA.cer
RSA Authentication Manager Root CA.cer

BerryRemote Installation Instructions
WINDOWS 7 – Installation Certificates
16 WINDOWS 7 – Installation Certificates
Install process after particular Click to [Install Certificate…]-Button:
Attention ! Following both Certificates have to assign into Certificates-Store: „Trusted Root Certification Authorities“
DigiCert High Assurance EV Root CA
RSA Authentication Manager Root CA

BerryRemote Installation Instructions
WINDOWS 7 – Installation Certificates
17 WINDOWS 7 – Installation Certificates
Attention ! Following Certificate has to assign into Certificates-Store:
„Intermediate Certification Authorities“
DigiCert SHA2 High Assurance Server CA