bird spike - bird b gone 2001 instructions.pdfinstall bird spike 2001 on all curved surfaces such as...
TRANSCRIPT

ApplicationsBird-B-Gone Spike 2001 is a versatile system that can be easily installed where any bird can roost.
ConduitSpike 2001 can be attached to wires,conduit, gutters, and pipes by usingcommon hose clamps, Nylon ties or wire lashings.
Curved Surfaces:Spike 2001 is so flexible that it can bend 360 degrees without breaking. Install Bird Spike 2001 on all curved surfaces such as lampposts, signs, letters, etc. by using adhesive with nylonties, hose clamps, etc.
Features
Ledges:To prevent pest birds from congregating andnesting on ledges, sills, roof tops, etc. InstallingBird Spike 2001 will stop birds from creatingunsightly messes and health problems.
IMPORTANT ! Observe all Cautions and Warnings listed in instructions prior to installation.See reverse side.
TM
B IR D SP IK E stainless steelspike system
Bird Spike 2001™ is the most effective, permanent protection against bird landings. It is constructed of 316 Stainless Steel spikes, manufactured into aU.V. protected polycarbonate base. Bird Spike 2001's patent pending design provides extra strength and stability, and unlike other spike products, it will notrust or deteriorate under extreme conditions. Bird Spike 2001 has an industry leading 10 YEAR GUARANTEE, and is available in 3", 5" and 8" widths - the widest coverage on ANY spike product available.
Bird Pressure: Light, Medium, and Heavy.Bird Type: Repells all birds, including pigeons, seagulls and larger species.Packaging: Bird Spike 2001 is packaged 50 ft. per carton (25 - 2ft. sections/box). Each carton is 25" x 15" x 10".
2 FEET!
8"
Nesting Areas:Because pigeons and other birds will nest in a
specific area for generations, Bird Spike 2001 can be installed using intertwining vertical and horizontal
rows to prevent nesting or roosting.
Large Flat Surface:Bird Spike 2001 can be installed in multiple rows for a wide area of coverage.
CAUTION! READ AND FOLLOW ALL INSTRUCTIONS PRIOR TO ATTEMPTING TO INSTALL BIRD-B-GONE SPIKE 2001. SPIKES ARE SHARP... BE SURE TO WEAR GLOVES AND SAFETY EYE WEAR. KEEP OUT OF REACH OF CHILDREN AND PETS. DO NOT INSTALL WHERE HUMAN PHYSICAL CONTACT IS POSSIBLE.
INSTALLATION INSTRUCTIONS FORBIRD•B•GONE “SPIKE 2001” SYSTEM
23918 Skyline • Mission Viejo, CA 92692
1.
2.
1. Thoroughly clean all surfaces where the product is to be installed. Suggestion: Use a 10% bleach or ammonia solution to disinfect that area. It is important that all debris is removed including overhanging branches, leaves, nests, etc.before disinfecting.
DUE TO THE INFECTIOUS DISEASES ASSOCIATED WITH BIRD FECES, BE SURE TO USE EXTREME CARE WHEN REMOVING NESTS AND BIRD DROPPINGS.
2. Determine method of attaching Spike 2001 to the surface.
• For Wood: There are two sets of holes between each fan of spikes. Use wood screws to attach to the surface. Make sure ends are screwed down tightly and at least one screw is placed every six inches in between. • For Concrete, Brick, Steel: Use outdoor construction adhesive, preferably one that is not silicon based. Adhesive can be purchased from Bird-B-Gone, or call the office for a recommendation. One caulking tube of adhesive should cover approx. 30 ft. of Bird Spike 2001. Whenever possible, screw or bolt down the spikes in conjunction with using an outdoor construction adhesive.
3. When using adhesives: a. Run a bead line of adhesive down the under side of the spike strip. (Illus # 1) Also put a dollop of adhesive on each of the screw holes. This will allow the glue to mushroom up through holes and adhere more effectively. (Illus # 1) b. Carefully place strip on to surface. Remember to over hang strip 1/2” from edge of surface. Also, ensure that no more than1/2” is left to back of wall. (Illus. # 2)
Note: Whenever possible - Screw or bolt down the spikes in conjunction with using an Outdoor Construction Adhesive.
4. Adapting to size: Spike 2001 can be easily cut to desired size using tin snips, hacksaw, etc.
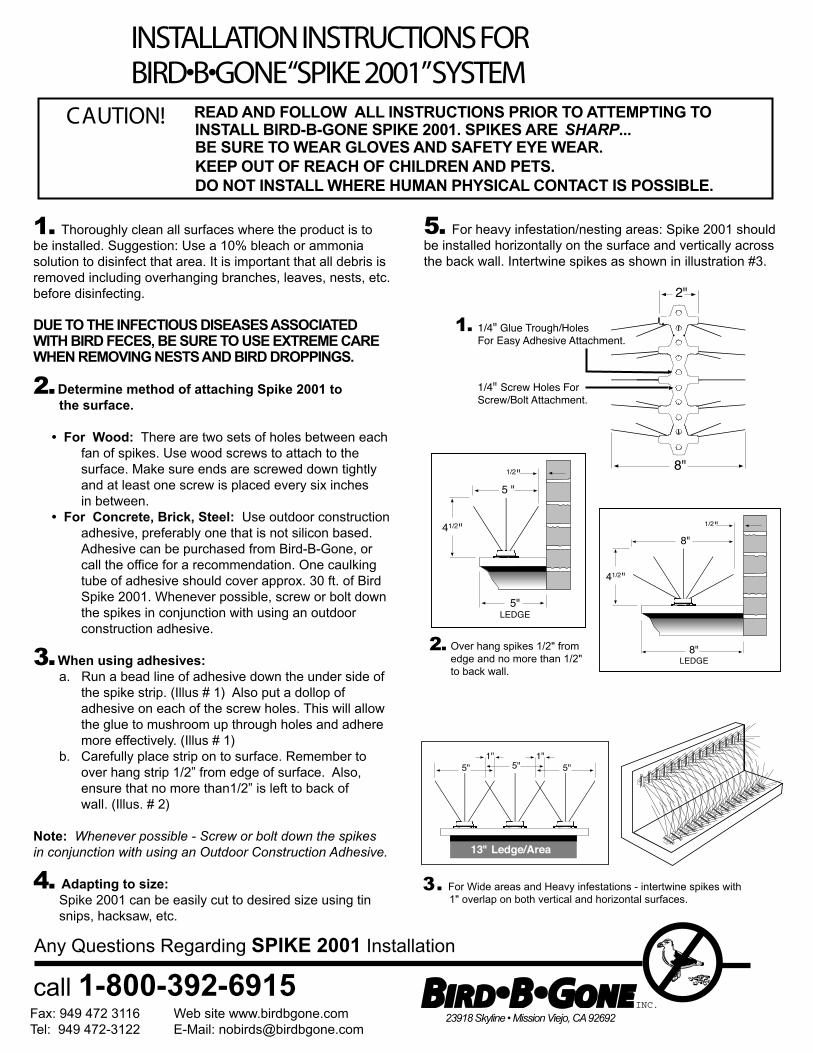
5. For heavy infestation/nesting areas: Spike 2001 should be installed horizontally on the surface and vertically acrossthe back wall. Intertwine spikes as shown in illustration #3.
8"
2"
1/4" Glue Trough/HolesFor Easy Adhesive Attachment.
1/4" Screw Holes For Screw/Bolt Attachment.
5"LEDGE
5 "
41/2"
1/2"
8"LEDGE
8"
41/2"
1/2"
13" Ledge/Area
1" 1"5" 5"5"
3. For Wide areas and Heavy infestations - intertwine spikes with 1" overlap on both vertical and horizontal surfaces.
Any Questions Regarding SPIKE 2001 Installation
call 1-800-392-6915Fax: 949 472 3116 Web site www.birdbgone.comTel: 949 472-3122 E-Mail: [email protected]
Over hang spikes 1/2" fromedge and no more than 1/2"to back wall.
INC.