bitnami wildfly for huawei enterprise cloud · bitnami wildfly for huawei enterprise cloud ... ssh...
TRANSCRIPT

Bitnami WildFly for Huawei Enterprise Cloud
Description
WildFly is a flexible, lightweight, managed application runtime that implements the Java Enterprise Edition 7 Platform
specifications. It includes ready-to-run versions of Apache, WildFly, MySQL and Java and required dependencies.
How can I get started with WildFly?
To get started, we suggest the following steps:
Step 1. Access the management console.
The Wildfly management console provides an interface to manage the Wildfly server and deploy applications. To
access it, refer to these instructions.
Step 2. Use Apache with Wildfly.
You can connect the Apache Web server with Wildfly through an HTTP proxy. To make them work together, enable
the mod_proxy.so and mod_proxy_http.so modules in /opt/bitnami/apache2/conf/httpd.conf and then configure the
ProxyPass directive in the /opt/bitnami/wildfly/conf/wildfly.conf file.
For more information, refer to these instructions.
How to start or stop the services?
Each Bitnami stack includes a control script that lets you easily stop, start and restart services. The script is located at
/opt/bitnami/ctlscript.sh. Call it without any service name arguments to start all services:
sudo /opt/bitnami/ctlscript.sh start
Or use it to restart a single service, such as Apache only, by passing the service name as argument:
sudo /opt/bitnami/ctlscript.sh restart apache
Use this script to stop all services:
sudo /opt/bitnami/ctlscript.sh stop
Restart the services by running the script without any arguments:
sudo /opt/bitnami/ctlscript.sh restart
Obtain a list of available services and operations by running the script without any arguments:
sudo /opt/bitnami/ctlscript.sh
How to access the WildFly server console?

For security reasons, the WildFly server console will be accessible only when using 127.0.0.1 as the hostname. To
access the server console, it is necessary to create an SSH tunnel by forwarding port 9990 on the WildFly server to
port 9990 on the local host.
An example of configuring the SSH tunnel using PuTTY on Windows is displayed below.
While the tunnel is active, you should be able to access the server console through the secure SSH tunnel you created,
by browsing to http://127.0.0.1:9990/console.
Refer to the FAQ for platform-specific instructions to create the SSH tunnel.
How to upload files to the server with SFTP?
NOTE: Bitnami applications can be found in /opt/bitnami/apps.
When uploading files via SFTP, you must have the server's IP address, username and password or, if you chose to
deploy the server with an SSH key instead of a password, you must have the server username and corresponding
SSH private key in .ppk format (for Windows) or in .pem format (for Linux and Mac OS X).
To obtain the IP address for your server, follow these steps:
Log in to the Huawei Cloud Server Console.
Navigate to the "Computing -> Elastic Cloud Server" section.
Note the public IP address for the server you wish to connect to.
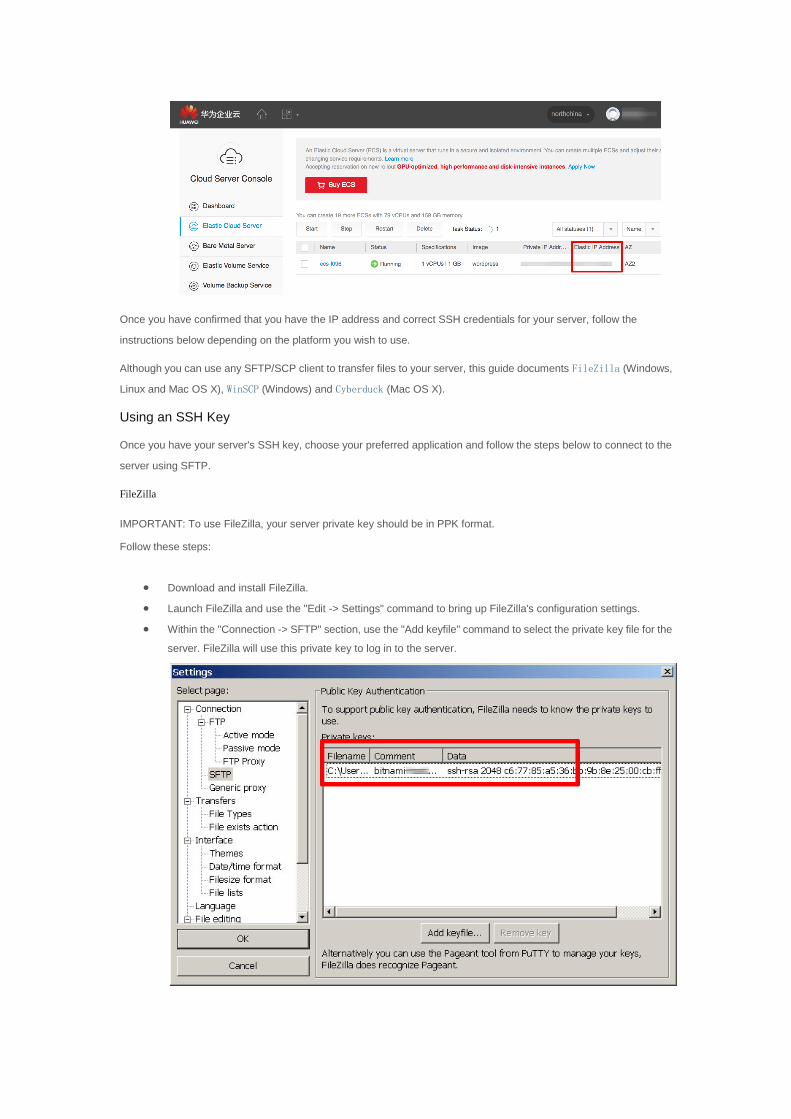
Once you have confirmed that you have the IP address and correct SSH credentials for your server, follow the
instructions below depending on the platform you wish to use.
Although you can use any SFTP/SCP client to transfer files to your server, this guide documents FileZilla (Windows,
Linux and Mac OS X), WinSCP (Windows) and Cyberduck (Mac OS X).
Using an SSH Key
Once you have your server's SSH key, choose your preferred application and follow the steps below to connect to the
server using SFTP.
FileZilla
IMPORTANT: To use FileZilla, your server private key should be in PPK format.
Follow these steps:
Download and install FileZilla.
Launch FileZilla and use the "Edit -> Settings" command to bring up FileZilla's configuration settings.
Within the "Connection -> SFTP" section, use the "Add keyfile" command to select the private key file for the
server. FileZilla will use this private key to log in to the server.
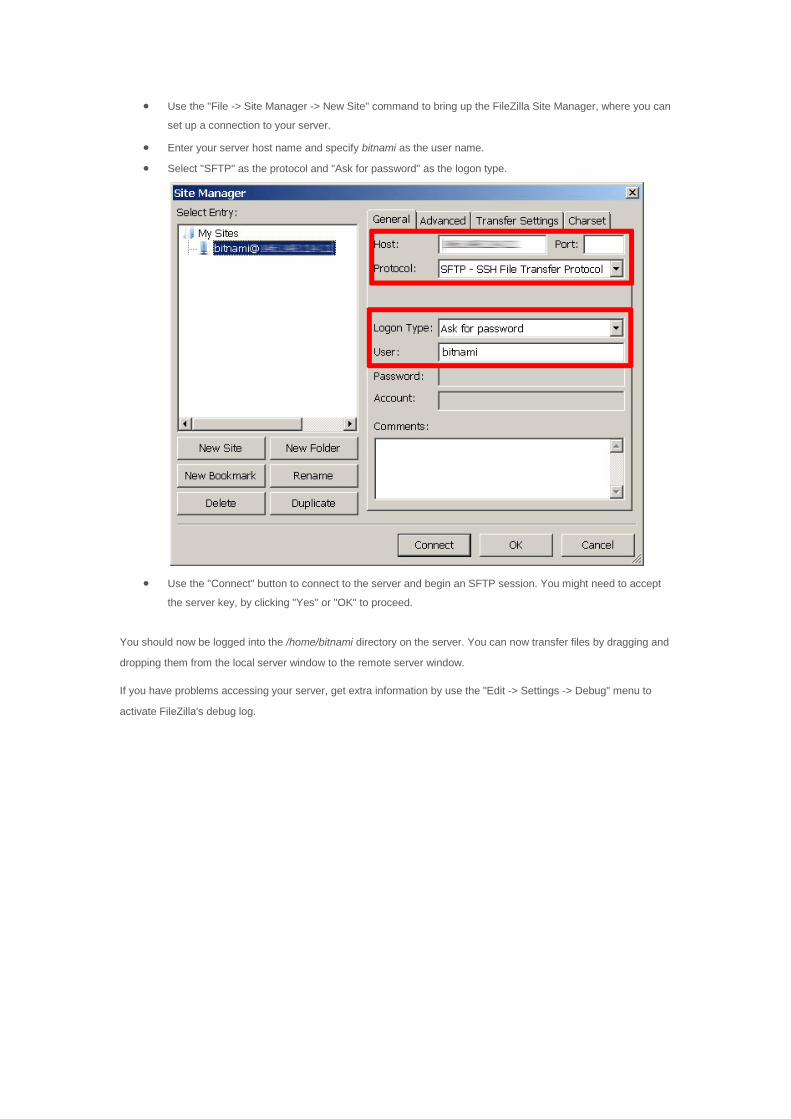
Use the "File -> Site Manager -> New Site" command to bring up the FileZilla Site Manager, where you can
set up a connection to your server.
Enter your server host name and specify bitnami as the user name.
Select "SFTP" as the protocol and "Ask for password" as the logon type.
Use the "Connect" button to connect to the server and begin an SFTP session. You might need to accept
the server key, by clicking "Yes" or "OK" to proceed.
You should now be logged into the /home/bitnami directory on the server. You can now transfer files by dragging and
dropping them from the local server window to the remote server window.
If you have problems accessing your server, get extra information by use the "Edit -> Settings -> Debug" menu to
activate FileZilla's debug log.
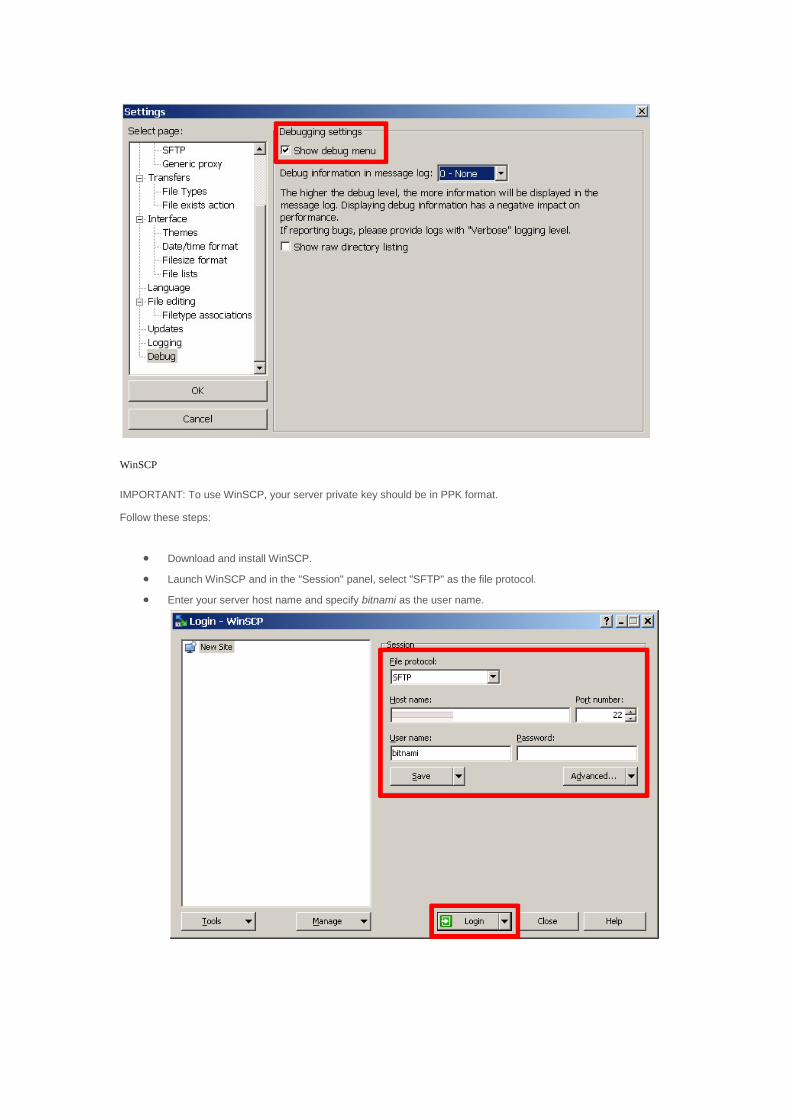
WinSCP
IMPORTANT: To use WinSCP, your server private key should be in PPK format.
Follow these steps:
Download and install WinSCP.
Launch WinSCP and in the "Session" panel, select "SFTP" as the file protocol.
Enter your server host name and specify bitnami as the user name.

Click the "Advanced…" button and within the "SSH -> Authentication -> Authentication parameters" section,
select the private key file for the server. WinSCP will use this private key to log in to the server.
From the "Session" panel, use the "Login" button to connect to the server and begin an SCP session.
You should now be logged into the /home/bitnami directory on the server. You can now transfer files by dragging and
dropping them from the local server window to the remote server window.
If you need to upload files to a location where the bitnami user doesn't have write permissions, you have two options:
Once you have configured WinSCP as described above, click the "Advanced…" button and within the
"Environment -> Shell" panel, select sudo su - as your shell. This will allow you to upload files using the
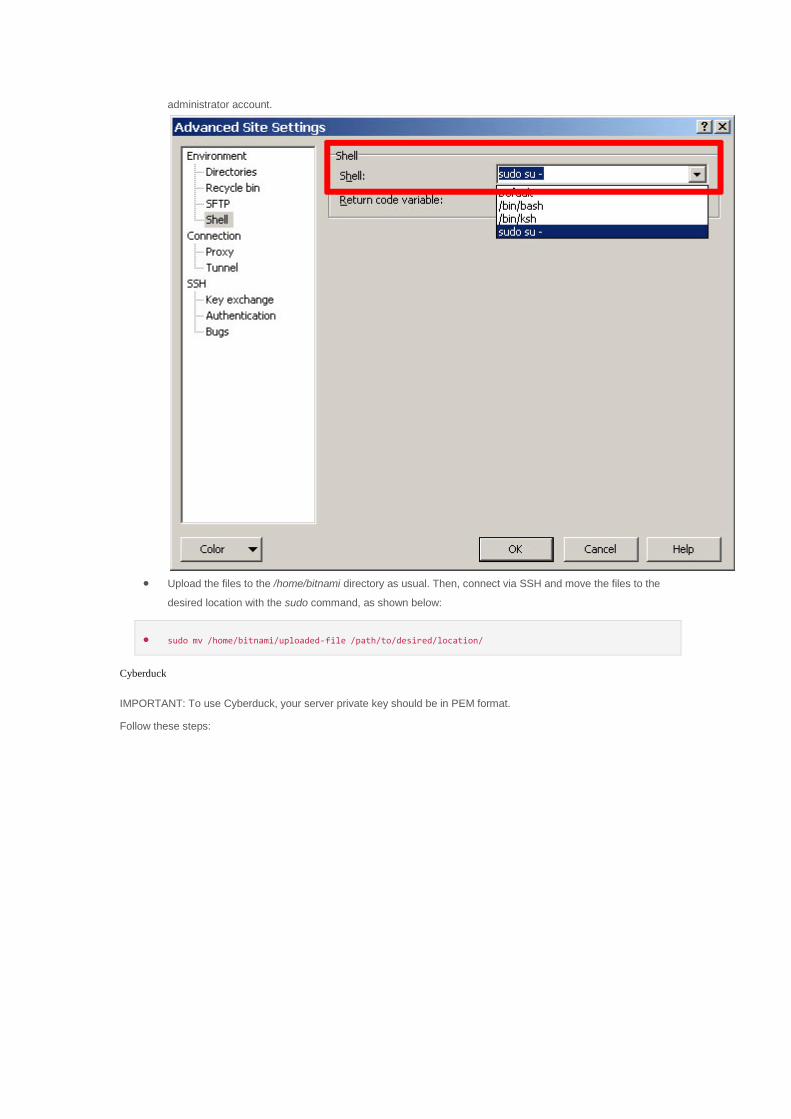
administrator account.
Upload the files to the /home/bitnami directory as usual. Then, connect via SSH and move the files to the
desired location with the sudo command, as shown below:
sudo mv /home/bitnami/uploaded-file /path/to/desired/location/
Cyberduck
IMPORTANT: To use Cyberduck, your server private key should be in PEM format.
Follow these steps:

Select the "Open Connection" command and specify "SFTP" as the connection protocol.
In the connection details panel, under the "More Options" section, enable the "Use Public Key
Authentication" option and specify the path to the private key file for the server.
Use the "Connect" button to connect to the server and begin an SFTP session.
You should now be logged into the /home/bitnami directory on the server. You can now transfer files by dragging and
dropping them from the local server window to the remote server window.
Using a Password

Once you have your server's SSH credentials, choose your preferred application and follow the steps below to
connect to the server using SFTP.
FileZilla
Follow these steps:
Download and install FileZilla.
Launch FileZilla and use the "File -> Site Manager -> New Site" command to bring up the FileZilla Site
Manager, where you can set up a connection to your server.
Enter your server host name.
Select "SFTP" as the protocol and "Ask for password" as the logon type. Use bitnami as the server
username and the password generated during the server deployment process.
Use the "Connect" button to connect to the server and begin an SFTP session. You might need to accept
the server key, by clicking "Yes" or "OK" to proceed.
You should now be logged into the /home/bitnami directory on the server. You can now transfer files by dragging and
dropping them from the local server window to the remote server window.
If you have problems accessing your server, get extra information by use the "Edit -> Settings -> Debug" menu to
activate FileZilla's debug log.

WinSCP
Follow these steps:
Download and install WinSCP.
Launch WinSCP and in the "Session" panel, select "SFTP" as the file protocol.
Enter your server host name and set bitnami as the server username.

From the "Session" panel, use the "Login" button to connect to the server and begin an SCP session. Enter
the password when prompted.
You should now be logged into the /home/bitnami directory on the server. You can now transfer files by dragging and
dropping them from the local server window to the remote server window.
Cyberduck
Follow these steps:
Select the "Open Connection" command and specify "SFTP" as the connection protocol.

In the connection details panel, enter the server IP address, bitnami as the username, and the password
generated during the deployment process.
Use the "Connect" button to connect to the server and begin an SFTP session.
You should now be logged into the /home/bitnami directory on the server. You can now transfer files by dragging and
dropping them from the local server window to the remote server window.
What are the default access credentials for the server console?
Refer to the detail page for your cloud server for access credentials.
How is Apache server connected with WildFly?
Bitnami stacks include the Apache Web server. There are different ways to connect these two servers. One of this is
connecting through an HTTP proxy.
The HTTP Connector element represents a Connector component that communicates with a web connector via the
HTTP protocol. This is used to invisibly integrate Wildfly into an Apache installation and have Apache handle the static
content of the web application and/or to utilize Apache's SSL processing.
To make them work together, enable the mod_proxy.so and mod_proxy_http.so modules in
/opt/bitnami/apache2/conf/httpd.conf. Then, add the following lines to the /opt/bitnami/wildfly/conf/wildfly.conf file:
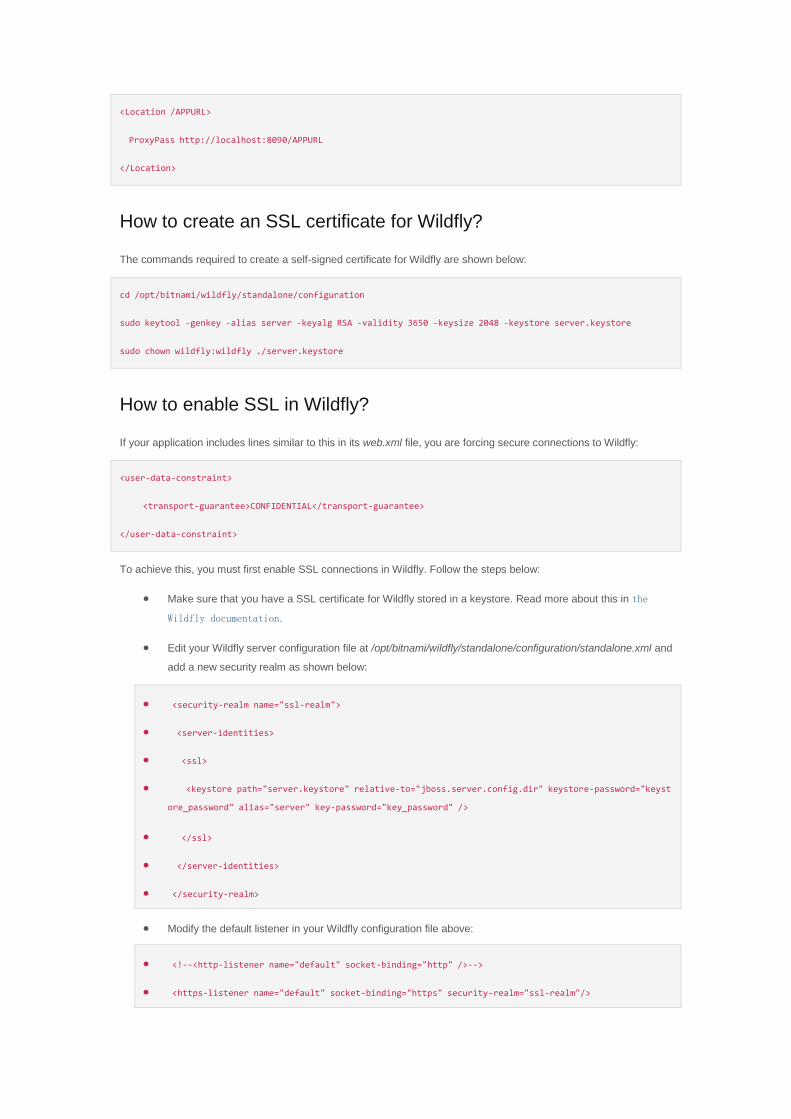
<Location /APPURL>
ProxyPass http://localhost:8090/APPURL
</Location>
How to create an SSL certificate for Wildfly?
The commands required to create a self-signed certificate for Wildfly are shown below:
cd /opt/bitnami/wildfly/standalone/configuration
sudo keytool -genkey -alias server -keyalg RSA -validity 3650 -keysize 2048 -keystore server.keystore
sudo chown wildfly:wildfly ./server.keystore
How to enable SSL in Wildfly?
If your application includes lines similar to this in its web.xml file, you are forcing secure connections to Wildfly:
<user-data-constraint>
<transport-guarantee>CONFIDENTIAL</transport-guarantee>
</user-data-constraint>
To achieve this, you must first enable SSL connections in Wildfly. Follow the steps below:
Make sure that you have a SSL certificate for Wildfly stored in a keystore. Read more about this in the
Wildfly documentation.
Edit your Wildfly server configuration file at /opt/bitnami/wildfly/standalone/configuration/standalone.xml and
add a new security realm as shown below:
<security-realm name="ssl-realm">
<server-identities>
<ssl>
<keystore path="server.keystore" relative-to="jboss.server.config.dir" keystore-password="keyst
ore_password" alias="server" key-password="key_password" />
</ssl>
</server-identities>
</security-realm>
Modify the default listener in your Wildfly configuration file above:
<!--<http-listener name="default" socket-binding="http" />-->
<https-listener name="default" socket-binding="https" security-realm="ssl-realm"/>

Restart the Wildfly server.
sudo /opt/bitnami/ctlscript.sh restart wildfly
How to configure Apache with Wildfly using SSL?
Using the Bitnami Wildfly Stack, it is possible to have Apache working as a proxy server for Wildfly. If you have
followed the steps to enable SSL directly in Wildfly, you must also configure Apache to use the Wildfly SSL port. To do
this, follow the steps below:
Modify the Apache configuration file for Wildfly at /opt/bitnami/wildfly/conf/wildfly.conf as shown below.
SSLProxyEngine On
SSLProxyVerify none
SSLProxyCheckPeerCN off
SSLProxyCheckPeerName off
SSLProxyCheckPeerExpire off
<Location />
ProxyPass https://localhost:8443/
ProxyPassReverse https://localhost:8443/
</Location>
The example above disables the ProxyVerify and ProxyCheck options because a dummy keystore is in use.
If you have certificates provided by a Certificate Authority (CA), those options may be ignored.
Restart the server to load the new configuration.
sudo /opt/bitnami/ctlscript.sh restart apache
How to debug errors?
The main Wildfly log file is created at /opt/bitnami/wildfly/standalone/log/wildfly.out.