bluetooth sniffer user guide · the wireshark capture screen is displayed when wireshark is first...
TRANSCRIPT

Copyright © 2018 Nordic Semiconductor ASA. All rights reserved.Reproduction in whole or in part is prohibited without the prior written permission of the copyright holder.
nRF Sniffer
User Guide v2.2
nRF Sniffer User Guide v2.2
1 IntroductionThe nRF Sniffer is a tool for debugging Bluetooth low energy (BLE) applications by detecting packets between a selected device and the device it is communicating with, even when the link is encrypted. When developing a BLE product, knowing what happens over-the-air between devices can help you isolate and solve any potential issues.
By default, the Sniffer lists nearby BLE devices that are advertising, providing the Bluetooth Address and Address type, complete or shortened name, and RSSI.
1.1 Required hardwareTo set up the Sniffer you will need one of the following kits:
• nRF51 Development Kit (PCA10028) v1.0 or later and a micro USB cable• nRF51 Dongle (PCA10031)• nRF51822 Evaluation Kit (PCA10001) and a mini USB cable• nRF51422 Evaluation Kit (PCA10003) v3.0.0 or later and a mini USB cable• nRF51822 Development Kit dongle (PCA10000)• nRF52 Development Kit (PCA10040) and a micro USB cable• nRF52840 Development Kit (PCA10056) and a micro USB cable
1.2 Required software• nRF Sniffer software v2.x or later available on the Sniffer product page under the downloads
tab. This also includes the SEGGER J-Link software that is compatible.• Wireshark v2.4.6 or later available from http://www.wireshark.org/. Wireshark is a free
software tool that captures wireless traffic and reproduces it in a readable format.• An operating system that runs the required version of Wireshark
• Windows 7 or later • 64 bit OS X/macOS 10.6 or later• Linux (check for version compatibility)
• python v2.7.x available from https://www.python.org/downloads/• pyserial v3.4 or later available from https://github.com/pyserial/pyserial
• Type “pip --version” in the terminal to verify that the pip installed with python v2.7 is used
• For Windows - “C:\Python27\Scripts\pip.exe install -r requirements.txt” to install the python modules required for nRF Sniffer v2
• For OS X/mac OS/Linux - verify that the pip software being used is the pip installed with python 2.7. Then type “pip install -r requirements.txt” into the terminal
1.3 Writing conventionsThis user guide follows a set of typographic rules that make the document consistent and easy to read. The following writing conventions are used:
• Commands are written in Lucida Console.• Pin names are written in Consolas.• File names and User Interface components are written in bold.• Internal cross-references are italicized and written in semi-bold.
Page 2

nRF Sniffer User Guide v2.2
2 Setting up the nRF SnifferSet up the Sniffer for the first time by performing the following steps:
1. Except for the nRF Sniffer, install all of the software listed in Section 1.2 “Required software” on page 2 before plugging in the hardware.
2. Connect the hardware to a USB port.3. For Windows - Wait for the hardware drivers to be loaded before continuing. You can also click
Skip obtaining driver software from Windows Update to speed up the driver installation process.
4. Place the hardware between the Peripheral and Central device. Now you’re ready to set up the software.
Figure 1 System overview
Page 3
nRF Sniffer User Guide v2.2
2.1 Install nRF Sniffer
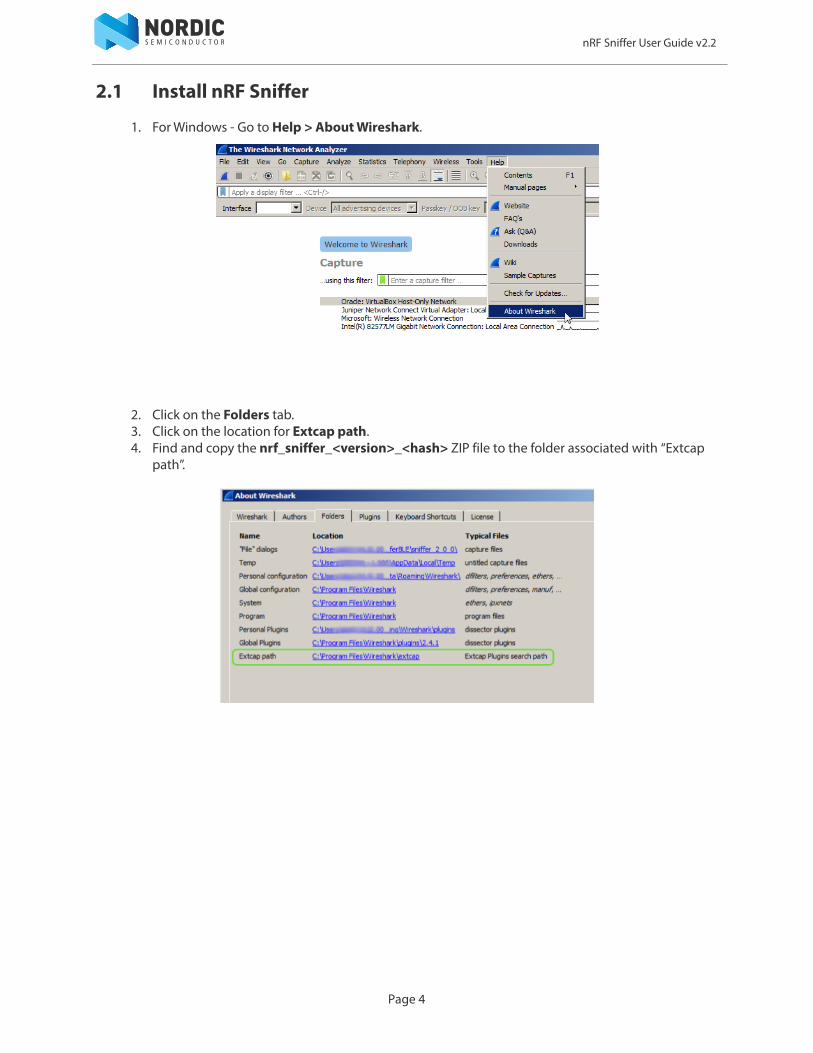
1. For Windows - Go to Help > About Wireshark.
2. Click on the Folders tab.3. Click on the location for Extcap path.4. Find and copy the nrf_sniffer_<version>_<hash> ZIP file to the folder associated with “Extcap
path”.
Page 4
nRF Sniffer User Guide v2.2
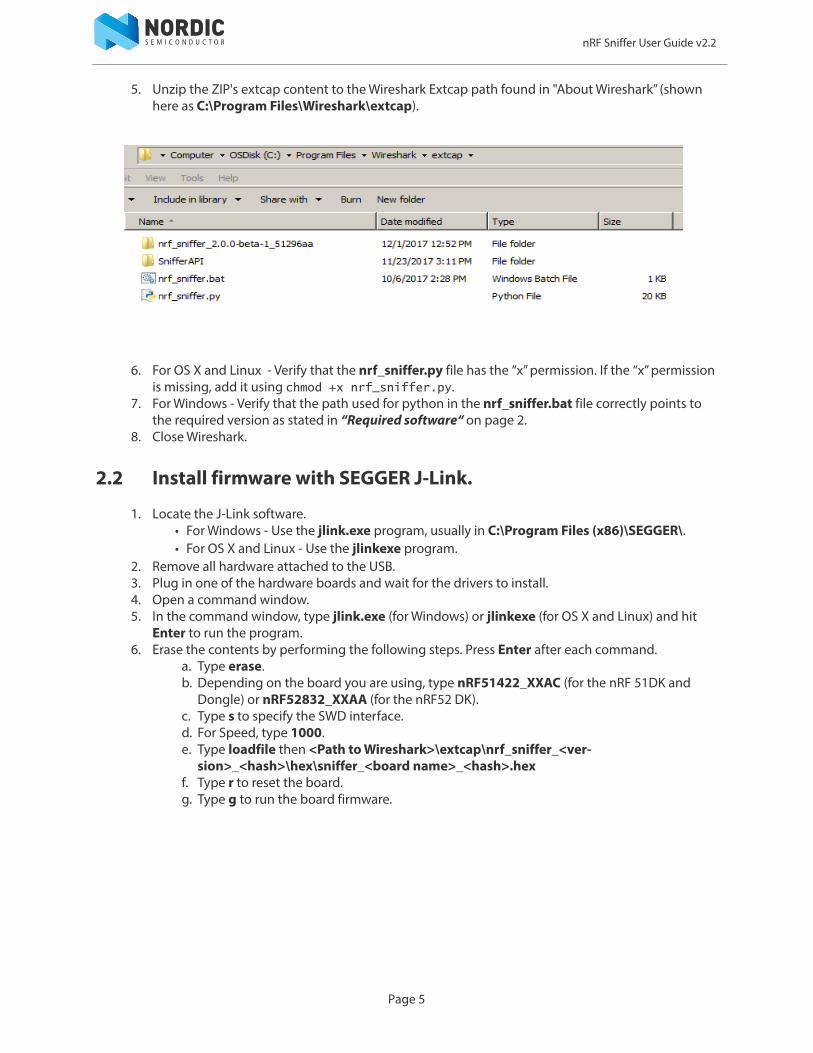
5. Unzip the ZIP's extcap content to the Wireshark Extcap path found in "About Wireshark” (shown here as C:\Program Files\Wireshark\extcap).
6. For OS X and Linux - Verify that the nrf_sniffer.py file has the “x” permission. If the “x” permission is missing, add it using chmod +x nrf_sniffer.py.
7. For Windows - Verify that the path used for python in the nrf_sniffer.bat file correctly points to the required version as stated in “Required software“ on page 2.
8. Close Wireshark.
2.2 Install firmware with SEGGER J-Link.
1. Locate the J-Link software. • For Windows - Use the jlink.exe program, usually in C:\Program Files (x86)\SEGGER\. • For OS X and Linux - Use the jlinkexe program.
2. Remove all hardware attached to the USB. 3. Plug in one of the hardware boards and wait for the drivers to install. 4. Open a command window.5. In the command window, type jlink.exe (for Windows) or jlinkexe (for OS X and Linux) and hit
Enter to run the program.6. Erase the contents by performing the following steps. Press Enter after each command.
a. Type erase. b. Depending on the board you are using, type nRF51422_XXAC (for the nRF 51DK and
Dongle) or nRF52832_XXAA (for the nRF52 DK). c. Type s to specify the SWD interface. d. For Speed, type 1000. e. Type loadfile then <Path to Wireshark>\extcap\nrf_sniffer_<ver-
sion>_<hash>\hex\sniffer_<board name>_<hash>.hex f. Type r to reset the board. g. Type g to run the board firmware.
Page 5
nRF Sniffer User Guide v2.2
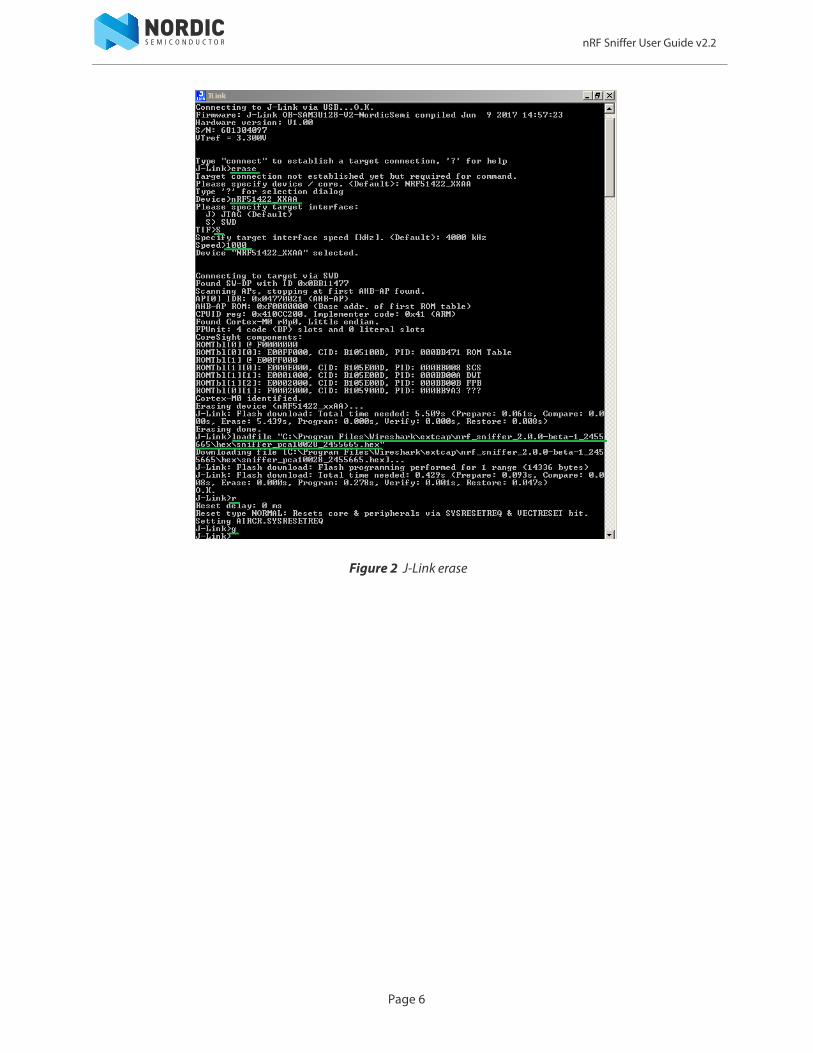
Figure 2 J-Link erase
Page 6
nRF Sniffer User Guide v2.2
2.3 Finalize the set upVerify that the Sniffer firmware is running correctly by checking that LED1 toggles each time a packet is received. At least one device must be advertising for the Sniffer to detect the advertisements.
2.3.1 Enable the Sniffer
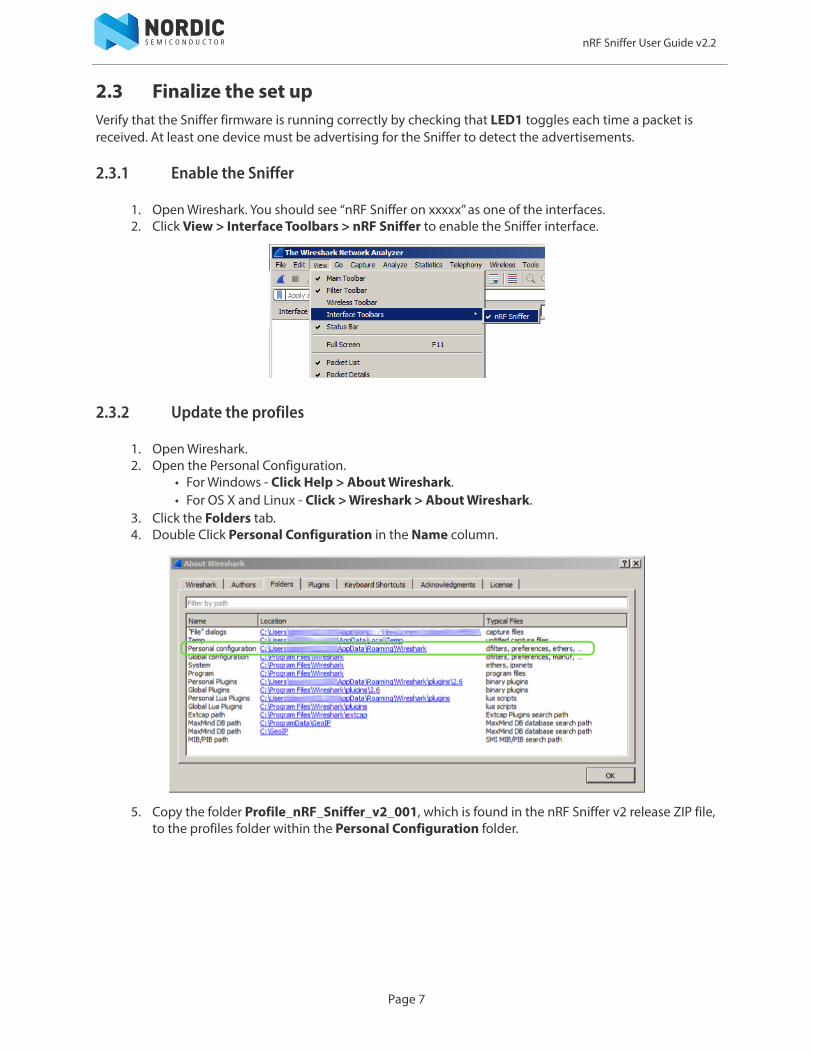
1. Open Wireshark. You should see “nRF Sniffer on xxxxx” as one of the interfaces.2. Click View > Interface Toolbars > nRF Sniffer to enable the Sniffer interface.
2.3.2 Update the profiles
1. Open Wireshark.2. Open the Personal Configuration.
• For Windows - Click Help > About Wireshark.• For OS X and Linux - Click > Wireshark > About Wireshark.
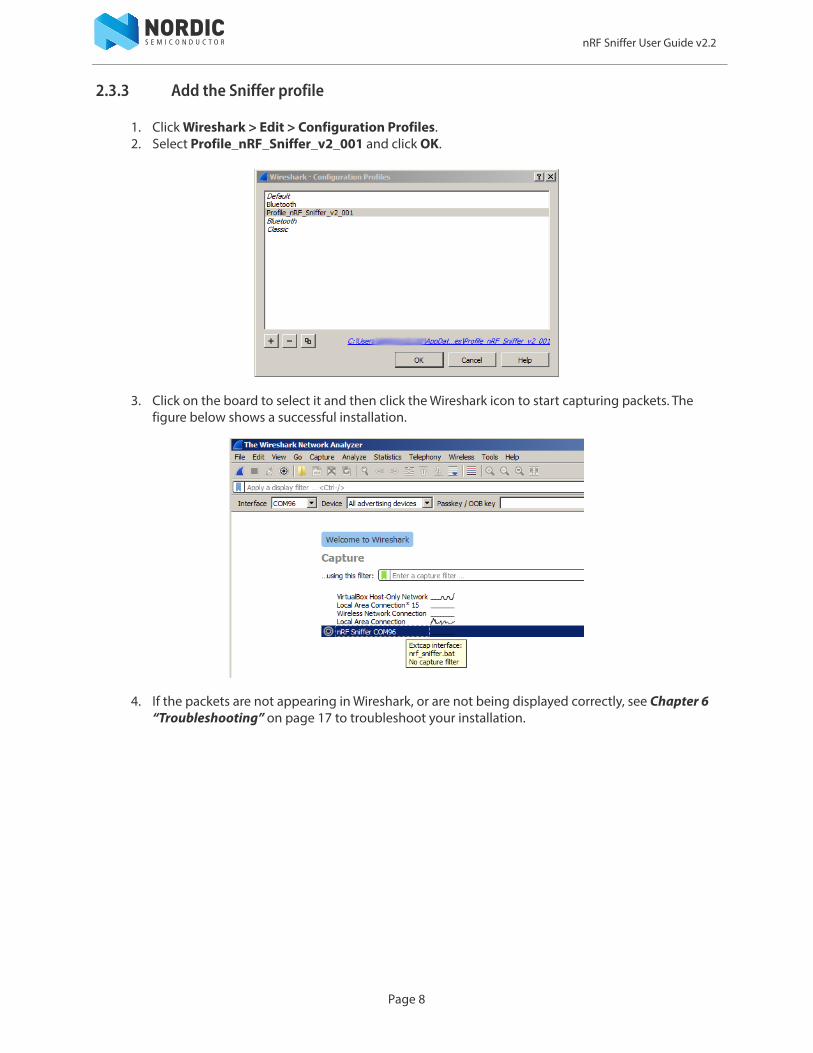
3. Click the Folders tab.4. Double Click Personal Configuration in the Name column.
5. Copy the folder Profile_nRF_Sniffer_v2_001, which is found in the nRF Sniffer v2 release ZIP file, to the profiles folder within the Personal Configuration folder.
Page 7
nRF Sniffer User Guide v2.2
2.3.3 Add the Sniffer profile
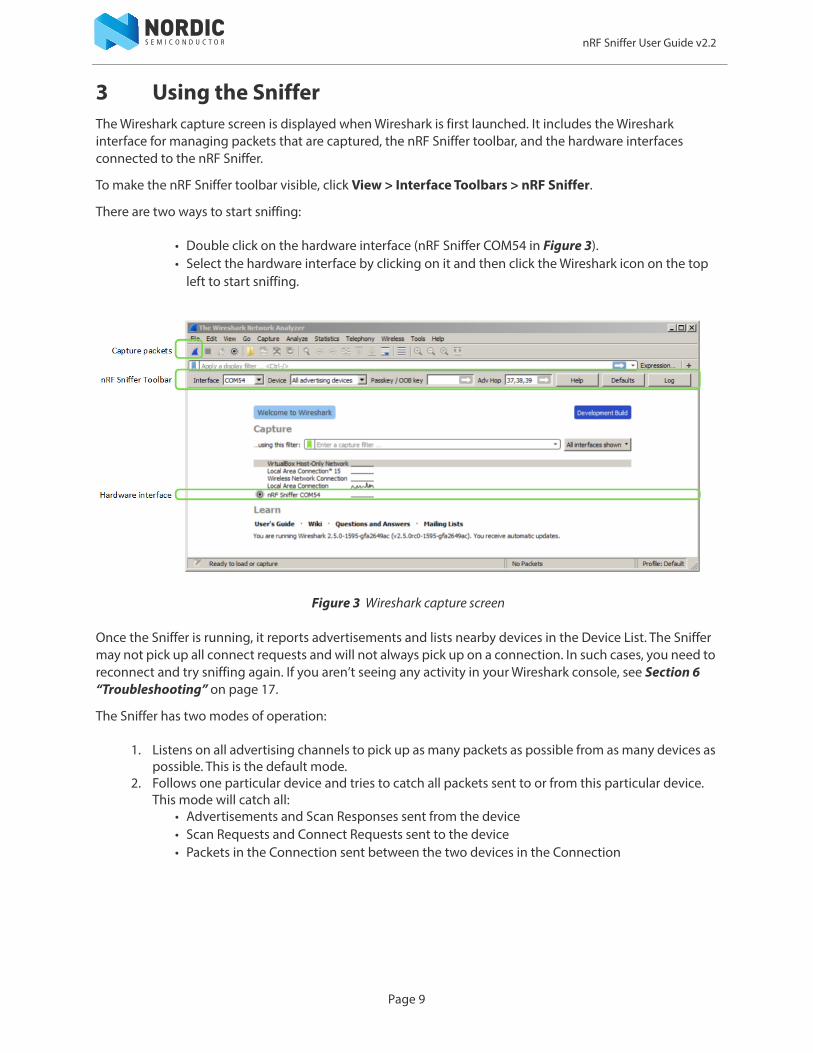
1. Click Wireshark > Edit > Configuration Profiles.2. Select Profile_nRF_Sniffer_v2_001 and click OK.
3. Click on the board to select it and then click the Wireshark icon to start capturing packets. The figure below shows a successful installation.
4. If the packets are not appearing in Wireshark, or are not being displayed correctly, see Chapter 6 “Troubleshooting” on page 17 to troubleshoot your installation.
Page 8
nRF Sniffer User Guide v2.2
3 Using the SnifferThe Wireshark capture screen is displayed when Wireshark is first launched. It includes the Wireshark interface for managing packets that are captured, the nRF Sniffer toolbar, and the hardware interfaces connected to the nRF Sniffer.
To make the nRF Sniffer toolbar visible, click View > Interface Toolbars > nRF Sniffer.
There are two ways to start sniffing:
• Double click on the hardware interface (nRF Sniffer COM54 in Figure 3).• Select the hardware interface by clicking on it and then click the Wireshark icon on the top
left to start sniffing.
Figure 3 Wireshark capture screen
Once the Sniffer is running, it reports advertisements and lists nearby devices in the Device List. The Sniffer may not pick up all connect requests and will not always pick up on a connection. In such cases, you need to reconnect and try sniffing again. If you aren’t seeing any activity in your Wireshark console, see Section 6 “Troubleshooting” on page 17.
The Sniffer has two modes of operation:
1. Listens on all advertising channels to pick up as many packets as possible from as many devices as possible. This is the default mode.
2. Follows one particular device and tries to catch all packets sent to or from this particular device. This mode will catch all:
• Advertisements and Scan Responses sent from the device• Scan Requests and Connect Requests sent to the device• Packets in the Connection sent between the two devices in the Connection
Page 9
nRF Sniffer User Guide v2.2
3.1 Sniffer commandsThe software interface has several commands to for controlling the Sniffer. Below you will find a list of commands and their description, along with some examples.
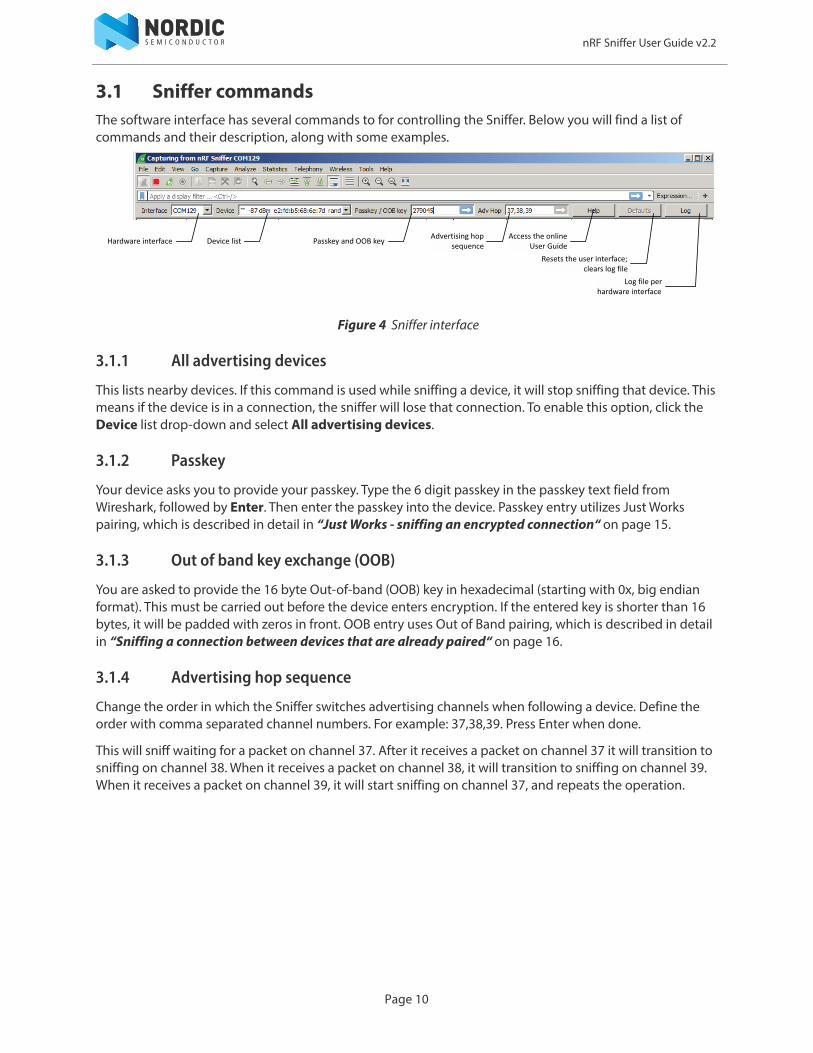
Figure 4 Sniffer interface
3.1.1 All advertising devices
This lists nearby devices. If this command is used while sniffing a device, it will stop sniffing that device. This means if the device is in a connection, the sniffer will lose that connection. To enable this option, click the Device list drop-down and select All advertising devices.
3.1.2 Passkey
Your device asks you to provide your passkey. Type the 6 digit passkey in the passkey text field from Wireshark, followed by Enter. Then enter the passkey into the device. Passkey entry utilizes Just Works pairing, which is described in detail in “Just Works - sniffing an encrypted connection“ on page 15.
3.1.3 Out of band key exchange (OOB)
You are asked to provide the 16 byte Out-of-band (OOB) key in hexadecimal (starting with 0x, big endian format). This must be carried out before the device enters encryption. If the entered key is shorter than 16 bytes, it will be padded with zeros in front. OOB entry uses Out of Band pairing, which is described in detail in “Sniffing a connection between devices that are already paired“ on page 16.
3.1.4 Advertising hop sequence
Change the order in which the Sniffer switches advertising channels when following a device. Define the order with comma separated channel numbers. For example: 37,38,39. Press Enter when done.
This will sniff waiting for a packet on channel 37. After it receives a packet on channel 37 it will transition to sniffing on channel 38. When it receives a packet on channel 38, it will transition to sniffing on channel 39. When it receives a packet on channel 39, it will start sniffing on channel 37, and repeats the operation.
Hardware interface Device list Passkey and OOB key Advertising hop sequence
Access the online User Guide
Resets the user interface; clears log file
Log file per hardware interface
Page 10
nRF Sniffer User Guide v2.2
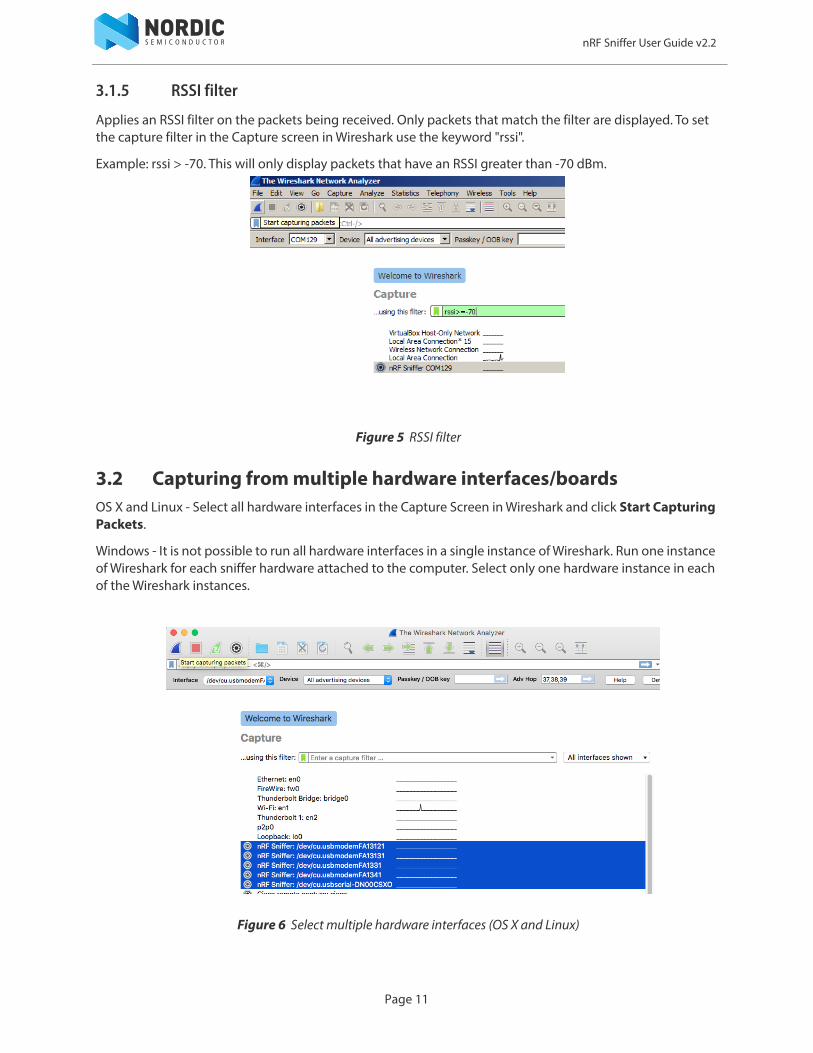
3.1.5 RSSI filter
Applies an RSSI filter on the packets being received. Only packets that match the filter are displayed. To set the capture filter in the Capture screen in Wireshark use the keyword "rssi".
Example: rssi > -70. This will only display packets that have an RSSI greater than -70 dBm.
Figure 5 RSSI filter
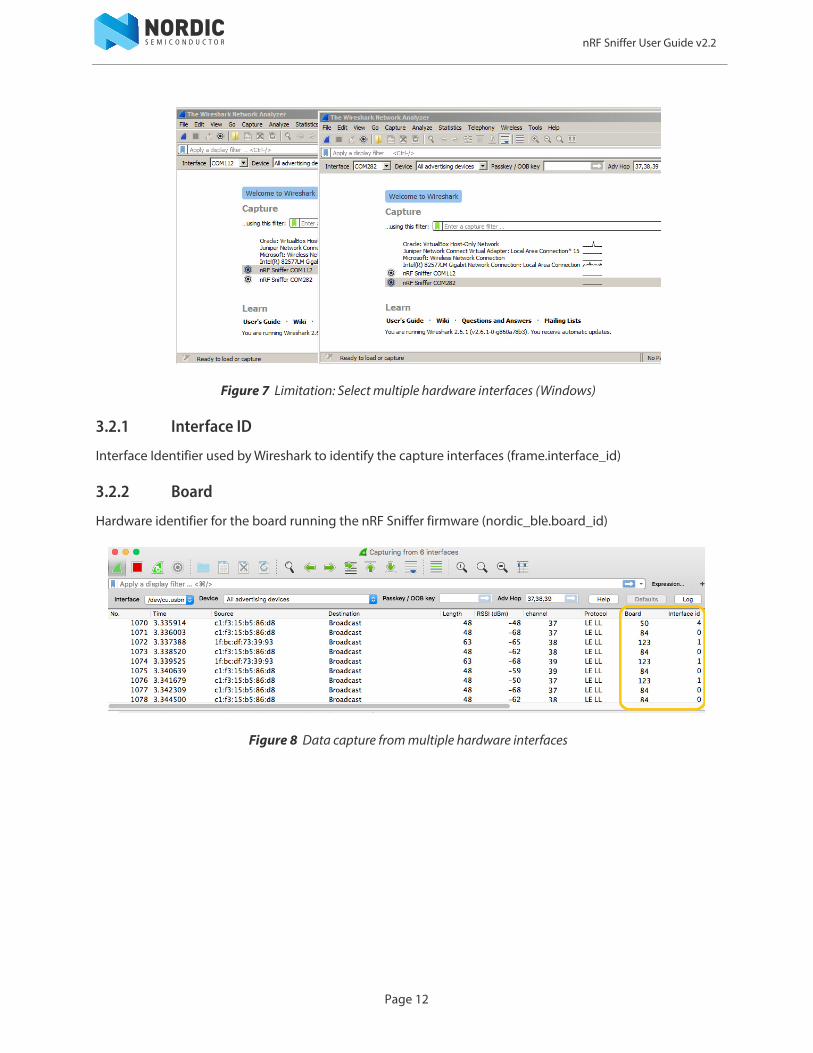
3.2 Capturing from multiple hardware interfaces/boardsOS X and Linux - Select all hardware interfaces in the Capture Screen in Wireshark and click Start Capturing Packets.
Windows - It is not possible to run all hardware interfaces in a single instance of Wireshark. Run one instance of Wireshark for each sniffer hardware attached to the computer. Select only one hardware instance in each of the Wireshark instances.
Figure 6 Select multiple hardware interfaces (OS X and Linux)
Page 11
nRF Sniffer User Guide v2.2
Figure 7 Limitation: Select multiple hardware interfaces (Windows)
3.2.1 Interface ID
Interface Identifier used by Wireshark to identify the capture interfaces (frame.interface_id)
3.2.2 Board
Hardware identifier for the board running the nRF Sniffer firmware (nordic_ble.board_id)
Figure 8 Data capture from multiple hardware interfaces
Page 12
nRF Sniffer User Guide v2.2
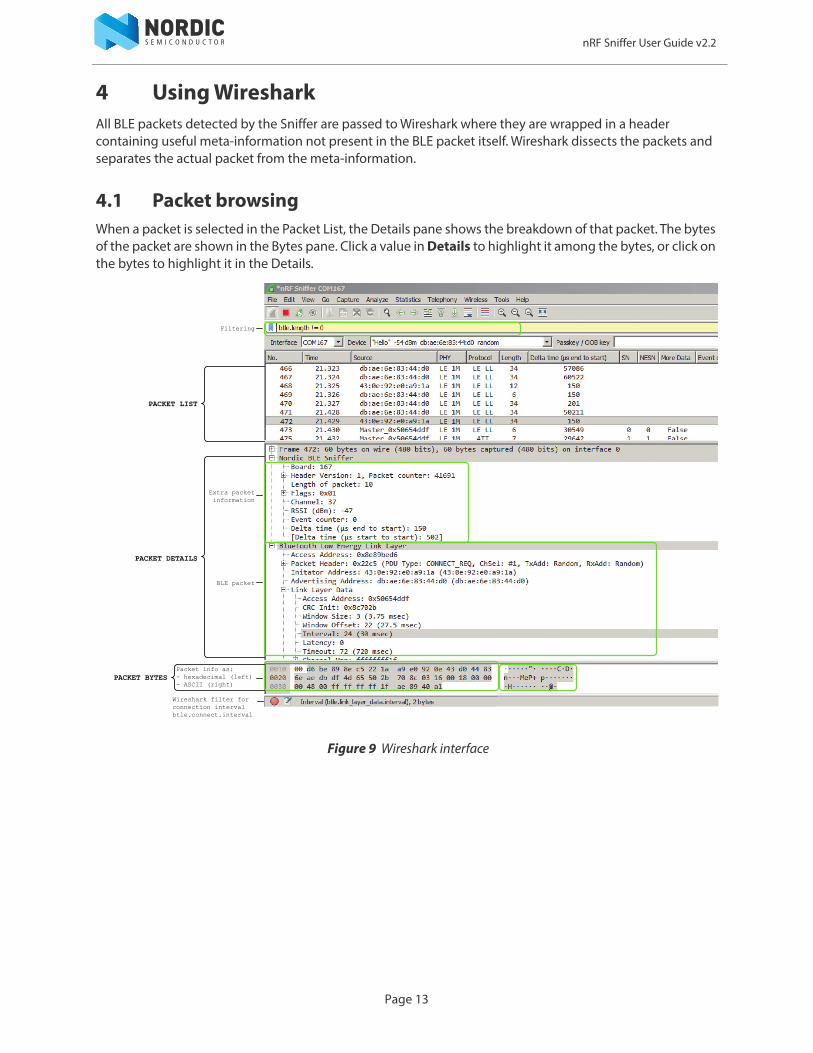
4 Using WiresharkAll BLE packets detected by the Sniffer are passed to Wireshark where they are wrapped in a header containing useful meta-information not present in the BLE packet itself. Wireshark dissects the packets and separates the actual packet from the meta-information.
4.1 Packet browsingWhen a packet is selected in the Packet List, the Details pane shows the breakdown of that packet. The bytes of the packet are shown in the Bytes pane. Click a value in Details to highlight it among the bytes, or click on the bytes to highlight it in the Details.
Figure 9 Wireshark interface
Extra packet information
BLE packet
Packet info as: - hexadecimal (left)- ASCII (right)
Filtering
PACKET LIST
PACKET DETAILS
PACKET BYTES
Wireshark filter for connection interval btle.connect.interval
Page 13
nRF Sniffer User Guide v2.2
4.2 Display filteringDisplay filters allow you to display a chosen packet subset. Most filters are based on the values of the packets, such as length or access address. The filter expressions use Boolean operators (&& || == != !). Some examples are given in Table 1.
Table 1 Display filtering
4.2.1 Wireshark Tips
More information can be found in the documentation on Wireshark’s website.
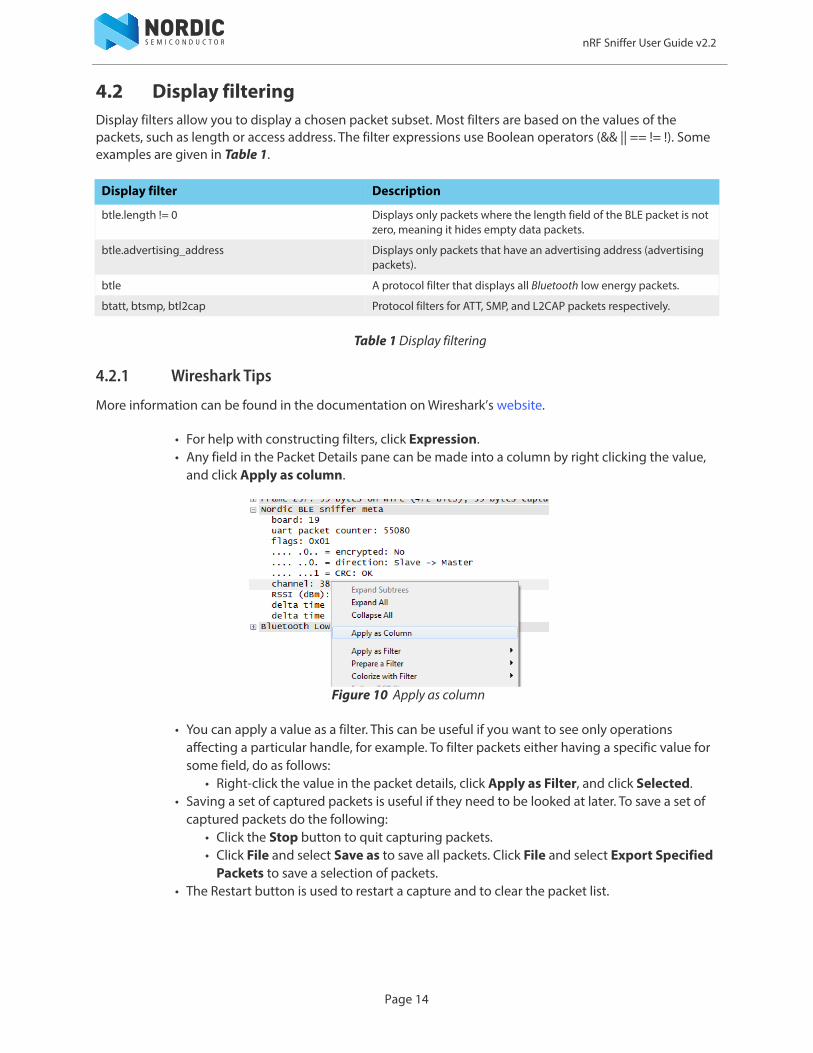
• For help with constructing filters, click Expression.• Any field in the Packet Details pane can be made into a column by right clicking the value,
and click Apply as column.
Figure 10 Apply as column
• You can apply a value as a filter. This can be useful if you want to see only operations affecting a particular handle, for example. To filter packets either having a specific value for some field, do as follows:
• Right-click the value in the packet details, click Apply as Filter, and click Selected.• Saving a set of captured packets is useful if they need to be looked at later. To save a set of
captured packets do the following:• Click the Stop button to quit capturing packets.• Click File and select Save as to save all packets. Click File and select Export Specified
Packets to save a selection of packets. • The Restart button is used to restart a capture and to clear the packet list.
Display filter Description
btle.length != 0 Displays only packets where the length field of the BLE packet is not zero, meaning it hides empty data packets.
btle.advertising_address Displays only packets that have an advertising address (advertising packets).
btle A protocol filter that displays all Bluetooth low energy packets.
btatt, btsmp, btl2cap Protocol filters for ATT, SMP, and L2CAP packets respectively.
Page 14
nRF Sniffer User Guide v2.2
5 Common sniffing actions
5.1 Sniffing advertisements from all nearby devicesTo see advertisements from all nearby devices:
1. Start the nRF Sniffer.2. Ensure “All advertising devices” is selected in the Device drop-down.
5.2 Sniffing advertisement packets involving a single slave deviceTo see advertisement packets, scan requests, and scan responses to and from a single device:
1. Start the Sniffer if not already running.2. In the Sniffer, choose the device from the Device drop-down list.
5.3 Sniffing a connection involving a single slave deviceTo sniff a connection between a specific Peripheral device and a Central:
1. Start the Sniffer if not already running.2. In the Sniffer, choose the device from the Device drop-down list.3. Connect the Central to the Peripheral.
5.4 Just Works - sniffing an encrypted connectionTo sniff a connection encrypted with Just Works:
1. Start the Sniffer if not already running.2. In the Sniffer, choose the device from the Device drop-down list.3. Initiate pairing between the devices if it does not happen automatically. The Sniffer will
automatically decrypt encrypted packets.
Page 15
nRF Sniffer User Guide v2.2
5.5 Sniffing a connection between devices that are already pairedThe Sniffer needs to have sniffed the pairing procedure if the devices are already paired. If the sniffer board is reset, stored pairing information will be lost.
To sniff a connection encrypted with passkey:
1. Start the Sniffer if not already running.2. In the Sniffer, choose the device from the Device drop-down list.3. Initiate pairing between the devices if it does not happen automatically. A passkey will be
displayed on either the Central or the Peripheral device.4. Type the 6 digit passkey from the passkey text field in Wireshark.5. Press Enter.6. Enter the passkey into the other device after entering it into the Sniffer.
To sniff a connection encrypted with OOB:
1. Start the Sniffer if not already running.2. In the Sniffer, choose the device from the Device drop-down list.3. Enter the OOB key into the Sniffer before the devices initiate pairing.
• Type the OOB key in big-endian, hexadecimal format with a leading "0x".• Press Enter.
4. Connect the Central to the Peripheral device.5. Initiate pairing between the devices if it does not happen automatically.
Page 16
nRF Sniffer User Guide v2.2
6 Troubleshooting
6.1 The nRF sniffer is not listed in the Wireshark interface.
1. See if the hardware has been enumerated on USB and the drivers are loaded.2. Check that the HEX file for the hardware has been flashed.3. Reset the hardware by unplugging the hardware, waiting 5 seconds, and plugging it back in.
If it still doesn’t appear, verify the python script located in the extcap folder is able to run.
For Windows:
1. Run nrf_sniffer.bat --extcap-interfaces to list the interface.2. If this exits with a python error, verify that python.exe can be run from the command line
c:>python.exe --version, where the Python version is the same as Section 1.2 “Required software” on page 2.
For OS X and Linux:
1. Verify that the execute permission is present for the nrf_sniffer.py file. • ls -l nrf_sniffer.py
2. If the "x" permission is missing:• chmod +x nrf_sniffer.py
3. Run nrf_sniffer.py --extcap-interfaces to list the interface.
6.2 I cannot see the extcap folder in Wireshark.
1. Create the extcap folder as described in “Install nRF Sniffer“ on page 4.
6.3 nRF Sniffer occasionally works and appears unstable.Make sure you are using the correct software versions as stated in Section 1.2 “Required software” on page 2. Install the SEGGER J-link software that is bundled with the nRF Sniffer v2 release ZIP file. Upgrade or downgrade the J-link emulator firmware on the hardware to match the J-link version found in the nRF Sniffer v2 release ZIP file.
Force J-Link to use flow control in the serial connection.
1. Open the JLink.exe(Windows) or JLinkexe (OS X/Linux) in the install folder of the required J-Link version.
2. Type "sethwfc force".3. Exit the JLink software.
Verify that the J-Link emulator version is the same as the J-Link software version that came bundled with the Sniffer.
1. Open the JLinkConfig.exe in the install folder of the required J-Link version.2. The host firmware and the emulator firmware should have the same date.
Page 17
nRF Sniffer User Guide v2.2
Upgrade the J-Link emulator version on the hardware.
1. Download the J-Link software as mentioned in Section 1.2 “Required software” on page 2.2. Unplug the hardware, wait 5 seconds.3. Plug in the hardware.4. For Windows:
• Run jlink.exe from the folder where the J-Link software was installed.• A popup appears "A new firmware version is available.....Do you want to upgrade ...?”• Click yes.
5. OS X/Linux:• Type “jlinkexe”. The J-Link firmware updates automatically.
6.4 “nRF Sniffer on xxxxx” doesn’t show up as one of the interfaces when I open Wireshark.
1. Open Wireshark.2. Click View > Interface Toolbars > nRF Sniffer.
6.5 Packets are incorrectly displayed in Wireshark.
1. Verify that the NORDIC_BLE protocol is enabled in Wireshark by clicking Analyze > Enabled Protocols...
• Verify that the NORDIC_BLE protocol is enabled, indicated by a check next to it. 2. Verify that only a stable release of Wireshark is used. Development and user build versions are not
supported.• For example: v2.4.6 and v2.6.1 are examples of stable versions of Wireshark, as indicated by
the second number being an even number. Version 2.5.x is a development version of Wireshark, indicated by the second number being an odd number.
6.6 Why am I not receiving packets after I double click on the "nRF Sniffer COMxx" in Wireshark for Windows ?If the COM port number on Windows is COM200 or higher, rename the COM port on Windows to a COM port number that is COM199 or lower.
1. Open the Device Manager and click Ports (COM & LPT).2. Right click on your COM port and click Properties.3. In Properties, go to the Port Settings tab and click Advanced...4. Change the COM port number by clicking the COM port number drop-down and selecting a COM
port that is less than 200. Select a COM port number that is not in the list of devices currently attached to your computer. These are listed in the Device Manager under Ports (COM & LPT).
5. Click OK and accept the changes when asked "...Do you want to continue".
Page 18

nRF Sniffer User Guide v2.2
6.7 nRF Sniffer interface in Wireshark is not receiving packets/not able to send commands.Verify that J-link emulator firmware is correct version.
1. Install the SEGGER J-Link that is bundled with the nRF Sniffer v2 release ZIP file.2. Locate the folder where the J-Link software is installed.3. Make sure that only one of the supported hardware devices is plugged into the PC.4. For Windows - Use the jlinkConfig.exe program.
Linux and OS X - skip the rest of the steps in this section and follow the steps listed in “nRF Sniffer occasionally works and appears unstable.“ on page 17 regarding verifying the J-Link emulator version.
5. The “Host Firmware” and the “Emulator Firmware” dates displayed in jlinkConfig.exe should be identical.
6. For Windows - If the “Host Firmware” and “Emulator Firmware” dates are not identical, in the jlinkConfig.exe click the button update firmware of selected emulators to update the emulator firmware.
Page 19
nRF Sniffer User Guide v2.2
Liability disclaimerNordic Semiconductor ASA reserves the right to make changes without further notice to the product to improve reliability, function or design. Nordic Semiconductor ASA does not assume any liability arising out of the application or use of any product or circuits described herein.
Life support applicationsNordic Semiconductor’s products are not designed for use in life support appliances, devices, or systems where malfunction of these products can reasonably be expected to result in personal injury. Nordic Semiconductor ASA customers using or selling these products for use in such applications do so at their own risk and agree to fully indemnify Nordic Semiconductor ASA for any damages resulting from such improper use or sale.
Contact detailsFor your nearest distributor, please visit http://www.nordicsemi.com.Information regarding product updates, downloads, and technical support can be accessed through your My Page account on our homepage.
Main office:
Phone: +47 72 89 89 00Fax: +47 72 89 89 89
Otto Nielsens veg 127052 TrondheimNorway
Mailing address: Nordic SemiconductorP.O. Box 23367004 TrondheimNorway
Page 20
nRF Sniffer User Guide v2.2
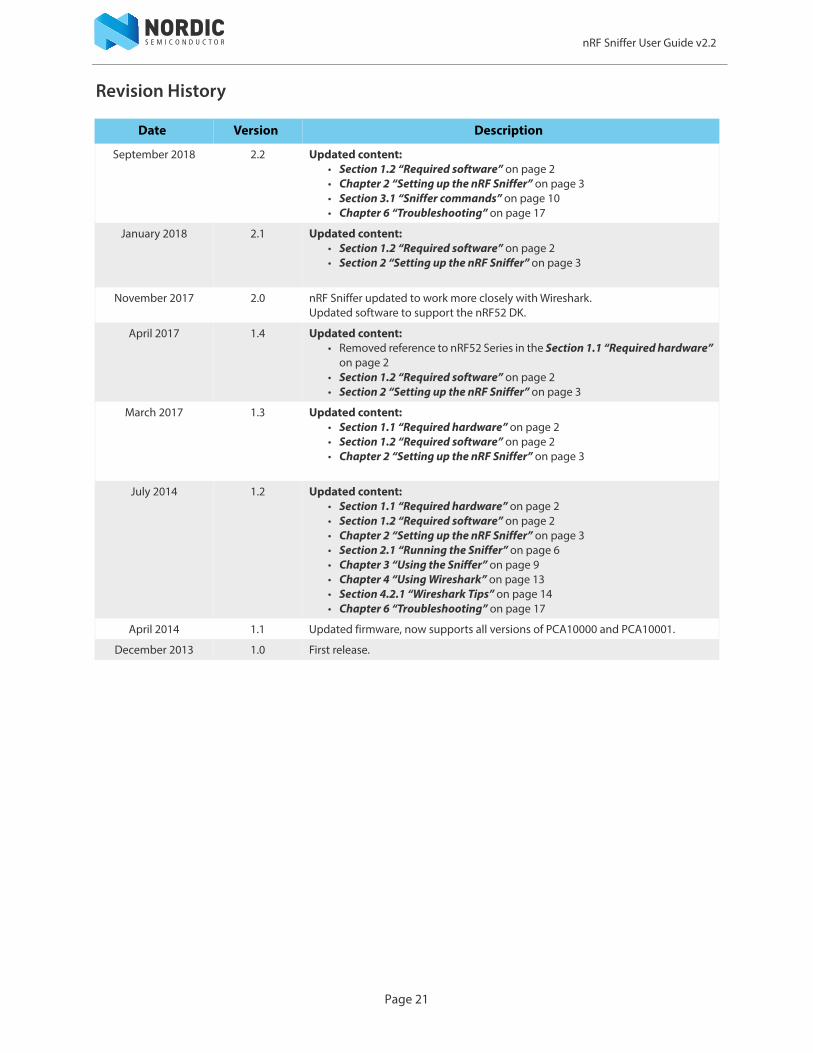
Revision History
Date Version Description
September 2018 2.2 Updated content:• Section 1.2 “Required software” on page 2• Chapter 2 “Setting up the nRF Sniffer” on page 3• Section 3.1 “Sniffer commands” on page 10• Chapter 6 “Troubleshooting” on page 17
January 2018 2.1 Updated content:• Section 1.2 “Required software” on page 2• Section 2 “Setting up the nRF Sniffer” on page 3
November 2017 2.0 nRF Sniffer updated to work more closely with Wireshark. Updated software to support the nRF52 DK.
April 2017 1.4 Updated content:• Removed reference to nRF52 Series in the Section 1.1 “Required hardware”
on page 2• Section 1.2 “Required software” on page 2• Section 2 “Setting up the nRF Sniffer” on page 3
March 2017 1.3 Updated content:• Section 1.1 “Required hardware” on page 2• Section 1.2 “Required software” on page 2• Chapter 2 “Setting up the nRF Sniffer” on page 3
July 2014 1.2 Updated content:• Section 1.1 “Required hardware” on page 2• Section 1.2 “Required software” on page 2• Chapter 2 “Setting up the nRF Sniffer” on page 3• Section 2.1 “Running the Sniffer” on page 6• Chapter 3 “Using the Sniffer” on page 9• Chapter 4 “Using Wireshark” on page 13• Section 4.2.1 “Wireshark Tips” on page 14• Chapter 6 “Troubleshooting” on page 17
April 2014 1.1 Updated firmware, now supports all versions of PCA10000 and PCA10001.
December 2013 1.0 First release.
Page 21