boot services quickstart
TRANSCRIPT

Using 3Com
®
Boot Services OEM Version 1.02 with Symantec
®
Ghost Version 7 Corporate Edition
http://www.3com.com/bootserviceshttp://www.3com.com/productreg
Part No. 3CDA120-QSG-SYM-1 Rev 7Published March 2001
Quick Start Guide

3Com Corporation
■
5400 Bayfront Plaza
■
Santa Clara, California
■
95052-8145
Copyright © 2001, 3Com Corporation. All rights reserved. No part of this documentation may be reproduced in any form or by any means or used to make any derivative work (such as translation, transformation, or adaptation) without written permission from 3Com Corporation.
3Com Corporation reserves the right to revise this documentation and to make changes in content from time to time without obligation on the part of 3Com Corporation to provide notification of such revision or change.
3Com Corporation provides this documentation without warranty, term, or condition of any kind, either implied or expressed, including, but not limited to, the implied warranties, terms or conditions of merchantability, satisfactory quality, and fitness for a particular purpose. 3Com may make improvements or changes in the product(s) and/or the program(s) described in this documentation at any time.
If there is any software on removable media described in this documentation, it is furnished under a license agreement included with the product as a separate document, in a directory file named LICENSE.TXT or !LICENSE.TXT or LICENSE.PDF. If you are unable to locate a copy, please contact 3Com and a copy will be provided to you.
UNITED STATES GOVERNMENT LEGEND
If you are a United States government agency, then this documentation and the software described herein are provided to you subject to the following:
All technical data and computer software are commercial in nature and developed solely at private expense. Software is delivered as “Commercial Computer Software” as defined in DFARS 252.227-7014 (June 1995) or as a “commercial item” as defined in FAR 2.101(a) and as such is provided with only such rights as are provided in 3Com’s standard commercial license for the Software. Technical data is provided with limited rights only as provided in DFAR 252.227-7015 (Nov 1995) or FAR 52.227-14 (June 1987), whichever is applicable. You agree not to remove or deface any portion of any legend provided on any licensed program or documentation contained in, or delivered to you in conjunction with, this User Guide.
Unless otherwise indicated, 3Com registered trademarks are registered in the United States and may or may not be registered in other countries.
3Com is a registered trademark. The 3Com logo and DynamicAccess is a trademark of 3Com Corporation or its subsidiaries. Microsoft, Windows 95, Windows 98, and Windows NT are registered trademarks of Microsoft Corporation. NetWare is a registered trademark of Novell Inc. Other brand and product names may be registered trademarks or trademarks of their respective holders.
Symantec, the Symantec logo, Symantec Ghost, Ghost Walker, Ghost Explorer, and GDisk are trademarks of Symantec Corporation.
3Com Boot Services was formerly known as 3Com DynamicAccess Boot Services

Quick Start Guide
3
Table of Contents
About 3Com Boot Services
• System Requirements• Installing 3Com Boot Services • Accessing Help
Automating Symantec Ghost V7
• Introduction• Creating a TCP/IP Network Boot Image• Creating the Source Machine• Using the 3Com Boot Image Editor to Automate the Rollout • Using PXE with Symantec Ghost• References
Page
4
568
9
10111212
1522

4
3Com
®
Boot Services is your complete boot management solution. It provides all of the utilities and enabling services you need to configure your network to realize the benefits of network booting and pre-operating system (Pre-OS) booting.3Com
®
Boot Services contains the following components:
■
Boot Image Editor
The Boot Image Editor enables network administrators to create and edit TCP/IP, PXE, and NetWare boot image files and menu files. These files allow network client PCs to boot from network servers instead of their local drives, or to perform Pre-OS tasks before booting from their local drive.
■
Trivial File Transfer Protocol (TFTP) Service
The TFTP Service is used to transfer files between a network server and client PCs. For example, it can be used to transfer boot image files to boot ROMs on client PCs, or to provide firmware updates to other network devices such as wireless access points or routers.
■
Preboot eXecution Environment (PXE) Service
The PXE Service is an extension of the Dynamic Host Configuration Protocol (DHCP) that is used primarily in Wired for Management (WfM) remote boot and preboot environments where client PCs contain PXE-compatible boot ROMs, such as the 3Com Managed PC Boot Agent. The PXE Service provides the boot ROM with a boot image filename and configuration information.
■
BOOTP Service
The BOOTP Service issues static IP addresses, boot image filenames, or configuration information to BOOTP-compatible boot ROMs (such as the 3Com Managed PC Boot Agent or the BootWare boot ROM) on client PCs.
About 3Com Boot Services

About 3Com Boot Services
5
■
BOOTPTAB Editor
The BOOTPTAB Editor enables network administrators to create, edit, and maintain BOOTPTAB database files. BOOTPTAB files contain information used by the PXE and BOOTP Services, such as IP address (for BOOTP), boot image filename, and other configuration information.
■
DOS-based network boot utilities
The DOS-based utilities included with 3Com
®
Boot Services can be useful for network booting. For a complete description of the utilities, see the DOSUTILS.TXT file.
Meeting System Requirements
To install 3Com
®
Boot Services, your PC must have one of the following operating systems installed:
■
Windows 95 (OSR 2)
■
Windows 98
■
Windows NT 3.51 (Service Pack 5 or later)
■
Windows NT 4.0 (Service Pack 4 or later)
■
Windows 2000
Quick Start Guide
6
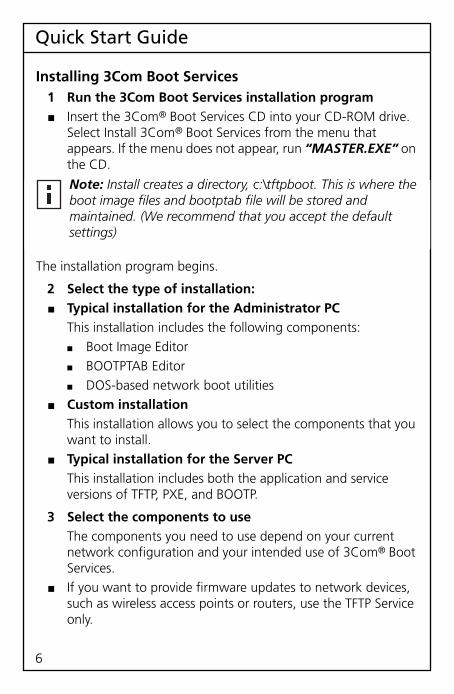
Installing 3Com Boot Services
1 Run the 3Com Boot Services installation program
■
Insert the 3Com
®
Boot Services CD into your CD-ROM drive. Select Install 3Com
®
Boot Services from the menu that appears. If the menu does not appear, run
“MASTER.EXE”
on the CD.
The installation program begins.
2 Select the type of installation:
■
Typical installation for the Administrator PC
This installation includes the following components:
■
Boot Image Editor
■
BOOTPTAB Editor
■
DOS-based network boot utilities
■
Custom installation
This installation allows you to select the components that you want to install.
■
Typical installation for the Server PC
This installation includes both the application and service versions of TFTP, PXE, and BOOTP.
3 Select the components to use
The components you need to use depend on your current network configuration and your intended use of 3Com
®
Boot Services.
■
If you want to provide firmware updates to network devices, such as wireless access points or routers, use the TFTP Service only.
Note:
Install creates a directory, c:\tftpboot. This is where the boot image files and bootptab file will be stored and maintained. (We recommend that you accept the default settings)

About 3Com Boot Services
7
■
If you have client PCs with boot ROMs, use all of the following components:
■
Boot Image Editor to create boot image files
■
BOOTP or PXE Services to provide configuration information to the client
■
BOOTPTAB Editor to edit client information
■
TFTP Service to transfer the files to the client
■
If you use DHCP on your network to issue IP adrdresses, use the PXE Service. If you are
not
using DHCP, use the BOOTP Service. The PXE Service can be installed on the same PC as DHCP, or it can be installed on another PC. If you install the PXE Service on the same PC as DHCP, a configuration setting needs to be added to DHCP. This should have been done automatically when PXE was installed. See the PXE Service online Help topic “Adding the Option 60 ‘PXEClient’ Tag String to DHCP Packets” for more information.If you install the PXE Service on a PC that does not have DHCP installed, you must enable the ProxyDHCP functionality available in the PXE server software. The first time PXE is used, a prompt to enable "Proxy DHCP" will be displayed.
■
If you want to specify client configuration information in the BOOTPTAB database file (a text database file used by both the BOOTP and PXE Services), use the BOOTPTAB Editor.
IMPORTANT:
If you are using a Windows 2000 Server that is running Remote Installation Services (RIS), then you will not be able to run the PXE Service. You must stop RIS in order to run PXE Service.

Quick Start Guide
8
Accessing Help
For help on using 3Com® Boot Services see the online Help for each component. For Customer Support Information, refer to the Symantec Ghost User Manual.For detailed information on the DOS-based network boot utilities, see the “DOSUTILS.TXT” file.
Quick Start Guide
9
AUTOMATING SYMANTEC® GHOST V7 WITH 3COM® BOOT SERVICESVERSION 1.02
http://www.3com.com/bootserviceshttp://www.3com.com/productreg
Part No. 3CDA120-QSG-Ghost-1 Rev 7Published March 2001

10
IntroductionNow that you have installed 3Com Boot Services, you’re ready to use it with Symantec Ghost. IT Managers are continually looking for less expensive ways to deploy machines across the network in an effort to reduce the Total Cost of Ownership (TCO.) With 3Com Boot Services, PXE-compatible boot ROMs (such as 3Com Managed PC Boot Agent (MBA)), and Symantec Ghost, administrators can perform a complete rollout without ever leaving their desk.This section illustrates how to use 3Com Boot Services and MBA in combination with Symantec Ghost to automate operating system installations on networked machines.
Intended Audience
Network Administrators, PC installers, VARs, and IT professionals.
Why use 3Com Boot Services?
By using 3Com Boot Services in combination with PXE-compatible boot ROMs and Symantec Ghost, you can automate the use of Symantec Ghost and consequently reduce TCO. Because it stores the boot image file on the server, Boot Services eliminates the need to visit each client machine with a Ghost Boot Disk. Time saved by eliminating the need to manually install software and configuration means more time for IT staffs to provide professional, high-level support.
3Com's Managed PC Boot Agent (MBA)and Symantec Ghost
With a PXE-compatible boot ROM installed, such as MBA, a client machine can boot from the network regardless of the contents of its local hard drive. MBA lets both new and existing machines take advantage of pre-boot management technology to perform operating system installations or upgrades as well as desktop disaster recovery.
Automating Symantec Ghost 7

Automating Symantec Ghost 7
11
What You Need■ A Windows 2000 or NT 4.0 Server with Symantec Ghost 7
Corporate Edition and DHCP installed■ 3Com Boot Services v1.02■ Client machines installed with NICs and PXE-compatible boot
ROMs, such as 3Com MBA■ Remote Wake-up and shutdown utilities (optional)
Overview:Step 1 - Installing 3Com Boot ServicesStep 2 - Creating a TCP/IP Network Boot ImageStep 3 - Creating the Source MachineStep 4 - Using the 3Com Boot Image Editor to Automate
the RolloutStep 5 - Using PXE with Symantec Ghost
Step 1 – Installing 3Com Boot Services1. Installing 3Com Boot Services (Refer to page 6 for instructions on installing 3Com Boot Services)
Step 2 – Creating a TCP/IP Network Boot Image1. To create the boot package, launch the Symantec Ghost Boot Wizard. You can do this from either the Console’s toolbar or from the Start menu.2. Choose the "TCP/IP Network Boot Image" option. Go to the next screen.3. Choose "PXE Packet Driver" from the list. It supports a universal network driver for use with any PXE-compliant machine. Go to the next screen.4. Accept the default settings on the Client Type and Network Settings dialogs.

Quick Start Guide
12
5. In the TCP/IP Network Boot Image dialog, specify the name of the image file with the extension .sys. The recommended location for this image file is the tftpboot folder, c:\tftpboot\3comboot.sys.6. Choose "Next" to go to the Review screen and "Next" again to create the actual image file.7. Choose "Finish."
You can now use the boot image file (c:\tftpboot\3comboot.sys) with 3Com Boot Services.
Step 3 - Creating the Source Machine
Set up a client machine as a template for all other machines. This will be the source machine. Install and configure the desired operating system, including all of its applications and drivers.
Step 4 - Using the 3Com Boot Image Editor to Automate the Rollout
Normally, it takes a visit to each target machine at this point to choose a desired option (Load or Dump an image) from the Ghost interface.
It requires a few steps to automate this process and eliminate the required visit. The obvious choice for automation is to take an image of the target machine and deploy that image back to the target machine later.
Create a new Boot Image using the Symantec Ghost Boot Wizard as explained in Step 2, "Creating a TCP/IP Network Boot Image." Follow the steps described in that section with one exception. At point 4 of the process, on the "Client Type" screen, specify the following parameters: -ja=<session name> (e.g. –ja=ROLLOUT) and –sure.
The –ja switch will enable Ghost on the target machine to execute any task specified by the Ghost Multicast Server located on the

Automating Symantec Ghost 7
13
Server machine. This is a particularly useful switch because you can specify all the options and parameters on the server end.
The –sure switch avoids the final prompt "Proceed with disk clone - destination drive will be overwritten?" This command is useful in batch mode.
After this, complete items 5 through 7 as described in "Creating a TCP/IP Network Boot Image." Choose a different filename for this boot image, c:\tftpboot\ghstboot.sys.
After finishing this operation, create two batch files on the server – one for taking an image from the target machine ("Dump" operation in Ghost), and another for deploying the image back to the target machine ("Load" operation in Ghost.)
For more information on using the command line switches with Symantec Ghost see the "Symantec Ghost Implementation Guide."
Note: After the target machine has dumped or loaded a hard drive image, there are several options available to conclude the automation process:
■ Use the Ghost -rb switch to reboot the target machine
■ Use the 3Com PBOOT utility to terminate the preboot connection between the target machine and the boot server. PBOOT can be inserted and executed as the last command in the autoexec.bat within the boot image (e.g. ghstboot.sys) by using the 3Com Boot Image Editor. The following switches are available:■ pboot /reboot to reboot the target machine■ pboot /shutdown to shutdown the target
machine■ pboot with no option specified to continue the
regular booting process from the target machine's local hard drive

Quick Start Guide
14
Automating the process of taking an image:
On the server machine, create a batch file named, for example, diskdump.cmd with the following contents:
@echo off@echo Starting Ghost Multicast Server – Disk DumpREM –n1 switch starts the multicast session as soon as the first client connectsc:\programfiles\symantec\ghost\ghostsrv.exe c:\tftpboot\mach001.gho ROLLOUT –d –n1 –disk1 –ls –fc:\tftpboot\dump001.log –c
Make sure this batch file is executed before the target machine is started. This batch file must be run first because the Ghost Program on the target machine, when started with –ja switch, will attempt to connect to a multicast session named ROLLOUT. If there is no such session currently active, Ghost on the target machine will time-out in 30 seconds.
Note: The above command line is a single command line.

Automating Symantec Ghost 7
15
Automating the process of deploying an image:
On the server machine, create a batch file named, for example, deploy.cmd with the following contents:
@echo off@echo Starting Ghost Multicast Server –Disk Load (deploy.cmd)REM –n1 switch starts the multicast session as soon as the first client connectsc:\programfiles\symantec\ghost\ghostsrv.exe c:\tftpboot\mach001.gho ROLLOUT –n1–disk1–ls –fc:\tftpboot\load001.log –c
Make sure this batch file is executed before the target machine is started. This batch file needs to be run first because the Ghost on the target machine, when started with –ja switch, will attempt to connect to a mulitcast session named ROLLOUT. If there is no such session currently active, Ghost on the target machine will time-out in 30 seconds.
Step 5 - Using PXE with Symantec GhostThis section covers four separate procedures:
■ creating a PXE menu boot file ■ adding a client to the BOOTPTAB Editor■ "dumping" the hard drive image from the source machine■ "loading" the hard drive image to the client machines
Note: The above command line is a single command line.
Quick Start Guide
16
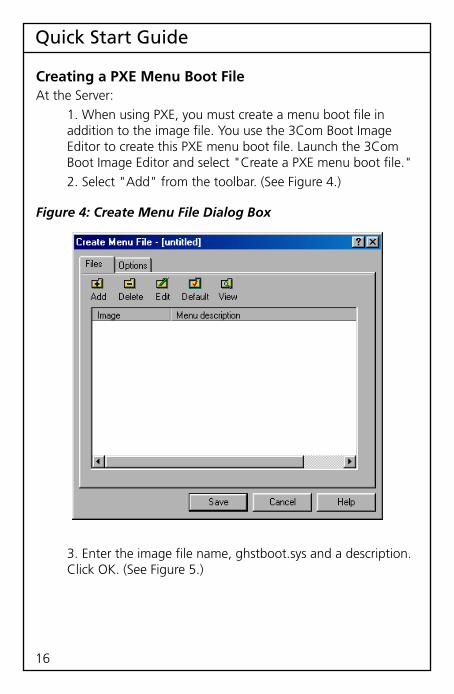
Creating a PXE Menu Boot FileAt the Server:
1. When using PXE, you must create a menu boot file in addition to the image file. You use the 3Com Boot Image Editor to create this PXE menu boot file. Launch the 3Com Boot Image Editor and select "Create a PXE menu boot file." 2. Select "Add" from the toolbar. (See Figure 4.)
Figure 4: Create Menu File Dialog Box
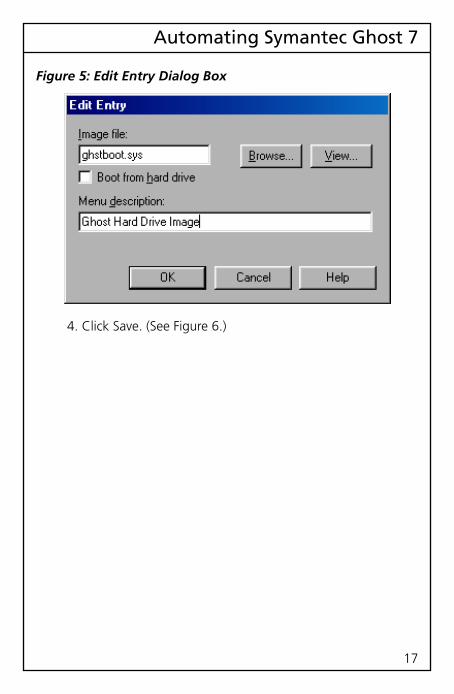
3. Enter the image file name, ghstboot.sys and a description. Click OK. (See Figure 5.)
Automating Symantec Ghost 7
17
Figure 5: Edit Entry Dialog Box
4. Click Save. (See Figure 6.)
Quick Start Guide
18
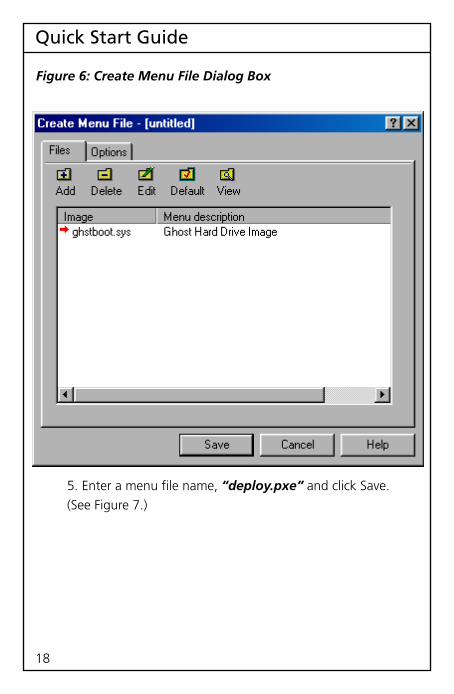
Figure 6: Create Menu File Dialog Box
5. Enter a menu file name, “deploy.pxe” and click Save. (See Figure 7.)
Automating Symantec Ghost 7
19
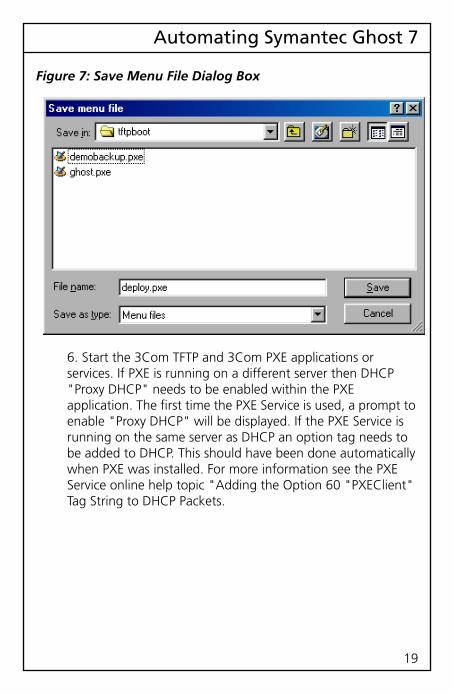
Figure 7: Save Menu File Dialog Box
6. Start the 3Com TFTP and 3Com PXE applications or services. If PXE is running on a different server then DHCP "Proxy DHCP" needs to be enabled within the PXE application. The first time the PXE Service is used, a prompt to enable "Proxy DHCP" will be displayed. If the PXE Service is running on the same server as DHCP an option tag needs to be added to DHCP. This should have been done automatically when PXE was installed. For more information see the PXE Service online help topic "Adding the Option 60 "PXEClient" Tag String to DHCP Packets.
Quick Start Guide
20
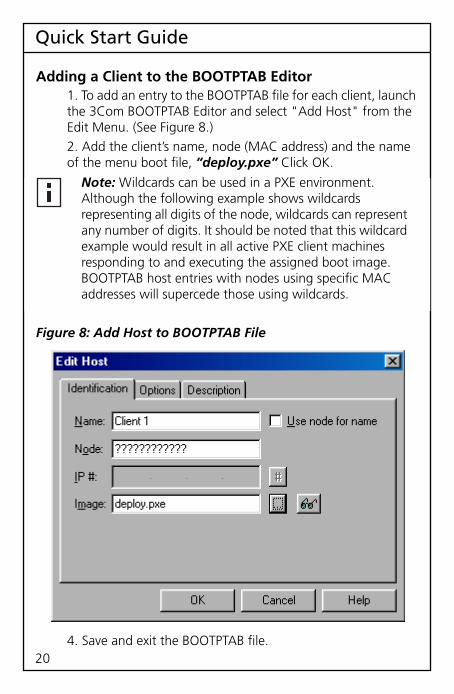
Adding a Client to the BOOTPTAB Editor1. To add an entry to the BOOTPTAB file for each client, launch the 3Com BOOTPTAB Editor and select "Add Host" from the Edit Menu. (See Figure 8.)2. Add the client’s name, node (MAC address) and the name of the menu boot file, “deploy.pxe” Click OK.
Figure 8: Add Host to BOOTPTAB File
4. Save and exit the BOOTPTAB file.
Note: Wildcards can be used in a PXE environment. Although the following example shows wildcards representing all digits of the node, wildcards can represent any number of digits. It should be noted that this wildcard example would result in all active PXE client machines responding to and executing the assigned boot image. BOOTPTAB host entries with nodes using specific MAC addresses will supercede those using wildcards.

Automating Symantec Ghost 7
21
"Dumping" the Hard Drive Image From the Source Machine:
1. Run the batch file "diskdump.cmd" on the server.2. Turn on the source machine. Configure MBA on the client machine to boot PXE. You can do this with either the MBA Configuration Utility, “MBACFG.EXE”, or press CTRL+ALT+B when prompted at startup. This will connect to the "ROLLOUT" multicast session to "dump" its hard drive image.After the source machine has finished dumping the hard drive image, this hard drive image can be "loaded" to the client machines.
"Loading" the Hard Drive Image to the Client Machines1. Run the batch file, "deploy.cmd" on the server.2. Turn on the client machines and configure MBA on the client machine to boot PXE. You can do this with either the MBA Configuration Utility, “MBACFG.EXE”, or press CTRL+ALT+B when prompted at startup. The client machines will connect to the "ROLLOUT" multicast session and "load" the hard drive image.
ConclusionYou can reduce Total Cost of Ownership dramatically by using 3Com Boot Services and a PXE-compatible boot ROM in combination with Symantec Ghost to perform an automated rollout. You accomplish this by compressing new machine setup, reducing downtime due to machine problems, and accelerating upgrades to the latest machine technologies and applications.

Quick Start Guide
22
References
Symantec Ghost Enterprise Implementation Guide
Managed PC Boot Agent User Guide
Microsoft Windows 2000 Server Deployment Planning Guide.
www.3com.com/bootservices
Information on using Microsoft's sysprep to avoid SID duplication when cloning: http://www.microsoft.com/TechNet/win2000/sysprep.asp