box end user guide1 (1)
DESCRIPTION
ÂTRANSCRIPT
1
Box.net End User Guide
Table of Contents
I. Logging into your Box.net Account
II. Creating a New Folder
III. Uploading Files
a. Adding Files via Upload Files
b. Adding Files via Bulk Upload
IV. Inviting Collaborators
a. Access Type for Collaborators
V. Share Links
VI. Adding a Discussion to a Folder
VII. Adding Comments to a File
VIII. Creating Tasks for a Collaborator
IX. Version Control and History
a. Download and Lock a File to Edit
b. Upload a New Version
X. Advanced Folder Properties
XI. User Email Notifications
XII. Online Help Pages & Webinars

2
I. Logging into your Box.net Account
1. Go to http://www.box.net/login.
2. Enter in your email/username on the right hand side.
3. Enter in your password.
4. Click “Log In”.
Please note and utilize the “Forgot password?” link if you happen to forget your password.
3
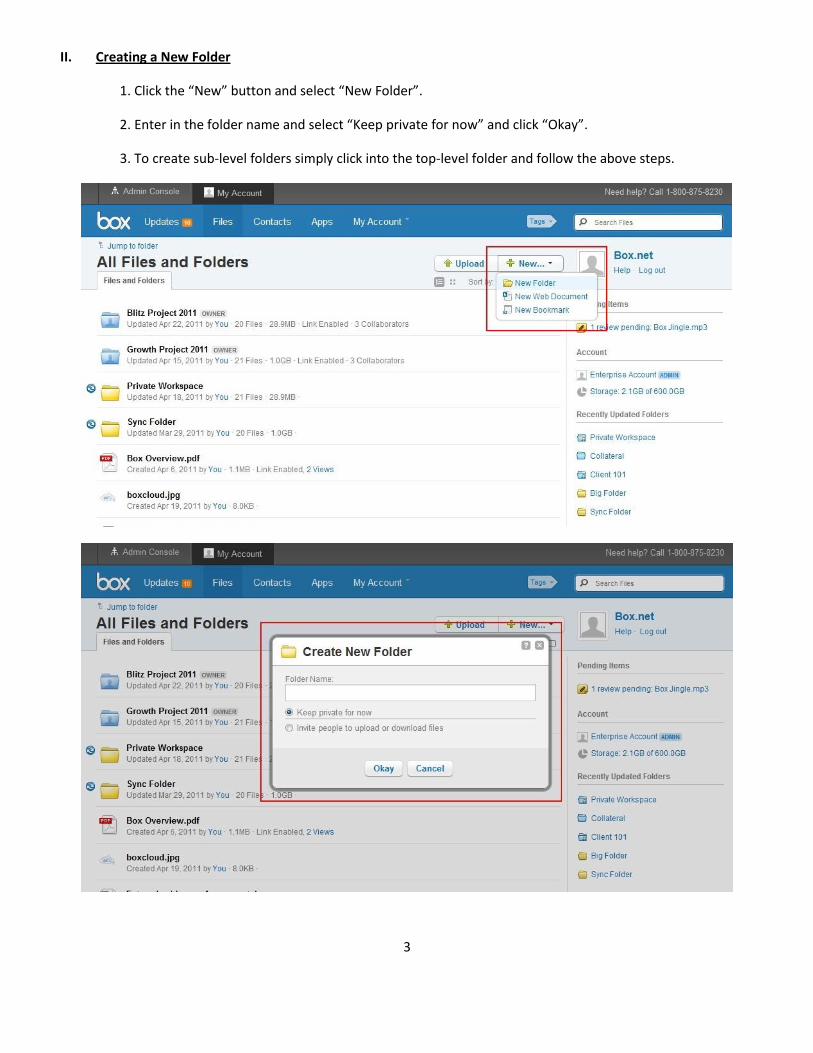
II. Creating a New Folder
1. Click the “New” button and select “New Folder”.
2. Enter in the folder name and select “Keep private for now” and click “Okay”.
3. To create sub-level folders simply click into the top-level folder and follow the above steps.

4
III. Uploading Files
a. Adding Files via Upload Files
1. Ensure that you are in the actual folder where you want to upload content.
2. Click the “Upload” button and select “Upload Files”.
3. A pop-up window will appear allowing you to select the specific file(s) you want to upload.
4. Select the specific file(s) and click the “Open” button.

5
b. Adding Files via Bulk Upload (multiple files or folders at a time)
1. Ensure that you are in the actual folder where you want to upload content.
2. Click the “Upload” button and select “Bulk Upload”.
3. A pop-up window will appear allowing you to “Drag and drop” or to “Add Files”.
4. To use “Drag and drop” simply select, drag, and drop the files or folders into the pop-up
window.
5. To use “Add files” simply click the “Add files” button and select the files or folders you want to
upload. Once selected, click the “Open” button.
6. Once you have added the files or folders via “Drag and drop” or “Add files”, click the “Upload”
button and your files or folders will be uploaded.
Note: Bulk Upload will not work properly without the latest version of Java. Use the following link
to download or update: http://java.com/en/download/index.jsp

6
IV. Inviting Collaborators
Note: You can invite any person as a collaborator as long as he/she has a Box.net account.
1. Mouse over the desired folder and click the drop down arrow/menu. Select “Share” and click “Invite
Collaborators”.
2. A pop-up window will appear allowing you to type in the email addresses of the collaborators you want to
invite into the folder.
3. Select the “Access type” and click “Invite”. An email will be sent to your collaborators for confirmation.

7
a. Access Type for Collaborators
Note: A collaborator will have the same access type throughout a particular folder structure. For
example, if a collaborator is an editor in a top-level folder he/she will be an editor in the
associated sub-level folders as well.
1. Co-owner: Users will have the same permissions as the owner of the folder.
2. Editor: Users will be able to upload, download, preview, edit, delete, and share the files within
this folder.
3. Viewer Uploader: Users will be able to upload, download, and preview the files within this
folder.
4. Previewer Uploader: Users will be able to upload and preview the files within this folder.
5. Viewer: Users will be able to download and preview the files within this folder.
6. Previewer: Users will be able to preview the files within this folder.
7. Uploader: Users will be able to upload files into this folder.

8
V. Share Links
Note: Share links can be used to quickly share content with people who do not have a Box.net account. A
person can only preview and/or download the contents of a share link (i.e. no collaboration features). Please
note that there is very limited tracking and reporting on share links.
1. Mouse over the desired folder or file and click “Share”.
2. A new drop down window will appear below the selected folder or file revealing a secure link to that
folder or file.
3. To share, you can copy and paste the secure link into an email or you can click the envelope icon next to
the share link and type in the email addresses of the recipients you want to share with.
4. To set expirations for the share link click the cog/wheel icon and select “Set expirations”. Select a date
through the “Unshare on” field and click “Okay”.
5. To set a password for the share link click the lock icon and select “Password protect this share link”. Type
in a password and click “Save”.

9

10
VI. Adding a Discussion to a Folder
Discussions can be used to cultivate, track, and store all conversations pertaining to a folder. For example, all
conversations pertaining to a specific project can be housed under “Discussions” (instead of email threads).
1. Click into the desired folder.
2. Select the “Discussions” tab.
3. Type in a topic and click “Create Topic” to begin a discussion thread.
4. The “Discussions” tab will update with the number of discussions associated with the folder.

11
VII. Adding Comments to a File
Comments can be used to cultivate, track, and store all conversations pertaining to a file. For example, all
conversations pertaining to a specific document can be housed under “Comments” (instead of email
threads).
1. Mouse over the desired file and click on the comments balloon icon.
2. Type in your comments and click “Add comment”.
3. The comments balloon icon will update with the number of comments associated with the file.
12
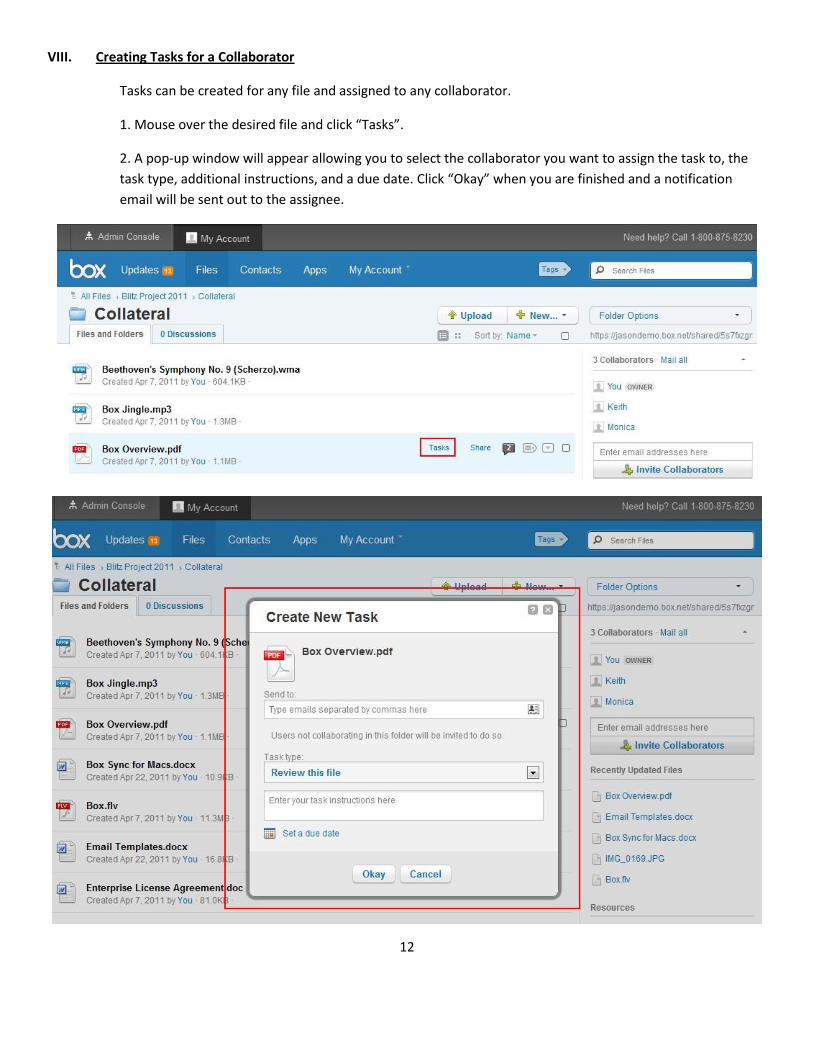
VIII. Creating Tasks for a Collaborator
Tasks can be created for any file and assigned to any collaborator.
1. Mouse over the desired file and click “Tasks”.
2. A pop-up window will appear allowing you to select the collaborator you want to assign the task to, the
task type, additional instructions, and a due date. Click “Okay” when you are finished and a notification
email will be sent out to the assignee.

13
IX. Version Control and History
Version control and locking a file can be used to ensure that concurrent editing of a file does not occur. Your
version history log will allow you to access and keep up to 10 versions of a particular file. Please note that
all versions you store will count against your allotted storage.
a. Download and Lock a File to Edit
1. Mouse over the desired file and click the drop down arrow/menu. Select “Lock File” and click
“Download & Lock (to edit)”.
2. A pop-up window will appear allowing you to download the file. If you want to prevent others
from downloading the file while you make your edits select “Prevent other users from
downloading this file while it is locked” and click “Continue”.
3. The file will open in the specified program (i.e. word, excel, etc.) you can make your edits.
4. After you have finished, save the file on your desktop. Ensure that you are saving the file with
the exact same name.
5. To upload the new and edited version of the file, please refer to the next section titled b.
Upload a New Version.

14
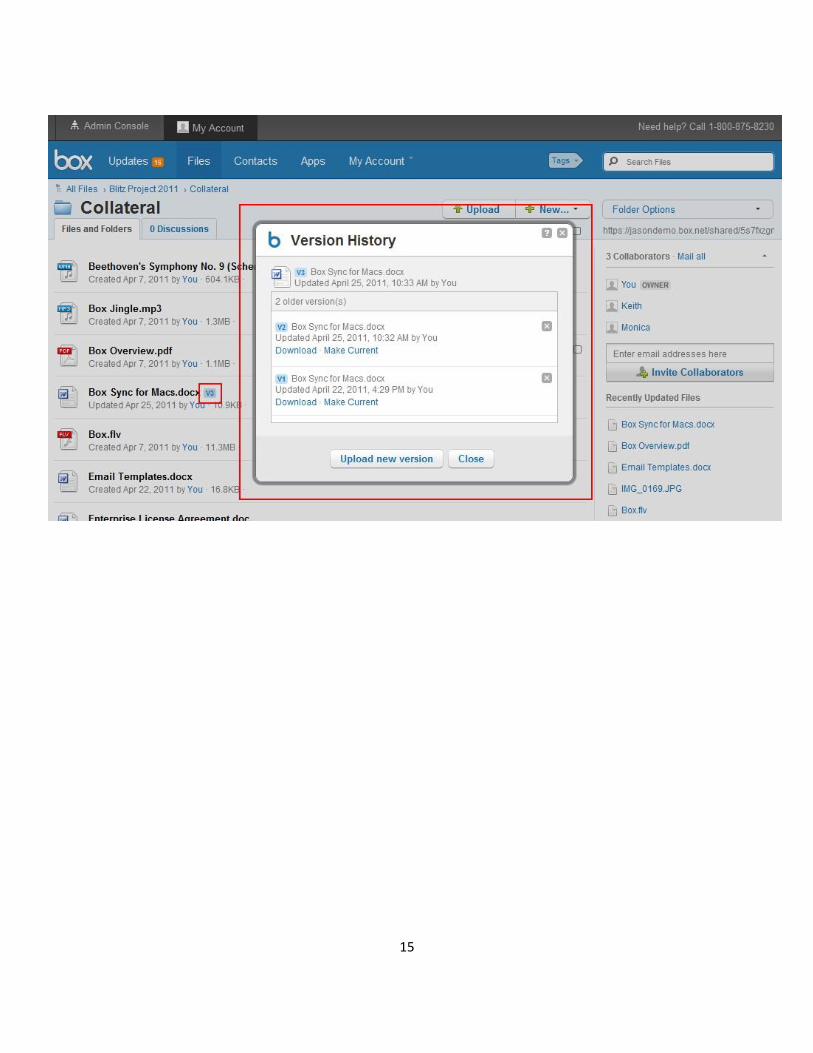
b. Upload a New Version
1. Mouse over the locked file and click the drop down arrow/menu. Select “Unlock File” and click
“Upload Edited File (Unlock)”.
2. A pop-up window will appear allowing you to select the edited version. Click “Select File” and
select the edited version of the file to upload and click “Open”.
3. Click “Upload” to upload and unlock the file.
4. Once you have completed the upload you will see a version icon next to the file letting you
know the number of versions associated with that file. If you click on that version icon you will
be able to see, download, and make current an older version of the file.
15

16
X. Advanced Folder Properties
Advanced folder properties are only accessible to the folder owner and co-owner (if there is one).
1. Mouse over the desired folder and click the drop down arrow/menu. Select “Folder Properties” and click
“Advanced Properties”.
2. A pop-up window will appear allowing you to adjust the properties and restrictions of that folder. For
example, you can disable share links, restrict invite privileges, and disable commenting for that folder.

17
XI. User Email Notifications
1. Mouse over “My Account” at the top of your window and click “Account Settings”.
2. Click the “User Settings” tab and from here you will be able to adjust your email notifications for your
account under the “Email Notifications” section. Click “Save” once you have finished.
Please note that email notifications can be adjusted on an individual folder level as well. The setting is under
“Folder Properties”.

18
XII. Online Help Pages & Webinars
Our online help pages & knowledge base can be found at the below address. It is a robust directory of help
docs and answers to frequently asked questions.
http://support.box.net/
We offer weekly webinars that will walk you through all the features of your Box.net account for both
Administrators and End Users. You can access the webinars through the below link along with the
schedules.
https://www.box.net/webinars