business process operations
TRANSCRIPT
INTERNALDocument Version: Draft – 2018-11-01
Business Process Operations
© 2
018
SAP
SE o
r an
SAP affi
liate
com
pany
. All r
ight
s re
serv
ed.
THE BEST RUN
Content
1 Business Process Operations. . . . . . . . . . . . . . . . . . . . . . . . . . . . . . . . . . . . . . . . . . . . . . . . . . . 5
2 Business Process Operations Launchpad Group. . . . . . . . . . . . . . . . . . . . . . . . . . . . . . . . . . . . . 6
3 Business Process and Interface Monitoring. . . . . . . . . . . . . . . . . . . . . . . . . . . . . . . . . . . . . . . . 83.1 Business Process Monitoring Launchpad Group. . . . . . . . . . . . . . . . . . . . . . . . . . . . . . . . . . . . . . . 93.2 Setting Up Alerting and Analytics Objects. . . . . . . . . . . . . . . . . . . . . . . . . . . . . . . . . . . . . . . . . . . 103.3 Business Process Monitoring . . . . . . . . . . . . . . . . . . . . . . . . . . . . . . . . . . . . . . . . . . . . . . . . . . . .153.4 Alert Inbox. . . . . . . . . . . . . . . . . . . . . . . . . . . . . . . . . . . . . . . . . . . . . . . . . . . . . . . . . . . . . . . . . 173.5 Configuration - Dashboard Builder. . . . . . . . . . . . . . . . . . . . . . . . . . . . . . . . . . . . . . . . . . . . . . . . 203.6 Object Adminstration - Business Process Monitoring. . . . . . . . . . . . . . . . . . . . . . . . . . . . . . . . . . . 213.7 SAP Operations Control Center. . . . . . . . . . . . . . . . . . . . . . . . . . . . . . . . . . . . . . . . . . . . . . . . . . 22
SAP Operations Control Center Alert Reporting. . . . . . . . . . . . . . . . . . . . . . . . . . . . . . . . . . . . 24
4 Business Process Improvement. . . . . . . . . . . . . . . . . . . . . . . . . . . . . . . . . . . . . . . . . . . . . . . . 294.1 Business Process Improvement Launchpad Group. . . . . . . . . . . . . . . . . . . . . . . . . . . . . . . . . . . . .294.2 Business Process Analytics - Classic. . . . . . . . . . . . . . . . . . . . . . . . . . . . . . . . . . . . . . . . . . . . . . . 31
SAP Business Process Analytics for SAP HANA. . . . . . . . . . . . . . . . . . . . . . . . . . . . . . . . . . . . 32SAP Business Process Analytics for Cross-Database Comparison. . . . . . . . . . . . . . . . . . . . . . . 33Assigning Roles and Authorizations As an Administrator. . . . . . . . . . . . . . . . . . . . . . . . . . . . . . 34Creating an Analysis Variant As a Configuration User. . . . . . . . . . . . . . . . . . . . . . . . . . . . . . . . 35Automatic Pattern Analysis. . . . . . . . . . . . . . . . . . . . . . . . . . . . . . . . . . . . . . . . . . . . . . . . . . 40Performing an Analysis. . . . . . . . . . . . . . . . . . . . . . . . . . . . . . . . . . . . . . . . . . . . . . . . . . . . . . 41Defining Virtual Characteristics. . . . . . . . . . . . . . . . . . . . . . . . . . . . . . . . . . . . . . . . . . . . . . . .42
4.3 Business Process Analytics. . . . . . . . . . . . . . . . . . . . . . . . . . . . . . . . . . . . . . . . . . . . . . . . . . . . . 444.4 Maintaining Variant Categories. . . . . . . . . . . . . . . . . . . . . . . . . . . . . . . . . . . . . . . . . . . . . . . . . . 454.5 Business Process Operations Dashboards. . . . . . . . . . . . . . . . . . . . . . . . . . . . . . . . . . . . . . . . . . 46
Technical Prerequisites. . . . . . . . . . . . . . . . . . . . . . . . . . . . . . . . . . . . . . . . . . . . . . . . . . . . . .47BPO Dashboards Setup. . . . . . . . . . . . . . . . . . . . . . . . . . . . . . . . . . . . . . . . . . . . . . . . . . . . . 50Roles and Authorizations. . . . . . . . . . . . . . . . . . . . . . . . . . . . . . . . . . . . . . . . . . . . . . . . . . . . 60Working with Business Process Operations Dashboards as End User. . . . . . . . . . . . . . . . . . . . . .61
4.6 Maintaining Exchange Currency Rates. . . . . . . . . . . . . . . . . . . . . . . . . . . . . . . . . . . . . . . . . . . . . 624.7 Dependency Diagrams. . . . . . . . . . . . . . . . . . . . . . . . . . . . . . . . . . . . . . . . . . . . . . . . . . . . . . . . 634.8 Progress Management Board. . . . . . . . . . . . . . . . . . . . . . . . . . . . . . . . . . . . . . . . . . . . . . . . . . . .63
Creating Customer-Defined Authorization Areas for Progress Management Board. . . . . . . . . . . .64Creating Data Sources for Progress KPIs. . . . . . . . . . . . . . . . . . . . . . . . . . . . . . . . . . . . . . . . . 65Configuring Progress KPIs. . . . . . . . . . . . . . . . . . . . . . . . . . . . . . . . . . . . . . . . . . . . . . . . . . . 66Configuring Progress Management Boards. . . . . . . . . . . . . . . . . . . . . . . . . . . . . . . . . . . . . . . 68
2 I N T E R N A LBusiness Process Operations
Content
Using Progress Management Boards. . . . . . . . . . . . . . . . . . . . . . . . . . . . . . . . . . . . . . . . . . . . 704.9 BPO Reporting Infrastructure. . . . . . . . . . . . . . . . . . . . . . . . . . . . . . . . . . . . . . . . . . . . . . . . . . . .72
TwinCubes in Business Process Analytics. . . . . . . . . . . . . . . . . . . . . . . . . . . . . . . . . . . . . . . . .73Usage Analysis. . . . . . . . . . . . . . . . . . . . . . . . . . . . . . . . . . . . . . . . . . . . . . . . . . . . . . . . . . . 77Log for Data Collection and Cube Upload. . . . . . . . . . . . . . . . . . . . . . . . . . . . . . . . . . . . . . . . . 78Maintaining a Connector Instance. . . . . . . . . . . . . . . . . . . . . . . . . . . . . . . . . . . . . . . . . . . . . . 79Define Data Sources. . . . . . . . . . . . . . . . . . . . . . . . . . . . . . . . . . . . . . . . . . . . . . . . . . . . . . . 80Execute AKF Repository Update. . . . . . . . . . . . . . . . . . . . . . . . . . . . . . . . . . . . . . . . . . . . . . . 81
5 Data Consistency Management. . . . . . . . . . . . . . . . . . . . . . . . . . . . . . . . . . . . . . . . . . . . . . . . 825.1 Data Consistency Management Launchpad Group. . . . . . . . . . . . . . . . . . . . . . . . . . . . . . . . . . . . .845.2 Cross-Database Comparison. . . . . . . . . . . . . . . . . . . . . . . . . . . . . . . . . . . . . . . . . . . . . . . . . . . . 85
Performing Cross-Database Comparison. . . . . . . . . . . . . . . . . . . . . . . . . . . . . . . . . . . . . . . . . 86Comparison. . . . . . . . . . . . . . . . . . . . . . . . . . . . . . . . . . . . . . . . . . . . . . . . . . . . . . . . . . . . . 87Data Sources in Cross-Database Comparison. . . . . . . . . . . . . . . . . . . . . . . . . . . . . . . . . . . . . 101Mass Processing Functions in Cross-Database Comparison. . . . . . . . . . . . . . . . . . . . . . . . . . . 110Filters in Cross-Database Comparison. . . . . . . . . . . . . . . . . . . . . . . . . . . . . . . . . . . . . . . . . . .111Comparison Group. . . . . . . . . . . . . . . . . . . . . . . . . . . . . . . . . . . . . . . . . . . . . . . . . . . . . . . . 115Evaluating Comparisons. . . . . . . . . . . . . . . . . . . . . . . . . . . . . . . . . . . . . . . . . . . . . . . . . . . . 119Creating Messages. . . . . . . . . . . . . . . . . . . . . . . . . . . . . . . . . . . . . . . . . . . . . . . . . . . . . . . . 126Duplicate Checker. . . . . . . . . . . . . . . . . . . . . . . . . . . . . . . . . . . . . . . . . . . . . . . . . . . . . . . . 126Drill-down comparisons. . . . . . . . . . . . . . . . . . . . . . . . . . . . . . . . . . . . . . . . . . . . . . . . . . . . 127
5.3 Transactional Correctness. . . . . . . . . . . . . . . . . . . . . . . . . . . . . . . . . . . . . . . . . . . . . . . . . . . . . 129Evaluating Transaction Correctness in a Managed System. . . . . . . . . . . . . . . . . . . . . . . . . . . . 131Evaluating Transactional Correctness Using SAP Solution Manager. . . . . . . . . . . . . . . . . . . . . .133Handling Transaction Correctness Warning Messages. . . . . . . . . . . . . . . . . . . . . . . . . . . . . . . 135
5.4 GSS: Data Consistency Management. . . . . . . . . . . . . . . . . . . . . . . . . . . . . . . . . . . . . . . . . . . . . 1385.5 Internal Database Comparison. . . . . . . . . . . . . . . . . . . . . . . . . . . . . . . . . . . . . . . . . . . . . . . . . . 1395.6 Business Process Completeness Check. . . . . . . . . . . . . . . . . . . . . . . . . . . . . . . . . . . . . . . . . . . .140
Configuring Business Process Completeness Check. . . . . . . . . . . . . . . . . . . . . . . . . . . . . . . . .141Instrumenting the Business Process Completeness Check. . . . . . . . . . . . . . . . . . . . . . . . . . . . 144Analyzing Business Process Steps with Business Process Completeness Check. . . . . . . . . . . . .146
6 Job Management. . . . . . . . . . . . . . . . . . . . . . . . . . . . . . . . . . . . . . . . . . . . . . . . . . . . . . . . . . 1496.1 Job Management Launchpad Group. . . . . . . . . . . . . . . . . . . . . . . . . . . . . . . . . . . . . . . . . . . . . . 1516.2 Job Management Administration. . . . . . . . . . . . . . . . . . . . . . . . . . . . . . . . . . . . . . . . . . . . . . . . 1536.3 Requesting Jobs. . . . . . . . . . . . . . . . . . . . . . . . . . . . . . . . . . . . . . . . . . . . . . . . . . . . . . . . . . . . 155
Requesting Jobs via a Job Request. . . . . . . . . . . . . . . . . . . . . . . . . . . . . . . . . . . . . . . . . . . . .156Requesting Jobs via a Job Document. . . . . . . . . . . . . . . . . . . . . . . . . . . . . . . . . . . . . . . . . . . 164Processing Job Requests. . . . . . . . . . . . . . . . . . . . . . . . . . . . . . . . . . . . . . . . . . . . . . . . . . . .167
6.4 Job Documentation. . . . . . . . . . . . . . . . . . . . . . . . . . . . . . . . . . . . . . . . . . . . . . . . . . . . . . . . . .180Integration with Solution Documentation. . . . . . . . . . . . . . . . . . . . . . . . . . . . . . . . . . . . . . . . 181
Business Process OperationsContent I N T E R N A L 3
Creating and Editing Job Documentation. . . . . . . . . . . . . . . . . . . . . . . . . . . . . . . . . . . . . . . . 183Importing Job Data into Job Documentation. . . . . . . . . . . . . . . . . . . . . . . . . . . . . . . . . . . . . . 194Working with Job Documentation Templates. . . . . . . . . . . . . . . . . . . . . . . . . . . . . . . . . . . . . .198Managing Job Documents According to Validity. . . . . . . . . . . . . . . . . . . . . . . . . . . . . . . . . . . 202
6.5 Job Scheduling. . . . . . . . . . . . . . . . . . . . . . . . . . . . . . . . . . . . . . . . . . . . . . . . . . . . . . . . . . . . .204Scheduling Jobs with Job Documentation. . . . . . . . . . . . . . . . . . . . . . . . . . . . . . . . . . . . . . . 205Scheduling Jobs Directly. . . . . . . . . . . . . . . . . . . . . . . . . . . . . . . . . . . . . . . . . . . . . . . . . . . . 212Using the Job Scheduling Assistant. . . . . . . . . . . . . . . . . . . . . . . . . . . . . . . . . . . . . . . . . . . . 213Job Control for Managed Systems. . . . . . . . . . . . . . . . . . . . . . . . . . . . . . . . . . . . . . . . . . . . . 214Scheduling Recommended Jobs. . . . . . . . . . . . . . . . . . . . . . . . . . . . . . . . . . . . . . . . . . . . . . 221
6.6 Job Overview. . . . . . . . . . . . . . . . . . . . . . . . . . . . . . . . . . . . . . . . . . . . . . . . . . . . . . . . . . . . . . 222Central Job Overview. . . . . . . . . . . . . . . . . . . . . . . . . . . . . . . . . . . . . . . . . . . . . . . . . . . . . . 223Simple Job Selection. . . . . . . . . . . . . . . . . . . . . . . . . . . . . . . . . . . . . . . . . . . . . . . . . . . . . . 224SAP Scheduler Management. . . . . . . . . . . . . . . . . . . . . . . . . . . . . . . . . . . . . . . . . . . . . . . . .225External Scheduler Management. . . . . . . . . . . . . . . . . . . . . . . . . . . . . . . . . . . . . . . . . . . . . .226
6.7 Job Analysis. . . . . . . . . . . . . . . . . . . . . . . . . . . . . . . . . . . . . . . . . . . . . . . . . . . . . . . . . . . . . . . 228Job Schedule Gantt Chart. . . . . . . . . . . . . . . . . . . . . . . . . . . . . . . . . . . . . . . . . . . . . . . . . . .228Background Job Analysis. . . . . . . . . . . . . . . . . . . . . . . . . . . . . . . . . . . . . . . . . . . . . . . . . . . 230
6.8 Reports. . . . . . . . . . . . . . . . . . . . . . . . . . . . . . . . . . . . . . . . . . . . . . . . . . . . . . . . . . . . . . . . . . 231ABAP Reports. . . . . . . . . . . . . . . . . . . . . . . . . . . . . . . . . . . . . . . . . . . . . . . . . . . . . . . . . . . 232Job Management Health Check Reports. . . . . . . . . . . . . . . . . . . . . . . . . . . . . . . . . . . . . . . . .233
4 I N T E R N A LBusiness Process Operations
Content
1 Business Process Operations
Use
In this component, you find tools and functions that help you support the productive operation of your core business processes across your systems and components.
You can make sure that core business processes run according to the priorities of your company and that the costs for operating a solution remain at a reasonable level in the following areas:
● Business Process and Interface MonitoringYou use business process and interface monitoring to get alerted about critical situations disrupting the flow of your business processes and the processing of your interfaces.
● Business Process ImprovementBusiness Process Improvement enables you to analyze and optimize the throughput through your business processes and reduce the backlog within the business process executions.
● Data Consistency ManagementData consistency management allows you to avoid, detect, analyze, and solve inconsistencies in your business process execution.
● Job ManagementJob management enables you to automate business processes while considering time and hardware restrictions. You can request, document, and schedule background jobs in your system environment from a central location, with a standardized workflow.
Business Process OperationsBusiness Process Operations I N T E R N A L 5
2 Business Process Operations Launchpad Group
Use
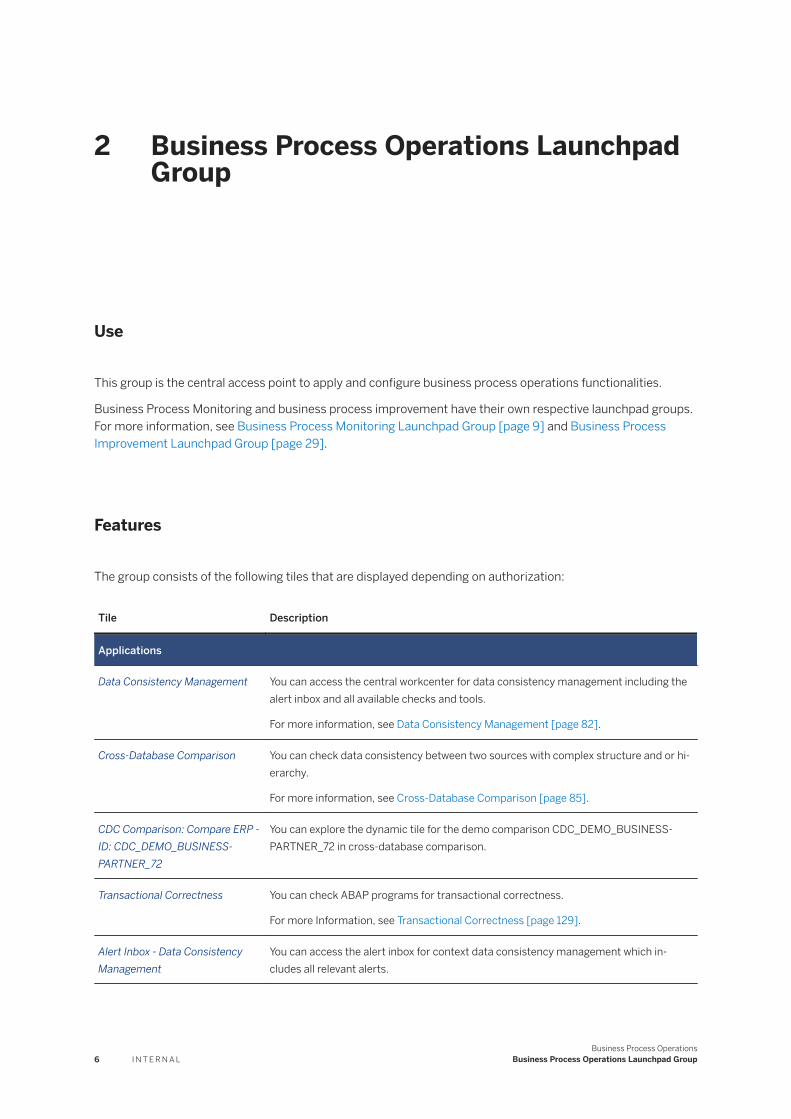
This group is the central access point to apply and configure business process operations functionalities.
Business Process Monitoring and business process improvement have their own respective launchpad groups. For more information, see Business Process Monitoring Launchpad Group [page 9] and Business Process Improvement Launchpad Group [page 29].
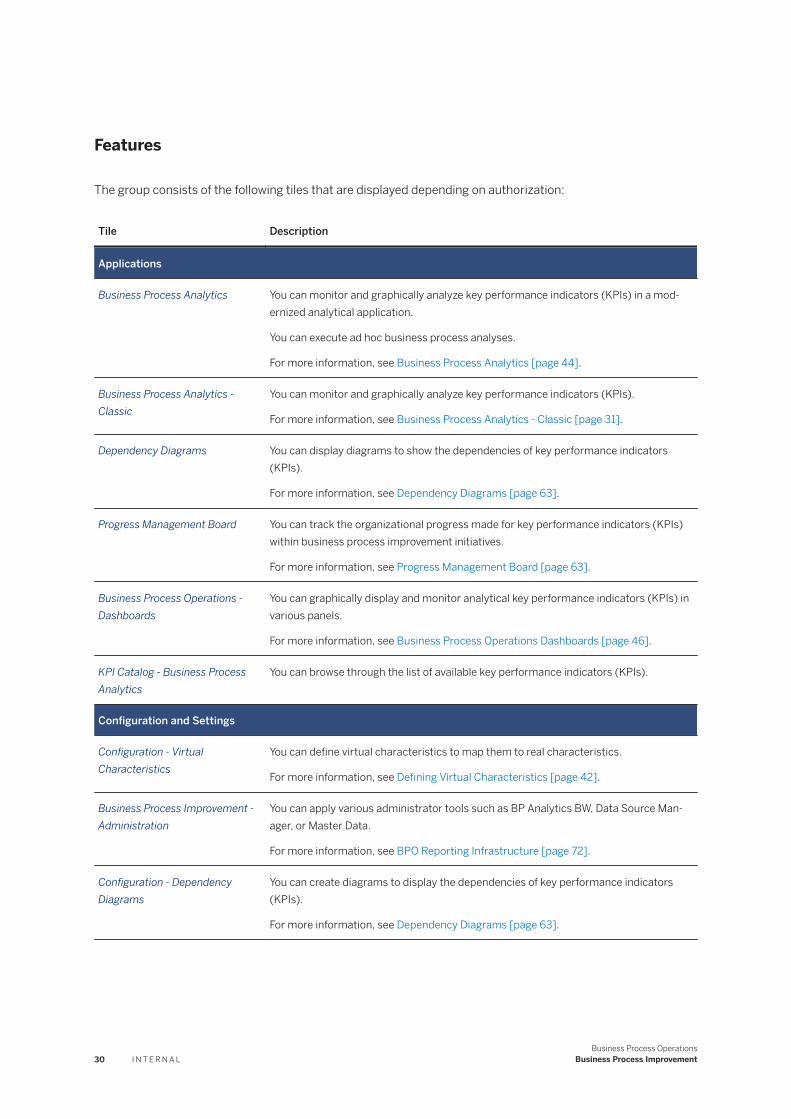
Features
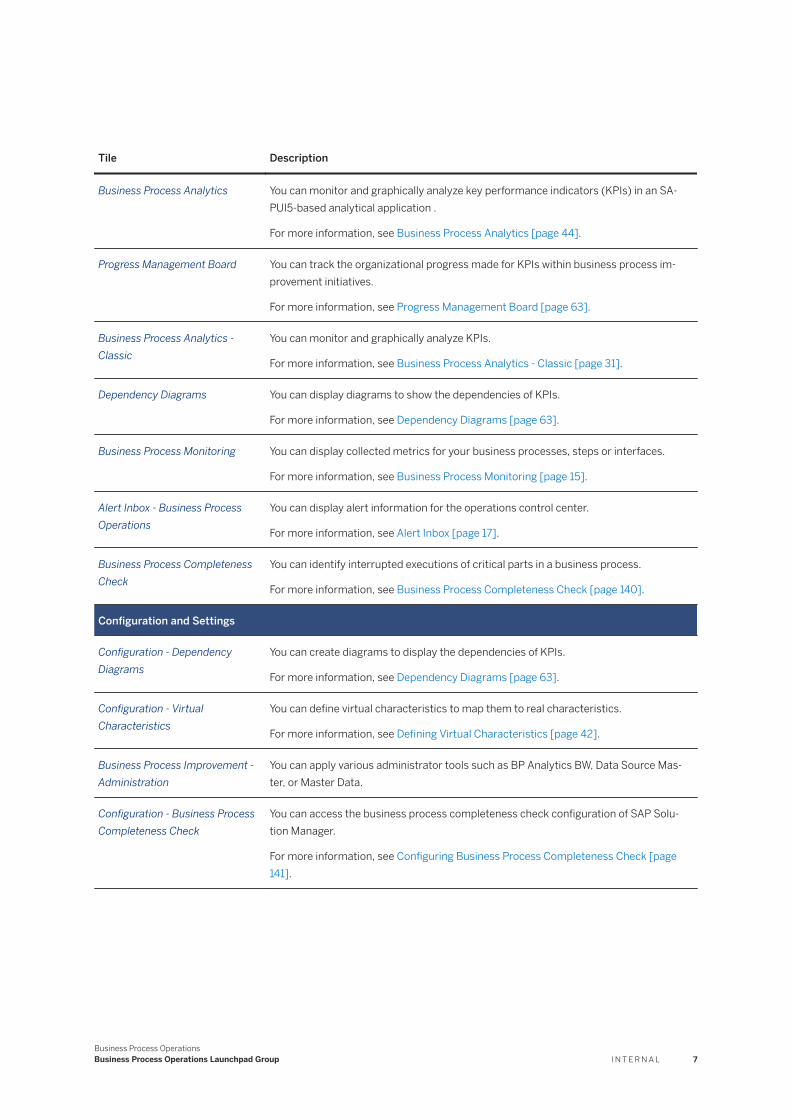
The group consists of the following tiles that are displayed depending on authorization:
Tile Description
Applications
Data Consistency Management You can access the central workcenter for data consistency management including the alert inbox and all available checks and tools.
For more information, see Data Consistency Management [page 82].
Cross-Database Comparison You can check data consistency between two sources with complex structure and or hierarchy.
For more information, see Cross-Database Comparison [page 85].
CDC Comparison: Compare ERP - ID: CDC_DEMO_BUSINESS-PARTNER_72
You can explore the dynamic tile for the demo comparison CDC_DEMO_BUSINESS-PARTNER_72 in cross-database comparison.
Transactional Correctness You can check ABAP programs for transactional correctness.
For more Information, see Transactional Correctness [page 129].
Alert Inbox - Data Consistency Management
You can access the alert inbox for context data consistency management which includes all relevant alerts.
6 I N T E R N A LBusiness Process Operations
Business Process Operations Launchpad Group
Tile Description
Business Process Analytics You can monitor and graphically analyze key performance indicators (KPIs) in an SAPUI5-based analytical application .
For more information, see Business Process Analytics [page 44].
Progress Management Board You can track the organizational progress made for KPIs within business process improvement initiatives.
For more information, see Progress Management Board [page 63].
Business Process Analytics - Classic
You can monitor and graphically analyze KPIs.
For more information, see Business Process Analytics - Classic [page 31].
Dependency Diagrams You can display diagrams to show the dependencies of KPIs.
For more information, see Dependency Diagrams [page 63].
Business Process Monitoring You can display collected metrics for your business processes, steps or interfaces.
For more information, see Business Process Monitoring [page 15].
Alert Inbox - Business Process Operations
You can display alert information for the operations control center.
For more information, see Alert Inbox [page 17].
Business Process Completeness Check
You can identify interrupted executions of critical parts in a business process.
For more information, see Business Process Completeness Check [page 140].
Configuration and Settings
Configuration - Dependency Diagrams
You can create diagrams to display the dependencies of KPIs.
For more information, see Dependency Diagrams [page 63].
Configuration - Virtual Characteristics
You can define virtual characteristics to map them to real characteristics.
For more information, see Defining Virtual Characteristics [page 42].
Business Process Improvement - Administration
You can apply various administrator tools such as BP Analytics BW, Data Source Master, or Master Data.
Configuration - Business Process Completeness Check
You can access the business process completeness check configuration of SAP Solution Manager.
For more information, see Configuring Business Process Completeness Check [page 141].
Business Process OperationsBusiness Process Operations Launchpad Group I N T E R N A L 7
3 Business Process and Interface Monitoring
Use
Use Business Process and Interface Monitoring with SAP Solution Manager to detect and solve problems before critical situations arise. Avoid costly system or business process downtimes and reduce the risk of data inconsistencies.
Graphical displays provide an overview of entire business processes and provide access to details of automatically collected application-specific key figures.
The business process and interface monitoring applications can be called directly from the SAP Solution Manager launchpad as well as from the monitoring setup in Solution Documentation, where you can add alerting objects to business processes and interfaces.
NoteBusiness process monitoring (including interface monitoring) in SAP Solution Manager uses the Monitoring and Alerting Infrastructure (MAI).
NoteYou can also use business process monitoring as a data source type for dashboards that you create in the Dashboard Builder framework. By selecting Business Process Monitoring data sources, you can configure dashboards for monitoring specific business process key figures. For more information about the Dashboard Builder, see .
Prerequisites
● Administration has performed all relevant steps for business process monitoring in SAP Solution Manager Configuration, see .
● In you have defined business processes, with steps that are linked to logical components to which production systems are assigned.
● You are authorized to set up business process monitoring. For more information, see the Application-Specific Security Guide at https://help.sap.com/viewer/p/SAP_Solution_Manager.
8 I N T E R N A LBusiness Process Operations
Business Process and Interface Monitoring
Activities
To use business process and interface monitoring, proceed as follows:
1. Create a monitoring concept. In doing so, you define the required technical information for business critical steps or interfaces. You specify which criteria are decisive and which threshold values must be reached or must not be exceeded.
2. To implement your technical requirements, select a key figure from a catalog of key figures and create alerting objects at the level of business process step and interface you want to monitor.For more information, see Setting Up Alerting and Analytics Objects [page 10].
3. Monitor the status of the key figures collected by the alerting objects in the alert inbox or the monitoring application. You can create auto notifications (for example, by e-mail or SMS) when you set up the individual alerting objects. That way, you don’t need to regularly check the Alert Inbox for new alerts.For more information, see Alert Inbox [page 17].
4. Extract the data recorded in business process monitoring to an SAP NetWeaver BW system. Once you have done that, you can use the data to determine the trends of the last few weeks or months. You can identify problem situations early and take appropriate measures.For more information, see Reports: Business Processes Operations [page 235]
5. The data recorded in business process monitoring can be extracted to a SAP NetWeaver Business Warehouse system (BW system), if you configure this for an alerting object. Thus, you can use the data to determine the trends of the last few weeks or months. You can identify problem situations early and take appropriate measures.For more information, see Business Process Operations Dashboard [page 46].
6. Use SAP Operations Control Center alert reporting to monitor and improve the efficiency of your business process and interface monitoring activities.For more information, see SAP Operations Control Center Alert Reporting [page 24].
More Information
For more information, see the SAP Solution Manager Support Portal at https://support.sap.com under Application Lifecycle Management SAP Solution Manager Processes Business Process Operations .
3.1 Business Process Monitoring Launchpad Group
Use
This group is the central access point to implement business process monitoring functionalities.
Business Process OperationsBusiness Process and Interface Monitoring I N T E R N A L 9
Features
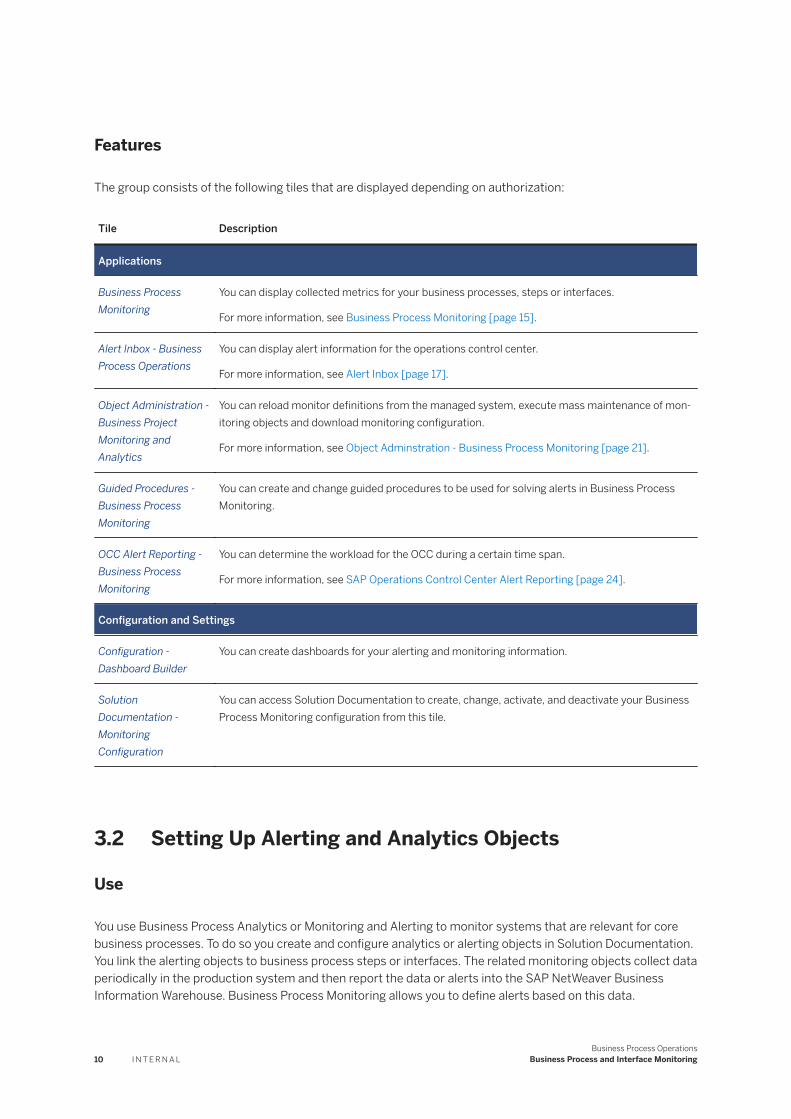
The group consists of the following tiles that are displayed depending on authorization:
Tile Description
Applications
Business Process Monitoring
You can display collected metrics for your business processes, steps or interfaces.
For more information, see Business Process Monitoring [page 15].
Alert Inbox - Business Process Operations
You can display alert information for the operations control center.
For more information, see Alert Inbox [page 17].
Object Administration - Business Project Monitoring and Analytics
You can reload monitor definitions from the managed system, execute mass maintenance of monitoring objects and download monitoring configuration.
For more information, see Object Adminstration - Business Process Monitoring [page 21].
Guided Procedures - Business Process Monitoring
You can create and change guided procedures to be used for solving alerts in Business Process Monitoring.
OCC Alert Reporting - Business Process Monitoring
You can determine the workload for the OCC during a certain time span.
For more information, see SAP Operations Control Center Alert Reporting [page 24].
Configuration and Settings
Configuration - Dashboard Builder
You can create dashboards for your alerting and monitoring information.
Solution Documentation - Monitoring Configuration
You can access Solution Documentation to create, change, activate, and deactivate your Business Process Monitoring configuration from this tile.
3.2 Setting Up Alerting and Analytics Objects
Use
You use Business Process Analytics or Monitoring and Alerting to monitor systems that are relevant for core business processes. To do so you create and configure analytics or alerting objects in Solution Documentation. You link the alerting objects to business process steps or interfaces. The related monitoring objects collect data periodically in the production system and then report the data or alerts into the SAP NetWeaver Business Information Warehouse. Business Process Monitoring allows you to define alerts based on this data.
10 I N T E R N A LBusiness Process Operations
Business Process and Interface Monitoring

For background information and examples, see SAP Support Portal at https://support.sap.com SAP Solution Manager Processes Business Process Operations .
Prerequisites
● In Solution Documentation you have defined business processes, with steps that are linked to logical components to which production systems are assigned. In Solution Documentation you have set the system role to Production System (analogously you can also monitor test systems). For more information, see .
NoteIf you want to use Business Process Analytics only, you do not have need to create business processes.
● The latest release of software component ST-A/PI is installed in the managed systems.● You have authorization for Business Process Operations.● Optional: You have created a monitoring concept and defined the business requirements for the monitoring
of business process steps or interfaces.
Preparation
CautionThe collection of data may affect the performance of production systems.
To keep the system load of the managed systems as low as possible, specify which key figures to analyze, and which must not necessarily be analyzed.
1. On the SAP Solution Manager launchpad, start Solution Documentation.2. Check the solution documentation content and ensure the following:
○ To use Business Process Analytics, assign the relevant system via a logical component group to the solution.
○ To use Monitoring and Alerting, assign the relevant system via a logical component group to the solution and create at least one scenario containing a business process with at least one process step.
Creating and Configuring Alerting or Analytics Objects
NoteEven though the setup of analytics objects is similar to the setup of alerting objects, there are some differences:
● For analytics objects thresholds cannot be maintained and notifications cannot be configured.
Business Process OperationsBusiness Process and Interface Monitoring I N T E R N A L 11
● For some of the selection criteria of analytics objects, a so-called group-by option is available.
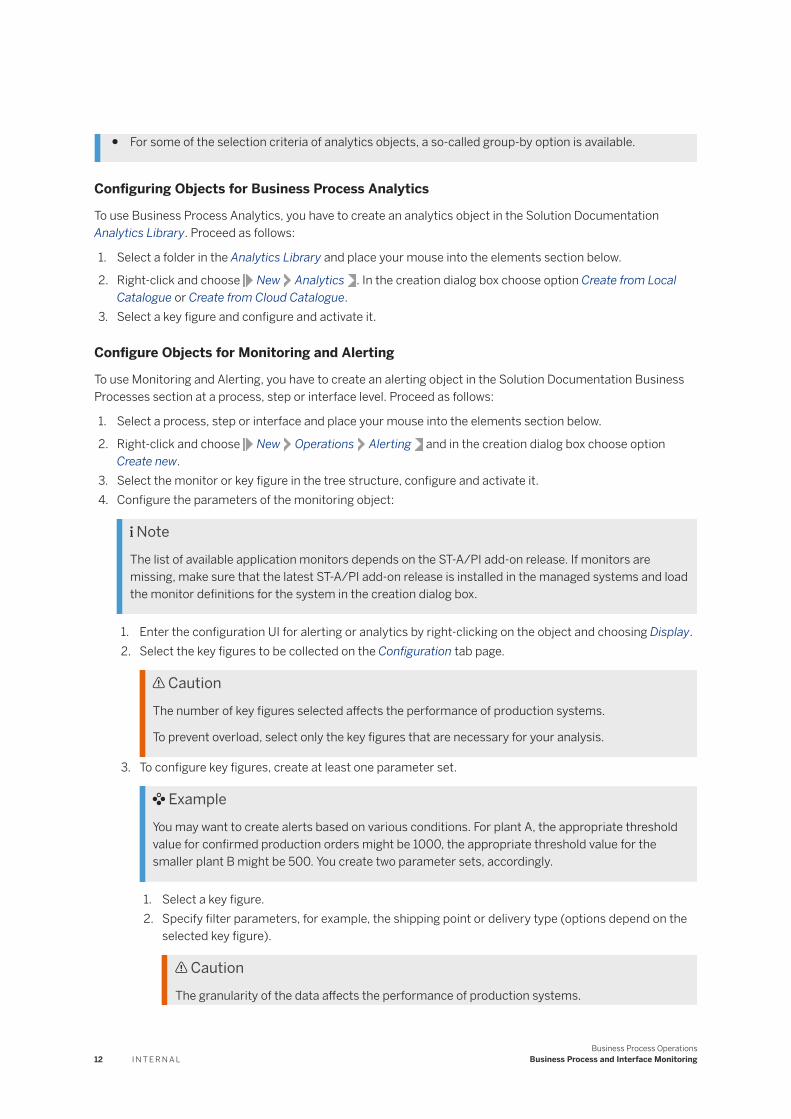
Configuring Objects for Business Process Analytics
To use Business Process Analytics, you have to create an analytics object in the Solution Documentation Analytics Library. Proceed as follows:
1. Select a folder in the Analytics Library and place your mouse into the elements section below.
2. Right-click and choose New Analytics . In the creation dialog box choose option Create from Local Catalogue or Create from Cloud Catalogue.
3. Select a key figure and configure and activate it.
Configure Objects for Monitoring and Alerting
To use Monitoring and Alerting, you have to create an alerting object in the Solution Documentation Business Processes section at a process, step or interface level. Proceed as follows:
1. Select a process, step or interface and place your mouse into the elements section below.
2. Right-click and choose New Operations Alerting and in the creation dialog box choose option Create new.
3. Select the monitor or key figure in the tree structure, configure and activate it.4. Configure the parameters of the monitoring object:
NoteThe list of available application monitors depends on the ST-A/PI add-on release. If monitors are missing, make sure that the latest ST-A/PI add-on release is installed in the managed systems and load the monitor definitions for the system in the creation dialog box.
1. Enter the configuration UI for alerting or analytics by right-clicking on the object and choosing Display.2. Select the key figures to be collected on the Configuration tab page.
CautionThe number of key figures selected affects the performance of production systems.
To prevent overload, select only the key figures that are necessary for your analysis.
3. To configure key figures, create at least one parameter set.
ExampleYou may want to create alerts based on various conditions. For plant A, the appropriate threshold value for confirmed production orders might be 1000, the appropriate threshold value for the smaller plant B might be 500. You create two parameter sets, accordingly.
1. Select a key figure.2. Specify filter parameters, for example, the shipping point or delivery type (options depend on the
selected key figure).
CautionThe granularity of the data affects the performance of production systems.
12 I N T E R N A LBusiness Process Operations
Business Process and Interface Monitoring

To keep the system load of the managed systems as low as possible, you can, for example, exclude countries that are not relevant for your analysis.
NoteIf you want to use Business Process Analytics, consider the following:
○ If you analyze throughput data, select Active in the Data from previous day field.To provide relevant throughput data, you must collect the data from the previous day to make sure that the data covers the complete business day
○ Depending on the selected key figure, to specify the dimensions of the data collection runs, you can select Group by check boxes. You must select at least one dimension.An analysis of the distribution is possible only for those fields, for which the Group by checkbox is selected.If you want to analyze, for example, the distribution of overdue outbound deliveries across shipping points, the Group by checkbox must be selected for the Shipping Point field.In the analysis, such fields are available as so-called dimensions.
CautionThe granularity of the data affects the performance of production systems.
To keep the system load of the managed systems as low as possible, carry out one-dimensional data collection runs.
3. If you want to use Monitoring and Alerting, enter threshold values.5. Specify the execution time of the data collection
NoteData collection for business process monitoring puts load on the monitored system. Consider how often a data collection (monitoring, for example) makes sense. For technical monitors or critical jobs, a frequency of 5 minutes might be reasonable, but for backlog key figures, even weekly schedules might be sufficient.
The scheduling options depend on the object as follows:○ Simple schedule
You define on which week days, with which frequency and in which time window (start time and end time), the monitoring is to take place.
○ Extended scheduleYou define on which work days the monitoring is to take place. You can refer to a factory calendar (on the SAP Solution Manager system or on the monitored system).
6. Optional: If the data collection is supposed to take a lot of time, select the Data Collection in Background field. In the following cases, choose this option:○ The alerts generated are not time-critical.○ You use the monitoring object for throughput and backlog key figures.
NoteIt cannot be guaranteed that the background job (BPM_DATA_COLLECTION*) is executed on time, according to the schedule.
Business Process OperationsBusiness Process and Interface Monitoring I N T E R N A L 13
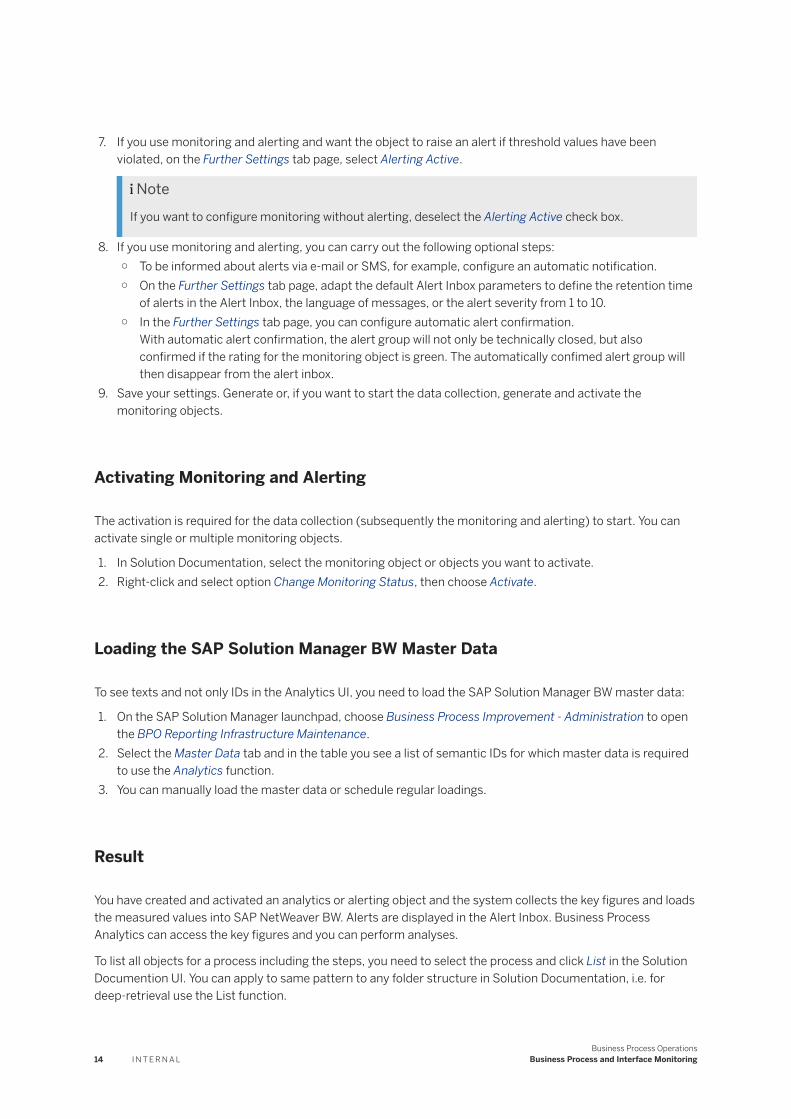
7. If you use monitoring and alerting and want the object to raise an alert if threshold values have been violated, on the Further Settings tab page, select Alerting Active.
NoteIf you want to configure monitoring without alerting, deselect the Alerting Active check box.
8. If you use monitoring and alerting, you can carry out the following optional steps:○ To be informed about alerts via e-mail or SMS, for example, configure an automatic notification.○ On the Further Settings tab page, adapt the default Alert Inbox parameters to define the retention time
of alerts in the Alert Inbox, the language of messages, or the alert severity from 1 to 10.○ In the Further Settings tab page, you can configure automatic alert confirmation.
With automatic alert confirmation, the alert group will not only be technically closed, but also confirmed if the rating for the monitoring object is green. The automatically confimed alert group will then disappear from the alert inbox.
9. Save your settings. Generate or, if you want to start the data collection, generate and activate the monitoring objects.
Activating Monitoring and Alerting
The activation is required for the data collection (subsequently the monitoring and alerting) to start. You can activate single or multiple monitoring objects.
1. In Solution Documentation, select the monitoring object or objects you want to activate.2. Right-click and select option Change Monitoring Status, then choose Activate.
Loading the SAP Solution Manager BW Master Data
To see texts and not only IDs in the Analytics UI, you need to load the SAP Solution Manager BW master data:
1. On the SAP Solution Manager launchpad, choose Business Process Improvement - Administration to open the BPO Reporting Infrastructure Maintenance.
2. Select the Master Data tab and in the table you see a list of semantic IDs for which master data is required to use the Analytics function.
3. You can manually load the master data or schedule regular loadings.
Result
You have created and activated an analytics or alerting object and the system collects the key figures and loads the measured values into SAP NetWeaver BW. Alerts are displayed in the Alert Inbox. Business Process Analytics can access the key figures and you can perform analyses.
To list all objects for a process including the steps, you need to select the process and click List in the Solution Documention UI. You can apply to same pattern to any folder structure in Solution Documentation, i.e. for deep-retrieval use the List function.
14 I N T E R N A LBusiness Process Operations
Business Process and Interface Monitoring
To carry out mass changes (of threshold values, parameters or monitoring schedules, for example) you can select multiple objects and right-click Display, which starts a mass maintenance application.
3.3 Business Process Monitoring
Use
The Business Process Monitoring application shows all metrics collected for your monitored processes, steps, or interfaces. You can switch between business processes. The application displays the processes with active Business Process Monitoring, with the highest rating in the alert categories, and the alerts.
Prerequisites
● You have created at least one solution with business processes.● You have configured monitoring for a business process.
Features
● Scope Selection and Variant ManagementTo start with Business Process Monitoring, proceed as follows:
1. Select (Scope Selection)to open the scope selection area.2. Select the solution branch.3. Select the solution role.4. Select the solution site.5. Via forward navigation, select the business process context for which you want to display the monitoring
data.6. Press Select.
You can save a set of selections as a variant to retrieve it in a later session. You can set a variant as default and next time the application loads, the data of the set variant is loaded.
You also have the option to delete a variant. Note that variants are user specific. The variants created by you are not visible to other users.
The Business Process Monitoring application consists of different areas.
● Overview: There are three sections.○ Status Overview: You can view an overall count of monitoring objects and various statuses in a chart
view or a tabular view.
Business Process OperationsBusiness Process and Interface Monitoring I N T E R N A L 15
○ Process Overview: You can view the following data.○ Details of the business process in a tabular view or in a chart view○ Business processes (), process steps (), or interfaces of the selected scope○ Rating of each business process step or interface, by alert category. Clicking on the ratings
navigates you to the metric details.○ Number of alerts. Clicking on the alerts navigates you to the Alert Inbox.
○ Alert Ticker: You can find a short preview of alerts with current rating as Red (Critical) or Yellow (Warning). By clicking any alert you can view its details.
● Process Diagram: Here, you can do the following:○ You can view the process diagram or a graphical representation of the business process steps and
technical interfaces. The graphic also displays the name of the logical component to which the solution is assigned. If you choose one of the category icons at the top of the process graphic, you can view the metric details of individual metrics.
○ Search and select any process steps of the business process by choosing and view the process diagram of the selected process.
○ Increase or decrease the size of the diagram by clicking the and icon respectively.● Metrics: Here, you can do the following:
○ View the process hierarchy○ View the rating information and other data such as trend, value, or system of all monitored objects for
the selected node○ View the metric trend of the monitoring object by clicking (Click to launch Trend) of the respective
metric○ View the details of the last measured metric value○ Filter, sort, and group the data by using (View Settings).○ Search and select any process steps of the business process by choosing and view the metric
details of the selected process.○ Navigate to Job Monitoring and Interface Channel Monitoring.
Other features are as follows:
● You can personalize the view of Business Process Monitoring by clicking (User Menu)Personalization . You can drag and drop the required view on the screen and choose Save. A new page gets added. You can rename, hide, copy, or delete the newly added page.
● You can create incidents for support, or send an e-mail or text message to system users, business partners or external recipients.
● You can set auto refresh, and the details will be refreshed at the specified interval. You can also pause and restart the refresh.
● You can refresh the details immediately by clicking (Refresh).● You can check your notifications by clicking (Show Notifications).● You can toggle the side navigation by clicking (Toggle Side Navigation).
16 I N T E R N A LBusiness Process Operations
Business Process and Interface Monitoring
3.4 Alert Inbox
The alert inbox displays alert information. The alert inbox lists all alerts for which there are unconfirmed alert groups.
Use
The alert inbox gives an overview of all open alert groups in Business Process Monitoring for your monitored business processes. Objects for which all data collections had a green rating, or for which all alert groups have been confirmed, are not displayed.
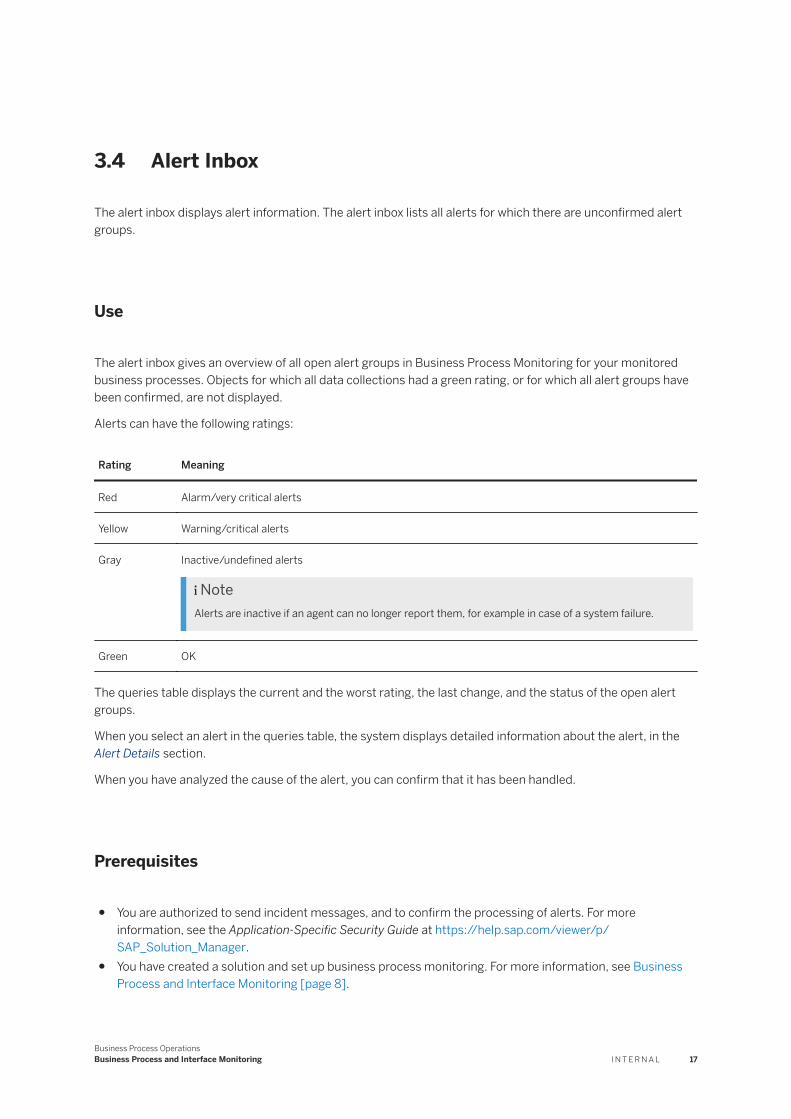
Alerts can have the following ratings:
Rating Meaning
Red Alarm/very critical alerts
Yellow Warning/critical alerts
Gray Inactive/undefined alerts
NoteAlerts are inactive if an agent can no longer report them, for example in case of a system failure.
Green OK
The queries table displays the current and the worst rating, the last change, and the status of the open alert groups.
When you select an alert in the queries table, the system displays detailed information about the alert, in the Alert Details section.
When you have analyzed the cause of the alert, you can confirm that it has been handled.
Prerequisites
● You are authorized to send incident messages, and to confirm the processing of alerts. For more information, see the Application-Specific Security Guide at https://help.sap.com/viewer/p/SAP_Solution_Manager.
● You have created a solution and set up business process monitoring. For more information, see Business Process and Interface Monitoring [page 8].
Business Process OperationsBusiness Process and Interface Monitoring I N T E R N A L 17
Features
The alert inbox can be started by selecting Alert Inbox - Business Process Operations on the SAP Solution Manager launchpad.
Alternatively, you can access the alert inbox from the Business Processes Monitoring application by choosing an alert icon or a link.
The alert inbox comprises the following areas:
● Scope selectionSelect (Scope Selection) to open the scope selection area, where you can select the solution context or alerting objects for which you want to display alerts. First select the solution branch, the solution role, and the solution site. Then select a business process or process step or an alerting object from the alerting library of Solution Documentation.You can save filter variants and you can specify a default variant.
● Solution contextThe current context is displayed on top of the inbox.
● Auto refreshIn this area, you choose the auto-refresh time interval. For example, you can choose how frequently the system refreshes the query tables. The query tables of the business process monitoring on MAI are refreshed according to this time interval.
● Active queriesIn this area, you manage your Alert Inbox and can adjust the display to your requirements. You select the business context.There are queries to display the alerts, one query per alert category. The standard alert categories are:○ Throughput & Backlog○ Job○ Interface○ Consistency○ Exceptions○ Performance
The number behind the query name indicates the number of alerts currently available in this query. You can define your own queries that can include any type of alerts (even system alerts).
● Where-used listThe where-used list allows you to understand the related business process and to navigate to the solution context in Solution Documentation.
● Alert details sectionGo to a query and select an alert to display detailed information about the alert in the alert details section. In the alert details section, you can analyze and process the alert.
● SettingsYou can edit the standard view selecting (Open Settings Dialog).
To start working with the alert inbox, proceed as follows:
1. Select (Scope Selection)to open the scope selection area.2. Select the solution branch.3. Select the solution role.4. Select the solution site.
18 I N T E R N A LBusiness Process Operations
Business Process and Interface Monitoring

5. Via forward navigation, select the business process context for which you want to display the monitoring data.
6. Press Select.
Alert Details Section
The alert details section has the following subsections:
● Alert Header: Alert name and alert time stamps● Alert Processing and Guided Procedures: Information about the alert processing and guided procedures
that have been executed to handle the error● Alert Description and Analysis: Description of the monitoring function● Alert Details:
○ Measured values and alert text○ For access to metric reporting, select .○ Access to detail info list (if available for the monitoring object)
The functions available in the alert details section depend on the business context, your authorization, and your settings. The following functions are available to all users:
Confirming Alerts
You can confirm the processing of an alert by selecting Confirm. Your confirmation is automatically put in the alert list. You can enter a comment.
Assigning a Processor
You can assign the alert to a processor who is responsible for the alert handling by choosing Assign. The processor is displayed, for example, in the Alert Processing and Guided Procedures section and in the action log.
Creating Incident Messages
You create incident messages to report a problem to support by selecting Create Incident. You can create incident messages in the following roles:
● As a user or customer● As a support employee, on behalf of a user
See for further information.
Creating Notifications
You can create and send notifications about alerts to recipients by selecting Create Notfication.
Executing Guided Procedures
You can search for guided procedures by selecting Search Guided Procedures that help you to resolve the alert. If a guided procedure has been executed for the alert, this is displayed in the Alert Processing and Guided Procedures subsection.
Business Process OperationsBusiness Process and Interface Monitoring I N T E R N A L 19

3.5 Configuration - Dashboard Builder
Use
The Dashboard Builder application is a cross-application dashboard framework. You can use it to create dashboards for various applications. You can use it to create more high-level dashboards for your alerting and monitoring information from Business Process Monitoring.
Features
There are the following options:
● You can access dashboards in display mode using (view mode)○ In the display mode, you can zoom in on individual tiles to display the legend for the graphic using
(Zoom in).● To create a new dashboard, proceed as follows:
1. Select (New Dashboard).2. Provide a dashboard name and assign a category.3. Assign a transport request or create the dashboard as a local object.
● You can edit dashboards by clicking (Edit Dashboard).● You can copy dashboards by clicking (Copy Dashboard).● You can delete dashboards by clicking (Delete Dashboard).
To add a custom tile to a dashboard, proceed as follows:
1. Select Custom Tile.2. On the following screen, you can specify the custom tile.3. To display information on Business Process Monitoring, assign Business Process Monitoring as data source
type.4. To select a data source name from the list of available dashboard key figures for Business Process
Monitoring, select the value help for Data Source Name. You can use the filter and search options to find the metrics to be displayed on the dashboard.
5. Select a metric from the catalog.
Note
For each of the metrics, you can display the available values by clicking , , or .
6. Press OK .The section Available Fields lists all available filters and grouping fields. The fields in the Rows section are assigned to the x-axis, the ones in the Columns section are assigned to the y-axis. The section Filters shows filter assignments.
20 I N T E R N A LBusiness Process Operations
Business Process and Interface Monitoring
7. Save your configuration.
You can access the configuration of an existing tile by selecting (Settings).
3.6 Object Adminstration - Business Process Monitoring
With this administration tool you can reload monitor definitions from a managed system, execute mass maintenance of monitoring objects, and download monitoring configurations.
Features
There are the following options:
● You can display the object lists for selected solution contexts.
NoteYou can only navigate to logical components, not to business processes.
○ You can personalize the view of tables by selecting (Personalize).○ On each tab, you can export data to a spreadsheet by selecting (Export to Spreadsheet).
NoteEach tab needs to be downloaded seperately.
NoteThe downloaded sheet only contains the content displayed in the Object List.
○ You can search object lists by selecting (Search (Ctrl+F)).○ You can edit the standard view of Current Context by selecting (Open Settings Dialog).
● To reload monitor definitions from a managed system, proceed as follows:1. In the navigation, choose Logical Components2. Choose the system(s) which you would like to execute the reload for3. Press Load Monitor Definitions
● To execute individual maintenance of a monitoring object, proceed as follows:1. Choose a logical component.2. Press in the column Actions.
Business Process OperationsBusiness Process and Interface Monitoring I N T E R N A L 21
3.7 SAP Operations Control Center
Use
To efficiently make use of the Business Process Operations tools provided in SAP Solution Manager, SAP recommends establishing an SAP Operations Control Center. SAP Operations Control Center is a central, on-site IT support entity that proactively monitors the productive SAP environment (non-SAP applications can be also included).
SAP Operations Control Center ensures highly automated and proactive operation, resulting in reduced operation costs, improved IT services, and increased business satisfaction. SAP Operations Control Center is closely integrated with the SAP Innovation Control Center and the SAP Mission Control Center.
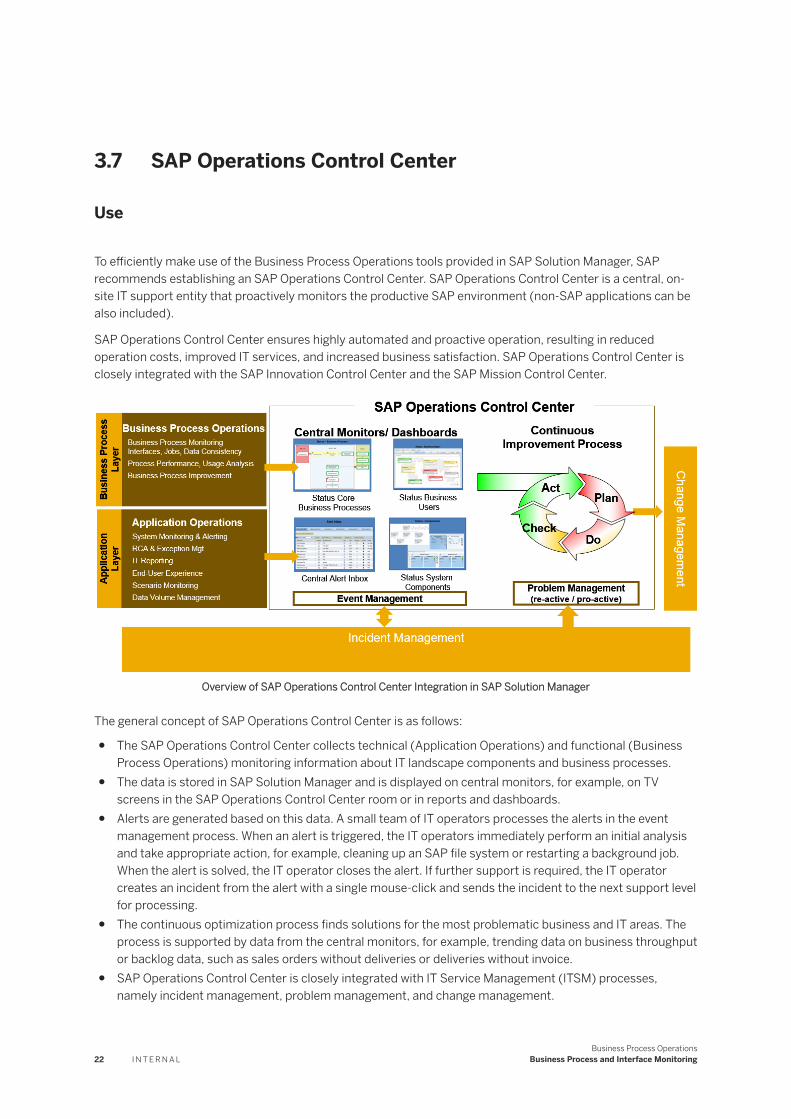
Overview of SAP Operations Control Center Integration in SAP Solution Manager
The general concept of SAP Operations Control Center is as follows:
● The SAP Operations Control Center collects technical (Application Operations) and functional (Business Process Operations) monitoring information about IT landscape components and business processes.
● The data is stored in SAP Solution Manager and is displayed on central monitors, for example, on TV screens in the SAP Operations Control Center room or in reports and dashboards.
● Alerts are generated based on this data. A small team of IT operators processes the alerts in the event management process. When an alert is triggered, the IT operators immediately perform an initial analysis and take appropriate action, for example, cleaning up an SAP file system or restarting a background job. When the alert is solved, the IT operator closes the alert. If further support is required, the IT operator creates an incident from the alert with a single mouse-click and sends the incident to the next support level for processing.
● The continuous optimization process finds solutions for the most problematic business and IT areas. The process is supported by data from the central monitors, for example, trending data on business throughput or backlog data, such as sales orders without deliveries or deliveries without invoice.
● SAP Operations Control Center is closely integrated with IT Service Management (ITSM) processes, namely incident management, problem management, and change management.
22 I N T E R N A LBusiness Process Operations
Business Process and Interface Monitoring
Implementation Considerations
SAP Operations Control Center is not available by default. The implementation of an SAP Operations Control Center is part of a “Run SAP like a Factory” implementation and includes the following activities:
● Installing SAP Solution Manager 7.2● Setting up and configure the central technical and functional monitors and dashboards● Defining the IT support processes for Event Management and Continuous Improvement and integrating
them into the existing IT Support processes (especially with Incident Management).
SAP has documented the implementation and setup activities in detail in SAP Solution Manager, under Roadmaps (transaction RMMAIN). The relevant roadmaps are available as part of SAP software component ST-ICO. SAP Support Pack 35 for ST-ICO provides roadmap updates.
There are the following relevant roadmaps:
● ESRV RSLaF Appl. Operations describes the setup activities for technical monitors.● ESRV RSLaF Business Proc. Oper. describes the setup activities for functional monitors.● ESRV RSLaF Operations Control Center describes the setup activities for Event Management and
Continuous Improvement.
Features
SAP Operations Control Center performs the following functions:
● Immediately processes alerts from the productive SAP environment● Supports finding the root cause of problems● Provides transparency about the operational state of the SAP environment by using automated reports
and dashboards● Constantly identifies and improves problem areas for business and IT services
Multilingual Support
SAP Operations Control Center can operate in multiple languages.
More Information
● For more information about SAP Innovation Control Center, see the SAP Library for Innovation Control Center on SAP Help Portal at http://help.sap.com/icc Application Help <release><language> .
● For more information about reporting and optimizing your SAP Operations Control Center activities, see SAP Operations Control Center Alert Reporting [page 24].
Business Process OperationsBusiness Process and Interface Monitoring I N T E R N A L 23
3.7.1 SAP Operations Control Center Alert Reporting
As an SAP Operations Control Center manager, you use SAP Operations Control Center Alert Reporting to report the control center workload and performance.
Using SAP Operations Control Center Alert Reporting, you check KPIs per managed object to optimize the alert resolution process for both Business Process Operations, and Application Operations.
SAP Operations Control Center Alert Reporting is available for alerts from Business Process Monitoring and technical monitoring:
● Business Process Operations alert reporting contains information about alerts assigned to a business process in Solution Documentation. This can include technical alerts from shared use cases, for example interface monitoring or job monitoring.
● Application Operations alert reporting contains information about the alerts related to Application Operations.
NoteThe key figures of SAP Operations Control Center Alert Reporting are only relevant if you have an event management process and if alerting for Applications Operations and Business Process Operations is configured and operational. The key figures regarding incidents are only relevant if you use SAP Solution Manager Service Desk for Incident Management. The number of incidents or the ratio of confirmed alerts without incidents, for example, only make sense if the operations control center staff confirms alerts promptly (otherwise the duration until alert confirmation is exaggerated).
Using SAP Operations Control Center Alert Reporting
Starting SAP Operations Control Center Alert Reporting
You start the SAP Operations Control Center Alert Reporting application from the SAP Solution Manager launchpad.
Selecting the Scope
1. Select (Scope Selection)2. In the scope selection window, specify the alert information that you want to display:
○ For Business Process Operations alert reporting, choose the Solution Context tab and select the system role, the site, and the Solution Documentation structure element. You can select business processes or alerting objects from the alerting library.
○ For Application Operations alert reporting, choose the Technical Context tab and select the managed object type and the alert category.
Your selection is saved for your next use of the application.
Selecting the Data SourceTo select the data source, go to the Configuration pane. The following data sources are available:
● SAP Business Warehouse● Alert Store
24 I N T E R N A LBusiness Process Operations
Business Process and Interface Monitoring
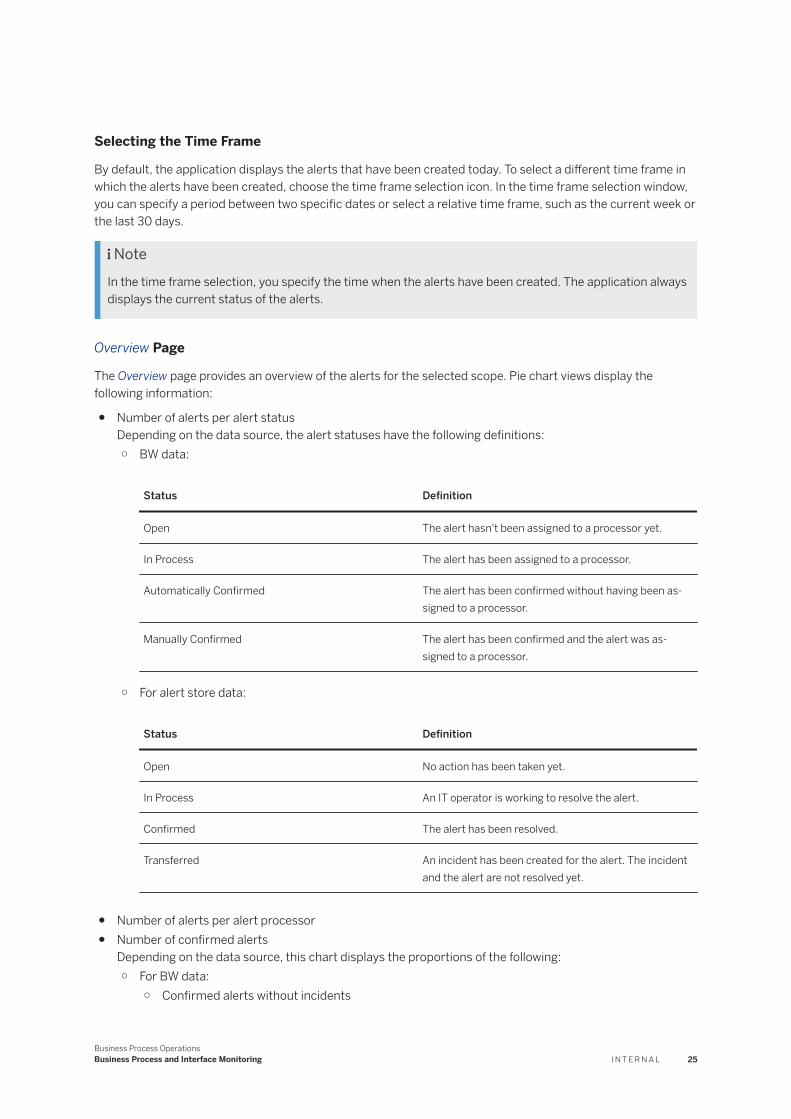
Selecting the Time Frame
By default, the application displays the alerts that have been created today. To select a different time frame in which the alerts have been created, choose the time frame selection icon. In the time frame selection window, you can specify a period between two specific dates or select a relative time frame, such as the current week or the last 30 days.
NoteIn the time frame selection, you specify the time when the alerts have been created. The application always displays the current status of the alerts.
Overview Page
The Overview page provides an overview of the alerts for the selected scope. Pie chart views display the following information:
● Number of alerts per alert statusDepending on the data source, the alert statuses have the following definitions:○ BW data:
Status Definition
Open The alert hasn't been assigned to a processor yet.
In Process The alert has been assigned to a processor.
Automatically Confirmed The alert has been confirmed without having been assigned to a processor.
Manually Confirmed The alert has been confirmed and the alert was assigned to a processor.
○ For alert store data:
Status Definition
Open No action has been taken yet.
In Process An IT operator is working to resolve the alert.
Confirmed The alert has been resolved.
Transferred An incident has been created for the alert. The incident and the alert are not resolved yet.
● Number of alerts per alert processor● Number of confirmed alerts
Depending on the data source, this chart displays the proportions of the following:○ For BW data:
○ Confirmed alerts without incidents
Business Process OperationsBusiness Process and Interface Monitoring I N T E R N A L 25
○ Confirmed alerts with incidents○ For alert store data:
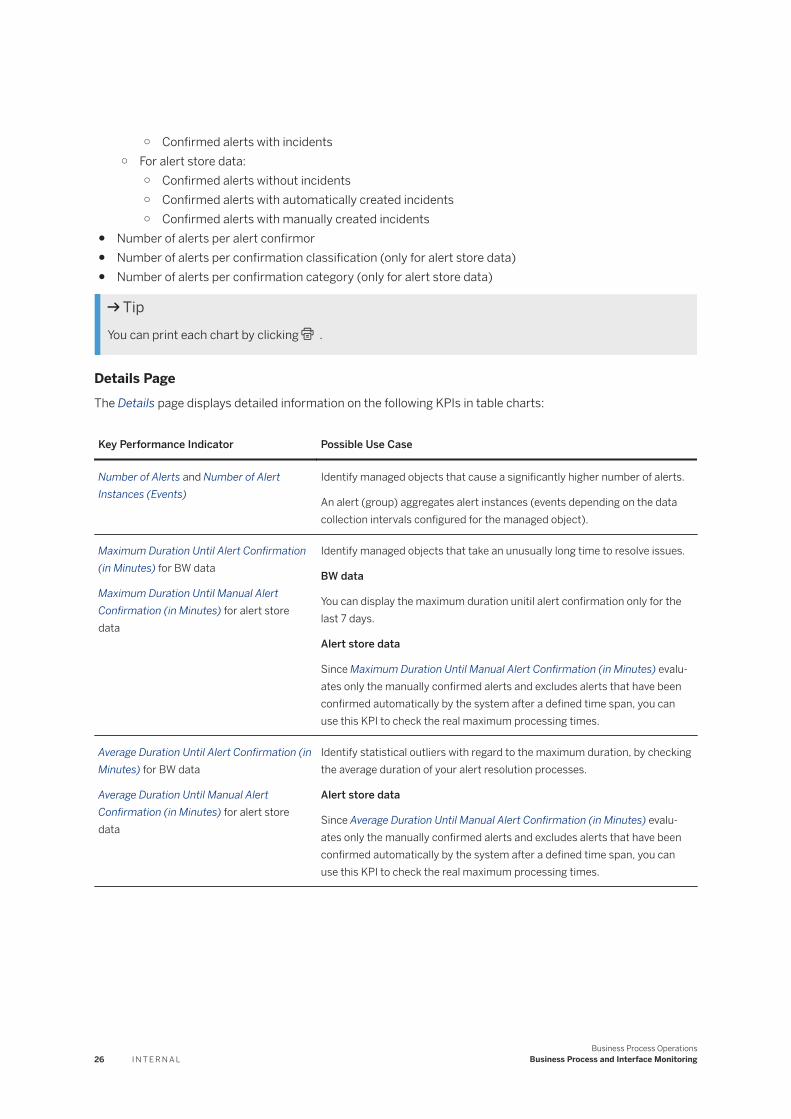
○ Confirmed alerts without incidents○ Confirmed alerts with automatically created incidents○ Confirmed alerts with manually created incidents
● Number of alerts per alert confirmor● Number of alerts per confirmation classification (only for alert store data)● Number of alerts per confirmation category (only for alert store data)
TipYou can print each chart by clicking .
Details PageThe Details page displays detailed information on the following KPIs in table charts:
Key Performance Indicator Possible Use Case
Number of Alerts and Number of Alert Instances (Events)
Identify managed objects that cause a significantly higher number of alerts.
An alert (group) aggregates alert instances (events depending on the data collection intervals configured for the managed object).
Maximum Duration Until Alert Confirmation (in Minutes) for BW data
Maximum Duration Until Manual Alert Confirmation (in Minutes) for alert store data
Identify managed objects that take an unusually long time to resolve issues.
BW data
You can display the maximum duration unitil alert confirmation only for the last 7 days.
Alert store data
Since Maximum Duration Until Manual Alert Confirmation (in Minutes) evaluates only the manually confirmed alerts and excludes alerts that have been confirmed automatically by the system after a defined time span, you can use this KPI to check the real maximum processing times.
Average Duration Until Alert Confirmation (in Minutes) for BW data
Average Duration Until Manual Alert Confirmation (in Minutes) for alert store data
Identify statistical outliers with regard to the maximum duration, by checking the average duration of your alert resolution processes.
Alert store data
Since Average Duration Until Manual Alert Confirmation (in Minutes) evaluates only the manually confirmed alerts and excludes alerts that have been confirmed automatically by the system after a defined time span, you can use this KPI to check the real maximum processing times.
26 I N T E R N A LBusiness Process Operations
Business Process and Interface Monitoring
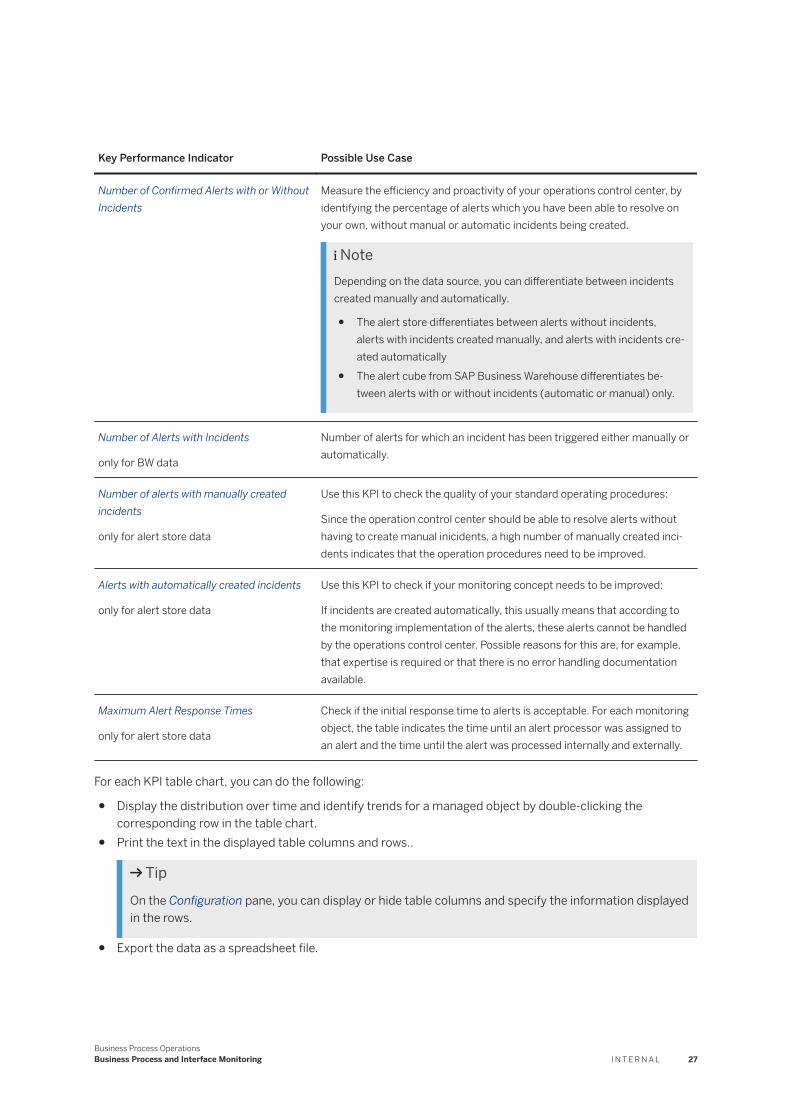
Key Performance Indicator Possible Use Case
Number of Confirmed Alerts with or Without Incidents
Measure the efficiency and proactivity of your operations control center, by identifying the percentage of alerts which you have been able to resolve on your own, without manual or automatic incidents being created.
NoteDepending on the data source, you can differentiate between incidents created manually and automatically.
● The alert store differentiates between alerts without incidents, alerts with incidents created manually, and alerts with incidents created automatically
● The alert cube from SAP Business Warehouse differentiates between alerts with or without incidents (automatic or manual) only.
Number of Alerts with Incidents
only for BW data
Number of alerts for which an incident has been triggered either manually or automatically.
Number of alerts with manually created incidents
only for alert store data
Use this KPI to check the quality of your standard operating procedures:
Since the operation control center should be able to resolve alerts without having to create manual inicidents, a high number of manually created incidents indicates that the operation procedures need to be improved.
Alerts with automatically created incidents
only for alert store data
Use this KPI to check if your monitoring concept needs to be improved:
If incidents are created automatically, this usually means that according to the monitoring implementation of the alerts, these alerts cannot be handled by the operations control center. Possible reasons for this are, for example, that expertise is required or that there is no error handling documentation available.
Maximum Alert Response Times
only for alert store data
Check if the initial response time to alerts is acceptable. For each monitoring object, the table indicates the time until an alert processor was assigned to an alert and the time until the alert was processed internally and externally.
For each KPI table chart, you can do the following:
● Display the distribution over time and identify trends for a managed object by double-clicking the corresponding row in the table chart.
● Print the text in the displayed table columns and rows..
TipOn the Configuration pane, you can display or hide table columns and specify the information displayed in the rows.
● Export the data as a spreadsheet file.
Business Process OperationsBusiness Process and Interface Monitoring I N T E R N A L 27

Configuring Table SettingsOn the Configuration pane, you can configure the KPI table charts displayed on the Details page or on custom pages with KPI table charts. You can specify settings for the information displayed on the KPI table charts, for example, you can display or hide table columns and specify the information displayed in the rows.
PersonalizationYou can personalize SAP Operations Control Center Alert Reporting by adding custom pages that display selected views. You drag and drop the required views on the screen of the custom page. You can rename, hide, copy, or delete the newly added pages. By default, a custom page is visible only to the user that has created the page. To share a custom page, save it as a public custom page.
28 I N T E R N A LBusiness Process Operations
Business Process and Interface Monitoring
4 Business Process Improvement
Use
Business process improvement enables you to maximize the value of your existing SAP solution. SAP provides a business process improvement methodology to analyze critical process milestones in a systematic 9-step approach. Business process improvement comprises the following tools:
● Business Process AnalyticsFor more information, see Business Process Analytics [page 31].
● Business Process Operations dashboardsFor more information, see Business Process Operations Dashboard [page 46].
● BPO reporting infrastructureFor more information, see BPO Reporting Infrastructure [page 72].
● Dependency diagramsFor more information, see Dependency Diagrams [page 63].
● Progress management boardsFor more information, see Progress Management Board [page 63].
Prerequisites
For information, see SAP Note 2324106 .
4.1 Business Process Improvement Launchpad Group
Use
This group is the central access point to apply and configure business process improvement functionalities.
Business Process OperationsBusiness Process Improvement I N T E R N A L 29
Features
The group consists of the following tiles that are displayed depending on authorization:
Tile Description
Applications
Business Process Analytics You can monitor and graphically analyze key performance indicators (KPIs) in a modernized analytical application.
You can execute ad hoc business process analyses.
For more information, see Business Process Analytics [page 44].
Business Process Analytics - Classic
You can monitor and graphically analyze key performance indicators (KPIs).
For more information, see Business Process Analytics - Classic [page 31].
Dependency Diagrams You can display diagrams to show the dependencies of key performance indicators (KPIs).
For more information, see Dependency Diagrams [page 63].
Progress Management Board You can track the organizational progress made for key performance indicators (KPIs) within business process improvement initiatives.
For more information, see Progress Management Board [page 63].
Business Process Operations - Dashboards
You can graphically display and monitor analytical key performance indicators (KPIs) in various panels.
For more information, see Business Process Operations Dashboards [page 46].
KPI Catalog - Business Process Analytics
You can browse through the list of available key performance indicators (KPIs).
Configuration and Settings
Configuration - Virtual Characteristics
You can define virtual characteristics to map them to real characteristics.
For more information, see Defining Virtual Characteristics [page 42].
Business Process Improvement - Administration
You can apply various administrator tools such as BP Analytics BW, Data Source Manager, or Master Data.
For more information, see BPO Reporting Infrastructure [page 72].
Configuration - Dependency Diagrams
You can create diagrams to display the dependencies of key performance indicators (KPIs).
For more information, see Dependency Diagrams [page 63].
30 I N T E R N A LBusiness Process Operations
Business Process Improvement
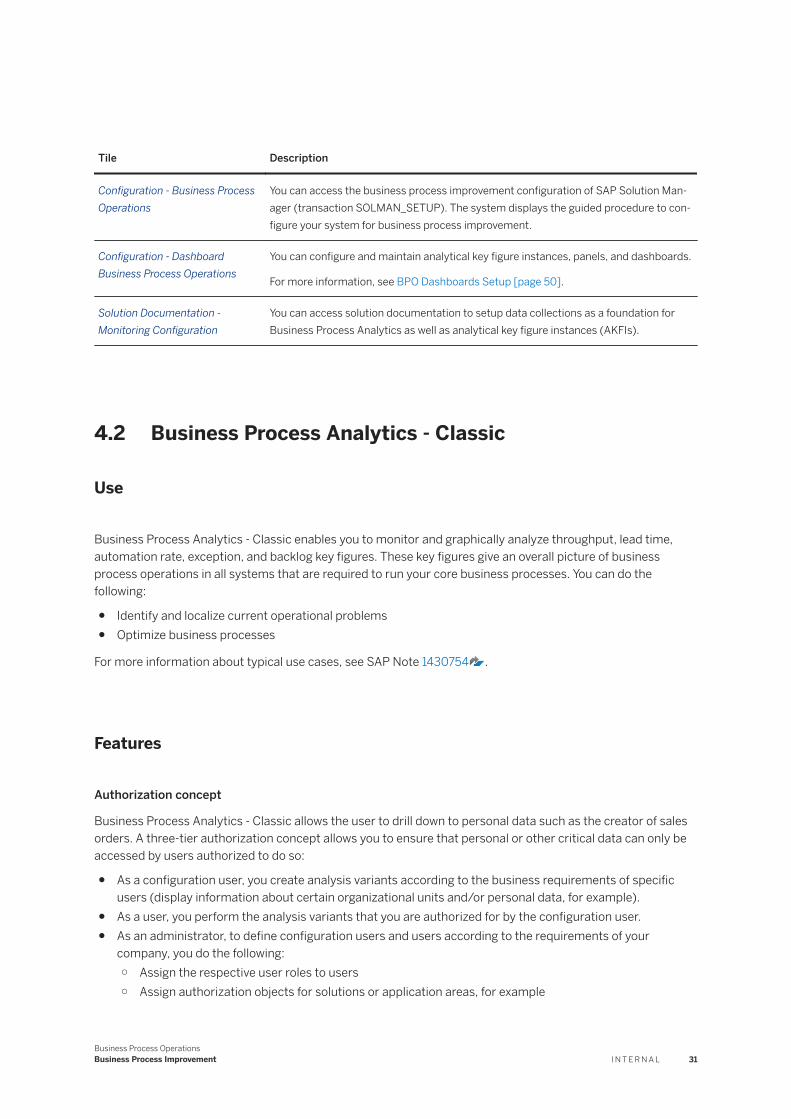
Tile Description
Configuration - Business Process Operations
You can access the business process improvement configuration of SAP Solution Manager (transaction SOLMAN_SETUP). The system displays the guided procedure to configure your system for business process improvement.
Configuration - Dashboard Business Process Operations
You can configure and maintain analytical key figure instances, panels, and dashboards.
For more information, see BPO Dashboards Setup [page 50].
Solution Documentation - Monitoring Configuration
You can access solution documentation to setup data collections as a foundation for Business Process Analytics as well as analytical key figure instances (AKFIs).
4.2 Business Process Analytics - Classic
Use
Business Process Analytics - Classic enables you to monitor and graphically analyze throughput, lead time, automation rate, exception, and backlog key figures. These key figures give an overall picture of business process operations in all systems that are required to run your core business processes. You can do the following:
● Identify and localize current operational problems● Optimize business processes
For more information about typical use cases, see SAP Note 1430754 .
Features
Authorization concept
Business Process Analytics - Classic allows the user to drill down to personal data such as the creator of sales orders. A three-tier authorization concept allows you to ensure that personal or other critical data can only be accessed by users authorized to do so:
● As a configuration user, you create analysis variants according to the business requirements of specific users (display information about certain organizational units and/or personal data, for example).
● As a user, you perform the analysis variants that you are authorized for by the configuration user.● As an administrator, to define configuration users and users according to the requirements of your
company, you do the following:○ Assign the respective user roles to users○ Assign authorization objects for solutions or application areas, for example
Business Process OperationsBusiness Process Improvement I N T E R N A L 31
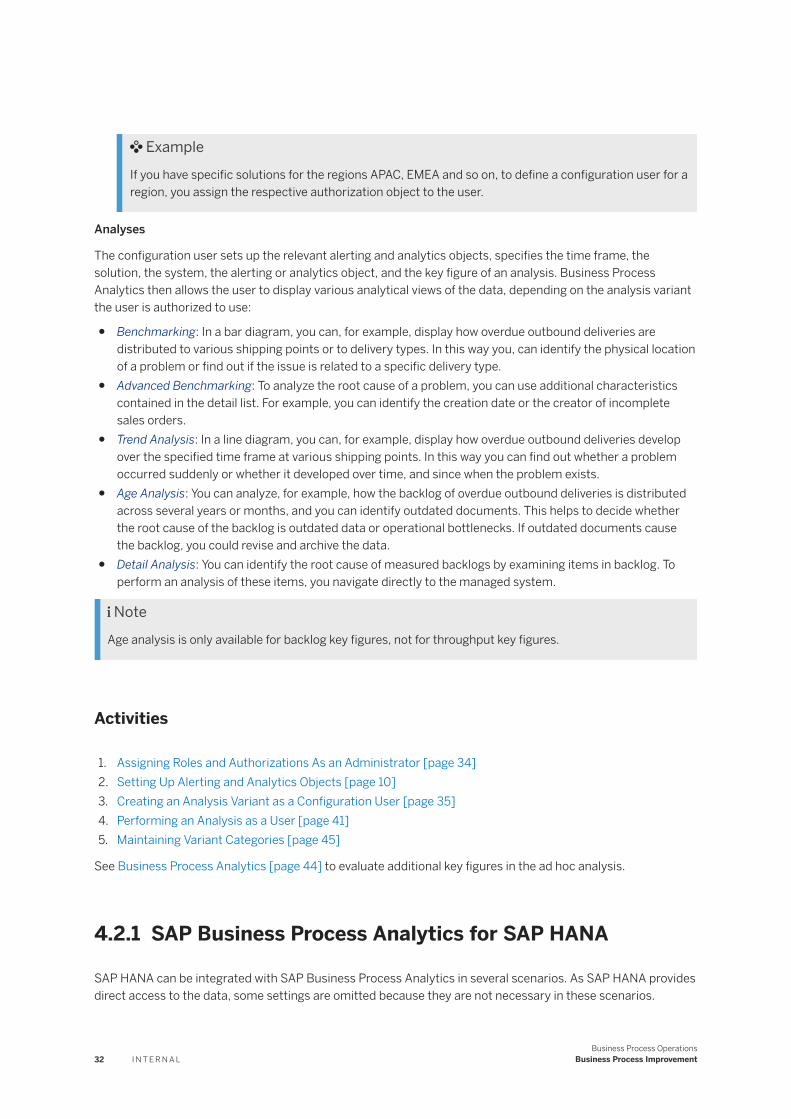
ExampleIf you have specific solutions for the regions APAC, EMEA and so on, to define a configuration user for a region, you assign the respective authorization object to the user.
Analyses
The configuration user sets up the relevant alerting and analytics objects, specifies the time frame, the solution, the system, the alerting or analytics object, and the key figure of an analysis. Business Process Analytics then allows the user to display various analytical views of the data, depending on the analysis variant the user is authorized to use:
● Benchmarking: In a bar diagram, you can, for example, display how overdue outbound deliveries are distributed to various shipping points or to delivery types. In this way you, can identify the physical location of a problem or find out if the issue is related to a specific delivery type.
● Advanced Benchmarking: To analyze the root cause of a problem, you can use additional characteristics contained in the detail list. For example, you can identify the creation date or the creator of incomplete sales orders.
● Trend Analysis: In a line diagram, you can, for example, display how overdue outbound deliveries develop over the specified time frame at various shipping points. In this way you can find out whether a problem occurred suddenly or whether it developed over time, and since when the problem exists.
● Age Analysis: You can analyze, for example, how the backlog of overdue outbound deliveries is distributed across several years or months, and you can identify outdated documents. This helps to decide whether the root cause of the backlog is outdated data or operational bottlenecks. If outdated documents cause the backlog, you could revise and archive the data.
● Detail Analysis: You can identify the root cause of measured backlogs by examining items in backlog. To perform an analysis of these items, you navigate directly to the managed system.
NoteAge analysis is only available for backlog key figures, not for throughput key figures.
Activities
1. Assigning Roles and Authorizations As an Administrator [page 34]2. Setting Up Alerting and Analytics Objects [page 10]3. Creating an Analysis Variant as a Configuration User [page 35]4. Performing an Analysis as a User [page 41]5. Maintaining Variant Categories [page 45]
See Business Process Analytics [page 44] to evaluate additional key figures in the ad hoc analysis.
4.2.1 SAP Business Process Analytics for SAP HANA
SAP HANA can be integrated with SAP Business Process Analytics in several scenarios. As SAP HANA provides direct access to the data, some settings are omitted because they are not necessary in these scenarios.
32 I N T E R N A LBusiness Process Operations
Business Process Improvement
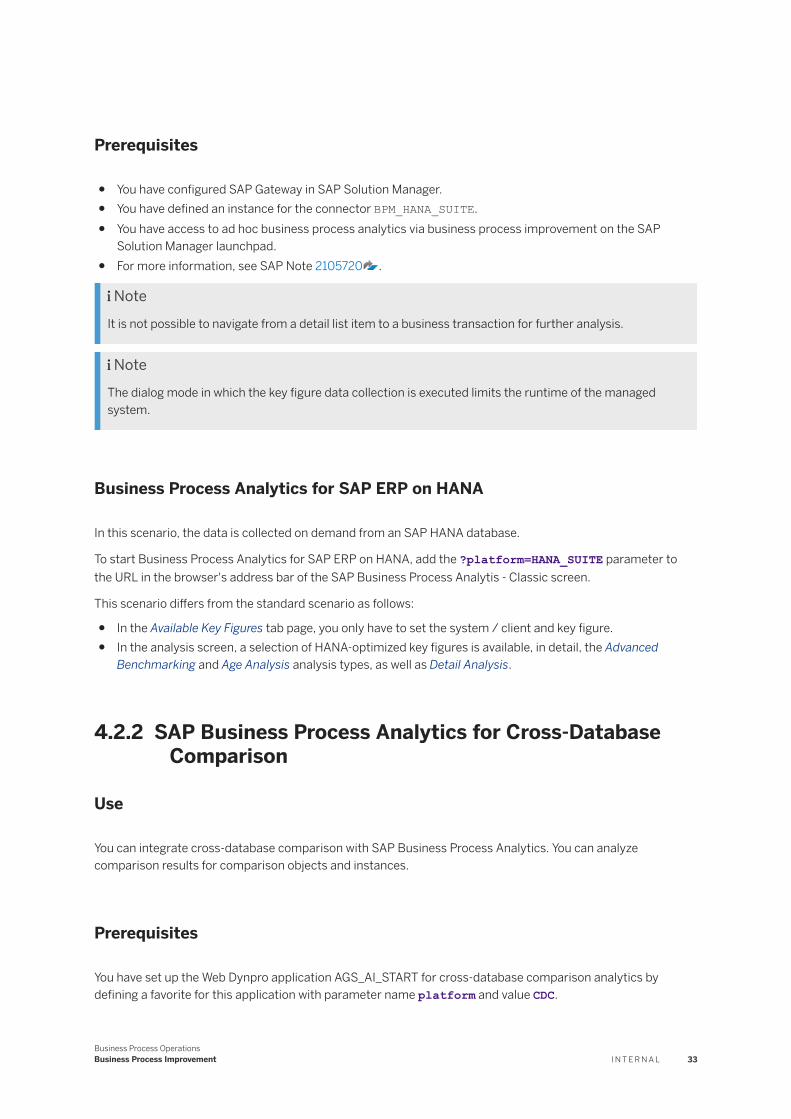
Prerequisites
● You have configured SAP Gateway in SAP Solution Manager.● You have defined an instance for the connector BPM_HANA_SUITE.● You have access to ad hoc business process analytics via business process improvement on the SAP
Solution Manager launchpad.● For more information, see SAP Note 2105720 .
NoteIt is not possible to navigate from a detail list item to a business transaction for further analysis.
NoteThe dialog mode in which the key figure data collection is executed limits the runtime of the managed system.
Business Process Analytics for SAP ERP on HANA
In this scenario, the data is collected on demand from an SAP HANA database.
To start Business Process Analytics for SAP ERP on HANA, add the ?platform=HANA_SUITE parameter to the URL in the browser's address bar of the SAP Business Process Analytis - Classic screen.
This scenario differs from the standard scenario as follows:
● In the Available Key Figures tab page, you only have to set the system / client and key figure.● In the analysis screen, a selection of HANA-optimized key figures is available, in detail, the Advanced
Benchmarking and Age Analysis analysis types, as well as Detail Analysis.
4.2.2 SAP Business Process Analytics for Cross-Database Comparison
Use
You can integrate cross-database comparison with SAP Business Process Analytics. You can analyze comparison results for comparison objects and instances.
Prerequisites
You have set up the Web Dynpro application AGS_AI_START for cross-database comparison analytics by defining a favorite for this application with parameter name platform and value CDC.
Business Process OperationsBusiness Process Improvement I N T E R N A L 33
Features
The analytics provide various drill-down and filter options for comparison results:
● You can drill down to, or set a filter value for, comparison object-specific context fields. For each object, only the available context fields can be selected.
● You can define which type of inconsistency you want to analyze, for example, “entry exists in system 1 only”, or “entry identical”. The inconsistency type can be set as a category, as a filter value, or it can be drilled down to.
● The comparison instance is available for category, drill-down and filter. If no filter is set on a comparison instance, the results from all comparison instances of the comparison object are aggregated.
Activities
1. Start the Web Dynpro application for cross-database comparison analytics.2. Select a timeframe.3. The system displays comparison runs containing results for this time frame.4. Select a comparison run and start the analysis.5. You can restrict the display by comparison instances and objects. Depending on the selection, you have
various filter and drill-down options, and you can choose the inconsistency type you want to analyze.
4.2.3 Assigning Roles and Authorizations As an Administrator
Use
As an administrator, you define configuration users and users according to the requirements of your company. In this way you ensure that personal or other critical data can only be accessed by users authorized to do so. You proceed as follows:
● You assign the respective user roles to users● You assign authorizations objects for, for example, solutions, application areas, or categories of analysis
variants.
ExampleIf you have specific solutions for the regions APAC, EMEA and so on, to define a configuration user for a region, you assign the respective authorization object to the user.
34 I N T E R N A LBusiness Process Operations
Business Process Improvement
Procedure
In transaction PFCG, do the following:
● To define user types, you assign the following roles:○ Configuration user○ User who performs an analysis variant
● To define the functions a user is authorized to use, specify the following authorization objects:○ Analytics variant○ Analytics category:○ Analytics Detail: Data a user is authorized to display in an analysis:
○ System and client○ Business Process Monitoring application area (ERP_SD, for example)○ Key figures○ Analytics functions (Benchmarking, Adavnced Benchmarking, for example).
For more information about defining roles and specifying authorization objects for Business Process Analytics see the Application-Specific Security Guide on at https://help.sap.com/viewer/p/SAP_Solution_Manager.
4.2.4 Creating an Analysis Variant As a Configuration User
Prerequisites
● You have identified the alerting or analytics objects and key figures that describe the process you want to monitor and analyze.For more information about available alerting or analytics objects and related key figures, see the SCN wiki page for Business Process Improvement at https://wiki.scn.sap.com/wiki/x/Y4DSFw Links and further Information KPI Catalog .
NoteIn the KPI catalog, you can filter out KPI Providers, e.g. Business Process Analytics.
● You have set up the alerting and analytics objects for your analysis. For more information, see: Setting Up Alerting and Analytics Objects [page 10] and SAP Note 1430754 .
● You have authorization to configure analysis variants. For more information, see Assigning Roles and Authorizations as an Administrator [page 34].
● To perform a detailed analysis and identify the root cause of operational problems, you can navigate to the display transaction for sampling single documents (a sales order, for example). You must have display authorization for the managed system.
Business Process OperationsBusiness Process Improvement I N T E R N A L 35
Context
To allow users to identify current problems or optimize a business process, you create an analysis variant according to the business requirements of the user.
Procedure
1. From the launchpad, choose Business Process Operations . Then choose Business Process Analytics.2. Define the time frame of your analysis.
○ Use the default time frame (one week) to identify current problems.○ Extend the time frame to perform long-term trend analyses to recognize historical patterns and
identify optimization possibilities.
RecommendationExtended time frames can affect the display of trend diagrams. The time scale of trend diagrams is divided into days as the biggest unit.
Restrict the time frame for trend analyses to not more than two months to avoid performance issues.
1. Under Time Frame Selection, define the time frame of your analysis.2. Choose Apply Time Frame.
The system displays all solutions for which data is available.3. Under Filters for Key Figures Selection, specify the key figure context of your analysis:
1. Under Solution, select one or multiple solutions.
NoteYou can combine data from several solutions. For example, you have created separate solutions for regions such as EMEA, APAC.
The alerting and analytics objects and systems assigned to the solution are displayed.2. Under Monitoring ID, select the alerting or analytics object.
The key figures you have set up are displayed.3. Select the system and client.4. Select the key figure you wish to analyze.
4. Choose the Start analysis for the selected Key Figure pushbutton.
You go to the Benchmarking and Analysis screen.5. In the Analysis Type field, select the type of view of the data, for example Benchmarking, Advanced
Benchmarking, Trend Analysis or Age Analysis.
For more information about the available features and their use, see Business Process Analytics [page 31].
The characteristics available for the key figure are displayed.6. Specify the data to be displayed. For more information, see Defining Filter Criteria [page 37].7. To generate a chart, choose Update.
36 I N T E R N A LBusiness Process Operations
Business Process Improvement
8. To save the filter criteria defined for the key figure, do the following:1. Choose Save Variant.
A dialog box appears.2. Enter a name and a description of the variant. To ensure that the analysis variant is correctly assigned
to the respective users, describe which data can be displayed with the analysis variant. If, for example, personal data can be displayed in an advanced benchmarking analysis variant, enter this information.
3. Optional: Assign a variant category.If you have not created a variant category yet, you can do so later and assign it to the analysis variant. For more information, see Maintaining Variant Categories [page 45].
4. Save your entries.9. Assign the analysis variant to a user. For more information, see Assigning Roles and Authorizations As an
Administrator [page 34].
Results
The users can display all analysis variants whose variant names and variant categories are assigned to their respective users. For more information about analysis options, see Performing an Analysis [page 41].
4.2.4.1 Defining Filter Criteria
Procedure
1. Expand the Filter screen area.2. Under Available Characteristics, select one or more characteristics which you want to use as a category
characteristic or as a drilldown characteristic, and choose Add to Filter.
Under Active Filter Characteristics, the values of the respective characteristics are displayed.3. Under Active Filter Characteristics, select the values which you want to use as filter criteria.
ExampleIf the characteristic is the shipping point, you can select 0002 - Shipping Point Paris and 0004 - Shipping Point Marseille and perform a trend analysis based on those two shipping points only.
CautionAs the configuration user, you have to select the filter criteria according to the business requirements of the end user. Ensure, for example, that personal data is accessible only to authorized users.
4. In the Category Dimension field, select the characteristic you want to use as the category characteristic.5. Optional: Depending on the setup, you can select a drilldown dimension in the Drilldown Dimension field.
Business Process OperationsBusiness Process Improvement I N T E R N A L 37
For more information, see Setting Up Alerting and Analytics Objects [page 10].
NoteDrilldown dimensions are not supported for the Age Analysis.
4.2.4.2 Setting Filters
Use
You can restrict the data displayed for specific users by setting filters for analysis variants. You can set multiple filters for an analysis variant.
Procedure
1. On the launchpad, choose Business Process Operations. Then choose Business Process Analytics.2. On the Key Figure Variants tab, choose Manage Variant Categories and Variants.3. On the Variant Maintenance tab, select a variant.4. In the Filter Characteristic screen area, choose the Add Filter Element button.5. Enter the filter characteristic which you want to filter. There are the following filter characteristic types:
○ Time characteristic, for example, Calendar day or Calendar week.○ System characteristics, for example, System ID or Monitoring ID.○ Analytical key figure specific characteristics, for example, sales organization. Which characteristics are
available depends on the selected key figure.6. Select a filter type. The following filter types are available:
○ Regular filter○ Relative filter○ Runtime user○ Filter for Top N characteristic values
7. Save your entries.
NoteYou can define more than one filter for a variant, but you can only use one time characteristics filter per variant.
Regular Filter
A regular filter filters certain values of a filter characteristic directly. Regular filters can be used with all filter characteristics.
Typical use case: You want to display data for a single sales organization only.
1. Select the filter characteristics and the Regular Filter filter type.
38 I N T E R N A LBusiness Process Operations
Business Process Improvement
2. To define a select option, enter the following data:○ Sign (mandatory): I (Include) or E (Exclude)
NoteFor time characteristics, only I (Include) is supported.
○ Option (mandatory): EQ (Equal), BT (Between), CP (Contains Pattern)
NoteFor time characteristics, only BT (Between) is supported.
○ Low (mandatory): Enter a characteristic value you want to exclude or include in the filter.○ If you have selected BT (Between): High (optional): If you want to exclude or include a range of
characteristic values, enter values for Low and High3. To define more select options, choose Add and repeat steps 1 to 3.4. Save your entries by choosing the Save Filter button.
Relative Filter
Using a relative filter, you can filter dynamically. Relative filters can only be used for time characteristics.
Typical use case: You want to display data for the last ten days.
1. Select the filter characteristics and the Relative Filter filter type.2. To define a select option, enter the following data:
○ Sign (mandatory): I (Include)
NoteEven though exclude can be selected, it is not supported.
○ Option (mandatory): BT (Between)○ Low (mandatory): Enter the lowest value of a relative range.○ High (mandatory): Enter the highest value of a relative range.
3. Save your entries by choosing the Save Filter button.
Filter for Top N Characteristic Values
With the filter for top n characteristic values, you can filter for only the highest values of the selected filter characteristic. The top n filter cannot be used with time characteristics.
1. Select the Filter for Top N Characteristic Values filter type.2. Define the select options.3. Save your entries by choosing the Save Filter button.
NoteThe filters are used during data collection in the order in which they were defined. When using the filter for top n characteristic values in combination with other filters, set the filter for top n characteristic values as the last filter. Otherwise, data collection runtime is longer and performance is reduced.
Filter Overview
1. After saving a filter, the filter appears in the Analytical Key Figure Details screen in the Filter Characteristic screen area.
Business Process OperationsBusiness Process Improvement I N T E R N A L 39
2. To display the select options for a filter in the Select Options screen area, select a filter.3. To delete a filter, select it and choose Remove Filter Element.4. To add a new filter, choose Add Filter Element.
NoteYou can maintain more than one filter for one variant, but you can use only one on time characteristics filter per variant.
5. To change the sequence of the filter elements, select a filter and choose the up or down button.
Best Practice for Filters
Set filters as specifically as possible. When you set a filter (for example, on solution and monitoring ID), you restrict the amount of data to be evaluated. This improves the performance, so the data is displayed faster.
NoteFiltering is especially important when using the detail list connector. The detail list connector is used implicit for analysis types Age Analysis and Advanced Benchmarking. The detail list connector only works if a filter is set to only a single detail list. Otherwise, an error occurs. A detail list is uniquely identified by system, client, solution, and monitoring ID. It is sufficient to set a filter on a monitoring ID.
4.2.5 Automatic Pattern Analysis
The automatic pattern analysis can be used to detect characteristic value combinations in the data source to be analyzed.
This allows a quick start or can help less experienced users in the analysis process.
You can define thresholds for characteristic value combinations.
NoteIncreasing this value might lead to performance improvement but reduces the number of possible pattern results.
You can define the maximum number of characteristics to be analyzed.
NoteReducing the maximum number of characteristics might lead to performance improvements but reduces the number of possible pattern results.
The results of the automatic pattern analysis are grouped by the number of combined chracteristics.
The results of the analysis are based on the selected data source (which is being defined by the selected analysis type) and the filter characteristics applied.
NoteIn SAP Solution Manager 7.2 SPS 8, the automatic pattern analysis only works for backlog key figures.
40 I N T E R N A LBusiness Process Operations
Business Process Improvement
You can expand, collapse, and export the result list.
4.2.5.1 Performing an Automatic Pattern Analysis
Procedure
1. On the SAP Solution Manager launchpad, select Business Process Analytics - Classic.2. On the Business Process Analytics - Analysis Section screen, press Apply Timeframe.3. On the Business Process Analytics - Benchmarking and Analysis screen, select an Analysis Type.4. On the Business Process Analytics - Benchmarking and Analysis screen, press the Automatic Pattern
Analysis pushbutton.5. In the new window Automatic Pattern Analysis, choose a threshold for characteristic value combinations
and a ranking for the maximum number of characteristics to be analyzed.6. Press Start Analysis.
4.2.6 Performing an Analysis
Prerequisites
● The authorization to perform a certain analysis variant has been assigned to your user. For more information, see Assigning Roles and Authorizations As an Administrator [page 34].
● To perform a detailed analysis and identify the root cause of operational problems, you can navigate to the display transaction for sampling single documents (a sales order, for example). You must have display authorization for the managed system.
Context
Performing an analysis enables you to identify current problems or optimize a business process. Depending on the setup, you have the following options:
● If backlog or throughput key figures were set up, the following diagrams are generated:○ Benchmarking/Advanced Benchmarking:
○ If the key figure is a backlog key figure, the most recent measurement in the selected time frame is used for benchmarking.
Business Process OperationsBusiness Process Improvement I N T E R N A L 41
○ If the key figure is a throughput key figure, the measurements in the selected time frame are aggregated.
○ Trend Analysis: You can see how the measured value for a key figure has developed in the selected time frame. There is no difference in behavior between backlog and throughput key figures.
● If backlog key figures were set up, the following functions are available:○ Age Analysis: The diagram allows you to determine in which year or month the documents in the
backlog were created.You can also see the distribution across the values of the primary dimension. If you have, for example, selected the shipping point as the primary dimension, the distribution across years and shipping points is displayed. You can decide whether the backlog indicates one of the following:○ An operational issue○ A potential for archiving data
○ Detail Analysis: A sample document can be displayed in the respective business transaction. You can check why the document is in the backlog.
Procedure
1. On the launchpad, choose Business Process Operations. Then choose Business Process Analytics - Classics.
2. On the Key Figure Variants tab, select the analysis variant.3. Choose Launch Selected Variants.
The chart is displayed.4. Optional: Specify the data to be displayed. For more information, see Defining Filter Criteria [page 37].5. Select a characteristic for the Category Dimension.6. To generate a chart according to the selected filter criteria, choose Update.7. Optional: If you analyze backlog key figures, you can sample the documents in backlog:
1. To log on to the managed system, choose the Detail Analysis pushbutton.2. From the list of documents in the backlog, select a document that you want to sample.
The document is displayed in the respective business transaction.3. Check why the document is in the backlog.
4.2.7 Defining Virtual Characteristics
Context
You can define virtual characteristics to map them to real characteristics.
For example, you can map customer-specific organizational units (region, line of business, etc.) to organizational units in the SAP systems. You can analyze key figures based on customer-specific organizational
42 I N T E R N A LBusiness Process Operations
Business Process Improvement

units, which do not have a one-to-one relationship to the organizational units in an SAP system. You can see a virtual characteristic as a container that groups real characteristics.
Procedure
1. On the SAP Solution Manager launchpad, choose Configuration - Virtual Characteristics.2. To define a virtual characteristic in guided procedure step 1 (Create Virtual Characteristics and Values),
proceed as follows:
1. Select Append Row.2. Create a new virtual characteristic.
NoteThe prefix ZVIRT_CHARSTIC_ will be filled automatically.
3. Enter the virtual characteristic descriptions in the required languages by clicking Add language.4. Define virtual characteristic values (and their descriptions) for each virtual characteristic.
3. To map the values of the virtual characteristics to real values in guided procedure step 2 (Map Virtual Characteristic Values to Real Values), proceed as follows:1. Select a virtual characteristic and a value, and select a semantic ID from the input help.2. Enter real values for the semantic ID.
Example
Virtual Characteristic Virtual Characteristic Values
ZVIRT_CHARSTIC_REGION Region FRANCE France
Virtual Characteristic Value Mapping
Semantic ID Values
ERP_BUKRS Sign: I, Option: EQ, Low: 3000
Sign: I, Option: EQ, Low: 6000
ERP_VKORG Sign: I, Option: CP, Low: AND*
Sign: I, Option: CP, Low: FR*
You can download a list of selected values by clicking (Download to Excel).You can upload CSV files by clicking (Upload .csv file).
4. To add the virtual characteristics to the analytical key figures in guided procedure step 3 (Add Virtual Characteristics to AKFs), proceed as follows:
Business Process OperationsBusiness Process Improvement I N T E R N A L 43
1. Select the analytical key figure and the virtual characteristic from the input help.2. Save your entries.
You can download a list of characteristics and values by clicking (Download to Excel).
4.3 Business Process Analytics
Use
You can monitor and graphically analyze key performance indicators (KPIs) in a modernized analytical application. The analysis runs on mobile devices as well as on personal computers.
The data will not persist in the BW.
All key figures in ST-A/PI plugin in the used managed system are available for direct execution and for analysis on the business process analysis screen.
You can organize and store key figure selections (including filters) in tiles and cockpits.
Prerequisites
● You have configured SAP Gateway in SAP Solution Manager.● You have defined an instance for the connector BPM_HANA_SUITE.● You have access to ad hoc business process analytics via business process improvement on the SAP
Solution Manager launchpad.● For more information, see SAP Note 2105720 .
NoteIt is not possible to navigate from a detail list item to a business transaction for further analysis.
NoteThe dialog mode in which the key figure data collection is executed limits the runtime of the managed system.
Procedure
To execute an ad hoc business process analysis, proceed as follows:
1. On the SAP Solution Manager launchpad, select Business Process Analytics.2. Select New Analysis.
44 I N T E R N A LBusiness Process Operations
Business Process Improvement
3. Select the Target System.4. Select Key Figure for an SAP Standard Key Figure for Business Process Analytics via the KPI catalog in the
cloud.5. Select Confirm Selection.
Optionally, you can include additional selection parameters.6. Select Execute.
You can now set filters to find appropriate key figures and choose between different types of analyses.
● Benchmark: You can compare the distribution of a measured value over a specific characteristic.● Age: You can compare the distribution of a measured value in reference to an aging field.● Detail List: You can see all document items which participate in the calculation of measured value.
You can switch between the available analytic functions as well as between document and monetary values. To save your analysis view with all selection options as a tile, select Save Session as Tile.
You can download selected KPIs by clicking (Download Selected KPIs).
See Business Process Analytics - Classic [page 31] to perform trend analysis on historical data.
4.4 Maintaining Variant Categories
Context
Defining variant categories allows you to ensure that personal or other critical data can only be accessed by users authorized to do so. To do so, you can assign analysis variants to variant categories and then allow certain users to display only analysis variants of certain variant categories.
For more information about authorizations, see Assigning Roles and Authorizations As an Administrator [page 34].
Procedure
1. On the launchpad, choose Business Process Analytics - Classic.2. On the Key Figure Variants tab, choose the Manage Variant Categories and Variants link.3. Enter a name and a description.4. Choose Create.5. To assign an analysis variant to a variant category, do the following:
1. On the Variant Assignment tab, select a variant category.2. Under Available Variants, select the analysis variant you want to assign to the variant category.3. Choose Add.
The variant is displayed under Assigned Variants.
Business Process OperationsBusiness Process Improvement I N T E R N A L 45
4.5 Business Process Operations Dashboards
Use
In the Business Process Operations dashboards (BPO dashboards), end users can graphically display and monitor analytical key figures, such as throughput or backlog figures, in various panels. This gives the end users an overview of the status of business processes to identify current operational problems.
The panels can contain various types of charts. Users can, for example, display a trend over the previous two weeks or display a currently measured value.
Mainly the following end users use BPO dashboards:
● The business process expert maintains an overview of the business processes for which the business process expert is responsible (for example, order processing or procurement).
● The key user of a business process monitors critical key figures of the subprocesses. For example, the warehouse manager of a subsidiary monitors different possible backlog situations for business documents of the warehouse (for example, deliveries, goods movements, or transport orders).
● The application support expert monitors technical and business key figures. To identify technical irregularities, the application support expert compares, for example, the number of incoming orders and the number of backlog deliveries in all locations.
The BPO dashboards administrator and the business process expert together identify the end user’s information requirements, set up the BPO dashboards, and assign them to groups of end users according to their areas of responsibility.
Activities
The various roles do the following:
1. The business process expert specifies the information requirements of various groups of end users.2. The dashboard administrator:
○ Identifies, with the business process expert, the analytical key figures to be displayed in the dashboards.
○ Defines the data sources for the analytical key figures. If the data sources are not yet available, makes the configurations and settings for the data sources, so they are available to be used for the BPO dashboards.For more information, see Define Data Sources [page 80].
○ Sets up the BPO dashboards including creating connector instances, analytical key figure instances (AKFI), panels, and dashboards. For more information, see BPO Dashboards Setup [page 50].
○ Provides authorizations to users (other dashboard configuration users and dashboard end users).For more information, see Roles and Authorizations [page 60].
○ Makes the dashboards known to the end users.3. The end users (including business process experts, key users of a business process, application support
experts) display the dashboards that are assigned to their user groups. For more information, see Working with BPO Dashboards as End User [page 61].
46 I N T E R N A LBusiness Process Operations
Business Process Improvement

For more information about the BPO dashboards, installation details, and examples, see SAP Note 1819313 : Additional Information for BPO Dashboards.
4.5.1 Technical Prerequisites
The following prerequisites must be met for the BPO dashboards on SAP Solution Manager 7.2 SP06 and higher:
● Implement Software Plug-ins and SAP Notes [page 47]● Activate Services [page 47]● Assign Authorizations to Users [page 48]
4.5.1.1 Implement Software Plug-Ins and SAP Notes
For BPO dashboards on SAP Solution Manager 7.1 SP05 and higher and on SAP Solution Manager 7.2 SP03 and higher, do the following:
1. Implement the collective SAP Note for the support package level of your SAP Solution Manager:○ SAP Note 1759233 : BPO Dashboards and SAP Business Process Analytics on SAP Solution
Manager 7.1 SP05 - 7.1 SP15○ SAP Note 2324106 : BPO Dashboards and SAP Business Process Analytics on SAP Solution
Manager 7.2 SP03 or higher2. Implement the latest versions of the following software components on the managed systems:
○ ST-A/PI○ ST-PI
3. Implement the collective SAP Notes for the software components ST-A/PI and ST-PI.They can be found in○ SAP Note 1759233 : BPO Dashboards and SAP Business Process Analytics on SAP Solution
Manager 7.1 SP05 - 7.1 SP15 and○ SAP Note 2324106 : BPO Dashboards and SAP Business Process Analytics on SAP Solution
Manager 7.2 SP03 or higher.
4.5.1.2 Activate Services
Context
The Business Process Operations dashboard is designed as a Web Dynpro component, therefore the corresponding HTTP services have to be activated.
Business Process OperationsBusiness Process Improvement I N T E R N A L 47
Procedure
1. In SAP Solution Manager, call the client-independent SICF transaction. Select the Service hierarchy type and choose Execute.
2. Navigate to /default_host/sap/bc/webdynpro/sap.
3. Activate all entries starting with ags_ri and ags_bpm, except ags_bpm_eval_time_schd and ags_bpm_jsm_migration_tst.
4. To activate an entry, in the context menu, select Activate Service.
4.5.1.3 Assign Authorizations to Users
BPO dashboards include an elaborate authorization concept to guarantee well-controlled access to business-sensitive data.
Therefore, the users (administrators and end users) of Business Process Operations dashboards need the correct authorizations assigned in their user master record.
For more information, see Roles and Authorizations [page 60].
4.5.1.4 Maintaining a Connector Instance
Use
The data displayed on the business process operations dashboards is read from data sources.
The logical link between the business process operations dashboards infrastructure and a data source is established by a connector. The connector is instantiated once before usage for a connector type and the associated data source, by creating a connector instance. Later, during the configuration of business process operations dashboards, analytical key figure instances are assigned to the connector instance to get their data from the associated data source. Thus, for every data source that business process operations dashboards use, there must be at least one active connector instance.
The following SAP Solution Manager applications can provide data for business process operations dashboards:
● Business process analytics uses the following data sources:○ SAP Business Explorer BW query○ Detail list
● Business Process Monitoring uses the following data sources:○ Monitoring and alerting infrastructure○ Detail list
NoteTo display business process monitoring information, business process operations dashboards have to be manually configured in the .
48 I N T E R N A LBusiness Process Operations
Business Process Improvement
For more information about data sources, see Define Data Sources [page 80].
Procedure
To define the connector instances in the connector directory:
● To navigate to the data source manager, on the launchpad, choose Business Process Improvement - Administration. The BPO Reporting Infrastructure Maintenance screen appears.
● On the Data Source Manager tab, you can add, change, activate, or deactivate a connector instance.○ To create or change a connector instance, choose the corresponding connector in the upper part of the
screen, and choose the connector instance in the table below.○ To add, change, activate or deactivate a connector instance, choose Change Mode.
The system creates the following connector instances:
● BPM_TwinCube_default for the Analytics TwinCubes connector (BPM_TwinCube)● Analytics_DL_default for the detail list connector (BPM_Detail_List)
To activate the connector instances for use by business process operations dashboards:
1. Choose Change Mode, and in the Applications field, enter the additional entry DASHBOARD.2. Choose (De)Activate and save your entries.
If the system does not automatically create the connector instance associated with the data source for the business process operations dashboards, create the connector instance manually, as follows:
1. Choose Add.2. For the new connector instance, enter the following information:
○ Name: technical name of the connector instance○ Description: description of the connector instances○ RFC Destination: RFC connection to SAP Solution Manager from which data is extracted for the
analytical key figures in business process operations dashboards. The only possible entry for this field is NONE, because a remote scenario (extracting data from a remote SAP Solution Manager) is not supported for the business process operations dashboards.
○ System: description of the SAP Solution Manager system from which the data is extracted via RFC destination, with this connector instance. Enter the local SAP Solution Manager system.
○ Applications: Enter the applications that use the connector instance:To use the connector instance for dashboards, choose DASHBOARD. This entry is required for business process operations dashboards.To use the connector instance for analytics, choose ANALYTICS. This entry is required if you also want to use this connector instance for the business process analytics data source (recommended).
○ Managed Systems (optional): To limit the retrieval of data on certain managed systems or clients, enter the SID and client of the managed system. If no system or client is entered, data from all systems is used.
3. Save your entries and activate the connector instance.4. Change to display mode.
NoteIf you have created or changed a connector instance, refresh the browser window so that the changes take effect, before you create analytical key figures.
Business Process OperationsBusiness Process Improvement I N T E R N A L 49
NoteMake sure that there is only one active connector instance per data source (connector). To avoid having more than one active connector instance, create only one connector instance per data source.
For more information about how to configure and edit connector instances, see SAP Note 1819313 .
4.5.2 BPO Dashboards Setup
Prerequisites
The technical prerequisites are given.
● You have identified which information you want to visualize in BPO dashboards.● You are authorized to access Business Processes Operations.
○ SAP standard roles: SAP_SMWORK_BASIC and SAP_SMWORK_BPM○ Main authorization object: D_SOL_VSBL – Solution Manager – Visibility of Solutions
For more information, see the Application-Specific Security Guide at https://help.sap.com/viewer/p/SAP_Solution_Manager.
● You are authorized to access Configuration - Dashboards Business Process Operations .
For more information about the administrator authorizations to access the Manage BPO Dashboards view, see Roles and Authorizations [page 60].
Context
The administrator is responsible for configuring and maintaining connector instances, analytical key figure instances (AKFIs), panels and dashboards.
Procedure
1. On the SAP Solution Manager launchpad, choose Configuration - Dashboards Business Process Operations.2. Perform the following activities:
○ Create Analytical Key Figure Instances [page 51]○ Set Filter [page 52]○ Set Rating [page 56]○ Set Up Panel [page 57]○ Set Up Dashboard [page 59]
50 I N T E R N A LBusiness Process Operations
Business Process Improvement
4.5.2.1 Creating Analytical Key Figure Instances
Use
An analytical key figure can be seen as a program for BPO dashboards to retrieve data from a specific data source type (connector) and a specific kind of data (key figure). Hence, an analytical key figure consists of a connector name and a key figure name in the following format: <technical name of connector>.<Technical name of key figure>
Example“BPM_ACube.KPLE000110”
● “BPM_ACube”: Connector for BW InfoCube of the Business Process Analytics application● “KPLE000110”: Technical name of SAP standard key figure Outbound Deliveries (overdue)
The typical use case for BPO dashboards is to display the results for business-oriented key figures. In addition, various rather technical key figures are possible, for example, for interface monitoring or system monitoring.
If you are already running SAP Business Process Monitoring or SAP Business Process Analytics on your SAP Solution Manager, and you want to display the results of their data collectors (meanwhile over 800 delivered by SAP), you can use, for example, the following data collector types:
● Backlog key figures: For example, number of overdue outbound deliveries● Throughput key figures: For example, number of outbound deliveries created.● Lead time key figures: For example, Lead Time: From Outbound Delivery creation -> Post Goods Issue
(prev.day) [in days]
These key figures can provide data with several collector-specific characteristics (for example, plant, shipping point, delivery type, sales organization) and time-related characteristics (for example, calendar day, calendar week).
To define which data is retrieved and how the data is displayed, you create an analytical key figure instance (AKFI). To do this, specify the following:
● What kind of data is displayed, for example number of overdue outbound deliveries: Assign the analytical key figure.
● From which data source the data is retrieved, for example a table or BW InfoCube located on a certain system and client: Assign the connector instance that is associated to the data source.
● How the data is displayed, for example, which parameters are on the x-axis and the y-axis: Select the characteristics for category and drilldown.
● What kind of data is considered, for example, for which sales organizations the overdue outbound deliveries are displayed: Restrict the displayed data by setting filters on characteristics values.
NoteHow an analytical key figure instance (AKFI) is displayed in the BPO dashboards also depends on the chart type you selected when you configured the panel.
NoteAn analytical key figure instance can be reused in several panels.
Business Process OperationsBusiness Process Improvement I N T E R N A L 51
Prerequisites
The required connector instances are created.
Procedure
To create an analytical key figure instance, proceed as follows:
1. On the SAP Solution Manager launchpad, choose Configuration - Dashboards Business Process Operations.The Setup BPO Dashboards Web Dynpro application screen appears.
2. Choose Setup Analytical Key Figure Instance.3. Choose Add.
The New Analytical Key Figure Instance screen is active.4. Enter a technical name.5. Enter a description. You use the description in the panel configuration.6. In the Analytical Key Figure Repository Name field, select the analytical key figure from the repository.
NoteIf the key figure exists in different data sources that are connected via different connector instances, there is more than one entry for the analytical key figure. To find the key figure associated with the correct data source, see the prefix of the technical name.
7. To select the connector instance, use the value help.8. Choose a characteristic for category, and optionally, a characteristic for drilldown.
Which options are available depends on the chart type of the panel.
You can set filters for the AKFI. For more information, see Setting a Filter [page 52].
You can set a rating for the AKFI. For more information, set Setting a Rating [page 56].
For more information about how to create analytical key figure instances, see SAP Note 1819313 : Additional Information for BPO Dashboards.
4.5.2.1.1 Setting Filters
Use
The data displayed in BPO dashboards can be restricted by filtering on analytical key figure instances. You can set multiple filters for an AKFI.
52 I N T E R N A LBusiness Process Operations
Business Process Improvement
Procedure
To set up a filter:
1. To open the Setup BPO Dashboards screen, on the SAP Solution Manager launchpad, choose Configuration - Dashboards Business Process Operations.
2. In Setup BPO Dashboards, on the Setup Analytical Key figure Instance tab, select an analytical key figure instance, and choose Change.
3. In the Filter Characteristic screen area, choose Add Filter Element.4. Enter the filter characteristic for which you want to set a filter.
There are the following filter characteristic types:○ Time characteristic, for example, Calendar day or Calendar week.○ System characteristics, for example, System ID or Monitoring ID.○ Analytical key figure specific characteristics, for example, sales organization. Which characteristics are
available depends on the selected key figure.5. Select a filter type. The following filter types are available:
○ Regular filter○ Relative filter○ Runtime filter○ Filter for Top N characteristic values
6. Save your entries.
NoteYou can maintain more than one filter for one AKFI, but you can use only one time characteristics filter per AKFI.
Regular Filter
A regular filter directly filters certain values of a filter characteristic. Regular filters can be used with all filter characteristics.
Typical use case: You want to display data for a single sales organization only.
1. To open the Setup BPO Dashboards screen, on the SAP Solution Manager launchpad, choose Configuration - Dashboards Business Process Operations.
2. In Setup BPO Dashboards, on the Setup Analytical Key figure Instance tab, select an analytical key figure instance, and choose Change.
3. Choose Add Filter Element.4. Select the filter characteristics and the Regular Filter filter type.5. To define a select option, enter the following data:
○ Sign (mandatory): I (Include) or E (Exclude)
NoteFor time characteristics, only I (Include) is supported.
○ Option (mandatory): EQ (Equal), BT (Between), CP (Contains Pattern)
NoteFor time characteristics, only BT (Between) is supported.
Business Process OperationsBusiness Process Improvement I N T E R N A L 53

○ Low (mandatory): Enter a characteristic value you want to exclude or include in the filter.○ If you have selected BT (Between): High (optional): If you want to exclude or include a range of
characteristic values, enter values for Low and High.6. Choose Add to add the select option to the filter.7. To define more select options, repeat steps 1 to 3.8. Save your entries.
Relative Filter
Using a relative filter, you can filter dynamically. Relative filters can only be used for time characteristics.
Typical use case: You want to display data from the last ten days.
1. To open the Setup BPO Dashboards screen, on the SAP Solution Manager launchpad, choose Configuration - Dashboards Business Process Operations.
2. In Setup BPO Dashboards, on the Setup Analytical Key figure Instance tab, select an analytical key figure instance, and choose Change.
3. Choose Add Filter Element.4. Select the filter characteristics and the Relative Filter filter type.5. To define a select option, enter the following data:
○ Sign (mandatory): I (Include)
NoteEven though exclude can be selected, it is not supported.
○ Option (mandatory): BT (Between)○ Low (mandatory): Enter the lowest value of a relative range.○ High (mandatory): Enter the highest value of a relative range.
6. Choose Add to add the select option to the filter.7. Save your entries.
Runtime Filter
With runtime filters, you can define category and drilldown characteristics. The system applies runtime filters during runtime when a panel calls a detail panel.
1. To open the Setup BPO Dashboards screen, on the SAP Solution Manager launchpad, choose Configuration - Dashboards Business Process Operations.
2. In Setup BPO Dashboards, on the Setup Analytical Key figure Instance tab, select an analytical key figure instance and choose Change.
3. Choose Add Filter Element.4. Select the filter characteristics and the Runtime Filter filter type.5. To define a select option, enter the following data:
○ Sign (mandatory): I (Include) or E (Exclude)
NoteFor time characteristics, only I (Include) is supported.
○ Option (mandatory): EQ (Equal), BT (Between)
54 I N T E R N A LBusiness Process Operations
Business Process Improvement
NoteFor time characteristics, only BT (Between) is supported.
○ Low (mandatory): Enter a characteristic value you want to exclude or include in the filter.○ High (optional): If you want to exclude or include a range of characteristic values, enter values for Low
and High.6. Choose Add to add the select option to the filter.7. To define more select options, repeat steps 1 to 5.8. Save your entries.
Filter for Top N Characteristic Values
With the filter for top n characteristic values, you can filter for only the highest values of the selected filter characteristic.
The top n filter cannot be used with time characteristics.
1. To open the Setup BPO Dashboards screen, on the SAP Solution Manager launchpad, choose Configuration - Dashboards Business Process Operations.
2. In Setup BPO Dashboards, on the Setup Analytical Key figure Instance tab, select an analytical key figure instance, and choose Change.
3. Choose Add Filter Element.4. Select the filter type Filter for Top N Characteristic Values.5. Choose how many values you want to display in the AKFI panel.6. Save your entries.
NoteWhen using the filter for top n characteristic values in combination with other filters, set the filter for top n characteristic values as the last filter. Otherwise, data collection runtime is longer and performance is reduced.
Filter Overview
1. To open the Setup BPO Dashboards screen, on the SAP Solution Manager launchpad, choose Configuration - Dashboards Business Process Operations.
2. After saving a filter, the filter appears in the Analytical Key Figure Details screen in the Filter Characteristic screen area.
3. To display the select options for a filter in the Select Options screen area, select a filter.4. To delete a filter, select it and choose Remove Filter Element.5. To add a new filter, choose Add Filter Element.
NoteYou can maintain more than one filter for one AKFI, but you can use only one time characteristics filter per AKFI.
6. The Maintain Thresholds pushbutton is only available to display analytical key figure instances that were created in a previous version of BPO dashboards, and were transported to SAP Solution Manager 7.1 SP 05 and higher during an update.
7. To change the sequence/order of the filter elements, select a filter and choose the up or down button.
Best Practice for Filters
Business Process OperationsBusiness Process Improvement I N T E R N A L 55

Set filters as specifically as possible. When you set a filter (for example, on solution and monitoring ID), you restrict the amount of data to be evaluated. This improves the performance when calling the dashboard, so the data is displayed faster.
NoteFiltering is especially important when using the detail list connector. The detail list connector only works if a filter is set to only a single detail list. Otherwise, an error occurs. A detail list is uniquely identified by system, client, solution, and monitoring ID. It is sufficient to set a filter on a monitoring ID.
Required Filters to Refer Directly to Key Figures from SAP Business Process Analytics in BPO dashboards
In BPO dashboards, to refer directly to key figures from SAP Business Process Analytics, set a filter on SM_MONID (monitoring ID).
Key figures in SAP Business Process Analytics always refer to a specific collector set up in a specified solution (from Business Process Monitoring Setup). In contrast, AKFIs in the BPO dashboards refer to single collector setups, and even across solutions, to the data of all monitors set up for a certain key figure in Business Process Monitoring Setup.
To avoid displaying cross-collector data in BPO dashboards, filter on monitoring ID.
To refer directly to key figures from SAP Business Process Analytics in BPO dashboards:
1. Navigate to the key figure you want to use in BPO dashboards.2. Choose Technical Information.3. From Technical Information, copy the monitoring ID.4. In BPO dashboards, create an AKFI for the key figure.5. Create the following filter on the AKFI:
○ Create a regular filter for the SM_MONID filter characteristic:1. Sign = I2. Option = EQ3. Low = the monitoring ID you copied in step 3 from Business Process Analytics4. Choose Add and save your entries.
4.5.2.1.2 Setting a Rating
Context
A rating indicates, by using traffic light symbols, if threshold values are exceeded.
You create a general rating for an analytical key figure instance. For the Trend Chart with Rating Line(s) chart type, the panel displays the general rating thresholds as lines in the chart.
To define thresholds for specific drilldown values, such as for a sales organization, create specific ratings. The specific rating is based on a combination of Drilldown Value and Category Value.
56 I N T E R N A LBusiness Process Operations
Business Process Improvement
You can define value-based rating for specific currencies. Value-based rating allows the end user to see monetary values instead of the default measurement unit.
Procedure
1. On the SAP Solution Manager launchpad, choose Configuration - Dashboards Business Process Operations.
The Setup BPO Dashboards screen appears.2. In Setup BPO Dashboards, on the Setup Analytical Key Figure Instance tab, select an analytical key figure
instance, and choose Change.3. On the Standard Rating tab, in the General Rating screen area, enter the threshold values.4. To create a specific rating:
○ In the Specific Rating screen area, choose the Add button.○ Choose a drilldown value and a category value, and enter the thresholds for the traffic lights.
5. On the Value-Based Rating tab, you can define ratings for monetary values for specific currencies.
NoteThis tab is only displayed if the key figure supports monetary values (for example, document value).
To create a general rating:
1. In the General Rating screen area, choose the Add button.2. Enter the currency and the threshold values.
For information on how to maintain exchange currency rates, see Maintaining Exchange Currency Rates [page 62].
6. To create a specific rating for monetary values:1. In the Specific Rating screen area, choose the Add button.2. Choose a drilldown value and a category value, and enter the thresholds for the traffic lights.
7. Save your entries.
4.5.2.2 Setting Up a Panel
Context
A panel is a graphical display of one or more analytical key figure instances.
The following chart types are available:
● Bar chart, stacked bar chart● Column chart, stacked column chart
Business Process OperationsBusiness Process Improvement I N T E R N A L 57
● Trend chart, trend chart with rating lines● Pie chart● Static rating table, dynamic rating table
A panel contains, for example, a title, a chart type, data labels, and one or more analytical key figure instances. One or more panels are assigned to a dashboard. A panel can be reused in several dashboards.
A panel can also contain a reference to another panel that is displayed as detail panel. A detail panel is a panel that displays values in more detail. You can reference a detail panel from a panel if both share the same category. To drill down the level of detail, a detail panel can also reference another panel. For example, you can display sales orders for sales organization, region, country, and site.
Procedure
1. To open the Setup BPO Dashboards screen, on the SAP Solution Manager launchpad, choose Configuration - Dashboards Business Process Operations.
2. In the Setup Panel tab, choose Add.3. To be able to reuse panels, enter a technical name and a meaningful description. You cannot change the
technical name after saving. The description is displayed as panel title.4. Select the chart type.5. Depending on the chart type, enter the descriptions for the category and value axes.6. To enable auto refresh, enter a time interval per day and a period.
The default is 00:00:00 to 00:00:00 with period 0, that is, auto refresh is not enabled.7. Define the displayed default measure unit (default measure unit or value).8. Specify whether the end user can switch between the display of the default measure unit and the
(monetary) value, and whether they can change the displayed currency.9. Add one or more instances of an analytical key figure.
To reference a detail panel, enter the technical name of the panel.
ExampleTo compare, in a line chart, the development of the deliveries created with the development of overdue deliveries through time, for example, aggregated by time attribute calendar day (CALDAY), do one of the following:
○ Add the analytical key figure instance, for example, Plant 1 – Outbound Deliveries (created) and Plant 1 – Outbound Deliveries (overdue).In the line diagram, two lines and a legend are displayed.
○ For both instances of the analytical key figures, in addition to the calendar day attribute, create the shipping point as drilldown characteristic. In addition, filter by shipping points A and B.In the line diagram, four lines are displayed that show the development of deliveries created and overdue deliveries for shipping points A and B.
10. Save your entries.
The panel appears in the Panel Overview.11. To simulate how the panel is displayed in a dashboard, choose Preview.
58 I N T E R N A LBusiness Process Operations
Business Process Improvement
4.5.2.3 Set Up Dashboard
Context
A BPO dashboard is a visual display of one or several analytical key figures that gives the end user an overview of a certain business area or a business process.
A dashboard can have one to six panels assigned, depending on the chosen layout. You can restrict the visibility of a dashboard by assigning a specific authorization group to the dashboard.
Procedure
1. To open the Setup BPO Dashboards screen, on the SAP Solution Manager launchpad, choose Configuration - Dashboards Business Process Operations.
2. In the Set Up Dashboard tab, choose Add.3. Enter a technical name. You cannot change the technical name after saving the dashboard.4. Enter a description.5. In the Dashboard Type field, specify the layout of the panels that are displayed in the dashboard. The
following values are possible:○ 1 row / 1 column○ 2 rows / 2 columns○ 2 rows / 3 columns○ 3 rows / 1 column○ 3 rows / 2 columns○ 3 rows / 3 columns
6. To restrict the display of the dashboard to specific users only, assign an authorization group to the dashboard.
For more information, see Roles and Authorizations [page 60].7. Add panels to the dashboard. The sequence of the panels in the list specifies the panel sequence in the
dashboard from left to right.8. Save your entries.
Business Process OperationsBusiness Process Improvement I N T E R N A L 59

4.5.3 Roles and Authorizations
Use
Within the BPO dashboards, there are the following dedicated user types:
● The administrator is responsible for the configuration and maintenance of connector instances, analytical key figure instances (AKFIs), panels and dashboards. Additionally, the administrator is authorized to display the dashboards in the assigned authorization groups.
● The end user can display the dashboards in the authorization groups that are assigned to the end user’s user profile. An end user is not authorized to access the administration screens.
More Information
For more information about the roles and authorizations for using the BPO dashboards, see the Application-Specific Security Guide at https://help.sap.com/viewer/p/SAP_Solution_Manager.
4.5.3.1 Using Authorization Groups to Restrict the Display of Dashboards
Use
You use authorization groups to restrict the access to dashboards for end users. You can assign authorization groups to any dashboard. That is, if the authorization for a specific authorization group is granted to a user, by choosing Business Process Operations - Dashboards on the SAP Solution Manager launchpad, the user can access all dashboards that have the authorization group assigned.
The end user can only display the data inside the dashboards that is not restricted by other authorizations, such as solution, application area, key figure, and system and client. In the BPO dashboards, you can use authorization groups to restrict, for example, to regions (EMEA, US, APJ) or SAP application modules (SD, MM, FI).
RecommendationWe recommend that you assign an authorization group to every dashboard that an administrator creates. Doing so avoids unauthorized access to business-sensitive data in the dashboards.
Per default, in the standard roles SAP_SM_DASHBOARDS_ADMIN and SAP_SM_DASHBOARDS_DISP, all users are assigned to the PUBLIC authorization group.
60 I N T E R N A LBusiness Process Operations
Business Process Improvement
Procedure
To create and assign authorization groups for dashboards, do the following:
1. In the Data Browser transaction (SE16), in the DSH_AUTHGROUPS table, create a new entry for field AUTHGROUP (for example AUTHGROUP = “FINANCE”).
2. To open the Setup BPO Dashboards screen, on the SAP Solution Manager launchpad, choose Configuration - Dashboards Business Process Operations.
3. In the Setup BPO Dashboards screen, on the Setup Dashboard tab page, assign the authorization group to the dashboard.
4. Assign the authorizations to end users and administrators as follows:○ For end users:
Authorization object SM_DSBINST (in SAP standard role SAP_SM_DASHBOARDS_DISP):○ For display authorization, in ACTVT, enter value 03 (display mode).○ For displaying dashboards with specific authorization groups, in AUTHGRPDSB, enter the values of
the authorizations groups.○ For administrators:
Authorization object SM_APPTYPE (in SAP standard role SAP_SM_DASHBOARDS_ADMIN):○ For general authorization, in ACTVT, enter 01, 02, 03, and 06 (01 = Create, 02 = Change, 03 =
Display, 06 = Delete).○ For administering dashboards with specific authorization groups, in AUTHGRPDSB, enter the values
of the authorizations groups.
4.5.4 Working with Business Process Operations Dashboards as End User
Prerequisites
● You are authorized for Business Process Operations.
NoteThe dashboard administrator can also provide you with the URL to display a dashboard without access to Business Process Operations.
● You are authorized to use the feature Business Process Operations Dashboards.● You are authorized to display the dashboard, which means the administrator has your user assigned to the
corresponding authorization group.
Business Process OperationsBusiness Process Improvement I N T E R N A L 61
Context
As an end user, you use a dashboard to monitor the status of specific business processes and to identify current business problems.
Procedure
1. On the SAP Solution Manager launchpad, select Business Process Operations - Dashboards.2. To display a dashboard, enter the dashboard name. You can use the search help to find a dashboard.
○ On panel level, you can use the Show Keys and Show Text buttons to switch between the technical name and the text description of the values, which are displayed as legend.
○ To drill down into panel details: If a detail panel is assigned, double-click a panel value to go to the detail panel.
○ To exchange information with your colleagues who use the same panel, select Comment.○ If your data source is SAP Business Process Analytics: On panel level, use the Analytics button to
navigate from the panel to the corresponding key figure variant in SAP Business Process Analytics.○ You can open a panel in maximized mode by clicking (Maximize).○ You can set the number of visible rows and columns by clicking Table Settings.○ You can change the size of the columns by clicking on the space between two columns in the header of
a table.
4.6 Maintaining Exchange Currency Rates
You can maintain exchange currency rates to define ratings for monetary values.
Procedure
1. On the SAP Solution Manager launchpad, choose Business Process Improvement - Administration.2. In the BPO Reporting Infrastructure Maintenance window, choose the Exchange Rates tab.3. Click on the Open Exchange Rate Setup button.4. In the Exchange Rate Provider Settings window, you can add, modify, and delete exchange rate providers.
The provider configurations administered by SAP can be used as templates.
62 I N T E R N A LBusiness Process Operations
Business Process Improvement
4.7 Dependency Diagrams
Use
You can display and create diagrams to show the dependencies of key performance indicators (KPIs). A diagram consists of tiles; a tile represents an analytical key figure instance (AKFI).
Features
Displaying Dependency Diagrams
To display dependency diagrams, choose Dependency Diagrams on the SAP Solution Manager launchpad.
You can edit the standard view selecting (Settings).
To refresh the page, select (Refresh).
Setting Up Dependency Diagrams
To set up dependency diagrams, choose Business Process Operations on the launchpad. Then choose Business Process Analytics BPA Links Dependency Diagrams Setup .
The Level in Hierarchy field is filled automatically, based on the relations you entered in the Is Child Of Tile column.
NoteThe input help of the AKFI Technical Name column shows only those AKFIs that do not have a category and drilldown value, so they are aggregated to a single key figure. Otherwise, you cannot use the AKFI.
You can also set up new AKFIs if necessary, or use existing ones.
4.8 Progress Management Board
Progress Management Board allows managers to keep track of the progress made for KPIs that are being improved in Business Process Improvement projects.
Progress Management Board for End Users
End users of progress management board are, for example, managers who want to follow the progress made for KPIs of Business Process Improvement projects. In Progress Management Board, you call up progress management boards to display the following information about KPIs that are being improved:
Business Process OperationsBusiness Process Improvement I N T E R N A L 63

● Overview of the the improvement processFor each KPI, a chart indicates the process phases that have been passed.
● Current values of the KPIs compared to the target values, the baseline values, and the values of the previous week and the previous month
● Further detailed information, such as the due date, the business priority, or contact details of persons responsible for the improvement of the KPIs
Progress Management Board for Configuration Users
Configuration users of progress management board are, for example, Business Process Improvement team members. You configure the following for Progress Management Board:
● Progress KPIsTo configure the KPIs that you want to monitor with the application, you select the data sources and specify details, such as the baseline and target values, units or currencies. For more information, see Configuring Progress KPIs [page 66].
● Progress management boardsYou can configure specific progress management boards for different user groups, for example, progress management boards that display KPIs of specific business areas or regions. For more information, see Configuring Progress Management Boards [page 68].
● Authorization areasYou can manage the access of users to the progress management boards and KPIs by creating and maintaining authorization areas. For more information, see Creating Customer-Defined Authorization Areas for Progress Management Board [page 64].
You can edit the standard view by selecting (Settings).
To refresh the page, select (Refresh).
4.8.1 Creating Customer-Defined Authorization Areas for Progress Management Board
In Progress Management Board, authorization areas are used to restrict the access to progress KPIs or progress management boards for unauthorized end users.
Context
In addition to using the standard authorization areas for business goals areas, you can create your own customer-defined authorization areas for various scenarios, for example, for very specific business areas or regions. In Progress Management Board, you can then assign the authorization areas to progress management boards or progress KPIs to restrict the boards or the KPIs to users authorized for the authorization areas.
64 I N T E R N A LBusiness Process Operations
Business Process Improvement
Procedure
1. On the SAP Solution Manager launchpad, choose the Business Process Improvement - Administration tile to start the BPO Reporting Infrastructure Maintenance.
2. To open the Authorization Maintenance, in the BPO Reporting Infrastructure Maintenance, choose the Authorization tab.
3. Select (Select Group Type) , and then select Authorization Areas.4. In the Customer defined Authorization Areas table, add an authorization area.5. Enter a name and a description for the authorization area. Save your settings.
Next Steps
When you have created customer-defined authorization areas, do the following::
● Assign the authorization area to the users who you want to authorize for the authorization area.To assign authorization areas to users, you maintain authorization areas as objects in the user roles: In the BPA Object Authorization, you add the authorization area as an BPA object type (BPA_OBJTYP) and you maintain the specific authorization areas as BPA objects (BPA_OBJECT).
NoteIf you use the standard authorization areas, you also have to assign them to the users.
● In Progress Management Board, assign the authorization area to progress KPIs and progress management boards.
4.8.2 Creating Data Sources for Progress KPIs
The data sources for the progress KPIs are analytical key figure instances.
You set up the analytical key figure instances in the business process operations dashboard setup. To access the business process operations dashboard setup, choose Configuration - Dashboards Business Process Operations on the SAP Solution Manager launchpad. For more information about setting up analytical key figure instances, see Creating Analytical Key Figure Instances [page 51].
NoteThe following connector types are relevant for analytical key figure instances used for Progress KPIs in Progress Management Boards:
● BPA_TwinCube: Connector for Business Process Analytics TwinCubes● BPM_Detail_List: Connector for Business Process Monitoring Detail List (also used by Business
Process analytics key figures)● BPM_HANA_SUITE: Connector for Adhoc Analytics● MAI: Connector for MAI (Business Process Monitoring)
Business Process OperationsBusiness Process Improvement I N T E R N A L 65
● CDC_Conn: Connector for Cross- Data Comparison● BPO_BW_Query: Connector for BW Queries
In addition to creating analytical key figure instances directly in the business process operations dashboard setup, you also have the following options for creating analzticals as data sources for progress KPIs:
● If you have created key figure variants for business process analytics, you can convert key figure variants directly into analytical key figure instances:1. In Business Process Analytics, on the Key Figure Variants tab, choose Manage Variant Categories and
Variants .2. Select Variant Maintenance.3. Select the key figure variant you want to convert into an analytical key figure instance.4. To convert the key figure variant including all its filter settings into an analytical key figure instance,
choose Convert to AKFI for BPO Dashboards.● You can use the BW query connector to create analytical key figure instances for BW queries:
1. In Business Process Improvement - Administration on the Data Source Manager tab page, create a connector instance for the BW query connector (BPO_BW_Query). For more information about setting up a connector instance, see Maintaining a Connector Instance [page 48].
2. Choose Maintain BW Query AKF to configure BW query analytical key figures.3. In the business process operations dashboards setup, create analytical key figure instances based on
the BW query analytical key figures.
4.8.3 Configuring Progress KPIs
You can configure the progress KPIs to be displayed on the progress management boards.
Prerequisites
● You have Progress Management Board configuration user authorizations.● You have created analytical key figure instances (AKFIs).
Progress Management Board uses AKFIs as data sources for the progress KPIs. You need to set up the AKFIs before you can configure progress KPIs. For more information, see Creating Data Sources for Progress KPIs [page 65].
● If you want to use customer-defined authorization areas, you have to create them before you configure the progress KPIs. For more information, see Creating Customer-Defined Authorization Areas for Progress Management Board [page 64].
TipConsider on which progress management boards you want to display the progress KPIs. You might, for example, want to use a naming convention for the KPIs displayed on specific boards.
66 I N T E R N A LBusiness Process Operations
Business Process Improvement
Procedure
1. On the SAP Solution Manager launchpad, choose Progress Management Board to start the application.2. Choose Maintain Progress KPIs.
3. Select (Create Progress KPI).
The Add Progress KPI wizard opens.4. In 1 General Information and Data Source, select a Data Source and an Authorization Area.
NoteThe Authorization Area restricts the access to the progress KPI: The progress KPI is visbile only to users who are authorized to view KPIs of the Authorization Area. You can also select Public to make the progress KPI visible to all users.
5. Choose 2 Unit and Baseline Definition to go to the next step. In the second step, specify the measuring units, the currency and the baseline value:a. Specify the units.b. Define a baseline value.
The definition of a baseline value is optional.
To define a baseline value, switch to On and enter the baseline values and other details, such as the date of the baseline value (Baseline Time).
6. In 3 Target Definition, define a range of tolerance for the difference to the value of the previous period and a target value.
The definition of a target value is optional.
To define target values, switch to On and enter the target values and the target type. If you use the target type Between, you can define a value range as target.
7. In 4 Progress Information, enter the progress information:a. Enter a due date. The due date is the date when the target value should be reached.b. Enter the business priorty.c. Enter the phases passed in the improvement process.
NoteEnd users of progress management boards that display the progress KPI can maintain the passed phases, the business priority, and the due date.
8. In 5 Responsible Persons, you can assign the persons responsible for the improvement of the KPI, for example, the IT person responsible and the business person responsible.
The contact information of the persons responsible is displayed on the fact sheet of the progress KPI.
NoteYou maintain the contact information of the persons responsible in the Progress Management Board application: Choose Maintain Responsible and enter the contact information of the persons reponsible.
9. Save your settings
Business Process OperationsBusiness Process Improvement I N T E R N A L 67
To make changes to an existing progress KPI, choose Maintain Progress KPIs. Choose the progress KPI and choose Edit.
The progress information (the passed phases, the business priority, and the due date) of a KPI, can be maintained by the end users of the progress management boards that display the KPI: To change the progress information, select the KPI and choose Change Progress Information.
4.8.4 Configuring Progress Management Boards
You can configure specific progress management boards for different users or user groups.
Prerequisites
● You have Progress Management Board configuration user authorizations.● You have configured Progress KPIs. For more information, see Configuring Progress KPIs [page 66].● If you want to use customer-defined authorization areas, you have to create them before you configure the
progress management boards. For more information, see Creating Customer-Defined Authorization Areas for Progress Management Board [page 64].
Context
When you create a progress management board, you assign an authorization area to the progress management board, so that only authorized users can see and use the board. After creating a progress mangement board, you assign the progress KPIs that you want to display on the board.
Creating Progress Management Boards
Procedure
1. On the SAP Solution Manager launchpad, choose Progress Management Board.2. Choose Maintain Progress Boards.
3. Choose (Create Progress Board).4. Enter a Title and select the Authorization Area that you want to assign to the progress management board.
5. Save your settings by clicking (Save Progress Board).
68 I N T E R N A LBusiness Process Operations
Business Process Improvement
Assigning Progress KPIs to Progress Management Boards
Procedure
1. On the SAP Solution Manager launchpad, choose Progress Management Board.2. Select the progress management board.3. Choose Assign Progress KPI.
A pop-up window displays a list of the available and unassigned progress KPIs and a list of the KPIs already assigned to the progress management board.
4. To assign progress KPIs, select the KPIs in the list of unassigned KPIs and move them to the list of assigned KPIs by clicking (Assign Progress KPI).
5. Save your settings by clicking (Save Progress Board).
Deleting Progress Management Boards
Procedure
1. Select the progress management board you want to delete.
2. Select (Delete Progress Board).3. Select OK.
Editing Progress Management Boards
Procedure
1. On the SAP Solution Manager launchpad, choose Progress Management Board.2. Choose Maintain Progress Boards.3. Select the progress management board you want to edit.
4. Select (Edit Progress Board).5. Edit the progress management board.
6. Select (Save Progress Board).
Business Process OperationsBusiness Process Improvement I N T E R N A L 69
Displaying Technical Names
Procedure
1. Click (Settings).2. Display or hide technical names.
4.8.5 Using Progress Management Boards
In the Progress Management Board application, you call up progress management boards to display information about the KPIs of Business Process Improvement projects.
Prerequisites
● You have progress management board end user authorizations.
Starting Progress Management Board
1. On the SAP Solution Manager launchpad, choose Progress Management Board.2. Select a progress management board.
Viewing and Comparing Progress KPIs
Progress Management Board has the following tab pages:
● Overview ● Details
Overview Tab PageYou use the Overview tab page to get an overview of the current status of the KPIs in Business Process Improvement process. The Overview table displays the following information for each KPI:
● Passed PhasesThe phases in the improvement process that the KPI has completedThe phase bar on top of the Progress Management Board screen displays all possible phases of the improvement process
● Due DateThe date when the improvement of the KPI has to be reached
70 I N T E R N A LBusiness Process Operations
Business Process Improvement
● Current Value & Target:A bar chart shows the relation of the current value to the target value with a black vertical line indicating the target value. The number above the bullet bar is the current value and the number under the bar is the target valueThe target value can also be a value range. In this case, the value range is indicated by two green vertical lines on the bar.
● Business Priority
Details Tab PageYou use the Details tab page to compare the current value of the KPIs with the baseline values, the values of the previous month or week, and the target values.
Filtering Progress KPIsTo display only specific progress KPIs, choose Show Filter Bar and set filters.
You can save filter variants.
Changing the Measuring Unit or CurrencyTo change the displayed measuring unit or currency for selected KPIs, select the KPIs, choose Switch Unit, and select the unit or change the reference currency.
Changing the Comparison Period for KPI Values
To change the comparison period from previous week to previous month or vice versa, select (Settings). In the Table Settings, change the comparions period.
Displaying Technical Names
To display or hide the technical names of progress KPIs, click (Settings) .
KPI Fact Sheets
You can view additional information about a progess KPI on the KPI fact sheet. To display a fact sheet, click on a progess KPI displayed on the Overview or the Details tab page.
The fact sheet displays all the information about the KPI on one screen. This includes additional information, such as contact information of the persons responsible for the improvement of the KPI.
Changing the Progress Information for KPIs
To change the progress information of progress KPIs, select the KPIs and choose Change Progress Information.
You can change the following information for one or more progress KPIs:
● Due date● Business priority● Phase
Business Process OperationsBusiness Process Improvement I N T E R N A L 71
You can refresh the details immediately by clicking (Refresh).
4.9 BPO Reporting Infrastructure
Use
The business process operations reporting infrastructure is a software layer underlying business process analytics and business process operations dashboards. It is a collection of standardized functions to give business process analytics, business process operations dashboards, and other tools and applications, an easy-to-use interface to a set of data providers (business process improvement key figures).
Activities in the BPO Reporting Infrastructure Maintenance
To maintain the business process operations reporting infrastructure in the BPO Reporting Infrastructure Maintenance, choose Business Process Improvement - Administration on the SAP Solution Manager launchpad. You can do the following:
● BP Analytics BW tabYou can use TwinCubes in the business process operations reporting infrastructure. For more information, see TwinCubes in Business Process Analytics [page 73].
● Data Source Manager tabYou can add new connector instances, and change, activate, or deactivate existing ones. For more information, see Maintaining a Connector Instance [page 48].
● Master Data tabYou can control the loading of master data. For more information, see Loading Master Data. [page 76]
● Geo Data tabYou can configure the geospatial data functionality for key figures that support location information.
● Authorization tabYou can use this tab to access the Authorization Maintenance. Here, you configure key figure groups, visibility groups, authorization groups, and authorization areas.
● Exchange Rates tabYou can configure settings for exchange rate providers.For information on how to maintain exchange currency rates, see Maintaining Exchange Currency Rates [page 62].
● Usage Analysis tabYou can analyze how key figures are used by end users.
● Log for Data Collection and Cube Upload tabYou can analyze the root cause of problems in business process analytics and dashboards. For more information, see Log for Data Collection and Cube Upload [page 78].
72 I N T E R N A LBusiness Process Operations
Business Process Improvement
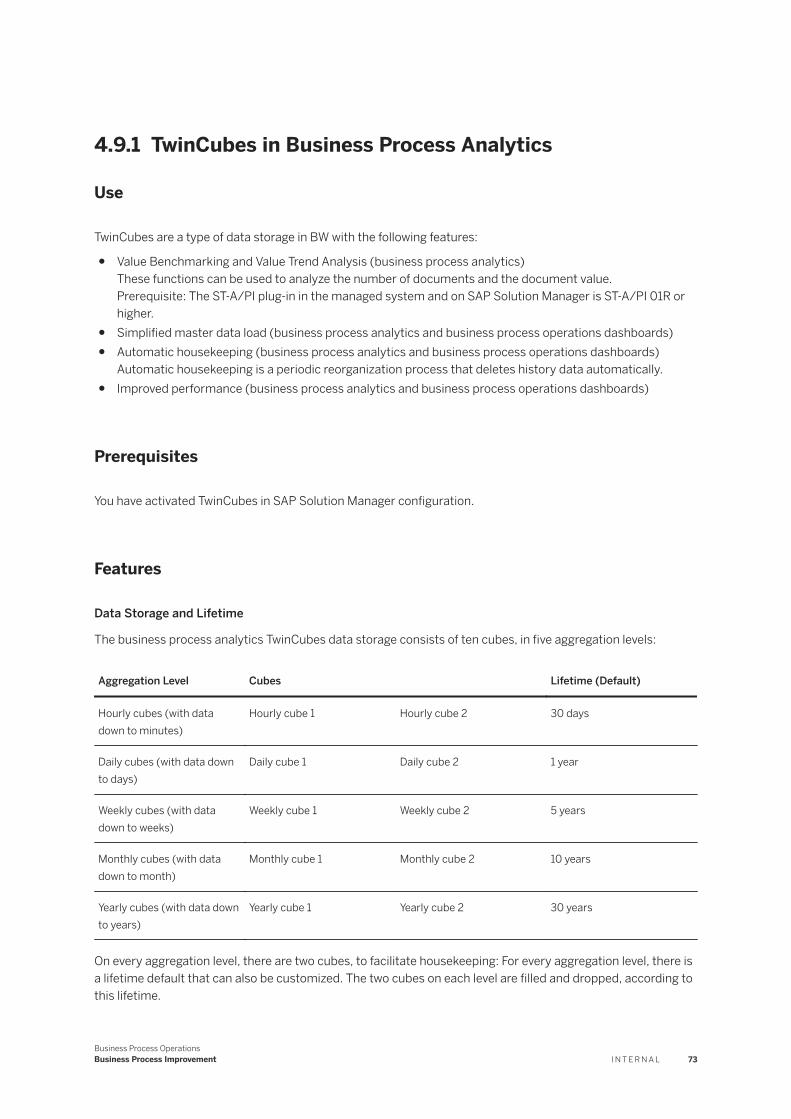
4.9.1 TwinCubes in Business Process Analytics
Use
TwinCubes are a type of data storage in BW with the following features:
● Value Benchmarking and Value Trend Analysis (business process analytics)These functions can be used to analyze the number of documents and the document value.Prerequisite: The ST-A/PI plug-in in the managed system and on SAP Solution Manager is ST-A/PI 01R or higher.
● Simplified master data load (business process analytics and business process operations dashboards)● Automatic housekeeping (business process analytics and business process operations dashboards)
Automatic housekeeping is a periodic reorganization process that deletes history data automatically.● Improved performance (business process analytics and business process operations dashboards)
Prerequisites
You have activated TwinCubes in SAP Solution Manager configuration.
Features
Data Storage and Lifetime
The business process analytics TwinCubes data storage consists of ten cubes, in five aggregation levels:
Aggregation Level Cubes Lifetime (Default)
Hourly cubes (with data down to minutes)
Hourly cube 1 Hourly cube 2 30 days
Daily cubes (with data down to days)
Daily cube 1 Daily cube 2 1 year
Weekly cubes (with data down to weeks)
Weekly cube 1 Weekly cube 2 5 years
Monthly cubes (with data down to month)
Monthly cube 1 Monthly cube 2 10 years
Yearly cubes (with data down to years)
Yearly cube 1 Yearly cube 2 30 years
On every aggregation level, there are two cubes, to facilitate housekeeping: For every aggregation level, there is a lifetime default that can also be customized. The two cubes on each level are filled and dropped, according to this lifetime.
Business Process OperationsBusiness Process Improvement I N T E R N A L 73
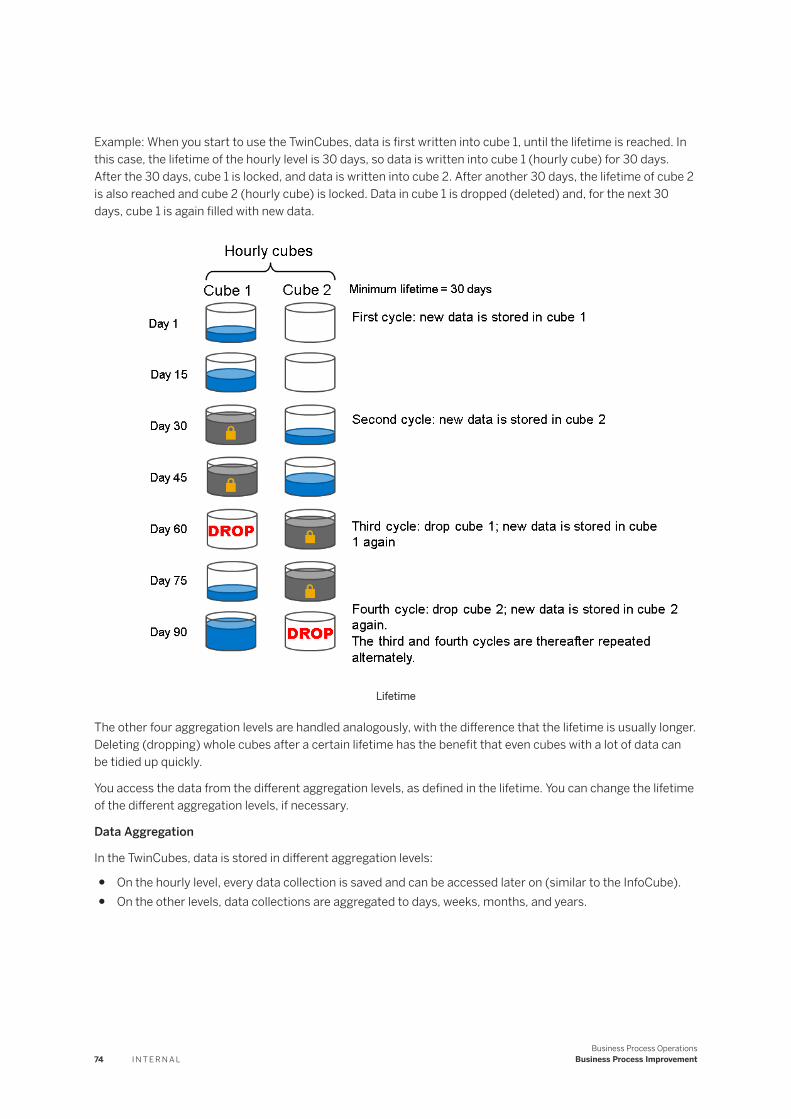
Example: When you start to use the TwinCubes, data is first written into cube 1, until the lifetime is reached. In this case, the lifetime of the hourly level is 30 days, so data is written into cube 1 (hourly cube) for 30 days. After the 30 days, cube 1 is locked, and data is written into cube 2. After another 30 days, the lifetime of cube 2 is also reached and cube 2 (hourly cube) is locked. Data in cube 1 is dropped (deleted) and, for the next 30 days, cube 1 is again filled with new data.
Lifetime
The other four aggregation levels are handled analogously, with the difference that the lifetime is usually longer. Deleting (dropping) whole cubes after a certain lifetime has the benefit that even cubes with a lot of data can be tidied up quickly.
You access the data from the different aggregation levels, as defined in the lifetime. You can change the lifetime of the different aggregation levels, if necessary.
Data Aggregation
In the TwinCubes, data is stored in different aggregation levels:
● On the hourly level, every data collection is saved and can be accessed later on (similar to the InfoCube).● On the other levels, data collections are aggregated to days, weeks, months, and years.
74 I N T E R N A LBusiness Process Operations
Business Process Improvement
4.9.1.1 Migrating Data and AKFIs to TwinCubes
Use
You will usually migrate your data in SAP Solution Manager Configuration, but you can also do so in the BPO Reporting Infrastructure Maintenance: Choose Business Process Improvement - Administration on the SAP Solution Manager launchpad and then go to the BP Analytics BW tab.
Procedure
Migrating Data from InfoCube to TwinCubes
NoteThe activation of the TwinCubes is irreversible. As soon as the TwinCubes have been activated, all new data collections will be written into the business process analytics TwinCubes instead of the business process analytics InfoCubes.
For more information about the activation of business process analytics TwinCubes, see https://wiki.scn.sap.com/wiki/x/lgYsG
NoteThe TwinCubes have to be activated prior to starting the migration.
1. Verify that the data migration status is green.2. Choose the Migrate Cube Data button
A background job is scheduled to migrate the data.3. In the job log, you can identify errors (for example, if the data could not be migrated because of missing
authorization) and monitor the progress of the migration.
The data displayed in business process analytics is retrieved from TwinCubes. You do not need to migrate or change key figure variants. When opening a variant, the system checks whether the TwinCubes are active. If so, the data displayed in the variant is requested from TwinCubes.
Migrating Analytical Key Figure Instances
To display data from the TwinCubes in existing dashboards, adjust the analytical key figure instances (AKFIs) to refer to data from the TwinCubes (BPM_TwinCube). Before the migration, the AKFIs that refer to data from BP Analytics pull data from the InfoCube (BPM_ACube).
Choose the Migrate AKFI Directory button. This adjusts all AKFIs that have BPM_ACube as a data source.
Business Process OperationsBusiness Process Improvement I N T E R N A L 75
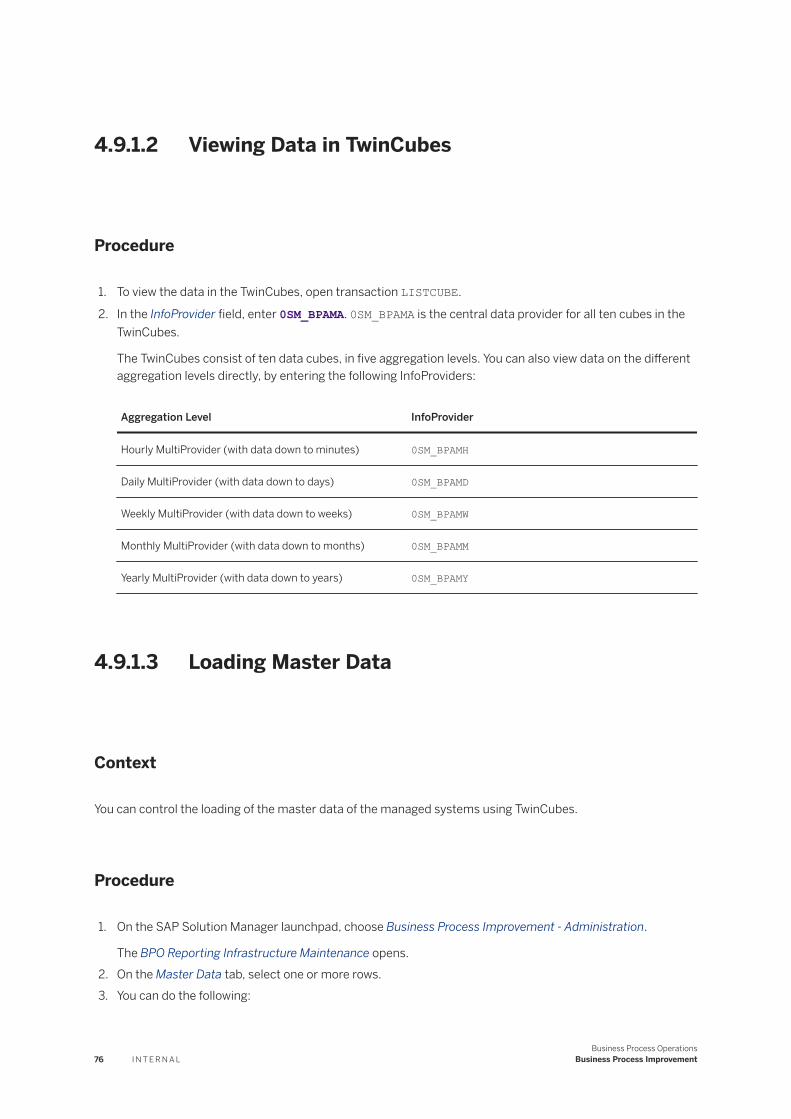
4.9.1.2 Viewing Data in TwinCubes
Procedure
1. To view the data in the TwinCubes, open transaction LISTCUBE.
2. In the InfoProvider field, enter 0SM_BPAMA. 0SM_BPAMA is the central data provider for all ten cubes in the TwinCubes.
The TwinCubes consist of ten data cubes, in five aggregation levels. You can also view data on the different aggregation levels directly, by entering the following InfoProviders:
Aggregation Level InfoProvider
Hourly MultiProvider (with data down to minutes) 0SM_BPAMH
Daily MultiProvider (with data down to days) 0SM_BPAMD
Weekly MultiProvider (with data down to weeks) 0SM_BPAMW
Monthly MultiProvider (with data down to months) 0SM_BPAMM
Yearly MultiProvider (with data down to years) 0SM_BPAMY
4.9.1.3 Loading Master Data
Context
You can control the loading of the master data of the managed systems using TwinCubes.
Procedure
1. On the SAP Solution Manager launchpad, choose Business Process Improvement - Administration.
The BPO Reporting Infrastructure Maintenance opens.2. On the Master Data tab, select one or more rows.3. You can do the following:
76 I N T E R N A LBusiness Process Operations
Business Process Improvement
○ To control the scheduling activation, choose the Start Schedule or Stop Schedule button.○ To remove the schedule and already loaded master data, choose the Remove Semantic ID button. The
entry will then disappear from the list.○ To change the frequency of the master data load, choose the Set Schedule Time button.○ To refresh the master data immediately, choose the Manual Master Data Reload button. The data can
take some minutes to be refreshed/reloaded, depending on the amount of data.○ To delete master data, choose the Clear Master Data button. A popup shows the languages in which
the master data was last loaded. Select the languages for which you want to delete the master data.○ To check the total amount of master data loaded, choose the Load/Reload Master Data Amount Details
button. To see the languages, click the number in the No. Languages (distinct) column.○ To schedule a new semantic ID that is not shown in the table, choose the Schedule New Semantic ID
button. In a popup, you can define the semantic ID, target system, and frequency.○ In the Master Data Language Customizing area, you can define the languages for which the master
data are to be loaded. By default, descriptions are loaded in English for every system/client. Only load the languages that are required. You can append rows or change existing Customizing according to your requirements.
4.9.1.4 Data Loader Error Queue
The data loader is a step in the data collection process. After data has been collected from the managed systems, the data loader stores the aggregated data packages in the cubes. In the InfoCube or TwinCubes, data loading into the cubes can fail, for example if the RFC connection between SAP Solution Manager and the remote BW does not work, a data package contains an invalid character, or the data packages contain other errors and cannot be written into the cubes.
In case of an error during the loading of data into the InfoCube, the framework tries to load it again and again. You cannot see that an error occurred. If such error situations occur for the TwinCube, the data loader puts these data packages into quarantine (error queue). The data loader status turns red.
You can view packages that could not be loaded into the TwinCubes, by choosing the Display Error Queue button. After an issue was solved, you can release data packages so that they will be loaded into the TwinCubes again.
4.9.2 Usage Analysis
Use
You can get an overview of how analytical key figures and dashboards are used by end users.
Prerequisites
You have administrator authorization.
Business Process OperationsBusiness Process Improvement I N T E R N A L 77

Features
To open the usage analysis overview, on the SAP Solution Manager launchpad, choose Business Process Improvement - Administration to open the BPO Reporting Infrastructure Maintenance. Then choose the Usage Analysis tab.
You can activate logging of usage data.
You can define a retention period by choosing a number of days and clicking retention period.
You can display users who used key figures and dashboards and how often key figures and dashboards are used.
You can sort and filter the lists by clicking (Open Settings Dialog).
4.9.3 Log for Data Collection and Cube Upload
Use
The log allows you to analyze the root cause of problems in business process analytics and dashboards. Since there are several infrastructures involved, the log allows you to identify which step of the data transfer caused a problem. When key figures are created and scheduled, they are transferred from the managed system to SAP Solution Manager, and saved in a BW cube. When data is collected, it is written to the log immediately.
Select the managed system for which you want to display the log. A system is available only if its key figures have been set up beforehand. The log contains entries for the managed system and the SAP Solution Manager system. The log data is retained for 14 days.
Features
● Start Extractor Manually: If you start the extractor manually, you override the priority of the extractor (see the Current Extractor Priority field).
● Release Extractor: After you have identified and solved a problem, you can release the extractor. This button is only active if the extractor has status B (banned) or M (maintenance). For more information, see .
● Data Collection LogThe Load column shows the processed BW packages that have been written to the BW cube.The entries in the last three columns should be the same, otherwise the alert rating is red.Status -> Package column:○ Status A (start package): Data collection from the managed system has not been completed; there are
still BW packages to be collected.○ Status E (end package): Data collection from the managed system has been completed; all BW
packages have been collected, data extraction is completely performed.
78 I N T E R N A LBusiness Process Operations
Business Process Improvement
4.9.4 Maintaining a Connector Instance
Use
The data displayed on the business process operations dashboards is read from data sources.
The logical link between the business process operations dashboards infrastructure and a data source is established by a connector. The connector is instantiated once before usage for a connector type and the associated data source, by creating a connector instance. Later, during the configuration of business process operations dashboards, analytical key figure instances are assigned to the connector instance to get their data from the associated data source. Thus, for every data source that business process operations dashboards use, there must be at least one active connector instance.
The following SAP Solution Manager applications can provide data for business process operations dashboards:
● Business process analytics uses the following data sources:○ SAP Business Explorer BW query○ Detail list
● Business Process Monitoring uses the following data sources:○ Monitoring and alerting infrastructure○ Detail list
NoteTo display business process monitoring information, business process operations dashboards have to be manually configured in the .
For more information about data sources, see Define Data Sources [page 80].
Procedure
To define the connector instances in the connector directory:
● To navigate to the data source manager, on the launchpad, choose Business Process Improvement - Administration. The BPO Reporting Infrastructure Maintenance screen appears.
● On the Data Source Manager tab, you can add, change, activate, or deactivate a connector instance.○ To create or change a connector instance, choose the corresponding connector in the upper part of the
screen, and choose the connector instance in the table below.○ To add, change, activate or deactivate a connector instance, choose Change Mode.
The system creates the following connector instances:
● BPM_TwinCube_default for the Analytics TwinCubes connector (BPM_TwinCube)● Analytics_DL_default for the detail list connector (BPM_Detail_List)
To activate the connector instances for use by business process operations dashboards:
1. Choose Change Mode, and in the Applications field, enter the additional entry DASHBOARD.
Business Process OperationsBusiness Process Improvement I N T E R N A L 79
2. Choose (De)Activate and save your entries.
If the system does not automatically create the connector instance associated with the data source for the business process operations dashboards, create the connector instance manually, as follows:
1. Choose Add.2. For the new connector instance, enter the following information:
○ Name: technical name of the connector instance○ Description: description of the connector instances○ RFC Destination: RFC connection to SAP Solution Manager from which data is extracted for the
analytical key figures in business process operations dashboards. The only possible entry for this field is NONE, because a remote scenario (extracting data from a remote SAP Solution Manager) is not supported for the business process operations dashboards.
○ System: description of the SAP Solution Manager system from which the data is extracted via RFC destination, with this connector instance. Enter the local SAP Solution Manager system.
○ Applications: Enter the applications that use the connector instance:To use the connector instance for dashboards, choose DASHBOARD. This entry is required for business process operations dashboards.To use the connector instance for analytics, choose ANALYTICS. This entry is required if you also want to use this connector instance for the business process analytics data source (recommended).
○ Managed Systems (optional): To limit the retrieval of data on certain managed systems or clients, enter the SID and client of the managed system. If no system or client is entered, data from all systems is used.
3. Save your entries and activate the connector instance.4. Change to display mode.
NoteIf you have created or changed a connector instance, refresh the browser window so that the changes take effect, before you create analytical key figures.
NoteMake sure that there is only one active connector instance per data source (connector). To avoid having more than one active connector instance, create only one connector instance per data source.
For more information about how to configure and edit connector instances, see SAP Note 1819313 .
4.9.5 Define Data Sources
Business process operations dashboards can be connected to various data sources, such as database tables or SAP BW InfoCubes. To make the data available in Business process operations dashboards, a so-called connector is required. The task of a connector is to transform a specific data format that is used in the source system into a generic data format that can be used in SAP Solution Manager. There are the following connector types:
● SAP Business Process Monitoring Trend Analysis (connector available in SAP standard)● SAP Business Process Monitoring Alerting (connector available in SAP standard)
80 I N T E R N A LBusiness Process Operations
Business Process Improvement
● SAP Business Process Analytics (connector available in SAP standard)
For every data source that the business process operations dashboards use, a connector instance is created. For more information, see Maintaining a Connector Instance [page 48].
4.9.6 Execute AKF Repository Update
Use
Most changes on the data source objects require that you update the AKF repository in SAP Solution Manager on a regular basis. This updates key figures, characteristics, and the corresponding descriptions from the managed systems.
There are, for example, the following changes on the data source objects:
● Implementation of new ST A/PI plugin in managed systems● Changing key figures in managed systems
Procedure
1. On the SAP Solution Manager launchpad, select Configuration - Dashboards Business Process Operations. On the Setup Analytical Key Figure Instance tab, select Maintain Connector Instances.
2. In the Data Source Manager, select the connector in the upper table. In the lower table, the connector instance for the connector is displayed.
3. Select the active connector instance and choose Update AKF Repository.
Business Process OperationsBusiness Process Improvement I N T E R N A L 81
5 Data Consistency Management
Use
Data consistency management checks the consistency of data between a source system and a destination system and restores it where necessary.
When certain events occur, such as a system crash, mass update, or change to the Customizing settings, you can find data consistency tasks and tools, check their suitability, and use them. The tools that are suggested depend on the particular event, the SAP product, and the business object.
ExampleYou have an integrated scenario that uses SAP ERP and SAP CRM. In SAP ERP, a mass update of material master data is performed. You want to know whether all of the updates in SAP ERP have been replicated correctly to SAP CRM for this event. For this purpose, you can use data consistency management.
Data consistency management provides tasks and tools for the required checks. It enables direct navigation to the corresponding transactions, check programs, and guidelines with Best Practices.
Implementation Considerations
The following prerequisites need to be fulfilled before you can use data consistency management:
● You are authorized to use the applications in the Business Process Operations section of the SAP Solution Manager launchpad.
● You have been assigned the necessary role for data consistency management.● Data consistency monitoring objects have been defined in the business process monitoring setup.● There are alerts for key figures that were flagged as relevant for data consistency monitoring.
Features
Data Consistency Monitoring
Data consistency monitoring proactively ensures a reliable business process flow and data consistency.
You can switch between the Solutions and the Business Processes view.
Only those alerts are displayed that were flagged as relevant for data consistency monitoring. These alerts are a subgroup of the business process monitoring alerts.
You can use the business process monitoring functions to display and edit alerts.
You can edit the standard view selecting (Open Settings Dialog).
82 I N T E R N A LBusiness Process Operations
Data Consistency Management
Consistency Checks
To keep your data consistent, you can use the following tools:
● Cross-Database ComparisonCheck data consistency and compare data sources across various systems.
● Internal Database ComparisonCompare tables within a system.
● Consistency Check Report Scheduling VerificationCheck which reports are used to check consistency.
● GSS: Data Consistency ManagementSelect the tools and tasks to keep your data consistent.
● Data Consistency Toolbox (Classic)You perform tasks and determine tools to check the data consistency between a source and target system and restore it if required.
NoteThe data consistency toolbox (classic) can still be used, but the functions are replaced by the GSS: Data Consistency Management. For information, see the application help under http://help.sap.com/solutionmanager for SAP Solution Manager 7.1 SP12 and earlier.
● Data QualityIntegration with SAP Information Steward. You can use this tool to check data quality according to definable business rules, which can be applied to datasets. For more information, see http://help.sap.com/bois .
Analysis Tools
To search for the causes of data inconsistencies, use the following tools:
● GSS: Data Consistency ManagementSelect the tools to keep your data consistent.
● Business Process Completeness Check (BPCC)Monitor critical subprocesses of business processes and check if all process steps of a process instance have been executed successfully. In the Business Process Completeness Check application, you can analyze errors in individual process steps. The Business Process Completeness Check is also integrated in the Exception Management.
● Transactional Correctness CheckThe transactional correctness tool checks the transactional correctness of your ABAP programs.
● End-to-End TraceYou switch to the root cause analysis to check the traces. For more information, see .
More Information
Cross-Database Comparison [page 85]
Internal Database Comparison [page 139]
GSS: Data Consistency Management [page 138]
Transactional Correctness [page 129]
Business Process OperationsData Consistency Management I N T E R N A L 83
Business Process Completeness Check [page 140]
5.1 Data Consistency Management Launchpad Group
Use
This group is the central access point for all the information and functions you need to implement data consistency management.
Features
The group consists of the following tiles that are displayed depending on authorization:
Tile Description
Applications
Data Consistency Management You can access the central workcenter for data consistency management including the alert inbox and all available checks and tools.
For more information, see Data Consistency Management [page 82].
Cross-Database Comparison You can check data consistency between two sources with complex structure and or hierarchy.
For more information, see Cross-Database Comparison [page 85].
CDC Comparison: Compare ERP - ID: CDC_DEMO_BUSINESS-PARTNER_72
You can explore the dynamic tile for the demo comparison CDC_DEMO_BUSINESS-PARTNER_72 in cross-database comparison.
For more information, see Cross-Database Comparison [page 85].
Transactional Correctness You can check ABAP programs for transactional correctness.
For more information, see Transactional Correctness [page 129].
Alert Inbox - Data Consistency Management
You can access the alert inbox for context data consistency management which includes all relevant alerts.
Business Process Completeness Check
You can identify interrupted executions of critical parts in a business process.
For more information, see Business Process Completeness Check [page 140].
84 I N T E R N A LBusiness Process Operations
Data Consistency Management
Tile Description
Configuration and Settings
Solution Documentation - Monitoring Configuration
You can access solution documentation to setup monitoring for data consistency.
Configuration - Business Process Completeness Check
You can access the business process completeness check configuration of SAP Solution Manager.
Configuration - Business Process Operations
You can access the business process operations configuration of SAP Solution Manager (transaction SOLMAN_SETUP). The system displays the guided procedure to configure your system.
5.2 Cross-Database Comparison
Use
You use this application to compare data sources with a complex structure or hierarchy. The data sources can be in the same system or in different systems. You check whether the data is consistent in the source and target systems, for example, whether updates in the source system have been replicated to the target system. Examples of complex data sources are sales orders with several billing items, or a customer master record containing multiple addresses, partner roles, and bank details.
The data sources must contain the same data logically, but they can have different values once they have been forwarded to a different system, for example, from an ERP system to a CRM system.
Implementation Considerations
You compare databases to check the consistency of data in your systems.
Prerequisites
You have the roles and authorizations required by the application. The following roles are provided for cross-database comparison:
Generic Roles
● SAP_CDC_ADMIN: Process championContains full authorization for all cross-database comparison tasks.
● SAP_CDC_DISPLAY: Display userContains display-only authorizations for various cross-database comparison tasks.
Specific Roles for Typical Cross-Database Comparison Tasks
● SAP_CDC_OBJECT_MODELER: Object Modeler
Business Process OperationsData Consistency Management I N T E R N A L 85
● SAP_CDC_INSTANCE_CREATOR: Instance Creator● SAP_CDC_INSTANCE_EXECUTER: Instance Executor● SAP_CDC_INSTANCE_ANALYZER: Instance Analyzer
Each role has full authorization for one task and display authorization for the others.
Features
● You can model the data that you want to compare.● You can compare data at any time or schedule regular comparisons.● You can display the results in an overview that contains all of the relevant details.
You can edit the standard view selecting (Open Settings Dialog).
This is a generic application, which means that you can use it to check the data consistency in both ABAP and non-ABAP systems. You can use this application to compare the following data sources:
● Tables from the ABAP Dictionary● Tables that are linked via ABAP Database Connectivity (ADBC)● XML and CSV files on a Solution Manager application server or on your local PC● Tables in an SAP HANA database● OData services● SAP Business Information Warehouse
You use the application as follows:
● Once, to check the consistency of new data● When necessary, to check the consistency of existing data● Regularly, to monitor important data
You can display the results of the comparison in Business Process Monitoring by configuring the relevant settings in Customizing for Business Process Monitoring.
The cross-database comparison application is included in the business process operations dashboard. You can create a dashboard for specific comparisons. For more information, see Business Process Operations Dashboard [page 46].
5.2.1 Performing Cross-Database Comparison
Use
This process describes the steps required to prepare, execute, and postprocess a cross-database comparison.
86 I N T E R N A LBusiness Process Operations
Data Consistency Management

Process
1. You create a comparison, in which you specify the data that you want to compare and create filters.2. You can assign comparisons to a comparison group, for example, because they affect the same business
object and you want to display the overall comparison results.3. You schedule and perform a comparison. By doing so, you specify when and how often you compare the
data sources. You can also specify further options for the comparison.4. You display the comparison results to see whether there are inconsistencies in the data sources.5. If you find inconsistencies in the cross-database comparison, you can create messages directly from the
comparison overview.6. You can create guided procedures to provide guidance to investigate the potential root causes of
inconsistencies.For more information, see .
5.2.2 Comparison
Definition
To compare data sources, you must create a comparison. A comparison contains information about the source systems as well as the connection information for the initial comparison. You specify the type of data source that contains the data that you want to compare. Data sources can be, for example, ABAP or non-ABAP systems.
Structure
A comparison is structured as follows:
Global Instance Parameters
The Global Instance Parameters area contains all of the generic data for your comparison.
● Name and description● Extraction strategy
The following strategies are available:○ Default: Individual data selection in each source system
The data to be compared is selected independently in each system.○ Use keys of source system 1 to select in source system 2
The data block to be compared is first extracted from system 1. Then the keys identifying each record are used to extract the required data from system 2.
○ Use keys of source system 2 to select in source system 1The data block to be compared is first extracted from system 2. Then the keys identifying each record are used to extract the required data from system 1.
○ Execute comparison in one systemThe data is compared in one system only. This extraction strategy is relevant for internal database comparison and for comparison in an SAP HANA database.
Business Process OperationsData Consistency Management I N T E R N A L 87
● Data sources from which the data to be compared is to be extractedFor more information, see Data Sources in Cross-Database Comparison [page 101].
● Comparison block sizeBlock size used to read the data for the comparison. You can use this value for the comparison depending on your system performance.
● Maximum number of differencesNumber of differences detected after which the system terminates the comparison.
Iteration Parameters
The Iteration Parameters area allow you to specify the maximum number of iterations, for example.
Comparison-Specific Filters
The Comparison-Specific Filters area lists the filters that are available for comparing databases. You can specify values for the variable filters that you create in the comparison. This allows you to create multiple comparisons and specify different filter values for each. For example, one comparison could have Country = “DE” and another comparison could have Country = “US”.
Data Model for Comparison
The Data Model for Comparison area contains the tables and fields in the source systems that are to be compared. The data model is displayed as a graphical user interface on which you can choose the compared tables and fields from both databases and define mapping between those fields. For more information, see Creating Data Models [page 91].
5.2.2.1 Processing Comparisons
Use
You define a comparison by following the steps below.
After you have created a comparison, you can change the settings at any time.
Process
You define a comparison as follows:
1. Create a comparison.2. Create a data model.3. Create foreign keys.4. Map the data fields.5. Generate extractors for the comparison.6. Edit the comparison.
88 I N T E R N A LBusiness Process Operations
Data Consistency Management
5.2.2.1.1 Creating Comparisons
Prerequisites
At least two systems with a data source each have been set up.
Context
A comparison contains information about the systems with the data sources to be compared. You specify the type of data source that contains the data that you want to compare. The data can be in different types of data source, such as ABAP or non-ABAP systems.
Procedure
1. On the Comparison or Comparison Overview tab, click Create.2. Enter a name for your comparison and press Enter .
3. Enter a description for your comparison.
You can change the size of the description field: Choose Preferences and at Height Description (ex) enter the size.
4. Choose one of the following extraction strategies:○ Default: Individual data selection in each source system
The data to be compared is selected independently in each system.○ Use keys of source system 1 to select in source system 2
The data block to be compared is first extracted from system 1. Then the keys identifying each record are used to extract the required data from system 2.
○ Use keys of source system 2 to select in source system 1The data block to be compared is first extracted from system 2. Then the keys identifying each record are used to extract the required data from system 1.
○ Execute comparison in one systemThe data is compared in one system only. This extraction strategy is relevant for internal database comparison and for comparison in an SAP HANA database.
Depending on the extraction strategy, the available data source types are displayed for selection.5. Specify the type of data source in which the data is stored. For more information, see Data Sources in
Cross-Database Comparison [page 101].
6. Click Validation Test Connection to Source 1 and Validation Test Connection to Source 2 to test the connection.
7. Enter the following information for all of your data sources:
Business Process OperationsData Consistency Management I N T E R N A L 89
○ Block Size: The block size is used to read the data for comparison. You can improve your system performance by changing the block size for each of your source systems here.
NoteDefining block sizes speeds up data extraction. However, the cross-database comparison cannot perform a binary full-block comparison if the block sizes for the source system are different. This is relevant only if you expect a near 100% consistency. Usually, it is OK to increase the system load of SAP Solution Manager if a changed block size reduces the database and network load of a source system instead.
○ Max No. Differences: The number of differences detected after which the system terminates the comparison.Enter 0 if you want the comparison job to be executed regardless of how many differences are detected. Use this setting to prematurely terminate an incorrectly configured comparison that returns an error for every data record.
8. Save your entries.
Results
You have created a comparison and must now create the data fields that you want to compare (see Creating Data Models [page 91]).
5.2.2.1.2 Entering Tolerances
In cross-database comparison, tolerances can be entered for cases inconsistencies can be disregarded.
Context
In cross-database comparison, an inconsistency is indicated whenever values in two data sources are different. However, in some cases inconsistencies can be disregarded (e.g. rounding differences). As of SAP Solution Manager 7.2 SPS 8, it is possible to enter tolerances for these cases.
Procedure
1. Go to the Data Model for Comparison tray.2. Double-click a mapping connection.3. In the new Mapping Details window, check Tolerance allowed.4. In the new tray Tolerance Values, enter a tolerance.
90 I N T E R N A LBusiness Process Operations
Data Consistency Management

5.2.2.1.3 Creating Data Models
Prerequisites
You have created a comparison (see Creating Comparisons [page 89]).
Context
For the comparison, you select data fields from one or more tables arranged hierarchically and consecutively. To do this, create comparison tables in your data model, and specify the data sources and data fields that you want to compare.
Regardless of the type of data source, the objects that you compare are represented as tables in this application.
You can select as many tables as you want for each system. You join the tables to one another using foreign keys (see Creating Foreign Keys [page 92]). You assign foreign keys in the root table or the higher-level child table to the primary keys in the child tables. First create the root table: The first table that you create in a system automatically becomes the root table. Subsequent tables that you create become child tables. When the systems are compared, the information from the child tables is read using the foreign keys for the root table.
Procedure
1. Open your comparison and click Edit.
2. In the Data Model for Comparison area, right-click to open the context menu and choose Element Add element to table source 1 .
A dialog box appears.3. Enter the table that you want to compare and select the data fields that you want in include in the
comparison.4. Save your entries.
The data sources and data fields that you have selected are displayed graphically.
Context fields are marked with the binoculars icon or a D. You can display details by double-clicking the field. Context fields are not in the comparison scope, but can be relevant for you as well. There are two types of context fields:
○ Field is only in one of the source systems and cannot be a mapping field.○ Field is in both source systems but always has different contents (for example, created-by fields); it is
not used as a comparison field.
Business Process OperationsData Consistency Management I N T E R N A L 91

5. Repeat the above steps to add any other tables that you want to compare to source system 1.6. Save your entries.
7. To create tables for the second system, right-click to open the context menu and choose Element Add element to table source 2 .
8. Enter the table that you want to compare and select the data fields that you want to include in the comparison.
9. Save your entries.
Results
You have selected the tables and data fields that you want to compare.
Now create the foreign keys.
5.2.2.1.4 Creating Foreign Keys
Prerequisites
You have created at least two tables in a system (see Creating Data Models [page 91]).
Context
When you create multiple tables in a system, you assign foreign keys. This specifies relationships between the tables in a system. You must define the relationships between the various tables in a system before you can validate the parameters and the data model, and generate the function modules and SQL statements.
Foreign keys specify the relationship between root and child tables within a system. You assign data fields as foreign keys in the root table or higher-level child table to the primary keys in the child tables.
Procedure
1. To create foreign keys for the first system, under Data Model for Comparison, choose Propose Foreign Key Relation.
2. Create the foreign keys by dragging the arrows on the left of the higher-level tables to the child tables.
The system shows the foreign key as an arrow pointing from the root table to the child table.
92 I N T E R N A LBusiness Process Operations
Data Consistency Management
3. Save your entries.
Results
You have created the foreign keys.
Now map the tables and fields to one another.
5.2.2.1.5 Mapping Data Fields
Prerequisites
● You have created a comparison.● If you have created more than one table for each system, you have defined the foreign keys between the
tables.
Context
You specify which data fields in the tables in the first system you want to compare to the data fields in the tables in the second system, as well as which data fields are to be used as comparison keys. You assign a name to this mapping so that you can identify it later on.
When you create your comparison, you also create fixed and variable filters that you use to restrict the comparison:
● For fixed filters, you specify the data field and the exact value of the filter. For example, you specify the restriction Country="DE" when you create the comparison.
● For variable filters, you specify that a certain data field is to be used as a variable filter, for example the Country data field. Variable filters are displayed in the comparison, where you can specify values for them such as Country="DE". This allows you to create multiple comparisons using the same data, but specify different filter values for each. For example, you can enter Country="DE" for one comparison and Country="US" for another comparison.
You can also define variable filters for just one side of the data model. This is useful, for example, if the field to be used as a filter exists only in one source system.
For date and time stamp fields, you can define relative filters to show the delta values between comparison runs. You can use the $DELTA variable for this purpose. For example, CREATED_AT>='$DELTA' would consider all new source documents created since the last comparison run.
Business Process OperationsData Consistency Management I N T E R N A L 93
Procedure
1. In the data model for the comparison, map the tables by dragging the arrows provided from left to right.
A dialog box is displayed for each mapping.2. Enter the following data:
○ Tag Name: Enter a name for the mapping.○ Comparison Key No.: You create at least one comparison key for the comparison and specify the
sequence of the comparison keys.Enter 1, 2, 3, and so on, to define the sequence of the comparison keys.Enter 0 to select the data fields for the actual comparison.
3. Variable Filter: Enter a value to indicate that the mapping is a fixed filter.
Enter X to indicate that the mapping is a variable filter.
If you do not want to use the mapping as a filter, leave the field empty.4. Save your entries.
Results
You have defined the mapping between the data fields of the comparison tables.
Now create the function module for the comparison.
Next Steps
Filters in Cross-Database Comparison [page 111]
Relative Date Filtering [page 112]
5.2.2.1.6 Generating Extractors for a Comparison
Prerequisites
● You have created a comparison.● You have created comparison tables.● If required, you have created foreign keys for the tables in a system.● You have assigned the data fields in the systems to one another.● For data sources that generate a function module, you have specified the connection that is to be used to
create the initial function module.
94 I N T E R N A LBusiness Process Operations
Data Consistency Management
Context
After you have created the comparison and the comparison tables, and you have assigned the table relationships within and between the systems, you generate the extractors for the comparison. When you generate the extractors, the system creates additional elements that are required for the comparison, such as RFC-enabled functions in the case of ABAP systems or SQL statements in the case of SQL-based extractions. You can test the SQL statements in the application before you generate them.
If you change the settings in a comparison, you must generate the comparison again so that the extractors take into account the changes in the systems.
When the application generates the extractors, it tests the connection and validates the comparison. If errors occur, the generation is terminated.
NoteIf you have saved your comparison data in an XML or CSV file in SAP Solution Manager, do not generate the extractors because the system reads the data directly from the file. You can test the specified path.
Automatic Generation of Extractors
Depending on the source type used in your comparison, you can configure the system in such a way that extractors are generated automatically when you save the comparison. To enable automatic generation, set the Extractor Generation option to Automatic Generation Only or Both Automatic and Manual Extractor Generation in Customizing for SAP Solution Manager under Capabilities (Optional) Business Process OperationsData Consistency Management Cross-Database Comparison Define Cross-Database Comparison Source Types .
Procedure
1. Test the connection by choosing Validation Test Connection to Source 1 or Validation Test Connection to Source 2 .
2. Check the comparison by choosing Validation Validate Parameters and Data Model .3. Generate the extractors by clicking Generate Extractors and choose whether you want to generate the
extractors for source 1, source 2, or both.4. Proceed as follows depending on the type of data source you are using:
○ If your data source generates an extractor that in turn generates a function module (for example, SAP ABAP System (RFC to Generated Extractor)), specify a transport request to transport your function module and save. If you do not want to transport the function module, leave the field empty.Create the function module in a development system and test it together with the function group. Then transport the function module to a test system.To execute the comparison in other systems, transport the function module to the systems that contain the tables that you want to compare. If you have created a function module in multiple systems, create multiple comparisons to compare the tables in the various systems.
○ If your data source generates an extractor that in turn generates an SQL statement (for example, Remote Database (Using ADBC)), check the SQL statement and the count statement.
Business Process OperationsData Consistency Management I N T E R N A L 95
5.2.2.1.7 Editing Comparisons
Use
You can edit a comparison that you have created at any time.
Procedure
Changing a Comparison
1. Open the comparison from the comparison overview by selecting it and clicking Edit.2. Change the comparison data as you require.3. Save your entries.
Copying a Comparison
You can create a comparison quickly by copying an existing one. To do so, copy a comparison, save it under a new name, and change the settings of the copied comparison.
1. In the comparison overview, select the comparison that you want to copy and click Copy.2. In the dialog box that appears, enter the name for your new comparison.
The copied comparison appears in display mode.3. Click Edit to change the settings for your new comparison.
Deleting a Comparison
CautionWhen you delete a comparison, all of the comparison results are also deleted. If you want to delete only the comparison results and not the comparison itself, use the Delete Obsolete Comparison Result Details transaction (DSWP_CDC_REORG). For more information, see Deleting Comparison Results [page 125].
1. In the comparison overview, select the comparison that you want to delete and click Delete.2. Confirm the popup that appears.
Editing Old Versions of Comparisons
1. Open your comparison and choose a previous version from the Data Model Version dropdown list.2. Modify the old version of the comparison and save.
Note that if you delete a comparison, all versions of the comparison are deleted.
Result
The system creates a new version of the comparison. When you execute a comparison run, the system uses the latest version of the comparison.
96 I N T E R N A LBusiness Process Operations
Data Consistency Management
5.2.2.1.8 Using Aggregates
Use
You use aggregates in cross-database comparisons (CDC) to significantly reduce the comparison volume.
Prerequisites
You have defined the data model and the mapping between the data fields of the comparison tables with comparison keys.
Features
Comparing Tables with Single Item Data
You can use aggregates for a comparison between systems where table data fields are not aggregated yet.
Comparing Tables with Single Item Data and Aggregated Data
You can use aggregates for a comparison between two systems, for example an SAP ERP system with non-aggregated table data fields and an SAP BW system with aggregated data.
Activities
First you adjust your data model in the Data Model for Comparison view.
1. Define the comparison key as needed for the aggregation level required.2. Double-click the table fields for which you want to use an aggregate.3. In the Aggregate field, select the desired aggregate type using the value help. Choose one of the following
aggregate types:○ COUNT DISTINCT: Count Number of Distinct Values
You use this aggregation if you are interested in the number of different values, which are used in this field, within a range of records defined by an individual comparison key. For example, you compare sales orders between two systems, and you are only interested in the number of different materials used in a specific order.
○ DISTINCT: Select Distinct Values onlyYou use this aggregation if you are interested in the distinct values only. For example, you compare data between two systems where the data is not unique in one of the two systems, and you are only interested whether a key like a document number exists in both systems.
○ MIN: Minimum ValueCDC extracts and compares the lowest value of this field within a range of records defined by a specific comparison key.
Business Process OperationsData Consistency Management I N T E R N A L 97
○ MAX: Maximum ValueCDC extracts and compares the largest value of this field within a range of records defined by a specific comparison key.
○ AVG: Average ValueCDC extracts and compares the arithmetic average of all values for the field, to which the aggregate is applied, within a range of records defined by a specific comparison key.
○ SUM: Sum of ValuesCDC extracts and compares the sum of values for the field, to which the aggregate is applied, within a range of records defined by a specific comparison key.
4. Choose OK.5. In addition, you can choose Create COUNT GROUP BY in the context menu of the data model.
As a result, an additional count-field is added to the comparison. You use this aggregation if you are interested in the number of records corresponding to the comparison key only. For example, you compare sales orders between two systems, and you are only interested in the number of line items in an order, and not in the individual line items.
6. Start the comparison.
NoteThe result of a comparison run with aggregated values might not be precisely enough for you to analyze the comparison. For example, if the number of order items deviate, we recommend that you run a detailed comparison to find out which item is missing.
5.2.2.1.9 Mass Processing of Comparisons
Use
You can create, change, and delete comparisons using the mass processing function.
Procedure
Delete Data Models
1. On the Comparison or Comparison Overview tabs, click Mass Processing.2. Choose Delete Data Models from the dropdown box and click Continue.3. Use the search criteria to find and select the data models that you want to delete and click Next.4. Confirm your selection and click Delete Data Models.
Create Comparisons Using Data from SAP Landscape Transformation Replication Server
1. On the Comparison or Comparison Overview tabs, click Mass Processing.2. Choose Create Comparisons Using Data from LT Replication Server from the dropdown box and click
Continue.3. Select the data sources and enter the required data as described under Creating Comparisons [page 89].
98 I N T E R N A LBusiness Process Operations
Data Consistency Management
4. Enter a prefix for the comparison name. The generated comparisons will consist of this prefix and the name of the compared table.
5. Enter the RFC destination of the ABAP source system.6. Enter the RFC destination of the LT server.7. Select a mass transfer ID. This is a logical grouping of tables that are relevant for replication.8. Optional: Select the DB connection and the schema of the SAP HANA system.9. To include the client field in the comparisons, select the Include Client checkbox.10. Select Test if you want to test the mass creation before performing it.11. Choose Next. The system lists all the tables available for generation.12. Select the tables for which you want to create comparisons.13. Review and submit the comparisons to be created.
Create Comparisons
1. On the Comparison or Comparison Overview tabs, click Mass Processing.2. Choose Create Comparisons from the dropdown box and click Continue.3. Select the data sources and enter the required data as described under Creating Comparisons [page 89].4. If you want to map the client, set the Include Client checkbox.
If you are comparing ABAP-based source systems, the client is not required because the generated or generic extractor handles clients automatically. You may need to map the client when accessing a remote database that contains tables replicated from an ABAP system. This depends on the comparison model and the combination of data source types.
5. If you want the system to generate extractors automatically for each comparison, select the option Generate Only for Source Types with Automatic Generation from the Extractors to be Generated for Source dropdown list.For more information about generating extractors, see Generating Extractors for a Comparison [page 94].
6. In the next step, use the Append Row and Insert Row buttons to enter the tables. Append Row adds a new row at the end of the table, whereas Insert Row adds a new row below the row currently selected.Alternatively, upload the tables from a local file.
7. In step 3, enter the data for your comparisons as described under Creating Comparisons [page 89]. Each of your comparisons is displayed on a separate tab.
8. Optional: In the next step, assign your comparisons to a comparison group.9. Review and submit your comparisons.
Create Comparisons for the Same Data Model
1. On the Comparison or Comparison Overview tabs, click Mass Processing.2. Choose Create Comparisons for the Same Data Model from the dropdown box and click Continue.3. Use the search criteria to find and select your data model and click Next.4. Enter generic data for your comparisons as described under Creating Comparisons [page 89] and click
Next.5. Enter names and descriptions for each of your data models and click Next.6. Enter specific data for each of your comparisons on the relevant tabs and click Next.7. Optional: In the next step, assign your comparisons to a comparison group.8. Review and submit your comparisons.
Change Comparisons
1. On the Comparison or Comparison Overview tabs, click Mass Processing.2. Choose Change Comparisons and click Continue.
Business Process OperationsData Consistency Management I N T E R N A L 99
A guided procedure appears.3. Enter the new parameters that are to apply to all of the comparisons you want to change.
For example, change the maximum number of differences to 5000.4. In the next step, use the search criteria to find and select all of the comparisons you want to change.
You can also save your search by entering a name and clicking the disk icon.5. In the next step, each of the comparisons you selected appears on a separate tab. You can make any
changes that are comparison-specific here.6. In the next step, you can add your comparisons to an existing comparison group or you can create a new
group and add them to that.7. Check and confirm your changes.
Mass Copy of Comparisons
1. On the Comparison or Comparison Overview tabs, click Mass Processing.2. Choose Copy Comparisons.3. Enter the new parameters that are to apply to all of the comparisons you want to create.4. In the next step, use the search criteria to find and select all of the comparisons you want to copy.
You can also save your search by entering a name and clicking the disk icon.5. In the next step, enter names for each of your new comparisons.6. In the next step, each of the comparisons you selected appears on a separate tab. You can make any
changes that are comparison-specific here.7. In the next step, you can add your comparisons to an existing comparison group or you can create a new
group and add them to that.8. Review and submit your comparisons.
5.2.2.1.10 Displaying Change Logs
Context
You can track which field values in comparisons were changed or deleted, by whom, and when.
The following fields are tracked:
● Header data attributes● Multi-lingual descriptions● Source-specific parameters● Variable filter criteria (comparison groups only)
Procedure
1. Display your comparison on the Comparison tab.
100 I N T E R N A LBusiness Process Operations
Data Consistency Management
2. Click Display Change Log.
5.2.3 Data Sources in Cross-Database Comparison
Use
You can compare data from various sources. The system displays the available data sources based on the selected extraction strategy.
Features
The types of data source that you can use for your comparison can be divided into the following areas:.
● Data sources from an ABAP system:○ ABAP Data Sources [page 102]○ "Determine Inconsistent Entries in One System" Data Source [page 103]
● Data sources from an external database:○ SAP HANA Data Source [page 103]○ Non-ABAP Data Sources [page 105]○ OData Service Data Sources [page 105]○ SAP Business Intelligence Data Sources [page 106]
● Data sources based on a file:○ XML Data Sources [page 107]○ CSV Data Sources [page 108]
You can define customer-specific source types in Customizing under SAP Solution Manager Capabilities (Optional) Business Process Operations Data Consistency Management Cross-Database ComparisonDefine Cross-Database Comparison Source Types .
Activities
1. Choose an extraction strategy for your comparison.The system displays the relevant data source types.
2. Enter the data required to establish a connection to the data sources.3. Provide the information required to extract data based on the selected data source.
4. Verify that the connection is working by choosing Validation Test Connection to Source 1 or Validation Test Connection to Source 2 .
5. Click Generate Extractors and generate the extractors for source 1, source 2, or both.
Business Process OperationsData Consistency Management I N T E R N A L 101
More Information
Creating Comparisons [page 89]
Generating Extractors for a Comparison [page 94]
5.2.3.1 Data Sources from an ABAP System
You can extract the data to be compared from an ABAP system or you can compare the data that exists only in one system. For more information, see the following sections:
● ABAP Data Sources [page 102]● "Determine Inconsistent Entries in One System" Data Source [page 103]
5.2.3.1.1 ABAP Data Sources
Use
You can extract data for comparison from ABAP systems.
Cross-database comparison uses RFC function modules to extract data from managed ABAP systems. You can specify which of the following types you want to use.
● Generated extractor function moduleThis function module is specific to your data model. It is generated for each comparison and transported from the development system to the production system. Each time a data model is changed, new extractor function modules are generated and retransported. This also allows complex models including specific custom code inside the extractor.
● Generic extractor function moduleThis function module receives selection criteria from the cross-database comparison application and can be used for most data models.
Features
The following ABAP data source types are available:
SAP ABAP System (RFC to Generated Extractor)
In this case, data is read by a generated function module. The following data is required:
● RFC Connection (Read): Connection to read the data from the ABAP Dictionary of the source system.● RFC Connection (Trusted): Connection to create the function module in the source system.● Function Group: Name of the function group (new or existing function group).● Function Name: Name of the function module generated by the application.
102 I N T E R N A LBusiness Process Operations
Data Consistency Management
SAP ABAP System (RFC to Generic Extractor)
The data is read by a generic function module. The following data is required:
● RFC Destination: Connection to read the data from the ABAP Dictionary of the source system.● SQL Statement: SELECT: Select-clause of the generated select statement, identifying the data fields to be
extracted.● SQL Statement: FROM: From-clause of the generated select statement, identifying the tables to be read.● SQL Statement: Fixed WHERE: A part of the where-clause of the generated select statement corresponding
to the fixed filters of the data model.● SQL Statement: ORDER BY: Extracted data has to be ordered by the keys.
5.2.3.1.2 "Determine Inconsistent Entries in One System" Data Source
You can compare data in a single database, for example, missing header entries for dependent tables. This data source enhances the existing internal database comparison features. For more information, see Internal Database Comparison [page 139].
NoteTo use this data source type, choose the extraction strategy Execute Comparison in One System.
SQL statements are generated for the different comparison cases:
● Only dependent data exists: SQL query: In source 1 only● Only header data exists: SQL query: In source 2 only● Data exists in header and dependent data but with different data fields: SQL query: Different data
5.2.3.2 Data Sources from an External Database
You can extract the data to be compared from a data source that connects to a database. For more information, see the following sections:
● SAP HANA Data Source [page 103]● Non-ABAP Data Sources [page 105]● OData Service Data Sources [page 105]● Business Intelligence Data Sources [page 106]
5.2.3.2.1 SAP HANA Data Source
Use
You can compare data between an SAP HANA database and another database (SAP HANA or non-SAP HANA), directly in an SAP HANA database. Remote access to the second database is provided by SAP HANA smart
Business Process OperationsData Consistency Management I N T E R N A L 103
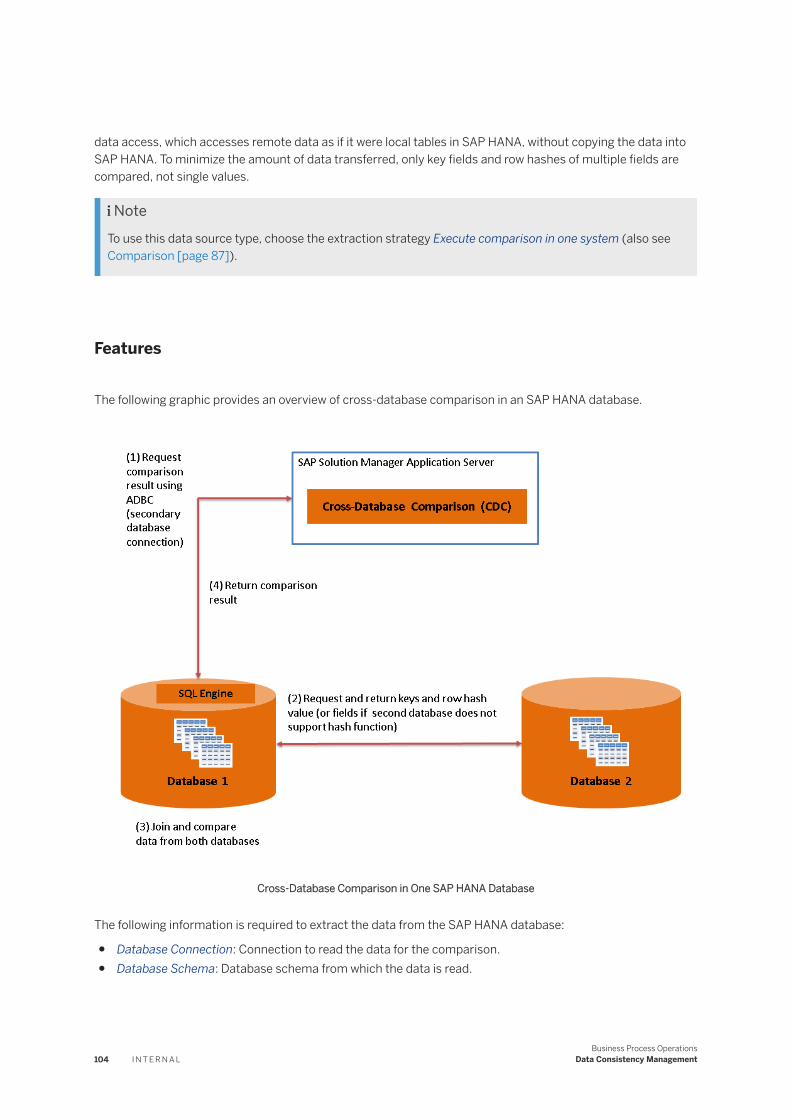
data access, which accesses remote data as if it were local tables in SAP HANA, without copying the data into SAP HANA. To minimize the amount of data transferred, only key fields and row hashes of multiple fields are compared, not single values.
NoteTo use this data source type, choose the extraction strategy Execute comparison in one system (also see Comparison [page 87]).
Features
The following graphic provides an overview of cross-database comparison in an SAP HANA database.
Cross-Database Comparison in One SAP HANA Database
The following information is required to extract the data from the SAP HANA database:
● Database Connection: Connection to read the data for the comparison.● Database Schema: Database schema from which the data is read.
104 I N T E R N A LBusiness Process Operations
Data Consistency Management
5.2.3.2.2 Non-ABAP Data Sources
You can extract data from non-ABAP data sources using the data source type Remote Database (Using ADBC). The data is read via ABAP Database Connectivity (ADBC) using a secondary database connection. A native SQL statement is generated to extract the data.
The following data is required:
● Database Connection: Connection to read the data for the comparison.● Database Schema: Database schema from which the data is read.● SQL String (Count): The SQL statement used to count the objects in the comparison is displayed after
generation.● SQL String (Extract): The SQL statement used to run the comparison is displayed after generation.
5.2.3.2.3 OData Service Data Sources
Use
You can extract data from OData Service data sources. Extracting data from OData sources allows you, for example, to compare data in a “hybrid” scenario where some of your data is stored in the cloud (and there is a corresponding OData service for it) and other data is stored on-premise.
Prerequisites
You have created an RFC connection of type HTTP Connection to External Server and specified the target system on the Technical Settings tab of transaction SM59. For example, you have entered the target host services.odata.org and the path prefix /V2/OData/OData.svc/.
Activities
If you select OData Service as your source type, you must enter the RFC destination for the OData service. You then create your data model by specifying entities of the OData service as the tables and properties of the OData service as the fields.
On generation, a query is created for this data model. When you run the comparison, the query is used to extract the data.
Business Process OperationsData Consistency Management I N T E R N A L 105
5.2.3.2.4 Business Intelligence Data Sources
Use
Cross-database comparison provides support for native SAP Business Information Warehouse by enabling you to extract data directly from SAP BW.
To do so, you enter the RFC destination to your SAP BW system.
Prerequisites
You have created an RFC connection to your SAP BW system.
Activities
If you select Business Intelligence (MDX Query) as source type, you must enter the RFC destination to your SAP BW system. You then create a data model by specifying the InfoCubes as the tables and dimensions or key figures as the fields. Dimensions are automatically marked as key fields in the data model.
On generation, an MDX query is created for this data model. When you run your comparison, the MDX query is sent to SAP BW over the RFC connection that you specified.
If you select SAP BW Data Manager Read Interface as a source type, you must enter the RFC destination to your SAP BW system. You then create a data model by specifying the InfoCubes as the tables and the characteristics and key figures as table columns.
The information in the data model is then used to call the SAP BW Data Manager Read Interface.
5.2.3.3 Data Sources from a File
You can extract the data to be compared from an XML file that is stored on the application server or on your local PC, or from a CSV file that is stored on the application server. For more information, see the following sections:
● XML Data Sources [page 107]● CSV Data Sources [page 108]
106 I N T E R N A LBusiness Process Operations
Data Consistency Management
5.2.3.3.1 XML Data Sources
Use
You can extract data from XML files that are stored on the SAP Solution Manager application server or on a local PC.
Features
The following data source types are available:
XML Files on Application Server
The following data is required to extract data that is stored on the application server:
● Host Name: The application server that hosts the data● File Path: Path on the SAP Solution Manager application server under which the XML file containing the
data to be compared is saved.● File Name: Name of the XML file.
You have the following options when using XML files:
● You can select several XML files for processing, by specifying a file path and no file name. The system processes all files in this path.
● You can enter the following parameters in the File Name field:○ $TODAY: The system selects all files that have today's date in the format YYYYMMDD in the file name.
For example, if the date is September 21, 2015 and you enter data$TODAY.xml, the system might return a file named data20150921.xml.
○ $YESTERDAY: The system selects all files that have yesterday's date in the format YYYYMMDD in the file name. For example, if the date is September 22, 2015 and you enter data$YESTERDAY.xml, the system might return a file named data20150921.xml.
○ Wildcard: You can use an asterisk (*) to stand in for any characters in the file name, and you can combine this with the parameters mentioned above.
● Use the following parameters in the Created from and Created to fields to enter a start and end time for the creation date of XML files.○ $TIMES: timestamp now (offset in seconds). Example: $TIMES-10○ $TIMEM: timestamp now (offset in minutes). Example: $TIMEM-30○ $TIMEH: timestamp now (offset in hours). Example: $TIMEH-12○ $TIMED: timestamp now (offset in days). Example: $TIMED-1
● You can enter XML transformation parameters in the Transformation field. Data is then changed from a different format to the required asXML format.
NoteThe cross-database comparison source type “XML files on application server” requires either XML files in asXML format, or XML files in any other format and a transformation to change the required data into asXML format.
Business Process OperationsData Consistency Management I N T E R N A L 107
asXML is the format that results from using a transformation ID for an internal ABAP table.
XML Files on Local PC
You do not have to enter any source-specific parameters for your comparison. Instead, you specify the file name directly in the comparison. For more information, see Creating Comparisons [page 89].
5.2.3.3.2 CSV Data Sources
Use
You can extract data from one or more CSV files that are stored on the SAP Solution Manager application server. Extracting data from CSV files allows you, for example, to compare data in a “hybrid” scenario where some of your data is stored in the cloud and other data is stored on-premise, provided that you have first extracted your data in the cloud to a CSV file.
When you run the comparison, the data from the specified CSV files is read directly. In this case, no function module or query is generated.
Prerequisites
You have stored the CSV files that are to be compared on an SAP Solution Manager application server.
Activities
The following data is required:
● Host Name: The application server that hosts the data● Path Name: Path to the directory in which the CSV file is stored.● File Name: Name of the CSV file.
You have the following options when using CSV files:
● You can select several CSV files for processing by specifying a path but no file name. The system processes all files in this path.
● You can enter the following parameters in the File Name field:○ $TODAY: The system selects all files that have today's date in the format YYYYMMDD in the file name.
For example, if the date is September 21, 2015 and you enter data$TODAY.csv, the system might return a file named data20150921.csv.
○ $YESTERDAY: The system selects all files that have yesterday's date in the format YYYYMMDD in the file name. For example, if the date is September 22, 2015 and you enter data$YESTERDAY.csv, the system might return a file named data20150921.csv.
○ Wildcard: You can use an asterisk (*) to stand in for any characters in the file name, and you can combine this with the parameters mentioned above.
108 I N T E R N A LBusiness Process Operations
Data Consistency Management
● Use the following parameters in the Created From and Created To fields to enter a start and end time for the creation date of CSV files.○ $TIMES: timestamp now (offset in seconds). Example: $TIMES-10○ $TIMEM: timestamp now (offset in minutes). Example: $TIMEM-30○ $TIMEH: timestamp now (offset in hours). Example: $TIMEH-12○ $TIMED: timestamp now (offset in days). Example: $TIMED-1
● You can specify whether the CSV files that are to be compared contain a header row. If you set this value to X, the first row in the CSV file is ignored.
● If your CSV files are separated by a character other than a comma (for example, a semicolon), you can enter the delimiter used in your files here.
5.2.3.4 Extra Fields in Cross-Database Comparison
Extra fields in cross-database comparison can be used to maintain additional fields for source types that support Data Dictionary integration.
For example, if you want to compare data fields with different formats and therefore want to transform their content, you can use extra fields in the mapping.
Possible use cases:
● You want to concatenate the value of two or more source fields into one extra field to compare this value with another system.
● You want to compare a substring and you want to extract its value from an original field to put it into an extra field.
● You want a conditional comparison on several possible source fields depending on some application logic.
The transformation of content is typically done as custom-specific code in the Business Add-In which is called after the extraction. The resulting values are written in the extra fields.
For source types that support Data Dictionary integration, the Fields for Table screen consists of two sections.
● The upper section Fields from Source System's Data Dictionary shows the fields available in the Data Dictionary of the table source.The SELECTED flags indicate the fields relevant for the current data model.
● The lower section Fields added manually shows the fields which were added manually.
NoteFor source types that do not support Data Dictionary integration, only the lower section is visible.
After having assigned extra fields to source table, you can see them in the Data Model for Comparison tray. You can move them up and down.
NoteFor source types that support Data Dictionary integration, you can use extra fields for data field mappings and as display-only fields.
For source types that do not support Data Dictionary integration, you can use extra fields for data field mappings, for key field mappings, for filtering, and as display-only fields.
Business Process OperationsData Consistency Management I N T E R N A L 109
5.2.3.4.1 Maintaining Extra Fields
This topic contains information about the maintenance of extra fields for source types that support Data Dictionary integration.
Procedure
1. In the comparison, click the Edit pushbutton.2. In the Data Model for Comparison tray, double-click a table.
The Fields for Table popup screen opens.3. In the Fields added manually grid, choose Append Row, Insert Row, or Delete Row.4. Select OK.
5.2.4 Mass Processing Functions in Cross-Database Comparison
Use
Instead of managing data for each comparison manually, you can execute various mass processing functions to change a lot of data at once.
Features
Cross-database comparison enables you to carry out the following mass changes:
● Create general comparisons● Generate extractors● Delete data models● Create comparisons for the same data model● Create comparisons using data from the SAP Landscape Transformation Replication Server
The system uses an RFC connection to retrieve a list of tables that are replicated between the SAP system and the SAP HANA database from the replication model. The list is used as a basis for generating comparisons. One comparison is created for each table, and the tables are compared 1:1 between the SAP system and the SAP HANA database.
110 I N T E R N A LBusiness Process Operations
Data Consistency Management

Activities
1. Start all mass processing options from the Comparison or Comparison Overview tab.2. Choose Mass Processing.3. Select the mass change option that you want to use.4. Enter the required parameters to execute the mass change, depending on the selected option, and follow
the guided procedure.5. Review and submit your changes.6. Confirm the changes.
More Information
Mass Processing of Comparisons [page 98]
For more information, in the SAP Help Portal at http://help.sap.com , search for Overview of SAP Landscape Transformation.
5.2.5 Filters in Cross-Database Comparison
Use
You can use various types of filters in the cross-database comparison to restrict the data that is compared. You can create filters for both source systems or for one source only.
Prerequisites
You have administration authorization for cross-database comparison (role SAP_CDC_ADMIN).
Features
The following filter types are available in cross-database comparison. You specify the filters at source level for the relevant fields when you map the comparison tables (see Mapping Data Fields [page 93]).
Business Process OperationsData Consistency Management I N T E R N A L 111

Filter Type Comparison Comparison Run
Fixed filter with fixed values You can define fixed filter values at source level, either for both sources or only one source. The value is used during the generation to create a hard-coded where-clause.
Fetches data from generated extractor using the hard-coded where-clause.
Variable filter with variable values The Variable Filter checkbox is set in the comparison, either in the mapping area (which means that it is relevant for both sources) or in the source area (which means that it is relevant for that source only).
The comparison run passes the filters to the extractor, which handles the filter values dynamically.
Fixed filter with relative dates If a filter for a comparison contains the syntax for relative dates (starting with $), it is not generated as a hard-coded filter in the extractor.
The comparison run translates the relative date syntax into an absolute time stamp and passes the filters to the extractor, which handles the filter values dynamically.
Variable filter with relative dates The Variable Filter checkbox is set in the comparison, either in the mapping area (which means that it is relevant for both sources) or in the source area (which means that it is relevant for that source only).
You can maintain the relative date syntax (starting with $) in the comparison. The filters are used for all comparison runs of this comparison.
The comparison run translates the relative date syntax into an absolute time stamp and passes the filters to the extractor, which handles the filter values dynamically.
More Information
Relative Date Filtering [page 112]
5.2.5.1 Relative Date Filtering
Use
You can enter specific values to define relative filters for dates, which can then be used for time-dependent comparisons. For example, you might want to compare new documents created on today’s date.
To perform relative date filtering, that is, to calculate relative dates instead of absolute dates, cross-database comparison provides syntax for defining fixed points and offsets for relative dates.
112 I N T E R N A LBusiness Process Operations
Data Consistency Management
Prerequisites
In the details popup for a mapped field or a source-specific field, you have set the filter type to Relative Time Stamp.
Features
● Instead of a fixed (absolute) date, you can enter a keyword for the start date (using $ as a prefix) and optionally an additional offset for the difference in days:Syntax = <StartDate>[<Difference>]You can replace <StartDate> with the following keywords:
Keyword for <StartDate> Description Example Using 2013-04-25 as a Reference Date
$TODAY Current date (today) 2013-04-25
$FDOCW First day of current week 2013-04-22
$LDOCW Last day of current week 2013-04-28
$FDOCM First day of current month 2013-04-01
$LDOCM Last day of current month 2013-04-30
$FDOCY First day of current year 2013-01-01
$LDOCY Last day of current year 2013-12-31
$FDOPW First day of previous week 2013-04-15
$LDOPW Last day of previous week 2013-04-21
$FDOPM First day of previous month 2013-03-01
$LDOPM Last day of previous month 2013-03-31
$FDOPY First day of previous year 2012-01-01
$LDOPY Last day of previous year 2012-12-31
$FDONW First day of next week 2013-04-29
$LDONW Last day of next week 2013-05-05
$FDONM First day of next month 2013-05-01
Business Process OperationsData Consistency Management I N T E R N A L 113
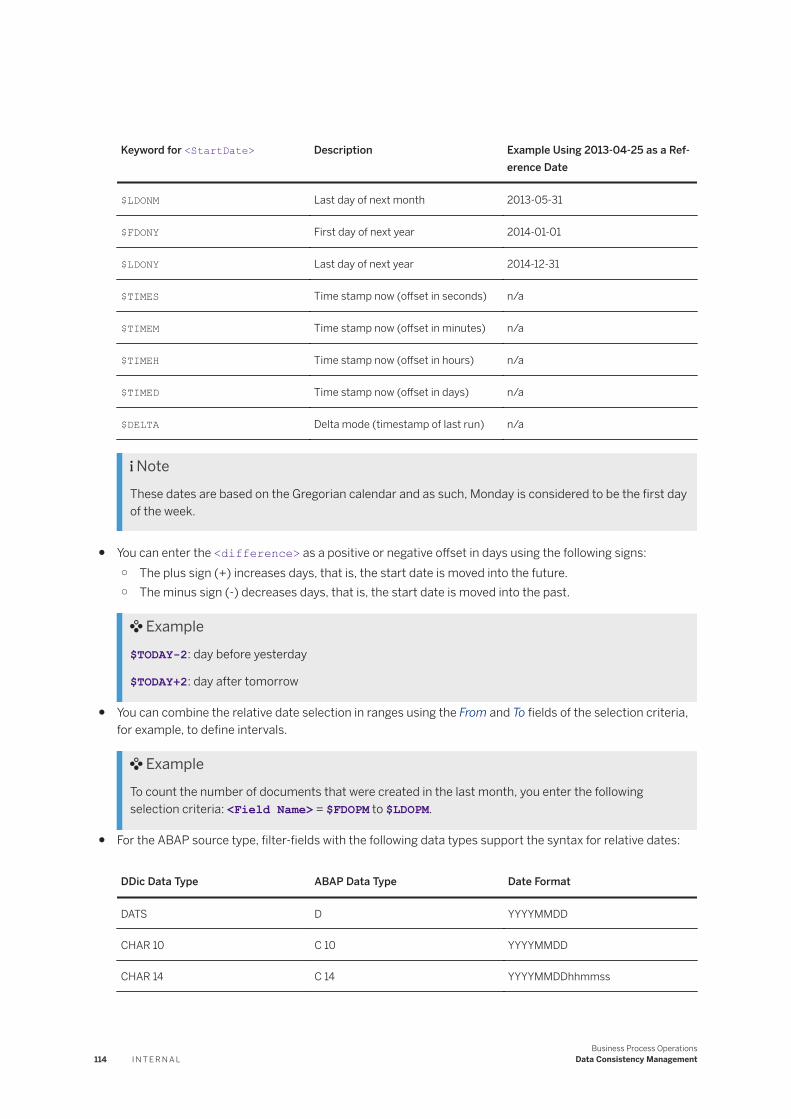
Keyword for <StartDate> Description Example Using 2013-04-25 as a Reference Date
$LDONM Last day of next month 2013-05-31
$FDONY First day of next year 2014-01-01
$LDONY Last day of next year 2014-12-31
$TIMES Time stamp now (offset in seconds) n/a
$TIMEM Time stamp now (offset in minutes) n/a
$TIMEH Time stamp now (offset in hours) n/a
$TIMED Time stamp now (offset in days) n/a
$DELTA Delta mode (timestamp of last run) n/a
NoteThese dates are based on the Gregorian calendar and as such, Monday is considered to be the first day of the week.
● You can enter the <difference> as a positive or negative offset in days using the following signs:○ The plus sign (+) increases days, that is, the start date is moved into the future.○ The minus sign (-) decreases days, that is, the start date is moved into the past.
Example$TODAY-2: day before yesterday
$TODAY+2: day after tomorrow
● You can combine the relative date selection in ranges using the From and To fields of the selection criteria, for example, to define intervals.
ExampleTo count the number of documents that were created in the last month, you enter the following selection criteria: <Field Name> = $FDOPM to $LDOPM.
● For the ABAP source type, filter-fields with the following data types support the syntax for relative dates:
DDic Data Type ABAP Data Type Date Format
DATS D YYYYMMDD
CHAR 10 C 10 YYYYMMDD
CHAR 14 C 14 YYYYMMDDhhmmss
114 I N T E R N A LBusiness Process Operations
Data Consistency Management
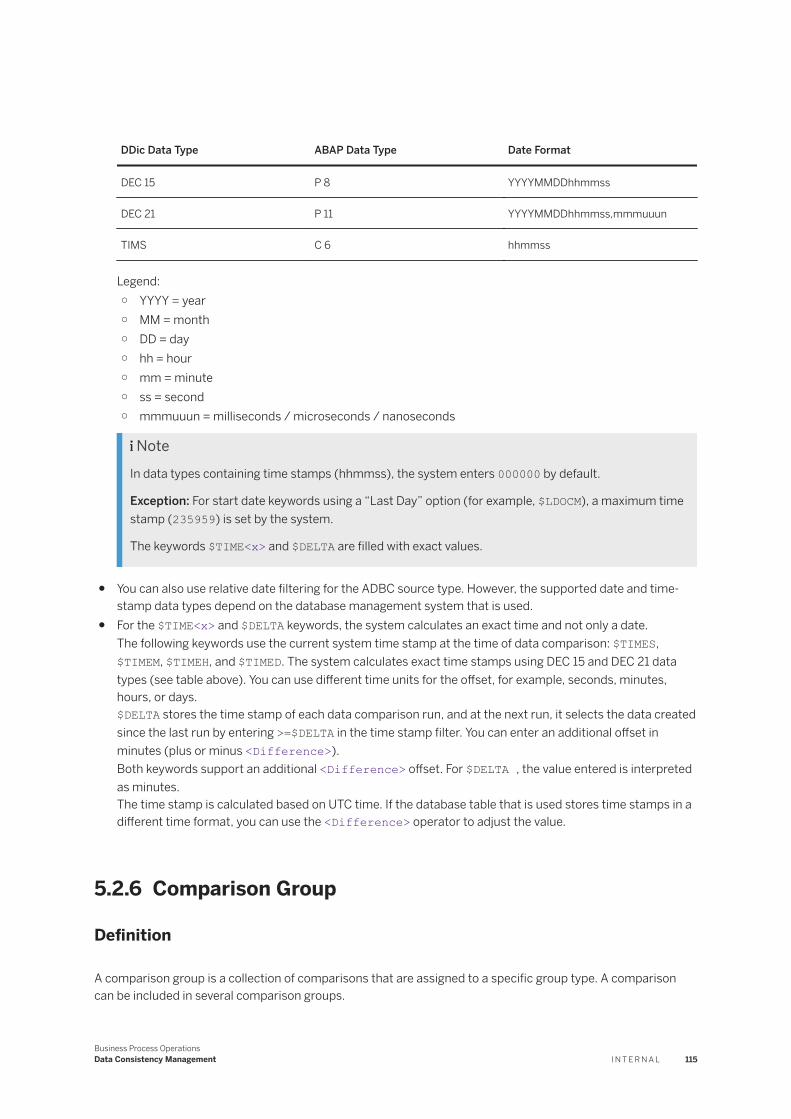
DDic Data Type ABAP Data Type Date Format
DEC 15 P 8 YYYYMMDDhhmmss
DEC 21 P 11 YYYYMMDDhhmmss,mmmuuun
TIMS C 6 hhmmss
Legend:○ YYYY = year○ MM = month○ DD = day○ hh = hour○ mm = minute○ ss = second○ mmmuuun = milliseconds / microseconds / nanoseconds
NoteIn data types containing time stamps (hhmmss), the system enters 000000 by default.
Exception: For start date keywords using a “Last Day” option (for example, $LDOCM), a maximum time stamp (235959) is set by the system.
The keywords $TIME<x> and $DELTA are filled with exact values.
● You can also use relative date filtering for the ADBC source type. However, the supported date and time-stamp data types depend on the database management system that is used.
● For the $TIME<x> and $DELTA keywords, the system calculates an exact time and not only a date.The following keywords use the current system time stamp at the time of data comparison: $TIMES, $TIMEM, $TIMEH, and $TIMED. The system calculates exact time stamps using DEC 15 and DEC 21 data types (see table above). You can use different time units for the offset, for example, seconds, minutes, hours, or days.$DELTA stores the time stamp of each data comparison run, and at the next run, it selects the data created since the last run by entering >=$DELTA in the time stamp filter. You can enter an additional offset in minutes (plus or minus <Difference>).Both keywords support an additional <Difference> offset. For $DELTA , the value entered is interpreted as minutes.The time stamp is calculated based on UTC time. If the database table that is used stores time stamps in a different time format, you can use the <Difference> operator to adjust the value.
5.2.6 Comparison Group
Definition
A comparison group is a collection of comparisons that are assigned to a specific group type. A comparison can be included in several comparison groups.
Business Process OperationsData Consistency Management I N T E R N A L 115
The type of comparison group defines the behavior of the comparison group.
ExampleGroup type A specifies that comparisons are grouped because they affect the same business object (for example, all comparisons that check business partners).
Group type B specifies that comparisons are grouped because they allow a correlated result, for example, transfer master data from one source system to multiple target systems.
Use
You can use comparison groups for various purposes:
● Group result view to display the correlated results for multiple systems within a comparison group● Filter for the administration view● Quick assessment of the data distribution from one source system to multiple target systems● Assessment of data distribution across a chain of systems
Structure
The following comparison group types are provided by default:
● DisplayThis type of comparison group combines comparisons and displays them in a comprehensive administration view. The comparisons can be started and stopped together.
● SequenceThis type of comparison group combines comparisons that belong to a distribution of master data across a chain of systems. Groups of this type can be used as filter criteria in the administration view, they can be started and stopped, and they are correlated.
● DistributionThis type of comparison group combines comparisons that belong to a distribution of master data from a single source system to multiple target systems. Groups of this type can be used as filter criteria in the administration view, they can be started and stopped, they have a validation function, and they are correlated.
● SplitThis type of comparison group combines comparisions that you have created by splitting up a large comparison using the mass procedure for splits. Groups of this type are used to split large comparisons into smaller comparisons.
More Information
Creating and Editing Comparison Groups [page 117]
Creating and Editing Comparison Group Types [page 117]
116 I N T E R N A LBusiness Process Operations
Data Consistency Management
Executing Comparison Group Runs [page 118]
5.2.6.1 Creating and Editing Comparison Groups
Procedure
1. On the Comparison Group tab, select a group type from the table.2. Click Create Group.3. Choose Edit/Display and enter a name and description for your group.4. Add the required comparisons to your group.5. Save your entries.
5.2.6.2 Creating and Editing Comparison Group Types
Context
You can use the comparison group types delivered by SAP or create and edit your own group types.
Procedure
1. On the Comparison Group tab page, click Create Group Type.2. Make sure that you are in edit mode and enter a name and description for your group type.3. Enter an implementing class to define the behavior of the group type. You can choose from the following
options:
Implementing Class Description Prerequisites
Display Completely independent comparisons can be grouped together irrespective of the business object.
None
Business Process OperationsData Consistency Management I N T E R N A L 117
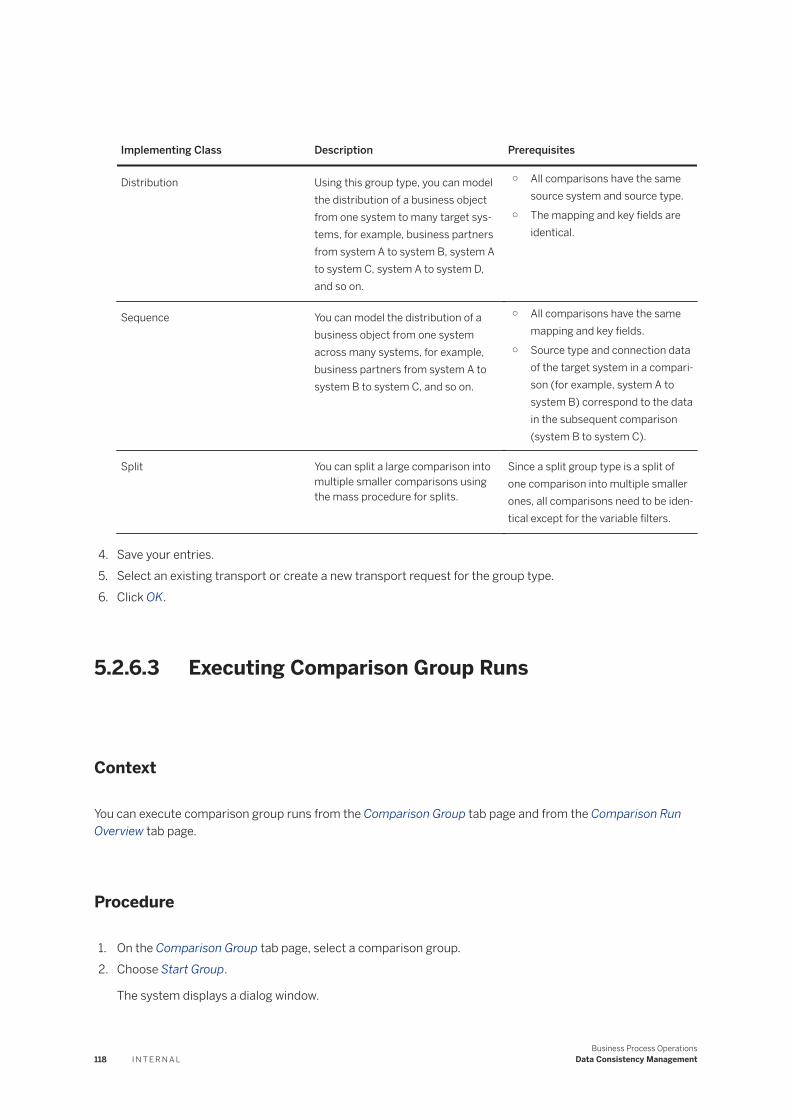
Implementing Class Description Prerequisites
Distribution Using this group type, you can model the distribution of a business object from one system to many target systems, for example, business partners from system A to system B, system A to system C, system A to system D, and so on.
○ All comparisons have the same source system and source type.
○ The mapping and key fields are identical.
Sequence You can model the distribution of a business object from one system across many systems, for example, business partners from system A to system B to system C, and so on.
○ All comparisons have the same mapping and key fields.
○ Source type and connection data of the target system in a comparison (for example, system A to system B) correspond to the data in the subsequent comparison (system B to system C).
Split You can split a large comparison into multiple smaller comparisons using the mass procedure for splits.
Since a split group type is a split of one comparison into multiple smaller ones, all comparisons need to be identical except for the variable filters.
4. Save your entries.5. Select an existing transport or create a new transport request for the group type.6. Click OK.
5.2.6.3 Executing Comparison Group Runs
Context
You can execute comparison group runs from the Comparison Group tab page and from the Comparison Run Overview tab page.
Procedure
1. On the Comparison Group tab page, select a comparison group.2. Choose Start Group.
The system displays a dialog window.
118 I N T E R N A LBusiness Process Operations
Data Consistency Management
3. Choose a scheduling option:○ Create Job Only
The system schedules the comparison job using transaction SM37. The name of the job is CDC_<comparison or comparison group name>. The job is now scheduled. To display the scheduling, choose Job Overview.
○ Create Job and Start ImmediatelyThe system executes the comparison run immediately.
○ Start Comparison Run Immediately in DialogThe comparison is executed in dialog, not as a background job. You must choose this option if your source type is XML File on Local PC.
4. Choose OK.
You can stop a running job by choosing Stop Group, for example, if the job is taking too long and you want to change the settings.
5. Choose Show Group Result.
Results
The results of the completed run is displayed in the Cross-Database Comparison pop-up window. In the pop-up window, you can choose a type of inconsistency to view details of the inconsistencies in the Group Result Details table. If you want to check the results of an earlier run, you can select the run in the Group Run selector field.
The results of the run are also displayed on the Comparison Overview tab page.
5.2.7 Evaluating Comparisons
Use
You can schedule comparisons and display the results for each comparison run. You specify whether the comparison is to be executed immediately or scheduled for another time.
Prerequisites
You have created a comparison.
Business Process OperationsData Consistency Management I N T E R N A L 119
Process
To perform a comparison, proceed as follows:
1. Schedule when the comparison is to be executed (see Scheduling Comparisons [page 120]).2. Optional: Stop the comparison (see Stopping Comparisons [page 123]).3. Display the comparison results (see Displaying Comparison Results [page 123]).4. Delete any comparison results that are no longer required (see Deleting Comparison Results [page 125]).
5.2.7.1 Scheduling Comparisons
Use
To trigger a comparison, you start the comparison from the comparison overview. This schedules the comparison run. The system creates a job in transaction SM37, which you can either execute immediately or schedule manually.
You can also schedule a comparison to run regularly and start the job immediately. The run ID is increased each time.
NoteThe following procedure describes how to schedule comparisons in the WebDynpro user interface. You can also schedule comparisons in batch jobs using transaction DSWP_CDC_START, which provides more advanced features. For more information, see the documentation in the transaction.
Prerequisites
You have created a comparison.
Procedure
Schedule a Job
1. On the Comparison Overview tab, select a comparison and click Start.The Select Execution Mode dialog box is displayed.
2. Select one of the following options:○ Create Job Only: The system schedules the comparison job using transaction SM37. The name of the
job is CDC_<comparison or comparison group name>. The job is now scheduled. To display the scheduling, choose Job Overview.
○ Create Job and Start Immediately: The system executes the comparison run immediately.
120 I N T E R N A LBusiness Process Operations
Data Consistency Management

○ Start Comparison Run Immediately in Dialog: The comparison is executed in dialog, not as a background job. You must choose this option if your source type is XML File on Local PC.
3. Choose Special Options to display the special options:○ If you check Rescan Identified Inconsistencies (Manual Iteration), the system starts a manual iteration.○ If you check Attempt to Restart the Canceled/Aborted Previous Run, the system does not generate a
new run ID. Instead, it tries to restart the previously canceled run.○ Choose a comparison scenario for further options. For more information, see Comparison Scenarios
[page 122].4. Click OK to start the comparison run.
Display Results
● On the Comparison Overview tab, find your comparison and check the overview of the evaluation status. For example:○ Run Status: Shows the status of the comparison run.
The following statuses are possible:
Status Description
Initial You have created but not yet scheduled the comparison or group run.
Running The comparison run is currently being executed.
Iterating The comparison run is currently executing an iteration.
Finished The comparison run was executed successfully.
Terminated (Aborted)
The comparison run aborted with a system error.
Paused (Canceled)
The comparison run was canceled by the user.
Confirmed The result of the comparison run was confirmed.
○ Inconsistency Status of Comparison: Shows whether the last comparison run found any inconsistencies.
○ Run ID: Shows how often the comparison has been executed.○ Progress: Shows the extent to which the comparison job has been executed.○ Start Time: Shows when the comparison job was last started.○ User Name: Shows the user who last started the comparison job.
Result
When the comparison has been run successfully, you can display the details of the comparison results by clicking the icon in the Inconsistency Status of Comparison column or by selecting the comparison in the table and choosing Show Last Result. For more information, see Displaying Comparison Results [page 123].
Business Process OperationsData Consistency Management I N T E R N A L 121
5.2.7.1.1 Comparison Scenarios
Use
When you start a comparison run, you can choose a comparison scenario from the special options. The comparison scenarios influence the runtime behavior of the data extraction and comparison engine.
CautionUse these scenarios for special purposes only, such as troubleshooting, debugging, or exceptional comparisons. Familiarize yourself with them and how they affect system behavior. Some of the scenarios may have a performance impact, while others may even falsify the result or fail to show existing inconsistencies correctly.
Features
You can choose from the following comparison scenarios:
● Count Expected Records Only (No Comparison)This scenario counts the number of expected records in each source system. However, it does not check that the keys are identical. Therefore, an identical count does not necessarily mean that the source systems contain the same objects.
● Detailed Comparison Only if Counts Are Not IdenticalThis scenario first counts the number of expected records in each source system. If the number of expected records is identical, the system does not perform a comparison. However, if the counts are different, a detailed extraction and comparison is performed. This does not include a check for identical keys. Therefore, an identical count does not necessarily mean that the source systems contain the same objects.
● Std Comparison with Details Results up to "Max Differences"This is the recommended, default option for a standard comparison. The system first counts the number of expected records in both source systems. It then performs a detailed extraction and comparison. If the number of inconsistencies identified exceeds the maximum number of differences (as defined in the comparison), the comparison run is stopped prematurely.
● Continue Comparison After "Max Differences" but w/o DetailsThis scenario is similar to the standard comparison but in this case, the comparison continues even if the maximum number of differences has been reached. The system does not record any further details; it simply increases the count of any inconsistent key figures.
CautionThis option can dramatically increase the total runtime, especially if there is a systematic error such as an incorrectly defined comparison or if the source systems are entirely different.
122 I N T E R N A LBusiness Process Operations
Data Consistency Management
5.2.7.2 Stopping Comparisons
Prerequisites
A comparison job is currently being executed.
Context
You can stop a comparison or group job that is currently running. For example, you might want to stop a job if the comparison is taking too long and you want to adjust the settings, or if the comparison has already found numerous inconsistencies and you want to analyze them before continuing.
If you want to reschedule the job, call transaction SM37 and reschedule the comparison there. The name of the job is CDC_<comparison or group name>.
Procedure
1. On the Comparison Overview or Comparison Group tab, select a comparison or group and choose Stop or Stop Group respectively.
2. The comparison job stops as soon as possible.
Results
You can now change the comparison, group, or run before restarting the comparison run.
5.2.7.3 Displaying Comparison Results
Prerequisites
You have executed a comparison run.
Business Process OperationsData Consistency Management I N T E R N A L 123
Context
After you have completed a comparison run or comparison group run, you can display the results of the comparison by selecting it and clicking Show Last Result.
The results are broken down as follows:
● Global Result ParametersThis area provides an overview of the comparison used in the run. You can display the comparison details by clicking Other Commands and then Show Comparison Definition.
● Result OverviewThis area summarizes the comparison results.
● Result DetailsThis area provides detailed information about the inconsistency type selected in the result overview.
● Comparison Runtime StatisticsThis area provides information about the duration and speed of the job, along with the actual block size for the source systems and whether any identical blocks were found in the comparison.
Procedure
1. On the Comparison Overview tab, select a comparison or group and choose Show Last Result.
The results of the last comparison are displayed.2. Optional: If you want to display other results for the comparison run, select a value from the Run ID
dropdown list in the Global Result Parameters area.3. In the Result Overview, select Objects Exist Only in System 1, Objects Exist Only in System 2, or Objects with
Differences.
The details are displayed in the Result Details area.
NoteIf you want to change the text used for the inconsistency types, click Rename Inconsistency Types and enter your own text in the Comparison-Specific Text column. Your new texts are then displayed for this comparison only. If you remove your custom texts from the table, the system reverts to the default texts.
4. Choose Hide/Show Context Fields to display further fields in addition to the mapped key fields. These fields are not in the comparison scope but may also be relevant to you. There are two types of Context Fields:○ Fields that are only available in one of the source systems and cannot be used as a mapping field.○ Fields that are available in both source systems but that always have different contents (for example,
created-by fields) and are, therefore, not used as comparison fields.5. Optional: Expand the Comparison Runtime Statistics area and review the statistics.
124 I N T E R N A LBusiness Process Operations
Data Consistency Management
5.2.7.4 Deleting Comparison Results
Use
The volume of data recorded in the comparison results grows over time. You can therefore delete data that you no longer require. In doing so, you can specify the following:
● How old the data for deletion is● Exactly what information you want to delete – just the details for a specific result or the entire result
including the summary and details
Prerequisites
You have run comparisons and are displaying the comparison results.
Procedure
1. Call transaction DSWP_CDC_REORG.2. Enter data as required.
Specify the comparison from which you want to delete data. If you do not specify a comparison, the system deletes the data from all comparisons.Specify which results you want to delete. For example, all results older than 30 days, but not the last three results.Specify which information you want to delete from the results.
3. Choose Execute ( F8 ).
NoteTo ensure that the comparison results are deleted regularly, schedule report DSWP_CDC_COMPARE_REORG as a background job in transaction SM37.
Result
The comparison results are deleted based on your selection.
Business Process OperationsData Consistency Management I N T E R N A L 125
5.2.8 Creating Messages
Prerequisites
You are authorized to create messages in IT Service Management.
Context
If you find inconsistencies in the cross-database comparison, you can create messages directly from the comparison run overview.
Procedure
1. On the Comparison Overview tab, click Create Incident.2. Choose the type of message you want to create and click OK.
The system displays the message form and automatically enters various data such as the description and the fact that the message is related to a comparison run.
NoteIf you want to change the predefined message text, implement enhancement spot DSWP_CDC_INCI_PARA.
3. Complete the information and choose Send.
Results
You have created a message and dispatched it to the relevant support team.
5.2.9 Duplicate Checker
The duplicate checker is a functionality within the cross-database comparison. You can find and list duplicated keys in a system.
You can use these results to clean up a data source or to fine tune a data model.
The following ABAP data source types are supported:
126 I N T E R N A LBusiness Process Operations
Data Consistency Management
● Remote database (using ADBC)● ABDY SAP ABAP system (RFC to Generic Extractor)
NoteThe duplicate checker analysis can only be done for comparison keys. There is no extraction and comparison of further data fields
5.2.9.1 Using the duplicate checker
When getting a duplicate key exception for a comparison run you can check for duplicate keys in the source system.
Procedure
1. On the SAP Solution Manager launchpad, select Cross-Database Comparison.2. Go to Comparison Overview.3. Select a comparison.4. Select Start.5. Expand the tray Special Options and choose a Comparison Scenario e.g.
Duplicates Check in Source 1,
Duplicate Check in Source 2 or
Duplicates Check in both Sources.6. Select OK (Start using selected parameters).7. To have the results of the duplicate check displayed, click on the status icons in the column Incon. Status -
Inconsistency Status of Comparison.
5.2.10 Drill-down comparisons
A drill-down comparison can be used to perform a detailed comparison of the results of a leading comparison.
Use
You can assign multiple leading and drill-down comparisons and trigger them automatically or manually.
Business Process OperationsData Consistency Management I N T E R N A L 127
Features
The result of a leading comparison can be applied as a filter in the drill-down comparison by considering the keys of the leading comparison for the selection of data.
On the result screen, you can navigate between the results of a leading and a drill-down comparison by clicking Show leading or Show drill-down.
To add or delete columns, click (Personalize) in the Define Drill-down Comparisons window.
5.2.10.1 Defining drill-down comparisons
You can add, delete, and validate new and existing drill-down comparisons.
Procedure
1. On the SAP Solution Manager launchpad, select Cross-Database Comparison.2. On the pushbutton Other commands, select Define Drill-down Comparisons.
This opens a new window (Define Drill-down Comparisons).3. Select Add.
The new comparison is added at the end of the list.
4. Click in column Comparison Name (Leading) and choose a leading comparison.
5. Click in column Comparison Name (Drill-Down) and choose a drill-down comparison.6. Choose a Description.7. Choose a Comparison Scenario (Runtime Behavior).8. Select whether you want to start the drill-down comparison automatically.9. Select whether a key transfer is mandatory or not required.
If you chose Key transfer not required, a full comparison is triggered. If you chose the option Key transfer mandatory and it fails because no matching key fields are found, the drill-down comparison will not start.
10. Click Save.
128 I N T E R N A LBusiness Process Operations
Data Consistency Management
5.2.10.2 Performing drill-down comparisons
You can select, schedule and perform drill-down comparisons.
Procedure
1. On the SAP Solution Manager launchpad, select Cross-Database Comparison.2. On the Cross-Database Comparison screen, tick the leading comparison you want to drill down on.
3. Select (Trigger Drill-Down).4. A new window opens (Schedule drill-down comparisons). Here, you can select individual drill-down
comparisons manually. You can also review and change the scheduling and the proposed comparison scenario.
5.3 Transactional Correctness
Use
Transactional correctness is an important database consistency requirement. If multiple programs update the same information simultaneously, data correctness can be at risk if the changes are not performed in an isolated manner. Locks control the access to data by multiple programs. In the event of a system failure, the logical unit of work principle ensures that the data affected is still consistent after recovery. The transactional correctness tool checks the transactional correctness of your ABAP programs.
Integration
The transactional correctness evaluation is based on the software principles of atomicity, consistency, isolation, and durability (ACID principles).
Business Process OperationsData Consistency Management I N T E R N A L 129
Prerequisites
Depending on the functions you want to use, the following prerequisites apply:
Use Prerequisite
Use the transactional correctness tool directly in the managed system
You have installed ST-PI 2008_1 or above
Evaluate enqueues and dequeues You have installed ST-PI 2008_1 SP9
Use the transactional correctness tool in SAP Solution Manager to evaluate transactional correctness in one of your managed systems
You have installed ST 7.10 SP12
Features
● The transactional correctness tool is a report that evaluates a transaction performance trace.● You can check transactional correctness either directly in the managed system or from the Transactional
Correctness tile on the Fiori launchpad.● Based on predefined rules, the report checks the following:
○ The number of independent changes in a logical unit of work (LUW)○ Whether the database changes are bundled in a single task○ The usage of enqueues and dequeues to lock the data
● The following rules are checked:
Rule Description
1 There should be no COMMIT and ROLLBACK statements between changes in the main program.
2 There should be no COMMIT and ROLLBACK statements between changes within each tRFC/qRFC.
3 There should be no changes in sRFC/aRFC unless executed in an update task.
4 An explicit COMMIT statement is needed to trigger changes in an update task.
5 If some changes in the main program are executed in an update task, the others should be as well.
E1 A database record can be modified without an active enqueue.
E2 A dequeue might be set without an active enqueue.
E3 A dequeue is set without all parameters specified.
130 I N T E R N A LBusiness Process Operations
Data Consistency Management
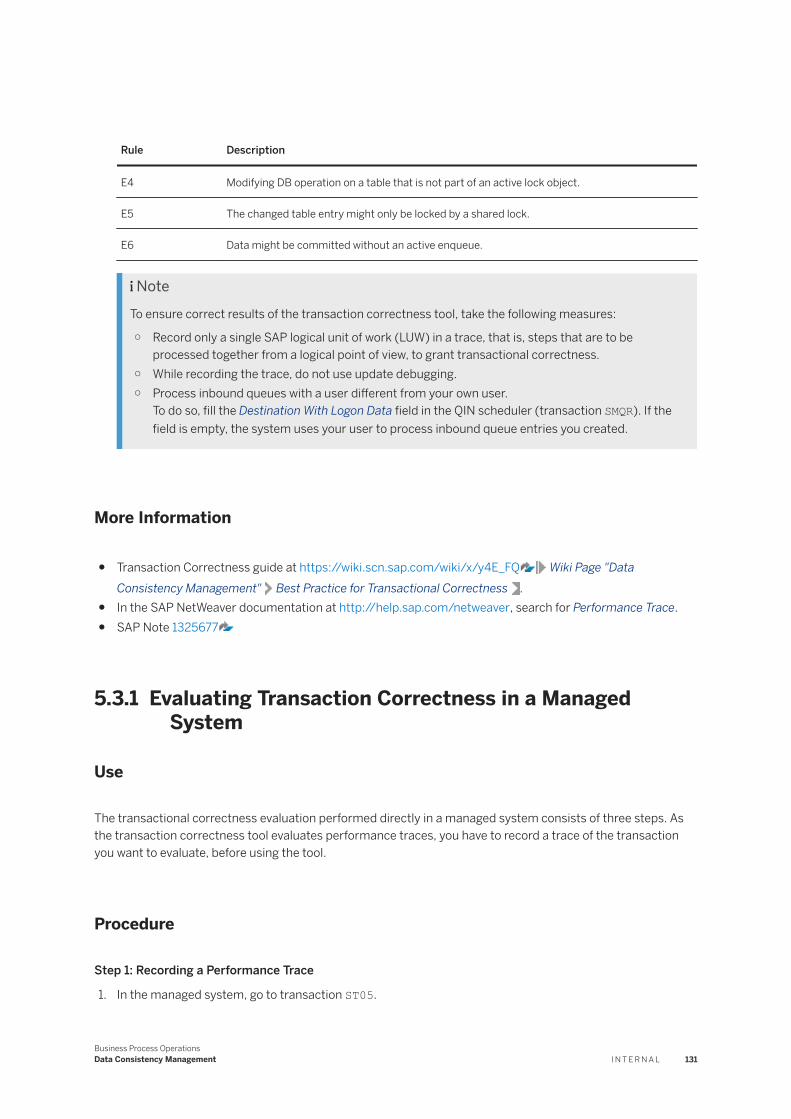
Rule Description
E4 Modifying DB operation on a table that is not part of an active lock object.
E5 The changed table entry might only be locked by a shared lock.
E6 Data might be committed without an active enqueue.
NoteTo ensure correct results of the transaction correctness tool, take the following measures:
○ Record only a single SAP logical unit of work (LUW) in a trace, that is, steps that are to be processed together from a logical point of view, to grant transactional correctness.
○ While recording the trace, do not use update debugging.○ Process inbound queues with a user different from your own user.
To do so, fill the Destination With Logon Data field in the QIN scheduler (transaction SMQR). If the field is empty, the system uses your user to process inbound queue entries you created.
More Information
● Transaction Correctness guide at https://wiki.scn.sap.com/wiki/x/y4E_FQ Wiki Page "Data Consistency Management" Best Practice for Transactional Correctness .
● In the SAP NetWeaver documentation at http://help.sap.com/netweaver, search for Performance Trace.● SAP Note 1325677
5.3.1 Evaluating Transaction Correctness in a Managed System
Use
The transactional correctness evaluation performed directly in a managed system consists of three steps. As the transaction correctness tool evaluates performance traces, you have to record a trace of the transaction you want to evaluate, before using the tool.
Procedure
Step 1: Recording a Performance Trace
1. In the managed system, go to transaction ST05.
Business Process OperationsData Consistency Management I N T E R N A L 131
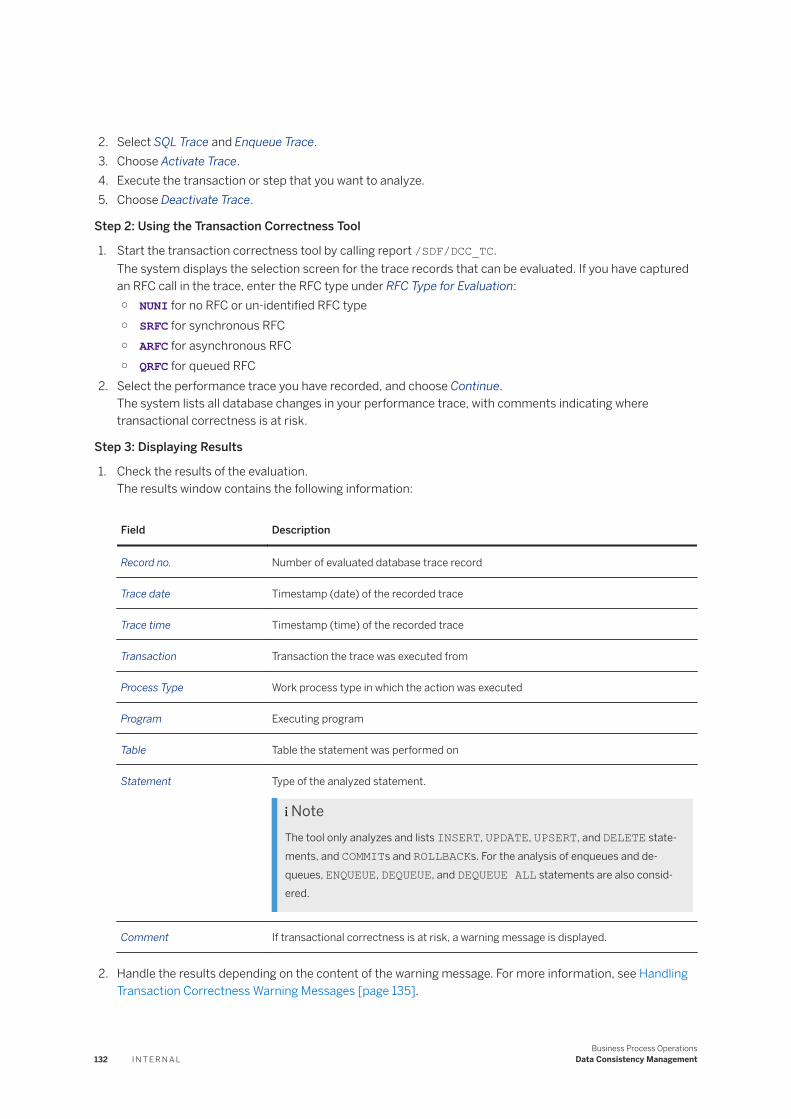
2. Select SQL Trace and Enqueue Trace.3. Choose Activate Trace.4. Execute the transaction or step that you want to analyze.5. Choose Deactivate Trace.
Step 2: Using the Transaction Correctness Tool
1. Start the transaction correctness tool by calling report /SDF/DCC_TC.The system displays the selection screen for the trace records that can be evaluated. If you have captured an RFC call in the trace, enter the RFC type under RFC Type for Evaluation:○ NUNI for no RFC or un-identified RFC type○ SRFC for synchronous RFC○ ARFC for asynchronous RFC○ QRFC for queued RFC
2. Select the performance trace you have recorded, and choose Continue.The system lists all database changes in your performance trace, with comments indicating where transactional correctness is at risk.
Step 3: Displaying Results
1. Check the results of the evaluation.The results window contains the following information:
Field Description
Record no. Number of evaluated database trace record
Trace date Timestamp (date) of the recorded trace
Trace time Timestamp (time) of the recorded trace
Transaction Transaction the trace was executed from
Process Type Work process type in which the action was executed
Program Executing program
Table Table the statement was performed on
Statement Type of the analyzed statement.
NoteThe tool only analyzes and lists INSERT, UPDATE, UPSERT, and DELETE statements, and COMMITs and ROLLBACKs. For the analysis of enqueues and dequeues, ENQUEUE, DEQUEUE, and DEQUEUE ALL statements are also considered.
Comment If transactional correctness is at risk, a warning message is displayed.
2. Handle the results depending on the content of the warning message. For more information, see Handling Transaction Correctness Warning Messages [page 135].
132 I N T E R N A LBusiness Process Operations
Data Consistency Management
More Information
For more information, in the SAP NetWeaver documentation at http://help.sap.com/netweaver , search for Performance Trace.
5.3.2 Evaluating Transactional Correctness Using SAP Solution Manager
Use
You can evaluate the transactional correctness of one of your managed systems, from SAP Solution Manager. You can call it from the Data Consistency Management tile on the Fiori launchpad.
Procedure
Step 1: Start and Stop Traces
1. On the ST05 tab page, choose the RFC destination of the managed system for which you want to check the transactional correctness.
2. Enter the user who is to execute the program you want to analyze.3. Under Tables, the list contains tables that are to be excluded from the transactional correctness analysis.
The tables listed by default should be excluded, since they are not relevant for the analysis, and might jeopardize the analysis if they are included. Review this list before each analysis.Choose Insert Row or Append Row, to add tables. Choose Delete Row to remove a table from the list.
4. Choose Start Trace to start the database performance trace in the managed system.5. Choose Stop Trace to finish the trace in the managed system.
Step 2: Select Traces
1. Under Trace Restrictions, enter the RFC destination of the managed system containing the program you want to analyze.
2. Enter the ID of the user who executed the program you want to analyze. This should be the user that has been traced.
3. The Date and Time fields are pre-filled by the system, with the start date and time and end date and time of the last trace. You can change the contents of these fields, if required.
4. If the trace records are to be distinguished by the extended passport root ID, the extended passport connection ID, the extended passport connection counter, or the TransGUID, you can enter the required data.
5. Under Data for Evaluation, if the program you traced used an RFC, you can either choose the RFC type or “Unknown RFC Type” if an un-identified RFC was used. You can also leave this field blank.
6. Choose Load Trace.The system displays the trace records based on the selection criteria specified.
Business Process OperationsData Consistency Management I N T E R N A L 133
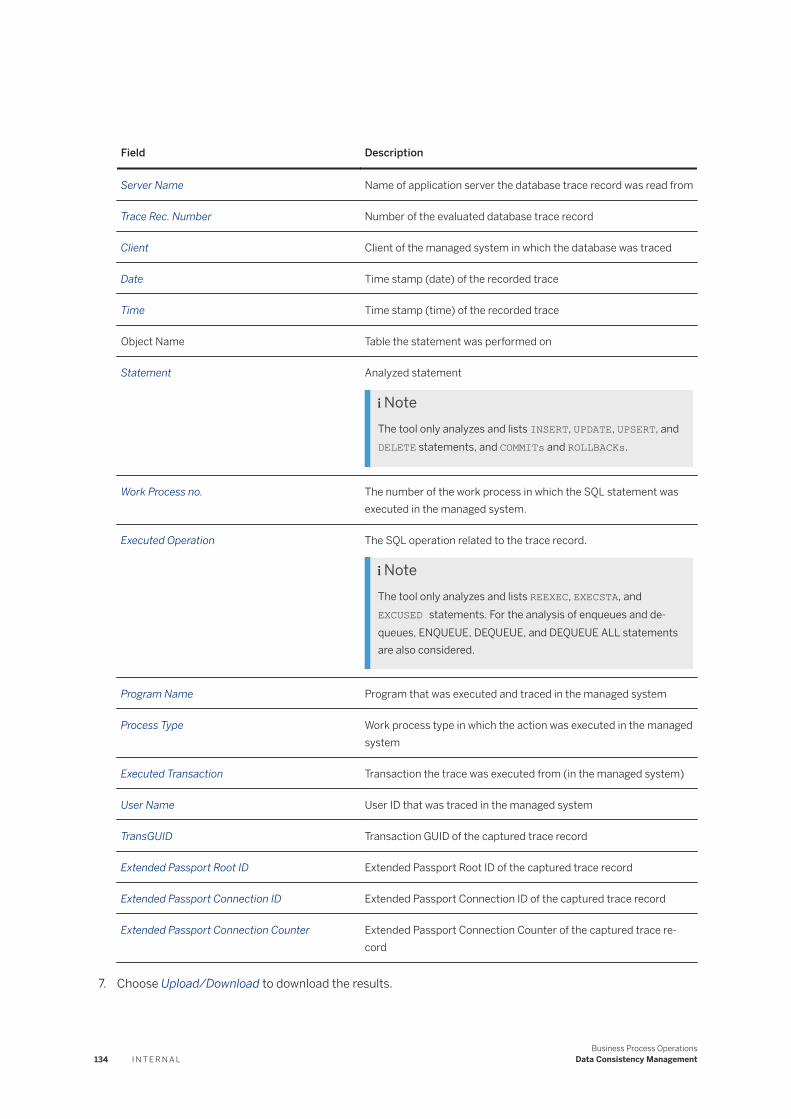
Field Description
Server Name Name of application server the database trace record was read from
Trace Rec. Number Number of the evaluated database trace record
Client Client of the managed system in which the database was traced
Date Time stamp (date) of the recorded trace
Time Time stamp (time) of the recorded trace
Object Name Table the statement was performed on
Statement Analyzed statement
NoteThe tool only analyzes and lists INSERT, UPDATE, UPSERT, and DELETE statements, and COMMITs and ROLLBACKs.
Work Process no. The number of the work process in which the SQL statement was executed in the managed system.
Executed Operation The SQL operation related to the trace record.
NoteThe tool only analyzes and lists REEXEC, EXECSTA, and EXCUSED statements. For the analysis of enqueues and dequeues, ENQUEUE, DEQUEUE, and DEQUEUE ALL statements are also considered.
Program Name Program that was executed and traced in the managed system
Process Type Work process type in which the action was executed in the managed system
Executed Transaction Transaction the trace was executed from (in the managed system)
User Name User ID that was traced in the managed system
TransGUID Transaction GUID of the captured trace record
Extended Passport Root ID Extended Passport Root ID of the captured trace record
Extended Passport Connection ID Extended Passport Connection ID of the captured trace record
Extended Passport Connection Counter Extended Passport Connection Counter of the captured trace record
7. Choose Upload/Download to download the results.
134 I N T E R N A LBusiness Process Operations
Data Consistency Management
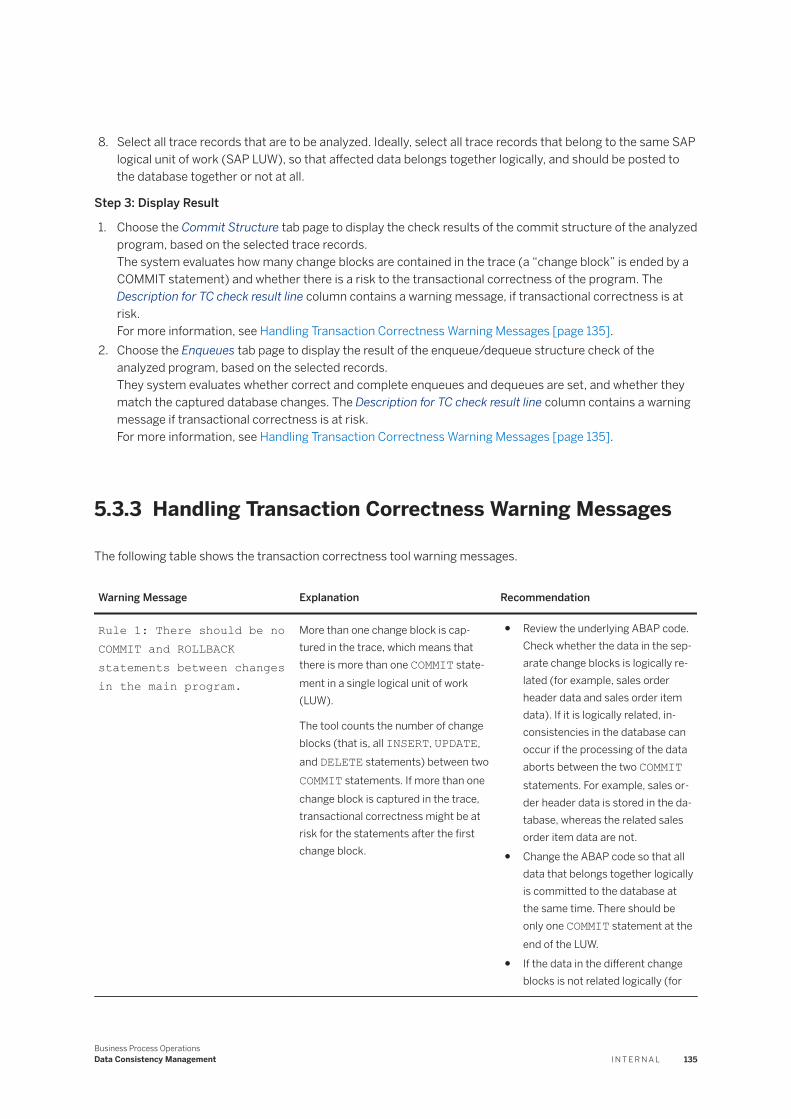
8. Select all trace records that are to be analyzed. Ideally, select all trace records that belong to the same SAP logical unit of work (SAP LUW), so that affected data belongs together logically, and should be posted to the database together or not at all.
Step 3: Display Result
1. Choose the Commit Structure tab page to display the check results of the commit structure of the analyzed program, based on the selected trace records.The system evaluates how many change blocks are contained in the trace (a “change block” is ended by a COMMIT statement) and whether there is a risk to the transactional correctness of the program. The Description for TC check result line column contains a warning message, if transactional correctness is at risk.For more information, see Handling Transaction Correctness Warning Messages [page 135].
2. Choose the Enqueues tab page to display the result of the enqueue/dequeue structure check of the analyzed program, based on the selected records.They system evaluates whether correct and complete enqueues and dequeues are set, and whether they match the captured database changes. The Description for TC check result line column contains a warning message if transactional correctness is at risk.For more information, see Handling Transaction Correctness Warning Messages [page 135].
5.3.3 Handling Transaction Correctness Warning Messages
The following table shows the transaction correctness tool warning messages.
Warning Message Explanation Recommendation
Rule 1: There should be no COMMIT and ROLLBACK statements between changes in the main program.
More than one change block is captured in the trace, which means that there is more than one COMMIT statement in a single logical unit of work (LUW).
The tool counts the number of change blocks (that is, all INSERT, UPDATE, and DELETE statements) between two COMMIT statements. If more than one change block is captured in the trace, transactional correctness might be at risk for the statements after the first change block.
● Review the underlying ABAP code. Check whether the data in the separate change blocks is logically related (for example, sales order header data and sales order item data). If it is logically related, inconsistencies in the database can occur if the processing of the data aborts between the two COMMIT statements. For example, sales order header data is stored in the database, whereas the related sales order item data are not.
● Change the ABAP code so that all data that belongs together logically is committed to the database at the same time. There should be only one COMMIT statement at the end of the LUW.
● If the data in the different change blocks is not related logically (for
Business Process OperationsData Consistency Management I N T E R N A L 135
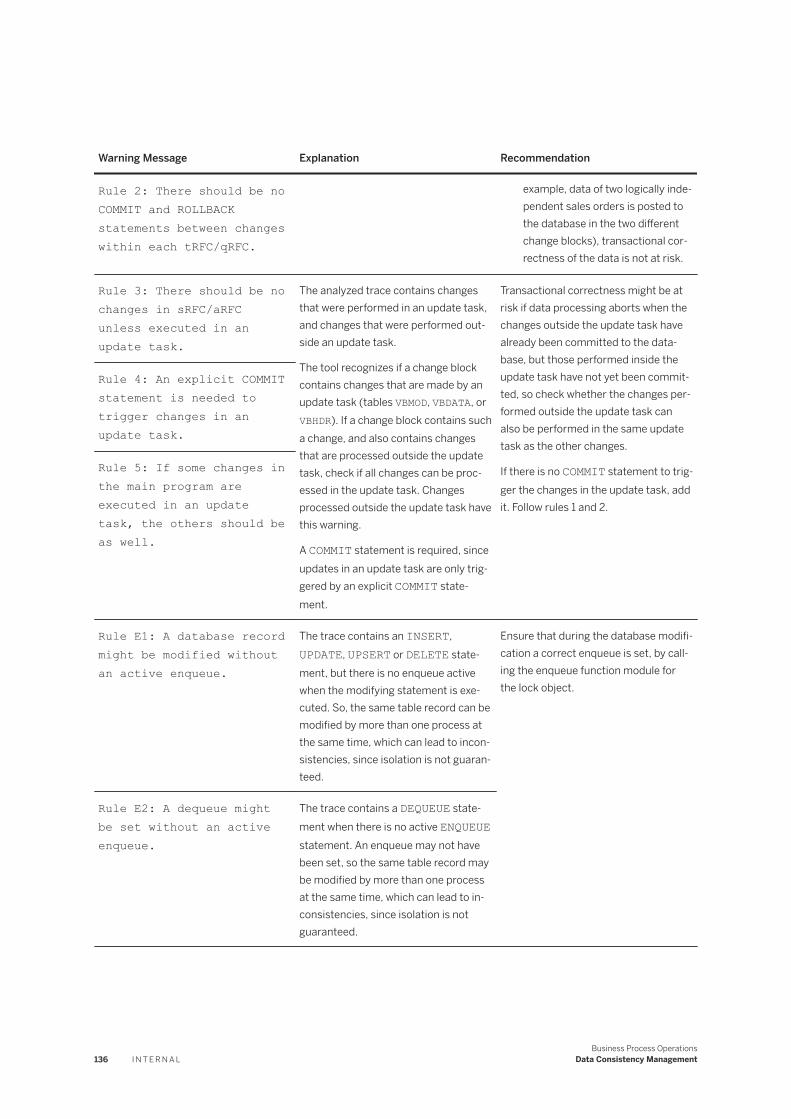
Warning Message Explanation Recommendation
Rule 2: There should be no COMMIT and ROLLBACK statements between changes within each tRFC/qRFC.
example, data of two logically independent sales orders is posted to the database in the two different change blocks), transactional correctness of the data is not at risk.
Rule 3: There should be no changes in sRFC/aRFC unless executed in an update task.
The analyzed trace contains changes that were performed in an update task, and changes that were performed outside an update task.
The tool recognizes if a change block contains changes that are made by an update task (tables VBMOD, VBDATA, or VBHDR). If a change block contains such a change, and also contains changes that are processed outside the update task, check if all changes can be processed in the update task. Changes processed outside the update task have this warning.
A COMMIT statement is required, since updates in an update task are only triggered by an explicit COMMIT statement.
Transactional correctness might be at risk if data processing aborts when the changes outside the update task have already been committed to the database, but those performed inside the update task have not yet been committed, so check whether the changes performed outside the update task can also be performed in the same update task as the other changes.
If there is no COMMIT statement to trigger the changes in the update task, add it. Follow rules 1 and 2.
Rule 4: An explicit COMMIT statement is needed to trigger changes in an update task.
Rule 5: If some changes in the main program are executed in an update task, the others should be as well.
Rule E1: A database record might be modified without an active enqueue.
The trace contains an INSERT, UPDATE, UPSERT or DELETE statement, but there is no enqueue active when the modifying statement is executed. So, the same table record can be modified by more than one process at the same time, which can lead to inconsistencies, since isolation is not guaranteed.
Ensure that during the database modifi-cation a correct enqueue is set, by calling the enqueue function module for the lock object.
Rule E2: A dequeue might be set without an active enqueue.
The trace contains a DEQUEUE statement when there is no active ENQUEUE statement. An enqueue may not have been set, so the same table record may be modified by more than one process at the same time, which can lead to inconsistencies, since isolation is not guaranteed.
136 I N T E R N A LBusiness Process Operations
Data Consistency Management
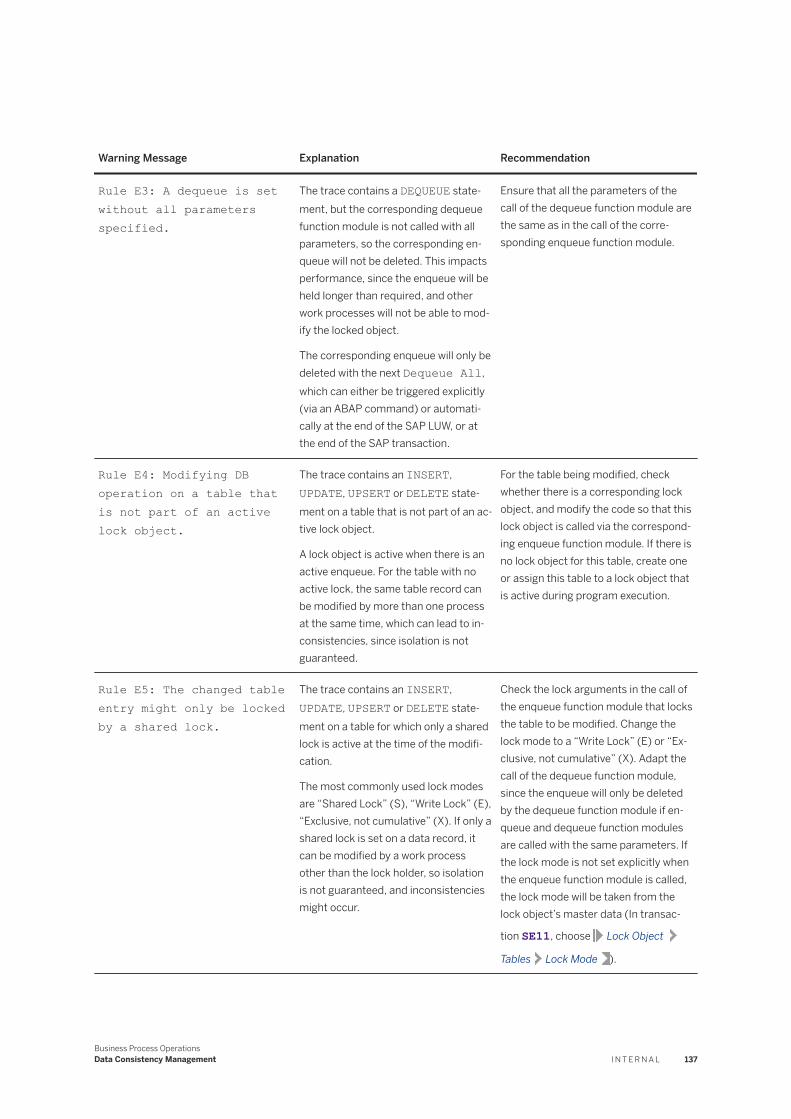
Warning Message Explanation Recommendation
Rule E3: A dequeue is set without all parameters specified.
The trace contains a DEQUEUE statement, but the corresponding dequeue function module is not called with all parameters, so the corresponding enqueue will not be deleted. This impacts performance, since the enqueue will be held longer than required, and other work processes will not be able to modify the locked object.
The corresponding enqueue will only be deleted with the next Dequeue All, which can either be triggered explicitly (via an ABAP command) or automatically at the end of the SAP LUW, or at the end of the SAP transaction.
Ensure that all the parameters of the call of the dequeue function module are the same as in the call of the corresponding enqueue function module.
Rule E4: Modifying DB operation on a table that is not part of an active lock object.
The trace contains an INSERT, UPDATE, UPSERT or DELETE statement on a table that is not part of an active lock object.
A lock object is active when there is an active enqueue. For the table with no active lock, the same table record can be modified by more than one process at the same time, which can lead to inconsistencies, since isolation is not guaranteed.
For the table being modified, check whether there is a corresponding lock object, and modify the code so that this lock object is called via the corresponding enqueue function module. If there is no lock object for this table, create one or assign this table to a lock object that is active during program execution.
Rule E5: The changed table entry might only be locked by a shared lock.
The trace contains an INSERT, UPDATE, UPSERT or DELETE statement on a table for which only a shared lock is active at the time of the modifi-cation.
The most commonly used lock modes are “Shared Lock” (S), “Write Lock” (E), “Exclusive, not cumulative” (X). If only a shared lock is set on a data record, it can be modified by a work process other than the lock holder, so isolation is not guaranteed, and inconsistencies might occur.
Check the lock arguments in the call of the enqueue function module that locks the table to be modified. Change the lock mode to a “Write Lock” (E) or “Exclusive, not cumulative” (X). Adapt the call of the dequeue function module, since the enqueue will only be deleted by the dequeue function module if enqueue and dequeue function modules are called with the same parameters. If the lock mode is not set explicitly when the enqueue function module is called, the lock mode will be taken from the lock object’s master data (In transac
tion SE11, choose Lock Object
Tables Lock Mode ).
Business Process OperationsData Consistency Management I N T E R N A L 137
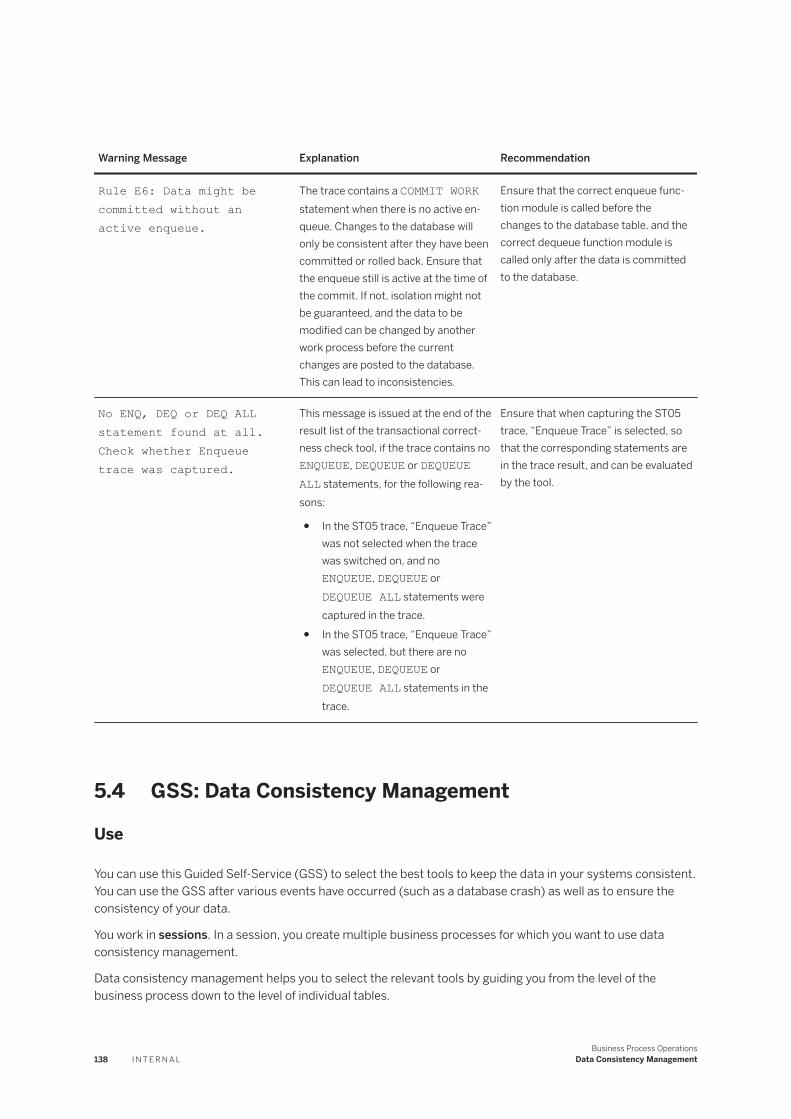
Warning Message Explanation Recommendation
Rule E6: Data might be committed without an active enqueue.
The trace contains a COMMIT WORK statement when there is no active enqueue. Changes to the database will only be consistent after they have been committed or rolled back. Ensure that the enqueue still is active at the time of the commit. If not, isolation might not be guaranteed, and the data to be modified can be changed by another work process before the current changes are posted to the database. This can lead to inconsistencies.
Ensure that the correct enqueue function module is called before the changes to the database table, and the correct dequeue function module is called only after the data is committed to the database.
No ENQ, DEQ or DEQ ALL statement found at all. Check whether Enqueue trace was captured.
This message is issued at the end of the result list of the transactional correctness check tool, if the trace contains no ENQUEUE, DEQUEUE or DEQUEUE ALL statements, for the following reasons:
● In the ST05 trace, “Enqueue Trace” was not selected when the trace was switched on, and no ENQUEUE, DEQUEUE or DEQUEUE ALL statements were captured in the trace.
● In the ST05 trace, “Enqueue Trace” was selected, but there are no ENQUEUE, DEQUEUE or DEQUEUE ALL statements in the trace.
Ensure that when capturing the ST05 trace, “Enqueue Trace” is selected, so that the corresponding statements are in the trace result, and can be evaluated by the tool.
5.4 GSS: Data Consistency Management
Use
You can use this Guided Self-Service (GSS) to select the best tools to keep the data in your systems consistent. You can use the GSS after various events have occurred (such as a database crash) as well as to ensure the consistency of your data.
You work in sessions. In a session, you create multiple business processes for which you want to use data consistency management.
Data consistency management helps you to select the relevant tools by guiding you from the level of the business process down to the level of individual tables.
138 I N T E R N A LBusiness Process Operations
Data Consistency Management
Integration
Data consistency management uses solutions to access the systems maintained.
Prerequisites
● The Solution Directory is maintained for the business processes.● The business objects and tables are specified in the configuration.
Activities
The GSS for data consistency management consists of several steps. In each step, you can save your entries and continue editing later. Information about each step is displayed directly on the screen.
The GSS runs as follows:
1. On the SAP Solution Manager launchpad, choose Data Consistency Management, then choose GSS Data Consistency Management.
2. You select the session to which you want to add objects.3. You select the event for which you want to use data consistency management.
○ Technical analysis: Analyze which tools you can use after a system crash before restoring the database.
○ Application analysis: Analyze which tools you can use to check data consistency.○ CDC documentation: Automate the documentation of existing cross-database comparisons and add
your own documentation.4. You choose the objects for which you want to ensure data consistency. Starting from the event, select the
systems, business processes, business objects, and tables and add them to a session.5. The system suggests the most suitable tools.6. Execute the suggested tools.7. You display evaluations of the analysis results.8. You specify follow-up activities.
5.5 Internal Database Comparison
Use
You can check data for consistency within one SAP system, for example, by comparing two tables to detect any missing table entries or inconsistent field contents.
Business Process OperationsData Consistency Management I N T E R N A L 139
There are two ways to compare data in an internal database:
● By opening the Data Consistency Management tile in the Fiori launchpad and choosing Internal Database Comparison.If you select this option, you can use the features described below.
● By choosing the extraction strategy Execute Comparison in One System in cross-database comparisonIf you select this option, you can use the features in cross-database comparison and define more complex data models. For more information, see Cross-Database Comparison [page 85] and "Determine Inconsistent Entries in One System" Data Source [page 103].
Features
● Define conditions and restrictions for the tables and field contents to be compared.● Select a use case: missing entries in a table or inconsistencies between tables.● Define fields to be displayed in the result.● Define a remote connection to the system in which the data to be compared is located.● Create a variant for your comparison that can be run regularly.
5.6 Business Process Completeness Check
Use
If business processes have subprocesses that are synchronously executed on several systems, it can be difficult to identify whether all process steps have been executed successfully and whether all objects were correctly created on the different systems. With the Business Process Completeness Check (BPCC), you can monitor critical parts of a business process.
Prerequisites
● You have configured the managed systems for Exception Management in SAP Solution Manager Configuration (transaction SOLMAN_SETUP).
● You have configured the monitoring of multiple-step exceptions for the business processes and their critical subprocesses in the Exception Management Instrumentation Platform (EM-IPA) configuration.
● You have instrumented the processes and the process steps in the managed systems.
Features
● In the Business Process Completeness Check application, you can view a process instance to check wether all process steps have been executed successfully and to examine the steps individually in case of an error.
140 I N T E R N A LBusiness Process Operations
Data Consistency Management

● You can also see the results of the Business Process Completeness Check for a process instance in the Details view of the Exception Management Cockpit.
More Information
Configuring Business Process Completeness Check [page 141]
Instrumenting the Business Process Completeness Check [page 144]
Analyzing Business Process Steps with the BPCC Process Flow view [page 146]
5.6.1 Configuring Business Process Completeness Check
Use
To implement the monitoring of business processes with the Business Process Completeness Check (BPCC), you do the following tasks in SAP Solution Manager:
● Activate the Exception Management Instrumentation Platform (EM-IPA) for systems and clients● Specify Journal Mode data collection for Exception Management logging● Configure business processes and their subprocesses as categories and subcategories in the EM-IPA
configuration● Map business process type IDs to the categories and subcategories
Prerequisites
● You have configured the systems in the Managed Systems Configuration of SAP Solution Manager Configuration (transaction solman_setup).
● You have configured Exception Management for the systems in the Exception Management scenario of SAP Solution Manager Configuration (transaction solman_setup).
Procedure
Activating the Exception Management Instrumentation Platform (EM-IPA) for the technical systems
1. Add Root Cause Analysis to the SAP Solution Manager launchpad. Then start Root Cause Analysis.2. In Root Cause Analysis, choose Exception Management.
Business Process OperationsData Consistency Management I N T E R N A L 141
NoteTo access the Exception Management Instrumentation Platform (EM-IPA) configuration, you have to start the Exception Management from the Root Cause Analysis work center. Do not start Exception Management directly by using the Exception Management tile on the SAP Solution Manager launchpad.
3. To access the Exception Management Instrumentation Platform (EM-IPA) configuration, in Exception Management, choose IPA Configuration.On the Overview tab page, you see the systems that are configured for exception management.
4. Select the Show all Technical Systems / Cloud Services check box to also show systems that have not yet been configured.
5. Select an technical system, and then choose Activate IPA.6. Select the clients on which you have implemented the Exception Management Instrumentation Platform.
Specifying Journal Mode Data Collection
On the Instrumentation Platform tab page, under Specific Settings, specify the data collection mode Journal Mode for the systems that you want to configure for BPCC.
NoteWith Journal Mode data collection, data is written for every processing step to exception management logging, regardless of whether an exception occurred. Only step data is persisted; in other words, there is no error or payload information. This setting is not sensitive to the trace flags provided by SAP Extended Passport. This means that tracing occurs for all users in all sessions in which the appropriate processing step is executed.
Configuring Business Processes and Subprocesses as Categories and Subcategories
You usually don't want to monitor a business process as a whole, but critical parts of the process, that is subprocesses. You configure the subprocesses in the Exception Management Instrumentation Platform so that you can later instrument them in the monitored systems.
On the IPA Configuration screen, you configure business processes and their subprocesses as categories with subcategories in the Exception Management Instrumentation Platform. You can use processes and process steps that you have configured in Solution Documentation and assign them to the categories and subcategories.
You also map a business process type ID to the categories and subcategories. The business process type ID is used for the instrumentation of the process steps in managed system to distinguish the different process types.
1. On the Repository tap page, go to the Repository sub-tab page.2. Choose Edit.3. Under Category, choose Add to define a new business process as category.4. Specify a category ID and a category text.
ExampleTo configure an order-to-cash process, you could specify the category ID O2C and the category text Order to Cash.
5. You can assign a process modelled in Solution Documentation to the category. To do so, use the value help at Assigned Process to select the process from Solution Documentation.
142 I N T E R N A LBusiness Process Operations
Data Consistency Management
6. To define a subprocess as a subcategory of a business process, select the category that represents the business process and, under Subcategory, choose Add.
7. Specify a subcategory ID and a subcategory text.
ExampleFor the order-to-cash process, you want to configure the order creation as the first process step. You specify the subcategory ID 1O2C and the category text Order Creation.
8. You can assign a process or process step modelled in the Solution Documentation to the subcategory. To do so, use the value help at Assigned Process or Process Step to select the process or process step from the Solution Documentation.
9. At Business Process Type ID, specify the business process type ID for the subcategory.
NoteThe business process type ID is assigned to the combination of category and subcategory. When you instrument the process steps of the subprocess in the managed system, you use the business process type ID to identify the subprocess that you want to monitor. You also use the business process type ID when you configure rules for BPCC.
ExampleYou assign the business process type ID OC00 to the subcategory Order Creation. When you later instrument the process step in the managed system, you use the business process type ID OC00 to identify the process step.
10. Save your configuration.
Configuring Object Types for BPCC
Configuring object types is a prerequiste for configuring rules that check wether specific object types exist or not exist in the process steps of a business process instance. You can configure object types that have been set up in the instrumentation of the business processes on the managed systems. An exception is the object type STEP, which refers to the logged business process steps. You configure the object types on the Object Maintenance tab:
1. On the Repository tap page, go to the Object Maintenance sub-tab page.2. Choose Edit.3. Under Object, choose Add to define a new object type.4. Specify the object type and an object name.5. Save your settings.
Configuring Rules for BPCC
On the Rules Maintenance tab, you can configure rules that check whether specific object types exist or not exist in the process steps of a business process instance. For example, you can configure a rule that checks if a Sales Order object has been created in the process step Create Sales Order.
1. On the Repository tap page, go to the Rule Maintenance sub-tab page.2. Choose Edit.3. Under Rule, choose Add to define a new rule.4. Define a rule ID and a rule name.
Business Process OperationsData Consistency Management I N T E R N A L 143

5. Specify the rule type. There are the following rule types:○ O_EXIST: Object exists○ O_NO_EXIST: Object does not exist
6. Specify the excecution mode of the rule. There are the following execution modes:○ AX
The rule is executed automatically and the rule completeness relevant: A failure of this rule impacts the completeness status of the business process instance.
○ AThe rule is executed automatically and the rule is not completeness relevant: A failure of this rule does not impact the completeness status of the business process instance.
○ MThe rule is executed manually.
7. To use the rule for the Business Process Completeness Check, activate the rule.8. You can configure rule attributes. Select a rule in the Rules table, and in the Rules Attributes table, add the
rule attributes.9. Save your settings.
More Information
5.6.2 Instrumenting the Business Process Completeness Check
Use
If you want to monitor business process steps with the Business Process Completeness Check, you need to instrument them in the source code of the managed systems. The instrumentation can be done via implicit or explicit enhancement points when enhancing SAP coding, or it can be done directly in customer coding.
For more information on the Exception Management Instrumentation Platform, see .
Prerequisites
● You have configured the business process and the subprocess that you want to as categories and subcategories in the Exception Management Instrumentation Platform configuration
● You have assigned business process type IDs to the subcategories.● You have identified the business process steps that you want to instrument.
144 I N T E R N A LBusiness Process Operations
Data Consistency Management
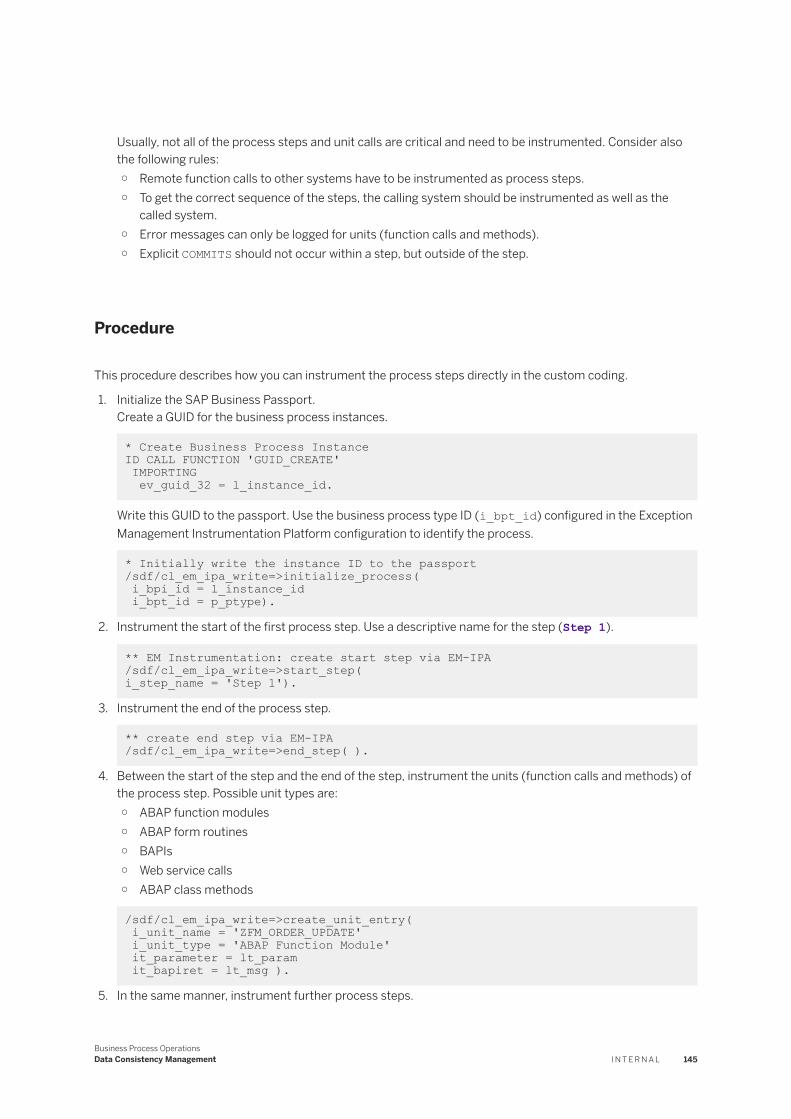
Usually, not all of the process steps and unit calls are critical and need to be instrumented. Consider also the following rules:○ Remote function calls to other systems have to be instrumented as process steps.○ To get the correct sequence of the steps, the calling system should be instrumented as well as the
called system.○ Error messages can only be logged for units (function calls and methods).○ Explicit COMMITS should not occur within a step, but outside of the step.
Procedure
This procedure describes how you can instrument the process steps directly in the custom coding.
1. Initialize the SAP Business Passport.Create a GUID for the business process instances.
* Create Business Process Instance ID CALL FUNCTION 'GUID_CREATE' IMPORTING ev_guid_32 = l_instance_id.
Write this GUID to the passport. Use the business process type ID (i_bpt_id) configured in the Exception Management Instrumentation Platform configuration to identify the process.
* Initially write the instance ID to the passport /sdf/cl_em_ipa_write=>initialize_process( i_bpi_id = l_instance_id i_bpt_id = p_ptype).
2. Instrument the start of the first process step. Use a descriptive name for the step (Step 1).
** EM Instrumentation: create start step via EM-IPA /sdf/cl_em_ipa_write=>start_step( i_step_name = 'Step 1').
3. Instrument the end of the process step.
** create end step via EM-IPA /sdf/cl_em_ipa_write=>end_step( ).
4. Between the start of the step and the end of the step, instrument the units (function calls and methods) of the process step. Possible unit types are:○ ABAP function modules○ ABAP form routines○ BAPIs○ Web service calls○ ABAP class methods
/sdf/cl_em_ipa_write=>create_unit_entry( i_unit_name = 'ZFM_ORDER_UPDATE' i_unit_type = 'ABAP Function Module' it_parameter = lt_param it_bapiret = lt_msg ).
5. In the same manner, instrument further process steps.
Business Process OperationsData Consistency Management I N T E R N A L 145
6. Instrument the saving of the data at the end of the business process or at the end of the function call (LUW).When the process runs across different systems, at least one save data should exist before the another system is called, if not the data won't be logged.
NoteIf you want to instrument the process steps in SAP coding, use implicit enhancement options. To display the implicit enhancements options, in the ABAP system, choose Edit Enhancement Options Show Implicit Enhancement Options .
5.6.3 Analyzing Business Process Steps with Business Process Completeness Check
Use
To analyze exceptions in a critical subprocess of a business process, you can examine the steps of the subprocess in the Business Process Completeness Check application.
Prerequisites
● You have configured the monitoring of the processes in the Exception Management Instrumentation Platform.
● You have instrumented the processes and steps in the managed systems.
For more information, see.
● Configuring Business Process Completeness Check [page 141]● Instrumenting Business Process Completeness Check [page 144]
Procedure
Starting the Business Process Completeness Check
1. Start the Business Process Completeness Check application from the SAP Solution Manager launchpad.2. In the Instance field, use the value help to select the business process instance that you want to analyze.
NoteBusiness Process Completeness Check is also integrated in Data Consistency and in Exception Management application. In Exception Management, select the exception type for multiple-step exceptions, the category of the business process, and the process instance and choose BPCC Process Flow.
146 I N T E R N A LBusiness Process Operations
Data Consistency Management
Analyzing Business Process Steps
The screen of Business Process Completeness Check consists of the header with general information, the process flow chart, and context-sensitive information for selected steps.
The header displays general information on the process instance, such as the ID of the selected process instance, the timestamp, and the overall execution time of the process instance. The statuses for the process instance as a whole, the overall status, the exception status, the completeness status, and the rule status, are indicated by traffic light icons:
● Red (error)● Yellow (warning)● Green (success)● Gray (undefined)
The process flow chart shows the sequence of the process steps. You see the status of each step and in which system the steps are performed.
On the right side, you can display context-sensitive information on individual process steps.
To analyze the steps, proceed as follows:
1. To display the statuses of the process steps in the flow chart, select a status type (overall status, exception status, completeness status, or rule status ) in the header. The flow chart indicates the status of each process steps for this status type.
ExampleYou see that the completeness status for the process instance indicates an error, which means that the process hasn't been completed. You want to know in which of the steps an error occurred. You select Completeness to see which of the steps are completed (green icon) and which of the steps are incomplete (red icon).
2. To see detailed information on a process step, click on a process step in the flow cart and select an information context. You can display up to three different information contexts at once. You can select the following contexts:○ Call Stack: Call stack of the process step○ Rule Result: The result of the rules evaluation. The configured rules are used to check whether specific
objects exist or not exist in a process step.○ Step Details: Information on the step, such as the following:
○ Step ID○ Pred. Step ID: ID of the previous step○ Sequence No.: Number of the step sequence to which the step belongs. A process can have several
step sequences.○ Step number○ Start time, end time, and duration
○ Step Context: Information on the technical context of the step, such as system, host, client, or user○ Business Objects Logged: Business objects logged during the step execution (if instrumented)○ Messages: Messages logged during the step execution (if instrumented)○ Extended Passport: Details from the extended passport, such as the client, the root context, the
transaction ID. This information refers to the process as a whole and is not specific to the selected step.
Business Process OperationsData Consistency Management I N T E R N A L 147
NoteTo view another process instance, select the process instance in the Instance field.
Saving Personalized Settings
To save your context selections as personalized settings for the Business Process Completeness Check application, proceed as follows:
1. Select the Context for the information that you want to see when you open the Business Process Completeness Check Process Flow view.
2. On the right side of the screen, choose Personalization.3. In the Personalization window, choose Save.
When you want to reload your personalized settings, choose Personalization and then Load.
148 I N T E R N A LBusiness Process Operations
Data Consistency Management

6 Job Management
Job management is a process that supports management of solution-wide background operations that automate your business processes. It allows you to request, document, analyze, and schedule background jobs in your system environment from a central location, with a standardized workflow.
Implementation Considerations
● Your system landscape and the Job Management scenario must be configured in . In SAP Solution Manager Configuration, make sure that:○ The relevant systems are connected to SAP Solution Manager.○ You have executed the guided procedure for job management under Business Process Operations.○ Each system that is relevant for job management is part of one technical scenario or a logical
component group.Note that logical component groups are defined in solution documentation.
● Solutions for the background processing business processes must be defined in .
Integration
Integration with SAP Solution Manager ScenariosJob management is integrated with the following SAP Solution Manager scenarios:
● Business Process and Interface Monitoring [page 8] and for monitoring jobs● Job monitoring, which is part of application operations (but can also be setup as part of process
monitoring in solution documentation).● and for handling job requests
To use this integration, you must configure these scenarios.
Integration with External SchedulersSolution Manager Scheduling Enabler (SMSE) is the interface between SAP applications and external schedulers for scheduling jobs and job chains, and for integrating business and infrastructure events. You can use SAP Solution Manager to view and monitor jobs and job chains that are managed with an SMSE-certified external scheduler, such as SAP Business Process Automation by Redwood (SAP BPA).
Features
Job Request ProcessingProject members or business end users can use an interactive job request form to request that a job be created, changed, or deleted. When you submit the job request, you can decide whether a job request
Business Process OperationsJob Management I N T E R N A L 149
document or a job document is created. An approval process is in place to handle these documents. If a job request document is created, it must be copied over to a job document before the job can actually be scheduled.
The workflow is handled by IT Service Management and Change Request Management, although you can also integrate your own, external ticketing system.
For more information, see Requesting Jobs [page 155].
Job Documentation
Job documentation is the central object of the job management standard. It allows you to centrally manage, schedule, and document in detail the background processing of your entire system landscape.
Create structured documentation of the following business and technical properties of background jobs:
● Job steps● Job-automated business process steps and the corresponding system● Business requirements, priority, and responsible organization● Scheduling parameters● Monitoring configuration● Error-handling procedures● Authorizations● Contacts and responsibilities
You can do the following:
● Schedule jobs in managed systems from job documentation.● Import job data, including scheduling parameters, from managed systems into job documentation.● Use templates to simplify the creation of job documentation and ensure consistency.
For more information, see Job Documentation [page 180].
Job Scheduling
Job scheduling supports the following activities:
● Perform centralized job scheduling from SAP Solution Manager to connected SAP systems, with or without job documentation.
● Use the job scheduling assistant to support your job planning process. Fulfill business requirements while ensuring optimal utilization of system resources.
● Fully document job scheduling parameters, supported by automatic data transfer from connected SAP systems.
● Activate Job Control for Managed Systems [page 214] to automatically redirect specified users to SAP Solution Manager when they try to schedule or change jobs using scheduling transactions such as SM36 or SM37.
For more information, see Job Scheduling [page 204].
Job Analysis
You can analyze the workload caused by background jobs using graphical analysis tools such as a Gantt Chart.
For more information, see Job Analysis [page 228].
150 I N T E R N A LBusiness Process Operations
Job Management
6.1 Job Management Launchpad Group
This launchpad group is the central access point for all functions offered for background operations management for your solution landscape.
The group consists of the following apps, which are displayed by default:
App Description
Alert Inbox - Job Monitoring The application displays alerts that are related to job monitoring. You can change the standard query to restrict the display of specific alerts.
Job Monitoring Job Monitoring is a centralized job monitoring concept based on the end-to-end Monitoring and Alerting Infrastructure (MAI). It enables you to monitor ABAP jobs, BW process chains, data service jobs, business objects jobs, SMSE jobs, and other custom job types.
Central Job Overview [page 223] You use this application to view job data over the complete lifecycle, similar to the Job Overview (transaction SM37). You can view detailed information of the ABAP jobs in the different managed systems. It also gives you an overview of the jobs scheduled via SAP Business Process Automation by Redwood or its predecessor SAP Central Process Scheduling by Redwood (enhancement to other certified schedulers is also possible). If the SAP BPA scheduled job is part of a job chain, hierarchical job chain information is also displayed. To provide this overview, data is collected directly from the managed system and the SAP BPA scheduler.
Job Schedule Gantt Chart [page 228]
The Gantt Chart provides a convenient graphical overview of scheduling information for selected jobs over a period of time. It allows you to analyze the workload caused by background jobs, so you can avoid bottlenecks and optimize system resources when scheduling jobs.
Job Scheduling Assistant The job scheduling assistant helps you to schedule a new job by finding slots with low system load and by providing information on similar jobs. In this way, you can avoid redundant jobs and make sure you schedule a job at times of low system load. It uses data obtained from System and Application Monitoring.
Requesting Jobs [page 155] You use this application to create and display job requests.
Job Documentation [page 180] You use this application to open and edit existing job or job chain documentation.
Create Job Documentation (Simple UI)
Users with detailed knowledge of SAP Solution Manager and job scheduling can use this app to create job documents that contain all of the important fields offered by job documentation. The UI is simplified but includes a validation function (that can be enhanced via BAdI). The system expects a certain sequence of actions to happen before the actual job scheduling takes place. If external scheduling is to take place, automatic creation of the external job definition can be implemented via a BAdI.
Business Process OperationsJob Management I N T E R N A L 151

App Description
Create Job Documentation (Detailed UI)
Users with detailed knowledge of SAP Solution Manager and job scheduling can use this app to create job documents that contain all fields offered by job documentation. The UI can be simplified by implicit enhancements. It does not offer a validation function, and does not expect a certain sequence of actions to happen before the job is actually scheduled. The automatic creation of the external job definition cannot be implemented via a BAdI.
Request Batch Job - Job Request + WF (Simple UI)
Users with a limited knowledge of SAP Solution Manager and job scheduling can use this app to create simplified job requests. The app consists of a subset of fields offered by job documentation. Integration with an external ticketing system is supported.
Request Batch Job - Job Request + WF (Detailed UI)
Users with detailed knowledge of SAP Solution Manager and job scheduling can use this app to create detailed job requests that contain all fields offered by job documentation.
Request Batch Job - Job Document + WF (Simple UI)
Users with a limited knowledge of SAP Solution Manager can use this app to create simplified job documentation without a job request. Integration with an external ticketing system is supported.
Job Management Administration [page 153]
This is the central point of access to Job Management applications.
Job documents enable you to manage the background processing of your entire system landscape. They allow you to document (with version management) and schedule your background jobs, as well as monitor their execution. The starting point of the job management process is the job request. End users and project members can create a job request for a new job, for a job change, or a job deletion. Job requests undergo an end-to-end approval and implementation process with the workflow handled by IT Service Management and Change Request Management. The content of a job request can automatically be copied over to a job document.
The following tiles are not displayed by default but can be added via the app finder:
Tile Description
Configuration - Job Management You can access the Job Management configuration of SAP Solution Manager (transaction SOLMAN_SETUP).
Job Resource Analysis Job Resource Analysis allows you to remotely analyze your entire system landscape, including KPIs that are relevant for background processing. It offers you a compulsory trend report on the relevant system monitoring metrics.
152 I N T E R N A LBusiness Process Operations
Job Management
6.2 Job Management Administration
The Job Management - Administration app provides access to the following features:
Overview
This view provides overview information with direct links to the personal object worklist (POWL) queries defined for the other views.
Depending on your configuration settings, a tag cloud may be displayed at the top of the Overview page. Click on a tag to view a list of job requests and job documentation that use that tag. Navigate directly to the tagged items by clicking them in the list.
You can set the refresh rate for the overview by using the Page Update Settings link in the bottom right corner of the page.
For more information, see Job Documentation [page 180].
Job Requests
This view enables you to quickly access job requests that you have submitted or that you have to process. You can also use it to create new or detailed job requests. For more information, see Requesting Jobs [page 155].
Job Documentation
This view enables you to quickly access job documentation, including any documentation that you need to review. You can also use this view to create job documentation. For more information, see Job Documentation [page 180].
Unified Alert Inbox
This view displays job alerts generated by active monitoring objects. For more information, see .
External Scheduler Management
Provides a view to manage jobs scheduled with a connected, SMSE-certified external job scheduler
For more information, see External Scheduler Management [page 226].
Business Process OperationsJob Management I N T E R N A L 153
SAP Scheduler Management
In this view, you can manage jobs scheduled with the SAP Scheduler via the BC-XBP interface.
For more information, see SAP Scheduler Management [page 225].
Recommended Jobs
Provides a view of background jobs in your system landscape, organized by system.
For more information, see Scheduling Recommended Jobs [page 221].
Task Inbox
Provides a list of job documentation tasks. If authorized, you can create new tasks and display, edit, and delete existing tasks.
For more information, see Tasks Tab Page [page 192].
Reports
This view provides access to ABAP and BW reports. For more information, see Reports [page 231].
Administration
Provides you access to perform various configuration and management tasks:
● Generate business partners for users● Manage connections to external schedulers● Define and check RFC BACK destinations from managed systems to SAP Solution Manager● Maintain criteria profiles for job control, and activate or deactivate job control for users● Configure Job Scheduling Management Health Check Reports [page 233] and Business Process
Monitoring reports● Configure the automatic delivery of specified query results to email recipients● Use a guided procedure to customize the UI configuration for different roles
Common Tasks
Provides you with links to the following frequently used job management tasks:
154 I N T E R N A LBusiness Process Operations
Job Management
● Access the template directory● Analyze jobs with the batch job analysis tool● Analyze jobs in a Gantt chart● Schedule jobs directly● Import jobs into job documentation● Select jobs in your managed systems to check details centrally from SAP Solution Manager● Link jobs in your managed systems with job documentation● Open the Central Job Overview [page 223]
6.3 Requesting Jobs
If you want to request a new job, a change to a job, or the deletion of a job, you can do so by submitting a job request or a job document. The job request or job document then undergoes an end-to-end approval and implementation process, with the workflow handled by IT Service Management or Change Request Management. However, you can also integrate your own, external ticketing system by implementing the BAdI for External Service Desk (BADI_AGS_SJR_EXTSDK).
NoteTo ensure that new jobs and job scheduling changes go through the job request and approval process, the administrator can set up job control. Job control redirects users to Job Management when they try to schedule or change jobs in the managed systems using scheduling transactions such as SM36 or SM37. For more information, see Job Control for Managed Systems [page 214].
To request that a new job be scheduled, you have the following options:
● You can submit a job request using a simplified user interface, which you can integrate with an external ticketing system. Before the job can be scheduled, the job request document has to be copied over to a job document.
● You can submit a job request using a detailed user interface, which is tightly integrated with ITSM. Before the job can be scheduled, the job request document has to be copied over to a job document.
● You can submit a job document using a simplified user interface, which you can integrate with an external ticketing system. The job document can then be used to schedule the job.
Business Process OperationsJob Management I N T E R N A L 155
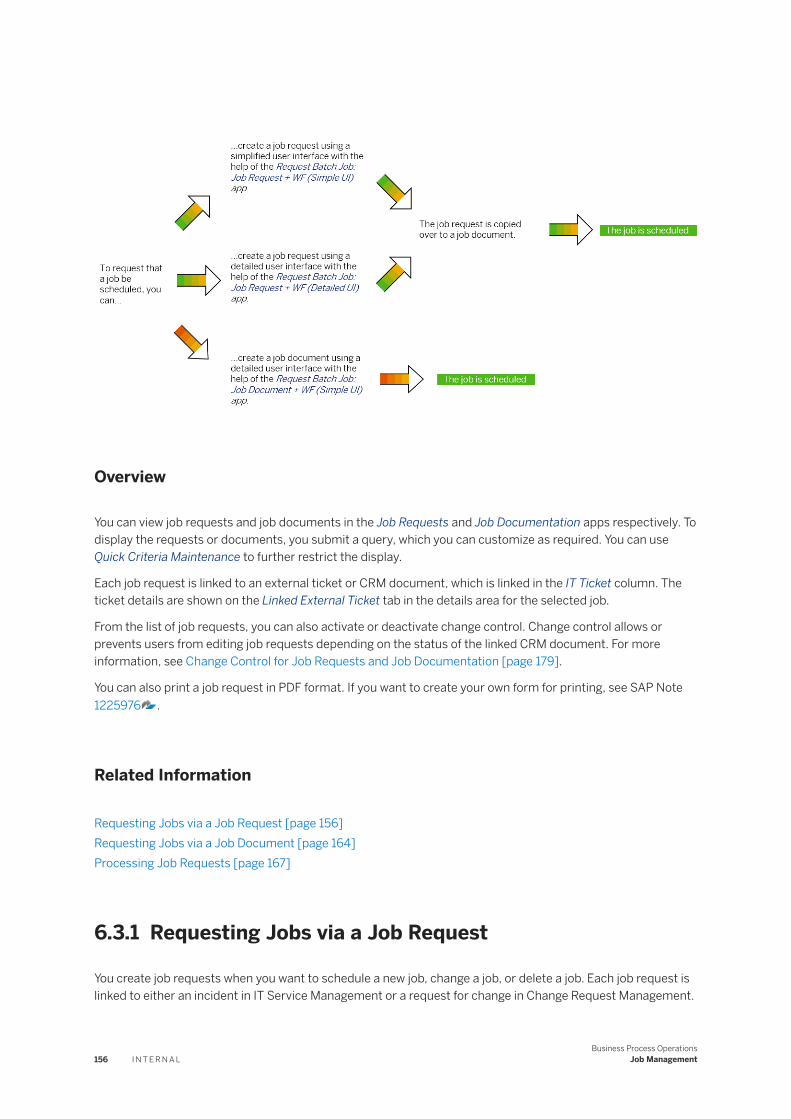
Overview
You can view job requests and job documents in the Job Requests and Job Documentation apps respectively. To display the requests or documents, you submit a query, which you can customize as required. You can use Quick Criteria Maintenance to further restrict the display.
Each job request is linked to an external ticket or CRM document, which is linked in the IT Ticket column. The ticket details are shown on the Linked External Ticket tab in the details area for the selected job.
From the list of job requests, you can also activate or deactivate change control. Change control allows or prevents users from editing job requests depending on the status of the linked CRM document. For more information, see Change Control for Job Requests and Job Documentation [page 179].
You can also print a job request in PDF format. If you want to create your own form for printing, see SAP Note 1225976 .
Related Information
Requesting Jobs via a Job Request [page 156]Requesting Jobs via a Job Document [page 164]Processing Job Requests [page 167]
6.3.1 Requesting Jobs via a Job Request
You create job requests when you want to schedule a new job, change a job, or delete a job. Each job request is linked to either an incident in IT Service Management or a request for change in Change Request Management.
156 I N T E R N A LBusiness Process Operations
Job Management
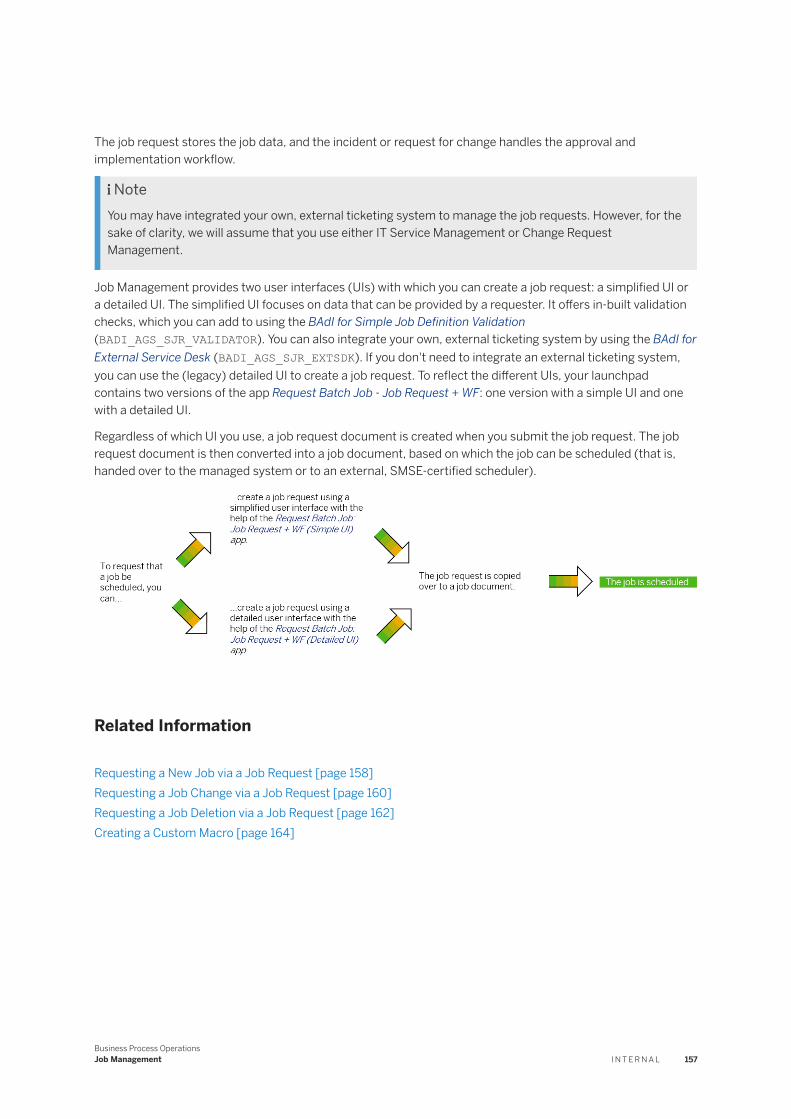
The job request stores the job data, and the incident or request for change handles the approval and implementation workflow.
NoteYou may have integrated your own, external ticketing system to manage the job requests. However, for the sake of clarity, we will assume that you use either IT Service Management or Change Request Management.
Job Management provides two user interfaces (UIs) with which you can create a job request: a simplified UI or a detailed UI. The simplified UI focuses on data that can be provided by a requester. It offers in-built validation checks, which you can add to using the BAdI for Simple Job Definition Validation (BADI_AGS_SJR_VALIDATOR). You can also integrate your own, external ticketing system by using the BAdI for External Service Desk (BADI_AGS_SJR_EXTSDK). If you don't need to integrate an external ticketing system, you can use the (legacy) detailed UI to create a job request. To reflect the different UIs, your launchpad contains two versions of the app Request Batch Job - Job Request + WF: one version with a simple UI and one with a detailed UI.
Regardless of which UI you use, a job request document is created when you submit the job request. The job request document is then converted into a job document, based on which the job can be scheduled (that is, handed over to the managed system or to an external, SMSE-certified scheduler).
Related Information
Requesting a New Job via a Job Request [page 158]Requesting a Job Change via a Job Request [page 160]Requesting a Job Deletion via a Job Request [page 162]Creating a Custom Macro [page 164]
Business Process OperationsJob Management I N T E R N A L 157

6.3.1.1 Requesting a New Job via a Job Request
To request a new job, you can submit a job request. You can submit either a simple job request or a detailed one.
Creating a Simple Job Request for a New Job
1. Open the Request Batch Job - Job Request + WF app with the simple UI, or open the Job Requests app and choose Create Simple Job Request .
2. Choose the request type Request: Create New Job.3. Enter a name for your job. You can use the Check feature to ensure that the name follows the suggested
naming convention.
NoteTo base your job request on the data from existing job documentation, click Fill from other Job Request and use the input help to find the required job documentation. The system will load its details into the current form, which you can then edit.
4. Optional: Enter a tag or select a tag that has been used already. Tags provide a simple way to label job requests and job documentation. You can search for tagged objects using Quick Criteria Maintenance and the Quick Search box in the Job Requests and Job Documentation apps.
5. Select a system and a client. You can use the input help or make the entries directly.
NoteIf you have selected existing job documentation, the input help only displays the corresponding systems and clients.
6. Specify the review date to which the job request is to be valid.7. Under Business Context, enter your business area, region, and country. The other entries are optional.
The value help is populated from the organizational structure for job management in Solution Manager Configuration, although you can also fetch the organizational structure from an external scheduler via a BAdI.
8. Describe the business requirements (for example, why you are scheduling a job) and the business process.9. Specify the job steps. For each step, enter a description and a command or report.10. Click Job Start Condition and enter the job scheduling and execution information:
○ Specify the frequency with which the job is to run.○ Specify the date and time on which the job is to start. For SMSE jobs, the time zones available are the
CPS time zones.○ Specify the maximum runtime for the job, its priority, and the target server/group.
ExampleTo define a job that runs every 6 hours, you can set the job frequency to “Periodic”, the period to “Hour”, and the value to “6”.
11. Submit the job request.
158 I N T E R N A LBusiness Process Operations
Job Management

Creating a Detailed Job Request for a New Job
1. Open the Request Batch Job - Job Request + WF app with the detailed UI, or open the Job Requests app and choose Create Detailed Job Request .
2. Choose the request type Request: Create New Job.3. The following table explains what information you can provide on each of the tab pages of the detailed job
request form. The job request form has a structure similar to the job documentation, so when the job request is approved, the information you provide in the job request can be copied to the job documentation.
Tab Page Description
General ○ Job request name○ Product system and client○ Date until which the job request is to be valid○ The transaction type, categories, priority, and other information for processing the job request
Business ○ Business ContextEnter text descriptions of the business requirements (for example, why you are scheduling a job) and the business process. The other entries (Region, Country Code, Organization, Business Area, and Business Priority) are optional.
○ Additional Context EntriesOptionally, you can assign a logical component group, technical scenario, and solution documentation context to your job request. Use the value help to select your entries.You can only assign one solution documentation element to a job request.
Scheduling
Choose a scheduler and specify detailed job scheduling information and calendar-based scheduling restrictions. Enter the job steps.
Organizations
Document which organizations are responsible for a background job, which business priority the background job has, and for which purpose it is required.
Errors Document error handling procedures for the job.
Contacts Add the user and business partner data, for example the person responsible for job documentation.
Restrictions
Document scheduling restrictions, such as other jobs that must not be scheduled at the same time as this job.
Authorizations
Document the authorizations required to schedule the job in the managed system.
Tasks Create tasks for job documentation. You can then allocate these tasks to employees for processing.
Attachments
Attach or link to documentation regarding the job request.
4. Submit the job request.
Business Process OperationsJob Management I N T E R N A L 159
Result
A job request is created and linked with a corresponding incident or request for change.
6.3.1.2 Requesting a Job Change via a Job Request
To request a change to a job, you can submit a job request. You can submit either a simple job request or a detailed one.
Creating a Simple Job Request for a Job Change
1. Open the Request Batch Job - Job Request + WF app with the simple UI, or open the Job Requests app and choose Create Simple Job Request .
2. Choose the request type Request: Edit Existing Job.3. In the Name field, use the input help to choose the job documentation for the job that you want to change.
You can only select the latest version of the job documentation, so that you don't change an older version of the documentation by mistake. If your job documentation is linked with solution documentation, you can only select job documentation that has been released to the production branch. Otherwise, you can only select the highest version of the job documentation.When you have selected the job documentation, the system automatically loads its detailed information for you to edit.
4. Optional: Enter a tag or select a tag that has been used already. Tags provide a simple way to label job requests and job documentation. You can search for tagged objects using Quick Criteria Maintenance and the Quick Search box in the Job Requests and Job Documentation apps.
5. Make the required changes to the job.6. Submit the job request.
Creating a Detailed Job Request for a Job Change
1. Open the Request Batch Job - Job Request + WF app with the detailed UI, or open the Job Requests app and choose Create Detailed Job Request .
2. Choose the request type Request: Edit Existing Job.3. In the Name field, use the input help to choose the job documentation for the job that you want to change.
You can only select the latest version of the job documentation, so that you don't change an older version of the documentation by mistake. If your job documentation is linked with solution documentation, you can only select job documentation that has been released to the production branch. Otherwise, you can only select the highest version of the job documentation.
4. Make the required changes.The following table explains what information you can provide on each of the tab pages of the detailed job request form. The job request form has a structure similar to the job documentation, so when the job
160 I N T E R N A LBusiness Process Operations
Job Management
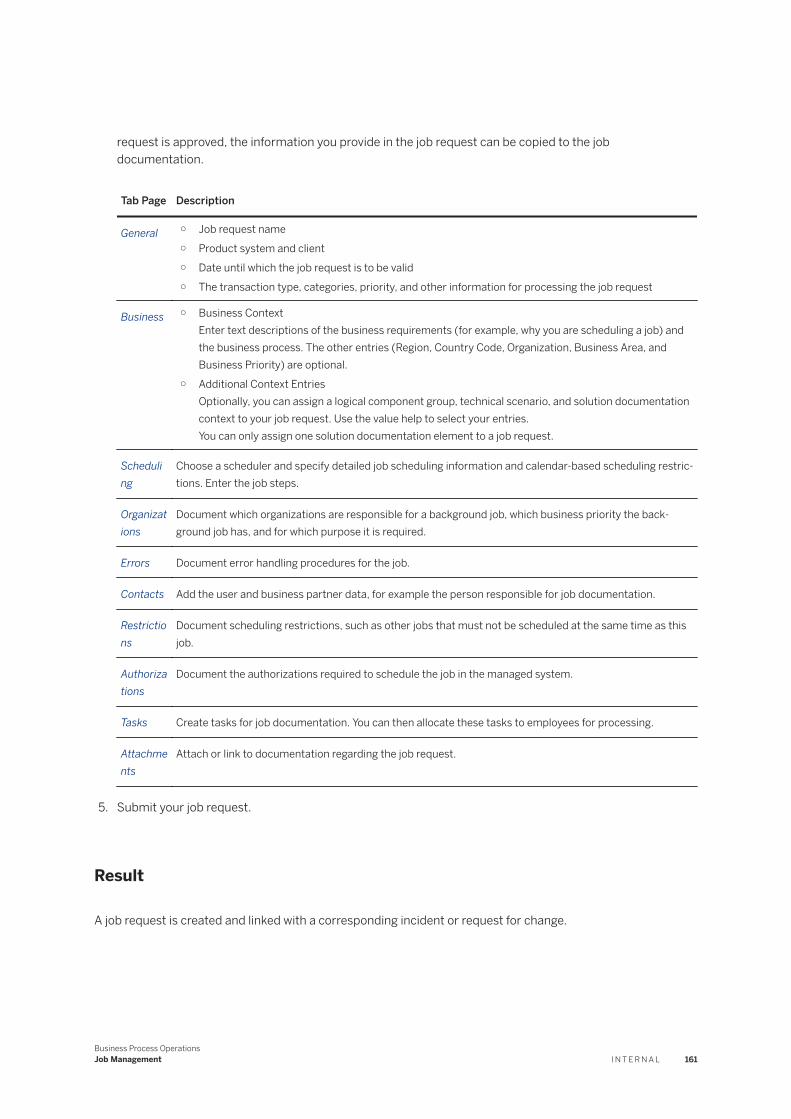
request is approved, the information you provide in the job request can be copied to the job documentation.
Tab Page Description
General ○ Job request name○ Product system and client○ Date until which the job request is to be valid○ The transaction type, categories, priority, and other information for processing the job request
Business ○ Business ContextEnter text descriptions of the business requirements (for example, why you are scheduling a job) and the business process. The other entries (Region, Country Code, Organization, Business Area, and Business Priority) are optional.
○ Additional Context EntriesOptionally, you can assign a logical component group, technical scenario, and solution documentation context to your job request. Use the value help to select your entries.You can only assign one solution documentation element to a job request.
Scheduling
Choose a scheduler and specify detailed job scheduling information and calendar-based scheduling restrictions. Enter the job steps.
Organizations
Document which organizations are responsible for a background job, which business priority the background job has, and for which purpose it is required.
Errors Document error handling procedures for the job.
Contacts Add the user and business partner data, for example the person responsible for job documentation.
Restrictions
Document scheduling restrictions, such as other jobs that must not be scheduled at the same time as this job.
Authorizations
Document the authorizations required to schedule the job in the managed system.
Tasks Create tasks for job documentation. You can then allocate these tasks to employees for processing.
Attachments
Attach or link to documentation regarding the job request.
5. Submit your job request.
Result
A job request is created and linked with a corresponding incident or request for change.
Business Process OperationsJob Management I N T E R N A L 161
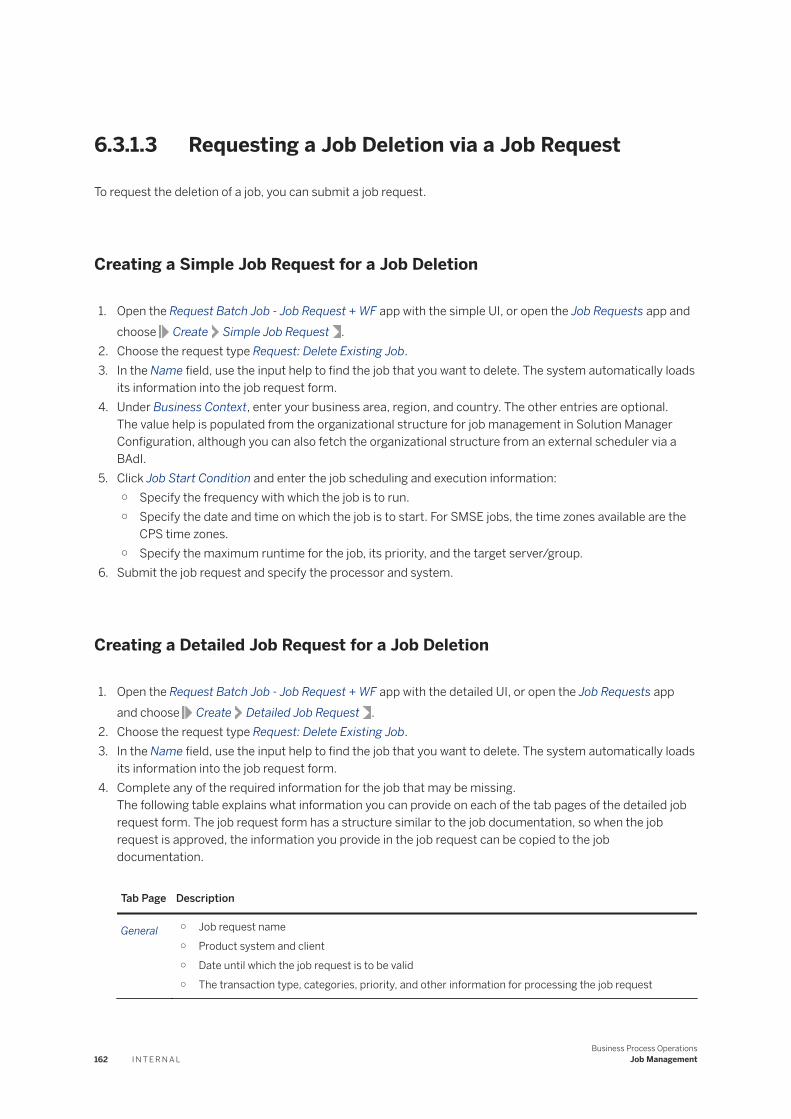
6.3.1.3 Requesting a Job Deletion via a Job Request
To request the deletion of a job, you can submit a job request.
Creating a Simple Job Request for a Job Deletion
1. Open the Request Batch Job - Job Request + WF app with the simple UI, or open the Job Requests app and choose Create Simple Job Request .
2. Choose the request type Request: Delete Existing Job.3. In the Name field, use the input help to find the job that you want to delete. The system automatically loads
its information into the job request form.4. Under Business Context, enter your business area, region, and country. The other entries are optional.
The value help is populated from the organizational structure for job management in Solution Manager Configuration, although you can also fetch the organizational structure from an external scheduler via a BAdI.
5. Click Job Start Condition and enter the job scheduling and execution information:○ Specify the frequency with which the job is to run.○ Specify the date and time on which the job is to start. For SMSE jobs, the time zones available are the
CPS time zones.○ Specify the maximum runtime for the job, its priority, and the target server/group.
6. Submit the job request and specify the processor and system.
Creating a Detailed Job Request for a Job Deletion
1. Open the Request Batch Job - Job Request + WF app with the detailed UI, or open the Job Requests app and choose Create Detailed Job Request .
2. Choose the request type Request: Delete Existing Job.3. In the Name field, use the input help to find the job that you want to delete. The system automatically loads
its information into the job request form.4. Complete any of the required information for the job that may be missing.
The following table explains what information you can provide on each of the tab pages of the detailed job request form. The job request form has a structure similar to the job documentation, so when the job request is approved, the information you provide in the job request can be copied to the job documentation.
Tab Page Description
General ○ Job request name○ Product system and client○ Date until which the job request is to be valid○ The transaction type, categories, priority, and other information for processing the job request
162 I N T E R N A LBusiness Process Operations
Job Management
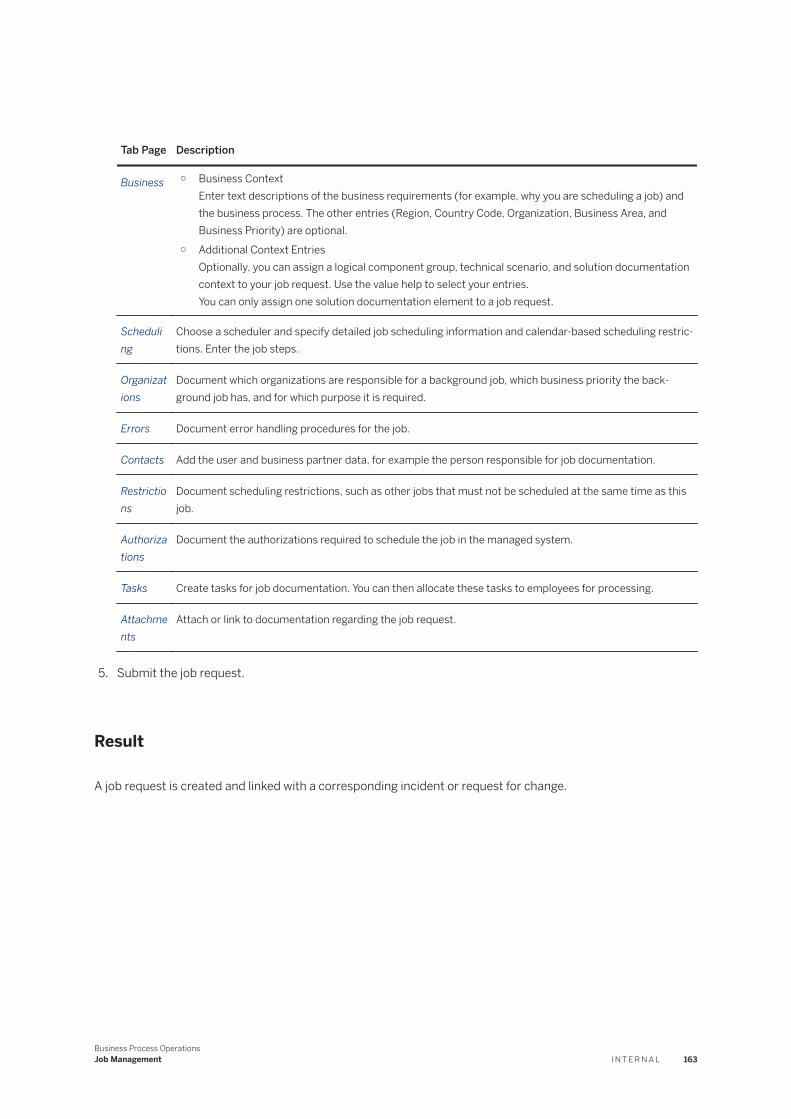
Tab Page Description
Business ○ Business ContextEnter text descriptions of the business requirements (for example, why you are scheduling a job) and the business process. The other entries (Region, Country Code, Organization, Business Area, and Business Priority) are optional.
○ Additional Context EntriesOptionally, you can assign a logical component group, technical scenario, and solution documentation context to your job request. Use the value help to select your entries.You can only assign one solution documentation element to a job request.
Scheduling
Choose a scheduler and specify detailed job scheduling information and calendar-based scheduling restrictions. Enter the job steps.
Organizations
Document which organizations are responsible for a background job, which business priority the background job has, and for which purpose it is required.
Errors Document error handling procedures for the job.
Contacts Add the user and business partner data, for example the person responsible for job documentation.
Restrictions
Document scheduling restrictions, such as other jobs that must not be scheduled at the same time as this job.
Authorizations
Document the authorizations required to schedule the job in the managed system.
Tasks Create tasks for job documentation. You can then allocate these tasks to employees for processing.
Attachments
Attach or link to documentation regarding the job request.
5. Submit the job request.
Result
A job request is created and linked with a corresponding incident or request for change.
Business Process OperationsJob Management I N T E R N A L 163

6.3.1.4 Creating a Custom Macro
If you have to create a lot of job requests or job documentation, you can simplify the process by using macros. For example, you can use macros to automatically enter contact persons, organizations, and systems (via a logical component).
Procedure
1. In transaction SA38, start report RAGS_CREATE_JOBDOC_MACRO.
2. Provide a unique ID and description for your macro.3. Enter the required parameters for business priority, logical component, region, country, contact person,
and so on.4. Assign the macro to your user only or to all users in the SAP Solution Manager system.5. Execute the report.
6.3.2 Requesting Jobs via a Job Document
You can schedule a new job, a change to a job, or a job deletion using the job document directly, which means that a job request is not required.
In this case, the job document is linked to an incident in IT Service Management, a request for change in Change Request Management, or an external ticketing system. The job document stores the job data, and the incident or request for change handles the approval and implementation workflow.
NoteYou may have integrated your own, external ticketing system to manage the job documents. However, for the sake of clarity, we assume that you use either IT Service Management or Change Request Management.
When you request that a job be scheduled via a job document, you can run in-built validation checks on the job data. You can also add your own checks via the BAdI for Simple Job Definition Validation (BADI_AGS_SJR_VALIDATOR), and integrate an external ticketing system into the simplified process by using the BAdI for External Service Desk (BADI_AGS_SJR_EXTSDK).
164 I N T E R N A LBusiness Process Operations
Job Management
Related Information
Requesting a New Job via a Job Document [page 165]Requesting a Job Change via a Job Document [page 166]Requesting a Job Deletion via a Job Document [page 166]Creating a Custom Macro [page 164]
6.3.2.1 Requesting a New Job via a Job Document
To request a new job, you can submit a job document.
Procedure
1. Open the Request Batch Job - Job Document + WF app with the simplified UI.2. Choose the request type Request: Create New Job.3. Enter a name for your job. You can use the Check feature to ensure that the name follows the suggested
naming convention.4. Optional: Enter a tag or select a tag that has been used already. Tags provide a simple way to label job
requests and job documentation. You can search for tagged objects using Quick Criteria Maintenance and the Quick Search box in the Job Requests and Job Documentation apps.
5. Select a system and a client. You can use the input help or make the entries directly.6. Specify the review date to which the job request is to be valid.7. Under Business Context, enter your business area, region, and country. The other entries are optional.
The value help is populated from the organizational structure for job management in Solution Manager Configuration, although you can also fetch the organizational structure from an external scheduler via a BAdI.
8. Describe the business requirements (for example, why you want the job to be scheduled) and the business process.
9. Specify the job steps. For each step, enter a description and a command or report.10. Click Job Start Condition and enter the job scheduling and execution information:
○ Specify the frequency with which the job is to run.○ Specify the date and time on which the job is to start. For SMSE jobs, the time zones available are the
CPS time zones.○ Specify the maximum runtime for the job, its priority, and the target server/group.
11. Submit the job request.
Results
A job document is created and linked with a corresponding incident or request for change.
Business Process OperationsJob Management I N T E R N A L 165
6.3.2.2 Requesting a Job Change via a Job Document
To request a change to a job, you can submit a job document.
Procedure
1. Open the Request Batch Job - Job Document + WF app with the simplified UI.2. Choose the request type Request: Edit Existing Job.3. In the Name field, use the input help to find the job that you want to change. Only the productive version
can be selected.4. Optional: Enter a tag or select a tag that has been used already. Tags provide a simple way to label job
requests and job documentation. You can search for tagged objects using Quick Criteria Maintenance and the Quick Search box in the Job Requests and Job Documentation apps.
5. Make the required changes to the job.6. Submit the job request.
Results
A job document is created and linked with a corresponding incident or request for change.
6.3.2.3 Requesting a Job Deletion via a Job Document
To request the deletion of a job, you can submit a job document.
Procedure
1. Open the Request Batch Job - Job Document + WF app with the simplified UI.2. Choose the request type Request: Delete Existing Job.3. In the Name field, use the input help to find the job that you want to delete.4. Click Job Start Condition and specify an end date for the job.5. Submit the job request and specify the processor and system.
Results
A job request is created and linked with a corresponding incident or request for change.
166 I N T E R N A LBusiness Process Operations
Job Management

6.3.3 Processing Job Requests
Use
Once a job request has been created, it must undergo an approval and implementation process.
Each job request is linked to either an incident or service request in IT Service Management, or a request for change in Change Request Management. The job request stores the job data, and the incident, or request for change handles the approval and implementation work flow.
Job requests can be handled with IT Service Management, Change Request Management, or a combination of the two:
● Processing Job Requests with IT Service Management [page 167]● Processing Job Requests with Change Request Management [page 170]
Job Management provides a change control functionality that can allow or prohibit editing of job requests and job documentation, depending on the status of the linked CRM document.
More Information
● Change Control for Job Requests and Job Documentation [page 179]●●
6.3.3.1 Processing Job Requests with IT Service Management
Job Management is integrated with IT Service Management to process job requests from end users. A job request can be created with the transaction types Incident or Service Request.
Prerequisites
In SAP Solution Manager Configuration (transaction SOLMAN_SETUP), administration has configured the IT Service Management scenario and the Job Management scenario, including the required steps for integrating IT Service Management with Job Management.
For more information, see and .
Business Process OperationsJob Management I N T E R N A L 167
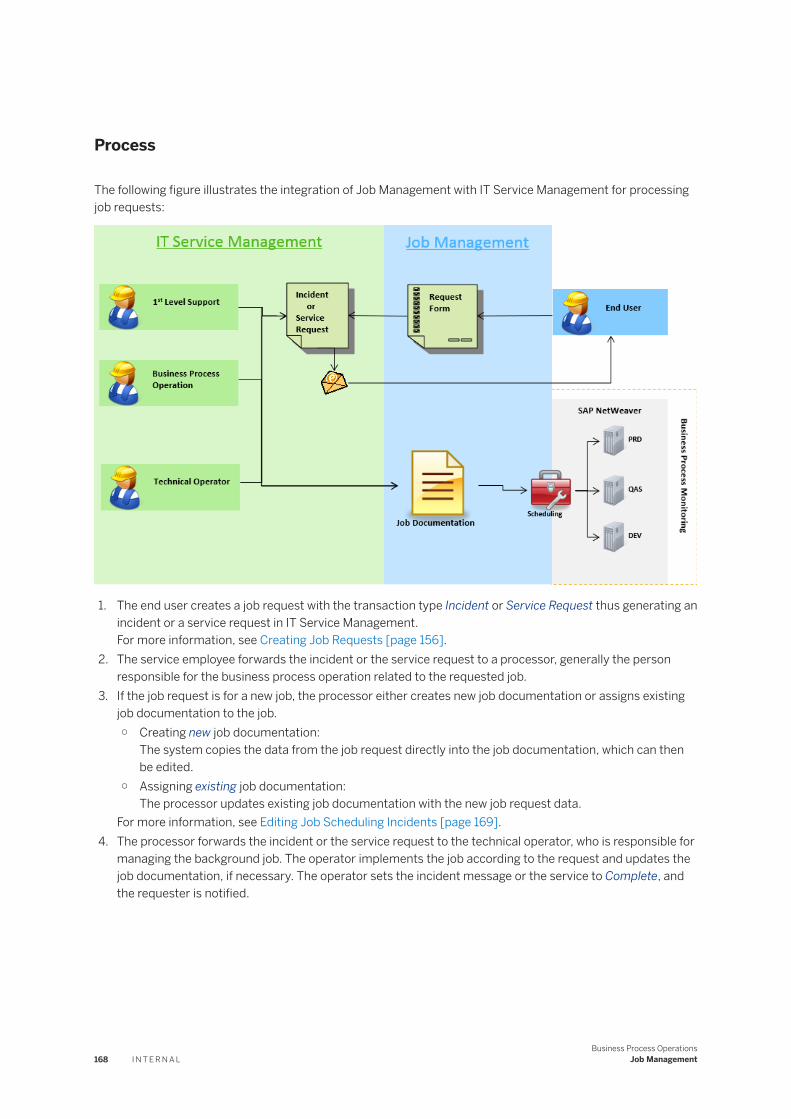
Process
The following figure illustrates the integration of Job Management with IT Service Management for processing job requests:
1. The end user creates a job request with the transaction type Incident or Service Request thus generating an incident or a service request in IT Service Management.For more information, see Creating Job Requests [page 156].
2. The service employee forwards the incident or the service request to a processor, generally the person responsible for the business process operation related to the requested job.
3. If the job request is for a new job, the processor either creates new job documentation or assigns existing job documentation to the job.○ Creating new job documentation:
The system copies the data from the job request directly into the job documentation, which can then be edited.
○ Assigning existing job documentation:The processor updates existing job documentation with the new job request data.
For more information, see Editing Job Scheduling Incidents [page 169].4. The processor forwards the incident or the service request to the technical operator, who is responsible for
managing the background job. The operator implements the job according to the request and updates the job documentation, if necessary. The operator sets the incident message or the service to Complete, and the requester is notified.
168 I N T E R N A LBusiness Process Operations
Job Management
Result
The job documentation is updated. The service employee can make further changes to the job documentation, such as copying job parameters from the production system to a test system or a development system.
6.3.3.1.1 Editing Job Scheduling Incidents
Context
In an incident that is linked to a job request, you create new job documentation or assign existing job documentation so that the new job can be scheduled from the job documentation.
Procedure
1. Open the incident in the WebClient UI.○ From the Job Management - Administration app:
1. Choose the Job Requests view.2. Find the job request you want to edit.3. Click the link in the CRM Document column of the job request.
○ From the WebClient UI:
1. Choose IT Service Management Incidents .2. Search for and open the relevant incident.
2. Set the status and processor.1. Choose Edit, and then set the status to In Process.2. Make sure that your business partner is entered in the Processor field.3. Save your entries.
3. Scroll down to the Job Management assignment block, and choose Edit.
NoteIf the Job Management assignment block is not displayed, choose Personalize to add it.
4. Create new job documentation or assign existing job documentation to the incident.○ To create new job documentation for the job request, choose Create Job Documentation.
The system automatically copies the data from the job request to the job documentation, and the job documentation appears in the list, together with the job request.
○ To assign existing job documentation, choose Assign Job Documentation, and then select the job documentation.The selected job documentation appears in the list, together with the job request.
Business Process OperationsJob Management I N T E R N A L 169
5. To compare the job request with the assigned job documentation, choose Compare.6. To copy data from the job request to the job documentation, choose Copy Data.7. Edit the job documentation further, if necessary.
You can open the job documentation for editing by clicking the link in the ID column.
Results
The job documentation is assigned to the job request, and has the correct job data. The requested job can now be scheduled from the job documentation. For more information, see Scheduling Jobs with Job Documentation [page 205].
6.3.3.2 Processing Job Requests with Change Request Management
Job Management is integrated with Change Request Management to process job requests from end users. Change Request Management centrally tracks all job requests and enables you to easily access and update the associated job documentation. You can accept or reject the requested changes in Change Request Management and document the background processing and change phases, such as development and testing.
NoteDifferent organizations may have different approval and implementation processes in Change Request Management. Job Scheduling Management can be fully integrated into your existing Change Request Management processes without having any impact on them.
Prerequisites
In SAP Solution Manager Configuration (transaction SOLMAN_SETUP), administration has configured the Change Request Management scenario and the Job Management scenario, including the required steps for integrating Change Request Management with Job Management.
For more information, see and .
170 I N T E R N A LBusiness Process Operations
Job Management
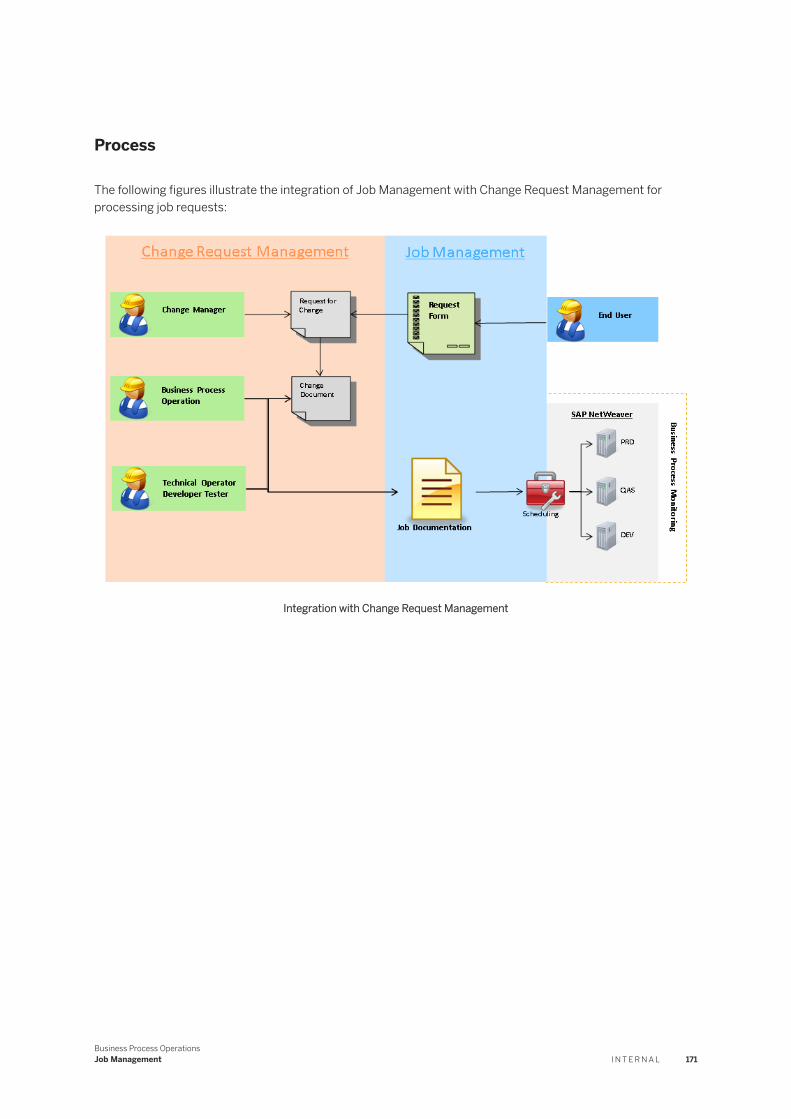
Process
The following figures illustrate the integration of Job Management with Change Request Management for processing job requests:
Integration with Change Request Management
Business Process OperationsJob Management I N T E R N A L 171
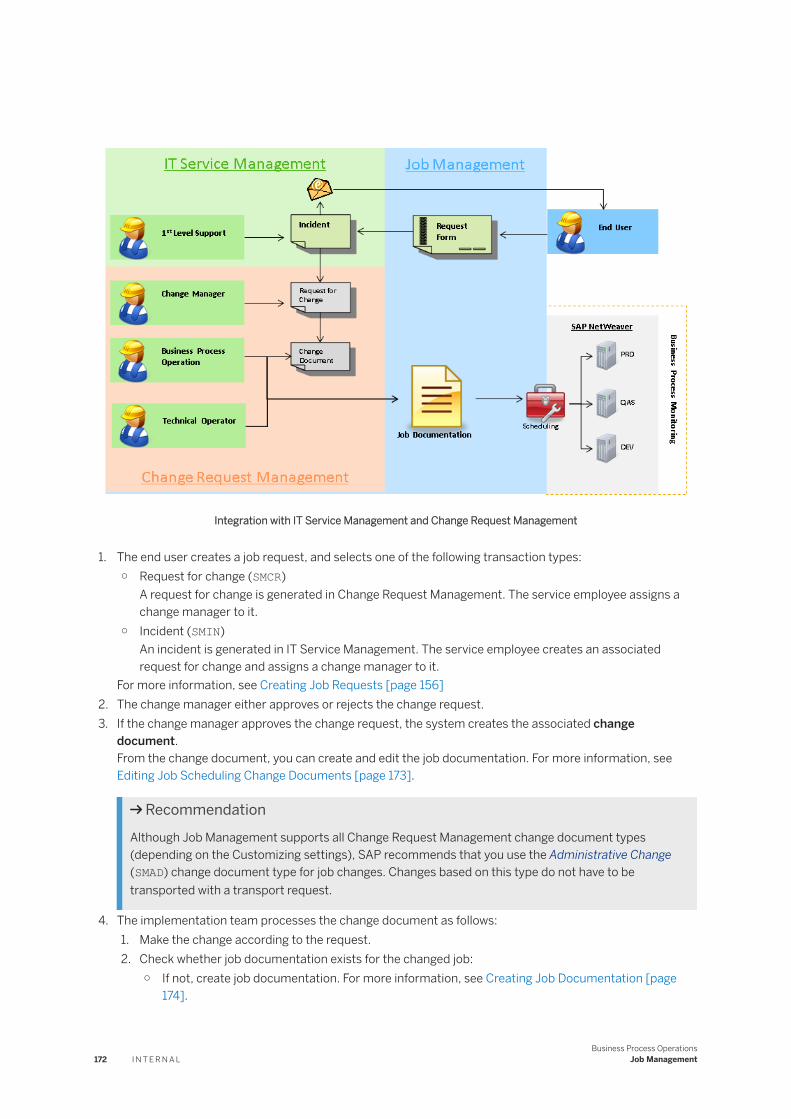
Integration with IT Service Management and Change Request Management
1. The end user creates a job request, and selects one of the following transaction types:○ Request for change (SMCR)
A request for change is generated in Change Request Management. The service employee assigns a change manager to it.
○ Incident (SMIN)An incident is generated in IT Service Management. The service employee creates an associated request for change and assigns a change manager to it.
For more information, see Creating Job Requests [page 156]2. The change manager either approves or rejects the change request.3. If the change manager approves the change request, the system creates the associated change
document.From the change document, you can create and edit the job documentation. For more information, see Editing Job Scheduling Change Documents [page 173].
RecommendationAlthough Job Management supports all Change Request Management change document types (depending on the Customizing settings), SAP recommends that you use the Administrative Change (SMAD) change document type for job changes. Changes based on this type do not have to be transported with a transport request.
4. The implementation team processes the change document as follows:1. Make the change according to the request.2. Check whether job documentation exists for the changed job:
○ If not, create job documentation. For more information, see Creating Job Documentation [page 174].
172 I N T E R N A LBusiness Process Operations
Job Management
○ If yes, assign the job documentation to this change document (if it has not already been assigned) in the Job Scheduling assignment block. For more information, see Assigning Job Documentation [page 175].
3. Display and check the changes that have been made to the job documentation. For more information, see Comparing Job Documentation with Job Requests [page 176].
4. Update the job documentation with the parameters in the job request. For more information, see Copying Job Request Data to Job Documentation [page 176].
5. Make further changes to the job documentation, if required. For more information, see Changing Job Documentation [page 177].
6.3.3.2.1 Editing Job Scheduling Change Documents
Use
You want to edit a request to change or create job documentation using .
Prerequisites
● The change manager has approved a request for change based on a job request, and created a change document.
● The Job Management assignment block is configured in the WebClient UI.● You have opened the job request in change mode.
Features
You can edit change documents for job scheduling in the Job Management assignment block of the WebClient UI.
You can use this assignment block for all change document types.
By default, the system uses the Administrative Change change document for job scheduling.
Activities
You find the relevant administrative change in one of the following ways:
● In the WebClient UI:
1. Choose Change Request Management Change Document .2. Select transaction type SMAD, for example, as the search criterion (for the Administrative Change).
Business Process OperationsJob Management I N T E R N A L 173
● In the Job Management launchpad group:1. Choose the Job Requests.
Your personal object worklist (POWL) is displayed. For more information, see Job Requests [page 155].2. Click an entry in the CRM Document column. The system starts the WebClient UI.
More Information
●●●● For more information about using the WebClient UI, see SAP Help Portal at http://help.sap.com/crm
SAP CRM 7.0 Application Help SAP Customer Relationship Management Getting Started with the WebClient UI .
6.3.3.2.1.1 Creating Job Documentation
Prerequisites
● You are currently editing the change document in the WebClient UI.● The change document has the status In Process and contains no errors.● You have not yet assigned job documentation to the change document.
Context
You want to create new job documentation and assign it to a change document.
Procedure
1. Navigate to the Job Scheduling Management assignment block.2. Choose Edit.3. Choose Create Job Documentation.4. Save the change document.
174 I N T E R N A LBusiness Process Operations
Job Management
Results
You have created new job documentation as a copy of the job request. The system has assigned the job documentation automatically to the change document. The job documentation appears in the Job Scheduling Management assignment block and in the document flow.
6.3.3.2.1.2 Assigning Job Documentation
Prerequisites
● You are currently editing the change document in the WebClient UI.● The change document has the status In Process and contains no errors.● You have not yet assigned job documentation to the change document.
Context
You want to assign existing job documentation to a change document.
Procedure
1. Navigate to the Job Scheduling Management assignment block.2. Choose Edit.3. Choose Assign Job Documentation.
A dialog box appears.4. Use the search (with the job name, for example) to determine the relevant job documentation for the job
request.5. Select the job documentation.
The system copies the job documentation to the assignment block.6. Save your entries.
Results
You have assigned job documentation to the change document. The job documentation appears in the document flow and in the Job Scheduling Management assignment block.
Business Process OperationsJob Management I N T E R N A L 175
6.3.3.2.1.3 Comparing Job Documentation with Job Requests
Prerequisites
● You are currently editing the change document in the WebClient UI.● Job documentation is assigned to the change document.● The change document has the status In Process.
Context
You want to display and check the changes made to the job documentation by the job request before you update the job documentation. The system compares the relevant parameters of the job request with the parameters of the assigned job documentation.
Procedure
1. Navigate to the Job Scheduling Management assignment block.2. Choose Compare.
A dialog box appears in which the job documentation and job request are compared. The system indicates whether and which values are different in the job request.
Results
You have displayed the parameters for the job request and job documentation and can check for differences between the job documentation and job request.
6.3.3.2.1.4 Copying Job Request Data to Job Documentation
Prerequisites
● You are currently editing the change document in the WebClient UI.
176 I N T E R N A LBusiness Process Operations
Job Management
● You have assigned job documentation to the change document.● The change document has the status In Process.
Context
After you have checked for changes, you want to update the job documentation with the job request parameters. You can also create new job documentation with the job request parameters.
Procedure
1. Navigate to the Job Scheduling Management assignment block.2. Choose Edit.3. Choose Copy Data.
Results
You have created a new version of the job documentation using the data from the job request.
6.3.3.2.1.5 Changing Job Documentation
Prerequisites
● The change document has the status In Process and you have assigned job documentation to the change document.
● You are currently editing the change document in the WebClient UI.● Your user is entered as the Current Processor in the Parties Involved assignment block.● You are authorized to change the job documentation.
NoteThe administrator defines the authorization of actions for editing job documentation in SAP Solution Manger Configuration (transaction solman_setup), Job Management scenario, in the step Integrate ChaRM.
Business Process OperationsJob Management I N T E R N A L 177

Context
In addition to updating the job documentation, you also want to make changes to it.
Procedure
1. Navigate to the Job Scheduling Management assignment block.2. In the ID column of the table, click a job documentation entry.3. Change the job documentation.
For more information, see Job Documentation [page 180].
Results
You have changed the job documentation assigned to the change document.
6.3.3.3 Processing Job Requests with an External Ticketing System
You can integrate Job Management with your own, external ticketing system by implementing Business Add-In (BAdI) BADI_AGS_SJR_EXTSDK. A requester can create a ticket in the external system or can submit a job document in the SAP Solution Manager system.
Prerequisites
You have created your own implementation of BAdI for External Service Desk (BADI_AGS_SJR_EXTSDK).
Process
The following figure illustrates how an external ticketing system can be integrated with SAP Solution Manager.
178 I N T E R N A LBusiness Process Operations
Job Management
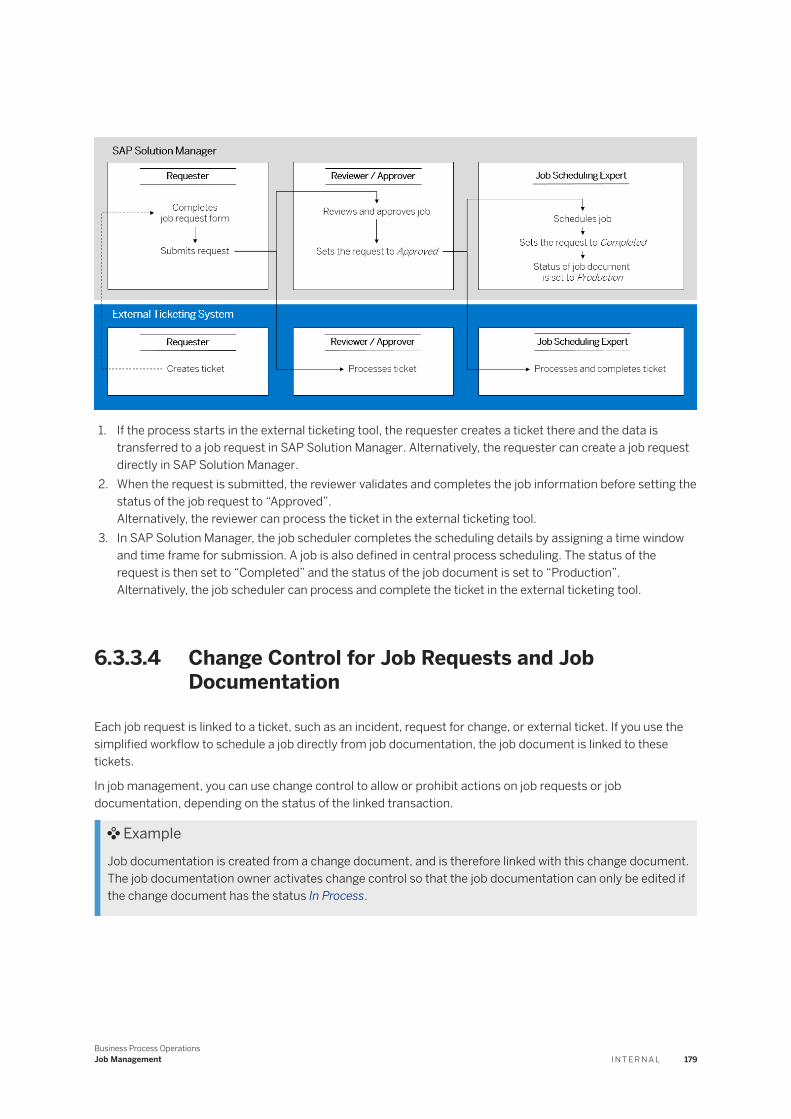
1. If the process starts in the external ticketing tool, the requester creates a ticket there and the data is transferred to a job request in SAP Solution Manager. Alternatively, the requester can create a job request directly in SAP Solution Manager.
2. When the request is submitted, the reviewer validates and completes the job information before setting the status of the job request to “Approved”.Alternatively, the reviewer can process the ticket in the external ticketing tool.
3. In SAP Solution Manager, the job scheduler completes the scheduling details by assigning a time window and time frame for submission. A job is also defined in central process scheduling. The status of the request is then set to “Completed” and the status of the job document is set to “Production”.Alternatively, the job scheduler can process and complete the ticket in the external ticketing tool.
6.3.3.4 Change Control for Job Requests and Job Documentation
Each job request is linked to a ticket, such as an incident, request for change, or external ticket. If you use the simplified workflow to schedule a job directly from job documentation, the job document is linked to these tickets.
In job management, you can use change control to allow or prohibit actions on job requests or job documentation, depending on the status of the linked transaction.
ExampleJob documentation is created from a change document, and is therefore linked with this change document. The job documentation owner activates change control so that the job documentation can only be edited if the change document has the status In Process.
Business Process OperationsJob Management I N T E R N A L 179
Prerequisites
Administration has configured change control for job requests and job documentation in SAP Solution Manager Configuration, Job Management scenario.
Activities
To activate change control, locate and select the job request or job documentation in the list, and choose Change Control Activate .
6.4 Job Documentation
Job documentation is the central object of the Job Management standard. It allows you to centrally manage, schedule, and document in detail the background processing of your entire system landscape.
The Job Documentation is the central access point to most activities related to job documentation. It provides the following functions:
● Displaying job documentationJob documentation is displayed in a list. You can choose a standard query or define your own queries. You can use Quick Criteria Maintenance to restrict the query results list by various criteria, including the technical system description, role, priority, lifecycle status, and business partner.It is also possible to query the job documentation based on Solution Documentation ID and Solution Documentation Description.
NoteThe relevant queries enable you to view job documentation that was created at the same time as the monitoring objects, provided that the job documentation was edited after it was created.
When you select job documentation in the list, its details are displayed below.● Creating and editing job and job chain documentation
You can use job documentation templates to ensure consistency.● Copying job documentation
When you copy job documentation, the copy gets the name Copy from <name of source documentation>.
● Creating a new versionTo save the current version of the job documentation before making changes, you can create a new version. You can later view the saved versions by opening the job documentation and choosing Versions. When you set the higher version as active version, the status of the lower version automatically changes to Obsolete.
● Activating or deactivating job monitoringIf job monitoring is configured for the job documentation, you can activate or deactivate the job monitoring directly in the overview. You do not need to open the job documentation to do so.For more information, see .
180 I N T E R N A LBusiness Process Operations
Job Management
● Activating or deactivating change controlThe change control functionality can allow or prohibit editing of job documentation, depending on the status of the linked CRM document. For more information, see Change Control for Job Requests and Job Documentation [page 179].
● Creating a print view of job documentation as a PDF document
NoteYou can use the default form delivered by SAP or a custom form. For information on how to create and use a custom form, see SAP Note 1225976 .
● Exporting the overview list to Microsoft Excel● Opening the linked CRM document
Every job document is linked to an external ticket or CRM document. The IT Ticket column refers to the external or CRM document. The details can be viewed on the Linked CRM Ticket tab in the Detailed Documentation of the Job section.
Related Information
Creating and Editing Job Documentation [page 183]Importing Job Data into Job Documentation [page 194]Working with Job Documentation Templates [page 198]Scheduling Jobs with Job Documentation [page 205]
6.4.1 Integration with Solution Documentation
Job Management is integrated with .
From Solution Administration (transaction SLAN), you can create new job documentation (or choose existing job documentation) and assign it to a solution documentation library context as an external object. The job documentation must be created in the library of a specified branch; then it can refer to other places (library steps or E2E elements). You can also display job documentation attributes, change job documentation, and create new versions.
You can also assign solution documentation and process elements on the Systems Tab Page [page 187] of job documentation.
Prerequisites
Solution documentation has been implemented for your process landscape.
Business Process OperationsJob Management I N T E R N A L 181

Procedure
Creating/Assigning Job Documentation from Solution Administration
For the create case, fill in all mandatory fields and some important but optional fields to create simple, basic job documentation.
For the assign case, you assign existing job documentation that is not linked with any other solution documentation context. (Job documentation that is linked to another branch is not selectable.)
1. From Solution Administration (transaction SLAN), open the solution documentation of a branch.2. Select an ACH (Application Component Hierarchy) folder from the Executable library.3. Use the context menu (right-click) to create or assign job documentation.4. A dialog appears for creating and assigning cases. Note that there is a read-only Logical Component Group
field in the window whose value comes from the parent ACH folder element.In the create case, complete all mandatory fields and save.In the assign case, select an existing job documentation using the value help, and save.
The job documentation is assigned to the specified solution documentation element.
Displaying Job Documentation Attributes from Solution Administration
You can view job documentation attributes in solution documentation. The attribute list is predefined in the solution documentation model.
When you select a job documentation in solution documentation, an attribute panel is displayed on the right. Read-only fields display attributes maintained in job management. Editable fields display attributes maintained in solution documentation (from the Executable library).
Changing Job Documentation in Solution Administration
You can display or change existing job documentation from solution documentation.
When you edit job documentation, depending on the solution documentation lifecycle mechanism, you may be asked whether to create a new version for further modifications. If yes, the newly created job documentation version is linked with the corresponding solution documentation element. If no, changes are made on current opened job documentation version.
1. In solution documentation, right-click on the job documentation and choose Display or Change.2. In the confirmation dialog, choose OK to create a new version and replace the current job documentation
of the solution documentation element. Choose cancel to make changes on the current job documentation.
Assigning the Process Landscape in Job Documentation
In the Job Management - Administration app, you can assign a solution documentation context on the Systems tab page of job documentation.
You can only assign one solution documentation library context, but multiple process elements. Assign the job documentation to a specific element in the library first, then assign the relevant process elements.
After the solution documentation context is assigned to the job documentation, you can access the job documentation from the solution documentation as well as from the Job Management - Administration app.
182 I N T E R N A LBusiness Process Operations
Job Management
6.4.2 Creating and Editing Job Documentation
The job documentation view is displayed when you create new job or job chain documentation or open existing job documentation.
The job documentation view has the following tab pages:
● General Tab Page [page 184]Enter general information about the job documentation, such as the name and job steps.
● Job Chain Structure Tab Page [page 185] (only available in job chain documentation)Link the documentation of the jobs in a job chain to the job chain documentation.
● Organization Tab Page [page 186]Document the responsible organization, reason for the job, and priority.
● Systems Tab Page [page 187]Assign logical components and specify in which systems the job is scheduled or for which systems the job is documented.
● Error Tab Page [page 188]Document error handling procedures.
● Contact Person Tab Page [page 189]Specify the contact persons for areas such as job documentation, job development, job scheduling or job monitoring.
● Restrictions Tab Page [page 190]Document restrictions that have to be taken into account in scheduling the job, for example, whether another job has to run before or after this job.
● Authorizations Tab Page [page 191]Document the authorizations required for scheduling jobs.
● Tasks Tab Page [page 192]Specify the tasks required for the job documentation. You can then assign the tasks to employees.
● Documents Tab Page [page 193]Add documents or references to documents.
● Changes Tab Page [page 193]Document the change requests that the employees have submitted for the job as well as all changes to the job documentation.
● Job-Doc Relationship Graph [page 194]Graphical representation of the relationship between the job documentation, job request, logical component group, Incident, Request for Change, and Change Document.
Additional Features
● Displaying job documentation versions● Creating a print view as a PDF document● Creating a job request
If you want to change a job, you can create a job request. When you create a job request from the job documentation, the system copies the job documentation data into the job request form and assigns the job documentation to the job request via the associated CRM object.For more information, see Creating Job Requests [page 156].
Business Process OperationsJob Management I N T E R N A L 183
● Running a macroIf you have to create several job documentations, you can simplify the process by using macros. For example, you can use macros to automatically enter contact persons, organizations, and systems (via a logical component). For more information, see Creating a Custom Macro [page 164].
● Adding to favoritesThis can be useful, for example, when you want quick access to job documentation so you can compare it with other job documentation.
6.4.2.1 General Tab Page
Use
The General tab page contains descriptive information about the job and its steps.
Procedure
1. Enter a unique name for your job documentation.2. Optionally, you can enter a tag or select a tag that has been used already. Tags provide a simple way to
label job requests and job documentation. You can search for tagged objects using Quick Criteria Maintenance and the Quick Search box.
3. Select the job type.The job type selection enables the system to launch the right applications for scheduling and configuring monitoring for the job from the Systems Tab Page [page 187].If the scheduling is managed with an SMSE-certified external job scheduler, choose the External Scheduler check box.
NoteThe SAP Scheduler only supports scheduling of ABAP jobs and BW Process Chains.
If you use an external scheduler, you can schedule other types of jobs from job documentation, including SAP BusinessObjects jobs and SAP Data Services jobs.
4. Choose a documentation status.5. For Valid until, you can specify a date after which the job documentation (and its jobs) should be checked.
The date is displayed in the Expiration Date column of the job documentation list. It does not cause any automatic activities to occur, such as stopping a job.
6. Describe the job. Specify the tasks which the job performs. You can also provide text descriptions of the scheduling and monitoring requirements.
7. To add a step, choose Add.A dialog box appears.1. Enter a description of the job step.2. Select the type. The types you can choose depend on the scheduler selected.3. Enter the program name (for example the name of the ABAP report) under Command.
184 I N T E R N A LBusiness Process Operations
Job Management
4. You can specify, for example, the ABAP report variant under Parameter.
NoteThe Client-Dependent check box is for documentation purposes only. You can use it to indicate if a job works on client-specific or on client-independent data.
5. Save your entries.The step appears in the table, with your data.
8. Create further steps, if required.
NoteIf you have selected the BC-XBP scheduler, you can document more than one step per job.
9. You can edit the steps in the table as follows:○ If you have created a step that executes an ABAP report and have created a variant of the report, you
can display the parameters of the variant. To do so, follow these steps:1. Choose a link in the Parameter/Variant column.2. Choose Find.
○ To change the order of the steps to be performed:1. Select the step in the table.2. Select Up or Down in the context menu.
○ To edit a step:1. Select the step in the table.2. Choose Edit.
You go to a dialog box in which you can make your changes.3. Save your entries.
○ To remove a step:1. Select the step.2. Choose Remove.
You go to a dialog box.3. Confirm with Remove.
10. Save your entries.
NoteTo schedule the job or configure job monitoring, use the Systems Tab Page [page 187].
6.4.2.2 Job Chain Structure Tab Page
Prerequisites
You have created job chain documentation.
Business Process OperationsJob Management I N T E R N A L 185
Context
When you edit the documentation of a job chain, you document the job chain structure by linking the job chain to its job documentation.
NoteThe steps of a job chain are performed sequentially, whereas the jobs within each step are performed in parallel.
Procedure
1. Switch to edit mode.2. Choose jobs in the table.3. Choose the documentation for each job from the value help.
Example
Row Step 1 Step 2 Step 3
Row 1 Job 1 Job 3 Job 5
Row 2 Job 2
1. Click in row 1 on the field for step 1 and choose job documentation from the value help.2. Click in row 1 and row 2 on the field for step 2 and choose job documentation from the value help.3. Click in row 1 on the field for step 3 and choose job documentation from the value help.
6.4.2.3 Organization Tab Page
Use
On this tab page, you document which organizations are responsible for a background job, which business priority the background job has, and for which purpose it is required.
Procedure
Assigning an Organization to the Job
1. Choose Add.A dialog box appears.
186 I N T E R N A LBusiness Process Operations
Job Management
2. Under Data Source, select the following:○ Organizational Model: You can assign the organization using an organizational model, such as a
department in a company.○ Direct Entry: You can assign the organization using the Region, Country Code, Organization, and
Business Area fields.
NoteYou specify the data proposed in the input help for these fields in Customizing.
Specifying Business Requirements for the Job
1. Select the business priority of the background job under Priority. You can choose the following:○ Very High○ High○ Medium○ Low
The priority is Medium by default.2. Document the purpose of the background job under Business Requirements.
6.4.2.4 Systems Tab Page
Use
On this tab page, you assign one or more systems to the job documentation. You can assign the systems via the logical component group, solution documentation element, or technical scenario.
Assigning systems allows you to perform the following activities through the job documentation:
● Schedule jobsJob Management supports scheduling of the following types of jobs:○ ABAP jobs (BC-XBP interface)○ External jobs managed by a SMSE-enabled external scheduler○ For BW process chains (BW-SCH interface), you can view but not change the scheduling.○ Custom job types that have been configured in the Extended Configuration step of the Job
Management scenario in SAP Solution Manager Configuration .For more information, see Scheduling Jobs with Job Documentation [page 205].
● Configure monitoringJob Management supports the configuration of monitoring for all types of jobs via job documentation.Once monitoring is configured and activated, you can launch the Job Monitor from the job documentation.For more information, see .
NoteThe scheduling interface and job type selected on the General tab page enable the system to launch the right scheduling and monitoring applications for the job.
Business Process OperationsJob Management I N T E R N A L 187

Procedure
To add a system, proceed as follows:
1. Open the job documentation and choose the Systems tab page.2. Switch to edit mode.3. Choose Add, and then choose one of the following contexts:
○ Logical Component Group○ Solution Documentation○ Technical Scenario
A dialog box appears.4. Use the value help to select the relevant context.5. Choose Assign.
The selected context appears in the table.6. Select the row for the context you added.
A list of technical systems is displayed in the table below.7. Select the system on which the job is running. The list may show several rows corresponding to the
different clients of the same system. Select the row with the correct client.
NoteIf the job documentation is opened from solution documentation on the Systems tab page, the upper table containing the Logical Component group and Solution Branch Information is hidden and in the lower table the system according to the system role and site selection is preselected. You can select other systems also as per your requirement.
8. Save the job documentation.
6.4.2.5 Error Tab Page
Context
On this tab page, you document error handling procedures.
Procedure
1. Document how to restart background processing under Restart in the input fields Prerequisites and Preparation, Procedure, and Post-Processing and Check.
2. Document the conditions under which the system should cancel a running background job, under Cancel, in the input fields Prerequisites and Preparation, Procedure, and Post-Processing and Check.
3. Document the prerequisites and procedure for continuing background processing after a crash, under Continue, in the input fields Prerequisites and Preparation, Procedure, and Post-Processing and Check.
188 I N T E R N A LBusiness Process Operations
Job Management
4. Document how to reschedule background processing, under Repeat, in the input fields Prerequisites and Preparation, Procedure, and Post-Processing and Check.
5. Enter the contact persons responsible in case of an error or unexpected behavior, under Communication. You can add business partners, users, or an email address.
Enter the ten-character business partner number of the contact person you want to add.
Enter the user name of the contact person you want to add.
NoteYou add and edit business partners in the WebClient UI. You add and edit users in transaction SU01.
6. Document other relevant notes, conditions, and instructions, as free text in the input field, under Notes.7. Save your entries.
6.4.2.6 Contact Person Tab Page
Use
You can specify the contact persons and their area of responsibility on this tab. You can add contacts by their e-mail address, business partner, or user.
You can assign the contact persons to the following areas:
● Background Processing, for example the job administrator● Business Process● Development, for example, the software developer● Job Documentation, the person responsible for this job documentation● Monitoring● System Landscape, for example the system administrator
Procedure
Adding a Business Partner
1. Choose Add Business Partner .A dialog box appears.
2. Enter the business partner number of the contact person you want to add.You can use the input help.
3. Choose an area.4. Confirm your entries.
Adding a User
1. Choose Add User .A dialog box appears.
Business Process OperationsJob Management I N T E R N A L 189
2. Enter the user name of the contact person you want to add.You can use the input help.
3. Choose an area.4. Confirm your entries.
Removing a Contact
1. Select the contact person you want to remove.2. Choose Remove.3. Save your entries.
Result
The contact appears in the list. When you select a contact, the available contact data appears below the list.
6.4.2.7 Restrictions Tab Page
Context
You document job scheduling restrictions on this tab page.
Procedure
1. Choose Add.2. Enter a name for the scheduling restriction.3. Choose a type. By default, there are four possible types of scheduling restrictions:
Scheduling Restriction Description
Conflict Use this type if your job can cause conflicts. A conflict can, for example, occur when two particular jobs run in parallel.
Dependency Use this type if the job depends on other factors or jobs.
Predecessor Use this type if another job must run before this one.
Successor Use this type if another job must run after this one.
NoteIf required, the administrator can specify additional types of scheduling restrictions. These are defined in SAP Solution Manager Configuration, under Job Management Extended Configuration Setup Organization Model Scheduling Restriction .
190 I N T E R N A LBusiness Process Operations
Job Management
4. In the Job Name field, use the value help to select the job documentation for the job with which there is a conflict, dependency, or predecessor/successor relationship. This will create a link that allows you to quickly open the corresponding job documentation.
5. Describe the scheduling restriction.6. Confirm with OK and save your entries.
To view the details of the scheduling restriction, select it in the list. Its details appear below.
6.4.2.8 Authorizations Tab Page
Use
On this tab page, you document the authorizations required for job scheduling.
Procedure
Adding an Authorization
1. Under Add, choose whether to add the authorization in the form of an SAP role, an authorization object or a custom object.A dialog box appears.
2. In the dialog box, enter the authorization and a description of the authorization.3. Save your entries.
The authorization you just created appears in the Authorizations list.
Changing an Authorization
1. In the Authorizations list, select the authorization that you wish to change.2. Choose Change.
A dialog box appears.3. Edit the authorization.4. Save your entries.
You have changed the authorization.
Removing an Authorization
1. In the Authorization list, select the authorization that you wish to remove.2. Choose Remove.
The system removes the task from the Authorizations list.
NoteYou have not yet removed the authorization from the system. To remove it, you have to save the job documentation.
3. Save the job documentation.
Business Process OperationsJob Management I N T E R N A L 191
You have removed the authorization.
6.4.2.9 Tasks Tab Page
Use
On this tab page, you create tasks for job documentation. You can then allocate these tasks to employees for processing.
Procedure
Adding a Task
1. Choose Create.A dialog box appears.
2. Enter task details on the tabs of the dialog box.3. Save your entries and close the dialog box.4. Update the task list for the job documentation.
The task you just created appears in the task list.
Changing a Task
1. In the task list, select the task that you wish to change.2. Choose Change.
A dialog box appears.3. Edit the task details.4. Save your entries and close the dialog box.5. Update the task list for the job documentation.
Removing a Task
1. In the task list, select the task that you wish to remove.2. Choose Remove.
The system removes the task from the task list.
NoteThe task has not yet been removed from the system. To remove it, you have to save the job documentation.
3. Save the job documentation.
192 I N T E R N A LBusiness Process Operations
Job Management
6.4.2.10 Documents Tab Page
Use
You can add a document or a reference to a job document on this tab page.
ExampleYou have created your job documentation with a word-processing program. You can now assign this existing document to the job documentation.
Procedure
To import a document:
1. Choose Browse to search for the document in your local file system.2. Choose Upload to transfer the document to the SAP Solution Manager system and to assign it to the job
documentation.
To create a URL as a reference to a document:
1. Specify the URL to the document.2. You can enter a document description.3. Choose Create to implement the URL as a reference to the job documentation.
To display a document:
1. Choose the document in the Documents list.2. Choose Display.
To remove a document:
1. Choose the document in the Documents list.2. Choose Remove.
6.4.2.11 Changes Tab Page
Use
The Changes tab page provides an overview of CRM transactions linked to the job documentation and a change log.
Under Job Requests, you can view the job requests assigned to the job documentation via an incident or a request for change. You can also assign transactions here.
The Change Log displays a log of changes made to the job documentation.
Business Process OperationsJob Management I N T E R N A L 193
Procedure
Job Requests
To assign a transaction:
1. Choose Assign.A dialog box appears.
2. Specify the transaction type, for example:○ SMCR for a request for change○ SMIN for an incident○ SLFI for an issue
3. Enter your transaction number. You can use the input help.
NoteYou cannot assign a completed transaction. You can only assign an open transaction.
4. Save your entries.
Change Log
This tab displays the log of changes made to job documentation. Choose from:
● New entriesChanges not yet saved.
● Existing entriesChanges have been made.
6.4.2.12 Job-Doc Relationship Graph
The Job-Doc Relationship Graph tab page provides a graphical presentation of the relationship among the following objects:
● Job documentation● Job request● Logical component group● Linked CRM Order (External Ticket)
6.4.3 Importing Job Data into Job Documentation
With the Import Jobs application, you can automatically create job documentation for one or more jobs in a system and copy the job steps and scheduling data. You can import data from ABAP jobs and BW process chains managed with the SAP scheduler, and you can import data from jobs managed with an SMSE-certified external scheduler. You can also import data from MS Excel.
Importing Externally Scheduled Jobs [page 195]
194 I N T E R N A LBusiness Process Operations
Job Management

Importing Jobs from SAP Scheduler [page 195]
Importing BW Process Chains [page 196]
Importing Job Data from Microsoft Excel [page 197]
6.4.3.1 Importing Externally Scheduled Jobs
Context
Create job documentation for one or more externally scheduled jobs and copy the data for job scheduling automatically. You can launch the Job Import application from the External Scheduler Management view or choose the link under Common Tasks.
Procedure
1. In the Job Management - Administration app, choose the External Scheduler Management view.2. Use Quick Criteria Maintenance to search for jobs to import.3. Select one or more jobs in the list, and choose Import.4. Confirm your selection and choose Import Jobs.
Results
The system creates job documentation for the selected jobs. A list of the new job documentation is displayed. Click the job documentation name link to check the new created job documentation.
6.4.3.2 Importing Jobs from SAP Scheduler
Context
Create job documentation for one or more ABAP jobs in a system and copy the data for job scheduling automatically. You can launch the Job Import application from the SAP Scheduler Management view or choose the link under Common Tasks.
Business Process OperationsJob Management I N T E R N A L 195
Procedure
1. Open the Job Management - Administration app and choose the SAP Scheduler Management view.2. Use Quick Criteria Maintenance to search for jobs to import.3. Select one or more jobs in the list, and choose Import4. Confirm your selection and choose Import Jobs.
Results
The system creates job documentation for the selected jobs. A list of the new job documentation is displayed. Click the job documentation name link to check the new created job documentation.
6.4.3.3 Importing BW Process Chains
Context
Create job documentation for one or more BW jobs in a system and copy the data for job scheduling automatically.
Procedure
1. Open the Job Management - Administration app and under Common Tasks, choose Import Jobs.
The Import Jobs guided procedure appears.2. Choose the job type BW Process Chain.3. Select the system landscape context. You can specify systems via the logical component group, technical
scenario, or solution documentation element to which the system is assigned. Use the value help to make your selections.
4. Choose Next.5. Search for process chains to import:
○ Select a technical system in the systems list.○ Choose an RFC connection. You can check if the connection works well.○ Use select criteria to search for the process chain. The chain ID is mandatory.
The BW process chains that meet the search criteria are displayed. You can filter and sort the results list.6. Select one or more chains in the table, and then choose Add to Selection.
Choose Display Selection to view the currently selected chains.
You can edit the target job documentation name manually. Otherwise, it will be set automatically to the chain description. Note that you cannot have duplicate job documentation names.
196 I N T E R N A LBusiness Process Operations
Job Management
7. If desired, repeat the search and selection to choose more process chains to import.8. When the list contains all desired chains and job doc names, choose Complete to begin the import.
Results
The system creates job documentation for the selected process chains. A list of the new job documentation is displayed.
● Click the job documentation name link to check the new created job documentation.● Click the chain id link to open the BW system to check the chain details.
6.4.3.4 Importing Job Data from Microsoft Excel
Context
You can import job scheduling data that is maintained in a Microsoft Excel spreadsheet into job documentation using report AC_JSM_JOBDOC_MASS_MAINTENANCE.
Procedure
1. Download the MS Excel template in one of the following ways:
Option Description
Download a blank template Click Download Template
Download a template that already contains job documentation
1. Enter the job documentation numbers that you want to include in the template.
2. Enter the system ID and client.3. Execute the report and click Download Excel (*.XLSX).
A Microsoft Excel file containing the specified job documentation (if any) is downloaded to your local machine.
2. Open the Excel file and enter the data for the job documentation that you want to import.3. In report AC_JSM_JOBDOC_MASS_MAINTENANCE, select the Read Mass Maintenance Excel radio button,
enter the path to the Excel file on your local machine, and execute the report.
The results screen appears, showing the content from your Excel template.4. Optional: Choose Validate to check, for example, whether the job name exceeds the maximum permitted
length.
Business Process OperationsJob Management I N T E R N A L 197
5. Click Read data from Managed System or Read data from Scheduler to add actual job data to the list (that is, the current schedule and executables).
Doing so may overwrite the list from your Excel, but no changes are written to the database at this point.6. Click Create / Update Job Documentation to add the content in your Excel template to the database.
6.4.4 Working with Job Documentation Templates
You can create templates to help you create job documentation and ensure consistency.
For example, you can use a template to ensure that the job documentation contains the recommended scheduling data.
You can assign templates to the following:
● Standard business processes delivered by SAP● Standard logical components delivered by SAP● SAP products
Prerequisites
● If you want to assign templates to SAP products, the Product and Production Management System (PPMS) data must be up to date in SAP Solution Manager.
● If you want to assign templates to standard processes of the Business Process Repository (BPR), the data of the ST-ICO add-on must be up to date in SAP Solution Manager.
Procedure
Opening the Template Directory1. Ope the Job Management - Administration app and under Common Tasks, choose Access Template.2. The Template Directory appears. With this application, you can create, view, and manage all of your job
documentation templates and their versions.
Creating New Templates1. Open the Template Directory.
2. Choose Template Create .The Create Job Documentation Template form appears.
3. General tab pageEnter the name of the job documentation template.Also enter general data. The system takes over this general data for the job documentation created from the template.For more information about this tab for the job documentation, see General Tab Page [page 184].
198 I N T E R N A LBusiness Process Operations
Job Management

4. Organization tab pageAssign organizations and enter the business information. The system takes over this data for the job documentation created from the template.For more information about this tab for the job documentation, see Organization Tab Page [page 186].
5. Systems tab pageAssign logical components. When you have assigned your systems to these logical components, these systems are automatically assigned to the job documentation created from the template.For more information about this tab for the job documentation, see Systems Tab Page [page 187].
6. Scheduling tab pageEnter scheduling data. You can:○ Link scheduling data
○ You can link to the standard jobs from transaction SM36.To do this, you choose Assign Standard Job .A dialog box appears.Select an RFC connection and a report name.
○ You can link to SAP Solution Manager jobs.To do this, you choose Assign Solution Manager Job .A dialog box appears.Select a report.The system shows the corresponding variant and the job.
○ You can link to job definitions from an external scheduler.To do this, you choose Assign Job Definition .A dialog box appears.Select the job.
○ Enter scheduling data manually○ You can assign an SAP job.
To do this, you choose Assign ABAP: Freely Definable Job Definition .A dialog box appears.Define the job.
○ You can assign a job which you define with an external scheduler.To do this, you choose Assign Freely Definable SMSE Job Definition .A dialog box appears.Define the job.
NoteYou can assign multiple jobs, linking scheduling data or entering scheduling data manually.
7. Errors tab pageEnter error-handling procedures.The system takes over this data for the job documentation created from the template.For more information about this tab for the job documentation, see Error Tab Page [page 188].
8. Restrictions tab pageEnter the restrictions to be considered for the job scheduling. The system takes over this data for the job documentation created from the template.For more information about this tab for the job documentation, see Restrictions Tab Page [page 190].
9. Authorizations tab pageEnter the authorizations required for the job scheduling. The system takes over this data for the job documentation created from the template.
Business Process OperationsJob Management I N T E R N A L 199
For more information about this tab for the job documentation, see Authorizations Tab Page [page 191].10. Save your entries.
Editing Templates
Select a job template in the Template Directory.
You have the following options for editing the template selected:
● Template○ Delete: You can delete the template selected.○ Edit: You can edit the data of the template selected.○ Copy: You can create a copy of the template selected. The system adds the copy to the list of
templates.● Refresh: You can refresh the template selected.
NoteThere is no automatic update, because you compile the data for the job documentation template in a separate window.
● Export○ Active Version: You can export the current version of the template selected to an XML file.○ All Versions: You can export all versions of the template selected to an XML file.
● Import: You can import a template to the template directory in the form of an XML file.● Communication
○ Check for New Data: You can check whether new templates have been made available by SAP which are not in your template directory yet.
○ Download Data: You can download the templates made available by SAP and copy them to your template directory.
Editing a Version of a Selected Job Template
Select a job template in the Template Directory. The versions of the template selected appear in the Versions of the Selected Job Template screen area.
Select a version.
You have the following options for editing the version:
● Edit: You can edit the data of the template version selected.● Create New Version: You can create a new version as a copy of the template version selected. The system
then adds the new version to the list of versions.● Refresh: You can refresh the versions of the template selected.
NoteThere is no automatic update, because you compile the data for the job documentation template in a separate window.
● Delete: You can delete the template version selected.● Create Job Documentation: You can create a job documentation from a template version selected. The
system then copies all data from the template to the corresponding areas of the job documentation, saves it under the name of the template, and stores a reference to the template in the job documentation.
200 I N T E R N A LBusiness Process Operations
Job Management
● Attributes Display : You can display the attributes of the template version selected.A dialog box then appears. When you select an attribute in the attribute structure, the system shows detailed information on the attribute.
● Attributes Change : You can change the attributes of a selected version.A dialog box appears in which you can add attributes to the template or delete them. To add an attribute, select one of the following object types for the new attribute under Add:○ Category○ Product assignment
When you add an attribute with this object type, you enter the product, the product version, and the instance in the Attribute Maintenance screen area.
○ RequiredWhen you add an attribute with this object type, the template is considered for the automatic creation of job documentation.For more information, see Creating Job Documentation from Templates [page 201].
○ Business process assignmentWhen you add an attribute with this object type, you enter the business object in the Attribute Maintenance screen area.
6.4.4.1 Creating Job Documentation from Templates
Context
In SAP Solution Manager, you can create new job documentation easily and efficiently from templates.
Procedure
1. Choose Recommended Jobs.2. Select a system.
3. Choose Job Documentation Template Create Job Documentation .
A dialog box appears.4. Procedure
Select the procedure for creating job documentation from a template.
NoteA procedure specifies the steps to be processed by the system for a task. Procedures include, for example, creating job documentation from a template or scheduling jobs in the production system.
Under Description, the system shows a description of the procedure selected. Under Other Details of Selected Procedure, you can choose additional information.
Business Process OperationsJob Management I N T E R N A L 201
Choose Next to select a template.
NoteIf you want to carry out the selected procedure immediately, do not select Next, but choose Complete instead. The system then specifies the suitable templates (recommended templates; see step 5 [page 202]) and creates the job documentation based on them.
5. Template selection
Select one or more templates in the following lists, then choose Next Step to copy the templates:
○ Recommended Templates: This list shows all the templates flagged as Recommended.○ All Templates for Selection: This list shows all the templates suitable for the procedure.○ All Templates: This list shows all available templates.
6. Check
Check whether the list of the selected templates is complete.
NoteYou can add other templates to the list of selected templates by choosing Previous and going back to the template selection.
Results
The system creates job documentation from the templates selected. As soon as the system has created job documentation, you see the following:
● An entry in the Log screen area stating that the job documentation was created.● Information on the job documentation in the Objects Created screen area.
6.4.5 Managing Job Documents According to Validity
Use
You can use report RAGS_MANAGE_EXPIRED_JOBDOC to send email reminders automatically to the job owner. It serves to remind the job owner that the review date maintained in the job documents is coming up, by sending an email containing a report about the current job document validity status.
Prerequisites
● You are using job documentation.● The function for sending emails has been set up.
202 I N T E R N A LBusiness Process Operations
Job Management
Features
The report reviews the validity of the job documents and sends reminder emails automatically to the respective job owners.
You can check whether a job document is still up to date, whether it must be changed, rescheduled or no longer scheduled.
In the settings, you can enter a specific date and define which job types you want to check for validity.
RecommendationTo check the validity of all job documents that need reviewing, we recommend using the report on a weekly basis. In this way, you can distribute the workload for changing job documents more evenly than using the report on a monthly or quarterly basis.
Job Log
The details of identified job documents reaching the end of validity are written to the job log. The job log includes the following information:
● Job Name● Job Document Number● Version Number● End Date of Validity: review date● Notification Counter: how many reminders have already been sent
Reminder Emails
Reminder emails are sent automatically to the email addresses of the contact persons or job owners maintained in the respective job documents that have review dates earlier than the date you have entered.
Depending on the email recipient and how often the email reminder has been sent, there are different emails with relevant content for each case:
● If the email addresses of the job owners are available, reminder emails will be sent to the job owners.● If the email address of the job owner is not available, reminder emails will be sent to the escalation
recipient.● If the job owners have already received three or more reminder emails and have not responded, the matter
must be escalated to the escalation recipient. For this reason, reminder emails for escalation cases will be send to the escalation recipient and the job owners.
● If the email address of the job owner is not available, and the escalation recipient has not responded, the matter must be escalated. Reminder emails for escalation will be sent to the escalation recipient.
Activities
Settings
Scheduler Type: If required, choose the scheduler type depending on the job types that you want to check for validity. If you leave this field empty, all jobs will be included.
Check Date for Job Validity: Here you enter the date by when the job documents should be reviewed to check, for example, whether they are still up to date, need to be changed or no longer scheduled. For example, if you
Business Process OperationsJob Management I N T E R N A L 203
are running the report on a weekly basis, you can enter a date one week later than today's date. In this way, you give the job owners enough time to react before the review date.
Sender Email Address: The address from which the reminder email is sent. The email address can come from the team responsible for the job management, for example, the central job management team, the team that schedules and executes the report.
You can also use a no-reply address for a system-generated email, for example, because the job owner must comply with the job request or change request management process.
Email Recipient Escalation Cases: You need this email address in the following cases:
● The email address of the contact person or job owner is missing because it is not a mandatory field in the job documentation. In this case, the email should be sent directly to the job management team.
● An email reminder has been sent to the job owner three times in succession, but the owner has never responded. In this case, a new email reminder will be sent to the job management team and to the job owner at the same time. Either the job owner contacts the job management team directly or if not, the overdue review is escalated to the job management team, which then acts according to defined guided procedures.
Reset the Generic Data Store: This serves as a reminder counter and indicates how often a reminder email has been sent to the job owner. You can reset the data store manually, for example, if you are testing the application for the first time or if the job owner could not respond to the reminder email for some particular reason. In this case, the relevant records in the generic data store will be deleted.
Test Run: When this is selected, no data is written to the database, no changes are made to the generic data store, and no emails are sent. It only records which jobs have been found, which are already overdue, and how often a reminder email has been sent.
Both Reset Generic Data Store and Test Run are generally intended for test purposes.
Email Texts
To define email texts freely, you can use Business Add-In (BAdI) JSM_EAMIL_MESSAGE_BODY. The default templates (in plain text format) are defined in the fallback class implementation of the BAdI.
In the reminder email, the job owner can click a URL to create a job request. A job can be created to update or cancel the job schedule.
6.5 Job Scheduling
Use
With SAP Solution Manager, you can schedule jobs in your managed systems from job documentation via the SAP scheduler (BC-XBP interface) or an external scheduler (SMSE interface). You can also schedule jobs directly, without job documentation.
The job scheduling assistant allows you to optimize your background job scheduling using data obtained from .
In addition, you can use job control to redirect users to SAP Solution Manager when they try to schedule or reschedule jobs in the managed systems using job scheduling transactions such as SM36 or SM37. Job control
204 I N T E R N A LBusiness Process Operations
Job Management

ensures that new jobs or scheduling changes go through the job request and approval process, and helps you maintain consistent job documentation.
The Recommended Jobs tool identifies standard jobs in your systems and provides functions to schedule these jobs easily.
Activities
● Scheduling Jobs with Job Documentation [page 205]● Using the Job Scheduling Assistant [page 213]● Scheduling Jobs Directly [page 212]● Job Control for Managed Systems [page 214]● Scheduling Recommended Jobs [page 221]
6.5.1 Scheduling Jobs with Job Documentation
If you have created job documentation in SAP Solution Manager, you can schedule its job in the managed system from the SAP Solution Manager system in one of the following ways:
● Scheduling Jobs with the SAP Scheduler [page 205]Schedule ABAP jobs and change the start conditions for BW process chains.
● Scheduling Jobs with an External Scheduler [page 208]Edit the scheduling for any type of externally scheduled job.
6.5.1.1 Scheduling Jobs with the SAP Scheduler (BC-XBP)
This procedure schedules a job from the SAP Solution Manager system, in a managed system, via the BC-XBP interface.
Prerequisites
● Administration has set up a trusted RFC connection between SAP Solution Manager and the target system.● You are authorized to call the BC-XBP interface and schedule jobs in the target system.
For more information, see the Application-Specific Security Guide at http://help.sap.com/solutionmanager.● You have created job documentation and assigned it to a system. For more information, see Systems Tab
Page [page 187].● You have selected the BC-XBP scheduler in the job documentation and have added at least one step. For
more information, see General Tab Page [page 184].
Business Process OperationsJob Management I N T E R N A L 205
Procedure
Starting the Job Scheduling Application
1. Open the job documentation:
NoteThe job documentation opens in the user interface in which it was created (either the simplified or the detailed user interface).
2. Navigate to the scheduling application in one of the following ways:.
○ From the simplified user interface, choose Scheduling <Managed System> (<Client>) .
○ From the detailed user interface, choose Systems Scheduling .3. Switch to edit mode to start scheduling a job.
Copying a Job
You can copy data from an existing job in the current system.
1. Choose an RFC connection.2. Specify the selection criteria, for example, job name, user name, or job status, and choose Find.
The system lists the jobs for the search criteria.3. To copy the job configuration, select a job and confirm with Copy.
The system copies the job configuration.
Scheduling a Job
1. Choose an RFC connection.2. Enter a job name and choose a job class.3. Choose the start method, and provide values for the corresponding subelements.4. You can add step parameters.5. Choose Schedule.
The job count appears in the display field.6. Save your entries.7. To release the job in the target system, choose Release.
You go to the transaction SM37 in the target system.
Changing a Job
You can change the scheduling of a job as long as it has not been completed. Proceed as follows:
1. Make changes.
NoteWhen you change a periodic job, the system searches for the changeable successor and only changes this successor.
If there is more than one changeable job with the same name, the system does not change any of these jobs.
2. Save your entries.
206 I N T E R N A LBusiness Process Operations
Job Management
3. Choose Change.4. To release the job in the target system, select Release.
Deleting a JobYou can delete a scheduled job, as long as it has not yet been released. Proceed as follows:
1. Select an RFC connection.2. Choose Delete.3. Save your entries.
Displaying Job StatusTo display the current status of the job, choose Status.
Displaying Job LogsWhen a job has the status Finished, you can display the job log.
Selecting a Job in the Target SystemYou can view the scheduled jobs by their status in the target system.
● Choose Job Selection.You go to the transaction SM37 in the target system. You can, for example, release a job scheduled with the job documentation.
Analyzing Runtime ErrorsTo analyze runtime errors, choose Runtime Errors.
You go to the job analysis of transaction ST22 in the target system.
Analyzing JobsPrerequisite: You have implemented the current version of the ST-PI plug-in in the SAP Solution Manager system and in the connected managed systems.
To analyze a job in the target system, select Job Analysis.
You go to the transaction ST13 in the target system.
Subsequent Jobs Tab PageThis tab page documents all jobs that follow periodic jobs already scheduled.
NoteFor the documentation of subsequent jobs, the SAP Solution Manager has to evaluate the parent-child relationship between jobs. For this purpose, you need to activate the Parent-Child Relationship function in the target system using program INITXBP2.
To display the subsequent jobs, proceed as follows:
1. Search for subsequent jobs. Enter the selection criteria and then choose Search.2. Choose the subsequent job from the search results. If more information has been specified for the job, you
will see this in the following lists under the search results:1. List Jobs Created by the Selected Job
Business Process OperationsJob Management I N T E R N A L 207
If the selected job has further scheduled jobs, then this list displays these jobs.2. List Successor Jobs of the Selected Job
If the selected job is part of a job chain, this list displays the job that follows on directly.
Description Tab PageOn this tab page, you can provide a text description of the job scheduling.
6.5.1.2 Scheduling Jobs with an External Scheduler (SMSE)
Use
You have created job documentation and want to manage the job scheduling using a SMSE-enabled external scheduler such as SAP Central Process Scheduling by Redwood.
Prerequisites
● The external scheduler is connected to SAP Solution Manager and the target systems and is configured.● You have created job documentation and assigned it to a system. For more information, see Systems Tab
Page [page 187].● You have selected the SAP Solution Manager Scheduling Enabler (SMSE) interface in the job
documentation. For more information, see General Tab Page [page 184].
Procedure
Scheduling an External Job1. Open the job documentation:
NoteThe job documentation opens in the user interface in which it was created (either the simplified or the detailed user interface).
2. Navigate to the scheduling application in one of the following ways:.
○ From the simplified user interface, choose Scheduling <Managed System> (<Client>) .
○ From the detailed user interface, choose Systems Scheduling .3. Complete the mandatory fields and specify the start conditions.
NoteRequired entry fields are indicated by *.
4. Choose Schedule/Change Externally.
208 I N T E R N A LBusiness Process Operations
Job Management

The system transfers the job configuration to the external scheduler and schedules the job.When the job has been scheduled, you get a status message with the job number.The system imports the remaining data automatically from the external scheduler.
5. Save the imported data.
NoteDepending on your authorizations, you can only schedule a job in status Paused. The administrator responsible for the external scheduler must release this job manually.
CautionYou cannot change a job that has already been scheduled. If you change a job that has already been scheduled and then select Schedule Externally again, the system creates a new job and does not change the existing job.
Copying an External Job Configuration1. On the Scheduling user interface, choose Copy.2. Specify the selection criteria, for example, job name, user name, or job status, and choose Find.
The system lists the jobs for the search criteria.3. To copy the job configuration, select a job and confirm with OK.
The system copies the job configuration.
NoteThe system cannot copy start conditions.
Canceling a Scheduled JobOn the Scheduling user interface, choose Cancel Job.
The system cancels the job and all its subsequent jobs.
NoteThe job you want to cancel must not have started.
Changing a Scheduled Job1. Select a logical component in the job documentation, under System Landscape, select the target system,
and choose Scheduling.2. Change the start options or parameters.3. Choose Schedule/Change Externally again to change an already scheduled job.
Rescheduling a Scheduled Job1. Select a logical component in the job documentation, under System Landscape, select the target system,
and choose Scheduling.2. Change only the start options.3. Choose Reschedule.4. A new job is scheduled and the old job is canceled. If the old job was periodic, all associated follow-on jobs
are also canceled.
Business Process OperationsJob Management I N T E R N A L 209
Adding Notes or Business Cards to a Scheduled JobTo add notes as free text, or business cards of business partners, to a scheduled job, or to display those already added:
1. Select a logical component in the job documentation, under System Landscape, select the target system, and choose Scheduling.
2. Choose External Notes.A dialog box appears.
3. To add notes or business cards:○ Note (free text):
1. Write your note. You can enter up to 1000 characters for each entry.2. Choose Add.
You can add any number of entries.○ Business cards: You can add the business cards of business partners that are entered in the job
documentation under Partners with the role Background Processing.1. Choose a business partner.2. Choose Add.
After adding a note or business card, the system puts this in an outbound queue.4. Choose OK to export all notes.
CautionYou cannot edit or delete exported notes.
Displaying Job Output Information1. Select a logical component in the job documentation, under System Landscape, select the target system,
and choose Scheduling.2. To display the job output information for a job that has already been scheduled, choose External Log.
A dialog box appears.3. Choose a log.
The system displays the log.
NoteJob output information depends on the job status.
External Scheduler ManagementThere are two ways to access the administration of an external scheduler:
● In the Job Management - Administration app, choose the Administration view.● In the job documentation, go to the Systems tab page and open the scheduling application. Choose
Scheduler Management.
Selecting a Job in the Target SystemTo see scheduled jobs, depending on the status in the target system:
1. Select a logical component in the job documentation, under System Landscape, select the target system, and choose Scheduling.
2. Choose Job Selection.
210 I N T E R N A LBusiness Process Operations
Job Management
You go to the transaction SM37 in the target system. You can, for example, release a job scheduled with the job documentation.
Analyzing Runtime Errors in the Target System1. Select a logical component in the job documentation, under System Landscape, select the target system,
and choose Scheduling.2. To analyze runtime errors, choose Runtime Errors.
You go to the transaction ST22 in the target system.
Analyzing Jobs in the Target System
NoteTo be able to run the analysis in the target system, you have implemented the current version of the ST-PI plug-in in the SAP Solution Manager system and the connected managed systems. You have set up a trusted RFC connection to the target system.
1. Select a logical component in the job documentation, under System Landscape, select the target system, and choose Scheduling.
2. To analyze a job in the target system, select Job Analysis.You go to the transaction ST13 in the target system.
Defining Subsequent JobsAs a prerequisite, you need a previously scheduled, periodic job in the external scheduler.
1. Select a logical component in the job documentation, under System Landscape, select the target system, and choose Scheduling.
2. Choose the Subsequent Jobs tab.3. Enter the selection criteria and then choose Search.4. The results list is displayed. The list also contains previously unscheduled jobs. A maximum of 200 result
entries are displayed.
More Information
You can also schedule a job directly in a system connected to the external scheduler, without having to create job documentation in advance. For more information, see Scheduling Jobs Directly [page 212].
Business Process OperationsJob Management I N T E R N A L 211
6.5.2 Scheduling Jobs Directly
Context
You can schedule a job directly, that is, without creating job documentation for it in advance, in a system connected to SAP Solution Manager.
Procedure
1. Open the Job Management - Administration app and under Common Tasks, choose Schedule Jobs.2. Specify the following:
○ System for the scheduling○ Client (optional)○ Scheduling method
○ To schedule the job with an external scheduler, select the SMSE interface.○ To schedule the job directly using an SAP Solution Manager system RFC connection, choose the
BC-XBP interface.3. Choose Start.
A dialog box appears.4. To enter the parameters and scheduling data, you can:
○ Enter the job information in the dialog box.
NoteYou can enter up to five job steps directly.
○ To import an existing job and adjust the data, choose Import.5. To schedule the job, choose Schedule.
The number of the job is displayed in the job number field.6. To change the job data for an existing or imported job, choose Change.
NoteTo avoid data inconsistencies, you can only change jobs that you created in the job documentation directly in the job documentation.
212 I N T E R N A LBusiness Process Operations
Job Management
6.5.3 Using the Job Scheduling Assistant
Prerequisites
● System monitoring has been setup for the managed system in which you want to schedule the job.● You are authorized to run Job Management and schedule jobs.● Your browser supports HTML5.
Context
The job scheduling assistant supports the job planning process. It helps you fulfill business requirements while ensuring optimal utilization of system resources. You can use it to plan new jobs and to optimize scheduling of existing background jobs.
You can analyze background jobs in the system context, taking under consideration not only requirements coming from the business/functional needs, but also other activities happening on the system (for example, non-essential background jobs should not be scheduled during peak hours). Therefore the schedule needs to be optimized not only based on the number and logic of jobs, but also based on available system resources.
The job scheduling assistant provides the following metrics for your scheduling analysis:
● CPU load on the application server/host● How many CPUs are available at a given point of time for the system● How much memory is utilized / How much memory is free● Number of dialog work processes that can be used in RFC call (used in parallel processing)● How many update requests are waiting in the queue● Number of background work processes available
Procedure
1. Open the Job Management - Administration app and under Common Tasks, choose Schedule Jobs.2. Choose the Schedule with Help of Assistant radio button.3. Select a technical system client and scheduler, and then choose Next.4. Follow the guided procedure.
Business Process OperationsJob Management I N T E R N A L 213
6.5.4 Job Control for Managed Systems
Use
This process automatically redirects users to SAP Solution Manager when they try to schedule or change jobs in a managed system. Job control integrates the job scheduling transactions in your managed systems with SAP Solution Manager job scheduling. This means the following:
1. The system automatically redirects users who try to schedule or change a periodic or ad hoc job using a scheduling transaction such as SM36 or SM37 to the SAP Solution Manager Job Control Web Dynpro application.
2. To schedule or change a periodic job, the user must submit a job request.3. When the job request is approved, the changes are carried out and documented in job documentation.
The job request, job documentation, and job scheduling can now be managed centrally with SAP Solution Manager.
Prerequisites
You have configured job control. For more information, see Configuring Job Control [page 215].
Process
1. When the user starts the transaction SM36 to create a job in the managed system, the system starts a guided procedure for creating a job request in SAP Solution Manager.
2. Depending on the job type (periodic or ad hoc), the user proceeds as follows:○ Periodic jobs must be approved before they can be scheduled. The approval process requires the user
to create a job request.The user plans and requests periodic jobs in the Job Control Web Dynpro application, attaching any necessary documents to the request.
○ Depending on the ad hoc job configuration settings, ad hoc jobs either need approval, or can be scheduled directly. For more information, see Ad Hoc Jobs [page 218]. If ad hoc jobs can be scheduled directly, the user schedules the job using Job Control Web Dynpro application, without creating a job request.
NoteBy default, ad hoc jobs can be scheduled directly in the managed systems.
3. If there is a job request, it goes through the approval process. For more information, see Job Requests [page 155].
4. The data in any change document is copied automatically into the job documentation that the job scheduling is based on.
5. The job is scheduled on the basis of the job documentation.
214 I N T E R N A LBusiness Process Operations
Job Management
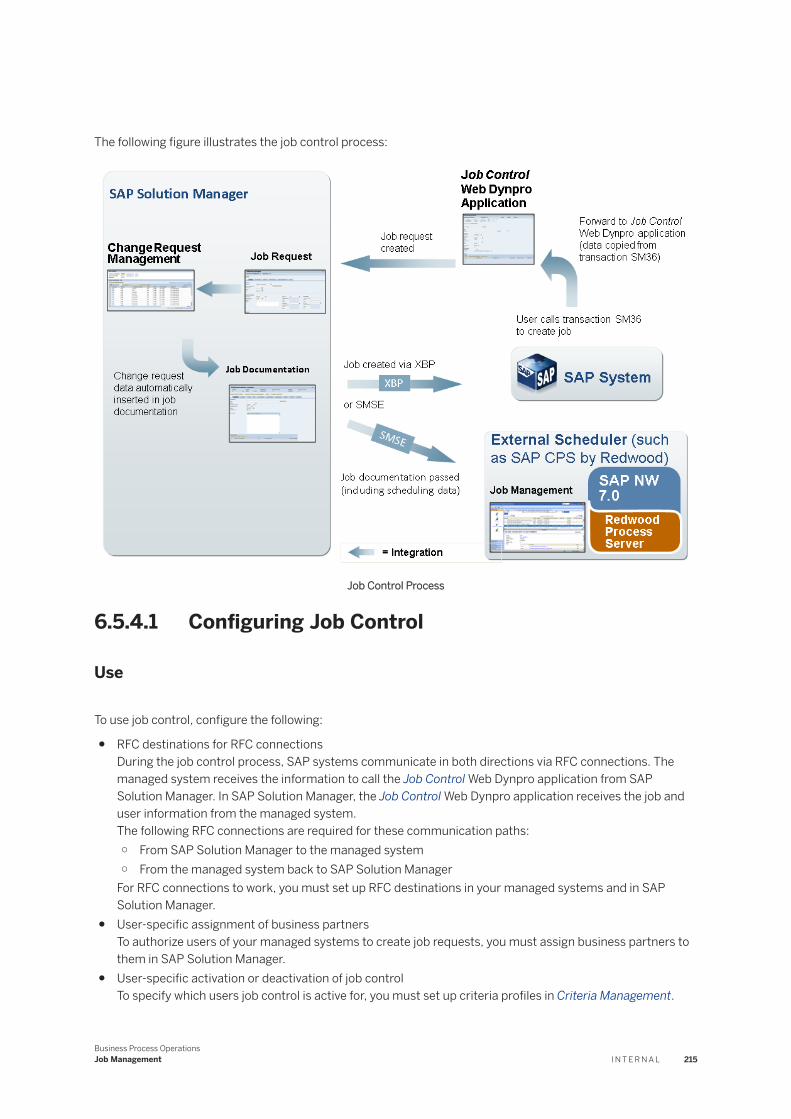
The following figure illustrates the job control process:
Job Control Process
6.5.4.1 Configuring Job Control
Use
To use job control, configure the following:
● RFC destinations for RFC connectionsDuring the job control process, SAP systems communicate in both directions via RFC connections. The managed system receives the information to call the Job Control Web Dynpro application from SAP Solution Manager. In SAP Solution Manager, the Job Control Web Dynpro application receives the job and user information from the managed system.The following RFC connections are required for these communication paths:○ From SAP Solution Manager to the managed system○ From the managed system back to SAP Solution Manager
For RFC connections to work, you must set up RFC destinations in your managed systems and in SAP Solution Manager.
● User-specific assignment of business partnersTo authorize users of your managed systems to create job requests, you must assign business partners to them in SAP Solution Manager.
● User-specific activation or deactivation of job controlTo specify which users job control is active for, you must set up criteria profiles in Criteria Management.
Business Process OperationsJob Management I N T E R N A L 215
Prerequisites
● You have activated the Job Management Web Dynpro applications in Customizing for SAP Solution Manager under Capabilities (Optional) Job Management .
● The user who accesses SAP Solution Manager from the managed system is authorized for Job Management.
● The user who accesses the managed system from SAP Solution Manager is authorized to access job data.
Procedure
Setting up RFC Destinations in the Managed Systems
To be able to establish RFC connections from SAP Solution Manager to your managed systems, you must first set up RFC destinations in your managed systems. For more information, see .
Setting Up RFC Destinations in SAP Solution Manager
To be able to establish RFC connections from your managed systems back to SAP Solution Manager, you must first set up RFC BACK destinations in SAP Solution Manager.
NoteBefore you can set up RFC destinations in SAP Solution Manager, you must already have created a (back) RFC connection to SAP Solution Manager. You do this in SAP Solution Manager Configuration (transaction SOLMAN_SETUP) in the Basic Configuration scenario under Technical Systems.
Proceed as follows:
1. Open the Job Management - Administration app and choose the Administration view.2. To check whether an RFC BACK destination is set up for a managed system:
1. Under BACK Destination, choose Check Back Destination.A dialog box appears.
2. Select the managed system and client (optional), and then choose Check.A message at the top of the Administration view shows whether an RFC BACK destination is already set up.
3. To set up a new RFC BACK destination:1. Under BACK Destination, choose Define Back Destination.
A dialog box appears.2. Select the managed system and client (optional).3. In the Destination field, select a name for the RFC BACK destination.4. Save your entries.
An RFC destination for a communication connection from the managed system to the currently open system (SAP Solution Manager) is now defined and can be used by the transactions SM36 and SM37 to communicate with SAP Solution Manager.
Assigning Business Partners to Users
To authorize users of your managed systems to create job requests, you must assign business partners to them in SAP Solution Manager.
216 I N T E R N A LBusiness Process Operations
Job Management
Proceed as follows to do this automatically, using the report BP_GEN:
1. Open the Job Management - Administration app and choose the Administration view.2. Under Business Partner, choose Generate Business Partner.
For information about how to execute the report, see .
Activating or Deactivating Job Control for Users
NoteBefore you can activate or deactivate job control for users, you have to complete the following configuration steps:
● Setting Up RFC BACK Destinations● Assigning Business Partners to Users
To specify which users job control is active for, you set up criteria profiles for your managed systems in the SAP Solution Manager Criteria Management application, and then assign users to these profiles.
NoteCriteria Management can only be called by background processing administrators (S_BTCH_ADM role).
Proceed as follows:
1. Open the Job Management - Administration app and choose the Administration view.2. Under Criteria Management, choose Maintain Criteria Profiles and Users.
A dialog box appears.3. Select the managed system and client (optional).4. Save your entries.
The ABAP Program Execution application starts.5. Start the transaction for Criteria Management (CRIT).
The Criteria Management dialog box appears.6. To create a new profile, choose the Criteria Profile and then choose the GUI icon with the quick info Add.
A dialog box appears.7. Select the criteria type for creating (or requesting) jobs using SAP Solution Manager and enter a
meaningful name for the profile, for example, Job Control Activation.8. Confirm with OK.
The criteria profile is created, and appears in the list.9. Double-click the entry for the new criteria profile.
The criteria for the criteria profile are displayed on the right side of the screen.10. To assign clients and users to the criteria profile, choose the GUI icon with the quick info Add.
A dialog box appears.11. Enter a description for the criterion. Choose the client, and specify the users the criteria profile should
apply to.
NoteYou can use wildcards (*) in the User field to add multiple users to a criteria profile.
12. Save your entries.The criterion is created for the criteria profile.
Business Process OperationsJob Management I N T E R N A L 217

NoteTo create more profiles with the same criteria type, repeat steps 6 to 12. In this way, you can create several profiles for the same criteria type for different clients or user groups.
13. To activate the profiles created for job control, select the profiles in the list, and choose .Job control is active for all users assigned to the active profile. When these users start the transaction SM36, they are automatically forwarded to SAP Solution Manager job control.Job control is inactive for all other users.
More Information
For more information about job control, see SAP Note 1383398 .
6.5.4.2 Ad Hoc Jobs
Use
Ad hoc jobs are jobs that run only once. By default, ad hoc jobs can be scheduled directly. To require the use of job requests for ad hoc jobs, you have to configure it explicitly.
Prerequisites
You have configured job control. For more information, see Configuring Job Control [page 215].
Procedure
To require job requests for ad hoc jobs, proceed as follows:
1. Start the transaction SM30 in your managed system.2. In the Table/View field, enter AGS_JOB_CONFIG, and then choose Maintain.3. Choose New Entries.4. Enter the parameter JSM_GAF_ADHOC_FLAG with the value X in the table.5. Save your entries.
218 I N T E R N A LBusiness Process Operations
Job Management
Result
Ad hoc jobs can no longer be scheduled directly. Users must submit job requests for ad hoc jobs, and an approval process is initiated.
6.5.4.3 Creating a Job with Job Control
Prerequisites
You have configured job control. For more information, see Configuring Job Control [page 215].
Context
If job control is activated, you must create a job request in SAP Solution Manager before a new job can be scheduled in your managed system from the job documentation.
You can create the following types of jobs with job control:
● Periodic: You must create job requests when you create periodic jobs, because these are required to go through an approval process.
● Ad hoc: Your configuration settings determine whether you must create job requests for ad hoc jobs. For more information, see Ad Hoc Jobs [page 218].
Procedure
1. Start the transaction SM36 in your managed system.
A dialog box appears, telling you that you can only create or change jobs in SAP Solution Manager.2. Confirm the dialog box
You go to the SAP Solution Manager Job Control Web Dynpro application.
Job control gets the job data from your managed system and displays it in the SAP Solution Manager Job Control Web Dynpro application.
3. In the Planning step of the Job Control Web Dynpro application, make the following entries, and then choose Next:○ Specify the RFC connection from the SAP Solution Manager to your managed system.
NoteThe system proposes a default RFC connection, which you can change.
Business Process OperationsJob Management I N T E R N A L 219
○ Enter a name for the job you want to create.○ Choose the type of scheduler you want to use: SAP Scheduler or External Scheduler.○ Specify the date and time until which the job request is to be valid.○ Add new job steps.
4. In the Request Job step, make the following entries, and then choose Next:
NoteThis step is not shown for ad hoc jobs unless you have configured them to require approval.
○ Reason for the job request and priority○ Business requirements information○ Business process information
NoteThe business partner, managed system, and a predefined request short text are automatically provided by the application.
5. In the Add Attachments step, you can upload documents to provide more information about the job you want to create. When you are finished, choose Next.
6. Save your entries.
6.5.4.4 Using Job Control to Change the Job Scheduling
Prerequisites
● You have configured job control. For more information, see Configuring Job Control [page 215] and Ad Hoc Jobs [page 218]
● You have created a request for a new job, for which there is already documentation, in job control.● The job that you want to change has a changeable status. It must not, for example, have one of the
following statuses:○ Canceled○ Completed
Context
You want to use job control to change a job that has already been created.
220 I N T E R N A LBusiness Process Operations
Job Management
Procedure
1. Start the transaction SM37 in your managed system.
2. To search for the job to be changed, enter the job data and choose Execute.
3. Select the job and choose Job Change .
A dialog box appears, telling you that you can only create or change jobs in SAP Solution Manager.4. Confirm the dialog box.
You go to the SAP Solution Manager Job Control Web Dynpro application, where the job creation data is displayed.
5. You can change the job creation data in the Web Dynpro application steps.6. Save your entries.
6.5.5 Scheduling Recommended Jobs
The Recommended Jobs view in the Job Management - Administration app provides an overview of background jobs in your system landscape, organized by system. You can monitor various job types system-specifically and, if necessary, create job documentation using existing templates.
Integration
You can schedule and monitor standard jobs with the Define Background Job transaction (SM36). For more information about standard jobs, see SAP Note 16083 .
RecommendationRun the standard jobs regularly.
Features
The standard view shows a table of data for the systems connected to SAP Solution Manager, such as the system status and product version.
You can display job details for the following job types:
● ABAP jobs● SMSE jobs● Standard jobs
You can also determine which job documentation templates are available, across product versions, and create job documentation with a selected template.
Business Process OperationsJob Management I N T E R N A L 221
Activities
Display Data of ABAP Jobs and SMSE Jobs
1. Select a system in the table.2. Select ABAP Jobs or SMSE Jobs.3. The system checks whether a job documentation template exists in SAP Solution Manager for the selected
product version.If so, SAP Solution Manager proceeds as follows:1. The system reads the job definition and status information for the selected job type, from the managed
system.2. The system shows the job status, for example, Scheduled or Canceled.
NoteFor ABAP jobs, you can display job detail information by clicking the job name link.
The job detail view contains basic information such as the job count and status. You can also view the job log and step information.
Display Data of Standard Jobs
1. Select a system in the table.2. Choose Standard Jobs.3. SAP Solution Manager reads the standard job definition from the managed system, and displays the job
status.
Get Job Template, and Create Job Documentation
1. Select a system in the table.2. Choose Job Templates.3. The system displays all job documentation templates for the selected product version that exist in SAP
Solution Manager.4. You can select a template, and create job documentation with it.
6.6 Job Overview
The Job Management - Administration app provides access to several applications for viewing jobs:
● Central Job Overview [page 223]● Simple Job Selection [page 224]● SAP Scheduler Management [page 225]● External Scheduler Management [page 226]
222 I N T E R N A LBusiness Process Operations
Job Management
6.6.1 Central Job Overview
Use
The Central Job Overview enables you to view detailed information about ABAP jobs and externally scheduled jobs. You can select and view job data over the complete lifecycle, similar to the Job Overview (transaction SM37). If the externally scheduled job is part of a job chain, hierarchical job chain information is also displayed. To provide this overview, data is collected directly from the managed system and the external scheduler.
The Central Job Overview can be launched from the Job Management Administration tile, under Common Tasks.
Prerequisites
● You use SAP Central Process Scheduling (SAP CPS) 8.0 or later. Only SAP CPS/SAP BPA is supported by default. Other external schedulers may be connected on a project basis.
NoteThe latest version of SAP CPS was renamed SAP Business Process Automation by Redwood 9.0 (SAP BPA) in March 2015. For more information, see SAP Note 2005087 .
● The administrator has performed the managed system configuration in SAP Solution Manager Configuration.
● The administrator has configured the Central Job Overview and the remote database connection to the external scheduler. For more information, see the Configuration Guide for Central Job Overview.
● Your browser supports SAPUI5.
NoteTo make the application UI refresh correctly with Internet Explorer 9 and above, adjust the browser cache settings as follows:
1. Go to Tools Internet Options2. On the General tab, under Browsing History, choose Settings.3. Under Check for newer versions of stored pages:, choose Every time I visit the web page.
Features
Selecting Jobs
Select jobs using the filter area at the top of the screen.
● Select jobs using Central Job Overview selection criteria. Specify the managed systems and then filter jobs by name, user, status, scheduled time, after event, and program. It is possible to select multiple Job Names and multiple System IDs.
Business Process OperationsJob Management I N T E R N A L 223
NoteIf you enter a user name or after event, the search will only return ABAP jobs.
● Save and reuse filter variants for frequently viewed jobs. The date and time are not persisted for any saved variant.
Viewing Results
Search results are displayed below the filter area.
● If a found job is part of a job chain, the job chain is displayed in the results area. You can drill down to see the job chain hierarchy.
● Click on the job ID to view detailed information, including basic information, job log, job steps with variant details, spool list number (click to start an ITS session and view the spool list), child jobs, scheduling details, and the job documentations realted to the job.
● At the chain header level, you can view CPS-specific scheduling parameters, such as the requested start time, end date, submit frame, and event information (wait event, raise event).
● Sort and filter the results list.● Export the results list to a CSV file.● In the hierarchy view of job chains, you can toggle the display between all jobs or ABAP jobs only.
6.6.2 Simple Job Selection
Context
You can search for BC-XBP jobs in a managed system.
Procedure
1. Under Common Tasks, choose Select Job.2. Specify the product system and client to search, and then choose Start.3. Choose an RFC connection.4. Enter your search criteria, and then choose Find.
The system displays the jobs that meet your criteria, as well as the subjobs (jobs created by the selected job).
You can do the following:
○ Select a job and display its job log or status.○ Click the job name to display more job details.○ Open the job documentation for the job by clicking the icon in the Job Documentation column.
224 I N T E R N A LBusiness Process Operations
Job Management
6.6.3 SAP Scheduler Management
Use
The SAP Scheduler Management view in the Job Management - Administration app provides an overview of jobs scheduled with the SAP scheduler via the BC-XBP interface. It has two sub-views. They are as follows:
● Job MonitorDisplay jobs scheduled with the SAP Scheduler.Access functions for analyzing and scheduling selected jobs.Create new job definitions and new job and job chain documentation and request new jobs or job changes.
● Own JobsQueries are limited to jobs owned by you.
Prerequisites
You have scheduled jobs.
Features
You can display an overview of scheduled jobs. Use the standard queries or define your own queries for displaying jobs. The jobs are displayed in a list.
You can do the following for a selected job:
● Display the job logs● Create a job request
For more information, see Job Requests [page 155].● Display job documentation
For more information, see Job Documentation [page 180].● Import a job with its scheduling parameters into job documentation● Go to the following applications:
○ Job Analysis○ Job Scheduling○ Job Diagram
Activities
Displaying Jobs
1. In the Active Queries area, select the appropriate query.2. To specify the systems and other search criteria, choose Show Quick Criteria Maintenance.
Business Process OperationsJob Management I N T E R N A L 225
The System Category determines the strategy for including systems in the query. In other words, it determines which fields will be evaluated when you run the query:○ Manual
Systems you enter manually in the System:Client field are to be evaluated. You use the syntax <system>:<client>.
○ SolutionSystems in the solutions that you select in Solution field are to be evaluated.
○ ProjectSystems for the projects that you select in the Project field are to be evaluated.
○ IBaseSystems in the projects assigned to the business partner of the scheduling user are to be evaluated.
3. Select additional relevant search criteria, for example:○ One or more explicit statuses, such as Scheduled or Released○ Start and end date○ Jobs without documentation
NoteUse this parameter to find jobs without job documentation so you can create job documentation for them or identify users who create jobs without job requests.
4. Using the input help for the Job Name field, define one or more standard jobs.
ExampleSAP_REORG_ABAPDUMPS
SAP_REORG_JOBS
5. Run the query.The system displays the search results in the table.For standard jobs, the evaluation result displays a table with the start time, status, duration and start delay, among other information. When you select a standard job, job log information is displayed below.
NoteFor ABAP jobs, you can display job detail information by clicking the job name link.
The job detail view contains basic information such as the job count and status. You can also view the job log and step information.
6.6.4 External Scheduler Management
Use
In the External Scheduler Management view, you can manage jobs scheduled with a connected, SMSE-certified external job scheduler. The External Scheduler Management view has the following subviews:
● Job Monitor
226 I N T E R N A LBusiness Process Operations
Job Management
Display a list of jobs scheduled with an external scheduler. You can define queries and apply externally defined filters to select data.Access functions for analyzing, monitoring, and scheduling selected jobs.Create new job definitions and new job and job chain documentation and request new jobs or job changes.Import jobs, with their scheduling parameters, into job documentation.
● Own JobsQueries are limited to jobs owned by you.
● Operator MessagesDisplay operator messages from your external scheduler.
Prerequisites
● You have scheduled jobs with an external scheduler.● You have created a connection to an external scheduler as follows:
1. In the Active Queries area, select the appropriate query.2. Choose Show Quick Criteria Maintenance.3. Specify the destination and at least one isolation group. You can select multiple isolation groups to get
data from several systems.● If you want to use filters in your queries, you have defined these in your external scheduler. You can apply,
but not change, the filters in SAP Solution Manager.
Features
You can perform the following activities in the External Scheduler Management view:
● Display an overview of jobs scheduled with an external schedulerUse the standard queries or define your own queries for displaying jobs. You can use individual search criteria or apply an external filter in your query.
NoteYou can use the Queue field to indirectly specify which systems to get data from. You can choose queues from several managed systems by using the multiple selection dialog box.
For example, choose the following queues for the systems ABC and XYZ:
GLOBAL.ABC_QUEUE
GLOBAL.XYZ_QUEUE
● Go to the following applications:○ Job Analysis○ Job Scheduling○ Job Monitor○ Job Diagram
● Import a selected job with its scheduling parameters into job documentation
Business Process OperationsJob Management I N T E R N A L 227
● Create a job request● Create job or job chain documentation● Display a list of operator messages from your external scheduler
6.7 Job Analysis
Job Management provides access to the following graphical applications for analyzing the workload caused by background jobs:
● Job Gantt Chart [page 228]● Background Job Analysis [page 230]
6.7.1 Job Schedule Gantt Chart
The Gantt chart provides a convenient graphical overview of scheduling information for selected jobs over a period of time. It allows you to analyze the workload caused by background jobs, so you can avoid bottlenecks and optimize system resources when scheduling jobs.
Starting the Application
To start the application, you have the following options:
● On the SAP Solution Manager launchpad, open the Job Schedule Gantt Chart app.● In the Job Management - Administration app, choose Analyze Jobs (Gantt) under Common Tasks.
Setting the Time Zone
At the top of the application screen, you have the option to select a time zone. This setting determines whether any time period that you enter as part of your search criteria should refer to a specific time zone, or simply the time zone of the selected target system. The time zone setting also determines how the current time is labeled on the Gantt graph.
● If you select a time zone, any time period you enter for the search refers to the selected time zone. When you execute the search, the application converts your time period entries to the target system time zone when searching for jobs on the target system.
● If you choose to ignore the time zone, any time period you enter for the job search refers to the time zone of the target system.
228 I N T E R N A LBusiness Process Operations
Job Management
Searching for Jobs
In order to display a Gantt chart, you have search for jobs to display. You can perform a standard search or a solution search:
● Standard searchFind jobs in one or more managed systems based on standard criteria such as the job name, user, or time period.
Search Criteria Description
Target system information Choose one or more managed systems to search.
Job Limit the search to jobs with a certain name, or a naming pattern using wildcards (*).
Limit the search to jobs run by a specific user.
Job-steps Limit the search to a certain program or variant.
Job-options Limit the search to jobs of a certain minimum duration or status. The search always returns jobs with the status Released.
Note that the lowest possible minimum duration is 5 minutes, which means that you cannot display jobs with a runtime of less than 5 minutes in the Gantt chart.
Job-start conditions Limit the search to jobs scheduled within a certain time period, or within a certain number of hours in the past or future.
Note that the time zone setting at the top of the application window applies to the time period specified here.
Time scale level Choose the layout of the Gantt chart. Note that you can change the time scale after executing a search.
● Solution searchFind jobs that have been assigned (via job documentation) to a specific solution and scenario, business process, or step.If you only specify a solution, it will be searched hierarchically to see if there is any job documentation linked with it. If there is, then the name of the job documentation will be used as the job name for the search on the target systems. The target systems are determined by the logical components assigned to the specified solution. The time zone and other search fields work the same way as the standard search.
NoteYou can save the current job selection criteria by choosing Save Current Criteria and entering a name for your search.
To select a previously saved search, choose Select Criteria. Here you can also specify a search to be the default when the application starts.
Business Process OperationsJob Management I N T E R N A L 229
Viewing the Chart
If the search returns jobs, a Gantt graph is displayed.
On the left, the jobs that meet your search criteria are displayed in a table list, grouped by server and work process. You can expand and collapse the nodes representing the servers and work processes.
The time scale is displayed above the graph.
The current time is indicated by a vertical line that divides the main graph display into two zones: On the left are past jobs which have been scheduled and run. On the right are future jobs that are scheduled but have not run yet.
Each job is represented by a horizontal bar on the graph. The position and length of the bar reflects the start time, end time, and duration of the job. You can hover over a bar with your mouse to display the job details. The color of the bar indicates the job status:
● Red: canceled● Yellow: active / running● Blue: released● Green: finished
Past jobs may be marked with a black triangle, which indicates that the job ran with a delay.
Navigating the Chart
The tool bar above the chart provides some options for the display. You can do the following:
● Hide the search area to make more room for the chart display● Define the chart height in pixels (default = 700 px)● Display a navigation window to move to a difference section of the chart● Display the jobs in a sortable, filterable list
6.7.2 Background Job Analysis
Background job analysis (BACKGROUND_JOB_ANALYSIS) is a standalone tool that graphically displays data from transaction SM37. It is part of the Service Tools for Applications Plug-In ST-A/PI, and is locally available in every SAP back-end system with a recent ST-A/PI plug-in.
The tool was designed to identify system bottlenecks caused by background jobs. It can be used, for example, if you encountered a performance issue at a specific time, and you want to find out what was running at that time on your system. The tool can help you identify whether the jobs can be rescheduled to run at another time, or whether workload can be shifted to another server.
230 I N T E R N A LBusiness Process Operations
Job Management

Launching the Tool
Open the Job Management - Administration app and under Common Tasks, choose Analyze Jobs.
NoteYou can also call the BACKGROUND_JOB_ANALYSIS tool in transaction ST13, or by executing the ABAP report /SSA/BTC in transaction SA38/SE38/SE80.
Performing an Analysis
The entry screen is similar to transaction SM37, but you can only select the statuses Active, Finished, and Canceled (but not Released or Scheduled).
The output screen contains the following three sections:
● The first shows the selection criteria and provides information about how many job executions had a runtime of more than 5 minutes and how many with less than 5 minutes.
● The second is a job list similar to transaction SM37, but it shows only the long-running jobs (longer than 5 minutes). It shows the variant, executing server, and work process. The duration is shown in a hh:mm:ss format instead of seconds.
● The third is a graphical representation of all the long-running jobs. The length of a bar represents the job runtime. The jobs are arranged so that you can read which application server and which work process was utilized at which point in time. Additionally, you see the average CPU idleness of the respective host server per clock hour (similar to transaction ST06). The color scheme is the same as in SM37: green jobs finished successfully, red jobs canceled, and blue jobs are still active.From within the graphic, you can navigate to transaction SM37 or STAD to view job details.
6.8 Reports
You can access the following reports from the Reports view of the Job Management - Administration app:
● ABAP reports that contain information about job requests and job documentation● BW reports that contain information about health checks in job scheduling management
Related Information
ABAP Reports [page 232]Job Management Health Check Reports [page 233]
Business Process OperationsJob Management I N T E R N A L 231

6.8.1 ABAP Reports
Use
The following ABAP reports are available:
● Job requests (CRM Web UI)Searches job requests (linked to incidents or requests for change)
● Job documentationSearches job documentation so you can monitor it and avoid duplication.
Procedure
To run a report, proceed as follows:
1. Open the Job Management - Administration app and choose Reports.2. Select the ABAP Reports radio button.3. Click the Report link for the report you want to run.
The section screen for the ABAP report opens.4. Specify the desired selection criteria.
NoteFor the job documentation report, under Due Date, you can enter a date range in the Exact Date fields. The due date is the date after which the user should check if the job is still required.
Under Time Frame, in the From <n> Days before Today and To <n> Days after Today fields, you can specify within what period the due date must lie for the jobs of the job documentation to be selected. These fields are evaluated independently of the Exact Date fields. If you specify a due date range and a time frame, the system will return all job documentation for the jobs whose due date either matches the due date specified or lies within the specified period.
5. Execute the report.
Result
All the documents that match your selection criteria are displayed in the results list. You can open the job request, job documentation, or CRM document from the results list by clicking its ID.
232 I N T E R N A LBusiness Process Operations
Job Management
6.8.2 Job Management Health Check Reports
Use
You can run reports in SAP Business Warehouse (SAP BW) to monitor job processing. The reports are part of the health checks for Job Management. You use data from business process monitoring and from the managed systems.
Integration
The Job Management analyses contain further reports, including an SAP BW report for job alerts with trend analysis. With this report, you can examine the data for a positive or negative trend. For more information, see Reports: Business Processes Operations [page 235]
Prerequisites
● Activities to set up SAP BW reports in Customizing for SAP Solution Manager, under Capabilities :○ You have activated the BI content
This activates all SAP BW objects in the BI content which are relevant for the JSM health check.○ You have set up data aggregation.
You have specified the periods (for example, week or month) over which the system report data is summed.
NoteYou only need to set up SAP BW reporting once, before the first reports are created.
● Your system administrator has set up job management analysis in the Administration view of the Job Management - Administration app:○ Assign data collections
You must activate the following extractors:
Extractor Description
F86_JSMHC_EXTRACTOR_JOBS JSM Health Check at job level
The system extracts this data into the table TBTCO.
F87_JSMHC_EXTRACTOR_STEPS JSM Health Check at job step level
The system extracts this data into the tables TBTCO and TBTCP.
Business Process OperationsJob Management I N T E R N A L 233

NoteActivation of the extractors for the managed systems requires the latest version of the solution tool plug-in (ST-PI) and the application service tool (ST-A/ PI, type M), in the managed system. You can download ST-PI and ST-A/PI from the software download center at http://support.sap.com/swdc
. Call the program RTCCTOOL in the managed system, after installation, in the ABAP editor (transaction SE38). It checks whether certain transports or SAP notes are missing in your system.
○ Configure the JSM health checkYou have specified which reports the system is to run, to inform you about the duration and delays in job processing, using job and business process monitoring data.
Features
You can call the following Job Management health check reports:
Report Data Source Template ID
Daily job view Managed system 0SM_JSM_HC_XBP_DAILY_JOBS
Daily view of steps Managed system 0SM_JSM_HC_XBP_DAILY_STEPS
Weekly view of jobs (aggregated) Managed system 0SM_JSM_HC_XBP_WEEKLY_JOBS
Weekly view of steps (aggregated) Managed system 0SM_JSM_HC_XBP_WEEKLY_STEPS
Monthly view of jobs (aggregated) Managed system 0SM_JSM_HC_XBP_MONTHLY_JOBS
Monthly view of steps (aggregated) Managed system 0SM_JSM_HC_XBP_MONTHLY_STEPS
Weekly view of business process management
Business Process Monitoring
0SM_JSM_HC_BPMON
Weekly view of business process management (job chains)
Business Process Monitoring
0SM_JSM_HC_BPMON_CHAIN
NoteFor further information about running a health check report, see Monitoring Process Chains [page 238].
234 I N T E R N A LBusiness Process Operations
Job Management
Example
You can, for example, analyze the following key figures for job management:
Key Figure Analysis Object Value Range or Interval
Runtime distribution All jobs ● Less than five seconds● between five seconds and five minutes● More than five minutes
Runtime distribution Long jobs ● Between five and 15 minutes● Between 15 and 30 minutes● Between 30 and 60 minutes● More than 60 minutes
Job status: Canceled or Completed
Job comparison by number of jobs
● Canceled● Completed
Job status: Canceled or Completed
Job comparison by job runtime
● Canceled● Completed
Workload distribution User comparison by number of jobs
● The ten users with the highest load● Other users
Workload distribution User comparison by accumulated job runtime
● The ten users with the highest load● Other users
Workload distribution Server comparison by number of jobs
All servers on which the system runs jobs in the background
Workload distribution Server comparison by accumulated job runtime
All servers on which the system runs jobs in the background
6.8.2.1 Reports: Business Process Operations
Use
You can extract the data entered in Business Process Monitoring to an SAP BW system. In this system, the data for the past weeks and months can be used to determine trends. You can identify problem situations early, and take appropriate measures.
You can add new reports in this view, and specify basic information and parameters for them. You can also open, change or delete existing reports (SAP BW templates).
Business Process OperationsJob Management I N T E R N A L 235
Prerequisites
● You are authorized for this work center.● You are authorized to display and create a report.● You have configured an SAP BW system and configured the settings to:
○ Set up the BW system○ Set up communication between BW and the SAP Solution Manager system○ Activate the BI Content○ Edit Web templates○ Specify data extraction from the SAP Solution Manager system
For more information about configuring reports, see the setup guide at https://wiki.scn.sap.com/wiki/x/Y4DSFw .
Procedure
Displaying Reports
To open a report, click on the URL in the table. Assuming you have the required authorizations, the system opens the report in a browser window.
Adding a New Report
To add a new report, choose Add. The Add New Report dialog box appears, with the following tab pages:
● Basic Information tab pageEnter the basic report information here. Entries are required in the fields marked with an asterisk.1. Enter a template ID. The template must already exist. SAP has supplied the standard template with the
ID 0SM_BPM_WT0001.2. Enter a description.3. Enter the server in the format server:port.4. Select the server type: ABAP or JAVA.
● Variables tab pageVariables are predefined selection criteria for queries.Users should fill out the parameter ID and default values to add variables to the query.By selecting the Dynamic checkbox, you can select a function which determines this default value, with Assign Function. You can create functions using a Customizing activity.○ Parameter ID
Enter the ID.○ Parameter Description
You can describe the parameter here.○ Parameter Type
You can choose between Individual Value, Interval, and Selection Option, depending on the variable definition.
○ ValueSpecify a value.
● Filters tab page
236 I N T E R N A LBusiness Process Operations
Job Management
Filters are freely-definable selection criteria. You can specify additional filters to specify your query:○ Data Provider
Specify a data provider.○ Attribute ID
Specify the ID of your search.○ Description
Describe your filter.○ Sign
Choose between Include and Exclude.○ Operator
Choose an operator.○ Low and High
Enter the extreme values.● Text Parameters tab page
A BW template contains elements such as tables or diagrams. You can adjust the labeling of these elements.○ Language
Choose a language. Users who log on in this language see what you enter in this language.○ Web Item
Choose a Web item. The Web item must have been specified and exist in the template.○ Text Type
Choose a text type.○ Text
Enter the new text.
ExampleChoose the language German, the text type Title, and the Web ID of a table. Enter German - Title in the Text field, and choose Add. Then choose the language English, the text type Title, and the Web ID. Enter English - Title in the Text field, and choose Add.
Users who log on in German, see the text German - Title above the table in the BW report. Users who log on in English, see the text English - Title above the table in the BW report.
● Users' Authorization tab pageIf you specify user names here, only these users are permitted to use the SAP BW reports in the Business Process Operations work center.
Changing or Deleting an Existing Report
To change a report, select it in the list and choose Change.
To delete a report, select it in the list and choose Delete.
Business Process OperationsJob Management I N T E R N A L 237

6.8.2.2 Monitoring Process Chains
Prerequisites
● You use business process monitoring and have activated job monitoring for process chains.● You have fulfilled the prerequisites for SAP BW reports in Job Management. For more information, see Job
Scheduling Management Health Check Reports [page 233].
Context
You use this procedure to run a report that informs you of the daily duration and start delays of SAP BW process chains. The system gets the job data from business process monitoring.
Procedure
1. Open the Job Management - Administration app and choose Reports.2. Select the BW Reports radio button.3. In the table of reports, navigate to the row for the process chain-specific weekly view in business process
management.
In the detail area below the table, the system displays further information, such as the template ID.4. Choose Report.
A dialog box appears.
NoteYou can also execute the report within the open report dialog. In this case, enter the variable selection criteria on the Preview tab.
5. Enter a solution name.1. The system selects all jobs that ran for this solution.2. To further restrict the search results, you must specify the calendar week.
6. Choose Execute.
The system opens a report with the evaluation results. The report contains the selection criteria, the selected processes and process steps as well as the following information in table and graphic form:
○ Maximum duration of the process chain per day○ Maximum start delay of the process chain per day
238 I N T E R N A LBusiness Process Operations
Job Management
Important Disclaimers and Legal Information
HyperlinksSome links are classified by an icon and/or a mouseover text. These links provide additional information.About the icons:
● Links with the icon : You are entering a Web site that is not hosted by SAP. By using such links, you agree (unless expressly stated otherwise in your agreements with SAP) to this:
● The content of the linked-to site is not SAP documentation. You may not infer any product claims against SAP based on this information.● SAP does not agree or disagree with the content on the linked-to site, nor does SAP warrant the availability and correctness. SAP shall not be liable for any
damages caused by the use of such content unless damages have been caused by SAP's gross negligence or willful misconduct.
● Links with the icon : You are leaving the documentation for that particular SAP product or service and are entering a SAP-hosted Web site. By using such links, you agree that (unless expressly stated otherwise in your agreements with SAP) you may not infer any product claims against SAP based on this information.
Beta and Other Experimental FeaturesExperimental features are not part of the officially delivered scope that SAP guarantees for future releases. This means that experimental features may be changed by SAP at any time for any reason without notice. Experimental features are not for productive use. You may not demonstrate, test, examine, evaluate or otherwise use the experimental features in a live operating environment or with data that has not been sufficiently backed up.The purpose of experimental features is to get feedback early on, allowing customers and partners to influence the future product accordingly. By providing your feedback (e.g. in the SAP Community), you accept that intellectual property rights of the contributions or derivative works shall remain the exclusive property of SAP.
Example CodeAny software coding and/or code snippets are examples. They are not for productive use. The example code is only intended to better explain and visualize the syntax and phrasing rules. SAP does not warrant the correctness and completeness of the example code. SAP shall not be liable for errors or damages caused by the use of example code unless damages have been caused by SAP's gross negligence or willful misconduct.
Gender-Related LanguageWe try not to use gender-specific word forms and formulations. As appropriate for context and readability, SAP may use masculine word forms to refer to all genders.
Business Process OperationsImportant Disclaimers and Legal Information I N T E R N A L 239
www.sap.com/contactsap
© 2018 SAP SE or an SAP affiliate company. All rights reserved.
No part of this publication may be reproduced or transmitted in any form or for any purpose without the express permission of SAP SE or an SAP affiliate company. The information contained herein may be changed without prior notice.
Some software products marketed by SAP SE and its distributors contain proprietary software components of other software vendors. National product specifications may vary.
These materials are provided by SAP SE or an SAP affiliate company for informational purposes only, without representation or warranty of any kind, and SAP or its affiliated companies shall not be liable for errors or omissions with respect to the materials. The only warranties for SAP or SAP affiliate company products and services are those that are set forth in the express warranty statements accompanying such products and services, if any. Nothing herein should be construed as constituting an additional warranty.
SAP and other SAP products and services mentioned herein as well as their respective logos are trademarks or registered trademarks of SAP SE (or an SAP affiliate company) in Germany and other countries. All other product and service names mentioned are the trademarks of their respective companies.
Please see https://www.sap.com/about/legal/trademark.html for additional trademark information and notices.
THE BEST RUN