bvm tips and how to’s - welcome to bob violett models surface spot repairs.pdf · ·...
TRANSCRIPT
BVM Tips and How To’s
BVM © 2012 1/6/2012
Flying Surface Spot Repair With paint blending and color matching
See also “Skin Patching”, “Color Matching”, and “Wing Ding Repair” on www.bvmjets.com/Tips and How To’s
“Skin Patching” describes one method of repairing the skin of a built-up or composite wing. It is primarily aimed at repairing an upper wing skin crack caused by a hard landing, but the same method is transferrable to other surfaces as well.
The method presented in this tutorial is different, easily accomplished, but does entail some additional modeling and painting skills
If you don’t have any experience with airbrush patch painting you might want to seek some help from a modeler that does.
An accidental slip with a drill caused the hole in the Bandit stab that is the subject of this repair tutorial.
Note: A list of materials used here and their sources are listed at the end of this paper.
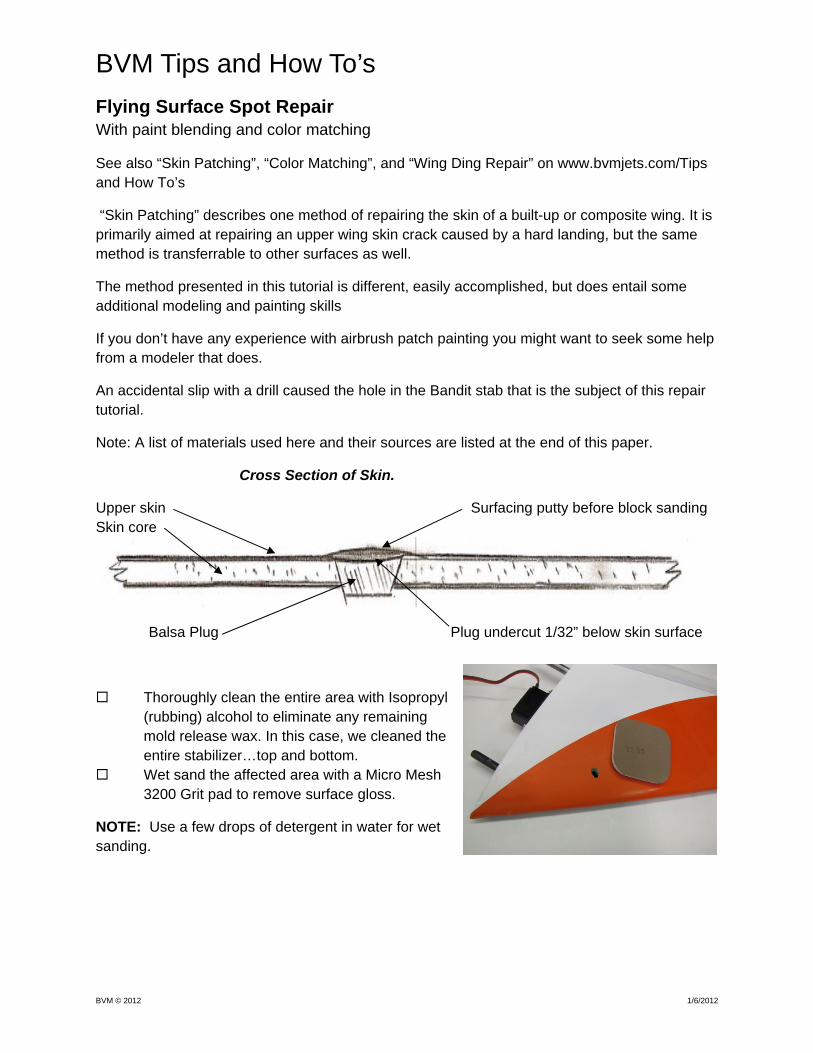
Cross Section of Skin.
Upper skin Surfacing putty before block sanding Skin core
Balsa Plug Plug undercut 1/32” below skin surface
Thoroughly clean the entire area with Isopropyl (rubbing) alcohol to eliminate any remaining mold release wax. In this case, we cleaned the entire stabilizer…top and bottom.
Wet sand the affected area with a Micro Mesh 3200 Grit pad to remove surface gloss.
NOTE: Use a few drops of detergent in water for wet sanding.

BVM Tips and How To’s
BVM © 2012 2 1/6/2012
Flying Surface Spot Repair Continued
Use a Perma-Grit RF-2 conical grinder, to enlarge and round out the hole to increase the bonding area. Be sure to use a slow speed, as high RPM will cause the tool to “chatter”. The conical shape of the hole is important.
From medium density balsa stock, carve a plug to fit the hole, just long enough to extend through the skin. Mask the area surrounding the hole, and then bond the plug in place with Zap-A-Gap.
Mask the surface as shown and cut the plug flush with the skin surface using an X-Acto saw or equivalent.
Grind the plug and the chamfered edge of the repair with a dish cutter BVM # PA-SR-0037. The surface should be slightly below the airfoil surface. The masking has been removed for

BVM Tips and How To’s
BVM © 2012 3 1/6/2012
clarity. See sketch on page #1.
Flying Surface Spot Repair Continued
Mix and apply a small amount of finishing and spot putty. BVM uses Evercoat Spot-Lite, P/N 100445, available at automotive body and
paint supply stores.
While the putty is curing, make a small sanding block from scrap balsa, pine, or maple.
Block sand the cured putty with #180 grit.
Extend the masking tape beyond the repair and block sand with #320 grit to get the repaired area totally conformal to the airfoiled skin. Some scuffing of the surrounding paint is necessary.

BVM Tips and How To’s
BVM © 2012 4 1/6/2012
Flying Surface Spot Repair Continued
Prime the repaired area with your favorite primer. The primer shown works very well for repairs such as this. Block sand the first coat with 320 grit, then re-prime and sand with 400 grit. Multiple light coats are better than one heavy coat.
Carefully inspect the surface under natural lighting and check for flaws. The surface should blend into the airfoil without any blemishes or inclusions. Fill any low spots with more primer, then block sand until truly “bump” or “valley” free.
Remove the tape and re-mask about 1” to 2” from the primer. Use a small block to wet sand the primer with 800 grit. Carefully “feather” the edges of the primer.
The blue tape in this photograph outlines the area that is now wet sanded with the #3200 grit Micro-Mesh pad. The outline is for instructional purposes only.

BVM Tips and How To’s
BVM © 2012 5 1/6/2012
Mask the area to be repainted with 3M ¼” blue vinyl tape .Mask the color separation on the leading edge seam as necessary. Finish the masking operation with masking paper.
Rub a coat of BVM # 1925 Pin Hole Filler onto the repaired area. After the filler has dried to a haze, scrub the surface with a piece of a 3M Scotch-Brite #7447 pad to remove the pin hole filler.
Lightly wipe all dust from the repair surface and the masking paper with a tack cloth.

BVM Tips and How To’s
BVM © 2012 6 1/6/2012
Before painting the repair, test the spray pattern on a like object. Adjust the airbrush to deliver a fine mist. Start the airbrush spray off the part then proceed onto the part. This prevents “sputter” from depositing unwanted droplets onto the surface.
Apply the paint evenly, in two or three light coats. Do not extend more than 1”-2” beyond the repair. The remaining sanded area will be used when applying the DX840 blending agent. The fresh paint shows up glossy in the accompanying photograph.
After the color is applied, over the entire repair area, thin the paint mixture 100% with DX840 Color Blender. Use very light coats as the mixture will be very thin. Spray the color/blender mixture a couple of inches beyond the previously applied paint in all directions, but do not go beyond the sanded area. This step will blend the fresh paint onto the surface of the original paint. The blender thins the paint such that the mist of paint particles is very fine and allows the color transition to be gradual and easier to polish.
Allow the paint to dry thoroughly before removing the masking paper and tape. Remove the tape by pulling it back over itself.
Wet sand the new paint until the gloss has been removed with a #3200 grit Micro-Mesh pad. Follow up by wet sanding with the #4000 grit Micro-Mesh pad.

BVM Tips and How To’s
BVM © 2012 7 1/6/2012
Polish the surface with the white polishing
compound until the gloss has been restored. Use a very clean soft towel.
A properly accomplished repair will look as good as new.
A coat of automotive wax added 30 days later will add to the gloss and protect the surface.
BILL OF MATERIAL AND SOURCES 1. Isopropyl (rubbing) alcohol Grocery or drug store 2. Perma-Grit RF-2 conical grinder (BVM # RF2F) BVM Jets 3. Balsa Scrap Scrap Box 4. Zap-A-Gap (BVM # PT01) BVM Jets, Local hobby shop 5. BVM “Dish Cutter” (BVM # PA-SR-0037) BVM Jets 6. Evercoat “Spot-Lite” #100445 finishing putty Auto paint and body supply 7. Sand paper 180, 320, 400, 800 grits Auto paint and body supply 8. 3M ¼” vinyl masking tape Auto paint and body supply 9. Surface Repair Kit (BVM # PA-SR-0045) BVM Jets
(Consisting of 3200 and 4000 grit Micro-Mesh pads, polishing compound) 10 Pin Hole Filler (BVM #1925) BVM Jets 11 3M Scotch Brite #7447 abrasive pad Auto paint and body supply
*12 Touch-up colors, hardener and color blender BVM Jets *13 Reducer PPG DT (appropriate to ambient temp) Auto paint and body supply 14 Masking paper Auto paint and body supply 15 Single action Paasche Airbrush Hobby Shop or paint store 16 Tack Cloth Auto paint and body supply
Note: *When ordering touch-up paint from BVM, specify the airframe type and its serial number The serial number label will be found inside each airframe component.
*Note: Usually any automotive urethane reducers will work ok. *Some Auto paint stores will sell small quantities of the materials. Call them to ask.