c. portfoilio finished!
TRANSCRIPT
Construction Studies
2015
Study Desk
Examination number:
121012
1

Contents:
Project Planning........................................................3-4
Research & Investigation........................................5-17
Design of Artefact.................................................18-28
Realisation - Manufacture of Artefact...................29-36
Evaluation..................................................................37
Experimental work................................................38-43
2

Project Planning:
Introduction:
I have selected to make a furniture piece for my project. The project I am constructing is a desk. The reason being that when it is finished I can take it home and put it in my bedroom as I have plenty of space for it. I will be able to use it in the future for studying and maybe as a computer desk.
Aims & objectives
Aims:
Improve my wood crafting skills in the areas of jointing and turning. I hope to get a greater understanding in areas such as joints, finishes,
turning & cabinet making.
Objectives:
To design and manufacture a suitable desk for studying and use as a computer desk that will be aesthetically pleasing to look at.
3

Time Management
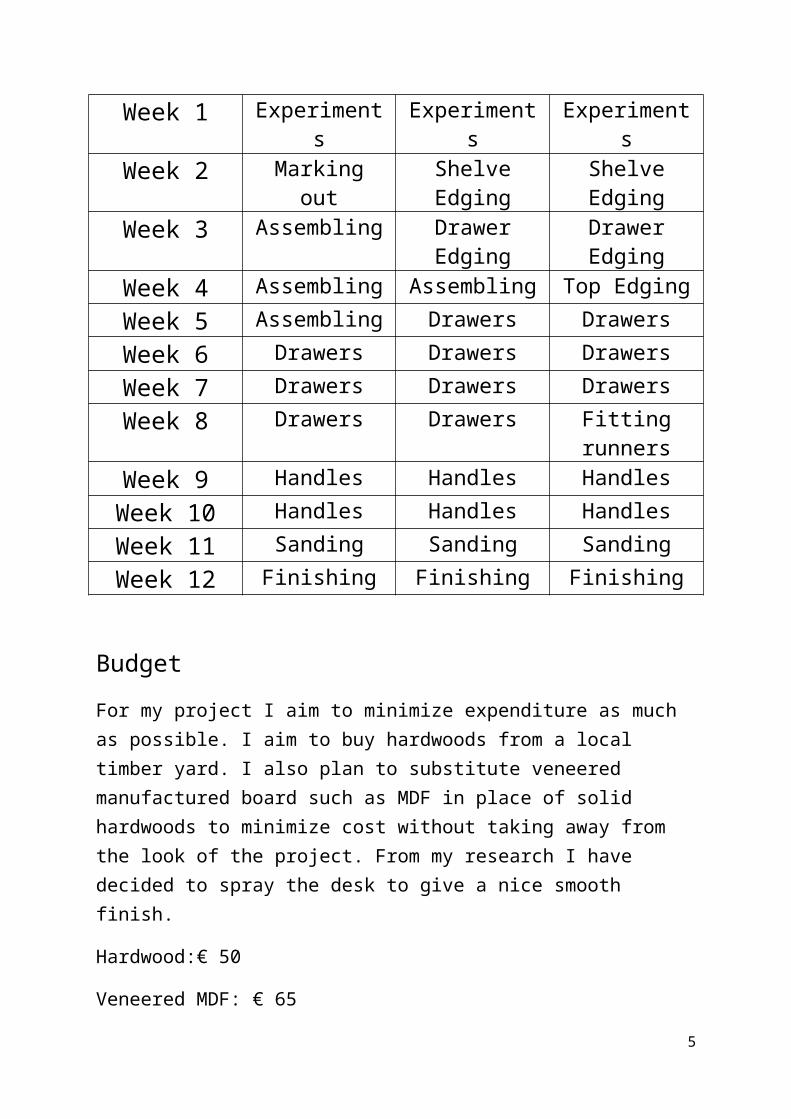
Class 1 Class 2 Class 3Week 1 Experiments Experiments ExperimentsWeek 2 Marking out Shelve Edging Shelve EdgingWeek 3 Assembling Drawer Edging Drawer EdgingWeek 4 Assembling Assembling Top EdgingWeek 5 Assembling Drawers DrawersWeek 6 Drawers Drawers DrawersWeek 7 Drawers Drawers DrawersWeek 8 Drawers Drawers Fitting runnersWeek 9 Handles Handles Handles
Week 10 Handles Handles HandlesWeek 11 Sanding Sanding SandingWeek 12 Finishing Finishing Finishing
Budget
For my project I aim to minimize expenditure as much as possible. I aim to buy hardwoods from a local timber yard. I also plan to substitute veneered manufactured board such as MDF in place of solid hardwoods to minimize cost without taking away from the look of the project. From my research I have decided to spray the desk to give a nice smooth finish.
Hardwood:€ 50
Veneered MDF: € 65
Fixtures & fittings: € 22.50
Edging: € 40
Lacquer €48.50
Total: € 226
4
Research & Investigation:
Analysis of Project
For my project I originally had a various ideas of what to make such as a coffee table, a display cabinet, a round table or a desk. I decided to make the desk because I think that the skills involved in the making of this would be more suitable to show my wood working skills. I also choose to make the desk because I feel that I would get the most practical use out of it and it would serve a better function then any of my other ideas. I thought that making this desk would be a good challenge and would test my woodworking skills.
Fixtures & Fittings
Mouldings
Size
Joints
FinishesWood Types
Drawer handles
5
DESK

Theory Investigation for Project Topic
Since I have gone with the desk to make as my leaving cert project I will have to do a lot of research on the heights and measurements for the standard person to be able to sit comfortably at it. I will make sure that the drawers are big enough to hold stationary equipment and research the best possible joint for the drawer construction. I also need to research the material most suitable for the desk. I shall also research the best finish I could apply to the desk to make it stand out. I intend to get my research by using the internet, books, magazines and possibly an interview. I should be able to have more than enough research to make the desk confidently.
6

Desk 1:
This desk is a nice and simple looking desk, this is where I got my basic idea to construct a desk as it has a good practical use and is a good project to add more features to. I think it has too many drawers though.
http://hometrendsdecor.com/201
Desk 2:
I then found this desk and it made me want to add more detail and features onto my original design. I like the edging and the curves on the table. I also find the dark mahogany a rather nice luxurious wood. I like the georgian stlye on this desk but I think I would rather more of a modern Style. It is easy to see that this is georgian due to the curved bottom and feet of the desk.
http://gmindy.com/
7

Desk 3:
I started to look at curved tables as well, I really liked them but I thought that they would be out of my comfort zone to construct. I also thought that they were not as practical as a rectangular desk is because there is a lot of wasted space in the curved ones. I liked it though due to its modern stylish look.
Desk 4:
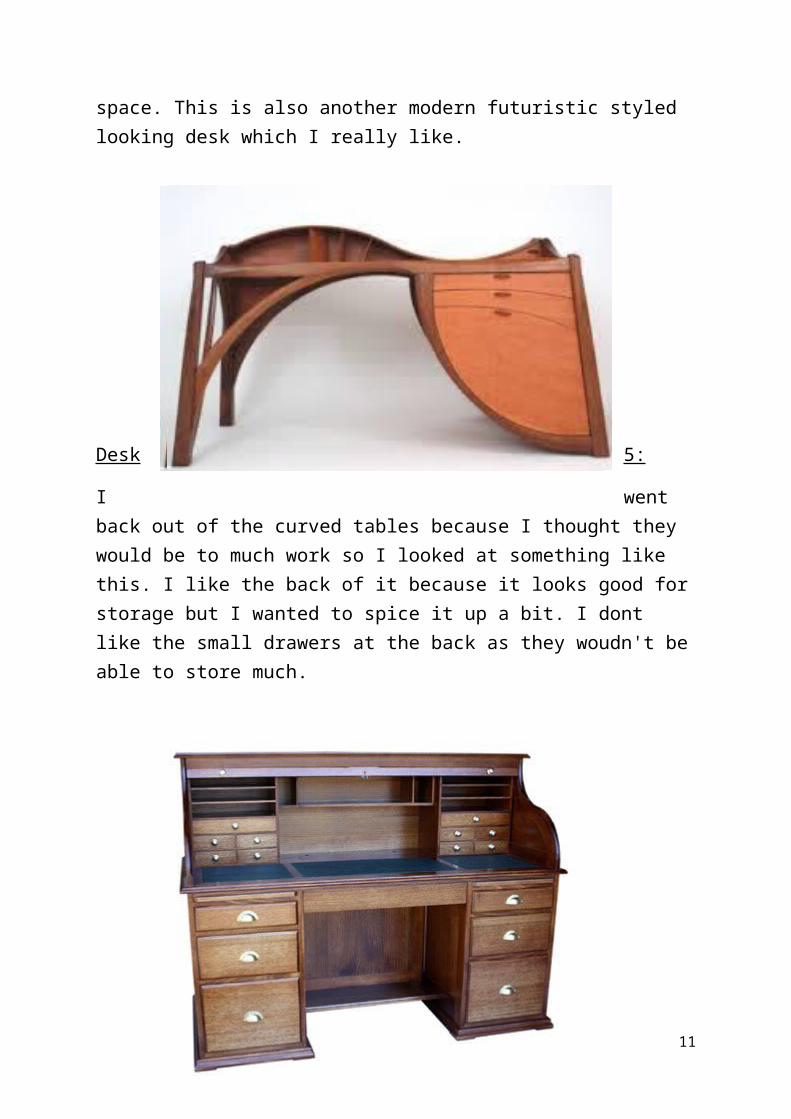
This desk is what I found that is in between the the curved and rectangular desk as its outside profile is rectangular the inside has a lot of curved features such as the drawers, the arch and the back shelving space. This is also another modern futuristic styled looking desk which I really like.
8

Desk 5:
I went back out of the curved tables because I thought they would be to much work so I looked at something like this. I like the back of it because it looks good for storage but I wanted to spice it up a bit. I dont like the small drawers at the back as they woudn't be able to store much.
Desk 6:
I found this stripy table which I though was very unique, it gave me ideas of what woods I could use and I decided that I was going to use two types of wood, mahogany and beach for my desk to create a bit of contrast and to outline the profile of the desk.
9

Desk 7:
I also looked at drawer ideas and found this very sleek looking drawer that is camoflagued into the other wood very well. I really liked the look of this drawer but found that it would not suit the desk I had in mind.
Desk 8:
I stayed looking for a desk similar to what I was picturing in my head and found this picture. I am not to keen on the overall shape and look of it but it is the similar idea of outlining the profile in a different coloured wood.
10
Drawer handles:
This was the first handle I found during my research for drawer
handles. It is nice and looks simple to make. It also looks like it would be good to grip so it would serve its purpose properly.
http://www.whitechapel-ltd.com/
11

This caught my eye straight away because of the detail gone into such a small object. This is a very nice drawer knob but I don't think it is within my skills to make it.
http://www.pinterest.com/jinaj
This is also a nice drawer knob, is has more detail then the first one but not as much as the second. I think I would be able to make a similar handle to this.
http://essiebeex.blogspot.ie/
Joints for the drawers:
As I will be using joints in the making of the drawers I have decided to research them do decide which one to use in my project.
I like this dovetail joint because of the nice contrast of the woods end grain. I find the angles are pleasing to the eye instead of just straight finger joints. The dovetail is also a stronger joint then the finger joint.
12

http://www.startwoodworking.com/
This finger joint is slightly boring to look at, it looks simpler to make then a dovetail but does not look as well when finished.
://www.insidewoodworking.com/
Mouldings:
The first moulding I found was this, it looks very nice but I guess it would cost a lot of money to get it done.
http://shivshaktifurnitures.com/
I then found this, it is not as detailed but it is probably similar to the moulding I shall use for my desk.
13

http://www.idostuff.co.uk/
This appears nicer than the previous one, this would do for the top of the table but I would need a symmetrical moulding for the rest of the desk.
http://dans-woodshop.blogspot.ie/
Finishes:
I first looked at brushing on a varnish but I found that some of reviews and images showed some visible brush strokes, however some looked quite nice and you would barely notice it had been brushed but I don't want to take a risk.
www.newhudsonvalley.com
I then researched spraying on a lacquer which had got all good reviews
14

and every image I seen looked very nice and smooth. I also talked about this at home and as we had a spray gun I thought that I should get it sprayed.
www.guitarscanada.com
Fixtures & Fittings:
These were the first drawer runners I came across and found the reviews and usage of them to be excellent. they are designed to allow heavy loads in drawers so they are a real heavy duty sort of drawer runner.
www.eurofitdirect.co.uk
I then kept researching to see my other options but the other runners were few and far between which suggested to me that the heavy duty ones were the only way to go as it was hard to come across a wheeled type of runner.
15

kitchensrepaired.com
Ergonomics:
During my research of suitable desk sizes I found this picture which gives a lot of information about how high a desk should be and for comfortable seating height.
http://www.healthsafety.com/ergonomics.html
I found some more images to do with ergonomics to make sure that the size of my desk would be comfortable to work at. this images shows again the height for the desk and distance from the screen when sitting down.
16

http://homes-kid.com/standing-desk-ergonomics-diagram.html
Key Findings
From my research I have found out about a lot of things. I have found that I like the look of a modern styled desk to a georgian stlye because it is more unique and unusual. I also found out the suitable height and size to make the desk so that a person can sit comfortably at it.
I have also decided to use the dovetail joint for my drawer. I picked the dovetail over the finger joint because I think it is by far more pleasing to the eye. From my research of drawer handles I have come to a conclusion to make my own design based on the three that I have looked at. I will design it to be capable of my skills to make it but also that it will not just look to simple as will use a mix of mahogany and beach in each handle. For the drawer runners I shall use the heavy duty ones as they look stronger and have an overall nicer appearance to them.
I also researched the moulding that I will use for the desk, I didnt get much choice in the style of it as the carpenter I got it from had only one symetrical cutter. I didnt mind though because I rather liked it. I have decided to spray my desk with a lacquer rather than brushing it as I wanted a smooth finish with no brush marks.
I think that all my research has been very beneficial to me as without it, I could of made some poor choices which would have led to manufacturing a desk of lower standard.
17

Reasearch material referenced/acknowledged
http://freshhome.com, http://hometrendsdecor.com, http://gminy.com, http://theluxhome.com, http://fivestarpainting.com, http://lyonfurniture.com, http://interiorish.com, http://ironwoodenfurniture.com, http://rialnodesign.com, www.startwoodworking.com, www.insidewoodworking.com, http://www.whitechapel-
ltd.com, www.pinterest.com, essiebeex.blogspot.com, shivshaktifurnitures.com, dans-woodshopblogspot.com, www.idostuff.co.uk
18

19

20

21

22

23

24

25

26

27

Design of artifactCutting list
Component Quantity Lenght Width ThicknessTop 1 1200 mm 600 mm 20 mm
Ends 3 700 mm 200 mm 20 mm
Facia 2 700 mm 200 mm 20 mm
Shelves 2 560 mm 200 mm 20 mm
Drawer front 3 400 mm 200 mm 20 mm
Drawer sides 6 420 mm 150 mm 16 mm
Drawer back 3 375 mm 130 mm 16 mm
Drawer front inner 3 375 mm 150 mm 16 mm
Drawer Knob 3 50 mm 50 mm 50 mm
Shelf batton 1 2 560 mm 50 mm 20 mm
Shelf batton 2 2 150 mm 30 mm 20 mm
Shelf batton 3 1 560 mm 30 mm 25 mm
Drawer batton 4 400 mm 55 mm 20 mm
Drawer panel 1 700 mm 420 mm 10 mm
Drawer base 3 385 mm 170 mm 6 mm
Top side edging 2 650 mm 40 mm 25 mm
Top lenght edging 2 1250 mm 40 mm 25 mm
Side edging 8 680 mm 20 mm 13 mm
Shelf edging 2 560 mm 20 mm 13 mm
28

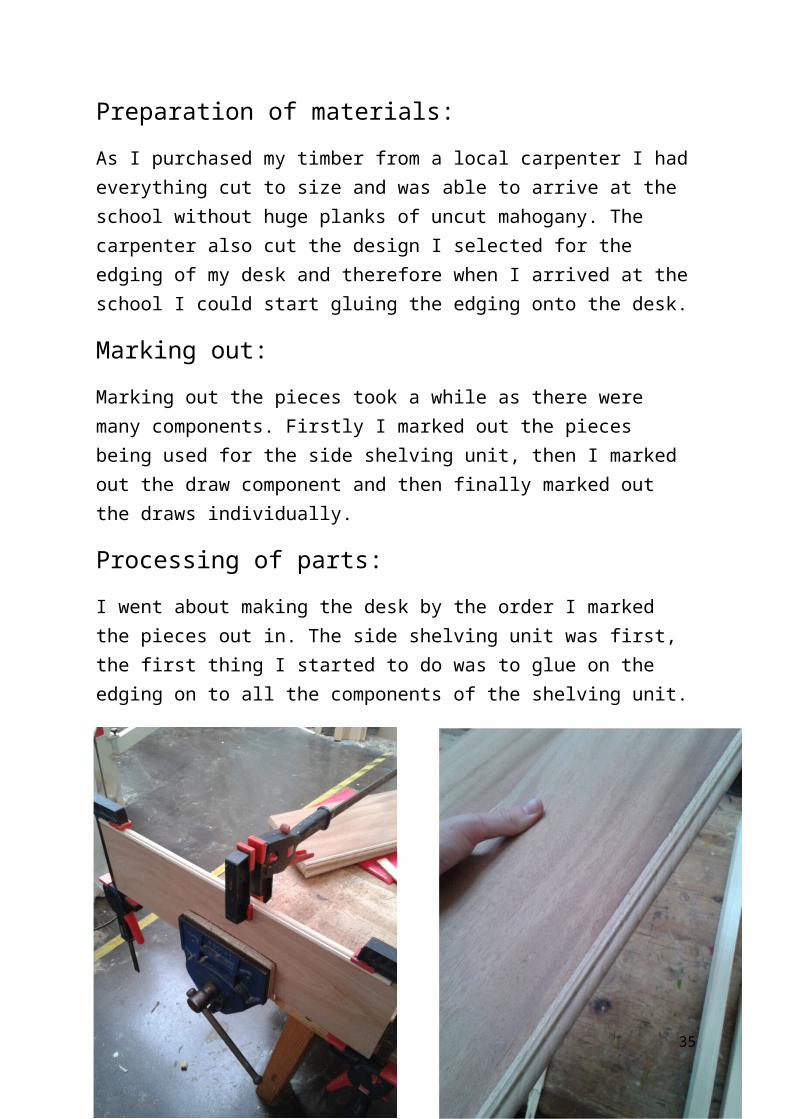
Realisation - Manufacturing of Artefact:Preparation of materials:
As I purchased my timber from a local carpenter I had everything cut to size and was able to arrive at the school without huge planks of uncut mahogany. The carpenter also cut the design I selected for the edging of my desk and therefore when I arrived at the school I could start gluing the edging onto the desk.
Marking out:
Marking out the pieces took a while as there were many components. Firstly I marked out the pieces being used for the side shelving unit, then I marked out the draw component and then finally marked out the draws individually.
Processing of parts:
I went about making the desk by the order I marked the pieces out in. The side shelving unit was first, the first thing I started to do was to glue on the edging on to all the components of the shelving unit.
29

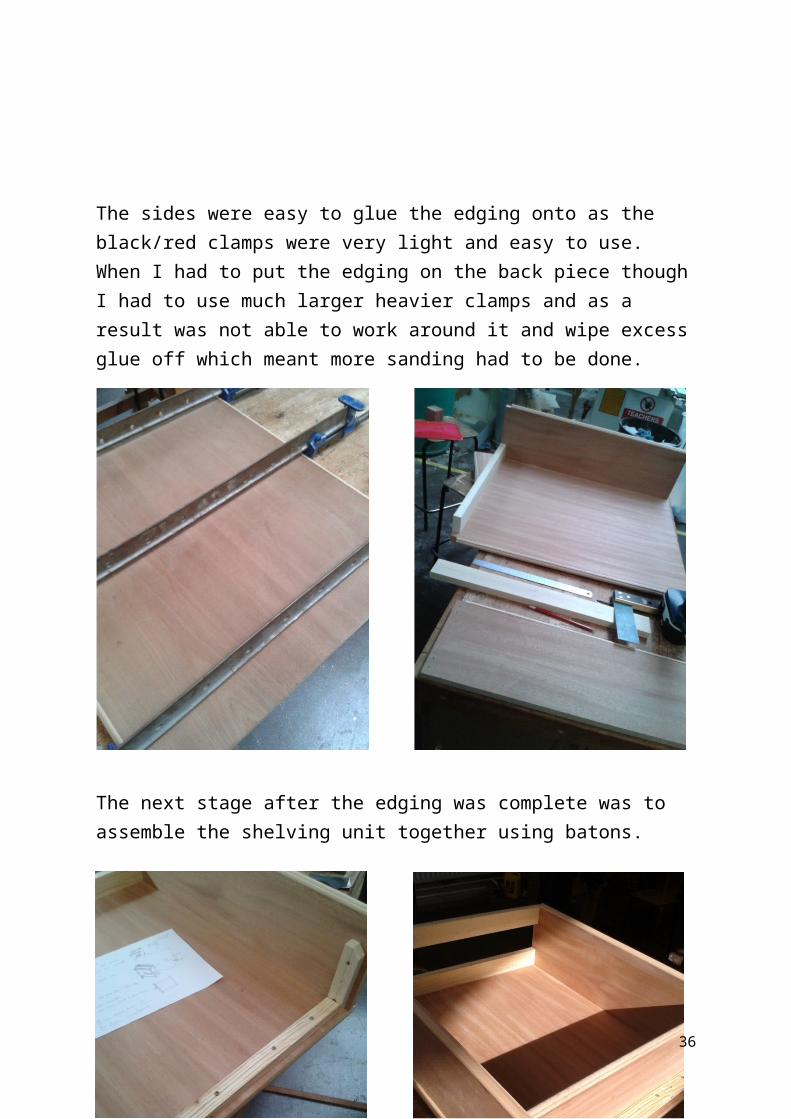
The sides were easy to glue the edging onto as the black/red clamps were very light and easy to use. When I had to put the edging on the back piece though I had to use much larger heavier clamps and as a result was not able to work around it and wipe excess glue off which meant more sanding had to be done.
The next stage after the edging was complete was to assemble the shelving
30

The next component of the desk I made was the drawer unit, this took me a while to put the edging on due to the lack of cramps available.
After the sides had been edged I assembled the sides and back using batons, brackets and screws. I was then able to proceed, putting the edging on the
31

back board. I had to use duck tape to hold the edging on as the light clamps were to small and the big clamps were too heavy.
Now that the drawer unit was made I could start making the drawers. I started by marking out the dovetail joints. when that was done I began cutting them out using a coping saw.
Once it was cut I had to chisel out the remainder of the wood to get it nice and level so that it would fit nice and smoothly.
32

I
repeated the same processes to make the other two drawers and glued and screwed the front of the drawers on. I then started to apply the runners which I found difficult as I had to use a hand screwdriver because the there was no drill bit small enough to use. I spent a lot of time making sure the runners were in the right place so the drawers would fit snug.
33

The next objective was to turn the drawer knobs. I hadn't used the lathe since third year so I made a practice pieces before I started on the mixed wood ones. I had difficulty gluing the mahogany and beach together as the first time I had them glued up they fell apart so I had to re-glue them before I could get it on the lathe.
34
The next step was to put the beach edging onto the table top. I did this using glue and the pin gun to make sure it was kept on well as one piece of the edging was slightly bowed.
35
When the edging was on I screwed on the top which fitted perfectly, all that was left to do was to take it outside into the yard to spray it. To move it outside I unscrewed the top so that it was back into the shelve, drawer and top units so it easier to transport out into the yard.
This is a picture of the desk after the first coat, I then let it dry for a while and took it back inside.
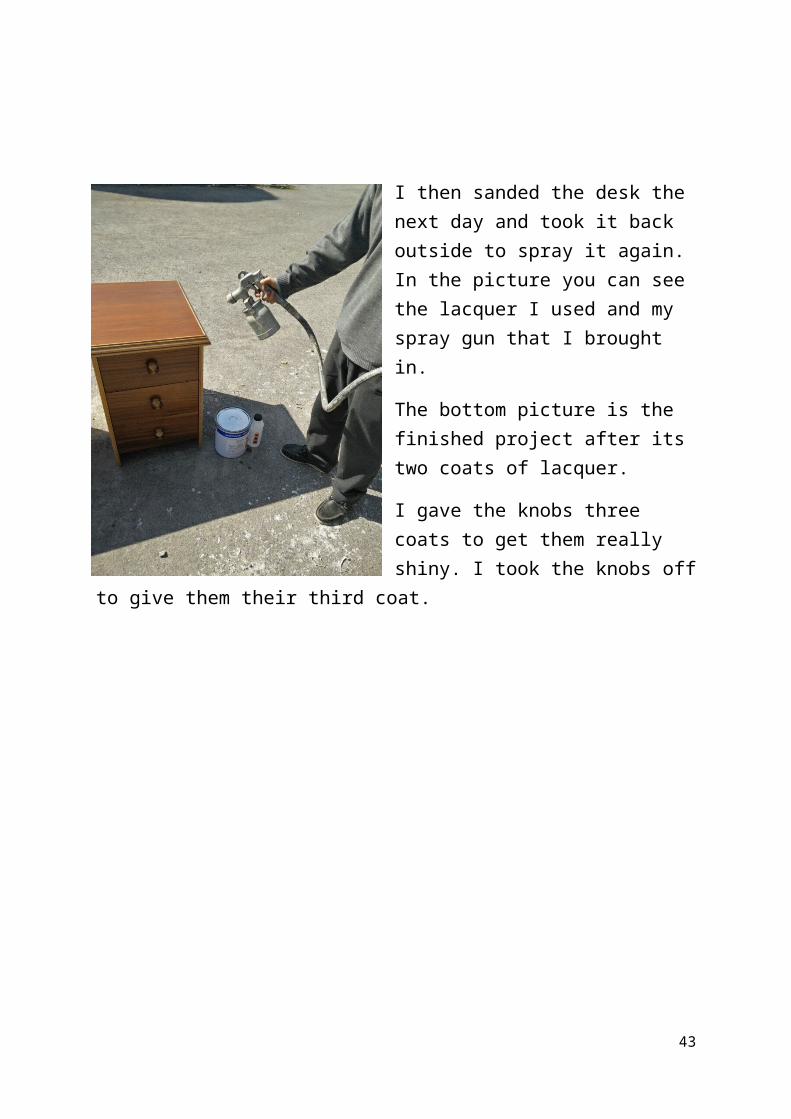
I then sanded the desk the next day and took it back outside to spray it again. In the picture you can see the lacquer I used and my spray gun that I brought in.
The bottom picture is the finished project after its two coats of lacquer.
I gave the knobs three coats to get them really shiny. I took the knobs off to give them their third coat.
36

Modifications:
The first
modification on this project was that I made a mistake in one dovetail and ended up having to cut the wood down in length which in turn made the drawer slightly shorter in length. I also decided to turn the edging upside down to allow its elegant design to be seen as in my original plan the design on the edging wasn't visible to be seen when standing up.
Evaluation of Project:Critical Appraisal of Project
The only thing that went wrong in my project was the mistake I made when cutting out the dovetail joints and having to then shorten the drawer. This hasn't affected the overall appearance of the desk as you will only notice if you pull all the drawers out and compare the lengths of them.
The other part of my project I was slightly concerned about was the edging on the top as it was slightly bowed and would not rest flat against the table edge, due to this is decided to use the pin gun to make sure it would stay in place instead of only using glue.
37

My favourite part of the project are the drawer knobs as I love the shiny look they have and the contrast of the two woods. I also really enjoyed turning them as I love using the lathe.
Personal Reflection
Now that the project is finished I am extremely happy with it as most of it went according to plan. I am also pleased that I achieved all my aims and I think that my wood crafting skills have definitely improved over the course of making the project which will benefit me greatly for the day exam. I have also completed my objective to design and manufacture a suitable desk for studying and be able to use it as a computer desk that is aesthetically pleasing to look at.
Experimental workTitle: Timber bending test
Introduction:
In this experiment I will determine which wood has better flexibility, veneered MDF or red deal
Preparation & Planning:
38

I gathered the equipment and placed the wood into the clamp.
Apparatus:
Piece of veneered MDF Piece of soft wood Ruler Weights Clamp.
Procedure:
1. Clamp the veneered MDF to the desk, leaving only 15cm on the desk.2. Hang the first weight of 7kg onto the overhanging end of the veneered
MDF and record the distance that it bent using the 7kg weight.3. Then add a heavier weight of 9kg onto the veneered MDF and record the
distance it bent using the 9kg weight.4. Repeat all steps on the soft wood.
Results:
Timber Weight 1 Drop Weight 2 Dropv. MDF 7kg 7cm 9kg 9.4cm then broke
Soft wood 7kg 1.6cm 9kg 2.7cm
Conclusion & Evaluation of results:
It is clear from this experiment that the soft wood is definitely the strongest wood in terms of bending and that MDF is not a good wood to be bending considering how it snapped after I took the last measurement from it with the 9kg weight.
39

Comments:
If I was to do this experiment again I would test a few more types of wood like hardwoods to see if they could take more weight than the 9kg weight I used.
Experimental workTitle: Expansion of timber
Introduction:
40

In this experiment I will determine the difference in the volume of dry timber and wet timber.
Preparation & Planning:
I gathered the equipment and then put the basin on the ground directly under the overflow can to catch any water that might spill.
Apparatus:
Overflow can Measuring jug Piece of timber Water Basin
Procedure:
1. Fill the overflow can with water.2. Place the measuring jug under the stout of the overflow can.3. Put the piece of timber into the overflow can until fully submerged
under the water.4. Check the volume of the timber and record.5. Soak the timber for a couple of days in a water basin making sure it is
fully submerged under the water and then repeat above steps.
Results:
Dry WetVolume 198cm3 237cm3
Volume increase as % 237-198 100
198 x 1 = 19.69%
Conclusions & Evaluation of Results:
It is clear that the woods volume is a lot smaller when dry and therefore the wet timber would not be used inside due to the fact when it dries it will shrink.
Comments:
41

If I was to repeat this experiment I would try using different woods to see if there is a difference in the density of each wood and how much water it could absorb.
Experimental workTitle: Dent test
Introduction:
In this experiment I will determine which wood is the hardest and would dent the least if hit or bashed. For this experiment I will use Veneered MDF, Mahogany and Red deal.
Preparation & Planning:
I gathered the equipment and found a suitable place to carry out the test. I found a quiet corner in the room so no one would get hit with the metal if it bounced
42
Apparatus:
Heavy piece of metal Veneered MDF sample Mahogany sample Red deal sample Ruler/ measuring tape
Procedure:
1. Measure a distance of 100cm on a wall to make sure the metal object is dropped from same height for each sample of wood.
2. Drop the metal onto each piece of timber.3. Repeat the above steps with a different height of 150cm.4. After this is done, compare the dents between the veneered MDF,
mahogany and red deal samples.
Results:
Height V. MDF Mahogany Red deal100cm 1.5cm 1.4cm 2.4cm150cm 2.0cm 1.9cm 2.8cm
Conclusion & Evaluation of results:
As the veneered MDF and mahogany had the smallest dents they would be the most suitable for my project as they are more resilient to dents and marks.
Comments:
If I repeated this experiment I would try using finishes on the woods to see if it toughens the wood and leaves a smaller dent.
43

44