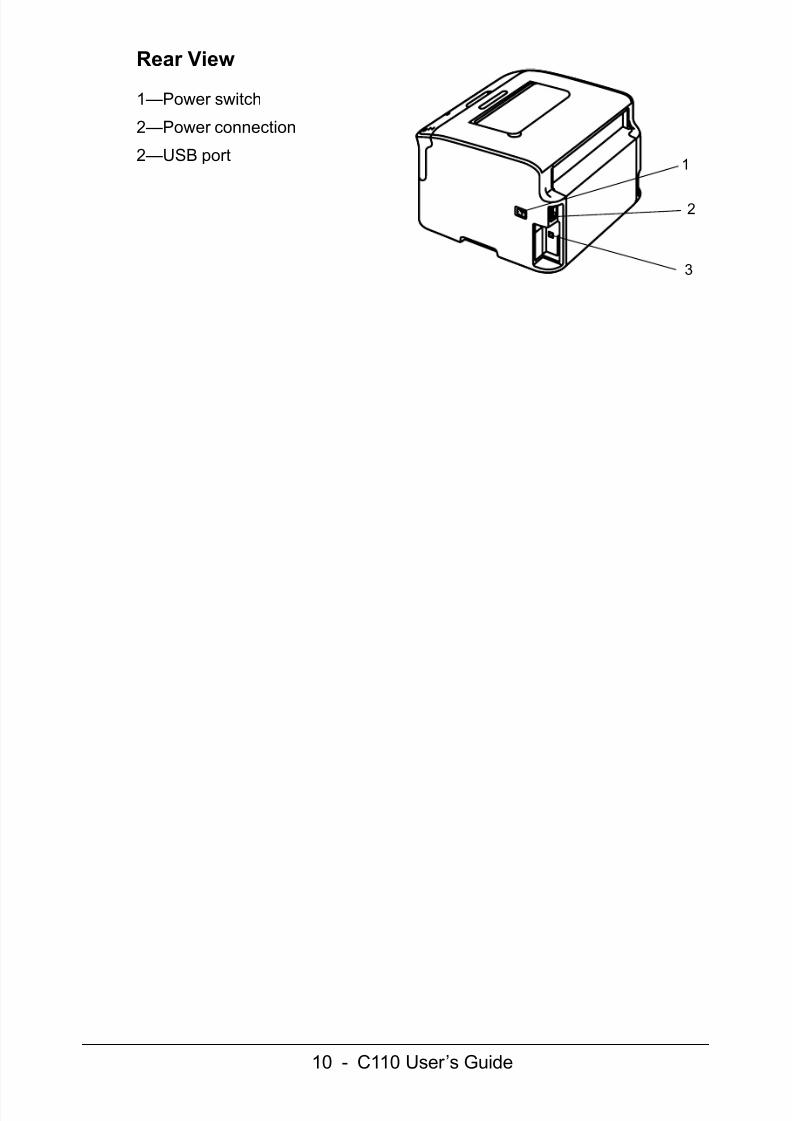
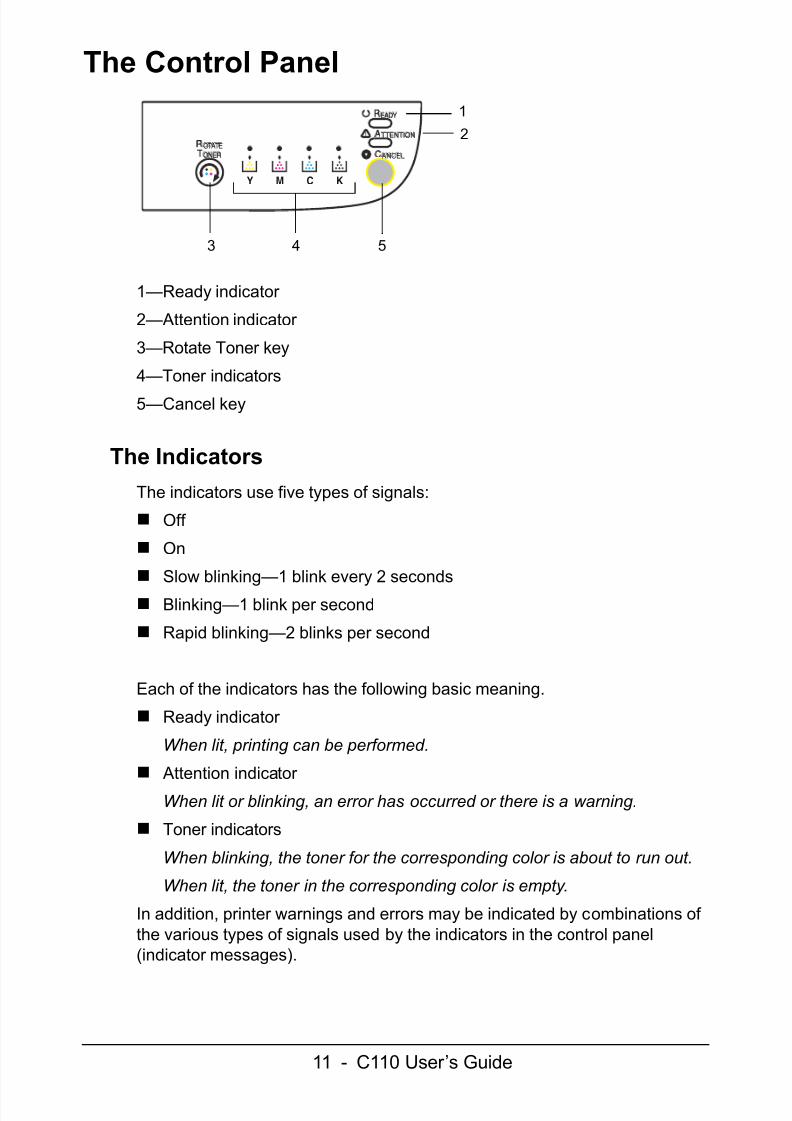
c110 user guide
TRANSCRIPT
7/30/2019 C110 User Guide
http://slidepdf.com/reader/full/c110-user-guide 1/110
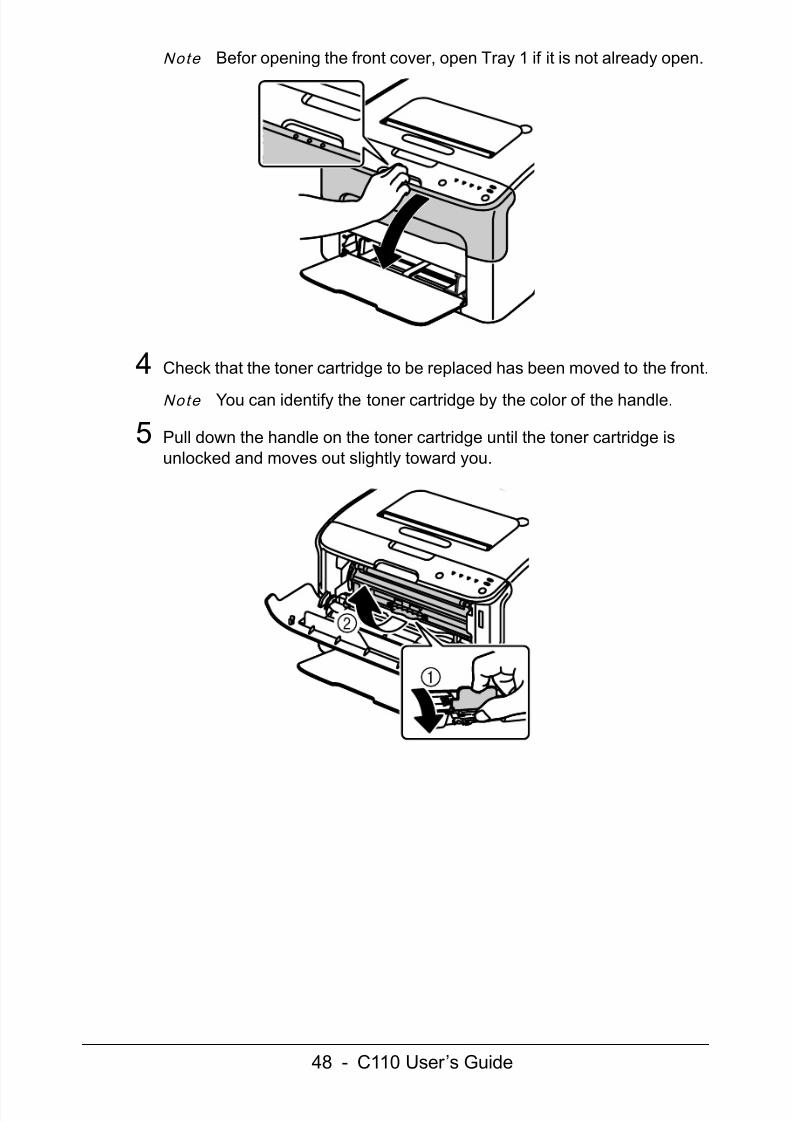
7/30/2019 C110 User Guide
http://slidepdf.com/reader/full/c110-user-guide 2/110
7/30/2019 C110 User Guide
http://slidepdf.com/reader/full/c110-user-guide 3/110
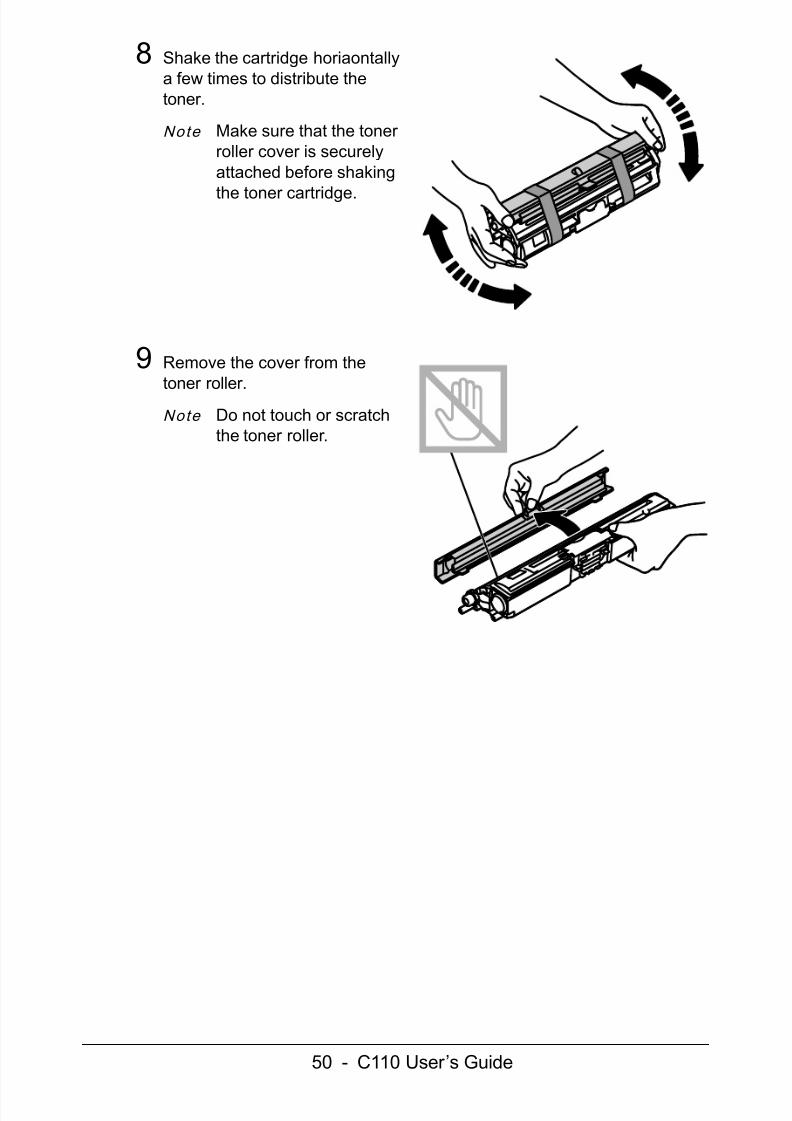
7/30/2019 C110 User Guide
http://slidepdf.com/reader/full/c110-user-guide 4/110
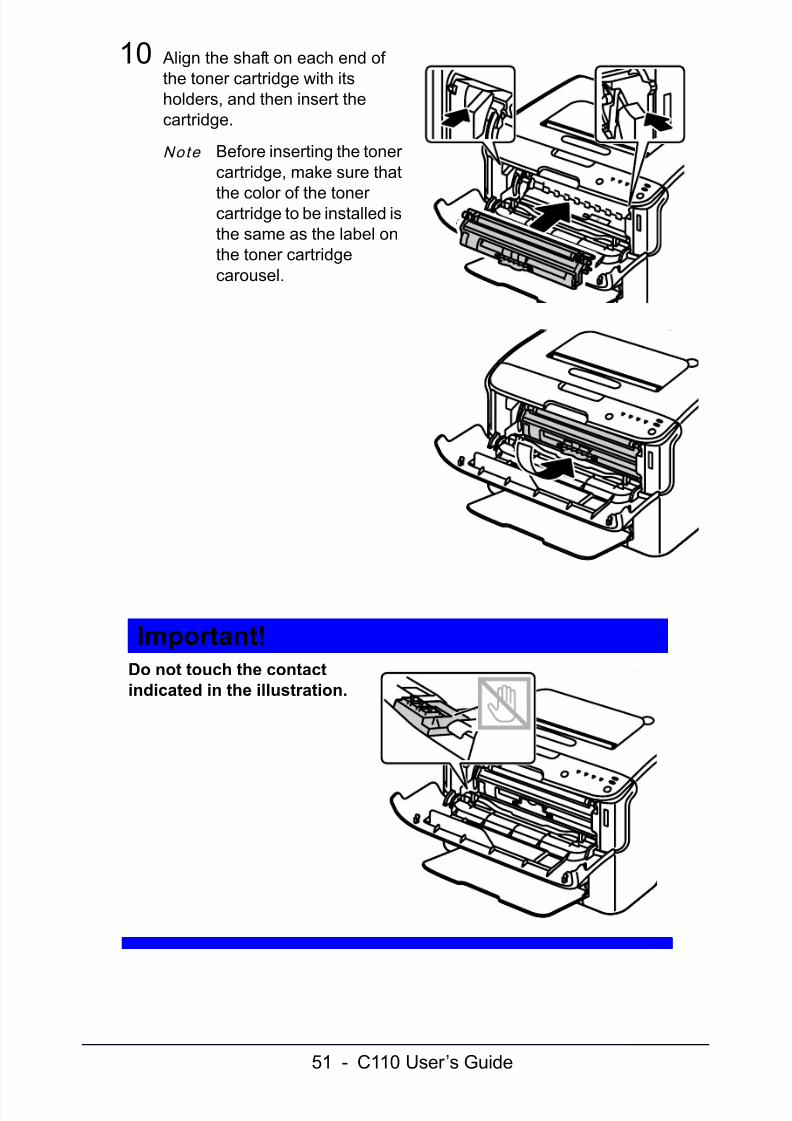
7/30/2019 C110 User Guide
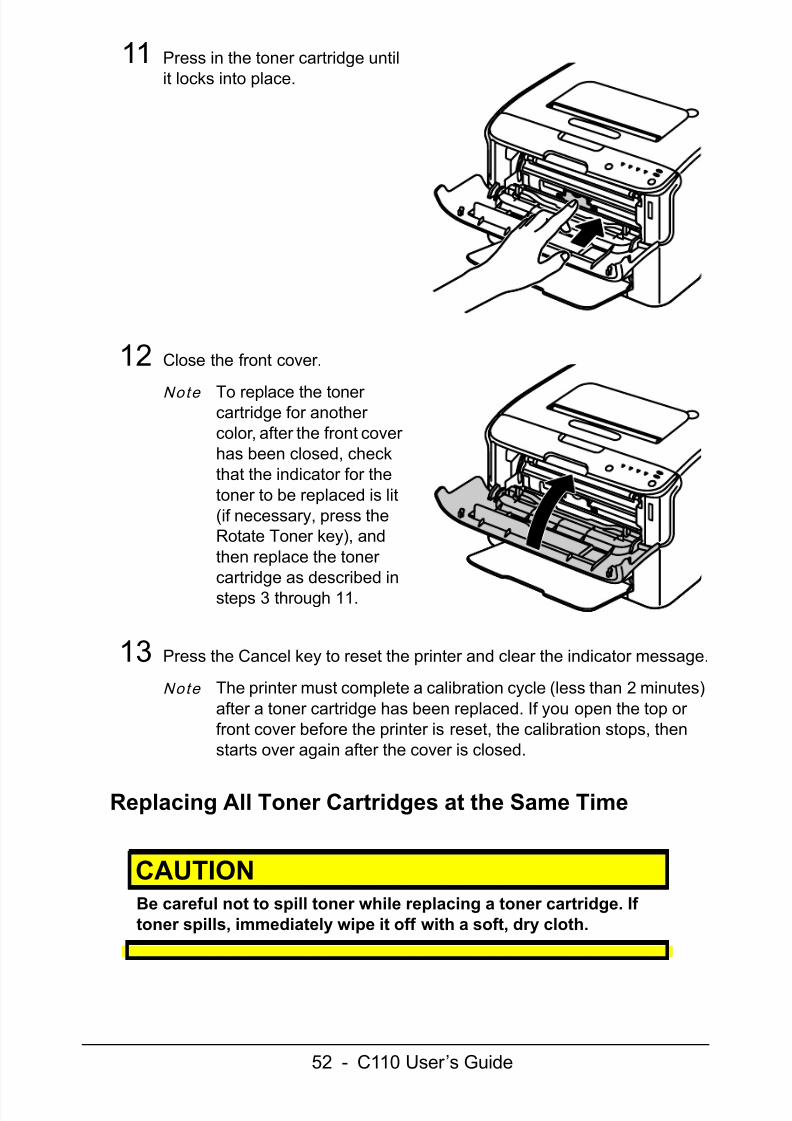
http://slidepdf.com/reader/full/c110-user-guide 5/110
7/30/2019 C110 User Guide
http://slidepdf.com/reader/full/c110-user-guide 6/110

7/30/2019 C110 User Guide
http://slidepdf.com/reader/full/c110-user-guide 7/110
7/30/2019 C110 User Guide
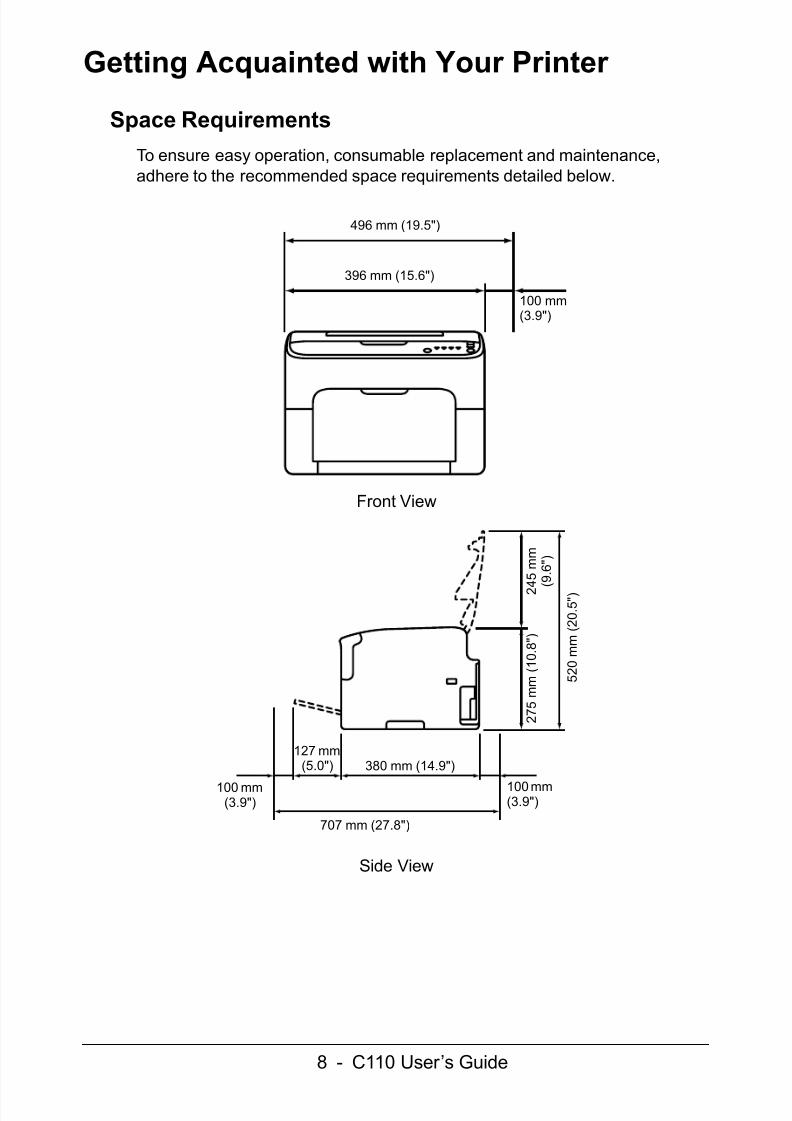
http://slidepdf.com/reader/full/c110-user-guide 8/110
7/30/2019 C110 User Guide
http://slidepdf.com/reader/full/c110-user-guide 9/110
7/30/2019 C110 User Guide
http://slidepdf.com/reader/full/c110-user-guide 10/110
7/30/2019 C110 User Guide
http://slidepdf.com/reader/full/c110-user-guide 11/110
7/30/2019 C110 User Guide
http://slidepdf.com/reader/full/c110-user-guide 12/110
7/30/2019 C110 User Guide
http://slidepdf.com/reader/full/c110-user-guide 13/110
7/30/2019 C110 User Guide
http://slidepdf.com/reader/full/c110-user-guide 14/110
7/30/2019 C110 User Guide
http://slidepdf.com/reader/full/c110-user-guide 15/110
7/30/2019 C110 User Guide
http://slidepdf.com/reader/full/c110-user-guide 16/110
7/30/2019 C110 User Guide
http://slidepdf.com/reader/full/c110-user-guide 17/110
7/30/2019 C110 User Guide
http://slidepdf.com/reader/full/c110-user-guide 18/110
7/30/2019 C110 User Guide
http://slidepdf.com/reader/full/c110-user-guide 19/110
7/30/2019 C110 User Guide
http://slidepdf.com/reader/full/c110-user-guide 20/110
7/30/2019 C110 User Guide
http://slidepdf.com/reader/full/c110-user-guide 21/110
7/30/2019 C110 User Guide
http://slidepdf.com/reader/full/c110-user-guide 22/110
7/30/2019 C110 User Guide
http://slidepdf.com/reader/full/c110-user-guide 23/110

7/30/2019 C110 User Guide
http://slidepdf.com/reader/full/c110-user-guide 24/110
7/30/2019 C110 User Guide
http://slidepdf.com/reader/full/c110-user-guide 25/110
7/30/2019 C110 User Guide
http://slidepdf.com/reader/full/c110-user-guide 26/110
7/30/2019 C110 User Guide
http://slidepdf.com/reader/full/c110-user-guide 27/110
7/30/2019 C110 User Guide
http://slidepdf.com/reader/full/c110-user-guide 28/110
7/30/2019 C110 User Guide
http://slidepdf.com/reader/full/c110-user-guide 29/110
7/30/2019 C110 User Guide
http://slidepdf.com/reader/full/c110-user-guide 30/110
7/30/2019 C110 User Guide
http://slidepdf.com/reader/full/c110-user-guide 31/110
7/30/2019 C110 User Guide
http://slidepdf.com/reader/full/c110-user-guide 32/110
7/30/2019 C110 User Guide
http://slidepdf.com/reader/full/c110-user-guide 33/110
7/30/2019 C110 User Guide
http://slidepdf.com/reader/full/c110-user-guide 34/110
7/30/2019 C110 User Guide
http://slidepdf.com/reader/full/c110-user-guide 35/110
7/30/2019 C110 User Guide
http://slidepdf.com/reader/full/c110-user-guide 36/110
7/30/2019 C110 User Guide
http://slidepdf.com/reader/full/c110-user-guide 37/110
7/30/2019 C110 User Guide
http://slidepdf.com/reader/full/c110-user-guide 38/110
7/30/2019 C110 User Guide
http://slidepdf.com/reader/full/c110-user-guide 39/110
7/30/2019 C110 User Guide
http://slidepdf.com/reader/full/c110-user-guide 40/110
7/30/2019 C110 User Guide
http://slidepdf.com/reader/full/c110-user-guide 41/110
7/30/2019 C110 User Guide
http://slidepdf.com/reader/full/c110-user-guide 42/110
7/30/2019 C110 User Guide
http://slidepdf.com/reader/full/c110-user-guide 43/110

7/30/2019 C110 User Guide
http://slidepdf.com/reader/full/c110-user-guide 44/110
7/30/2019 C110 User Guide
http://slidepdf.com/reader/full/c110-user-guide 45/110
7/30/2019 C110 User Guide
http://slidepdf.com/reader/full/c110-user-guide 46/110
7/30/2019 C110 User Guide
http://slidepdf.com/reader/full/c110-user-guide 47/110
7/30/2019 C110 User Guide
http://slidepdf.com/reader/full/c110-user-guide 48/110

7/30/2019 C110 User Guide
http://slidepdf.com/reader/full/c110-user-guide 49/110
7/30/2019 C110 User Guide
http://slidepdf.com/reader/full/c110-user-guide 50/110
7/30/2019 C110 User Guide
http://slidepdf.com/reader/full/c110-user-guide 51/110
7/30/2019 C110 User Guide
http://slidepdf.com/reader/full/c110-user-guide 52/110

7/30/2019 C110 User Guide
http://slidepdf.com/reader/full/c110-user-guide 53/110
7/30/2019 C110 User Guide
http://slidepdf.com/reader/full/c110-user-guide 54/110
7/30/2019 C110 User Guide
http://slidepdf.com/reader/full/c110-user-guide 55/110
7/30/2019 C110 User Guide
http://slidepdf.com/reader/full/c110-user-guide 56/110
7/30/2019 C110 User Guide
http://slidepdf.com/reader/full/c110-user-guide 57/110
7/30/2019 C110 User Guide
http://slidepdf.com/reader/full/c110-user-guide 58/110
7/30/2019 C110 User Guide
http://slidepdf.com/reader/full/c110-user-guide 59/110
7/30/2019 C110 User Guide
http://slidepdf.com/reader/full/c110-user-guide 60/110
7/30/2019 C110 User Guide
http://slidepdf.com/reader/full/c110-user-guide 61/110
7/30/2019 C110 User Guide
http://slidepdf.com/reader/full/c110-user-guide 62/110
7/30/2019 C110 User Guide
http://slidepdf.com/reader/full/c110-user-guide 63/110

7/30/2019 C110 User Guide
http://slidepdf.com/reader/full/c110-user-guide 64/110
7/30/2019 C110 User Guide
http://slidepdf.com/reader/full/c110-user-guide 65/110
7/30/2019 C110 User Guide
http://slidepdf.com/reader/full/c110-user-guide 66/110
7/30/2019 C110 User Guide
http://slidepdf.com/reader/full/c110-user-guide 67/110
7/30/2019 C110 User Guide
http://slidepdf.com/reader/full/c110-user-guide 68/110
7/30/2019 C110 User Guide
http://slidepdf.com/reader/full/c110-user-guide 69/110
7/30/2019 C110 User Guide
http://slidepdf.com/reader/full/c110-user-guide 70/110
7/30/2019 C110 User Guide
http://slidepdf.com/reader/full/c110-user-guide 71/110
7/30/2019 C110 User Guide
http://slidepdf.com/reader/full/c110-user-guide 72/110

7/30/2019 C110 User Guide
http://slidepdf.com/reader/full/c110-user-guide 73/110

7/30/2019 C110 User Guide
http://slidepdf.com/reader/full/c110-user-guide 74/110
7/30/2019 C110 User Guide
http://slidepdf.com/reader/full/c110-user-guide 75/110
7/30/2019 C110 User Guide
http://slidepdf.com/reader/full/c110-user-guide 76/110
7/30/2019 C110 User Guide
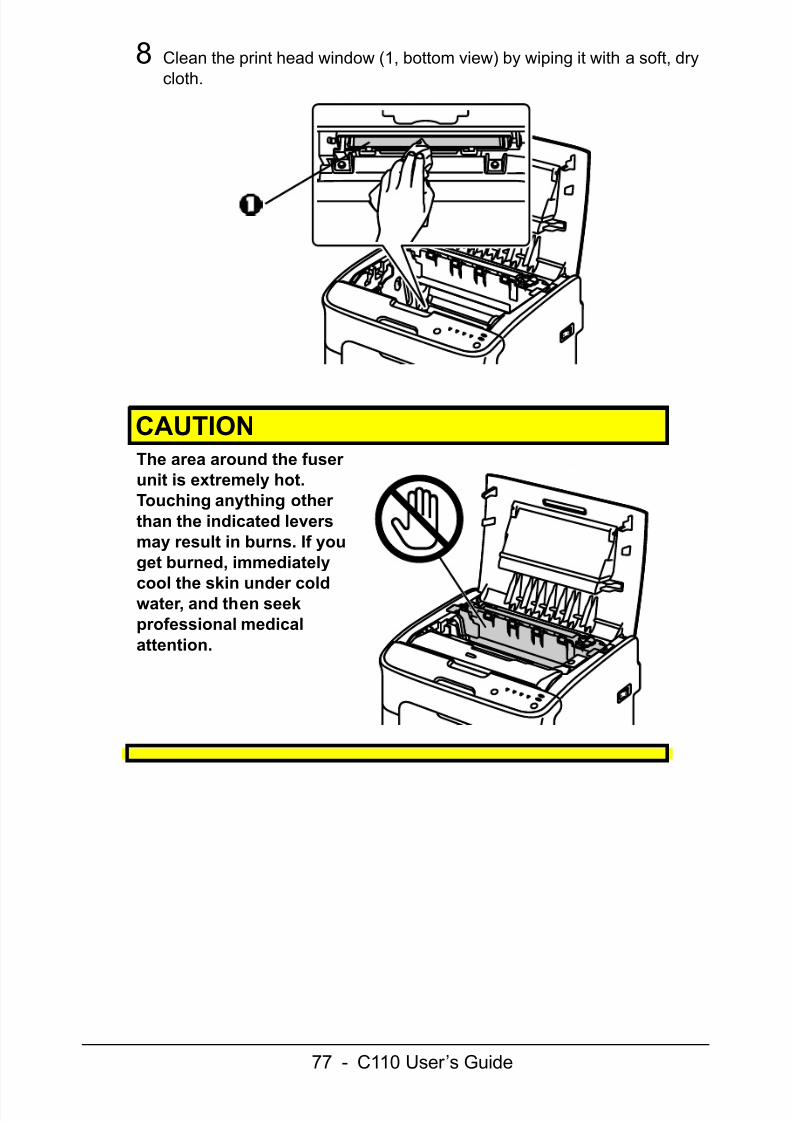
http://slidepdf.com/reader/full/c110-user-guide 77/110

7/30/2019 C110 User Guide
http://slidepdf.com/reader/full/c110-user-guide 78/110
7/30/2019 C110 User Guide
http://slidepdf.com/reader/full/c110-user-guide 79/110
79 - C110 User’s Guide
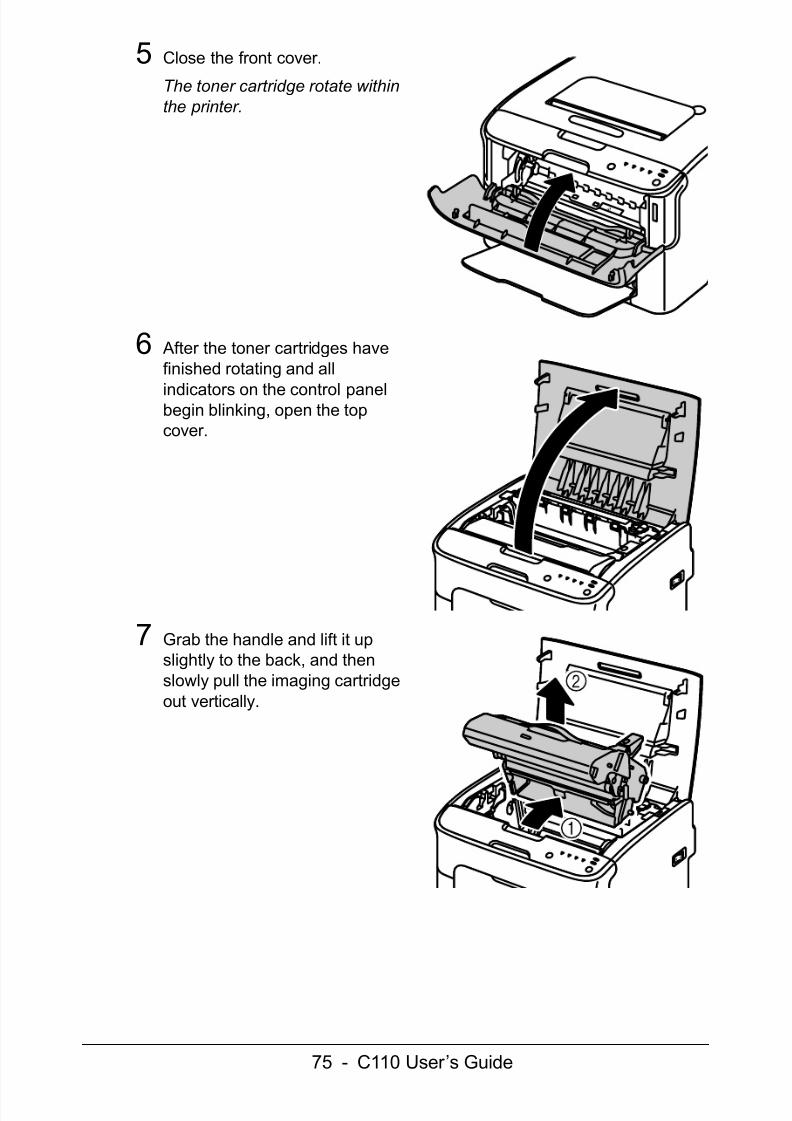
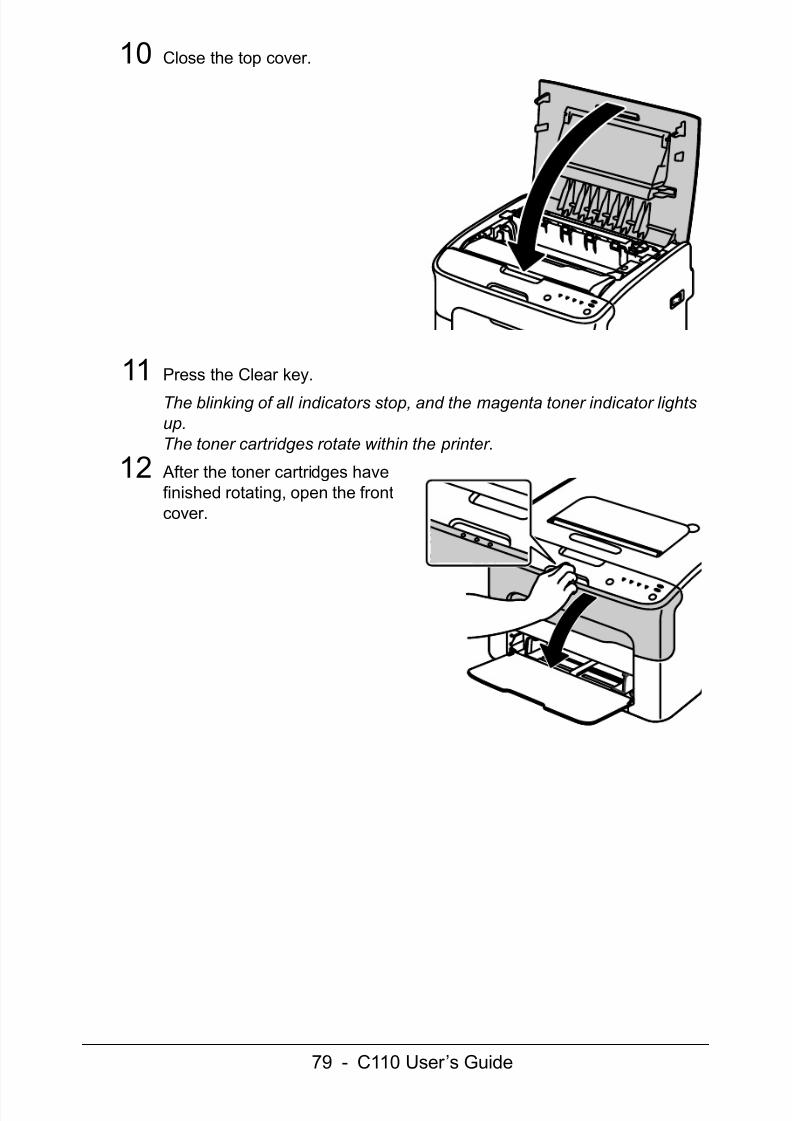
10 Close the top cover.
11 Press the Clear key.
The blinking of all indicators stop, and the magenta toner indicator lightsup. The toner cartridges rotate within the printer.
12 After the toner cartridges havefinished rotating, open the frontcover.
7/30/2019 C110 User Guide
http://slidepdf.com/reader/full/c110-user-guide 80/110
80 - C110 User’s Guide
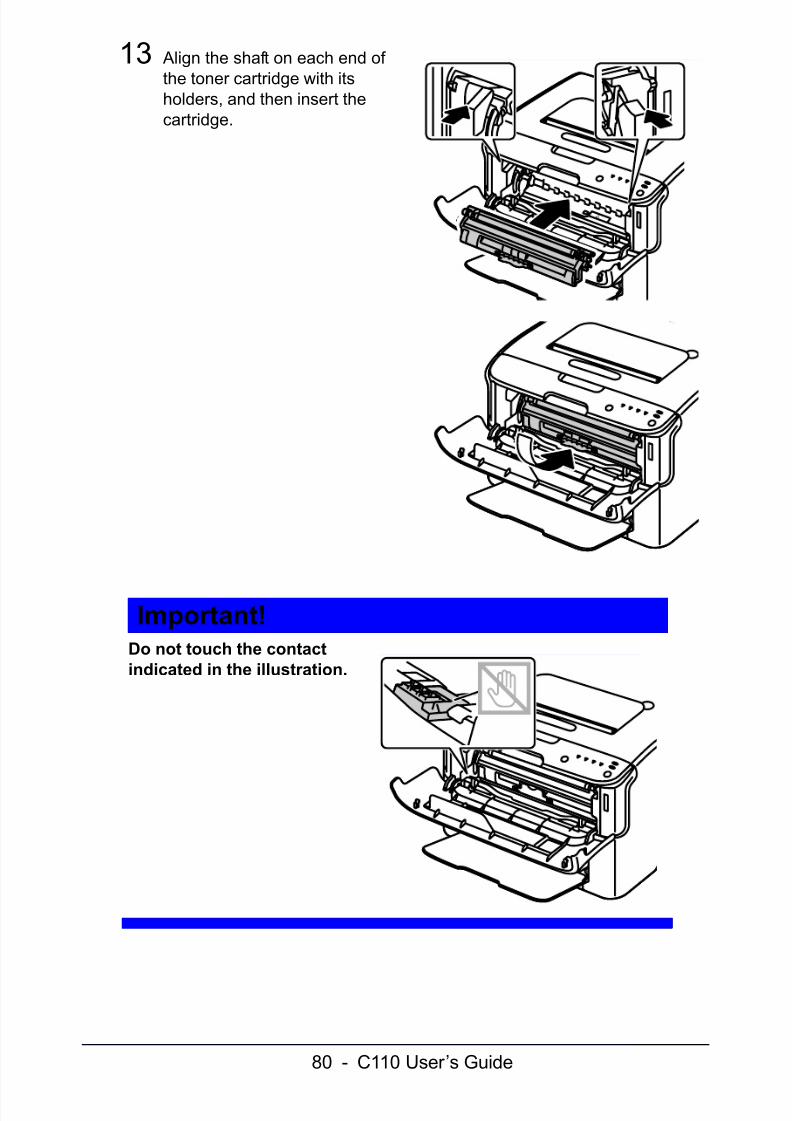
13 Align the shaft on each end of the toner cartridge with itsholders, and then insert thecartridge.
Important!Do not touch the contactindicated in the illustration.

7/30/2019 C110 User Guide
http://slidepdf.com/reader/full/c110-user-guide 81/110
81 - C110 User’s Guide
14 Press in the magenta toner cartridge until it locks into place.
15 Close the front cover.

7/30/2019 C110 User Guide
http://slidepdf.com/reader/full/c110-user-guide 82/110
82 - C110 User’s Guide
Troubleshoo t ing
7/30/2019 C110 User Guide
http://slidepdf.com/reader/full/c110-user-guide 83/110
83 - C110 User’s Guide
IntroductionThis chapter provides information to aid you in resolving printer problems youmay encounter, or at least guide you to the proper sources for help.
Preventing Media Misfeeds page 84
Understanding the Media Path page 85Indicator Messages page 86
Clearing Media Misfeeds page 90
Solving Problems with Media Misfeeds page 98
Solving Other Problems page 99
Solving Problems with Printing Quality page 101
7/30/2019 C110 User Guide
http://slidepdf.com/reader/full/c110-user-guide 84/110
84 - C110 User’s Guide
Preventing Media Misfeeds
Make sure that...
" Media matches the printer specifications." Media is flat, especially on the leading edge." The printer is on a hard, flat, level surface." You store media in a dry location away from moisture and humidity." You always adjust the media guides in Tray 1 after inserting the media (a
guide that is not properly adjusted can cause poor print quality, mediamisfeeds, and printer damage).
" You load the media printing-side up in the tray (many manufacturers placean arrow on the end of the wrapper to indicate the printing side).
Avoid...
" Media that is folded, wrinkled, or excessively curled." Double feeding (remove the media and fan the sheets—they may be
sticking together). " Loading more than one type/size/weight of media in a tray at the same
time." Overfilling the trays." Allowing the output tray to overfill (the output tray has a 100-sheet
capacity—misfeeding may occur if you allow media to accumulate morethan 100 sheets at one time).
7/30/2019 C110 User Guide
http://slidepdf.com/reader/full/c110-user-guide 85/110
85 - C110 User’s Guide
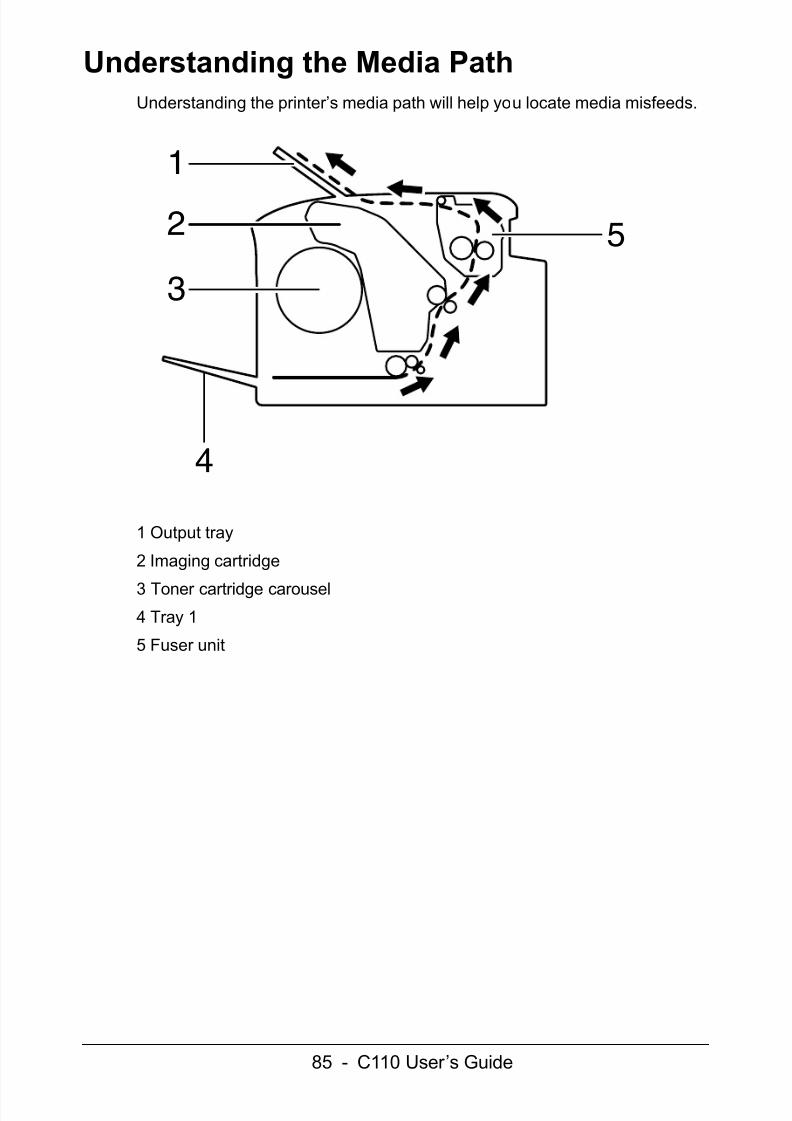
Understanding the Media PathUnderstanding the printer’s media path will help you locate media misfeeds.
1 Output tray
2 Imaging cartridge
3 Toner cartridge carousel4 Tray 1
5 Fuser unit
1
2
4
5
3
7/30/2019 C110 User Guide
http://slidepdf.com/reader/full/c110-user-guide 86/110
86 - C110 User’s Guide
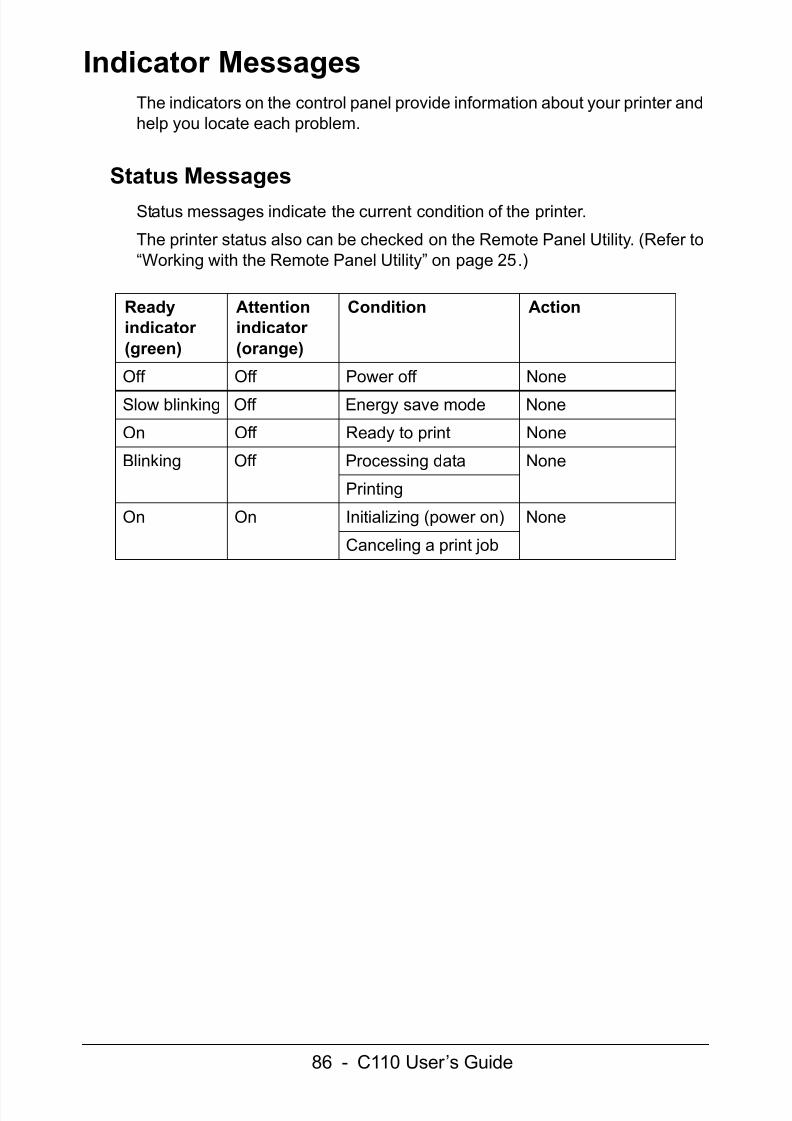
Indicator MessagesThe indicators on the control panel provide information about your printer andhelp you locate each problem.
Status MessagesStatus messages indicate the current condition of the printer.
The printer status also can be checked on the Remote Panel Utility. (Refer to“Working with the Remote Panel Utility” on page 25 .)
Readyindicator (green)
Attentionindicator (orange)
Condition Action
Off Off Power off None
Slow blinking Off Energy save mode None
On Off Ready to print None
Blinking Off Processing data None
Printing
On On Initializing (power on) None
Canceling a print job
7/30/2019 C110 User Guide
http://slidepdf.com/reader/full/c110-user-guide 87/110
87 - C110 User’s Guide
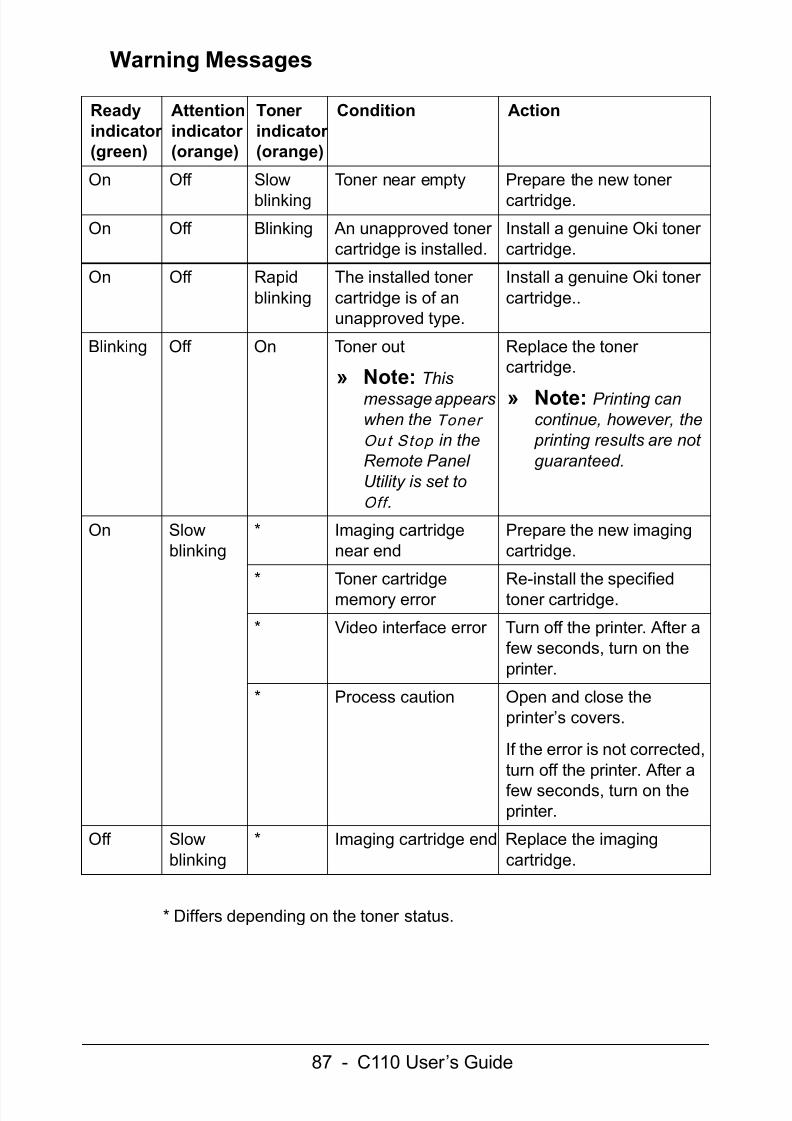
Warning Messages
* Differs depending on the toner status.
Readyindicator (green)
Attentionindicator (orange)
Toner indicator (orange)
Condition Action
On Off Slowblinking
Toner near empty Prepare the new toner cartridge.
On Off Blinking An unapproved toner cartridge is installed.
Install a genuine Oki toner cartridge.
On Off Rapidblinking
The installed toner cartridge is of anunapproved type.
Install a genuine Oki toner cartridge..
Blinking Off On Toner out
» Note: Thismessage appearswhen the Toner Ou t Stop in theRemote Panel Utility is set toOff .
Replace the toner cartridge.
» Note: Printing cancontinue, however, the
printing results are not guaranteed.
On Slowblinking
* Imaging cartridgenear end
Prepare the new imagingcartridge.
* Toner cartridgememory error
Re-install the specifiedtoner cartridge.
* Video interface error Turn off the printer. After afew seconds, turn on theprinter.
* Process caution Open and close theprinter’s covers.
If the error is not corrected,turn off the printer. After afew seconds, turn on theprinter.
Off Slowblinking
* Imaging cartridge end Replace the imagingcartridge.
7/30/2019 C110 User Guide
http://slidepdf.com/reader/full/c110-user-guide 88/110
88 - C110 User’s Guide
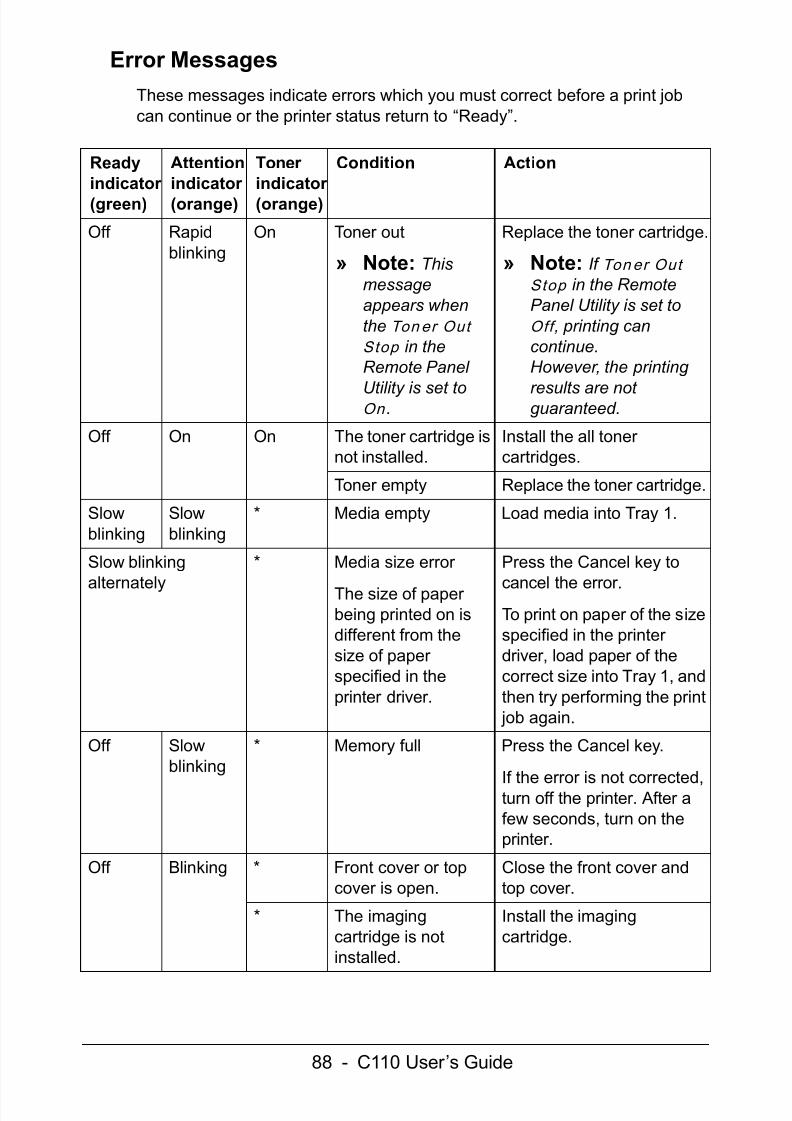
Error MessagesThese messages indicate errors which you must correct before a print jobcan continue or the printer status return to “Ready”.
Readyindicator (green)
Attentionindicator (orange)
Toner indicator (orange)
Condition Action
Off Rapidblinking
On Toner out
» Note: Thismessageappears whenthe Ton er Out Stop in theRemote Panel
Utility is set toOn .
Replace the toner cartridge.
» Note: If Ton er Out Stop in the RemotePanel Utility is set toOff , printing cancontinue. However, the printing
results are not guaranteed.
Off On On The toner cartridge isnot installed.
Install the all toner cartridges.
Toner empty Replace the toner cartridge.
Slowblinking
Slowblinking
* Media empty Load media into Tray 1.
Slow blinking
alternately
* Media size error
The size of paper being printed on isdifferent from thesize of paper specified in theprinter driver.
Press the Cancel key to
cancel the error.To print on paper of the sizespecified in the printer driver, load paper of thecorrect size into Tray 1, andthen try performing the print
job again.
Off Slowblinking
* Memory full Press the Cancel key.
If the error is not corrected,turn off the printer. After afew seconds, turn on theprinter.
Off Blinking * Front cover or topcover is open.
Close the front cover andtop cover.
* The imagingcartridge is notinstalled.
Install the imagingcartridge.
7/30/2019 C110 User Guide
http://slidepdf.com/reader/full/c110-user-guide 89/110
89 - C110 User’s Guide
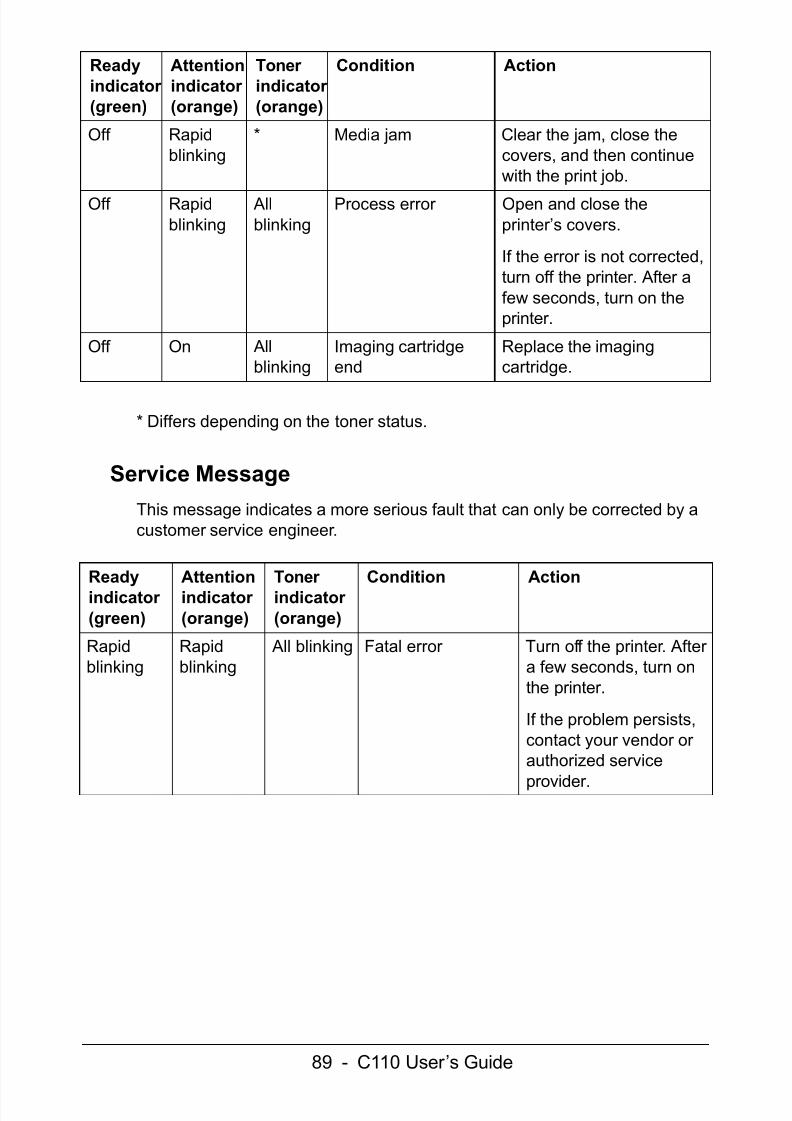
* Differs depending on the toner status.
Service MessageThis message indicates a more serious fault that can only be corrected by acustomer service engineer.
Off Rapidblinking
* Media jam Clear the jam, close thecovers, and then continuewith the print job.
Off Rapidblinking
Allblinking
Process error Open and close theprinter’s covers.
If the error is not corrected,turn off the printer. After afew seconds, turn on theprinter.
Off On Allblinking
Imaging cartridgeend
Replace the imagingcartridge.
Readyindicator (green)
Attentionindicator (orange)
Toner indicator (orange)
Condition Action
Rapidblinking
Rapidblinking
All blinking Fatal error Turn off the printer. After a few seconds, turn onthe printer.
If the problem persists,contact your vendor or authorized service
provider.
Readyindicator (green)
Attentionindicator (orange)
Toner indicator (orange)
Condition Action
7/30/2019 C110 User Guide
http://slidepdf.com/reader/full/c110-user-guide 90/110
90 - C110 User’s Guide
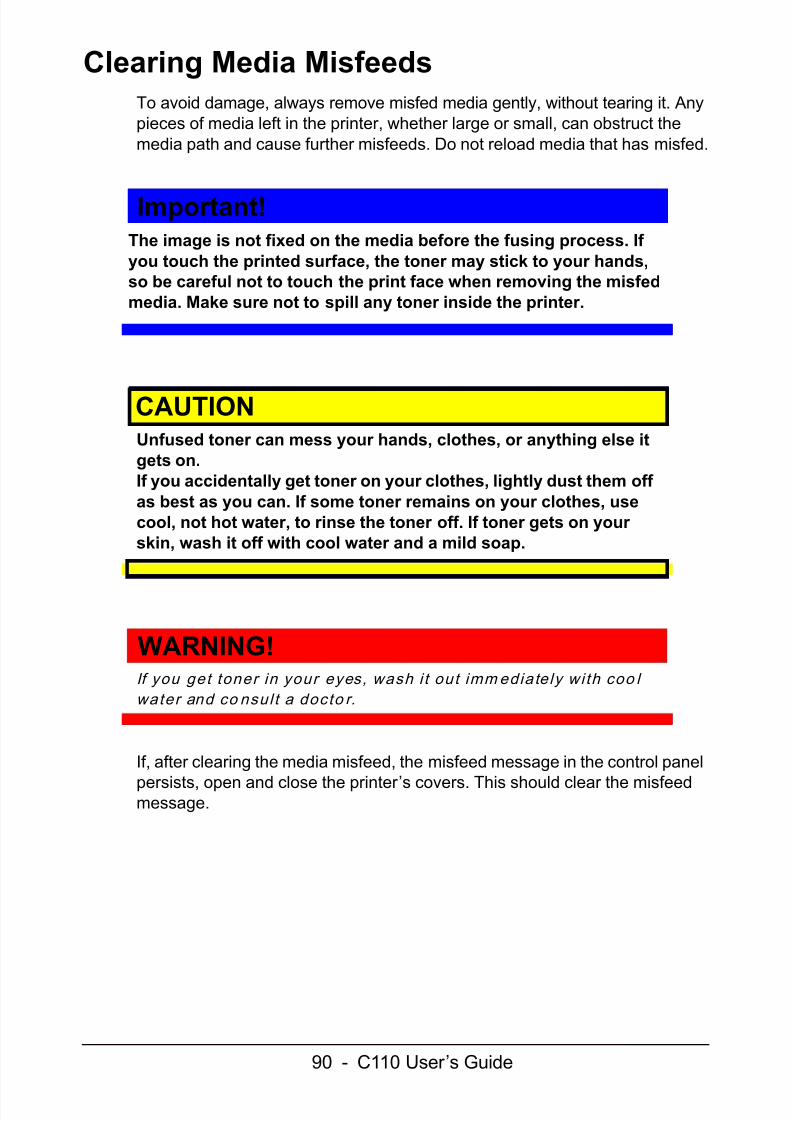
Clearing Media MisfeedsTo avoid damage, always remove misfed media gently, without tearing it. Anypieces of media left in the printer, whether large or small, can obstruct themedia path and cause further misfeeds. Do not reload media that has misfed.
Important!The image is not fixed on the media before the fusing process. If you touch the printed surface, the toner may stick to your hands,so be careful not to touch the print face when removing the misfedmedia. Make sure not to spill any toner inside the printer.
CAUTIONUnfused toner can mess your hands, clothes, or anything else itgets on. If you accidentally get toner on your clothes, lightly dust them off as best as you can. If some toner remains on your clothes, usecool, not hot water, to rinse the toner off. If toner gets on your skin, wash it off with cool water and a mild soap.
WARNING!If you ge t toner in your eyes , wash i t ou t imm edia te ly wi th coo l water and co nsul t a doc to r.
If, after clearing the media misfeed, the misfeed message in the control panel
persists, open and close the printer’s covers. This should clear the misfeedmessage.
7/30/2019 C110 User Guide
http://slidepdf.com/reader/full/c110-user-guide 91/110
91 - C110 User’s Guide
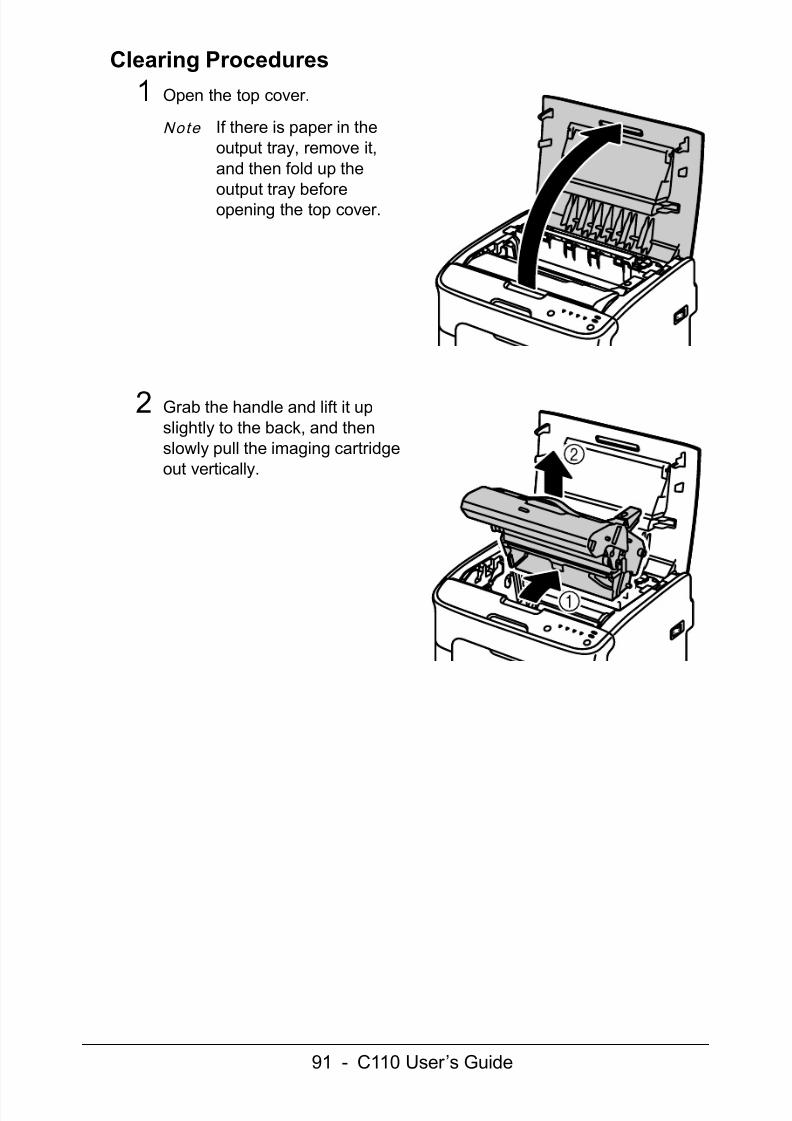
Clearing Procedures
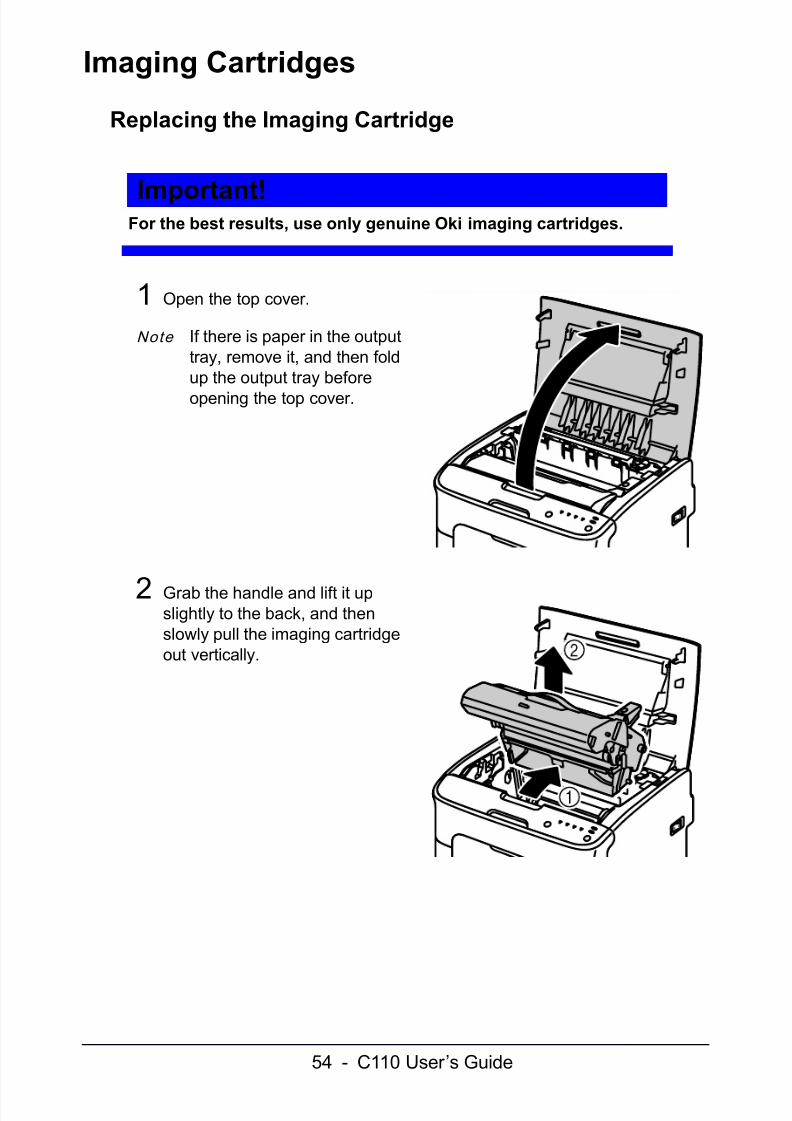
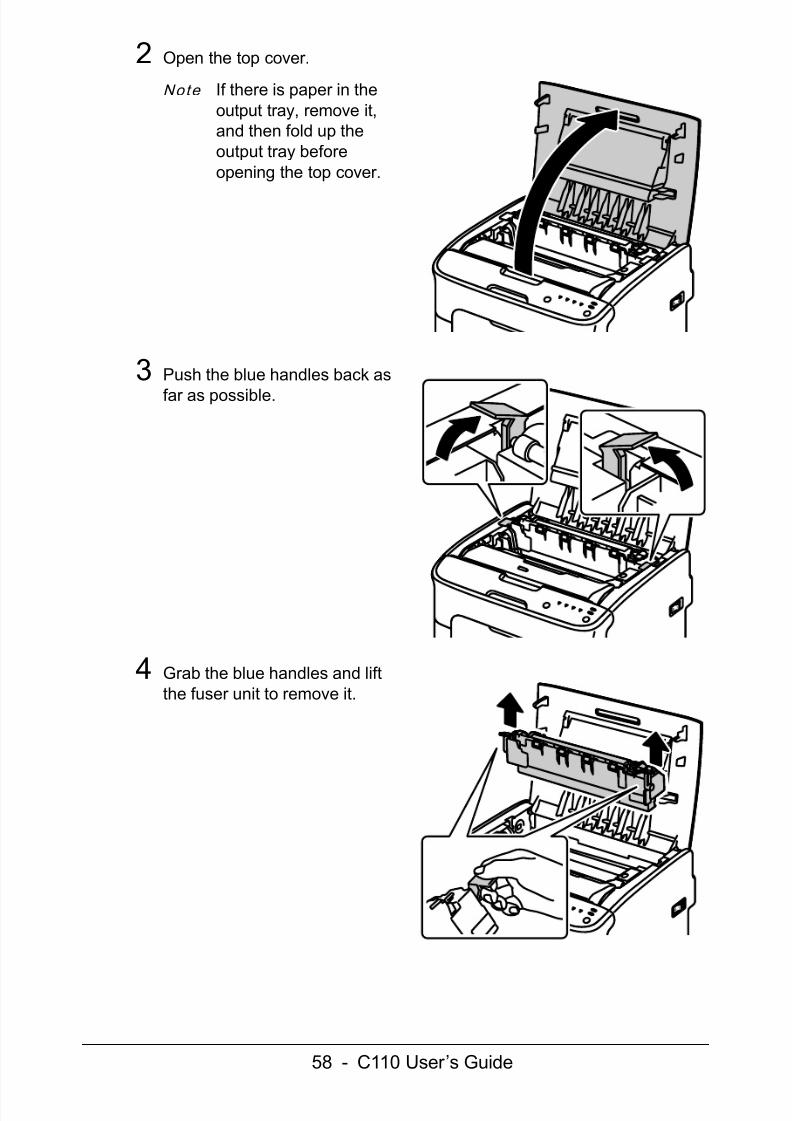
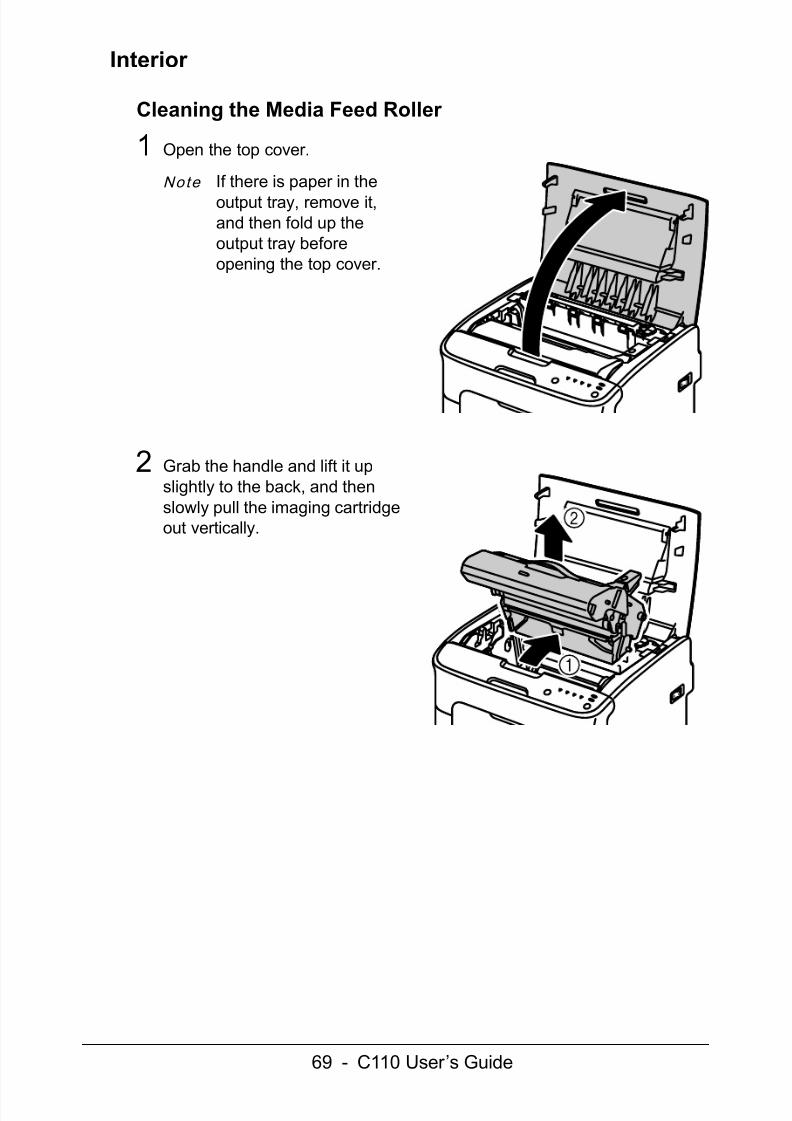
1 Open the top cover.
Note If there is paper in theoutput tray, remove it,and then fold up the
output tray beforeopening the top cover.
2 Grab the handle and lift it upslightly to the back, and thenslowly pull the imaging cartridgeout vertically.
7/30/2019 C110 User Guide
http://slidepdf.com/reader/full/c110-user-guide 92/110
92 - C110 User’s Guide
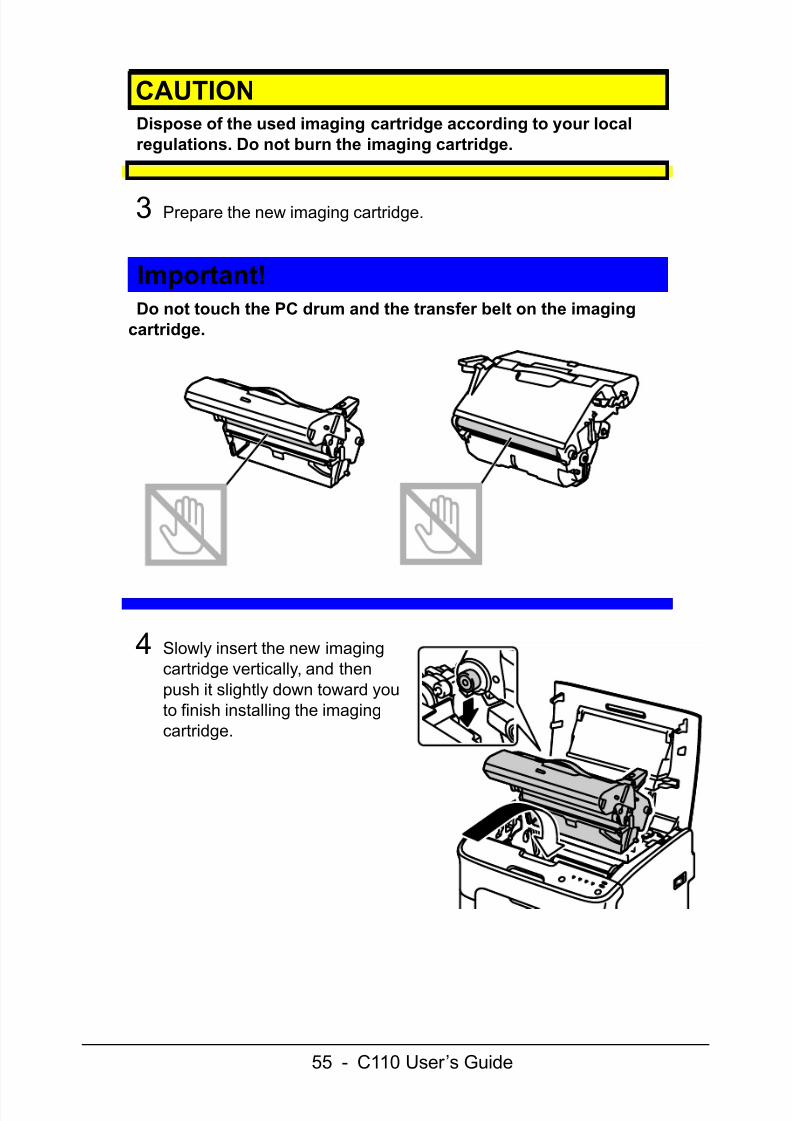
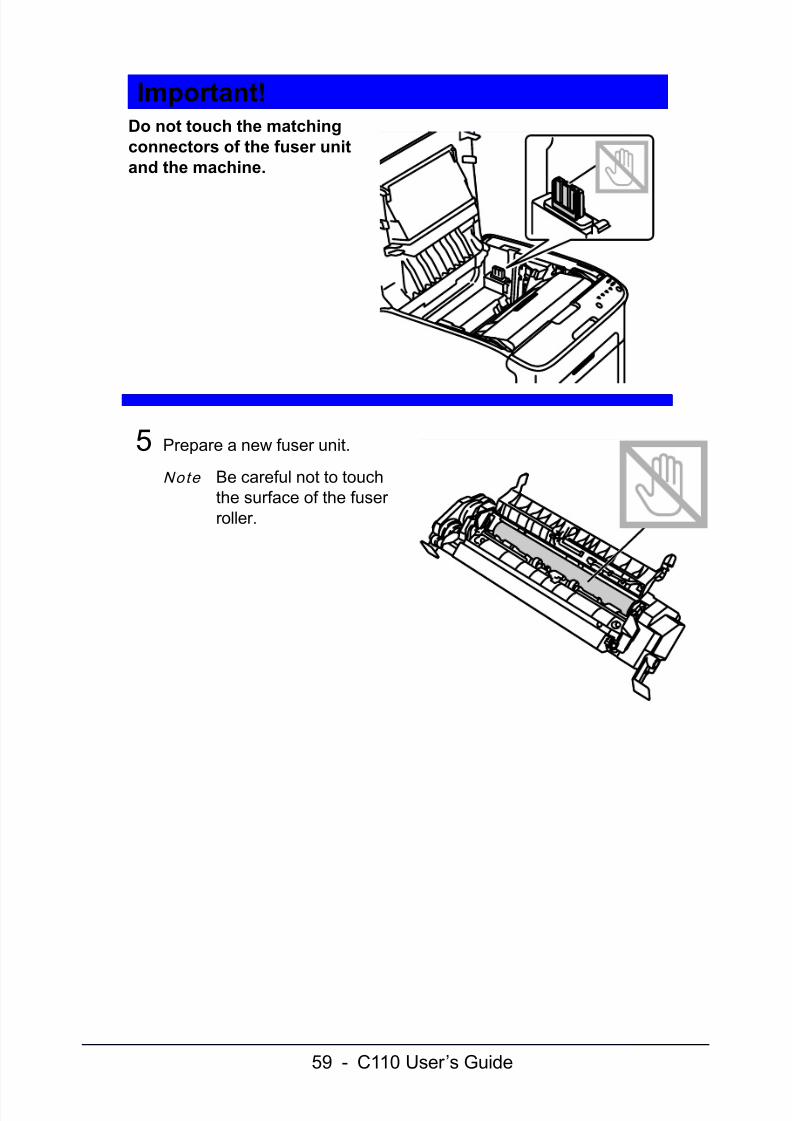
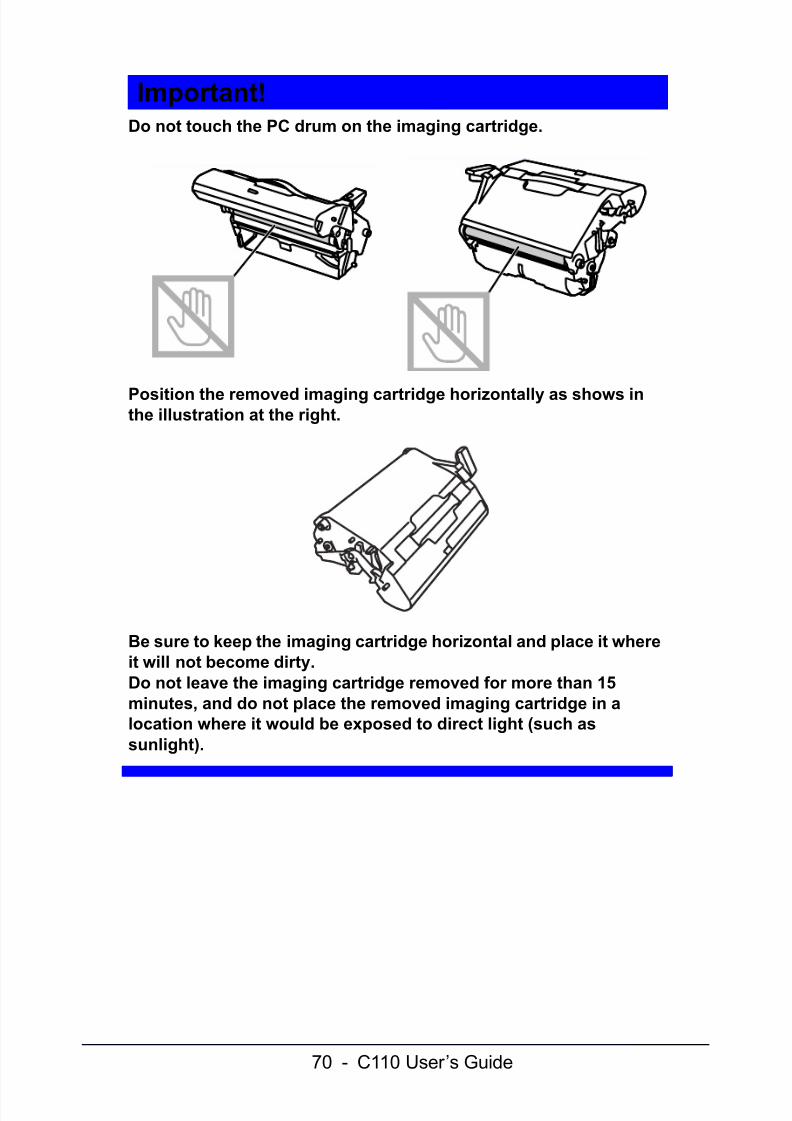
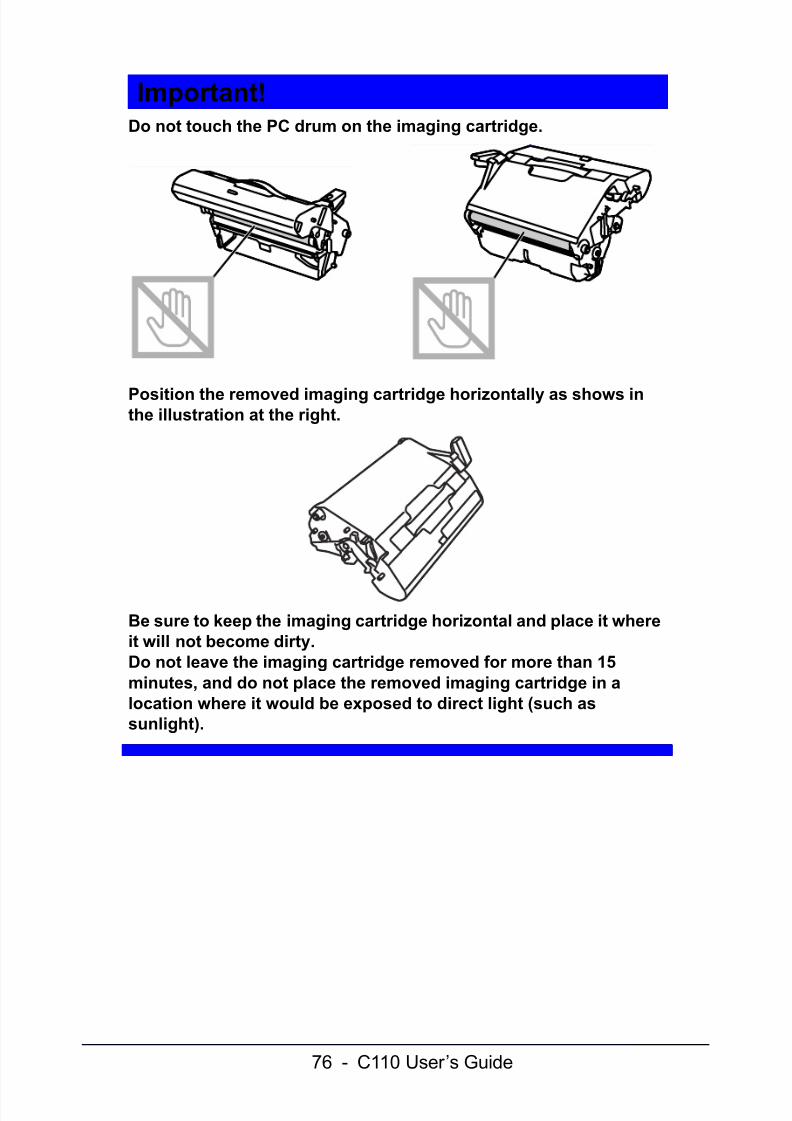
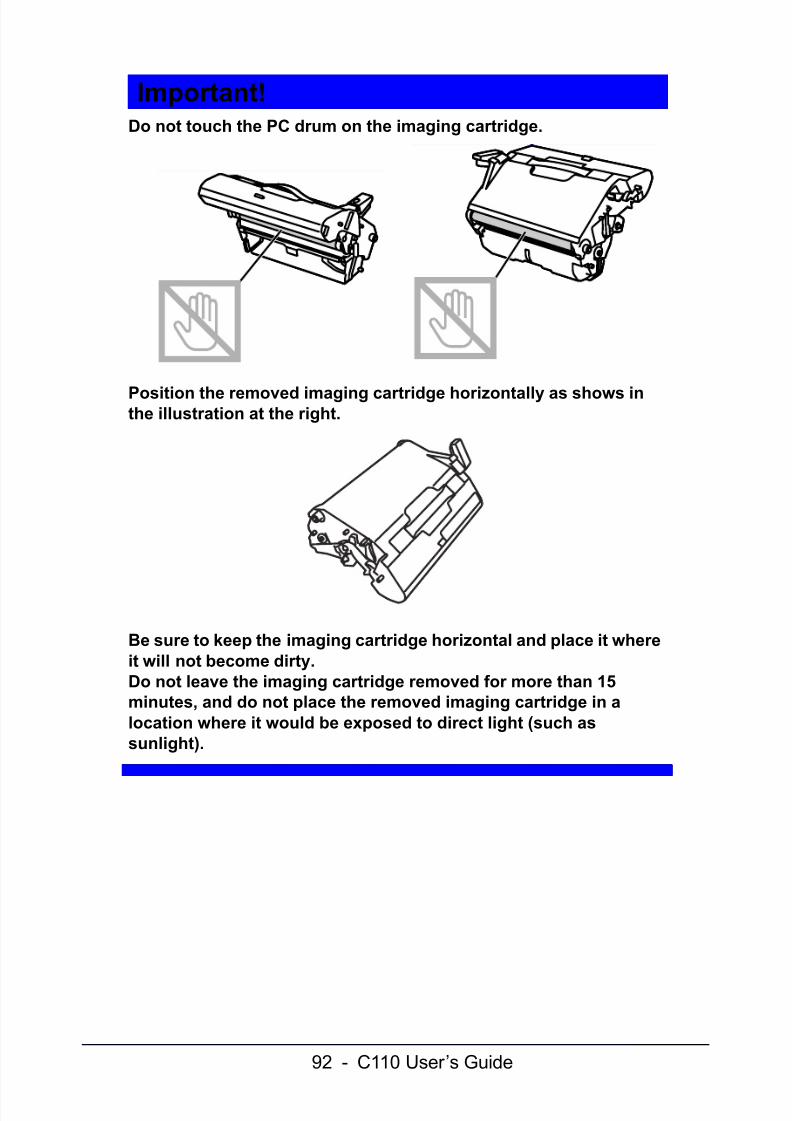
Important!Do not touch the PC drum on the imaging cartridge.
Position the removed imaging cartridge horizontally as shows inthe illustration at the right.
Be sure to keep the imaging cartridge horizontal and place it whereit will not become dirty. Do not leave the imaging cartridge removed for more than 15minutes, and do not place the removed imaging cartridge in alocation where it would be exposed to direct light (such assunlight).
7/30/2019 C110 User Guide
http://slidepdf.com/reader/full/c110-user-guide 93/110
93 - C110 User’s Guide
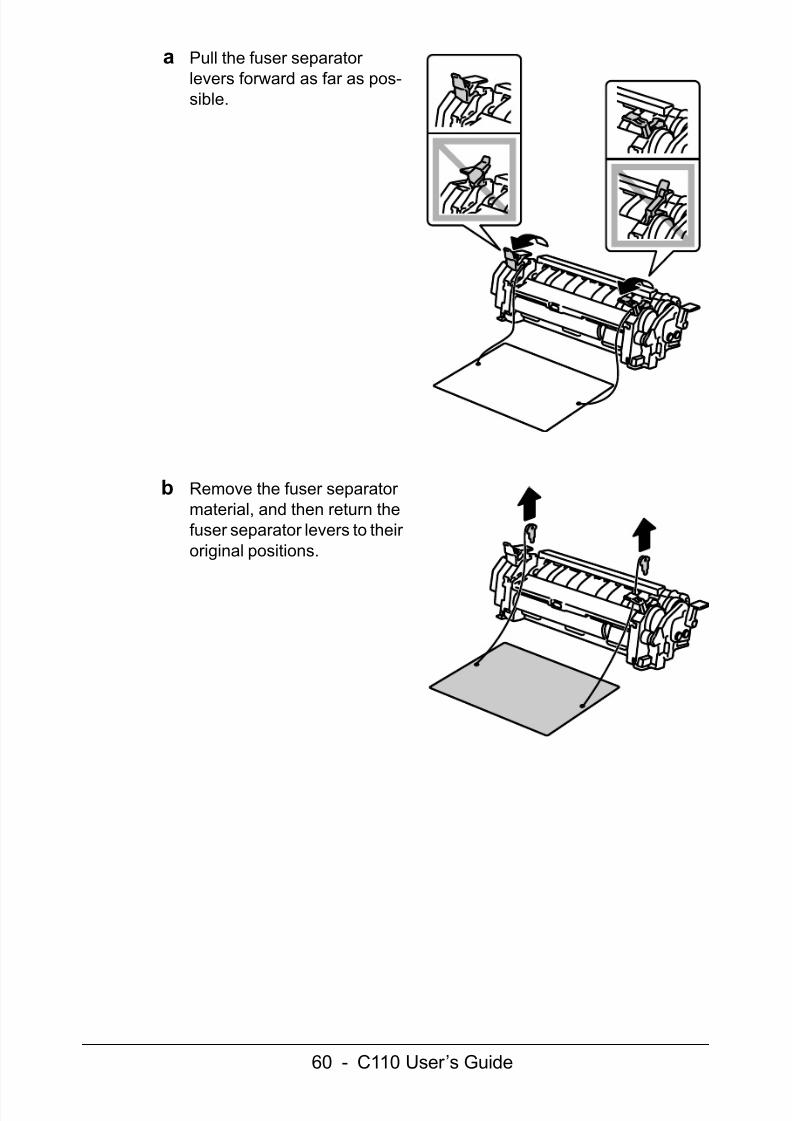
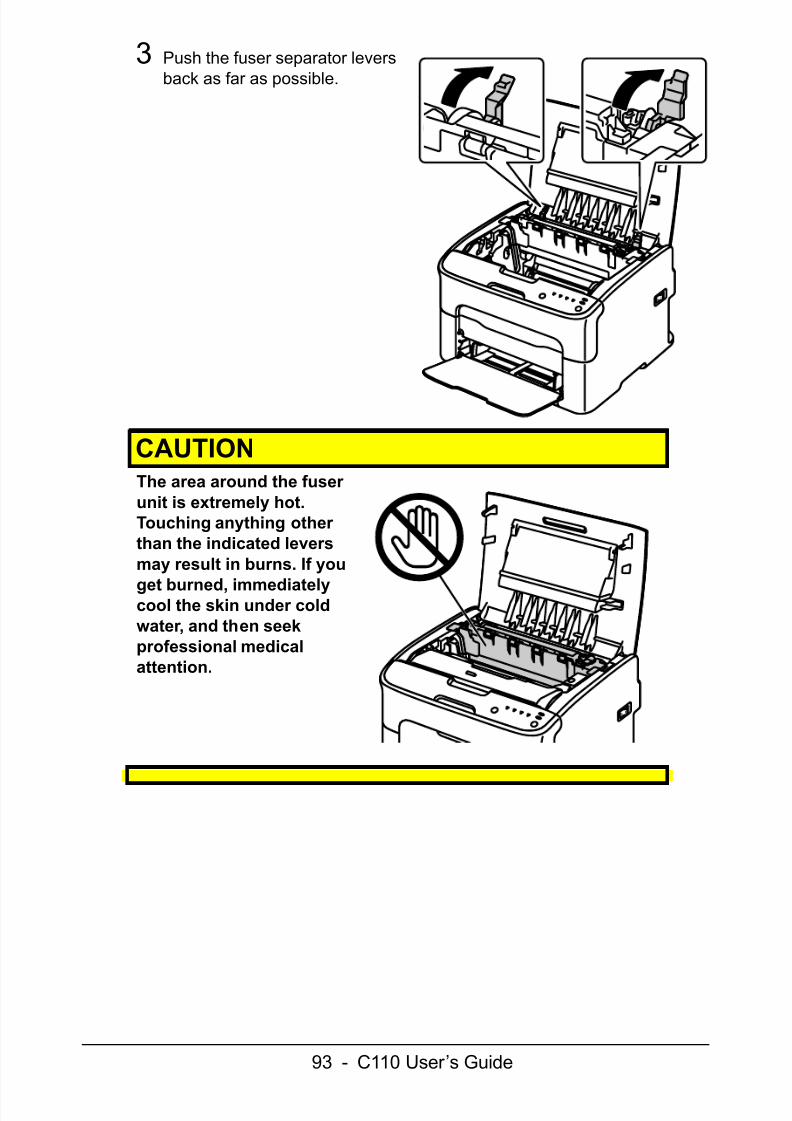
3 Push the fuser separator leversback as far as possible.
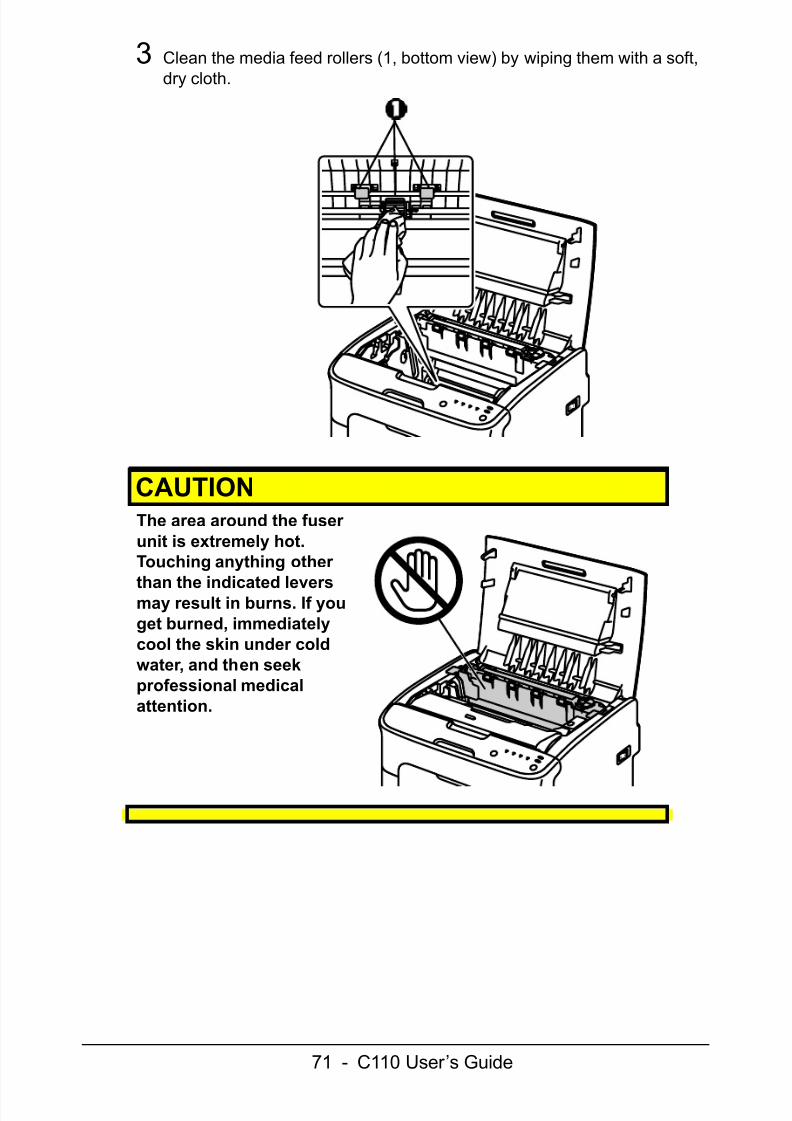
CAUTIONThe area around the fuser unit is extremely hot. Touching anything other than the indicated leversmay result in burns. If you
get burned, immediatelycool the skin under coldwater, and then seekprofessional medicalattention.
M
7/30/2019 C110 User Guide
http://slidepdf.com/reader/full/c110-user-guide 94/110
94 - C110 User’s Guide
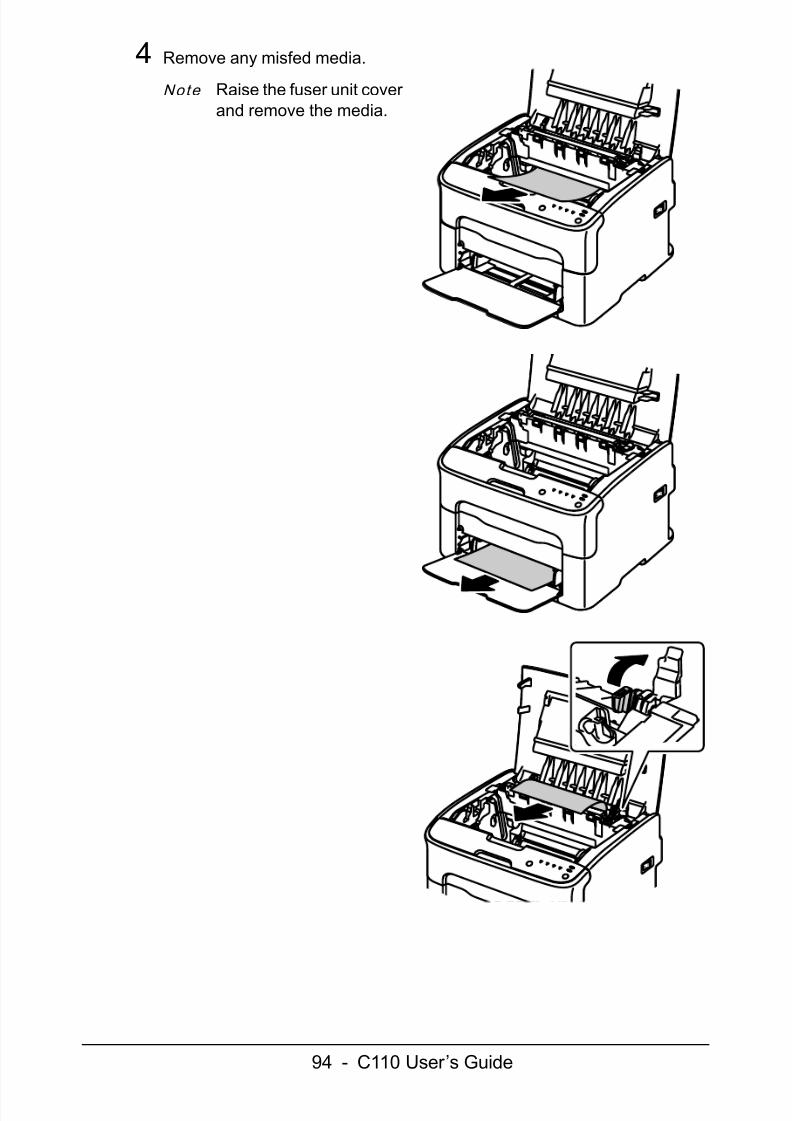
4 Remove any misfed media.
Note Raise the fuser unit cover and remove the media.
M
M

7/30/2019 C110 User Guide
http://slidepdf.com/reader/full/c110-user-guide 95/110
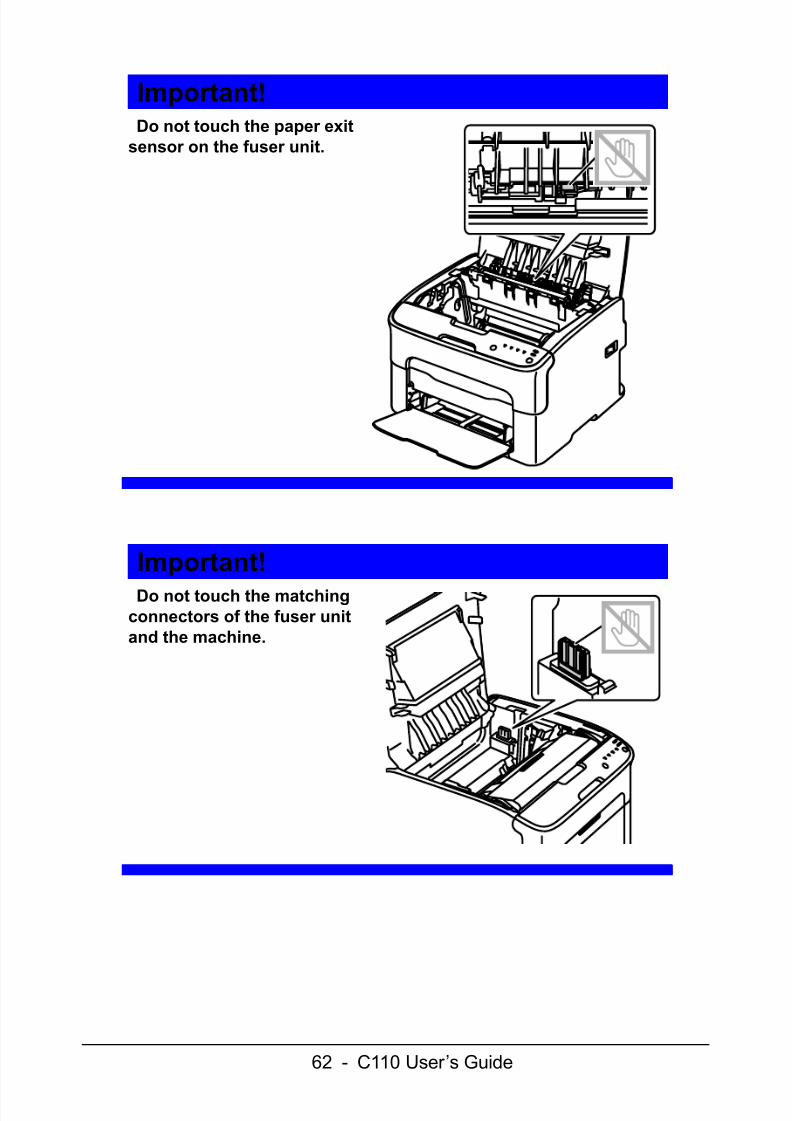
95 - C110 User’s Guide
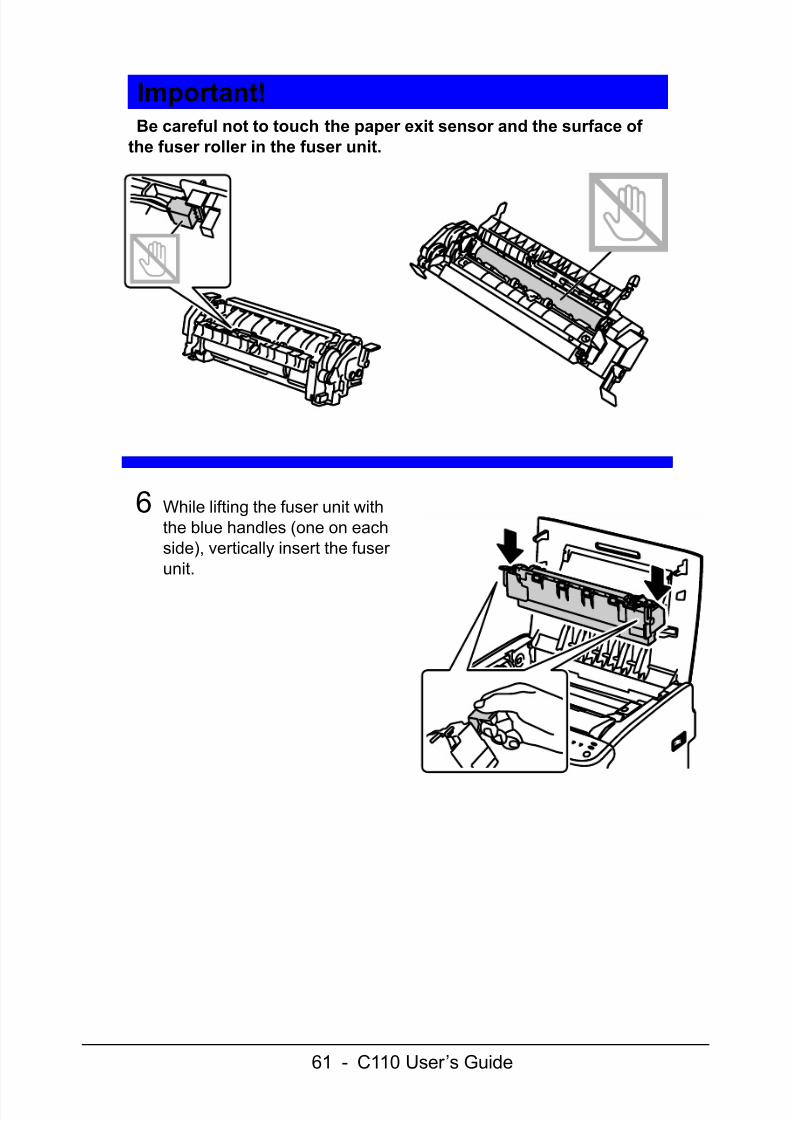
Important!Do not touch the paper exitsensor on the fuser unit.
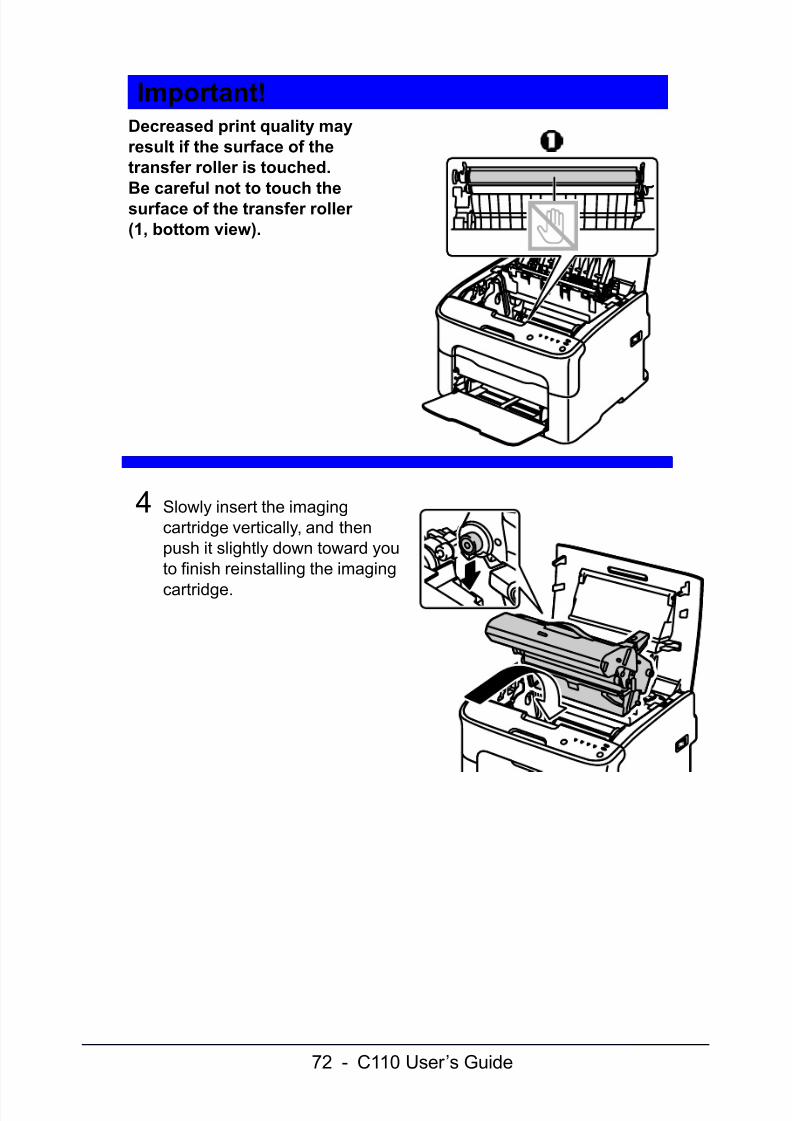
Important!Decreased print quality mayresult if the surface of thetransfer roller is touched. Be careful not to touch thesurface of the transfer roller.
M
7/30/2019 C110 User Guide
http://slidepdf.com/reader/full/c110-user-guide 96/110
96 - C110 User’s Guide
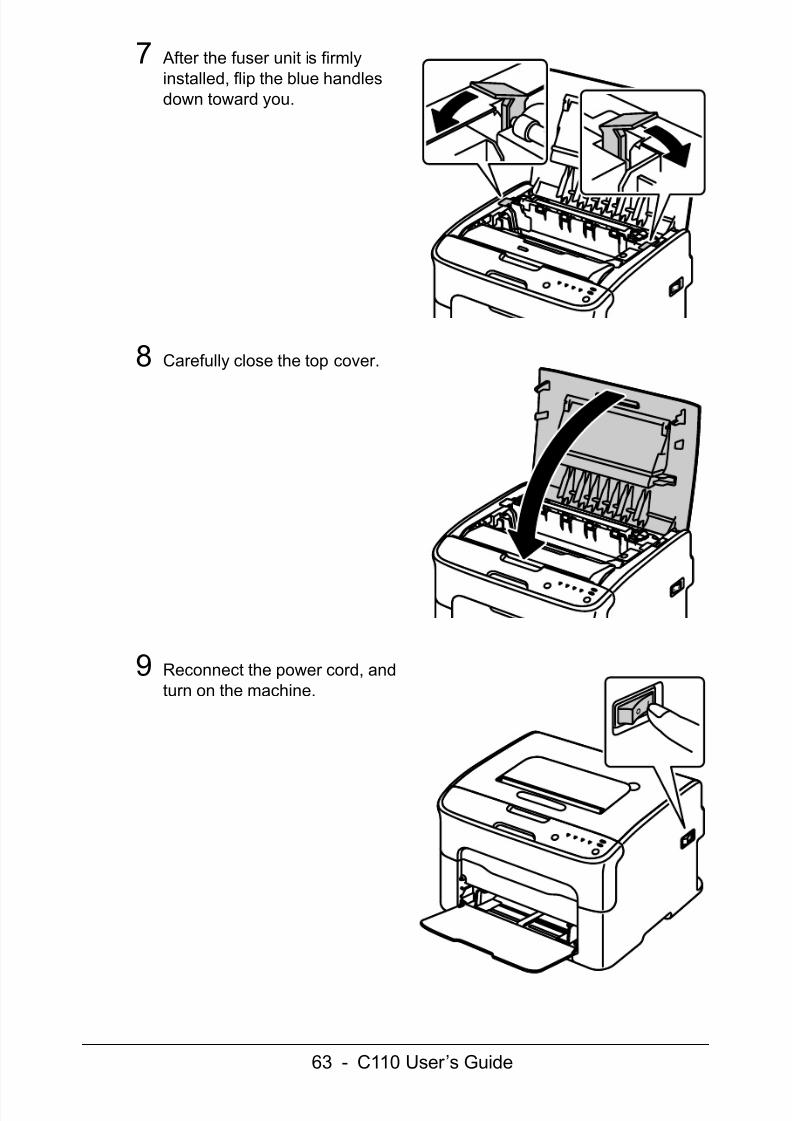
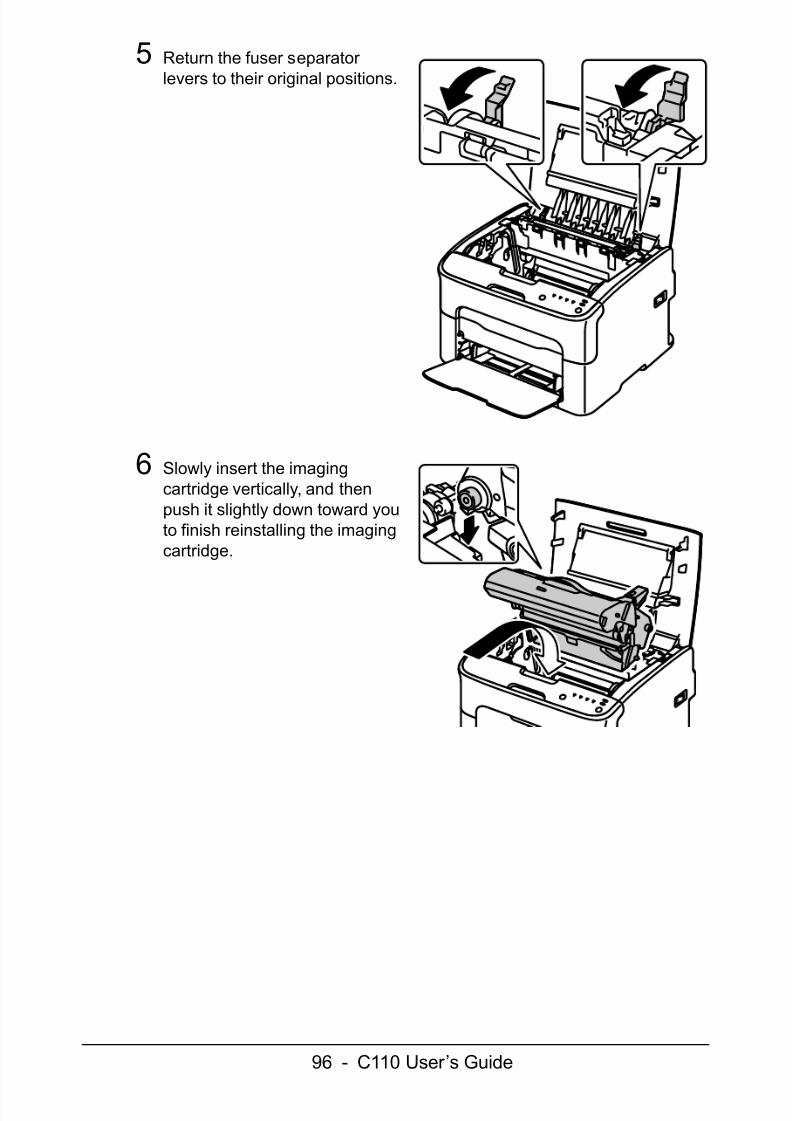
5 Return the fuser separator levers to their original positions.
6 Slowly insert the imagingcartridge vertically, and thenpush it slightly down toward youto finish reinstalling the imagingcartridge.
M
7/30/2019 C110 User Guide
http://slidepdf.com/reader/full/c110-user-guide 97/110
97 - C110 User’s Guide
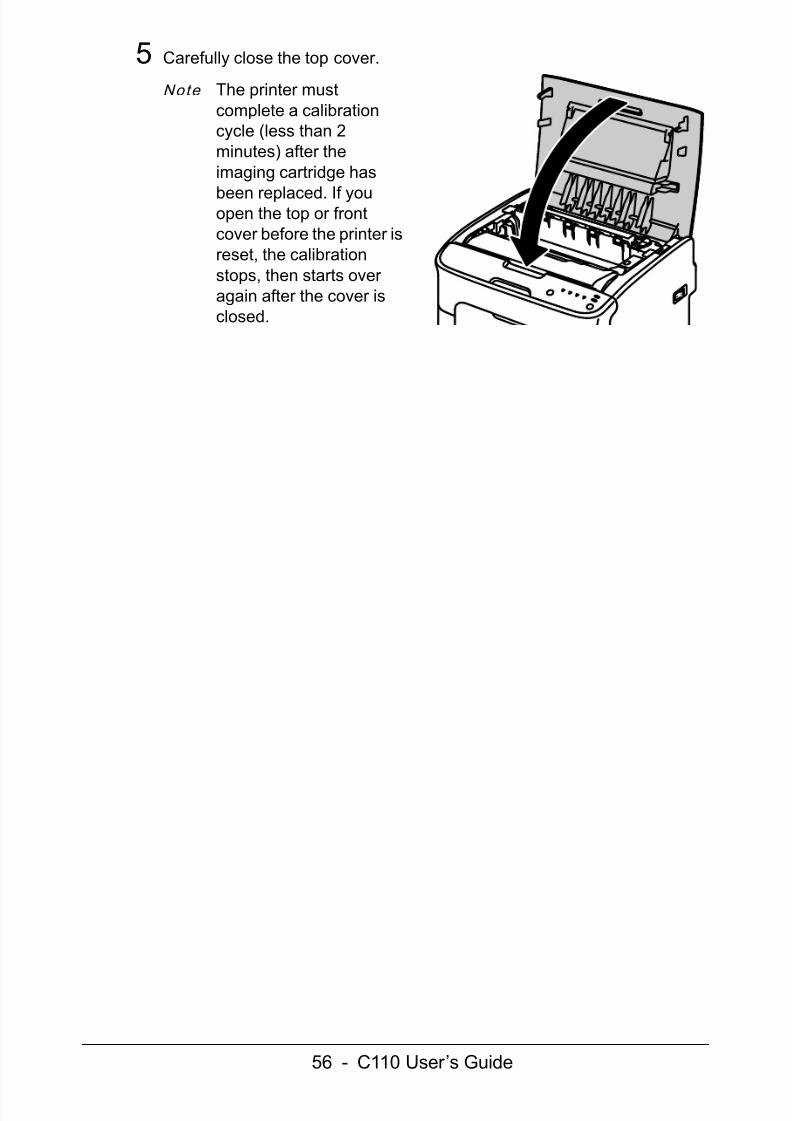
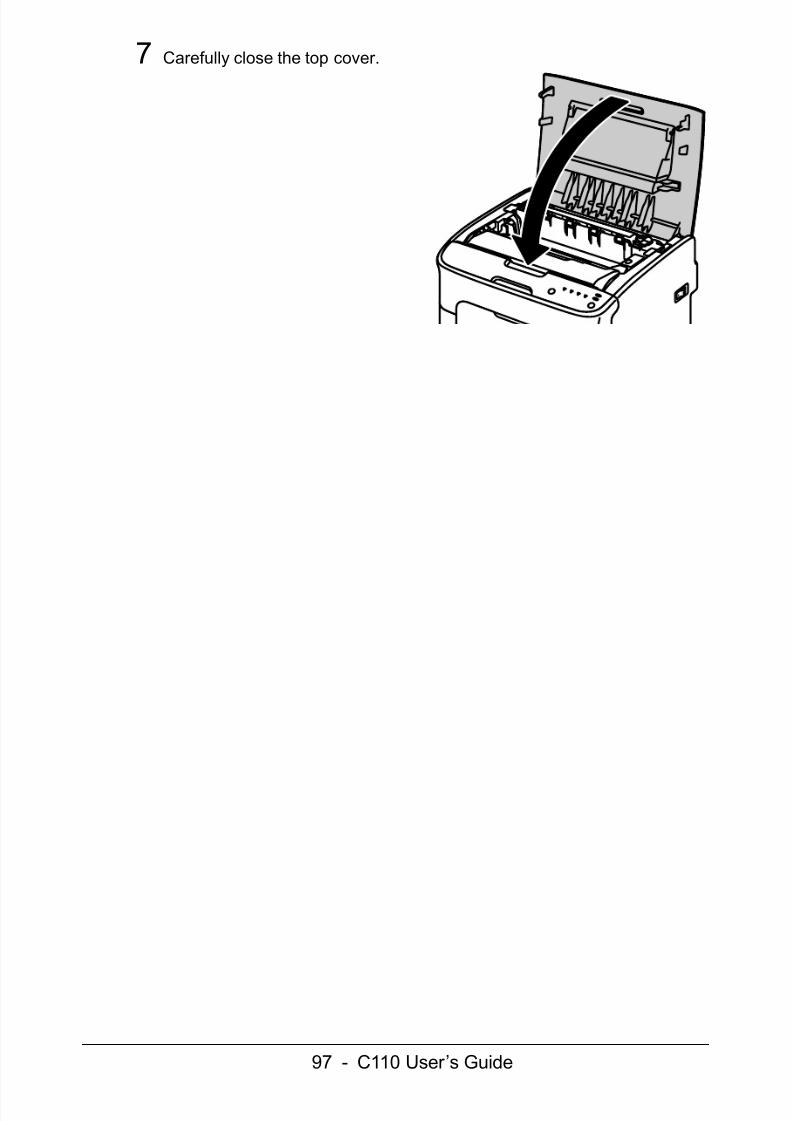
7 Carefully close the top cover.
7/30/2019 C110 User Guide
http://slidepdf.com/reader/full/c110-user-guide 98/110
98 - C110 User’s Guide
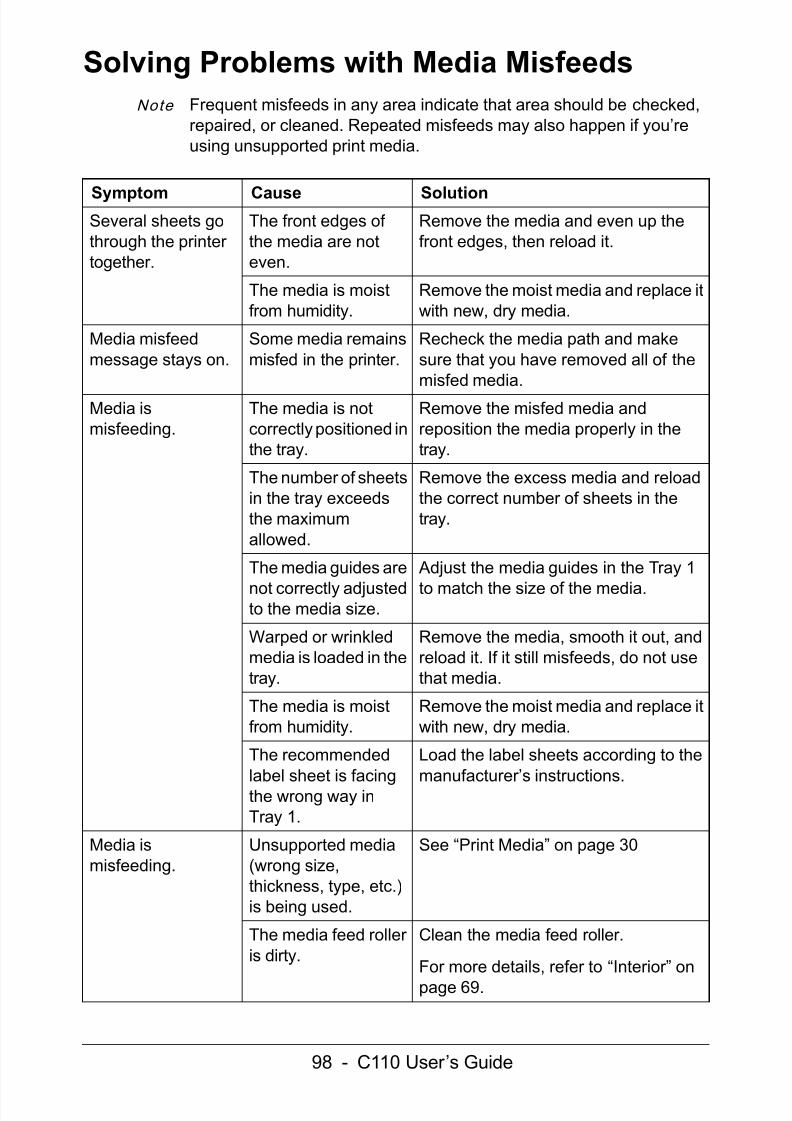
Solving Problems with Media MisfeedsNote Frequent misfeeds in any area indicate that area should be checked,
repaired, or cleaned. Repeated misfeeds may also happen if you’reusing unsupported print media.
Symptom Cause SolutionSeveral sheets gothrough the printer together.
The front edges of the media are noteven.
Remove the media and even up thefront edges, then reload it.
The media is moistfrom humidity.
Remove the moist media and replace itwith new, dry media.
Media misfeedmessage stays on.
Some media remainsmisfed in the printer.
Recheck the media path and makesure that you have removed all of themisfed media.
Media ismisfeeding.
The media is notcorrectly positioned inthe tray.
Remove the misfed media andreposition the media properly in thetray.
The number of sheetsin the tray exceedsthe maximumallowed.
Remove the excess media and reloadthe correct number of sheets in thetray.
The media guides are
not correctly adjustedto the media size.
Adjust the media guides in the Tray 1
to match the size of the media.
Warped or wrinkledmedia is loaded in thetray.
Remove the media, smooth it out, andreload it. If it still misfeeds, do not usethat media.
The media is moistfrom humidity.
Remove the moist media and replace itwith new, dry media.
The recommendedlabel sheet is facingthe wrong way inTray 1.
Load the label sheets according to themanufacturer’s instructions.
Media ismisfeeding.
Unsupported media(wrong size,thickness, type, etc.)is being used.
See “Print Media” on page 30
The media feed roller is dirty.
Clean the media feed roller.
For more details, refer to “Interior” onpage 69 .
7/30/2019 C110 User Guide
http://slidepdf.com/reader/full/c110-user-guide 99/110
99 - C110 User’s Guide
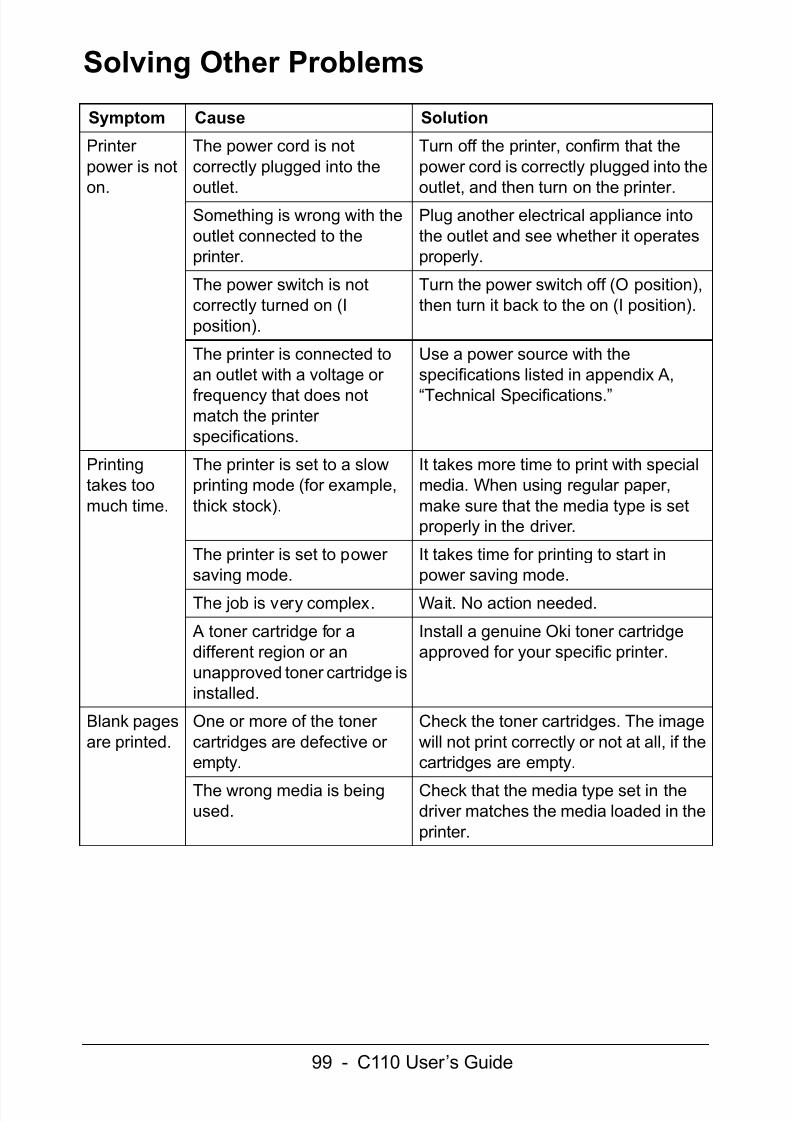
Solving Other Problems
Symptom Cause Solution
Printer power is not
on.
The power cord is notcorrectly plugged into the
outlet.
Turn off the printer, confirm that thepower cord is correctly plugged into the
outlet, and then turn on the printer.Something is wrong with theoutlet connected to theprinter.
Plug another electrical appliance intothe outlet and see whether it operatesproperly.
The power switch is notcorrectly turned on (Iposition).
Turn the power switch off (O position),then turn it back to the on (I position).
The printer is connected toan outlet with a voltage or frequency that does notmatch the printer specifications.
Use a power source with thespecifications listed in appendix A,“Technical Specifications.”
Printingtakes toomuch time.
The printer is set to a slowprinting mode (for example,thick stock).
It takes more time to print with specialmedia. When using regular paper,make sure that the media type is setproperly in the driver.
The printer is set to power saving mode.
It takes time for printing to start inpower saving mode.
The job is very complex. Wait. No action needed.
A toner cartridge for adifferent region or anunapproved toner cartridge isinstalled.
Install a genuine Oki toner cartridgeapproved for your specific printer.
Blank pagesare printed.
One or more of the toner cartridges are defective or empty.
Check the toner cartridges. The imagewill not print correctly or not at all, if thecartridges are empty.
The wrong media is beingused.
Check that the media type set in thedriver matches the media loaded in theprinter.
7/30/2019 C110 User Guide
http://slidepdf.com/reader/full/c110-user-guide 100/110
100 - C110 User’s Guide
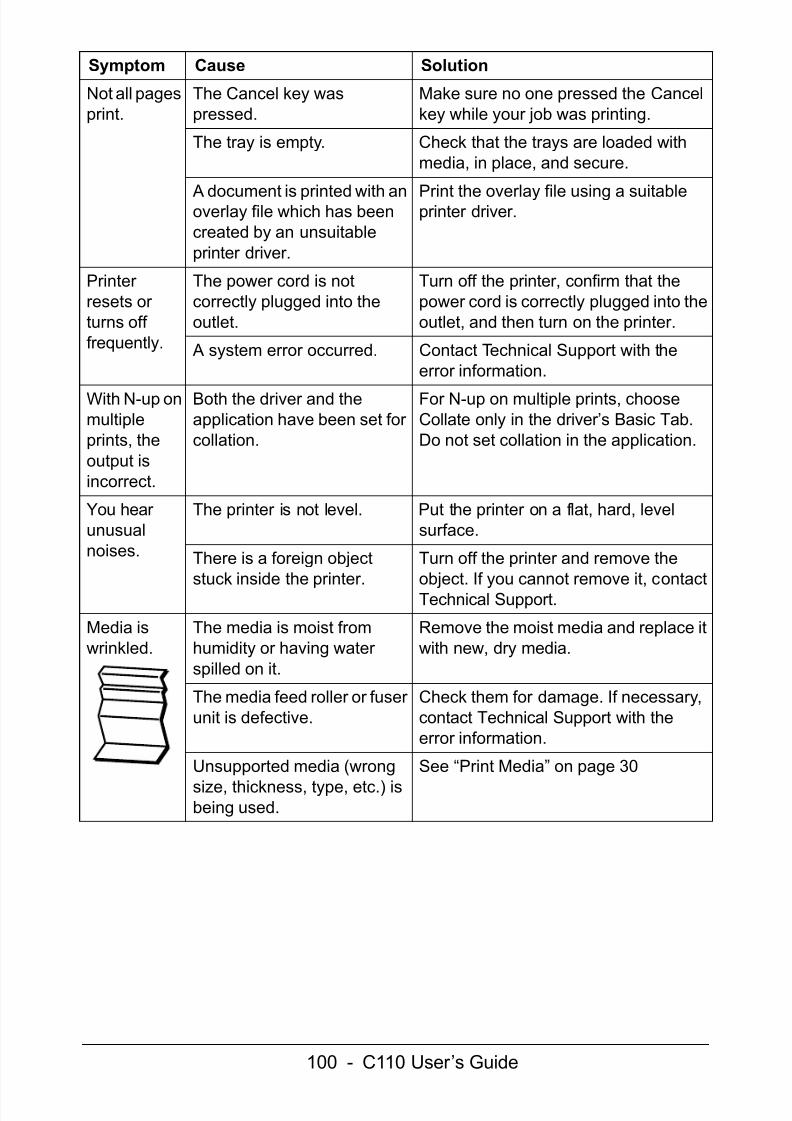
Not all pagesprint.
The Cancel key waspressed.
Make sure no one pressed the Cancelkey while your job was printing.
The tray is empty. Check that the trays are loaded withmedia, in place, and secure.
A document is printed with anoverlay file which has beencreated by an unsuitableprinter driver.
Print the overlay file using a suitableprinter driver.
Printer resets or turns off frequently.
The power cord is notcorrectly plugged into theoutlet.
Turn off the printer, confirm that thepower cord is correctly plugged into theoutlet, and then turn on the printer.
A system error occurred. Contact Technical Support with theerror information.
With N-up onmultipleprints, theoutput isincorrect.
Both the driver and theapplication have been set for collation.
For N-up on multiple prints, chooseCollate only in the driver’s Basic Tab.Do not set collation in the application.
You hear unusualnoises.
The printer is not level. Put the printer on a flat, hard, levelsurface.
There is a foreign objectstuck inside the printer.
Turn off the printer and remove theobject. If you cannot remove it, contactTechnical Support.
Media iswrinkled.
The media is moist fromhumidity or having water spilled on it.
Remove the moist media and replace itwith new, dry media.
The media feed roller or fuser unit is defective.
Check them for damage. If necessary,contact Technical Support with theerror information.
Unsupported media (wrong
size, thickness, type, etc.) isbeing used.
See “Print Media” on page 30
Symptom Cause Solution
7/30/2019 C110 User Guide
http://slidepdf.com/reader/full/c110-user-guide 101/110
101 - C110 User’s Guide
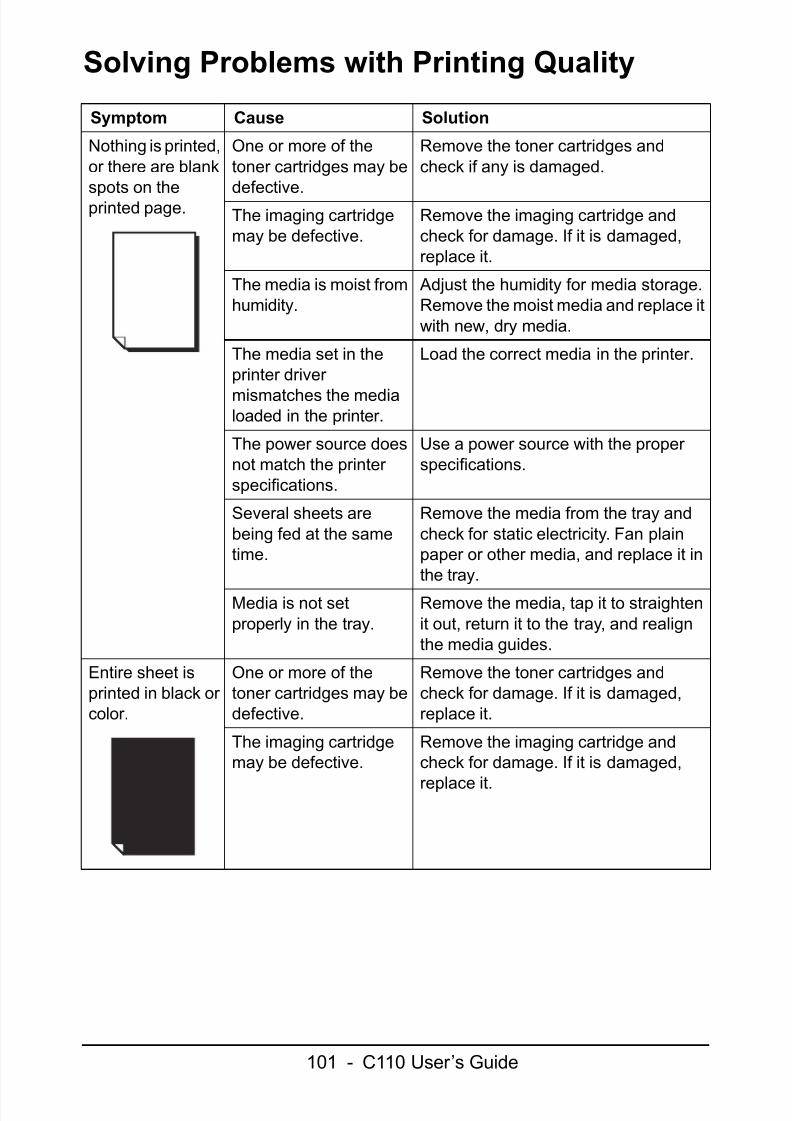
Solving Problems with Printing Quality
Symptom Cause Solution
Nothing is printed,or there are blank
spots on theprinted page.
One or more of thetoner cartridges may be
defective.
Remove the toner cartridges andcheck if any is damaged.
The imaging cartridgemay be defective.
Remove the imaging cartridge andcheck for damage. If it is damaged,replace it.
The media is moist fromhumidity.
Adjust the humidity for media storage.Remove the moist media and replace itwith new, dry media.
The media set in theprinter driver mismatches the medialoaded in the printer.
Load the correct media in the printer.
The power source doesnot match the printer specifications.
Use a power source with the proper specifications.
Several sheets arebeing fed at the sametime.
Remove the media from the tray andcheck for static electricity. Fan plainpaper or other media, and replace it inthe tray.
Media is not setproperly in the tray.
Remove the media, tap it to straightenit out, return it to the tray, and realignthe media guides.
Entire sheet isprinted in black or color.
One or more of thetoner cartridges may bedefective.
Remove the toner cartridges andcheck for damage. If it is damaged,replace it.
The imaging cartridgemay be defective.
Remove the imaging cartridge andcheck for damage. If it is damaged,
replace it.
7/30/2019 C110 User Guide
http://slidepdf.com/reader/full/c110-user-guide 102/110
102 - C110 User’s Guide
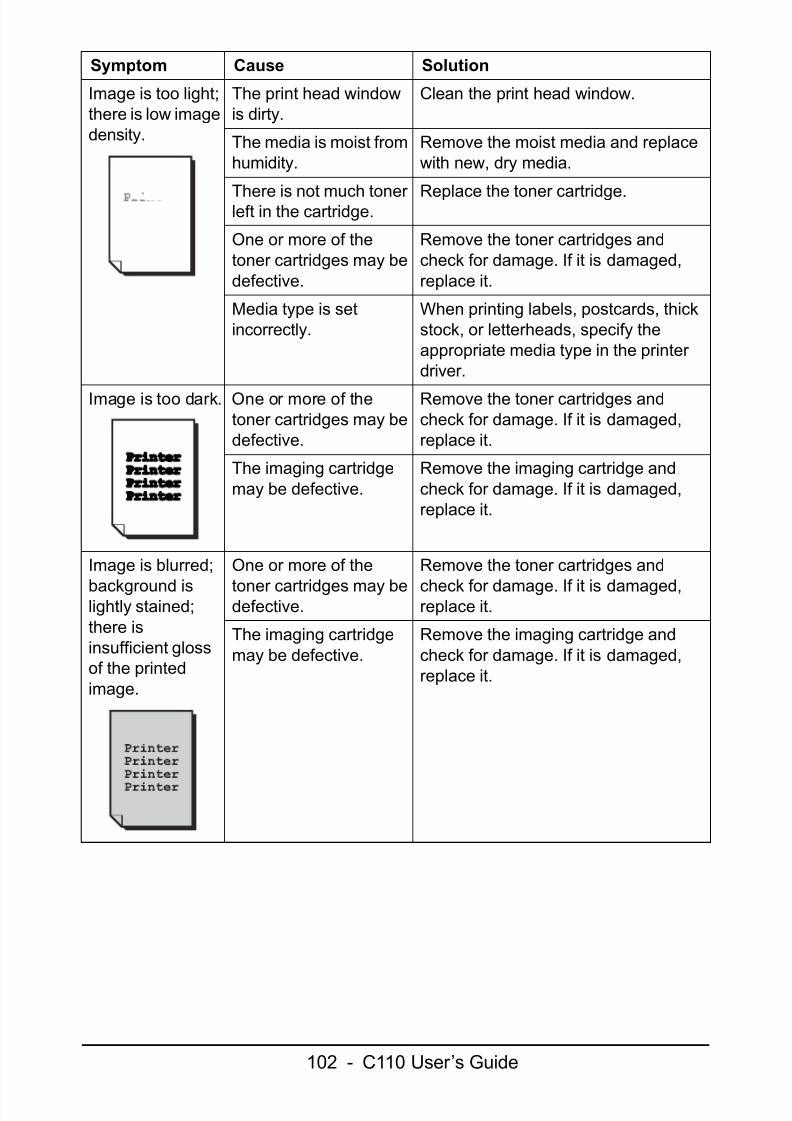
Image is too light;there is low imagedensity.
The print head windowis dirty.
Clean the print head window.
The media is moist fromhumidity.
Remove the moist media and replacewith new, dry media.
There is not much toner left in the cartridge. Replace the toner cartridge.
One or more of thetoner cartridges may bedefective.
Remove the toner cartridges andcheck for damage. If it is damaged,replace it.
Media type is setincorrectly.
When printing labels, postcards, thickstock, or letterheads, specify theappropriate media type in the printer driver.
Image is too dark. One or more of thetoner cartridges may bedefective.
Remove the toner cartridges andcheck for damage. If it is damaged,replace it.
The imaging cartridgemay be defective.
Remove the imaging cartridge andcheck for damage. If it is damaged,replace it.
Image is blurred;
background islightly stained;there isinsufficient glossof the printedimage.
One or more of the
toner cartridges may bedefective.
Remove the toner cartridges and
check for damage. If it is damaged,replace it.
The imaging cartridgemay be defective.
Remove the imaging cartridge andcheck for damage. If it is damaged,replace it.
Symptom Cause Solution
7/30/2019 C110 User Guide
http://slidepdf.com/reader/full/c110-user-guide 103/110
103 - C110 User’s Guide
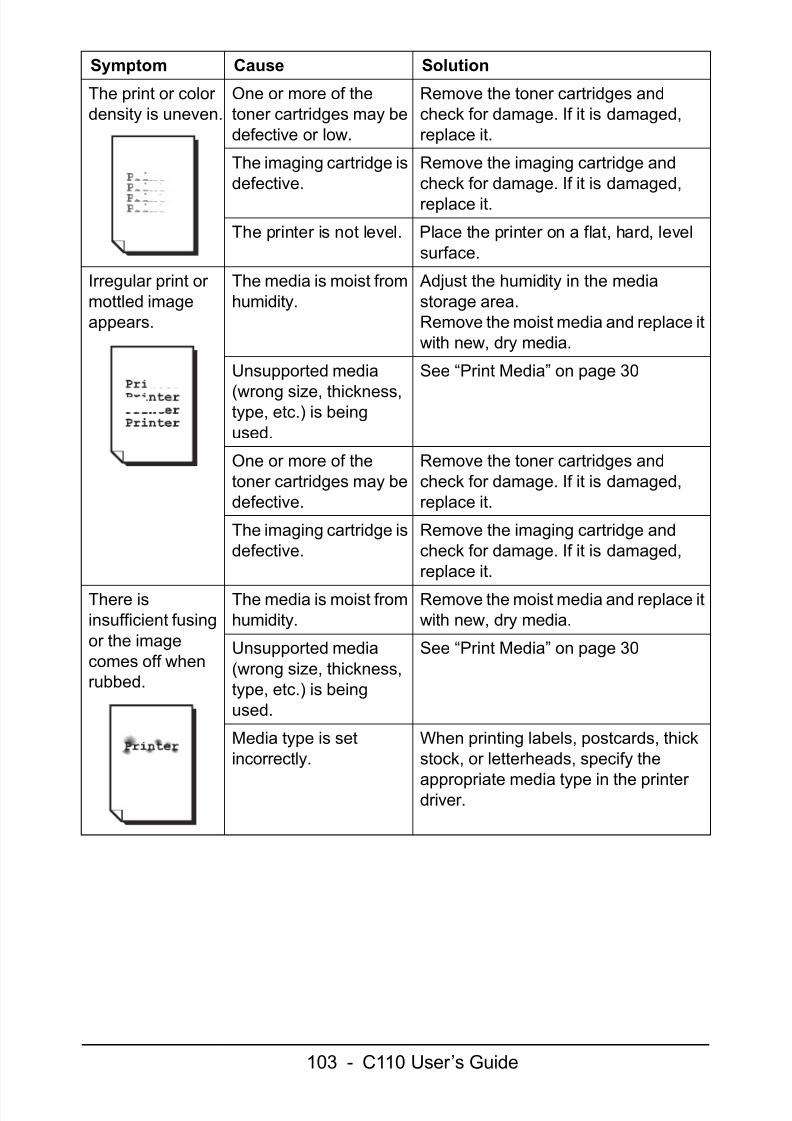
The print or color density is uneven.
One or more of thetoner cartridges may bedefective or low.
Remove the toner cartridges andcheck for damage. If it is damaged,replace it.
The imaging cartridge isdefective.
Remove the imaging cartridge andcheck for damage. If it is damaged,replace it.
The printer is not level. Place the printer on a flat, hard, levelsurface.
Irregular print or mottled imageappears.
The media is moist fromhumidity.
Adjust the humidity in the mediastorage area. Remove the moist media and replace itwith new, dry media.
Unsupported media
(wrong size, thickness,type, etc.) is beingused.
See “Print Media” on page 30
One or more of thetoner cartridges may bedefective.
Remove the toner cartridges andcheck for damage. If it is damaged,replace it.
The imaging cartridge isdefective.
Remove the imaging cartridge andcheck for damage. If it is damaged,replace it.
There isinsufficient fusingor the imagecomes off whenrubbed.
The media is moist fromhumidity.
Remove the moist media and replace itwith new, dry media.
Unsupported media(wrong size, thickness,type, etc.) is beingused.
See “Print Media” on page 30
Media type is setincorrectly.
When printing labels, postcards, thickstock, or letterheads, specify the
appropriate media type in the printer driver.
Symptom Cause Solution
7/30/2019 C110 User Guide
http://slidepdf.com/reader/full/c110-user-guide 104/110
104 - C110 User’s Guide
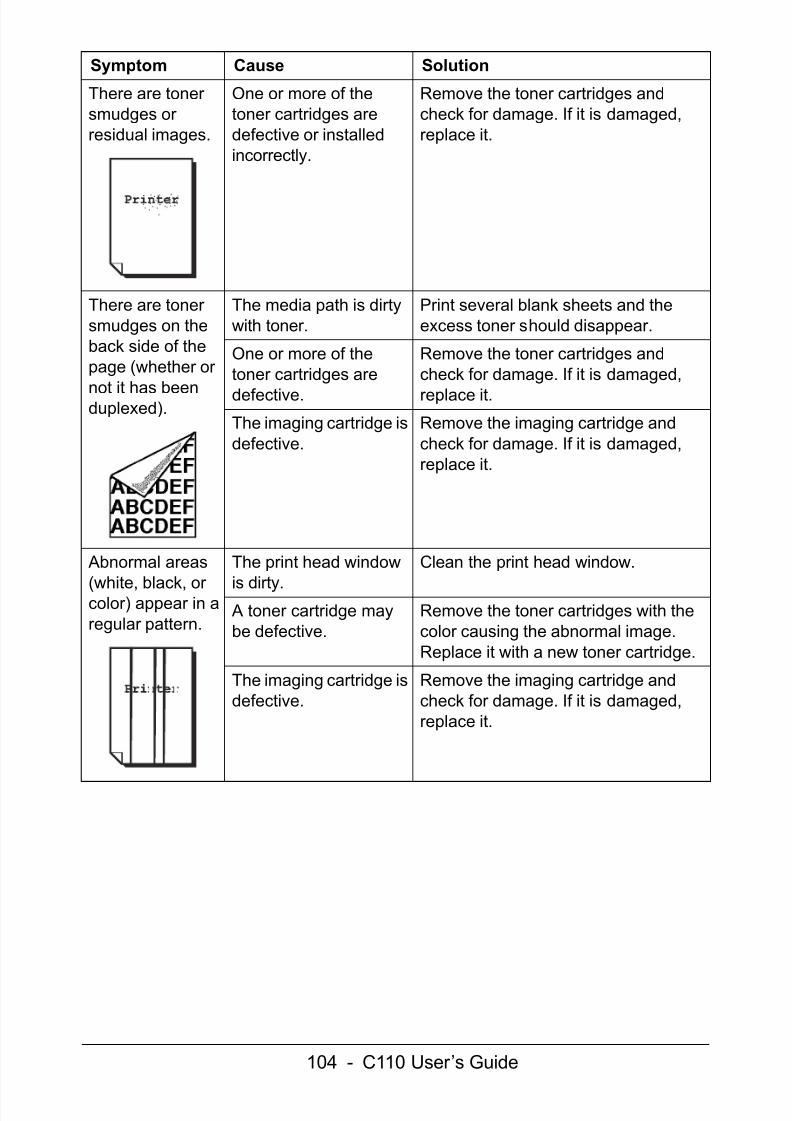
There are toner smudges or residual images.
One or more of thetoner cartridges aredefective or installedincorrectly.
Remove the toner cartridges andcheck for damage. If it is damaged,replace it.
There are toner smudges on theback side of thepage (whether or
not it has beenduplexed).
The media path is dirtywith toner.
Print several blank sheets and theexcess toner should disappear.
One or more of thetoner cartridges aredefective.
Remove the toner cartridges andcheck for damage. If it is damaged,replace it.
The imaging cartridge isdefective.
Remove the imaging cartridge andcheck for damage. If it is damaged,replace it.
Abnormal areas
(white, black, or color) appear in aregular pattern.
The print head window
is dirty.
Clean the print head window.
A toner cartridge maybe defective.
Remove the toner cartridges with thecolor causing the abnormal image.Replace it with a new toner cartridge.
The imaging cartridge isdefective.
Remove the imaging cartridge andcheck for damage. If it is damaged,replace it.
Symptom Cause Solution
7/30/2019 C110 User Guide
http://slidepdf.com/reader/full/c110-user-guide 105/110
105 - C110 User’s Guide
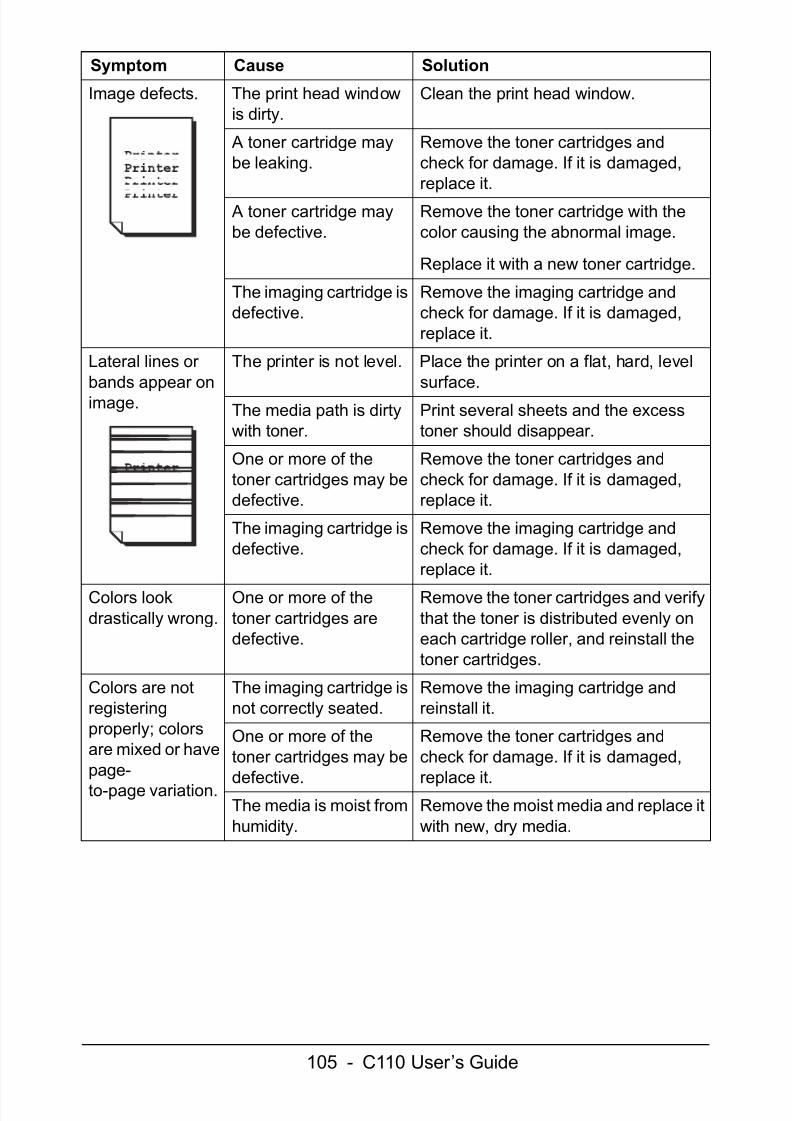
Image defects. The print head windowis dirty.
Clean the print head window.
A toner cartridge maybe leaking.
Remove the toner cartridges andcheck for damage. If it is damaged,replace it.
A toner cartridge maybe defective.
Remove the toner cartridge with thecolor causing the abnormal image.
Replace it with a new toner cartridge.
The imaging cartridge isdefective.
Remove the imaging cartridge andcheck for damage. If it is damaged,replace it.
Lateral lines or bands appear onimage.
The printer is not level. Place the printer on a flat, hard, levelsurface.
The media path is dirtywith toner.
Print several sheets and the excesstoner should disappear.
One or more of thetoner cartridges may bedefective.
Remove the toner cartridges andcheck for damage. If it is damaged,replace it.
The imaging cartridge isdefective.
Remove the imaging cartridge andcheck for damage. If it is damaged,replace it.
Colors lookdrastically wrong.
One or more of thetoner cartridges aredefective.
Remove the toner cartridges and verifythat the toner is distributed evenly oneach cartridge roller, and reinstall thetoner cartridges.
Colors are notregisteringproperly; colorsare mixed or havepage- to-page variation.
The imaging cartridge isnot correctly seated.
Remove the imaging cartridge andreinstall it.
One or more of thetoner cartridges may be
defective.
Remove the toner cartridges andcheck for damage. If it is damaged,
replace it.The media is moist fromhumidity.
Remove the moist media and replace itwith new, dry media.
Symptom Cause Solution
7/30/2019 C110 User Guide
http://slidepdf.com/reader/full/c110-user-guide 106/110
106 - C110 User’s Guide
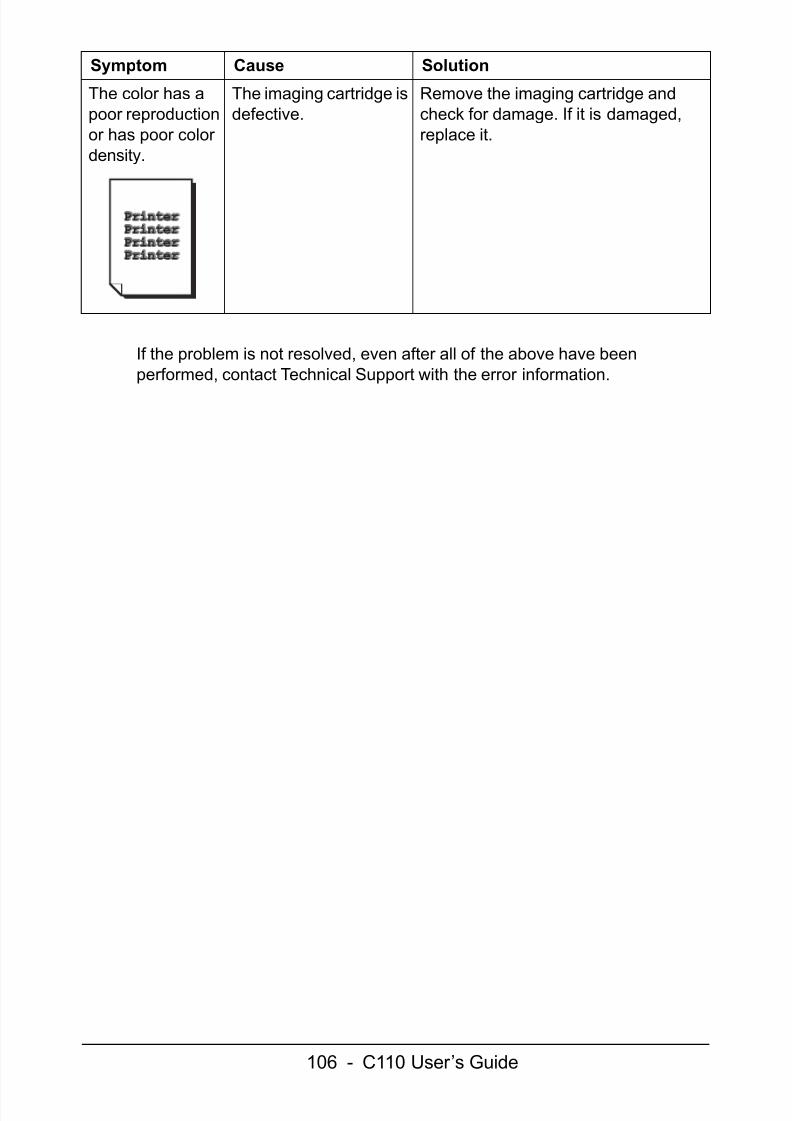
If the problem is not resolved, even after all of the above have beenperformed, contact Technical Support with the error information.
The color has apoor reproductionor has poor color density.
The imaging cartridge isdefective.
Remove the imaging cartridge andcheck for damage. If it is damaged,replace it.
Symptom Cause Solution
7/30/2019 C110 User Guide
http://slidepdf.com/reader/full/c110-user-guide 107/110
107 - C110 User’s Guide
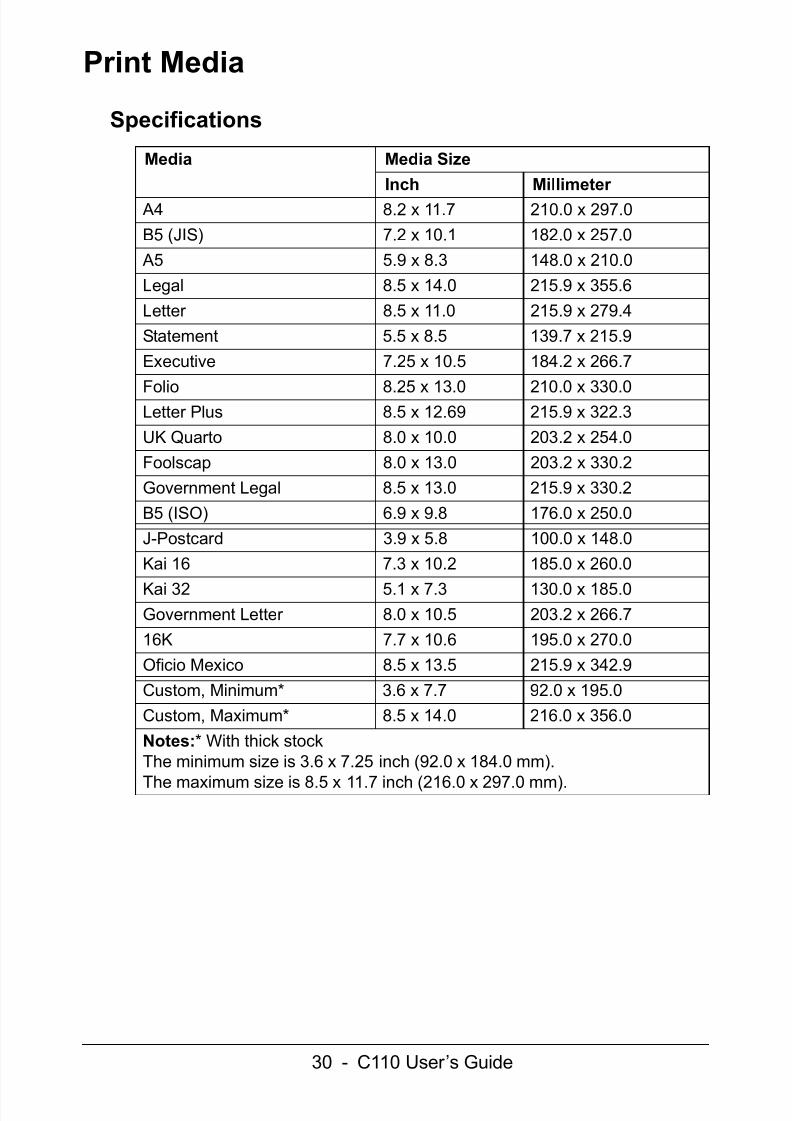
Speci f ica t ions
7/30/2019 C110 User Guide
http://slidepdf.com/reader/full/c110-user-guide 108/110
108 - C110 User’s Guide
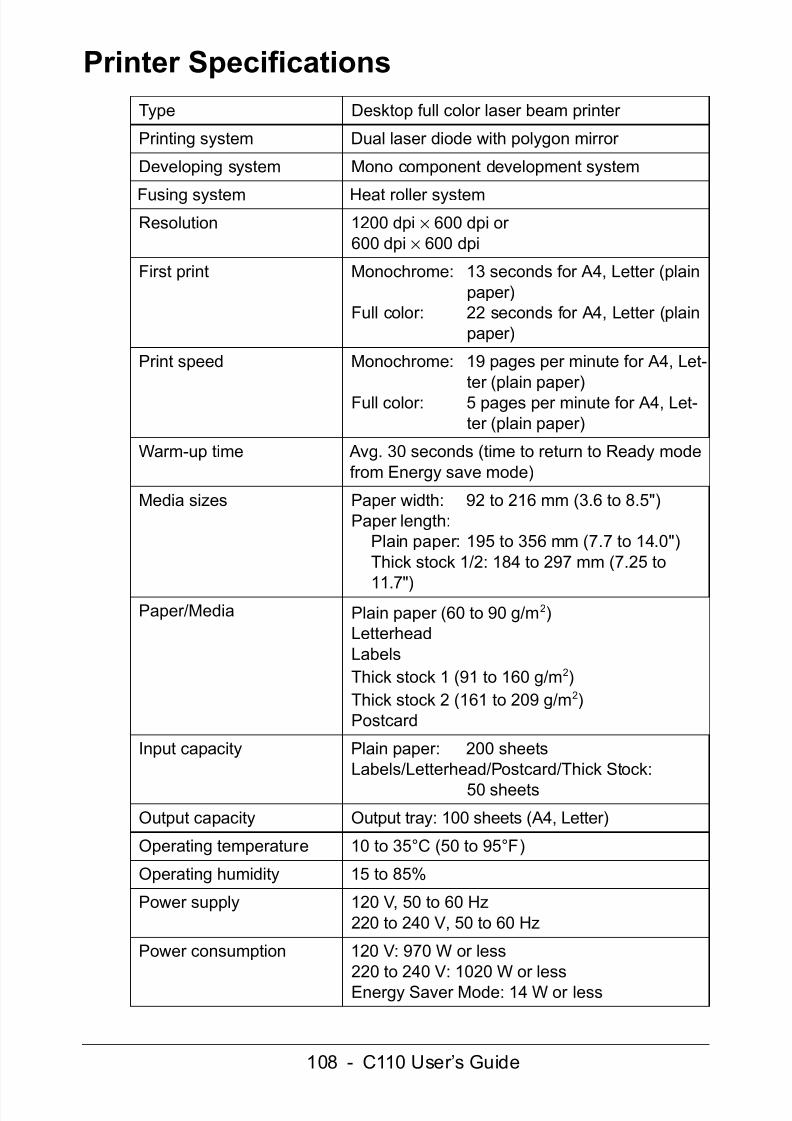
Printer SpecificationsType Desktop full color laser beam printer
Printing system Dual laser diode with polygon mirror
Developing system Mono component development system
Fusing system Heat roller systemResolution 1200 dpi × 600 dpi or
600 dpi × 600 dpi
First print Monochrome: 13 seconds for A4, Letter (plainpaper)
Full color: 22 seconds for A4, Letter (plainpaper)
Print speed Monochrome: 19 pages per minute for A4, Let-ter (plain paper)
Full color: 5 pages per minute for A4, Let-ter (plain paper)
Warm-up time Avg. 30 seconds (time to return to Ready modefrom Energy save mode)
Media sizes Paper width: 92 to 216 mm (3.6 to 8.5")Paper length:
Plain paper: 195 to 356 mm (7.7 to 14.0")Thick stock 1/2: 184 to 297 mm (7.25 to
11.7")Paper/Media Plain paper (60 to 90 g/m 2)
LetterheadLabelsThick stock 1 (91 to 160 g/m 2)Thick stock 2 (161 to 209 g/m 2)Postcard
Input capacity Plain paper: 200 sheetsLabels/Letterhead/Postcard/Thick Stock:
50 sheetsOutput capacity Output tray: 100 sheets (A4, Letter)
Operating temperature 10 to 35°C (50 to 95°F)
Operating humidity 15 to 85%
Power supply 120 V, 50 to 60 Hz220 to 240 V, 50 to 60 Hz
Power consumption 120 V: 970 W or less220 to 240 V: 1020 W or lessEnergy Saver Mode: 14 W or less
7/30/2019 C110 User Guide
http://slidepdf.com/reader/full/c110-user-guide 109/110
109 - C110 User’s Guide
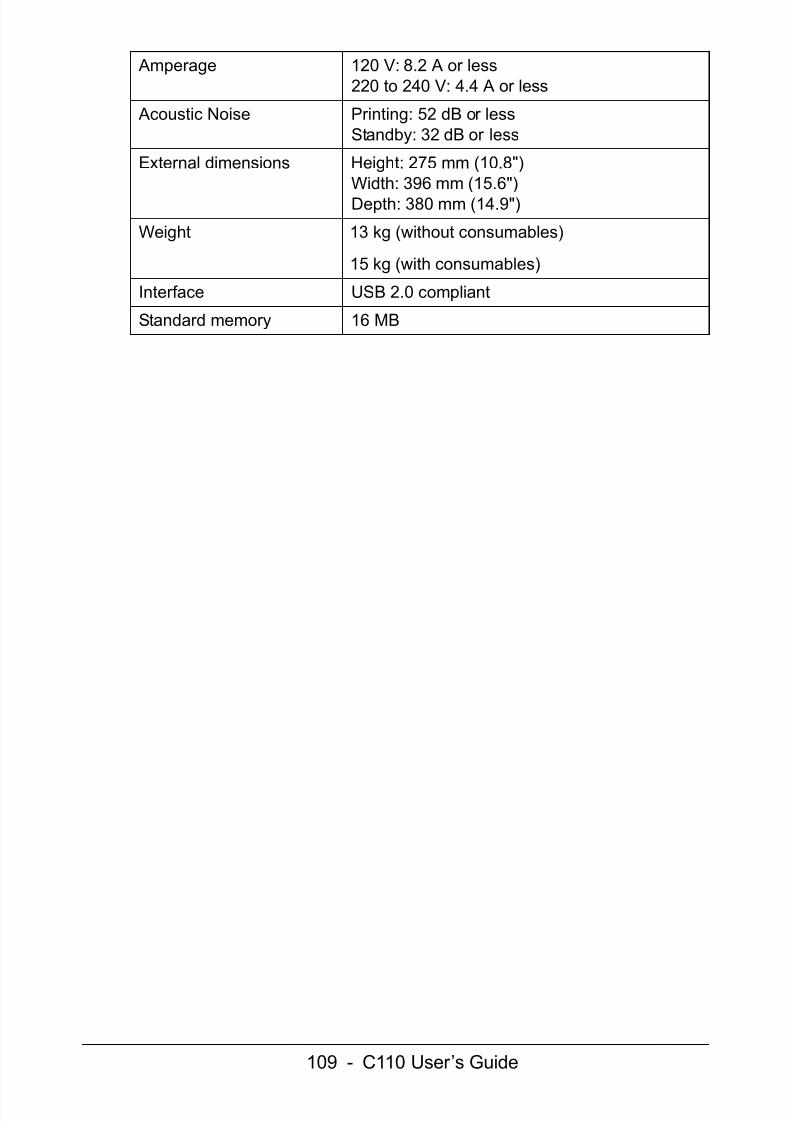
Amperage 120 V: 8.2 A or less220 to 240 V: 4.4 A or less
Acoustic Noise Printing: 52 dB or lessStandby: 32 dB or less
External dimensions Height: 275 mm (10.8")Width: 396 mm (15.6")Depth: 380 mm (14.9")
Weight 13 kg (without consumables)
15 kg (with consumables)
Interface USB 2.0 compliant
Standard memory 16 MB
7/30/2019 C110 User Guide
http://slidepdf.com/reader/full/c110-user-guide 110/110
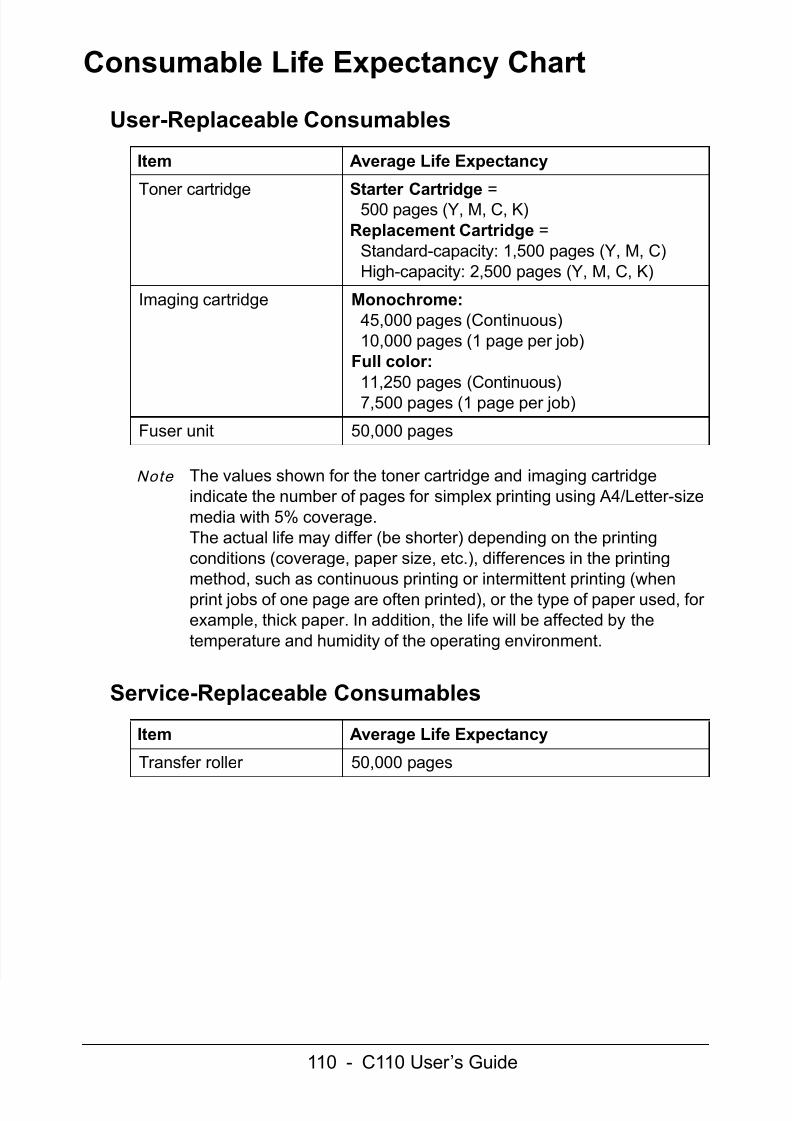
Consumable Life Expectancy Chart
User-Replaceable Consumables
Note The values shown for the toner cartridge and imaging cartridgeindicate the number of pages for simplex printing using A4/Letter-sizemedia with 5% coverage. The actual life may differ (be shorter) depending on the printingconditions (coverage, paper size, etc.), differences in the printingmethod, such as continuous printing or intermittent printing (whenprint jobs of one page are often printed), or the type of paper used, for example, thick paper. In addition, the life will be affected by thetemperature and humidity of the operating environment.
Service-Replaceable Consumables
Item Average Life Expectancy
Toner cartridge Starter Cartridge =500 pages (Y, M, C, K)Replacement Cartridge =
Standard-capacity: 1,500 pages (Y, M, C)High-capacity: 2,500 pages (Y, M, C, K)
Imaging cartridge Monochrome: 45,000 pages (Continuous)10,000 pages (1 page per job)
Full color:11,250 pages (Continuous)7,500 pages (1 page per job)
Fuser unit 50,000 pages
Item Average Life Expectancy