capsicum manual v2 - real ipmrealipm.com/wp-content/uploads/2015/10/capsicum-manual.pdfreal ipm...
TRANSCRIPT

Capsicumsfor

Founded in 2013 by owners, Louise Labuschagne and Dr Henry Wainwright, Real IPM now employs 250 staff.
Our BASIS-qualified field consultants serve both large and small-scale farmers in crops ranging from cereals, field vegetables, fruit and nut plantations, to greenhouse vegetables and ornamental crops.
Based in Thika, Kenya, Real IPM is a leading producer and toll manufacturer of predatory mites, which are exported globally for other bio-control company brands. Our predatory mites are produced under license from Syngenta Bioline
Biopesticides are produced by our laboratories in Kenya. We have global rights to several isolates of Metarhizium under license from icipe international research institute. Together with our own isolates, we have a comprehensive offer for crop protection solutions
Real Solutions | Real Farming
Nairobi has excellent airfreight logistics for exports and our products have Registrations in Kenya, Ethiopia, Tanzania, Ghana, South Africa, Zambia, Zimbabwe, Madagascar, and Canada; and are under-going other pan-African Registrations.

Real IPM Capsicum Manual
The Real IPM Capsicum Manual was developed by joint MD of Real IPM Kenya, Louise Labuschagne, by bringing together published information from many sources and pooling the extensive field experiences of the Real IPM technical field advisors working in Africa. Louise has over 30 years experience in IPM crop protection and is BASIS-qualified and legally able to give advice on the use of chemical pesticides under UK law.
The contents of the Real IPM manual for Capsicum are offered as useful information for agronomists seeking to develop more robust IPM programmes in many parts of the world. It is not advice.
Growers must satisfy themselves of the local registration issues for both chemicals and biological control agents and the efficacy of these control methods under their local conditions.
In order to capitalise on the information provided, growers are encouraged to contact Real IPM Kenya Ltd for both in-depth training and consultancy services to develop appropriate IPM programmes in the country where their crops are grown. www.realipm.com
If local Registrations are needed, Real IPM Kenya is willing to discuss potential markets and collaborations that will enable this to happen.

.
.
.
.
.
Chillies and peppers (Capsicum spp)
Capsicum is a member of the Solanacae family, related to tomatoes, eggplants and potatoes. The pests and diseases of these crops and their IPM programmes tend to be similar and crop rotation plans need to account for this.
The five commercialized species of capsicums are:
• Capsicum annuum: (bell peppers, cayenne, jalapenos)
• Capsicum frutescens: (tabasco, Thai peppers, piri piri)
• Capsicum chinense: (habanero, Scotch bonnet)
• Capsicum pubescens: (rocoto peppers)
• Capsicum baccatum: (aji pepper)
Common groupings of the above capsicum species describe them as bell peppers, sweet peppers and hot peppers depending on their shape and the amount of ‘heat’ they contain.
Bell peppers change colour as they ripen. Immature bell peppers are green and become red as they ripen. Other varieties can be yellow, orange, purple of white.

Scoville Heat Units
Variation in the ‘heat units’ of the various chillies and peppers is measured in Scoville Heat Units (SHU). This measures the point at which the ‘heat’ becomes undetectable by a panel of tasters, after a measure of chilli extract with sugar syrup is taste tested.The more ‘heat’ detected – the higher the SHU reading. High performance liquid chromatography is now used to quantify this analysis by measuring the concentration of capsaicinoid in a chilli pepper variety. Pure capsaicin measures 16,000,000 SHU.Chillies with high SHI ratings are used in the production of products such as teargas.
1

Sustainable ABE chili production
ABE chillies can be a profitable crop if the farmer has reliable markets and understands how to optimize both the growing conditions and crop protection of the crop. It will be in the ground for several years so it is important to invest time, money and effort in providing Good Agricultural Practice (GAP) as follows:
• Good start with a good quality seed and a healthy seedling made in seed trays, inoculated with biopesticides and bio-fertilisers. • Good soil preparation to optimize plant establishment and growth with good bio-enhanced organic matter pre-treated with bio-pesticides and bio-fertilisers. • Good Agricultural Practice (GAP) to reduce plant stress at planting and throughout growth of crop – optimum irrigation and fertiliser programme.• Good crop protection with a preventative, bio-intensive IPM programme, to manage resistance to chemical pesticides, improve crop protection and reduce pesticide resi dues. • Good field hygiene to reduce risk of re-infection with pests and diseases from infected crop debris of fruits and leaves.
.
.
.
.
.
Get off to a good startHealthy seedlings are more likely to ensure healthy profits.
2

If seedlings are already infected with pests and diseases before they are planted out in the field, this will limit the yields that each individual plant will be able to achieve.
The chilli plants will be in the ground for several years, so it is worth taking extra care to make the healthiest transplant possible. Do not grow seedlings directly in the soil because:
• The soil can be contaminated with a range of fungal and bacterial pathogens that will quickly infect the roots. Even if you cannot see any infection in the transplants before they are planted out in the field - they could still be infected.
• The fungi and bacteria are microscopic and cannot be seen. It is only when the plant comes under stress that it may exhibit the disease symptoms. The plant may not actually die but it will not be as vigorous and productive as a non-infected plant.
• Water used for irrigation can also contain bacteria, fungi and nematodes – especially if the water has come from a river source. Water from a bore hole or mains water, is less contaminated.
.
.
.
3

Keep pests off young transplants
Young seedlings are very attractive to pests such as thrips, whitefly and broad mite.
The nursery must have a good Real IPM crop protection programme to ensure that the transplants leave the nursery without small populations of pests that start the field pest populations when they are planted out in the field.
There are some easy Real IPM programmes for clean healthy transplant production:
• Sticky traps to attract and stick flying pests. Yellow traps for whitefly and aphids Blue traps for thrips
• Real Trichoderma seed tray drenches to ensure healthy root growth and reduce diseases.
• Real Metarhizium 69 foliar sprays on the seedling trays to kill whitefly and thrips.
• Real Amblyseius – a predatory mite that preys on whitefly, thrips and mites (spider mite and broad mites).
The nursery should be insect proof and have a double entry door – so that there is never a wide open door for pests to fly inside.
Check out the Real IPM Tool Box
.
.
.
.
4

5
Real IPM Tool BoxSticky traps Entrap is used for attracting and
sticking pests (killing them). Hang one Entrap card for every ten meters square in the nursery, about one foot above the height of the crop. Half of the cards should be blue (for thrips) and half yellow (for whitefly) because both thrips and whitefly are potential pests.
Monitrap is used for monitoring pest levels. It has sections on the trap that can be pulled off individually over a period of time to expose smaller areas of the sticky surface each week. This enables the grower to monitor whether the flying pests are going up or down over a period – by comparing the catches in the sections between the weeks.
Rollertrap is used for mass trapping flying pests. It works like Entrap but is more useful in large greenhouses.

...
.
..
Trichoderma is a naturally occurring fungus that comes originally from the soil. It has been mass-produced by Real IPM as a commercial bio-pesticide and is also used as a bio-fertiliser because it can make phosphate from the soil more available to the plant.
Application methods
Real Trichoderma can be used in several ways, depending on the reason for applying it.
• Bio-priming seeds before planting – using a clean container with water and Real Trichoderma. Drench into seedling trays in the nursery – using a knapsack sprayer or watering can. Apply to compost before it is put in the planting hole – using a knapsack sprayer or watering can to wet the pile evenly and thoroughly. Applying to the roots of plants as they grow in the field – using drip irrigation linked to an injector system (as used for liquid fertiliser applications). Foliar applications with conventional spray equipment of any type, including fogging systems. This is for crops that suffer from downy mildew.
Real Trichoderma
Real Trichoderma OD
This formulation is pure spores in vegetable oil
Real Trichoderma is available in sachets (20 ml) for knapsack use. One sachet per knapsack.
It is also available in a one-litre bottle for larger areas. The rate is 200 ml per hectare (2.5 acres).
Always use immediately once the bottle is opened, as quality will deteriorate. Do not store open bottles for alter use. Buy the mostsuitable product for the intended use.
Store all products in a cool dry place, out of direct sunlight. Ideal storage temperature no more than 20 deg C (for three months)
6

7

8
Advantages of Metarhizium
. It is compatible with predatory mites and parasitoids.
. There are no pesticide residue issues, or re-entry intervals with this product.
. It is safe to humans and the environment.
. There is no recorded resistance of pests to Metarhizium, due to its many modes of action
Metarhizium life cycle
Metarhizium spore germinates on contact with insect’s body then forms an apressorium that helps it penetrate the cuticle.
The fungus grows through the insect’s cuticle, into the haemolymph, where it proliferates and kills the target pest.
Metarhizium spores are sprayed onto the soil and in the canopy. The fungus can grow saprophytically on organic matter in the soil, where it can reduce the number of fruit fly, thrips and weevils emerging as adults from the pupae in the soil.
The addition of a layer of organic matter (sawdust, rice husks, coffee husks etc.) on the soil surface will promote this effect.

....
9
ACHIEVE
Real Metarhizium 78 ODIs used for the control of: Spider mites• Tarsonemid mites• Broad mites• Use with predatory mites (Phytoseiulus or Amblyseius)
Met 78 is sprayed in the canopy only because this is where the pest mites spends all of its life cycle.
Spider mite Broad mites
Phytoseiulus Amblyseius

10
.Real Metarhizium 62 ODIs used for the control of: • aphids
Met 62 is sprayed in the canopy only because this is where the aphid spends all of its life cycle
Produced and Distributed by:(Imetengenezwa na kusambazwa na):
The Real IPM Company (K) LtdOffice: (+254) 725 806 086Email: [email protected] Box 4001- 01002, Madaraka,Thika, Kenya.
Aphids
Real Solutions | Real Farming
REAL Metarhizium 62 OD
Aphids

.
.
.
.
11
Real Metarhizium products can be used in several ways, depending on the reason for applying it.
• Drench into seedling trays in the nursery – using a knapsack sprayer or watering to establish Metarhizium near the roots when the seedlings are planted out in the field with the bio-enhanced compost plug. • Apply to compost before it is put in the planting hole – using a knapsack sprayer or watering can to wet the pile evenly and thoroughly. Again this will top up Metarhizium under the canopy of the plants, so it is locally present when the thrips and fruit fly pupate in the soil beneath the plant.• Applying to the roots of plants as they grow in the field – using drip irrigation linked to an injector system (as used for liquid fertiliser applications). • Foliar applications with conventional spray equipment of any type, including fogging systems. Foliar applications need to be made at the optimum time of day when the pest is sitting on the upper surface of the leaves (e.g. 2 hrs after sunrise or 2 hrs before sunset).
Metarhizium is compatible with Trichoderma and can be applied together in the same tank.
Real Metarhizium OD (69, 78.62)
This formulation is pure spores in vegetable oil
Real Metarhizium is available in sachets (20 ml) for knapsack use. One sachet per knapsack.
It is also available in a one-litre bottle for larger areas. The rate is 200 ml per hectare (2.5 acres).
Always use immediately once the bottle is opened, as quality will deteriorate. Do not store open bottles for alter use. Buy the most suitable product for the intended use.
Store all products in a cool dry place, out of direct sunlight. Ideal storage temperature no more than 20 deg C (for three months)

12
Real Bacillus subtilis
Bacillus subtilis is a naturally occurring beneficial bacterium. It has been mass-produced by Real IPM as a commercial bio-pesticide. It is not harmful to the environment, spray operators or consumers. The Pre Harvest Interval is zero days. There are no residues.
Real Bacillus subtilis TFP
This formulation is a Total Fermented Product containing the bacterium and the natural substances it produced during he production process.
Real Bacillus subtilis is available in sachets (120 ml) for knapsack use. One sachet per knapsack.
It is also available in a one-litre bottle for larger areas. The rate is one litre per hectare (2.5 acres).
Always use immediately once the bottle is opened, as quality will deteriorate. Do not store open bottles for alter use. Buy the most suitable product for the intended use.
Store all products in a cool dry place, out of direct sunlight. Ideal storage temperature no more than 5 deg C (for three months). Bacillus subtilis is used to control
powdery mildew in chillies.
It should not be applied to ‘run-off’, because it is a contact bio-fungicide and should not drip off the plant when it is applied.
It must stay on the plants leaves

Good nursery planning
The ingredients for success are simple.
If you understand that seeds can be infected with diseases and need to be of good quality – you will ensure that you start with seed from a reliable, certified supplier.
• If you understand that microbes can infect your plants from either infested soil or water – you will ensure that good hygiene is practiced in the propagation nursery even before planting the seed.
If you remember that whitefly and thrips can carry viruses, you will make very sure that you try to keep them off your young plants, until they are large enough to with stand some attack.
• If you remember that broad mite are difficult to detect I the field because they are so small, you will try to prevent establishment by applying predatory mites in the nursery – so that predators go out with the plants when the seedlings are transplanted.
.
.
.
.
.
13

Get the beginning right
• Good start with a good quality seed and a healthy seedling made in seed trays, inoculated with biopesticides and bio-fertilisers.
Many chilli diseases and viruses are seed borne (see section on viruses) Ensure that the seed used is either:
• Bought-in certified seed guaranteed to be free of seed borne diseases and viruses OR• Farm-saved seed from VERY healthy plants ONLY (know WHERE seed came from)
Twenty grams of seeds should give at least 500 good plants. Planting density is about 10,000 plants per hectare (= 4,000 per acre or 100 plants per 100 m.sq.).
A small-scale farmer producing their own plants for 100 m. sq. production unit would therefore only need about 10 grams of seeds. This would allow them twice as many plants and permit them to choose only the best quality seedlings for transplanting
.
.
.
14
Seed sterilisation
ONLY If seed borne diseases are suspected - it is possible to sterilise seeds before planting, providing appropriate precautions (PPE) are used – gloves, apron and face shield. If seed borne viruses are not suspected – do not sterilise the seed.Before planting, seeds could be soaked in a 1.31% solution of sodium hypochlorite (eg one part household bleach (5.25%) to four parts water) for 40 minutes with agitation. One litre of solution treats 0.5 kg of seed. Rinse for 5-10 minutes under cold running water. To soak the seeds, place them in a small hole gauge sieve and dip into a bowl of the mixed solution. Some seeds will float and can be pushed below the surface by breaking the surface tension with a stick. Remove any seeds that will not sink, as they are probably not viable. After rinsing place seeds on several layers of paper towels to absorb the extra moisture (seeds will not clump together and are easier to handle).Do not store sterilised seed as its viability will decline.

.
.
.
.
.
..
..
15
Bio-priming seeds
Bio-priming of seeds is a technique for soaking seeds in water (to get them ready to germinate quickly) and including a bio-pesticide in the soaking water (to establish the beneficial microbe on the seed. Bio priming of chilli seeds provides1 the following advantages:
• Increased germination percentage• Longer mean root and shoot length• Greater biomass production• Improved plant vigour
Do not soak the seeds for longer than recommended and always test a small batch of seeds first – to check germination and ensure you have the protocol right.
Bio-priming guidelines
Step one : Put the seeds in a clean container and cover the seeds with clean drinking quality water to one inch of water above the level of the seeds. A glass jar with a lid is ideal.
• Step 2: Add one sachet of Real Trichoderma (20 ml) to the water and agitate well.
• Step 3: Soak the seeds in the bio-solution for 3 hours only and then drain the seeds. Retain the drainage water as this still contains beneficial microbes, which can be drenched onto the seedling trays when the seeds are planted.
• Step 4: Spread the wet seeds out on a new clean plastic sheet in the shade (out of direct sunlight) and allow the seeds to air dry for about half an hour before planting immediately. Do not dry on newspaper or other absorbent material because this will pull the biopesticide off the seed. Do not dry in direct sunlight as the microbe is killed by UV light.
• Step 5: plant the bio-primed seeds immediately into seed trays containing good quality sieved compost or washed coir fiber. Ensure coir fiber is washed three times before use in case it has too much salt in it. Testing the EC of the drainage water can assess the amount of salt in the coir fiber. The Ec should not be greater than EC 1.
1
The Journal of Horticultural Science & Biotechnology Vol. 89 No: 5 itle: E�ect of bio-priming using bio-control agents on seed germination and seedling vigour in chilli (Capsicum annuum L.) 'PKM 1' Authors:M. ANANTHI, P. SELVARAJU and K. SUNDARALINGAM

16
.
..
.
Grow healthy seedlings
Attributes of a good quality transplant
10 to 15 cm height Uniform, dark green leaf colour – without blemishes Vigorous root system Free from pests and disease
Chilli transplants can be sown in a seed tray or in a prepared seed bed. Seed trays are preferred because they produce healthier transplants. As small-scale farmers do not need large numbers of transplants, the production of plants in seed trays can be cost-effective and reduces many of the pest and disease risks associated with the seed-bed system.
Why seed trays?
Advantages of transplants from seed trays
1. Transplants from seeds trays do not suffer ‘transplant shock’ caused by plant stress due to insufficient water at establishment or root damage. This gives a higher percentage establishment and requires less hand labour needed to irrigated the young seedlings during this period.
2. Transplants raised in a seed tray tend to be more uniform in size than transplants grown in a seed bed, which has a greater variation in soil type than compost in a seed tray.
3. The seed tray method has less risk of infection with soil borne pests and diseases and needs only small amounts of good quality compost in the cells.
4. They need not be more expensive than transplants grown in a seed-bed, if farmers can make seed-tray plants themselves, rather than buy them from a propagator. One seed tray produces 250 transplants.

17
5. The seed trays can be re-used many times but must be thoroughly cleaned between batches of plants as they can be contaminated with diseases that will infect the young plants.
Soak them in 2% bleach (JIK) solution (e.g. 20 ml of in 2 litres of water) for one hour. Scrub all soil out of the cells and allow to air dry away from the soil before use.
6. The seeds and compost are cheap if produced on farm – always sow 100% more seeds than needed.
This will allow seedlings to be removed if infected with pests or diseases.
The grower can then CHOOSE the BEST uniform plants to transplant and THROW AWAY the rest!

.
.
.
.
.
.
.
.
.
Guidelines for seed tray propagation
• Choose a seed tray about 1.3 cm depth – about 250 cells per tray.
• Fill the seed tray with good quality, farm-produced sieved compost or washed coco fibers (wash 3 times). Sieve the com post first and make sure the cells are over full with compost. Then give the tray a hard tap against the bench to condense the compost a little before scraping off any excess compost with a level ruler.
• Thoroughly wet the compost by submerging the tray in clean water for a few minutes to allow the compost to absorb water. Ten take it out of the water and allow it to drain freely for half an hour.
• Bio-prime the seeds as described above and plant immediately. (3 hours)
• Sow two seeds per cell very shallow (2 to 5 mm in depth) and cover lightly with vermiculite or sieved soil. This allows you to have some losses and to remove one seedling from each cell to keep only the strongest seedling. Do not plant too deep, as this may encourage damping-off disease.
• Expect to water the seed trays twice per day. The ideal way to water seed trays is to have an overhead fine irrigation system. In this absence of this type of irrigation system and if only small numbers of trays need to be watered - stand the seed trays in a tray of water and allow them to absorb the water through the bottom of the seed tray. In this way heavy downpours of water do not disturb the seeds.
Alternatively use a watering can with a fine rose head or a hose pipe with your thumb partially over the end of the hose to create a fine mist. Hold either the watering can or the hose some distance from the seed tray so the water is gently applied to the seed trays.
• Check the compost twice per day to see if more water us needed. Do not let the com post dry out completely but do not let it get soaking wet! As a guide, expect to use about 2 litres of water per day to irrigate one seed tray (50 cm x 30 cm).
• The seed trays should not be placed ON the ground or they will be in contact with the soil where disease spores and nematodes could infect the roots. Place seed trays on a shelf made with wire mesh or chicken wire – to allow the seed tray to drain freely after irrigation. This will reduce the risk of damping off disease in seedlings. It will also improve air flow around the plants and reduce leaf diseases
• Make a small wooden frame, covered with insect-proof mesh (very small holes – thrips-proof netting from ShadeNet ltd in Thika) to house the seed tray – to keep away thrips and other pests from infecting the new seedlings. This is inexpensive and if managed properly – may avoid the need for expensive insecticides during propagation.
18

19
.
.
.
.• Seedlings should begin to emerge after 10 – 14 days, depending on the temperature.
• When there is 75% emergence add Tricho derma to the irrigation water once per week. Use one sachet per knapsack and water and use the knapsack to apply the bio-irrigation water.
• Thin to one seedling per cell when the seedlings are 5 cm tall. Do not keep more than one seedling per cell after the 5 cm tall stage – as this will lead to overcrowding and disease.
• Check for pests or diseases daily, when irrigating and physically remove them by wiping the pests off the leaves or squashing them and then REMOVE the seedling which had the pest – do not leave the seedling behind as the insect could have transmitted a virus which could spread and kill all plants.
Techniques for large-scale seed-tray production can be adapted
to small-scale farmers

.
.
.
.
.
.
.
.
.
20
Guidelines for seed-bed transplant propagation
The risks of pest and disease losses in propagation are greater in seedbed propagation systems. Greater care is needed in managing the environment to reduce potential losses.
Calculate the area of seedbed needed to produce enough plants for the commercial crop area to be planted.
• Ensure the soil is free of root knot nematode or other soil diseases, either by soil sterilisation (solar or steaming)
• Burn plant trash on seedbed surface for 30 minutes and after cooling mix soil with equal amount of compost or with decom posed manure at a rate of 2 to 3 kg/sq m. In semi-arid areas soil solarisation of seed bed could be done.
• Otherwise use an area which is risk-free due to known history, or the seedbed medium is fully composted material. Dress the seed bed with Trichoderma by preparing a solution in a watering can. (follow instructions as for seed trays)
• Prepare the seed bed with a fine tilth in the form of a raised beds (at least 25 cm high) of 1 meter width, surrounded by drainage channels of 30 cm width.
• Sow seeds uniformly in rows - spacing 10 -15 cm between rows at the depth of 5 mm, using 16 g seed per m sq. One hect are of commercial chilli will require 120 sq m of seedbed. I sq.m of seedbed should produce transplants for 80 meters of commercial chilli beds (if 2 rows of plants per 1 meter wide bed). • Consolidate the beds after sowing with a roller, or press down firmly with a wooden board.
• Protect seedlings from wind damage with a windbreak and provide sufficient shading just to maintain soil moisture and reduce water stress. Allow some airflow between the windbreak and the shade net, so that leaves do not remain wet for long periods after irrigation (to reduce disease development). Reduce shading later to avoid elongated plants once the seedlings have emerged.
• Put organic mulch (insect-free dry leaves or grass etc) over the entire seedbed as the seeds germinate (should take 7 – 10 days). Once seeds have germinated, remove the mulch and place it between rows after seedlings appeared, to conserve water and stop evapo-transpiration from exposed soil surface.
On-farm seed bed with damping off – no raised bed or drainage used

.
.
.
.
.
.
21
• Irrigation should be limited 7 – 10 days before transplanting to harden off the plants and prevent them from suffering transplant shock. Ideally, irrigate the crop so that the leaves do not remain wet for longer than necessary. If necessary, remove shading or windbreak for a short period to allow leaves to dry once the soil is thoroughly wet beneath the plants. Wet leaves are liable to disease.
• If seedlings are affected by damping-off, this could be due to overcrowding or over watering. Possible solutions include: 1) Cutting back the water or thinning out some of the seedlings to allow leaves to dry off. 2) Remove all infected plants, as they appear to prevent the diseases from spreading. 3) Reduce shading or wind break to allow soil or leaves to dry off to improved levels. Prompt action saves plants.
• Fungicides can be applied if the situation demands it. Do not apply in the heat of the day – as this could cause leaf scorch. • Seedbeds must be kept weed-free by hand weeding regularly. Weed will encourage pests and diseases by reducing airflow. Yields of seedlings will suffer if weeds are not checked.
• Seedling should be ready for transplanting after six weeks, if they have to remain in the seed bed for longer, they may require to be thinned out to prevent overcrowding and they may also need to have the tops pinched out
• When transplanting with plants from a seed bed – make sure the roots are not damaged when lifting from the seed bed – this will allow diseases to enter the plant and will slow down establishment of the transplant in the field. It will reduce yields!
Transplants are normally 6-8 weeks old when ready for planting. Harden them off for 7 – 10 days before transplanting by reducing watering a little and standing them out in the shade outside the propagation unit – or remove shading for most of the day in seed-beds (cover plants in the middle of the day with shade).

22
Damping off Damping off is a common problem in the production of young plants. It is caused by two soil borne fungi (Phytophthora and Pythium), which can both move in water because they have motile zoospores. This disease is a higher risk if contaminated soil is used during propagation – especially if the seedlings are prepared in the field in seedbeds. This is why clean seed trays – without con-taminated soil is preferred. Seedlings infected with damping off will either not emerge or will collapse and die soon after emergence. The condition is characterized by rapid wilting and death
Once transplants get to the 2 or 3-leaf stage they are generally no longer susceptible to damping off. .
The stems of infected plants may have a dark shriveled section at the soil line.

23
.
.
.
.
GAP – for COMMERCIAL FIELD
The soil is the most important component of the crop management system. If the soil is looked after well this will ensure good yield
Soil Analysis
The fertiliser programme should be based on soil analysis for optimum yields. If small-scale farmers cannot afford these tests, at least an annual soil test should be taken from represen-tative soils and the information used to make general recommendations for farms with the same soil type.
Take the soil sample six to eight weeks before planning to transplant, so that the appropriate fertiliser programme can be determined and the required fertilisers purchased.
This will also indicate if lime or dolomite is required to raise the pH to the optimum of between 6 and 6.5. These products should be applied at least four weeks before the crop is planted.
Check list for choice of site for growing chillies
• Solanacae crops (chillies, peppers, tomatoes, potatoes etc) should not have been grown in the same land for at least three years and maize or brassicas (cabbages) should have been grown on the land in between the last crop of chillies.
• Chillies thrive in well drained, aerated, light to medium soils. Soils with high humus content will greatly increase yield and lengthen the cropping period
• Slightly acidic soils can be tolerated but a pH of 5.5-6.6 is preferable.
• Good sunlight – no overhanging trees which shade the crop.

..
.
24
A barrier of maize plants should also be planted around the edges of
the whole block of chillies
AgronomyMaize barrier crops
Maize is an excellent barrier crop for chillies because:
• it acts as a lure for fruit flies during the heat of the day and allows the grower to concentrate biological or chemical controls for fruit flies in the maize crop. (see section on fruit flies)
• Maize is a non-host plant for aphid borne chilli viruses If viruses are a local problem, it is very important to interplant a row of maize or baby-corn in between every bed of chillies. This will slow down the spread of aphid-borne viruses, by providing the opportunity for aphids to feed on the maize plant (a non-host for chilli viruses) and clean their mouth-parts from the virus before feeding on the chilli.

25
Marigold Marigold can be a useful trap plant for thrips and caterpillar pests. Dwarf Mexican Marigold is preferred to tall African marigold.
If trap crops are planted on the borders of fields or between blocks they can help to concentrate the pest in areas where they are easier to treat. However they must betreated and killed (preferably biological control) so that they do not build up pests in or near the crop
White speckling on marigold leaves is from thrips feeding damage. Amblyseius predatory mites should be applied to marigold plants so that they can build up on the thrips in the marigold trap plants.
The bright orange or yellow colour of the flower and the strong scent of the leaves and flower attract thrips and moth pests.

26
Calendula Calendula is very attractive to whiteflies and can make a useful trap crop as part of an IPM programme for whiteflies. Calendula can also be planted n the same area as the marigold.
Whitefly eggsTrialeuroides
Whiteflies prefer to lay eggs on Calendula but the eggs do not hatch into whitefly larvae.If needed, a yellow sticky trap can be put up near the trap plants to enhance the lure effectand stick the whitefly

.
.
.
.
.
.
.
.
.
.
27
Bed Preparation
A good root system will provide higher yields, so ensure there is no soil pan (hard layer in the soil) to prevent root growth downwards.
• A raised bed at least 20 cm high should be prepared – to ensure very good drainage and reduce losses due to soil diseases.
• Moisture retention in the soil is very important to provide continued growth and even survival during dry periods (in rain fed crops). The addition of organic compost will improve soil moisture retention. Add compost into the bed when making the 20 cm high bed.
• During bed making - apply base (phosphate rich) fertiliser dressing as advised depending on soil analysis.
• Use a string with a peg at each end to mark out and make the beds straight and to mark out the planting rows on the bed.
• When making the bed, move soil and compost about to achieve a level surface on the bed. This will help promote even growth and avoid dips in the beds where water accumulates (and leads to root diseases)
• Mark out the two rows for planting with the strings, as described above. The rows should be 60 cm apart and the plants within the row should be 60 cm apart. Use a zig-zag pattern of planting to maximize the space for each plant.
• Prepare the planting holes about 20 cm deep and 20 cm wide – fill with good quality compost. Make sure there is enough compost to over fill the holes, then press the surface lightly before transplanting
• When transplanting with plants from a seed tray, make sure the compost surface of the transplant plug is at the same level as the final soil surface in the bed. Do not plant too deep, or the stems will rot. Do not plant too shallow, or the new roots will dry out.
• When transplanting with plants from a seed bed – make sure the roots are not damaged when lifting from the seed bed – this will allow diseases to enter. Make sure the part of the stem which was level with the soil surface in the seed bed – is STILL at the soil surface in the commercial bed, when transplanted. Do not plant too deep, or the stems will rot. Do not plant too shallow, or the new roots will dry out.

.
.
28
Mulching the soil• If plastic is available (clean, second hand plastic is adequate – even old fertiliser bags) this can be used to cover the one-meter wide beds. Holes can be made in the plastic in the position where the transplants are to be planted. Plastic can help to slow down the life cycle of thrips and leafminer in the soil. The plants can be irrigated by hand with a watering can and a long spout – by applying water to the hole where the transplant is planted.
• If plastic is not used, the soil should be covered with an organic mulch, such as straw, after the seeds are planted. This will conserve soil moisture and reduce weeds. There should be no seeds in the organic mulch material – which could become a weed!
Irrigation
Flower and bud abortion can result from insufficient water applications during flower development and fruit set.
Feel the soil moisture by hand during these critical periods and apply more water during this time – if necessary. Take a handful of soil from the bottom of a 15-cm deep hole and squeeze it. If it holds together when you release your grip, then there is sufficient soil moisture. If the soil crumbles, then is time to irrigate
If water is in short supply, make sure the soil mulch is deep and even enough to prevent water loss from exposed soil surfaces.
Advantages and disadvantages of different irrigation systems
Overhead irrigation will increase leaf wetness and encourage the spread of bacterial wilt. However, overhead irrigation can discourages pests such as aphids, mites, thripsand whiteflies. Do not apply overhead irrigation after 4.00 pm as wet leaves and fruits over night will promote disease development.
Furrow irrigation can spread soil borne diseases such as bacterial wilt, Fusarium wilt or Verticillium wiltIdeally, the crops should be irrigated with drip irrigation lines with the correct spacing

29
Inter-row cultivation Chillies benefit from inter-row cultivation at 10-day intervals from 30 days after sowing, if direct seeded. Hand weeding follows inter-row cultivation to check competition from weeds.
Fertiliser ProgrammeSoil Analysis
The fertiliser programme should be based on soil analysis for optimum yields. If small-scale farmers cannot afford these tests, at least an annual soil test should be taken from representative soils and the information used to make general recommendations for farms with the same soil type. Take the soil sample six to eight weeks before planning to transplant, so that the appropriate fertiliser programme can be determined and the required fertilisers purchased.
This will also indicate if lime or dolomite is required to raise the pH to the optimum of between 6 and 6.5. These products should be applied at least four weeks before the crop is planted. The laboratory that undertakes the analysis will advise on the rates of lime to be used to correct the soil pH.
Fertiliser Programme
The recommended blanket rates for mineral fertilisers, subjected to adjustment based on the results of soil analysis, for hot pepper are 400-600 kg NPK/ha in a 4-1-3 N:P:K proportion.
This is 40 - 60 gm per square metre applied over the whole growing season (not in one application!). This is divided in a base dressing, top dressing and in foliar feeds.
Apply as base dressing at transplanting use a phosphate fertiliser depending on soil fertility. For example DAP at 10 gm per square metre or 2 gm in each planting hole
Top dressing should be applied 1 and 2 months after transplanting. Calcium ammonium nitrate (CAN) (100kg/ha) for acidic soils or ammonium sulphate nitrate (100kg/ha) for alkaline soils. This translates into 10 gm per square metre.
Foliar feeds with magnesium are desirable on alkaline soils - read the label fro application rates. Alternatively use a dilute vermi-liquid at a rate of 1 to 10 and spray until the foliage is wet.
If no soil analysis is available and the soil is of average fertility, a basal fertiliser that contains 20 gm of DAP per square metre, 10 gm of CAN per square metre and regularly apply foliar feed of liquid vermicompost liquid. Top dressing can be applied as 10 gm per square metre of urea and or CAN at 10 gm per square metre.

30
If the crop leaves look yellow – it may need more nitrogen fertiliser which can be applied by foliar feeds or vermi-liquid sprays to the canopy (as above).
Pollination
Most chillies are self-pollinated and should grow true to form unlike hybrids. Chillies planted close to each other can and do cross-pollinate. This will not have any effect on the current fruit crop but can alter the seeds.If you are buying new seed each year it does not matter if you plant different types or varieties of chillies or peppers. Commercial seed growers keep different variet-ies planted at least 2 miles from each other to prevent crops pollination by bees.Chillies benefit from pollination from managed beehives, increasing flower set and pod size. Remove all virus-infected plants IMMEDIATELY
At all stages of growth, from propagation to fruiting – it is very important to remove all plants with virus symptoms as soon as they appear -to prevent the spread of the virus.The virus is spread by flying vectors such as thrips, whitefly and aphids. It is therefore important to only remove the plants when the temperature is low (early morning or late after-noon) when these insects cannot fly. Otherwise they will move off to new plants when disturbed and spread the virus!Take a large bag to the plant, which is being removed, and place it inside the bag to take itoff the field.
Do not leave the virus-infected plant in the open, as insect vectors may still be on it and can move from the old plant to new plants. Cover, bury or burn the plant immediatelyReduction of Branch Budding
Once the plant has grown to about 30 cm of height, it is recommended to remove the weakest stems to leave a plant with 5 to 8 stems.
If a knife is used to remove the stems this could spread virus infections. BEFORE beginning to remove the stems REMOVE completely all plants with virus symptoms by pulling out the plants and placing in a bag for later destruction
The knife should be dipped in a 50:50 milk and water solution in between every cut – this will help to reduce spread of virus between plants which are not yet showing virus symptoms

31
Remove first flowers
Remove the first flowers, if the plant has not yet reached 30 cm at the time the first flowers are showing. If the first few flowers remain on the plant, when it is still small – they will take up all the nutrients in competition with the continued vegetative growth of the plant. A small plant will produce small yields. Better to remove those early flowers and build a larger plant with a larger total yield potential.
Remove lower leaves
Improve air-circulation at the base of plants by removing all leaves and branches that are touching the ground – ensure that all leaves on the lower 15-20 cm of each stem are removed.
HarvestFirst harvest of chilli commences within 8 - 10 weeks from transplanting and continues for several weeks. A harvest period from Sept to December is insured by a planting every 4 weeks from April to June, when rains aid establishment in areas without irrigation.
Pests of Chillies
The most serious pests of chillies are those that carry viruses (aphids, thrips and whitefly). If viruses are a serious risk, it is not wise to rely only on biological control for these pests – as this may be too slow to prevent spread of the virus. Bear this in mind in relation to information below on potential biological control agents (natural enemies) of these pests.
See Real IPM ID Chart for Pests of Chillies

....
32
Aphids (Aphis gossypi and Myzus persicae)
Aphids transmit chilli leaf curl and other viruses (see section below on viruses)
Damage
Aphids appear on the tender shoots, leaves and on the lower surface of the old leaves. They suck the sap and reduce the vigour of the plant. More importantly, they are vectors for sever-al viruses (see section below on viruses)
As aphids feed, the excess sugar solution, which they suck from the plant, will drop from their bodies onto the upper surfaces of the leaves below. Sooty moulds quickly develop on this substance and it can also cause down grading of chilli pods.
Choice of chemicals
The approved pesticides for control of aphids are detailed in the Appendix. Follow Label recommendations and guidelines on Safe Use of Pesticides. If viruses are present, pesticides are preferred to biological controls, which may be too slow to stop the spread of virus diseases.Caution: Neonicotinoid pesticides such as thiamethoxam, imidacloprid etc are likely to harm bees. This could affect pollinations and yield of the crop.
Physical control
Physical controls may also be used to reduce aphid number. A spray solution made from locally available starch (cassava, maize or potato) may be made by:
• Dissolving 15 gm of starch per litre of hot water. • Stir solution until starch dissolved and use immediately. • Then direct the spray to the underside of the leaf to contact the aphids. • The water is drawn out of the aphids and into the starch spray. This kills the aphid by dehydration.

33
.
.
.
.
.
.
.
Metarhizium 62 for aphid control
Real IPM has a strain of Metarhizium, which is specific to aphids – Metarhizium 62. Met 62 has a zero PHI and leaves no residues. There are no resistance issues. This works in the same was as the other Metarhizium isolates and it has the following guidelines:
• Ensure optimum coverage of the plants because Met 62 is a contact action biopesticides. Do not spray to ‘run-off’.
• Spray late afternoon, to reduce exposure of Met 62 to UV light.
• When aphids present, spray twice per week until under control.
• If aphid borne viruses are suspected, tank mix the Met 62 with a suitable insecticide (correct PHI) – for resistance management and a synergistic effect.
Aphidius – parasitic wasp
Providing compatible pesticides are used, it is possible to rapidly establish the common parasitic wasp, Aphidius on farms in Kenya, even in dry growing areas.
• Metarhizium is compatible with Aphidius.
• Natural pyrethrum sprays within the first 2-3 weeks should prevent rapid build up of aphids but because it is broken down by UV light, it is also compatible with Aphidius. Advice should be sought on measures which can be taken to enhance levels of Aphidius on farms.
• Natural enemies of aphids can be built up in the maize interplant crop between the chillies. This may help to slow down the spread of aphids (whilst Met 62 are used in the chilli crop).

34
Aphidius adult laying egg in aphid
parasitized aphid (mummified)
Aphidius
Aphidius is a highly efficient parasitoid as a
single female can lay up to 300 eggs (each
killing and aphid) and most of these eggs are
laid within 3 days after hatching and mating.
The female Aphidius lays an egg in the body of
an aphid. This Aphidius egg hatches inside the aphid’s
body, into an Aphidius larva which feeds on the
body fluids of the aphid. The aphid does not
die immediately and could even continue to
give birth to one or two more aphids.
However, after a few days, the aphid will feed
less and eventually the Aphidius larvae will
pupate inside the aphid, spinning a silken
cocoon. The body of the parasitized aphid
takes on a papery appearance and is described
as being ‘mummified’. It still looks like an aphid
but it is a golden papery looking aphid. Inside
the mummified aphid, the Aphidius turns into
an adult Aphidius wasp.
The wasp breaks out of the mummified aphid
body by eating a circular door. The wasp
pushes this open and flies out.
Other natural enemies of aphids include
ladybirds

35
Thrips (Frankliniella occidentalis)
Thrips are vectors of Tomato Spotted Wilt Virus (TSWV). Damage
Both nymphs and adult thrips damage the crop from their rasping feeding on the leaf and pod surfaces. Air spaces in the leaf caused by the feeding, sometimes gives the feeding patches a silvery look for a while.
Eventually these patches dry out and turn brown and will have small black dots (frass from thrips). Thrips infested leaves will curl upwards. If the plants are affected at early stage they remain stunted in growth and flower production and pod set are arrested causing severe
Thrips frass - small back dotsare always associated with thrips damage.

36
Life Cycle of thrips
Part of the life cycle of thrips is in the soil. This is why drenches of Met 69 OD in the soil should be made immediately underneath the plant canopy (total area shaded by bush) should be drenched.
This is why plastic soil mulch may reduce the build up of this pest. Biological controls, such as the biopesticide.These should be applied to the soil to slow down the build up of thrips in the canopy.

37
Control
The approved pesticides for control of thrips are detailed in the Appendix. Follow Label recommendations and guidelines on Safe Use of Pesticides. If viruses are present, pesti-cides are preferred to biological controls, which may be too slow to stop the spread of virus diseases.Physical controls may also be used to reduce thrips numbers as for aphids (see above). Thrips can be very specific in the time of day when they emerge from the flower or from under the leaf, when they are more exposed to insecticide sprays. This is normally from 7.30 am to 8.30 am and in the afternoon from about 5.30 pm to 6.30 pm. Scouting will confirm if this is the pattern of thrips activity.Thrips are attracted to both yellow and certain types of blue sticky traps. They prefer the blue traps
Several thrips stuck on yellow sticky trap. One larger fungus gnat far left. Coin for scale information

38
Biological controls for thrips
There are several species of predatory mites(Amblyseius spp.), which will attack the younger thrips. They cannot prey on adult thrips, pupae or pre-pupae or thrips eggs. Therefore they are only useful for control of juvenile thrips and should be used in conjunction with regular sprays of Met 69 OD in the canopy and on the soil surface.
Amblyseius will need to be present in very high numbers to exert any control of thrips and be applied weekly to the crop. They should not be the main means of control if TSWV is present, because the control will be too slow to stop the spread of the virus. A ratio of less than 1 Ambly-seius to 20 thrips would be a satisfactory balance – if no virus was present. Amblyseius can survive on flower pollen in the absence of thrips.It is advisable to apply the Amblyseius to the nursery plants during propagation to encourage even distribution of Amblyseius in the crop when planted out in the field.

39
Physical controls for thrips
Providing the topsoil depth is adequate, deep ploughing of heavily infested thrips blocks will bury the thrips, which pupate in the soil. Do not deep plough, if sub-soil is brought to the surface, as this will reduce subsequent yields.
Orius
Various species of the predatory bug, Orius, are common in Kenya and will kill many adult thrips. They are very useful when thrips numbers are high, killing more thrips than they actually consume (by piercing their bodies and sucking out the contents).
Sunflower if planted on the farm will increase Orius numbers locally and may contribute to increased numbers of relevant natural enemies. IPM Scouting will assist in measuring the benefit of these Field Insectaries.
Orius adult feeding on thrips

..
40
Whitefly
Whitefly are vectors for Chilli Leaf Curl Virus (CLCV) and Chilli Leaf Mosaic Virus (CLMV)
Chilli Leaf Curl Virus Damage
Plants infested with whiteflies will lack vigour, wilt, turn yellow, and may die.
In addition, heavily infested plants will be coated with a sticky material called honeydew, which reduces the attractiveness and saleability of the fruit. Heavy concentrations of honeydew will promote the growth of a black sooty mould, which interferes with photosynthesis. Sooty mould may also interfere with production or harvest operations.
ID and Life Cycle of whitefly
There are two main types of whitefly in Kenya. Trialeurodes vaporaiorum (glasshouse whitefly) Bemisia tabaci (sweet potato whitefly)
Bemisia is a notifiable pest in the EU as it is resistant to most pesticides and a virus vector, whilst Trialeurodes is not notifiable. Other species may be present at the Coast.
Tomato Leaf Curl Virus in chilli

.
.
.
.
.
41
Whiteflies have piercing-sucking mouthparts with the adults very active and easily disturbed. The immature stages are less mobile and usually found on the undersides of the foliage. Adult whiteflies feed on the lower leaf surfaces where they lay their eggs, but may rest on other areas of the host plant.
• Adult females lays eggs on the leaves of host plants
• Eggs hatch into a crawler stage which will move short distances to find a suitable place to ‘plug into’ the leaf and start sucking the sap
• There are three development instars which feed on the leaf – called ‘scales’ (instar 1-3 above)
• The fourth instar is the pupa which does not feed.
• The adult whitefly hatches out of the pupae by bursting out (look for split open pupae)

42
Time line
Egg laying commences 1 - 3 days after emergence and during the day. Eggs are attached to the lower leaf surface with egg hatch occurring 7 - 10 days later. This stage known as the "crawler" is the only mobile immature stage. It moves only a short distance, inserts its needle-like mouthparts, and begins to feed on plant sap.
For approximately 7 days, the insect remains sessile, but goes through 3 moults. The second and third instars also feed on plant sap with each stage being 3 - 4 days depending on temperature. The insect then moults into a fourth stage nymph or resting stage called the pupa. No feeding takes place during the pupa stage.
Distinguishing between Trialeuroides (top) and Bemisia (below)

43
Trialeuroides pupae (left) are more hairy than Bemisia pupae (right)
Trialeuroides lay eggs in a semi circle and Bemisia lay all over the leaf

.
.
44
Control
If whitefly transmitted viruses are present a fast acting pesticide is needed.
If the whiteflies are resistant to available chemicals or there are issue with pesticide resi-dues, there is no option other than to use a prophylactic preventative bio-intensive programme.
Metarhizium 69
• Metarhizium 69 can infect whiteflies. It must be applied frequently to keep pests such as thrips and whiteflies from establishing.
• If high levels of whitefly are already present, it is advisable to tank mix Met 69 with a suitable chemical insecticide – for faster knockdown, whilst providing resistance management and a synergistic action.
Whitefly on rose leaves infected
with Met 69

45
Parasitic wasp for whitefly
Encarsia formosa
Encarsia is a common tiny parasitic wasp, which lays eggs in the scales of whitefly. Parasitised scales are black and easy to distinguish from un-parasitised whitefly scales, which are white. Instead of a whitefly adult emerging from a whitefly scale – an Encarsia adult wasp will emerge.
Encarsia are very common, naturally occurring parasitoids in many parts of the world.
Encarsia wasp laying and egg in a whitefly scale.
When the whitefly scale is parasitised – it turns from white to black. This makes it very easy to estimate
the percentage parasitism.
Life Cycle of Whitefly and Encarsia

46
Physical controls for whiteflies
The physical controls described for aphids and thrips will have some impact on whitefly.
Whitefly adults cannot move in cold temperatures – even if the plant canopy is shaken! Therefore crops infested with whitefly should be removed at the end of the crop, only when it is cold (early in the morning). In this way there will not be clouds of whitefly in the air (moving to new plants) when the crop is taken out.
Preferably crops should be sprayed at night as the whitefly will not move off during the spray application (possibly to other blocks) and are more easily contacted by sprays. This may also help reduce thrips problems (Jan/Feb/March) as it has been observed that thrips will come out at night onto the top surface of leaves. Most thrips come out after a period of hot weather, followed by a shower in the afternoon
Whiteflies are attracted to yellow sticky traps (but so are parasitic wasps).

.
.
.....
...
....
47
VIRUSES IN CHILLIES
There are many important virus diseases of chillies. Some of them are transmitted by insect vectors (aphids, thrips and whitefly) and others are seed borne. Identification of The specific virus is from characteristic visual symptoms which is alter confirmed by PCR tests in a laboratory.
The practical impact of a virus infection is that plants will be stunted, yields will be low and if unchecked, chilli growing may become uneconomic.
It is important therefore to be able to identify potential virus symptoms in a crop. Symptoms are generally an ‘unusual’ colour pattern on leaves or fruit and an unusual shape of the leaves or fruit.
Leaf symptoms:
• mosaic pattern, • crinkled or wrinkled leaves, • yellow mottling, • distorted narrow blades.
Fruit symptoms
mottle, spotting, distortion
Some of the common chilli viruses are
• Chilli Veinal Mottle Virus• Cucumber Mosaic Virus• Pepper Mild Mosaic Virus• Pepper Mild Mottle Virus• Tomato Spotted Wilt Virus• Potato Y Virus• Tobacco Mosaic Virus
There are at least 40 other plant viruses, mostly those which also affect tomatoes, peppers, tobacco and other Solanacae crops.

..
.
.
.
48
MAJOR VIRUS DISEASES IN CHILLI
Tomato Spotted wilt (TSWV)
Symptoms
Orange or bronze coloured flecks on middle or lower leaves and calyx or stems and petioles. Stunting, black depressed spots.
TSWV is spread by thrips Very extensive on annuals, bulb crops, and weeds.
Tobacco Mosaic Virus
Variable symptoms depending on the virus strain. Leaves may be light green or yellow mottling, rough edges turn down. The plant may be dwarfed. The fruit is small, and their may be poor fruit set with brown streaks. A characteristic ‘shoestring’ effect in leaves may occur on young plants. TMV is a sap transmissible virus. The virus spreads throughout the host plant and virus particles can be found in cells and sap throughout the plant. Sap containing the virus is highly infectious. Handling chilli plants leaves sap on the hands, and if this sap was from an infected plant, then the virus will be transferred via the sap on the hands to the next plant handled. The virus is extremely tough and can survive in dried up sap, in plant debris or in the soil for several years. It can infect the outside of chilli seeds but only infects a very small number of seed internally. TMV has a wide host range including most other members of the family Solanacae including potato, capsicum, eggplant, pepino, tobacco, nightshade, and many ornamental plants and weeds. These plants may be host to many different strains of tobacco mosaic virus and may be symptom-less or show severe symptoms.
TSWV symptoms on chilli fruit.

.
.
.
.
.
.
49
Cucumber Mosaic Virus (CMV)
• Similar to TMV, upper leaf may be very narrow and twisted giving them a shoestring appearance that may be confused with 2, 4-D type injury. Later excessive number of lateral leaflets are produced. Plants may be dwarfed or stunted. Cucumber mosaic virus (CMV) causes foliar mosaic and mottled fruit• Cucumber Mosaic Virus – aphid transmitted poty virus. It can be transmitted by more than 60 aphid species. • CMV can infect more than 800 plant species, including many vegetable crops, ornamentals, and woody plants. Many weeds and cultivated crops are reservoirs of this virus.
Mosaic Virus (MV)
• Mosaic virus diseases also cause considerable damage to chilli crop. Mosaic disease exhibits itself as vein clearing of the younger leaves followed by severe mottling with patches of light and dark green scattered all over the leaf surface. Other important symptoms are leaf distortions, curling, marginal rolling of leaves. The plants become stunted and flower production is ceased.• Aphids and white fly both transmit MV.
Pepper Mild Mottle Virus (PMMV)
PMMV affects both peppers and chillies. Infected plants are stunted and have sunken brown spots that look like a rot on the fruit.
PMMV virus spreads by leaf contact, root contact and in irrigation water moving along beds. PMMV survives processing of foods and passage through the human gut, and the viral particles are known to be extremely “stable," There is no evidence that people should try to avoid getting this virus. It most likely has no adverse effects on human health.
PMMV symptoms on sweet pepper

.
..
.
..
.
..
50
Double streak TMV + PVX (Potato virus X or CMV)
• Usually affects large plants, dwarfed, spindly appearance, rolling and withering of leaves. Long brown streaks on petioles and stems. Irregular ripening of fruit, light brown sunken spots on green fruit.• Aphids are vectors of Potato Virus X• As for CMV and TMV
Tobacco and tomato ringspot (TRSV)
• Ringspot or zigzag lines on foliage, occasionally on stems, petioles, and fruit. On fruit, rings are often concentric.• Dagger nematode, thrips, mites, grasshopper, flea beetles• Very extensive; annuals, weeds, vegetables, ornamentals, tobacco, soybeans
Potato virus Y (PVY)
• Dark brown dead areas between veins in leaflets near maturity, yellowing along veins, faint mottling on leaves; petioles curved downward; stems with purple streaking; symptoms usually become mild, but severe symptoms develop if TMV is present• Aphids are vectors of Potato Virus Y• Solanaceous and leguminous plants, pepper and potato.

51
.
.
.
Chilli Leaf Curl Virus CLCV
Chilli leaf curl is a virus transmitted by sap sucking pests such as aphids and white-flies. Control requires measures to be taken against the vectors, aphids and whiteflies. In other parts of the world, viruses are a serious problem in chillies and agronomists should be aware of the symptoms.
Take immediate action to rogue infected plants and prevent transmission. Put infected plants into a bag to remove them from field (do not drag crop debris through the crops as vectors will fall of the infected plants and spread throughout the crop). Burn, rouged plants.
• Incidence of virus symptoms would always trigger a preventative spray programme for the vectors, irrespective of their numbers in the crop, since viruses are quickly transmitted. Infected crops should be destroyed immediately picking is finished to prevent the spread of the virus post harvest.
• If the crop is infested with whitefly, it is important to remove the crop only after 4.30 pm as temperatures begin to drop, as whiteflies do not fly in the cool of the day. If these crops are removed in the heat of the day, then clouds of whitefly, carrying virus will move onto adjacent crops and spread the virus.
Control

52
.
.
.
Chilli leaf mosaic virus (CLMV)
Chilli leaf mosaic virus is transmitted by aphids and whitefly vectors and can cause considerable damage to chilli crops. Symptoms of infection are vein clearing of the younger leaves followed by severe mottling with patches of light and dark green scattered all over the leaf surface. Other important symptoms are leaf distortions, curling, marginal rolling of leaves. The plants become stunted and flower production ceases
Control:
• Take immediate action to rogue infected plants and prevent transmission as above. Obser-vation of CLMV symptoms would always trigger a preventative spray programme for whitefly and aphids. Again removal of crops in the cool of the day will reduce the spread of aphids and white-fly vectors to new plantings
Limit spread of viruses in chillies
Tip: The coat protein of many viruses reacts with proteins in skim milk, and hence skim milk can be used as an in-activator of viruses. Skim milk is quite safe for hand washing.
In propagation
1. Decontaminate seed trays, tools, tables, before use by:
soaking 10 minutes in 1% formaldehyde or a 1:10 dilution of a 5.25% sodium hypochlorite (10% Clorox) solution, do not rinse; or• washing (enough to clean) in detergent at the concentrations recommended for washing clothes or dishes. Keep all solutions fresh • heating or steaming at 300 degrees F for 30 minutes;
2. If virus is a serious problem - sow seed in individual pots (peat pots, etc.) rather than seed trays (or adopt wide spacing in seed beds) and do not touch or handle plants prior to setting in the field or greenhouse. Discard pots with seedlings that show leaf twisting, mosaic, or unusual growth. Do not touch other seedlings while discarding them.
3. Dip hands in milk while handling plants every 5 minutes (more often if different lots of plants are handled). Rubber gloves will protect hands.
4. Remove and destroy diseased plants early in the season. Do not touch healthy plants with the diseased plants when removing them.

53
5. Make sure workers or visitors do not bring virus into a propagation area. Change clothing or provide overalls if workers or visitors have been in other crops and wash hands before handling the crop. Take care during Open Days and training sessions – visitors may have viruses on their clothing or hands if they have been in a chilli crop.
In commercial fields
1. Plants should be spaced to prevent leaf contact between plants as some viruses (PMMV) are spread by leaf and root contact. Use a spacing of 60 cm between plants in a zig-zag pattern between the two rows of plants per raised bed.
2. The chillies should be planted on a raised bed, at least 20 cm high and 1 meter wide to ensure good drainage, as some viruses can be moved in soil water (PMMV).
3. Interplant one row of maize in between two rows of chillies and have a perimeter ‘fence’ of maize around the whole plot of chillies. Maize is a non-host for some of the viruses transmitted by aphids (Potato Virus X and Y, Mosaic Virus and Cucumber Mosaic Virus). These viruses are transmitted in a ‘non-persistent’ manner because the virus only lives on the outside of the stylet mouth-parts of the aphid. When the aphid feeds on the maize plant the virus is ‘washed off’ the mouth parts and it is then ‘safe’ for the aphid to feed on the chilli plant without transmitting the virus.
4. Use Trichoderma in the compost used to improve soil structure in the raised bed. Trichoderma colonisation of the roots of chilli plants will enhance the natural resistance of the chilli plant to virus diseases. (Systemic Acquired Resistance – SAR)
5. Sprays of skimmed milk have been shown to be effective in preventing leaf spread, and spread by contaminated cutting tools. Prepare the skimmed milk spray by adding 7 litre of skimmed milk per 15 litre knap sack. Spray chilli plants once a week with skimmed milk when virus vectors (aphids, thrips and whitefly) are present.
6. Disinfest equipment, tools, and hands on a regular basis while pulling, pruning, harvesting, and spraying plants, and when moving from one row or area to another.
7. Remove the affected plants and destroy them as quickly as possible
8. Control vectors with insecticide sprays. Biological controls may be too slow to prevent movement of the virus.
9. Mineral oil sprays have been used to interfere with the transmission of all pepper viruses by aphids.

54
10. Do not use human faeces as fertiliser for the chilli crop as this may spread the virus – if the human has eaten infected chillies (PPMV can be present in human faeces)
At the end of the Crop Life
11. Spray the plant bed prior to pulling or handling plants (24 hours) with whole or skim milk at the rate of 5 litres per 10 meter square. Thorough coverage of plants is important.
12. Immediately the last harvest is completed - destroy all chilli plants in the bed, field, or greenhouse as soon as possible after harvest.
Before next crop is planted
13. Rotate tomato crops with maize, cabbages or sorghum
14. Avoid following chilli crops after crops of tobacco, pepper, eggplant, tomatoes, potatoes or cucurbits.

55
CATERPILLAR PESTS IN CHILLIES
There are several caterpillar pests of chillies and their controls will be presented togther after they have been described, individually. Pod Borers (Spodoptera litura, Heliothis armigera) Pod borers have many hosts and will attack chilli crops both in vegetative phase and at the time of pod formation. They enter chilli pods by making a hole near calyx and feed on the chilli seed. The affected pods drop off or develop a white colour on drying. The fully-grown caterpillars enter the soil for pupation. Heliothis armigera (also known as Helicoverpa) or Bollworm
Heliothis is also known as
Helicoverpa and Old World
Bollworm
brown (top) and grey (below) forms of
Heliothis adult moths
Heliothis larvae

56
Spodoptera litura or Armyworm
Armyworm is a large moth with a wingspan of up to 3 cm with a mustard or orange coloured liver-shaped spot on the forewings that is narrowly ringed with white. Longevity of adults is about 4-10 days, being reduced by high tem-perature and low humidity.
The female lays egg masses on the undersides of leaves, covering the eggs with felt made from her body hairs. Young green larvae feed together on the underside of leaves and also inside flower buds. Feeding damage from young larvae will produce ‘skeletonised’ leaves. As larvae get bigger they turn a brown, black, grey or green in colour and begin feeding on their own. They will now chew up entire leaves or flowers.
Armyworms are characterized by a pattern of fine lines along the full length of their bodies. They have a dark spot near the head, just under the largest of these stripes.
Egg mass of Spodoptera spp
Adult Spodoptera litoralis

57
The young larvae (first to third instar) feed in groups, leaving the opposite epidermis of the leaf intact. Later, the (4th to 6th instar) larvae disperse and spend the day in the ground under the host plant, feeding at night and early in the morning. The pupal period is spent in earthen cells in the soil and lasts about 11-13 days at 25°C.Thus, the life cycle can be completed in about 5 weeks. In Japan (Nakasuji, 1976).
In the Northern Hemisphere, there may be only four generations per year because of the winter periods; but in the humid tropics there could be 6 to 8 generations.

58
False codling moth
59
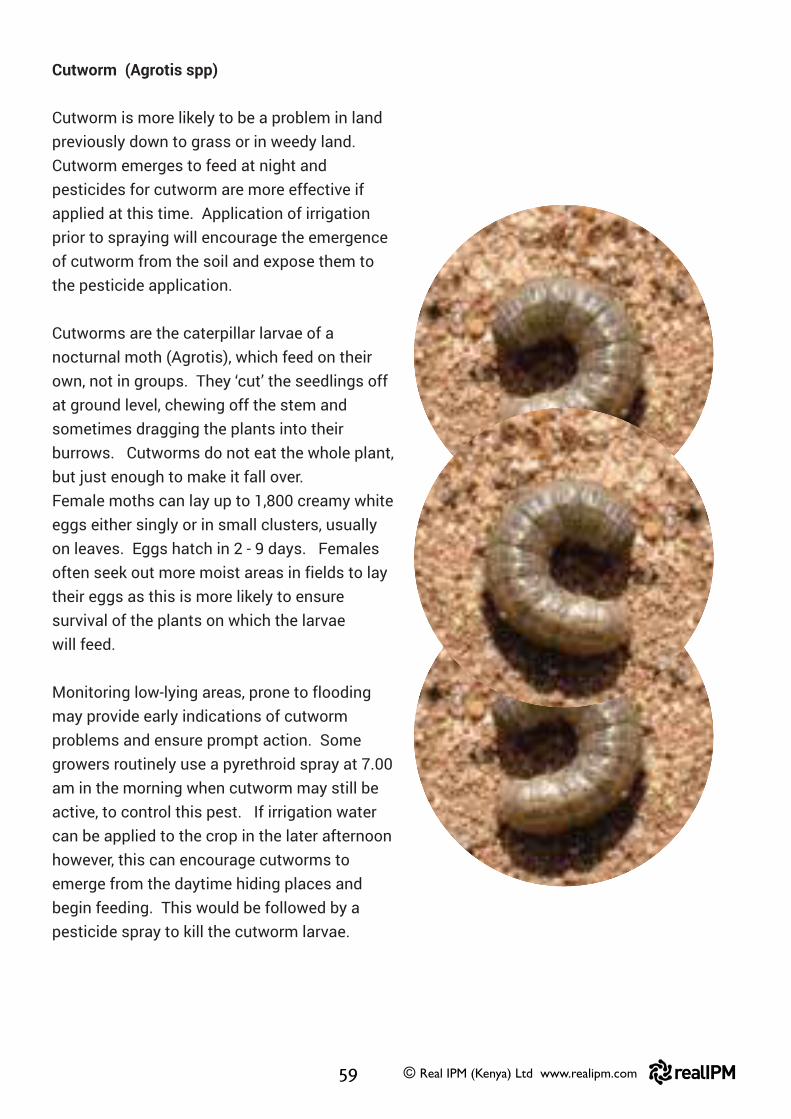
Cutworm (Agrotis spp)
Cutworm is more likely to be a problem in land previously down to grass or in weedy land. Cutworm emerges to feed at night and pesticides for cutworm are more effective if applied at this time. Application of irrigation prior to spraying will encourage the emergence of cutworm from the soil and expose them to the pesticide application.
Cutworms are the caterpillar larvae of a nocturnal moth (Agrotis), which feed on their own, not in groups. They ‘cut’ the seedlings off at ground level, chewing off the stem and sometimes dragging the plants into their burrows. Cutworms do not eat the whole plant, but just enough to make it fall over. Female moths can lay up to 1,800 creamy white eggs either singly or in small clusters, usually on leaves. Eggs hatch in 2 - 9 days. Females often seek out more moist areas in fields to lay their eggs as this is more likely to ensure survival of the plants on which the larvae will feed.
Monitoring low-lying areas, prone to flooding may provide early indications of cutworm problems and ensure prompt action. Some growers routinely use a pyrethroid spray at 7.00 am in the morning when cutworm may still be active, to control this pest. If irrigation water can be applied to the crop in the later afternoon however, this can encourage cutworms to emerge from the daytime hiding places and begin feeding. This would be followed by a pesticide spray to kill the cutworm larvae.

60
Chemical controls for caterpillar pestsWidespread resistance to chemical pesticides by armyworm is reported. Careful resistance management strategies are advisable to secure the longer-term effectiveness of the remaining chemicals that work. Real IPM Kenya, can provide training of trainers courses in how to design a Resistance Management Strategy. [email protected] Biological controls for caterpillar pestsBacillus thuringiensis BtBacillus thuringiensis is a naturally occurring bacterium common in soils throughout the world. Several strains can infect and kill caterpillar pests. The caterpillar-specific Bts are in a group called Bacillus thuringiensis kurstaki (Btk) and Bacillus thuringiensis aiawaza (Bta).Commercially available products based on both of these Bts are widely available and are generally inexpensive. There are some records of resistance to the Bts because sometimes the formulation does not include living spores but only the insecticidal proteins produced by the Bacillus thuringiensis.It is advisable to rotate the Btk products with the Bta products to reduce the risk of resistance. Mode of action of Bt
In nature, the target pest ingests the Bt and once inside the bacterium produces a protecin that is toxic to the caterpillar. The toxic crystal binds with the stomach wall, making a hole in it. The pest stops feeding almost straight away and eventually dies when the bacterium reproduces within its body.

..
.
.
.
.
.
.
61
Bt acts by producing proteins (delta-endotoxin, the "toxic crystal") that reacts with the cells of the gut lining of susceptible insects. These Bt proteins paralyze the digestive system, and the infected insect stops feeding within hours. Bt-affected insects generally die from starvation, which can take several days.
Occasionally, the bacteria enter the insect's blood and reproduce within the insect. However, in most insects it is the reaction of the protein crystal that is lethal to the insect. Even dead bacteria containing the proteins are effective insecticides.
Bt is susceptible to degradation by sunlight. Most formulations persist on foliage less than a week following application.
To optimise the effect of Bt
• Spray when caterpillars are still small. • Completely cover all leaf surfaces. The insects must ingest the bacteria when they are feeding. • Spray in the evening or during cloudy (but not rainy) days. • There may be a need to reapply if it rains soon after application. • Caterpillars will take several days to die, but they will stop feeding soon after infection. • Bt is not persistent. It may need to be reapplied. Follow label instructions. • Mix only enough product needed and use immediately. This is especially important in areas with high pH water (alkaline). • Use a spreader-sticker to enhance product coverage on leaves.

62
Viruses that kill caterpillars
There are two types of viruses known to infect and kill caterpillar pests that have been mass-produced as biopesticides and widely used. • Nuclear polyhedroid viruses NPV• Granulosis virus GV
In the same way as Bt products – the viruses must be ingested in order to kill the caterpillar pest.
NPV is a naturally present disease that kills armyworm and helps control its outbreaks. Each armyworm killed by NPV can contain 2,000 million new infective particles, each capable of infecting another armyworm. Thus, each insect killed by NPV can act as a new source of NPV to spread the disease.
However, while NPV can destroy outbreaks once it has established in the armyworm population, in most years the NPV appears too late in the outbreak cycle to prevent serious armyworm damage.
Sometimes naturally occurring viruses can occur in Heliothus and Spodoptera populations. If this happens the infected larvae can be collected and have been used as a ‘starter culture’ for home-made sprays of caterpillar viruses, by adding more live caterpillars and allowing them to become infected.
The solution can then be sieved and sprayed onto trap plants to kill caterpillars once they are brought to one place by providing a very attractive host plant.
Symptoms
Different viruses cause different symptoms. NPV-infected larvae may initially turn white and granular or very dark. Some may climb to the top of the crop canopy, stop feeding,become limp, and hang from the upper leavesor stems, hence the common name"caterpillar wilt" or "tree top" disease.
..
Victims of a granulosis virus may turn milky white and stop feeding. In both cases, the body contents of the dead larvae are liquified and the cuticle ruptures easily to release infectious viral parti-cles. Death from a virus infection usually occurs within three to eight days.

63
Role of other biopesticides for caterpillar control
If Real Metarhizium 69 OD is the backbone of an IPM programme for thrips, leafminer and fruit fly in chillies, it will have already been applied to the soil because these pests have part of their life cycle in the soil.
It is therefore possible that the pupae of several of the pest caterpillars which are in the soil, will be infected with the Metarhizium and fail to emerge as adults.Other Metarhizium isolates have been tested against caterpillar larvae, adults and pupae andfound to infect them Real IPM is currently testing its isolates against caterpillar pests.
Pheromones
Most economically important caterpillar pests have got commercially produced pheromones which are used in monitoring devices and which could also be used in auto-dissemination devices together with Real IPM Metarhizium using the re-charge packs for fruit fly AD devices.
Trap crops for caterpillarsAdult moths do not directly damage crops – they feed on nectar. But the eggs that they lay, turn into caterpillars that cause significant commercial damage.Moths can usually lay many hundreds of eggs. Therefore any reduction in the number of adult moths will have a very significant reduction in the number of caterpillars damaging the crop. A single armyworm moth for example will lay between 500 and 3,000 eggs.
Metarhizium infection in Heliothis caterpillar

64
Moth and caterpillar predators and parasitoids
Caterpillars are prey for a wide range of predators and parasitoids, which are usually killed by broad-spectrum sprays of pyrethroids and organophosphates. The benefit of Real Metarhizium is that it does not kill these natural enemies. These include Trichogramma (parasitic wasp of caterpillar eggs), ichneumon wasps, earwigs, tachinid flies, braconid wasps, chalcid wasps, carabid beetles, and ants. Spiders eat codling moth eggs, moths and larvae. Birds and bats are also an important ‘tool’ in keeping moths and caterpillar levels in check. Metarhizium harms neither bats nor birds.
Cultural methods for conserving these populations in the perennial fruit orchard are described below.
Conservation of indigenous natural enemies
Large numbers of any natural enemy will not be found in places where they do not have enough prey to feed on. When an orchard has been under a Real IPM programme for some years, the number of permanent resident pests will be lower and this will also reduce the number of‘permanent’ natural enemies. In the meantime, it is necessary to both conserve those which are present and possibly augment the natural enemy populations with additional, commercially reared predators and parasitoids.
Careful use of chemical pesticides, which are compatible with natural enemies, but also still kill pests, will be needed during the transition phase.
Grower groups, working in the same area, can exchange natural enemies between farms, on leaf material collected form orchards. Predatory mites and parasitized mealybug and wooly aphid are easily moved in this way.
Growers may refer to the Real IPM Pesticide Compatibility Charts available free of charge from the Log-in section of the Farmers Clubs. www.realipm.com

65
Field Insectaries
Parasitic wasps often take nectar from small flowers. Parasitoids that consume nectar are able to lay more eggs – which makes them more effective biological control agents. Umbelliferous flowers (e.g. coriander, dill, carrot). Other plants often used in field insectaries because they produce a lot of pollen for predatory mites are dwarf Mexican marigold and calendula.
The adult moths themselves may also be attracted to these flowers and could be killed by spraying the insectary with Real Metar-hizium 69. In this way the pest moths would not benefit by consuming ‘food’ from the flowers to help them lay more eggs in the crop.
Alternative egg-laying sites
Some plants such as sunflower and sorghum are preferred hosts for bollworm and could be included in the field insectary design.

66
Encouraging parasitic wasps
Some species of parasitic wasps will carry caterpillars from the crop and bring them to sites where they can be bricked in with mud, after laying an egg in the caterpillar body. The wasp egg develops into a larva that feeds on the caterpillar body, after pupating and emerg-ing as an adult wasp. Numbers of wasps can be enhanced if refuges are provided for them to conceal the caterpillars that they have captured in the crop.
Umbelliferous flowers provide nectar for beneficial insects
Parasitic wasps may paralyze caterpillars before carrying them away to refugia to lay eggs in them
Wasp carries away a large caterpillar to hollow reeds set up in an orchard

67
Mass produced parasitoids
In addition to conservation methods for natural enemies, it is possible to use either augmenta-tion methods (topping up levels of beneficial insects) or inundative releases (mass release when pest present). One of the most useful commercial parasitoids for caterpillars is Trichogramma, a tiny wasp that lays eggs inside caterpillar eggs.
Life cycle of Trichogramma
Trichogramma wasps laying eggs in a bollworm egg

68
Light traps
Moths are active at dusk and at night when they feed on nectar before laying eggs.Nectar provides the protein required for massive egg-laying programme. Using trap crops and night light traps to lure females out of the chilli crop will therefore have an impact on infestations in the chilies as killing one adult female could result in up to 3,000 less eggs laid in the chilies.Heliothis will attack a wide range of hosts, including tomato, which is very susceptible and is often grown on smallholder farms. If it is not controlled in the tomato crops, it will be a problem in adjacent chilli crops.
Repellent sprays
The use of repellent neem sprays just prior to flowering is worthy of investigation, since this is known to have a repellent effect on Diamond Back Moths and may have the same effect on Bollworm (eg Heliothis/Helicoverpa).Cultural controls for Armyworm, Bollworm and cutwormAll these caterpillars have a wide host range and will also feed on weeds. Keeping crops weed free is an important IPM strategy. Removing crop debris and keeping fields clean will also slow down the population growth of these pests. Do not prepare ground too far in advance of planting, so that weeds do not develop on open ground, as this will encourage these pests.
Physical controls
All of these caterpillars pupate in the soil. Deep ploughing of fields between crops turn up larvaeand pupae to the soil surface making them susceptible to predators and sun.Depending on the crop, flooding of the infested field may be a feasible control method in somecases. In small-scale farms, manual collection of the larvae is sufficient for control.

69
Mites (Tarsonemus spp and Tetranychus spp)
Two types of mites are known to infest chillies – tarsonemid mites and spider mites and it is important to distinguish which mites is the cause of the problem. Spider mite is easily observed with a hand lens but tarsonemid mites are much smaller and often hide along the leaf veins, where they are difficult to see. Tarsonemid mites are probably first noticed when they have already caused some damage because they are very small. (see below)
Symptoms of mite damage
The symptoms of tarsonemid and spider miteare different. Spider mite feeding causes speckling on the leaf as it sucks the green chlorophyll from the cells. Tarsonemid mite cause leaf distortion as a result of feeding - affected leaves curl downward along the margins of the leaf and attains on inverted boat shape. Fruits develop a corky, distorted surface. The affected plants develop dark green colour.In the affected plants the vegetative growth is inhibited and flower production affected and yields are considerably reduced.

70
Spider mite can be controlled using the predatory mite, Phytoseiulus, but tarsonemid mite is less attractive to Phytoseiulus as a prey. Amblyseius is a better predator for tarsonemid mites. Phytoseiulus is a predatory mite, which attacks spider mites. It is particularly effective since it will walk to the underside of leaves in search of prey.
There are several indigenous Amblyseius predatory mites that can migrate into the chilli cropif the spray programme is compatible.
spider mite egg (left)
Phytoseiulus adult (centre)
Phytoseiulus egg (right)
Juvenile Phytoseiulus is lighter in colour but still has noticeably longer legs than Amblyseius.

71
Real IPM programme for mite pests
Achieve - Real Metarhizium 78
Metarhizium 78 is specifically for mite pests. It kills the mite pests but not the predatory mites. So it can be used in situations where there are pest mites but not yet ‘enough’ predatory mite.
By spraying the Metarhizium 78 onto a population of a lot of broad mites (but not many predatory mites) you will reduce the number of pest mites more than you affect the predatory mite. This changes the ratio (balance of nature) between the predatory mite and the pest mites. See section on scouting.
• Apply Achieve during nursery production two weeks before planting out in the field• Continue with applications to the growing crop as scouting indicates is necessary. • One sachet per knapsack – one sachet costs 230/- Ksh each• Minimum order: 50 sachets. • Can be ordered on line see www.realipm.com
Amblyseius spp
Real IPM produces Amblyseius spp., which will prey on whitefly, thrips, spider mite and broad mites.
• Apply one bottle (12,500 Amblyseius) in each 25 msq of nursery plant production when the plants are touching. • Re-apply Amblyseius to the crop in the field once per month at a rate of 400,000 Amblyseius per acre (costs 4,000 Ksh per month)• They are packed in bottles of 12,500 in each bottle and cost 125/- per bottle• Minimum order 10 bottles.• Can be ordered on line see www.realipm.com
.....
.
..
.
.

62
Scouting method to measure risk
The pest pressure is unlikely to be even throughout the field. Crop-walk the whole field first to get a feeling for the pattern of the pest distribution. The edges may have higher pest levels because they are near bushes Some areas may be naturally hotter or cooler because of shade orprevailing wind.
Divide up the farm into a Scouting Map according to your observations and make a rough map of the different areas. Give them a Label or name – so that you can refer to that area in the scouting report.
The scouting map should also indicate the number of plants in each and an estimate of the meter square area because this will influence the number of knapsacks needed for each block or the number of predatory mites that need to be applied in each block.
Data
The three important pieces of information needed are:
1. What is the % of the plants in the field which are infested (estimate from crop walk)2. Of the leaves, which are showing damage (sample at least 20 damaged leaves/area) – what is the average number of pest mites (spider mite and broad mite) per leaf?3. Within the leaf sample – what is the ratio of predatory mite to pest mite?
How to use the ratio information
A ratio of 1 Predator to 10 spider mites is well under controlA ratio of 1 Predator to 50 broad mites is well under control
A ratio of 1 Predator to 50 spider mites is may need topping up with more predatorsA ratio of 1 Predator to 100 broad mites is may need topping up with more predators
A ratio of 1 Predator to 500 spider mites is a problem if the average number of spider mite per leafis ALSO high. You need to spray a compatible pesticide (Met 78 or silwet) to bring down the mite levels and then re-check the ratio and apply more predatory mites
A ratio of 1 Predator to 200 broad mites is a problem if the average number of broad mite per leafis ALSO high. You need to spray a compatible pesticide (Met 78 or silwet) to bring down the mite levels and then re-check the ratio and apply more predatory mites

73
Role of other biopesticides for caterpillar control
If Real Metarhizium 69 OD is the backbone of an IPM programme for thrips, leafminer and fruit fly in chillies, it will have already been applied to the soil because these pests have part of their life cycle in the soil.
It is therefore possible that the pupae of several of the pest caterpillars which are in the soil, will be infected with the Metarhizium and fail to emerge as adults.Other Metarhizium isolates have been tested against caterpillar larvae, adults and pupae andfound to infect them Real IPM is currently testing its isolates against caterpillar pests.
Pheromones
Most economically important caterpillar pests have got commercially produced pheromones which are used in monitoring devices and which could also be used in auto-dissemination devices together with Real IPM Metarhizium using the re-charge packs for fruit fly AD devices.
Trap crops for caterpillarsAdult moths do not directly damage crops – they feed on nectar. But the eggs that they lay, turn into caterpillars that cause significant commercial damage.Moths can usually lay many hundreds of eggs. Therefore any reduction in the number of adult moths will have a very significant reduction in the number of caterpillars damaging the crop. A single armyworm moth for example will lay between 500 and 3,000 eggs.
Fruit Flies in chillies
See Real Insight on Fruit Flies
fruit flies Bactrocera, Dacus, Ceratitis

74
FUNGAL DISEASES OF CHILLIES
Fruit-rot and die back (Collectotrichum capsici)2
Die back is a common symptom of Colle-totrichum. Young twigs will begin to die from the tip backwards. The infection may be latent in the plant but only shows symptoms when the plant is under stress – for example when flowering begins and there is a peak in demand for plant nutrients to feed the flowers.
There may be very heavy flower drop if the plant is infected with Colletotrichum. The flower stalks dry up first and this spreads into the flowers and from there to the stems and branches. This infection can severely affect the yield and quality of chillies
Fruit symptoms Ripe fruits are more vulnerable to attack than green ones
Small, circular, yellowish to pinkish sunken spots appear on fruits
Spots increase along fruit length attaining elliptical shape
Severe infection result in the shriveling and drying of fruits.
Tissues around lesions will be bleached and turn white or greyish in colour and lose their pungency.
On the surface of the lesions minute black dot like fruiting bodies called ‘acervuli’ devel-op in concentric rings and fruits appear straw coloured
The affected fruits may fall off subsequently. The seeds produced in severely infected fruits are discoloured and covered with mycelial mat.
2
http://agritech.tnau.ac.in/crop_protection/chilli_diseases_2.html

75
.
.
.
.
.
.
The affected stem and the bark first turns brownish and then turn to shinny white in long and narrow strips containing several black dot like fructifications. Affected twigs get with red and dry up from tip downwards, after on, the disease spreads to the fruits also Circular to oval, black sports occur on the ripe pods. Severally affected pods turn straw coloured instead of normal red, shrivel and dry up.
Life cycle
Colletotrichum survives on seeds from infected fruit and also on crop debris in the field. The conidia area spread by rain splash and movement on pickers hands.
Real IPM Programme
• This disease is seed borne and it is not advisable to use self-saved seeds for this reason. Buy and use certified disease-free seeds.
• Bio-primed seeds may reduce the risk of seed borne pathogens and viruses (see above)
• Use the Real IPM Healthy Transplant Programme described earlier in this manual.
• Apply strict hygiene programmes – remove all infected pods and plant debris and rogue all infected plants immediately.
• Regularly apply Real Trichoderma to the roots of plants via drip irrigation – this will help to enhance the plants immune system.
• Regularly apply Real Bacillus subtilis as a foliar spray – this will act as a bio-fertiliser as well as reduce foliar diseases in general. Tank mix with an appropriate fungicide only if disease symptoms occur. Timing: Just before flowering and at fruit formation and again 2 weeks later.
Copper oxychloride and sulphur have been used for this disease control

76
Powdery mildew (Oidiopsis taurica)
Symptoms
Yellow, chlorotic patches on the upper surface of the leaf, may dry out and die; whilst on the lower surface white powdery patches can be observed. Powdery white patches of spores develop on the lower surface of the leaves. Severe infections can cause leaves to turn yellow and drop-off and flower production is affected
Life Cycle
Powdery mildew is an airborne disease and spreads quickly in suitable weather. The disease progresses from the older to younger leaves and shedding of foliage is prominent symptom.
Real IPM Programme
• Use the Real IPM Healthy Transplant Programme described earlier in this manual.
• Regularly apply Real Bacillus subtilis as a foliar spray – this will act as a bio-fertiliser as well as reduce foliar diseases in general. Tank mix with an appropriate fungicide only if disease symptoms occur. Timing: Just before flowering and at fruit formation and again 2 weeks later.
.
.

Damping off (Pythium aphanidermatum and Rhizoctonia solanum)
Symptoms
Damping off is very common disease in nurseries. Seed may rot or the seedlings may be killed before they emerge from the soil. Stem of young seedlings may also be attacked after emergence showing water soaking and shrivel-ling of stem, which fall over and die. In nursery the disease may appear in patches in 2-4 days, the entire lot of seedling may be destroyed.
Life Cycle Phytophthora
Disease is most damaging on moist soils with poor drainage. Pythium has a motile zoospore that can swim in water to new plants and begin the infection. Therefore overwater will make this disease spread more quickly.
The fungus is mainly soil - borne. It requires humidity in the range of 90-100 % and a soil temperature nearer 20oC. When there is sufficient moisture in the soil, it germinates and produce mycelium which later forms the asexual stage of reproduction. The fungus is capable of living for many years in soil.
77
Mass produced parasitoids
In addition to conservation methods for natural enemies, it is possible to use either augmenta-tion methods (topping up levels of beneficial insects) or inundative releases (mass release when pest present). One of the most useful commercial parasitoids for caterpillars is Trichogramma, a tiny wasp that lays eggs inside caterpillar eggs.

78
Light traps
Moths are active at dusk and at night when they feed on nectar before laying eggs.Nectar provides the protein required for massive egg-laying programme. Using trap crops and night light traps to lure females out of the chilli crop will therefore have an impact on infestations in the chilies as killing one adult female could result in up to 3,000 less eggs laid in the chilies.Heliothis will attack a wide range of hosts, including tomato, which is very susceptible and is often grown on smallholder farms. If it is not controlled in the tomato crops, it will be a problem in adjacent chilli crops.
Repellent sprays
The use of repellent neem sprays just prior to flowering is worthy of investigation, since this is known to have a repellent effect on Diamond Back Moths and may have the same effect on Bollworm (eg Heliothis/Helicoverpa).Cultural controls for Armyworm, Bollworm and cutwormAll these caterpillars have a wide host range and will also feed on weeds. Keeping crops weed free is an important IPM strategy. Removing crop debris and keeping fields clean will also slow down the population growth of these pests. Do not prepare ground too far in advance of planting, so that weeds do not develop on open ground, as this will encourage these pests.
Physical controls
All of these caterpillars pupate in the soil. Deep ploughing of fields between crops turn up larvaeand pupae to the soil surface making them susceptible to predators and sun.Depending on the crop, flooding of the infested field may be a feasible control method in somecases. In small-scale farms, manual collection of the larvae is sufficient for control.
Life cycle Rhizoctonia solani
Rhizoctonia can affect both seedlings (damping off) and mature plants, if the crop is over watered. If mature plants are infected it can lead to wilting and death of chilli plants. Rhizoctonia solani persists in soils and organic debris.
.
.
.
.
.
.
Real IPM Programme for damping off
Control of damping-off diseases is difficult3. Damping-off must be anticipated and prevented by using seed and transplant treatments before the seed or plants are put in the field.
• Use the Real IPM Healthy Transplant Programme described earlier in this manual.
• Apply strict hygiene programmes – remove all seedlings.
• Regularly apply Real Trichoderma to the roots of plants via drip irrigation – this will help to enhance the plants immune system.
• Good seedbed preparation is important.
• Shallow planting of seed and seedlings to promote rapid germination and thereby less stem exposure to the soil has been used to reduce losses from R. solani damping-off.
Irrigation should be managed to enhance germination and growth and to avoid over watering.
Rhizoctonia inside the stem
of a mature chilli plant
3
http://anrcatalog.ucdavis.edu/pdf/8041.pdf

79
Fusarium wilt (Fusarium oxysporum f.sp.capsici)
Symptoms
Fusarium wilt is characterised by wilting of the plant and upward and inward rolling of the leaves. The leaves turn yellow and die
Generally appear localised areas of the field where a high percentage of the plants wilt and die, although scattered wilted plants may also occur. Disease symptoms are characterised by an initial slight yellowing of the foliage and wilting of the upper leaves that progress in a few days into a permanent wilt with the leaves still attached.By the time above - ground symptoms are evident, the vascular system of the plant is discoloured, particularly in the lower stem and roots.
Life CycleFungus causing this disease can live for several years in the soil. High temperatures and wet soil conditions favour disease development.
Disease is most likely occur in poorly drained soils. Hence, provision of drainage is necessary to control this disease to some extent.
Real IPM Programme for Fusarium
• Use the Real IPM Healthy Transplant Programme described earlier in this manual.
• Apply strict hygiene programmes – remove all seedlings.
• Regularly apply Real Trichoderma to the roots of plants via drip irrigation – this will help to enhance the plants immune system.
• Apply the Real IPM Good Agricultural Practice Recommendations.
.
.
.
.
.
By the time above - ground symptoms are evident, the vascular system of the plant is discoloured, particularly in the lower stem and roots.

80
Phytophthora Blight or Crown Rot (Phytophthora capsici).
Under field conditions, P. capsici has been found to affect a wide range of hosts in the Cucurbitaceae, Fabaceae, and Solanaceae families, including: cantaloupe, cucumber, watermelon, bell pepper, tomato, snap beans, and lima beans. Care needs to be taken with rotation of crops to avoid susceptible crops.
Caused by a water-borne fungus called Phytophthora capsici and is generally found in wet waterlogged areas. The fungus invades all plant parts causing the syndromes leaf blight, fruit rot and root rot. Plants suffering from this conditions often wilt and die very quickly.
Once the fungus enters the roots the plant is beyond saving unfortunately due to root rot. The condition may also affect a section of the plant rather than the plant as a whole. This section is often bordered with white mould - remove immediately. Avoid excess watering of plants and try to give your soil good drainage. A fungicide can be used on the leaf blight and fruit rot symptoms however root rot is usually terminal.
Infection of the root and lower portion of the stem leads to plant death.

81
Various types of Phytophthora spores are produced from rot lesions in fruits and stems. These spores can then directly penetrate the leaves, stems, fruits or roots of host plants.The pathogen is soil-borne and also spread by rain splashes or running water. Warm wet weath-er and damp soil promotes this disease. The disease may appear as damping-off of young seedlings, a root and crown rot of plants, or blight on leaves, stems and fruits.
Real IPM Programme for Phytophthora
• Use the Real IPM Healthy Transplant Programme described earlier in this manual.
• Apply strict hygiene programmes – remove all seedlings.
• Regularly apply Real Trichoderma to the roots of plants via drip irrigation – this will help to enhance the plants immune system.• Apply the Real IPM Good Agricultural Practice
Recommendations. 1. Phytophthora has a motile zoospore so is able to swim in water. It can be present in river water used for irrigation and overhead irrigation. In furrow-irrigated fields, there is a row-delimited pattern of wilted plants. 2. The disease can be spared by rain splash from the soil. Organic mulches will help reduce rain splash as well as help to conserve soil moisture. If excess rainfall is a recurring problem, growers should consider growing on raised beds to reduce Phytophthora. 3.The fungus is soil borne, so reducing populations of the pathogen through crop rotation is Good Agricultural Practice. 4.Soil solarisation may help reduce inoculum in the soil.
.
.
.
.
Life cycle

82
Leaf spots (Cercospora capsici) Leaf spots, which occur on the stem or leaf, which are oblong or circular with a small light grey centre and a dark margin, are likely to be Cercospora. Normally the cells in the spots die out and the dry tissue fall out of the leaf, leaving a hole. If infections are severe, leaf drop will occur.
Cercospora is seed borne and it is important to use only disease free, certified seed and sue the Real IPM bio-priming protocol.
Foot rot or Southern Blight (Sclerotium rollftsii)
Sclerotinia is a very persistent soil borne disease with many hosts. It is encouraged by over watering and is prevalent in hot wet seasons. Plants wilt due to the fungus girdling the stem and causing rots at the soil surface.
It has the nickname ‘frog – eye’
because of the pattern of the leaf
spot.
The fungus has a white growth with small brown ‘seeds’ in the mycelium. It can be visible above and below the soil
surface
Early symptoms are small yellow/green to brown spots on the young leaves, which develop into darker, water-soaked lesions.
The bacteria spread along the veins where water collects and the lesions take on a characteristic angular pattern because of the way the bacteria spreads on the leaf. The leaf spots become enlarged (3 – 6 mm in diameter and the centres will dry out to a straw colour with a dark margin.Leaves turn yellow and drop-off in severe infections.

83
Verticillium wilt (Verticillium dahliae and V. albo-atrum)
Verticillium is a soil-borne fungi which can infect the chili plant at any growth stageVisual symptoms of the disease include stunt-ing, defoliation and wilting, with discoloration of the vascular system.
Infected plants may exhibit physiological changes such as reduction in photosynthe-sis, increased plant transpiration, and respi-ration. Cool air and low soil temperatures can worsen the condition.
If the stem is cut, a brown discolouration may be visible.
Even within a plant, one side of a bush may be infected whilst the other side remains green.
In the field, the disease first appears in a single plant or a small group of wilting plants (foci) scattered throughout the field, depending on the distribution of the pathogen in soil.

84
BACTERIAL DISEASES OF CHILLIESBacterial leaf spot4 (Xanthomonas campestris)5
Xanthomonas is seed borne and can survive in soil. The disease is therefore more likely to develop in the propagation nursery. Rapid detection kits using plant sap can detect it.
Early symptoms are small yellow/green to brown spots on the young leaves, which develop into darker, water-soaked lesions.
The bacteria spread along the veins where water collects and the lesions take on a character-istic angular pattern because of the way the bacteria spreads on the leaf. The leaf spots become enlarged (3 – 6 mm in diameter and the centres will dry out to a straw colour with a dark margin.
Leaves turn yellow and drop-off in severe infections.
Fruit spots (up to 0.5 cm, 0.2 in.) begin as pale-green, water-soaked areas, which eventually become raised, brown, and roughened
Spots may provide entrance points for various fungal and other bacterial invaders that can cause secondary fruit rots.
The bacterial spot pathogen alone does not cause fruit rot.
5
www.apsnet.org/edcenter/intropp/lessons/prokaryotes/Pages/Bacterialspot.aspx
4
www.apsnet.org/edcenter/intropp/lessons/prokaryotes/Pages/Bacterialspot.aspx

85
...
..
The bacteria have a very limited survival period of days to weeks in the soil, and thus their survival is almost always in association with debris from infected or diseased plants.
The pathogen can survive in association with seed, either externally or internally
Real IPM Programme for Xanthomonas
• Use the Real IPM Healthy Transplant Programme described earlier in this manual. • Apply strict hygiene programmes – remove all crop debris.• Regularly apply Real Trichoderma to the roots of plants via drip irrigation – this will help to enhance the plants immune system.• Regularly apply Real Bacillus subtilis as a foliar spray. • Apply the Real IPM Good Agricultural Practice Recommendations.
Life cycle of bacterial leaf spot

86
.
Bacterial canker (Corynebacterium) and Bacterial soft rot (Erwinia) causing scabby canker spots or soft rots of pods (respectively). Suspect bacteria if the rot is foul smelling or there is a milky stream of fluid exuding from cut stems held under water.
Control: Resistant varieties, coupled with good drainage, liming, and crop rotation, are the best approach to disease control. This pathogen is not internally transmitted in seeds.
Copper fungicides offer limited control under favourable conditions (eg not too wet) Prevention is easier than cure (nursery and field hygiene and good irrigation management. If bacterial diseases are suspected, drip irrigation is less likely to encourage spread of the disease than overhead irrigation
Bacterial Wilt ( Ralstonia solanacearum - formerly called Pseudomonas solanacearum). Warm weather and poor drainage promotes this disease. The lower leaves may turn yellow, wilt and drop, and plants may die if disease advances. Vascular bundles in the lower stem turn brown when stems are pressed. When stems are cut and placed in water, milky streams of bacteria ooze from the plant. This disease occurs primarily in the humid periods
Erwinia
soft rot in
chilllies

87
CutwormsScouting guide for main pests and diseases of chillies
Caterpillars are grey, greenish-brown to brown in colour with a smooth skin. They normally curl-up when disturbed. Caterpillars feed at night and hide in the soil during the day. Scout for seedlings cut off at the base of the stem. Check for cutworms in the soil near the damaged plants.
Check field for cutworms before transplanting or before plants emerge when direct sowing is done.If pheromone traps are used to monitor appearance of moths check them regularly.
Aphids
Check for small colonies on young leaves and shoots. When the numbers are high the plant maybe covered with honeydew and black sooty mould.Check also for the presence of natural enemies. Parasitised aphids, known as mummies, are easily recognised, as they turn hard, and brown in colour.Larvae and adults of ladybird beetles, lacewings and hoverflies are normally found within or near the colony of aphids.
Fruit flies
Monitor fruits for egg-laying scars (dimples or small white specks in the middle of a shallow indentedarea on the surface of the fruit). Check appearance of flies on traps. Fruit flies are 4-7 mm long,brightly coloured, usually in brown-yellow-black patterns. The wings are spotted or banded withyellow or brown margins.
Caterpillars
For early detection scout for eggs and small caterpillars especially on young leaves, flower buds and shoots. Once the caterpillars get into the flowers and fruits they are well protected and damage has been done.
Helicoverpa moths lay single eggs while Spodoptera moths lay eggs in groups (masses)covered with scales or hairs on the lower leaf surfaces or on the structures of greenhouses. Thecolour of the caterpillars is very variable. Helicoverpa young caterpillars are olive green to reddish brown, have a dark head and coarse black hairs that gives them a spiny appearance.
Older caterpillars are olive green or dark grey or brown with alternating light and dark stripes running lengthwise on the body and two typical side stripes. They may reach 3-5 cm when fully grown.
Spodoptera caterpillars vary from green, yellowish white to brown and have lines along the body or dark spots on the dorsal side, according to the species. The size of the mature caterpillars varies from 3 to 4.5 cm long depending on the species.

88
If pheromone traps are used to monitor appear-ance of moths, check them regularly.Helicoverpa moths are about 1.5 cm long, yellowish brown in colour, with greyish wavy lines and a dark mark on each forewing.
Spodoptera littoralis moths are about 2 cm long, brown in colour with a large numberof pale yellow lines across the forewings. S. exigua are smaller (1.2 cm), brownish-grey with two small spots on the forewings.
Leafminers
For early detection check the upper surface of young leaves for punctures made by adults while feeding and laying eggs. The adult leafminer is a tiny (2-3mm long) blackish yellow fly. Check for presence of mines on leaves. Mines in young leaves indicate recent attacks. Check mines for presence of parasitised maggots (dark in colour in contrast to yellow colour of healthy maggots).Check yellow traps (sticky or water traps) for presence of leafminer flies and parasitic waspssuch as Diglyphus.
Thrips
For early detection check the underside of leaves, the apices of young fruits and shake flowers on a white piece of paper and look for the thrips. Check the underside of leaves for a silvery sheen and/or small, dark spots of faecal material. The upper side of older leaves turns brown.
Monitor adult thrips by hanging coloured (blue, yellow or white) sticky or water traps in the nursery or field. Check traps regularly.
Check for natural enemies. Pirate (Orius) bugs are commonly found in the flowers when thrips are present.
For early detection check the underside of young leaves for presence of adults and eggs. Whitefly adults resemble very small moths (about 1 mm long), are white in colour. They are often found in groups on the lower leaf surface and readily fly away when the plant is shaken.
Eggs are elliptical, about 0.2 to 0.3 mm long, attached vertically to the leaf surface. They are normally laid in an arc or circle on the underside of young leaves. The young stages or nymphs are scale-like in shape, greenish in colour and are covered or surrounded by wax. They are found on the underside of intermediate-aged and old leaves. They do not move. When they are many the plant may be partially or completely covered by sooty mould. Check yellow traps if used.

89
Broad mites
Broad mites are very small (0.1-0.2 mm long) and cannot be seen with the naked eye, and are difficult to detect with a hand lens. For early detection check for symptoms such as necrosis on the lower leaf surfaces, deformation (elongation and curling) of young leaves.
Spider mites:
Check plants at the edges of the field as mites can be dispersed by wind and infestation start in patches often on plants along the border. To detect early infestation look out for white speckling (clusters of yellow-white spots) of the upper leaf surface and check lower surface of leaves mainly along the main veins for presence of eggs and mites.
Mites are tiny (about 0.5 mm long) oval in shape with an arched back and have eight legs, except in the larval stage when they have six legs. The colour of the adult mite varies from yellowish green, brownish red to dark red according to the species.
The eggs, which look like a droplet of water, can be seen only with a hand lens. A magnifying lenswill also be handy to determine if they are alive. This is particular important to determine if an intervention (e.g. spraying with acaricides) has been successful.
Diseases: Early symptoms of the major diseases:
Damping-off
Seedlings fail to emerge (pre-emergence damping-off), small seedlings collapse (post-emergence damping-off) or seedlings are stunted (root rot and collar rot).
Seedbeds affected appear patchy. In the field, seedling diseases are conduced by cold, wet periods.
Anthracnose
Small tan flecks develop on cotyledon leaves shortly after emergence. Spots on leaves and fruitsare small, sunken with dark fungal spores on them, and a characteristic concentric ring (target-shaped) appearance. The fungus causes rapid infection only during heavy fog, dew or drizzle. The disease is most serious on ripe fruits.
Powdery mildew
On the upper leaf surface, chlorotic blotches or yellow spots, which may become necrotic aresymptomatic. On the lower leaf surface, a white to grey powdery growth may develop.Warm temperatures and high relative humidity favour the disease.

90
Fusarium wilt
The first visible symptom is drooping of the lower leaves. Later, younger shoots turn yellow, die and turn brown. Invaded roots become soft and develop a water-soaked appearance. Sliced roots exhibit a reddish brown colour in the wood. The disease is favoured by warm temperatures and high soil moisture and thus particularly serious in poorly drained soils.
Bacterial spot
Leaf spots first appear as small, circular, pale green pimples that are raised on the under surface of the leaf while the top surface of the spot may be depressed slightly. On older leaves, spots often are first dark green and water-soaked. Fruit spots are circular, initially green but become brown and raised with a cracked, roughened and wart-like surface (scabby appearance).
Warm temperatures and high relative humidity with free moisture on leaves favour disease development.
Bacterial soft rot
Rot symptoms usually start as a sunken area, either from the peduncle or around a skin puncture. The rot spreads rapidly until the entire fruit collapses into a soft slimy mass (resembling a sack of liquid retained by the skin). When the skin breaks the contents flow out. It is most destructive market disease. Warm temperatures and high moisture favour disease development.
Root-knot nematodes:
Aboveground symptoms may include stunting, drooping of leaves, lack of vigour and wilting of plants. Roots of affected plants develop small knots or galls. Severely affected roots rot. Root-knot nematodes are most damaging in sandy soils and in warm climates.
Bacterial wilt
First symptom is drooping of all leaves resembling symptoms of soil moisture deficiency. This is particularly conspicuous when it is hot. Drooping of leaves is followed by a sudden, permanent wilt of the entire plant with no leaf yellowing or browning. Roots of infected plants are discoloured. Cross sections cut from lower stems and roots of infected plants exude milky streams of bacteria from the vascular system when suspended in water. Warm temperatures and high soil moisture favour disease development.
Virus diseases:
It is nearly impossible to identify specific pepper viruses on the basis of symptoms observed on pepper plants and fruits in the field.
Symptoms include mosaic patterns, mottling, leaf deformation (including small-sized leaves), leaf curling, chlorosis, stunting (dwarfing) of plants when plants are attacked at early growth stages, and spotting (including ring spots), line patterns and distortion of fruits. Since many of the pepper viruses are transmitted by pests (aphids, leaf hoppers, mites, thrips and white-flies), it is important to check for these pests during scouting. Most viruses are serious in arid and semiarid areas where high temperatures prevail.

Realipm
@Realipm

The information contained in this manual does not constitute advice. Farmers should satisfy themselves of the registration and efficacy issues involved in implementation
Real Solutions | Real Farming
Real IPM (Kenya) Ltd
P.O Box 4001- 01002 Madaraka, Thika, Kenya
(+254) 0725 806086 | [email protected] |
www.realipm.com www.realipm.co.uk
DirectorDr Henry [email protected]
DirectorLouise [email protected]
Real IPM South Africa Pty LtdManaging DirectorJean [email protected]
Crop Defenders LtdManaging DirectorDr. Ishtiaq [email protected]
Real IPM U.KManaging DirectorAntony [email protected] & other countries
Elephant VertTechnical ManagerBenoit [email protected]
Zaidi [email protected]
South Africa, Zambia, Zimbabwe Morocco, Mali, Côte d'Ivoire,Ghana, Senegal, CamerounBurkina Faso & Tunisia
DISTRIBUTORS
Realipm