cash management user manual - first citizens … type the appropriate ... deposit accounts as well...
TRANSCRIPT

Cash Management
User Manual
CONTACT INFORMATION
First Citizens National Bank 15 South Main Street Mansfield, PA 16933
800-326-9486
Table of Contents NETTELLER LOGIN SCREEN ....................................................................................... 1 CHANGING PASSWORD OPTIONS............................................................................... 2 CASH MANAGEMENT LOGIN SCREEN .......................................................................... 3 Cash Management User Sign On ................................................................................ 3 Cash Management User Single Signon ........................................................................ 3 ACCOUNT ACTIVIY OPTIONS ..................................................................................... 5 TRANSACTIONS....................................................................................................... 6 STOP PAYMENTS...................................................................................................... 7 STOP PAYMENT CONFIRMATION................................................................................. 8 TRANSFERS ............................................................................................................ 9 PRIOR DAY ........................................................................................................... 10 PRIOR DAY ........................................................................................................... 11 STATEMENTS ........................................................................................................ 12 WIRES – Transmit Single Wire ................................................................................. 15 WIRES – Transmit Repetitive Wire............................................................................ 16 WIRES – Wire Transfers requiring Dual Control .......................................................... 17 ACH Batch List....................................................................................................... 18 ACH - Add Transactions .......................................................................................... 20 ACH – Batch Initiation ............................................................................................ 23 SEARCH ACH......................................................................................................... 24 UPLOAD ACH......................................................................................................... 25 TAX PAYMENTS – Federal ........................................................................................ 26 TAX PAYMENTS – (Initiate)...................................................................................... 28 TAX PAYMENTS – State (New) ................................................................................. 29 CASH MANAGEMENT USERS .................................................................................... 30 User Settings ........................................................................................................ 30 Global Settings ...................................................................................................... 32 Account Settings.................................................................................................... 33 OPTIONS .............................................................................................................. 34 Personal Options.................................................................................................... 34 Account Options .................................................................................................... 35 Alerts ................................................................................................................... 36 Display Options ..................................................................................................... 37 FILE STATUS......................................................................................................... 38

1
NETTELLER LOGIN SCREEN
This is the first screen you will see when accessing your accounts from the bank’s login page. The first time any company user signs on, they each will enter the same ID assigned by the bank in the ID field, and the last four digits of the company’s federal tax ID number in the Password field. All users in your company share this initial ID and Password, so be sure to safely and appropriately communicate it between your users. Initial Sign On (for Company) FIELD DESCRIPTIONS
NetTeller ID: The 12 digit number assigned by the bank during your account setup.
Password: The last four digits of the company’s Tax ID Number (default). Passwords are case sensitive.
Home: Clicking on this tab will take you back to www.firstcitizensbank.com.
Help: At any time throughout NetTeller you can select the Help feature to view an explanation of the page and the fields on that page.
Test Browser: This feature allows you to verify that your Internet Browser supports the required encryption level of 128-bit.
Reset Password: To use this feature, you must have entered an email address, Personal Question, and Personal Question answer in the NetTeller Options page. Click on the link if your password becomes locked, and follow the instructions to reset your password.
PROCEDURES
Type the appropriate NetTeller ID or Personal ID in the ID Field, then click in or tab to the Password field.
Type the appropriate Password in the Password field.
Click Submit.

2
CHANGING PASSWORD OPTIONS
The first time you sign on, or when your password has expired, you will be required to change your password for security reasons. All users in your company share this initial ID & Password, so be sure to safely and appropriately communicate it between your users.
FIELD DESCRIPTIONS
Current Password: The password that has just expired, or your default password if you are a new user or have had your password reset.
Enter your new Password: A 4–8 character alphanumeric password of your choice.
Re-enter your new password: Re-type your new password from the previous field. PROCEDURES
Type the appropriate password in the current password field, then click or tab to the next field.
Type the new 4-8 character alphanumeric password of your choice, then click or tab to the next field.
Re-enter the exact 4-8 character alphanumeric password that you entered in the previous field.
Click Submit.

3
CASH MANAGEMENT LOGIN SCREEN
Enter the Cash User ID and Password assigned by the bank. This ID is unique to each user.
Cash Management User Sign On
FIELD DESCRIPTIONS
Cash Management ID: The unique ID of each Cash Management User. IDs are case sensitive. Cash Management Password: The password established for your Cash User ID. Passwords are case sensitive. PROCEDURES
Type the appropriate User Name in the Cash Management ID field, then click in or tab to the Password field.
Type the appropriate Password in the Cash Management Password field, and then click Submit.
Cash Management User Single Signon
Upon initial login, and Cash User password change, you will be prompted to enter a new, unique single signon ID and Password. This ID and Password will be used as the signon information on all subsequent logins. Each time you log in, you will enter this information in the NetTeller ID and Password fields, versus the login for the company.

4
ACCOUNT LISTING PAGE
FIELD DESCRIPTIONS
Note: All available fields are displayed here. Fields enabled for the user will depend on security access.
Accounts: This is the default module when you log in to NetTeller. The Main screen lists the accounts to which you have access through NetTeller. Click the Pseudo account name for more account details.
Wires: Use this tab to access the Wires module. This is where you set up, maintain and send Wire Transfers.
ACH: Use this tab to access the ACH module to set up, maintain, and initiate ACH Batches (Payroll, Tax Payments, etc.)
ARP: Use this tab to access the Reconciliation module. This is where you upload and download files for reconciliation processing, and review Positive Pay files and exceptions.
Options: From the Options tab you can make changes to your NetTeller ID. Cash User Administration is also under Options. (Remember, if you change the initial sign on information, please communicate this change with all of your company’s users.)
Contact: If you would like to send a secure message to the bank, use the Contact option. The information you include in the message is not sent through e-mail, but rather a secure connection. Therefore, feel free to include account information in your correspondence.
Help: At any time while logged in to NetTeller, you can click on Help for more information about the page you are on or modules you are using.
Privacy Policy: To view our Privacy Policy at any time click on the Privacy Policy tab.
Logout: Please use the Logout tab when you are finished with your eBanking session. Upon exiting, you will be directed to www.firstcitizensbank.com.
Balance: This is the account’s real-time, available balance.
Status: The status of the account – New, Dormant, or Closed.
Account Listing: The accounts to which you have been given access via NetTeller will be listed.
Customer Summary Information: This will summarize the total dollar amount in your deposit accounts as well as any loan accounts displayed through NetTeller.

5
ACCOUNT ACTIVIY OPTIONS
FIELD DESCRIPTIONS
Transactions: Click on this option to view the transactions posted to your account during the current statement cycle, to search for a specific transaction, or to view your account information.
Download: Allows you to download your transaction history in various formats (Microsoft Money, Spreadsheet, etc.)
Stop Payments: Allows you to add or view stop payments for your account.
Transfers: Allows you to add, view, edit or delete account-to-account funds transfers that you have established. Transfers that have been set up by the bank may be viewed only.
Prior Day: Displays the prior day account information for the selected account. This information will be updated nightly.
Statements: Allows you to view your account statements. Your previous 90 days statement activity is always available. You will start accruing statement history when you are established as a NetTeller customer.

6
TRANSACTIONS
FIELD DESCRIPTIONS
Current Account: Use the drop-down menu to change which account’s transactions you are viewing.
Current Balance: This is your available balance for the current day.
Available Funds: This amount may include additional balances from other account types. Click the link to see the additional balances.
View Transactions Since: By default, transactions since your last statement will display. Use the drop-down menu to view the last 7, 15, or 30 days, or to Search Transactions. You can change the default setting in Options – Display.

7
STOP PAYMENTS
FIELD DESCRIPTIONS
View Stop Payments for: Using the drop-down menu, select the account for which you would like to view any stop payments.
Add Stop Payment: Select the account for which you would like to add the stop payment and then click the Add Stop Payment button. (See screen below for adding a stop payment.)
PROCEDURES
Check Number: Enter the number of the check for which you are placing the stop.
Amount: Enter the dollar amount of the check.
Payee: Enter the name of the person or company to which you issued the check.
Remark: Enter any remarks about the item or stop payment (e.g. lost check, duplicate).

8
STOP PAYMENT CONFIRMATION
Receipt of the confirmation page indicates the bank has placed the Stop Payment request on your account. *Note: to revoke a stop payment placed on your account, please call the bank directly at 800-326-9486.)

9
TRANSFERS
FIELD DESCRIPTIONS
View Transfers for: Using the drop-down menu, select the account for which you would like to view any scheduled transfers.
Add Transfer From: Select the account for which you would like to transfer funds from.
PROCEDURES – Transfer Funds
Transfers funds from: This will default to the account selected on the previous screen. You may select another available account.
Transfer funds to: Select the account into which you would like to transfer funds.
Payment Options: Different payment options will be available if you are transferring to a loan account.
Amount to Transfer: Enter the dollar amount of the funds transfer.
Frequency: Choose the frequency for the funds transfer. Options include One-Time, Weekly, Bi-Weekly and Monthly. (Depending on the frequency selected, additional fields will display on the page – e.g. expiration date, day of month, etc.).
Date: Enter the date the transfer should be made.
Memo: Enter any descriptive information for the funds transfer. This information will display with the transaction and on your statement.
10
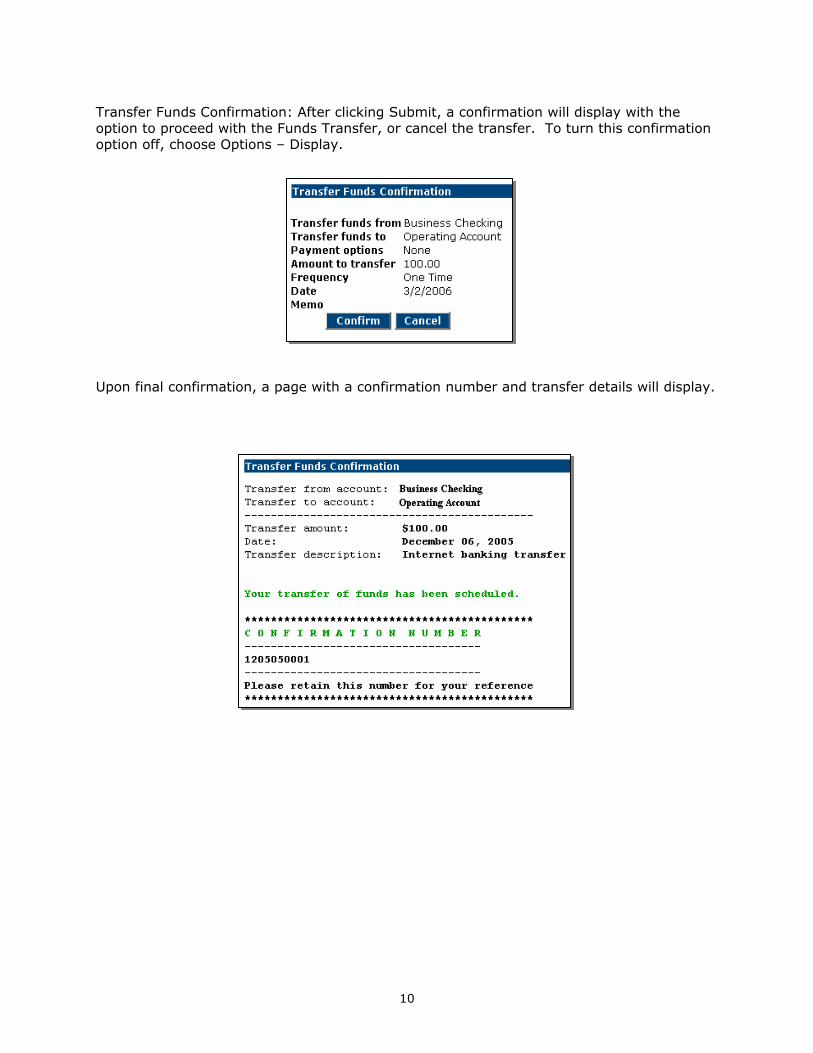
Transfer Funds Confirmation: After clicking Submit, a confirmation will display with the option to proceed with the Funds Transfer, or cancel the transfer. To turn this confirmation option off, choose Options – Display.
Upon final confirmation, a page with a confirmation number and transfer details will display.

11
PRIOR DAY
FIELD DESCRIPTIONS
Prior Day information: A summary of transaction dollar amounts posted to your account the previous business day. This information is updated nightly.

12
STATEMENTS
FIELD DESCRIPTIONS
View Statements/Notices for: Using the drop-down menu, select the account for which you would like to view your statement.
View Statement/Notice List: Your statement activity will be available for the previous 90 days through NetTeller. Next to the statement you want to view, select the view type. Options are PDF, HTML, or Text.
13
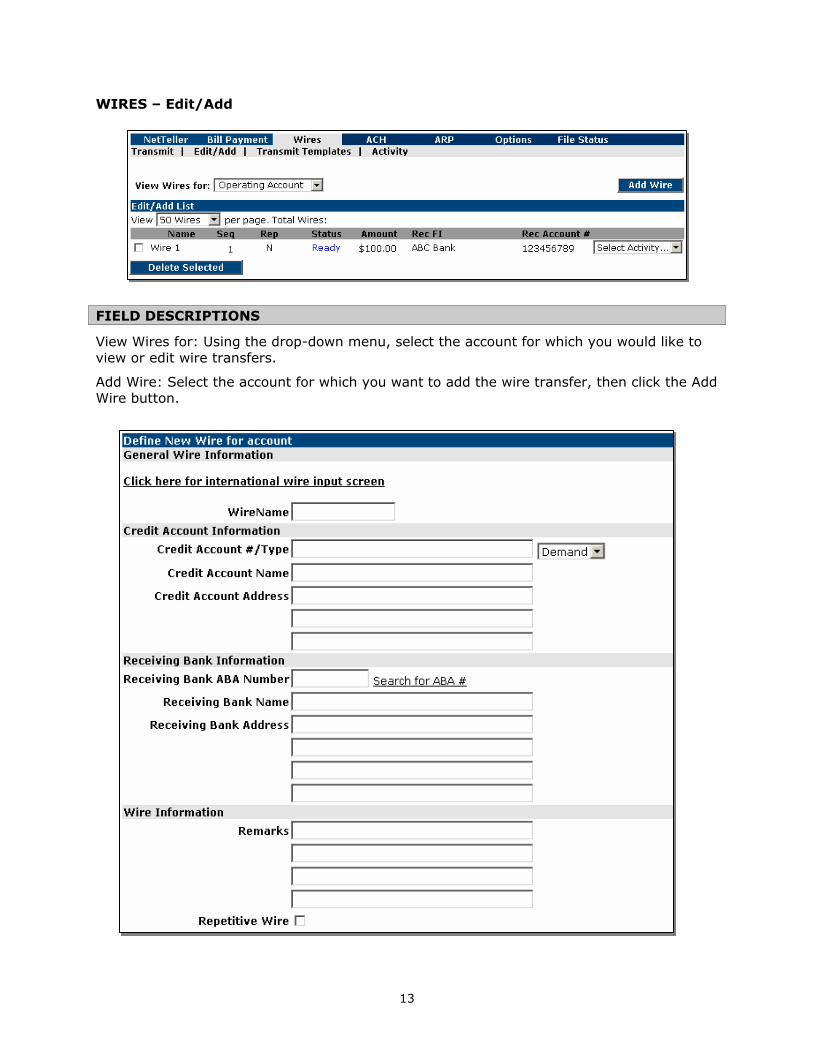
WIRES – Edit/Add FIELD DESCRIPTIONS
View Wires for: Using the drop-down menu, select the account for which you would like to view or edit wire transfers.
Add Wire: Select the account for which you want to add the wire transfer, then click the Add Wire button.
14
PROCEDURES – Add Wire Transfer
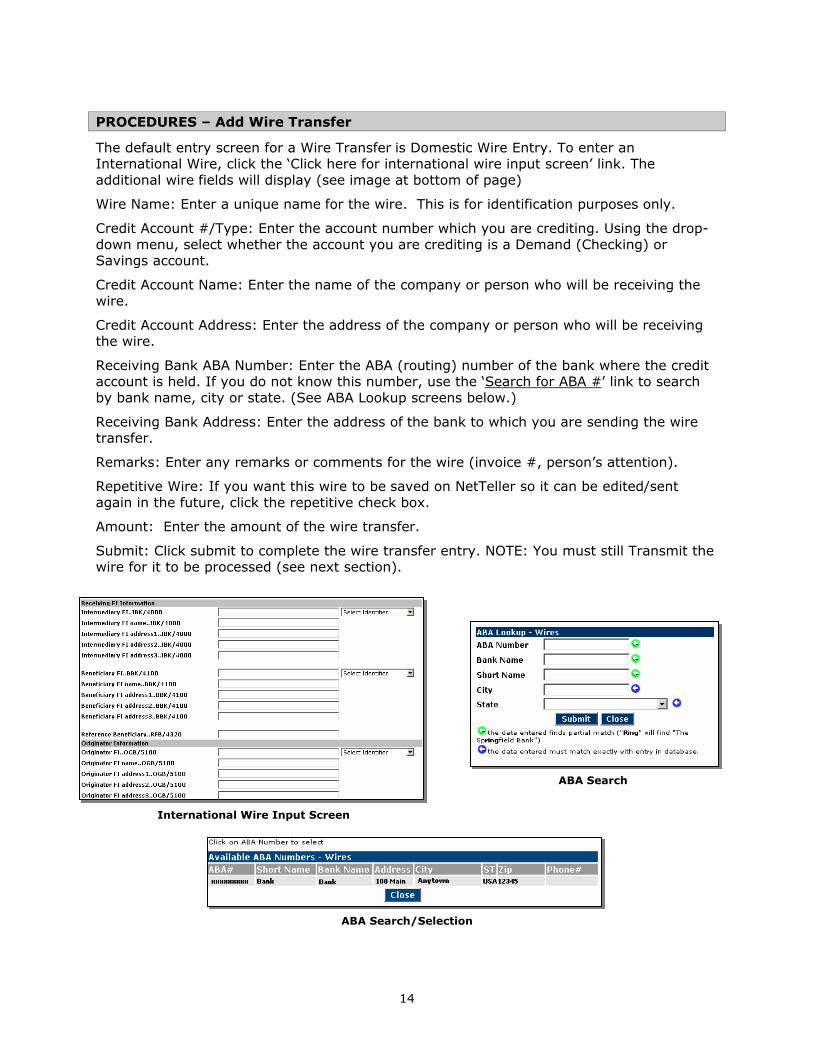
The default entry screen for a Wire Transfer is Domestic Wire Entry. To enter an International Wire, click the ‘Click here for international wire input screen’ link. The additional wire fields will display (see image at bottom of page)
Wire Name: Enter a unique name for the wire. This is for identification purposes only.
Credit Account #/Type: Enter the account number which you are crediting. Using the drop-down menu, select whether the account you are crediting is a Demand (Checking) or Savings account.
Credit Account Name: Enter the name of the company or person who will be receiving the wire.
Credit Account Address: Enter the address of the company or person who will be receiving the wire.
Receiving Bank ABA Number: Enter the ABA (routing) number of the bank where the credit account is held. If you do not know this number, use the ‘Search for ABA #’ link to search by bank name, city or state. (See ABA Lookup screens below.)
Receiving Bank Address: Enter the address of the bank to which you are sending the wire transfer.
Remarks: Enter any remarks or comments for the wire (invoice #, person’s attention).
Repetitive Wire: If you want this wire to be saved on NetTeller so it can be edited/sent again in the future, click the repetitive check box.
Amount: Enter the amount of the wire transfer.
Submit: Click submit to complete the wire transfer entry. NOTE: You must still Transmit the wire for it to be processed (see next section).
International Wire Input Screen
ABA Search
ABA Search/Selection
15
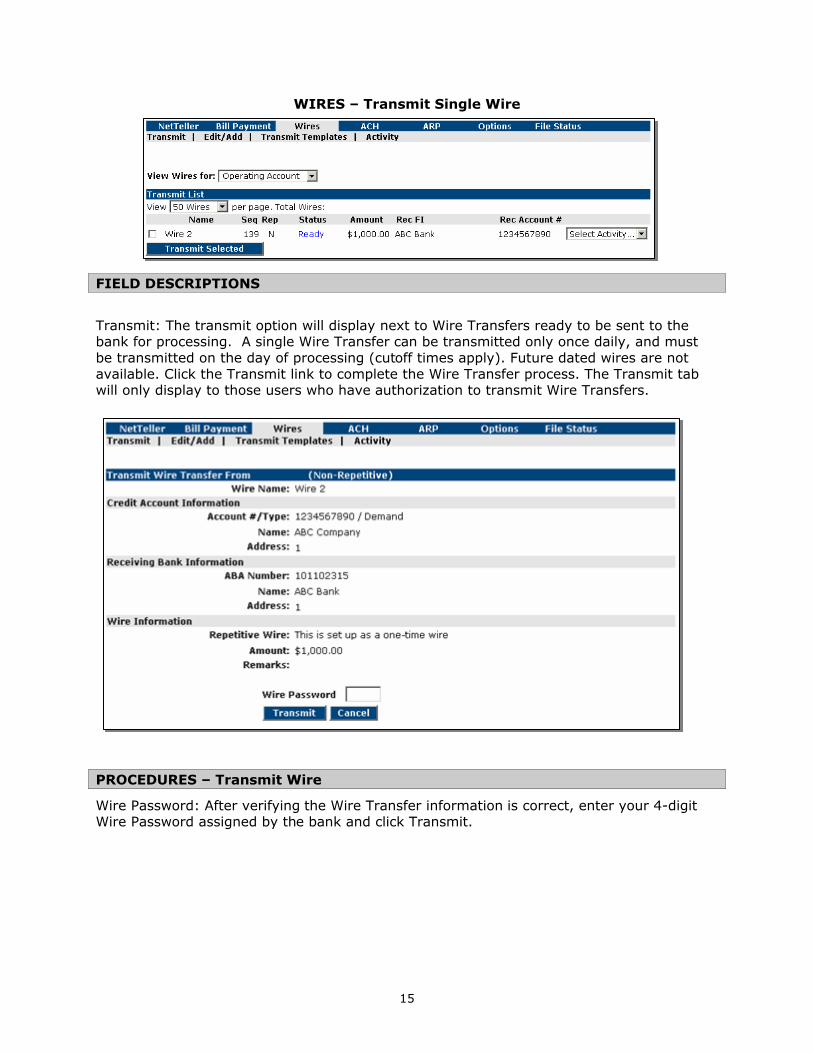
WIRES – Transmit Single Wire
FIELD DESCRIPTIONS
Transmit: The transmit option will display next to Wire Transfers ready to be sent to the bank for processing. A single Wire Transfer can be transmitted only once daily, and must be transmitted on the day of processing (cutoff times apply). Future dated wires are not available. Click the Transmit link to complete the Wire Transfer process. The Transmit tab will only display to those users who have authorization to transmit Wire Transfers. PROCEDURES – Transmit Wire
Wire Password: After verifying the Wire Transfer information is correct, enter your 4-digit Wire Password assigned by the bank and click Transmit.
16
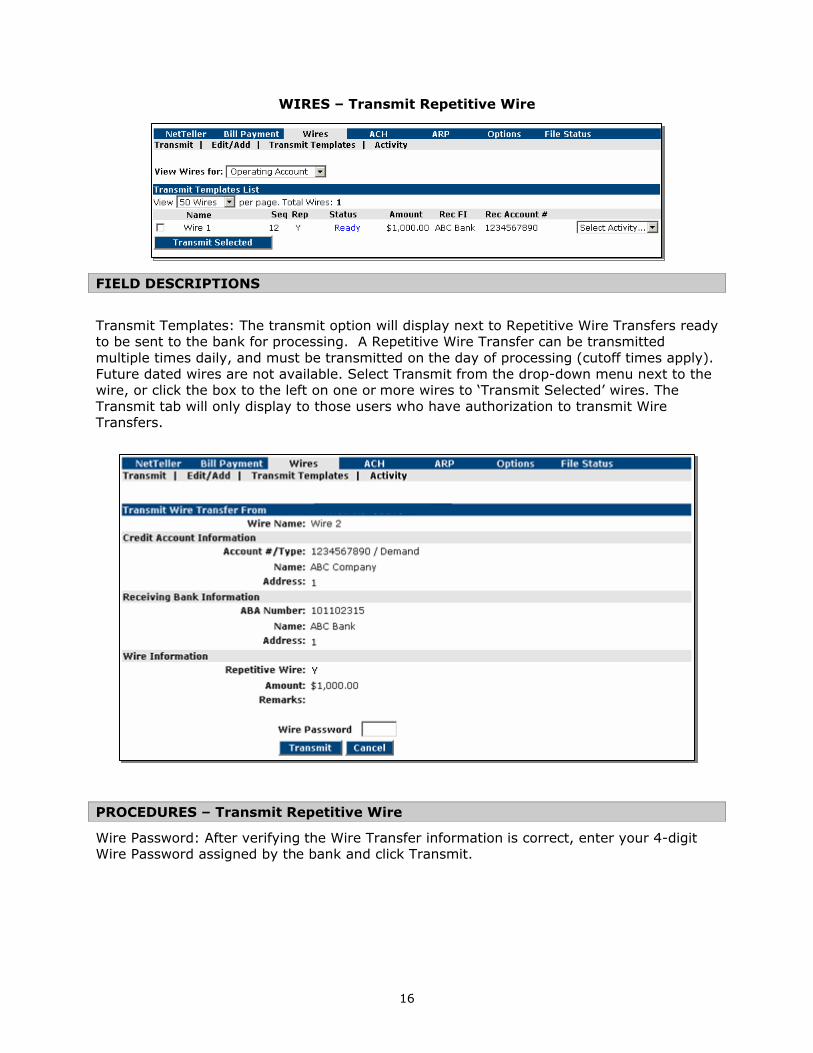
WIRES – Transmit Repetitive Wire
FIELD DESCRIPTIONS
Transmit Templates: The transmit option will display next to Repetitive Wire Transfers ready to be sent to the bank for processing. A Repetitive Wire Transfer can be transmitted multiple times daily, and must be transmitted on the day of processing (cutoff times apply). Future dated wires are not available. Select Transmit from the drop-down menu next to the wire, or click the box to the left on one or more wires to ‘Transmit Selected’ wires. The Transmit tab will only display to those users who have authorization to transmit Wire Transfers. PROCEDURES – Transmit Repetitive Wire
Wire Password: After verifying the Wire Transfer information is correct, enter your 4-digit Wire Password assigned by the bank and click Transmit.

17
WIRES – Wire Transfers requiring Dual Control
PROCEDURES – Dual Control Wires
Dual Control Wires: If a Wire Transfer is at or above the Dual Control limit for the user, the wire must be approved by a second user. Upon the second user entering their Wire PIN and clicking ‘Approve’, the Wire is sent to the bank for processing. A user’s Dual Control limit can be changed under Options – Cash Mgmt Users.

18
ACH Batch List FIELD DESCRIPTIONS
ACH Batch List: This list will contain the ACH Batches you have entered or uploaded into NetTeller.
Create new batch for: Using the drop-down menu, select the company for which you want to create a new ACH Batch.
Status
Ready – The batch is ready to be initiated and sent to the bank for processing.
Initiated – The batch has been initiated and sent to the bank for processing, but the bank has not yet processed the batch.
Processed – The bank has processed the batch. Following the bank’s End of Day processing, the batch will return to a Ready or Pending status.
Uploaded – The batch has been uploaded from a 3rd party software. Batches can be initiated while in uploaded status.
Category: Each batch should have a unique category name. This can be generic (Payroll) or specific (033106 Payroll).
Type: This is the class code for the ACH Batch. Use the drop-down menu to select a different standard entry class code.
Company: This is the company for which the batch has been established.
Debits: This is the total of all debit transactions for the batch. Batches must have equal debits and credits to be initiated. The dollar amounts for batches not in balance will display in red.
Credits: This is the total of all credit transactions for the batch. Batches must have equal debits and credits to be initiated. The dollar amounts for batches not in balance will display in red.
Quick Initiate: To initiate more than one batch at a time, select the batches to initiate by clicking in the box to the left of the batch. Once the batches have been selected, click Quick Initiate. You will be able to enter the effective date of each batch on the next screen.

19
New ACH Batch
PROCEDURES – Set up a new ACH Batch
At the ACH Batch List page, click on “Create new batch for:” and select company. You will receive a batch header screen as shown above.
Complete the following fields:
Batch: Enter a unique name for this batch, which can be generic (Payroll) or specific (Payroll 031504).
SEC Code: Choose the correct SEC Category Code for the batch.
Company: The company selected in the previous screen will prefill. This name, along with the Entry Description, will be transmitted with the transaction.
Company ID: The Tax ID number of the selected company.
Discretionary Data: A description of the batch.
Entry Description: This description, along with the Company Name, will transmit with the transaction.
Click Submit

20
ACH - Add Transactions
PROCEDURES – Add Transactions
Complete the following fields (for multiple records, click ‘Add Multiple Records’, or to Import Transactions, click ‘Import Transactions’ - see next sections):
Name: Enter the name of the person or company you are going to credit or debit.
ID#: Enter the ID number of the person or company you are going to credit or debit. This can be a social security number, employee number, name, etc.
Amount: Enter the amount of the transaction.
Prenote: If this transaction should also be created as a prenote, click the Prenote box. A separate Prenote batch will be created.
Routing #: Enter the routing number for the transaction or use the search feature to look up the ABA number.
Account Number: Enter the account number to which you will be sending the transaction.
Account Type: Using the drop-down menu, choose the type of account that corresponds to the account number entered.
Transaction Type: Choose whether the transaction is a Credit or Debit.
Status: You can hold a transaction if you want the transaction to be part of the batch, but you do not want it to be transmitted with this batch.
Click Quick Add to enter another transaction.
Click Submit when all transactions have been entered.
21
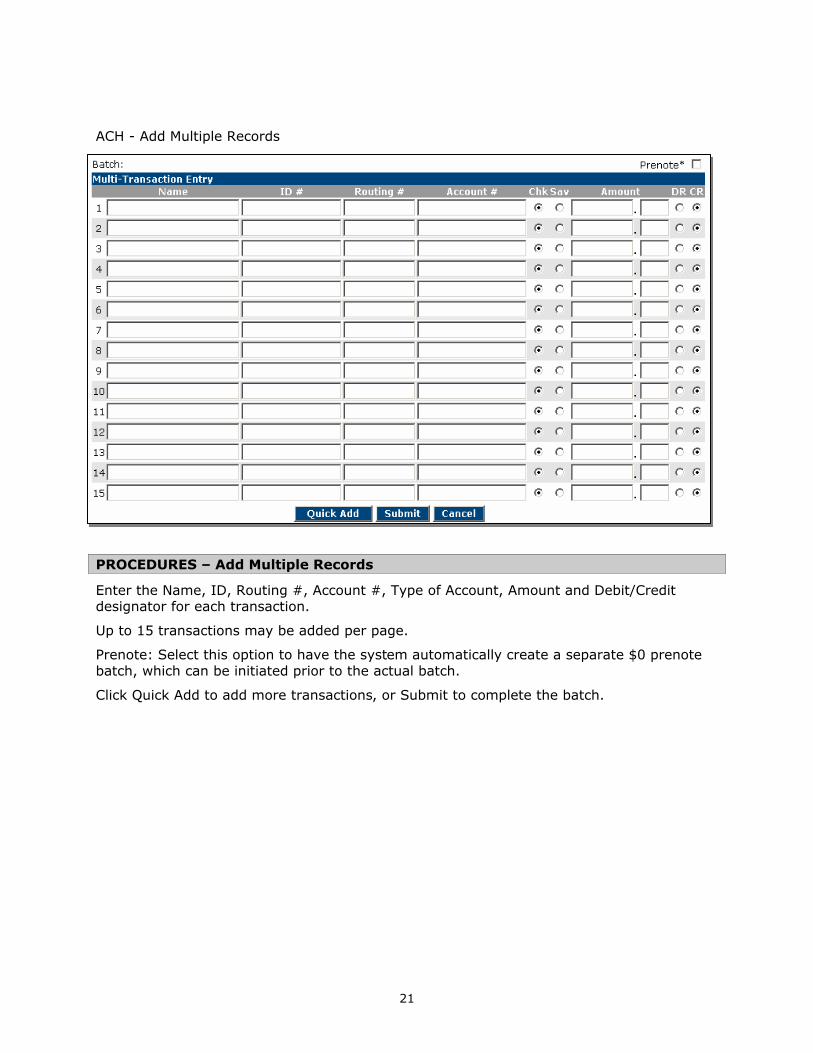
ACH - Add Multiple Records
PROCEDURES – Add Multiple Records
Enter the Name, ID, Routing #, Account #, Type of Account, Amount and Debit/Credit designator for each transaction.
Up to 15 transactions may be added per page.
Prenote: Select this option to have the system automatically create a separate $0 prenote batch, which can be initiated prior to the actual batch.
Click Quick Add to add more transactions, or Submit to complete the batch.

22
Batch Activity
FIELD DESCRIPTIONS
Add Record: Click Add Record to add transactions to the batch.
Return: Click return to go to the Batch List.
Batches in Ready status must be Initiated to send to the Bank for processing.
FIELD DESCRIPTIONS – Batch Activity Options
View: Use this option to view the transactions entered for this batch.
Download: You can download an ACH summary in .pdf or NACHA format. .pdf format requires Adobe Acrobat Reader.
Edit: Allows you to edit, delete or add transactions, or modify the Batch Header information.
Quick Edit: Allows you to change the amount, debit/credit setting, hold, or prenote status.
Copy: Allows you to make a duplicate of the batch.
Import Transactions: Allows you to import non-NACHA files to create an ACH batch. Imported files must match your specified Import Layout format (see Import Layout).
23
Delete: Deletes the batch from NetTeller. The batch will no longer exist in the batch list for future use.
Initiate: Use this option to send the batch to the bank for processing.
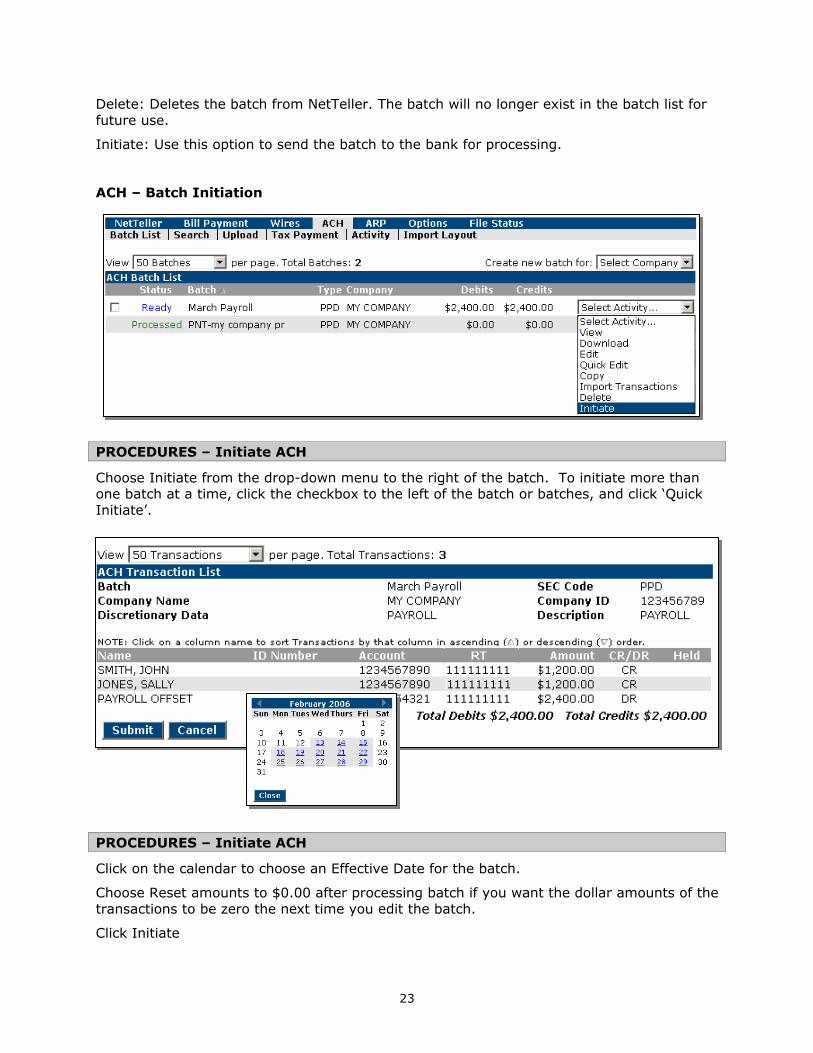
ACH – Batch Initiation
PROCEDURES – Initiate ACH
Choose Initiate from the drop-down menu to the right of the batch. To initiate more than one batch at a time, click the checkbox to the left of the batch or batches, and click ‘Quick Initiate’.
PROCEDURES – Initiate ACH
Click on the calendar to choose an Effective Date for the batch.
Choose Reset amounts to $0.00 after processing batch if you want the dollar amounts of the transactions to be zero the next time you edit the batch.
Click Initiate

24
A system message will display the initiated batch confirmation number.
After the bank processes the batch, the status will change to Processed. The next business day the batch status will return to Ready and the batch can then be edited or initiated again.
SEARCH ACH
PROCEDURES – Search ACH
You can search across all batches for a record or transaction. Enter the search criteria and click Search.
The results will allow you to make changes or delete transactions from one screen, versus searching through each batch one at a time.

25
UPLOAD ACH PROCEDURES – Upload ACH
File Name: Enter the file name/path or Browse for the NACHA formatted file you want to upload.
Click Upload
To check the status of the upload, click File Status from the menu bar.
26
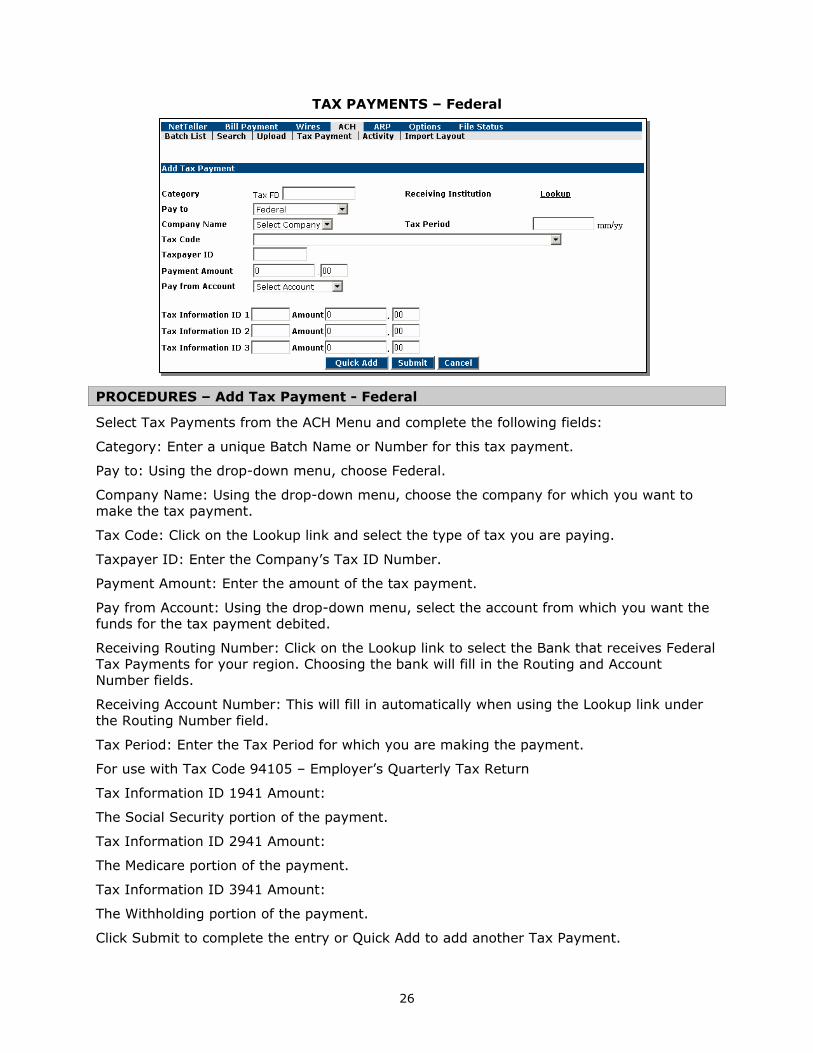
TAX PAYMENTS – Federal PROCEDURES – Add Tax Payment - Federal
Select Tax Payments from the ACH Menu and complete the following fields:
Category: Enter a unique Batch Name or Number for this tax payment.
Pay to: Using the drop-down menu, choose Federal.
Company Name: Using the drop-down menu, choose the company for which you want to make the tax payment.
Tax Code: Click on the Lookup link and select the type of tax you are paying.
Taxpayer ID: Enter the Company’s Tax ID Number.
Payment Amount: Enter the amount of the tax payment.
Pay from Account: Using the drop-down menu, select the account from which you want the funds for the tax payment debited.
Receiving Routing Number: Click on the Lookup link to select the Bank that receives Federal Tax Payments for your region. Choosing the bank will fill in the Routing and Account Number fields.
Receiving Account Number: This will fill in automatically when using the Lookup link under the Routing Number field.
Tax Period: Enter the Tax Period for which you are making the payment.
For use with Tax Code 94105 – Employer’s Quarterly Tax Return
Tax Information ID 1941 Amount:
The Social Security portion of the payment.
Tax Information ID 2941 Amount:
The Medicare portion of the payment.
Tax Information ID 3941 Amount:
The Withholding portion of the payment.
Click Submit to complete the entry or Quick Add to add another Tax Payment.

27
You will be brought back to the ACH Batch List. The message successfully added Tax Payment will display.
You must initiate the batch to the bank for processing (see page 24 – Initiate ACH ACH Batch).
28
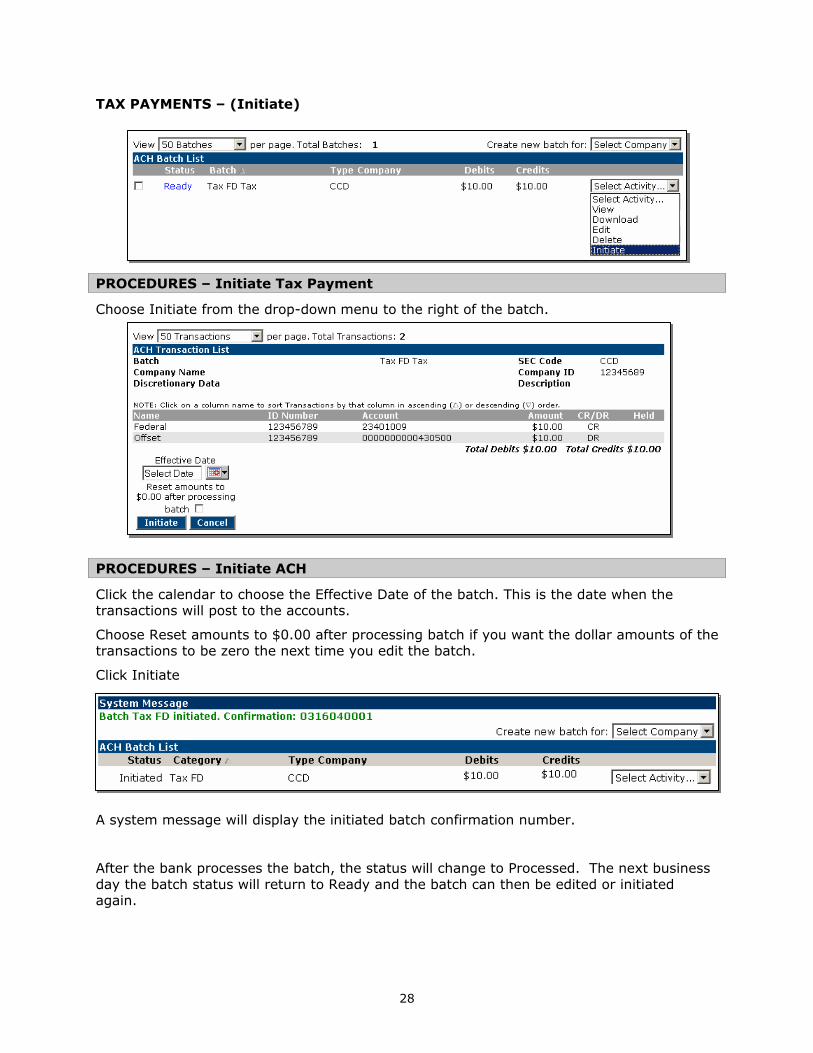
TAX PAYMENTS – (Initiate)
PROCEDURES – Initiate Tax Payment
Choose Initiate from the drop-down menu to the right of the batch.
PROCEDURES – Initiate ACH
Click the calendar to choose the Effective Date of the batch. This is the date when the transactions will post to the accounts.
Choose Reset amounts to $0.00 after processing batch if you want the dollar amounts of the transactions to be zero the next time you edit the batch.
Click Initiate
A system message will display the initiated batch confirmation number.
After the bank processes the batch, the status will change to Processed. The next business day the batch status will return to Ready and the batch can then be edited or initiated again.
29
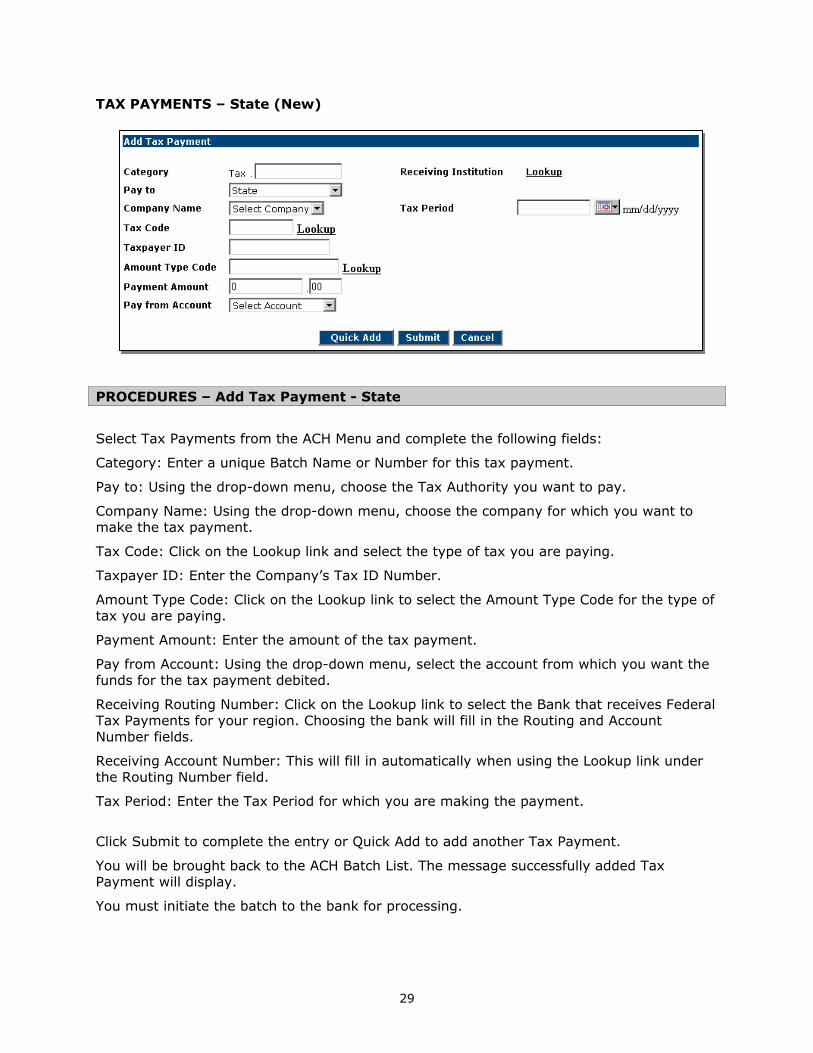
TAX PAYMENTS – State (New) PROCEDURES – Add Tax Payment - State
Select Tax Payments from the ACH Menu and complete the following fields:
Category: Enter a unique Batch Name or Number for this tax payment.
Pay to: Using the drop-down menu, choose the Tax Authority you want to pay.
Company Name: Using the drop-down menu, choose the company for which you want to make the tax payment.
Tax Code: Click on the Lookup link and select the type of tax you are paying.
Taxpayer ID: Enter the Company’s Tax ID Number.
Amount Type Code: Click on the Lookup link to select the Amount Type Code for the type of tax you are paying.
Payment Amount: Enter the amount of the tax payment.
Pay from Account: Using the drop-down menu, select the account from which you want the funds for the tax payment debited.
Receiving Routing Number: Click on the Lookup link to select the Bank that receives Federal Tax Payments for your region. Choosing the bank will fill in the Routing and Account Number fields.
Receiving Account Number: This will fill in automatically when using the Lookup link under the Routing Number field.
Tax Period: Enter the Tax Period for which you are making the payment.
Click Submit to complete the entry or Quick Add to add another Tax Payment.
You will be brought back to the ACH Batch List. The message successfully added Tax Payment will display.
You must initiate the batch to the bank for processing.

30
CASH MANAGEMENT USERS FIELD DESCRIPTIONS
User ID: The Cash Management ID assigned to the user.
User Name: The name of the Cash Management user.
Status: Status options are OK or Locked. Only the bank can unlock an Administrative User. The company’s Administrative User can unlock other user’s IDs.
Add User: Enter the name the new user (case sensitive) and click Add User to set up a new Cash User.
User Settings

31
PROCEDURE – Add New Cash Management User – User Settings
Complete the following fields:
User ID: This is established on the previous screen (Add User field)
User Name: Enter the full name of the new user.
User Held: If you want to block the Cash User’s access to the system, place a check mark in the box. This can be used at any time if the user should be away from work for a period of time and you do not want them to log in. When a Cash User is locked due to too many invalid login attempts, this box will be checked. To unlock a user, un-check the box and type over the user’s password to reset it. Leave the password fields blank to keep the current password.
Password: Enter the password for the user’s sign on to NetTeller Cash Management. The user will be required to change this when they log in.
Administration:
Yes – The cash user will be able to add or edit other cash users, as well as make changes to the eBanking Options (PIN, Pseudo Account Names, etc.)
Partial – The cash user will be able to make changes to eBanking Options, but not add or edit cash users.
No – The cash user will only be able to change their cash user password or Wire PIN (if applicable).
View – The cash user will be able to view other Cash User’s setup information, but not make any changes.
Allow Download: If the user should have access to download Prior Day Information files, check the box.
Wire PIN: If this user will have rights to Transmit Wire Transfers, enter a 4-digit wire password. This field is required if the Transmit Wires option is selected in the next section.
E-Mail Address: Enter the e-mail address of this user. This will be used to notify the user of responses to a secure message.
Daily ACH Limit: Enter the maximum dollar amount that the user will be able to initiate. This amount is per day. Please be sure to allow for credits and debits. Example: A batch with $5000.00 in credits will require an ACH limit of $10,000.00. More than one batch up to this limit may be sent by the user in the same day. Batches initiated by all users cannot exceed the limits set for the company or the bank.
Per Wire Limit: Enter the maximum dollar amount that the user will be able to initiate. This amount is per Wire Transfer. More than one wire up to this limit may be sent by the user in the same day. Wires initiated by all users cannot exceed the limits set for the company or the bank.
Transfer Limit: Enter the maximum dollar amount that the user will be able to transfer to another account. This amount is per transfer.
Daily Wire Limit: Enter the maximum dollar amount that the user will be able to initiate or approve per day. Wires that this user approves or transmits will be checked against this limit.

32
Dual Control: Check the box if wires for this user will require approval by a second user.
Dual Control Limit: If the Dual Control box is checked, all wires at and above the Dual Control Limit will require approval by a second user.
ACH Controls
Display ACH: Allows the user to view ACH batches and the associated transactions.
Work with ACH: Allows the user to add, edit, and delete ACH transactions from a batch, and create new ACH batches.
Initiate ACH: Allows the user to send an ACH batch to the bank for processing.
Full ACH Control: Allows the user to utilize all of their assigned functions without another user’s involvement. If Full Control is not selected, users that create a batch will not be able to initiate the batch unless another user edits the batch first. Another user with Initiate capability can initiate the batch at any time.
Upload ACH: Allows the user to upload NACHA files.
Delete ACH: Allows the user to delete ACH batches.
Import ACH: Allows the user to import transactions (CSV, Fixed-position, etc.) in to a batch.
Update ACH: Allows the user to re-import transactions in to a batch to update the dollar amount of the transactions.
Restricted Batch Access: Allows the user to create and view ACH Batches that only Restricted Batch Access users can view, edit, or initiate.
Global Settings
PROCEDURE – Add New Cash Management User – Global Settings
Select the options to which the Cash User will have access. Options with a shaded box cannot be selected. Options allowed at the NetTeller ID level will be checked by default.

33
Define Non-Repetitive Wires: Allows the user to create a single wire transfer.
Edit Non-Repetitive Wires: Allows the user to edit a single wire transfer.
Define Repetitive Wires: Allows the user to create a Repetitive wire transfer.
Edit Repetitive Wires: Allows the user to edit a Repetitive wire.
Full Wire Control: Allows the user to utilize all of their assigned Wire functions without another user’s involvement. If Full Control is not selected, users that create a wire will not be able to transmit the wire unless another user edits the wire first. Another user with Transmit capability can transmit the wire at any time.
Allowed to View: Select the account types or reports to which the Cash User will have access. Options with a shaded box cannot be selected.
Click Submit
Account Settings
PROCEDURE – Add New Cash Management User – Account Settings
Edit Wires Controls: Further control the limits and Dual Control setting for the selected account.
Edit Access Rights: Select the options to which the Cash User will have access on an account-by-account basis. Options with a shaded box cannot be selected. Options allowed on the Global Settings screen will be checked by default for the accounts to which the user has access. Use the ‘View Access for Account’ drop-down menu to change accounts.
Click Submit

34
OPTIONS
Personal Options
FIELD DESCRIPTIONS – Personal Options
Reset Login Count: To clear the access counter on the Account Listing page, click the Reset Login Count link. The count will still include your current login.
Password: The password for the NetTeller ID (Company). Passwords must meet the criteria displayed to the left of the Password option.
Personal ID: The Personal ID for the NetTeller ID (Company). The Personal ID is used as a way to log in to NetTeller instead of using the 12-digit NetTeller ID.
Change E-mail Address: The e-mail address for the NetTeller ID (Company). An e-mail address must be entered in order to use the Password Self Reset feature.
Single Sign On Maintenance - ID: Edit your Single Sign On ID.
Single Sign On Maintenance – PIN: Edit your Single Sign On PIN.
Cash Management Wire Password: The password needed to transmit a Wire Transfer.
Personal Question: A question of your choice that will be presented when using the Password Self Reset feature.
Personal Question Answer: The answer to the Personal Question, which will need to be entered when using the Password Self Reset feature.
Click Submit to save changes.

35
Account Options
FIELD DESCRIPTIONS – Account Options
Account Pseudo Names: Edit the display names for your accounts. For security reasons, please do not name the accounts your account number. Pseudo names cannot contain special characters.
Account Display Order: Edit the order in which your accounts are displayed on the Account Listing Page, as well as all account drop-down menus.
36
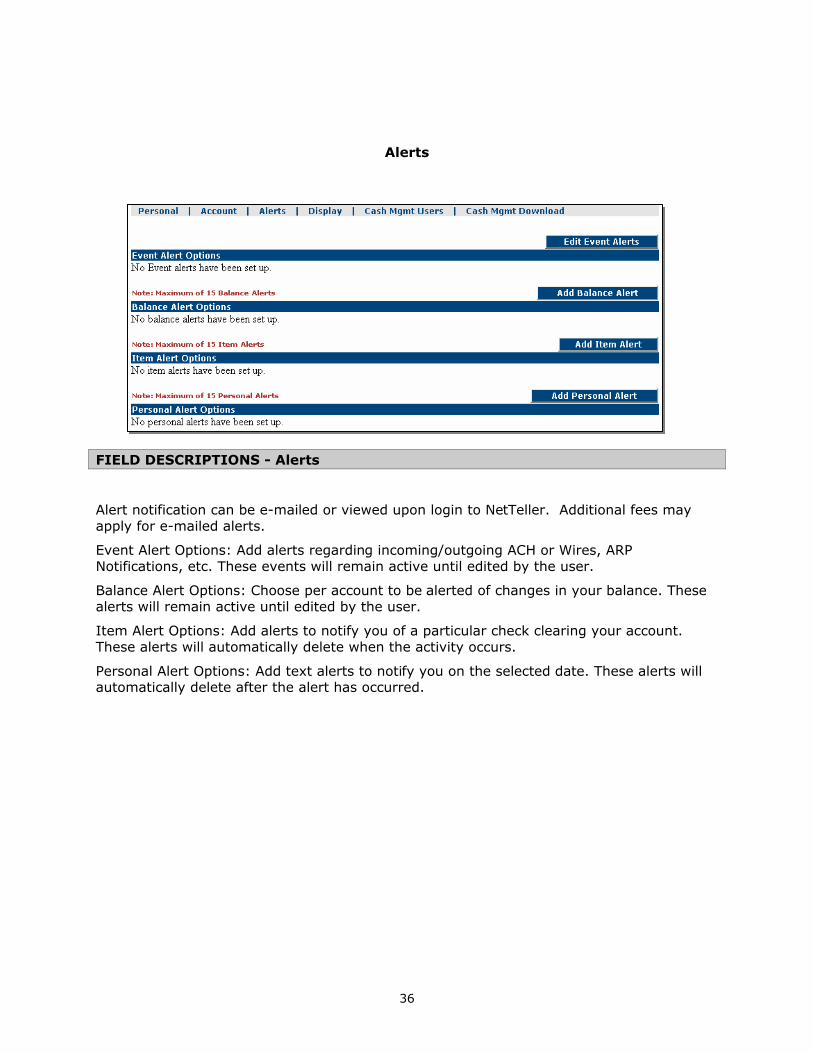
Alerts
FIELD DESCRIPTIONS - Alerts
Alert notification can be e-mailed or viewed upon login to NetTeller. Additional fees may apply for e-mailed alerts.
Event Alert Options: Add alerts regarding incoming/outgoing ACH or Wires, ARP Notifications, etc. These events will remain active until edited by the user.
Balance Alert Options: Choose per account to be alerted of changes in your balance. These alerts will remain active until edited by the user.
Item Alert Options: Add alerts to notify you of a particular check clearing your account. These alerts will automatically delete when the activity occurs.
Personal Alert Options: Add text alerts to notify you on the selected date. These alerts will automatically delete after the alert has occurred.

37
Display Options
FIELD DESCRIPTIONS – Display Options
Choose the default display options for the options listed.

38
FILE STATUS
All files uploaded in to NetTeller Cash Management will be listed here with the file details, upload date and upload status. Uploaded files will display for 3 days.