center for army lessons learned 10 meade avenue, building ... · center for army lessons learned 10...
TRANSCRIPT

CENTER FOR ARMY LESSONS LEARNED10 Meade Avenue, Building 50
Fort Leavenworth, KS 66027-1350
www.leavenworth.army.mil
APPROVED FOR PUBLIC RELEASEDISTRIBUTION UNLIMITED
NO. 18-37 SEP 2018
APPROVED FOR PUBLIC RELEASEDISTRIBUTION UNLIMITED
18-37 THE A
RM
Y CO
MB
AT FITNESS TEST
SEP 2018


DIGITAL VERSION AVAILABLEA digital version of this CALL publication is available to view or download from the CALL website:
http://call.army.mil
Reproduction of this publication is welcomed and highly encouraged.
The Army Combat Fitness Test
FOLLOW CALL ON SOCIAL MEDIA
https://twitter.com/USArmy_CALLhttps://www.facebook.com/CenterforArmyLessonsLearned


ARMY COMBAT FITNESS TEST
iii
STEPHEN J. TOWNSEND General, U.S. Army Commanding Training and Doctrine Command
ForewordOur nation’s greatest assets – our Soldiers – face a dynamic, competitive, and lethal operational environment (OE) that has evolved in recent years, one in which our adversaries will employ a mix of traditional, unconventional, and hybrid strategies. Our Army’s physical readiness program must evolve to keep pace with the demands of modern war – our physical fitness test must evolve as well.
Based on results of years of scientific study, the Secretary and Chief of Staff of the Army have directed replacement of the Army Physical Fitness Test (APFT). While the legacy APFT is an acceptable test for measuring general fitness, it does not adequately assess the domains of combat physical fitness. The six-event Army Combat Fitness Test (ACFT) was developed to better predict a Soldier’s readiness for the demands of the modern battlefield. Like combat, the ACFT is both age and gender neutral. The desired end-states of ACFT implementation are an increase in physical readiness, a decrease in chronic injuries, and an evolution in the Army’s fitness culture.
This handbook is a compilation of products developed by the Center for Initial Military Training (CIMT) in preparation for the Army-wide implementation of the ACFT. The ACFT is in its initial stages and there will certainly be refinements as we receive feedback from the ACFT Field Test in Fiscal Year (FY) 2019. In the interim, this handbook provides commanders, leaders, and Soldiers with a single guide for preparing for and administering the ACFT in advance of Army-wide implementation in FY20.
The Army Vision says the physical fitness, mental toughness and grit of the American Soldier are keys to the success of our Army in ground combat. Our next fitness test will strengthen our fitness culture, our Soldiers’ fitness for battle, and our Army’s readiness for war.

iv
CENTER FOR ARMY LESSONS LEARNED
About This HandbookThis handbook consists of three sections and five appendices:
Section I, ACFT Events, discusses the six testing events. It includes information on muscular strength and endurance needed to correctly perform each event and prevent injuries. It also includes grading tips for ACFT graders for each lane.
Section II, ACFT Administrative Guidance and Testing Procedures, discusses the testing OIC/NCOIC responsibilities. It also discusses the authorized uniform for the ACFT and the order in which the ACFT will be administered.
Section III, ACFT Training Guide, provides exercises that will help Soldiers successfully prepare to take the ACFT. These specific exercises will help develop strength, endurance, and mobility using common strength training methods and Army doctrine.
U.S. Army Center For Initial Military TrainingACFT Points of Contact Michael S. McGurk
Whitfield B. East
CALL Director COL Michael J. Lawson
CALL Analysts Marvin K. Decker
CPT Latrice Boatner
Note: This handbook does not address policy, procedures, and standards with respect to profiles or alternate testing events. They will be developed during the field test and approved by Army leadership no later than 01 OCT 2020.

ARMY COMBAT FITNESS TEST
v
The Army Combat Fitness TestTable of Contents
Introduction 1Section 1: Army Combat Fitness Test Events 5Event 1: 3-Repetition Maximum Deadlift 5Event 2: Standing Power Throw 7Event 3: Hand-Release Push-up 11Event 4: Sprint-Drag-Carry 15Event 5: Leg Tuck 19
Event 6: 2-Mile Run 23Section 2: Army Combat Fitness Test Administrative Guidance and Testing Procedures 25
Section 3: Army Combat Fitness Test Training Guide 29
Event 1: 3-Repetition Maximum Deadlift Top 3 Exercises 31
Event 2: Standing Power Throw Top 3 Exercises 37
Event 3: Hand-Release Push-up Top 4 Exercises 41
Event 4: Sprint-Drag-Carry Top 3 Exercises 47
Event 5: Leg Tuck Top 3 Training Exercises 51
Event 6: 2-Mile Run Top 3 Training Exercises 55
Appendices 59
Appendix A: Army Combat Fitness Test Instructions 59
Appendix B: Sample Army Combat Fitness Test Scorecard 63Appendix C: Phase 1 Initial Operating Capability Army Combat Fitness Test Score Scales 65
Appendix D: Field Testing – Army Combat Fitness Test Equipment List (1 Lane Requirement) 67
Appendix E: Department of the Army Pamphlet 611-21 Army Physical Demand Categories 77

vi
CENTER FOR ARMY LESSONS LEARNED
The Secretary of the Army has determined that the publication of this periodical is necessary in the transaction of the public business as required by law of the Department.
Unless otherwise stated, whenever the masculine or feminine gender is used, both are intended.
Note: Any publications (other than CALL publications) referenced in this product, such as ARs, ADPs, ADRPs, ATPs, FMs, and TMs, must be obtained through your pinpoint distribution system.

1
ARMY COMBAT FITNESS TEST
Introduction
The Army will replace the Army Physical Fitness Test (APFT) with the Army Combat Fitness Test (ACFT) as the physical fitness test of record beginning in Fiscal Year 2021 (FY21). To accomplish this, the ACFT will be implemented in three phases. Phase 1 (Initial Operating Capability [IOC]) includes a limited-user field test with approximately 60 battalion-sized units from across all components of the Army. During Phase 1, each field test battalion will be tested using the physical demand categories (heavy, significant, and moderate [See Appendix E]). Phase 2, Full Operational Capability ‒ Initial (FOC-Initial) includes all Army units obtaining ACFT equipment in accordance with (IAW) Headquarters, Department of the Army (HQDA) Executive Order (EXORD) 219-18, Implementation of the Army Combat Fitness Test. In Phase 3 (FOC), starting 01 October 2020, the Army adopts ACFT as Army test of record IAW HQDA EXORD 219-18.
While the ACFT is backed by thorough scientific research and has undergone several revisions, there are still details that have not been finalized. The purpose of the field test is to refine the field administration and scoring of the ACFT. This draft of the ACFT testing manual is designed to provide structure for the testing protocols used during the field test.
Any comments or recommendations for improvement should be prepared using DA Form 2028 (Recommended Changes to Publications and Blank Forms) and sent to Director, Research and Analysis, United States Army Center for Initial Military Training, ATTN: ATMT-RA, 210 Dillon Circle, Fort Eustis, VA 23604-5701, or submit an electronic DA Form 2028 by email to: [email protected].
“War doesn’t distinguish between gender and age. This test helps you execute your warrior tasks and battle drills, no matter who you are.”
— CSM Edward Mitchell, Center for Initial Military Training (CIMT)

2
CENTER FOR ARMY LESSONS LEARNED
Army Combat Fitness Test Site and Equipment Requirements The ACFT requires a testing site with a 2-mile run course and a flat field space approximately 40 x 40 meters. The field space should be grass (well-maintained and cut) or artificial turf that is generally flat and free of debris. While maintaining testing standards and requirements, commanders will make adjustments for local conditions when necessary. The start and finish point for the 2-mile run course should be in close proximity to the Leg Tuck station. When test events are conducted indoors, the surface must be artificial turf only. Wood and rubberized surfaces are not authorized as they impact the speed of the Sprint-Drag-Carry. When environmental conditions prohibit outdoor testing, an indoor track may be used for the 2-Mile Run (2MR) event. The test officer in charge (OIC) or NCO in charge (NCOIC) are responsible to inspect and certify the site and determine the number of testing lanes.
There should not be more than four Soldiers per testing group for the Standing Power Throw (SPT), Hand-Release Push-up (HRP), and Sprint-Drag-Carry (SDC). The OIC or NCOIC must add more lanes or move Soldiers to a later testing session to ensure there are no more than four Soldiers per testing group. Concerns related to Soldiers, graders, or commanders will be addressed prior to test day. The number of lanes varies by number of Soldiers testing. A 16-lane ACFT site will have the following:
• • ACFT-specific test equipment requirements (See Appendix D).
• • 16 hexagon/trap bars (60 pounds), each with a set of locking collars. While all national stock number (NSN)-approved hexagon bars must weigh 60 pounds, there is always a small manufacturer’s production tolerance. The approved weight tolerance for the hexagon bar is +/- 2 pounds (58-62 pounds). Weight tolerance for the hexagon bar and therefore the 3-Repetition Maximum Deadlift (MDL) does not include the collars.

3
ARMY COMBAT FITNESS TEST
• • On average, hexagon bar collars, weigh less than 2 pounds per pair and are considered incidental to the total weight of the MDL weight.
• • Approximately 3,000 pounds of bumper plates
• • 16 x 10-pound medicine balls
• • 16 x nylon sleds with pull straps
• • 32 x 40-pound kettle bells
• • Permanent or mobile pull-up bars (16 pull-up bars at approximately 7.5 feet off the ground with step-ups for shorter Soldiers)
• • Common unit equipment for set-up and grading:
○○○○ 16 stopwatches
○○○○ 8 x 25-meter tape measures
○○○○ 8 wooden or polyvinyl chloride (PVC) marking sticks for the SPT. One stick for every two lanes.
○○○○ 70 x 18-inch traffic cones.
○○○○ 50 field/dome cones
○○○○ A soft, flat, dry test area approximately 40m x 40m on grass or artificial turf (half of a soccer or football field)

4
CENTER FOR ARMY LESSONS LEARNED
Figure I-1. Lane Testing Site – proposed configuration.
Pull-up bar
Deadlift
40-lb kettlebells
90-lb drag sled
10-lb medicine ball
Admin table: Will include grade sheets, surveys, DD2977, combat life saver (CLS) bags, ice sheets (and CLS point)

5
ARMY COMBAT FITNESS TEST
Section 1, Event 1: 3-Repetition Maximum Deadlift
The 3-Repetition Maximum Deadlift (MDL) is a muscular strength test that represents movements required to safely and effectively lift heavy loads from the ground, jump, bound, and tolerate landing. The MDL is a strong predictor of a Soldier’s ability to lift and carry a casualty on a litter, and to lift and move personnel and equipment. This test event requires well-conditioned back and leg muscles that assist Soldiers in load carriage and in avoiding injuries to the upper and lower back caused by moving long distances under load and lifting heavy objects.
• • The MDL consists of three phases: preparatory, upward movement, and downward movement.
○○○○ Preparatory phase. The Soldier will step inside the hexagon/trap bar, feet generally shoulder width apart, and locate the midpoint of the hexagon/trap bar handles. On the command of “GET SET,” the Soldier will bend at the knees and hips, reach down and grasp the center of the handles (“D-handle” hexagon/traps bars are not authorized. As an exception, if a dual-handled hexagon/trap bar is used, the Soldier will grasp the lower handles, with the D-handles facing down). Arms should be fully extended, back flat, head in line with the spinal column or slightly extended, head and eyes to the front or slightly upward, and heels in contact with the ground. All repetitions will begin from this position.
○○○○ Upward movement phase. On the command of “GO,” the Soldier will stand up and lift the bar by extending the hips and knees. Hips should never rise before or above the shoulders. The back should remain straight – not flexed or extended. The Soldier will continue to extend the hips and knees until reaching an upright stance. There is a slight pause at the top of this movement.
○○○○ Downward movement phase. By flexing the hips and knees slowly, the Soldier lowers the bar to the ground under control while maintaining a flat-back position. Do not drop or let go of the bar. The hexagon/trap bar weight plates must touch the ground before beginning the next repetition. Weight plates may not bounce on the ground.
Figure 1-1. 3-Repetition Maximum Deadlift (MDL).

6
CENTER FOR ARMY LESSONS LEARNED
• • Execute three continuous repetitions with the same weight. If the Soldier fails to complete three continuous repetitions under control, he or she is permitted one retest at a lower weight after a rest of up to two minutes. If the Soldier successfully completes three continuous repetitions on the first attempt, he or she may elect an additional attempt at a higher weight after a rest of up to two minutes. The maximum number of attempts on the MDL is two.
• • The heaviest weight successfully lifted three times is the raw score recorded.
• • Graders will stop the attempt if they determine a Soldier will injure themselves by continuing. If the grader stops a Soldier to prevent injury, this is not considered a record attempt. A test attempt is not stopped for minor errors in form that are not deemed a threat of injury. Common causes of injury include:
○○○○ Hips moving above the shoulders.
○○○○ Excessive rounding of the shoulders.
○○○○ Knees collapsing inward.
○○○○ Dropping the weights.
• • Graders will terminate a record attempt (which counts as one of two record attempts) if the Soldier:
○○○○ Drops or bounces the weights off the ground.
○○○○ Rests in the down position. Resting means no continuous effort is being made to lift the weight.

7
ARMY COMBAT FITNESS TEST
Section 1, Event 2: Standing Power Throw
The Standing Power Throw (SPT) measures upper and lower body explosive power, flexibility, and dynamic balance. Explosive power contributes to tasks requiring quick explosive movements to maneuver equipment and personnel. These tasks include executing a buddy drag to pull an injured person to a safe location, throwing equipment onto or over an obstacle, throwing a hand grenade, assisting a buddy to climb up a wall, lifting and loading equipment, and employing progressive levels of force in man-to-man contact.
• • Graders in adjacent lanes (for example, lanes 1 and 2) will work together to administer the SPT to their groups of two to four Soldiers. One grader moves onto the testing lane (lane grader) with the wooden/polyvinyl chloride (PVC) marking stick, in preparation for marking the landing point of the throw and measuring the distance. The lane grader pre-positions a Soldier from each group in the SPT lane to retrieve the medicine balls. The other grader manages the throws. As a safety precaution and to ensure accurate measures of throwing distance, only one Soldier from the two lanes throws at a time. Soldiers only execute throws when directed by their grader.
• • The grader will call the first two Soldiers (one from group/lane 1 and one from group/lane 2) to the start line; one Soldier in lane 1 and one Soldier in lane 2. The Soldiers will face away from the start line, grasp the medicine ball (10 lb.) with both hands at hip level and stand with both heels at (but not on or over) the start line. Grasp the ball firmly and as far around the sides of the ball as possible. Towels or rags will be provided to remove excess moisture/debris from the medicine ball.
• • Start line grader ensures the lane is clear and the lane grader is prepared to score the throw.
Figure 1-2. Standing Power Throw (SPT) illustration.

8
CENTER FOR ARMY LESSONS LEARNED
• • Throw 1 is a “partial effort” practice throw to allow Soldiers to warm-up and the lane grader to move to an approximate landing point. Throw 1 is not measured or recorded.
• • As directed by the grader, the Soldier in lane 1 executes throw 1 (practice throw). Soldiers are permitted several preparatory movements flexing at the trunk, knees, and hips while lowering the ball between their legs. When directed by the grader, the Soldier in lane 2 executes throw 1 (practice throw).
• • Soldiers in lanes 1 and 2 alternately execute throws 2 and 3 (the two record throws). Soldiers are still permitted the preparatory movements. Once the Soldiers complete three throws, they will move onto the SPT lane to retrieve medicine balls and replace their fellow Soldiers who return to the back of the line.
• • The start line grader will give the command “GO” and observe the Soldier’s feet to make sure they do not step on or over the start line. The lane grader marks the center of the landing point (the ball may land outside of the designated lane), transfers this point to the tape measure, and calls out the distance to the nearest tenth of a meter. The measurement is taken from the center of the landing point perpendicular to the tape measure. The lane grader calls out the distance (for example, “Eight point five”) and the start line grader records the distance on the Soldier’s scorecard.
Figure 1-3. Standing Power Throw (SPT).

9
ARMY COMBAT FITNESS TEST
• • The Soldier must remain behind the start line throughout the attempt. If a Soldier steps on or over the start line during the attempt, that throw will be a “fault” and the throw will be repeated. Two faults in a row will count as one record attempt and the Soldier will receive a raw score of 0.0 meters for that attempt.
• • The Soldier must make one practice throw and two record throws, and the start line grader must record both record throws. Although both record throws are recorded, only the longer of the two record throws will count as the raw score. The start line grader will circle the longer attempt.
• • To prevent injuries, the grader should ensure the:
○○○○ Medicine ball is free of debris and dry before each attempt.
○○○○ Lane grader and ball retriever are ready to receive the throw.
○○○○ Start line grader is ready when the ball retriever rolls the ball back to the start line.
• • Grader tips:
○○○○ A record attempt will not count if a Soldier steps on or over the start line during a throw. This is a fault and the throw will be repeated.
○○○○ Two faults in a row will count as a record attempt and the Soldier will receive a “0” for that record attempt.


11
ARMY COMBAT FITNESS TEST
Section 1, Event 3: Hand-Release Push-up
Hand-Release Push-up (HRP). During the Phase I – IOC-Field Testing period, the Army will field-test two different Hand-Release Push-up (HRP) protocols: the arm extension protocol and the hand lift protocol. Regardless of protocol, the HRP is a 2-minute timed event that measures upper body muscular endurance, and represents repetitive and sustained pushing used in combat tasks. The HRP tests a Soldier’s ability to push an opponent away during man-to-man contact, push a disabled vehicle, and push up from the ground during evasion and maneuver. It also engages upper back muscles used when reaching out from the prone position when shooting, taking cover, or low-crawling.
• • The NCOIC will serve as the starter and common timer for the HRP. All lanes will start on the command “GO” and the NCOIC will keep the 2-minute clock.
• • On the command of “GET SET,” one Soldier in each lane will assume the prone position facing the start line with hands flat on the ground and index fingers inside the outer edges of the shoulders. The chest and front of the hips and thighs will be on the ground. Toes will touch the ground with feet together or up to a boot’s width apart. The ankles will be flexed. The head does not have to be on the ground.
• • Hands will be placed flat on the ground with the index fingers inside the outer edges of the shoulders. Feet will remain generally together, no more than a boot’s width apart throughout the HRP. Soldiers may adjust their feet during the test event as long as they do not lift a foot off the ground.
Figure 1-4. Hand-Release Push-up (HRP).
Figure 1-5. Hand-Release Push-up (HRP) illustration.

12
CENTER FOR ARMY LESSONS LEARNED
• • Movement 1: On the command “GO,” a Soldier will push their whole body up from the ground as a single unit to the up position by fully extending the elbows (front leaning rest).
○○○○ The Soldier will maintain a generally straight body alignment from the shoulders to the ankles. This generally straight position will be maintained for the duration of the HRP.
○○○○ Failing to maintain a generally straight alignment during a repetition will cause that repetition to not count.
○○○○ The front leaning rest is the only authorized rest position. Bending or flexing the knees, hips, or trunk while in the rest position is not authorized.
• • Movement 2: After the elbows are fully extended and the Soldier has reached the up position, the Soldier will bend their elbows to lower the body back to the ground. The chest, hips and thighs should touch down at the same time. The head or face do not have to contact the ground.
• • Movement 3a: Hand Lift HRP – without moving the head, body, or legs, the Soldier will lift both hands from the ground at the same time. A clear gap between the palms and the ground must be visible to the grader to ensure Soldiers have released their hands from the ground. The hands are then lowered until they are flat on the ground back under the shoulder.
• • Movement 3b: Arm Extension HRP – without moving the head, body, or legs, the Soldier will extend both hands out from the body until the arms are extended, forming a 90-degree angle between the arms and trunk at the shoulders. Hands may be on or off the ground. After reaching this position, the elbows bend to move the hands back under the shoulder.
• • Movement 4: Regardless of the HRP protocol, Soldiers must ensure their hands are flat on the ground with the index fingers inside the outer edges of the shoulders (returning to the starting position). This completes one repetition.

13
ARMY COMBAT FITNESS TEST
• • The Soldier must make a continuous effort to push up and cannot rest on the ground. While the exercise cadence may vary during the 2-minute test event, the grader will ensure the Soldier is not resting on the ground. The grader will exercise their judgment, but a Soldier will generally be considered “at rest” if their efforts to perform a repetition stop for longer than 5 seconds. The HRP event is terminated if the Soldier rests in any position other than the front leaning rest position, fails to exhibit continuous effort, lifts a foot off the ground, or places a knee on the ground. The number of successfully completed repetitions in 2 minutes will be recorded as the raw score.
• • During the HRP event, graders should sit or kneel 3 feet to the side and above the Soldier’s head.
• • Grader tips:
○○○○ A repetition will not count if the:
•••* Index finger is outside the outer edge of the shoulder.
•••* Feet are more than a boot’s width apart.
•••* Soldier fails to simultaneously raise the shoulders and hips (the whole body) off the ground in a generally straight body alignment from the top of the head to the ankles.
•••* Soldier bends or sags at the shoulders, hips, knees while in the front leaning rest position.
○○○○ After a warning, the test event will be terminated if the Soldier:
•••* Lifts a foot off the ground.
•••* Lifts a hand off the ground while in the front leaning rest position.
•••* Rests on the ground or in any position other than the front leaning rest position.


15
ARMY COMBAT FITNESS TEST
Section 1, Event 4: Sprint-Drag-CarryThe Sprint-Drag-Carry (SDC) is a measure of muscular power, endurance, strength, and anaerobic capacity, which are needed to accomplish high-intensity combat tasks that last from a few seconds to several minutes. This capacity contributes to a Soldier’s ability to react quickly to direct and indirect fire, build a hasty fighting position, and extract a casualty from a vehicle and carry them to safety. Typically, all lanes will start on the command “GO.” Individual graders will time their lane.
• • When the NCOIC gives the command “GET SET,” one Soldier in each lane will assume the prone position with the top of the head behind the start line. The grader is positioned to see both the start line and the 25m line. The grader can position a Soldier/battle buddy on the 25m line to ensure compliance with test event standards.
○○○○ Sprint: When the NCOIC gives the command “GO,” Soldiers stand and sprint 25m; touch the 25m line with foot and hand; turn, and sprint back to the start line. If the Soldier fails to touch the 25m line with hand and foot, the grader watching the 25m turn line will call them back.
○○○○ Drag: Soldiers will grasp each strap handle, which will be positioned and resting on the 90-lb. sled behind the start line; pull the sled backward until the entire sled crosses the 25m line; turn the sled around and pull back until the entire sled crosses the start line. If the entire sled does not cross the 25m or start line, the grader watching the 25m turn line will call them back.
Figure 1-6. 50m sprint.
Figure 1-7. 50m sled drag.

16
CENTER FOR ARMY LESSONS LEARNED
○○○○ Lateral: After the entire sled crosses the start line, the Soldier will perform a lateral for 25m, touch the 25m turn line with foot and hand, and perform the lateral back to the start line. The Soldier will face the same direction moving away from the 25m start line and return to the start line so they lead with each foot. Feet may shuffle and touch, but should not cross. If the Soldier fails to touch the 25m turn line with hand and foot, the grader watching the 25m turn line will call them back. Graders will correct Soldiers if they cross their feet.
○○○○ Carry: Soldiers will grasp the handles of the two 40-lb. kettlebells and run to the 25m turn line; step on or over the 25m turn line with one foot; turn, and run back to the start line. If the Soldier drops the kettlebells during movement, the carry will resume from the point the kettlebells were dropped. If the Soldier fails to touch the 25m turn line with their foot, the grader watching the 25m turn line will call them back.
○○○○ Sprint: After stepping on/over the start line, Soldiers will place, not throw the kettlebells on the ground; turn and sprint 25m; touch the 25m turn line with foot and hand; turn, and sprint back to the start line. If the Soldier fails to touch the 25m turn line with hand and foot, the grader watching the 25m turn line will call them back.
Figure 1-8. 50m lateral.
Figure 1-9. 50m kettlebell carry.
Figure 1-10. 50m sprint.

17
ARMY COMBAT FITNESS TEST
• • The time is stopped when the Soldier crosses the start line after the final sprint (250m).
• • The “penalty” for incorrect form or action is to return to the line and redo the action correctly.
• • Record the time from start to finish of the 250m course on the scorecard.
• • Graders will correct Soldier performance that may result in injury to include:
○○○○ Jerking the straps or slinging the sled to turn the sled around.
○○○○ Crossing the feet during the lateral.
○○○○ Failure to turn under control after picking up kettlebells.
○○○○ Throwing the kettlebells.
• • Graders will call Soldiers back to the start line or the 25m turn line to correct violations in performance to include:
○○○○ Failure to touch the line with a hand and foot while sprinting or doing laterals.
○○○○ Failure to pull the entire sled across the 25m or start line; Soldier’s body must cross the line pulling the sled backward until the entire sled crosses the line; Soldier may then turn the sled.
○○○○ Failure to pull the entire sled across the start line before beginning the laterals.
○○○○ Failure to place the kettlebells on the ground under control; Soldier may not throw or toss the kettlebells.


19
ARMY COMBAT FITNESS TEST
Section 1, Event 5: Leg TuckLeg Tuck (LTK) has great occupational relevance and tests a Soldier’s muscular strength and endurance. LTK assesses grip strength, shoulder adduction and flexion, elbow flexion, and trunk and hip flexion. These movements assist Soldiers in all climbing tasks and surmounting obstacles like a vertical wall, or climbing onto a ledge or up a rope. This test event will require well-conditioned abdominal, hip, and core flexor muscles, and anterior and posterior upper body muscles that will assist Soldiers in load carriage and in avoiding injuries to the upper and lower back. The objective of this exercise is to maintain a relative vertical posture while moving the hips and knees up and down without excessive swinging or kipping.
Figure 1-11. Leg Tuck Part A. Figure 1-12. Leg Tuck Part B.
Figure 1-13. Leg Tuck illustration.

20
CENTER FOR ARMY LESSONS LEARNED
• • Typically, all lanes will start on the command “GO.” Individual graders may time their lane.
• • On the command “GET SET,” one Soldier from each lane will mount the bar and assume a straight-arm hang on the bar, with feet off the ground and knees bent if necessary. Graders or other Soldiers may assist Soldiers up onto the bar. The grip is the alternating grip (recommend placing the dominant hand closest to the head). The body is perpendicular with the bar; however, the alternating grip will cause the body to rotate outward slightly. The Soldier’s body must be fully extended in a straight-arm position (elbows, trunk, and hips are straight). Legs and feet may not be crossed; feet must be off the ground with knees bent if necessary.
• • On the command “GO,” the Soldier will flex at the elbows, knees, hips, and waist to lift the knees. Flexing the elbows assists with this movement. The right and left knees or thighs must touch the right and left elbows, respectively. The grader must observe both knees (or thighs) in contact with both elbows for the Soldier to receive credit for the repetition.
• • The Soldier will return under control to the straight-arm position, elbows straight, to complete each repetition. If the elbows remain bent, the next repetition will not count. The Soldier does not have to be completely still. Small, inconsequential, or passive movement of the body and twisting of the trunk is permitted. Deliberately swinging the trunk and legs to assist with lifting the knees is not permitted and will cause the subsequent repetition to not count.
• • The Soldier may rest in the straight-arm (down) position and may adjust grip positions by moving the hands. The Soldier’s feet cannot touch the ground during grip adjustments.
• • In order for the last repetition to count, the Soldier must assume the straight-arm hang position UNDER CONTROL before dropping from the bar to the ground.
• • The event will be terminated when the Soldier voluntarily stops (drops from the bar) or when 2 minutes has expired.
• • The grader will ensure the Soldier’s safety by spotting during the LTK and the grader may steady the Soldier to prevent or control excessive swinging.
• • The grader will count off the number of correctly completed repetitions. The number of successfully completed repetitions will count as the raw score and will be recorded on the scorecard.

21
ARMY COMBAT FITNESS TEST
• • Graders and Soldiers will apply the following safety tips:
○○○○ Ensure the bar is free of moisture before mounting the bar.
○○○○ Use a foot mount or grader/Soldier to mount the bar.
○○○○ Ensure the Soldier’s hands are near the mid-point of the bar.
○○○○ Prevent the head or back from striking the horizontal or vertical posts.
• • A repetition will not count if a Soldier:
○○○○ Fails to touch both knees (or thighs) to both elbows.
○○○○ Swings or twists to establish momentum to lift the knees.
○○○○ Fails to return to a straight-arm position; arms fully extended in the down position.
○○○○ Pushes off the post, ground or bar with back or foot to establish momentum to lift the knees. Incidental contact with the ground, post or bar is not penalized if the grader deems the Soldier has gained no advantage.
• • The LTK event will be terminated if the Soldier drops from the bar or rests on the ground.


23
ARMY COMBAT FITNESS TEST
Section 1, Event 6: 2-Mile RunThe 2-Mile Run (2MR) is a test of aerobic endurance. It applies to common Soldier tasks such as dismounted movement, ruck marching, and infiltration. It can be completed on an indoor or outdoor track, or an improved surface such as a road or sidewalk. The 2MR cannot be tested on unimproved terrain. There is a programmed 5-minute rest between the Leg Tuck and the 2MR. The rest period begins when the last Soldier in the group completes the LTK. The start line will be near the same location as the test site for the other five test events. Out-and-back or lap track courses are authorized. Separate 2MR graders are authorized. When using separate graders, the officer in charge (OIC) or noncommissioned officer in charge (NCOIC) is responsible for the orderly transfer of the scorecards from the lane graders to the 2MR graders.
• • Grader tips:
○○○○ The OIC/NCOIC will ensure the 2MR course is measured to standard for distance and elevation and is clear from obstructions and debris.
○○○○ An additional set of 2MR graders will increase throughput and reduce overall testing time. When a group of Soldiers completes the Leg Tuck, the NCOIC will facilitate the transfer of Soldiers and scorecards to the 2MR NCOIC. The 2MR NCOIC will ensure Soldiers receive a minimum of 5 minutes between the end of the LTK and the beginning the 2MR.
○○○○ An out-and-back 2MR course may reduce number of 2MR graders required to effectively monitor large groups of Soldiers.
Figure 1-13. 2-Mile Run illustration.
Figure 1-14. 2-Mile Run.


25
ARMY COMBAT FITNESS TEST
Section 2: Army Combat Fitness Test Field Test Administrative Guidance and Testing Procedures
Army Combat Fitness Test Field Test Administrative GuidanceThe Army Combat Fitness Test (ACFT) is a six-event physical fitness test; the test events are administered in the following order: 3-Repetition Maximum Deadlift (MDL), Standing Power Throw (SPT), Hand-Release Push-up (HRP), Sprint-Drag-Carry (SDC), Leg Tuck (LTK), and 2-Mile Run (2MR). There are no exceptions to the ACFT testing sequence and currently, there are no alternative tests or test events.
As a test of record, the ACFT is intended to be completed in 70 minutes or less for two platoons of Soldiers with 16 lanes. Groups of Soldiers will be tested under two protocols during the Phase I – Initial Operating Capability (IOC)-Field Testing: groups of two and groups of four. Soldiers must take all six test events for the ACFT to qualify as a valid test. The officer in charge (OIC) will have an appropriate number of printed copies of the testing instructions available at the ACFT test site. Prior to the start of the first test event, Soldiers will warm up using Field Manual (FM) 7-22 Army Physical Readiness Training (Preparation Drill (PD) [approximately 10 minutes]) and 3-Repetition Maximum Deadlift warm-up (approximately 10 minutes). Following the 10-minute Preparation Drill and 10-minute 3-Repetition Maximum Deadlift warm-up, Soldiers will execute the MDL test event. Once this event is complete (all Soldiers have been tested) the OIC/noncommissioned officer in charge (NCOIC) will start the master continuous clock.
The purpose of the continuous clock is to ensure Soldiers complete each ACFT test event with the minimum amount of rest and complete the entire test in 70 minutes. Due to the work-rest cycles for the 2-Soldier and 4-Soldier stack testing, it is not necessary to time the rest interval between each event. The minimum rest intervals are critical for a 90-day ACFT failure retest. Retesting of individuals who fail a record ACFT will be individually administered and scored.

26
CENTER FOR ARMY LESSONS LEARNED
Army Combat Fitness Test Testing Procedures Uniform: The uniform for the ACFT is the Army Physical Fitness Uniform (APFU) per Army Regulation (AR) 670-1. Any article of clothing not prescribed as a component of the APFU is not permitted for wear during the ACFT. Devices or equipment that offer any potential for unfair advantage during testing are not authorized (weight lifting belts, weight lifting gloves or wraps). Unless specifically prescribed as part of the Soldier’s medical profile, the wearing of the following items is also not authorized: nasal strips, back braces, elastic bandages, compression socks, or braces. Time or biometric measuring devices such as watches, heart rate monitors, step counters and fitness trackers are authorized in garrison. In operational and overseas locations, the use of geotracking devices may be limited by Army policy and not permitted during the ACFT. The wearing and carrying of other electronic devices is not authorized. These include music players, radios, and cell phones. To protect the hands, a Soldier may use gloves that conform to AR 670-1 at any time during the ACFT.
Personnel: The testing OIC/NCOIC will administer the test. There will be one certified ACFT grader per lane. The number of testing lanes will depend on the size of the unit and the intent of the commander. Each record test will have a designated OIC or NCOIC. For test development and validation during the Phase I – IOC-Field Test period, the conduct of the ACFT will
Figure 2-1. Total ACFT test time.

27
ARMY COMBAT FITNESS TEST
vary by unit and training standard. Testing procedures and protocols for Phase II – Full Operational Capability (FOC)-Initial will be published after Phase I – IOC-Field Test results are approved by Army senior leaders. For IOC-Field Test administration, Soldiers will rotate through the six-event ACFT in groups of two to four.
Preparation: The first task of the OIC or NCOIC is to ensure every Soldier has read and understands the testing instructions (See Appendix A) prior to reporting to the testing site. Soldiers’ questions/concerns will be addressed prior to commencement of the test.
Note: The testing instructions will not be read at the event. After certifying the test site, the OIC or NCOIC will read aloud the following instructions to all Soldiers taking the ACFT.
The ACFT begins with a 10-minute PD. This drill is a dynamic warm-up that prepares the body for more intense activity. The principle instructor for the PD will not be one of the Soldiers about to be tested. Soldiers who are about to be tested will participate in the PD exercises at a self-paced intensity to avoid undue fatigue.
Within the last 48 hours, you have been given the opportunity to review the test events and standards. Are there any Soldiers who failed to complete this task or who do not fully understand the testing requirements? You are about to take the Army Combat Fitness Test or ACFT, a test that measures total body fitness. The test results will give you and your commanders an indication of your level of physical fitness and will serve as a guide in determining your physical training needs. You will rest and recover at each station while others in your testing group complete their turns. Do the best you can on each test event.

28
CENTER FOR ARMY LESSONS LEARNED
Following the PD, Soldiers will be allowed 10 minutes to conduct a self-paced ‘warm-up’ for the MDL and other warm-up or stretching as they desire. Soldiers are encouraged to execute several repetitions at weights of increasing loads (representing about 25-50 percent of their MDL weight) during the warm-up. The MDL warm-up is self-paced to avoid undue fatigue. Before starting the 10-minute MDL warm-up, the NCOIC will hand out a scorecard and pencil to each Soldier (See Appendix B), instruct each Soldier to fill in the appropriate spaces with the required personal data (if not already complete) and read aloud the following instructions before Soldiers begin the MDL warm-up.
Once the MDL warm-up is complete, Soldiers will fall-in at an MDL station. MDL stations should be organized by weight. For example, station 1 is set up at 160lbs., station 2 at 180lbs., etc. Graders will be posted at each MDL station and will grade every Soldier who comes to their station. If too many Soldiers form up at one MDL station, weights should be adjusted at nearby stations to minimize the MDL testing time. The test should not start with more than five Soldiers in any MDL lane. The OIC or NCOIC will start the ACFT when all MDL lanes are set and all graders are on station. After completing the MDL, each Soldier will be directed to fill a Standing Power Throw lane by the NCOIC (generally two to four per lane, but never more than four per lane). The SPT, HRP, and SDC all begin with a common start directed by the NCOIC. The HRP event will also have a common clock controlled by the NCOIC. For the SPT, HRP, and SDC test events, Soldiers will complete each test event, one Soldier at a time, while remaining together as a group. Following the Leg Tuck, there will be a 5-minute programmed rest before the start of the 2MR. There are no test event re-starts. Incorrectly performed repetitions will not be counted. The grader records and initials the correctly completed weights, number of repetitions, distance, and times. Soldiers sign their scorecard before leaving the ACFT site, acknowledging that they agree with the scores recorded by their grader. The OIC/NCOIC will annotate any discrepancies on the scorecard.
You are to carry this scorecard with you to each test event. While you are conducting the 3-Repetition Maximum Deadlift warm-up, fill in the required information. Before you begin each test event, hand the card to your grader. After you complete the event, the grader will record your raw score, initial the card, and return it to you. After completing the six ACFT test events, you must sign the scorecard before departing the test area in order to certify your score.

29
ARMY COMBAT FITNESS TEST
Section 3: Army Combat Fitness Test Training GuideThe purpose of the Army Combat Fitness Test (ACFT) training guide is to provide exercises that will help Soldiers successfully prepare to take the ACFT. These specific exercises will help develop strength, endurance, and mobility using common strength training methods and Army doctrine.
The Army’s current Physical Readiness Training (PRT) doctrine, Field Manual 7-22 (October 2012), and the Army PRT application for smart devices (iOS and Android) can assist with more extensive workout information. Refer to Preparation Drill (PD), Hip Stability Drill (HSD), Shoulder Stability Drill (SSD), Four for the Core (4C), and Military Movement Drills (MMDs) for warm-up exercises and Recovery Drill (RD) in FM 7-22 for cool-down exercises.
The exercises and drills in this guide can be conducted anywhere and are not resource intensive. When time or environmental constraints limit PRT sessions, this guide will provide potential modifications to individual and collective training.
MDL SPT HRP
Top exercises
1. Sumo squat 2. Alternate staggered squat jump 3. Forward lunge
1. Power jump 2. Overhead push-press 3. Tuck jump
1. Supine chest press 2. Eight-count push-up 3. Incline bench 4. Quadraplex
Top PRT drill Strength training circuit Conditioning drill 3 Four for the core
Standard equipment
60-lb. trap bar and plates 10-lb. medicine ball Kettlebells
Alternate equipment
Ammo cans Duffle bag Rucksack 5-gallon buckets Tow bars Polyvinyl chloride (PVC) pipe Wooden handle
10-lb. sand bag Slam ball Kettlebells
Kettlebells Ammo cans Tow bar Improvised Outer Tactical Vest (IOTV)
Table 3-1. 3-MDL, SPT and HRP Events

30
CENTER FOR ARMY LESSONS LEARNED
Table 3-2. SDC, LTK, 2MR Events
SDC LTK 2MR
Top exercises
1. Straight-leg deadlift 2. Bent over row 3. 300m shuttle run
1. Bent leg raise 2. Leg tuck and twist 3. Alternating grip pull-up
1. Sprint intervals (30:60s, 60:120s) 2. Release run 3. Hill repeats
Top PRT drill Guerrilla drill Climbing drill 2 10 x 60:120s
Standard equipment
2 x 40-lb. kettlebells 90 lb sled Climbing bar 2MR route
Alternate equipment
40-lb. duffle bag 40-lb. ruck sack 90-lb. SKEDCO 90-lb. litter 90-lb. log Tires
Pull-up bar Suspension trainer Stretch cords
Treadmill (to simulate the drills and exercises listed above)
31
ARMY COMBAT FITNESS TEST
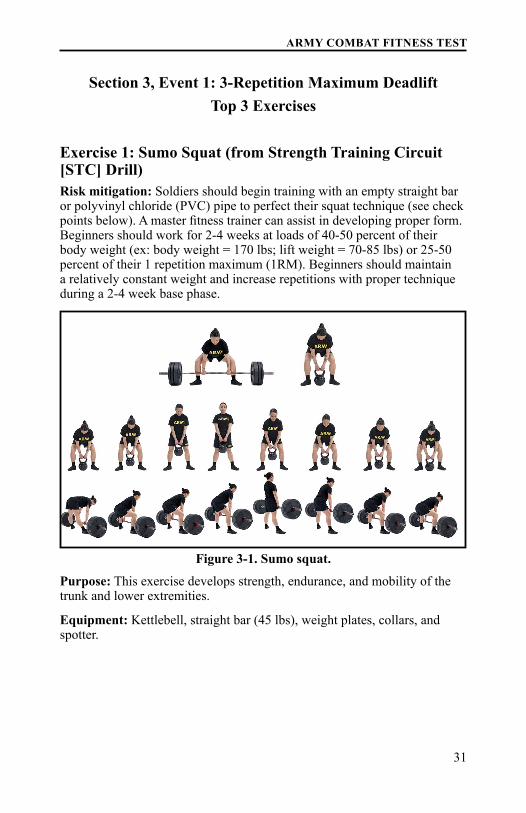
Section 3, Event 1: 3-Repetition Maximum DeadliftTop 3 Exercises
Exercise 1: Sumo Squat (from Strength Training Circuit [STC] Drill)Risk mitigation: Soldiers should begin training with an empty straight bar or polyvinyl chloride (PVC) pipe to perfect their squat technique (see check points below). A master fitness trainer can assist in developing proper form. Beginners should work for 2-4 weeks at loads of 40-50 percent of their body weight (ex: body weight = 170 lbs; lift weight = 70-85 lbs) or 25-50 percent of their 1 repetition maximum (1RM). Beginners should maintain a relatively constant weight and increase repetitions with proper technique during a 2-4 week base phase.
Purpose: This exercise develops strength, endurance, and mobility of the trunk and lower extremities.
Equipment: Kettlebell, straight bar (45 lbs), weight plates, collars, and spotter.
Figure 3-1. Sumo squat.

32
CENTER FOR ARMY LESSONS LEARNED
Starting position: Straddle stance with the feet wider than the shoulders and the toes pointing outward. Hold a single kettlebell or straight bar with both hands, in front of the body, using a pronated grip (palms facing the body). Weight will be appropriate for the goal of the PRT session. Training Aid: Refer to FM 7-22 for expanded training programs and additional exercises.
Execution: Squat while leaning slightly forward from the waist with head in line with the spine. Move downward until the upper legs are at least parallel to the ground, pause and return to the starting position.
Exercise prescription: 2-3 sets of 12-15 repetitions using weight equal to 50-65 percent of 1RM.
Check points:
• • Ensure feet are spread wider than shoulder width apart.
• • Ensure knees are in line with the toes and heels remain on the floor.
• • Ensure head and neck are in line with eyes facing forward.
• • Avoid rounding of the shoulders and spine and avoid letting the knees collapse inward (knock-knee).
Exercise 2: Alternate Staggered Squat Jump (from Conditioning Drill 3 [CD3])
Figure 3-2. Alternate staggered squat jump.

33
ARMY COMBAT FITNESS TEST
Risk mitigation: Soldiers will perform a dynamic warm-up before starting this exercise. A master fitness trainer can assist in developing proper form. Beginners should start with five repetitions in a limited range of movement. Beginners should increase repetitions with proper technique to 10 repetitions across a 2-4 week base phase.
Purpose: This exercise develops balance and explosive strength of the legs.
Equipment: Level space.
Starting position: Staggered stance with the left leg back and arms at sides; the trunk is generally straight, but tilted slightly forward.
Execution: Squat and touch the ground between the legs with the fingertips of the left hand. Jump forcefully into the air, switching legs in mid-air to land with the right leg back and arms at the sides. Repeat the squat, touch, and jump on the opposite side.
Exercise prescription: 1 set of 5 to 10 repetitions.
Check points:
• • Do not allow the back to round; keep the head up and the eyes forward.
• • Cadence is slow to allow for precision and adequate time to properly jump and land; however, each jump should be performed quickly and explosively.
• • On each landing, the feet should be oriented to the front.
• • The landing should be “soft” and proceed from the balls of the feet to the heels.
Exercise 3: Forward Lunge (from Preparation Drill [PD])Risk mitigation: Soldiers will perform a dynamic warm-up before starting this exercise. A master fitness trainer can assist in developing proper form. Beginners should start with five repetitions in a limited range of movement. Beginners should increase repetitions with proper technique to 10 repetitions across a 2-4 week base phase.
Purpose: This exercise develops strength, endurance, balance, and mobility of the legs and trunk.

34
CENTER FOR ARMY LESSONS LEARNED
Equipment: Level space.
Starting position: Staggered stance.
Execution: Step forward with the left leg as in the forward lunge as in the PD, allowing the left knee to bend until the left thigh is parallel to the ground. Return to the starting position. Repeat with the right leg. Return to the starting position. As skill improves and to add load, perform the same movements with weight in each hand. More advanced Soldiers can increase
Figure 3-3. Forward lunge.

35
ARMY COMBAT FITNESS TEST
exercise overload by adding kettlebells, water cans, sandbags, etc., to the forward lunge. Loads should progress from light (5 lbs.) to moderate (10 lbs.) to heavy (20 lbs.) in each hand. Lean slightly forward from the waist and bring the kettlebells to the left and right sides of the forward leg. Return to the starting position. Repeat with the right leg. Return to the starting position.
Exercise prescription: 1-3 sets of 5-10 repetitions.
Check points:
• • Keep the forward heel flat on the ground and the rear heel up.
• • Keep the forward knee directly over the ball of the foot.
• • Push off vigorously with the forward leg to return to the starting position.
• • Do not allow the forward knee to go beyond the forward toes or waiver from side to side. Do not jerk the trunk rearward to return to the starting position.
• • Ensure feet are spread approximately shoulder width apart.
• • Ensure knees are in line with the toes and heels remain on the floor.
• • Ensure head and neck are in a neutral position with eyes facing forward.
• • Avoid rounding of the spine and letting the knees collapse inward (knock-knee).


37
ARMY COMBAT FITNESS TEST
Section 3, Event 2: Standing Power ThrowTop 3 Exercises
Exercise 1: Power Jump (from Conditioning Drill 1 [CD1]) Risk mitigation: Soldiers will perform a dynamic warm-up before starting this exercise. A master fitness trainer can assist in developing proper form. Beginners should start with five repetitions in a limited range of movement. Beginners should increase repetitions with proper technique to 10 repetitions across a 2-4 week base phase.
Purpose: This exercise develops balance and explosive strength of the legs.
Equipment: Level space.
Starting position: Straddle stance with hands on hips.
Figure 3-4. Power jump.

38
CENTER FOR ARMY LESSONS LEARNED
Execution: Squat with the heels flat, bending forward at the hips and keeping the back straight to allow the straight arms to reach to the ground. Attempt to touch the ground with the palms of the hands. Jump forcefully in the air, vigorously raising arms overhead, with palms facing inward. Control the landing and then repeat the squat and jump movement.
Exercise prescription: 1 set of 5-10 repetitions.
Check points:
• • Keep the back straight to assist with generating power.
• • Keep the head up and the eyes forward.
• • Arms should be extended fully overhead. The trunk and legs should also be in line.
• • On each landing, the feet are directed forward and maintained at shoulder distance apart.
• • The landing should be soft and proceed from the balls of the feet to the heels.
Exercise 2: Overhead Push-PressRisk mitigation: Soldiers should begin training with light kettlebells, an empty straight bar, PVC pipe, or wooden handle to perfect their technique. A master fitness trainer can assist in developing proper form. Beginners should work for 2-4 weeks at loads of 10-25 percent of their body weight (ex: body weight = 170 lbs; lift weight = 17-40 lbs). Beginners should maintain a relative constant weight and increase repetitions with proper technique during a 2-4 week base phase.
Figure 3-5. Overhead push-press.

39
ARMY COMBAT FITNESS TEST
Purpose: This exercise develops strength of the arms, shoulders, and grip.
Equipment: Kettlebells, straight bar, PVC pipe, or wooden handle.
Starting position: Straddle stance holding the kettlebells at the collarbones using a neutral grip with palms facing each other – the racked position.
Execution: From the starting position, slightly flex the hips and knees (slight squat) with feet flat on the floor, keeping the trunk vertical and upper arms parallel to the ground. Forcefully extend the hips, knees, and ankles while simultaneously extending the elbows to raise the kettlebells overhead. Return to the starting position by flexing the elbows, controlling the descent to the collarbones and shoulders while simultaneously flexing the hips and knees to reduce the impact of the kettlebells on the shoulders. Repeat 5 to 10 times. As Soldiers become more advanced, they can increase the workload by progressively increasing the weight of the kettlebells or the range of motion on the initial flex at the hips and knees.
Exercise prescription: 1-3 sets of 5-10 repetitions.
Check points:
• • Hold the head and neck in alignment, looking straight ahead or slightly upward.
• • Perform the press movement in a fast, continuous motion.
• • Always control the descent of the kettlebells to avoid injury to the trunk and back.
• • In the up position, straighten the elbows but do not lock them.
Exercise 3: Tuck Jump (from Conditioning Drill 3 [CD3])Risk mitigation: Soldiers will perform a dynamic warm-up before starting this exercise. A master fitness trainer can assist in developing proper form. Beginners should start with five repetitions in a limited range of movement. Beginners should increase repetitions with proper technique to 10 repetitions across a 2-4 week base phase.
Purpose: This exercise develops coordination, balance, and explosive strength of the legs.
Equipment: Level space.
Starting position: Straddle stance with arms at the sides.

40
CENTER FOR ARMY LESSONS LEARNED
Execution: Perform a half squat, while driving both arms rearward. Jump upward, driving both arms forward, wrapping the hands around the knees, as the knees are drawn toward the chest. Then land in the half-squat position.
Exercise prescription: 1 set of 5-10 repetitions.
Check points:
• • Do not allow the back to round; keep the head up and the eyes forward.
• • Cadence is slow to allow for precision and adequate time to properly jump and land; however, each jump should be performed quickly and explosively.
• • The landing should be soft and proceed from the balls of the feet to the heels.
Figure 3-6. Tuck jump.

41
ARMY COMBAT FITNESS TEST
Section 3, Event 3: Hand-Release Push-upTop 4 Exercises
Exercise 1: Supine Chest Press (from Strength Training Circuit [STC])Risk mitigation: Soldiers should begin training with light kettlebells, an empty straight bar, PVC pipe, or wooden handle to perfect their technique. A master fitness trainer can assist in developing proper form. Beginners should work for 2-4 weeks at loads of 10-25 percent of their body weight (ex: body weight = 170 lbs; lift weight = 17-40 lbs). Beginners should maintain a relative constant weight and increase repetitions with proper technique during a 2-4 week base phase.
Purpose: This exercise strengthens the chest, shoulders, and triceps muscles.
Equipment: Kettlebells and level space.
Starting position: Supine position with the knees bent at 90 degrees and the feet 8 to 12 inches apart and flat on the ground. Hold the kettlebells in front of the shoulders using a pronated grip (palms facing up and toward the midline of the trunk). The back of the upper arms should rest on the ground and the forearms should be perpendicular to the ground. The head is on the ground.
Figure 3-7. Supine chest press.

42
CENTER FOR ARMY LESSONS LEARNED
Execution: Extend the elbows, raising the kettlebells until the upper arms are straight (not locked) and parallel to each other – the weights should remain under control at the top of the movement. Return to the starting position before repeating.
Exercise prescription: 1 set of 5-10 repetitions.
Check points:
• • Keep the head on the ground throughout the exercise.
• • At the top of the movement, straighten, but do not lock the elbows.
Exercise 2: 8-Count T Push-up (from Conditioning Drill 2 [CD2])Risk mitigation: Soldiers will perform a dynamic warm-up before starting this exercise. A master fitness trainer can assist in developing proper form. Beginners should start with five repetitions using slow, controlled movement. Beginners should increase repetitions with proper technique to 10 repetitions across a 2-4 week base phase.
Purpose: This exercise develops strength and endurance in the arms, upper back, and legs.
Equipment: Level space.
Starting position: Position of attention.
Figure 3-8. 8-count T push-up.

43
ARMY COMBAT FITNESS TEST
Execution: Using the following “slow” 8 counts:
• • Assume the squat position.
• • Thrust the legs backward to the front leaning rest position.
• • Bend the elbows, lowering the body all the way to the ground.
• • Release the hands from the ground and straighten the arms out straight to the side.
• • Bring the hands back under the shoulders.
• • Push-up into the front leaning rest position.
• • Reverse thrust the legs to the squat position.
• • Return to the starting position – the position of attention – before repeating.
As Soldiers become more advanced, they can increase the workload for the 8-count T push-up by adding a weighted workout vest or body armor or a power jump/burpee at count 8.
Exercise prescription: 1 set of 5-10 repetitions.
Check points:
• • To keep the trunk from sagging, tighten the abdominal muscles while in the front leaning rest position. Maintain a straight body position from the head to the ankles throughout the exercise.
• • On counts 1 through 7, the hands are directly below the shoulders with fingers spread and the middle fingers directed straight forward.
• • On counts 1 through 7, keep the heels together.
• • On counts 4 and 6, straighten, but do not lock the elbows.
• • Allowing the trunk to sag, especially on count 2, strains the back. If the push-up cannot be performed on counts 2 through 6 correctly, quickly assume the 6-point stance before count 3 and return to the front leaning rest position just before performing count 7.

44
CENTER FOR ARMY LESSONS LEARNED
Exercise 3: Incline BenchRisk mitigation: Soldiers should begin training with an empty straight bar, PVC pipe, or wood staff to perfect their incline bench technique. A master fitness trainer can assist in developing proper form. Beginners should work for 2-4 weeks at loads of 40-50 percent of their body weight (ex: body weight = 170 lbs; lift weight = 70-85 lbs) or 25-50 percent of their 1RM. Beginners should maintain a relative constant weight and increase repetitions with proper technique during a 2-4 week base phase.
Purpose: This exercise develops strength in the arm, shoulder, and chest muscles.
Equipment: Straight bar (45 lbs.), weight plates, incline bench, collars, and spotter.
Starting position: Seated position with the feet firmly on the ground. The seat is adjusted so a 90-degree angle is formed between the upper and lower arms with the shoulders directly below the handgrips. The hips, lower back, shoulders, and head are firmly against the bench back with the eyes looking straight ahead. A natural arch is maintained in the lower back. Select the appropriate weight and ensure the barbell collar is in place.
Execution: Grasp the bar with a closed grip, hands about shoulder width apart. Lower the straight bar in a controlled fashion until upper arm is at least parallel to the ground or the bar is gently touching the chest. Immediately, return the bar to the starting position by fully extending the arms while keeping the head against the bench. A spotter should be used to lift the bar off the supporting rack and return the straight bar to the rack.
Figure 3-9. Incline bench.

45
ARMY COMBAT FITNESS TEST
Exercise prescription: 3 sets of 8-10 repetitions using 60-70 percent of 1RM.
Check points:
• • Feet remain on the ground, with hips, back, shoulders, and head firmly on the bench.
• • Do not bounce the barbell on the chest.
• • Keep the head and neck aligned with the spine and look straight ahead.
Exercise 4: Quadraplex (from Four for the Core Drill [4C])Risk mitigation: Soldiers should execute a dynamic warm-up before starting this exercise. A master fitness trainer can assist in developing proper form. Beginners should start with three repetitions of 20-30 seconds per repetition. Beginners should increase repetitions with proper technique while maintaining a limited range of movement and 30-60 second interval throughout a 2-4 week base phase.
Purpose: This exercise develops strength and endurance of the trunk.
Equipment: Level space.
Figure 3-10. Quadraplex.

46
CENTER FOR ARMY LESSONS LEARNED
Starting position: Kneel on the ground and place your hands on the ground directly below your shoulders. Support your body with your hands and knees. Keep your back flat.
Execution: Contract the abdominal muscles, without rotating the trunk or sagging or arching the spine, straighten the left leg to the rear and the right arm to the front. The goal is to hold each quadraplex position (left and right) for 60 seconds each. Alternate the arm and leg movements on subsequent repetitions, repeating for 1 minute. The key to this exercise is controlled lowering and raising of the opposite arm and leg while keeping the rest of the body aligned and still.
Exercise prescription: 3 repetitions of 30-60 second holds per side.
Check points:
• • Ensure head and neck are aligned.
• • Ensure abdominal contraction is performed prior to lifting the extremities.
• • Maintain flat back and avoid trunk/hip rotation.

47
ARMY COMBAT FITNESS TEST
Section 3, Event 4: Sprint-Drag-CarryTop 3 Exercises
Exercise 1: 300-Meter Shuttle Run (300SR)Risk Mitigation: Soldiers will perform a dynamic warm-up before starting this exercise. A master fitness trainer can assist in developing proper form. Beginners should start with five repetitions in a limited range of movement. Beginners should increase repetitions with proper technique to 10 repetitions across a 2-4 week base phase.
Purpose: The 300SR develops the ability to repeatedly sprint after changing direction. It is an indicator of the Soldier’s anaerobic endurance, speed, and agility.
Equipment: Level space with 25-meter lane.
Starting Position: Staggered stance.
Figure 3-11. 300-meter shuttle run.

48
CENTER FOR ARMY LESSONS LEARNED
Execution: The 300SR can be conducted by individual Soldiers or as a collective exercise from the extended rectangular formation (covered). On the command, “READY,” one Soldier in each column will move behind the starting line and assume the staggered stance. On the command, “GO,” Soldiers sprint to a line 25 meters from the starting line. They must turn, squat, and touch the line or beyond it with their left hand, then return to touch the starting/finish line with their right hand. This is considered one repetition. Soldiers will perform six repetitions, alternating touching the lines with opposite hands. On the last (sixth) repetition, Soldiers sprint past the starting/finish line without touching it.
Check points:
• • Soldiers should slow their movement before planting feet and changing direction.
• • Soldiers should both bend the trunk and squat when reaching to touch the ground as they change direction (this is particularly important when picking up the kettlebells prior to the Carry leg of SDC).
• • Soldiers touch the ground with their left hand on the first turn, and with their right hand on the second turn and continue to alternate touches on each turn.
• • Soldiers must sprint with their heads up and watch for other Soldiers who may be moving in the opposite direction.
Exercise 2: Bent Over Row (from STC) Risk mitigation: Soldiers should begin training with an empty straight or hex bar, PVC pipe, or wooden handle to perfect their technique. A master fitness trainer can assist in developing proper form. Beginners should work for 2-4 weeks at loads of 10-25 percent of their body weight (ex: body weight = 170 lbs; lift weight = 17-40 lbs) or 25-50 percent of their 1RM. Beginners should maintain a relative constant weight and increase repetitions with proper technique during a 2-4 week base phase.
Purpose: This exercise develops strength, endurance, and mobility of the trunk, lower extremities, and grip strength.
Equipment: Kettlebells, straight bar (45 lbs.), weight plates, collars, or alternate equipment. Select the appropriate weight and ensure the barbell collars are in place.
Starting position: After picking up the weight from the ground, move into the forward leaning rest position while holding the weight in front of the legs using a pronated grip (palms facing the thighs). Select the appropriate weight and ensure the barbell collars are in place.

49
ARMY COMBAT FITNESS TEST
Execution: While maintaining a secure grip, pinch the shoulder blades together while keeping both knees in a slightly flexed position. Pull the weight up toward the chest and shoulders while keeping the trunk still and the spine straight. Return to the starting position before repeating.
Exercise prescription: 3 sets of 8-10 repetitions using 60-70 percent of 1RM.
Check points:
• • Feet remain flat on the ground or foot supports.
• • The trunk is erect and the back is flat.
• • Keep the head and neck in a neutral position, looking straight ahead or slightly downward.
Figure 3-12. Bent over row.
Exercise 3: Straight-Leg DeadliftRisk mitigation: Soldiers should begin training with an empty straight or hex bar, PVC pipe, or wooden handle to perfect their deadlift technique. A master fitness trainer can assist in developing proper form. Beginners should work for 2-4 weeks at loads of 40-50 percent of their body weight (ex: body weight = 170 lbs; lift weight = 70-85 lbs) or 25-50 percent of their 1RM. Beginners should maintain a relative constant weight and increase repetitions with proper technique during a 2-4 week base phase.
Purpose: This exercise develops strength, endurance, and mobility of the trunk, lower extremities, and grip strength.
Equipment: Straight bar (45 lbs.), weight plates, collars, or alternate equipment. Select the appropriate weight and ensure the barbell collars are in place.

50
CENTER FOR ARMY LESSONS LEARNED
Starting position: After picking up the weight from the ground, move into the forward leaning rest position while holding the weight in front of the legs using a pronated grip (palms facing the thighs). Select the appropriate weight and ensure the barbell collars are in place.
Execution: While maintaining a secure grip, pinch the shoulder blades together while keeping both knees in a slightly flexed position. Flex at the hips to lower the bar toward the floor while keeping a straight spine with head in line with the spine.
Exercise prescription: 3 sets of 8-10 repetitions using 60-70 percent of 1RM.
Check points:
• • Ensure feet are spread approximately shoulder width apart.
• • Ensure knees are in line with the toes and heels remain on the floor.
• • Ensure head and neck are in a neutral position with eyes facing forward.
• • Avoid flexing at the waist, rounding the spine or allowing the knees to move inward (knock-knee).
Figure 3-13. Straight-leg deadlift.

51
ARMY COMBAT FITNESS TEST
Section 3, Event 5: Leg TuckTop 3 Exercises
Exercise 1: Bent-Leg Raise (from 4C)Risk mitigation: Soldiers should execute a dynamic warm-up before starting this exercise. A master fitness trainer can assist in developing proper form. Beginners should start with 20-second repetitions and exercise in a limited range of movement. Beginners should increase repetitions with proper technique from 20- to 60-second intervals throughout a 2-4 week base phase.
Purpose: This exercise develops strength, endurance, and mobility of the trunk.
Equipment: Level space.
Starting position: Lying in the starting position for the sit-up, place the fingers of both hands underneath the small of the back.
Execution: Raise the feet off of the ground until both the hips and knees flex to 90 degrees. Holding the head 2-3 inches off the ground, contract the abdominals while thinking about the amount of pressure on the fingers created by the contraction of the abdominals. Maintain the same degree of pressure while slowly straightening the legs. Hold.
Check points:
• • Head is 2-3 inches off the ground.
• • Ensure abdominal contraction is performed prior to lifting the extremities.
• • Maintain consistent pressure on the fingers throughout the exercise.
Figure 3-14. Bent-leg raise.

52
CENTER FOR ARMY LESSONS LEARNED
Exercise 2: Leg Tuck and Twist (from CD1)Risk mitigation: Soldiers should execute a dynamic warm-up before starting this exercise. A master fitness trainer can assist in developing proper form. Beginners should start with five repetitions and exercise in a controlled range of movement. Beginners should increase repetitions with proper technique from 5 to 10 repetitions throughout a 2-4 week base phase.
Purpose: This exercise develops trunk strength and mobility while enhancing balance.
Equipment: Soft, level space.
Starting position: Seated with trunk straight, but leaning backward 45 degrees, arms straight and hands on ground 45 degrees to the rear with palms down. Legs are straight, extended to the front, and 8-12 inches off the ground.
Execution: Raise legs while rotating on to the left buttock and draw the knees toward the left shoulder. Return to the starting position. Repeat on the right side.
Figure 3-15. Leg tuck and twist.

53
ARMY COMBAT FITNESS TEST
Exercise prescription: 2 sets of 5-10 repetitions.
Check points:
• • Keep the legs and knees together.
• • The head and trunk remain still while the legs move.
• • The legs are tucked (bent) and aligned diagonally to the trunk as they move up.
• • To protect the back, avoid jerking the legs and trunk to achieve the up position.
Exercise 3: Alternating Grip Pull-Up (from Climbing Drill 1 [CL1])Risk mitigation: Soldiers should begin training with a spotter, step bench, or other assistive stretch cord to perfect their pulling range of motion. A master fitness trainer can assist in developing proper form. Beginners should work for 2-4 weeks with assistance, supplementing with other pulling or climbing drill exercises such as the straight arm pull or lat pull down machine starting at 50 percent of their body weight (ex: body weight = 170 lbs; pull weight = 70-85 lbs), or 25-50 percent of their 1RM. Beginners should maintain a relative constant weight and increase repetitions with proper technique during a 2-4 week base phase.
Purpose: This exercise develops the muscles used to pull the body upward while using an alternating grip.
Starting position: Straight arm hang using the alternating grip, left or right.
Equipment: Climbing bar, pull-up bar, suspension trainer or lat pull down machine.

54
CENTER FOR ARMY LESSONS LEARNED
Execution: Keeping the body straight, pull upward, allowing the head to move to the left or right side of the bar while touching the left or right shoulder to the bar. Return to the starting position. Soldiers should pair up with a battle buddy to work “negatives” (eccentric contractions) after they reach volitional fatigue. The battle buddy can assist the Soldier to achieve the fully flexed position to allow the Soldier to execute a slow cadence eccentric extension movement to full arm extension.
Exercise prescription: 1 set of 5-10 repetitions.
Check points:
• • When using the left alternating grip, Soldiers touch the left shoulder to the bar. If the right alternating grip is used, Soldiers touch the right shoulder to the bar.
• • The arms are fully extended in the starting position.
• • Keep the feet together and uncrossed throughout the exercise.
Figure 3-16: Alternating grip pull-up.

55
ARMY COMBAT FITNESS TEST
Section 3, Event 6: 2-Mile RunTop 3 Exercises
Exercise 1: Sprint Intervals (PRT Activities 30:60s and 60:120s)Risk mitigation: Soldiers should execute a dynamic warm-up before starting this exercise. A master fitness trainer can assist in developing proper running form. Beginners should start with 4 x 30-second repetitions at 50-60 percent effort followed by a 60-second rest (30:60s). Beginners should increase repetitions (6-8 reps), maintaining proper running technique for 30 seconds at 50-60 percent effort throughout a 2-4 week base phase.
Purpose: This exercise improves the resistance to fatigue of the active muscles by repeatedly exposing them to high-intensity effort. As a result of their increased anaerobic and aerobic endurance, Soldiers will be able to sustain performance of physically demanding tasks at a higher intensity for a longer duration.
Equipment: Level field, track, or running surface.
Execution: Following a dynamic warm-up (PD and MMD), sprint at near maximal effort for 30 seconds followed by 60 seconds of rest.
Exercise prescription: 1 x week, 4-10 repetitions followed by a cool down (RD). After achieving 10 x 30:60s, replace with 5 x 60:120s weekly increasing to 10 x 60:120s over 4 weeks.
Check points:
• • Must perform dynamic warm-up prior to executing 30:60s.
• • Follow 1:2 work-to-rest ratio.
• • Ensure cool down (RD) is performed.
• • Avoid running on consecutive (back-to-back) days.
Figure 3-17. Sprint intervals.

56
CENTER FOR ARMY LESSONS LEARNED
Exercise 2: Release Run (RR)Risk mitigation: Soldiers should execute a dynamic warm-up before starting this exercise. A master fitness trainer can assist in developing proper running form. Beginners should start running at a moderate sustainable pace for 5-10 minutes. Beginners should gradually increase the time to 10-15 minutes throughout a 2-4 week base phase.
Purpose: This exercise shares the similar purpose to interval sprints, but with less intensity and longer duration.
Equipment: Level field, track, or running surface.
Execution: Following a dynamic warm-up (PD and MMD), the running pace should be “comfortably hard.” Soldiers should be able to maintain a steady pace for 5-6 minutes with a similar ability group before being released to run at their own pace or target pace. The duration of the release portion of the run should increase progressively to 15-25 minutes.
Exercise prescription: 1 week at the highest sustainable pace for 5-6 minutes initially, progressing to 15-25 minutes.
Check points:
• • Must perform dynamic warm-up prior to exercise.
• • Ensure the running pace is “comfortably hard” while sustaining 5-6 minutes of duration initially.
• • The goal is to be able to progress to 15-25 minutes of duration at the same pace.
• • Ensure cool down (RD) is performed.
• • Avoid running on consecutive (back-to-back) days.
Exercise 3: Hill Repeats (HR)Risk mitigation: Soldiers should execute a dynamic warm-up before starting this exercise. A master fitness trainer can assist in developing proper running form. Beginners should start running at a slow, sustainable pace for 10-15 minutes. Beginners should gradually increase the time to 15-20 minutes throughout a 2-4 week base phase.
Purpose: This exercise develops aerobic fitness and muscular endurance by using a slower pace and a longer duration of sustained running.
Equipment: Level field, track, or running surface.

57
ARMY COMBAT FITNESS TEST
Execution: Following a dynamic warm-up (PD, HSD, and MMDs), the running pace should be slow enough to carry a conversation without becoming out of breath for 20-30 minutes. You should increase your time/distance slowly, no more than 10 percent in time or distance per week. You should not increase your pace.
Exercise prescription: 1 week for 6-10 repetitions.
Check points:
• • Must perform dynamic warm-up prior to exercise.
• • Ensure the running pace can be sustained across each of the repetitions.
• • Ensure cool down (RD) is performed.
• • Avoid running on consecutive (back-to-back) days.


59
ARMY COMBAT FITNESS TEST
Appendix AArmy Combat Fitness Test Instructions
No earlier than 48 hours prior to taking a record Army Combat Fitness Test (ACFT), all Soldiers are required to read the following test instructions. Soldiers are encouraged to ask their chain of command questions about the ACFT prior to the event. These instructions will not be read aloud or briefed at the event, but will be available in written form for Soldiers to review. The ACFT testing directions and standards are as follows:
You are about to take the Army Combat Fitness Test or ACFT, a test that measures your total body fitness. The test results will give you and your commanders an indication of your level of physical fitness and will serve as a guide in determining your physical training needs. You will rest and recover at each station while other Soldiers in your group complete their turns. Do the best you can on each test event.
You are required to read and understand the following instructions. These instructions will be available for any Soldier to read at the test site. You are encouraged to ask questions of your chain of command. These instructions will not be read aloud or briefed at the test site.
Prior to the start of the test, you will participate in a 10-minute Preparation Drill led by an noncommissioned officer (NCO). Following the Preparation Drill, you will be allowed 10 minutes to warm up for the 3-Repetition Maximum Deadlift. You are encouraged to start at a low weight and ‘ladder up’ to a weight that is about half of your maximum deadlift weight.
ACFT Event 1: 3-Repetition Maximum Deadlift (MDL). You will line up with other Soldiers behind a hexagon/trap bar with your maximum expected weight – total weight will be marked and you should identify the location of your appropriate maximum weight during the MDL warm-up. When the NCOIC begins the test, move to the lane with your target maximum weight. When called forward by your grader, you will hand your scorecard to your grader and step inside the hexagon/trap bar, feet shoulder width apart, and locate the mid-point of the hexagon/trap bar handles. On the command of “GET SET,” you will bend at the knees and hips, reach down, and grasp the center of the handles. Arms will be fully extended, back flat, head in line with the spinal column or slightly extended, head and eyes straight ahead or slightly upward, and heels in contact with the ground. All repetitions will begin from this “START” position. On the command of “GO,” you will stand up and lift the bar by extending at the hips and knees (lifting with your legs). Your hips should never rise above your shoulders. Your back should remain straight – not flexed or extended. As the hips and knees reach full extension, you will stand upright. After completing the lift up, you will slowly lower the bar to the ground under control by flexing the hips and knees while maintaining a flat-back position. Do not drop or let go of the bar. The weight plates must touch the ground briefly before beginning the next repetition (touch and go). You may not bounce the weight. Complete three continuous repetitions. The grader will stop any MDL attempt/repetition with a form break that may result in injury (knees collapsing inward, back or shoulders rounding out, hips above shoulders, loss of

60
CENTER FOR ARMY LESSONS LEARNED
balance, or dropping the bar). This attempt will not count as a record attempt. If you fail to complete three continuous repetitions, you will be allowed a second attempt at a lower weight of your choosing. You will be allowed up to 2 minutes of rest between attempts. If you complete three continuous repetitions successfully, you will be allowed one attempt at a higher weight of your choosing. Lifting at a higher weight is optional. Your score for the MDL is the highest weight successfully lifted for three continuous repetitions.
After successfully completing three continuous repetitions of the deadlift, your grader will return your scorecard and you will be directed to a lane for the Standing Power Throw, where you will form a group of two to four Soldiers. That group will stay together for the SPT, Hand-Release Push-up (HRP), Sprint-Drag-Carry (SDC), and Leg Tuck (LTK) Test events.
A record attempt will terminate if the Soldier drops or bounces the weights off the ground, or rests in the down position. Resting means no continuous effort is being made to lift the weight.
ACFT Event 2: Standing Power Throw (SPT). When called forward by your SPT grader, you will hand your scorecard to your grader, face away from the “START” line, pick up the 10-lb medicine ball and stand with both heels at (but not on or over) the “START” line. To avoid having the ball slip, grasp the medicine ball firmly in both hands as far around the sides of the ball as possible. Towels will be provided to dry the ball. On the command “GO,” you will execute a practice throw; on the practice throw, use less than maximum effort to conserve energy for your record attempts. As part of the throw you may make several preparatory movements by flexing at the trunk, knees, and hips while lowering the ball almost to the ground. On the next command “GO,” perform one record throw; on the final command “GO,” perform the second record throw. During the record throws, attempt to throw the ball as far as possible. Your feet may leave the ground or move forward or backward during the throwing motion to exert more power, but you may not fall down and your feet may not touch or cross the “START” line at any time during the test event. If this happens, the attempt will be considered a “fault” and will be repeated. Two consecutive faults will count as one record attempt, and you will receive a score of zero for that attempt. Your graders will mark and record both record throws; however, only the longer of the two record throws will be used for your SPT score. Your grader will return your scorecard and you will move onto the SPT lane to retrieve the medicine ball for other Soldiers in your group.
ACFT Test Event 3: Hand-Release Push-up (HRP). When called forward by your grader, you will hand your scorecard to your grader. You will assume the prone position with hands flat on the ground, index fingers inside the outer edge of your shoulders. Your chest and the front of your hips and thighs will be on the ground. Toes will be touching the ground with feet together or up to a boot’s width apart. Your ankles will be flexed. Your head does not have to be on the ground. With the hands flat on the ground, your index fingers will be inside the outer edge of your shoulder. Your feet will remain on the ground throughout the event. On the command “GO,” you will push the whole body up from the ground as a single unit to fully extend the elbows, moving to the front leaning rest position. You will maintain the same straight body alignment from the shoulders to the ankles. Failure to maintain a straight body alignment during the execution of the HRP will cause that repetition not to count.

61
ARMY COMBAT FITNESS TEST
The only authorized rest position is the front leaning rest position. You must maintain the straight body alignment from shoulders to ankles. If you bend or flex the knees, hips, or trunk while in the rest position, but immediately self-correct or immediately correct when directed by the grader, you may continue the event, only losing a count for that repetition.
(For movement 3A – Hand Lift HRP). After you reach full extension in the “UP” position, you will bend your elbows to lower your body to the ground. Your chest, hips, and thighs will touch the ground. Your head or face do not have to contact the ground. After reaching the ground, without moving the body or legs, you will lift both hands from the ground at the same time. A clear gap between the palms and the ground must be visible to the grader so that the grader knows you have released your hands from the ground. You will then place your hands back on the ground, returning to the “START” position. This completes one repetition.
(For movement 3B – Arm Extension HRP). After you reach full extension in the “UP” position, you will bend your elbows to lower your body to the ground. Your chest, hips, and thighs will touch the ground. Your head or face do not have to contact the ground. After reaching the ground, without moving the body or legs, you will extend both arms out from the body at the same time to a 90-degree position. Hands may be on or off the ground. You will then bend your elbows and place your hands back on the ground, index fingers inside the edge of the shoulder, returning to the “START” position. This completes one repetition.
In the “UP” position, you must maintain the front leaning rest position. You cannot lift a hand or foot or touch your knees to the ground. If you lift a hand or foot or touch a knee in the “UP” position, the event will be terminated. You cannot rest on the ground. You must make a continuous effort to repeat the push-up movement. If, after a warning, the grader determines you are resting on the ground, the event will be terminated. Your raw score is the number of correct repetitions executed during 2 minutes or at the point the test event was terminated.
ACFT Test Event 4: Sprint-Drag-Carry (SDC). When called forward by your SDC grader, you will hand your scorecard to your grader. You will assume the prone position with the top of your head behind the “START” line. The SDC consists of 5 x 50 meter shuttles. For the first shuttle, on the command “GO,” stand up and sprint 25 meters; touch the 25 meter line with your foot and hand; turn and sprint back to the “START” line. For the second shuttle, grasp each strap handle on the sled, and pull the sled backward to the 25 meter line. When the entire sled crosses the 25 meter line, turn the sled around and pull backward until the entire sled crosses the “START” line. For the third shuttle, you will perform a lateral for 25 meters, touching the line with foot and hand; perform the lateral back to the “START” line. You will face the same direction during both laterals, leading with one foot for 25 meters and the other foot for 25 meters. For the fourth shuttle, grasp the handles of the two 40-lb kettlebells and run 25 meters, touching the line with the foot only; turn and run back to the “START” line; place the kettlebells on the ground, under control. Do not drop or throw the kettlebells. For the fifth shuttle, sprint 25 meters to the 25 meter line, touching with the foot and hand; turn and sprint back to the “START” line to complete the event.

62
CENTER FOR ARMY LESSONS LEARNED
SDC performance considerations: During the laterals, your feet may touch but not cross; if you fail to touch or cross the line with your foot and hand in shuttle 1, 3, and 5, or the entire sled in shuttle 2, or your foot in shuttle 4, the grader will call you back to touch/cross the line before allowing you to continue; you may not toss or throw the kettlebells. If you fail standards by not touching a line, crossing feet, or throwing equipment, you may be directed to return to the line and correct the error. Lastly, be sure the sled and kettlebells are positioned correctly before you begin the SDC.
ACFT Event 5: Leg Tuck (LTK). When called forward by your LTK grader, you will hand your scorecard to the grader. On the command “GET SET,” you will mount the bar (Soldier/grader may provide assistance) and assume a straight-arm position on the bar. Use an alternating grip. Your body will be perpendicular to the bar. Your elbows, trunk, and hips will be straight. Your feet cannot contact the ground. Knees may be bent but legs may not be crossed. On the command “GO,” you will flex at the elbows, knees, hips, and waist to raise your knees or thighs to your elbows. Your elbows should flex during this movement. The right and left knees (or thighs) must touch the right and left elbows, respectively. The grader must observe both knees (or thighs) in contact with both elbows. You must return to the straight-arm position under control in order to complete and get credit for the repetition.
If a repetition does not start from the straight-arm position (your elbows remain bent), that repetition will not count. You do not have to be completely still in the straight-arm position, but deliberately swinging the trunk or legs to assist with upward movement is not permitted and that repetition will not count. The grader may steady you to prevent or control excessive swinging. Some minor body movement or twisting of the trunk will occur and is permitted. You should not touch the vertical support posts or the ground during the exercise. You will not be penalized for inadvertent contact with a post or the ground, as long as you do not gain an advantage from that contact. You may rest in the straight-arm (down) position. The event will be terminated when you drop from the bar, rest on the ground, or when 2 minutes have elapsed.
There will be 5 minutes of rest in between the LTK and the 2-Mile Run (2MR).
ACFT Test Event 6: 2-Mile Run (2MR). When called forward by your 2MR grader, you will hand your scorecard to the grader. You will receive instruction on running the 2-mile course, including the start and finish points, turns, turn-around points, or number of laps, in advance of the ACFT. Your 2MR grader may be a different grader from your first five test events.
On the command “GO,” the clock will start and you will begin running at your own pace, completing the 2-mile distance without receiving any physical help. You may walk or pause, but cannot be picked up, pulled, or pushed in any way. You may pace another Soldier or be paced by another Soldier. Verbal encouragement is permitted. Leaving the course at any time or any point during the event will cause the event to be terminated. Your time will be recorded as you cross the finish line at the 2-mile point.
After completing the six-event ACFT, you will review and sign your scorecard. Any discrepancies must be resolved at the test site. Requests for reconsideration will not be permitted after the scorecard has been signed and turned in.
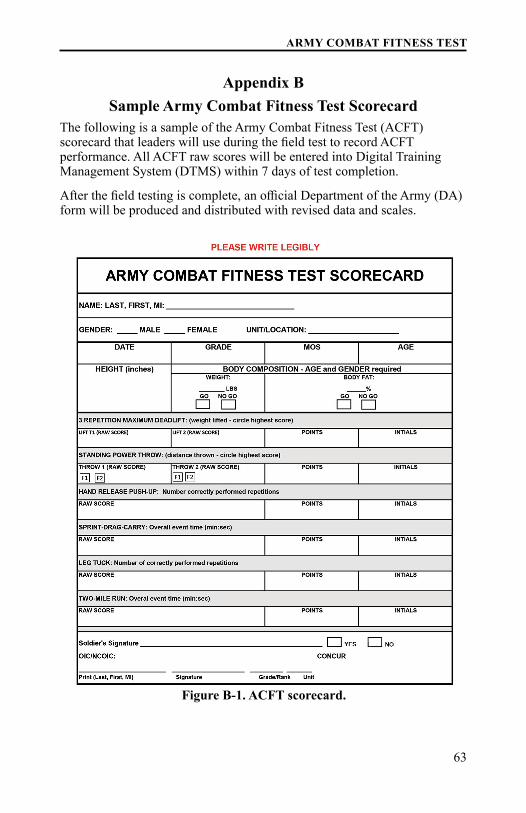
63
ARMY COMBAT FITNESS TEST
Appendix BSample Army Combat Fitness Test Scorecard
The following is a sample of the Army Combat Fitness Test (ACFT) scorecard that leaders will use during the field test to record ACFT performance. All ACFT raw scores will be entered into Digital Training Management System (DTMS) within 7 days of test completion.
After the field testing is complete, an official Department of the Army (DA) form will be produced and distributed with revised data and scales.
Figure B-1. ACFT scorecard.


65
ARMY COMBAT FITNESS TEST
Appendix CPhase 1 Initial Operating Capability
Army Combat Fitness Test Score Scales
Figure C-1. ACFT field test ACFT score scales.


67
ARMY COMBAT FITNESS TEST
Specifications:• • Hexagon bar/trap-bar (no d-handles).
• • Olympic size. Weight: 60 lbs. (unloaded) must be within +/- 2 lbs. of claimed weight.
• • Durable hexagonal frame welded from 1.5 inches square steel tubing (1.5 inches Schedule [SCH] 80 pipe sleeves).
• • 16.4 inches of loadable sleeve length (to accommodate 4 x 45-lb. bumper plates with collar).
• • Both sets of knurled, parallel handles measure 1.34 inches in diameter and are spaced 25 inches on center.
• • Hexagon bar requires rust proofing. Examples: Black oxide bare steel; bright zinc; black zinc chrome; nickel; phosphorous zinc plate or primer and paint.
• • Required to have a solid sleeve design.
• • Color is non-specific.
Appendix DField Testing – Army Combat Fitness Test Equipment List
(1 Lane Requirement)During fielding, beginning 01 OCT 2018 and ending 30 SEP 2020, battalions will obtain one Army Combat Fitness Test (ACFT) equipment set. To provide greater flexibility in ordering equipment across the force, the description below is for the ACFT equipment required to execute testing in a single lane. U.S. Army Center for Initial Military Training (USACIMT) recommends at least 16 ACFT testing lanes per battalion set.
Nomenclature: Hexagon Barbell (hexagon bar/trap-bar)
Figure D-1. One per lane. Its configuration leads to a much more upright torso position, allowing the Soldier to “sit” into the movement
with far fewer technical requirements and greater safety than a traditional straight bar deadlift. Ideal for shrugs and deadlifts.

68
CENTER FOR ARMY LESSONS LEARNED
USACIMT procurement recommendation: Chrome-plated hexagon barbells have been known to rust due to outside usage and storage; d-handle hexagon barbell are not authorized. Olympic/standard straight bar should not be used to perform the 3 Repetition Maximum Deadlift (MDL) test event. Loadable sleeve length must be able to hold 4 x 45-lb. bumper plates with collar. Weight of bar should be standard 60 lbs. empty.
Nomenclature: Single Hi-Temp Bumper Plates (550 lbs.)Figure D-2. Bumper plates should be constructed of vulcanized rubber and a
2-inch stainless steel insert. Though not recommended, units may use steel plates if they already possess them. Collar on bumper plates should be inset from the
plane of the plate, allowing for better protection when multiple plates are on the
bar, and reducing the risk of inserts getting impacted or
popping out.
Specifications:• • Standard diameter 450 mm (17.7165 inches).
• • Solid rubber plates made from virgin or high-quality recycled rubber.
• • Shore durometer A 87.7 - 88.3.
• • Collar opening: 50.4 mm.
• • Insert type: Forged stainless steel.
• • Bumper plate thickness measurements are within 1/16 of an inch.
• • Weight tolerance: +/- 1 percent of claimed weight.
• • Bumper plate color is non-specific.
USACIMT procurement recommendation: Bumper plate quality and durability is essential. Should be crack and peel resistant, have rubber casings, recessed center, and within accurate weight measure. All metal plates are less expensive, but rust in outdoor use and place Soldiers at higher risk of injury in set-up and testing. Must fit on trap-bar selected.

69
ARMY COMBAT FITNESS TEST
Nomenclature: Barbell Collar/Spring
Figure D-3. Two (pairs) per lane. Designed to be used on 50 mm Olympic bar sleeves. Long lasting rubber interior to protect your barbell and provide a snug fit. Quick and easy locking mechanism
provides secure hold and easy on/off.
Specification• • Plastic or metal 2 inch x 2 inch barbell collar.
• • Weight: 1 to 2 lbs. per pair.
• • Must ensure collar/spring and bar selected are fully compatible. Fits allowable range between 1.937 to 2.015 (inches). Not all collars/springs work with all bars.
• • Barbell collar color is non-specific.
USACIMT procurement recommendation: Quality products are more durable and less prone to breakage.

70
CENTER FOR ARMY LESSONS LEARNED
Nomenclature: Nylon Sled (with pull strap)
Figure D-4. One per lane. The nylon sled can be dragged on multiple surfaces (grass and turf). The sled can handle up to 4 x 45-lb. plates and is considerably lighter than the traditional metal dragging sled.
The sled should not be used on concrete, asphalt, or any rough-textured surface as this will significantly shorten the lifespan of the sled. The
nylon sled can be rolled up for storage.
Specification• • Made of thick heavy duty nylon.
• • Size standard is 22 inches (length) by 19.5 inches (width).
• • Can handle up to 4 x 45-lb. plates. Weight standard is 90 lbs. (2 x 45-lb. plates).
• • Must include pull 92-inch strap with handle on both ends.
• • Nylon sled color is non-specific. Sled and strap 5 lbs. (+/- .5 lbs.)
USACIMT procurement recommendation: Presently, metal sleds are not authorized for use in the ACFT. Nylon sled with straps is only authorized sled for record testing. Strongly recommend purchasing sleds and pull strap as a unit.

71
ARMY COMBAT FITNESS TEST
Nomenclature: 10-lb. Rubber Medicine BallFigure D-5. One per lane. A
medicine ball (also known as an exercise ball, a med ball,
or a fitness ball) is a weighted ball (approximately 9 [+/- 1 inch] inches in diameter),
often used for rehabilitation and strength training.
Specifications:• • The medicine ball should be made from hard rubber.
• • It should be inflatable, heavy duty, and non-malleable, unlike a slam ball, a textured grip surface should make it easy to handle.
• • Medicine ball should not lose its shape and should be made from a durable weighted rubber shell specially designed to withstand normal impact.
• • Weight cannot shift inside and cannot be filled with sand or similar material.
• • Medicine ball needs to be weatherproof.
• • Medicine ball color is non-specific.
Nomenclature: 40-lb. KettlebellFigure D-6. Two per lane.
The kettlebell is a cast-iron or cast steel weight (resembling a cannonball with a handle) used to perform many types
of exercises, including but not limited to ballistic exercises
that combine cardiovascular, strength, and flexibility
training. Should be made of a natural, slip-free texture with
a seamless and even finish.

72
CENTER FOR ARMY LESSONS LEARNED
Specifications:• • Should be made of a natural, slip-free texture with a seamless and even finish.
• • Weight will be 40 lbs. +/- 1 percent.
• • Cast iron or steel construction.
• • Powder coated.
• • Approximate height: 11 inches
• • Approximate diameter: 8 inches
• • Able to accommodate hands of any size.
• • One-piece design.
• • Flat base.
• • Kettlebell color is non-specific.
USACIMT procurement recommendation: Standard per Field Manual (FM) 7-22 training – 40 lbs. for testing.
Nomenclature: Measuring Tape (metric)Figure D-7. One per lane. Must be
capable of measuring in metric. Durable, long-lasting, vinyl-coated
fiberglass tapes in abs shatter resistant case. Closed reel tapes
feature an easy-to-wind, flush-folding handle.
Specification• • 100-foot tape with a “metric” side.
• • Minimum tape length is 30m (98 feet).
• • Measuring tape color is non-specific.
USACIMT procurement recommendation: Item prone to breakage/damage/theft over time.
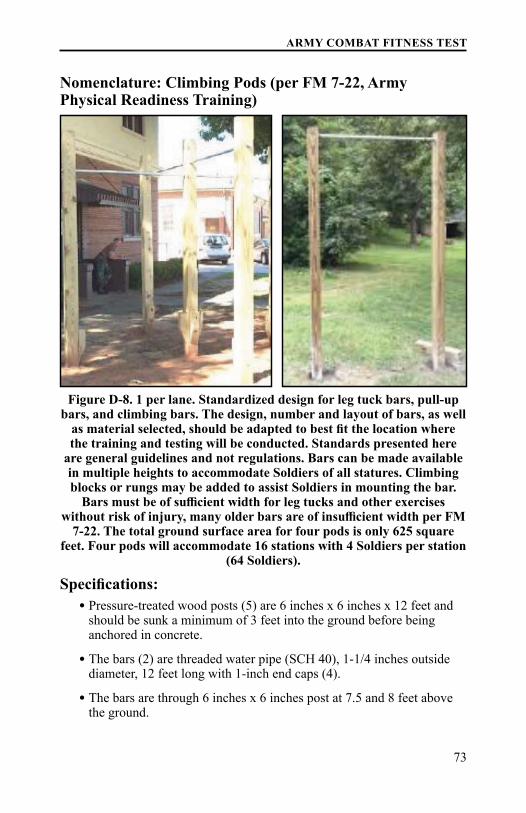
73
ARMY COMBAT FITNESS TEST
Nomenclature: Climbing Pods (per FM 7-22, Army Physical Readiness Training)
Figure D-8. 1 per lane. Standardized design for leg tuck bars, pull-up bars, and climbing bars. The design, number and layout of bars, as well
as material selected, should be adapted to best fit the location where the training and testing will be conducted. Standards presented here
are general guidelines and not regulations. Bars can be made available in multiple heights to accommodate Soldiers of all statures. Climbing blocks or rungs may be added to assist Soldiers in mounting the bar.
Bars must be of sufficient width for leg tucks and other exercises without risk of injury, many older bars are of insufficient width per FM
7-22. The total ground surface area for four pods is only 625 square feet. Four pods will accommodate 16 stations with 4 Soldiers per station
(64 Soldiers).
Specifications:• • Pressure-treated wood posts (5) are 6 inches x 6 inches x 12 feet and should be sunk a minimum of 3 feet into the ground before being anchored in concrete.
• • The bars (2) are threaded water pipe (SCH 40), 1-1/4 inches outside diameter, 12 feet long with 1-inch end caps (4).
• • The bars are through 6 inches x 6 inches post at 7.5 and 8 feet above the ground.

74
CENTER FOR ARMY LESSONS LEARNED
• • The distance from inside post edge to inside post edge is 62 inches.
• • The step-ups (16 inches long) are cut from 4 inches x 4 inches x 8 foot post secured to 6 foot x 6 foot post with lag bolt that is countersunk, see step-up detail.
• • Units are for a single pull-up bar unit.
• • Provide a 6-inch layer of 3/8” to 3/4” shredded rubber mulch. Site plans for extents (35 feet x 35 feet for each set of 4 pull-up bars).
Nomenclature: Portable Squat Stand with/Pull-Up Bar (alternate to climbing pods)
Figure D-9. One per lane. Squat stand 92 inches in height offers ample space for pull-ups under an 8-foot ceiling with a compact 8 inch x 48 inch base footprint
that can be easily transported or relocated.
Specifications• • 1.5 inch (+/- .25 inches) outside diameter of bar.
• • Smooth, unpainted, galvanized steel bar. Knurling acceptable.
• • Product weight: 146 lbs.
• • Height: minimum 86 inches.
• • Steel notes: 2 x 3 inches, 11 gauge.
• • Other product specifications: weight capacity – tested at 1,000 lbs.
• • Squat stands: steel, pull-up bar.
• • Color is non-specific.
USACIMT procurement recommendation: 2 inches outside diameter is too large for small hands.

75
ARMY COMBAT FITNESS TEST
Table D-1. Supplemental Army Combat Fitness Test Supporting Equipment List
Nomenclature Description Specification
Sled Artificial Turf Strip
Rolled artificial turf which works well for strength and conditioning platforms. Stadium padded artificial turf is an economical synthetic turf.
Rolls cut 8 ft. wide by 50 ft. in length (2 each), stays clean and green ‒ even with heavy use. Nylon, diamond monofilament, 1/2 pile height, primary backing woven, coating 5 mm polyurethene foam. Grab tear strength > 200 lbs. per foot.
Field Cones Any style of marking cone, painted lines, chalk lines, engineer tape or other lane marking method is acceptable. These are low-cost and simple. Some prefer colored cones to better mark lanes.
• These softer style markers are flexible and stack easily. • Improve your practice with these lightweight and completely portable low-profile cones.
Measuring Wheel
The wheel makes it easier to measure and set up lanes for the course. If not available, use a 30-meter measuring tape.
Lightweight and extremely durable
• Measures in English up to 10,000 feet
• Handle folds down for easy storage
Speaker Box PYLE Very High Frequency (VHF) 200W wireless
• Unit powered by internal rechargeable battery pack
• Dynamic wireless microphone with 3-position power switch and LED
• Unit battery life: Approximately 5 hours
• 110/220 voltage switchable

76
CENTER FOR ARMY LESSONS LEARNED
Nomenclature Description Specification
Pointer Can be used to keep better mark the exact landing spot. Other field expedient pointers are acceptable. Make testing more efficient but not required. Note: One 10’ white PVC pipe can make 2 x 5’ pointers.
Meets NSF/ANSI safety standards
• Pliable with limited lifetime warranty
• Product Details:
○○○○ • Product Dimensions: 1” X 10’
○○○○ • Shipping Weight: 3.150 pounds
○○○○ • ASIN: 51V/105 002
○○○○ • GSA Part number: 2510207497
Outdoor Clock High-visibility red LEDs readable in bright sunlight
• 5 digits timing
• Should include tripod and carrying case
• Timing modes
• Time up or time down
• Time of day mode
• Participants place count
• Pace per mile
• Projected time to finish
• Split modes: frame and lap
Stopwatch Stopwatch with a hand or digital display that can be started and stopped at will for exact timing (as of a race).
Product description:
• Water resistant
• 1/100 second
• Shock resistant

77
ARMY COMBAT FITNESS TEST
Appendix EDepartment of the Army Pamphlet 611-21
Army Physical Demand CategoriesDuring the Field Test, passing scores may be determined by a physical demand category (PDC). PDCs are governed by DA PAM 611-21 (Military Occupational Classification and Structure), which is currently under review.
Each military occupational speciality (MOS), area of concentration (AOC) and functional area will be designated as Heavy (Black), Significant (Gray), or Moderate (Gold) in accordance with task requirements submitted and validated by proponent leadership. As MOS duties and tasks change, PDCs may change as well.


79
ARMY COMBAT FITNESS TEST
SUBMIT INFORMATION OR REQUEST PUBLICATIONS
To help you access information efficiently, the Center for Army Lessons Learned (CALL) posts publications and other useful products available for download on the CALL website:
http://call.army.mil
PROVIDE LESSONS AND BEST PRACTICES OR SUBMIT AN AFTER ACTION REPORT (AAR)
If your unit has identified lessons or best practices or would like to submit an AAR or a request for information (RFI), please contact CALL using the following information:
Telephone: DSN 552-9533; Commercial 913-684-9533
Fax: DSN 552-4387; Commercial 913-684-4387
Mailing Address: Center for Army Lessons Learned ATTN: Chief, Analysis Division 10 Meade Ave., Bldg. 50 Fort Leavenworth, KS 66027-1350
REQUEST COPIES OF CALL PUBLICATIONS
If you would like copies of this publication, please submit your request on the CALL restricted website (CAC login required):
https://call2.army.mil
Click on “Request for Publications.” Please fill in all the information, including your unit name and street address. Please include building number and street for military posts.NOTE: Some CALL publications are no longer available in print. Digital publications are available by clicking on “Publications by Type” under the “Resources” tab on the CALL restricted website, where you can access and download information. CALL also offers Web-based access to the CALL archives. CALL produces the following publications on a variety of subjects:
•○○○○ Handbooks•○○○○ Bulletins, Newsletters, and Observation Reports•○○○○ Special Studies•○○○○ News From the Front•○○○○ Training Lessons and Best Practices•○○○○ Initial Impressions Reports
FOLLOW CALL ON SOCIAL MEDIA
https://twitter.com/USArmy_CALLhttps://www.facebook.com/CenterforArmyLessonsLearned

CENTER FOR ARMY LESSONS LEARNED
80
COMBINED ARMS CENTER (CAC)Additional Publications and Resources
The CAC home page address is: http://usacac.army.milCenter for Army Leadership (CAL) CAL plans and programs leadership instruction, doctrine, and research. CAL integrates and synchronizes the Professional Military Education Systems and Civilian Education System. Find CAL products at http://usacac.army.mil/cac2/cal. Combat Studies Institute (CSI) CSI is a military history think tank that produces timely and relevant military history and contemporary operational history. Find CSI products at http://usacac.army.mil/cac2/csi/csipubs.asp. Combined Arms Doctrine Directorate (CADD) CADD develops, writes, and updates Army doctrine at the corps and division level. Find the doctrinal publications at either the Army Publishing Directorate (APD) at http://www.apd.army.mil or the Central Army Registry (formerly known as the Reimer Digital Library) at http://www.adtdl.army.mil. Foreign Military Studies Office (FMSO) FMSO is a research and analysis center on Fort Leavenworth under the TRADOC G-2. FMSO manages and conducts analytical programs focused on emerging and asymmetric threats, regional military and security developments, and other issues that define evolving operational environments around the world. Find FMSO products at http://fmso.leavenworth.army.mil. Military Review (MR) MR is a revered journal that provides a forum for original thought and debate on the art and science of land warfare and other issues of current interest to the U.S. Army and the Department of Defense. Find MR at http://usacac.army.mil/cac2/militaryreview. TRADOC Intelligence Support Activity (TRISA) TRISA is a field agency of the TRADOC G-2 and a tenant organization on Fort Leavenworth. TRISA is responsible for the development of intelligence products to support the policy-making, training, combat development, models, and simulations arenas. Capability Development Integration Directorate (CDID) CDID conducts analysis, experimentation, and integration to identify future requirements and manage current capabilities that enable the Army, as part of the Joint Force, to exercise Mission Command and to operationalize the Human Dimension. Find CDID at http://usacac.army.mil/organizations/mccoe/cdid. Joint Center for International Security Force Assistance (JCISFA) JCISFA’s mission is to capture and analyze security force assistance (SFA) lessons from contemporary operations to advise combatant commands and military departments on appropriate doctrine; practices; and proven tactics, techniques, and procedures (TTP) to prepare for and conduct SFA missions efficiently. JCISFA was created to institutionalize SFA across DOD and serve as the DOD SFA Center of Excellence. Find JCISFA at https://jcisfa.jcs.mil/Public/Index.aspx.
Support CAC in the exchange of information by telling us about your successes so they may be shared and become Army successes.


CENTER FOR ARMY LESSONS LEARNED10 Meade Avenue, Building 50
Fort Leavenworth, KS 66027-1350
http://call.army.mil
https://usacac.army.mil
APPROVED FOR PUBLIC RELEASEDISTRIBUTION UNLIMITED
NO. 18-37 SEP 2018
APPROVED FOR PUBLIC RELEASEDISTRIBUTION UNLIMITED
18-37 THE A
RM
Y CO
MB
AT FITNESS TEST
SEP 2018