cg4 resistant materials project
DESCRIPTION
TRANSCRIPT

Page 1 of 303
CG4 Resistant Materials Project
CG4.1 ANALYSIS
Background
At Slough Grammar School, the Resistant Materials Technology department is involved in the
ordering of materials for students studying the subject at GCSE and A Level. The current ordering
system comprises of a paper based procedure.
The students utilise a printed list of materials, the sizes available, and their respective prices to
create an ordering list for the technician to collect. The students have to produce two copies of this
ordering list for use in their subject coursework. There is no backup plan to replace these ordering
lists should they be misplaced by the technician. The technician then uses the student ordering lists
to create a batch order that covers all the student orders.
The printed list of materials, and their respective details, is annually updated by the technician.
These updates will consist of price changes, the addition, and removal of some of the materials
available to the students to order. These changes in the list result in a new material order list for the
next set of pupils to use.
The creation of a computerised system will benefit the department of Resistant Materials
Technology the most. The system will benefit the students and the technician as it will focus on how
the department deals with ordering, with the aim of increasing its efficiency whilst benefiting the
students also. The computerised system will seek to address secondary issues the department faces,
such as department expenditure involving printing and non-existent backup measures. Nevertheless,
the ordering aspect will remain priority.
Page 2 of 303
Investigation and Analysis
An investigation into the current system was necessary to fully understand the depth of the issues
the solution will be required to deliver on. This meant investigating the efficiency of the current
paper based system.
The investigation proceedings began with an interview with Tony Smithers, lead technician at the
department. Mr Smithers dealt with producing the batch order, and supplying the materials ordered
to the students. His position meant he was the ideal candidate to question with regards to the
ordering process. The interview transcript is shown below:
What areas of improvement, if any, do you recognize in the current system?
“Well, you see the current method used for updating the material lists takes quite a long time. This
department is also facing new limitations in how much printing is done. So printing off the renewed lists
time and time again is not helping…Another thing is backing up the orders. You know sometimes the
students lose their copies and it takes a while to track their order down and hand over my copy. This
also means that my copy is also at potential risk of being misplaced too.”
Ok. Do you see any ways to improve these areas?
“To backup the orders, I mean, you could have them saved electronically on a document or something.
A method of bringing them up again efficiently would be brilliant. Giving the students access to them
will also help because they can change the orders without having to go through me. For the list, a
couple of years ago I transferred the list to the computer so that I can print them off when prices
changed etc. These new printing limits mean that somehow if the list could be interactive and stay on
the computer for access, which would be ideal.”
You describe feasible improvements to the areas of concern. What is the hardest aspect of the whole
ordering procedure in your view?
The hardest procedure would be…the calculating how many large material sheets to order so that it
would be enough to provide all the students with their orders.
Do you calculate that by the combined individual materials area or by the totalling of material lengths?
“I suppose it could be worked out both ways but I use the combining the individual areas to see how
many student orders will fit on a single sheet and make the batch order from that.”
The calculations are all supposedly calculated by hand yourself?
“Yeah all the calculations for the price and areas are done by me to make sure the student calculations
are correct. It takes quite a lot of valuable time. I suppose if they can be done electronically it will make
sure there are no errors for me to check really.”
Electronic calculations can potentially give inaccurate results. The accuracy of the calculations depends
on the quality of the code and the testing of the system. Thank you for your time and the next visit will
be about the design of the program.
Page 3 of 303
Analysis of Interview with Technician:
Updating the Materials list can be very time-consuming.
Backing-up the student orders is also time-consuming and difficult with the current system.
The printing limitations are not helping with the efficiency of the current system.
Identified the student order backups could possibly be available electronically.
Identified the calculations involved in the orders is the most crucial aspect, and one that
needs addressing the most with the new system.
Storing the orders would allow for the batch order to be created easier as the technician
would be able to access the student orders easier.
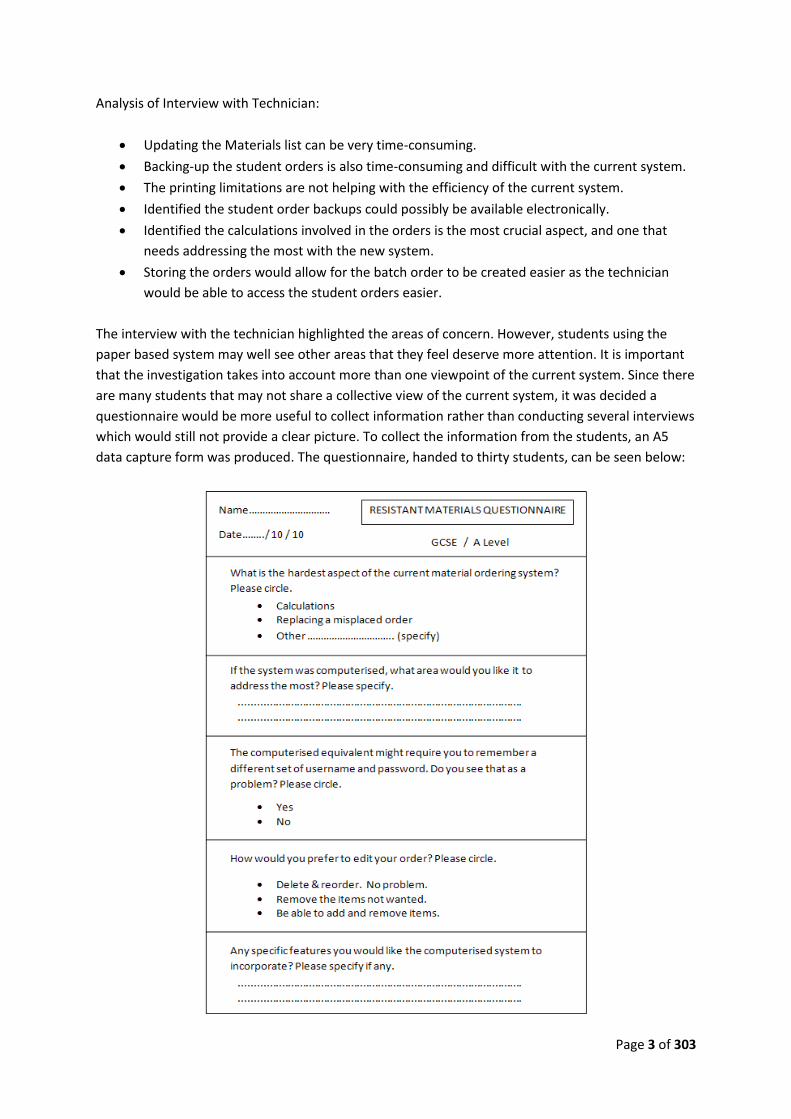
The interview with the technician highlighted the areas of concern. However, students using the
paper based system may well see other areas that they feel deserve more attention. It is important
that the investigation takes into account more than one viewpoint of the current system. Since there
are many students that may not share a collective view of the current system, it was decided a
questionnaire would be more useful to collect information rather than conducting several interviews
which would still not provide a clear picture. To collect the information from the students, an A5
data capture form was produced. The questionnaire, handed to thirty students, can be seen below:

Page 4 of 303
The questionnaire was completed by students studying the subject at GCSE and at A Level. The
questionnaire was completed and returned by twenty-eight students of the thirty, and the
breakdown of the results is as follows:-
The majority of the participants said the calculations aspect of the current ordering system
was the most difficult. Twenty-three students shared this view while the rest felt replacing
the order (having to recalculate) was the most difficult. Some students noted next to the
calculations choice about the confusion caused by the calculations.
All the students made clear that automatic calculations and saving the order in some form
were the most welcome features on a computerised system if there was to be one. The most
popular are of concern was calculations with nineteen votes.
The students did not see the additional username and password as being a big problem. The
majority also noted how the program may not be used as frequently if everything is stored.
Thus the additional username and password may not be a real problem.

Page 5 of 303
Most of the students chose the second option because they would are told never to under-
order any of the materials that would be needed. However eleven students chose the option
to be allowed to add and remove order items. The program is tailored for the technician and
students to use so it is important their needs are seen to.
In this question the students mentioned mostly about the program being able to help with
the ordering process. Through this it meant that a lot of the calculations are automatic and
using the program is simple.
A table of results has been created to summarise the results of the questionnaire.
Question Number
Answers Result 20% 40% 60% 80% 100%
1 Calculation of Order.
Replacing Order
2 Automatic Calculations
Amend & Reprint
3 U+P is a Problem
U+P is not a Problem
4 Remove Items Only
Remove & Add Items
5 Secure Orders
Automatic Calculations
The questionnaire provided a clearer picture of the students’ viewpoint on the current system. It
also provided information that will prove valuable come the designing of the system. But to ensure
the thorough investigation of the current system, personal observation of current practice and a
review of the existing system is needed.
The observation of the current practice highlighted the issues with the current system. The steps
involved in the current practice are:

Page 6 of 303
1. The technician updates the materials list with the prices, and an ordering form.
2. The students receive the printed list and ordering form.
3. The students use the list to complete the ordering form and calculate charges.
4. The student orders are handed back to the technician.
5. Technician validates the orders and the students’ calculations.
6. The students are charged and pay accordingly.
7. A batch order is produced that includes all the material needed for all the students.
A logical data model representing the procedures in the current system has been produced. This
helps to visualise the steps involved and also better understand the current system at hand.
SYSTEM FLOWCHARTS OF THE CURRENT ORDERING PROCESS
Material list and ordering forms
are updated by technician.
The ordering forms and
calculations are completed by the
students.
START
Student orders are validated by
the technician.
Students pay for materials order
and batch order that caters for all
the student orders is produced by
the technician.
Batch order is sent to schools
finance department for
processing and makes its way to
the suppliers.
FINISH
The ordering forms and calculations are
completed by a student. The completed
order is given to the technician.
Is the student
orders completed
correctly?
START
EACH STUDENT ORDER PROCESS
YES
NO
Student order is validated by the technician.
The student order is filtered and separate
materials are grouped to calculate how many
sheets are required.
FINISH
The separate materials are added to the
batch orders that will be sent off to the
material suppliers.
Has the student
finished the order? NO
YES

Page 7 of 303
Data flow modelling involves identifying and documenting how the data moves around in the
current system. This examines the processes, data stores, external entities and data flows in the
current system to help understand where data is input, and visualise the data calculation stages. A
data flow diagram representing the current system at the Resistant Materials Department can be
seen below.
DATA FLOW DIAGRAM OF THE CURRENT ORDERING PROCESS
To identify the relationship between the entities involved in the current system an entity
relationship diagram was produced and can be seen below.
ENTITY RELATIONSHIP OF THE CURRENT ORDERING PROCESS
STUDENT
SUPPLIER
TECHNICIAN
MATERIAL ORDER
BATCH ORDER
KEY
One to many
relationship.
One to no more
than one
relationship.
SUPPLIER ORDER

Page 8 of 303
The ordering system proved to be very lengthy and some orders required weeks before actually
making it through to the suppliers. Further delays such as misplacing orders, or last minute changes
and recalculations could further delay the process. This was crucial as there were department
deadlines to meet for the orders because there is only one financial window per department at the
school. Seeing this further supported the fact that this department would benefit the most at the
school.
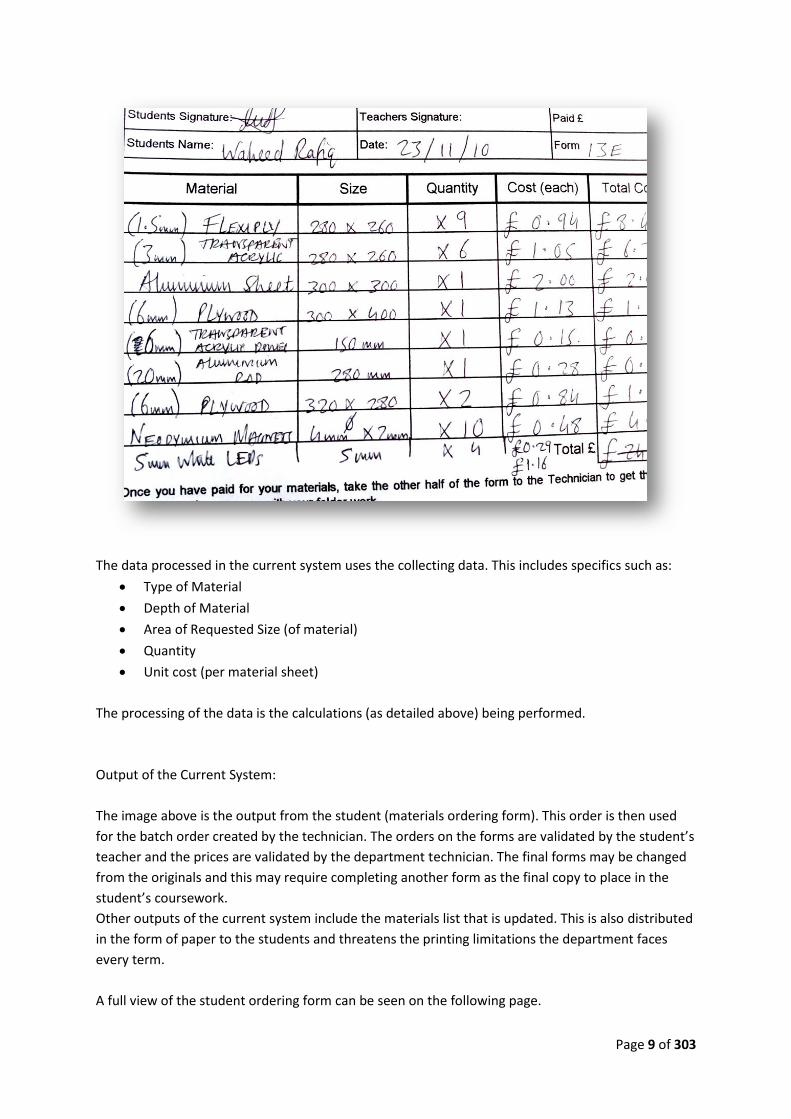
The data collected by the system is derived from the materials ordering form. From following details
are collected:
Student Details (Name, Form)
Date
Material Details (Material, Size, Quantity)
Cost (per Material, Total Cost)
This ‘Materials Ordering Form’ can be seen below. The collected data has already been processed by
the students to calculate the costs. The data from which the calculations are derived from, the
‘Materials List’, can also bee seen further below. The processing of the data involves calculating the
cost of the materials. An example of the calculations involved follows.
The price of a piece of 9mm MDF measuring 480 x 680 (mm) is calculated by:
( Unit Cost / Unit Size ) X Order Area
( 4.00 / 744200) X (480 x 680) = 1.754367...
Which is rounded and the student would be charged £1.75 for the material
This calculation is performed for all the materials on the order form. The order has do be written out
twice by the students increasing the chances of potential mistakes. This can result in the student
being over-charged and provides the technician enough reason to have to validate the student
orders. An example of a finished student order can be seen below.
Page 9 of 303
The data processed in the current system uses the collecting data. This includes specifics such as:
Type of Material
Depth of Material
Area of Requested Size (of material)
Quantity
Unit cost (per material sheet)
The processing of the data is the calculations (as detailed above) being performed.
Output of the Current System:
The image above is the output from the student (materials ordering form). This order is then used
for the batch order created by the technician. The orders on the forms are validated by the student’s
teacher and the prices are validated by the department technician. The final forms may be changed
from the originals and this may require completing another form as the final copy to place in the
student’s coursework.
Other outputs of the current system include the materials list that is updated. This is also distributed
in the form of paper to the students and threatens the printing limitations the department faces
every term.
A full view of the student ordering form can be seen on the following page.

Page 10 of 303
Limitations in the Current System:
The limitations in the current system include being able to efficiently update the student
order. This was identified in the interview with the technician. A computerised system would
easily deal with this limitation as orders would be stored in a flat file where they can be
retrieved for amendments at any given time.
Page 11 of 303
Another limitation is the printing availabilities. The department is limited in its amount of
printing and at around 90 students potentially changing their orders on a regular basis, or
making any errors, it results in a high demand for printing. Annual updates and printing of
material lists only add to the problems caused by this limitation. The proposed computerised
system would also deal with this as the order can be stored and amended until the student
is content, ensuring every student need only to print their order once.
The lack of backup procedure that should store the latest student orders is an additional
limitation. The amount of loose paper in the form of material orders that are exchanged
between student and technician involves the risk of misplacing the orders. This causes a
nuisance to both the student and the technician as it means re-calculating and re-validating.
The current system is also limited in how it deals with performing with respect to
department deadlines. There is a window in which department finances are dealt with and
should a student order miss this window, it places the risk of jeopardising the continuation
of the course.
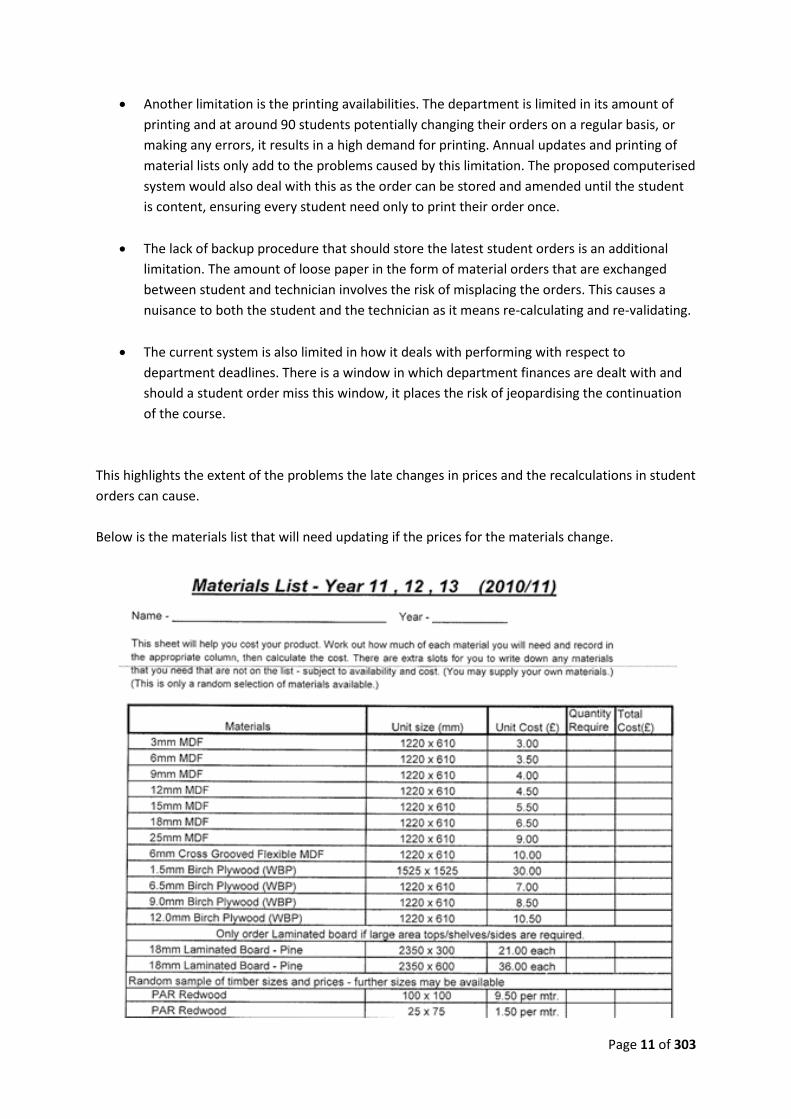
This highlights the extent of the problems the late changes in prices and the recalculations in student
orders can cause.
Below is the materials list that will need updating if the prices for the materials change.

Page 12 of 303
The investigation and analysis of the current system highlighted the bigger problems and the views
of the target users of the computerised solution. The analysis also emphasised the limitations that
the computerised solution will be trying to attend to. The current system has been analysed
sufficiently and the information from it is more than enough to create a problem definition and
produce suitable project objectives.

Page 13 of 303
Problem Definition
The Resistant Materials Technology department at Slough Grammar School has been utilising an old
paper based system for the ordering processes. The department procedures were in need of an
update. The department relies on the department technician, Tony Smithers, to deal with all the
aspects of the ordering. After a thorough investigation of the current system, a clearer picture of
what the computerised system will need to address can be drawn.
The intention is to create a computerised system that the students can utilise to order their
materials. The computerised system should be accessible to students from years 10 to 13 at the
school, studying the subject. The new system should also allow staff and the technician to make any
changes to the materials list. The program should include automated calculations meaning no
manual calculations or validation should be needed. The new system should aim to meet the project
objectives and be tailored to client needs.
The system should allow for separate student and staff logins. The login steps should aim to be
simple and not complicate the process. The staff login will be used for certain aspects of the ordering
process such as accessing all orders and the ability to amend the materials list.
The student login should allow the students access to an ordering form where the actual material
ordering can take place. The solution should be designed to make the process easier than doing the
equivalent on the current system. The form should allow material selection, size and quantity
options, and a relatable interface. Most of the solution will be automated. Ideally, the new system
will be straightforward to use and thus not need any instructions on the input forms etc.
The system will store all the student order details and the updates of the material lists in a flat file.
The system produced will cover all aspects of ordering process and will take into account
amendments may need to be made after the initial order has been created.
Despite these aims, there may be possible limitations in the computerised system produced. The
preliminary limitations may include:
Keeping track of the latest time and date of the order update.
Keeping track of when the order was last accessed or amended.
The delegation of unique usernames and passwords considering the number of students
that will potentially use the solution annually.
Automatic updates to student orders based on the changes on the material list.
An efficient password reminder facility that is secure, restricting access to other students
who may try to exploit the facility.
Taking into the account the limitations the initial project may face, the problem definition allows for
the initial project objectives to be written.
Page 14 of 303
Objectives
The main objective of the project will be to create a replacement system for the ordering process
within the Resistant Materials department. The system will benefit both the department and the
students. A computerised solution will be created using Visual Basic 6.
This will include a user interface capable of allowing the students to:
Register to use the system if it is the first time they are using it.
Be reminded of their password.
Enter their login details to access the materials ordering form.
Choose materials and the sizes of the materials to enable the program to calculate the
prices.
Amend a previous order.
Print the latest order by displaying the total order on a printable form.
View the latest materials list for information on material availability and prices.
The interface will be capable of allowing the staff to:
Register to use the system if it is the first time they are using it.
Enter their login details to access the materials list form.
Edit the materials list once accessed.
Access any student order.
Be reminded of their password.
The system will allow the input of and have the facility to store the following details:
Student Username, Password and other student details.
Student Order:
o Material name selected.
o Material Size selected.
o Quantity selected.
o Cost of order.
Any updates to the Material List.
Any updates to the Student Order.
The system will allow for the searching of student order by the student login details. The login details
will be stored alongside other data that will ensure the correct order is displayed at the time of
searching. This will also ensure no errors occur during search or more than one order is related to
one student.
The design of the computerised system should be professional and simple to use as students will be
using it as well as the staff members of the department. The appearance of the system should
remain consistent to ensure the program navigation is quick and simple. The computerised system
should be completed within the time provided.

Page 15 of 303
CG4.2 DESIGN
Output Content and Format
The output of the computerised system will include printed forms that summarise the student
material orders. This will be the main output of the system. The data that will be output from the
system will be the finished orders of the students. These will include all the material information
such as Type, Size, Depth, Quantity and Cost. As well as this, essentials such as student name and
form will be displayed on the form. These will ensure there is no confusion as they will serve as
order identifiers on the printed forms. The data included in the output is essential as it is the
information that is required by the technician and the students’ coursework files. This is why the
data chosen to be included in the output, is included. The form will appear with a white background
to remain printer friendly when it is printed. When the form is printed, the command buttons,
images and time which are all non-related to the order will be hidden. This will leave for an elegant
solution and provide an elegant output from the system.
Below is the design of the output form of the system. (Printable Student Order Summary Form)
<-
Time
Display Full Name
Display Form
Cost: £ Signed…………………………
.
##/##/####
No. of Items
ImageBox: Displays an
image, that when
clicked, takes the user
back to the previous
form. Hidden when
form is printed.
Label: Displays the current
time. This is also hidden
when the form is printed.
Label: Displays the title
of the page. Will display
on the printed form.
Labels: Displays the
students name and the
students form in the
respective labels. Will
show when printed.
Labels: Displays the date.
It is vital this is displayed
in the printing form.
The number of items
ordered will be displayed.
Labels: Displays cost and
the actual cost of the order.
Formatted in currency.
Label: Displays the signed text.
This is for the teacher’s signature.
This will be displayed on print.
CommandBox: Prints the form with the
whole order being displayed. This cmdbox
will be hidden on the printed form.
DataGrid: Displays all the
material items that have
been ordered by the
student. This forms the
main art of the printed
form. Columns of
information will be
Material, Depth, Size,
Quantity, Cost will be
visible. The columns that
store data that links the
orders to the students will
not be visible in the data
grid. This will make for an
elegant output of the
computerised system.
Material Order

Page 16 of 303
Another output of the system will be an electronic version of the materials list. This will allow
students and staff to view the latest prices.
The form should display the latest prices which may be edited by the technician or staff member.
The form will use a datagrid to retrieve all the information from a database. The datagrid should not
allow any editing to the information when used in this form. This form will not be printable through
the system.
The material information is included in this form because it will be available to both students and
members of staff. Students will use this form to check the prices when considering their material
order and members of staff can check the prices are up to date and accurate.
Below is the design of the output form of the system. (Viewing Materials List and Latest Prices)
Another output form will be available from the main menu of the program. This will be a display
screen for the information about the system. This display screen is essentially to ensure the solution
to the problem is complete and the program is produced properly.
<-
Time
Label: Displays the
title of the page. DataGrid: Displays all the
material items and their
prices from the database.
The columns will display
Material, Depth, Unit
Sheet Size, Unit Cost and
any other additional info.
It will be locked as it is
available to the students
and thus values in the
datagrid will not be
editable.
This information will be
linked directly to the
database and should
display the latest
information.
ImageBox: Displays an
image, that when
clicked, takes the user
back to the previous
form.
Label: Displays the current
time.
DataGrid: The
background colour of
the datagrid should
relate to the colour
scheme of the form.
Materials List

Page 17 of 303
The form should display information on the version of the software solution, what the application is
designed to do, who it is developed for and who it is developed by. This information will provide the
software version, which if is updated through maintenance, can be updated and replaced.
Below is the design of the output form of the system. (About (the Application) Form)
The output forms designed above will all have similar backgrounds and colour schemes to ensure
the appearance of the program is consistent. This should aid user navigation and make using the
program easier. The background for all the forms will be a custom-made image, consisting of pastel-
light tones for a modern yet professional appearance.
The size of the forms will vary as their purposes vary. The ‘Material Order Print’ Form will be big
enough to fit the screen and space the data so that the printed orders stay elegant. This will also
help the technician as the data printed will be easy to read and key facts will stand out on the
printed page. The size of the ‘About’ form will be smaller as it provides useful, yet little, information
and thus does not need to occupy as much room on screen.
The position of the forms on when displayed on the screen will be set to Centre-Screen position so
that all output forms and display screens load in the centre of the user’s screen. Failure to ensure
this would damage the professional impression the software will be aiming to make.
Time
GIF IMAGE
Label: Displays the title
of the page.
PictureBox: With a
WebBrowser control
placed inside to load the
GIF animation as VB6 is
not capable of displaying
GIF images otherwise.
CommandBox: Exits the
form. A mouseover effect
will be applied to the
command button to make
using the program user
friendly.
Clicking this should also
make the main menu
form useable again.
Label: Displays the current
time. LOGO
Version………………………..
App Description + Info
Additional Info OK
ImageBox: This will
display the software
logo, which will
remain consistent
and be displayed in
all the forms in the
system tray.
Label: Displays the
information about
the version of the
software.
Displays the
description of the
app, explaining its
purpose and who the
application is tailored
to.
Any additional info
displayed below.
Resistant Materials
Ordering App.

Page 18 of 303
Input Content, Capture and Format
There will be many input forms in the new system as the main aim will be to make a program that
satisfies all of its broad objectives. All the designs have taken inspiration from the designs and notes
of Mr. Smithers the technician at the department. They can be seen after the designs of the input
forms.
MAIN MENU FORM
The design of the input form frmMainMenu.
The input in the form here will be in the form of command boxes. These will allow the user to make
a selection as to how the user logs in. The selections will be ‘STUDENT’ and ‘STAFF’.
The selection here will not be stored but will determine the next form that is displayed. The use of
command boxes here is most appropriate as there are only two choices and any other form of input,
such as textboxes, would not be suitable. The background of the form will remain consistent and be
similar to the output forms. The positioning of similar elements in the form will also remain the
same e.g. Return Image, position of title, display of time etc. The size of the form will be slightly
smaller than the others to differentiate it as a main menu rather than a data capture form. This will
be the first form on display when the program is loaded and its start-up position will be the centre of
the user screen.
Time
PictureBox: Displaying
ORDERING APP. When
clicked it will display the
ABOUT form which will
include all the information
about program.
CommandBox: Exits the
form. A mouseover effect
will be applied to the
command button to make
using the program user
friendly.
Clicking this should also
make the main menu
form useable again.
Label: Displays the current
time and displays the
date.
LOGIN
Labels: Will display
the department
name in front of oval
shapes. The font
colour will be black
and the shapes back
colour, yellow.
Labels: Displays the
information for the
login command
boxes. Will simply
display STUDENT and
STAFF. Mouse over
effects will be applied
here to make the
form interactive and
make obvious the
selection on the form.
The font colour will
be vbBlack and a bold
font will be used.
Resistant Date
LOGIN
Technology
Materials
Student Staff

Page 19 of 303
STUDENT LOGIN FORM
The design of the input form frmStudentLogin.
`
The input in the form will be in the form of textboxes and CommandButtons. These will allow the
user to input their username and passwords, and click to allow access to the users account. From
here the user will be able to access the other features of the program. There is also a command
button that will display the password reminder form. CommandButtons were the most appropriate
methods of input for the described.
Other input in the form will be by input in the textboxes. This is because data entry via keyboard is
required to input the user’s username and password. So textboxes were the most suitable form of
input here. Textboxes also have a ToolTipText feature that displays help on what to enter when the
cursor hovers over the box.
The background of the form will remain consistent and be similar to frmMainMenu. The positioning
of elements in the form will be logical e.g. the return button on the top left of the form. The size of
the form will be slightly smaller than the others to differentiate it as a login screen rather than a
form with a main feature of the system.
The forms start-up position will be centre screen also.
Time
Label: Displays the title
of the page.
PictureBox: Displaying an
image of a page. To
differentiate form the staff
login page, this will have a
book. Also groups the
inputs together.
CommandButtons: The
button marked “?” when
clicked will display the
password form that will
remind users of their
password in some way.
The LOGIN button will start
the search for matching
username and password
and give the user access
depending on match.
Label: Displays the current
time.
Don’t have an account? #####
Label: Displays
USERNAME and
PASSWORD in black
bold font.
Textboxes as inputs to
the right of the labels.
The most suitable for
this type of input.
If user does not have
an account a link will
display frmRegister.
LOGIN
Student Login
<-
ImageBox: Displays an
image, that when
clicked, takes the user
back to the previous
form. FrmMainMenu.
?
Username:
Password:
Page 20 of 303
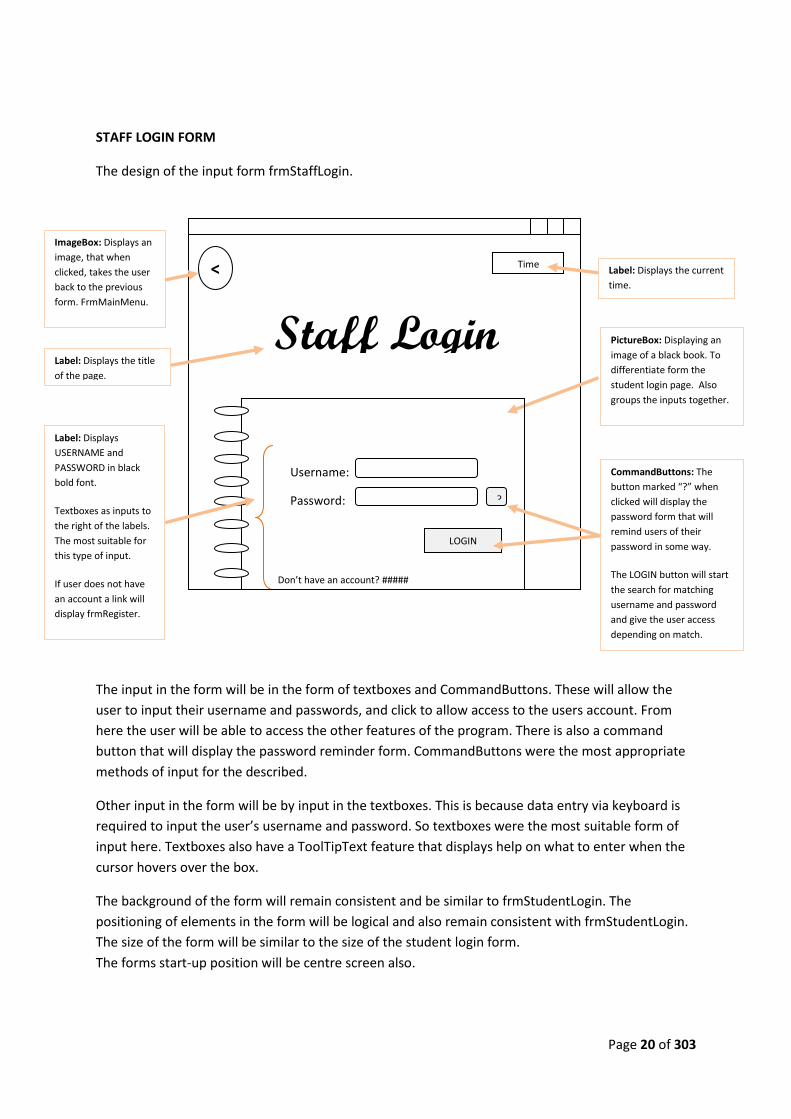
STAFF LOGIN FORM
The design of the input form frmStaffLogin.
`
The input in the form will be in the form of textboxes and CommandButtons. These will allow the
user to input their username and passwords, and click to allow access to the users account. From
here the user will be able to access the other features of the program. There is also a command
button that will display the password reminder form. CommandButtons were the most appropriate
methods of input for the described.
Other input in the form will be by input in the textboxes. This is because data entry via keyboard is
required to input the user’s username and password. So textboxes were the most suitable form of
input here. Textboxes also have a ToolTipText feature that displays help on what to enter when the
cursor hovers over the box.
The background of the form will remain consistent and be similar to frmStudentLogin. The
positioning of elements in the form will be logical and also remain consistent with frmStudentLogin.
The size of the form will be similar to the size of the student login form.
The forms start-up position will be centre screen also.
Time
Label: Displays the title
of the page.
PictureBox: Displaying an
image of a black book. To
differentiate form the
student login page. Also
groups the inputs together.
CommandButtons: The
button marked “?” when
clicked will display the
password form that will
remind users of their
password in some way.
The LOGIN button will start
the search for matching
username and password
and give the user access
depending on match.
Label: Displays the current
time.
Don’t have an account? #####
Label: Displays
USERNAME and
PASSWORD in black
bold font.
Textboxes as inputs to
the right of the labels.
The most suitable for
this type of input.
If user does not have
an account a link will
display frmRegister.
LOGIN
Staff Login
<-
ImageBox: Displays an
image, that when
clicked, takes the user
back to the previous
form. FrmMainMenu.
?
Username:
Password:

Page 21 of 303
REGISTER FORM
The design of the input form frmRegister.
`
The input in this form will require both textboxes and command buttons. The textboxes will be used
to capture the data entry on the form. The data entry will include USERNAME, PASSWORD and
STUDENT DETAILS. The textboxes will also feature ToolTipText so when the cursor is hovered over
the textbox, providing help as to what to enter in the textboxes. Also used for the first time in the
system will be combo boxes. They feature options that the user may choose from. This form of data
capture ensures the user cannot input any invalid data such as characters in a field that requires
integers. The command button on this form will provide a method of checking all fields have data
entered into them before adding the data into the database.
The background of the form will remain consistent and be similar to all the other forms on the
program, using pastel-like shades and colours. The positioning of the return image, title and time on
the form will also remain consistent. The size of the form will be similar to the size of form
frmMainMenu, smaller than the forms that store the order data. The forms start-up position will be
centre screen (VB option).
Time
Label: Displays the title
of the page.
ComboBox: Displays the
options STUDENT and
STAFF. This ensures no
invalid data can be entered
in this box. This also
determines where the data
is stored when the CREATE
ACCOUNT button is clicked.
CommandButtons: The
button marked “?” when
clicked will display the
password form that will
remind users of their
password in some way.
The LOGIN button will start
the search for matching
username and password
and give the user access
depending on match.
Label: Displays the current
time.
Label: Displays
USERNAME and
PASSWORD and the
other labels in black
font.
TextBoxes:
Textboxes as inputs to
the right of the labels.
The most suitable for
this type of data input
capture.
CREATE
ACCOUNT
Sign Up
<-
ImageBox: Displays an
image, that when
clicked, takes the user
back to the previous
form. FrmStudentLogin
or FrmStaffLogin.
Username:
Password:
Confirm Password:
Alias:
SCHOOL USERNAME
SCHOOL PASSWORD
CONFIRM PASS.
Full Name: FORENAME SURNAME
Tech. Class: GROUP
Margin: Invisible margin on the form to
keep the appearance of the form organised
and easy on the eyes.

Page 22 of 303
STUDENT OPTIONS FORM
The design of the input form frmStudentOptions.
`
The form frmStudentOptions requires input in the form of selection. No input via textboxes is
needed here. The reason for this is because this form is a method of giving the student options to
access the different features of the program. The command buttons are enough to display the
respective forms. The selections will include NEW ORDER, EDIT ORDER, PRINT ORDER and VIEW LIST.
The background of the form will remain consistent and be similar to all the other forms on the
program, using pastel-like shades and colours. The positioning of the LOGOUT image will have to be
similarly placed on the staff options form. The size of the form will be similar to the size of form
frmMainMenu, smaller than the forms that store the order data. The forms start-up position will be
centre screen (VB option).
The form will have an appropriate caption. The GIF animations will be still to start with and the
mouse over effect on the forms will include running the animations when the cursor hovers over the
image. This screen will be used the most by all the students. To help the students understand the
options on the form a little description might be displayed at the bottom of the form upon
mouseover.
Time
Label: Displays the title
of the page.
Label: Displays the name of
the student that has logged
in. This will call data from
the database and display it
in on the form.
The data for display may be
displayed in a temporary
data form.
CommandButtons: The
button should display the
appropriate forms if the
images are not clicked to
the display the respective
forms.
Mouseover effects will be in
place here to give the
impression they can also be
clicked and which choice
the user will be making.
Label: Displays the current
time.
PictureBox: Contains
the web browser
control which allows
GIF images to be
displayed and
animate.
WebBrowserControl:
In the navigation
property will display
the GIF files.
Welcome
LOGOUT ImageBox: Displays
the logout image.
Once clicked will
display the main menu
form.
New Order Edit Order Print Order View List
You are logged in as: [ ]
NEW ORDER
GIF IMAGE
VIEW MAT.
LIST GIF
IMAGE
PRINT ORDER
GIF IMAGE
EDIT ORDER
GIF IMAGE

Page 23 of 303
STAFF OPTIONS FORM
The design of the input form frmStaffOptions.
`
The form frmStaffOptions requires input in the form of selection. No input via textboxes is needed
here. The reason for this is because this form is a method of giving the staff options to access the
different features of the program. The command buttons are enough to display the respective
forms. The selections will include VIEW LIST, EDIT LIST and FIND ORDER.
The background of the form will remain consistent and be similar to all the other forms on the
program, using pastel-like shades and colours. The positioning of the LOGOUT image will have to be
similarly placed on the student options form. The size of the form will be similar to the size of form
frmMainMenu, smaller than the forms that store the order data. The forms start-up position will be
centre screen (VB option).
The form will have an appropriate caption. The GIF animations will be still to start with and the
mouse over effect on the forms will include running the animations when the cursor hovers over the
image. This screen will be used the most by all the staff. To help the members of staff understand
the options on the form a little description might be displayed at the bottom of the form upon
mouseover.
Time
Label: Displays the title
of the page.
Label: Displays the name of
the student that has logged
in. This will call data from
the database and display it
in on the form.
The data for display may be
displayed in a temporary
data form.
CommandButtons: The
button should display the
appropriate forms if the
images are not clicked to
the display the respective
forms.
Mouseover effects will be in
place here to give the
impression they can also be
clicked and which choice
the user will be making.
Label: Displays the current
time.
PictureBox: Contains
the web browser
control which allows
GIF images to be
displayed and
animate.
WebBrowserControl:
In the navigation
property will display
the GIF files.
Welcome
LOGOUT ImageBox: Displays
the logout image.
Once clicked will
display the main menu
form.
View list Edit List Find Order
You are logged in as: [ ]
FIND ORDER
GIF IMAGE
EDIT LIST GIF
IMAGE
VIEW LIST
GIF IMAGE

Page 24 of 303
EDIT MATERIALS LIST FORM
The design of the input form frmEditList.
The data input on this form will take place directly in the datagrid. No input outside this datagrid will
take place. The datagrid will be re-queried on the change property so that any changes are
automatically updated. Simply exiting the form can be done without the need to click a SAVE button.
Then the changes can be viewed on the form frmViewMaterialsList from the staff options.
This is the most suitable method of inputting the data because it is updated on-the-fly. The form will
remain consistent in its appearance and have a similar background as well as keeping the
placements of the items on the form the same.
This will be an important form come every term and the technician will be using this form a lot. It is
important that enough help is provided as to how the form should be used.
<-
Time
Label: Displays the
title of the page. DataGrid: Displays all the
material items and their
prices from the database.
The columns will display
Material, Depth, Unit
Sheet Size, Unit Cost and
any other additional info.
It will not be locked and
will allow ADD, DELETE,
UPDATE any material
information on the form.
This information will be
linked directly to the
database and should
display updated
information on-the-go.
ImageBox: Displays an
image, that when
clicked, takes the user
back to the previous
form.
Label: Displays the current
time.
DataGrid: The
background colour of
the datagrid should
relate to the colour
scheme of the form.
HELP
CommandButton: When clicked will display
a MsgBox that will inform the member of
staff as to how to edit the list and what sort
of editing can be one on the datagrid.
Edit Materials List

Page 25 of 303
NEW ORDER FORM
The design of the input form frmNewOrder.
The data input on this form will take in the picturebox which will contain comboboxes and
textboxes. These are the most appropriate types of input here because in some areas it is vital the
data is valid to search the database for cost information. Other fields, such as length, will be
captured by using textboxes. These will also be validated to ensure there are no errors or no
erroneous data is entered. When the ADD button is clicked, validation checks will be carried out
before storing the data into the appropriate table in the flat file.
This is the most suitable method of inputting the data because it is updated on-the-fly. The form will
remain consistent in its appearance and have a similar background as well as keeping the
placements of the items on the form the same. This will be an important form and should be
validated correctly. The appearance of the form will remain consistent and information placed in
logical places on the form.
<-
Time
Label: Displays the
title of the page.
Labels: Displays all the
information; NAME,
FORM, NUMBER OF ITEMS
IN BASKET.
ImageBox: Displays an
image, that when
clicked, takes the user
back to the previous
form.
Label: Displays the current
time.
SUBTOTAL
Label: The label will display the total cost of
the order of all the items added into the
basket (datagrid to the left).
New Order
DataGrid: Displays all the
material items and their
prices from the database.
The columns will display
Material, Depth, Unit
Sheet Size, Unit Cost and
any other additional info.
It will not be locked and
will allow ADD, DELETE,
UPDATE any material
information on the form.
This information will be
linked directly to the
database and should
display updated
information on-the-go.
The background colour of
the datagrid should relate
to the colour scheme of
the form.
NO. OF ITEMS
ADD
CLEAR
CommandButtons: Will
allow the student to add a
material to the basket.
Will display the print
order form. From here the
order can be printed to
hand to the technician to
make the batch order.
PictureBox: Contains the
comboboxes used to
ensure the order is valid.
Will group the inputs and
also be used for an effect.

Page 26 of 303
FIND ORDER & EDIT ORDER FORM
The design of the input form frmEditOrder.
This form will be used by both students and members of staff. It will require input into textboxes to
search the database and retrieve the correct order. From hereon the order can be amended by
either student or technician. The form will be very similar to the new order form because it needs to
allow ADDING, DELETING to the order. So the textboxes used for search will be the only change to
the form. It will also provide a link in the form of a command box to the printing order form.
The form will remain consistent in its appearance and have a similar background as well as keeping
the placements of the items on the form the same. This will be an important form and should be
validated correctly. The appearance of the form will remain consistent and information placed in
logical places on the form.
<-
Time
Label: Displays the
title of the page.
CommandBox: When
clicked will search the
database for the
USERNAME and DATE
provided in the textboxes
above.
ImageBox: Displays an
image, that when
clicked, takes the user
back to the previous
form.
Label: Displays the current
time.
SUBTOTAL
Label: The label will display the total cost of
the order of all the items added into the
basket (datagrid to the left).
Edit Order
DataGrid: Displays all the
material items and their
prices from the database.
The columns will display
Material, Depth, Unit
Sheet Size, Unit Cost and
any other additional info.
It will not be locked and
will allow ADD, DELETE,
UPDATE any material
information on the form.
This information will be
linked directly to the
database and should
display updated
information on-the-go.
The background colour of
the datagrid should relate
to the colour scheme of
the form.
NO. OF ITEMS
ADD
CLEAR
CommandButtons: Will
allow the student to add a
material to the basket.
Will display the print
order form. From here the
order can be printed to
hand to the technician to
make the batch order.
PictureBox: Contains the
comboboxes used to
ensure the order is valid.
Will group the inputs and
also be used for an effect.
SEARCH

Page 27 of 303
PASSWORD REMINDER FORM
The design of the input form frmPasswordRem.
The only input on this form will be the textbox requiring the student username to remind of the
password. The user will not have to log on to use this form. The form may be accessed through the
login form by clicking on the “?” command button. To validate the data entry on the form, the
username will be searched for before displaying the password (possibly through an email).
ToolTipText feature will again be used here to tell the student to input the school username. The
description on the form should provide details on how the password can be retrieved.
The background of the form will remain consistent and be similar to all the other forms on the
program, using pastel-like shades and colours. The size of the form will be similar to the size of form
frmMainMenu, smaller than the forms that store the material order data. The forms start-up
position will be centre screen.
The input and data capture forms have been designed using the technician sketches and ideas,
which can be seen on the next page. The ideas of separate logins and datagrid-like displays on the
forms have influenced the actual designs a great deal.
Time
Label: Displays the title
of the page.
CommandButtons: The
button should display the
appropriate forms if the
images are not clicked to
the display the respective
forms.
Mouseover effects will be in
place here to give the
impression they can also be
clicked and which choice
the user will be making.
Label: Displays the current
time.
PictureBox: Contains
the web browser
control which allows
GIF images to be
displayed and
animate.
WebBrowserControl:
In the navigation
property will display
the GIF files.
Password
<-
ImageBox: Displays an
image, that when
clicked, takes the user
back to the previous
form.
Label: Description of the
process. Instructions.
USERNAME School Username:

Page 28 of 303

Page 29 of 303
File and/or Data Structures, Methods of Access
The new ordering system will consist of an easy to use interface which will utilise a database to store
all the input details from the data capture forms. The computers at the school will need to have at
the very least Microsoft Office 2003 edition installed. This is because the database file will be made
using Microsoft Access. Although there should be no need to open the database because the new
system should provide the interface to do so, any additional upgrades made in the future may
require opening the file directly. At least the technician’s computer will need to have Visual Basic
6.0 installed for debugging or maintenance purposes. Fortunately the all the computers at the school
have these software requirements installed.
The new computerised system will utilise a database with the file extension “.mdb”. This is because Visual Basic 6.0 collaborates well with the older version of Access. The location of the database will be in the local “M:/” drive (on the server) so that the program will have no problems accessing the database wherever will be used on the school network. The solution will not be using any arrays but will use RecordSets for linking and accessing the tables
in the database. The tables whether they require filtering on display or not, will be declared through
SQL statements. The system will consist of four tables.
Data Structure and Method of Access to STUDENT DETAILS:
The student details will be stored and can be accessed from the database file
‘resistantmaterialsdb.mdb’. This is a flat file with all the data that will need to be stored from the
computerised system. The file will hold all of the student details on the table ‘tblStudentDetails’.
The database will allow for many students details to be added as the program continues to be used
each term. The student details can be accessed by the random access method. This will allow the
adding and retrieving of records in the table. The information should also be accessible through the
computerised system.
The system will require the students to include the following details when registering to use the
system; school username, school password, full name and technology class amongst other details.
The data will be structured in the following way:
FIELD NAME DESCRIPTION DATA TYPE LENGTH EXAMPLE DATA
StudentID Each student needs a unique identifier. It will be a number.
AutoNumber Long Integer
34
Alias Type of registered account. Text 7 STUDENT
Username The school username of the student.
Text 20 04lawsonb
Password The school password of the student.
Text 20 Langley5%
Forename The forename of the student. Text 20 Ben
Surname The surname of the student, Text 20 Lawson
StudentYear The yeargroup of the student. Number 2 13
StudentGroup The class initials of the student. Text 3 BGP
Page 30 of 303
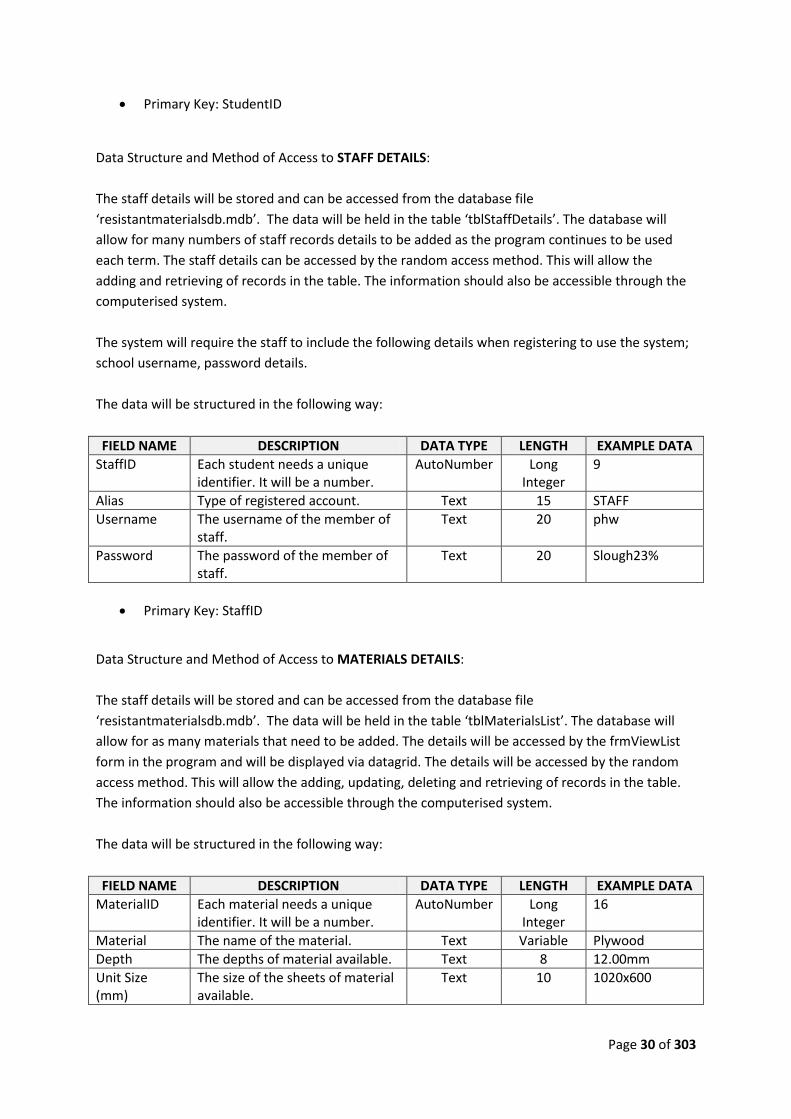
Primary Key: StudentID Data Structure and Method of Access to STAFF DETAILS:
The staff details will be stored and can be accessed from the database file
‘resistantmaterialsdb.mdb’. The data will be held in the table ‘tblStaffDetails’. The database will
allow for many numbers of staff records details to be added as the program continues to be used
each term. The staff details can be accessed by the random access method. This will allow the
adding and retrieving of records in the table. The information should also be accessible through the
computerised system.
The system will require the staff to include the following details when registering to use the system;
school username, password details.
The data will be structured in the following way:
FIELD NAME DESCRIPTION DATA TYPE LENGTH EXAMPLE DATA
StaffID Each student needs a unique identifier. It will be a number.
AutoNumber Long Integer
9
Alias Type of registered account. Text 15 STAFF
Username The username of the member of staff.
Text 20 phw
Password The password of the member of staff.
Text 20 Slough23%
Primary Key: StaffID
Data Structure and Method of Access to MATERIALS DETAILS:
The staff details will be stored and can be accessed from the database file
‘resistantmaterialsdb.mdb’. The data will be held in the table ‘tblMaterialsList’. The database will
allow for as many materials that need to be added. The details will be accessed by the frmViewList
form in the program and will be displayed via datagrid. The details will be accessed by the random
access method. This will allow the adding, updating, deleting and retrieving of records in the table.
The information should also be accessible through the computerised system.
The data will be structured in the following way:
FIELD NAME DESCRIPTION DATA TYPE LENGTH EXAMPLE DATA
MaterialID Each material needs a unique identifier. It will be a number.
AutoNumber Long Integer
16
Material The name of the material. Text Variable Plywood
Depth The depths of material available. Text 8 12.00mm
Unit Size (mm)
The size of the sheets of material available.
Text 10 1020x600

Page 31 of 303
Unit Cost The cost of the sheet of material. Currency 5 £4.80
Additional Info
Additional information on the material .
Text Variable Price per metre.
Primary Key: MaterialID Data Structure and Method of Access to STUDENT ORDER:
The staff details will be stored and can be accessed from the database file
‘resistantmaterialsdb.mdb’. The data will be held in the table ‘tblStudentOrder’. The database will
allow for as many orders that need to be added over the course of its use. The details will be
accessed by the frmNewOrder and frmPrintOrder form in the program and will be displayed via a
DataGrid. The details will be accessed by the random access method. This will allow the adding,
updating, deleting and retrieving of records in the table. The information should also be accessible
through the computerised system.
The data will be structured in the following way:
FIELD NAME DESCRIPTION DATA TYPE LENGTH EXAMPLE DATA
OrderID Each order needs a unique identifier. It will be a number.
AutoNumber Long Integer
16
Material The name of the material selected.
Text Variable MDF
Depth The depth of the material selected.
Text 8 3.00mm
Size The size of the material selected. Text 10 1010x540
Quantity The quantity of the material chosen,
Number 2 3
Cost The cost of the size of material chosen considering quantity as well.
Currency 5 £7.29
StudentID The unique student identifier. Number Long Integer
34
OrderDate The date the order was made. Date/Time 10 12/02/2011
Primary Key: MaterialID
Foreign Key: StudentID
The student order table will use the primary key from tblStudentDetails as a foreign key. The fields will also be related with a one-to-many relationship. This relationship will occur when a student orders more than one material per whole order.
Foreign Key.

Page 32 of 303
Validation
The details of the students, staff and student orders will be entered through the computerised
system. Thus validation for the data entered must be considered. Any invalid data entered may
cause the system to crash. Making the system robust is necessary to avoid any potential crashes.
This will be done by verifying the data meets certain criterion that avoids the saving of invalid data.
These checks will be prompted in command buttons or in real-time data entry.
The following measures will be in place for validating STUDENT DETAILS on frmRegister:
FIELD NAME VALIDATION DESCRIPTION
StudentID None
This field will not be accessible to the user through the form so there’s no need to validate. The number will be automatically assigned.
Alias To validate this, a ‘DropDownList’ style combo box will be used.
PRESENCE CHECK.
The student will not be allowed to enter in an option so save. The dropdown box will require input before other inputs are enabled. Validation will take place when prompted before storing via command box.
Username Input via textbox. Length restriction placed on textbox.
PRESENCE CHECK.
LENGTH CHECK.
A length restriction of 20 characters is more than enough for any name of any student that has a school account. It will also restrict deliberate attempts to test the system to its limits by the students, to some extent.
Password Input via textbox also. Length restriction also placed here.
PRESENCE CHECK.
LENGTH CHECK.
Like the username textbox, a presence check will be present to validate the input initially. Then a length check will take place that will avoid the storing of invalid data. This length check may also be placed in a way so that the input is being validated in real-time.
Forename Limitation in the form of input restriction.
PRESENCE CHECK.
FORMAT CHECK.
LENGTH CHECK.
Valid data in this field would not contain integers. Thus the textbox input is restricted to characters only. Any attempt to enter an integer into the textbox will result in nothing being input. There will also be a presence check before storing the data.
Surname Limitation in the form of input restriction.
PRESENCE CHECK.
FORMAT CHECK.
LENGTH CHECK.
Very similar in terms of validation to the forename textbox. A presence check will be present when the command button is clicked. Also there will a length check to avoid invalid password (length more than 20 characters.) This also enforces students to produce a password not to difficult to remember.
Student Year To validate this, a ‘DropDownList’ The validation will ensure that a valid input

Page 33 of 303
style combo box will be used.
PRESENCE CHECK.
is stored in the database. A presence check when the command button is clicked will take place.
Student Group
Limitation in the form of input restriction.
PRESENCE CHECK.
FORMAT CHECK.
LENGTH CHECK.
Validation here will use KeyAscii to ensure the correct data has been input. The textbox will require no more than two upper case letters. A textbox will be validated for data presence also.
The following measures will be in place for validating STUDENT/STAFF LOGIN DETAILS on
frmStudentLogin/frmStaffLogin:
FIELD NAME VALIDATION DESCRIPTION
Username Input via textbox. Length restriction placed on textbox.
PRESENCE CHECK.
Additional Check (existence)
The username when attempting to login must be present to allow access to the programs features. An additional check will be made to ensure the data is valid by searching the database to confirm the username is registered; this will allow the user to access the features of the system.
Password Input via textbox also. Length restriction also placed here.
PRESENCE CHECK.
Additional Check (existence)
Much like the username textbox validation, a presence check will be one of the checks here. The additional check will be to ensure (if the username is registered) the password matches the one for the registered username. If not, the user will not be able to gain access to the system.
The following measures will be in place for validating ORDER DETAILS on frmNewOrder:
FIELD NAME VALIDATION DESCRIPTION
OrderID None
This field will not be accessible to the user through the form so there’s no need to validate. The number will be automatically assigned.
Material To validate this, a ‘DropDownList’ style combo box will be used.
PRESENCE CHECK.
The drop down style combo box will ensure that only the options given to the student by the comb box will be valid input. The student will not be able to name the material. A presence check will be made before saving the order or enabling the rest of the material options.
Depth To validate this, a ‘DropDownList’ style combo box will be used.
The options from the combo box will change depending on the material selected. This will ensure the depth chosen by the user will

Page 34 of 303
PRESENCE CHECK.
always be valid as the cost calculations will use this data to retrieve the cost from the database.
Size Input via textbox.
PRESENCE CHECK.
RANGE CHECK.
A presence check will be carried out when the adding of the item to the basket takes place. The range check will be an important feature here as it will be important the student cannot order a material piece bigger than the sheets available.
Quantity Input via textbox.
PRESENCE CHECK.
RANGE CHECK.
The textbox will have a range limit of 1-50. This will mean an order of zero quantity cannot be made. A presence check will be made here too as this is required for the calculation of the cost.
Cost Indirect validation.
The cost will be validated by ensuring the cost is rounded to two decimal places. The validation of the other fields will ensure the cost is valid.
StudentID None
This field will not be accessible to the user through the form so there’s no need to validate. The number will be automatically assigned. The number will be the foreign key, adding the unique ID of the student here.
OrderDate None
This field will not be accessible to the user through the form so there’s no need to validate.
All the details that will be input into the system have been validated. This, to an extent, should ensure
that the probability of invalid data being stored by the system or provoking the system to crash should
stay close to zero. The importance of the data being valid is crucial for the system to function correctly
as different parts of the system rely on previously entered data. This will also make for a robust
solution, which works towards one of its objectives, as well as ensuring the user interface meets its
standard requirements.

Page 35 of 303
Processing Stages
To use the system, the user must have registered by entering all the details. This will be the first
step the user encounters when using the system. Both students and members of staff will need
to register to use the system.
NEW USER REGISTRATION PROCESS:
START
Are all registration
details completed?
FINISH
YES
NO
Is the user a
student? NO
Message box
Student details are added
to the database file, table
tblStudentDetails.
YES
User enters all the
details required for
registration process.
Student Details
Database File
(tblStudentDetails)
Staff Details
Staff details are added to
the database file, table
tblStaffDetails.
Database File
(tblStaffDetails)
An orange-outlined process
indicates the processes will
access the database file.
For this processing stage
the file will be accessed to
store details of the user.

Page 36 of 303
USER LOGIN PROCESS:
START
Have all the login
details been
completed?
FINISH
YES
NO
Is the user a
student? NO
Message box
Student login details are
compared with the all
student registered details.
YES
User enters the login
details.
Student Login
Details
Staff Login
Details
Database File
(tblStudentDetails)
Do the student
login details
match?
YES
NO
Display student welcome
form.
Message box
Staff login details are
compared with the all
student registered details.
Database File
(tblStaffDetails)
An orange-outlined process
indicates the processes will
access the database file.
For this processing stage
the file will be accessed to
compare details of the
user.
Do the student
login details
match?
YES
Display staff welcome form.
NO

Page 37 of 303
PASSWORD REMINDER PROCESS:
START
Has the username
been input?
FINISH
YES
NO
Is the user a
student? NO
Message box
YES
User enters their
username.
Database File
(tblStudentDetails)
Database File
(tblStaffDetails)
An orange-outlined process
indicates the processes will
access the database file.
For this processing stage
the file will be accessed to
extract password details to
display on the form.
Student
password is
extracted.
Student password is
displayed on the form.
Staff username is searched
from tblStaffDetails.
Student username is
searched from
frmStudentDetails.
Staff password
is extracted.
Staff password is emailed to
the member of staff account.

Page 38 of 303
NEW ORDER PROCESS:
START
Have all the
material details
been completed?
FINISH
YES
NO
Message box
Order details for the user are
extracted and displayed in
the data grid on the form.
Clears all inputs for a new
order.
User input all the
material details.
Material Order
Details
Display printing order form.
Material order details are
added to the database in the
table tblStudentOrder.
An orange-outlined process
indicates the processes will
access the database file.
For this processing stage
the file will be accessed to
store and display material
order details.
YES
NO
Database File
(tblStudentOrder)
Has the print
command button
been pressed?

Page 39 of 303
CALCULATING INDIVIDUAL MATERIAL ITEM COST PROCESS:
START
Are all the details
completed and
valid?
YES
NO
Message box
Retrieve data from searches
and perform calculation.
Round number to two
decimal places. Display in the
appropriate label.
Material details.
Material Order
Details
Search the corresponding
unit cost of the material.
Search for the corresponding
unit size of the material.
An orange-outlined process
indicates the processes will
access the database file.
For this processing stage
the file will be accessed to
retrieve material data that
will be used for the
calculations.
Database File
(tblMaterialDetails)
Material order details are
added to the database in the
table tblStudentOrder.
Database File
(tblStudentOrder)

Page 40 of 303
FIND ORDER PROCESS:
From this, the form can be edited. The processing stages for the editing of the orders will be very
similar to the adding material orders processing stage. The form can also be printed. The processing
stages for the printing of the form can be seen below.
START
Are all the details
completed and
valid?
YES
NO
Message box
Retrieve material orders that
match the student details
and the date of order.
Display in the datagrid on the
form.
Student Details and
Date of Order is input.
Material Order
Details
Search the corresponding
details in the database to
retrieve the orders.
An orange-outlined process
indicates the processes will
access the database file.
For this processing stage
the file will be accessed to
display the student
material order details.
Database File
(tblStudentOrder)
FINISH

Page 41 of 303
PRINT ORDER PROCESS:
START
Are all the details
completed and
valid?
YES
NO
Message box
Retrieve material orders that
match the student details
and the date of order.
Display in the datagrid on the
form.
Student Details and
Date of Order is input.
Material Order
Details
Search the corresponding
details in the database to
retrieve the orders.
An orange-outlined process
indicates the processes will
access the database file.
For this processing stage
the file will be accessed to
display the student
material order details.
Database File
(tblStudentOrder)
User clicks the PRINT
command button on
the form.
FINISH

Page 42 of 303
PROCESS AND PSEUDOCODE FOR REGISTRATION FORM:
START------------------------------------------------------------------------------------------------------------------------
Declare Recordsets
Declare Variables
Declare SQL Statements
Define SQL’s
Load Recordsets
CASE Student
Check all input boxes are completed:
IF (relevant input boxes) EQUAL NOTHING THEN
MsgBox (“(relevant message)”)
Highlight all incomplete input boxes
ELSE
IF all student details have been completed THEN
GET student details
OPEN database table tblStudentDetails
ADD student details AS RECORD
DISPLAY “you have been successfully registered.”
UNLOAD registration form
LOAD student login form
END IF
END IF
CASE Member of Staff
Check all input boxes are completed:
IF (relevant input boxes) EQUAL NOTHING THEN
MsgBox (“(relevant message)”)
Highlight all incomplete input boxes
ELSE
IF all staff details have been completed THEN
GET staff details
OPEN database table tblStaffDetails
ADD staff details AS RECORD
DISPLAY “you have been successfully registered.”
UNLOAD registration form
LOAD staff login form
END IF
END IF
FINISH----------------------------------------------------------------------------------------------------------------------

Page 43 of 303
PROCESS AND PSEUDOCODE FOR LOGIN FORMS:
STUDENT
Declare Recordset
Declare Variables
Declare and Define SQL Statement
Load Recordset
Check all input boxes are completed:
IF (relevant input boxes) EQUAL NOTHING THEN
MsgBox (“(relevant message)”)
ELSE
IF all student login details have been completed THEN
GET student login details
OPEN database table tblStudentDetails
COMPARE student details WITH existing records
IF a match is found THEN
UNLOAD login form
DISPLAY student welcome form with student details
MsgBox (“(relevant message)”)
END IF
END IF
STAFF
Declare Recordset
Declare Variables
Declare SQL Statements
Define SQL’s
Load Recordset
Check all input boxes are completed:
IF (relevant input boxes) EQUAL NOTHING THEN
MsgBox (“(relevant message)”)
ELSE
IF all staff login details have been completed THEN
GET staff login details
OPEN database table tblStaffDetails
COMPARE staff details WITH existing records
IF a match is found THEN
UNLOAD login form
DISPLAY staff welcome form with staff’s details
MsgBox (“(relevant message)”)
END IF
END IF

Page 44 of 303
PROCESS AND PSEUDOCODE FOR NEW ORDER FORM:
START------------------------------------------------------------------------------------------------------------------------
Declare Recordsets
Declare Variables
Declare SQL Statements
Define SQL’s
Load Recordsets
Check all input boxes are completed:
IF (relevant input boxes) EQUAL NOTHING THEN
MsgBox (“(relevant message)”)
Highlight all incomplete input boxes
ELSE
IF all input boxes have been completed THEN
CALCULATE the material item cost
GET input material details
OPEN database table tblStudentOrder
ADD material details AS RECORD
CLEAR all input boxes
UPDATE subtotal on form
GET all current student orders.
DISPLAY the current material items in order
END IF
END IF
IF print command button is clicked THEN
HIDE the new order form
SHOW the print form
END IF
FINISH----------------------------------------------------------------------------------------------------------------------
PROCESS AND PSEUDOCODE FOR FIND ORDER FORM:
START------------------------------------------------------------------------------------------------------------------------
Declare Recordsets
Declare Variables
Declare SQL Statements
Define SQL’s
Load Recordsets
Check all input boxes are completed:
IF (relevant input boxes) EQUAL NOTHING THEN

Page 45 of 303
MsgBox (“(relevant message)”)
Highlight all incomplete input boxes
ELSE
IF all input boxes have been completed THEN
GET search details
OPEN database table tblStudentOrder
COMPARE order details WITH existing records
IF a match is found THEN
MsgBox (“(relevant message)”)
ELSE
GET material order details
DISPLAY material items in form
END IF
END IF
FINISH----------------------------------------------------------------------------------------------------------------------
PROCESS AND PSEUDOCODE FOR PASSWORD REMINDER FORM:
START------------------------------------------------------------------------------------------------------------------------
Declare Recordsets
Declare Variables
Declare SQL Statements
Define SQL’s
Load Recordsets
Check the username has been input.
IF (txtUsername) IS EMPTY THEN
MsgBox (“(relevant message)”)
ELSE
IF the username has been input THEN
GET username data
OPEN database table tblStudentDetails
COMPARE username data WITH existing records
IF a match is found THEN
MsgBox (“(relevant message)”)
ELSE
GET corresponding password details
DISPLAY password on form
END IF
END IF
FINISH----------------------------------------------------------------------------------------------------------------------

Page 46 of 303
DATA FLOW DIAGRAM OF NEW REGISTRATION SYSTEM
DATA FLOW DIAGRAM OF NEW ORDERING SYSTEM

Page 47 of 303
Evaluation Criteria
To successfully evaluate the computerised system, a set of evaluation criteria will be needed. A
criterion will be created that evaluates the suitability, usability, the success rate measured by
students testing the program and testing the performance of the solution.
The old system was very time consuming. The new system should minimise the time to
produce the orders. The calculations of the old system were identified to be the most
difficult phase of the ordering process. The new system should make the ordering process
simple by automatically calculating the costs for the orders. This should minimise the errors
within the process.
The new system should not allow duplicate accounts. This will extend to not allowing invalid
data and details. The human errors should be minimised to none. The new system should
allow the students to edit the orders with ease.
The suitability of the solution will need to be evaluated to ensure that the solution meets the
objectives. The suitability will be assessed after the system is created. Taken into account will be
who the system was designed for, whether it is suitable for audience and the purpose the system
was created for. For purpose, the system will be compared with the objectives I specified earlier in
documentation.
The usability will be tested by me and others to see if the system is clear enough so that the user can
navigate and complete tasks successfully. Other factors that will be taken into account are how easy
the system is to use, whether it is possible to use the solution with no prior information on its
purpose because this will indicate the system is very usable.
The success rate will also be determined by the students that test the system. A good indication to
me will be if 75% of the students that test the solution agree that the system is fit for audience and
purpose. But if the system fails to convince 75% of the students, it will be tweaked in accordance to
the tester’s feedback. In other words, corrective maintenance will be necessary to improve the
system further.
The success rate will also be tested by performing acceptance testing. This will involve the testing of
the system against the technician’s system criteria. The technician criterion includes the following:
The printed orders the system produced must include:
o Full Student Name & Form
o Date of Order
o Full Details of Order (inc. Breakdown of Costs)
o Total Cost of Order
Materials List available on the system must include:
o Material Name
o Material Depths Available
o Material Sheet sizes
o Material Sheet Costs

Page 48 of 303
Staff or Technician Options must include:
o The ability to find a student order if needed
o The ability to update the materials list at any given time
Student Options must include:
o The ability to edit an order
o The ability to re-print a previous order
o The ability to view the latest materials available and their prices
If the system meets 90% of the technician criterion at a satisfactory level it will be considered a
success. If it fails to meet the criterion, perfective or adaptive maintenance will be required to
ensure that it does as the system will strive to meet every requirement.
Feedback from the technician will be the decisive information on whether the new system is a
success. Being the most experienced with the old system, the technician will rate several aspects of
the system on a scale of 10 and leave detailed comments. Again, this may result in some corrective
maintenance.
When the system is being tested, it will primarily be tested to see it fulfils each objective set. The
test will be a success if it is able to deal appropriately with typical, extreme and erroneous data.
While the system is being tested, commentary will outline the successes and failures of the system.
The areas in which the system fails, immediate action will be taken to rectify these.

Page 49 of 303
CG4.3 SOFTWARE DEVELOPMENT
Software
Please see program.

Page 50 of 303
CG4.4 MAINTENANCE DOCUMENTATION
Annotated Listings
-----------------------------------------------------------------------------------------------------------------
About Form (frmAbout)
OPTION EXPLICIT
Private Sub Form_Load()
'Display the newroll gif animation.
WebBrowser1.Navigate (App.Path & "\MYDATA\newroll.gif")
'Load the background picture.
Set imgBackground.Picture = LoadPicture(App.Path & "\MYDATA\aboutbackground.bmp")
End Sub
Private Sub cmdOk_Click()
'Unload the About form.
Unload frmAbout
'Remove the picture of main menu out of form view.

Page 51 of 303
frmMainMenu.picMainBackground.Left = 7200
End Sub
Private Sub cmdOk_MouseMove(Button As Integer, Shift As Integer, X As Single, Y As Single)
'Change colour upon mouse hover as mouse over effect.
cmdOk.BackColor = vbWhite
End Sub
Private Sub Form_Unload(Cancel As Integer)
'Unload the About form.
Unload frmAbout
'Remove the picture of main menu out of form view.
frmMainMenu.picMainBackground.Left = 7200
End Sub
Private Sub imgBackground_MouseMove(Button As Integer, Shift As Integer, X As Single, Y As Single)
'Change command button to original appearance when mouse hovers on form area.
cmdOk.BackColor = &HE0E0E0
End Sub
Private Sub lblCeator_MouseMove(Button As Integer, Shift As Integer, X As Single, Y As Single)
'Change command button to original appearance when mouse hovers on form area.
cmdOk.BackColor = &HE0E0E0
End Sub
-----------------------------------------------------------------------------------------------------------------

Page 52 of 303
Main Menu Form (frmMainMenu)
OPTION EXPLICIT
Private Sub Form_Load()
frmTempData.Show
frmTempData.Hide
'Loads the pictures into the imageboxes.
Set imgBackground.Picture = LoadPicture(App.Path & "\MYDATA\mainbackground2.bmp")
Set chkStudentLogin.Picture = LoadPicture(App.Path & "\MYDATA\button2.bmp")
Set chkStaffLogin.Picture = LoadPicture(App.Path & "\MYDATA\button2.bmp")
Set picMainBackground.Picture = LoadPicture(App.Path &
"\MYDATA\mainmenubackground.bmp")
'Label displays the current date.
lblDate = Date
'Set ObjTextToSpeech = CreateObject("SAPI.spVoice")
'ObjTextToSpeech.speak ("Welcome to resistant materials ordering application.")

Page 53 of 303
End Sub
Private Sub chkStudentLogin_MouseMove(Button As Integer, Shift As Integer, X As Single, Y As
Single)
'Loads the picture into the student login checkbox when the cursor hovers on the checkbox
(mouse-over effect)
Set chkStudentLogin.Picture = LoadPicture(App.Path & "\MYDATA\button1.bmp")
End Sub
Private Sub chkStaffLogin_MouseMove(Button As Integer, Shift As Integer, X As Single, Y As Single)
'Loads the picture into the staff login checkbox when the cursor hovers on the checkbox (mouse-
over effect)
Set chkStaffLogin.Picture = LoadPicture(App.Path & "\MYDATA\button1.bmp")
End Sub
Private Sub chkStaffLogin_Click()
'Loads the picture into the imagebox in the StaffLogin form upon click.
'This is a measure to ensure the imagebox has this picture loaded when the StaffLogin form is
shown.
Set frmStaffLogin.imgReturn.Picture = LoadPicture(App.Path & "\MYDATA\returnup1.bmp")
'The following code changes the behaviour of the StaffLogin checkbox to the behaviour of a
command box.
'The code ensures the appearance of a checked checkbox is not retained after the click.
If chkStaffLogin.Value = vbChecked Then
chkStaffLogin.Value = vbUnchecked
Exit Sub
End If
'Displays the StaffLogin form.
frmMainMenu.Hide
frmStaffLogin.Show
'Sets the focus onto the login commandbox to avoid blank textboxes when form is displayed.
frmStaffLogin.cmdForgot.SetFocus
'Ensures the return image colour is reset.
Set frmStaffLogin.imgReturn.Picture = LoadPicture(App.Path & "\MYDATA\returnup1.bmp")
End Sub

Page 54 of 303
Private Sub chkStudentLogin_Click()
'Loads the picture into the imagebox in the StudentLogin form upon click.
'This is a measure to ensure the imagebox has this picture loaded when the StudentLogin form is
shown.
Set frmStudentLogin.imgReturn.Picture = LoadPicture(App.Path & "\MYDATA\returnup1.bmp")
'The following code changes the behaviour of the StudentLogin checkbox to that of a command
box.
'The code ensures the appearance of a checked checkbox is not retained after the click.
If chkStudentLogin.Value = vbChecked Then
chkStudentLogin.Value = vbUnchecked
Exit Sub
End If
'Displays the StudentLogin form.
frmMainMenu.Hide
frmStudentLogin.Show
'Sets the focus onto the login commandbox to avoid blank textboxes when form is displayed.
frmStudentLogin.cmdForgot.SetFocus
'Ensures the return image colour is reset.
Set frmStudentLogin.imgReturn.Picture = LoadPicture(App.Path & "\MYDATA\returnup1.bmp")
End Sub
Private Sub imgBackground2_MouseOver()
'Changes the font colour (to black) and font size (to 48) when the cursor hovers over the
background.
'This code appears here as well to ensure the fonts are black and size 48 when the form is revisited
(shown).
lblStudent.ForeColor = vbBlack
lblStudent.FontSize = 48
lblStaff.ForeColor = vbBlack
lblStaff.FontSize = 48
'Loads the original pictures into chkStudentLogin and chkStaffLogin checkboxes when form is
shown.
Set chkStudentLogin.Picture = LoadPicture(App.Path & "\MYDATA\button2.bmp")
Set chkStaffLogin.Picture = LoadPicture(App.Path & "\MYDATA\button2.bmp")
End Sub

Page 55 of 303
Private Sub Form_Unload(Cancel As Integer)
'Unloads the forms to ensure executable does not keep running in background.
Unload frmTempData
Unload frmMainMenu
End Sub
Private Sub imgAbout_Click()
'Brings the picture onto the form where it can be seen so focus is on the about form.
picMainBackground.Left = 0
frmAbout.Show
End Sub
Private Sub imgBackground_MouseMove(Button As Integer, Shift As Integer, X As Single, Y As Single)
'Changes the font colour (to black) and font size (to 48) when the cursor hovers over the
background.
'This code appears here as well to ensure the fonts are black and size 48 when the form is revisited
(shown).
lblStudent.ForeColor = vbBlack
lblStudent.FontSize = 48
lblStaff.ForeColor = vbBlack
lblStaff.FontSize = 48
'Loads the original pictures into chkStudentLogin and chkStaffLogin checkboxes when form is
shown.
Set chkStudentLogin.Picture = LoadPicture(App.Path & "\MYDATA\button2.bmp")
Set chkStaffLogin.Picture = LoadPicture(App.Path & "\MYDATA\button2.bmp")
End Sub
Private Sub imgStaff_MouseMove(Button As Integer, Shift As Integer, X As Single, Y As Single)
'Changes the font colour (to light grey) and font size (to 72) when the cursor hovers over imagebox
imgStaff.
'Replicating a MouseOver effect.
lblStaff.ForeColor = &HC0C0C0
lblStaff.FontSize = 72
'Loads the picture into the StaffLogin checkbox when cursor hovers over imgStaff.
Set chkStaffLogin.Picture = LoadPicture(App.Path & "\MYDATA\button2.bmp")

Page 56 of 303
End Sub
Private Sub imgStudent_MouseMove(Button As Integer, Shift As Integer, X As Single, Y As Single)
'Changes the font colour (to light grey) and font size (to 72) when the cursor hovers over imagebox
imgStudent.
'Replicating a MouseOver effect.
lblStudent.ForeColor = &H8000000F
lblStudent.FontSize = 72
'Loads the picture into the StudentLogin checkbox when cursor hovers over imgStudent.
Set chkStudentLogin.Picture = LoadPicture(App.Path & "\MYDATA\button2.bmp")
End Sub
Private Sub lblStaff_MouseMove(Button As Integer, Shift As Integer, X As Single, Y As Single)
'Loads the picture into StaffLogin checkbox when the cursor hovers over lblStaff label.
Set chkStaffLogin.Picture = LoadPicture(App.Path & "\MYDATA\button2.bmp")
'Colours the font in lblStudent lbel black and reduces font to size 48.
lblStaff.ForeColor = vbBlack
lblStaff.FontSize = 48
End Sub
Private Sub lblStudent_MouseMove(Button As Integer, Shift As Integer, X As Single, Y As Single)
'Loads the picture into StudentLogin checkbox when the cursor hovers over lblStudent label.
Set chkStudentLogin.Picture = LoadPicture(App.Path & "\MYDATA\button2.bmp")
'Colours the font in lblStudent label black and reduces font to size 48.
lblStudent.ForeColor = vbBlack
lblStudent.FontSize = 48
End Sub
Private Sub tmrTime_Timer()
'Displays the current time in the respective label.
lblTime.Caption = Time
End Sub
-----------------------------------------------------------------------------------------------------------------

Page 57 of 303
Student Login Form (frmStudentLogin)
OPTION EXPLICIT
Dim db As New ADODB.Connection 'Declaration of connection from VB to database
Dim newStudentAccount As New ADODB.Recordset 'Declaration of student recordset
Dim sConn As String 'Declaration of object location for connection
Dim sSQL As String 'Declaration of primary SQL statement
Dim SearchUsername As String 'Declaration of string used for variable Student Username
Dim SearchPassword As String 'Declaration of string used for variable Student Password
Dim SearchPhrase1 As String 'Declaration of string used for variable SearchForename
Dim SearchPhrase2 As String 'Declaration of string used for variable SearchForename
Private Sub Form_Load()
'Loads the pictures into the imageboxes.
Set imgBackground.Picture = LoadPicture(App.Path & "\MYDATA\background1.bmp")
Set imgReturn.Picture = LoadPicture(App.Path & "\MYDATA\returnup1.bmp")
Set cmdLogin.Picture = LoadPicture(App.Path & "\MYDATA\button2.bmp")
Set imgPage = LoadPicture(App.Path & "\MYDATA\page.bmp")
Set picForgot = LoadPicture(App.Path & "\MYDATA\studentbackground.bmp")
txtUsername.BackColor = &HC0E0FF 'colour light orange
txtPassword.BackColor = &HC0E0FF 'colour light orange
'---------------------------------------------------------------------------------
' This opens the student recordset upon the loading of the form.
'---------------------------------------------------------------------------------
sPath = App.Path & "\MYDATA\resistantmaterialsdb.mdb"
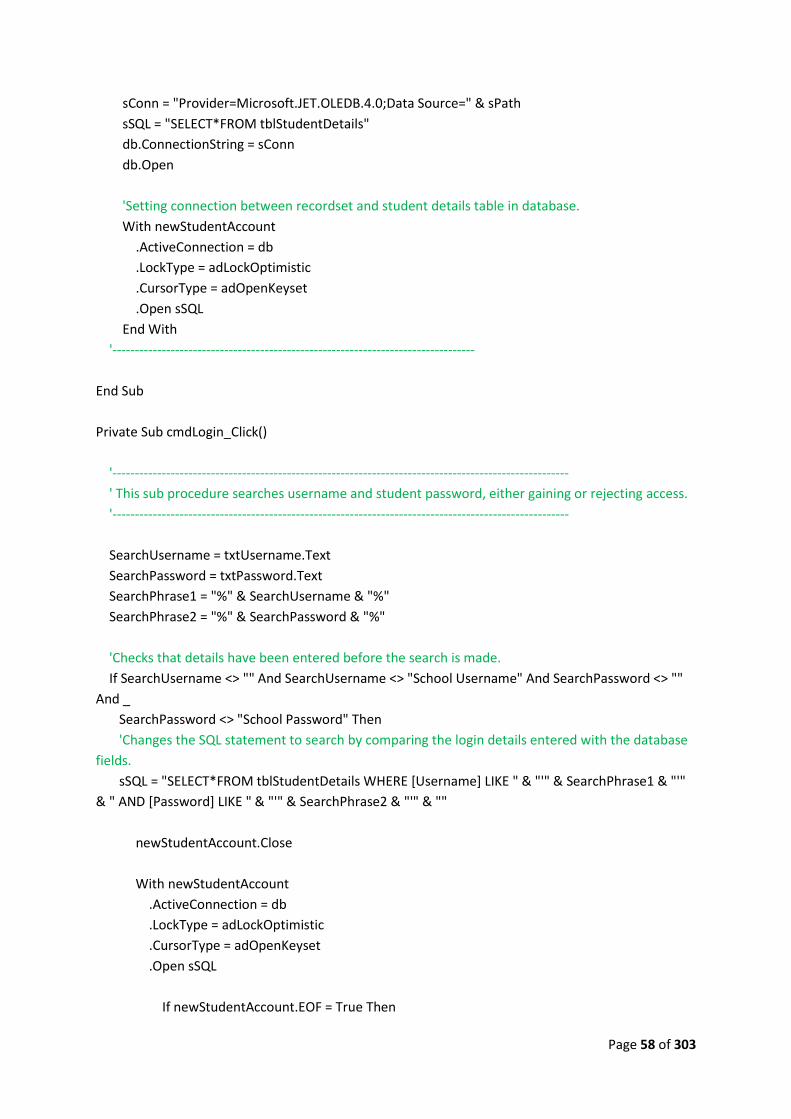
Page 58 of 303
sConn = "Provider=Microsoft.JET.OLEDB.4.0;Data Source=" & sPath
sSQL = "SELECT*FROM tblStudentDetails"
db.ConnectionString = sConn
db.Open
'Setting connection between recordset and student details table in database.
With newStudentAccount
.ActiveConnection = db
.LockType = adLockOptimistic
.CursorType = adOpenKeyset
.Open sSQL
End With
'---------------------------------------------------------------------------------
End Sub
Private Sub cmdLogin_Click()
'------------------------------------------------------------------------------------------------------
' This sub procedure searches username and student password, either gaining or rejecting access.
'------------------------------------------------------------------------------------------------------
SearchUsername = txtUsername.Text
SearchPassword = txtPassword.Text
SearchPhrase1 = "%" & SearchUsername & "%"
SearchPhrase2 = "%" & SearchPassword & "%"
'Checks that details have been entered before the search is made.
If SearchUsername <> "" And SearchUsername <> "School Username" And SearchPassword <> ""
And _
SearchPassword <> "School Password" Then
'Changes the SQL statement to search by comparing the login details entered with the database
fields.
sSQL = "SELECT*FROM tblStudentDetails WHERE [Username] LIKE " & "'" & SearchPhrase1 & "'"
& " AND [Password] LIKE " & "'" & SearchPhrase2 & "'" & ""
newStudentAccount.Close
With newStudentAccount
.ActiveConnection = db
.LockType = adLockOptimistic
.CursorType = adOpenKeyset
.Open sSQL
If newStudentAccount.EOF = True Then

Page 59 of 303
MsgBox ("The username " + txtUsername.Text + "" + " does not exist or your password
is incorrect." + vbNewLine + vbNewLine + "Please ensure you have entered your login details
correctly."), vbOKOnly + vbExclamation, "Invalid Login Details!"
'Reloads the current form.
db.Close
Unload frmStudentLogin
frmStudentLogin.Show
'cmdLogin.SetFocus
Else
frmStudentOptions.lblName.Caption = (.Fields("Forename").Value + " " +
.Fields("Surname").Value)
frmTempData.txtFnameData = .Fields("Forename").Value
frmTempData.txtSnameData = .Fields("Surname").Value
frmTempData.txtSIDData = .Fields("StudentID").Value
frmTempData.txtClassData = (.Fields("StudentYear").Value +
.Fields("StudentGroup").Value)
frmTempData.txtDateData = Date
'Displays the options form.
frmStudentLogin.Hide
frmStudentOptions.Show
db.Close 'closing the database connection so the form can be unloaded and secondly
to avoid errors when the form is reloaded through the main menu.
Unload frmStudentLogin
End If
End With
Else
'Notifies the user of invalid login details entered.
MsgBox ("Please ensure you have entered your login details correctly."), vbOKOnly +
vbExclamation, "Invalid Login Details!"
'Reloads the current form.
db.Close
Unload frmStudentLogin
frmStudentLogin.Show
'cmdLogin.SetFocus
End If
End Sub
Private Sub cmdLogin_MouseMove(Button As Integer, Shift As Integer, X As Single, Y As Single)

Page 60 of 303
'Loads the picture into the login checkbox when the cursor hovers on the checkbox (for mouse-
over effect).
Set cmdLogin.Picture = LoadPicture(App.Path & "\MYDATA\button1.bmp")
'Changes the height and width of cmdLogin upon mouseover to indicate that it can be selected.
cmdLogin.Height = 475
cmdLogin.Width = 1075
'Changes the positon of cmdLogin so the it appears as cmdLogin has not moved in the X or Y axes.
cmdLogin.Left = 3840
cmdLogin.Top = 3600
End Sub
Private Sub cmdLogin_GotFocus()
'Loads the picture into the login checkbox when it selected using the tab key.
Set cmdLogin.Picture = LoadPicture(App.Path & "\MYDATA\button1.bmp")
'Changes the height and width of cmdLogin when checkbox is selected through tab index.
cmdLogin.Height = 475
cmdLogin.Width = 1075
'Changes the positon of cmdLogin so the it appears as cmdLogin has not moved in the X or Y axes.
cmdLogin.Left = 3840
cmdLogin.Top = 3600
End Sub
Private Sub cmdLogin_LostFocus()
'Loads the picture into the login checkbox when it selected using the tab key.
Set cmdLogin.Picture = LoadPicture(App.Path & "\MYDATA\button2.bmp")
'Changes the size and the location of cmdLogin to original.
cmdLogin.Height = 375
cmdLogin.Width = 975
cmdLogin.Left = 3960
cmdLogin.Top = 3600
End Sub
Private Sub Form_Unload(Cancel As Integer)
'Unloads the form.

Page 61 of 303
Unload frmStudentLogin
Set frmStudentLogin = Nothing
frmMainMenu.Show
End Sub
Private Sub imgBackground_Click()
'Focuses on thebutton on student login form to lose focus on current textbox.
cmdForgot.SetFocus
End Sub
Private Sub imgBackground_MouseMove(Button As Integer, Shift As Integer, X As Single, Y As Single)
lblClickHere.ForeColor = &H80FF&
End Sub
Private Sub imgPage_Click()
'Focuses on thebutton on student login form to lose focus on current textbox.
cmdForgot.SetFocus
End Sub
Private Sub imgPage_MouseMove(Button As Integer, Shift As Integer, X As Single, Y As Single)
'Loads the picture into the login checkbox when the cursor hovers over the imagebox imgPage.
'The code is placed in this subprocedure because cursor movement on the background image _
causes the picture to be loaded frequently and hence creates an unwanted flickering effect.
Set cmdLogin.Picture = LoadPicture(App.Path & "\MYDATA\button2.bmp")
'Changes the size and the location of cmdLogin to original.
cmdLogin.Height = 375
cmdLogin.Width = 975
cmdLogin.Left = 3960
cmdLogin.Top = 3600
lblClickHere.ForeColor = &H80FF&
End Sub
Private Sub imgReturn_Click()

Page 62 of 303
'Unloads the form.
Unload frmStudentLogin
Set frmStudentLogin = Nothing
'Displays the Main Menu form.
frmStudentLogin.Hide
frmMainMenu.Show
End Sub
Private Sub imgReturn_MouseMove(Button As Integer, Shift As Integer, X As Single, Y As Single)
'Loads picture into imgReturn that differs in colour to create a mouseover effect.
Set imgReturn.Picture = LoadPicture(App.Path & "\MYDATA\returnup2.bmp")
End Sub
Private Sub imgReturnArea_MouseMove(Button As Integer, Shift As Integer, X As Single, Y As Single)
'Loads the original picture back into imgReturn.
'This code has been placed in this subprocedure because of the smaller area of the imagebox _
this decreases the refresh rate of the image when the mouse moves on the form and hence _
decreases the flickering of the image.
Set imgReturn.Picture = LoadPicture(App.Path & "\MYDATA\returnup1.bmp")
End Sub
Private Sub lblClickHere_Click()
'Displays the registration form.
frmStudentLogin.Hide
frmRegister.Show
'Ensures the return image colour is reset.
Set frmRegister.imgReturn.Picture = LoadPicture(App.Path & "\MYDATA\returnup1.bmp")
'Adds "Staff" to the unseen textbox in the form frmRegister. This is used for when the return
button is clicked.
frmRegister.txtType = "Student"
db.Close
Unload frmStudentLogin
End Sub

Page 63 of 303
Private Sub lblClickHere_MouseMove(Button As Integer, Shift As Integer, X As Single, Y As Single)
'Mouse over effect to show it can be clicked.
lblClickHere.ForeColor = vbRed
End Sub
Private Sub tmrTime_Timer()
'Code to display current time in label.
lblTime.Caption = Time
End Sub
Private Sub txtUsername_GotFocus()
'Displays pop-up text when the cursor hovers over txtUsername.
txtUsername.ToolTipText = "Enter your School Username"
'Clear the textbox for username data entry.
If txtUsername = "School Username" Then
txtUsername = ""
txtUsername.ForeColor = vbBlack
Else
End If
End Sub
Private Sub txtUsername_LostFocus()
'Reverts the textbox into original settings if no password is input.
If txtUsername = "" Then
txtUsername.ForeColor = &H80FF&
txtUsername = "School Username"
Else
End If
End Sub
Private Sub txtPassword_GotFocus()
'Code to protect password from being visible by replacing characters entered into textbox with
asterisks.
txtPassword.PasswordChar = "*"

Page 64 of 303
'Displays pop-up text when the cursor hovers over txtPassword.
txtPassword.ToolTipText = "Enter your School Password"
'Clear the textbox for password data entry.
If txtPassword = "School Password" Then
txtPassword = ""
txtPassword.ForeColor = vbBlack
Else
End If
End Sub
Private Sub txtPassword_LostFocus()
'Reverts the textbox into original settings if no password is input.
If txtPassword = "" Then
txtPassword.ForeColor = &H80FF&
txtPassword.PasswordChar = ""
txtPassword = "School Password"
Else
End If
End Sub
Private Sub cmdForgot_Click()
'Brings the picturebox used for effect from an unseen area, to a visible area on form.
picForgot.Left = 0
'Unloads the staff login form and displays the password reminder form.
If MsgBox("Have you forgotten your password?", vbYesNo + vbQuestion, "Password Help") =
vbYes Then
db.Close
Unload frmStudentLogin
frmPassword.txtType = "Student"
frmPassword.Show
frmPassword.cmdRemind.SetFocus
Else
picForgot.Left = 6960 'moves the image from the view of the form.
End If
End Sub
-----------------------------------------------------------------------------------------------------------------

Page 65 of 303
Staff Login Form (frmStaffLogin)
OPTION EXPLICIT
Dim db As New ADODB.Connection 'Declaration of connection from VB to database
Dim newStaffAccount As New ADODB.Recordset 'Declaration of staff recordset
Dim sConn As String 'Declaration of object location for connection
Dim sSQL As String 'Declaration of primary SQL statement
Dim SearchUsername As String 'Declaration of string used for variable Student Username
Dim SearchPassword As String 'Declaration of string used for variable Student Password
Dim SearchPhrase1 As String 'Declaration of string used for variable SearchForename
Dim SearchPhrase2 As String 'Declaration of string used for variable SearchForename
Private Sub Form_Load()
'Loads the pictures into the imageboxes.
Set imgBackground.Picture = LoadPicture(App.Path & "\MYDATA\background1.bmp")
Set imgReturn.Picture = LoadPicture(App.Path & "\MYDATA\returnup1.bmp")
Set cmdLogin.Picture = LoadPicture(App.Path & "\MYDATA\button2.bmp")
Set imgBook = LoadPicture(App.Path & "\MYDATA\book2.bmp")
Set picForgot = LoadPicture(App.Path & "\MYDATA\staffbackground.bmp")
txtUsername.BackColor = &HC0E0FF 'colour light orange
txtPassword.BackColor = &HC0E0FF 'colour light orange
'---------------------------------------------------------------------------------
' This opens the student recordset upon the loading of the form.

Page 66 of 303
'---------------------------------------------------------------------------------
sPath = App.Path & "\MYDATA\resistantmaterialsdb.mdb"
sConn = "Provider=Microsoft.JET.OLEDB.4.0;Data Source=" & sPath
sSQL = "SELECT*FROM tblStaffDetails"
db.ConnectionString = sConn
db.Open
'Setting connection between recordset and staff details table in database.
With newStaffAccount
.ActiveConnection = db
.LockType = adLockOptimistic
.CursorType = adOpenKeyset
.Open sSQL
End With
'---------------------------------------------------------------------------------
End Sub
Private Sub cmdForgot_Click()
'Brings the picturebox used for effect from an unseen area, to a visible area on form.
picForgot.Left = 0
'Unloads the staff login form and displays the password reminder form.
If MsgBox("Have you forgotten your password?", vbYesNo + vbQuestion, "Password Help") =
vbYes Then
db.Close
Unload frmStaffLogin
frmPassword.txtType = "Staff"
frmPassword.Show
frmPassword.cmdRemind.SetFocus
Else
picForgot.Left = 6960
End If
End Sub
Private Sub cmdLogin_Click()
'------------------------------------------------------------------------------------------------------
' This sub procedure searches username and student password, either gaining or rejecting access.
'------------------------------------------------------------------------------------------------------
SearchUsername = txtUsername.Text
SearchPassword = txtPassword.Text
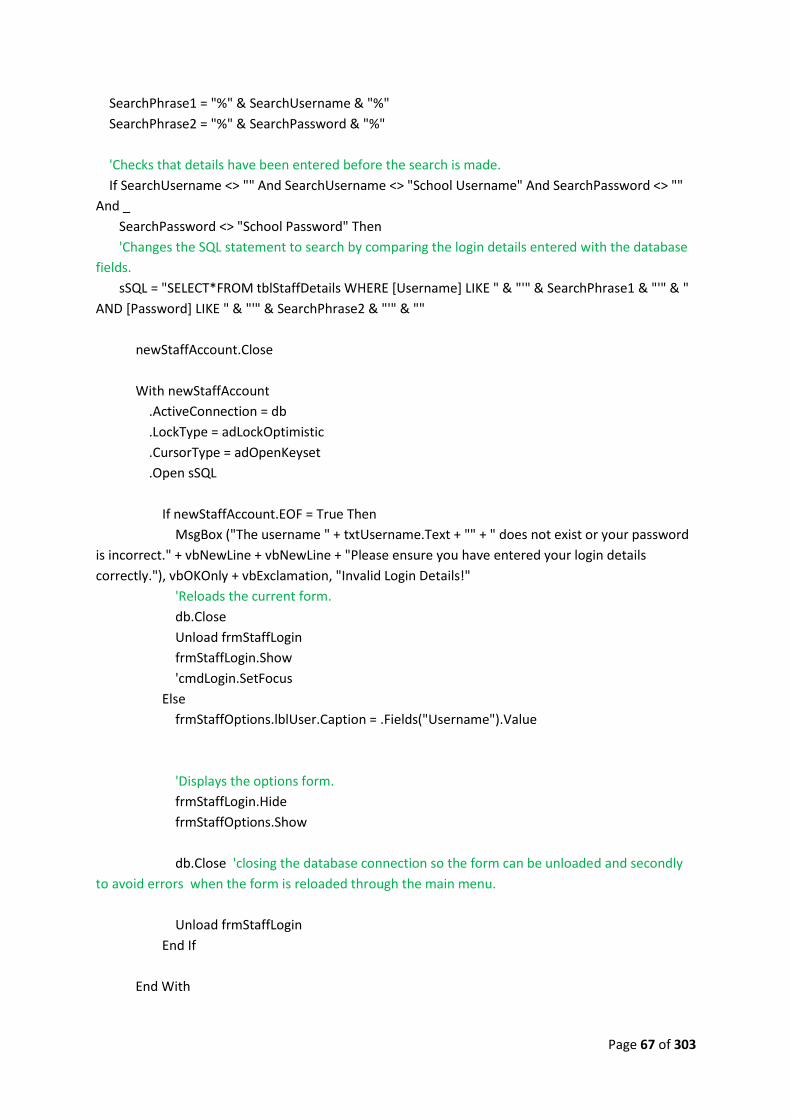
Page 67 of 303
SearchPhrase1 = "%" & SearchUsername & "%"
SearchPhrase2 = "%" & SearchPassword & "%"
'Checks that details have been entered before the search is made.
If SearchUsername <> "" And SearchUsername <> "School Username" And SearchPassword <> ""
And _
SearchPassword <> "School Password" Then
'Changes the SQL statement to search by comparing the login details entered with the database
fields.
sSQL = "SELECT*FROM tblStaffDetails WHERE [Username] LIKE " & "'" & SearchPhrase1 & "'" & "
AND [Password] LIKE " & "'" & SearchPhrase2 & "'" & ""
newStaffAccount.Close
With newStaffAccount
.ActiveConnection = db
.LockType = adLockOptimistic
.CursorType = adOpenKeyset
.Open sSQL
If newStaffAccount.EOF = True Then
MsgBox ("The username " + txtUsername.Text + "" + " does not exist or your password
is incorrect." + vbNewLine + vbNewLine + "Please ensure you have entered your login details
correctly."), vbOKOnly + vbExclamation, "Invalid Login Details!"
'Reloads the current form.
db.Close
Unload frmStaffLogin
frmStaffLogin.Show
'cmdLogin.SetFocus
Else
frmStaffOptions.lblUser.Caption = .Fields("Username").Value
'Displays the options form.
frmStaffLogin.Hide
frmStaffOptions.Show
db.Close 'closing the database connection so the form can be unloaded and secondly
to avoid errors when the form is reloaded through the main menu.
Unload frmStaffLogin
End If
End With

Page 68 of 303
Else
'Notifies the user of invalid login details entered.
MsgBox ("Please ensure you have entered your login details correctly."), vbOKOnly +
vbExclamation, "Invalid Login Details!"
'Reloads the current form.
db.Close
Unload frmStaffLogin
frmStaffLogin.Show
'cmdLogin.SetFocus
End If
End Sub
Private Sub cmdLogin_GotFocus()
'Loads the picture into the login checkbox when it selected using the tab key.
Set cmdLogin.Picture = LoadPicture(App.Path & "\MYDATA\button1.bmp")
'Changes the height and width of cmdLogin when checkbox is selected through tab index.
cmdLogin.Height = 475
cmdLogin.Width = 1075
'Changes the positon of cmdLogin so the it appears as cmdLogin has not moved in the X or Y axes.
cmdLogin.Left = 3960
cmdLogin.Top = 3600
End Sub
Private Sub cmdLogin_LostFocus()
'Loads the picture into the login checkbox when it selected using the tab key.
Set cmdLogin.Picture = LoadPicture(App.Path & "\MYDATA\button2.bmp")
'Changes the size and the location of cmdLogin to original.
cmdLogin.Height = 375
cmdLogin.Width = 975
cmdLogin.Left = 4080
cmdLogin.Top = 3600
End Sub
Private Sub cmdLogin_MouseMove(Button As Integer, Shift As Integer, X As Single, Y As Single)
'Loads the picture into the login checkbox when the cursor hovers on the checkbox (mouse-over
effect).

Page 69 of 303
Set cmdLogin.Picture = LoadPicture(App.Path & "\MYDATA\button1.bmp")
'Changes the height and width of cmdLogin upon mouseover to indicate that it can be selected.
cmdLogin.Height = 475
cmdLogin.Width = 1075
'Changes the positon of cmdLogin so the it appears as cmdLogin has not moved in the X or Y axes.
cmdLogin.Left = 3960
cmdLogin.Top = 3600
End Sub
Private Sub Form_Unload(Cancel As Integer)
'Unloads the form.
Unload frmStaffLogin
Set frmStaffLogin = Nothing
frmMainMenu.Show
End Sub
Private Sub imgBackground_Click()
'Focuses on thebutton on student login form to lose focus on current textbox.
cmdForgot.SetFocus
End Sub
Private Sub imgBackground_MouseMove(Button As Integer, Shift As Integer, X As Single, Y As Single)
lblClickHere.ForeColor = &H80FF&
End Sub
Private Sub imgBook_Click()
'Focuses on thebutton on student login form to lose focus on current textbox.
cmdForgot.SetFocus
End Sub
Private Sub imgBook_MouseMove(Button As Integer, Shift As Integer, X As Single, Y As Single)
'Loads the picture into the login checkbox when the cursor hovers over the imagebox imgBook.

Page 70 of 303
'The code is placed in this subprocedure because cursor movement on the background image _
causes the picture to be loaded frequently and hence creates an unwanted flickering effect.
Set cmdLogin.Picture = LoadPicture(App.Path & "\MYDATA\button2.bmp")
'Changes the size and the location of cmdLogin to original.
cmdLogin.Height = 375
cmdLogin.Width = 975
cmdLogin.Left = 4080
cmdLogin.Top = 3600
lblClickHere.ForeColor = &H80FF&
End Sub
Private Sub imgReturn_Click()
'Unloads the form.
Unload frmStaffLogin
Set frmStaffLogin = Nothing
'Displays the Main Menu form.
frmStaffLogin.Hide
frmMainMenu.Show
End Sub
Private Sub imgReturnArea_MouseMove(Button As Integer, Shift As Integer, X As Single, Y As Single)
'Loads the picture into the return imagebox to add to the mouseover effect.
'The code is placed in this subprocedure because cursor movement on the background image _
causes the picture to be loaded frequently and hence creates an unwanted flickering effect.
Set imgReturn.Picture = LoadPicture(App.Path & "\MYDATA\returnup1.bmp")
End Sub
Private Sub imgReturn_MouseMove(Button As Integer, Shift As Integer, X As Single, Y As Single)
'Loads a different variation of the existing picture into the return imagebox to create a mouseover
effect.
Set imgReturn.Picture = LoadPicture(App.Path & "\MYDATA\returnup2.bmp")
End Sub
Private Sub lblClickHere_Click()

Page 71 of 303
'Displays the registration form.
frmStaffLogin.Hide
frmRegister.Show
'Ensures the return image colour is reset.
Set frmRegister.imgReturn.Picture = LoadPicture(App.Path & "\MYDATA\returnup1.bmp")
'Adds "staff" to the unseen textbox in the form frmRegister. This is used for when the return
button is clicked.
frmRegister.txtType = "Staff"
db.Close
Unload frmStaffLogin
End Sub
Private Sub lblClickHere_MouseMove(Button As Integer, Shift As Integer, X As Single, Y As Single)
'Mouse over effect to show it can be clicked.
lblClickHere.ForeColor = vbRed
End Sub
Private Sub tmrTime_Timer()
'Code to display current time in label.
lblTime.Caption = Time
End Sub
Private Sub txtUsername_GotFocus()
'Displays pop-up text when the cursor hovers over txtUsername.
txtUsername.ToolTipText = "Enter your School Username"
'Clear the textbox for username data entry.
If txtUsername = "School Username" Then
txtUsername = ""
txtUsername.ForeColor = vbBlack
Else
End If
End Sub

Page 72 of 303
Private Sub txtUsername_LostFocus()
'Reverts the textbox into original settings if no password is input.
If txtUsername = "" Then
txtUsername.ForeColor = &H80FF&
txtUsername = "School Username"
Else
End If
End Sub
Private Sub txtPassword_GotFocus()
'Code to protect password from being visible by replacing characters entered into textbox with
asterisks.
txtPassword.PasswordChar = "*"
'Displays pop-up text when the cursor hovers over txtPassword.
txtPassword.ToolTipText = "Enter your School Password"
'Clear the textbox for password data entry.
If txtPassword = "School Password" Then
txtPassword = ""
txtPassword.ForeColor = vbBlack
Else
End If
End Sub
Private Sub txtPassword_LostFocus()
'Reverts the textbox into original settings if no password is input.
If txtPassword = "" Then
txtPassword.ForeColor = &H80FF&
txtPassword.PasswordChar = ""
txtPassword = "School Password"
Else
End If
End Sub
-----------------------------------------------------------------------------------------------------------------

Page 73 of 303
Register Form (frmRegister)
OPTION EXPLICIT
Dim db As New ADODB.Connection 'Declaration of connection from VB to database
Dim newStudentAccount As New ADODB.Recordset 'Declaration of students recordset
Dim newStaffAccount As New ADODB.Recordset 'Declaration of staffs recordset
Dim sConn As String 'Declaration of object location for connection
Dim sSQL As String 'Declaration of primary SQL statement
Dim rSQL As String 'Declaration of secondary SQL statement
Dim SearchUsername As String 'Declaration of string used for variable Username
Dim SearchPhrase As String 'Declaration of string used for variable SearchUsername
Dim pSQL As String 'Declaration of third SQL statement
Dim qSQL As String 'Declaration of fourth SQL statement
Private Sub Form_Load()
'Loads the pictures into the imageboxes.
Set imgBackground.Picture = LoadPicture(App.Path & "\MYDATA\background1.bmp")
Set imgReturn.Picture = LoadPicture(App.Path & "\MYDATA\returnup1.bmp")
Set cmdCreate.Picture = LoadPicture(App.Path & "\MYDATA\addbutton1.bmp")
Set picDetailsMove = LoadPicture(App.Path & "\MYDATA\detailsmove.bmp")
'Sets the back colour of the following combo and textboxes to light orange.

Page 74 of 303
cmbAlias.BackColor = &HC0E0FF
txtUsername.BackColor = &HC0E0FF
txtPassword.BackColor = &HC0E0FF
txtForename.BackColor = &HC0E0FF
txtSurname.BackColor = &HC0E0FF
cmbYear.BackColor = &HC0E0FF
txtGroup.BackColor = &HC0E0FF
'Set ObjTextToSpeech = CreateObject("SAPI.spVoice")
'ObjTextToSpeech.speak ("To register, please enter your details and click create account.")
'Disable the following inputs to ensure the Alias combobox is seen to first.
txtUsername.Enabled = False
txtPassword.Enabled = False
txtConfirmPassword.Enabled = False
cmdCreate.Enabled = False
'----------------------------------------------------------------------------------------
' This opens the recordset on the loading of the form.
'----------------------------------------------------------------------------------------
sPath = App.Path & "\MYDATA\resistantmaterialsdb.mdb"
sConn = "Provider=Microsoft.JET.OLEDB.4.0;Data Source=" & sPath
sSQL = "SELECT*FROM tblStudentDetails"
rSQL = "SELECT*FROM tblStaffDetails"
db.ConnectionString = sConn
db.Open
'Setting connection between recordset and student details table in database.
With newStudentAccount
.ActiveConnection = db
.LockType = adLockOptimistic
.CursorType = adOpenKeyset
.Open sSQL
End With
'Setting connection between recordset and staff details table in database.
With newStaffAccount
.ActiveConnection = db
.LockType = adLockOptimistic
.CursorType = adOpenKeyset
.Open rSQL
End With
'----------------------------------------------------------------------------------------
End Sub

Page 75 of 303
Private Sub cmdCreate_Click()
'----------------------------------------------------------------------------------------
' Procedure adds the current user details to the database into the correct tables.
'----------------------------------------------------------------------------------------
Select Case cmbAlias
Case "Student"
'If nothing has been entered then the respective textbox is highlighted for the user to re-
enter data into.
'Highlight colour is yellow.
If InStr("School Username", txtUsername) <> 0 Then
txtUsername.BackColor = &HFFFF&
Else
txtUsername.BackColor = &HC0E0FF
End If
If InStr("School Password", txtPassword) <> 0 Then
txtPassword.BackColor = &HFFFF&
Else
txtPassword.BackColor = &HC0E0FF
End If
If InStr("Confirm Password", txtConfirmPassword) <> 0 Then
txtConfirmPassword.BackColor = &HFFFF&
Else
txtConfirmPassword.BackColor = &HC0E0FF
End If
If InStr("Forename", txtForename) <> 0 Then
txtForename.BackColor = &HFFFF&
Else
txtForename.BackColor = &HC0E0FF
End If
If InStr("Surname", txtSurname) <> 0 Then
txtSurname.BackColor = &HFFFF&
Else
txtSurname.BackColor = &HC0E0FF
End If
If cmbYear = "" Then
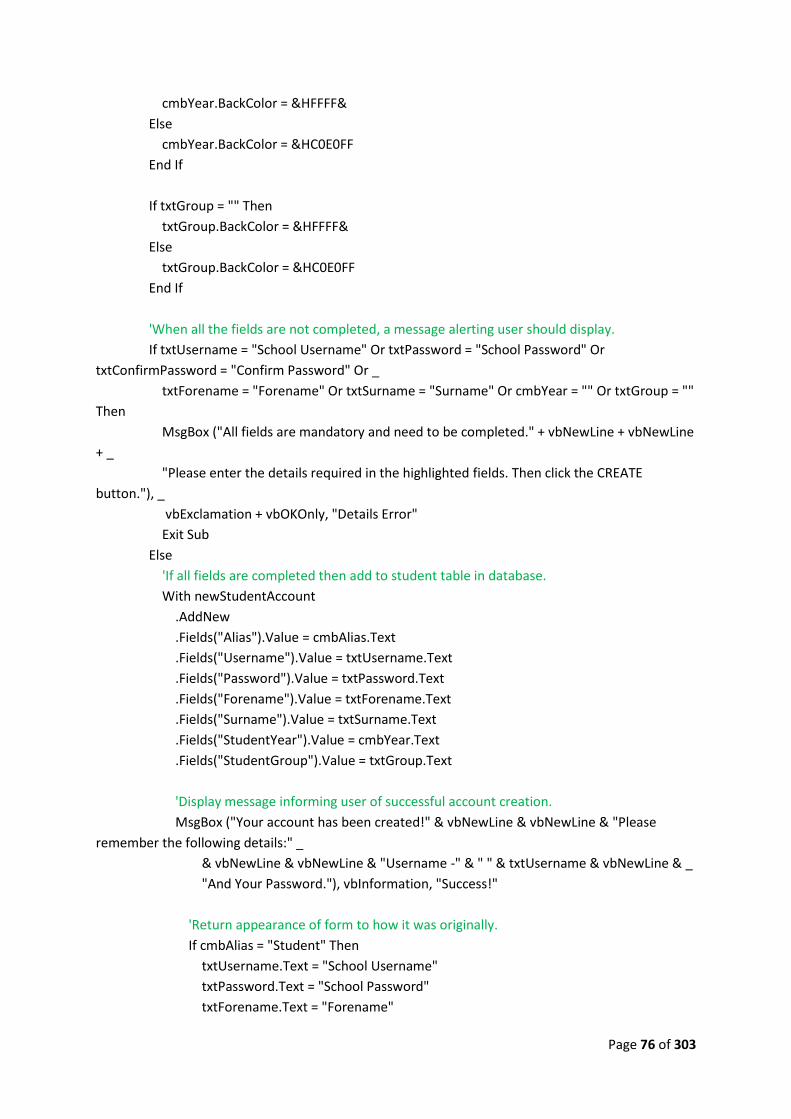
Page 76 of 303
cmbYear.BackColor = &HFFFF&
Else
cmbYear.BackColor = &HC0E0FF
End If
If txtGroup = "" Then
txtGroup.BackColor = &HFFFF&
Else
txtGroup.BackColor = &HC0E0FF
End If
'When all the fields are not completed, a message alerting user should display.
If txtUsername = "School Username" Or txtPassword = "School Password" Or
txtConfirmPassword = "Confirm Password" Or _
txtForename = "Forename" Or txtSurname = "Surname" Or cmbYear = "" Or txtGroup = ""
Then
MsgBox ("All fields are mandatory and need to be completed." + vbNewLine + vbNewLine
+ _
"Please enter the details required in the highlighted fields. Then click the CREATE
button."), _
vbExclamation + vbOKOnly, "Details Error"
Exit Sub
Else
'If all fields are completed then add to student table in database.
With newStudentAccount
.AddNew
.Fields("Alias").Value = cmbAlias.Text
.Fields("Username").Value = txtUsername.Text
.Fields("Password").Value = txtPassword.Text
.Fields("Forename").Value = txtForename.Text
.Fields("Surname").Value = txtSurname.Text
.Fields("StudentYear").Value = cmbYear.Text
.Fields("StudentGroup").Value = txtGroup.Text
'Display message informing user of successful account creation.
MsgBox ("Your account has been created!" & vbNewLine & vbNewLine & "Please
remember the following details:" _
& vbNewLine & vbNewLine & "Username -" & " " & txtUsername & vbNewLine & _
"And Your Password."), vbInformation, "Success!"
'Return appearance of form to how it was originally.
If cmbAlias = "Student" Then
txtUsername.Text = "School Username"
txtPassword.Text = "School Password"
txtForename.Text = "Forename"
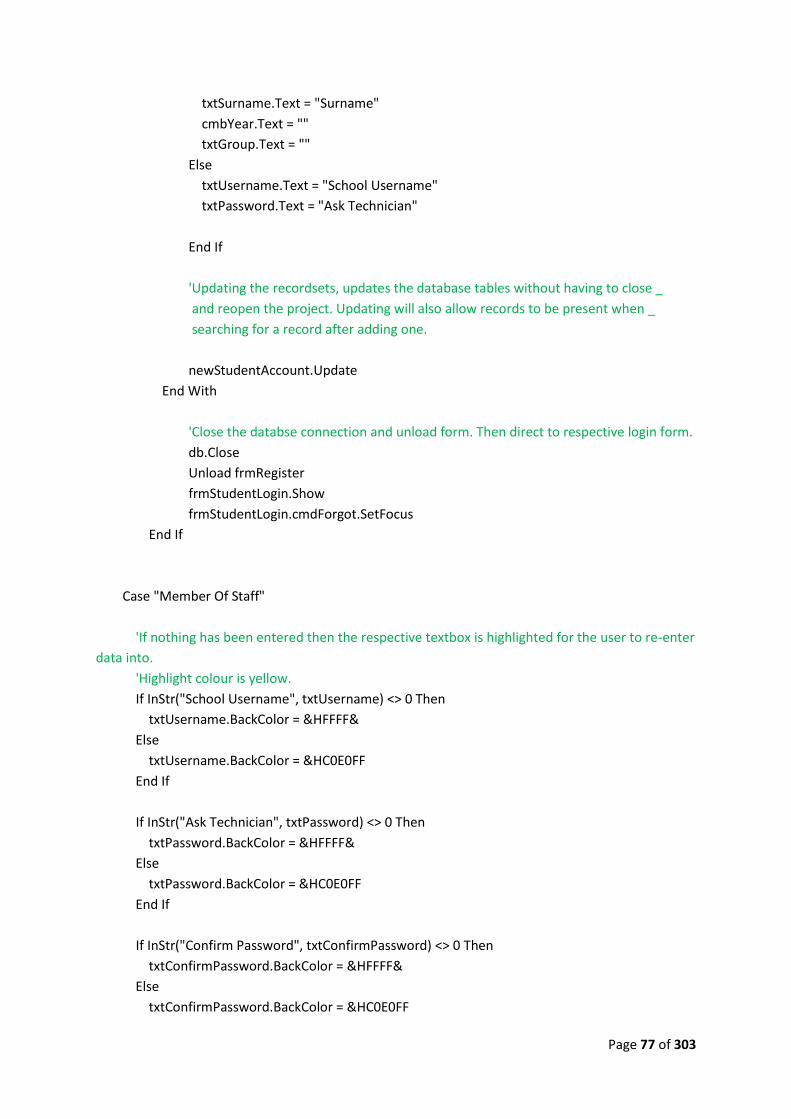
Page 77 of 303
txtSurname.Text = "Surname"
cmbYear.Text = ""
txtGroup.Text = ""
Else
txtUsername.Text = "School Username"
txtPassword.Text = "Ask Technician"
End If
'Updating the recordsets, updates the database tables without having to close _
and reopen the project. Updating will also allow records to be present when _
searching for a record after adding one.
newStudentAccount.Update
End With
'Close the databse connection and unload form. Then direct to respective login form.
db.Close
Unload frmRegister
frmStudentLogin.Show
frmStudentLogin.cmdForgot.SetFocus
End If
Case "Member Of Staff"
'If nothing has been entered then the respective textbox is highlighted for the user to re-enter
data into.
'Highlight colour is yellow.
If InStr("School Username", txtUsername) <> 0 Then
txtUsername.BackColor = &HFFFF&
Else
txtUsername.BackColor = &HC0E0FF
End If
If InStr("Ask Technician", txtPassword) <> 0 Then
txtPassword.BackColor = &HFFFF&
Else
txtPassword.BackColor = &HC0E0FF
End If
If InStr("Confirm Password", txtConfirmPassword) <> 0 Then
txtConfirmPassword.BackColor = &HFFFF&
Else
txtConfirmPassword.BackColor = &HC0E0FF

Page 78 of 303
End If
'When all the fields are not completed, a message alerting user should display.
If txtUsername = "School Username" Or txtPassword = "Ask Technician" Or
txtConfirmPassword = "Confirm Password" Then
MsgBox ("All fields are mandatory and need to be completed." + vbNewLine + vbNewLine +
_
"Please enter the details required in the highlighted fields.Then click the CREATE button."),
_
vbExclamation + vbOKOnly, "Details Error"
Exit Sub
Else
'Otherwise add the details ot the staff table in databse.
With newStaffAccount
.AddNew
.Fields("Alias").Value = cmbAlias.Text
.Fields("Username").Value = txtUsername.Text
.Fields("Password").Value = txtPassword.Text
'Inform user of successful data transfer.
MsgBox ("Your account has been created!" & vbNewLine & vbNewLine & "Please
remember the following details:" _
& vbNewLine & vbNewLine & "Username -" & " " & txtUsername & vbNewLine &
_
"And Your Password."), vbInformation, "Success!"
'Updating the recordsets, updates the database tables without having to close _
and reopen the project. Updating will also allow records to be present when _
searching for a record after adding one.
newStaffAccount.Update
End With
'Close the databse connection and unload form. Then display to respective login form.
db.Close
Unload frmRegister
frmStaffLogin.Show
frmStaffLogin.cmdForgot.SetFocus
End If
End Select
End Sub
Private Sub cmdCreate_GotFocus()

Page 79 of 303
'Loads the picture into the create account checkbox when it is selected via tab key.
Set cmdCreate.Picture = LoadPicture(App.Path & "\MYDATA\addbutton2.bmp")
End Sub
Private Sub cmdCreate_LostFocus()
'Loads the picture into the create account checkbox when it is deselected via tab key.
Set cmdCreate.Picture = LoadPicture(App.Path & "\MYDATA\addbutton1.bmp")
End Sub
Private Sub cmdCreate_MouseMove(Button As Integer, Shift As Integer, X As Single, Y As Single)
'Loads the picture into the create account checkbox when cursor hovers over the checkbox.
Set cmdCreate.Picture = LoadPicture(App.Path & "\MYDATA\addbutton2.bmp")
End Sub
Private Sub cmbAlias_Click()
'The appearance of the form depends on the option selected from this combobox.
'If a student is creating the account then more details are required in case the _
order needs to be searched to be updated in the future.
Select Case cmbAlias
'If the student option is selected then the picturebox containing the extra _
comboboxes and textboxes needs to be on display on the form.
'The following code moves the picturebox onto the form from the left. _
It also moves the create account checkbox further down so the structure _
of the form looks correct.
Case "Student"
'Check to see if a search of existing username is being done.
'If it is then there is no need to perform the swipe in effect.
If frmTempData.txtStatus <> "1" Then
Do Until picDetailsMove.Left < 10
picDetailsMove.Left = picDetailsMove.Left - 50
DoEvents
Loop
Do Until cmdCreate.Top > 4680

Page 80 of 303
cmdCreate.Top = cmdCreate.Top + 50
DoEvents
Loop
Else
picDetailsMove.Left = 0
cmdCreate.Top = 4681
End If
txtUsername.BackColor = &HC0E0FF
txtPassword.BackColor = &HC0E0FF
txtConfirmPassword.BackColor = &HC0E0FF
txtForename.BackColor = &HC0E0FF
txtSurname.BackColor = &HC0E0FF
cmbYear.BackColor = &HC0E0FF
txtGroup.BackColor = &HC0E0FF
txtUsername.ForeColor = &H80FF&
txtUsername = "School Username"
'To avoid the change in information text being masked by passwordchar.
txtPassword.PasswordChar = ""
txtPassword.ForeColor = &H80FF&
txtPassword = "School Password"
txtConfirmPassword.PasswordChar = ""
txtConfirmPassword.ForeColor = &H80FF&
txtConfirmPassword = "Confirm Password"
'With the moving of the create account checkbox further down, the tabIndex _
of the comboboxes and textboxes need to be changed so the student can enter _
data and move through the input boxes using the tab key.
cmbAlias.TabIndex = 0
txtUsername.TabIndex = 1
txtPassword.TabIndex = 2
txtConfirmPassword.TabIndex = 3
txtForename.TabIndex = 4
txtSurname.TabIndex = 5
cmbYear.TabIndex = 6
txtGroup.TabIndex = 7
cmdCreate.TabIndex = 8
'Similarly, if the member of staff option is selected then there is no need for _
the extra details picturebox to be on display on the form.

Page 81 of 303
'The following code moves the picturebox out of the form border. _
It also moves the create account checkbox back to original place on the form.
Case "Member Of Staff"
'Empty textbox that determines whether a search is done or not.
frmTempData.txtStatus = ""
'Remove extra options for students with swipe effec when member of staff is selected.
Do Until picDetailsMove.Left > 6960
picDetailsMove.Left = picDetailsMove.Left + 50
DoEvents
Loop
Do Until cmdCreate.Top < 3600
cmdCreate.Top = cmdCreate.Top - 50
DoEvents
Loop
txtUsername.BackColor = &HC0E0FF
txtPassword.BackColor = &HC0E0FF
txtConfirmPassword.BackColor = &HC0E0FF
txtForename.BackColor = &HC0E0FF
txtSurname.BackColor = &HC0E0FF
cmbYear.BackColor = &HC0E0FF
txtGroup.BackColor = &HC0E0FF
txtForename = "Forename"
txtForename.ForeColor = &H80FF&
txtSurname = "Surname"
txtSurname.ForeColor = &H80FF&
cmbYear.Text = ""
txtGroup = ""
txtUsername.ForeColor = &H80FF&
txtUsername = "School Username"
'To avoid the change in information text being masked by passwordchar.
txtPassword.PasswordChar = ""
txtPassword.ForeColor = &H80FF&
txtPassword = "School Password"
txtConfirmPassword.PasswordChar = ""
txtConfirmPassword.ForeColor = &H80FF&

Page 82 of 303
txtConfirmPassword = "Confirm Password"
'The staff will need a special numerical password to stop students creating a _
staff account. This will be known to the technician hence the text.
txtPassword = "Ask Technician"
'When the picturebox containing the input boxes for the extra details is not _
on display on the form, the tab index need to be reset so after txtPassword _
the member of staff can access the create account checkbox using the tab key.
cmbAlias.TabIndex = 0
txtUsername.TabIndex = 1
txtPassword.TabIndex = 2
txtConfirmPassword.TabIndex = 3
cmdCreate.TabIndex = 4
End Select
'Allow input once a selection in the cmbAlias combobox has been made.
txtUsername.Enabled = True
txtPassword.Enabled = True
txtConfirmPassword.Enabled = True
cmdCreate.Enabled = True
End Sub
Private Sub imgBackground_Click()
'Sets the focus on the image so the focus is lost on the current textbox.
If cmdCreate.Enabled = True Then
cmdCreate.SetFocus
Else
End If
End Sub
Private Sub imgBackground_MouseMove(Button As Integer, Shift As Integer, X As Single, Y As Single)
'Loads the picture into the create account when cursors hovers over background.
Set cmdCreate.Picture = LoadPicture(App.Path & "\MYDATA\addbutton1.bmp")
End Sub
Private Sub imgReturn_Click()

Page 83 of 303
'Displays the appropiate previous form based on the contents of txtType form.
If txtType.Text = "Student" Then
frmStudentLogin.Show
frmStudentLogin.cmdForgot.SetFocus
Else
frmStaffLogin.Show
frmStaffLogin.cmdForgot.SetFocus
End If
db.Close
'Unloads the form.
Unload frmRegister
Set frmRegister = Nothing
End Sub
Private Sub imgReturn_MouseMove(Button As Integer, Shift As Integer, X As Single, Y As Single)
'Loads the picture into the create account when cursors hovers over imgReturn.
Set imgReturn.Picture = LoadPicture(App.Path & "\MYDATA\returnup2.bmp")
End Sub
Private Sub imgReturnArea_MouseMove(Button As Integer, Shift As Integer, X As Single, Y As Single)
'Loads the picture into the create account when cursors hovers over imgReturnArea.
Set imgReturn.Picture = LoadPicture(App.Path & "\MYDATA\returnup1.bmp")
End Sub
Private Sub picDetailsMove_Click()
'Sets the focus on the image so the focus is lost on the current textbox.
cmdCreate.SetFocus
End Sub
Private Sub picDetailsMove_MouseMove(Button As Integer, Shift As Integer, X As Single, Y As Single)
'Loads the picture into the create account when cursors hovers over picturebox _
containing the ectra details.
Set cmdCreate.Picture = LoadPicture(App.Path & "\MYDATA\addbutton1.bmp")

Page 84 of 303
End Sub
Private Sub txtForename_GotFocus()
'Displays pop-up text when the cursor hovers over txtForename.
txtForename.ToolTipText = "Forename"
'Clear the textbox for username data entry.
If txtForename = "Forename" Then
txtForename = ""
txtForename.ForeColor = vbBlack
Else
End If
End Sub
Private Sub txtForename_KeyPress(KeyAscii As Integer)
'Uses Ascii in the keypress event to allow A-Z, a-z and backspace keypress only.
'This insures no numbers are inputted into the Forename textbox.
Select Case KeyAscii
Case 65 To 90, 97 To 122, 8
Case Else
KeyAscii = 0 'cancels input
End Select
'The database field length is set ot a maximum of 20.
'This limits the length of the input to 20 characters to avoid an error when saving.
txtForename.MaxLength = 20
End Sub
Private Sub txtForename_LostFocus()
'Reverts the textbox into original settings if no input is present.
If txtForename = "" Then
txtForename.ForeColor = &H80FF&
txtForename = "Forename"
Else
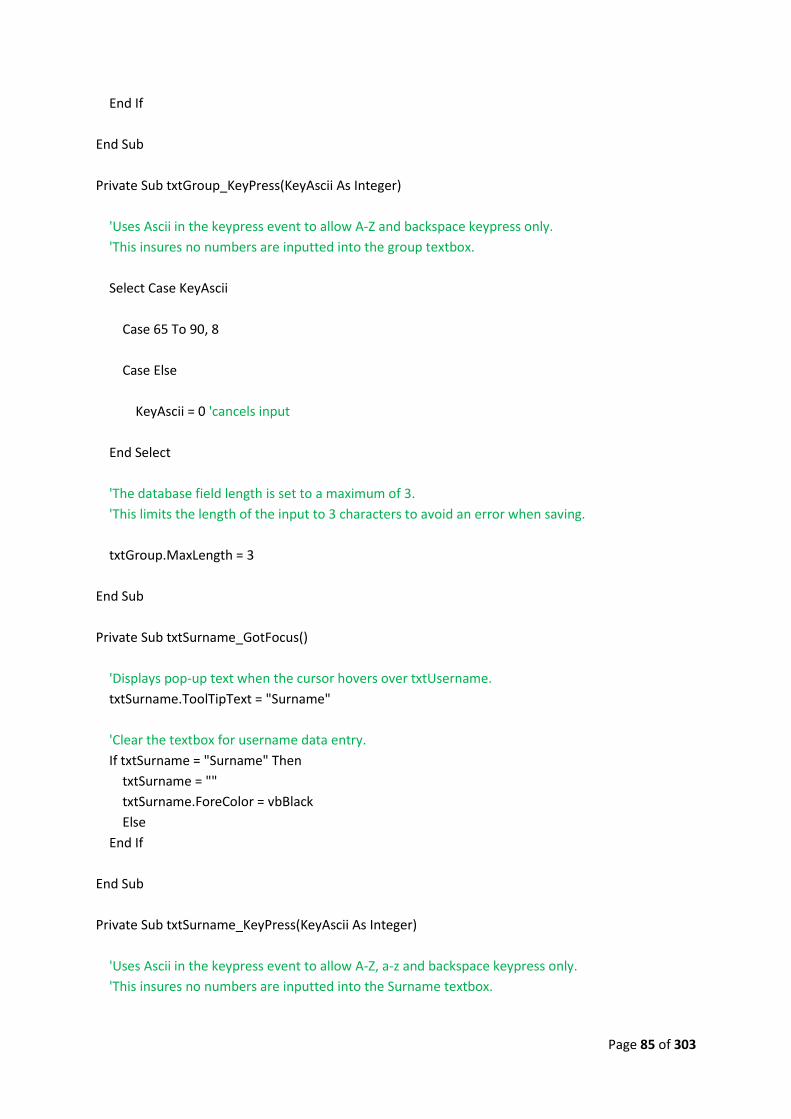
Page 85 of 303
End If
End Sub
Private Sub txtGroup_KeyPress(KeyAscii As Integer)
'Uses Ascii in the keypress event to allow A-Z and backspace keypress only.
'This insures no numbers are inputted into the group textbox.
Select Case KeyAscii
Case 65 To 90, 8
Case Else
KeyAscii = 0 'cancels input
End Select
'The database field length is set to a maximum of 3.
'This limits the length of the input to 3 characters to avoid an error when saving.
txtGroup.MaxLength = 3
End Sub
Private Sub txtSurname_GotFocus()
'Displays pop-up text when the cursor hovers over txtUsername.
txtSurname.ToolTipText = "Surname"
'Clear the textbox for username data entry.
If txtSurname = "Surname" Then
txtSurname = ""
txtSurname.ForeColor = vbBlack
Else
End If
End Sub
Private Sub txtSurname_KeyPress(KeyAscii As Integer)
'Uses Ascii in the keypress event to allow A-Z, a-z and backspace keypress only.
'This insures no numbers are inputted into the Surname textbox.

Page 86 of 303
Select Case KeyAscii
Case 65 To 90, 97 To 122, 8
Case Else
KeyAscii = 0 'cancels input
End Select
'The database field length is set ot a maximum of 20.
'This limits the length of the input to 20 characters to avoid an error when saving.
txtSurname.MaxLength = 20
End Sub
Private Sub txtSurname_LostFocus()
'Reverts the textbox into original settings if no input present.
If txtSurname = "" Then
txtSurname.ForeColor = &H80FF&
txtSurname = "Surname"
Else
End If
End Sub
Private Sub txtUsername_GotFocus()
'Displays pop-up text when the cursor hovers over txtUsername.
txtUsername.ToolTipText = "Enter your school username."
'Clear the textbox for username data entry.
If txtUsername = "School Username" Then
txtUsername = ""
txtUsername.ForeColor = vbBlack
Else
End If
End Sub
Private Sub txtUsername_KeyPress(KeyAscii As Integer)
'Database field length set to maximum 20 charcaters so code to avoid error when saving.

Page 87 of 303
txtUsername.MaxLength = 20
End Sub
Private Sub txtUsername_LostFocus()
'Reverts the textbox into original settings if no password is input.
If txtUsername = "" Then
txtUsername.ForeColor = &H80FF&
txtUsername = "School Username"
frmTempData.txtStatus = ""
Else
End If
'----------------------------------------------------------------------------------------
' Checks whether the username being used exists in the database.
'----------------------------------------------------------------------------------------
SearchUsername = txtUsername.Text
SearchPhrase = "%" & SearchUsername & "%"
'Checks that the username input does not already exist.
'Searches only if conditions are met.
If SearchUsername <> "" And SearchUsername <> "School Username" Then
'Changes the SQL statement to search by comparing the username entered with the database
fields.
pSQL = "SELECT*FROM tblStaffDetails WHERE [Username] LIKE " & "'" & SearchPhrase & "'" & ""
qSQL = "SELECT*FROM tblStudentDetails WHERE [Username] LIKE " & "'" & SearchPhrase & "'" &
""
Else
'If conditions are not met then cancel sub procedure.
Exit Sub
End If
newStaffAccount.Close
newStudentAccount.Close
If cmbAlias = "Member Of Staff" Then
With newStaffAccount
.ActiveConnection = db
.LockType = adLockOptimistic
.CursorType = adOpenKeyset
.Open pSQL
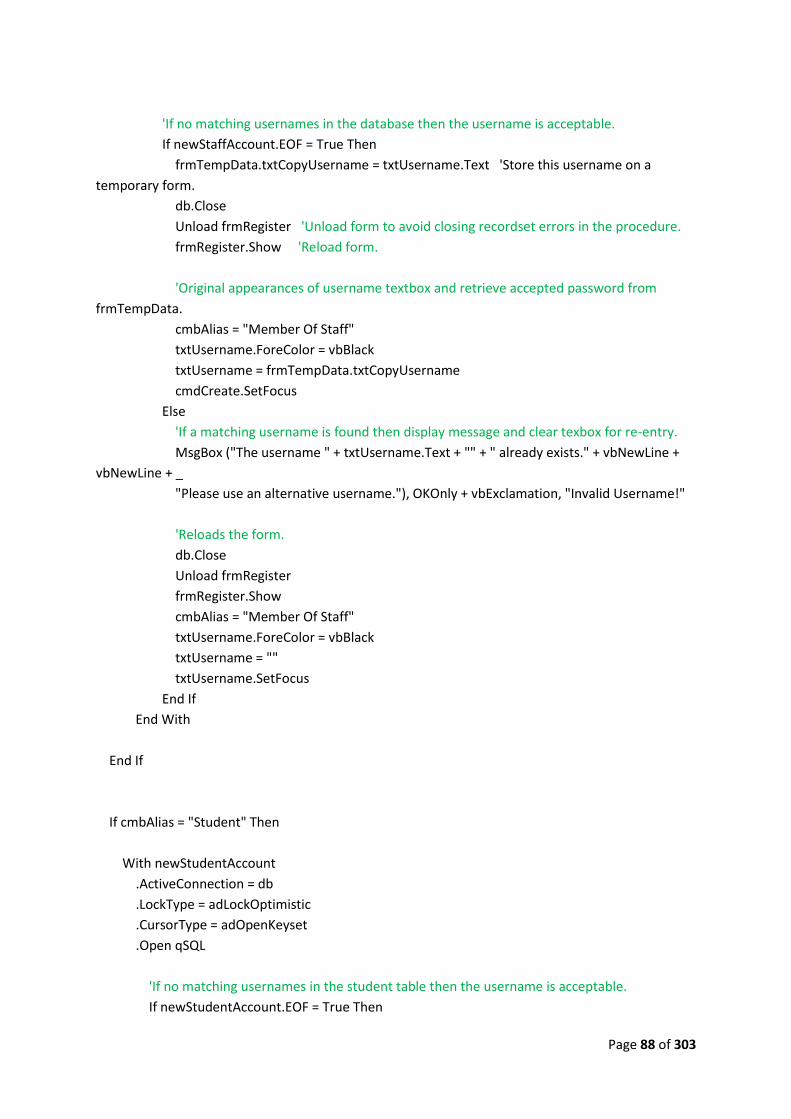
Page 88 of 303
'If no matching usernames in the database then the username is acceptable.
If newStaffAccount.EOF = True Then
frmTempData.txtCopyUsername = txtUsername.Text 'Store this username on a
temporary form.
db.Close
Unload frmRegister 'Unload form to avoid closing recordset errors in the procedure.
frmRegister.Show 'Reload form.
'Original appearances of username textbox and retrieve accepted password from
frmTempData.
cmbAlias = "Member Of Staff"
txtUsername.ForeColor = vbBlack
txtUsername = frmTempData.txtCopyUsername
cmdCreate.SetFocus
Else
'If a matching username is found then display message and clear texbox for re-entry.
MsgBox ("The username " + txtUsername.Text + "" + " already exists." + vbNewLine +
vbNewLine + _
"Please use an alternative username."), OKOnly + vbExclamation, "Invalid Username!"
'Reloads the form.
db.Close
Unload frmRegister
frmRegister.Show
cmbAlias = "Member Of Staff"
txtUsername.ForeColor = vbBlack
txtUsername = ""
txtUsername.SetFocus
End If
End With
End If
If cmbAlias = "Student" Then
With newStudentAccount
.ActiveConnection = db
.LockType = adLockOptimistic
.CursorType = adOpenKeyset
.Open qSQL
'If no matching usernames in the student table then the username is acceptable.
If newStudentAccount.EOF = True Then

Page 89 of 303
frmTempData.txtCopyUsername = txtUsername.Text 'Store this username on a
temporary form.
frmTempData.txtStatus = "1"
db.Close
Unload frmRegister 'Unload form to avoid closing recordset errors in the procedure.
frmRegister.Show 'Reload form.
'Original appearances of username textbox and retrieve accepted password from
frmTempData.
cmbAlias = "Student"
txtUsername.ForeColor = vbBlack
txtUsername = frmTempData.txtCopyUsername
cmdCreate.SetFocus
Else
'If a matching username is found then display message and clear texbox for re-entry.
MsgBox ("The username " + txtUsername.Text + "" + " already exists." + vbNewLine +
vbNewLine + _
"Please use an alternative username."), OKOnly + vbExclamation, "Invalid Username!"
'Reloads the form.
frmTempData.txtStatus = "1"
db.Close
Unload frmRegister
frmRegister.Show
cmbAlias = "Student"
txtUsername.ForeColor = vbBlack
txtUsername = ""
txtUsername.SetFocus
End If
End With
End If
End Sub
Private Sub txtPassword_GotFocus()
'Code to protect password from being visible by replacing characters entered into textbox with
asterisks.
txtPassword.PasswordChar = "*"
'Displays pop-up text when the cursor hovers over txtPassword.
txtPassword.ToolTipText = "School Password"
'Clear the textbox for password data entry.

Page 90 of 303
If txtPassword = "School Password" Or txtPassword = "Ask Technician" Then
txtPassword = ""
txtPassword.ForeColor = vbBlack
Else
End If
txtPassword.MaxLength = 30
End Sub
Private Sub txtPassword_LostFocus()
'Reverts the textbox into original settings if no password is input.
If txtPassword = "" And cmbAlias = "Student" Then
txtPassword.ForeColor = &H80FF&
txtPassword.PasswordChar = ""
txtPassword = "School Password"
Else
End If
'Reverts the textbox to display the following if a member of staff has been selected _
in the cmbAlias combobox.
If txtPassword = "" And cmbAlias = "Member Of Staff" Then
txtPassword.ForeColor = &H80FF&
txtPassword.PasswordChar = ""
txtPassword = "Ask Technician"
Else
End If
End Sub
Private Sub txtConfirmPassword_GotFocus()
'Code to protect confirmation password from being visible by replacing characters entered _
into textbox with asterisks.
txtConfirmPassword.PasswordChar = "*"
'Displays pop-up text when the cursor hovers over txtConfirmPassword.
txtConfirmPassword.ToolTipText = "Confirm Your Password"
'Clear the textbox for password data entry.
If txtConfirmPassword = "Confirm Password" Then
txtConfirmPassword = ""
txtConfirmPassword.ForeColor = vbBlack
Else

Page 91 of 303
End If
txtConfirmPassword.MaxLength = 30
End Sub
Private Sub txtConfirmPassword_LostFocus()
'----------------------------------------------------------------------------------------
' Verification of two passwords by comparison on lostfocus.
'----------------------------------------------------------------------------------------
'Reverts the textbox into original settings if no password is input.
If txtConfirmPassword = "" And cmbAlias = "Student" Then
txtConfirmPassword.ForeColor = &H80FF&
txtConfirmPassword.PasswordChar = ""
txtConfirmPassword = "Confirm Password"
Else
End If
'Reverts the textbox to display the following if a member of staff has been selected _
in the cmbAlias combobox.
If txtConfirmPassword = "" And cmbAlias = "Member Of Staff" Then
txtConfirmPassword.ForeColor = &H80FF&
txtConfirmPassword.PasswordChar = ""
txtConfirmPassword = "Confirm Password"
Else
End If
'Comprehensive check by comparing the textboxes for password input to ensure either password
is verified.
If txtConfirmPassword <> "Confirm Password" Then
If txtConfirmPassword.Text <> txtPassword.Text Then
MsgBox ("Your passwords did not match up." + vbNewLine + vbNewLine + _
"Please ensure your passwords are entered correctly."), vbExclamation + vbOKOnly,
"Password Error"
txtConfirmPassword.PasswordChar = ""
txtConfirmPassword = "Confirm Password"
txtConfirmPassword.ForeColor = &H80FF&
txtPassword = ""
txtPassword.SetFocus
Else
End If
Else
'If nothing is entered in the confirm password textbox but something is entered in the _

Page 92 of 303
password textbox.
If txtConfirmPassword = "Confirm Password" And txtPassword <> "School Password" Then
If txtConfirmPassword = "Confirm Password" And txtPassword = "Ask Technician" Then
Else
MsgBox ("Your passwords did not match up." + vbNewLine + vbNewLine + _
"Please ensure your passwords are entered correctly."), vbExclamation + vbOKOnly,
"Password Error"
txtConfirmPassword.PasswordChar = ""
txtConfirmPassword = "Confirm Password"
txtConfirmPassword.ForeColor = &H80FF&
txtPassword = ""
txtPassword.SetFocus
End If
End If
End If
End Sub
Private Sub cmbYear_KeyPress(KeyAscii As Integer)
'Uses Ascii in the keypress event to allow 0-9 and backspace keypress only.
'This insures no letters are inputted into the Year group textbox.
Select Case KeyAscii
Case 48 To 57, 8
Case Else
KeyAscii = 0 'cancels input
End Select
End Sub
Private Sub tmrTime_Timer()
'Code to display current time in lblTime.
lblTime.Caption = Time
End Sub
-----------------------------------------------------------------------------------------------------------------
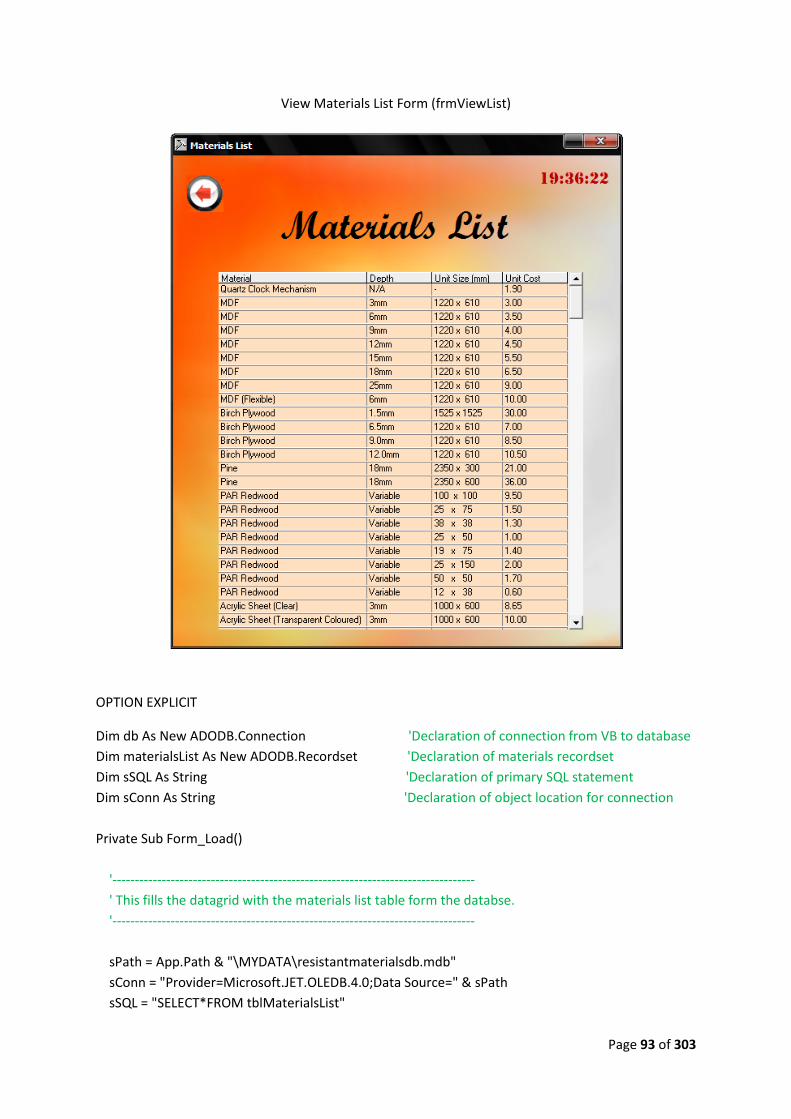
Page 93 of 303
View Materials List Form (frmViewList)
OPTION EXPLICIT
Dim db As New ADODB.Connection 'Declaration of connection from VB to database
Dim materialsList As New ADODB.Recordset 'Declaration of materials recordset
Dim sSQL As String 'Declaration of primary SQL statement
Dim sConn As String 'Declaration of object location for connection
Private Sub Form_Load()
'---------------------------------------------------------------------------------
' This fills the datagrid with the materials list table form the databse.
'---------------------------------------------------------------------------------
sPath = App.Path & "\MYDATA\resistantmaterialsdb.mdb"
sConn = "Provider=Microsoft.JET.OLEDB.4.0;Data Source=" & sPath
sSQL = "SELECT*FROM tblMaterialsList"
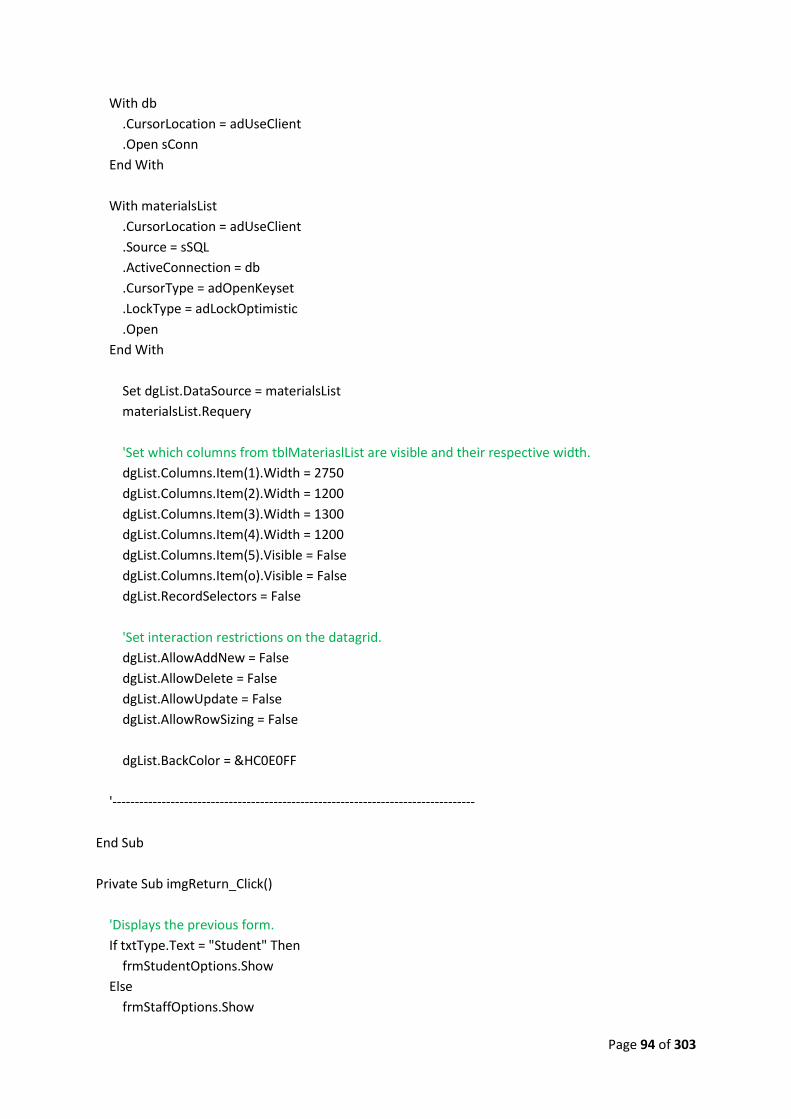
Page 94 of 303
With db
.CursorLocation = adUseClient
.Open sConn
End With
With materialsList
.CursorLocation = adUseClient
.Source = sSQL
.ActiveConnection = db
.CursorType = adOpenKeyset
.LockType = adLockOptimistic
.Open
End With
Set dgList.DataSource = materialsList
materialsList.Requery
'Set which columns from tblMateriaslList are visible and their respective width.
dgList.Columns.Item(1).Width = 2750
dgList.Columns.Item(2).Width = 1200
dgList.Columns.Item(3).Width = 1300
dgList.Columns.Item(4).Width = 1200
dgList.Columns.Item(5).Visible = False
dgList.Columns.Item(o).Visible = False
dgList.RecordSelectors = False
'Set interaction restrictions on the datagrid.
dgList.AllowAddNew = False
dgList.AllowDelete = False
dgList.AllowUpdate = False
dgList.AllowRowSizing = False
dgList.BackColor = &HC0E0FF
'---------------------------------------------------------------------------------
End Sub
Private Sub imgReturn_Click()
'Displays the previous form.
If txtType.Text = "Student" Then
frmStudentOptions.Show
Else
frmStaffOptions.Show

Page 95 of 303
End If
'Unloads the form.
Unload frmViewList1
Set frmViewList1 = Nothing
End Sub
Private Sub imgReturnArea_MouseMove(Button As Integer, Shift As Integer, X As Single, Y As Single)
'Loads the picture into the return imagebox to add to the mouseover effect.
'The code is placed in this subprocedure because cursor movement on the background image _
causes the picture to be loaded frequently and hence creates an unwanted flickering effect.
Set imgReturn.Picture = LoadPicture(App.Path & "\MYDATA\returnup1.bmp")
End Sub
Private Sub imgReturn_MouseMove(Button As Integer, Shift As Integer, X As Single, Y As Single)
'Loads a different variation of the existing picture into the return imagebox to create a mouseover
effect.
Set imgReturn.Picture = LoadPicture(App.Path & "\MYDATA\returnup2.bmp")
End Sub
Private Sub tmrTime_Timer()
'Code to display current time in label.
lblTime.Caption = Time
End Sub
-----------------------------------------------------------------------------------------------------------------

Page 96 of 303
Edit Materials List Form (frmEditList)
OPTION EXPLICIT
Dim db As New ADODB.Connection 'Declaration of connection from VB to database
Dim materialsList As New ADODB.Recordset 'Declaration of materials recordset
Dim sSQL As String 'Declaration of primary SQL statement
Dim sConn As String 'Declaration of object location for connection
Private Sub Form_Load()
'---------------------------------------------------------------------------------
' This fills the datagrid with the materials list table form the database.
'---------------------------------------------------------------------------------
sPath = App.Path & "\MYDATA\resistantmaterialsdb.mdb"
sConn = "Provider=Microsoft.JET.OLEDB.4.0;Data Source=" & sPath

Page 97 of 303
sSQL = "SELECT*FROM tblMaterialsList"
With db
.CursorLocation = adUseClient
.Open sConn
End With
With materialsList
.CursorLocation = adUseClient
.Source = sSQL
.ActiveConnection = db
.CursorType = adOpenKeyset
.LockType = adLockOptimistic
.Open
End With
Set dgList.DataSource = materialsList
materialsList.Requery
'Set which columns from tblMateriaslList are visible and their respective width.
dgList.Columns.Item(1).Width = 2700
dgList.Columns.Item(2).Width = 1150
dgList.Columns.Item(3).Width = 1250
dgList.Columns.Item(4).Width = 1000
dgList.Columns.Item(0).Visible = False
dgList.Columns.Item(5).Visible = False
dgList.BackColor = &HC0E0FF 'Light orange.
'Allow the staff member to amnipulate the materials list through the datagrid.
dgList.AllowAddNew = False
dgList.AllowDelete = True
dgList.AllowUpdate = True
'---------------------------------------------------------------------------------
lblEg.Visible = False 'hide the example input intially.
End Sub
Private Sub cmdAdd_Click()
'Perform a check to see if all material information has been completed before adding.
If txtMaterial = "" Or txtDepth = "" Or txtUnitSize1 = "" Or txtUnitSize2 = "" Or txtUnitCost = ""
Then

Page 98 of 303
MsgBox ("Please ensure all material information has been completed!"), vbExclamation,
"Material Info"
Exit Sub
Else
'Add the data on the form to the database in the respective fields.
With materialsList
.AddNew
.Fields("Material").Value = txtMaterial
.Fields("Depth").Value = txtDepth
.Fields("Unit Size (mm)").Value = txtUnitSize1 + " " + "x" + " " + txtUnitSize2
.Fields("Unit Cost").Value = txtUnitCost
End With
End If
materialsList.Requery
'Clear all the input boxes after the adding of the material.
txtMaterial = ""
txtDepth = ""
txtUnitSize1 = ""
txtUnitSize2 = ""
txtUnitCost = ""
'Set which columns from tblMateriaslList are visible and their respective width.
dgList.Columns.Item(1).Width = 2700
dgList.Columns.Item(2).Width = 1150
dgList.Columns.Item(3).Width = 1250
dgList.Columns.Item(4).Width = 1000
dgList.Columns.Item(0).Visible = False
dgList.Columns.Item(5).Visible = False
lblEg.Visible = False
cmdHelp.SetFocus
End Sub
Private Sub cmdClear_Click()
'Clear all the input boxes.
txtMaterial = ""
txtDepth = ""
txtUnitSize1 = ""
txtUnitSize2 = ""

Page 99 of 303
txtUnitCost = ""
lblEg.Visible = False
cmdHelp.SetFocus
End Sub
Private Sub cmdAdd_MouseMove(Button As Integer, Shift As Integer, X As Single, Y As Single)
'Mouseover effect.
cmdAdd.BackColor = &HFF00& 'darker green
End Sub
Private Sub cmdClear_MouseMove(Button As Integer, Shift As Integer, X As Single, Y As Single)
'Mouseover effect.
cmdClear.BackColor = &H8080FF 'darker red
End Sub
Private Sub dgList_BeforeDelete(Cancel As Integer)
'Prompt a message when deleting and cancel if no is selected.
If MsgBox("Are you sure you want to delete this item?", vbYesNo + vbQuestion, "Item Delete") =
vbNo Then
Cancel = True
Else
End If
End Sub
Private Sub imgBackground_Click()
'Sets the focus onto the command button.
cmdHelp.SetFocus
'Hides the example input data.
lblEg.Visible = False
End Sub
Private Sub imgBackground_MouseMove(Button As Integer, Shift As Integer, X As Single, Y As Single)

Page 100 of 303
'Cancelling mouseover effect on cmdHelp.
cmdHelp.BackColor = vbWhite
'Setting the command boxes to their original appearance.
cmdAdd.BackColor = &HC0FFC0
cmdClear.BackColor = &HC0C0FF
End Sub
Private Sub imgReturn_Click()
dgList.Refresh
'Displays the staff options form.
frmStaffOptions.Show
'Unloads the form.
Unload frmEditList
Set frmEditList = Nothing
End Sub
Private Sub imgReturnArea_MouseMove(Button As Integer, Shift As Integer, X As Single, Y As Single)
'Loads the picture into the return imagebox to add to the mouseover effect.
'The code is placed in this subprocedure because cursor movement on the background image _
causes the picture to be loaded frequently and hence creates an unwanted flickering effect.
Set imgReturn.Picture = LoadPicture(App.Path & "\MYDATA\returnup1.bmp")
End Sub
Private Sub imgReturn_MouseMove(Button As Integer, Shift As Integer, X As Single, Y As Single)
'Loads a different variation of the existing picture into the return imagebox to create a mouseover
effect.
Set imgReturn.Picture = LoadPicture(App.Path & "\MYDATA\returnup2.bmp")
End Sub
Private Sub cmdHelp_Click()
'Display help message when button is clicked on.
MsgBox ("To edit the material details simply click on the area to highlight and then edit." _
+ vbNewLine + vbNewLine + "To delete a material simply click the tab on the left to highlight it
and press the DELETE key." _

Page 101 of 303
+ vbNewLine + vbNewLine + "All changes are saved automatically."), vbOKOnly +
vbInformation, "Help"
cmdHelp.BackColor = vbWhite
End Sub
Private Sub cmdHelp_MouseMove(Button As Integer, Shift As Integer, X As Single, Y As Single)
'Mouse over effect turning button red.
cmdHelp.BackColor = vbRed
End Sub
Private Sub lblEg_Click()
'Hide the example input when the textbox is in focus.
lblEg.Visible = False
cmdHelp.SetFocus
End Sub
Private Sub tmrTime_Timer()
'Code to display current time in label.
lblTime.Caption = Time
End Sub
Private Sub txtDepth_GotFocus()
'Display the example input when the textbox is in focus.
lblEg.Visible = True
End Sub
Private Sub txtDepth_KeyPress(KeyAscii As Integer)
'This limits the max number of acharcters in the textbox to 6.
txtDepth.MaxLength = 6
End Sub

Page 102 of 303
Private Sub txtMaterial_GotFocus()
'Display the example input when the textbox is in focus.
lblEg.Visible = True
End Sub
Private Sub txtMaterial_KeyPress(KeyAscii As Integer)
'Uses Ascii in the keypress event to allow A-Z, a-z and backspace keypress only.
'This insures no numbers are inputted into the materials textbox.
Select Case KeyAscii
Case 65 To 90, 97 To 122, 8
Case Else
KeyAscii = 0 'cancels input
End Select
'This limits the length of the input to 30 characters to avoid an error when saving.
txtMaterial.MaxLength = 30
End Sub
Private Sub txtUnitCost_GotFocus()
'Display the example input when the textbox is in focus.
lblEg.Visible = True
End Sub
Private Sub txtUnitCost_KeyPress(KeyAscii As Integer)
'Uses Ascii in the keypress event to allow 0-9 and backspace keypress only.
'This insures no letters are inputted into the unit size textbox.
Select Case KeyAscii
Case 48 To 57, 8, 46 '46 = period key [.]

Page 103 of 303
Case Else
KeyAscii = 0 'cancels input
End Select
'Sets the maximum length of the unit size textbox to 5.
txtUnitCost.MaxLength = 5
End Sub
Private Sub txtUnitSize1_GotFocus()
'Display the example input when the textbox is in focus.
lblEg.Visible = True
End Sub
Private Sub txtUnitSize1_KeyPress(KeyAscii As Integer)
'Uses Ascii in the keypress event to allow 0-9 and backspace keypress only.
'This insures no letters are inputted into the unit cost textbox.
Select Case KeyAscii
Case 48 To 57, 8
Case Else
KeyAscii = 0 'cancels input
End Select
'Sets the maximum length of the unit cost textbox to 4.
txtUnitSize1.MaxLength = 4
End Sub
Private Sub txtUnitSize2_GotFocus()
'Display the example input when the textbox is in focus.
lblEg.Visible = True
End Sub

Page 104 of 303
Private Sub dgList_Click()
'Hide the example input when the textbox is in focus.
lblEg.Visible = False
End Sub
Private Sub txtUnitSize2_KeyPress(KeyAscii As Integer)
'Uses Ascii in the keypress event to allow 0-9 and backspace keypress only.
'This insures no letters are inputted into the unit size textbox.
Select Case KeyAscii
Case 48 To 57, 8
Case Else
KeyAscii = 0 'cancels input
End Select
'Sets the maximum length of the unit size textbox to 4.
txtUnitSize2.MaxLength = 4
End Sub
-----------------------------------------------------------------------------------------------------------------

Page 105 of 303
Edit Materials List Form (frmEditList)
OPTION EXPLICIT
Dim db As New ADODB.Connection 'Declaration of connection from VB to database
Dim studentAccount As New ADODB.Recordset 'Declaration of students recordset
Dim sConn As String 'Declaration of object location for connection
Dim sSQL As String 'Declaration of primary SQL statement
Dim rSQL As String 'Declaration of secondary SQL statement.
Dim SearchUsername As String 'Declaration of string used for variable Username
Dim SearchPhrase1 As String 'Declaration of string used for variable SearchUsername
Dim SearchYear As String 'Declaration of string used for variable Year Group
Dim SearchPhrase2 As String 'Declaration of string used for variable SearchYear
Dim SearchGroup As String 'Declaration of string used for variable Group
Dim SearchPhrase3 As String 'Declaration of string used for variable SearchGroup
Private Sub Form_Load()
'Loads the pictures into the imageboxes.
Set imgBackground.Picture = LoadPicture(App.Path & "\MYDATA\background1.bmp")
Set imgReturn.Picture = LoadPicture(App.Path & "\MYDATA\returnup1.bmp")
Set cmdRemind.Picture = LoadPicture(App.Path & "\MYDATA\remind2.bmp")
'-----------------------------------------------------------------------------------
' This sub procedure opens the recordset on the loading of the form.

Page 106 of 303
'-----------------------------------------------------------------------------------
sPath = App.Path & "\MYDATA\resistantmaterialsdb.mdb"
sConn = "Provider=Microsoft.JET.OLEDB.4.0;Data Source=" & sPath
sSQL = "SELECT*FROM tblStudentDetails"
db.ConnectionString = sConn
db.Open
'Setting connection between recordset and customer table in database.
With studentAccount
.ActiveConnection = db
.LockType = adLockOptimistic
.CursorType = adOpenKeyset
.Open sSQL
End With
'-----------------------------------------------------------------------------------
End Sub
Private Sub cmdRemind_Click()
'----------------------------------------------------------------------------------
' This sub procedure searches for the students password to display on the form.
'----------------------------------------------------------------------------------
'Perform a check to avoid errors when the input boxes are incomplete.
If txtUsername = "" Or cmbYear = "" Or txtGroup = "" Then
MsgBox ("Please ensure all details have been completed!"), vbExclamation, "Details"
Exit Sub
Else
SearchUsername = txtUsername
SearchYear = cmbYear.Text
SearchGroup = txtGroup
SearchPhrase1 = "%" & SearchUsername & "%"
SearchPhrase2 = "%" & SearchClass & "%"
SearchPhrase3 = "%" & SearchGroup & "%"
rSQL = "SELECT*FROM tblStudentDetails WHERE [Username] LIKE " & "'" & SearchPhrase1 & "'"
& " AND [StudentYear] LIKE " & "'" & SearchPhrase2 & "'" & " AND [StudentGroup] LIKE " & "'" &
SearchPhrase3 & "'" & ""
studentAccount.Close

Page 107 of 303
'Displays details of searched record in locked textboxes.
With studentAccount
.ActiveConnection = db
.LockType = adLockOptimistic
.CursorType = adOpenKeyset
.Open rSQL
lblPassword.Caption = .Fields("Password").Value
End With
'Starts the timer for the password.
tmrPassword.Interval = 500
End If
End Sub
Private Sub cmdRemind_MouseMove(Button As Integer, Shift As Integer, X As Single, Y As Single)
'Loads the picture into the create account checkbox when cursor hovers over the checkbox.
Set cmdRemind.Picture = LoadPicture(App.Path & "\MYDATA\remind2.bmp")
End Sub
Private Sub imgBackground_Click()
'Sets the focus on command button cmdremind.
cmdRemind.SetFocus
End Sub
Private Sub imgBackground_MouseMove(Button As Integer, Shift As Integer, X As Single, Y As Single)
'Loads the picture into the create account when cursors hovers over background.
Set cmdRemind.Picture = LoadPicture(App.Path & "\MYDATA\remind1.bmp")
End Sub
Private Sub imgReturn_Click()
'Displays the previous form.
If txtType.Text = "Student" Then
frmStudentLogin.Show
frmStudentLogin.cmdForgot.SetFocus

Page 108 of 303
Else
frmStaffLogin.Show
frmStaffLogin.cmdForgot.SetFocus
End If
'Unloads the form.
Unload frmPassword
End Sub
Private Sub imgReturnArea_MouseMove(Button As Integer, Shift As Integer, X As Single, Y As Single)
'Loads the picture into the return imagebox to add to the mouseover effect.
'The code is placed in this subprocedure because cursor movement on the background image _
causes the picture to be loaded frequently and hence creates an unwanted flickering effect.
Set imgReturn.Picture = LoadPicture(App.Path & "\MYDATA\returnup1.bmp")
End Sub
Private Sub imgReturn_MouseMove(Button As Integer, Shift As Integer, X As Single, Y As Single)
'Loads a different variation of the existing picture into the return imagebox to create a mouseover
effect.
Set imgReturn.Picture = LoadPicture(App.Path & "\MYDATA\returnup2.bmp")
End Sub
Private Sub lblPassword_Click()
'Sets the focus on command button cmdremind.
cmdRemind.SetFocus
End Sub
Private Sub tmrPassword_Timer()
'Approximately 5 seconds after which the password is removed from the form.
If txtTimer > 3 Then
lblPassword.Caption = ""
tmrPassword.Interval = 0
txtTimer = "0"
Else
End If
txtTimer = Val(txtTimer) + 1

Page 109 of 303
End Sub
Private Sub tmrTime_Timer()
'Code to display current time in label.
lblTime.Caption = Time
End Sub
Private Sub txtGroup_KeyPress(KeyAscii As Integer)
'Uses Ascii in the keypress event to allow A-Z and backspace keypress only.
'This insures no numbers are inputted into the group textbox.
Select Case KeyAscii
Case 65 To 90, 8
Case Else
KeyAscii = 0 'cancels input
End Select
'The database field length is set ot a maximum of 3.
'This limits the length of the input to 3 characters to avoid an error when saving.
txtGroup.MaxLength = 3
End Sub
Private Sub cmbYear_KeyPress(KeyAscii As Integer)
'Uses Ascii in the keypress event to allow 0-9 and backspace keypress only.
'This insures no letters are inputted into the Year group textbox.
Select Case KeyAscii
Case 48 To 57, 8
Case Else
KeyAscii = 0 'cancels input

Page 110 of 303
End Select
End Sub
Private Sub txtUsername_GotFocus()
'Displays pop-up text when the cursor hovers over txtUsername.
txtUsername.ToolTipText = "Enter your school username."
'Clear the textbox for username data entry.
If txtUsername = "School Username" Then
txtUsername = ""
txtUsername.ForeColor = vbBlack
Else
End If
End Sub
Private Sub txtUsername_LostFocus()
'Reverts the textbox into original settings if no username is input.
If txtUsername = "" Then
txtUsername.ForeColor = &H80FF&
txtUsername = "School Username"
frmTempData.txtStatus = ""
Else
End If
End Sub
Private Sub txtClass_GotFocus()
'Displays pop-up text when the cursor hovers over txtUsername.
txtClass.ToolTipText = "Enter your technology class."
'Clear the textbox for class details data entry.
If txtClass = "Technology Class" Then
txtClass = ""
txtClass.ForeColor = vbBlack
Else
End If
End Sub
Private Sub txtClass_LostFocus()

Page 111 of 303
'Reverts the textbox into original settings if no class details are input.
If txtClass = "" Then
txtClass.ForeColor = &H80FF&
txtClass = "Technology Class"
Else
End If
End Sub
-----------------------------------------------------------------------------------------------------------------
Student Options Form (frmStudentOptions)
OPTION EXPLICIT
Private Sub Form_Load()
'Loads the pictures into the imageboxes.
Set imgBackground.Picture = LoadPicture(App.Path & "\MYDATA\welcomebackground.bmp")
Set imgLogOut.Picture = LoadPicture(App.Path & "\MYDATA\logout1.bmp")
Set picEditAbove.Picture = LoadPicture(App.Path & "\MYDATA\editabove2.gif")
Set picViewAbove.Picture = LoadPicture(App.Path & "\MYDATA\findabove2.gif")
Set picOrderAbove.Picture = LoadPicture(App.Path & "\MYDATA\orderabove2.gif")
Set picPrintAbove.Picture = LoadPicture(App.Path & "\MYDATA\printabove2.gif")
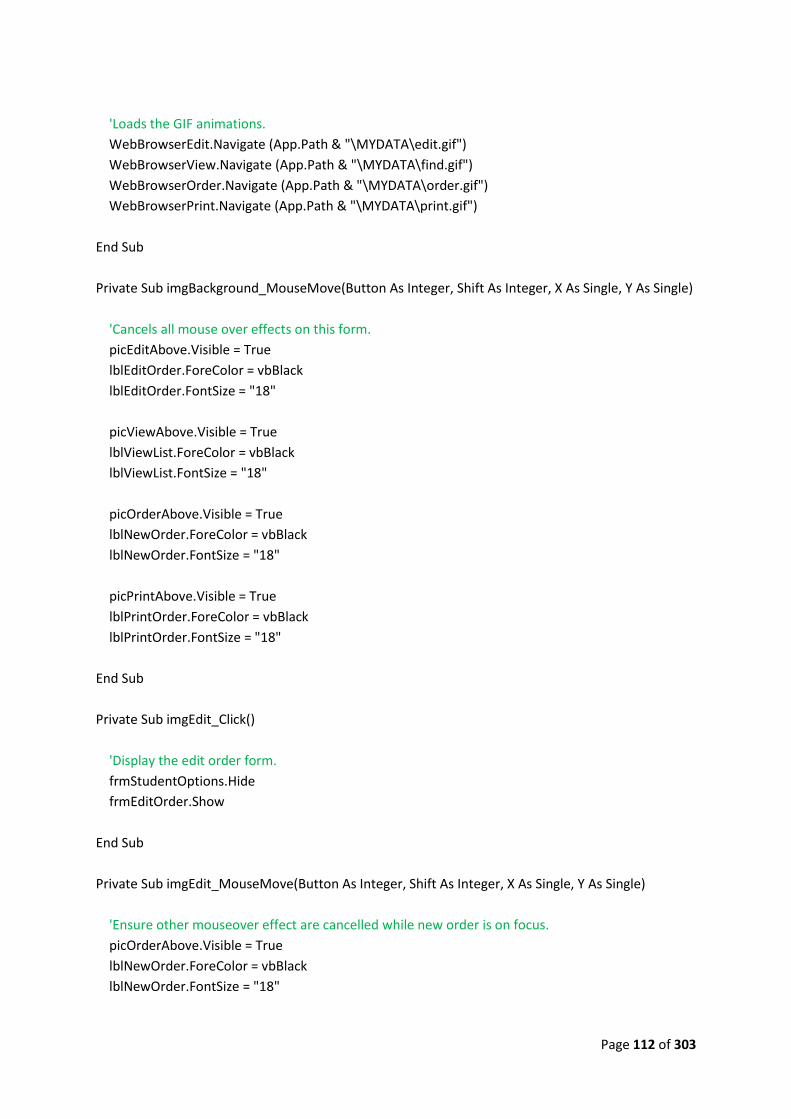
Page 112 of 303
'Loads the GIF animations.
WebBrowserEdit.Navigate (App.Path & "\MYDATA\edit.gif")
WebBrowserView.Navigate (App.Path & "\MYDATA\find.gif")
WebBrowserOrder.Navigate (App.Path & "\MYDATA\order.gif")
WebBrowserPrint.Navigate (App.Path & "\MYDATA\print.gif")
End Sub
Private Sub imgBackground_MouseMove(Button As Integer, Shift As Integer, X As Single, Y As Single)
'Cancels all mouse over effects on this form.
picEditAbove.Visible = True
lblEditOrder.ForeColor = vbBlack
lblEditOrder.FontSize = "18"
picViewAbove.Visible = True
lblViewList.ForeColor = vbBlack
lblViewList.FontSize = "18"
picOrderAbove.Visible = True
lblNewOrder.ForeColor = vbBlack
lblNewOrder.FontSize = "18"
picPrintAbove.Visible = True
lblPrintOrder.ForeColor = vbBlack
lblPrintOrder.FontSize = "18"
End Sub
Private Sub imgEdit_Click()
'Display the edit order form.
frmStudentOptions.Hide
frmEditOrder.Show
End Sub
Private Sub imgEdit_MouseMove(Button As Integer, Shift As Integer, X As Single, Y As Single)
'Ensure other mouseover effect are cancelled while new order is on focus.
picOrderAbove.Visible = True
lblNewOrder.ForeColor = vbBlack
lblNewOrder.FontSize = "18"
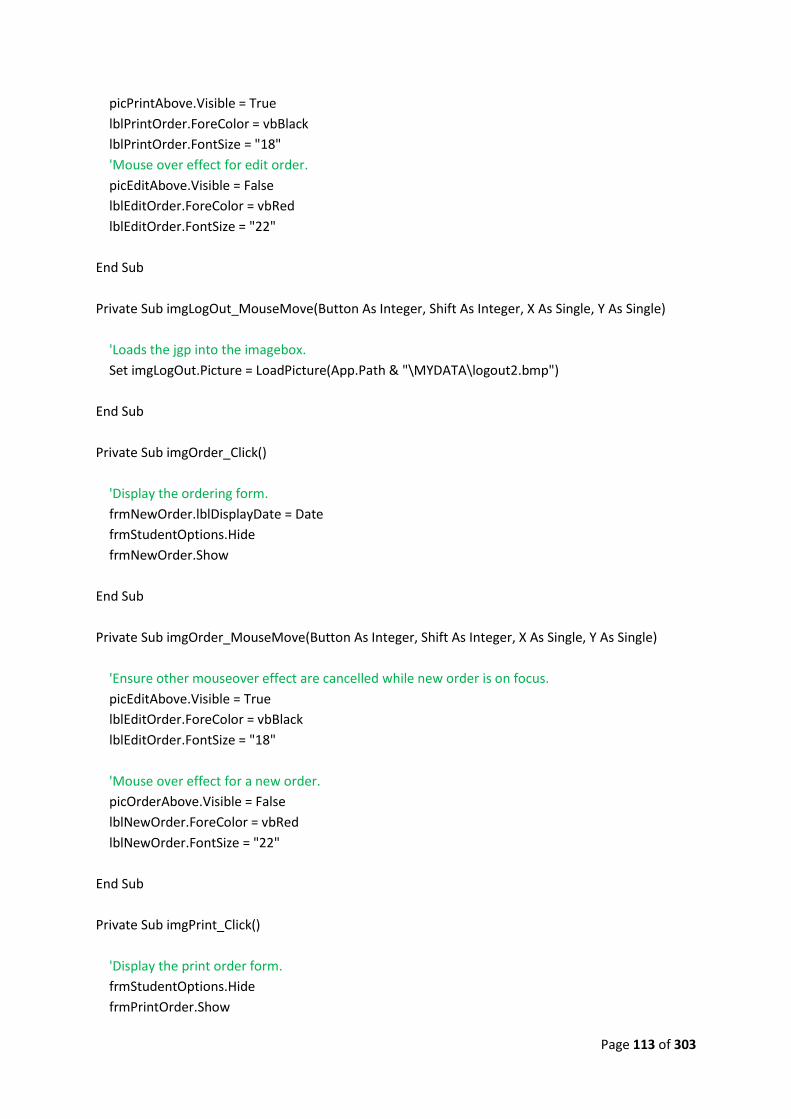
Page 113 of 303
picPrintAbove.Visible = True
lblPrintOrder.ForeColor = vbBlack
lblPrintOrder.FontSize = "18"
'Mouse over effect for edit order.
picEditAbove.Visible = False
lblEditOrder.ForeColor = vbRed
lblEditOrder.FontSize = "22"
End Sub
Private Sub imgLogOut_MouseMove(Button As Integer, Shift As Integer, X As Single, Y As Single)
'Loads the jgp into the imagebox.
Set imgLogOut.Picture = LoadPicture(App.Path & "\MYDATA\logout2.bmp")
End Sub
Private Sub imgOrder_Click()
'Display the ordering form.
frmNewOrder.lblDisplayDate = Date
frmStudentOptions.Hide
frmNewOrder.Show
End Sub
Private Sub imgOrder_MouseMove(Button As Integer, Shift As Integer, X As Single, Y As Single)
'Ensure other mouseover effect are cancelled while new order is on focus.
picEditAbove.Visible = True
lblEditOrder.ForeColor = vbBlack
lblEditOrder.FontSize = "18"
'Mouse over effect for a new order.
picOrderAbove.Visible = False
lblNewOrder.ForeColor = vbRed
lblNewOrder.FontSize = "22"
End Sub
Private Sub imgPrint_Click()
'Display the print order form.
frmStudentOptions.Hide
frmPrintOrder.Show

Page 114 of 303
End Sub
Private Sub imgPrint_MouseMove(Button As Integer, Shift As Integer, X As Single, Y As Single)
'Ensure other mouseover effect are cancelled while new order is on focus.
picEditAbove.Visible = True
lblEditOrder.ForeColor = vbBlack
lblEditOrder.FontSize = "18"
picViewAbove.Visible = True
lblViewList.ForeColor = vbBlack
lblViewList.FontSize = "18"
'Mouse over effect for printing order option.
picPrintAbove.Visible = False
lblPrintOrder.ForeColor = vbRed
lblPrintOrder.FontSize = "22"
End Sub
Private Sub imgView_Click()
'Display the view list form.
frmStudentOptions.Hide
frmViewList1.txtType = "Student"
frmViewList1.Show
End Sub
Private Sub imgView_MouseMove(Button As Integer, Shift As Integer, X As Single, Y As Single)
'Ensure other mouseover effect are cancelled while new order is on focus.
picPrintAbove.Visible = True
lblPrintOrder.ForeColor = vbBlack
lblPrintOrder.FontSize = "18"
'Mouse over effect for view list animation.
picViewAbove.Visible = False
lblViewList.ForeColor = vbRed
lblViewList.FontSize = "22"
End Sub
Private Sub imgLogArea_MouseMove(Button As Integer, Shift As Integer, X As Single, Y As Single)

Page 115 of 303
'Loads the jgp into the imagebox.
Set imgLogOut.Picture = LoadPicture(App.Path & "\MYDATA\logout1.bmp")
End Sub
Private Sub imgLogOut_Click()
'Unload form and display main menu form.
Unload frmStudentOptions
frmMainMenu.Show
frmTempData.txtFnameData = ""
frmTempData.txtSnameData = ""
frmTempData.txtClassData = ""
frmTempData.txtSIDData = ""
End Sub
Private Sub lblEditOrder_Click()
'Display the edit order form.
frmStudentOptions.Hide
frmEditOrder.Show
End Sub
Private Sub lblNewOrder_Click()
'Display the ordering form.
frmStudentOptions.Hide
frmNewOrder.Show
End Sub
Private Sub lblPrintOrder_Click()
'Display the print order form.
frmStudentOptions.Hide
frmPrintOrder.Show
End Sub
Private Sub tmrTime_Timer()
'Code to display current time in lblTime.
lblTime.Caption = Time

Page 116 of 303
End Sub
-----------------------------------------------------------------------------------------------------------------
Student Options Form (frmStudentOptions)
OPTION EXPLICIT
Private Sub Form_Load()
'Loads the pictures into the imageboxes.
Set imgBackground.Picture = LoadPicture(App.Path & "\MYDATA\welcomebackground.bmp")
Set imgLogOut.Picture = LoadPicture(App.Path & "\MYDATA\logout1.bmp")
Set picFindOrderAbove.Picture = LoadPicture(App.Path & "\MYDATA\findorderabove2.gif")
Set picViewListAbove.Picture = LoadPicture(App.Path & "\MYDATA\viewlistabove2.gif")
Set picEditAbove.Picture = LoadPicture(App.Path & "\MYDATA\editabove2.gif")
'Load the gif animations.
WebBrowserView.Navigate (App.Path & "\MYDATA\viewlist.gif")
WebBrowserEdit.Navigate (App.Path & "\MYDATA\edit.gif")
WebBrowserFind.Navigate (App.Path & "\MYDATA\findorder.gif")
End Sub
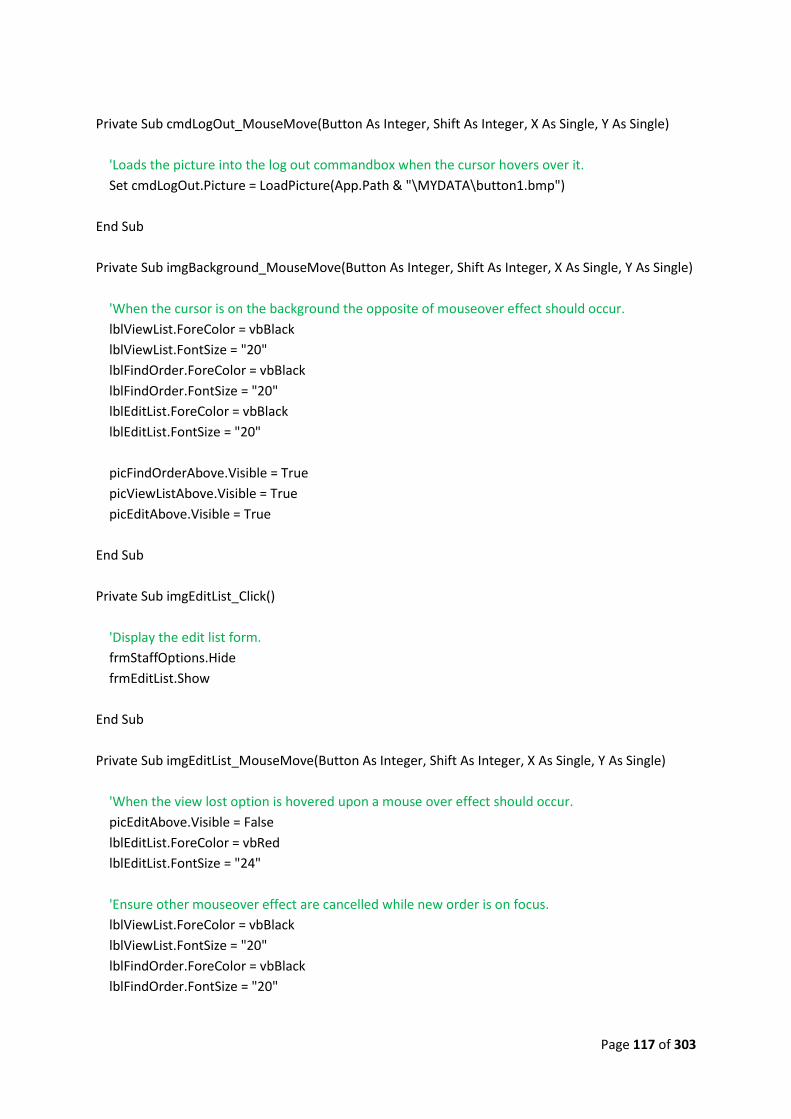
Page 117 of 303
Private Sub cmdLogOut_MouseMove(Button As Integer, Shift As Integer, X As Single, Y As Single)
'Loads the picture into the log out commandbox when the cursor hovers over it.
Set cmdLogOut.Picture = LoadPicture(App.Path & "\MYDATA\button1.bmp")
End Sub
Private Sub imgBackground_MouseMove(Button As Integer, Shift As Integer, X As Single, Y As Single)
'When the cursor is on the background the opposite of mouseover effect should occur.
lblViewList.ForeColor = vbBlack
lblViewList.FontSize = "20"
lblFindOrder.ForeColor = vbBlack
lblFindOrder.FontSize = "20"
lblEditList.ForeColor = vbBlack
lblEditList.FontSize = "20"
picFindOrderAbove.Visible = True
picViewListAbove.Visible = True
picEditAbove.Visible = True
End Sub
Private Sub imgEditList_Click()
'Display the edit list form.
frmStaffOptions.Hide
frmEditList.Show
End Sub
Private Sub imgEditList_MouseMove(Button As Integer, Shift As Integer, X As Single, Y As Single)
'When the view lost option is hovered upon a mouse over effect should occur.
picEditAbove.Visible = False
lblEditList.ForeColor = vbRed
lblEditList.FontSize = "24"
'Ensure other mouseover effect are cancelled while new order is on focus.
lblViewList.ForeColor = vbBlack
lblViewList.FontSize = "20"
lblFindOrder.ForeColor = vbBlack
lblFindOrder.FontSize = "20"

Page 118 of 303
picFindOrderAbove.Visible = True
picViewListAbove.Visible = True
End Sub
Private Sub imgFind_Click()
'Display the find order form.
frmStaffOptions.Hide
frmFindOrder.Show
End Sub
Private Sub imgFind_MouseMove(Button As Integer, Shift As Integer, X As Single, Y As Single)
'When the view lost option is hovered upon a mouse over effect should occur.
picFindOrderAbove.Visible = False
lblFindOrder.ForeColor = vbRed
lblFindOrder.FontSize = "24"
'Ensure other mouseover effect are cancelled while new order is on focus.
picEditAbove.Visible = True
lblEditList.ForeColor = vbBlack
lblEditList.FontSize = "20"
End Sub
Private Sub imgLogArea_MouseMove(Button As Integer, Shift As Integer, X As Single, Y As Single)
'Loads the jgp into the imagebox.
Set imgLogOut.Picture = LoadPicture(App.Path & "\MYDATA\logout1.bmp")
End Sub
Private Sub imgLogOut_Click()
'Unload form and display main menu form.
Unload frmStaffOptions
frmMainMenu.Show
End Sub
Private Sub imgLogOut_MouseMove(Button As Integer, Shift As Integer, X As Single, Y As Single)
'Loads the jgp into the imagebox.

Page 119 of 303
Set imgLogOut.Picture = LoadPicture(App.Path & "\MYDATA\logout2.bmp")
End Sub
Private Sub imgViewList_Click()
'Display the view list form.
frmStaffOptions.Hide
frmViewList1.txtType = "Staff"
frmViewList1.Show
End Sub
Private Sub imgViewList_MouseMove(Button As Integer, Shift As Integer, X As Single, Y As Single)
'When the view lost option is hovered upon a mouse over effect should occur.
picViewListAbove.Visible = False
lblViewList.ForeColor = vbRed
lblViewList.FontSize = "24"
'Ensure other mouseover effect are cancelled while new order is on focus.
lblEditList.ForeColor = vbBlack
lblEditList.FontSize = "20"
picEditAbove.Visible = True
End Sub
Private Sub tmrTime_Timer()
'Code to display current time in lblTime.
lblTime.Caption = Time
End Sub
-----------------------------------------------------------------------------------------------------------------

Page 120 of 303
-----------------------------------------------------------------------------------------------------------------
New Order Form (frmNewOrder)
OPTION EXPLICIT
Dim db As New ADODB.Connection 'Declaration of connection from VB to database
Dim studentDetails As New ADODB.Recordset 'Declaration of student recordset
Dim newOrder As New ADODB.Recordset 'Declaration of order recordset
Dim newOrderList As New ADODB.Recordset 'Declaration of datagrid recordset
Dim materialsList As New ADODB.Recordset 'Declaration of materials list recordset.
Dim sConn As String 'Declaration of object location for connection
Dim sSQL As String 'Declaration of primary SQL statement

Page 121 of 303
Dim rSQL As String 'Declaration of secondary SQL statement
Dim pSQL As String 'Declaration of third SQL statement
Dim oSQL As String 'Declaration of fourth SQL statement
Dim SearchStudentForename As String 'Declaration of string used for variable Forename
Dim SearchStudentSurname As String 'Declaration of string used for variable Surname
Dim SearchOrder As String 'Declaration of string used for variable Order
Dim SearchOrderDate As String 'Declaration of string used for variable Order Date
Dim SearchMaterial As String 'Declaration of string used for variable Material
Dim SearchDepth As String 'Declaration of string used for variable Depth
Dim SearchPhrase1 As String 'Declaration of string used for variable SearchForename
Dim SearchPhrase2 As String 'Declaration of string used for variable SearchSurname
Dim SearchPhrase3 As String 'Declaration of string used for variable SearchOrder
Dim SearchPhrase4 As String 'Declaration of string used for variable SearchOrderDate
Dim SearchPhrase5 As String 'Declaration of string used for variable SearchMaterial
Dim SearchPhrase6 As String 'Declaration of string used for variable SearchDepth
Private Sub Form_Load()
'Loads the pictures into the imageboxes.
Set imgBackground.Picture = LoadPicture(App.Path & "\MYDATA\neworderbackground.bmp")
Set imgReturn.Picture = LoadPicture(App.Path & "\MYDATA\returnup1.bmp")
Set picItem.Picture = LoadPicture(App.Path & "\MYDATA\picorderbackground.bmp")
Set cmdAddItem.Picture = LoadPicture(App.Path & "\MYDATA\addbutton1.bmp")
'Set ObjTextToSpeech = CreateObject("SAPI.spVoice")
'ObjTextToSpeech.speak ("To register, please enter your details and click create account.")
'Populate textboxes with respective data.
lblDisplayDate = Date
lblDisplayNAme = frmTempData.txtFnameData + " " + frmTempData.txtSnameData
txtStudentID = frmTempData.txtSIDData
lblDisplayGroup = frmTempData.txtClassData
'Disable inputs to allow for proper combobox population. Also promotes logical order and
prevents errors.
cmbMaterial.Enabled = False
cmbThickness.Enabled = False
txtThickness.Enabled = False
cmbSize.Enabled = False
txtSize1.Enabled = False
txtSize2.Enabled = False
txtSize3.Enabled = False
txtQuantity.Enabled = False

Page 122 of 303
'Back-colour of all disabled input to light grey.
cmbMaterial.BackColor = &HE0E0E0
cmbThickness.BackColor = &HE0E0E0
txtThickness.BackColor = &HE0E0E0
cmbSize.BackColor = &HE0E0E0
txtSize1.BackColor = &HE0E0E0
txtSize2.BackColor = &HE0E0E0
txtSize3.BackColor = &HE0E0E0
txtQuantity.BackColor = &HE0E0E0
'Sets which inputs are available on form load.
cmbThickness.Visible = True
txtThickness.Visible = False
cmbSize.Visible = False
lblmmDepth.Visible = False
txtSize3.Visible = False
txtQuantity.Visible = True
txtSize1.Visible = True
txtSize2.Visible = True
lblX.Visible = True
cmbSize.Visible = False
sPath = App.Path & "\MYDATA\resistantmaterialsdb.mdb"
sConn = "Provider=Microsoft.JET.OLEDB.4.0;Data Source=" & sPath
SearchStudentForename = frmTempData.txtFnameData
SearchPhrase1 = "%" & SearchStudentForename & "%"
SearchStudentSurname = frmTempData.txtSnameData
SearchPhrase2 = "%" & SearchStudentSurname & "%"
SearchOrder = frmTempData.txtSIDData
SearchPhrase3 = "%" & SearchOrder & "%"
SearchOrderDate = frmTempData.txtDateData
SearchPhrase4 = "%" & SearchOrderDate & "%"
SearchMaterial = cmbMaterial
SearchPhrase5 = "%" & SearchMaterial & "%"
SearchDepth = cmbThickness
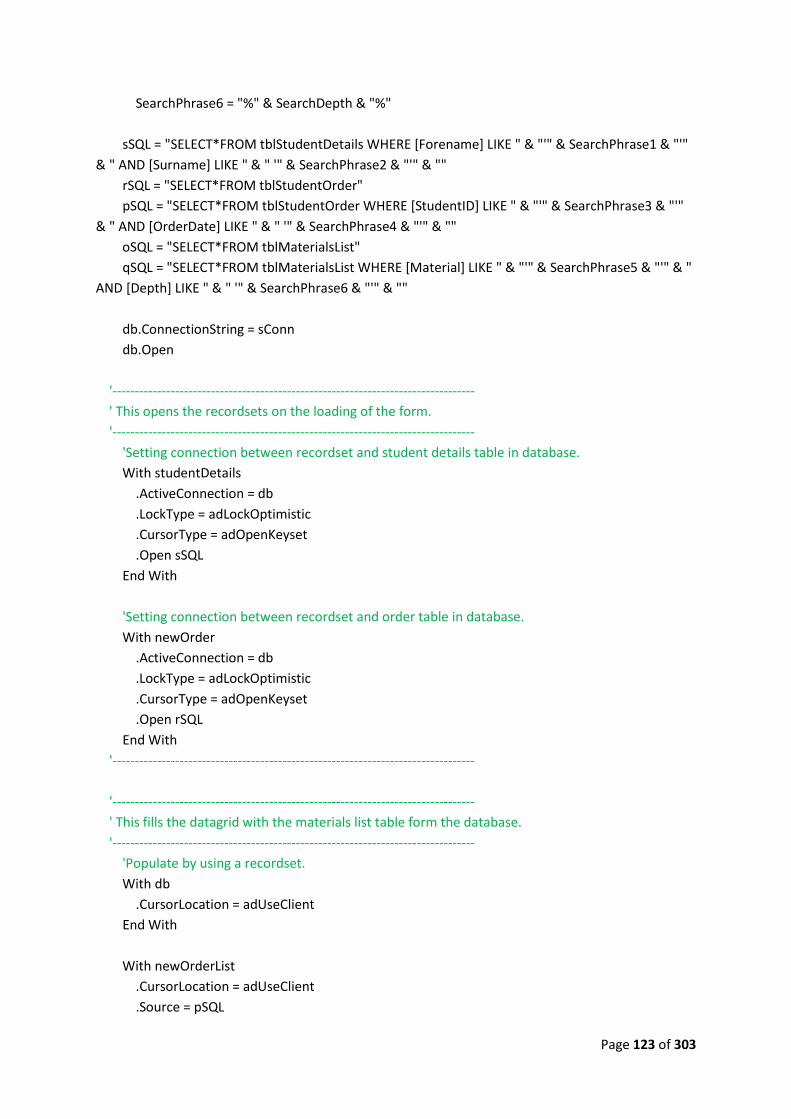
Page 123 of 303
SearchPhrase6 = "%" & SearchDepth & "%"
sSQL = "SELECT*FROM tblStudentDetails WHERE [Forename] LIKE " & "'" & SearchPhrase1 & "'"
& " AND [Surname] LIKE " & " '" & SearchPhrase2 & "'" & ""
rSQL = "SELECT*FROM tblStudentOrder"
pSQL = "SELECT*FROM tblStudentOrder WHERE [StudentID] LIKE " & "'" & SearchPhrase3 & "'"
& " AND [OrderDate] LIKE " & " '" & SearchPhrase4 & "'" & ""
oSQL = "SELECT*FROM tblMaterialsList"
qSQL = "SELECT*FROM tblMaterialsList WHERE [Material] LIKE " & "'" & SearchPhrase5 & "'" & "
AND [Depth] LIKE " & " '" & SearchPhrase6 & "'" & ""
db.ConnectionString = sConn
db.Open
'---------------------------------------------------------------------------------
' This opens the recordsets on the loading of the form.
'---------------------------------------------------------------------------------
'Setting connection between recordset and student details table in database.
With studentDetails
.ActiveConnection = db
.LockType = adLockOptimistic
.CursorType = adOpenKeyset
.Open sSQL
End With
'Setting connection between recordset and order table in database.
With newOrder
.ActiveConnection = db
.LockType = adLockOptimistic
.CursorType = adOpenKeyset
.Open rSQL
End With
'---------------------------------------------------------------------------------
'---------------------------------------------------------------------------------
' This fills the datagrid with the materials list table form the database.
'---------------------------------------------------------------------------------
'Populate by using a recordset.
With db
.CursorLocation = adUseClient
End With
With newOrderList
.CursorLocation = adUseClient
.Source = pSQL

Page 124 of 303
.ActiveConnection = db
.CursorType = adOpenKeyset
.LockType = adLockOptimistic
.Open
End With
Set dgOrder.DataSource = newOrderList
newOrderList.Requery
'Set which columns from tblMateriaslList are visible and their respective width.
dgOrder.Columns.Item(1).Width = 2400
dgOrder.Columns.Item(2).Width = 800
dgOrder.Columns.Item(3).Width = 1100
dgOrder.Columns.Item(4).Width = 800
dgOrder.Columns.Item(5).Width = 1000
dgOrder.Columns.Item(0).Visible = 1000
dgOrder.Columns.Item(0).Locked = True
dgOrder.Columns.Item(1).Locked = True
dgOrder.Columns.Item(2).Locked = True
dgOrder.Columns.Item(3).Locked = True
dgOrder.Columns.Item(4).Locked = True
dgOrder.Columns.Item(5).Locked = True
dgOrder.Columns.Item(6).Locked = True
dgOrder.Columns.Item(7).Locked = True
dgOrder.BackColor = &HC0E0FF 'Light orange.
'Set datagrid interactive capabilities. Also sets which columns are visible in datagrid.
dgOrder.AllowAddNew = False
dgOrder.AllowDelete = False
dgOrder.AllowUpdate = False
dgOrder.AllowRowSizing = False
dgOrder.Columns.Item(0).Visible = False 'OrderID field.
dgOrder.Columns.Item(6).Visible = False 'StudentID field.
dgOrder.Columns.Item(7).Visible = False 'OrderDate field.
'Return the number of items in basket to label.
lblItemCount = newOrderList.RecordCount
'Prevents student from orderign over 10 items in basket.
If lblItemCount > 9 Then
cmdAddItem.Enabled = False
Else
cmdAddItem.Enabled = True
End If

Page 125 of 303
'Adds up the total cost of all the materials added in basket (datagrid).
Dim rowNum As Integer
Dim subTotal As String
rowNum = 0
dgOrder.Col = 1
Do While rowNum < Val(lblItemCount)
dgOrder.Row = rowNum
If dgOrder.Columns(5).Text <> "" Then
subTotal = Val(subTotal) + Val(dgOrder.Columns(5).Text)
rowNum = Val(rowNum) + 1
End If
Loop
'Displays the cost in currency format.
lblSTotalValue.Caption = Format(subTotal, "Currency")
'---------------------------------------------------------------------------------
End Sub
Private Sub cmdAddItem_Click()
'Check to ensure all details have been input before storing in database. Avoids errors.
If cmbMaterialChoice = "" Or cmbMaterial = "" Or txtQuantity = "" Then
MsgBox ("Complete all material details before adding!"), vbExclamation, "Missing Details!"
Exit Sub 'Cancel adding to db.
Else
End If
'-------------------------------------------------------------------
'Visual effect of order being taken off screen and added to basket.
'-------------------------------------------------------------------
Do Until picItem.Left < -6000
picItem.Left = picItem.Left - 75
DoEvents
Loop
Do Until picItem.Left > 959
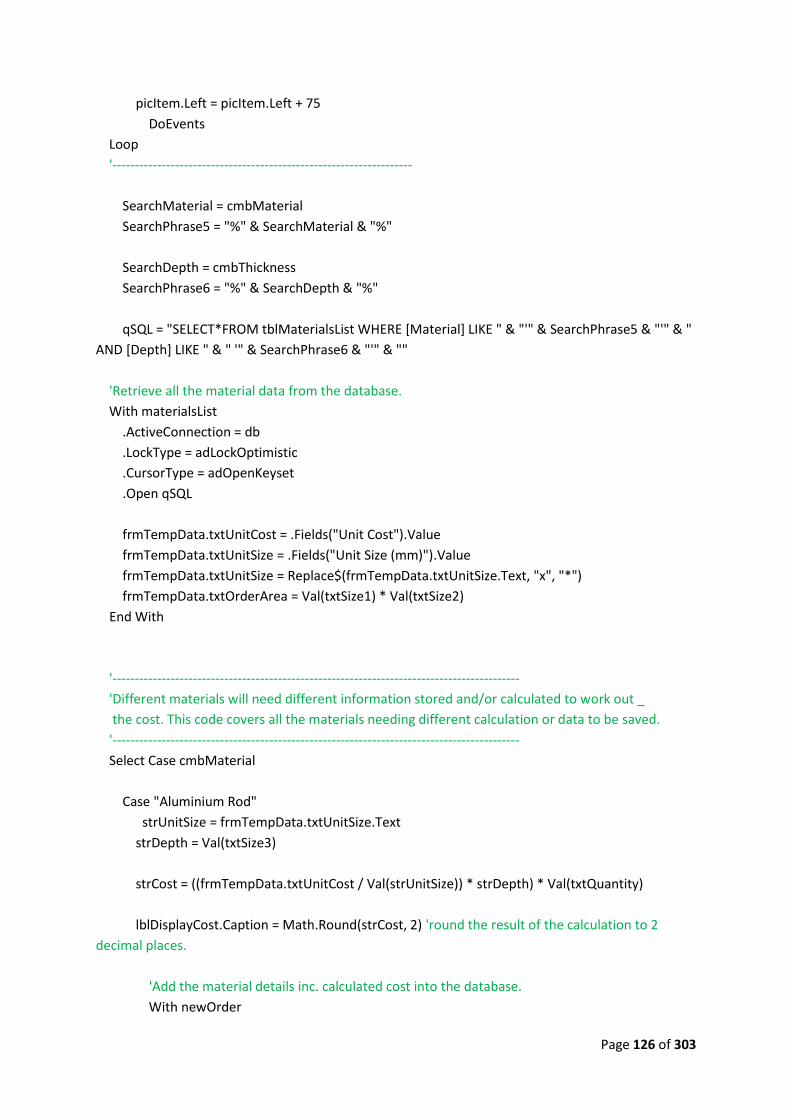
Page 126 of 303
picItem.Left = picItem.Left + 75
DoEvents
Loop
'-------------------------------------------------------------------
SearchMaterial = cmbMaterial
SearchPhrase5 = "%" & SearchMaterial & "%"
SearchDepth = cmbThickness
SearchPhrase6 = "%" & SearchDepth & "%"
qSQL = "SELECT*FROM tblMaterialsList WHERE [Material] LIKE " & "'" & SearchPhrase5 & "'" & "
AND [Depth] LIKE " & " '" & SearchPhrase6 & "'" & ""
'Retrieve all the material data from the database.
With materialsList
.ActiveConnection = db
.LockType = adLockOptimistic
.CursorType = adOpenKeyset
.Open qSQL
frmTempData.txtUnitCost = .Fields("Unit Cost").Value
frmTempData.txtUnitSize = .Fields("Unit Size (mm)").Value
frmTempData.txtUnitSize = Replace$(frmTempData.txtUnitSize.Text, "x", "*")
frmTempData.txtOrderArea = Val(txtSize1) * Val(txtSize2)
End With
'-------------------------------------------------------------------------------------------
'Different materials will need different information stored and/or calculated to work out _
the cost. This code covers all the materials needing different calculation or data to be saved.
'-------------------------------------------------------------------------------------------
Select Case cmbMaterial
Case "Aluminium Rod"
strUnitSize = frmTempData.txtUnitSize.Text
strDepth = Val(txtSize3)
strCost = ((frmTempData.txtUnitCost / Val(strUnitSize)) * strDepth) * Val(txtQuantity)
lblDisplayCost.Caption = Math.Round(strCost, 2) 'round the result of the calculation to 2
decimal places.
'Add the material details inc. calculated cost into the database.
With newOrder

Page 127 of 303
.AddNew
.Fields("Material").Value = cmbMaterial
.Fields("Depth").Value = cmbThickness
.Fields("Size").Value = txtSize3 + "mm"
.Fields("Quantity").Value = txtQuantity
.Fields("Cost").Value = lblDisplayCost.Caption
.Fields("StudentID").Value = frmTempData.txtSIDData
.Fields("OrderDate").Value = frmTempData.txtDateData
End With
Case "Steel Tube"
strUnitSize = frmTempData.txtUnitSize.Text
strDepth = Val(txtSize3)
strCost = ((frmTempData.txtUnitCost / Val(strUnitSize)) * strDepth) * Val(txtQuantity)
lblDisplayCost.Caption = Math.Round(strCost, 2) 'round the result of the calculation to 2
decimal places.
'Add the material details inc. calculated cost into the database.
With newOrder
.AddNew
.Fields("Material").Value = cmbMaterial
.Fields("Depth").Value = cmbThickness
.Fields("Size").Value = txtSize3 + "mm"
.Fields("Quantity").Value = txtQuantity
.Fields("Cost").Value = lblDisplayCost.Caption
.Fields("StudentID").Value = frmTempData.txtSIDData
.Fields("OrderDate").Value = frmTempData.txtDateData
End With
Case "Dowel"
strUnitSize = frmTempData.txtUnitSize.Text
strDepth = Val(txtSize3)
strCost = ((frmTempData.txtUnitCost / Val(strUnitSize)) * strDepth) * Val(txtQuantity)
lblDisplayCost.Caption = Math.Round(strCost, 2) 'round the result of the calculation to 2
decimal places.
'Add the material details inc. calculated cost into the database.
With newOrder
.AddNew
.Fields("Material").Value = cmbMaterial

Page 128 of 303
.Fields("Depth").Value = cmbThickness
.Fields("Size").Value = txtSize3 + "mm"
.Fields("Quantity").Value = txtQuantity
.Fields("Cost").Value = lblDisplayCost.Caption
.Fields("StudentID").Value = frmTempData.txtSIDData
.Fields("OrderDate").Value = frmTempData.txtDateData
End With
Case "Acrylic Rod (Clear Round)"
strUnitSize = frmTempData.txtUnitSize.Text
strDepth = Val(txtSize3)
strCost = ((frmTempData.txtUnitCost / Val(strUnitSize)) * strDepth) * Val(txtQuantity)
lblDisplayCost.Caption = Math.Round(strCost, 2) 'round the result of the calculation to 2
decimal places.
'Add the material details inc. calculated cost into the database.
With newOrder
.AddNew
.Fields("Material").Value = cmbMaterial
.Fields("Depth").Value = cmbThickness
.Fields("Size").Value = txtSize3 + "mm"
.Fields("Quantity").Value = txtQuantity
.Fields("Cost").Value = lblDisplayCost.Caption
.Fields("StudentID").Value = frmTempData.txtSIDData
.Fields("OrderDate").Value = frmTempData.txtDateData
End With
Case "PAR Redwood"
strDepth = Val(txtThickness)
strCost = ((strDepth / 1000) * (frmTempData.txtUnitCost)) * Val(txtQuantity)
lblDisplayCost.Caption = Math.Round(strCost, 2) 'round the result of the calculation to 2
decimal places.
'Add the material details inc. calculated cost into the database.
With newOrder
.AddNew
.Fields("Material").Value = cmbMaterial
.Fields("Depth").Value = txtThickness + "mm"
.Fields("Size").Value = Replace$(frmTempData.txtUnitSize.Text, "*", "x")
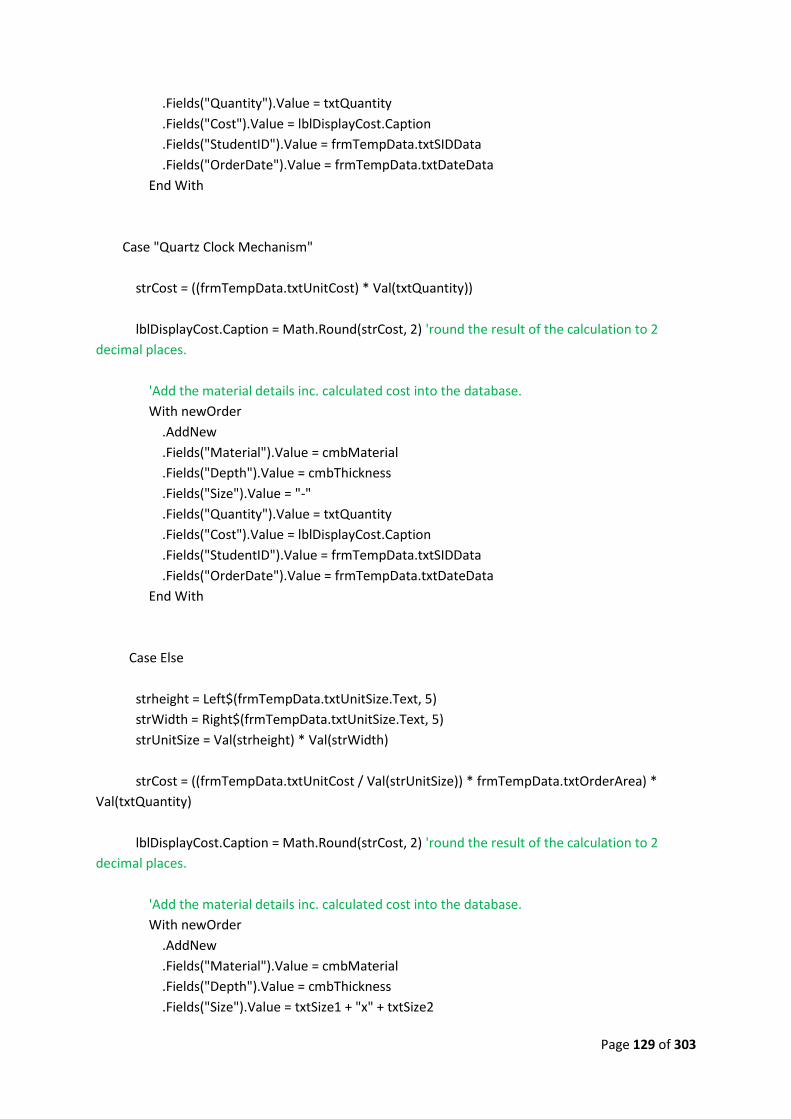
Page 129 of 303
.Fields("Quantity").Value = txtQuantity
.Fields("Cost").Value = lblDisplayCost.Caption
.Fields("StudentID").Value = frmTempData.txtSIDData
.Fields("OrderDate").Value = frmTempData.txtDateData
End With
Case "Quartz Clock Mechanism"
strCost = ((frmTempData.txtUnitCost) * Val(txtQuantity))
lblDisplayCost.Caption = Math.Round(strCost, 2) 'round the result of the calculation to 2
decimal places.
'Add the material details inc. calculated cost into the database.
With newOrder
.AddNew
.Fields("Material").Value = cmbMaterial
.Fields("Depth").Value = cmbThickness
.Fields("Size").Value = "-"
.Fields("Quantity").Value = txtQuantity
.Fields("Cost").Value = lblDisplayCost.Caption
.Fields("StudentID").Value = frmTempData.txtSIDData
.Fields("OrderDate").Value = frmTempData.txtDateData
End With
Case Else
strheight = Left$(frmTempData.txtUnitSize.Text, 5)
strWidth = Right$(frmTempData.txtUnitSize.Text, 5)
strUnitSize = Val(strheight) * Val(strWidth)
strCost = ((frmTempData.txtUnitCost / Val(strUnitSize)) * frmTempData.txtOrderArea) *
Val(txtQuantity)
lblDisplayCost.Caption = Math.Round(strCost, 2) 'round the result of the calculation to 2
decimal places.
'Add the material details inc. calculated cost into the database.
With newOrder
.AddNew
.Fields("Material").Value = cmbMaterial
.Fields("Depth").Value = cmbThickness
.Fields("Size").Value = txtSize1 + "x" + txtSize2

Page 130 of 303
.Fields("Quantity").Value = txtQuantity
.Fields("Cost").Value = lblDisplayCost.Caption
.Fields("StudentID").Value = frmTempData.txtSIDData
.Fields("OrderDate").Value = frmTempData.txtDateData
End With
End Select
'-------------------------------------------------------------------------------------------
newOrder.Update
'Clear all the input boxes after storing order.
cmbMaterialChoice.Clear
cmbMaterialChoice.AddItem "Mechanisms"
cmbMaterialChoice.AddItem "Metal"
cmbMaterialChoice.AddItem "Plastic"
cmbMaterialChoice.AddItem "Wood"
cmbMaterial.Clear
cmbThickness.Clear
txtSize1 = ""
txtSize2 = ""
txtSize3 = ""
txtQuantity = ""
lblDisplayCost = ""
'Disable inputs to allow for proper combobox population. Also promotes logical order and
prevents errors.
cmbMaterial.Enabled = False
cmbThickness.Enabled = False
txtThickness.Enabled = False
cmbSize.Enabled = False
txtSize1.Enabled = False
txtSize2.Enabled = False
txtSize3.Enabled = False
txtQuantity.Enabled = False
'Back-colour of all disabled input to light grey.
cmbMaterial.BackColor = &HE0E0E0
cmbThickness.BackColor = &HE0E0E0
txtThickness.BackColor = &HE0E0E0
cmbSize.BackColor = &HE0E0E0
txtSize1.BackColor = &HE0E0E0
txtSize2.BackColor = &HE0E0E0
txtSize3.BackColor = &HE0E0E0

Page 131 of 303
txtQuantity.BackColor = &HE0E0E0
'Sets which inputs are available.
cmbThickness.Visible = True
txtThickness.Visible = False
cmbSize.Visible = False
lblmmDepth.Visible = False
txtSize3.Visible = False
txtSize1.Visible = True
txtSize2.Visible = True
lblX.Visible = True
cmbSize.Visible = False
shp5.BackColor = vbWhite
shp1.BackColor = vbWhite
shp2.BackColor = vbWhite
shp3.BackColor = vbWhite
shp4.BackColor = vbWhite
db.Close
lblDB.Caption = "Closed"
'-----------------------------------------------------------------------
'Link the datahrid to the database table of student orders (filtered).
'-----------------------------------------------------------------------
With db
.CursorLocation = adUseClient
.Open sConn
End With
lblDB.Caption = "Open"
With newOrder
.CursorLocation = adUseClient
.Source = pSQL
.ActiveConnection = db
.CursorType = adOpenKeyset
.LockType = adLockOptimistic
.Open
End With
Set dgOrder.DataSource = newOrder
newOrder.Requery

Page 132 of 303
'-----------------------------------------------------------------------
'Sets the width of the datagrid columns after refresh.
dgOrder.Columns.Item(1).Width = 2400
dgOrder.Columns.Item(2).Width = 800
dgOrder.Columns.Item(3).Width = 1100
dgOrder.Columns.Item(4).Width = 800
dgOrder.Columns.Item(5).Width = 1000
dgOrder.Columns.Item(o).Visible = 1000
dgOrder.Columns.Item(0).Locked = True
dgOrder.Columns.Item(1).Locked = True
dgOrder.Columns.Item(2).Locked = True
dgOrder.Columns.Item(3).Locked = True
dgOrder.Columns.Item(4).Locked = True
dgOrder.Columns.Item(5).Locked = True
dgOrder.Columns.Item(6).Locked = True
dgOrder.Columns.Item(7).Locked = True
'Sets the appearance of the datagrid after refresh.
dgOrder.BackColor = &HC0E0FF
dgOrder.AllowAddNew = False
dgOrder.AllowDelete = True
dgOrder.AllowUpdate = False
dgOrder.AllowRowSizing = False
dgOrder.Columns.Item(0).Visible = False
dgOrder.Columns.Item(6).Visible = False
dgOrder.Columns.Item(7).Visible = False
'Displays the number items in basket.
lblItemCount = newOrder.RecordCount
If lblItemCount > 9 Then
cmdAddItem.Enabled = False
Else
cmdAddItem.Enabled = True
End If
'Adds up the total cost of all the materials added in basket (datagrid).
Dim rowNum As Integer
Dim subTotal As String
rowNum = 0
dgOrder.Col = 1

Page 133 of 303
Do While rowNum < Val(lblItemCount)
dgOrder.Row = rowNum
If dgOrder.Columns(5).Text <> "" Then
subTotal = Val(subTotal) + Val(dgOrder.Columns(5).Text)
rowNum = Val(rowNum) + 1
End If
Loop
'Displays the cost in currency format.
lblSTotalValue.Caption = Format(subTotal, "Currency")
End Sub
Private Sub cmbSize_Click()
'Unlocks the size textbox to allow input by user.
If cmbSize <> "" Then
txtQuantity.BackColor = vbWhite
txtQuantity.Enabled = True
Else
'When nothing is input.
txtQuantity.BackColor = &HE0E0E0 'background light grey.
txtQuantity.Enabled = False
End If
txtQuantity = ""
'Highlights the number 5 step.
shp4.BackColor = vbYellow
shp1.BackColor = vbWhite
shp2.BackColor = vbWhite
shp3.BackColor = vbWhite
shp5.BackColor = vbWhite
End Sub
Private Sub dgOrder_AfterUpdate()
'Updates the number of items count after update.
lblItemCount = newOrder.RecordCount

Page 134 of 303
'Disables the ADD button if max items are in basket e.g. 10
If lblItemCount > 9 Then
cmdAddItem.Enabled = False
Else
cmdAddItem.Enabled = True
End If
End Sub
Private Sub dgOrder_AfterDelete()
'Updates the number of items count after delete.
lblItemCount = newOrder.RecordCount
'Disables the ADD button if max items are in basket e.g. 10
If lblItemCount > 9 Then
cmdAddItem.Enabled = False
Else
cmdAddItem.Enabled = True
End If
End Sub
Private Sub dgOrder_BeforeDelete(Cancel As Integer)
'Prompt a message before the deletion of the item akes place, cancel-able
If MsgBox("Are you sure you want to delete this item?", vbYesNo + vbQuestion, "Item Delete") =
vbNo Then
Cancel = True
Else
End If
End Sub
Private Sub cmbMaterial_Click()
'Unlocks the combo box after choice is made to allow depth selection by user.
If cmbMaterial <> "" Then
cmbThickness.BackColor = vbWhite
cmbThickness.Enabled = True
txtThickness.BackColor = vbWhite
txtThickness.Enabled = True
Else
'When nothing is selected.
cmbThickness.BackColor = &HE0E0E0 'background light grey.

Page 135 of 303
cmbThickness.Enabled = False
txtThickness.BackColor = &HE0E0E0 'background light grey.
txtThickness.Enabled = False
End If
'Highlights the number 3 step.
shp3.BackColor = vbYellow
shp1.BackColor = vbWhite
shp2.BackColor = vbWhite
shp4.BackColor = vbWhite
shp5.BackColor = vbWhite
'Clear the other comboboxes that rely on the selection a value from this combobox first.
cmbThickness.Clear
txtQuantity.Visible = True
txtSize1 = ""
txtSize2 = ""
txtSize1.Visible = True
txtSize2.Visible = True
lblX.Visible = True
txtSize1.BackColor = &HE0E0E0 'background light grey.
txtSize2.BackColor = &HE0E0E0 'background light grey.
txtQuantity = ""
txtQuantity.BackColor = &HE0E0E0 'light grey
txtQuantity.Enabled = False
txtSize1.Enabled = False
txtSize2.Enabled = False
txtSize3.BackColor = &HE0E0E0 'background light grey.
txtSize3 = ""
txtSize3.Enabled = False
txtSize3.Visible = False
'------------------------------------------------------------------------------
'Layout of the input boxes will change depending on the material chosen.
'------------------------------------------------------------------------------
Select Case cmbMaterial
Case "PAR Redwood"
cmbThickness.Visible = False
txtThickness.Visible = True
txtThickness = ""
cmbSize.Visible = True
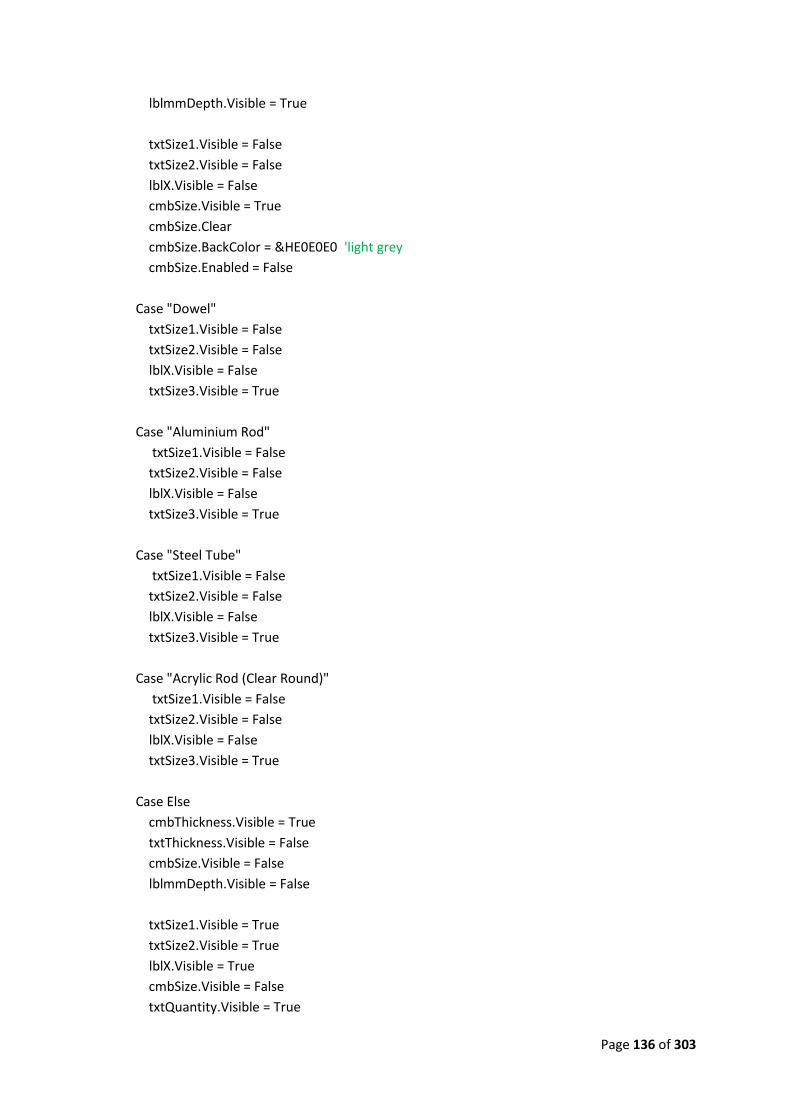
Page 136 of 303
lblmmDepth.Visible = True
txtSize1.Visible = False
txtSize2.Visible = False
lblX.Visible = False
cmbSize.Visible = True
cmbSize.Clear
cmbSize.BackColor = &HE0E0E0 'light grey
cmbSize.Enabled = False
Case "Dowel"
txtSize1.Visible = False
txtSize2.Visible = False
lblX.Visible = False
txtSize3.Visible = True
Case "Aluminium Rod"
txtSize1.Visible = False
txtSize2.Visible = False
lblX.Visible = False
txtSize3.Visible = True
Case "Steel Tube"
txtSize1.Visible = False
txtSize2.Visible = False
lblX.Visible = False
txtSize3.Visible = True
Case "Acrylic Rod (Clear Round)"
txtSize1.Visible = False
txtSize2.Visible = False
lblX.Visible = False
txtSize3.Visible = True
Case Else
cmbThickness.Visible = True
txtThickness.Visible = False
cmbSize.Visible = False
lblmmDepth.Visible = False
txtSize1.Visible = True
txtSize2.Visible = True
lblX.Visible = True
cmbSize.Visible = False
txtQuantity.Visible = True

Page 137 of 303
End Select
'------------------------------------------------------------------------------
Select Case cmbMaterial
'If MDF is selected as a material then the following sizes become options in combobox
cmbThickness
Case "MDF"
cmbThickness.Clear
cmbThickness.AddItem "3mm"
cmbThickness.AddItem "6mm"
cmbThickness.AddItem "9mm"
cmbThickness.AddItem "12mm"
cmbThickness.AddItem "15mm"
cmbThickness.AddItem "18mm"
cmbThickness.AddItem "25mm"
'If Plywood is selected as a material then the following sizes become options in combobox
cmbThickness
Case "Birch Plywood"
cmbThickness.Clear
cmbThickness.AddItem "1.5mm"
cmbThickness.AddItem "6.5mm"
cmbThickness.AddItem "9.0mm"
cmbThickness.AddItem "12.0mm"
'If Pine is selected as a material then the following sizes become options in combobox
cmbThickness
Case "Pine"
cmbThickness.Clear
cmbThickness.AddItem "18mm"
'If flexible MDF is selected as a material then the following sizes become options in combobox
cmbThickness.
Case "MDF (Flexible)"
cmbThickness.Clear
cmbThickness.AddItem "6mm"

Page 138 of 303
'If PAR Redwood is selected as a material then the following sizes become options in combobox
cmbThickness.
Case "PAR Redwood"
cmbThickness.Clear
cmbSize.AddItem "100 x 100"
cmbSize.AddItem "25 x 75"
cmbSize.AddItem "38 x 38"
cmbSize.AddItem "25 x 50"
cmbSize.AddItem "19 x 75"
cmbSize.AddItem "25 x 150"
cmbSize.AddItem "50 x 50"
cmbSize.AddItem "12 x 38"
'If Dowel is selected then the following sizes become options in combobox cmbThickness.
Case "Dowel"
cmbThickness.Clear
cmbThickness.AddItem "6mm"
'If transparent Acrylic is selected as a material then the following sizes become options in
combobox cmbThickness.
Case "Acrylic Sheet (Clear)"
cmbThickness.Clear
cmbThickness.AddItem "3mm"
'If coloured transparent Acrylic is selected as a material then the following sizes become options
in combobox cmbThickness.
Case "Acrylic Sheet (Transparent Coloured)"
cmbThickness.Clear
cmbThickness.AddItem "3mm"
'If opaque coloured Acrylic is selected as a material then the following sizes become options in
combobox cmbThickness.
Case "Acrylic Sheet (Opaque Coloured)"
cmbThickness.Clear
cmbThickness.AddItem "3mm"
'If an Acrylic clear round rod is selected then the following sizes become options in combobox
cmbThickness.
Case "Acrylic Rod (Clear Round)"

Page 139 of 303
cmbThickness.Clear
cmbThickness.AddItem "10mm"
'If Aluminium Sheet is selected as a material then the following sizes become options in
combobox cmbThickness.
Case "Aluminium Sheet"
cmbThickness.Clear
cmbThickness.AddItem "0.90mm"
'If Copper Sheet is selected as a material then the following sizes become options in combobox
cmbThickness.
Case "Copper Sheet"
cmbThickness.Clear
cmbThickness.AddItem "0.70mm"
'If Brass Sheet is selected as a material then the following sizes become options in combobox
cmbThickness.
Case "Brass Sheet"
cmbThickness.Clear
cmbThickness.AddItem "0.55mm"
'If Aluminium Rod is selected then the following sizes become options in combobox
cmbThickness.
Case "Aluminium Rod"
cmbThickness.Clear
cmbThickness.AddItem "6.35mm Diam."
'If Steel Tube is selected then the following sizes become options in combobox cmbThickness.
Case "Steel Tube"
cmbThickness.Clear
cmbThickness.AddItem "19.05mm Diam."
'If a Quartz Clock Mechanism is selected then the following sizes become options in combobox
cmbThickness.
Case "Quartz Clock Mechanism"
cmbThickness.Clear
cmbThickness.AddItem "N/A"
End Select

Page 140 of 303
txtQuantity.Visible = True
End Sub
Private Sub cmbMaterial_GotFocus()
'Highlight the number 1 step when the material choice combobox is in focus.
shp2.BackColor = vbYellow
shp1.BackColor = vbWhite
shp3.BackColor = vbWhite
shp4.BackColor = vbWhite
shp5.BackColor = vbWhite
End Sub
Private Sub cmbThickness_Click()
'Unlocks the size textbox to allow input by user.
If cmbThickness <> "" Then
Select Case cmbThickness
Case "N/A"
txtSize1.BackColor = &HE0E0E0 'light grey
txtSize2.BackColor = &HE0E0E0 'light grey
txtSize1.Enabled = False
txtSize2.Enabled = False
'Highlights the number 5 step.
shp5.BackColor = vbYellow
shp1.BackColor = vbWhite
shp2.BackColor = vbWhite
shp3.BackColor = vbWhite
shp4.BackColor = vbWhite
txtQuantity.BackColor = vbWhite
txtQuantity.Enabled = True
Case Else
txtSize1.BackColor = vbWhite
txtSize2.BackColor = vbWhite

Page 141 of 303
txtSize1.Enabled = True
txtSize2.Enabled = True
txtSize1 = ""
txtSize2 = ""
'Highlights the number 4 step.
shp4.BackColor = vbYellow
shp1.BackColor = vbWhite
shp2.BackColor = vbWhite
shp3.BackColor = vbWhite
shp5.BackColor = vbWhite
End Select
Else
'When nothing is selected.
cmbMaterial.BackColor = &HE0E0E0 'background light grey.
cmbMaterial.Enabled = False
End If
txtSize1 = ""
txtSize2 = ""
If cmbMaterial = "Aluminium Rod" Or cmbMaterial = "Steel Tube" Or cmbMaterial =
"Dowel" Or _
cmbMaterial = "Acrylic Rod (Clear Round)" Then
txtSize1.BackColor = &HE0E0E0 'light grey
txtSize2.BackColor = &HE0E0E0 'light grey
txtSize1.Enabled = False
txtSize2.Enabled = False
txtSize3.Enabled = True
txtSize3.BackColor = vbWhite
'Highlights the number 4 step.
shp4.BackColor = vbYellow
shp1.BackColor = vbWhite
shp2.BackColor = vbWhite
shp3.BackColor = vbWhite
shp5.BackColor = vbWhite
txtQuantity.BackColor = &HE0E0E0 'light grey
txtQuantity.Enabled = False
Else
End If

Page 142 of 303
End Sub
Private Sub cmbMaterialChoice_Click()
'Unlocks the combo box after material choice is made to allow material selection by user.
If cmbMaterialChoice <> "" Then
cmbMaterial.BackColor = vbWhite
cmbMaterial.Enabled = True
Else
'When nothing is selected.
cmbMaterial.BackColor = &HE0E0E0 'background light grey.
cmbMaterial.Enabled = False
End If
'Highlights the number 2 step.
shp2.BackColor = vbYellow
shp1.BackColor = vbWhite
shp3.BackColor = vbWhite
shp4.BackColor = vbWhite
shp5.BackColor = vbWhite
'Clear the other comboboxes that rely on the selection a value from this combobox first.
cmbMaterial.Clear
cmbThickness.Clear
cmbThickness.Visible = True
cmbSize.Visible = False
txtThickness.Visible = False
lblmmDepth.Visible = False
txtSize1.Visible = True
txtSize2.Visible = True
lblX.Visible = True
cmbThickness.BackColor = &HE0E0E0 'background light grey.
cmbThickness.Enabled = False
txtSize1 = ""
txtSize2 = ""
txtQuantity = ""
txtQuantity.Enabled = False
txtQuantity.BackColor = &HE0E0E0 'light grey
txtSize1.BackColor = &HE0E0E0 'background light grey.
txtSize2.BackColor = &HE0E0E0 'background light grey.
txtSize1.Enabled = False

Page 143 of 303
txtSize2.Enabled = False
txtSize3 = ""
txtSize3.Enabled = False
txtSize3.Visible = False
Select Case cmbMaterialChoice
'If wood is chosen as the material type then the following become options in combobox
cmbMaterial.
Case "Wood"
cmbMaterial.Clear
cmbMaterial.AddItem "Dowel"
cmbMaterial.AddItem "MDF"
cmbMaterial.AddItem "MDF (Flexible)"
cmbMaterial.AddItem "PAR Redwood"
cmbMaterial.AddItem "Pine"
cmbMaterial.AddItem "Birch Plywood"
'If plastic is chosen as the material type then the following become options in combobox
cmbMaterial.
Case "Plastic"
cmbMaterial.Clear
cmbMaterial.AddItem "Acrylic Rod (Clear Round)"
cmbMaterial.AddItem "Acrylic Sheet (Clear)"
cmbMaterial.AddItem "Acrylic Sheet (Opaque Coloured)"
cmbMaterial.AddItem "Acrylic Sheet (Transparent Coloured)"
'If metal is chosen as the material type then the following become options in combobox
cmbMaterial.
Case "Metal"
cmbMaterial.Clear
cmbMaterial.AddItem "Aluminium Rod"
cmbMaterial.AddItem "Aluminium Sheet"
cmbMaterial.AddItem "Copper Sheet"
cmbMaterial.AddItem "Brass Sheet"
cmbMaterial.AddItem "Steel Tube"
'If mechanisms is chosen then the following become options in combobox cmbMaterial.
Case "Mechanisms"
cmbMaterial.Clear
cmbMaterial.AddItem "Quartz Clock Mechanism"
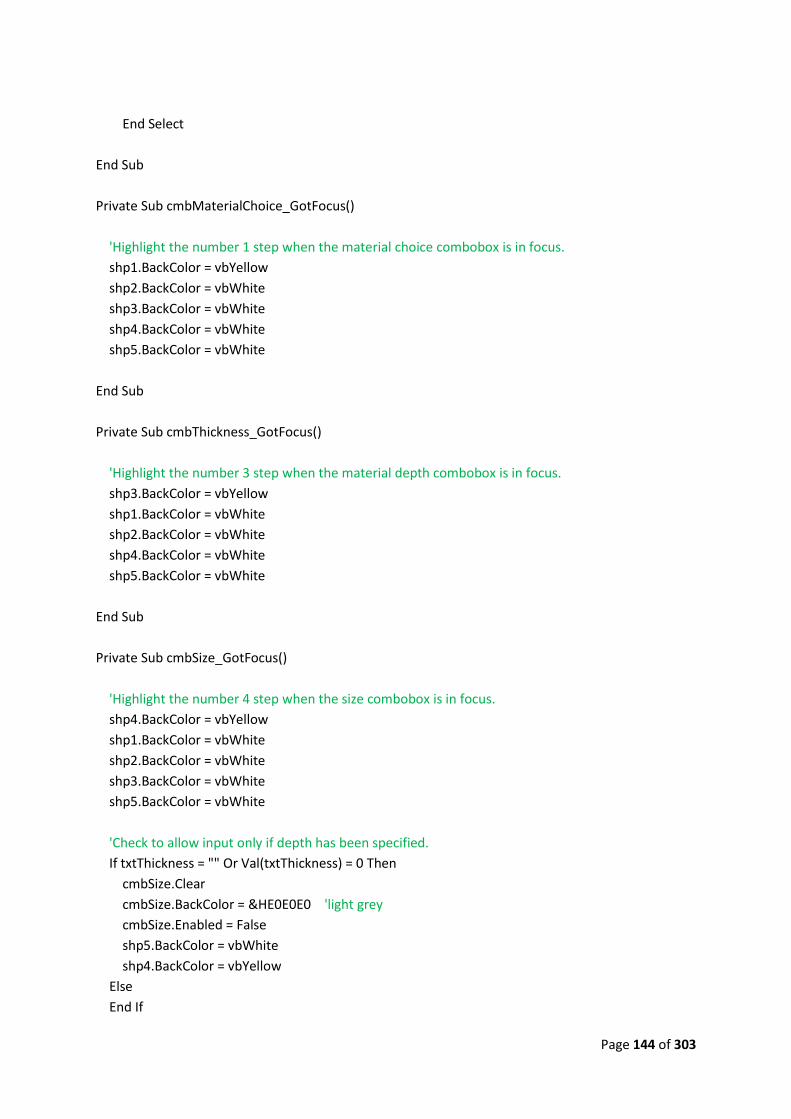
Page 144 of 303
End Select
End Sub
Private Sub cmbMaterialChoice_GotFocus()
'Highlight the number 1 step when the material choice combobox is in focus.
shp1.BackColor = vbYellow
shp2.BackColor = vbWhite
shp3.BackColor = vbWhite
shp4.BackColor = vbWhite
shp5.BackColor = vbWhite
End Sub
Private Sub cmbThickness_GotFocus()
'Highlight the number 3 step when the material depth combobox is in focus.
shp3.BackColor = vbYellow
shp1.BackColor = vbWhite
shp2.BackColor = vbWhite
shp4.BackColor = vbWhite
shp5.BackColor = vbWhite
End Sub
Private Sub cmbSize_GotFocus()
'Highlight the number 4 step when the size combobox is in focus.
shp4.BackColor = vbYellow
shp1.BackColor = vbWhite
shp2.BackColor = vbWhite
shp3.BackColor = vbWhite
shp5.BackColor = vbWhite
'Check to allow input only if depth has been specified.
If txtThickness = "" Or Val(txtThickness) = 0 Then
cmbSize.Clear
cmbSize.BackColor = &HE0E0E0 'light grey
cmbSize.Enabled = False
shp5.BackColor = vbWhite
shp4.BackColor = vbYellow
Else
End If

Page 145 of 303
End Sub
Private Sub cmdPrint_MouseMove(Button As Integer, Shift As Integer, X As Single, Y As Single)
'Mouseover effect
cmdPrint.BackColor = vbWhite
End Sub
Private Sub cmdClear_Click()
'Clear all input boxes.
cmbMaterialChoice.Clear
cmbMaterialChoice.AddItem "Mechanisms"
cmbMaterialChoice.AddItem "Metal"
cmbMaterialChoice.AddItem "Plastic"
cmbMaterialChoice.AddItem "Wood"
cmbMaterial.Clear
cmbThickness.Clear
txtSize1 = ""
txtSize2 = ""
txtSize3 = ""
txtQuantity = ""
lblDisplayCost = ""
'Disable inputs to allow for proper combobox population. Also promotes logical order and
prevents errors.
cmbMaterial.Enabled = False
cmbThickness.Enabled = False
txtThickness.Enabled = False
cmbSize.Enabled = False
txtSize1.Enabled = False
txtSize2.Enabled = False
txtSize3.Enabled = False
txtQuantity.Enabled = False
'Back-colour of all disabled input to light grey.
cmbMaterial.BackColor = &HE0E0E0
cmbThickness.BackColor = &HE0E0E0
txtThickness.BackColor = &HE0E0E0
cmbSize.BackColor = &HE0E0E0
txtSize1.BackColor = &HE0E0E0
txtSize2.BackColor = &HE0E0E0
txtSize3.BackColor = &HE0E0E0

Page 146 of 303
txtQuantity.BackColor = &HE0E0E0
'Sets which inputs are available.
cmbThickness.Visible = True
txtThickness.Visible = False
txtQuantity.Visible = True
cmbSize.Visible = False
lblmmDepth.Visible = False
txtSize3.Visible = False
txtSize1.Visible = True
txtSize2.Visible = True
lblX.Visible = True
cmbSize.Visible = False
'Visually lose focus on all input rows.
shp5.BackColor = vbWhite
shp1.BackColor = vbWhite
shp2.BackColor = vbWhite
shp3.BackColor = vbWhite
shp4.BackColor = vbWhite
End Sub
Private Sub imgAdd_MouseMove(Button As Integer, Shift As Integer, X As Single, Y As Single)
'Cancels the add button mouseover effect.
Set cmdAddItem.Picture = LoadPicture(App.Path & "\MYDATA\addbutton1.bmp")
cmdPrint.BackColor = &H8000000F 'light grey
End Sub
Private Sub imgBackground_Click()
'Loses focus on current step.
shp5.BackColor = vbWhite
shp1.BackColor = vbWhite
shp2.BackColor = vbWhite
shp3.BackColor = vbWhite
shp4.BackColor = vbWhite
'Sets focus onto picturebox
picItem.SetFocus
End Sub

Page 147 of 303
Private Sub imgReturn_Click()
'Unloads the form.
Unload frmNewOrder
Set frmNewOrder = Nothing
'Displays the Main Menu form.
frmStudentOptions.Show
End Sub
Private Sub imgReturn_MouseMove(Button As Integer, Shift As Integer, X As Single, Y As Single)
'Loads picture into imgReturn that differs in colour to create a mouseover effect.
Set imgReturn.Picture = LoadPicture(App.Path & "\MYDATA\returnup2.bmp")
End Sub
Private Sub imgReturnArea_MouseMove(Button As Integer, Shift As Integer, X As Single, Y As Single)
'Sets the return button into original appearance.
Set imgReturn.Picture = LoadPicture(App.Path & "\MYDATA\returnup1.bmp")
End Sub
Private Sub cmdAddItem_MouseMove(Button As Integer, Shift As Integer, X As Single, Y As Single)
'Loads the picture into the add to basket button.
Set cmdAddItem.Picture = LoadPicture(App.Path & "\MYDATA\addbutton2.bmp")
End Sub
Private Sub cmdPrint_Click()
'Ensures the option was what the user wanted.
If MsgBox("Are you sure you want print?", vbYesNo + vbQuestion, "Print Order") = vbYes Then
frmNewOrder.Hide
frmPrintOrder.Show
Else
End If
MsgBox ("It is vital the date of your order is remembered. Please jot todays date down as you may
be asked for it again."), vbInformation, "Important!"

Page 148 of 303
End Sub
Private Sub cmdClear_MouseMove(Button As Integer, Shift As Integer, X As Single, Y As Single)
'Mouseover effect.
cmdClear.BackColor = vbWhite
End Sub
Private Sub imgView_MouseMove(Button As Integer, Shift As Integer, X As Single, Y As Single)
'Cancels mouseover effect.
cmdPrint.BackColor = &H8000000F 'light grey
Set cmdAddItem.Picture = LoadPicture(App.Path & "\MYDATA\addbutton1.bmp")
End Sub
Private Sub picItem_Click()
'Loses focus on current step.
shp5.BackColor = vbWhite
shp1.BackColor = vbWhite
shp2.BackColor = vbWhite
shp3.BackColor = vbWhite
shp4.BackColor = vbWhite
End Sub
Private Sub picItem_MouseMove(Button As Integer, Shift As Integer, X As Single, Y As Single)
'Cancel command button "clear" mouseover effect.
cmdClear.BackColor = &HE0E0E0 'background light grey.
End Sub
Private Sub tmrCost_Timer()
'Only is the recordset is open can the recordcount function work. So this code checks before
attempting.
If lblDB = "Open" Then
lblItemCount = newOrder.RecordCount
Else
End If

Page 149 of 303
'Adds up the total cost of all the materials added in basket (datagrid).
Dim rowNum As Integer
Dim subTotal As String
rowNum = 0
dgOrder.Col = 1
Do While rowNum < Val(lblItemCount)
dgOrder.Row = rowNum
If dgOrder.Columns(5).Text <> "" Then
subTotal = Val(subTotal) + Val(dgOrder.Columns(5).Text)
rowNum = Val(rowNum) + 1
End If
Loop
'Displays the cost in currency format.
lblSTotalValue.Caption = Format(subTotal, "Currency")
End Sub
Private Sub tmrTime_Timer()
'Code to display current time in label.
lblTime.Caption = Time
End Sub
Private Sub txtQuantity_GotFocus()
'Highlight the number 5 step when the quantity textbox is in focus.
shp5.BackColor = vbYellow
shp1.BackColor = vbWhite
shp2.BackColor = vbWhite
shp3.BackColor = vbWhite
shp4.BackColor = vbWhite
'------------------------------------------------------------------------------
'Validating and allowing input into the quantity if certain conditions are met.
'------------------------------------------------------------------------------
Select Case cmbMaterial

Page 150 of 303
Case "Aluminium Rod"
'Check to allow input only if sizes are inputted before to avoid error in calculation.
If txtSize3 = "" Or Val(txtSize3) = 0 Then
txtQuantity.BackColor = &HE0E0E0 'light grey
txtQuantity.Enabled = False
shp5.BackColor = vbWhite
shp4.BackColor = vbYellow
Else
End If
Case "Steel Tube"
'Check to allow input only if sizes are inputted before to avoid error in calculation.
If txtSize3 = "" Or Val(txtSize3) = 0 Then
txtQuantity.BackColor = &HE0E0E0 'light grey
txtQuantity.Enabled = False
shp5.BackColor = vbWhite
shp4.BackColor = vbYellow
Else
End If
Case "Dowel"
'Check to allow input only if sizes are inputted before to avoid error in calculation.
If txtSize3 = "" Or Val(txtSize3) = 0 Then
txtQuantity.BackColor = &HE0E0E0 'light grey
txtQuantity.Enabled = False
shp5.BackColor = vbWhite
shp4.BackColor = vbYellow
Else
End If
Case "Acrylic Rod (Clear Round)"
'Check to allow input only if sizes are inputted before to avoid error in calculation.
If txtSize3 = "" Or Val(txtSize3) = 0 Then
txtQuantity.BackColor = &HE0E0E0 'light grey
txtQuantity.Enabled = False
shp5.BackColor = vbWhite
shp4.BackColor = vbYellow
Else
End If
Case "PAR Redwood"
'Check to allow input only if sizes are inputted before to avoid error in calculation.
If txtThickness = "" Or Val(txtThickness) = 0 Then
txtQuantity.BackColor = &HE0E0E0 'light grey

Page 151 of 303
txtQuantity.Enabled = False
shp5.BackColor = vbWhite
shp4.BackColor = vbYellow
Else
End If
Case "Quartz Clock Mechanism"
'Do nothing as no sizes are supposed to be input. This will not affect the cost.
Case Else
'Check to allow input only if sizes are inputted before to avoid error in calculation.
If txtSize1 = "" Or txtSize2 = "" Or Val(txtSize1) = 0 Or Val(txtSize2) = 0 Then
txtQuantity.BackColor = &HE0E0E0 'light grey
txtQuantity.Enabled = False
shp5.BackColor = vbWhite
shp4.BackColor = vbYellow
Else
End If
End Select
'------------------------------------------------------------------------------
'Search the database to retrieve the unit sizes for the check.
'------------------------------------------------------------------------------
SearchMaterial = cmbMaterial
SearchPhrase5 = "%" & SearchMaterial & "%"
SearchDepth = cmbThickness
SearchPhrase6 = "%" & SearchDepth & "%"
qSQL = "SELECT*FROM tblMaterialsList WHERE [Material] LIKE " & "'" & SearchPhrase5 & "'" &
" AND [Depth] LIKE " & " '" & SearchPhrase6 & "'" & ""
'Retrieve values in tempdata form.
With materialsList
.ActiveConnection = db
.LockType = adLockOptimistic
.CursorType = adOpenKeyset
.Open qSQL
frmTempData.txtUnitCost = .Fields("Unit Cost").Value
frmTempData.txtUnitSize = .Fields("Unit Size (mm)").Value
frmTempData.txtUnitSize = Replace$(frmTempData.txtUnitSize.Text, "x", "*")

Page 152 of 303
frmTempData.txtOrderArea = Val(txtSize1) * Val(txtSize2)
End With
'-------------------------------------------------------------------------------
'-------------------------------------------------------------------------------------
'Search the database and compare the order values to see if they exceed the unit size.
'-------------------------------------------------------------------------------------
'Check to see if the order size is valid. (not bigger than unit sizes available.)
Select Case cmbMaterial
Case "MDF"
strheight = Left$(frmTempData.txtUnitSize.Text, 5)
strWidth = Right$(frmTempData.txtUnitSize.Text, 5)
strUnitSize = Replace$(frmTempData.txtUnitSize.Text, "*", "x")
'Checking the order size is valid against the values retrieved.
If Val(txtSize1) > strheight Or Val(txtSize2) > strWidth Then
MsgBox ("The size of your order is too large!" + vbNewLine + vbNewLine + _
"The maximum size for this material is " + strUnitSize), vbExclamation, "Size Limit
Exceeded!"
'If it is prompt and clear input boxes.
txtSize1 = ""
txtSize2 = ""
txtSize1.SetFocus
'Close to reopen when calculating the cost and storing the data.
materialsList.Close
Else
materialsList.Close
End If
Case "MDF (Flexible)"
strheight = Left$(frmTempData.txtUnitSize.Text, 5)
strWidth = Right$(frmTempData.txtUnitSize.Text, 5)
strUnitSize = Replace$(frmTempData.txtUnitSize.Text, "*", "x")
'Checking the order size is valid against the values retrieved.
If Val(txtSize1) > strheight Or Val(txtSize2) > strWidth Then
MsgBox ("The size of your order is too large!" + vbNewLine + vbNewLine + _
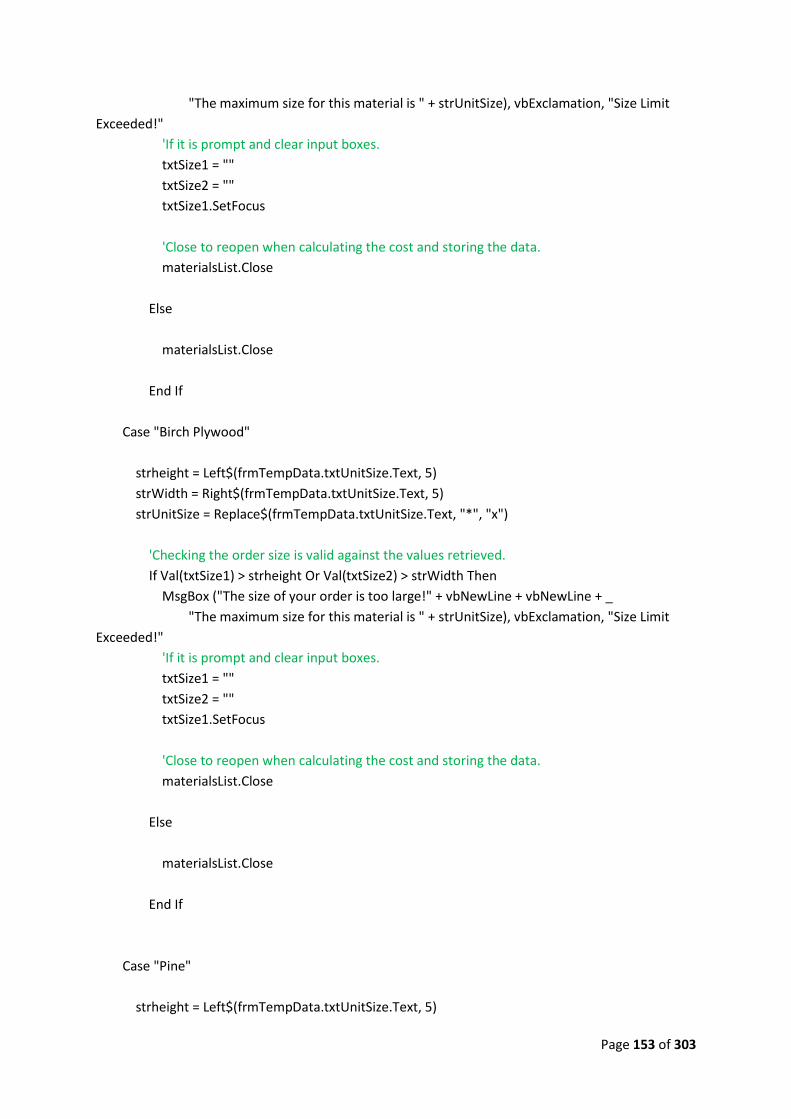
Page 153 of 303
"The maximum size for this material is " + strUnitSize), vbExclamation, "Size Limit
Exceeded!"
'If it is prompt and clear input boxes.
txtSize1 = ""
txtSize2 = ""
txtSize1.SetFocus
'Close to reopen when calculating the cost and storing the data.
materialsList.Close
Else
materialsList.Close
End If
Case "Birch Plywood"
strheight = Left$(frmTempData.txtUnitSize.Text, 5)
strWidth = Right$(frmTempData.txtUnitSize.Text, 5)
strUnitSize = Replace$(frmTempData.txtUnitSize.Text, "*", "x")
'Checking the order size is valid against the values retrieved.
If Val(txtSize1) > strheight Or Val(txtSize2) > strWidth Then
MsgBox ("The size of your order is too large!" + vbNewLine + vbNewLine + _
"The maximum size for this material is " + strUnitSize), vbExclamation, "Size Limit
Exceeded!"
'If it is prompt and clear input boxes.
txtSize1 = ""
txtSize2 = ""
txtSize1.SetFocus
'Close to reopen when calculating the cost and storing the data.
materialsList.Close
Else
materialsList.Close
End If
Case "Pine"
strheight = Left$(frmTempData.txtUnitSize.Text, 5)

Page 154 of 303
strWidth = Right$(frmTempData.txtUnitSize.Text, 5)
strUnitSize = Replace$(frmTempData.txtUnitSize.Text, "*", "x")
'Checking the order size is valid against the values retrieved.
If Val(txtSize1) > strheight Or Val(txtSize2) > strWidth Then
MsgBox ("The size of your order is too large!" + vbNewLine + vbNewLine + _
"The maximum size for this material is " + strUnitSize), vbExclamation, "Size Limit
Exceeded!"
'If it is prompt and clear input boxes.
txtSize1 = ""
txtSize2 = ""
txtSize1.SetFocus
'Close to reopen when calculating the cost and storing the data.
materialsList.Close
Else
materialsList.Close
End If
Case "PAR Redwood"
strLength = 2000 '2000mm equals 2 metres
'Checking the order size is valid against the value retrieved.
If Val(txtThickness) > strLength Then
MsgBox ("The maximum length for this material is 2000mm."), vbExclamation, "Size Limit
Exceeded!"
'If it is prompt and clear input boxes.
txtThickness = ""
txtThickness.SetFocus
txtQuantity.BackColor = &HE0E0E0 'light grey
'Close to reopen when calculating the cost and storing the data.
materialsList.Close
Else
materialsList.Close
End If
Case "Acrylic Sheet (Clear)"
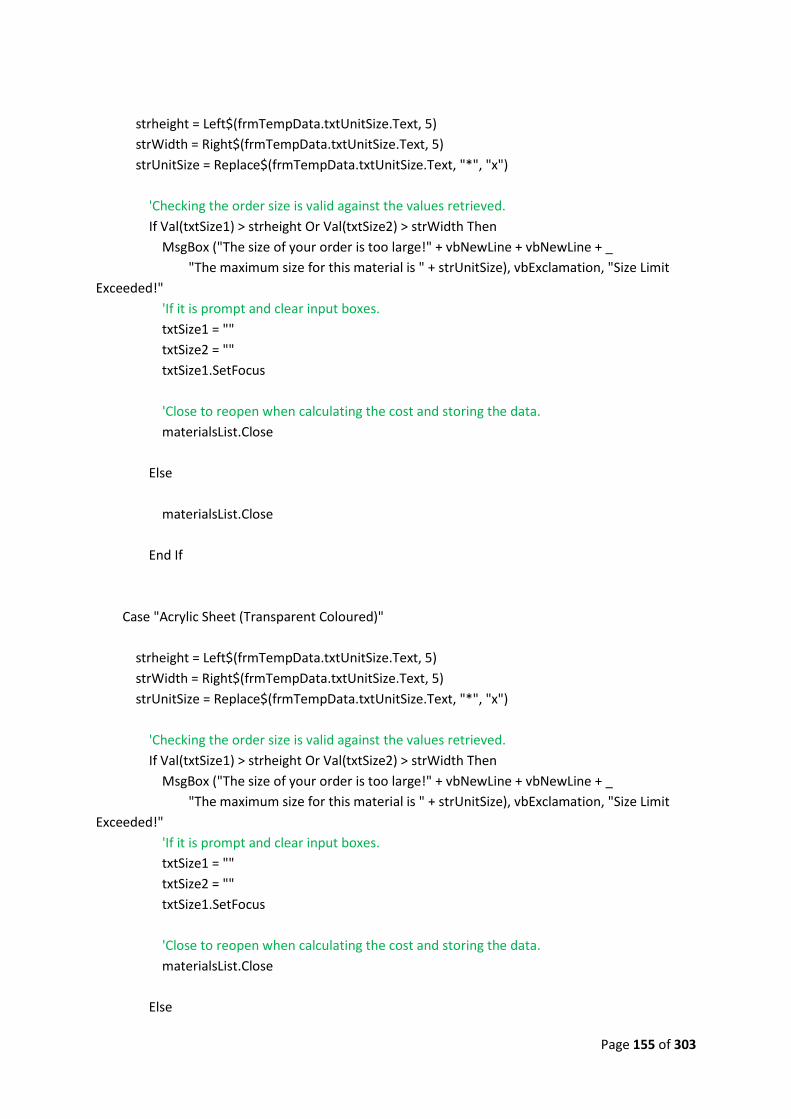
Page 155 of 303
strheight = Left$(frmTempData.txtUnitSize.Text, 5)
strWidth = Right$(frmTempData.txtUnitSize.Text, 5)
strUnitSize = Replace$(frmTempData.txtUnitSize.Text, "*", "x")
'Checking the order size is valid against the values retrieved.
If Val(txtSize1) > strheight Or Val(txtSize2) > strWidth Then
MsgBox ("The size of your order is too large!" + vbNewLine + vbNewLine + _
"The maximum size for this material is " + strUnitSize), vbExclamation, "Size Limit
Exceeded!"
'If it is prompt and clear input boxes.
txtSize1 = ""
txtSize2 = ""
txtSize1.SetFocus
'Close to reopen when calculating the cost and storing the data.
materialsList.Close
Else
materialsList.Close
End If
Case "Acrylic Sheet (Transparent Coloured)"
strheight = Left$(frmTempData.txtUnitSize.Text, 5)
strWidth = Right$(frmTempData.txtUnitSize.Text, 5)
strUnitSize = Replace$(frmTempData.txtUnitSize.Text, "*", "x")
'Checking the order size is valid against the values retrieved.
If Val(txtSize1) > strheight Or Val(txtSize2) > strWidth Then
MsgBox ("The size of your order is too large!" + vbNewLine + vbNewLine + _
"The maximum size for this material is " + strUnitSize), vbExclamation, "Size Limit
Exceeded!"
'If it is prompt and clear input boxes.
txtSize1 = ""
txtSize2 = ""
txtSize1.SetFocus
'Close to reopen when calculating the cost and storing the data.
materialsList.Close
Else

Page 156 of 303
materialsList.Close
End If
Case "Acrylic Sheet (Opaque Coloured)"
strheight = Left$(frmTempData.txtUnitSize.Text, 5)
strWidth = Right$(frmTempData.txtUnitSize.Text, 5)
strUnitSize = Replace$(frmTempData.txtUnitSize.Text, "*", "x")
'Checking the order size is valid against the values retrieved.
If Val(txtSize1) > strheight Or Val(txtSize2) > strWidth Then
MsgBox ("The size of your order is too large!" + vbNewLine + vbNewLine + _
"The maximum size for this material is " + strUnitSize), vbExclamation, "Size Limit
Exceeded!"
'If it is prompt and clear input boxes.
txtSize1 = ""
txtSize2 = ""
txtSize1.SetFocus
'Close to reopen when calculating the cost and storing the data.
materialsList.Close
Else
materialsList.Close
End If
Case "Acrylic Rod (Clear Round)"
strLength = frmTempData.txtUnitSize.Text
'Checking the order size is valid against the values retrieved.
If Val(txtSize3) > strLength Then
MsgBox ("The maximum length for this material is " + strLength + "mm."), vbExclamation,
"Size Limit Exceeded!"
'If it is prompt and clear input boxes.
txtSize3 = ""
txtSize3.SetFocus
'Close to reopen when calculating the cost and storing the data.

Page 157 of 303
materialsList.Close
Else
materialsList.Close
End If
Case "Dowel"
strLength = frmTempData.txtUnitSize.Text
'Checking the order size is valid against the values retrieved.
If Val(txtSize3) > strLength Then
MsgBox ("The maximum length for this material is " + strLength + "mm."), vbExclamation,
"Size Limit Exceeded!"
'If it is prompt and clear input boxes.
txtSize3 = ""
txtSize3.SetFocus
'Close to reopen when calculating the cost and storing the data.
materialsList.Close
Else
materialsList.Close
End If
Case "Steel Tube"
strLength = frmTempData.txtUnitSize.Text
'Checking the order size is valid against the values retrieved.
If Val(txtSize3) > strLength Then
MsgBox ("The maximum length for this material is " + strLength + "mm."), vbExclamation,
"Size Limit Exceeded!"
'If it is prompt and clear input boxes.
txtSize3 = ""
txtSize3.SetFocus
'Close to reopen when calculating the cost and storing the data.
materialsList.Close

Page 158 of 303
Else
materialsList.Close
End If
Case "Aluminium Sheet"
strheight = Left$(frmTempData.txtUnitSize.Text, 5)
strWidth = Right$(frmTempData.txtUnitSize.Text, 5)
strUnitSize = frmTempData.txtUnitSize
'Checking the order size is valid against the values retrieved.
If Val(txtSize1) > strheight Or Val(txtSize2) > strWidth Then
MsgBox ("The size of your order is too large!" + vbNewLine + vbNewLine + _
"The maximum size for this material is " + strUnitSize), vbExclamation, "Size Limit
Exceeded!"
'If it is prompt and clear input boxes.
txtSize1 = ""
txtSize2 = ""
txtSize1.SetFocus
'Close to reopen when calculating the cost and storing the data.
materialsList.Close
Else
materialsList.Close
End If
Case "Copper Sheet"
strheight = Left$(frmTempData.txtUnitSize.Text, 5)
strWidth = Right$(frmTempData.txtUnitSize.Text, 5)
strUnitSize = frmTempData.txtUnitSize
'Checking the order size is valid against the values retrieved.
If Val(txtSize1) > strheight Or Val(txtSize2) > strWidth Then
MsgBox ("The size of your order is too large!" + vbNewLine + vbNewLine + _
"The maximum size for this material is " + strUnitSize), vbExclamation, "Size Limit
Exceeded!"
'If it is prompt and clear input boxes.
txtSize1 = ""

Page 159 of 303
txtSize2 = ""
txtSize1.SetFocus
'Close to reopen when calculating the cost and storing the data.
materialsList.Close
Else
materialsList.Close
End If
Case "Brass Sheet"
strheight = Left$(frmTempData.txtUnitSize.Text, 5)
strWidth = Right$(frmTempData.txtUnitSize.Text, 5)
strUnitSize = frmTempData.txtUnitSize
'Checking the order size is valid against the values retrieved.
If Val(txtSize1) > strheight Or Val(txtSize2) > strWidth Then
MsgBox ("The size of your order is too large!" + vbNewLine + vbNewLine + _
"The maximum size for this material is " + strUnitSize), vbExclamation, "Size Limit
Exceeded!"
'If it is prompt and clear input boxes.
txtSize1 = ""
txtSize2 = ""
txtSize1.SetFocus
'Close to reopen when calculating the cost and storing the data.
materialsList.Close
Else
materialsList.Close
End If
Case "Aluminium Rod"
strLength = frmTempData.txtUnitSize.Text
'Checking the order size is valid against the values retrieved.
If Val(txtSize3) > strLength Then
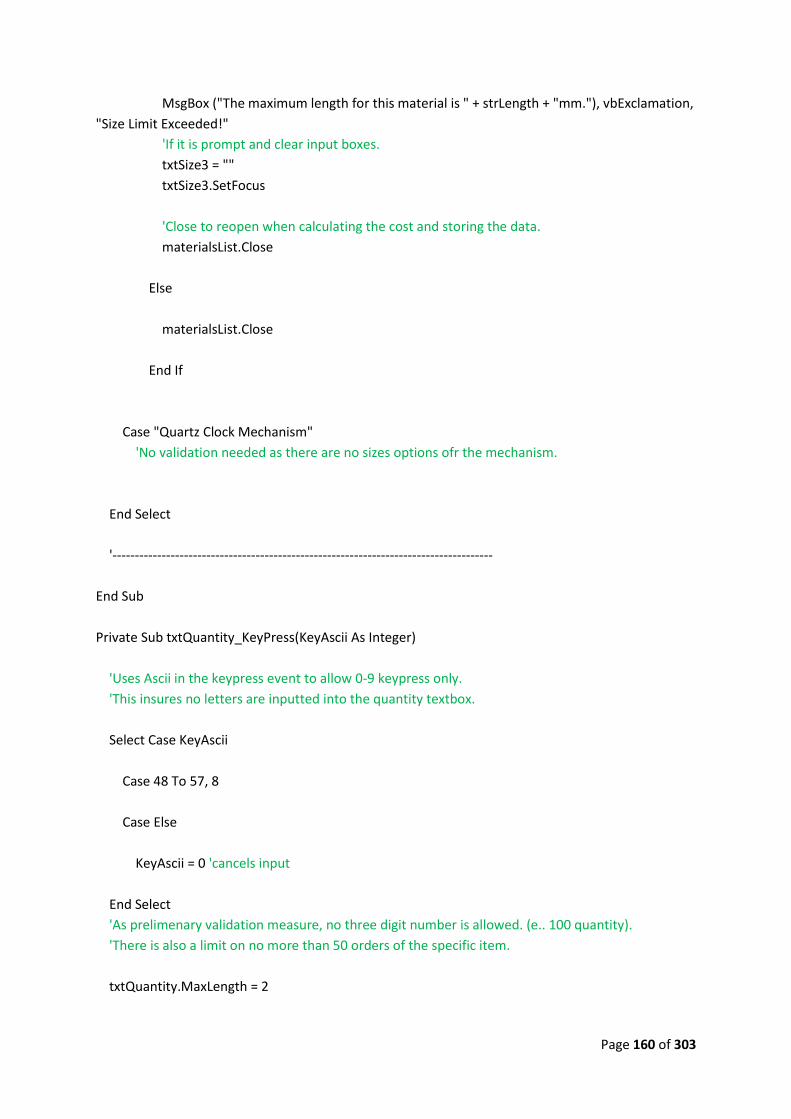
Page 160 of 303
MsgBox ("The maximum length for this material is " + strLength + "mm."), vbExclamation,
"Size Limit Exceeded!"
'If it is prompt and clear input boxes.
txtSize3 = ""
txtSize3.SetFocus
'Close to reopen when calculating the cost and storing the data.
materialsList.Close
Else
materialsList.Close
End If
Case "Quartz Clock Mechanism"
'No validation needed as there are no sizes options ofr the mechanism.
End Select
'-------------------------------------------------------------------------------------
End Sub
Private Sub txtQuantity_KeyPress(KeyAscii As Integer)
'Uses Ascii in the keypress event to allow 0-9 keypress only.
'This insures no letters are inputted into the quantity textbox.
Select Case KeyAscii
Case 48 To 57, 8
Case Else
KeyAscii = 0 'cancels input
End Select
'As prelimenary validation measure, no three digit number is allowed. (e.. 100 quantity).
'There is also a limit on no more than 50 orders of the specific item.
txtQuantity.MaxLength = 2

Page 161 of 303
If Val(txtQuantity) > 25 Then
MsgBox ("Exceeded the 25 item quantity limit."), vbOKOnly + vbExclamation, "Quantity Error"
Else
End If
End Sub
Private Sub txtQuantity_LostFocus()
'To avoid recordset errors when the txtquantity box is clciked, the recordset should be closed.
Select Case cmbMaterial
Case "Quartz Clock Mechanism"
materialsList.Close
End Select
End Sub
Private Sub txtSize1_GotFocus()
'Highlight the number 4 step when the size textbox is in focus.
shp4.BackColor = vbYellow
shp1.BackColor = vbWhite
shp2.BackColor = vbWhite
shp3.BackColor = vbWhite
shp5.BackColor = vbWhite
End Sub
Private Sub txtSize1_KeyPress(KeyAscii As Integer)
'Allows user input into quantity textbox.
If txtSize1 <> "" Then
txtQuantity.BackColor = vbWhite
txtQuantity.Enabled = True
Else
txtQuantity.BackColor = &HE0E0E0 'background light grey.
txtQuantity.Enabled = False
End If
'Uses Ascii in the keypress event to allow 0-9 keypress only.
'This insures no letters are inputted into the size textbox.
Select Case KeyAscii

Page 162 of 303
Case 48 To 57, 8
Case Else
KeyAscii = 0 'cancels input
End Select
txtSize1.MaxLength = 4
End Sub
Private Sub txtSize2_GotFocus()
'Highlight the number 4 step when the size textbox is in focus.
shp4.BackColor = vbYellow
shp1.BackColor = vbWhite
shp2.BackColor = vbWhite
shp3.BackColor = vbWhite
shp5.BackColor = vbWhite
End Sub
Private Sub txtSize2_KeyPress(KeyAscii As Integer)
'Allows user input into quantity textbox.
If txtSize2 <> "" Then
txtQuantity.BackColor = vbWhite
txtQuantity.Enabled = True
Else
txtQuantity.BackColor = &HE0E0E0 'background light grey.
txtQuantity.Enabled = False
End If
'Uses Ascii in the keypress event to allow 0-9 keypress only.
'This insures no letters are inputted into the size textbox.
Select Case KeyAscii
Case 48 To 57, 8
Case Else

Page 163 of 303
KeyAscii = 0 'cancels input
End Select
txtSize2.MaxLength = 4
End Sub
Private Sub txtSize3_KeyPress(KeyAscii As Integer)
'Allows user input into quantity textbox.
If txtSize3 <> "" Then
txtQuantity.BackColor = vbWhite
txtQuantity.Enabled = True
Else
txtQuantity.BackColor = &HE0E0E0 'background light grey.
txtQuantity.Enabled = False
End If
'Uses Ascii in the keypress event to allow 0-9 keypress only.
'This insures no letters are inputted into the size textbox.
Select Case KeyAscii
Case 48 To 57, 8
Case Else
KeyAscii = 0 'cancels input
End Select
'Places a restriction on the length.
txtSize3.MaxLength = 4
End Sub
Private Sub txtThickness_GotFocus()
'Highlight the number 3 step when the size depth textbox is in focus.
shp3.BackColor = vbYellow
shp1.BackColor = vbWhite
shp2.BackColor = vbWhite

Page 164 of 303
shp4.BackColor = vbWhite
shp5.BackColor = vbWhite
End Sub
Private Sub txtThickness_KeyPress(KeyAscii As Integer)
'Allows user input into size combobox.
If txtThickness <> "" Then
cmbSize.BackColor = vbWhite
cmbSize.Enabled = True
Else
cmbSize.Clear
cmbSize.AddItem "100 x 100"
cmbSize.AddItem "25 x 75"
cmbSize.AddItem "38 x 38"
cmbSize.AddItem "25 x 50"
cmbSize.AddItem "19 x 75"
cmbSize.AddItem "25 x 150"
cmbSize.AddItem "50 x 50"
cmbSize.AddItem "12 x 38"
cmbSize.BackColor = &HE0E0E0 'background light grey.
cmbSize.Enabled = False
End If
'Uses Ascii in the keypress event to allow 0-9 keypress only.
'This insures no letters are inputted into the size textbox.
Select Case KeyAscii
Case 48 To 57, 8
Case Else
KeyAscii = 0 'cancels input
End Select
'Sets the maxlength of this textbox.
txtThickness.MaxLength = 4
End Sub
-----------------------------------------------------------------------------------------------------------------

Page 165 of 303
-----------------------------------------------------------------------------------------------------------------
Edit Order Form (frmEditOrder)
OPTION EXPLICIT
Dim db As New ADODB.Connection 'Declaration of connection from VB to database
Dim studentDetails As New ADODB.Recordset 'Declaration of student recordset
Dim newOrder As New ADODB.Recordset 'Declaration of order recordset
Dim newOrderList As New ADODB.Recordset 'Declaration of datagrid recordset
Dim materialsList As New ADODB.Recordset 'Declaration of materials list recordset.
Dim sConn As String 'Declaration of object location for connection
Dim sSQL As String 'Declaration of primary SQL statement
Dim rSQL As String 'Declaration of secondary SQL statement
Dim pSQL As String 'Declaration of third SQL statement
Dim oSQL As String 'Declaration of fourth SQL statement
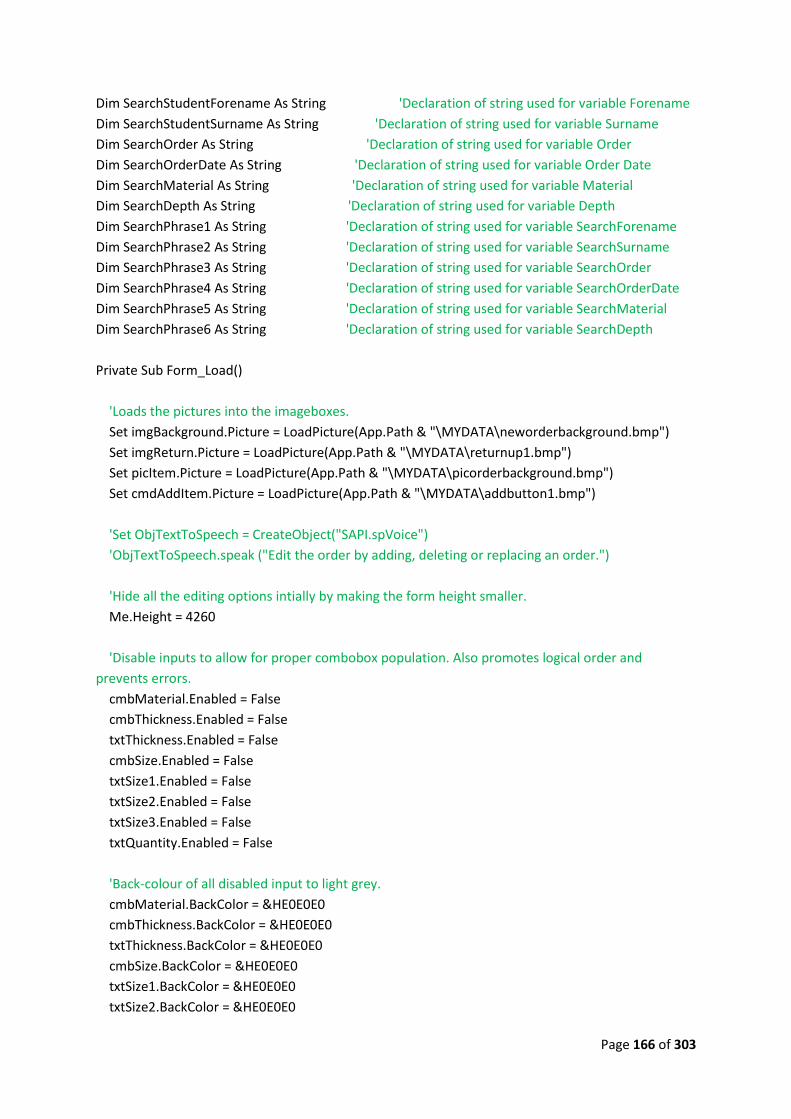
Page 166 of 303
Dim SearchStudentForename As String 'Declaration of string used for variable Forename
Dim SearchStudentSurname As String 'Declaration of string used for variable Surname
Dim SearchOrder As String 'Declaration of string used for variable Order
Dim SearchOrderDate As String 'Declaration of string used for variable Order Date
Dim SearchMaterial As String 'Declaration of string used for variable Material
Dim SearchDepth As String 'Declaration of string used for variable Depth
Dim SearchPhrase1 As String 'Declaration of string used for variable SearchForename
Dim SearchPhrase2 As String 'Declaration of string used for variable SearchSurname
Dim SearchPhrase3 As String 'Declaration of string used for variable SearchOrder
Dim SearchPhrase4 As String 'Declaration of string used for variable SearchOrderDate
Dim SearchPhrase5 As String 'Declaration of string used for variable SearchMaterial
Dim SearchPhrase6 As String 'Declaration of string used for variable SearchDepth
Private Sub Form_Load()
'Loads the pictures into the imageboxes.
Set imgBackground.Picture = LoadPicture(App.Path & "\MYDATA\neworderbackground.bmp")
Set imgReturn.Picture = LoadPicture(App.Path & "\MYDATA\returnup1.bmp")
Set picItem.Picture = LoadPicture(App.Path & "\MYDATA\picorderbackground.bmp")
Set cmdAddItem.Picture = LoadPicture(App.Path & "\MYDATA\addbutton1.bmp")
'Set ObjTextToSpeech = CreateObject("SAPI.spVoice")
'ObjTextToSpeech.speak ("Edit the order by adding, deleting or replacing an order.")
'Hide all the editing options intially by making the form height smaller.
Me.Height = 4260
'Disable inputs to allow for proper combobox population. Also promotes logical order and
prevents errors.
cmbMaterial.Enabled = False
cmbThickness.Enabled = False
txtThickness.Enabled = False
cmbSize.Enabled = False
txtSize1.Enabled = False
txtSize2.Enabled = False
txtSize3.Enabled = False
txtQuantity.Enabled = False
'Back-colour of all disabled input to light grey.
cmbMaterial.BackColor = &HE0E0E0
cmbThickness.BackColor = &HE0E0E0
txtThickness.BackColor = &HE0E0E0
cmbSize.BackColor = &HE0E0E0
txtSize1.BackColor = &HE0E0E0
txtSize2.BackColor = &HE0E0E0

Page 167 of 303
txtSize3.BackColor = &HE0E0E0
txtQuantity.BackColor = &HE0E0E0
'Sets which inputs are available on form load.
cmbThickness.Visible = True
txtThickness.Visible = False
cmbSize.Visible = False
lblmmDepth.Visible = False
txtSize3.Visible = False
txtQuantity.Visible = True
txtSize1.Visible = True
txtSize2.Visible = True
lblX.Visible = True
cmbSize.Visible = False
sPath = App.Path & "\MYDATA\resistantmaterialsdb.mdb"
sConn = "Provider=Microsoft.JET.OLEDB.4.0;Data Source=" & sPath
SearchStudentForename = frmTempData.txtFnameData
SearchPhrase1 = "%" & SearchStudentForename & "%"
SearchStudentSurname = frmTempData.txtSnameData
SearchPhrase2 = "%" & SearchStudentSurname & "%"
SearchOrder = frmTempData.txtSIDData
SearchPhrase3 = "%" & SearchOrder & "%"
SearchOrderDate = frmTempData.txtDateData
SearchPhrase4 = "%" & SearchOrderDate & "%"
SearchMaterial = cmbMaterial
SearchPhrase5 = "%" & SearchMaterial & "%"
SearchDepth = cmbThickness
SearchPhrase6 = "%" & SearchDepth & "%"
sSQL = "SELECT*FROM tblStudentDetails WHERE [Forename] LIKE " & "'" & SearchPhrase1 & "'"
& " AND [Surname] LIKE " & " '" & SearchPhrase2 & "'" & ""
rSQL = "SELECT*FROM tblStudentOrder"
pSQL = "SELECT*FROM tblStudentOrder WHERE [StudentID] LIKE " & "'" & SearchPhrase3 & "'"
& " AND [OrderDate] LIKE " & " '" & SearchPhrase4 & "'" & ""

Page 168 of 303
oSQL = "SELECT*FROM tblMaterialsList"
qSQL = "SELECT*FROM tblMaterialsList WHERE [Material] LIKE " & "'" & SearchPhrase5 & "'" & "
AND [Depth] LIKE " & " '" & SearchPhrase6 & "'" & ""
db.ConnectionString = sConn
db.Open
'---------------------------------------------------------------------------------
' This opens the recordsets on the loading of the form.
'---------------------------------------------------------------------------------
'Setting connection between recordset and student details table in database.
With studentDetails
.ActiveConnection = db
.LockType = adLockOptimistic
.CursorType = adOpenKeyset
.Open sSQL
End With
'Setting connection between recordset and order table in database.
'With newOrder
' .ActiveConnection = db
' .LockType = adLockOptimistic
' .CursorType = adOpenKeyset
' .Open pSQL
'End With
'---------------------------------------------------------------------------------
End Sub
Private Sub cmdSearchDate_Click()
SearchOrder = frmTempData.txtSIDData
SearchPhrase3 = "%" & SearchOrder & "%"
SearchOrderDate = dtOrder.Value
SearchPhrase4 = "%" & SearchOrderDate & "%"
pSQL = "SELECT*FROM tblStudentOrder WHERE [StudentID] LIKE " & "'" & SearchPhrase3 & "'"
& " AND [OrderDate] LIKE " & " '" & SearchPhrase4 & "'" & ""
'---------------------------------------------------------------------------------
' This fills the datagrid with the materials list table form the database.
'---------------------------------------------------------------------------------
'Populate by using a recordset.
With db

Page 169 of 303
.CursorLocation = adUseClient
End With
With newOrder
'Check to see if the recordset is open.
If txtDbState <> "Open" Then 'If its not open.
.CursorLocation = adUseClient
.Source = pSQL
.ActiveConnection = db
.CursorType = adOpenKeyset
.LockType = adLockOptimistic
.Open
'If there is no order placed on that date. Prompt message.
If newOrder.EOF = True Then
MsgBox ("You did not place an order on this date." + vbNewLine + vbNewLine + "Please
check your date order and select again."), vbOKOnly + vbInformation, "No Order Found!"
txtDbState = "Open"
lblItemCount = "0"
lblSTotalValue.Caption = Format("0", "Currency")
Exit Sub
Else
txtDbState = "Open"
'Enlarges the form to reveal the editing options.
Do Until Me.Height > 10542
Me.Height = Me.Height + 100
DoEvents
Loop
End If
Else 'The database is open then close it before reopening it to avoid errors.
newOrder.Close
.CursorLocation = adUseClient
.Source = pSQL
.ActiveConnection = db
.CursorType = adOpenKeyset
.LockType = adLockOptimistic
.Open
'If there is no order placed on that date. Prompt message.
If newOrder.EOF = True Then

Page 170 of 303
MsgBox ("You did not place an order on this date." + vbNewLine + vbNewLine + "Please
check your date order and select again."), vbOKOnly + vbInformation, "No Order Found!"
txtDbState = "Open"
lblItemCount = "0"
lblSTotalValue.Caption = Format("0", "Currency")
Exit Sub
Else
txtDbState = "Open"
'Enlarges the form to reveal the editing options.
Do Until Me.Height > 10542
Me.Height = Me.Height + 100
DoEvents
Loop
End If
End If
End With
Set dgOrder.DataSource = newOrder
newOrder.Requery
'Set which columns from tblMateriaslList are visible and their respective width.
dgOrder.Columns.Item(1).Width = 2400
dgOrder.Columns.Item(2).Width = 800
dgOrder.Columns.Item(3).Width = 1100
dgOrder.Columns.Item(4).Width = 800
dgOrder.Columns.Item(5).Width = 1000
dgOrder.Columns.Item(0).Visible = 1000
dgOrder.Columns.Item(0).Locked = True
dgOrder.Columns.Item(1).Locked = True
dgOrder.Columns.Item(2).Locked = True
dgOrder.Columns.Item(3).Locked = True
dgOrder.Columns.Item(4).Locked = True
dgOrder.Columns.Item(5).Locked = True
dgOrder.Columns.Item(6).Locked = True
dgOrder.Columns.Item(7).Locked = True
dgOrder.BackColor = &HC0E0FF 'Light orange.
'Set datagrid interactive capabilities. Also sets which columns are visible in datagrid.
dgOrder.AllowAddNew = False
dgOrder.AllowDelete = True
dgOrder.AllowUpdate = False
dgOrder.AllowRowSizing = False

Page 171 of 303
dgOrder.Columns.Item(0).Visible = False 'OrderID field.
dgOrder.Columns.Item(6).Visible = False 'StudentID field.
dgOrder.Columns.Item(7).Visible = False 'OrderDate field.
'Return the number of items in basket to label.
lblItemCount = newOrder.RecordCount
'Prevents student from orderign over 10 items in basket.
If lblItemCount > 9 Then
cmdAddItem.Enabled = False
Else
cmdAddItem.Enabled = True
End If
'Adds up the total cost of all the materials added in basket (datagrid).
Dim rowNum As Integer
Dim subTotal As String
rowNum = 0
dgOrder.Col = 1
Do While rowNum < Val(lblItemCount)
dgOrder.Row = rowNum
If dgOrder.Columns(5).Text <> "" Then
subTotal = Val(subTotal) + Val(dgOrder.Columns(5).Text)
rowNum = Val(rowNum) + 1
End If
Loop
'Displays the cost in currency format.
lblSTotalValue.Caption = Format(subTotal, "Currency")
'---------------------------------------------------------------------------------
End Sub
Private Sub dtOrder_Change()
'Update the date of the order.
txtOrderDate = dtOrder.Value

Page 172 of 303
End Sub
Private Sub dtOrder_GotFocus()
'Hide all the editing options intially by making the form height smaller.
Me.Height = 4260
End Sub
Private Sub cmdAddItem_Click()
'Check to ensure all details have been input before storing in databse. Avoids errors.
If cmbMaterialChoice = "" Or cmbMaterial = "" Or txtQuantity = "" Then
MsgBox ("Complete all material details before adding!"), vbExclamation, "Missing Details!"
Exit Sub 'Cancel adding to db.
Else
End If
'-------------------------------------------------------------------
'Visual effect of order being taken off screen and added to basket.
'-------------------------------------------------------------------
Do Until picItem.Left < -6000
picItem.Left = picItem.Left - 75
DoEvents
Loop
Do Until picItem.Left > 959
picItem.Left = picItem.Left + 75
DoEvents
Loop
'-------------------------------------------------------------------
SearchMaterial = cmbMaterial
SearchPhrase5 = "%" & SearchMaterial & "%"
SearchDepth = cmbThickness
SearchPhrase6 = "%" & SearchDepth & "%"
qSQL = "SELECT*FROM tblMaterialsList WHERE [Material] LIKE " & "'" & SearchPhrase5 & "'" & "
AND [Depth] LIKE " & " '" & SearchPhrase6 & "'" & ""
'Retrieve all the material data from the database.
With materialsList
.ActiveConnection = db
.LockType = adLockOptimistic

Page 173 of 303
.CursorType = adOpenKeyset
.Open qSQL
frmTempData.txtUnitCost = .Fields("Unit Cost").Value
frmTempData.txtUnitSize = .Fields("Unit Size (mm)").Value
frmTempData.txtUnitSize = Replace$(frmTempData.txtUnitSize.Text, "x", "*")
frmTempData.txtOrderArea = Val(txtSize1) * Val(txtSize2)
End With
'-------------------------------------------------------------------------------------------
'Different materials will need different information stored and/or calculated to woek out _
the cost. This code covers all the maetrials needing different calculation or data to be saved.
'-------------------------------------------------------------------------------------------
Select Case cmbMaterial
Case "Aluminium Rod"
strUnitSize = frmTempData.txtUnitSize.Text
strDepth = Val(txtSize3)
strCost = ((frmTempData.txtUnitCost / Val(strUnitSize)) * strDepth) * Val(txtQuantity)
lblDisplayCost.Caption = Math.Round(strCost, 2) 'round the result of the calculation to 2
decimal places.
'Add the material details inc. calculated cost into the database.
With newOrder
.AddNew
.Fields("Material").Value = cmbMaterial
.Fields("Depth").Value = cmbThickness
.Fields("Size").Value = txtSize3 + "mm"
.Fields("Quantity").Value = txtQuantity
.Fields("Cost").Value = lblDisplayCost.Caption
.Fields("StudentID").Value = frmTempData.txtSIDData
.Fields("OrderDate").Value = dtOrder.Value
End With
Case "Steel Tube"
strUnitSize = frmTempData.txtUnitSize.Text
strDepth = Val(txtSize3)
strCost = ((frmTempData.txtUnitCost / Val(strUnitSize)) * strDepth) * Val(txtQuantity)
lblDisplayCost.Caption = Math.Round(strCost, 2) 'round the result of the calculation to 2
decimal places.

Page 174 of 303
'Add the material details inc. calculated cost into the database.
With newOrder
.AddNew
.Fields("Material").Value = cmbMaterial
.Fields("Depth").Value = cmbThickness
.Fields("Size").Value = txtSize3 + "mm"
.Fields("Quantity").Value = txtQuantity
.Fields("Cost").Value = lblDisplayCost.Caption
.Fields("StudentID").Value = frmTempData.txtSIDData
.Fields("OrderDate").Value = dtOrder.Value
End With
Case "Dowel"
strUnitSize = frmTempData.txtUnitSize.Text
strDepth = Val(txtSize3)
strCost = ((frmTempData.txtUnitCost / Val(strUnitSize)) * strDepth) * Val(txtQuantity)
lblDisplayCost.Caption = Math.Round(strCost, 2) 'round the result of the calculation to 2
decimal places.
'Add the material details inc. calculated cost into the database.
With newOrder
.AddNew
.Fields("Material").Value = cmbMaterial
.Fields("Depth").Value = cmbThickness
.Fields("Size").Value = txtSize3 + "mm"
.Fields("Quantity").Value = txtQuantity
.Fields("Cost").Value = lblDisplayCost.Caption
.Fields("StudentID").Value = frmTempData.txtSIDData
.Fields("OrderDate").Value = dtOrder.Value
End With
Case "Acrylic Rod (Clear Round)"
strUnitSize = frmTempData.txtUnitSize.Text
strDepth = Val(txtSize3)
strCost = ((frmTempData.txtUnitCost / Val(strUnitSize)) * strDepth) * Val(txtQuantity)
lblDisplayCost.Caption = Math.Round(strCost, 2) 'round the result of the calculation to 2
decimal places.

Page 175 of 303
'Add the material details inc. calculated cost into the database.
With newOrder
.AddNew
.Fields("Material").Value = cmbMaterial
.Fields("Depth").Value = cmbThickness
.Fields("Size").Value = txtSize3 + "mm"
.Fields("Quantity").Value = txtQuantity
.Fields("Cost").Value = lblDisplayCost.Caption
.Fields("StudentID").Value = frmTempData.txtSIDData
.Fields("OrderDate").Value = dtOrder.Value
End With
Case "PAR Redwood"
strDepth = Val(txtThickness)
strCost = ((strDepth / 1000) * (frmTempData.txtUnitCost)) * Val(txtQuantity)
lblDisplayCost.Caption = Math.Round(strCost, 2) 'round the result of the calculation to 2
decimal places.
'Add the material details inc. calculated cost into the database.
With newOrder
.AddNew
.Fields("Material").Value = cmbMaterial
.Fields("Depth").Value = txtThickness + "mm"
.Fields("Size").Value = Replace$(frmTempData.txtUnitSize.Text, "*", "x")
.Fields("Quantity").Value = txtQuantity
.Fields("Cost").Value = lblDisplayCost.Caption
.Fields("StudentID").Value = frmTempData.txtSIDData
.Fields("OrderDate").Value = dtOrder.Value
End With
Case "Quartz Clock Mechanism"
strCost = ((frmTempData.txtUnitCost) * Val(txtQuantity))
lblDisplayCost.Caption = Math.Round(strCost, 2) 'round the result of the calculation to 2
decimal places.
'Add the material details inc. calculated cost into the database.
With newOrder
.AddNew
.Fields("Material").Value = cmbMaterial

Page 176 of 303
.Fields("Depth").Value = cmbThickness
.Fields("Size").Value = "-"
.Fields("Quantity").Value = txtQuantity
.Fields("Cost").Value = lblDisplayCost.Caption
.Fields("StudentID").Value = frmTempData.txtSIDData
.Fields("OrderDate").Value = dtOrder.Value
End With
Case Else
strheight = Left$(frmTempData.txtUnitSize.Text, 5)
strWidth = Right$(frmTempData.txtUnitSize.Text, 5)
strUnitSize = Val(strheight) * Val(strWidth)
strCost = ((frmTempData.txtUnitCost / Val(strUnitSize)) * frmTempData.txtOrderArea) *
Val(txtQuantity)
lblDisplayCost.Caption = Math.Round(strCost, 2) 'round the result of the calculation to 2
decimal places.
'Add the material details inc. calculated cost into the database.
With newOrder
.AddNew
.Fields("Material").Value = cmbMaterial
.Fields("Depth").Value = cmbThickness
.Fields("Size").Value = txtSize1 + "x" + txtSize2
.Fields("Quantity").Value = txtQuantity
.Fields("Cost").Value = lblDisplayCost.Caption
.Fields("StudentID").Value = frmTempData.txtSIDData
.Fields("OrderDate").Value = dtOrder.Value
End With
End Select
'-------------------------------------------------------------------------------------------
newOrder.Update
'Clear all the input boxes after storing order.
cmbMaterialChoice.Clear
cmbMaterialChoice.AddItem "Mechanisms"
cmbMaterialChoice.AddItem "Metal"
cmbMaterialChoice.AddItem "Plastic"
cmbMaterialChoice.AddItem "Wood"

Page 177 of 303
cmbMaterial.Clear
cmbThickness.Clear
txtSize1 = ""
txtSize2 = ""
txtSize3 = ""
txtQuantity = ""
lblDisplayCost = ""
'Disable inputs to allow for proper combobox population. Also promotes logical order and
prevents errors.
cmbMaterial.Enabled = False
cmbThickness.Enabled = False
txtThickness.Enabled = False
cmbSize.Enabled = False
txtSize1.Enabled = False
txtSize2.Enabled = False
txtSize3.Enabled = False
txtQuantity.Enabled = False
'Back-colour of all disabled input to light grey.
cmbMaterial.BackColor = &HE0E0E0
cmbThickness.BackColor = &HE0E0E0
txtThickness.BackColor = &HE0E0E0
cmbSize.BackColor = &HE0E0E0
txtSize1.BackColor = &HE0E0E0
txtSize2.BackColor = &HE0E0E0
txtSize3.BackColor = &HE0E0E0
txtQuantity.BackColor = &HE0E0E0
'Sets which inputs are available.
cmbThickness.Visible = True
txtThickness.Visible = False
cmbSize.Visible = False
lblmmDepth.Visible = False
txtSize3.Visible = False
txtSize1.Visible = True
txtSize2.Visible = True
lblX.Visible = True
cmbSize.Visible = False
shp5.BackColor = vbWhite
shp1.BackColor = vbWhite
shp2.BackColor = vbWhite
shp3.BackColor = vbWhite

Page 178 of 303
shp4.BackColor = vbWhite
db.Close
lblDB.Caption = "Closed"
'-----------------------------------------------------------------------
'Link the datahrid to the database table of student orders (filtered).
'-----------------------------------------------------------------------
With db
.CursorLocation = adUseClient
.Open sConn
End With
lblDB.Caption = "Open"
With newOrder
.CursorLocation = adUseClient
.Source = pSQL
.ActiveConnection = db
.CursorType = adOpenKeyset
.LockType = adLockOptimistic
.Open
End With
Set dgOrder.DataSource = newOrder
newOrder.Requery
'-----------------------------------------------------------------------
'Sets the width of the datagrid columns after refresh.
dgOrder.Columns.Item(1).Width = 2400
dgOrder.Columns.Item(2).Width = 800
dgOrder.Columns.Item(3).Width = 1100
dgOrder.Columns.Item(4).Width = 800
dgOrder.Columns.Item(5).Width = 1000
dgOrder.Columns.Item(o).Visible = 1000
dgOrder.Columns.Item(0).Locked = True
dgOrder.Columns.Item(1).Locked = True
dgOrder.Columns.Item(2).Locked = True
dgOrder.Columns.Item(3).Locked = True
dgOrder.Columns.Item(4).Locked = True
dgOrder.Columns.Item(5).Locked = True
dgOrder.Columns.Item(6).Locked = True
dgOrder.Columns.Item(7).Locked = True
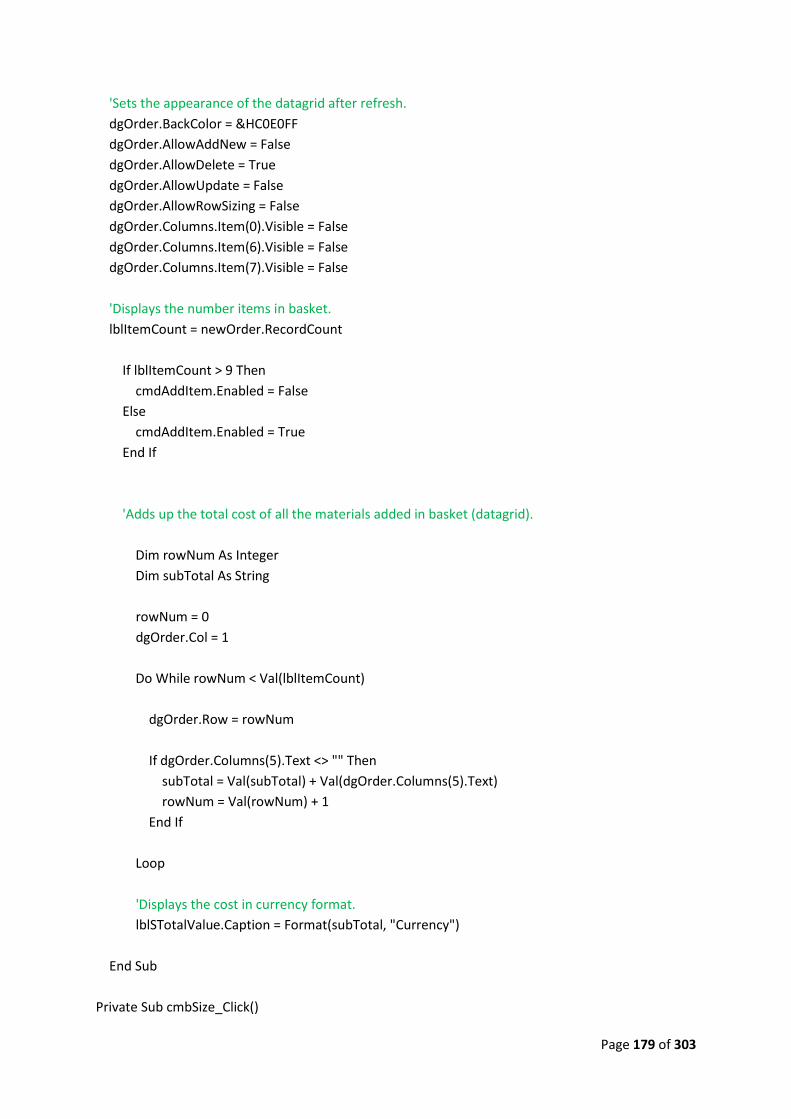
Page 179 of 303
'Sets the appearance of the datagrid after refresh.
dgOrder.BackColor = &HC0E0FF
dgOrder.AllowAddNew = False
dgOrder.AllowDelete = True
dgOrder.AllowUpdate = False
dgOrder.AllowRowSizing = False
dgOrder.Columns.Item(0).Visible = False
dgOrder.Columns.Item(6).Visible = False
dgOrder.Columns.Item(7).Visible = False
'Displays the number items in basket.
lblItemCount = newOrder.RecordCount
If lblItemCount > 9 Then
cmdAddItem.Enabled = False
Else
cmdAddItem.Enabled = True
End If
'Adds up the total cost of all the materials added in basket (datagrid).
Dim rowNum As Integer
Dim subTotal As String
rowNum = 0
dgOrder.Col = 1
Do While rowNum < Val(lblItemCount)
dgOrder.Row = rowNum
If dgOrder.Columns(5).Text <> "" Then
subTotal = Val(subTotal) + Val(dgOrder.Columns(5).Text)
rowNum = Val(rowNum) + 1
End If
Loop
'Displays the cost in currency format.
lblSTotalValue.Caption = Format(subTotal, "Currency")
End Sub
Private Sub cmbSize_Click()

Page 180 of 303
'Unlocks the size textbox to allow input by user.
If cmbSize <> "" Then
txtQuantity.BackColor = vbWhite
txtQuantity.Enabled = True
Else
'When nothing is input.
txtQuantity.BackColor = &HE0E0E0 'background light grey.
txtQuantity.Enabled = False
End If
txtQuantity = ""
'Highlights the number 5 step.
shp4.BackColor = vbYellow
shp1.BackColor = vbWhite
shp2.BackColor = vbWhite
shp3.BackColor = vbWhite
shp5.BackColor = vbWhite
End Sub
Private Sub dgOrder_AfterUpdate()
'Updates the number of items count after update.
lblItemCount = newOrder.RecordCount
'Disables the ADD button if max items are in basket e.g. 10
If lblItemCount > 9 Then
cmdAddItem.Enabled = False
Else
cmdAddItem.Enabled = True
End If
End Sub
Private Sub dgOrder_AfterDelete()
'Updates the number of items count after delete.
lblItemCount = newOrder.RecordCount
'Disables the ADD button if max items are in basket e.g. 10
If lblItemCount > 9 Then
cmdAddItem.Enabled = False
Else
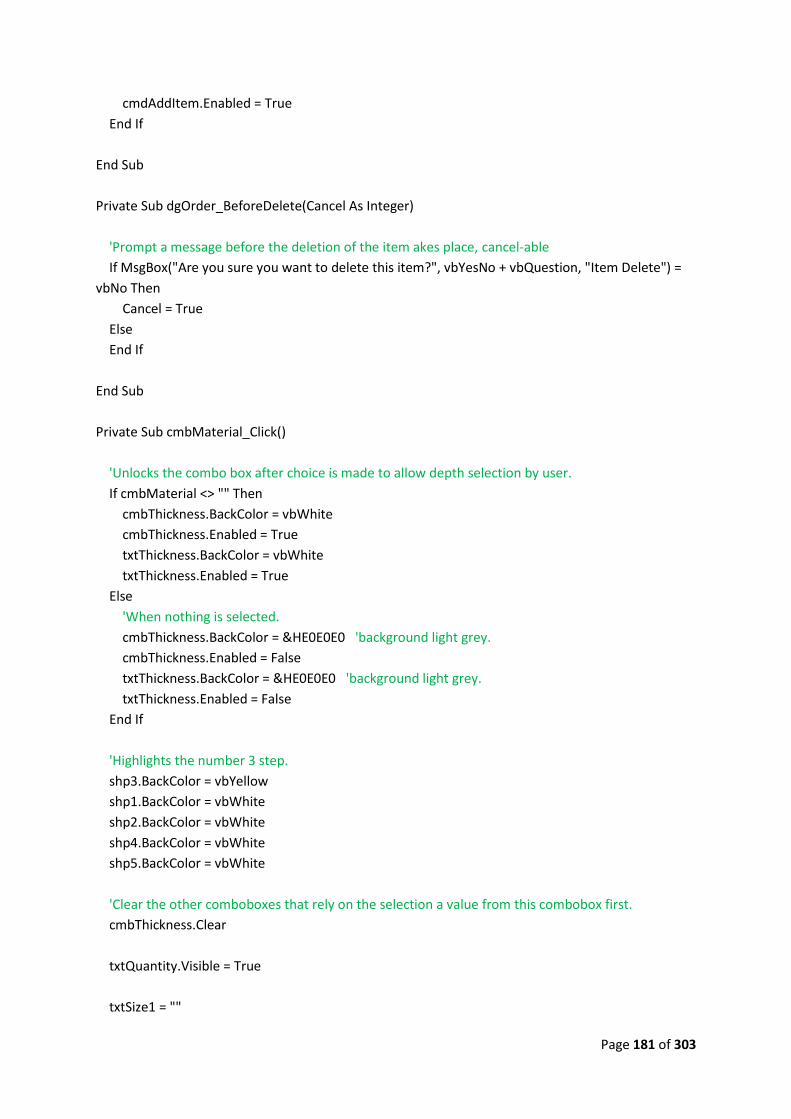
Page 181 of 303
cmdAddItem.Enabled = True
End If
End Sub
Private Sub dgOrder_BeforeDelete(Cancel As Integer)
'Prompt a message before the deletion of the item akes place, cancel-able
If MsgBox("Are you sure you want to delete this item?", vbYesNo + vbQuestion, "Item Delete") =
vbNo Then
Cancel = True
Else
End If
End Sub
Private Sub cmbMaterial_Click()
'Unlocks the combo box after choice is made to allow depth selection by user.
If cmbMaterial <> "" Then
cmbThickness.BackColor = vbWhite
cmbThickness.Enabled = True
txtThickness.BackColor = vbWhite
txtThickness.Enabled = True
Else
'When nothing is selected.
cmbThickness.BackColor = &HE0E0E0 'background light grey.
cmbThickness.Enabled = False
txtThickness.BackColor = &HE0E0E0 'background light grey.
txtThickness.Enabled = False
End If
'Highlights the number 3 step.
shp3.BackColor = vbYellow
shp1.BackColor = vbWhite
shp2.BackColor = vbWhite
shp4.BackColor = vbWhite
shp5.BackColor = vbWhite
'Clear the other comboboxes that rely on the selection a value from this combobox first.
cmbThickness.Clear
txtQuantity.Visible = True
txtSize1 = ""

Page 182 of 303
txtSize2 = ""
txtSize1.Visible = True
txtSize2.Visible = True
lblX.Visible = True
txtSize1.BackColor = &HE0E0E0 'background light grey.
txtSize2.BackColor = &HE0E0E0 'background light grey.
txtQuantity = ""
txtQuantity.BackColor = &HE0E0E0 'light grey
txtQuantity.Enabled = False
txtSize1.Enabled = False
txtSize2.Enabled = False
txtSize3.BackColor = &HE0E0E0 'background light grey.
txtSize3 = ""
txtSize3.Enabled = False
txtSize3.Visible = False
'------------------------------------------------------------------------------
'Layout of the input boxes will change depending on the material chosen.
'------------------------------------------------------------------------------
Select Case cmbMaterial
Case "PAR Redwood"
cmbThickness.Visible = False
txtThickness.Visible = True
txtThickness = ""
cmbSize.Visible = True
lblmmDepth.Visible = True
txtSize1.Visible = False
txtSize2.Visible = False
lblX.Visible = False
cmbSize.Visible = True
cmbSize.Clear
cmbSize.BackColor = &HE0E0E0 'light grey
cmbSize.Enabled = False
Case "Dowel"
txtSize1.Visible = False
txtSize2.Visible = False
lblX.Visible = False
txtSize3.Visible = True
Case "Aluminium Rod"
txtSize1.Visible = False

Page 183 of 303
txtSize2.Visible = False
lblX.Visible = False
txtSize3.Visible = True
Case "Steel Tube"
txtSize1.Visible = False
txtSize2.Visible = False
lblX.Visible = False
txtSize3.Visible = True
Case "Acrylic Rod (Clear Round)"
txtSize1.Visible = False
txtSize2.Visible = False
lblX.Visible = False
txtSize3.Visible = True
Case Else
cmbThickness.Visible = True
txtThickness.Visible = False
cmbSize.Visible = False
lblmmDepth.Visible = False
txtSize1.Visible = True
txtSize2.Visible = True
lblX.Visible = True
cmbSize.Visible = False
txtQuantity.Visible = True
End Select
'------------------------------------------------------------------------------
Select Case cmbMaterial
'If MDF is selected as a material then the following sizes become options in combobox
cmbThickness
Case "MDF"
cmbThickness.Clear
cmbThickness.AddItem "3mm"
cmbThickness.AddItem "6mm"
cmbThickness.AddItem "9mm"
cmbThickness.AddItem "12mm"
cmbThickness.AddItem "15mm"
cmbThickness.AddItem "18mm"
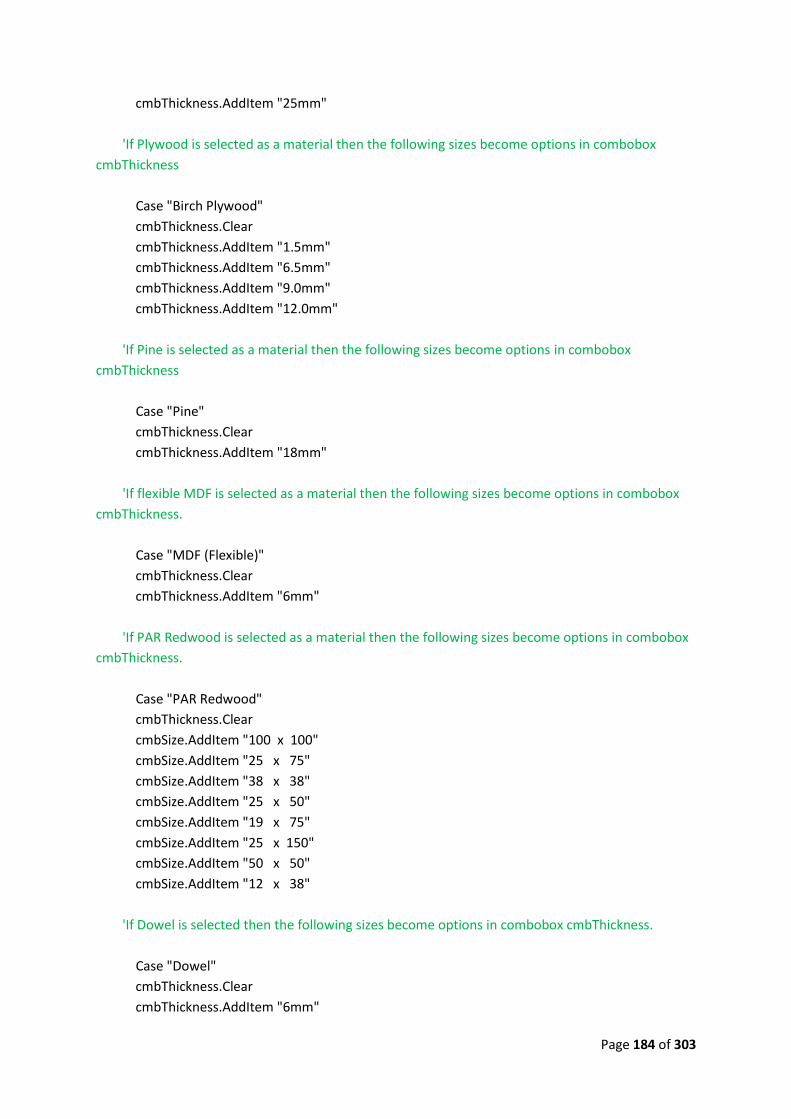
Page 184 of 303
cmbThickness.AddItem "25mm"
'If Plywood is selected as a material then the following sizes become options in combobox
cmbThickness
Case "Birch Plywood"
cmbThickness.Clear
cmbThickness.AddItem "1.5mm"
cmbThickness.AddItem "6.5mm"
cmbThickness.AddItem "9.0mm"
cmbThickness.AddItem "12.0mm"
'If Pine is selected as a material then the following sizes become options in combobox
cmbThickness
Case "Pine"
cmbThickness.Clear
cmbThickness.AddItem "18mm"
'If flexible MDF is selected as a material then the following sizes become options in combobox
cmbThickness.
Case "MDF (Flexible)"
cmbThickness.Clear
cmbThickness.AddItem "6mm"
'If PAR Redwood is selected as a material then the following sizes become options in combobox
cmbThickness.
Case "PAR Redwood"
cmbThickness.Clear
cmbSize.AddItem "100 x 100"
cmbSize.AddItem "25 x 75"
cmbSize.AddItem "38 x 38"
cmbSize.AddItem "25 x 50"
cmbSize.AddItem "19 x 75"
cmbSize.AddItem "25 x 150"
cmbSize.AddItem "50 x 50"
cmbSize.AddItem "12 x 38"
'If Dowel is selected then the following sizes become options in combobox cmbThickness.
Case "Dowel"
cmbThickness.Clear
cmbThickness.AddItem "6mm"

Page 185 of 303
'If transparent Acrylic is selected as a material then the following sizes become options in
combobox cmbThickness.
Case "Acrylic Sheet (Clear)"
cmbThickness.Clear
cmbThickness.AddItem "3mm"
'If coloured transparent Acrylic is selected as a material then the following sizes become options
in combobox cmbThickness.
Case "Acrylic Sheet (Transparent Coloured)"
cmbThickness.Clear
cmbThickness.AddItem "3mm"
'If opaque coloured Acrylic is selected as a material then the following sizes become options in
combobox cmbThickness.
Case "Acrylic Sheet (Opaque Coloured)"
cmbThickness.Clear
cmbThickness.AddItem "3mm"
'If an Acrylic clear round rod is selected then the following sizes become options in combobox
cmbThickness.
Case "Acrylic Rod (Clear Round)"
cmbThickness.Clear
cmbThickness.AddItem "10mm"
'If Aluminium Sheet is selected as a material then the following sizes become options in
combobox cmbThickness.
Case "Aluminium Sheet"
cmbThickness.Clear
cmbThickness.AddItem "0.90mm"
'If Copper Sheet is selected as a material then the following sizes become options in combobox
cmbThickness.
Case "Copper Sheet"
cmbThickness.Clear
cmbThickness.AddItem "0.70mm"
'If Brass Sheet is selected as a material then the following sizes become options in combobox
cmbThickness.

Page 186 of 303
Case "Brass Sheet"
cmbThickness.Clear
cmbThickness.AddItem "0.55mm"
'If Aluminium Rod is selected then the following sizes become options in combobox
cmbThickness.
Case "Aluminium Rod"
cmbThickness.Clear
cmbThickness.AddItem "6.35mm Diam."
'If Steel Tube is selected then the following sizes become options in combobox cmbThickness.
Case "Steel Tube"
cmbThickness.Clear
cmbThickness.AddItem "19.05mm Diam."
'If a Quartz Clock Mechanism is selected then the following sizes become options in combobox
cmbThickness.
Case "Quartz Clock Mechanism"
cmbThickness.Clear
cmbThickness.AddItem "N/A"
End Select
txtQuantity.Visible = True
End Sub
Private Sub cmbMaterial_GotFocus()
'Highlight the number 1 step when the material choice combobox is in focus.
shp2.BackColor = vbYellow
shp1.BackColor = vbWhite
shp3.BackColor = vbWhite
shp4.BackColor = vbWhite
shp5.BackColor = vbWhite
End Sub
Private Sub cmbThickness_Click()
'Unlocks the size textbox to allow input by user.
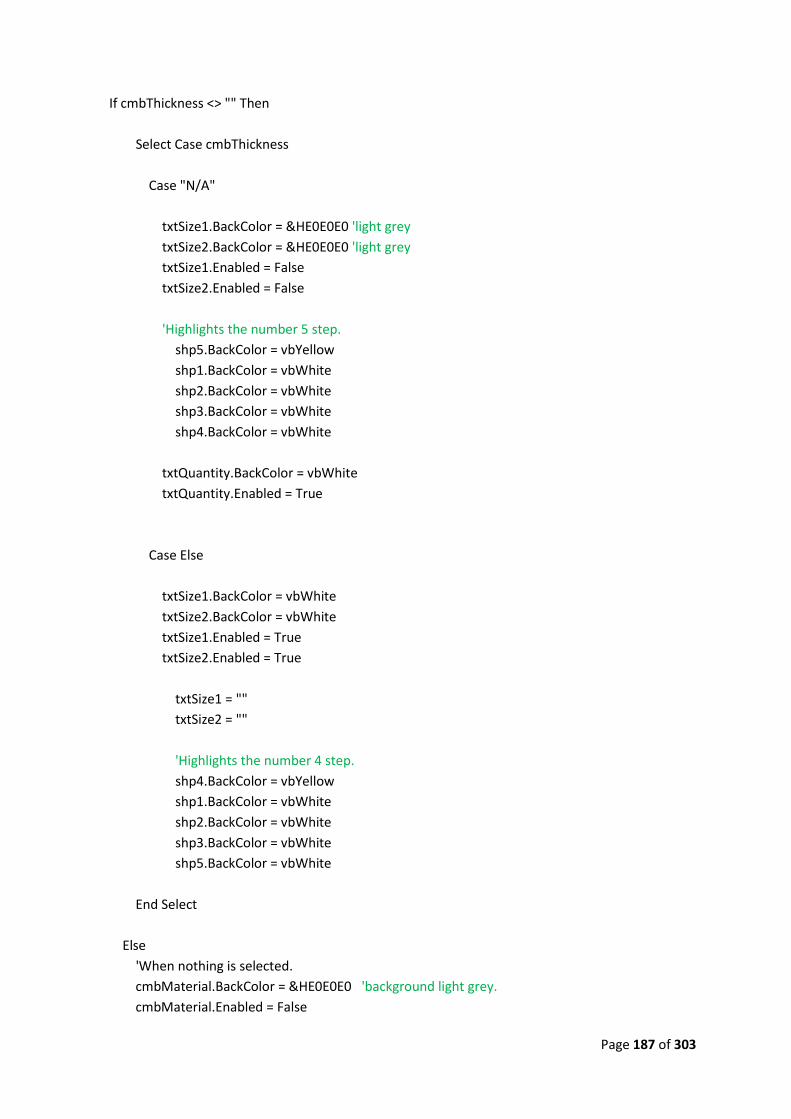
Page 187 of 303
If cmbThickness <> "" Then
Select Case cmbThickness
Case "N/A"
txtSize1.BackColor = &HE0E0E0 'light grey
txtSize2.BackColor = &HE0E0E0 'light grey
txtSize1.Enabled = False
txtSize2.Enabled = False
'Highlights the number 5 step.
shp5.BackColor = vbYellow
shp1.BackColor = vbWhite
shp2.BackColor = vbWhite
shp3.BackColor = vbWhite
shp4.BackColor = vbWhite
txtQuantity.BackColor = vbWhite
txtQuantity.Enabled = True
Case Else
txtSize1.BackColor = vbWhite
txtSize2.BackColor = vbWhite
txtSize1.Enabled = True
txtSize2.Enabled = True
txtSize1 = ""
txtSize2 = ""
'Highlights the number 4 step.
shp4.BackColor = vbYellow
shp1.BackColor = vbWhite
shp2.BackColor = vbWhite
shp3.BackColor = vbWhite
shp5.BackColor = vbWhite
End Select
Else
'When nothing is selected.
cmbMaterial.BackColor = &HE0E0E0 'background light grey.
cmbMaterial.Enabled = False

Page 188 of 303
End If
txtSize1 = ""
txtSize2 = ""
If cmbMaterial = "Aluminium Rod" Or cmbMaterial = "Steel Tube" Or cmbMaterial =
"Dowel" Or _
cmbMaterial = "Acrylic Rod (Clear Round)" Then
txtSize1.BackColor = &HE0E0E0 'light grey
txtSize2.BackColor = &HE0E0E0 'light grey
txtSize1.Enabled = False
txtSize2.Enabled = False
txtSize3.Enabled = True
txtSize3.BackColor = vbWhite
'Highlights the number 4 step.
shp4.BackColor = vbYellow
shp1.BackColor = vbWhite
shp2.BackColor = vbWhite
shp3.BackColor = vbWhite
shp5.BackColor = vbWhite
txtQuantity.BackColor = &HE0E0E0 'light grey
txtQuantity.Enabled = False
Else
End If
End Sub
Private Sub cmbMaterialChoice_Click()
'Unlocks the combo box after material choice is made to allow material selection by user.
If cmbMaterialChoice <> "" Then
cmbMaterial.BackColor = vbWhite
cmbMaterial.Enabled = True
Else
'When nothing is selected.
cmbMaterial.BackColor = &HE0E0E0 'background light grey.
cmbMaterial.Enabled = False
End If
'Highlights the number 2 step.
shp2.BackColor = vbYellow
shp1.BackColor = vbWhite
shp3.BackColor = vbWhite

Page 189 of 303
shp4.BackColor = vbWhite
shp5.BackColor = vbWhite
'Clear the other comboboxes that rely on the selection a value from this combobox first.
cmbMaterial.Clear
cmbThickness.Clear
cmbThickness.Visible = True
cmbSize.Visible = False
txtThickness.Visible = False
lblmmDepth.Visible = False
txtSize1.Visible = True
txtSize2.Visible = True
lblX.Visible = True
cmbThickness.BackColor = &HE0E0E0 'background light grey.
cmbThickness.Enabled = False
txtSize1 = ""
txtSize2 = ""
txtQuantity = ""
txtQuantity.Enabled = False
txtQuantity.BackColor = &HE0E0E0 'light grey
txtSize1.BackColor = &HE0E0E0 'background light grey.
txtSize2.BackColor = &HE0E0E0 'background light grey.
txtSize1.Enabled = False
txtSize2.Enabled = False
txtSize3 = ""
txtSize3.Enabled = False
txtSize3.Visible = False
Select Case cmbMaterialChoice
'If wood is chosen as the material type then the following become options in combobox
cmbMaterial.
Case "Wood"
cmbMaterial.Clear
cmbMaterial.AddItem "Dowel"
cmbMaterial.AddItem "MDF"
cmbMaterial.AddItem "MDF (Flexible)"
cmbMaterial.AddItem "PAR Redwood"
cmbMaterial.AddItem "Pine"
cmbMaterial.AddItem "Birch Plywood"
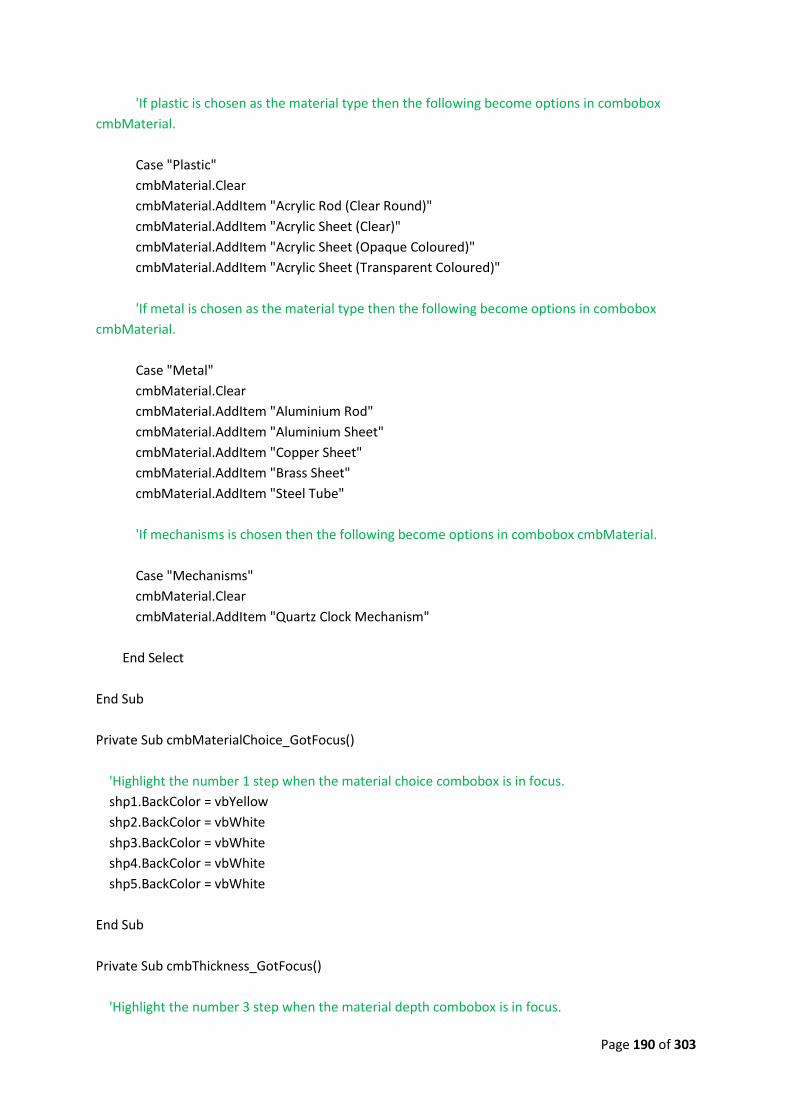
Page 190 of 303
'If plastic is chosen as the material type then the following become options in combobox
cmbMaterial.
Case "Plastic"
cmbMaterial.Clear
cmbMaterial.AddItem "Acrylic Rod (Clear Round)"
cmbMaterial.AddItem "Acrylic Sheet (Clear)"
cmbMaterial.AddItem "Acrylic Sheet (Opaque Coloured)"
cmbMaterial.AddItem "Acrylic Sheet (Transparent Coloured)"
'If metal is chosen as the material type then the following become options in combobox
cmbMaterial.
Case "Metal"
cmbMaterial.Clear
cmbMaterial.AddItem "Aluminium Rod"
cmbMaterial.AddItem "Aluminium Sheet"
cmbMaterial.AddItem "Copper Sheet"
cmbMaterial.AddItem "Brass Sheet"
cmbMaterial.AddItem "Steel Tube"
'If mechanisms is chosen then the following become options in combobox cmbMaterial.
Case "Mechanisms"
cmbMaterial.Clear
cmbMaterial.AddItem "Quartz Clock Mechanism"
End Select
End Sub
Private Sub cmbMaterialChoice_GotFocus()
'Highlight the number 1 step when the material choice combobox is in focus.
shp1.BackColor = vbYellow
shp2.BackColor = vbWhite
shp3.BackColor = vbWhite
shp4.BackColor = vbWhite
shp5.BackColor = vbWhite
End Sub
Private Sub cmbThickness_GotFocus()
'Highlight the number 3 step when the material depth combobox is in focus.

Page 191 of 303
shp3.BackColor = vbYellow
shp1.BackColor = vbWhite
shp2.BackColor = vbWhite
shp4.BackColor = vbWhite
shp5.BackColor = vbWhite
End Sub
Private Sub cmbSize_GotFocus()
'Highlight the number 4 step when the size combobox is in focus.
shp4.BackColor = vbYellow
shp1.BackColor = vbWhite
shp2.BackColor = vbWhite
shp3.BackColor = vbWhite
shp5.BackColor = vbWhite
'Check to allow input only if depth has been specified.
If txtThickness = "" Or Val(txtThickness) = 0 Then
cmbSize.Clear
cmbSize.BackColor = &HE0E0E0 'light grey
cmbSize.Enabled = False
shp5.BackColor = vbWhite
shp4.BackColor = vbYellow
Else
End If
End Sub
Private Sub cmdPrint_MouseMove(Button As Integer, Shift As Integer, X As Single, Y As Single)
'Mouseover effect
cmdPrint.BackColor = vbWhite
End Sub
Private Sub cmdClear_Click()
'Clear all input boxes.
cmbMaterialChoice.Clear
cmbMaterialChoice.AddItem "Mechanisms"
cmbMaterialChoice.AddItem "Metal"
cmbMaterialChoice.AddItem "Plastic"
cmbMaterialChoice.AddItem "Wood"
cmbMaterial.Clear

Page 192 of 303
cmbThickness.Clear
txtSize1 = ""
txtSize2 = ""
txtSize3 = ""
txtQuantity = ""
lblDisplayCost = ""
'Disable inputs to allow for proper combobox population. Also promotes logical order and
prevents errors.
cmbMaterial.Enabled = False
cmbThickness.Enabled = False
txtThickness.Enabled = False
cmbSize.Enabled = False
txtSize1.Enabled = False
txtSize2.Enabled = False
txtSize3.Enabled = False
txtQuantity.Enabled = False
'Back-colour of all disabled input to light grey.
cmbMaterial.BackColor = &HE0E0E0
cmbThickness.BackColor = &HE0E0E0
txtThickness.BackColor = &HE0E0E0
cmbSize.BackColor = &HE0E0E0
txtSize1.BackColor = &HE0E0E0
txtSize2.BackColor = &HE0E0E0
txtSize3.BackColor = &HE0E0E0
txtQuantity.BackColor = &HE0E0E0
'Sets which inputs are available.
cmbThickness.Visible = True
txtThickness.Visible = False
txtQuantity.Visible = True
cmbSize.Visible = False
lblmmDepth.Visible = False
txtSize3.Visible = False
txtSize1.Visible = True
txtSize2.Visible = True
lblX.Visible = True
cmbSize.Visible = False
'Visually lose focus on all input rows.
shp5.BackColor = vbWhite
shp1.BackColor = vbWhite
shp2.BackColor = vbWhite

Page 193 of 303
shp3.BackColor = vbWhite
shp4.BackColor = vbWhite
End Sub
Private Sub imgAdd_MouseMove(Button As Integer, Shift As Integer, X As Single, Y As Single)
'Cancels the add button mouseover effect.
Set cmdAddItem.Picture = LoadPicture(App.Path & "\MYDATA\addbutton1.bmp")
cmdPrint.BackColor = &H8000000F 'light grey
End Sub
Private Sub imgBackground_Click()
'Loses focus on current step.
shp5.BackColor = vbWhite
shp1.BackColor = vbWhite
shp2.BackColor = vbWhite
shp3.BackColor = vbWhite
shp4.BackColor = vbWhite
'Sets focus onto picturebox
picItem.SetFocus
End Sub
Private Sub imgBackground_MouseMove(Button As Integer, Shift As Integer, X As Single, Y As Single)
'Mouseover effect chnages colour to original orange.
cmdSearchDate.BackColor = &HC0E0FF
End Sub
Private Sub imgReturn_Click()
'Unloads the form.
Unload frmEditOrder
Set frmEditOrder = Nothing
'Displays the Main Menu form.
frmStudentOptions.Show
End Sub

Page 194 of 303
Private Sub imgReturn_MouseMove(Button As Integer, Shift As Integer, X As Single, Y As Single)
'Loads picture into imgReturn that differs in colour to create a mouseover effect.
Set imgReturn.Picture = LoadPicture(App.Path & "\MYDATA\returnup2.bmp")
End Sub
Private Sub imgReturnArea_MouseMove(Button As Integer, Shift As Integer, X As Single, Y As Single)
'Sets the return button into original appearance.
Set imgReturn.Picture = LoadPicture(App.Path & "\MYDATA\returnup1.bmp")
End Sub
Private Sub cmdAddItem_MouseMove(Button As Integer, Shift As Integer, X As Single, Y As Single)
'Loads the picture into the add to basket button.
Set cmdAddItem.Picture = LoadPicture(App.Path & "\MYDATA\addbutton2.bmp")
End Sub
Private Sub cmdPrint_Click()
'Ensures the option was what the user wanted.
If MsgBox("Are you sure you want print?", vbYesNo + vbQuestion, "Print Order") = vbYes Then
MsgBox ("You must remember the date of this order as you will need it in the future." +
vbNewLine + vbNewLine + _
"Please jot down the date " + txtOrderDate + " for future references."), vbInformation,
"Important!"
frmEditOrder.Hide
frmPrintOrder.Show
frmPrintOrder.txtOrderType = "Edit Order"
Else
End If
End Sub
Private Sub cmdClear_MouseMove(Button As Integer, Shift As Integer, X As Single, Y As Single)
'Mouseover effect.
cmdClear.BackColor = vbWhite

Page 195 of 303
End Sub
Private Sub imgView_MouseMove(Button As Integer, Shift As Integer, X As Single, Y As Single)
'Cancels mouseover effect.
cmdPrint.BackColor = &H8000000F 'light grey
Set cmdAddItem.Picture = LoadPicture(App.Path & "\MYDATA\addbutton1.bmp")
End Sub
Private Sub picItem_Click()
'Loses focus on current step.
shp5.BackColor = vbWhite
shp1.BackColor = vbWhite
shp2.BackColor = vbWhite
shp3.BackColor = vbWhite
shp4.BackColor = vbWhite
End Sub
Private Sub picItem_MouseMove(Button As Integer, Shift As Integer, X As Single, Y As Single)
'Cancel command button "clear" mouseover effect.
cmdClear.BackColor = &HE0E0E0 'background light grey.
End Sub
Private Sub cmdSearchDate_MouseMove(Button As Integer, Shift As Integer, X As Single, Y As Single)
'Mouseover effect cahnges colour of button.
cmdSearchDate.BackColor = &H80C0FF 'darker orange
End Sub
Private Sub tmrCost_Timer()
'Only is the recordset is open can the recordcount function work. So this code checks before
attempting.
If lblDB = "Open" Then
lblItemCount = newOrder.RecordCount
Else
End If

Page 196 of 303
If Me.Height > 10541 Then
'Adds up the total cost of all the materials added in basket (datagrid).
Dim rowNum As Integer
Dim subTotal As String
rowNum = 0
dgOrder.Col = 1
Do While rowNum < Val(lblItemCount)
dgOrder.Row = rowNum
If dgOrder.Columns(5).Text <> "" Then
subTotal = Val(subTotal) + Val(dgOrder.Columns(5).Text)
rowNum = Val(rowNum) + 1
End If
Loop
'Displays the cost in currency format.
lblSTotalValue.Caption = Format(subTotal, "Currency")
Else
End If
End Sub
Private Sub tmrTime_Timer()
'Code to display current time in label.
lblTime.Caption = Time
End Sub
Private Sub txtDateOfOrder_GotFocus()
'Display the date of order format label.
lblDateEg.Visible = True
End Sub
Private Sub txtDateOfOrder_LostFocus()

Page 197 of 303
'Hide the date of order format label.
lblDateEg.Visible = False
End Sub
Private Sub txtQuantity_GotFocus()
'Highlight the number 5 step when the quantity textbox is in focus.
shp5.BackColor = vbYellow
shp1.BackColor = vbWhite
shp2.BackColor = vbWhite
shp3.BackColor = vbWhite
shp4.BackColor = vbWhite
'------------------------------------------------------------------------------
'Validating and allowing input into the quantity if certain conditions are met.
'------------------------------------------------------------------------------
Select Case cmbMaterial
Case "Aluminium Rod"
'Check to allow input only if sizes are inputted before to avoid error in calculation.
If txtSize3 = "" Or Val(txtSize3) = 0 Then
txtQuantity.BackColor = &HE0E0E0 'light grey
txtQuantity.Enabled = False
shp5.BackColor = vbWhite
shp4.BackColor = vbYellow
Else
End If
Case "Steel Tube"
'Check to allow input only if sizes are inputted before to avoid error in calculation.
If txtSize3 = "" Or Val(txtSize3) = 0 Then
txtQuantity.BackColor = &HE0E0E0 'light grey
txtQuantity.Enabled = False
shp5.BackColor = vbWhite
shp4.BackColor = vbYellow
Else
End If
Case "Dowel"
'Check to allow input only if sizes are inputted before to avoid error in calculation.
If txtSize3 = "" Or Val(txtSize3) = 0 Then
txtQuantity.BackColor = &HE0E0E0 'light grey
txtQuantity.Enabled = False

Page 198 of 303
shp5.BackColor = vbWhite
shp4.BackColor = vbYellow
Else
End If
Case "Acrylic Rod (Clear Round)"
'Check to allow input only if sizes are inputted before to avoid error in calculation.
If txtSize3 = "" Or Val(txtSize3) = 0 Then
txtQuantity.BackColor = &HE0E0E0 'light grey
txtQuantity.Enabled = False
shp5.BackColor = vbWhite
shp4.BackColor = vbYellow
Else
End If
Case "PAR Redwood"
'Check to allow input only if sizes are inputted before to avoid error in calculation.
If txtThickness = "" Or Val(txtThickness) = 0 Then
txtQuantity.BackColor = &HE0E0E0 'light grey
txtQuantity.Enabled = False
shp5.BackColor = vbWhite
shp4.BackColor = vbYellow
Else
End If
Case "Quartz Clock Mechanism"
'Do nothing as no sizes are supposed to be input. This will not affect the cost.
Case Else
'Check to allow input only if sizes are inputted before to avoid error in calculation.
If txtSize1 = "" Or txtSize2 = "" Or Val(txtSize1) = 0 Or Val(txtSize2) = 0 Then
txtQuantity.BackColor = &HE0E0E0 'light grey
txtQuantity.Enabled = False
shp5.BackColor = vbWhite
shp4.BackColor = vbYellow
Else
End If
End Select
'------------------------------------------------------------------------------
'Search the database to retrieve the unit sizes for the check.
'------------------------------------------------------------------------------

Page 199 of 303
SearchMaterial = cmbMaterial
SearchPhrase5 = "%" & SearchMaterial & "%"
SearchDepth = cmbThickness
SearchPhrase6 = "%" & SearchDepth & "%"
qSQL = "SELECT*FROM tblMaterialsList WHERE [Material] LIKE " & "'" & SearchPhrase5 & "'" &
" AND [Depth] LIKE " & " '" & SearchPhrase6 & "'" & ""
'Retrieve values in tempdata form.
With materialsList
.ActiveConnection = db
.LockType = adLockOptimistic
.CursorType = adOpenKeyset
.Open qSQL
frmTempData.txtUnitCost = .Fields("Unit Cost").Value
frmTempData.txtUnitSize = .Fields("Unit Size (mm)").Value
frmTempData.txtUnitSize = Replace$(frmTempData.txtUnitSize.Text, "x", "*")
frmTempData.txtOrderArea = Val(txtSize1) * Val(txtSize2)
End With
'-------------------------------------------------------------------------------
'-------------------------------------------------------------------------------------
'Search the database and compare the order values to see if they exceed the unit size.
'-------------------------------------------------------------------------------------
'Check to see if the order size is valid. (not bigger than unit sizes available.)
Select Case cmbMaterial
Case "MDF"
strheight = Left$(frmTempData.txtUnitSize.Text, 5)
strWidth = Right$(frmTempData.txtUnitSize.Text, 5)
strUnitSize = Replace$(frmTempData.txtUnitSize.Text, "*", "x")
'Checking the order size is valid against the values retrieved.
If Val(txtSize1) > strheight Or Val(txtSize2) > strWidth Then
MsgBox ("The size of your order is too large!" + vbNewLine + vbNewLine + _
"The maximum size for this material is " + strUnitSize), vbExclamation, "Size Limit
Exceeded!"
'If it is prompt and clear input boxes.
txtSize1 = ""
txtSize2 = ""
txtSize1.SetFocus

Page 200 of 303
'Close to reopen when calculating the cost and storing the data.
materialsList.Close
Else
materialsList.Close
End If
Case "MDF (Flexible)"
strheight = Left$(frmTempData.txtUnitSize.Text, 5)
strWidth = Right$(frmTempData.txtUnitSize.Text, 5)
strUnitSize = Replace$(frmTempData.txtUnitSize.Text, "*", "x")
'Checking the order size is valid against the values retrieved.
If Val(txtSize1) > strheight Or Val(txtSize2) > strWidth Then
MsgBox ("The size of your order is too large!" + vbNewLine + vbNewLine + _
"The maximum size for this material is " + strUnitSize), vbExclamation, "Size Limit
Exceeded!"
'If it is prompt and clear input boxes.
txtSize1 = ""
txtSize2 = ""
txtSize1.SetFocus
'Close to reopen when calculating the cost and storing the data.
materialsList.Close
Else
materialsList.Close
End If
Case "Birch Plywood"
strheight = Left$(frmTempData.txtUnitSize.Text, 5)
strWidth = Right$(frmTempData.txtUnitSize.Text, 5)
strUnitSize = Replace$(frmTempData.txtUnitSize.Text, "*", "x")
'Checking the order size is valid against the values retrieved.
If Val(txtSize1) > strheight Or Val(txtSize2) > strWidth Then
MsgBox ("The size of your order is too large!" + vbNewLine + vbNewLine + _

Page 201 of 303
"The maximum size for this material is " + strUnitSize), vbExclamation, "Size Limit
Exceeded!"
'If it is prompt and clear input boxes.
txtSize1 = ""
txtSize2 = ""
txtSize1.SetFocus
'Close to reopen when calculating the cost and storing the data.
materialsList.Close
Else
materialsList.Close
End If
Case "Pine"
strheight = Left$(frmTempData.txtUnitSize.Text, 5)
strWidth = Right$(frmTempData.txtUnitSize.Text, 5)
strUnitSize = Replace$(frmTempData.txtUnitSize.Text, "*", "x")
'Checking the order size is valid against the values retrieved.
If Val(txtSize1) > strheight Or Val(txtSize2) > strWidth Then
MsgBox ("The size of your order is too large!" + vbNewLine + vbNewLine + _
"The maximum size for this material is " + strUnitSize), vbExclamation, "Size Limit
Exceeded!"
'If it is prompt and clear input boxes.
txtSize1 = ""
txtSize2 = ""
txtSize1.SetFocus
'Close to reopen when calculating the cost and storing the data.
materialsList.Close
Else
materialsList.Close
End If
Case "PAR Redwood"
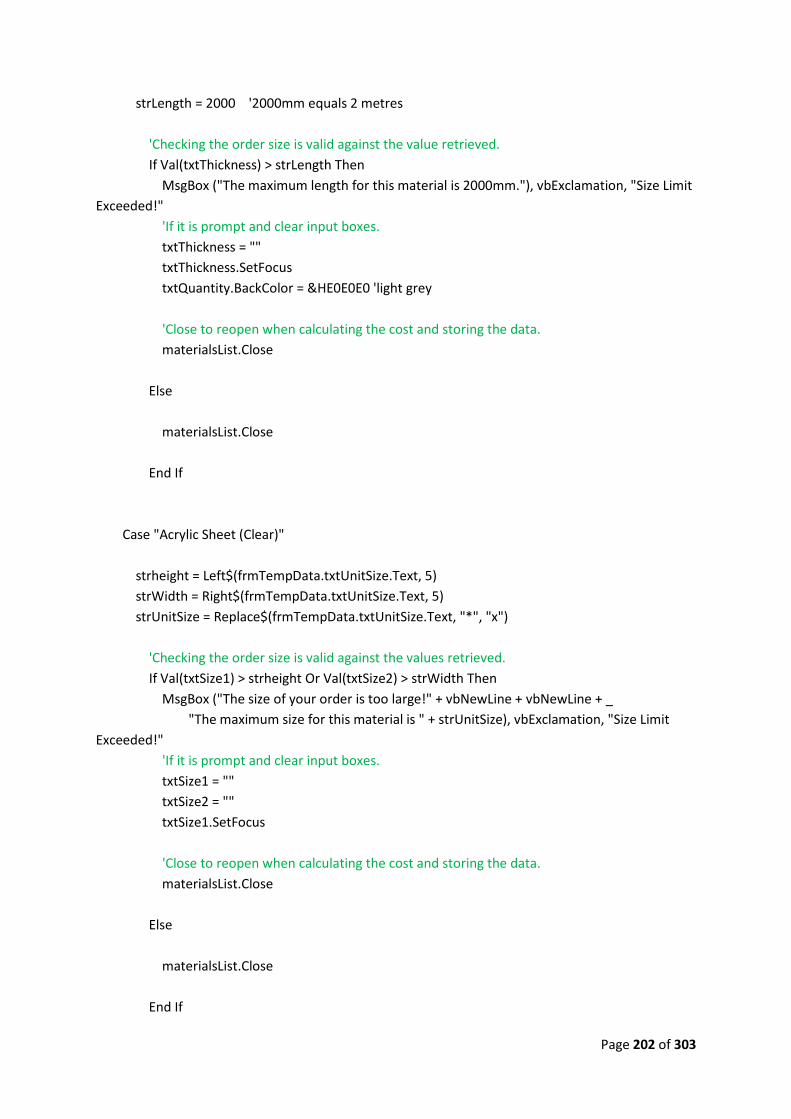
Page 202 of 303
strLength = 2000 '2000mm equals 2 metres
'Checking the order size is valid against the value retrieved.
If Val(txtThickness) > strLength Then
MsgBox ("The maximum length for this material is 2000mm."), vbExclamation, "Size Limit
Exceeded!"
'If it is prompt and clear input boxes.
txtThickness = ""
txtThickness.SetFocus
txtQuantity.BackColor = &HE0E0E0 'light grey
'Close to reopen when calculating the cost and storing the data.
materialsList.Close
Else
materialsList.Close
End If
Case "Acrylic Sheet (Clear)"
strheight = Left$(frmTempData.txtUnitSize.Text, 5)
strWidth = Right$(frmTempData.txtUnitSize.Text, 5)
strUnitSize = Replace$(frmTempData.txtUnitSize.Text, "*", "x")
'Checking the order size is valid against the values retrieved.
If Val(txtSize1) > strheight Or Val(txtSize2) > strWidth Then
MsgBox ("The size of your order is too large!" + vbNewLine + vbNewLine + _
"The maximum size for this material is " + strUnitSize), vbExclamation, "Size Limit
Exceeded!"
'If it is prompt and clear input boxes.
txtSize1 = ""
txtSize2 = ""
txtSize1.SetFocus
'Close to reopen when calculating the cost and storing the data.
materialsList.Close
Else
materialsList.Close
End If
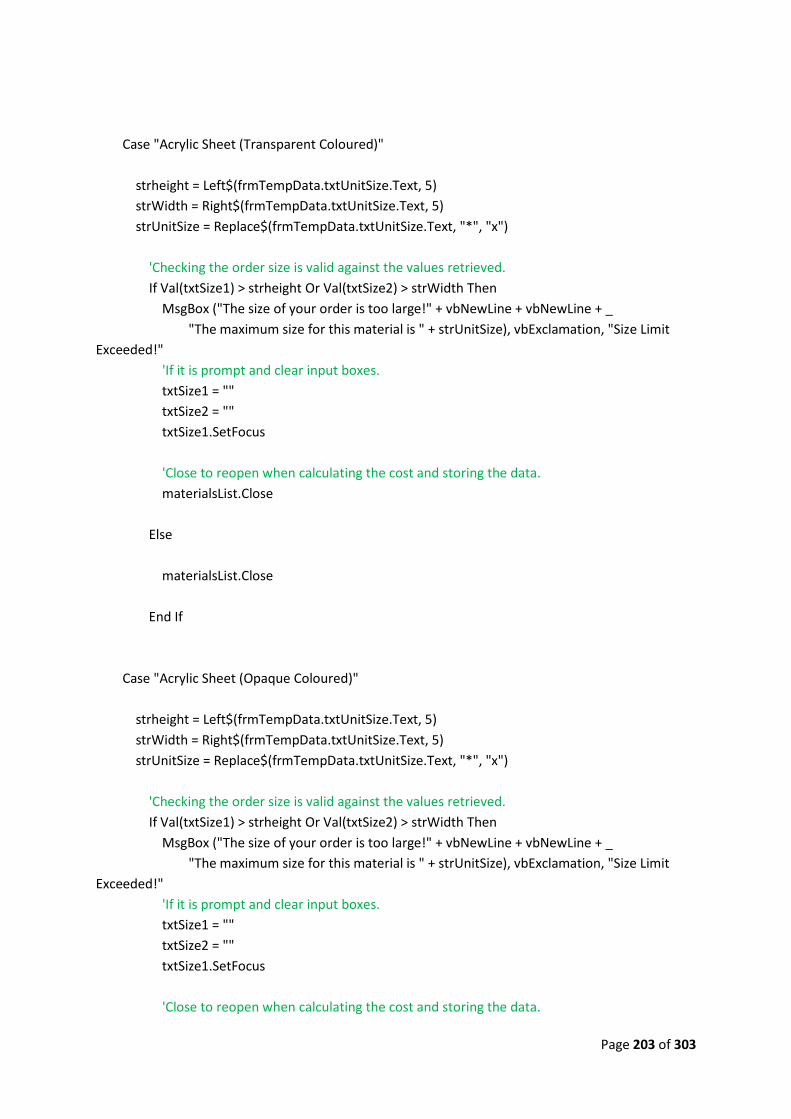
Page 203 of 303
Case "Acrylic Sheet (Transparent Coloured)"
strheight = Left$(frmTempData.txtUnitSize.Text, 5)
strWidth = Right$(frmTempData.txtUnitSize.Text, 5)
strUnitSize = Replace$(frmTempData.txtUnitSize.Text, "*", "x")
'Checking the order size is valid against the values retrieved.
If Val(txtSize1) > strheight Or Val(txtSize2) > strWidth Then
MsgBox ("The size of your order is too large!" + vbNewLine + vbNewLine + _
"The maximum size for this material is " + strUnitSize), vbExclamation, "Size Limit
Exceeded!"
'If it is prompt and clear input boxes.
txtSize1 = ""
txtSize2 = ""
txtSize1.SetFocus
'Close to reopen when calculating the cost and storing the data.
materialsList.Close
Else
materialsList.Close
End If
Case "Acrylic Sheet (Opaque Coloured)"
strheight = Left$(frmTempData.txtUnitSize.Text, 5)
strWidth = Right$(frmTempData.txtUnitSize.Text, 5)
strUnitSize = Replace$(frmTempData.txtUnitSize.Text, "*", "x")
'Checking the order size is valid against the values retrieved.
If Val(txtSize1) > strheight Or Val(txtSize2) > strWidth Then
MsgBox ("The size of your order is too large!" + vbNewLine + vbNewLine + _
"The maximum size for this material is " + strUnitSize), vbExclamation, "Size Limit
Exceeded!"
'If it is prompt and clear input boxes.
txtSize1 = ""
txtSize2 = ""
txtSize1.SetFocus
'Close to reopen when calculating the cost and storing the data.

Page 204 of 303
materialsList.Close
Else
materialsList.Close
End If
Case "Acrylic Rod (Clear Round)"
strLength = frmTempData.txtUnitSize.Text
'Checking the order size is valid against the values retrieved.
If Val(txtSize3) > strLength Then
MsgBox ("The maximum length for this material is " + strLength + "mm."), vbExclamation,
"Size Limit Exceeded!"
'If it is prompt and clear input boxes.
txtSize3 = ""
txtSize3.SetFocus
'Close to reopen when calculating the cost and storing the data.
materialsList.Close
Else
materialsList.Close
End If
Case "Dowel"
strLength = frmTempData.txtUnitSize.Text
'Checking the order size is valid against the values retrieved.
If Val(txtSize3) > strLength Then
MsgBox ("The maximum length for this material is " + strLength + "mm."), vbExclamation,
"Size Limit Exceeded!"
'If it is prompt and clear input boxes.
txtSize3 = ""
txtSize3.SetFocus
'Close to reopen when calculating the cost and storing the data.
materialsList.Close

Page 205 of 303
Else
materialsList.Close
End If
Case "Steel Tube"
strLength = frmTempData.txtUnitSize.Text
'Checking the order size is valid against the values retrieved.
If Val(txtSize3) > strLength Then
MsgBox ("The maximum length for this material is " + strLength + "mm."), vbExclamation,
"Size Limit Exceeded!"
'If it is prompt and clear input boxes.
txtSize3 = ""
txtSize3.SetFocus
'Close to reopen when calculating the cost and storing the data.
materialsList.Close
Else
materialsList.Close
End If
Case "Aluminium Sheet"
strheight = Left$(frmTempData.txtUnitSize.Text, 5)
strWidth = Right$(frmTempData.txtUnitSize.Text, 5)
strUnitSize = Replace$(frmTempData.txtUnitSize.Text, "*", "x")
'Checking the order size is valid against the values retrieved.
If Val(txtSize1) > strheight Or Val(txtSize2) > strWidth Then
MsgBox ("The size of your order is too large!" + vbNewLine + vbNewLine + _
"The maximum size for this material is " + strUnitSize), vbExclamation, "Size Limit
Exceeded!"
'If it is prompt and clear input boxes.
txtSize1 = ""
txtSize2 = ""
txtSize1.SetFocus
'Close to reopen when calculating the cost and storing the data.

Page 206 of 303
materialsList.Close
Else
materialsList.Close
End If
Case "Copper Sheet"
strheight = Left$(frmTempData.txtUnitSize.Text, 5)
strWidth = Right$(frmTempData.txtUnitSize.Text, 5)
strUnitSize = Replace$(frmTempData.txtUnitSize.Text, "*", "x")
'Checking the order size is valid against the values retrieved.
If Val(txtSize1) > strheight Or Val(txtSize2) > strWidth Then
MsgBox ("The size of your order is too large!" + vbNewLine + vbNewLine + _
"The maximum size for this material is " + strUnitSize), vbExclamation, "Size Limit
Exceeded!"
'If it is prompt and clear input boxes.
txtSize1 = ""
txtSize2 = ""
txtSize1.SetFocus
'Close to reopen when calculating the cost and storing the data.
materialsList.Close
Else
materialsList.Close
End If
Case "Brass Sheet"
strheight = Left$(frmTempData.txtUnitSize.Text, 5)
strWidth = Right$(frmTempData.txtUnitSize.Text, 5)
strUnitSize = Replace$(frmTempData.txtUnitSize.Text, "*", "x")
'Checking the order size is valid against the values retrieved.
If Val(txtSize1) > strheight Or Val(txtSize2) > strWidth Then
MsgBox ("The size of your order is too large!" + vbNewLine + vbNewLine + _
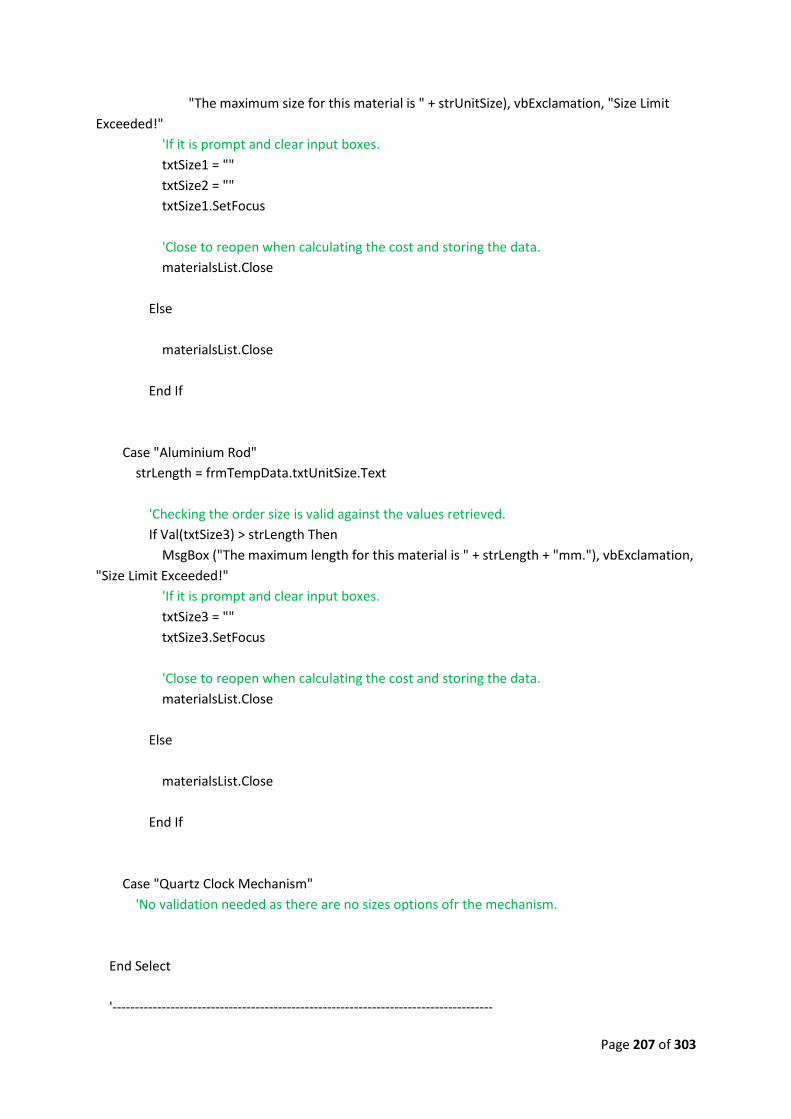
Page 207 of 303
"The maximum size for this material is " + strUnitSize), vbExclamation, "Size Limit
Exceeded!"
'If it is prompt and clear input boxes.
txtSize1 = ""
txtSize2 = ""
txtSize1.SetFocus
'Close to reopen when calculating the cost and storing the data.
materialsList.Close
Else
materialsList.Close
End If
Case "Aluminium Rod"
strLength = frmTempData.txtUnitSize.Text
'Checking the order size is valid against the values retrieved.
If Val(txtSize3) > strLength Then
MsgBox ("The maximum length for this material is " + strLength + "mm."), vbExclamation,
"Size Limit Exceeded!"
'If it is prompt and clear input boxes.
txtSize3 = ""
txtSize3.SetFocus
'Close to reopen when calculating the cost and storing the data.
materialsList.Close
Else
materialsList.Close
End If
Case "Quartz Clock Mechanism"
'No validation needed as there are no sizes options ofr the mechanism.
End Select
'-------------------------------------------------------------------------------------

Page 208 of 303
End Sub
Private Sub txtQuantity_KeyPress(KeyAscii As Integer)
'Uses Ascii in the keypress event to allow 0-9 keypress only.
'This insures no letters are inputted into the quantity textbox.
Select Case KeyAscii
Case 48 To 57, 8
Case Else
KeyAscii = 0 'cancels input
End Select
'As prelimenary validation measure, no three digit number is allowed. (e.. 100 quantity).
'There is also a limit on no more than 50 orders of the specific item.
txtQuantity.MaxLength = 2
If Val(txtQuantity) > 25 Then
MsgBox ("Exceeded the 25 item quantity limit."), vbOKOnly + vbExclamation, "Quantity Error"
Else
End If
End Sub
Private Sub txtQuantity_LostFocus()
'To avoid recordset errors when the txtquantity box is clciked, the recordset should be closed.
Select Case cmbMaterial
Case "Quartz Clock Mechanism"
materialsList.Close
End Select
End Sub
Private Sub txtSize1_GotFocus()
'Highlight the number 4 step when the size textbox is in focus.
shp4.BackColor = vbYellow

Page 209 of 303
shp1.BackColor = vbWhite
shp2.BackColor = vbWhite
shp3.BackColor = vbWhite
shp5.BackColor = vbWhite
End Sub
Private Sub txtSize1_KeyPress(KeyAscii As Integer)
'Allows user input into quantity textbox.
If txtSize1 <> "" Then
txtQuantity.BackColor = vbWhite
txtQuantity.Enabled = True
Else
txtQuantity.BackColor = &HE0E0E0 'background light grey.
txtQuantity.Enabled = False
End If
'Uses Ascii in the keypress event to allow 0-9 keypress only.
'This insures no letters are inputted into the size textbox.
Select Case KeyAscii
Case 48 To 57, 8
Case Else
KeyAscii = 0 'cancels input
End Select
txtSize1.MaxLength = 4
End Sub
Private Sub txtSize2_GotFocus()
'Highlight the number 4 step when the size textbox is in focus.
shp4.BackColor = vbYellow
shp1.BackColor = vbWhite
shp2.BackColor = vbWhite
shp3.BackColor = vbWhite
shp5.BackColor = vbWhite

Page 210 of 303
End Sub
Private Sub txtSize2_KeyPress(KeyAscii As Integer)
'Allows user input into quantity textbox.
If txtSize2 <> "" Then
txtQuantity.BackColor = vbWhite
txtQuantity.Enabled = True
Else
txtQuantity.BackColor = &HE0E0E0 'background light grey.
txtQuantity.Enabled = False
End If
'Uses Ascii in the keypress event to allow 0-9 keypress only.
'This insures no letters are inputted into the size textbox.
Select Case KeyAscii
Case 48 To 57, 8
Case Else
KeyAscii = 0 'cancels input
End Select
txtSize2.MaxLength = 4
End Sub
Private Sub txtSize3_KeyPress(KeyAscii As Integer)
'Allows user input into quantity textbox.
If txtSize3 <> "" Then
txtQuantity.BackColor = vbWhite
txtQuantity.Enabled = True
Else
txtQuantity.BackColor = &HE0E0E0 'background light grey.
txtQuantity.Enabled = False
End If
'Uses Ascii in the keypress event to allow 0-9 keypress only.
'This insures no letters are inputted into the size textbox.

Page 211 of 303
Select Case KeyAscii
Case 48 To 57, 8
Case Else
KeyAscii = 0 'cancels input
End Select
'Places a restriction on the length.
txtSize3.MaxLength = 4
End Sub
Private Sub txtThickness_GotFocus()
'Highlight the number 3 step when the size depth textbox is in focus.
shp3.BackColor = vbYellow
shp1.BackColor = vbWhite
shp2.BackColor = vbWhite
shp4.BackColor = vbWhite
shp5.BackColor = vbWhite
End Sub
Private Sub txtThickness_KeyPress(KeyAscii As Integer)
'Allows user input into size combobox.
If txtThickness <> "" Then
cmbSize.BackColor = vbWhite
cmbSize.Enabled = True
Else
cmbSize.Clear
cmbSize.AddItem "100 x 100"
cmbSize.AddItem "25 x 75"
cmbSize.AddItem "38 x 38"
cmbSize.AddItem "25 x 50"
cmbSize.AddItem "19 x 75"
cmbSize.AddItem "25 x 150"
cmbSize.AddItem "50 x 50"
cmbSize.AddItem "12 x 38"
cmbSize.BackColor = &HE0E0E0 'background light grey.
cmbSize.Enabled = False

Page 212 of 303
End If
'Uses Ascii in the keypress event to allow 0-9 keypress only.
'This insures no letters are inputted into the size textbox.
Select Case KeyAscii
Case 48 To 57, 8
Case Else
KeyAscii = 0 'cancels input
End Select
'Sets the maxlength of this textbox.
txtThickness.MaxLength = 4
End Sub
-----------------------------------------------------------------------------------------------------------------
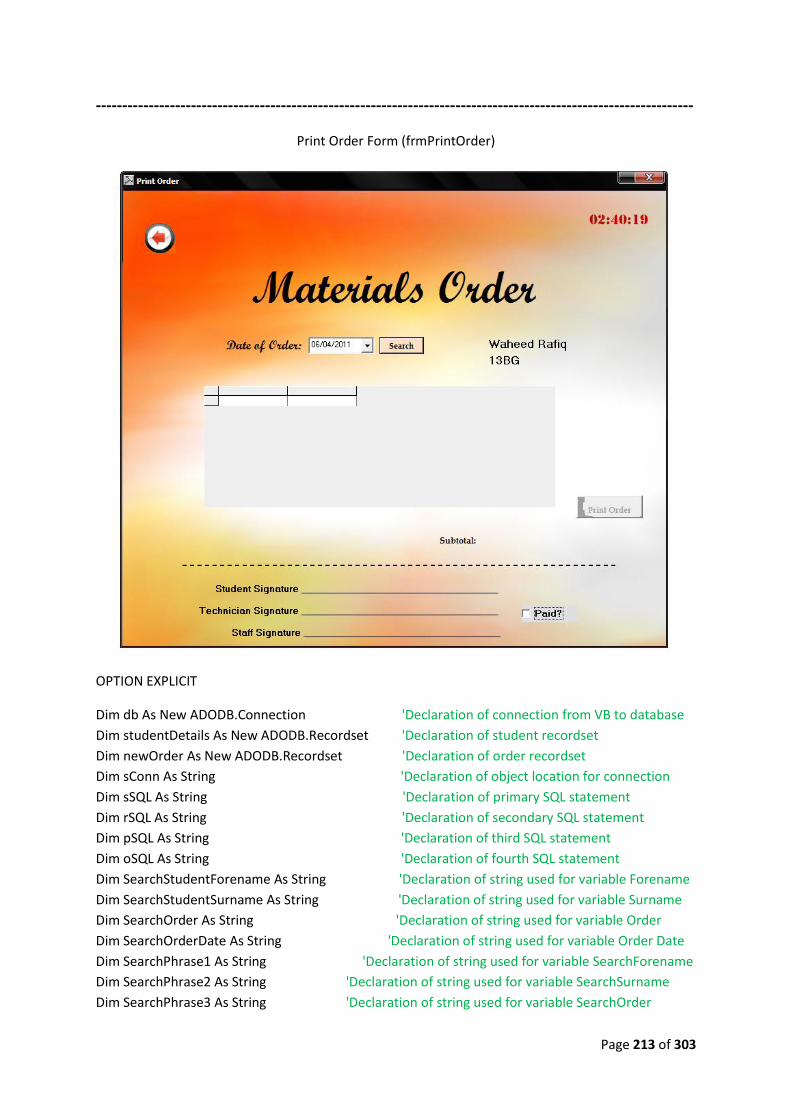
Page 213 of 303
-----------------------------------------------------------------------------------------------------------------
Print Order Form (frmPrintOrder)
OPTION EXPLICIT
Dim db As New ADODB.Connection 'Declaration of connection from VB to database
Dim studentDetails As New ADODB.Recordset 'Declaration of student recordset
Dim newOrder As New ADODB.Recordset 'Declaration of order recordset
Dim sConn As String 'Declaration of object location for connection
Dim sSQL As String 'Declaration of primary SQL statement
Dim rSQL As String 'Declaration of secondary SQL statement
Dim pSQL As String 'Declaration of third SQL statement
Dim oSQL As String 'Declaration of fourth SQL statement
Dim SearchStudentForename As String 'Declaration of string used for variable Forename
Dim SearchStudentSurname As String 'Declaration of string used for variable Surname
Dim SearchOrder As String 'Declaration of string used for variable Order
Dim SearchOrderDate As String 'Declaration of string used for variable Order Date
Dim SearchPhrase1 As String 'Declaration of string used for variable SearchForename
Dim SearchPhrase2 As String 'Declaration of string used for variable SearchSurname
Dim SearchPhrase3 As String 'Declaration of string used for variable SearchOrder

Page 214 of 303
Dim SearchPhrase4 As String 'Declaration of string used for variable SearchOrderDate
Private Sub Form_Load()
'Loads the pictures into the imageboxes.
Set imgBackground.Picture = LoadPicture(App.Path & "\MYDATA\neworderbackground.bmp")
Set imgReturn.Picture = LoadPicture(App.Path & "\MYDATA\returnup1.bmp")
Set cmdPrint.Picture = LoadPicture(App.Path & "\MYDATA\addbutton1.bmp")
dtOrder.Value = Date
'Populate labels with respective data.
lblDisplayNAme = frmTempData.txtFnameData + " " + frmTempData.txtSnameData
lblDisplayGroup = frmTempData.txtClassData
sPath = App.Path & "\MYDATA\resistantmaterialsdb.mdb"
sConn = "Provider=Microsoft.JET.OLEDB.4.0;Data Source=" & sPath
SearchStudentForename = frmTempData.txtFnameData
SearchPhrase1 = "%" & SearchStudentForename & "%"
SearchStudentSurname = frmTempData.txtSnameData
SearchPhrase2 = "%" & SearchStudentSurname & "%"
SearchOrder = frmTempData.txtSIDData
SearchPhrase3 = "%" & SearchOrder & "%"
SearchOrderDate = frmTempData.txtDateData
SearchPhrase4 = "%" & SearchOrderDate & "%"
sSQL = "SELECT*FROM tblStudentDetails WHERE [Forename] LIKE " & "'" & SearchPhrase1 & "'"
& " AND [Surname] LIKE " & " '" & SearchPhrase2 & "'" & ""
rSQL = "SELECT*FROM tblStudentOrder"
pSQL = "SELECT*FROM tblStudentOrder WHERE [StudentID] LIKE " & "'" & SearchPhrase3 & "'"
& " AND [OrderDate] LIKE " & " '" & SearchPhrase4 & "'" & ""
db.ConnectionString = sConn
db.Open
'---------------------------------------------------------------------------------
' This opens the recordsets on the loading of the form.
'---------------------------------------------------------------------------------
'Setting connection between recordset and student details table in database.
With studentDetails
.ActiveConnection = db

Page 215 of 303
.LockType = adLockOptimistic
.CursorType = adOpenKeyset
.Open sSQL
End With
'---------------------------------------------------------------------------------
'Set datagrid interactive capabilities. Also sets which columns are visible in datagrid.
dgOrder.AllowAddNew = False
dgOrder.AllowDelete = False
dgOrder.AllowUpdate = False
dgOrder.AllowRowSizing = False
cmdPrint.Enabled = False
End Sub
Private Sub cmdSearchDate_Click()
SearchOrder = frmTempData.txtSIDData
SearchPhrase3 = "%" & SearchOrder & "%"
SearchOrderDate = dtOrder.Value
SearchPhrase4 = "%" & SearchOrderDate & "%"
pSQL = "SELECT*FROM tblStudentOrder WHERE [StudentID] LIKE " & "'" & SearchPhrase3 & "'"
& " AND [OrderDate] LIKE " & " '" & SearchPhrase4 & "'" & ""
'---------------------------------------------------------------------------------
' This fills the datagrid with the materials list table form the database.
'---------------------------------------------------------------------------------
'Populate by using a recordset.
With db
.CursorLocation = adUseClient
End With
With newOrder
'Check to see if the recordset is open.
If txtDbState <> "Open" Then 'If its not open.
.CursorLocation = adUseClient
.Source = pSQL
.ActiveConnection = db
.CursorType = adOpenKeyset
.LockType = adLockOptimistic
.Open
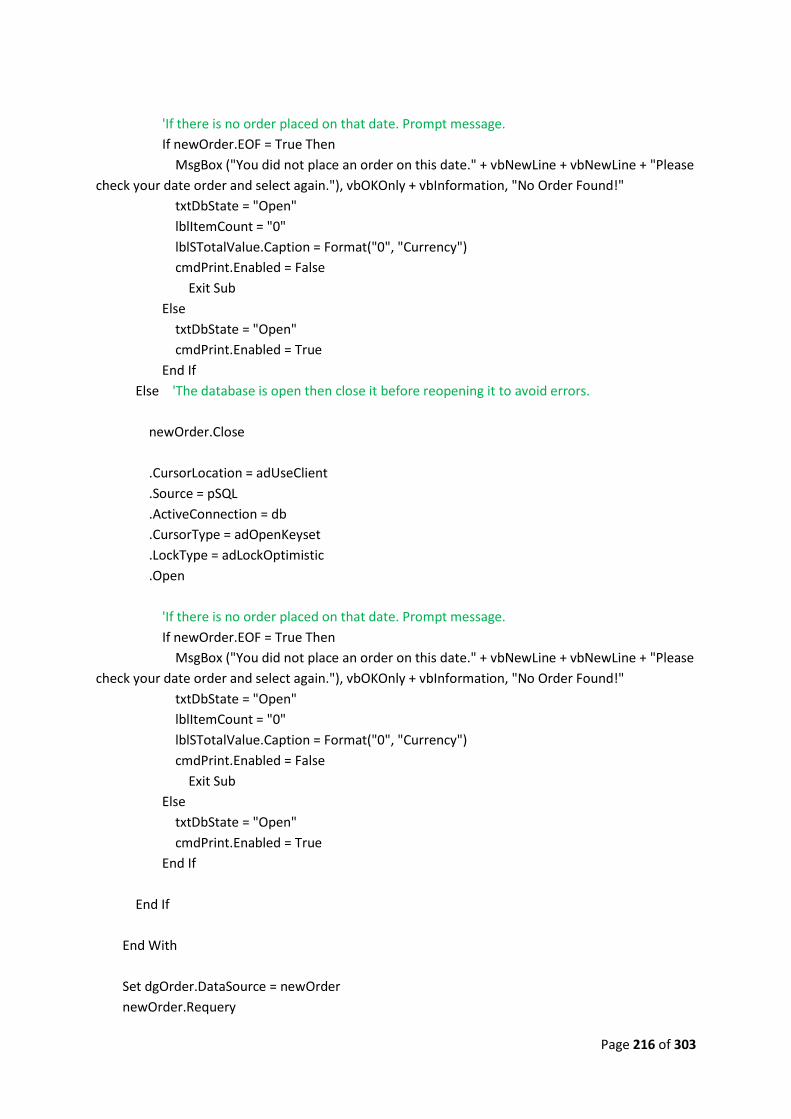
Page 216 of 303
'If there is no order placed on that date. Prompt message.
If newOrder.EOF = True Then
MsgBox ("You did not place an order on this date." + vbNewLine + vbNewLine + "Please
check your date order and select again."), vbOKOnly + vbInformation, "No Order Found!"
txtDbState = "Open"
lblItemCount = "0"
lblSTotalValue.Caption = Format("0", "Currency")
cmdPrint.Enabled = False
Exit Sub
Else
txtDbState = "Open"
cmdPrint.Enabled = True
End If
Else 'The database is open then close it before reopening it to avoid errors.
newOrder.Close
.CursorLocation = adUseClient
.Source = pSQL
.ActiveConnection = db
.CursorType = adOpenKeyset
.LockType = adLockOptimistic
.Open
'If there is no order placed on that date. Prompt message.
If newOrder.EOF = True Then
MsgBox ("You did not place an order on this date." + vbNewLine + vbNewLine + "Please
check your date order and select again."), vbOKOnly + vbInformation, "No Order Found!"
txtDbState = "Open"
lblItemCount = "0"
lblSTotalValue.Caption = Format("0", "Currency")
cmdPrint.Enabled = False
Exit Sub
Else
txtDbState = "Open"
cmdPrint.Enabled = True
End If
End If
End With
Set dgOrder.DataSource = newOrder
newOrder.Requery

Page 217 of 303
'Set which columns from tblMateriaslList are visible and their respective width. (cm)
dgOrder.Columns.Item(1).Width = 5
dgOrder.Columns.Item(2).Width = 2
dgOrder.Columns.Item(3).Width = 2
dgOrder.Columns.Item(4).Width = 1.4
dgOrder.Columns.Item(5).Width = 2.5
dgOrder.Columns.Item(0).Visible = False
dgOrder.Columns.Item(0).Locked = True
dgOrder.Columns.Item(1).Locked = True
dgOrder.Columns.Item(2).Locked = True
dgOrder.Columns.Item(3).Locked = True
dgOrder.Columns.Item(4).Locked = True
dgOrder.Columns.Item(5).Locked = True
dgOrder.Columns.Item(6).Locked = True
dgOrder.Columns.Item(7).Locked = True
'Set datagrid interactive capabilities. Also sets which columns are visible in datagrid.
dgOrder.AllowAddNew = False
dgOrder.AllowDelete = False
dgOrder.AllowUpdate = False
dgOrder.AllowRowSizing = False
dgOrder.Columns.Item(0).Visible = False 'OrderID field.
dgOrder.Columns.Item(6).Visible = False 'StudentID field.
dgOrder.Columns.Item(7).Visible = False 'OrderDate field.
'Return the number of items in basket to label.
lblItemCount = newOrder.RecordCount
'Adds up the total cost of all the materials added in basket (datagrid).
Dim rowNum As Integer
Dim subTotal As String
rowNum = 0
dgOrder.Col = 1
Do While rowNum < Val(lblItemCount)
dgOrder.Row = rowNum
If dgOrder.Columns(5).Text <> "" Then
subTotal = Val(subTotal) + Val(dgOrder.Columns(5).Text)
rowNum = Val(rowNum) + 1
End If
Loop

Page 218 of 303
'Displays the cost in currency format.
lblSTotalValue.Caption = Format(subTotal, "Currency")
'---------------------------------------------------------------------------------
End Sub
Private Sub cmdSearchDate_MouseMove(Button As Integer, Shift As Integer, X As Single, Y As Single)
'Mouseover effect changes colour of button.
cmdSearchDate.BackColor = &H80C0FF 'darker orange
End Sub
Private Sub imgBackground_MouseMove(Button As Integer, Shift As Integer, X As Single, Y As Single)
'Mouseover effect changes colour to original orange.
cmdSearchDate.BackColor = &HC0E0FF
End Sub
Private Sub cmdPrint_Click()
'Change appearance and print form.
Set imgBackground.Picture = LoadPicture(App.Path & "\MYDATA\printbackground.bmp")
imgReturn.Visible = False
cmdPrint.Visible = False
cmdSearchDate.Visible = False
Me.PrintForm
'Change the appearance of the form back to original.
Set imgBackground.Picture = LoadPicture(App.Path & "\MYDATA\neworderbackground.bmp")
imgReturn.Visible = True
cmdPrint.Visible = True
cmdSearchDate.Visible = True
End Sub
Private Sub dtOrder_GotFocus()
cmdPrint.Enabled = False
lblSTotalValue.Caption = Format("0", "Currency")
End Sub
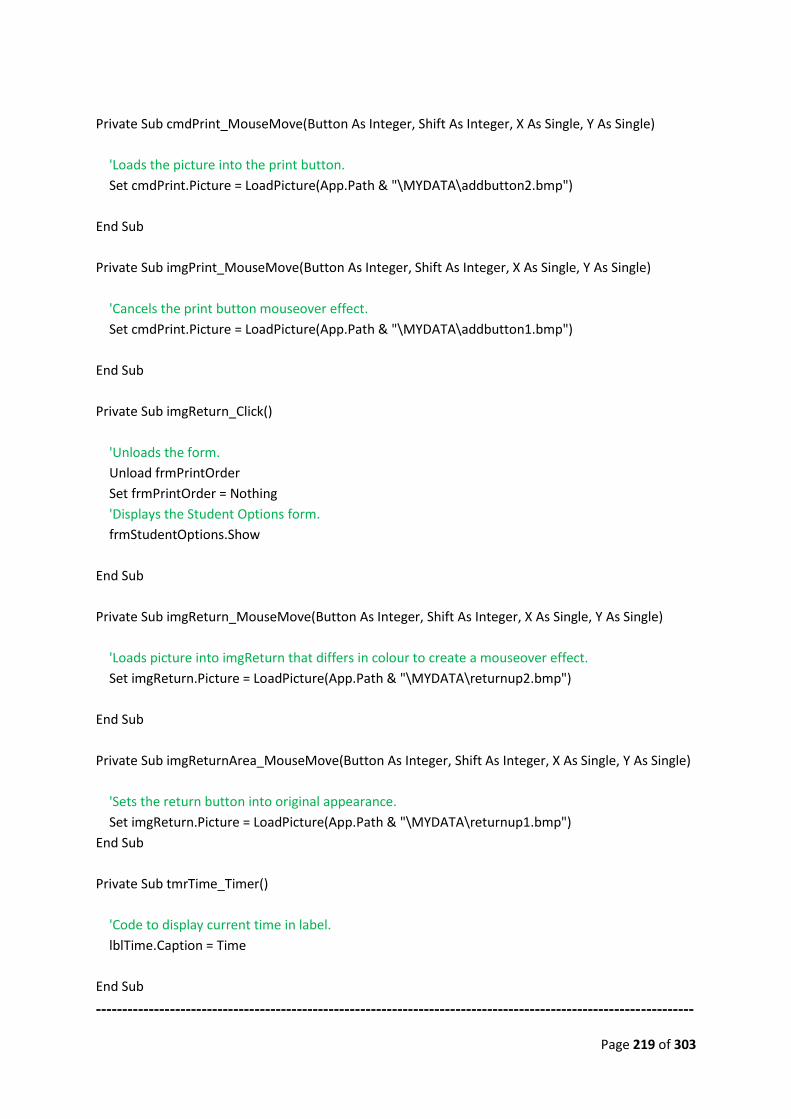
Page 219 of 303
Private Sub cmdPrint_MouseMove(Button As Integer, Shift As Integer, X As Single, Y As Single)
'Loads the picture into the print button.
Set cmdPrint.Picture = LoadPicture(App.Path & "\MYDATA\addbutton2.bmp")
End Sub
Private Sub imgPrint_MouseMove(Button As Integer, Shift As Integer, X As Single, Y As Single)
'Cancels the print button mouseover effect.
Set cmdPrint.Picture = LoadPicture(App.Path & "\MYDATA\addbutton1.bmp")
End Sub
Private Sub imgReturn_Click()
'Unloads the form.
Unload frmPrintOrder
Set frmPrintOrder = Nothing
'Displays the Student Options form.
frmStudentOptions.Show
End Sub
Private Sub imgReturn_MouseMove(Button As Integer, Shift As Integer, X As Single, Y As Single)
'Loads picture into imgReturn that differs in colour to create a mouseover effect.
Set imgReturn.Picture = LoadPicture(App.Path & "\MYDATA\returnup2.bmp")
End Sub
Private Sub imgReturnArea_MouseMove(Button As Integer, Shift As Integer, X As Single, Y As Single)
'Sets the return button into original appearance.
Set imgReturn.Picture = LoadPicture(App.Path & "\MYDATA\returnup1.bmp")
End Sub
Private Sub tmrTime_Timer()
'Code to display current time in label.
lblTime.Caption = Time
End Sub
-----------------------------------------------------------------------------------------------------------------

Page 220 of 303
-----------------------------------------------------------------------------------------------------------------
Find Order Form (frmFindOrder)
OPTION EXPLICIT
Dim db As New ADODB.Connection 'Declaration of connection from VB to database
Dim studentDetails As New ADODB.Recordset 'Declaration of student recordset
Dim studentOrder As New ADODB.Recordset 'Declaration of order recordset
Dim sConn As String 'Declaration of object location for connection
Dim sSQL As String 'Declaration of primary SQL statement
Dim rSQL As String 'Declaration of secondary SQL statement
Dim pSQL As String 'Declaration of third SQL statement
Dim oSQL As String 'Declaration of fourth SQL statement
Dim SearchStudentForename As String 'Declaration of string used for variable Forename
Dim SearchStudentSurname As String 'Declaration of string used for variable Surname
Dim SearchOrder As String 'Declaration of string used for variable Order
Dim SearchOrderDate As String 'Declaration of string used for variable Order Date
Dim SearchPhrase1 As String 'Declaration of string used for variable SearchForename

Page 221 of 303
Dim SearchPhrase2 As String 'Declaration of string used for variable SearchSurname
Dim SearchPhrase3 As String 'Declaration of string used for variable SearchOrder
Dim SearchPhrase4 As String 'Declaration of string used for variable SearchOrderDate
Private Sub Form_Load()
'Loads the pictures into the imageboxes.
Set imgBackground.Picture = LoadPicture(App.Path & "\MYDATA\neworderbackground.bmp")
Set imgReturn.Picture = LoadPicture(App.Path & "\MYDATA\returnup1.bmp")
dtOrder.Value = Date
sPath = App.Path & "\MYDATA\resistantmaterialsdb.mdb"
sConn = "Provider=Microsoft.JET.OLEDB.4.0;Data Source=" & sPath
db.ConnectionString = sConn
db.Open
With studentDetails
.ActiveConnection = db
.LockType = adLockOptimistic
.CursorType = adOpenKeyset
End With
'Set datagrid interactive capabilities. Also sets which columns are visible in datagrid.
dgOrder.AllowAddNew = False
dgOrder.AllowDelete = False
dgOrder.AllowUpdate = False
dgOrder.AllowRowSizing = False
End Sub
Private Sub cmdSearchDate_Click()
'Ensure a name has been entered. If not prompt a message.
If txtForename = "Forename" Or txtSurname = "Surname" Then
MsgBox ("Please enter the student's full name."), vbExclamation, "Student Details"
Exit Sub
Else
End If
SearchStudentForename = txtForename
SearchPhrase1 = "%" & SearchStudentForename & "%"
SearchStudentSurname = txtSurname

Page 222 of 303
SearchPhrase2 = "%" & SearchStudentSurname & "%"
sSQL = "SELECT*FROM tblStudentDetails WHERE [Forename] LIKE " & "'" & SearchPhrase1 & "'"
& " AND [Surname] LIKE " & " '" & SearchPhrase2 & "'" & ""
'---------------------------------------------------------------------------------
' This opens the recordsets on the loading of the form.
'---------------------------------------------------------------------------------
'Setting connection between recordset and student details table in database.
With studentDetails
'Check to see if the recordset is open.
If txtSDetailsState <> "Open" Then 'If its not open.
.Open sSQL
'If there is no order placed on that date. Prompt message.
If studentDetails.EOF = True Then
MsgBox (txtForename + " " + txtSurname + " is not a registered student."),
vbExclamation, "Invalid Student Details"
frmTempData.txtStudentSearchID = ""
txtSDetailsState = "Open"
'Clears all the input boxes.
txtForename.ForeColor = &H80FF& 'orange
txtSurname.ForeColor = &H80FF& 'orange
txtForename = "Forename"
txtSurname = "Surname"
Exit Sub
Else
txtSDetailsState = "Open"
End If
Else 'The database is open then close it before reopening it to avoid errors.
studentDetails.Close
.Open sSQL
'If there is no order placed on that date. Prompt message.
If studentDetails.EOF = True Then
MsgBox (txtForename + " " + txtSurname + " is not a registered student."),
vbExclamation, "Invalid Student Details"
frmTempData.txtStudentSearchID = ""
txtSDetailsState = "Open"

Page 223 of 303
'Clears all the input boxes.
txtForename.ForeColor = &H80FF& 'orange
txtSurname.ForeColor = &H80FF& 'orange
txtForename = "Forename"
txtSurname = "Surname"
Exit Sub
Else
txtSDetailsState = "Open"
End If
End If
End With
'---------------------------------------------------------------------------------
SearchOrder = frmTempData.txtStudentSearchID
SearchPhrase3 = "%" & SearchOrder & "%"
SearchOrderDate = dtOrder.Value
SearchPhrase4 = "%" & SearchOrderDate & "%"
pSQL = "SELECT*FROM tblStudentOrder WHERE [StudentID] LIKE " & "'" & SearchPhrase3 & "'"
& " AND [OrderDate] LIKE " & " '" & SearchPhrase4 & "'" & ""
'---------------------------------------------------------------------------------
' This fills the datagrid with the materials list table form the database.
'---------------------------------------------------------------------------------
'Populate by using a recordset.
With db
.CursorLocation = adUseClient
End With
With studentOrder
'Check to see if the recordset is open.
If txtDbState <> "Open" Then 'If its not open.
.CursorLocation = adUseClient
.Source = pSQL
.ActiveConnection = db
.CursorType = adOpenKeyset
.LockType = adLockOptimistic
.Open
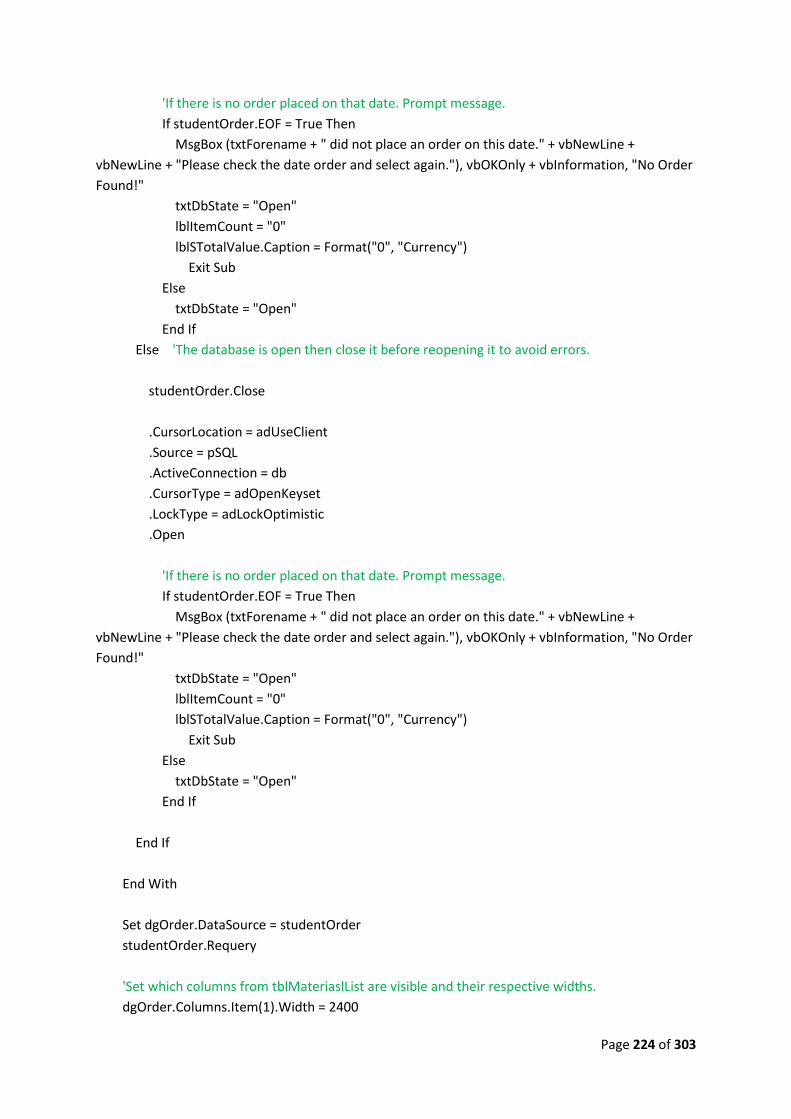
Page 224 of 303
'If there is no order placed on that date. Prompt message.
If studentOrder.EOF = True Then
MsgBox (txtForename + " did not place an order on this date." + vbNewLine +
vbNewLine + "Please check the date order and select again."), vbOKOnly + vbInformation, "No Order
Found!"
txtDbState = "Open"
lblItemCount = "0"
lblSTotalValue.Caption = Format("0", "Currency")
Exit Sub
Else
txtDbState = "Open"
End If
Else 'The database is open then close it before reopening it to avoid errors.
studentOrder.Close
.CursorLocation = adUseClient
.Source = pSQL
.ActiveConnection = db
.CursorType = adOpenKeyset
.LockType = adLockOptimistic
.Open
'If there is no order placed on that date. Prompt message.
If studentOrder.EOF = True Then
MsgBox (txtForename + " did not place an order on this date." + vbNewLine +
vbNewLine + "Please check the date order and select again."), vbOKOnly + vbInformation, "No Order
Found!"
txtDbState = "Open"
lblItemCount = "0"
lblSTotalValue.Caption = Format("0", "Currency")
Exit Sub
Else
txtDbState = "Open"
End If
End If
End With
Set dgOrder.DataSource = studentOrder
studentOrder.Requery
'Set which columns from tblMateriaslList are visible and their respective widths.
dgOrder.Columns.Item(1).Width = 2400

Page 225 of 303
dgOrder.Columns.Item(2).Width = 800
dgOrder.Columns.Item(3).Width = 1100
dgOrder.Columns.Item(4).Width = 800
dgOrder.Columns.Item(5).Width = 1000
dgOrder.Columns.Item(0).Locked = True
dgOrder.Columns.Item(1).Locked = True
dgOrder.Columns.Item(2).Locked = True
dgOrder.Columns.Item(3).Locked = True
dgOrder.Columns.Item(4).Locked = True
dgOrder.Columns.Item(5).Locked = True
dgOrder.Columns.Item(6).Locked = True
dgOrder.Columns.Item(7).Locked = True
'Set datagrid interactive capabilities. Also sets which columns are visible in datagrid.
dgOrder.AllowAddNew = False
dgOrder.AllowDelete = False
dgOrder.AllowUpdate = False
dgOrder.AllowRowSizing = False
dgOrder.Columns.Item(0).Visible = False 'OrderID field.
dgOrder.Columns.Item(6).Visible = False 'StudentID field.
dgOrder.Columns.Item(7).Visible = False 'OrderDate field.
'Return the number of items in basket to label.
lblItemCount = studentOrder.RecordCount
'Adds up the total cost of all the materials added in basket (datagrid).
Dim rowNum As Integer
Dim subTotal As String
rowNum = 0
dgOrder.Col = 1
Do While rowNum < Val(lblItemCount)
dgOrder.Row = rowNum
If dgOrder.Columns(5).Text <> "" Then
subTotal = Val(subTotal) + Val(dgOrder.Columns(5).Text)
rowNum = Val(rowNum) + 1
End If
Loop
'Displays the cost in currency format.

Page 226 of 303
lblSTotalValue.Caption = Format(subTotal, "Currency")
'---------------------------------------------------------------------------------
End Sub
Private Sub dtOrder_Change()
lblSTotalValue.Caption = ""
'lblSTotalValue.Caption = Format("0", "Currency")
Set dgOrder.DataSource = Nothing
End Sub
Private Sub cmdClear_Click()
'Clears all the input boxes.
txtForename.ForeColor = &H80FF& 'orange
txtSurname.ForeColor = &H80FF& 'orange
txtForename = "Forename"
txtSurname = "Surname"
dtOrder.Value = Date
End Sub
Private Sub cmdClear_MouseMove(Button As Integer, Shift As Integer, X As Single, Y As Single)
'Changes the colour. Mouseover effect.
cmdClear.BackColor = &H8080FF 'darker red
End Sub
Private Sub cmdSearchDate_MouseMove(Button As Integer, Shift As Integer, X As Single, Y As Single)
'Changes the colour. Mouseover effect.
cmdSearchDate.BackColor = &H80C0FF 'darker orange
End Sub
Private Sub imgBackground_Click()
'Sets the focus onto the search command button.
cmdSearchDate.SetFocus
End Sub

Page 227 of 303
Private Sub imgBackground_MouseMove(Button As Integer, Shift As Integer, X As Single, Y As Single)
'Changes the colours of the command buttons to original colour.
cmdSearchDate.BackColor = &HC0E0FF 'light orange
cmdClear.BackColor = &HC0C0FF 'light red
End Sub
Private Sub imgReturn_Click()
'Unloads the form.
Unload frmFindOrder
Set frmFindOrder = Nothing
'Displays the Staff Options form.
frmStaffOptions.Show
End Sub
Private Sub imgReturn_MouseMove(Button As Integer, Shift As Integer, X As Single, Y As Single)
'Loads picture into imgReturn that differs in colour to create a mouseover effect.
Set imgReturn.Picture = LoadPicture(App.Path & "\MYDATA\returnup2.bmp")
End Sub
Private Sub imgReturnArea_MouseMove(Button As Integer, Shift As Integer, X As Single, Y As Single)
'Sets the return button into original appearance.
Set imgReturn.Picture = LoadPicture(App.Path & "\MYDATA\returnup1.bmp")
End Sub
Private Sub tmrTime_Timer()
'Code to display current time in label.
lblTime.Caption = Time
End Sub
Private Sub txtSurname_GotFocus()
'Displays pop-up text when the cursor hovers over txtUsername.

Page 228 of 303
txtSurname.ToolTipText = "Surname"
'Clear the textbox for username data entry.
If txtSurname = "Surname" Then
txtSurname = ""
txtSurname.ForeColor = vbBlack
Else
End If
End Sub
Private Sub txtSurname_KeyPress(KeyAscii As Integer)
'Uses Ascii in the keypress event to allow A-Z, a-z and backspace keypress only.
'This insures no numbers are inputted into the Surname textbox.
Select Case KeyAscii
Case 65 To 90, 97 To 122, 8
Case Else
KeyAscii = 0 'cancels input
End Select
'The database field length is set ot a maximum of 20.
txtSurname.MaxLength = 20
End Sub
Private Sub txtSurname_LostFocus()
'Reverts the textbox into original settings if no input present.
If txtSurname = "" Then
txtSurname.ForeColor = &H80FF&
txtSurname = "Surname"
Else
End If
End Sub
Private Sub txtUsername_GotFocus()

Page 229 of 303
'Displays pop-up text when the cursor hovers over txtUsername.
txtUsername.ToolTipText = "Enter your school username."
'Clear the textbox for username data entry.
If txtUsername = "School Username" Then
txtUsername = ""
txtUsername.ForeColor = vbBlack
Else
End If
End Sub
Private Sub txtUsername_KeyPress(KeyAscii As Integer)
'Database field length set to maximum 20 charcaters so code to avoid error when saving.
txtUsername.MaxLength = 20
End Sub
Private Sub txtForename_GotFocus()
'Displays pop-up text when the cursor hovers over txtForename.
txtForename.ToolTipText = "Forename"
'Clear the textbox for username data entry.
If txtForename = "Forename" Then
txtForename = ""
txtForename.ForeColor = vbBlack
Else
End If
End Sub
Private Sub txtForename_KeyPress(KeyAscii As Integer)
'Uses Ascii in the keypress event to allow A-Z, a-z and backspace keypress only.
'This insures no numbers are inputted into the Forename textbox.
Select Case KeyAscii
Case 65 To 90, 97 To 122, 8
Case Else
KeyAscii = 0 'cancels input

Page 230 of 303
End Select
'The database field length is set ot a maximum of 20.
txtForename.MaxLength = 20
End Sub
Private Sub txtForename_LostFocus()
'Reverts the textbox into original settings if no input is present.
If txtForename = "" Then
txtForename.ForeColor = &H80FF&
txtForename = "Forename"
Else
End If
End Sub
-----------------------------------------------------------------------------------------------------------------

Page 231 of 303
Procedure / Subroutine Details
The subroutines used in the system aim to cover all the objectives in the system and meet all the
requirements specified by the client himself. The subroutines used in the system are documented
below.
--------------------------------------------------------------------------------------------------------------------------------------
SUBROUTINE: Student Login
The purpose of the subroutine is to allow the student to login using their username and password.
This acts as a security measure by not allowing non-registered users to use the system and allowing
registered users full use of the system from their account only.
Global Declarations:
Dim db As New ADODB.Connection 'Connection from VB to database
Dim newStudentAccount As New ADODB.Recordset 'Student recordset
Dim sConn As String 'Object location for connection
Dim sSQL As String 'Primary SQL statement
Local Variables:
Dim SearchUsername As String 'String used for variable Student Username
Dim SearchPassword As String 'String used for variable Student Password
Dim SearchPhrase1 As String 'String used for variable SearchForename
Dim SearchPhrase2 As String 'String used for variable SearchForename
The subroutine compares the student inputs on the form against registered student data in the
database to either grant or reject, the student trying to login, access to the system.
--------------------------------------------------------------------------------------------------------------------------------------
SUBROUTINE: Staff Login
The purpose of the subroutine is to allow members of staff to login using their username and
password. This acts as a security measure by not allowing non-registered members of staff to access
parts of the system that remain crucial to the systems performance, such as the costs of the
materials.
Global Declarations:
Dim db As New ADODB.Connection 'Connection from VB to database
Dim newStaffAccount As New ADODB.Recordset 'Staff recordset
Dim sConn As String 'Object location for connection
Dim sSQL As String 'Primary SQL statement
Local Variables:
Dim SearchUsername As String 'String used for variable Student Username
Dim SearchPassword As String 'String used for variable Student Password
Dim SearchPhrase1 As String 'String used for variable SearchForename

Page 232 of 303
Dim SearchPhrase2 As String 'String used for variable SearchForename
The subroutine compares the staff inputs on the form against registered members of staff data in
the database to either grant or reject the user access to the system.
--------------------------------------------------------------------------------------------------------------------------------------
SUBROUTINE: Account Registration
The purpose of the subroutine is to allow new users to the system to register and create an account
they can use to access the system in the future.
Global Declarations:
Dim db As New ADODB.Connection 'Connection from VB to database
Dim newStudentAccount As New ADODB.Recordset 'Students recordset
Dim newStaffAccount As New ADODB.Recordset 'Staff recordset
Dim sConn As String 'Object location for connection
Dim sSQL As String 'Primary SQL statement
Dim rSQL As String 'Secondary SQL statement
Dim pSQL As String 'Third SQL statement
Dim qSQL As String 'Fourth SQL statement
Global Variables:
Dim SearchUsername As String 'String used for variable Username
Dim SearchPhrase As String 'String used for variable SearchUsername
The subroutine checks for existing usernames and stores all the information needed form the users
to meet the client system requirements.
--------------------------------------------------------------------------------------------------------------------------------------
SUBROUTINE: Edit Materials List
The purpose of the subroutine is to allow a member of staff or a technician that has logged in to edit
the materials list. This includes updating all the prices and sizes, adding and deleting materials.
Global Declarations:
Dim db As New ADODB.Connection 'Connection from VB to database
Dim materialsList As New ADODB.Recordset 'Materials recordset
Dim sConn As String 'Object location for connection
Dim sSQL As String 'Primary SQL statement
Global/Local Variables: none.
The subroutine only adds or accepts valid material data to add. All changes to the prices etc. are
saved automatically.
--------------------------------------------------------------------------------------------------------------------------------------

Page 233 of 303
SUBROUTINE: New Order
The purpose of the subroutine is to allow registered students that have logged on to make a new
order. The maximum number of items that can be ordered on a single order is 10. From here, the
order can be printed or edited on a separate form of the system.
Global Declarations:
Dim db As New ADODB.Connection 'Connection from VB to database
Dim studentDetails As New ADODB.Recordset 'Student recordset
Dim newOrder As New ADODB.Recordset 'Order recordset
Dim newOrderList As New ADODB.Recordset 'Datagrid recordset
Dim materialsList As New ADODB.Recordset 'Materials list recordset.
Dim sConn As String 'Object location for connection
Dim sSQL As String 'Primary SQL statement
Dim rSQL As String 'Secondary SQL statement
Dim pSQL As String 'Third SQL statement
Dim oSQL As String 'Fourth SQL statement
Global Variables:
Dim SearchMaterial As String 'String used for variable Material
Dim SearchDepth As String 'String used for variable Depth
Dim SearchPhrase1 As String 'String used for variable SearchForename
Dim SearchPhrase2 As String 'String used for variable SearchSurname
Dim SearchPhrase3 As String 'String used for variable SearchOrder
Dim SearchPhrase4 As String 'String used for variable SearchOrderDate
Dim SearchPhrase5 As String 'String used for variable SearchMaterial
Dim SearchPhrase6 As String 'String used for variable SearchDepth
Dim SearchStudentForename As String 'String used for variable Forename
Dim SearchStudentSurname As String 'String used for variable Surname
The subroutine adds the order to the database where it can be retrieved at any time through the
system to amend or print. Validation and verification checks are carried out in this subroutine to
ensure no orders are invalid (larger than the maximum sheet size available), or contain any
characters that may interfere with the calculation including the accuracy of the calculations result.
--------------------------------------------------------------------------------------------------------------------------------------
SUBROUTINE: Edit Order
The purpose of the subroutine is to allow students to edit their order at any time providing they
noted the date of the order, as informed by the system. From here the order can also be printed.
Global Declarations:
Dim db As New ADODB.Connection 'Connection from VB to database
Dim studentDetails As New ADODB.Recordset 'Student recordset
Dim newOrder As New ADODB.Recordset 'Order recordset
Dim newOrderList As New ADODB.Recordset 'Datagrid recordset

Page 234 of 303
Dim materialsList As New ADODB.Recordset 'Materials list recordset.
Dim sConn As String 'Object location for connection
Dim sSQL As String 'Primary SQL statement
Dim rSQL As String 'Secondary SQL statement
Dim pSQL As String 'Third SQL statement
Dim oSQL As String 'Fourth SQL statement
Global Variables:
Dim SearchMaterial As String 'String used for variable Material
Dim SearchDepth As String 'String used for variable Depth
Dim SearchPhrase1 As String 'String used for variable SearchForename
Dim SearchPhrase2 As String 'String used for variable SearchSurname
Dim SearchPhrase3 As String 'String used for variable SearchOrder
Dim SearchPhrase4 As String 'String used for variable SearchOrderDate
Dim SearchPhrase5 As String 'String used for variable SearchMaterial
Dim SearchPhrase6 As String 'String used for variable SearchDepth
Dim SearchStudentForename As String 'String used for variable Forename
Dim SearchStudentSurname As String 'String used for variable Surname
The subroutine allows the student to add items to the existing order. The student is also allowed to
delete an order but cannot edit details of an already ordered item. This is because the calculations
cannot be performed this way. Validation and verification checks are also carried out here should
any invalid data be input and cause the program to crash. This in turn makes the program robust.
--------------------------------------------------------------------------------------------------------------------------------------
SUBROUTINE: Print Order
The purpose of the subroutine is to allow students to print off the order on A4 paper. The subroutine
calls the order details form the database and allows the student to print off the form containing the
data. Again, the date of the order is required as a student can have many orders but want to print
out a certain one.
Global Declarations:
Dim db As New ADODB.Connection 'Connection from VB to database
Dim studentDetails As New ADODB.Recordset 'Student recordset
Dim studentOrder As New ADODB.Recordset 'Order recordset
Dim sConn As String 'Object location for connection
Dim sSQL As String 'Primary SQL statement
Dim rSQL As String 'Secondary SQL statement
Dim pSQL As String 'Third SQL statement
Dim oSQL As String 'Fourth SQL statement
Global Variables:
Dim SearchMaterial As String 'String used for variable Material
Dim SearchDepth As String 'String used for variable Depth

Page 235 of 303
Dim SearchPhrase1 As String 'String used for variable SearchForename
Dim SearchPhrase2 As String 'String used for variable SearchSurname
Dim SearchPhrase3 As String 'String used for variable SearchOrder
Dim SearchPhrase4 As String 'String used for variable SearchOrderDate
Dim SearchStudentForename As String 'String used for variable Forename
Dim SearchStudentSurname As String 'String used for variable Surname
Dim SearchOrder As String 'Declaration of string used for variable Order
Dim SearchOrderDate As String 'Declaration of string used for variable Order
Date
Validating details before the search is made for the details in the database ensure the program will
not come up with any errors and maintains the robustness of the system.
--------------------------------------------------------------------------------------------------------------------------------------
SUBROUTINE: Find Order
The purpose of the subroutine is to allow members of staff to search for a student order. The date of
the order and student name is required for this subroutine to function and this is ensured through
presence checks on the form.
Global Declarations:
Dim db As New ADODB.Connection 'Connection from VB to database
Dim studentDetails As New ADODB.Recordset 'Student recordset
Dim studentOrder As New ADODB.Recordset 'Order recordset
Dim sConn As String 'Object location for connection
Dim sSQL As String 'Primary SQL statement
Dim rSQL As String 'Secondary SQL statement
Dim pSQL As String 'Third SQL statement
Dim oSQL As String 'Fourth SQL statement
Global Variables:
Dim SearchMaterial As String 'String used for variable Material
Dim SearchDepth As String 'String used for variable Depth
Dim SearchPhrase1 As String 'String used for variable SearchForename
Dim SearchPhrase2 As String 'String used for variable SearchSurname
Dim SearchPhrase3 As String 'String used for variable SearchOrder
Dim SearchPhrase4 As String 'String used for variable SearchOrderDate
Dim SearchStudentForename As String 'String used for variable Forename
Dim SearchStudentSurname As String 'String used for variable Surname
Dim SearchOrder As String 'Declaration of string used for variable Order
Dim SearchOrderDate As String 'Declaration of string used for variable Order
Date
Validating details before the search is made for the details in the database ensure the program will
not come up with any errors and maintains the robustness of the system.

Page 236 of 303
--------------------------------------------------------------------------------------------------------------------------------------
SUBROUTINE: Password Reminder
The purpose of the subroutine is to allow students who cannot recall their passwords to search for
their password by inputting their full name and technology class. The password appears and is on
display for 3 seconds only for security reasons.
Global Declarations:
Dim db As New ADODB.Connection 'Connection from VB to database
Dim studentAccount As New ADODB.Recordset 'Students recordset
Dim sConn As String 'Object location for connection
Dim sSQL As String 'Primary SQL statement
Dim rSQL As String 'Secondary SQL statement.
Global Variables:
Dim SearchUsername As String 'String used for variable Username
Dim SearchPhrase1 As String 'String used for variable SearchUsername
Dim SearchYear As String 'String used for variable Year Group
Dim SearchPhrase2 As String 'String used for variable SearchYear
Dim SearchGroup As String 'String used for variable Group
Dim SearchPhrase3 As String 'String used for variable SearchGroup
--------------------------------------------------------------------------------------------------------------------------------------

Page 237 of 303
List of Variables
The variables in the system are created for major parts of the system, mainly the processes. They are
used especially for calculating the costs and populating the forms with data. The variables used in
the solution are listed below.
VARIABLE DATA TYPE PURPOSE
studentAccount studentDetails studentOrder newOrder newOrderList materialsList newStudentAccount newStaffAccount
Not a data type. New ADODB Recordset
Recordsets are created to act as the medium between the database and the program. A recordset is essentially a copy of the database data, which the program can manipulate. The changes to the recordset data overwrite the data in the database afterwards.
db
Not a data type.
New ADODB Connection
Connect the program (.exe) to the database. Allows the loading of database data onto the form and its along this connection the data is saved.
sConn
String String for the object location of the connection (database).
sPath
String String for the database address.
SQL
String
String for the SQL statements that determine where the data is saved to or retrieved from in the database.
SearchUsername
String String for the variable username.
SearchPassword
String String for the variable password.
SearchMaterial
String String for the variable material name.
SearchDepth
String String for the variable material depth.
SearchStudentForename
String String for the variable student forename.
SearchStudentSurname
String String for the variable student surname.
SearchOrder
String String for the variable student order.
SearchOrderDate
String String for the variable student order date.
SearchGroup
String String for the variable student class group.
SearchYear
Integer Integer variable for the student year at school.
rowNum Integer Integer variable for the number
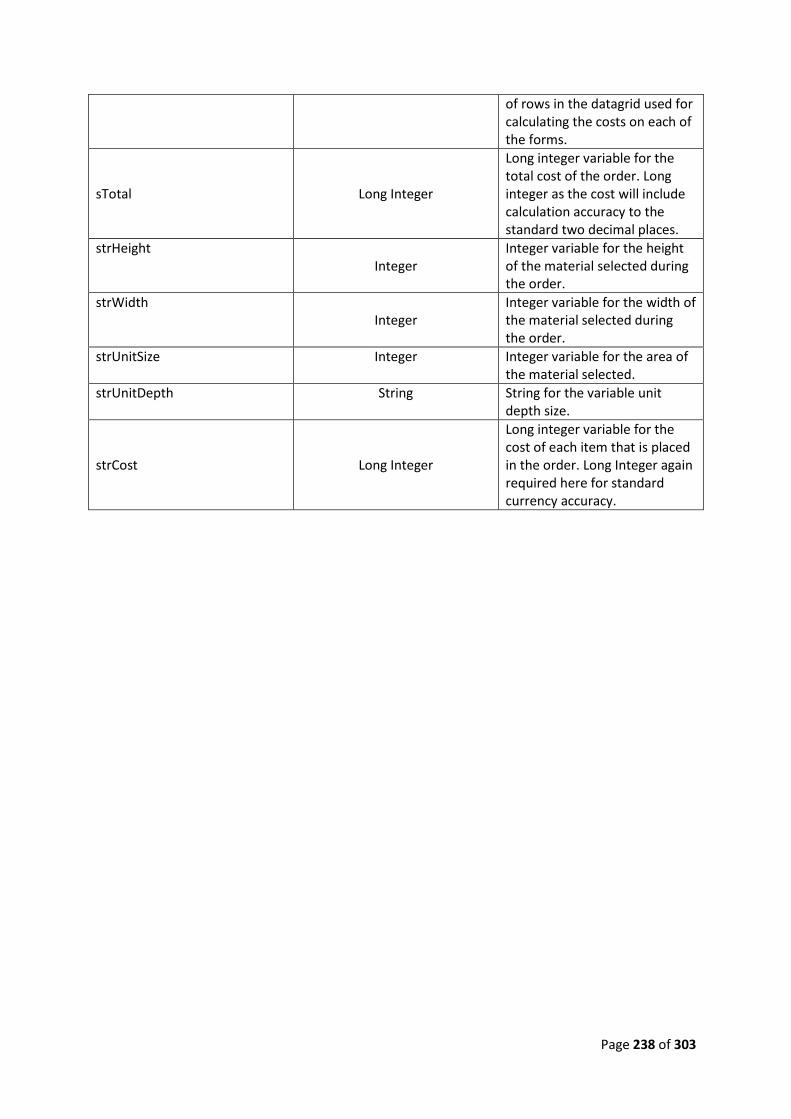
Page 238 of 303
of rows in the datagrid used for calculating the costs on each of the forms.
sTotal
Long Integer
Long integer variable for the total cost of the order. Long integer as the cost will include calculation accuracy to the standard two decimal places.
strHeight
Integer
Integer variable for the height of the material selected during the order.
strWidth
Integer
Integer variable for the width of the material selected during the order.
strUnitSize
Integer Integer variable for the area of the material selected.
strUnitDepth
String String for the variable unit depth size.
strCost
Long Integer
Long integer variable for the cost of each item that is placed in the order. Long Integer again required here for standard currency accuracy.

Page 239 of 303
CG4.5 TESTING
Testing Strategy
The testing strategy will be to test the new system thoroughly. The system will be tested by me,
current students studying the subject, and the department technician.
The testing performed by myself will include the following:
The testing of any input forms in the system. This will include the thorough testing of any
inputs on these forms. The inputs on these forms will be subject to typical, extreme and
erroneous data to witness the systems response. Should the system not respond correctly,
maintenance will be performed to correct or adapt any of the features that may need
attention. This should test the system is robust enough to be suitable for implementation.
The navigational paths will be tested by common scenarios to see if the system is logical or
not. This is important considering the system is also going to be used by students and
ensuring the interface is clear is important.
The functions of the command buttons or any links on the forms will be tested to ensure
that no errors appear when transporting the user from one form to another and to ensure
there are no broken links. Errors here would have a big impact on the use of the system and
some errors here may also render the system fairly useless.
The validation on each of the forms that prompt an input from the user will be tested. This is
also important as not doing so could leave the system crashing when it tries to process
unexpected data. The validation will be tested to ensure all presence, format and range
checks function correctly.
The calculations the system performs will be tested thoroughly to ensure the system is
producing the correct results. These results will affect the students and the department
directly and undervaluing the order would undermine the reason for the system. The
calculations will be tested by manually working out what the system should produce as a
result via a calculator and comparing with the actual result. The technician will also provide
some hand-validated orders to verify the accuracy of the new system.
The testing performed by the students who study the subject will include the following:
(Feedback will be received from this testing that will contribute to the evaluation against the criterion
established before the system was made.)
The testing of the inputs the students will come across on the system. This will include
inputting general data and also making attempts to cause an error which will result in the
system crashing. This will thoroughly test the robustness of the system.
The testing performed by the students will also include testing the validation in the system.
The testing performed by the department technician will include the following:
(Feedback will be received from this testing that will contribute to the evaluation against the criterion
established before the system was made.)

Page 240 of 303
The testing of the inputs members of staff may come across on the system. The technician
may also want to test the calculations which will only reinforce the thoroughness of the
system testing.
The technician will also test the outputs of the system such as the materials list and typical
printed orders and compare with the requirements that were set whilst the system was
being designed.

Page 241 of 303
Test Plan / Data
The test plan is to devise appropriate data that will test all the inputs on each of the forms that
require manual input in the system. This test data will then be input into the system to see how it
responds. Unexpected responses form the system will highlight areas that need maintenance or
measures to prevent the crashing of the system. Testing then looks at all the command buttons and
links on the system to verify they work as expected. The testing will then be handed over to the
students and the technician. Although this will not be documented, the feedback will be recorded as
it will form an integral part of the evaluation of the system.
The test data will need to include typical, extreme, erroneous and null data to fully test the system.
The department technician, who has overseen the development of the system from its design stage,
will provide three examples of previous orders as a preliminary measure of how the system
performs. This test will be performed at the end of the testing on my behalf.
--------------------------------------------------------------------------------------------------------------------------------------
The following is sets of data for the REGISTRATION PROCESS in the system.
1. TYPICAL DATA
2. EXTREME DATA
3. ERRONEOUS DATA
EXPECTED RESULTS
It is expected there will be no errors when this set of data
is inputted into the system. The system should except the
data and add it without any problems. It is expected the
data will still be subject to validation, but this should not
highlight anything in this data set as being invalid.
EXPECTED RESULTS
Expectations here are that the system should be able to
handle and validate data input of this size. This data set is
essentially created to test the system can cope with even
the extreme data that it may be subject to. Again, it should
not prompt any error messages or the like.

Page 242 of 303
--------------------------------------------------------------------------------------------------------------------------------------
The following is sets of data for the LOGIN PROCESS in the system.
4. TYPICAL DATA
5. EXTREME DATA
6. ERRONEOUS DATA
--------------------------------------------------------------------------------------------------------------------------------------
EXPECTED RESULTS
This set of data is designed to test the system so that it
rejects this data and does not store it in the database.
Rejecting the data either upon data entry, or when the
button to store the data is saved, is expected. One of the
prompts should include that the username already exists
and the user should be asked to make up a new username.
The only exception here may be the password, which all
characters will be allowed.
EXPECTED RESULTS
No errors are expected here. The system should allow
access. The system should display the student welcome
screen and have loaded the students name on the form.
EXPECTED RESULTS
Expectations similar to that of the typical data set.
EXPECTED RESULTS
The erroneous data set is designed to check the login
system is responding correctly to invalid data. The system
should prompt the user that the username does not exist
or has not been registered. If the data included in this data
set is stored by the system at any event, the system has
failed one of the simplest of tests and will need correcting.
This correction will be documented.

Page 243 of 303
The following is the set of data for the NEW ORDER PROCESS in the system. It will contain typical,
extreme and erroneous data that will fully test the system and the validation on the new order form.
1. TYPICAL DATA
2. EXTREME DATA
3. ERRONEOUS DATA
EXPECTED RESULTS
No errors are expected here. The system should allow for
the material details to be selected/entered and then add
them to the basket having calculated the cost. This
expectation applies to both sets of typical data.
EXPECTED RESULTS
Expectations similar to that of the typical data set. It
should handle the extreme data well and produce a cost,
adding the item to the basket.
EXPECTED RESULTS
The erroneous data set is designed to test the validation on
this form and expectation here include error message
prompting the user to change the unit size and the
quantity. Till these are changed it should not add the
material to the basket. Nor calculate the cost of the item.

Page 244 of 303
--------------------------------------------------------------------------------------------------------------------------------------
The following is the set of data for the EDIT ORDER PROCESS in the system. It will contain typical,
extreme and erroneous data that will fully test the system and the validation on the new order form.
1. TYPICAL DATA
2. EXTREME DATA
3. ERRONEOUS DATA
--------------------------------------------------------------------------------------------------------------------------------------
The following is the set of data for the PRINT ORDER PROCESS in the system.
1. TYPICAL DATA
EXPECTED RESULTS
No errors are expected here. The system should allow for
the material details to be selected/entered and then add
them to the basket having calculated the cost.
EXPECTED RESULTS
Expectations similar to that of the typical data set. It
should handle the extreme data well and produce a cost,
adding the item to the basket.
EXPECTED RESULTS
The erroneous data set is designed to test the validation on
this form and expectation here include error message
prompting the user to change the unit size and the
quantity. Till these are changed it should not add the
material to the basket. Nor calculate the cost of the item.
EXPECTED RESULTS
The method to input the date of order will be through a
calendar on which the student will select. So expected here
are no errors but the order to display when the search
button on the form is clicked.

Page 245 of 303
2. EXTREME DATA
3. ERRONEOUS DATA
--------------------------------------------------------------------------------------------------------------------------------------
The following is the set of data for the EDIT MATERIALS LIST PROCESS in the system.
1. TYPICAL DATA
2. EXTREME DATA
3. ERRONEOUS DATA
--------------------------------------------------------------------------------------------------------------------------------------
The following is the set of data for the FIND STUDENT ORDER PROCESS in the system.
EXPECTED RESULTS
The extreme date will test that the data is accessible
straight after the order has been placed. No errors
expected here and the searching of the order should
function flawlessly.
EXPECTED RESULTS
The erroneous date is a date in the future where no order
has been placed. So when searched, the system should
notify the user that no order was placed on this date via a
message box.
EXPECTED RESULTS
Expected results here include the system allowing the
typical data to be entered into the fields and stored in the
system. If stored in the system, the material should appear
in the data grid on the form as it is linked to the database.
EXPECTED RESULTS
Expectations here are that the validation, which is
integrated to perform whilst the data is being input,
functions correctly and does not allow rogue values such as
letters in to the unit cost field.
EXPECTED RESULTS
The extreme date will test that the system can handle
adding extreme values as well as it can handle typical data.
This would ensure that the system is robust and can carry
out its function correctly if relied upon in the future.

Page 246 of 303
1. TYPICAL DATA
2. EXTREME DATA
3. ERRONEOUS DATA
--------------------------------------------------------------------------------------------------------------------------------------
The following is the set of data for the PASSWORD REMINDER PROCESS in the system.
1. TYPICAL DATA
2. ERRONEOUS DATA
--------------------------------------------------------------------------------------------------------------------------------------
DEPARTMENT TECHNICIAN VALIDATED ORDERS:
Student: Madiha Nawaz
Form: 13MH
Date of Order: 23/11/2010
Validated: By the technician
Expected total: £7.85
EXPECTED RESULTS
The expected result here includes the system responding
appropriately by retrieving the correct order details and
displaying them on the data grid. There should be no error
messages or validation errors.
EXPECTED RESULTS
Erroneous data here will cause the system to identify that
no student under that name has been registered and
should inform the user. This is the expected result.
EXPECTED RESULTS
The extreme date will test the system to ensure that it does
not display orders when there were not any placed on that
specific date. The expected result is the system displaying a
message box notifying the user of no order being placed.
EXPECTED RESULTS
Expected result is the correct user password to be on
display for three seconds. No error message or prompts.
EXPECTED RESULTS
Expected result includes nothing displayed on the form.
This will indicate that one of the inputs is invalid.

Page 247 of 303
Student: Shane Mann
Form: 13R
Date of Order: -
Validated: By the technician
Expected total: £9.71

Page 248 of 303
To test the navigational paths, four potential scenarios will be defined and the navigational paths
will be tested. The potential scenarios follow.
SCENARIO 1:
A student wants to make a new order but is using the system for the first time.
SCENARIO 2:
A student wishes to edit a previous order and print it off.
SCENARIO 3:
Member of staff wishes to check the material prices and edit some prices.
SCENARIO 4:
A student has forgotten their password and would like to be reminded by the system.

Page 249 of 303
Actual Test Results
The testing of the system will thoroughly test each form individually. Thus the test for each form has
been assigned a number:
1.) Main Menu form testing.
2.) Registration form testing.
3.) Student Login form testing.
4.) Staff Login form testing.
5.) New Order form testing.
6.) Edit Order form testing.
7.) Print Order form testing.
8.) View List form testing.
9.) Edit List form testing.
10.) Find Student Order form testing.
11.) Password Reminder form testing.
12.) Student Options form testing.
13.) Staff Options form testing.
14.) About form testing.
1.) MAIN MENU FORM:
OBJECT WHAT SHOULD IT DO? WHAT IT ACTUALLY DOES?
ADDITIONAL COMMENTS.
Student Login button (chkStudentLogin)
Direct the user from the main menu to the student login form.
The button does direct the user to the student login form.
Button functions as desired.
Staff Login button (chkStaffLogin)
Direct the user from the main menu to the staff login form.
The button does direct the user to the staff login form.
Button functions as desired.
Ordering App Logo (imgAbout)
Change the background of the main menu and display the About form.
The button does display the About form with the correct background.
Image link functions as desired.
Exit Button (Top right corner of form)
Unload the application and quit the program.
The button does direct the user to the update quote form.
Button functions as desired.
There are no inputs aside form the buttons so there is no further testing on this form. The
buttons function correctly and display the appropriate forms so there is no need to further
refine this form.
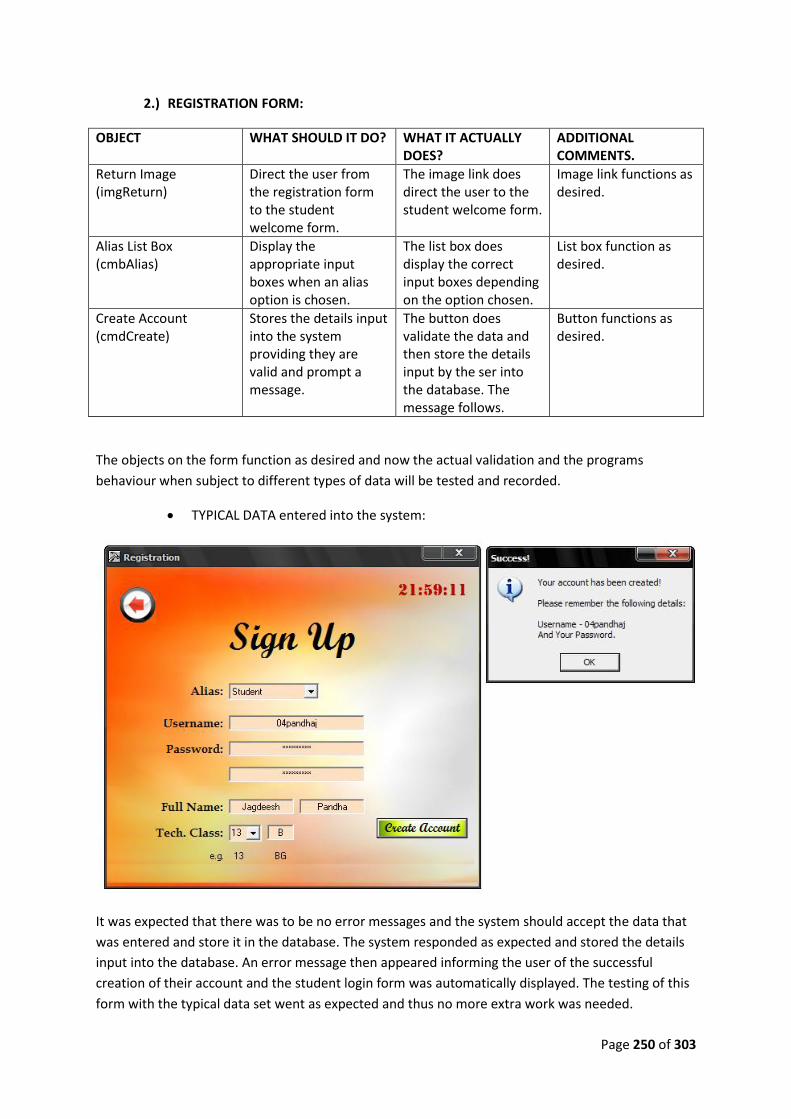
Page 250 of 303
2.) REGISTRATION FORM:
OBJECT WHAT SHOULD IT DO? WHAT IT ACTUALLY DOES?
ADDITIONAL COMMENTS.
Return Image (imgReturn)
Direct the user from the registration form to the student welcome form.
The image link does direct the user to the student welcome form.
Image link functions as desired.
Alias List Box (cmbAlias)
Display the appropriate input boxes when an alias option is chosen.
The list box does display the correct input boxes depending on the option chosen.
List box function as desired.
Create Account (cmdCreate)
Stores the details input into the system providing they are valid and prompt a message.
The button does validate the data and then store the details input by the ser into the database. The message follows.
Button functions as desired.
The objects on the form function as desired and now the actual validation and the programs
behaviour when subject to different types of data will be tested and recorded.
TYPICAL DATA entered into the system:
It was expected that there was to be no error messages and the system should accept the data that
was entered and store it in the database. The system responded as expected and stored the details
input into the database. An error message then appeared informing the user of the successful
creation of their account and the student login form was automatically displayed. The testing of this
form with the typical data set went as expected and thus no more extra work was needed.

Page 251 of 303
Evidence of successful storage in database:
EXTREME DATA entered into the system:
Again it was expected that there would be no error message and the test was created to ensure that
even extreme data could be handled well by the system. The test has been successful as the system
handled the data perfectly and has been validated and stored into the database. The testing of this
form with the extreme data set went as expected and thus no more extra work was needed.
Evidence of successful storage in database:

Page 252 of 303
ERRONEOUS DATA entered into the system:
Here it was expected that the username would cause the system to notify the user that the
username they had input was already chosen. This was exactly what happened when the system was
being tested. The system did not allow the storage of the details provided here as the data was
considered invalid. This test was also successful so no extra work on this form was needed.
All tests on the registration form also included new member of staff accounts. These also gave
accurate results and the reason they were not documented was because they included validation
that was not as comprehensive as for the student accounts. The tests that were not documented
were also successful and thus there was no extra work to refine this form was needed. The test data
for the tests that were not documented can be seen in the section above.

Page 253 of 303
Evidence of successful non-documented tests (new member of staff accounts):
3.) STUDENT LOGIN FORM:
OBJECT WHAT SHOULD IT DO? WHAT IT ACTUALLY DOES?
ADDITIONAL COMMENTS.
Return Image (imgReturn)
Direct the user from the student login form to the main menu form.
The image link does direct the user to the main menu form.
Image link functions as desired.
Forgot Password Button (cmdForgot)
Display the password reminder form.
The button does direct the user to the password reminder form.
Button functions as desired.
Login Button (cmdLogin)
Validates the login details and either grants or rejects the student access.
The button does validate the data and perform the appropriate action.
Button functions as desired.
Create New Account Link (lblCreateAcccount)
Directs the user to the registration form.
The link does direct the user to the registration form.
Link functions as desired.
The objects on the form function as desired and now the actual validation and the programs
behaviour when subject to different types of data will be tested and recorded.
TYPICAL DATA entered into the system:

Page 254 of 303
It was expected that there was to be no errors and that the system should allow the user access and
display the student welcome form with the student details on display. The system responded as
expected and displayed the welcome form with the student details displayed. The testing of this
form with the typical data set went as expected and thus no more extra work was needed.
EXTREME DATA entered into the system:
Again it was expected that there would be no errors and the system should have been able to cope
with the extreme data. This was the case as the test was successful and it did log in the user and
displayed the user’s details on the form. There was a slight problem with the display space of the
name and despite it being extreme data; the space was tweaked to allow extremely long names to

Page 255 of 303
be displayed properly. The test has been successful as the system handled the data perfectly. The
testing of this form with the extreme data set went reasonably well and after the minor tweak of the
display name space, there was no extra work required on the form.
ERRONEOUS DATA entered into the system:
It was expected here that the system would indentify that there was no student registered on the
system under the invalid name and the system would inform the user of the case. This would
prompt the user either to register or retry logging in. This was what happened when the system was
tested and this meant the test was successful. Because the test was successful there was no extra
work required on this form.
All the tests run on this form were documented and the results meant that the form was behaving as
expected and did not require maintenance.
4.) STAFF LOGIN FORM:
OBJECT WHAT SHOULD IT DO? WHAT IT ACTUALLY DOES?
ADDITIONAL COMMENTS.
Return Image (imgReturn)
Direct the user from the staff login form to the main menu form.
The image link does direct the user to the main menu form.
Image link functions as desired.
Forgot Password Button (cmdForgot)
Display the password reminder form.
The button does direct the user to the password reminder form.
Button functions as desired.
Login Button (cmdLogin)
Validates the login details and either grants or rejects the member of staff access.
The button does validate the data and perform the appropriate action.
Button functions as desired.
Create New Account Directs the user to the The link does direct the Link functions as

Page 256 of 303
Link (lblCreateAcccount)
registration form. user to the registration form.
desired.
The objects on the form function as desired and now the actual validation and the programs
behaviour when subject to different types of data will be tested and recorded.
TYPICAL DATA entered into the system:
It was expected that there was to be no errors and that the system should allow the user access and
display the staff welcome form with the staff username on display. The system responded as
expected and displayed the welcome form with the details. The testing of this form with the typical
data set went as expected and thus no more extra work was needed.
EXTREME DATA entered into the system:

Page 257 of 303
Again it was expected that there would be no errors and the system should have been able to cope
with the extreme data. This was the case as the test was successful and it did log in the user and
displayed the user’s details on the form. The test has been successful as the system handled the data
perfectly. The testing of this form with the extreme data set went reasonably well and requires no
extra work.
ERRONEOUS DATA entered into the system:
It was expected here that the system would indentify that there wasn’t a member of staff registered
on the system under the invalid name and the system would inform the user of the case. This would
prompt the user either to register or retry logging in. This was what happened when the system was
tested and this meant the test was successful. Because the test was successful there was no extra
work required on this form.
All the tests run on this form were documented and the results meant that the form was behaving as
expected and did not require maintenance.
5.) NEW ORDER FORM:
OBJECT WHAT SHOULD IT DO? WHAT IT ACTUALLY DOES?
ADDITIONAL COMMENTS.
Return Image (imgReturn)
Direct the user from the new order form to the student welcome form.
The image link does direct the user to the student welcome form.
Image link functions as desired.
Clear Button (cmdClear)
Clear all the material details input boxes.
The button does clear all the input boxes.
Button functions as desired.
Add to Basket (cmdAdd)
Validates the item order and adds the item to the basket and database.
The button does validate the data and perform the appropriate action.
Button functions as desired.
Print Order Button (cmdPrint)
Directs the user to the print order form.
The button directs user to print order form.
Button functions as desired.

Page 258 of 303
The objects on the form function as desired and now the actual validation and the programs
behaviour when subject to different types of data will be tested and recorded.
TYPICAL DATA entered into the system:
Evidence of successful storage in database:
The test data to the left shows the expected cost at which
these typical item orders were expected to cost. As seen in
the screenshot above, the system was able to match the
expected cost down to the exact penny. The system
accepted the values that were input and also validated
these whilst they were being entered.
The system also responded well to the other typical set of
data. This was the result that was expected which deems
the test successful. So far, no extra work is required on this
form as it is functioning as desired.

Page 259 of 303
EXTREME DATA entered into the system:
Evidence of successful storage in database:
The test data to the left shows the expected cost of the
extreme data. Again, the system has produced very
accurate results and was able to correctly validate and
calculate the result. This test data was designed to properly
test the validation the form and how well the system
handles extreme data when it has to process the input.
The system handled it well which deems the test successful.
Thus no further refinement on this form is needed so far.

Page 260 of 303
ERRONEOUS DATA entered into the system:
All the tests run on this form were documented and the results meant that the form was behaving as
expected and did not require further maintenance.
6.) EDIT ORDER FORM:
OBJECT WHAT SHOULD IT DO? WHAT IT ACTUALLY DOES?
ADDITIONAL COMMENTS.
Return Image (imgReturn)
Direct the user from the edit order form to the student welcome form.
The image link does direct the user to the student welcome form.
Image link functions as desired.
Clear Button (cmdClear)
Clear all the material details input boxes.
The button does clear all the input boxes.
Button functions as desired.
The test data to the left shows the erroneous data that
was included to test the validation of the form. The test
should have resulted in the data not being stored into the
system and the validation should have prompted
messages to notify the user of a mistake in the details they
had entered. The error messages produced by the system
can be viewed above.
The test was a success as it did not allow the invalid data
to be stored and the error messages were displayed at
appropriate times. No extra maintenance is therefore
needed on this form.

Page 261 of 303
Add to Basket (cmdAdd)
Validates the item order and adds the item to the basket and database.
The button does validate the data and perform the appropriate action.
Button functions as desired.
Print Order Button (cmdPrint)
Directs the user to the print order form.
The button directs user to print order form.
Button functions as desired.
Search Order Date (cmdSearch)
Searches the database for orders placed by the student on that date and populates the data grid.
The button behaves as expected.
Button functions as desired.
The objects on the form function as desired and now the actual validation and the programs
behaviour when subject to different types of data will be tested and recorded.
TYPICAL DATA entered into the system:
The test data was created to check that the edit form will
still accept typical data. The expected cost was £6.00 and
the system calculated it to be correct. This test was
successful and with the expected result as it is, no further
work is needed on this form so far.

Page 262 of 303
Evidence of successful storage in database:
EXTREME DATA entered into the system:
The test data to the left shows the expected cost of the
extreme data. Again, the system has produced very accurate
results and was able to correctly validate and calculate the
result. This test data was designed to properly test the
validation the form and how well the system handles extreme
data when it has to process the input.
The system handled it well which deems the test successful.
Thus no further refinement on this form is needed so far.

Page 263 of 303
Evidence of successful storage in database:
ERRONEOUS DATA entered into the system:
The test data to the left shows the erroneous data that
was included to test the validation of the form. The test
should have resulted in the data not being stored into the
system and the validation should have prompted
messages to notify the user of a mistake in the details they
had entered. The error messages produced by the system
can be viewed above.
The test was a success as it did not allow the invalid data
to be stored and the error messages were displayed at
appropriate times. No extra maintenance is therefore
needed on this form.

Page 264 of 303
Another part of editing the order includes deleting an order item. This was tested by highlighting the
item and pressing the delete key as instructed to on the system. The result was the deletion of the
item and an update on the price, which was now appropriately lower. This was what was expected.
A screenshot and evidence of the deletion can be seen below.
All the tests performed on this form were documented and the results meant that the form was
behaving as expected and did not require further maintenance.
7.) PRINT ORDER FORM:
OBJECT WHAT SHOULD IT DO? WHAT IT ACTUALLY DOES?
ADDITIONAL COMMENTS.
Return Image (imgReturn)
Direct the user from the print order form to the student welcome form.
The image link does direct the user to the student welcome form.
Image link functions as desired.

Page 265 of 303
Print Order Button (cmdPrint)
Prints off the form on a4 paper.
The button prints the form onto the default printer.
Button functions as desired.
Search Order Date (cmdSearch)
Searches the database for orders placed by the student on that date and populates the data grid.
The button behaves as expected.
Button functions as desired.
The objects on the form function as desired and now the actual validation and the programs
behaviour when subject to different types of data will be tested and recorded.
TYPICAL DATA entered into the system:
The typical data was any previous date that an order has
been placed on. When the search button as clicked, it
displayed the order that was placed on that date. There
were no errors deeming the test successful and as
expected.
No further maintenance has been performed so far.

Page 266 of 303
EXTREME DATA entered into the system:
ERRONEOUS DATA entered into the system:
The extreme data was the latest date an order was made. This
will test that the connection between the database are correct
and the system is robust. If the system was to crash it would
mean the database connection was still exclusive to a loaded
form. The test was performed and the result was as expected.
The test was successful and the order was displayed.
Page 267 of 303
All the tests performed on this form were documented and the results meant that the form was
behaving as expected and did not require further maintenance.
Evidence of the system producing a quality printed invoice of the users order can be seen on the
next page.
The test data to the left shows the erroneous data that was
included to test the validation of the form. The test should have
resulted in the system notifying the user that no order had been
placed on this date. The system notification (message box) can be
viewed in the screenshot above. This should also disable the print
order button. This can also be seen in the screenshot above.
The test was a success as it did not allow the user to print the
order as it was not found. The user was also notified through a
message box as expected. No extra maintenance is therefore
needed on this form.

Page 268 of 303
Evidence of successful test:

Page 269 of 303
8.) VIEW MATERIALS LIST FORM:
OBJECT WHAT SHOULD IT DO? WHAT IT ACTUALLY DOES?
ADDITIONAL COMMENTS.
Return Image (imgReturn)
Direct the user from the view materials list form to the student welcome form.
The image link does direct the user to the student welcome form.
Image link functions as desired.
Datagrid (dgList) Allow the user to scroll/move up and down the list to view its contents.
Data grid buttons allow the user to move up and down the list when clicked.
Datagrid Buttons function as desired.
There are no inputs aside form the buttons so there is no further testing on this form. The
buttons function correctly and display the appropriate forms so there is no need to further
refine this form.
9.) EDIT MATERIALS LIST FORM:
OBJECT WHAT SHOULD IT DO? WHAT IT ACTUALLY DOES?
ADDITIONAL COMMENTS.
Return Image (imgReturn)
Direct the user from the edit materials list form to the staff welcome form.
The image link does direct the user to the staff welcome form.
Image link functions as desired.
Add Item Button (cmdAdd)
Validates the data entered and stores the new material.
The button validates and stores the data in the database. It then appears in the data grid.
Button functions as desired.
Clear input Button (cmdClear)
Clears all the material information inputs.
The button clears all form inputs.
Button functions as desired.
Help Button (cmdHelp)
Display a message explaining the adding and deleting material process on the form.
The button displays a message box when the button s clicked.
Button functions as desired.
The objects on the form function as desired and now the actual validation and the programs
behaviour when subject to different types of data will be tested and recorded.
TYPICAL DATA entered into the system:
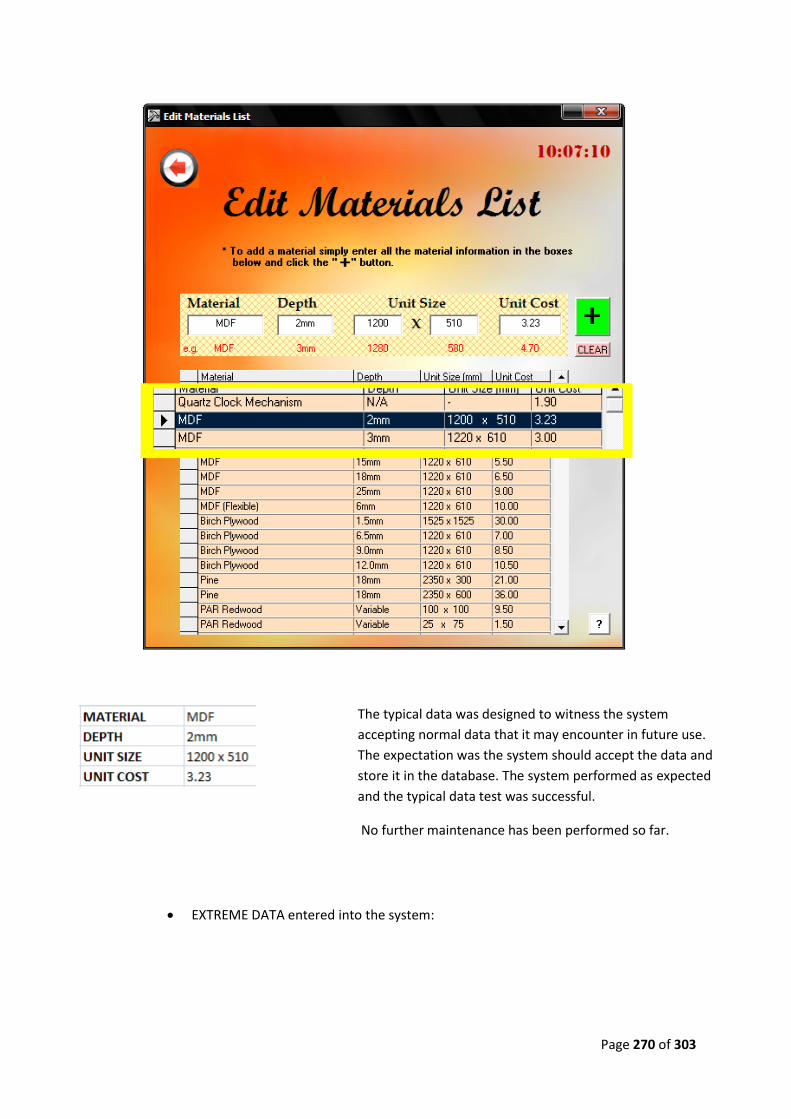
Page 270 of 303
EXTREME DATA entered into the system:
The typical data was designed to witness the system
accepting normal data that it may encounter in future use.
The expectation was the system should accept the data and
store it in the database. The system performed as expected
and the typical data test was successful.
No further maintenance has been performed so far.

Page 271 of 303
Evidence of successful typical and extreme tests on this form:
The extreme data was normal material information but the
dimensions were extreme. This was to test that the validation
on the form allowed these kind of sizes should a material of
that size be stocked in the future. The expected result was that
the system should accept the data and store it in the database.
The actual result of the test was the storage of the new
material item in the database so the test was a success.

Page 272 of 303
ERRONEOUS DATA entered into the system:
The system was expected to deal with the erroneous data in real-time. This meant that anything
entered into the material name field that was an integer, was not allowed and the input was cancelled.
This system performed as expected as the integer 0 from the erroneous test data was not allowed to
be input. The real-time validation for the material name was successful and this meant no further
refining on this form so far.

Page 273 of 303
All the tests performed on this form were documented and the results meant that the form was
behaving as expected and did not require further maintenance.
The validation was also applied to all the forms ensuring rogue
vales could not be entered into the respective fields. The
validation on all of the fields was valid as an be seen in the
screenshot above. A presence check also ensured that invalid data
in not added to the database. This was the performance expected
from the system and it was delivered. This means the erroneous
test for this form was also successful.
No further work on this form was needed as it could
comprehensively tackle any data it may encounter and only store
valid data.

Page 274 of 303
10.) FIND STUDENT ORDER FORM:
OBJECT WHAT SHOULD IT DO? WHAT IT ACTUALLY DOES?
ADDITIONAL COMMENTS.
Return Image (imgReturn)
Direct the user from the find student order form to the staff welcome form.
The image link does direct the user to the staff welcome form.
Image link functions as desired.
Clear input Button (cmdClear)
Clears all the student information inputs.
The button clears all form inputs.
Button functions as desired.
Search Button (cmdSearch)
Display a students order in the data grid if there is student order data found.
The button displays the correct information in the data grid.
Button functions as desired.
The objects on the form function as desired and now the actual validation and the programs
behaviour when subject to different types of data will be tested and recorded.
TYPICAL DATA entered into the system:

Page 275 of 303
EXTREME DATA entered into the system:
The typical data was designed to witness the system
accepting normal data that it may encounter in future use.
The expectation was the system should accept the data and
display the appropriate order in the data grid. The system
performed as expected and the typical data test was
successful. Evidence of which in the screenshot above.
No further maintenance has been performed so far.
The extreme data was expected to produce a notification from
the system to inform the user that the student had not placed
an order on that day. The test was successful in that the
message was produced, along the student name. The evidence
of the data inputted and the notification to the user can be
seen in the screenshots above.
No corrective maintenance was performed on this form.
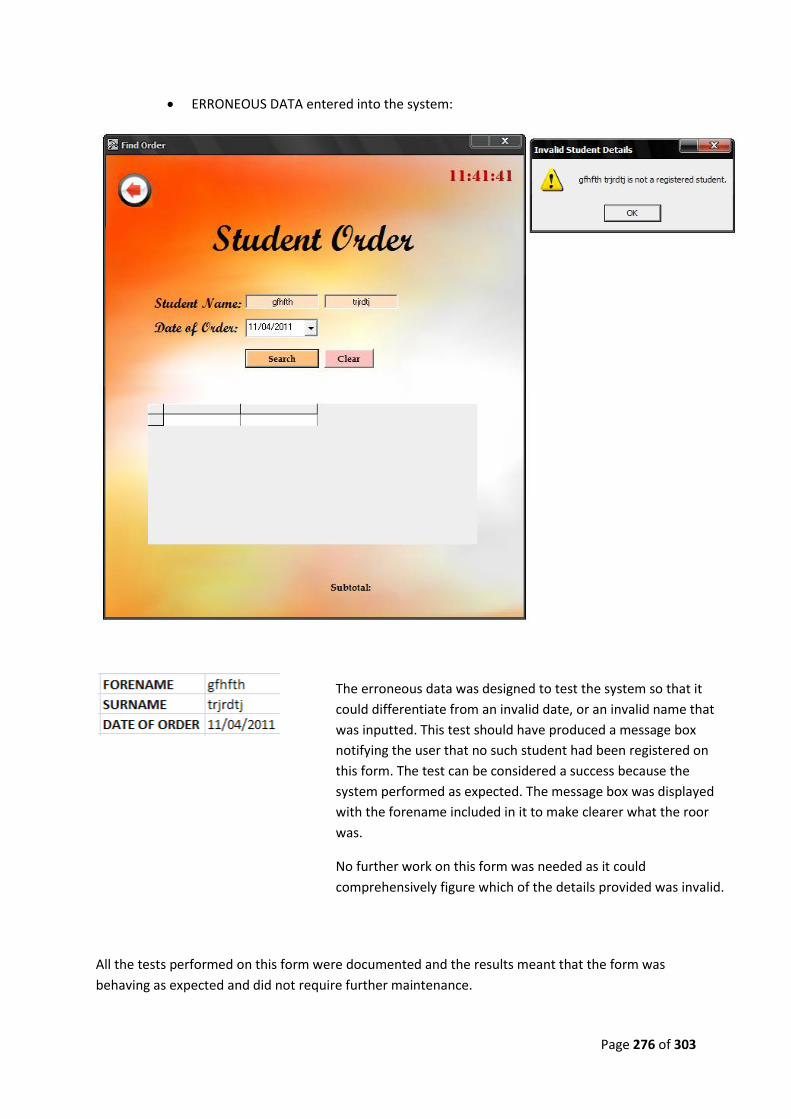
Page 276 of 303
ERRONEOUS DATA entered into the system:
All the tests performed on this form were documented and the results meant that the form was
behaving as expected and did not require further maintenance.
The erroneous data was designed to test the system so that it
could differentiate from an invalid date, or an invalid name that
was inputted. This test should have produced a message box
notifying the user that no such student had been registered on
this form. The test can be considered a success because the
system performed as expected. The message box was displayed
with the forename included in it to make clearer what the roor
was.
No further work on this form was needed as it could
comprehensively figure which of the details provided was invalid.
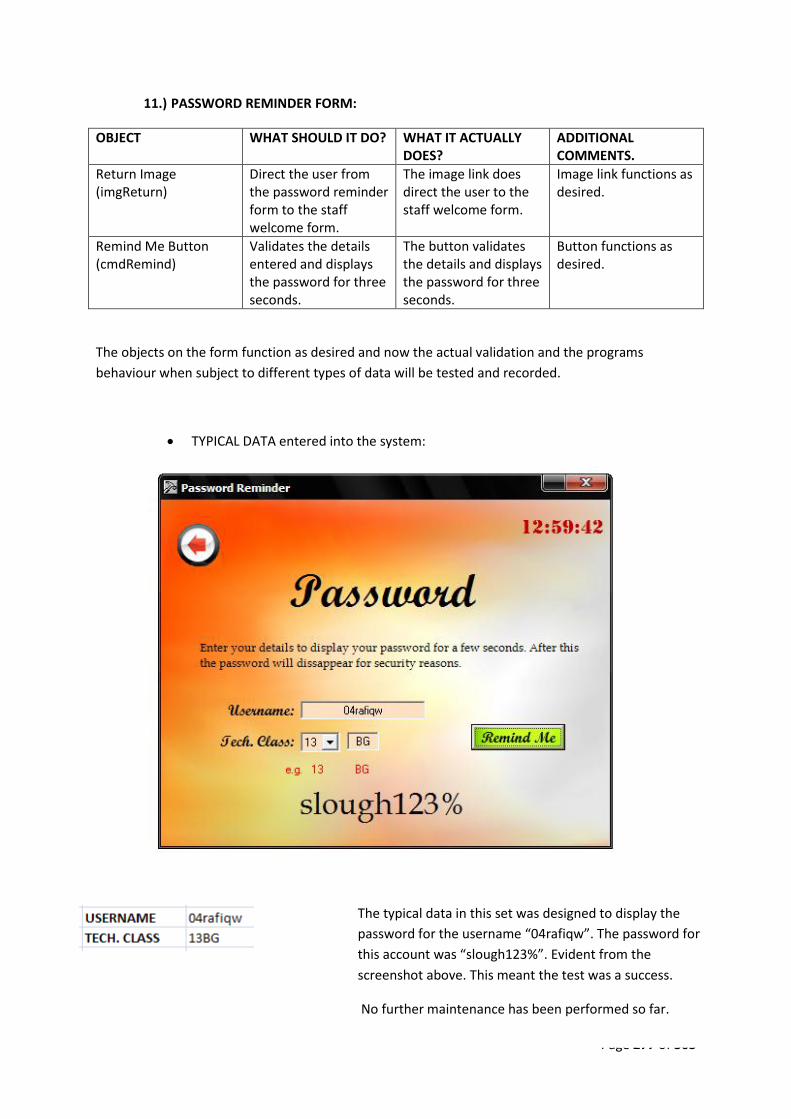
Page 277 of 303
11.) PASSWORD REMINDER FORM:
OBJECT WHAT SHOULD IT DO? WHAT IT ACTUALLY DOES?
ADDITIONAL COMMENTS.
Return Image (imgReturn)
Direct the user from the password reminder form to the staff welcome form.
The image link does direct the user to the staff welcome form.
Image link functions as desired.
Remind Me Button (cmdRemind)
Validates the details entered and displays the password for three seconds.
The button validates the details and displays the password for three seconds.
Button functions as desired.
The objects on the form function as desired and now the actual validation and the programs
behaviour when subject to different types of data will be tested and recorded.
TYPICAL DATA entered into the system:
The typical data in this set was designed to display the
password for the username “04rafiqw”. The password for
this account was “slough123%”. Evident from the
screenshot above. This meant the test was a success.
No further maintenance has been performed so far.

Page 278 of 303
ERRONEOUS DATA entered into the system:
All the tests performed on this form were documented and the results meant that the form was
behaving as expected and did not require further maintenance.
12.) STUDENT OPTIONS FORM:
OBJECT WHAT SHOULD IT DO? WHAT IT ACTUALLY DOES?
ADDITIONAL COMMENTS.
Logout Image (imgLogOut)
Direct the user from the student welcome form to the main menu.
The image link does direct the user to the main menu form.
Image link functions as desired.
New Order Text (lblNewOrder)
Direct the user from the student welcome form to the new order form.
The label link does direct the user to the new order form.
Label link functions as desired.
The expected result was nothing displayed when the user entered
the details. The test was a success in that nothing was displayed.
This hints at the fact that the details the user provided must be
invalid. A message box could be helpful here but the result was
nevertheless, as expected.

Page 279 of 303
Edit Order Text (lblEditOrder)
Direct the user from the student welcome form to the edit order form.
The label link does direct the user to the edit order form.
Label link functions as desired.
Print Order Text (lblPrintOrder)
Direct the user from the student welcome form to the print order form.
The label link does direct the user to the print order form.
Label link functions as desired.
View List Text (lblViewList)
Direct the user from the student welcome form to the view materials list form.
The label link does direct the user to the view materials list form.
Label link functions as desired.
There are no inputs aside form the buttons so there is no further testing on this form. The
buttons function correctly and display the appropriate forms so there is no need to further
refine this form.
13.) STAFF OPTIONS FORM:
OBJECT WHAT SHOULD IT DO? WHAT IT ACTUALLY DOES?
ADDITIONAL COMMENTS.
Find Order Text (lblFindOrder)
Direct the user from the staff welcome form to the find order form.
The label link does direct the user to the find order form.
Label link functions as desired.
View List Text (lblViewList)
Direct the user from the staff welcome form to the view materials list form.
The label link does direct the user to the view materials list form.
Label link functions as desired.
Edit List Text (lblEditList)
Direct the user from the staff welcome form to the edit materials list form.
The label link does direct the user to the edit materials list form.
Label link functions as desired.
There are no inputs aside form the buttons so there is no further testing on this form. The
buttons function correctly and display the appropriate forms so there is no need to further
refine this form.
14.) ABOUT FORM:
OBJECT WHAT SHOULD IT DO? WHAT IT ACTUALLY DOES?
ADDITIONAL COMMENTS.
OK button (cmdOK)
Direct the user from the about form to the main menu again.
Button link does direct the user to the main menu form.
Button functions as desired.

Page 280 of 303
vbEXIT (Exit button on form)
Direct the user from the about form to the main menu again.
The form button does direct the user to the main menu form.
Form buton functions as desired.
There are no inputs aside form the buttons so there is no further testing on this form. The
buttons function correctly and display the appropriate forms so there is no need to further
refine this form.
All the forms that require manual user input in the system have been thoroughly tested using
typical, extreme and erroneous data. The data used was all created and the department technician
felt testing the system against an order that he had validated would leave no part of the system
thoroughly tested. The department technician provided the order of which a picture was taken.
DEPARTMENT TECHNICIAN VALIDATED ORDERS (test data can be seen above):
Student: Madiha Nawaz
Form: 13MH
Date of Order: 23/11/2010
Validated: By the technician
Expected total: £7.85
The results the system produced were very accurate. The items where the result suffered some
inaccuracies in the costs was due to the fact that materials were been used that had been
discontinued for this years ordering options. Apart from these inaccuracies the system performed
very well.
Student: Shane Mann
Form: 13R
Date of Order: -
Validated: By the technician
Expected total: £9.71
The results the system produced were also very accurate. The slight inaccuracies in this order were
again due to the discontinued material so the substitute material resulted in a different item cost.
Taking into account the student was not charged for the aluminium rod, the total cost produced by
the system was accurate.
Both the tests from the department technicians were successes in that the system performed well
and gave a good indication as to how well it would perform in general. The technician was satisfied
with the level of accuracy and its reliability.

Page 281 of 303
Evidence of technician created tests that were successful:
Evidence of testing for the order of Shane Mann:

Page 282 of 303
Having tested the system fully, a results summary of the testing can be produced based on the
findings.
TEST NO. FORM TESTED OBJECTIVE OF TEST TEST RESULT
1
Main Menu form
Test the inputs on the form; these were the two command buttons on the form.
Test Successful
2
Registration form
Test all the buttons and links to ensure they function properly. Test all the inputs for correct validation and function.
Test Successful
3
Student Login form
Test all the buttons and links to ensure they function properly. Test all the inputs for correct validation and function.
Test Successful
4
Staff Login form
Test all the buttons and links to ensure they function properly. Test all the inputs for correct validation and function.
Test Successful
5
New Order form
Test all the buttons and links to ensure they function properly. Test all the inputs for correct validation and function.
Test Successful
6
Edit Order form
Test all the buttons and links to ensure they function properly. Test all the inputs for correct validation and function.
Test Successful
7
Print Order form
Test all the buttons and links to ensure they function properly. Test all the inputs for correct validation and function.
Test Successful
8 View List form Test the links and button on the form.
Test Successful
9
Edit List form
Test all the buttons and links to ensure they function properly. Test all the inputs for correct validation and function.
Test Successful
10
Find Student Order form
Test all the buttons and links to ensure they function properly. Test all the inputs for correct validation and function.
Test Successful
11
Password Reminder form
Test all the buttons and links to ensure they function properly. Test all the inputs for correct validation and function.
Test Successful
12
Student Options form
Test the inputs on the form; these were the labels that were linked to the other forms.
Test Successful
13
Staff Options form
Test the inputs on the form; these were the labels that were linked to the other forms.
Test Successful

Page 283 of 303
14 About form Test the one command button on the form.
Test Successful
TESTING OF THE SYSTEM INTERFACE:
For all the forms in the system, the layout was consistent which made navigating around the system
very easy and easy-to-understand. The interface contained details on the function of each form that
was slightly difficult to understand. Other details were included such as how to delete an item from
the order basket. The user interface looked very similar to the forms that were designed earlier on in
the project. Very little had changed transforming the designs into a fully functioning application.
The colour scheme of the system was consistent and similar backgrounds were used. The only
exception with the background was the print order form. The background her was deliberately
changed to keep the invoice printer friendly.
The interface also made it clear the links and buttons on the page by utilising moue-over effects.
Consistent mouse-over effects not only made the system user friendly but also lifted the quality of
the application overall.
Overall the system interface was more than satisfactory as it stayed true to the designs that were
created before the system was made and the consistency also made it easy to navigate around,
whilst keeping the system user friendly.
NAVIGATIONAL TESTING OF SYSTEM:
The navigational paths of the system will now be tested. This will include the necessary paths that
the user will need to take in order to successfully counter the four scenarios devised earlier in the
test data.
SCENARIO 1:
A student wants to make a new order but it using the system for the first time.
The student will need to click on the student LOGIN
button on the main menu.

Page 284 of 303
The student will then need to click the link at the
bottom of the page to be directed to the
registration form.
The student will need to fill in the details required
and click the CREATE ACCOUNT button.
The student will enter their login details and click
the LOGIN button to log onto the system.
Once logged in the student will need to click NEW
ORDER in red to be directed to the ordering form.

Page 285 of 303
Once on the form the student can enter the item
details on the form and keep adding to the basket
until content.
Once finished with the ordering, the student can
click on the RETURN image in the corner to return
to the student welcome form.
The student then clicks the LOG OUT button that
logs the student out and displays the main menu
form.

Page 286 of 303
SCENARIO 2:
A student wishes to edit a previous order and print it off.
The student will need to click on the student LOGIN
button on the main menu.
The student will enter their login details and click
the LOGIN button to log onto the system.
Once logged in the student will need to click EDIT
ORDER in red to be directed to the ordering form.
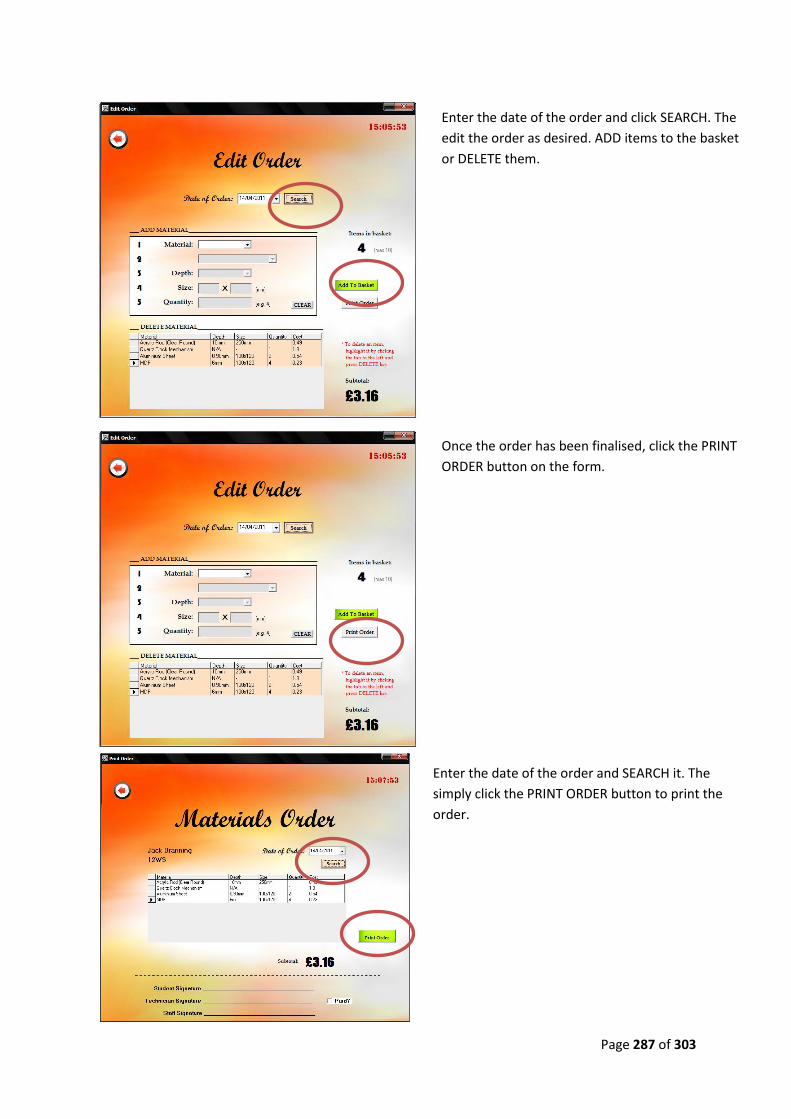
Page 287 of 303
Enter the date of the order and click SEARCH. The
edit the order as desired. ADD items to the basket
or DELETE them.
Once the order has been finalised, click the PRINT
ORDER button on the form.
Enter the date of the order and SEARCH it. The
simply click the PRINT ORDER button to print the
order.

Page 288 of 303
SCENARIO 3:
Member of staff wishes to check the material prices and edit some prices.
Click the VIEW LIST link in red.
User needs to enter staff login details and click
LOGIN.
User will need to click the staff LOGIN button.

Page 289 of 303
View the contents of the forma dn then click the
RETURN image to return to the staff welcome form.
Click the EDIT LIST link in red to be directed to the
edit list form.
Enter the item details to add a material item or
delete through the tabbed list. Once finished. click
the RETURN image to return to the staff welcome
form.

Page 290 of 303
SCENARIO 4:
A student has forgotten their password and would like to be reminded by the system.
Click the LOG OUT image to log the user off the
system and return to the main menu.
Click the student LOGIN button to be directed to
the student login form.
Click the “?” button to be directed to the password
reminder form. (May also need to answer a system
prompt.)
Click the YES option to display the password
reminder form.

Page 291 of 303
The test runs above were for the navigational paths. Four random but possible scenarios were
created that tested that the user could correctly navigate and complete the possible tasks. The
testing was successful because the user can correctly navigate around the forms and the system
allowed the user to do so.
Enter you detail and click the REMIND ME button to
display your password for three seconds. Then click
the RETURN image to return to the student login
form and continue logging on.

Page 292 of 303
CG4.6 EVALUATION
Evaluation of Test Results
There were seventeen different tests performed on the application during the testing of the solution. These sub-tests tested all the aspects of the solution thoroughly. All the forms in the system that required input were tested. All the tests that were undertaken on the system were successful bar one. This was not to do with the direct testing as such but the way the information on the page was being displayed. The display space on the form was not big enough to display the extreme data that was used in the testing. To correct this, the display size was adapted and is now capable of displaying any extreme data. Validation was thoroughly tested during the testing phase. The validation for the registration form was thoroughly tested to ensure that only valid data would be stored which in turn would only allow valid accounts to be created. The login validation was thoroughly tested to ensure that gaining access to the feature of the system was only possible after submitting valid login details. The validation on all the forms where the cost of material items was concerned were tested in particular to ensure that no rogue values could be entered into the inputs on the form, which could have potentially crashed the system or stored inaccurate calculations. The validation tests carried out on all the above were successful. The system did not accept any invalid data, nor did it crash at any point in the testing phase. The test data used for the testing of the system was appropriate as the results of the testing of the solution were conclusive. The test data entered, thoroughly tested the validation on the forms and the response from the system when it encountered this data, gave a clear indication of whether that particular part of the system was to a satisfactory standard. The system was tested using typical, extreme, erroneous and null data sets. These formed the basis of the comprehensive test plan. Navigational paths were tested and the test summary revealed that the system has succeeded in passing all the tests with the corrected name display. No aspect of the solution testing was avoided. The testing phase was efficient as it covered all the test data and followed the test plan as best as it could. The test results were accurate. The solution was tested using the test data that was created and these yielded very accurate results. To further test this accuracy, technician validated orders were replicated. The results to this test were also very promising and inaccuracies only occurred through slight differences in actual materials. After overseeing the results of the tests carried out on the system, the technician was satisfied that the old system could be replaced and the new system would succeed in its aim to make the department, and the ordering process, more efficient.

Page 293 of 303
Solution Satisfies the Objectives
The objectives were outlined at the start of this project. They were documented so the system can
be compared with these objectives to determine its success. The comparison to see if the solution
satisfies the objectives follows.
The main objective of the project will be to create a replacement system for the ordering process within the
Resistant Materials department. The system will benefit both the department and the students. A computerised
solution will be created using Visual Basic 6.
It was concluded that the solution was a more than adequate replacement system for the ordering
process at the department. This conclusion was reached by the department technician himself. The
solution is computerised and was created using Visual Basic 6 as the only programming language.
This will include a user interface capable of allowing the students to:
Register to use the system if it is the first time they are using it.
The students can use the system if it the first time they are using it. The students must
register before being able to access the full features of the system. The system interface
allows them to do this relatively easily.
Be reminded of their password.
The system interface has a dedicated form that deals with password requests from the
students. Accessing this form is also relatively easy.
Enter their login details to access the materials ordering form.
The system is very robust and will not allow users full access to the features of the system
unless valid login credentials are provided.
Choose materials and the sizes of the materials to enable the program to calculate the prices.
The student has complete control over the dimensions of the materials the student has
selected. This enables the program to calculate the prices every time.
Amend a previous order.
The system includes a dedicate form for students who wish to amend/edit a previous order.
The link to this form is available as soon as the student logs in.
Print the latest order by displaying the total order on a printable form.
The system also has a dedicated print order form where all the details of the final order are
displayed.
View the latest materials list for information on material availability and prices.
The system has an option that directs the student to the materials list. This option is
displayed when the student has logged on.
The interface will be capable of allowing the staff to:
Register to use the system if it is the first time they are using it.

Page 294 of 303
The system ensures any member of staff is registered before allowing access to any of the
staff specific features of the system.
Enter their login details to access the materials list form.
The system is very robust and will not allow users full access to the features of the system
unless valid login credentials are provided.
Edit the materials list once accessed.
A form is dedicated to the editing of the materials list, where items can be edited, added or
deleted.
Access any student order.
Another form is dedicated to allowing members of staff to search for student orders. They
can be accessed/viewed at any time providing the input details are correct.
Be reminded of their password.
The solution does not allow for this to happen because it is a security issue. An explanation
detailing this decision will follow at the end.
The system will allow the input of and have the facility to store the following details:
Student Username, Password and other student details.
The student username, password and other details can be stored from the registration form
on the system.
Student Order:
o Material name selected.
o Material Size selected.
o Quantity selected.
o Cost of order.
All the order details above are stored on the new order and edit order forms on the system.
This has been verified in the tests that were conducted on the system earlier.
Any updates to the Material List.
Any updates to the material are saved automatically on a form dedicated to updating the
materials.
Any updates to the Student Order.
The edit order form saves all changes made to the student order. This can later be checked
when visiting the find order or the edit order form again. This has also been verified during
testing.
The system will allow for the searching of student order by the student login details. The login details will be
stored alongside other data that will ensure the correct order is displayed at the time of searching. This will also
ensure no errors occur during search or more than one order is related to one student.
This has been changed slightly. Although the search still exists, the details used to search for the
order are the student forename and surname. This decreases the chance of running into errors
during the search and returns more accurate results. However the objective is still fulfilled.

Page 295 of 303
The design of the computerised system should be professional and simple to use as students will be using it as
well as the staff members of the department. The appearance of the system should remain consistent to ensure
the program navigation is quick and simple. The computerised system should be completed within the time
provided.
The design of the system is eye-catching and sticks to the sketches made during its development
stage. The interface remains consistent and this ensures that navigation is quick and simple. The
solution was also completed within the time limit specified.
Overall the solution satisfied nearly all of the objectives. The only objectives it did not fully satisfy
were the members of staff being able to have a password reminder and the data used to find a
student order. The latter however, wasn’t so much of a problem as it increased the efficiency of the
search by searching for related records. The staff password reminder did pose a security issue in that
a student could have retrieved a member of staff’s password without too much difficulty. This would
mean the student could log into the system as a member of staff and have full access to the
materials prices and the materials list.

Page 296 of 303
Solution Satisfies the Evaluation Criteria
To successfully evaluate the computerised system, a set of evaluation criterion was created that
would allow comparisons against to measure the success of the solution. The solution is compared
with the evaluation criteria to see if it satisfies the criterion. The result is detailed below.
The old system was very time consuming. The new system should minimise the time to produce the
orders. The calculations of the old system were identified to be the most difficult phase of the ordering
process. The new system should make the ordering process simple by automatically calculating the
costs for the orders. This should minimise the errors within the process.
The system now minimises the time to produce the order. Previously, where it would have
taken several lessons to calculate and validate the orders, using the system on several
computers can produce all the orders for a whole class in roughly a lesson. The
computerised solution has made a big difference to the amount of time being spent on
ordering. It has fulfilled this aspect of the evaluation criteria. The calculations are also
automatic and all the student needs to do is input valid material information, which
shouldn’t be difficult as the system is fully validated.
The new system should not allow duplicate accounts. This will extend to not allowing invalid data and
details. The human errors should be minimised to none. The new system should allow the students to
edit the orders with ease.
The system has a comprehensive check for exiting usernames to ensure that duplicate
accounts cannot be registered. The validation extends to all the forms that require an input
on the system. The new system has an easily accessible form that students can access to edit
their order.
The suitability of the solution will need to be evaluated to ensure that the solution meets the objectives. The
suitability will be assessed after the system is created. Taken into account will be who the system was designed
for, whether it is suitable for audience and the purpose the system was created for. For purpose, the system will
be compared with the objectives I specified earlier in documentation.
The system meets all the objectives that were designed to measure the suitability of the system. The
system is fit for purpose.
The usability will be tested by me and others to see if the system is clear enough so that the user can navigate
and complete tasks successfully. Other factors that will be taken into account are how easy the system is to
use, whether it is possible to use the solution with no prior information on its purpose because this will indicate
the system is very usable.
The system was tested by students studying the subject and the technician oversaw the testing of
the system. Not a single student who tested the solution was given any prior information about how
to use the system. The feedback from the students was that is was a very efficient interface that was
easy to navigate around. This highlights how easy the system is to use and thus meets this aspect of
the criteria also.
The success rate will also be determined by the students that test the system. A good indication to me will be if
75% of the students that test the solution agree that the system is fit for audience and purpose. But if the
system fails to convince 75% of the students, it will be tweaked in accordance to the tester’s feedback. In other
words, corrective maintenance will be necessary to improve the system further.

Page 297 of 303
Fifteen students tested the system and the feedback was overwhelmingly positive. Fourteen
students had declared the system more than satisfactory and fit for purpose. This is higher than the
75% limit the criteria had planned to meet. Thus the system is fit for purpose due to almost universal
agreement from the testers.
The success rate will also be tested by performing acceptance testing. This will involve the testing of the system
against the technician’s system criteria. The technician criterion includes the following:
The printed orders the system produced must include:
o Full Student Name & Form
o Date of Order
o Full Details of Order (inc. Breakdown of Costs)
o Total Cost of Order
The printed invoices include the student’s full name, form, date of order, full details of order
and the total cost of the order. Evidence of this can be seen in the testing phase. This part of
the technician criterion is satisfied.
Materials List available on the system must include:
o Material Name
o Material Depths Available
o Material Sheet sizes
o Material Sheet Costs
The materials list that is available on the system includes all the information that is
requested in the criterion. Evidence of this can be seen in the testing phase. This part of the
technician criterion is also satisfied.
Staff or Technician Options must include:
o The ability to find a student order if needed
o The ability to update the materials list at any given time
Finding a student order and updating the materials list can be done at any time providing the
member of staff can login onto the system. Separate forms have been designed to deal with
the separate processes. Point satisfied.
Student Options must include:
o The ability to edit an order
o The ability to re-print a previous order
o The ability to view the latest materials available and their prices
When the student has logged on all the options detailed above are available. The materials
list is always displayed with the latest information and there is no limit on how many times
the order can be re-printed. Point satisfied.
If the system meets 90% of the technician criterion at a satisfactory level it will be considered a success. If it
fails to meet the criterion, perfective or adaptive maintenance will be required to ensure that it does as the
system will strive to meet every requirement.
The system has met 99% of the technician criteria to a satisfactory level and thus the system can be
considered a success. Therefore there is no need to perform any perfective or adaptive maintenance
on the system.
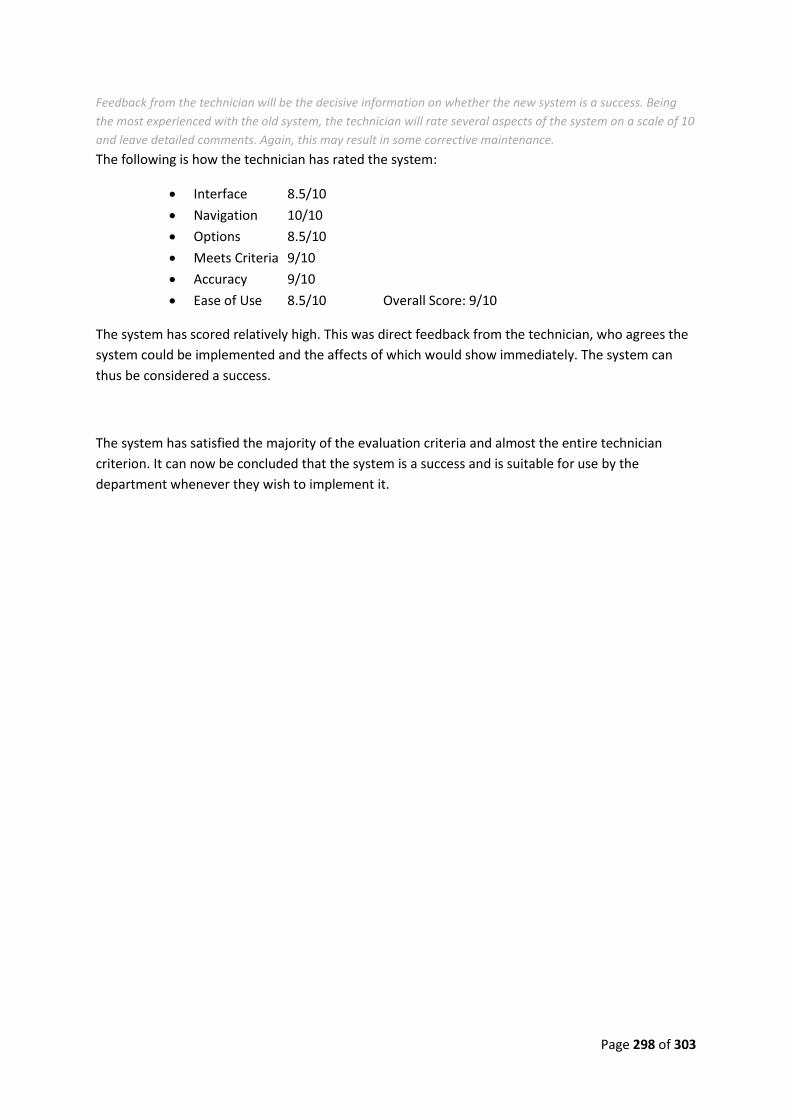
Page 298 of 303
Feedback from the technician will be the decisive information on whether the new system is a success. Being
the most experienced with the old system, the technician will rate several aspects of the system on a scale of 10
and leave detailed comments. Again, this may result in some corrective maintenance.
The following is how the technician has rated the system:
Interface 8.5/10
Navigation 10/10
Options 8.5/10
Meets Criteria 9/10
Accuracy 9/10
Ease of Use 8.5/10 Overall Score: 9/10
The system has scored relatively high. This was direct feedback from the technician, who agrees the
system could be implemented and the affects of which would show immediately. The system can
thus be considered a success.
The system has satisfied the majority of the evaluation criteria and almost the entire technician
criterion. It can now be concluded that the system is a success and is suitable for use by the
department whenever they wish to implement it.

Page 299 of 303
Future Improvements
The testing of the system was to ensure the system was usable, suitable and above all functioned
correctly. The testing proved crucial as it helped reassure that all areas were functioning correctly.
Although the system functions correctly and can be considered a success if measuring against the
objectives and the evaluation criteria, the system could be improved in areas to further enhance it.
Major improvements:
System creates a batch order for the technician.
o A major part of the department ordering process is the creating of a batch order to
send to suppliers. Adding this feature would involve adding a separate facility to the
system that would group similar materials and sizes and produce a list of them
which the technician could print out. It may also further extend to group orders of
the minimum amount of sheets are ordered. This could also help the department
financially.
System allows the members of staff to have a password reminder feature.
o This was not included initially for security reason but the facility could be added
onto the system if there was an extra measure of security for staff accounts. This
could be in the form of an extra question or an extra password.
Minor improvements:
Real-time updates on the materials that can be ordered.
o Materials have to be updated on a separate form before the affect of the change is
visible in the new order or edit order forms. This minor change would result in
students being able to order whilst the material prices can be changing
simultaneously. This is not very practical and this is why it is included a possible
minor change.
The ability to view the materials list without logging in.
o Currently the system requires users to log in to access the full range of features the
system has to offer. It would be more convenient, however, if the materials list
could be viewed without logging in. It would certainly cut down the amount of time
spent to retrieve the information wanted.
Further improve the security of the system.
o To further improve the security of the system, mainly where the password can be
displayed on the form, additional questions or an additional password could be
required. This would ensure that the security of the system is improved and lower
the chances of needing a password reminder or your account details being stolen.

Page 300 of 303
Log the user out automatically after 15 minutes.
o Logging the user out if there is no input from the keyboard or mouse for fifteen
minutes would be a helpful feature. This would tackle a problem if the user had
forgotten to sign off and increase the security measures by preventing another user
to use the account that was left logged in.
Improve the help the system provides.
o Although there were no complaints about the complexity of the system during the
testing of the system, to make it more user friendly a help file could be included on
the system. This would be a better solution than providing a readme file or a user
manual for the system as it would be available spontaneously and always up to date.
Both the major and minor future improvements would improve the system in the long run. They
were not included as the main aim of the solution was to meet the objectives and any requirements
After evaluating the system, it can concluded that if all these future improvements were to be
implemented properly then it would make for the best possible system for the department.

Page 301 of 303
CG4.7 USER DOCUMENTATION
Installation
To install the Resistant Materials Ordering Application simply follow the instructions below:
1.) Double-click on the SETUP application icon as seen in the picture below. This should
start an installation wizard that will help you through the installation process.
2.) Click the OK button to begin the installation process.
2.) Click the icon to begin the application setup.

Page 302 of 303
4.) Leave the default program group selected and click the CONTINUE button.
5.) Wait whilst the application is installed onto your system.
6.) Click the OK button when the following message is displayed.
7.) The Resistant Materials Ordering Application has now been successfully installed onto
your computer. You may now use the application at any time on your computer.

Page 303 of 303
Use
A user manual for the application has been created for the users of the system. The user manual is
best utilised on the computer although it can be useful if used in printed form.
VIEW APPLICATION USER MANUAL