chapter 53: endwall overhang(s) only - enclosed 53.pdfchapter 53: endwall overhang(s) only -...
TRANSCRIPT

Page 321
Chapter 53: Endwall Overhang(s) Only - Enclosed
Most Common Mistakes:
1. Incorrect eave height. 2. Placing “standard heel” end trusses at same height as interior trusses. 3. Fascia board top edges not bevel cut to match roof slope. 4. Failure to notch end trusses into columns. 5. Not properly adjusting first purlin spacing to compensate for lowered end truss. 6. RT-15 brackets omitted or not fully nailed. 7. Purlin (soffit support) blocks not cut for a snug fit. 8. Purlin (soffit support) blocks not set to overhang end truss nailer by 2”. 9. End trusses not set to string line prior to cutting overhanging purlins to length. 10. Improper length of overhang. 11. Failure to install varge rafters with “crown” up. 12. Improper trim used for varge lowers. 13. J Channel or Varge Lower trims overlapped, or caulking not placed behind splices. 14. Corner trims not properly cut at top. Endwall trusses with standard heels are designed to be set lower than common (interior) trusses by purlin thickness. In cases where trusses have a “raised heel”, end truss overall height may have been adjusted to compensate for the purlin thickness. Measure end of raised heel trusses to verify. See Figure 53-1
Figure 53-1
With proper planning, easily made errors can be avoided. Lower endwall trusses as follows: First, determine difference in height, on posts, between interior and endwall trusses. See Table 53-1 and Figure 53-2

Page 322
Table 53-1 Vertical Lowering Distance
Purlins (inches)
Roof Slope 2x6 2x8 2x10
2/12 5-9/16 7-3/8 9-3/8
3/12 5-11/16 7-1/2 9-1/2
4/12 5-13/16 7-5/8 9-3/4
5/12 5-15/16 7-7/8 10
6/12 6-1/8 8-1/8 10-5/16
7/12 6-3/8 8-3/8 10-11/16
8/12 6-5/8 8-3/4 11-1/8
Figure 53-2 Example: At a 4/12 roof slope, with 2x6 purlins, end trusses will be placed 5-13/16” lower (measured vertically) than interior trusses. Yes, we realize the vertical lowering distances may “not seem right”. Trust us on this one, we’ve “done the math” and have also done thousands of buildings exactly this way - these dimensions DO work. After laying out purlin locations on interior trusses (See Chapter 9) lay one of the interior trusses flat on ground.
Page 323
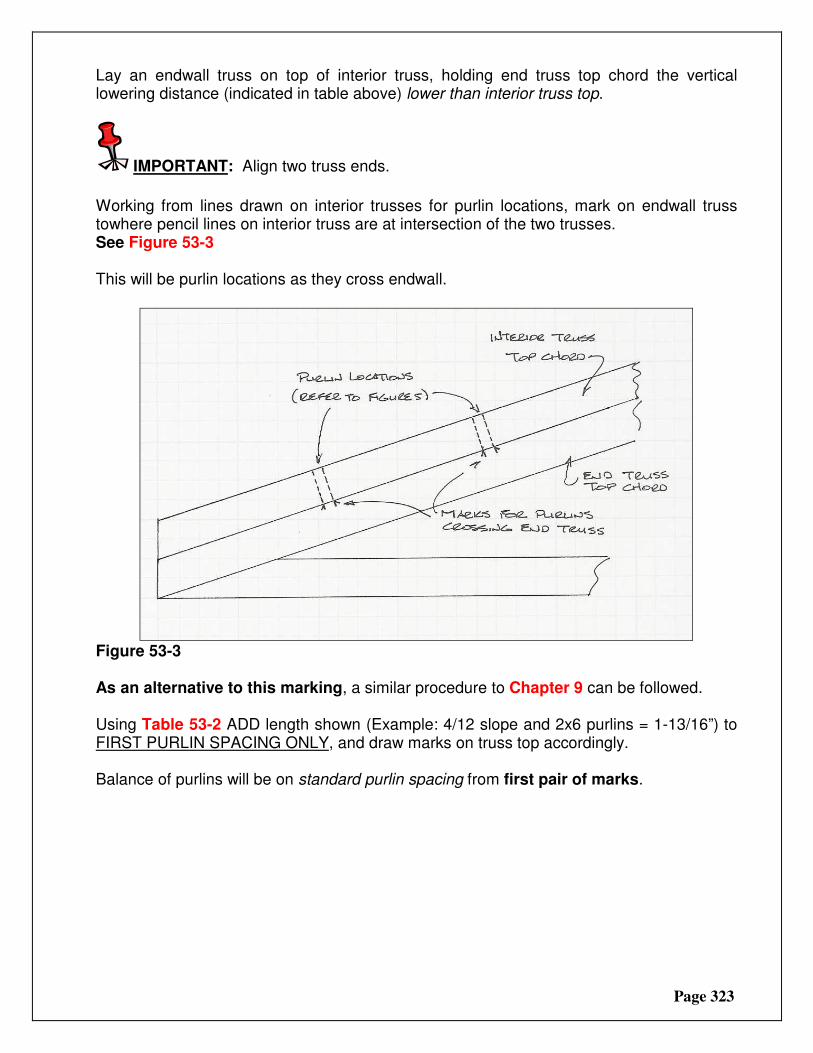
Lay an endwall truss on top of interior truss, holding end truss top chord the vertical lowering distance (indicated in table above) lower than interior truss top.
IMPORTANT: Align two truss ends.
Working from lines drawn on interior trusses for purlin locations, mark on endwall truss towhere pencil lines on interior truss are at intersection of the two trusses. See Figure 53-3
This will be purlin locations as they cross endwall.
Figure 53-3 As an alternative to this marking, a similar procedure to Chapter 9 can be followed. Using Table 53-2 ADD length shown (Example: 4/12 slope and 2x6 purlins = 1-13/16”) to FIRST PURLIN SPACING ONLY, and draw marks on truss top accordingly. Balance of purlins will be on standard purlin spacing from first pair of marks.

Page 324
Table 53-2
ADD TO FIRST PURLIN SPACING
Purlins (inches)
Roof Slope 2x6 2x8 2x10
2/12 7/8 1-3/16 1-1/2
3/12 1-3/16 1-13/16 2-5/16
4/12 1-13/16 2-7/16 3-1/16
5/12 2-5/16 3 3-7/8
6/12 2-3/4 3-5/8 4-5/8
7/12 3-1/4 4-1/4 5-3/8
8/12 3-11/16 4-13/16 6-3/16
Install H-1 (or RT-15) hangers on endwall truss inside face at each purlin crossing location. The bracket portion which will receive purlin will point outward toward endwall. See Figure 53-4
H-1 (RT-15) installed on inside of end truss
Figure 53-4 Install endwall truss into notches cut into corner and endwall columns. Remembering to have lowered end trusses on posts by appropriate distance below interior truss level.
Install eave girts level in end bays first. See Figure 53-5 Eave girts will project PAST corner post and help to support varge rafter.

Page 325
Figure 53-5
Figure 53-6
Install purlins over endwall truss top into earlier installed RT15 brackets.
Before nailing purlins into place, verify endwall trusses are plumb and overall roof length (from end truss outside to end truss outside) is equal to building length. Pre-cutting purlins to length now, will save trimming later. IF corner column and next column along sidewall are perfectly plumb, and post spacing is “on the money”, this can save time. Purlin length will be distance from first truss pair face, to endwall truss outside edge, plus overhang distance. Cut “purlin blocks” to fit between purlins and above endwall truss. See Figure 53-7
The first block will be angle cut (on lower end) at roof slope to fit snug against eave girt (even with outside edge of corner column). Balance of blocks (until getting to ridge) can be square cut to length at purlin spacing less 1-9/16".

Page 326
Figure 53-7 When installing purlin blocks, hold block inside face even with outside edge of end truss face. See Figure 53-8
Figure 53-8
IMPORTANT! Do not neglect custom cutting small blocks to fit space between ridge purlin and peak. See Figure 53-9
Figure 53-9

Page 327
2x4 Purlin blocks installed
If purlins were not pre-cut to length earlier, now is the time to trim.
Before cutting, square roof and plumb endwall truss. From endwall truss outside face, measure out overhang distance on both eave girt and ridge purlin. Run a string line between these two points and place a mark on each purlin. A chalk line is handy for this. See Figure 53-10 Trim purlins off vertically from this mark.
Figure 53-10 If a choice exists between several boards to use for varge rafters, select ones as straight as possible.

Page 328
Place boards with crown up, cut an angle on upper end to match roof slope (example shown is for a 4/12 roof slope). See Figure 53-11
Figure 53-11 Nail varge rafter to overhanging purlin ends. Trim varge rafter even with overhanging eave girt outside (downhill) edge. Roof steel MUST extend past fascia board ONLY by 1-1/2” to 1-3/4”. See Figure 53-12
Figure 53-12 Failure to adhere to these dimensions will cause a plethora of problems, including one or more of the following: water to either flow behind or to shoot over any future gutter tops and/or the ridge cap will not properly fit.
Reflective building insulation is not placed in overhangs. If reflective building insulation is installed in overhangs, there will be an insulation SHORTAGE !
Place Inside (skinny) closure strips on fascia board tops below roof steel panels. Peel the paper backing strips off adhesive and work closure strips into place. Strip ends will interlock at a major roof steel rib. Do this prior to installing any screw fasteners.

Page 329
Roof steel is installed PRIOR to placing any trims on varge rafters or eave girts.
IMPORTANT: Install all soffit material and all wall trim (other than wainscot, eave light or corner trims) before installing any wall steel! Cut soffit panels to overhang length (measured horizontally from end roof truss top chord nailer face to varge rafter outside edge) less 1/2”. Install endwall soffit material BEFORE installing trim. Use galvanized roofing nails, or staples to attach soffit to 2x4 soffit blocking underside and varge rafters.
IMPORTANT – Soffit material ribs are at a 90-degree angle to building. On endwalls, ribs run same direction as purlins. Install soffit panels, from one eave side to the other, starting flush with outside edge of eave girt. Provided temperatures are above freezing, an air-powered stapler may be used (set pressure low to avoid cracking soffit panels). Other acceptable fasteners are galvanized joist hangers or ½” drywall screws. Position fasteners in nailing slot of underlap. Fully interlock each piece with earlier installed panel. See Figure 53-13.
Figure 53-13

Page 330
Bend soffit panel at peak and continue towards opposite eave. See Figure 53-14.
Figure 53-14 At opposite eave girt, cut last soffit panel flush with eave girt outside edge. On building endwall face, tight below soffit panels, install J Channel with wide face against building and “open” side down (use joist hanger nails). Left side is installed with upper end square. See Figure 53-15
Figure 53-15 Right side J Channel will have outer face cut at roof slope and will overlap left side J Channel. See Figure 53-16 & Figure 53-17
Figure 53-16

Page 331
Figure 53-17 J Channel at low end will stop short of corner. See Figure 53-18
Figure 53-18
J Channel trims do NOT overlap, other than beneath peak. Apply liberal amounts of caulking behind trims at butt splices. Install the lower varge trim. With a 2x6 varge rafter, this will be a 1-1/2” x 1-1/2” “L” shaped piece. With 2x8 varge rafter 1-1/2” x 3-1/2”. See Figure 53-19
Figure 53-19

Page 332
Push lower varge trim up tight to soffit panels and attach with joist hanger nails. Lower varge trims will be held in place by rake trim, to be installed after roofing is in place. See Figure 53-20 & 53-21
Figure 53-20
Figure 53-21
Lower Varge trims do NOT overlap, other than beneath peak. Apply liberal amounts of caulking behind trims at butt splices. Cut “downhill” Lower Varge trim end flush with varge rafter end. Cut along Lower Varge Rafter bend to “bend” in soffit panels. See Figure 53-22
Figure 53-22

Page 333
Fold bottom (horizontal) leg up to soffit at soffit panel bend. Cut off vertical face portion below the folded up leg. See Figure 53-23
Figure 53-23 Install rake trim. See Figure 53-24
Figure 53-24
Page 334
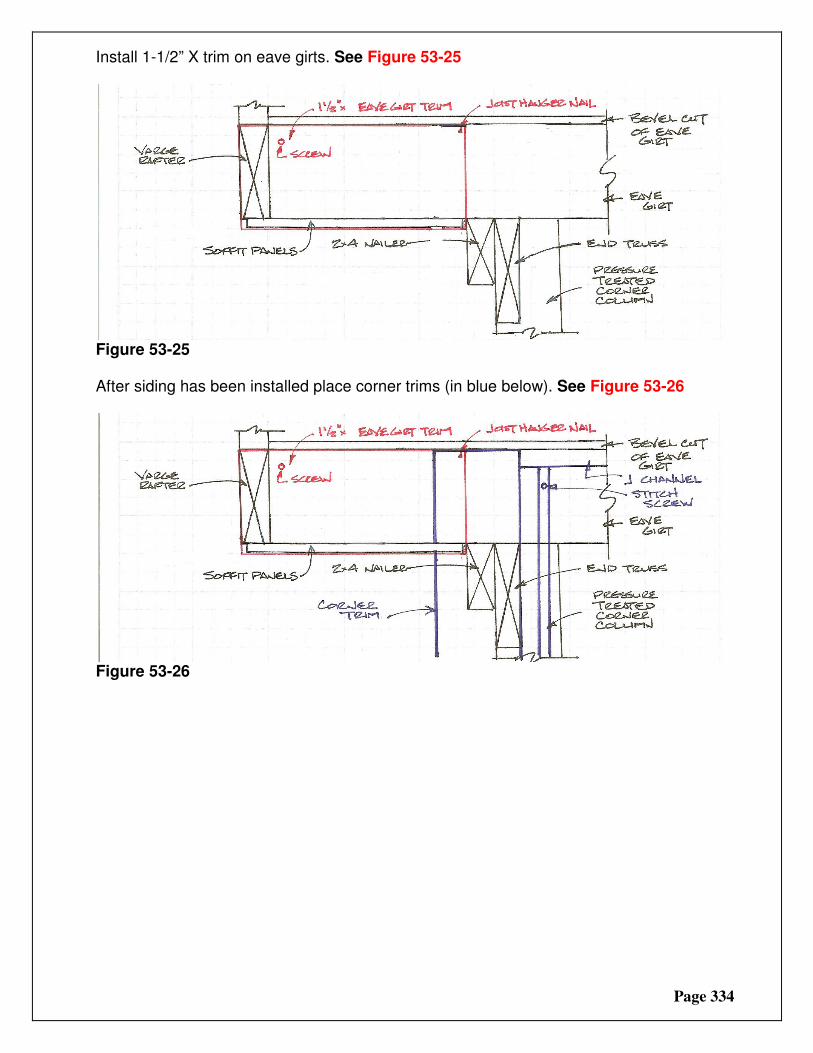
Install 1-1/2” X trim on eave girts. See Figure 53-25
Figure 53-25 After siding has been installed place corner trims (in blue below). See Figure 53-26
Figure 53-26

Page 335
Corner trim is cut to allow eave girt to pass through (in blue below). Caulk between vertical cut in corner trim and eave girt trim. See Figure 53-27
Figure 53-27