christmas craft guide - amazon web services
TRANSCRIPT

Christmas craft guide

Welcome to our very first ‘Craftmas’ booklet. We hope you enjoy all the different craft activities that have been
included in this booklet.There are many benefits to crafting especially when it comes to mental health. Crafting can help reduces stress, depression and anxiety. Knitting and crocheting can also reduce age related
dementia by 50%.Communities and friendships are built when sharing finished projects or sharing ideas. And now more than ever it is so important to keep in contact with friends and family, socially
distanced of course, to help reduce loneliness and isolation.Please share your craft ideas and any crafts you have
made from our Craftmas booklet
Ann Stephens Residents Council Wellbeing lead


Christmas gonkChristmas gonkGonks are mythological creatures that are often now considered to be a Nordic version of Santa Claus.
1. Begin by filling up your sock with rice until it forms a sturdy ball consistency. Once happy with the shape, tie a knot around the neck sock and trim off the excess. (Add an elastic band for extra security if needed)
2. Grab your square piece of material and using your glue gun, glue one side of the material and quickly mould into a cone shape.
3. Stuff the cone with fluffy material or use the excess material from the sock. Once happy with the shape, stick the cone to ball you made earlier using your glue gun.
4. Using your fluffy material, create a beard shape and stick it onto the ball.
5. Then stick on a pom pom of any size to create a nose for your gonk.
Recommendations – You could add another pom pom or bell to the top of the hat as a finishing touch.
Instructions
You will need:
• 1 Sock• Fluffy material • Glue gun• Scissors• Pom Pom• Elastic Band• Rice• Square Piece of Material

Christmas gonk
Christmas Gonk
1. 2.
3.
5.
4.

Wooden starWooden star
1. Begin by placing your twigs on the cardboard cut out and working out what sizes you need in order to cover the cardboard completely.
2. Once you are happy with the placement of the twigs, use your glue gun to stick the twigs down.
3. If using craft berries with wire, glue the berries down and then stick a twig over the wire to cover. You can add as many or as little berries as you like.
4. Repeat until the star cut out has been covered.
5. Once the star has been covered, repeat sporadically with extra twigs on top to give a 3D effect to your star.
Recommendations – Once completed and dry, you could add some fairy lights to the star to brighten it up as a Christmas decoration or add some snow spray paint to give it a more festive look.
Instructions
You will need:
• Star shape cardboard cut out in your desired size
• Glue gun• Craft twigs (or foraged twigs)• Scissors or shears • Festive berries or Christmas
ribbon (for decoration)

Wooden star

Christmas button cardsMake some really unique and incredibly easy personal cards for your family and friends by simply using buttons to help create Christmas images.
• Blank Cards and envelopes, although you could just use some plain thin card and make your own envelopes.
• Some strong glue.• A fine liner.• A selection of buttons, you can buy a bag of various buttons for
crafting if you don’t have any old ones.
You will need:

Examples:
Christmas button Cards

Cheesecake
• 300g digestive biscuits • 150g unsalted butter, melted, plus extra to grease• 400g white chocolate, broken into pieces• 300g full-fat cream cheese (we used philadelphia)• 250g mascarpone • 300ml double cream• 200g strawberries or respberries, to serve
Ingredients

1. Crush the biscuits in a food processor until completely ground. Add butter and whizz again until you have the desired crumbly consistency.
2. Grease and line the base of a 23cm deep, loose-bottomed cake tin. Add the biscuit mixture to the cake tin and pat it flat. Leave to set in the fridge for approximately 30 mins.
3. Begin melting the chocolate in a heatproof glass bowl over a small pan of hot water on a low heat. Stir occasionally to prevent sticking. Remove from the heat and leave to cool for 10 mins until barely warm but still liquid.
4. Meanwhile whisk the cream cheese and mascarpone together. Add double cream and keep whisking until the mixture is just holding its own shape. Finally, add the melted chocolate and whisk until just combined.
5. Spoon the mixture over the cooled and set biscuit base, then smooth the top. Return to the fridge to cool for at least 6 hrs until the topping is set. Finally, decorate with fruit.
Cheesecake
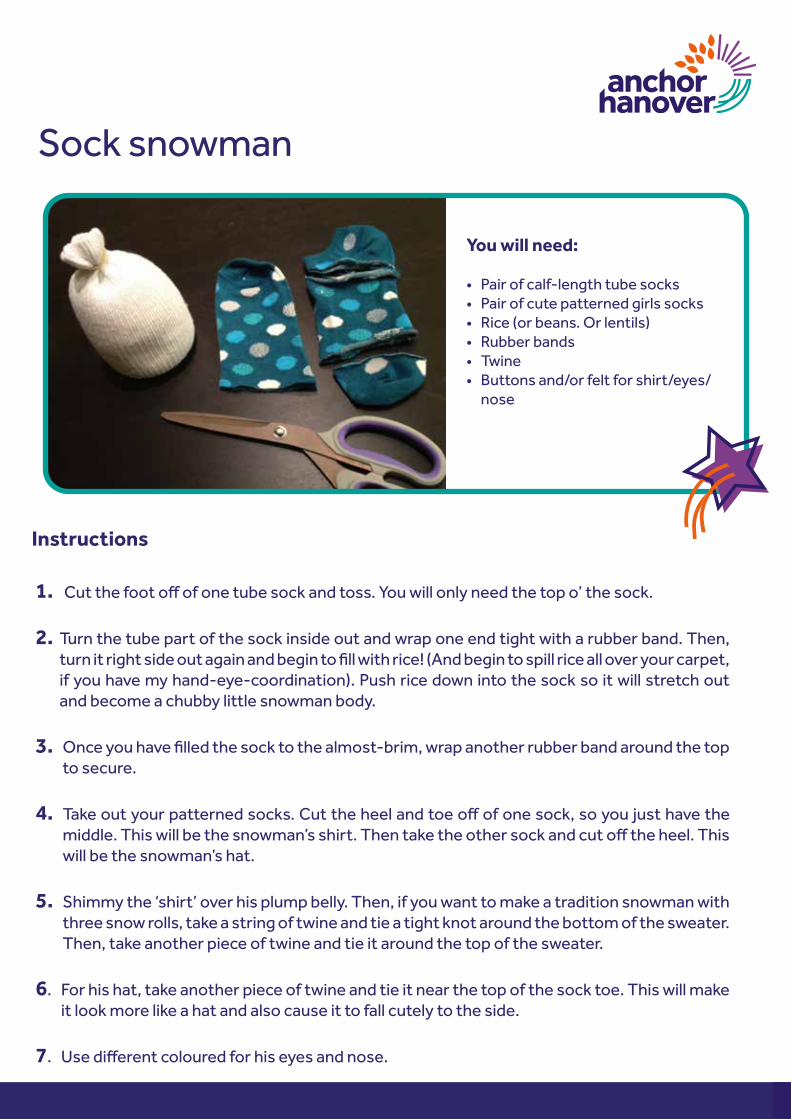
Sock snowmanSock snowman
1. Cut the foot off of one tube sock and toss. You will only need the top o’ the sock.
2. Turn the tube part of the sock inside out and wrap one end tight with a rubber band. Then, turn it right side out again and begin to fill with rice! (And begin to spill rice all over your carpet, if you have my hand-eye-coordination). Push rice down into the sock so it will stretch out and become a chubby little snowman body.
3. Once you have filled the sock to the almost-brim, wrap another rubber band around the top to secure.
4. Take out your patterned socks. Cut the heel and toe off of one sock, so you just have the middle. This will be the snowman’s shirt. Then take the other sock and cut off the heel. This will be the snowman’s hat.
5. Shimmy the ‘shirt’ over his plump belly. Then, if you want to make a tradition snowman with three snow rolls, take a string of twine and tie a tight knot around the bottom of the sweater. Then, take another piece of twine and tie it around the top of the sweater.
6. For his hat, take another piece of twine and tie it near the top of the sock toe. This will make it look more like a hat and also cause it to fall cutely to the side.
7. Use different coloured for his eyes and nose.
Instructions
You will need:
• Pair of calf-length tube socks• Pair of cute patterned girls socks• Rice (or beans. Or lentils)• Rubber bands• Twine• Buttons and/or felt for shirt/eyes/
nose

Sock snowman

Christmas quillingQuilling is the art rolling or coiling strips of paper to make 3D designs. It’s simple to do and an effective way to make Christmas Cards and gift tags look even more attractive. All you need is a little hand dexterity and some patience. You can even use quilling to make your own Christmas tree decorations.
Although you can buy specialist tools and paper for quilling, it’s easy to make your own quilling tool from items you have around your home. You can use any sturdy paper too.
You Will Need:
• A quilling tool – This is a tool that has a slot that paper strips can be inserted in to. You can make your own. Cut the top off a needle with wire cutters and tape it to the end of a pencil. You can try splitting one half of a toothpick instead of a needle.
• Paper glue (glue that dries clear is best)
• Paper for rolling – Stiff paper in assorted colours is best, however, quilling can be done with any paper that is not too thin. You may want to try using magazines if you don’t have any other types of paper. You can buy paper already cut into strips or you can cut your own strips.
• Card – This is to stick your rolled paper on to, you can use different colours of card to match or contrast with your rolled paper designs, or you can try using product packaging card.
• Scissors or a craft knife.

1. Cut paper into strips of approx. 0.55cm (1/8”) wide and between 5cm (2”) and 30cm long. Play around using different lengths of paper strips to create different sized shapes.
2. To begin, insert end of quilling paper into the slot of the quilling tool. turn tool (either directions) hold paper gently but firmly between thump and forefinger while rolling.
3. Glue the end of the strip to your coil and take it off the tool. Play with how tight you glue your coil, to make different shapes.
4. Pinch and bend the coil where needed to make the coil into the shape you require.
5. Stick your coil shapes on to card to make a design. If you are making Christmas tree decorations, stick the coiled shapes to each other.
Instructions
Christmas quilling

Christmas treeChristmas tree
1. 2. 3.
You will need:
• Conifer tree cuttings• Cardboard • Glue gun• Scissors• Cotton• Pencil
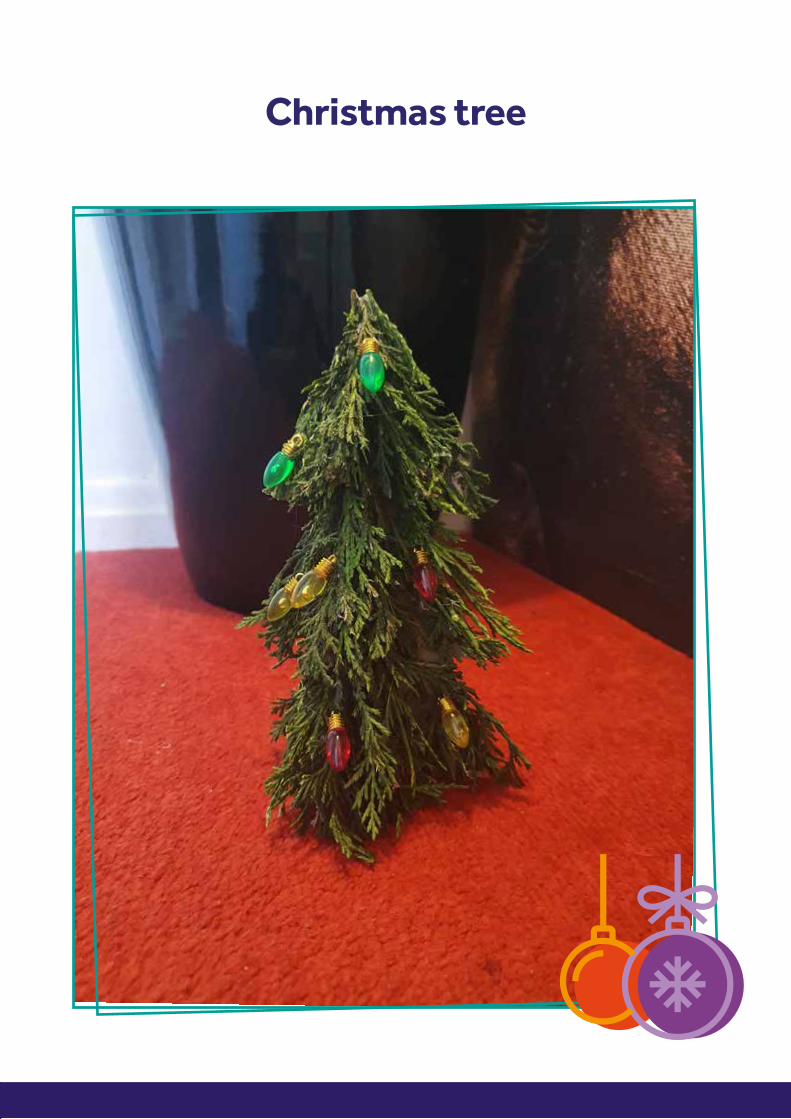
Christmas tree

Picture frames
You will need:
1. Choose your design and materials.2. Arrange in frame.3. Glue into placeyour coil, to make different shapes.4. Display.
Instructions

Picture frames
Examples:

Name tree decorationsName tree decorations
You will need:
1. Arrange letters.2. Glue together.3. Choose Christmas ribbon and glue to the back of the letters.4. Make a tartan bow and glue on top.
Instructions

Name tree decorations

Felt tree decorationsFelt tree decorations
1. Trace your desired shape onto your felt make sure to cut two of every shape for the front and back. Once all of your pieces are cut out, it is time to sew or use glue. Using the embroidery thread and needle thread first sew or glue on your buttons or felt for the detailing. Arrange them how ever you feel best one your front piece of felt.
2. Be sure that when you are sewing or glueing the pieces together you leave a small opening for the stuffing. Add a small amount of stuffing to each ornament then finish sewing. Repeat for all trees and stars.
3. Once your ornaments are complete it is time to glue them onto the ribbon.
Instructions
You will need:
• Different coloured felt• Glue or needle and thread• Different coloured ribbons• Buttons • Stuffing

Felt tree decorations
