chrysler subscription and application installation (j...
TRANSCRIPT
Chrysler Subscription and Application Installation (J 4.02.16)
Section D1 Page 1 of 14 Orig. Date: 12/12/99 Rev. Date: 7/27/10 Rev. Level: 002.1 Doc. # Section D1
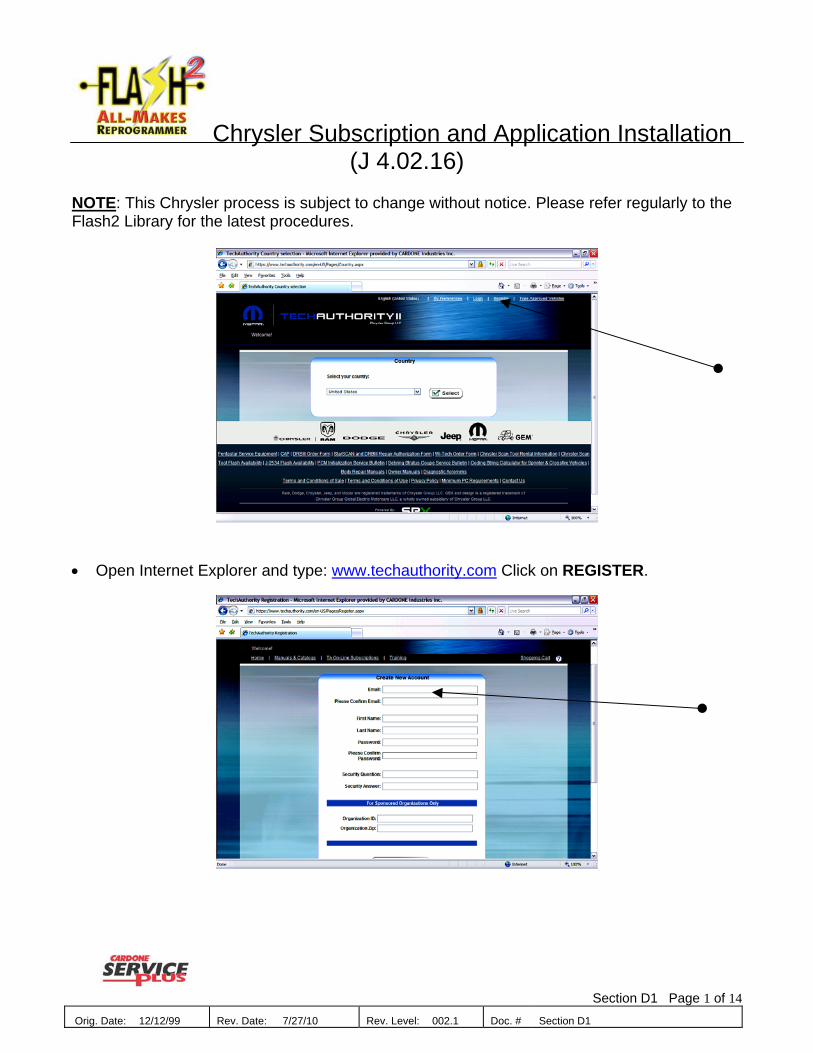
NOTE: This Chrysler process is subject to change without notice. Please refer regularly to the Flash2 Library for the latest procedures.
• Open Internet Explorer and type: www.techauthority.com Click on REGISTER.

Chrysler Subscription and Application Installation (J 4.02.16)
Section D1 Page 2 of 14 Orig. Date: 12/12/99 Rev. Date: 7/27/10 Rev. Level: 002.1 Doc. # Section D1
• Type in the requested information then click CREATE ACCOUNT
• When the Account Successfully Created notice appears, click NEXT. • After clicking on create account an email will be sent to the Email address provided in the setup.
Email sample shown below. Program will return to HOME page.
Chrysler Subscription and Application Installation (J 4.02.16)
Section D1 Page 3 of 14 Orig. Date: 12/12/99 Rev. Date: 7/27/10 Rev. Level: 002.1 Doc. # Section D1
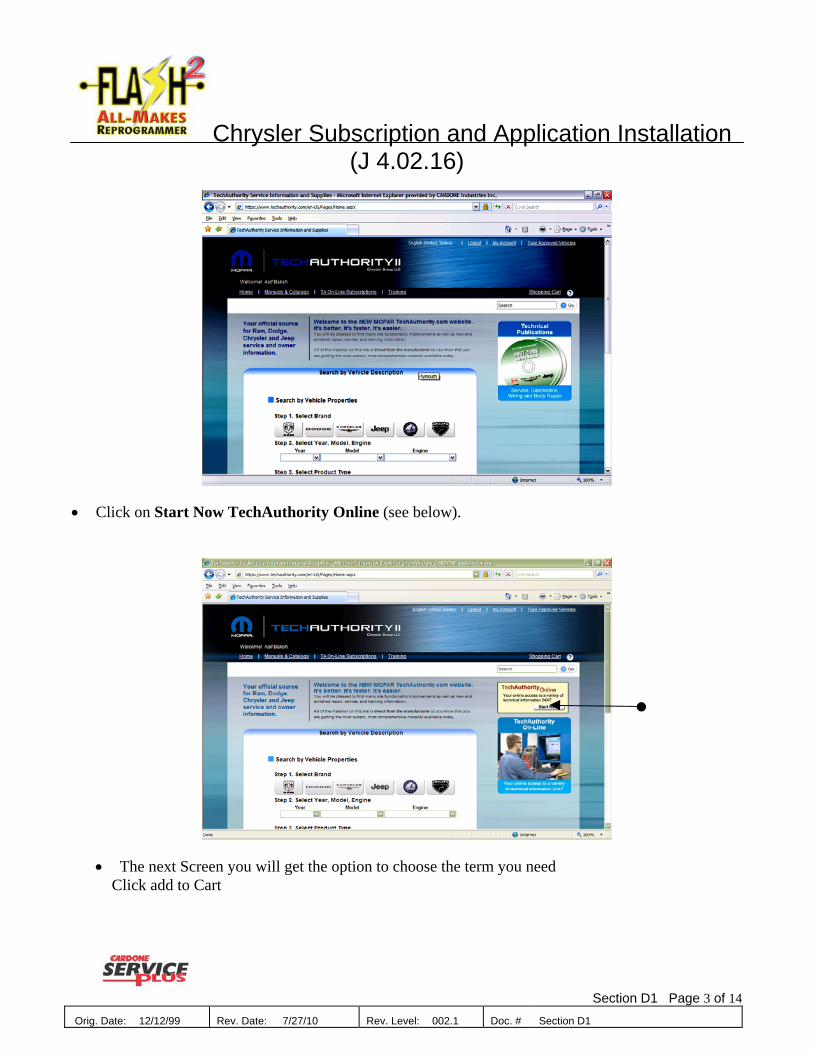
• Click on Start Now TechAuthority Online (see below).
• The next Screen you will get the option to choose the term you need Click add to Cart
Chrysler Subscription and Application Installation (J 4.02.16)
Section D1 Page 4 of 14 Orig. Date: 12/12/99 Rev. Date: 7/27/10 Rev. Level: 002.1 Doc. # Section D1
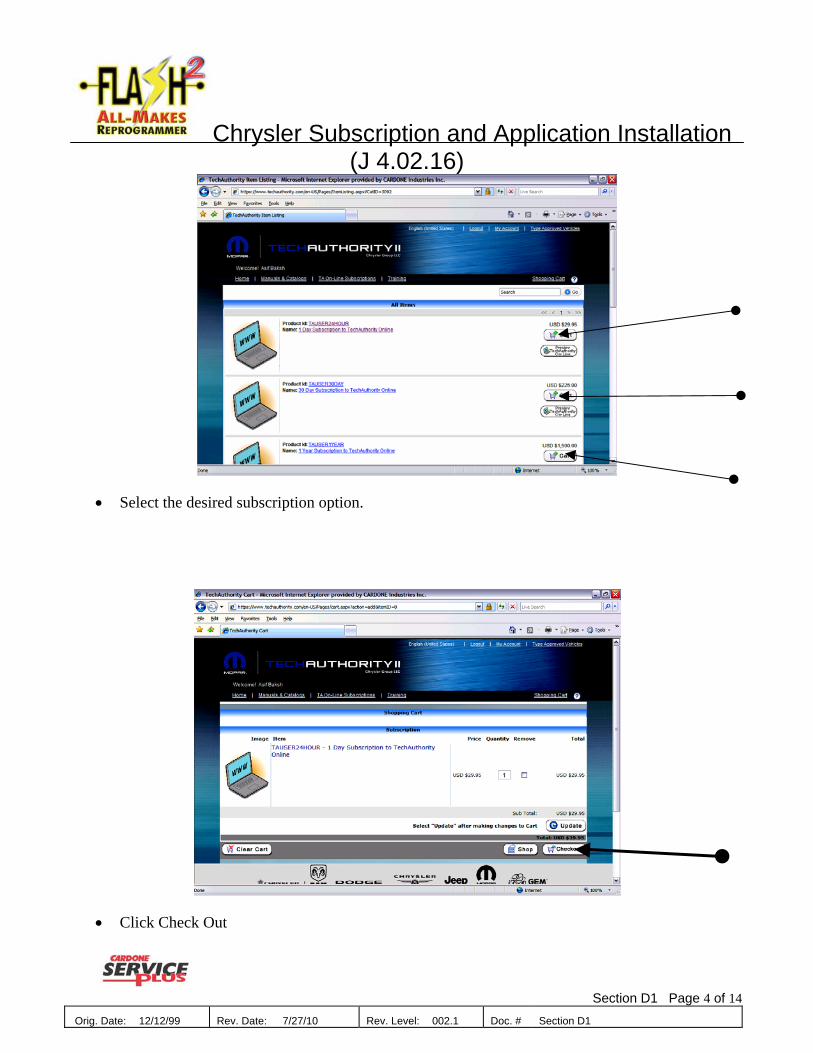
• Select the desired subscription option.
• Click Check Out

Chrysler Subscription and Application Installation (J 4.02.16)
Section D1 Page 5 of 14 Orig. Date: 12/12/99 Rev. Date: 7/27/10 Rev. Level: 002.1 Doc. # Section D1
• Complete the required information and click NEXT at the bottom of the screen.
• On this screen fill out the required information and credit card information, then click NEXT. • After entering the Credit Card information, the next screen shows verification of your purchase. • At this point you will need to log back in the Home page (see next step) and follow the
instructions on getting the Chrysler application SAVED and INSTALLED on your computer.
Chrysler Subscription and Application Installation (J 4.02.16)
Section D1 Page 6 of 14 Orig. Date: 12/12/99 Rev. Date: 7/27/10 Rev. Level: 002.1 Doc. # Section D1
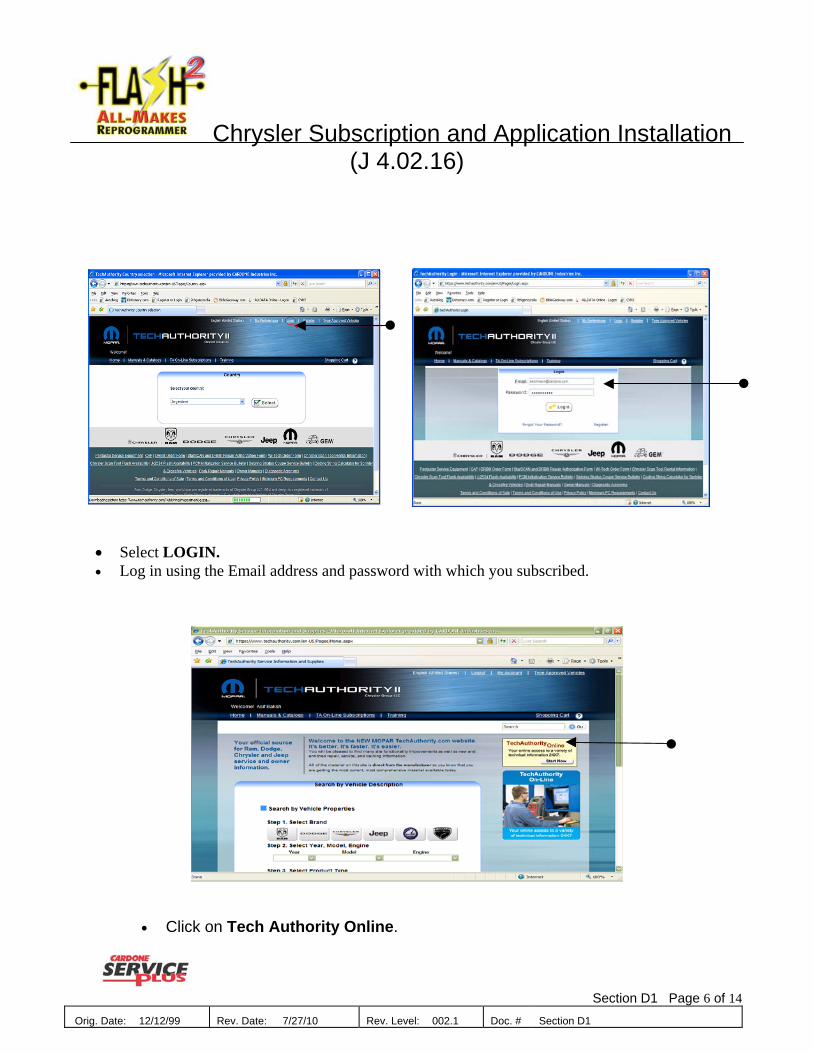
• Select LOGIN. • Log in using the Email address and password with which you subscribed.
• Click on Tech Authority Online.

Chrysler Subscription and Application Installation (J 4.02.16)
Orig. Date:
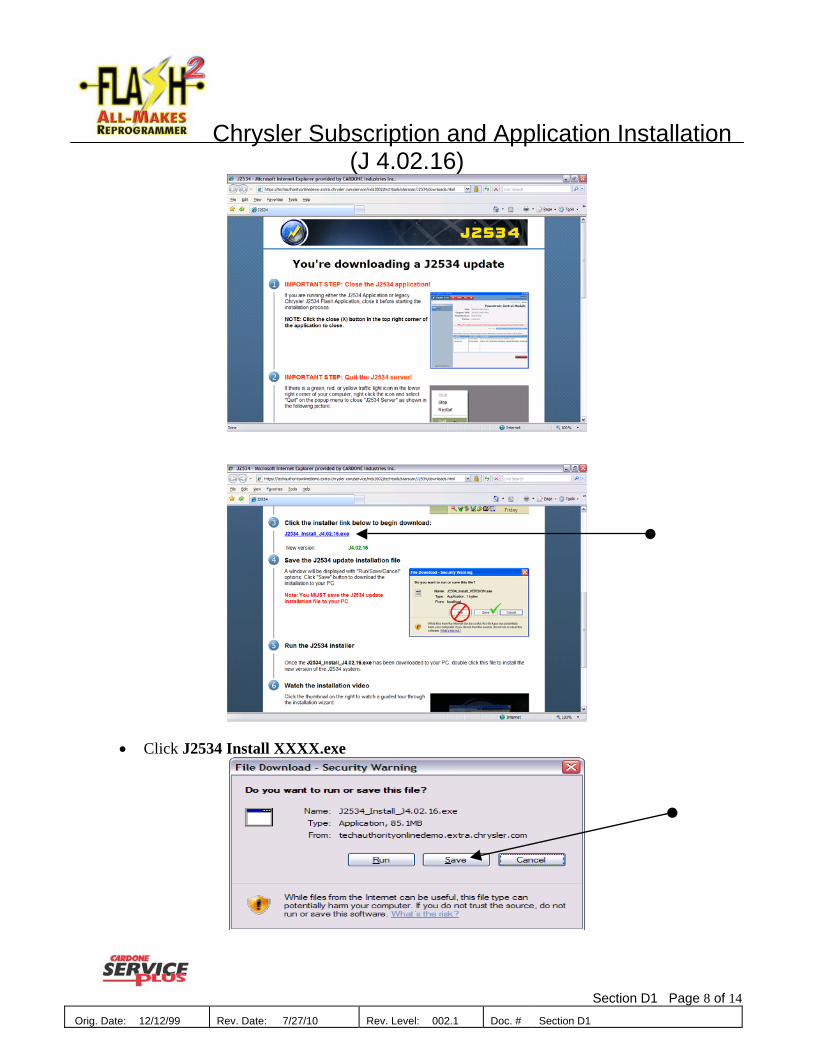
• In this step the Chrysler flash program will be downloaded. Click on Flash
•
Click Get the J2534 system
Section D1 Page 7 of 14 12/12/99 Rev. Date: 7/27/10 Rev. Level: 002.1 Doc. # Section D1
Chrysler Subscription and Application Installation (J 4.02.16)
Section D1 Page 8 of 14 Orig. Date: 12/12/99 Rev. Date: 7/27/10 Rev. Level: 002.1 Doc. # Section D1
• Click J2534 Install XXXX.exe
Chrysler Subscription and Application Installation (J 4.02.16)
Orig. Date: 12/12
• Cl
• Save th
• When d(J2534
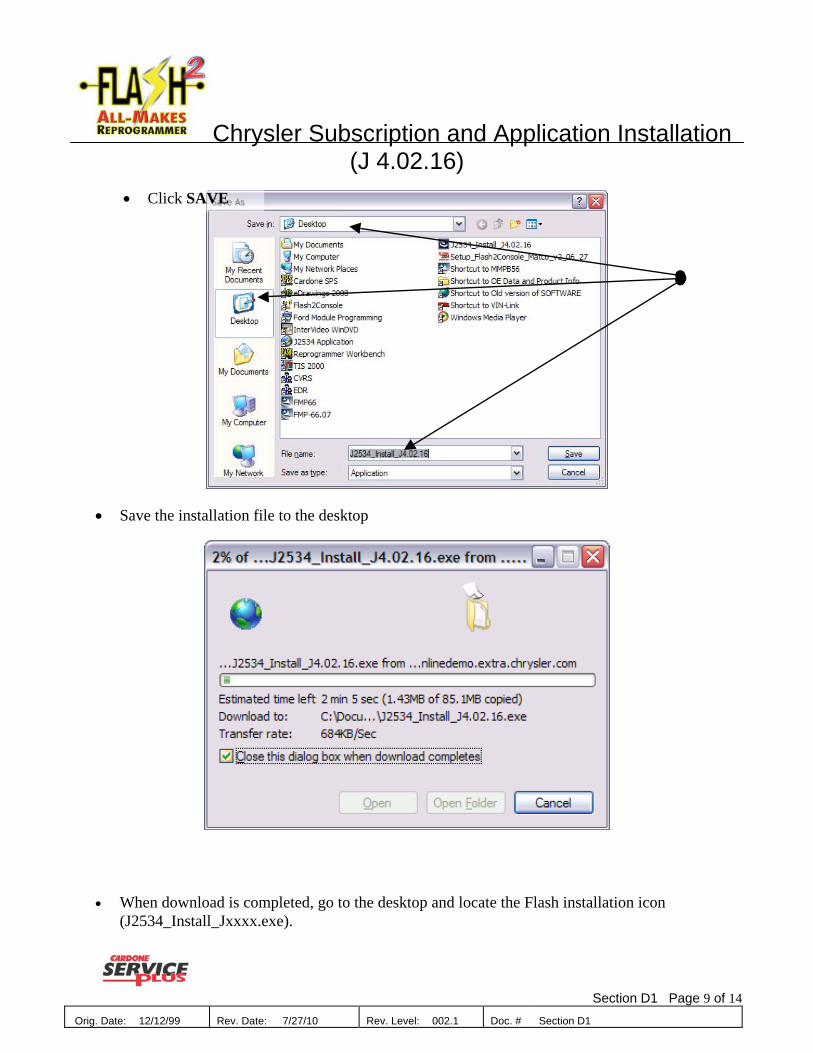
ick SAVE
Section D1 Page 9 of 14 /99 Rev. Date: 7/27/10 Rev. Level: 002.1 Doc. # Section D1
e installation file to the desktop
ownload is completed, go to the desktop and locate the Flash installation icon _Install_Jxxxx.exe).
Chrysler Subscription and Application Installation (J 4.02.16)
Section D1 Page 10 of 14 Orig. Date: 12/12/99 Rev. Date: 7/27/10 Rev. Level: 002.1 Doc. # Section D1
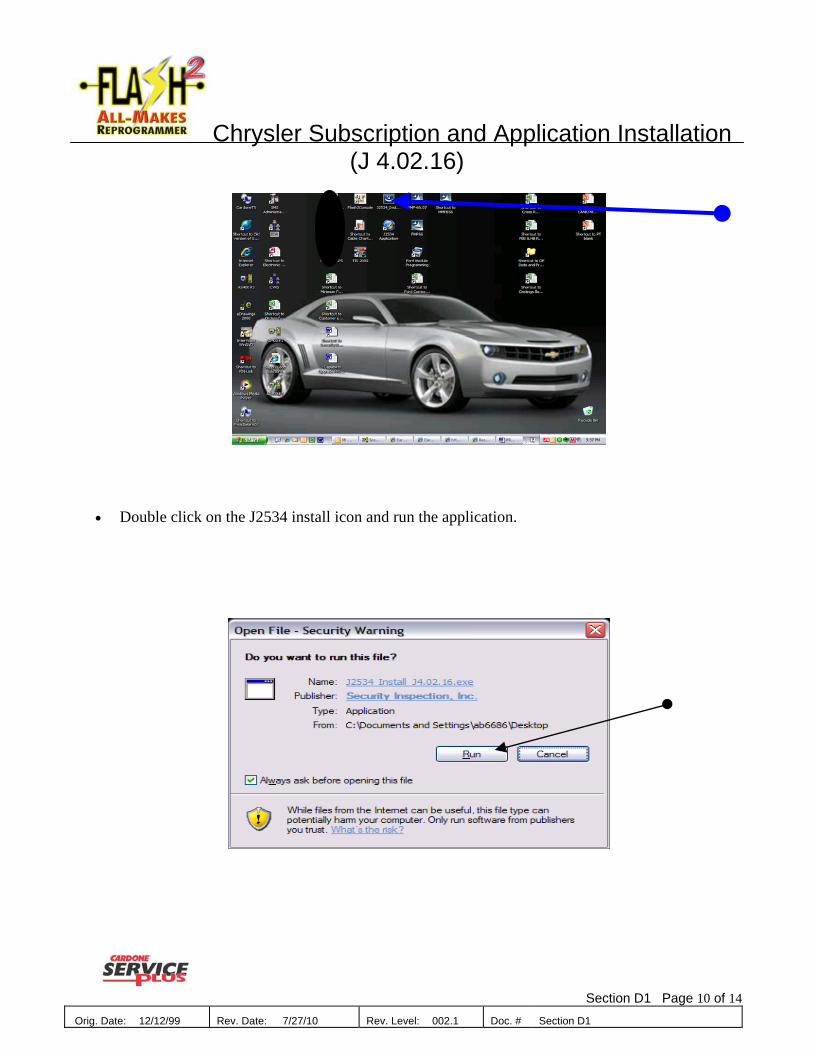
• Double click on the J2534 install icon and run the application.

Chrysler Subscription and Application Installation (J 4.02.16)
Section D1 Page 11 of 14 Orig. Date: 12/12/99 Rev. Date: 7/27/10 Rev. Level: 002.1 Doc. # Section D1
• Click NEXT

Chrysler Subscription and Application Installation (J 4.02.16)
Section D1 Page 12 of 14 Orig. Date: 12/12/99 Rev. Date: 7/27/10 Rev. Level: 002.1 Doc. # Section D1
• Click NEXT and follow the instructions
• Before clicking Next, verify that actual system Values meet or exceed recommended requirements. Update system as necessary.
Chrysler Subscription and Application Installation (J 4.02.16)
Section D1 Page 13 of 14 Orig. Date: 12/12/99 Rev. Date: 7/27/10 Rev. Level: 002.1 Doc. # Section D1
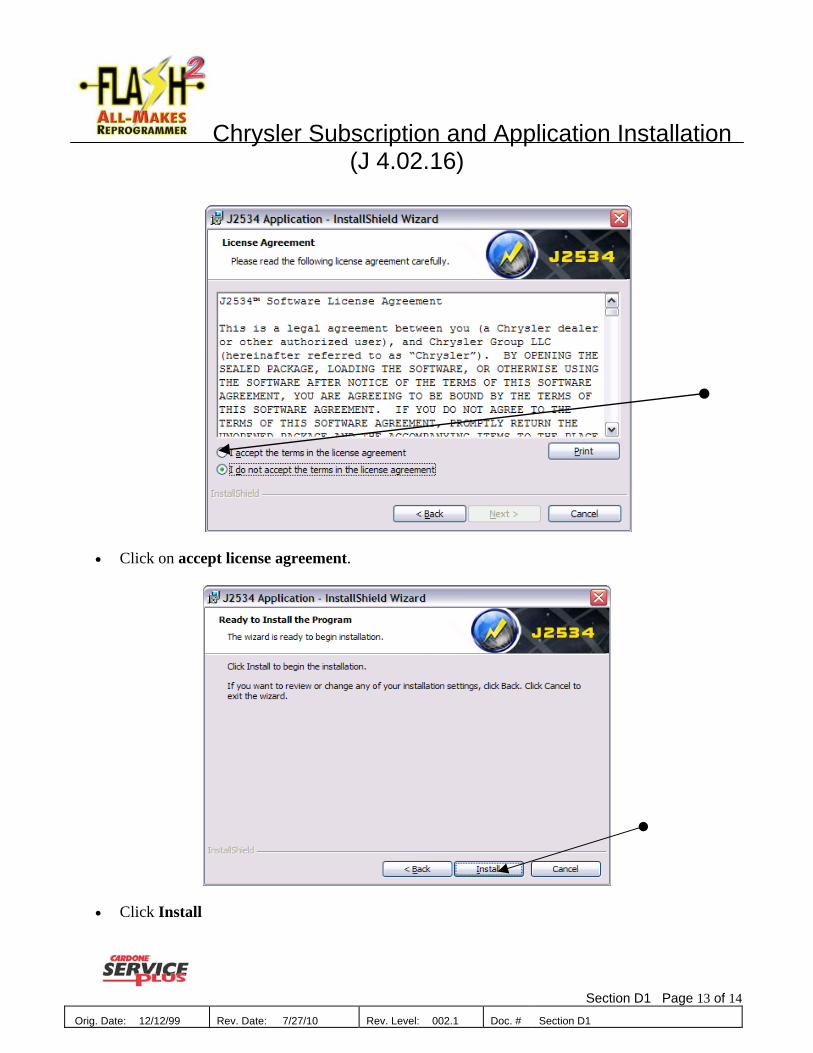
• Click on accept license agreement.
• Click Install
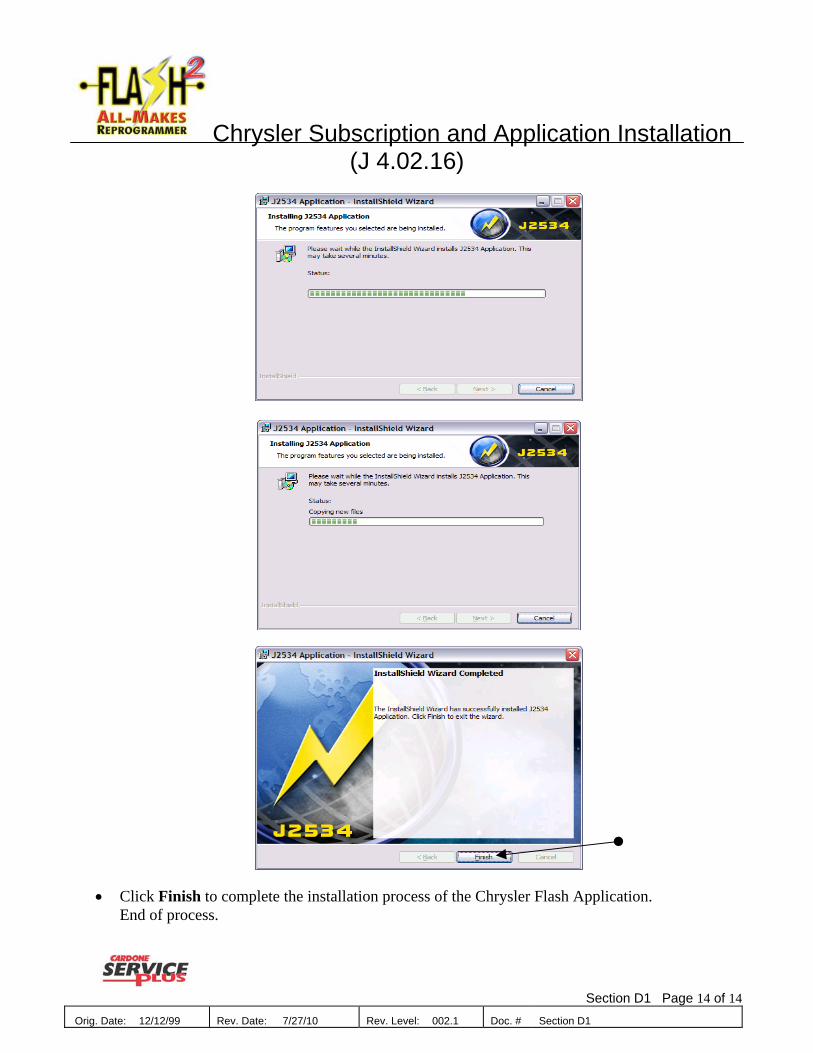
Chrysler Subscription and Application Installation (J 4.02.16)
Section D1 Page 14 of 14 Orig. Date: 12/12/99 Rev. Date: 7/27/10 Rev. Level: 002.1 Doc. # Section D1
• Click Finish to complete the installation process of the Chrysler Flash Application. End of process.

Chrysler On/Off-Car Reprogramming Guide
Section D2 Page 1 of 8
NOTE: This guide is and shows the common steps in reprogramming. Application-specific variations may not be represented. Simply follow the applicable screen prompts and proceed as indicated. This process is subject to change w/o notice.
• Click on the Chrysler icon in the Reprogramming/Analyze section.
• Click on “FLASH2 Reprogramming”.
• Click either “On-Car” or “Off-Car”.
• Read “Warning” information and click on “Next”.
Orig. Date: 12/12/99 Rev. Date: 7/20/10 Rev. Level: 002.1 Doc. # D2

Chrysler On/Off-Car Reprogramming Guide
Section D2 Page 2 of 8
• On-Car: make sure the vehicle’s Ignition Switch is in the “On” position and click
“OK”. • Off-Car: make sure the FLASH2 tool’s Ignition Switch is in the “On” position and click
“Ok”.
• On-Car only: It is strongly recommended that a “Battery Test” be conducted. Read
the notes and click on “Battery Test”.
• On-Car only: Battery test is within acceptable parameters. Click “Next”.
• Click “Retrieve” to get the part number. Other options available in the Chrysler
Application. Click “Next” to continue. (Note: Not all ECM/PCM support part number retrieval.)
Orig. Date: 12/12/99 Rev. Date: 05/18/10 Rev. Level: 003 Doc. # D2
Chrysler On/Off-Car Reprogramming Guide
Section D2 Page 3 of 8
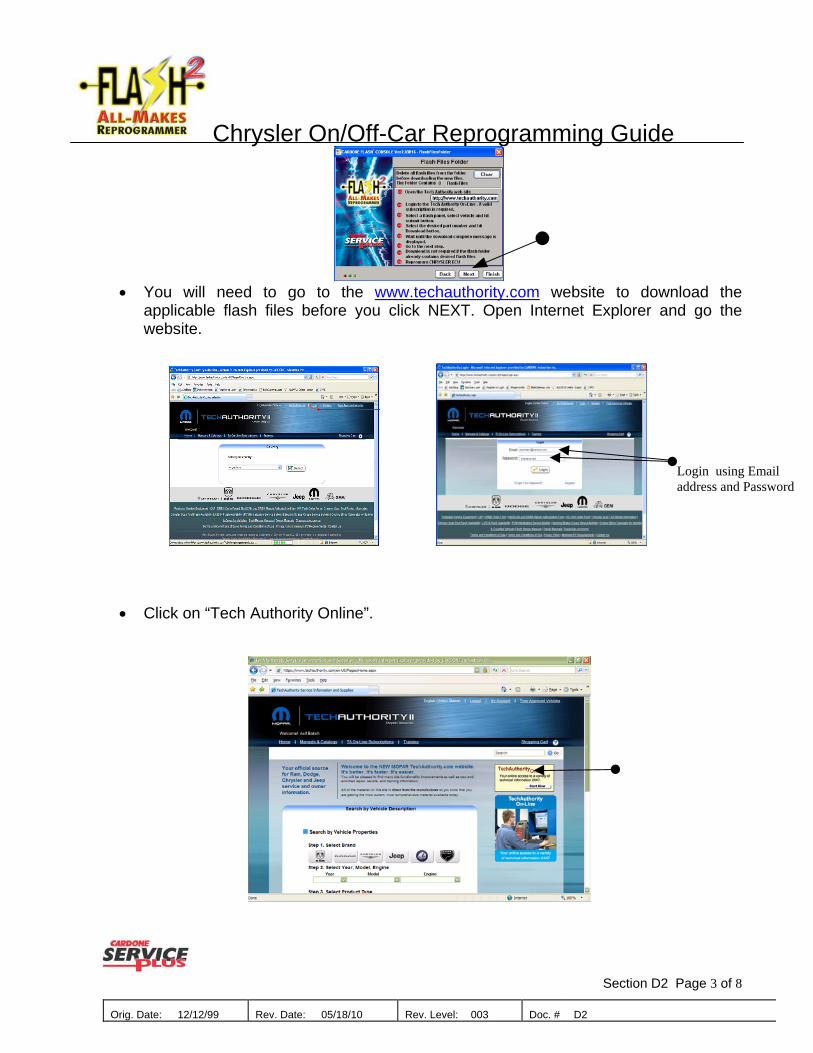
• You will need to go to the www.techauthority.com website to download the
applicable flash files before you click NEXT. Open Internet Explorer and go the website.
Login using Email address and Password
• Click on “Tech Authority Online”.
Orig. Date: 12/12/99 Rev. Date: 05/18/10 Rev. Level: 003 Doc. # D2
Chrysler On/Off-Car Reprogramming Guide
Section D2 Page 4 of 8
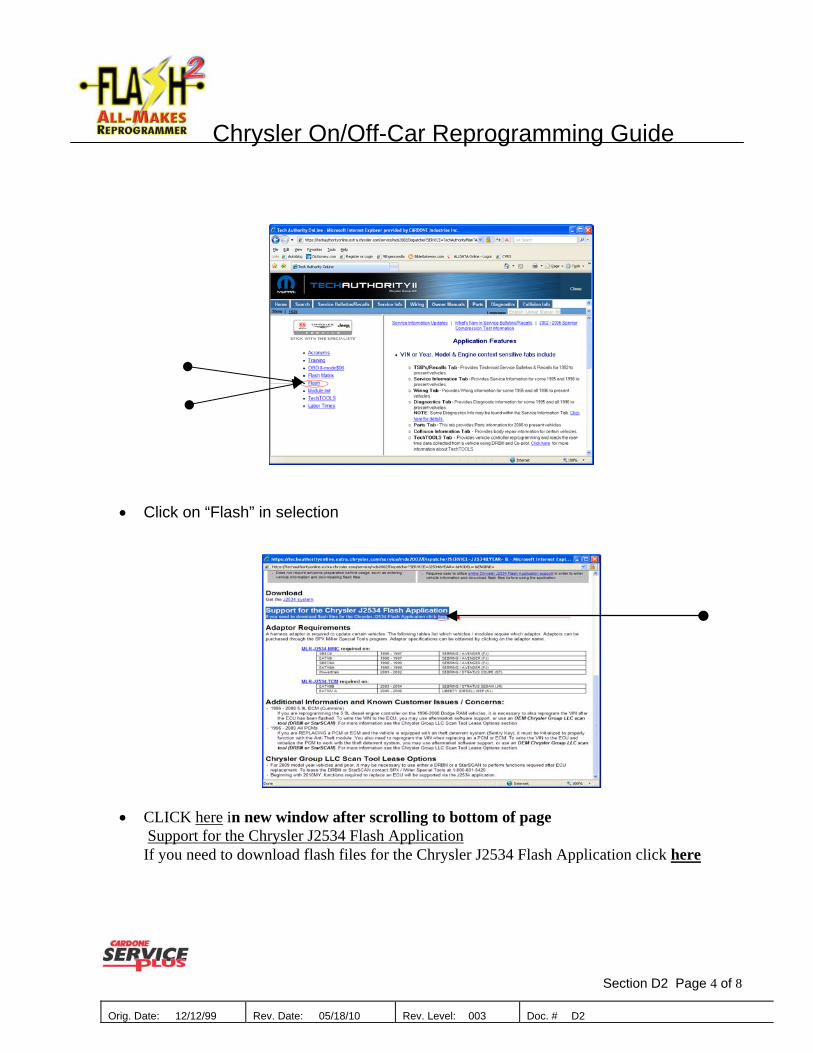
• Click on “Flash” in selection
• CLICK here in new window after scrolling to bottom of page
Support for the Chrysler J2534 Flash Application If you need to download flash files for the Chrysler J2534 Flash Application click here
Orig. Date: 12/12/99 Rev. Date: 05/18/10 Rev. Level: 003 Doc. # D2

Chrysler On/Off-Car Reprogramming Guide
Section D2 Page 5 of 8
• This window opens where you can use one of multiple choices in the left-hand pane to identify the vehicle being programmed. Enter one of the available options, scroll to the bottom of the pane and click on “Submit”.
• One or more available calibration files or “Flash Part List” items will be displayed. Select the correct one by clicking on the button and then click “Download”.
Orig. Date: 12/12/99 Rev. Date: 05/18/10 Rev. Level: 003 Doc. # D2

Chrysler On/Off-Car Reprogramming Guide
Section D2 Page 6 of 8
• When the files have been downloaded successfully, the message will display in the lower-right window pane. You may minimize the window or close out of the Internet at this time.
• Click on “Next” to launch the Chrysler J2534 Flash Application.
• Click on the “Start” button and respond to the various prompts (shown below). • On-Car: make sure the vehicle’s Ignition Switch is in the “On” position and click
“OK”. • Off-Car: make sure the FLASH2 tool’s Ignition Switch is in the “On” position and click
“Ok”.
Orig. Date: 12/12/99 Rev. Date: 05/18/10 Rev. Level: 003 Doc. # D2

Chrysler On/Off-Car Reprogramming Guide
Section D2 Page 7 of 8
• Calibration files being loaded into the ECM! When done, respond to the various
prompts (shown below). • On-Car: make sure the vehicle’s Ignition Switch is in the “On” position and click
“OK”. • Off-Car: make sure the FLASH2 tool’s Ignition Switch is in the “On” position and click
“Ok”.
• “Part Number Verification Successful!” Click “Done”.
Orig. Date: 12/12/99 Rev. Date: 05/18/10 Rev. Level: 003 Doc. # D2
Chrysler On/Off-Car Reprogramming Guide
Section D2 Page 8 of 8
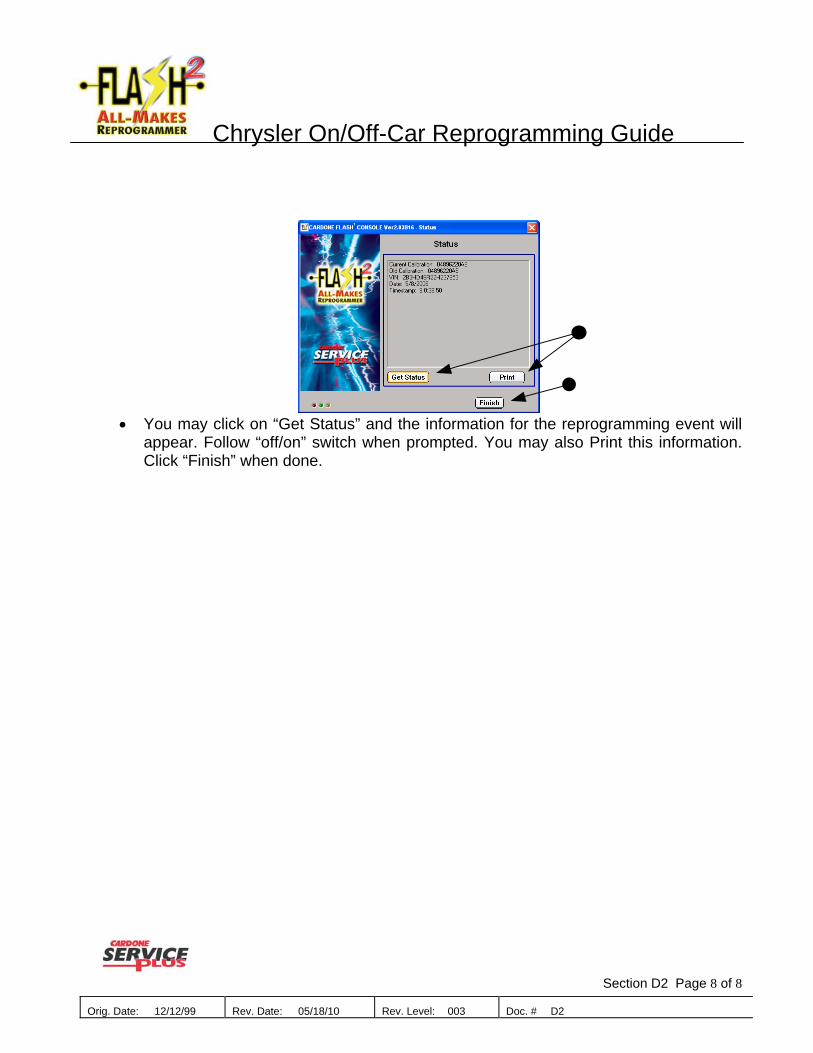
• You may click on “Get Status” and the information for the reprogramming event will
appear. Follow “off/on” switch when prompted. You may also Print this information. Click “Finish” when done.
Orig. Date: 12/12/99 Rev. Date: 05/18/10 Rev. Level: 003 Doc. # D2

Chrysler VIN Reprogramming Guide
Section D3 Page 1 of 2 Orig. Date: 12/12/99 Rev. Date: 6/14/10 Rev. Level: 001 Doc. # D3
NOTE: This guide shows the common steps for VIN reprogramming after selecting the VIN Reprogramming option. This option can be done “on-car” or “off-car”. Internet use is not required.
• Select “Modify VIN”.
• Turn Ignition Switch “On”.
• Enter the correct VIN number to be programmed into the ECM and click on “Set
VIN”.
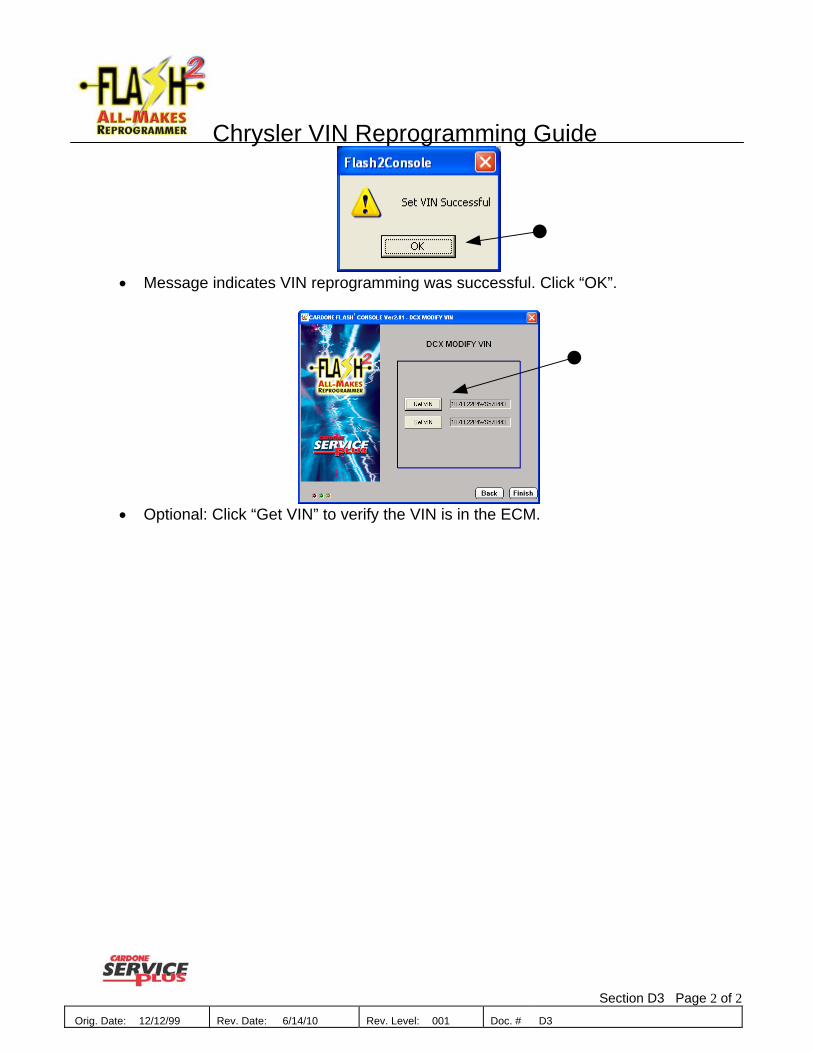
Chrysler VIN Reprogramming Guide
Section D3 Page 2 of 2 Orig. Date: 12/12/99 Rev. Date: 6/14/10 Rev. Level: 001 Doc. # D3
• Message indicates VIN reprogramming was successful. Click “OK”.
• Optional: Click “Get VIN” to verify the VIN is in the ECM.

Chrysler Modify SRI Odometer Guide
Section D4 Page 1 of 2 Orig. Date: 12/12/99 Rev. Date: 6/14/10 Rev. Level: 001 Doc. # D4
• NOTE: This guide shows the common step for SRI Odometer reprogramming. This
option can be done “on-car” or “off-car”. Internet use is not required. Some ECU’s do not support this SRI modification.
• VEHICLE MUST NOT BE RUNNING if performing on-car. • Select “Modify SRI Odometer”.
• Turn “Ignition Switch” On.
• Enter current Odometer mileage and click “Set Odometer”.
• Click “OK”.
Chrysler Modify SRI Odometer Guide
Section D4 Page 2 of 2 Orig. Date: 12/12/99 Rev. Date: 6/14/10 Rev. Level: 001 Doc. # D4
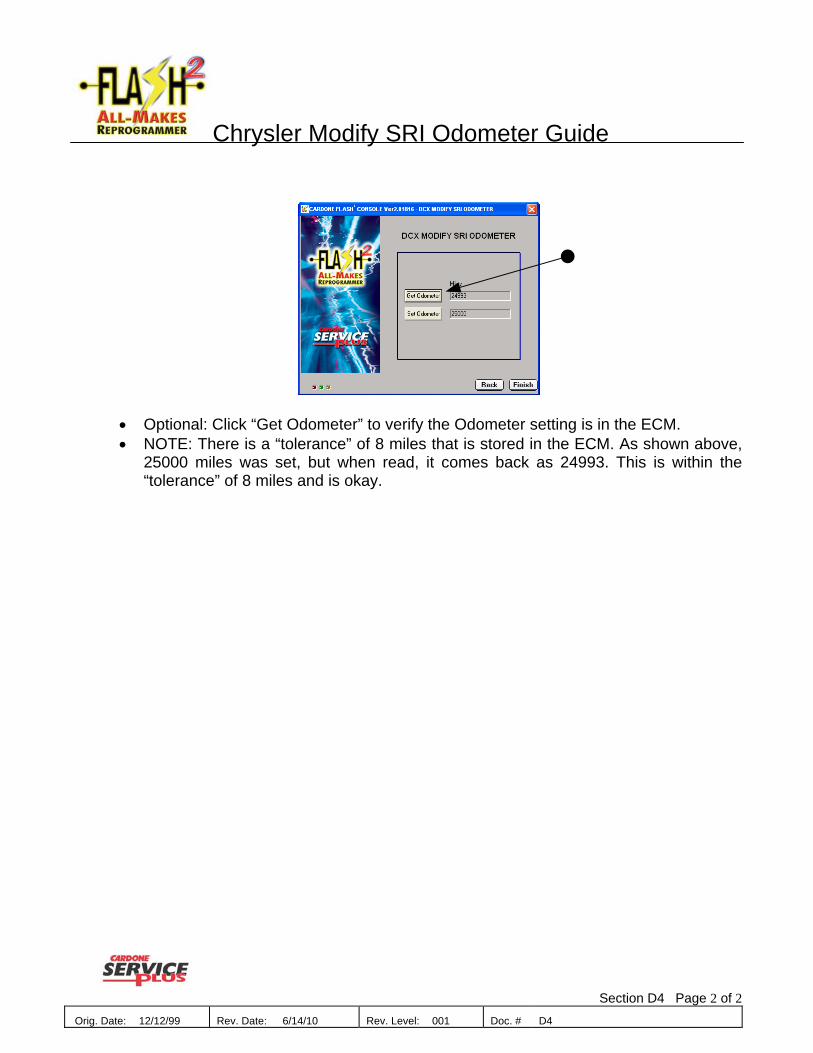
• Optional: Click “Get Odometer” to verify the Odometer setting is in the ECM. • NOTE: There is a “tolerance” of 8 miles that is stored in the ECM. As shown above,
25000 miles was set, but when read, it comes back as 24993. This is within the “tolerance” of 8 miles and is okay.