cis mac os x leopard (10.5.x) benchmark - cis center for ... · pdf filecis mac os x leopard...
TRANSCRIPT

Mac OS X 10.5 Leopard
Level 1 & 2 Benchmark
Version 1.0
May 2008
Copyright ©2008, The Center for Internet Security
http://www.cisecurity.org
Editor: Allan Marcus
CIS Mac OS X Leopard (10.5.x) Benchmark
Page 1 of 84
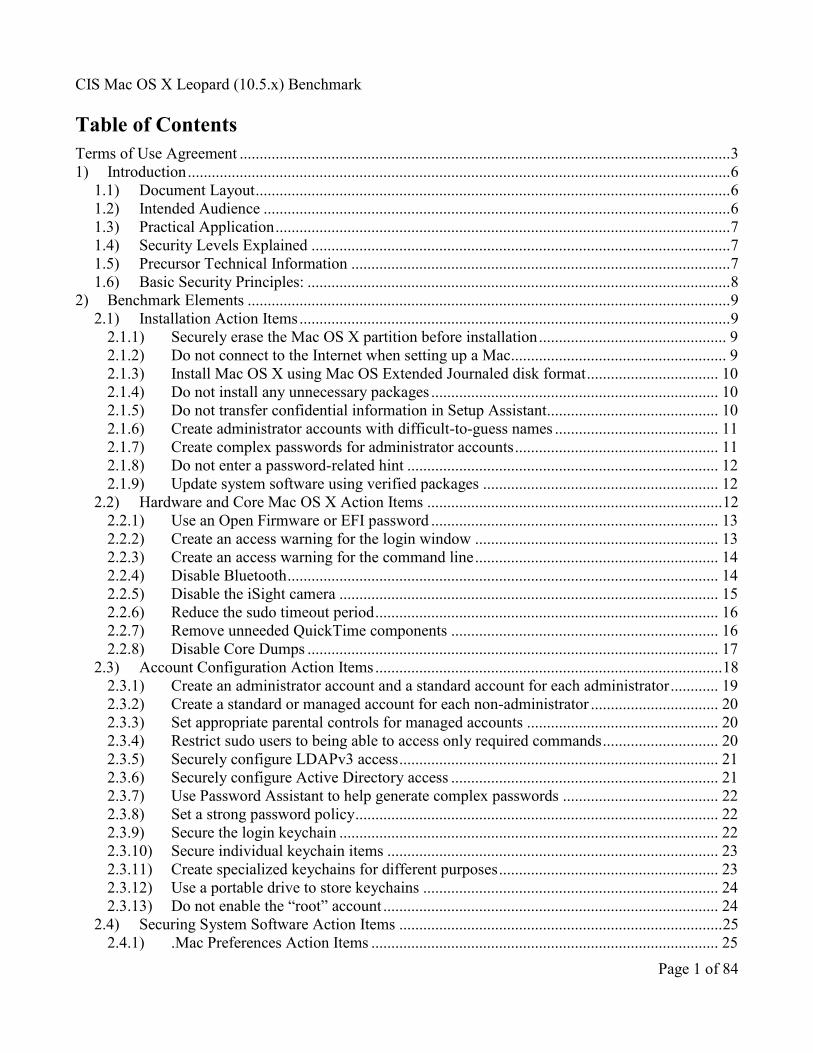
Table of Contents
Terms of Use Agreement ........................................................................................................................... 3
1) Introduction ........................................................................................................................................ 6
1.1) Document Layout ....................................................................................................................... 6
1.2) Intended Audience ..................................................................................................................... 6
1.3) Practical Application .................................................................................................................. 7
1.4) Security Levels Explained ......................................................................................................... 7
1.5) Precursor Technical Information ............................................................................................... 7
1.6) Basic Security Principles: .......................................................................................................... 8
2) Benchmark Elements ......................................................................................................................... 9
2.1) Installation Action Items ............................................................................................................ 9
2.1.1) Securely erase the Mac OS X partition before installation ............................................... 9
2.1.2) Do not connect to the Internet when setting up a Mac...................................................... 9
2.1.3) Install Mac OS X using Mac OS Extended Journaled disk format ................................. 10
2.1.4) Do not install any unnecessary packages ........................................................................ 10
2.1.5) Do not transfer confidential information in Setup Assistant........................................... 10
2.1.6) Create administrator accounts with difficult-to-guess names ......................................... 11
2.1.7) Create complex passwords for administrator accounts ................................................... 11
2.1.8) Do not enter a password-related hint .............................................................................. 12
2.1.9) Update system software using verified packages ........................................................... 12
2.2) Hardware and Core Mac OS X Action Items .......................................................................... 12
2.2.1) Use an Open Firmware or EFI password ........................................................................ 13
2.2.2) Create an access warning for the login window ............................................................. 13
2.2.3) Create an access warning for the command line ............................................................. 14
2.2.4) Disable Bluetooth ............................................................................................................ 14
2.2.5) Disable the iSight camera ............................................................................................... 15
2.2.6) Reduce the sudo timeout period ...................................................................................... 16
2.2.7) Remove unneeded QuickTime components ................................................................... 16
2.2.8) Disable Core Dumps ....................................................................................................... 17
2.3) Account Configuration Action Items ....................................................................................... 18
2.3.1) Create an administrator account and a standard account for each administrator ............ 19
2.3.2) Create a standard or managed account for each non-administrator ................................ 20
2.3.3) Set appropriate parental controls for managed accounts ................................................ 20
2.3.4) Restrict sudo users to being able to access only required commands ............................. 20
2.3.5) Securely configure LDAPv3 access ................................................................................ 21
2.3.6) Securely configure Active Directory access ................................................................... 21
2.3.7) Use Password Assistant to help generate complex passwords ....................................... 22
2.3.8) Set a strong password policy ........................................................................................... 22
2.3.9) Secure the login keychain ............................................................................................... 22
2.3.10) Secure individual keychain items ................................................................................... 23
2.3.11) Create specialized keychains for different purposes ....................................................... 23
2.3.12) Use a portable drive to store keychains .......................................................................... 24
2.3.13) Do not enable the ―root‖ account .................................................................................... 24
2.4) Securing System Software Action Items ................................................................................. 25
2.4.1) .Mac Preferences Action Items ....................................................................................... 25
CIS Mac OS X Leopard (10.5.x) Benchmark
Page 2 of 84
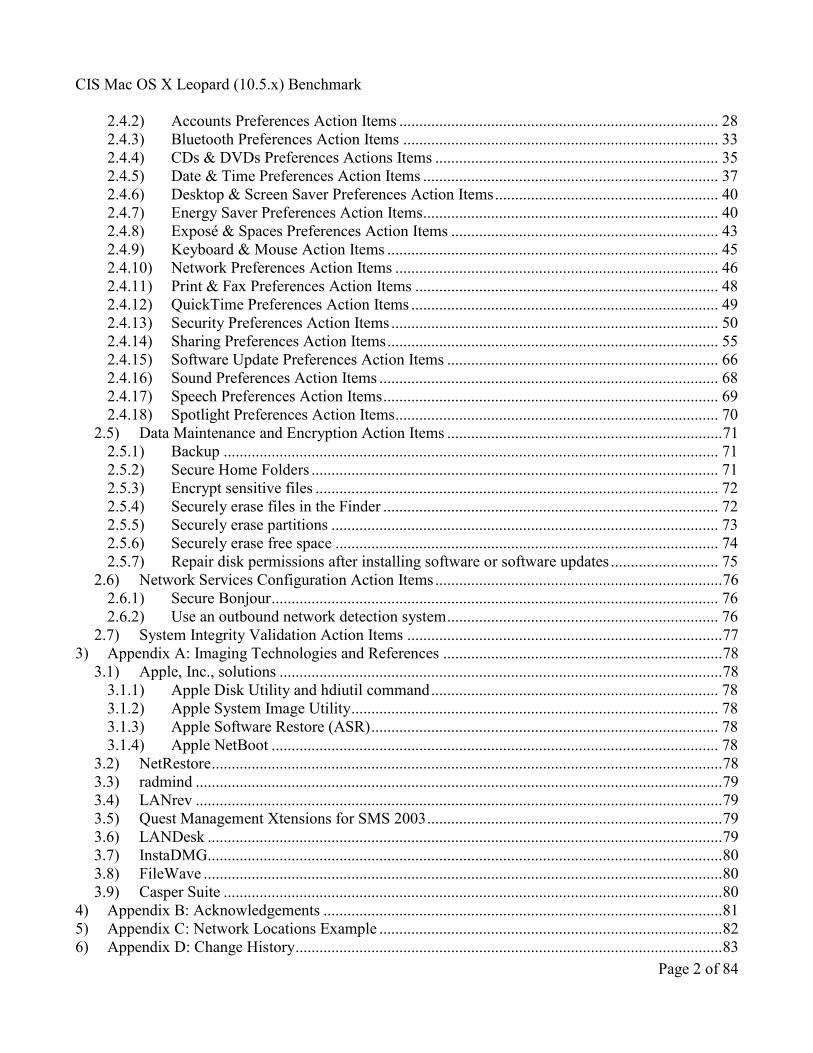
2.4.2) Accounts Preferences Action Items ................................................................................ 28
2.4.3) Bluetooth Preferences Action Items ............................................................................... 33
2.4.4) CDs & DVDs Preferences Actions Items ....................................................................... 35
2.4.5) Date & Time Preferences Action Items .......................................................................... 37
2.4.6) Desktop & Screen Saver Preferences Action Items ........................................................ 40
2.4.7) Energy Saver Preferences Action Items .......................................................................... 40
2.4.8) Exposé & Spaces Preferences Action Items ................................................................... 43
2.4.9) Keyboard & Mouse Action Items ................................................................................... 45
2.4.10) Network Preferences Action Items ................................................................................. 46
2.4.11) Print & Fax Preferences Action Items ............................................................................ 48
2.4.12) QuickTime Preferences Action Items ............................................................................. 49
2.4.13) Security Preferences Action Items .................................................................................. 50
2.4.14) Sharing Preferences Action Items ................................................................................... 55
2.4.15) Software Update Preferences Action Items .................................................................... 66
2.4.16) Sound Preferences Action Items ..................................................................................... 68
2.4.17) Speech Preferences Action Items .................................................................................... 69
2.4.18) Spotlight Preferences Action Items................................................................................. 70
2.5) Data Maintenance and Encryption Action Items ..................................................................... 71
2.5.1) Backup ............................................................................................................................ 71
2.5.2) Secure Home Folders ...................................................................................................... 71
2.5.3) Encrypt sensitive files ..................................................................................................... 72
2.5.4) Securely erase files in the Finder .................................................................................... 72
2.5.5) Securely erase partitions ................................................................................................. 73
2.5.6) Securely erase free space ................................................................................................ 74
2.5.7) Repair disk permissions after installing software or software updates ........................... 75
2.6) Network Services Configuration Action Items ........................................................................ 76
2.6.1) Secure Bonjour ................................................................................................................ 76
2.6.2) Use an outbound network detection system .................................................................... 76
2.7) System Integrity Validation Action Items ............................................................................... 77
3) Appendix A: Imaging Technologies and References ...................................................................... 78
3.1) Apple, Inc., solutions ............................................................................................................... 78
3.1.1) Apple Disk Utility and hdiutil command ........................................................................ 78
3.1.2) Apple System Image Utility ............................................................................................ 78
3.1.3) Apple Software Restore (ASR) ....................................................................................... 78
3.1.4) Apple NetBoot ................................................................................................................ 78
3.2) NetRestore ................................................................................................................................ 78
3.3) radmind .................................................................................................................................... 79
3.4) LANrev .................................................................................................................................... 79
3.5) Quest Management Xtensions for SMS 2003 .......................................................................... 79
3.6) LANDesk ................................................................................................................................. 79
3.7) InstaDMG................................................................................................................................. 80
3.8) FileWave .................................................................................................................................. 80
3.9) Casper Suite ............................................................................................................................. 80
4) Appendix B: Acknowledgements .................................................................................................... 81
5) Appendix C: Network Locations Example ...................................................................................... 82
6) Appendix D: Change History ........................................................................................................... 83

CIS Mac OS X Leopard (10.5.x) Benchmark
Page 3 of 84
Terms of Use Agreement
Background.
The Center for Internet Security ("CIS") provides benchmarks, scoring tools, software, data, information,
suggestions, ideas, and other services and materials from the CIS website or elsewhere (―Products‖) as a
public service to Internet users worldwide. Recommendations contained in the Products
(―Recommendations‖) result from a consensus-building process that involves many security experts and
are generally generic in nature. The Recommendations are intended to provide helpful information to
organizations attempting to evaluate or improve the security of their networks, systems, and devices.
Proper use of the Recommendations requires careful analysis and adaptation to specific user
requirements. The Recommendations are not in any way intended to be a ―quick fix‖ for anyone’s
information security needs.
No Representations, Warranties, or Covenants.
CIS makes no representations, warranties, or covenants whatsoever as to (i) the positive or negative
effect of the Products or the Recommendations on the operation or the security of any particular network,
computer system, network device, software, hardware, or any component of any of the foregoing or (ii)
the accuracy, reliability, timeliness, or completeness of the Products or the Recommendations. CIS is
providing the Products and the Recommendations ―as is‖ and ―as available‖ without representations,
warranties, or covenants of any kind.
User Agreements.
By using the Products and/or the Recommendations, I and/or my organization (―We‖) agree and
acknowledge that:
1. No network, system, device, hardware, software, or component can be made fully secure;
2. We are using the Products and the Recommendations solely at our own risk;
3. We are not compensating CIS to assume any liabilities associated with our use of the Products or
the Recommendations, even risks that result from CIS’s negligence or failure to perform;
4. We have the sole responsibility to evaluate the risks and benefits of the Products and
Recommendations to us and to adapt the Products and the Recommendations to our particular
circumstances and requirements;
5. Neither CIS, nor any CIS Party (defined below) has any responsibility to make any corrections,
updates, upgrades, or bug fixes; or to notify us of the need for any such corrections, updates,
upgrades, or bug fixes; and
6. Neither CIS nor any CIS Party has or will have any liability to us whatsoever (whether based in
contract, tort, strict liability or otherwise) for any direct, indirect, incidental, consequential, or
special damages (including without limitation loss of profits, loss of sales, loss of or damage to
reputation, loss of customers, loss of software, data, information or emails, loss of privacy, loss of

CIS Mac OS X Leopard (10.5.x) Benchmark
Page 4 of 84
use of any computer or other equipment, business interruption, wasted management or other staff
resources or claims of any kind against us from third parties) arising out of or in any way
connected with our use of or our inability to use any of the Products or Recommendations (even if
CIS has been advised of the possibility of such damages), including without limitation any
liability associated with infringement of intellectual property, defects, bugs, errors, omissions,
viruses, worms, backdoors, Trojan horses or other harmful items.
Grant of Limited Rights.
CIS hereby grants each user the following rights, but only so long as the user complies with all of the
terms of these Agreed Terms of Use:
1. Except to the extent that we may have received additional authorization pursuant to a written
agreement with CIS, each user may download, install and use each of the Products on a single
computer;
2. Each user may print one or more copies of any Product or any component of a Product that is in a
.txt, .pdf, .doc, .mcw, or .rtf format, provided that all such copies are printed in full and are kept
intact, including without limitation the text of this Agreed Terms of Use in its entirety.
Retention of Intellectual Property Rights; Limitations on Distribution.
The Products are protected by copyright and other intellectual property laws and by international treaties.
We acknowledge and agree that we are not acquiring title to any intellectual property rights in the
Products and that full title and all ownership rights to the Products will remain the exclusive property of
CIS or CIS Parties. CIS reserves all rights not expressly granted to users in the preceding section entitled
―Grant of limited rights.‖
Subject to the paragraph entitled ―Special Rules‖ (which includes a waiver, granted to some classes of
CIS Members, of certain limitations in this paragraph), and except as we may have otherwise agreed in a
written agreement with CIS, we agree that we will not (i) decompile, disassemble, reverse engineer, or
otherwise attempt to derive the source code for any software Product that is not already in the form of
source code; (ii) distribute, redistribute, encumber, sell, rent, lease, lend, sublicense, or otherwise transfer
or exploit rights to any Product or any component of a Product; (iii) post any Product or any component
of a Product on any website, bulletin board, ftp server, newsgroup, or other similar mechanism or device,
without regard to whether such mechanism or device is internal or external, (iv) remove or alter
trademark, logo, copyright or other proprietary notices, legends, symbols or labels in any Product or any
component of a Product; (v) remove these Agreed Terms of Use from, or alter these Agreed Terms of
Use as they appear in, any Product or any component of a Product; (vi) use any Product or any
component of a Product with any derivative works based directly on a Product or any component of a
Product; (vii) use any Product or any component of a Product with other products or applications that are
directly and specifically dependent on such Product or any component for any part of their functionality,
or (viii) represent or claim a particular level of compliance with a CIS Benchmark, scoring tool or other
Product. We will not facilitate or otherwise aid other individuals or entities in any of the activities listed
in this paragraph.
We hereby agree to indemnify, defend, and hold CIS and all of its officers, directors, members,
contributors, employees, authors, developers, agents, affiliates, licensors, information and service
providers, software suppliers, hardware suppliers, and all other persons who aided CIS in the creation,
development, or maintenance of the Products or Recommendations (―CIS Parties‖) harmless from and
against any and all liability, losses, costs, and expenses (including attorneys' fees and court costs)
CIS Mac OS X Leopard (10.5.x) Benchmark
Page 5 of 84
incurred by CIS or any CIS Party in connection with any claim arising out of any violation by us of the
preceding paragraph, including without limitation CIS’s right, at our expense, to assume the exclusive
defense and control of any matter subject to this indemnification, and in such case, we agree to cooperate
with CIS in its defense of such claim. We further agree that all CIS Parties are third-party beneficiaries
of our undertakings in these Agreed Terms of Use.
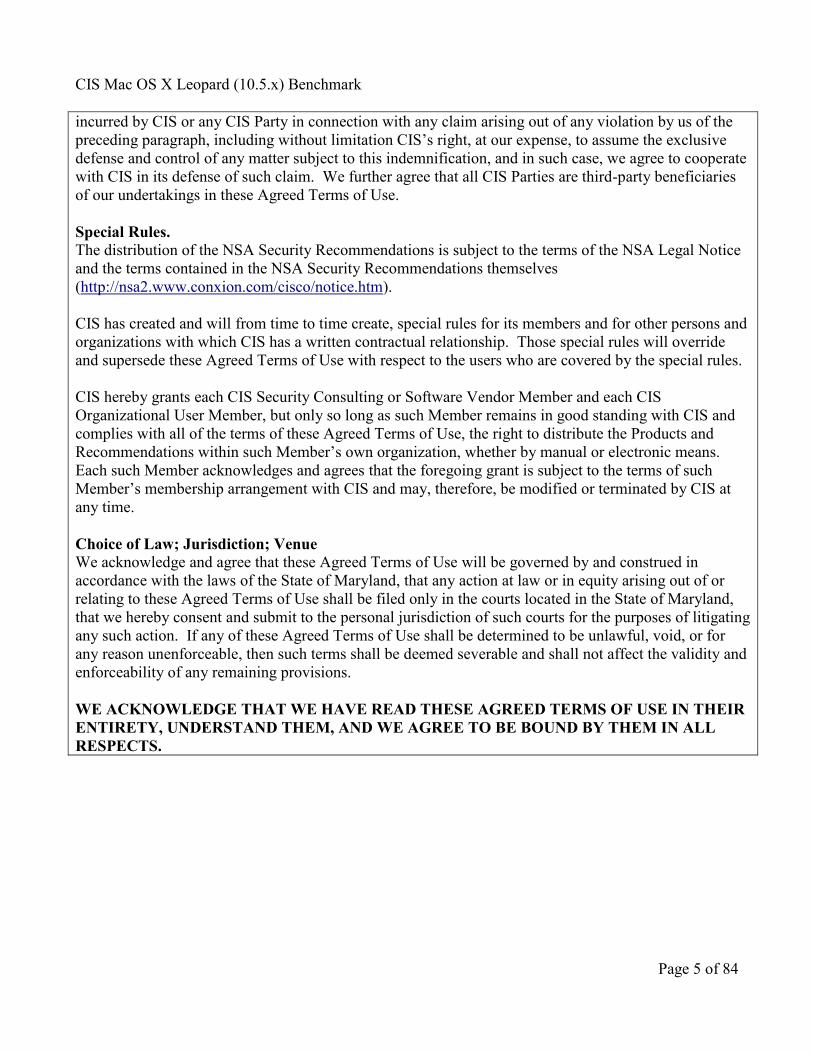
Special Rules. The distribution of the NSA Security Recommendations is subject to the terms of the NSA Legal Notice
and the terms contained in the NSA Security Recommendations themselves
(http://nsa2.www.conxion.com/cisco/notice.htm).
CIS has created and will from time to time create, special rules for its members and for other persons and
organizations with which CIS has a written contractual relationship. Those special rules will override
and supersede these Agreed Terms of Use with respect to the users who are covered by the special rules.
CIS hereby grants each CIS Security Consulting or Software Vendor Member and each CIS
Organizational User Member, but only so long as such Member remains in good standing with CIS and
complies with all of the terms of these Agreed Terms of Use, the right to distribute the Products and
Recommendations within such Member’s own organization, whether by manual or electronic means.
Each such Member acknowledges and agrees that the foregoing grant is subject to the terms of such
Member’s membership arrangement with CIS and may, therefore, be modified or terminated by CIS at
any time.
Choice of Law; Jurisdiction; Venue We acknowledge and agree that these Agreed Terms of Use will be governed by and construed in
accordance with the laws of the State of Maryland, that any action at law or in equity arising out of or
relating to these Agreed Terms of Use shall be filed only in the courts located in the State of Maryland,
that we hereby consent and submit to the personal jurisdiction of such courts for the purposes of litigating
any such action. If any of these Agreed Terms of Use shall be determined to be unlawful, void, or for
any reason unenforceable, then such terms shall be deemed severable and shall not affect the validity and
enforceability of any remaining provisions.
WE ACKNOWLEDGE THAT WE HAVE READ THESE AGREED TERMS OF USE IN THEIR
ENTIRETY, UNDERSTAND THEM, AND WE AGREE TO BE BOUND BY THEM IN ALL
RESPECTS.
CIS Mac OS X Leopard (10.5.x) Benchmark
Page 6 of 84
1) Introduction
Mac OS X 10.5 Leopard1 is a UNIX
2 operating system sold by Apple, Inc. that only runs on Apple
Macintosh hardware. Leopard comes with equipped with a number of applications and features. This
document provides prescriptive guidance for securing the Leopard operating system, along with its
applications and features, in accordance with best practice. However, several optional applications and
features offered by Leopard, including iCal, iChat, iTunes, Mail, the Oxford dictionaries, Safari, X11,
and printer drivers, will not be discussed.
It is assumed that the reader is versed in performing administrative configuration changes to the
Leopard operating system. Additionally, recommendations articulated within this document are
intended to align with the Tiger Apple/NSA Guidelines3 with respect to content and detail, where
applicable.
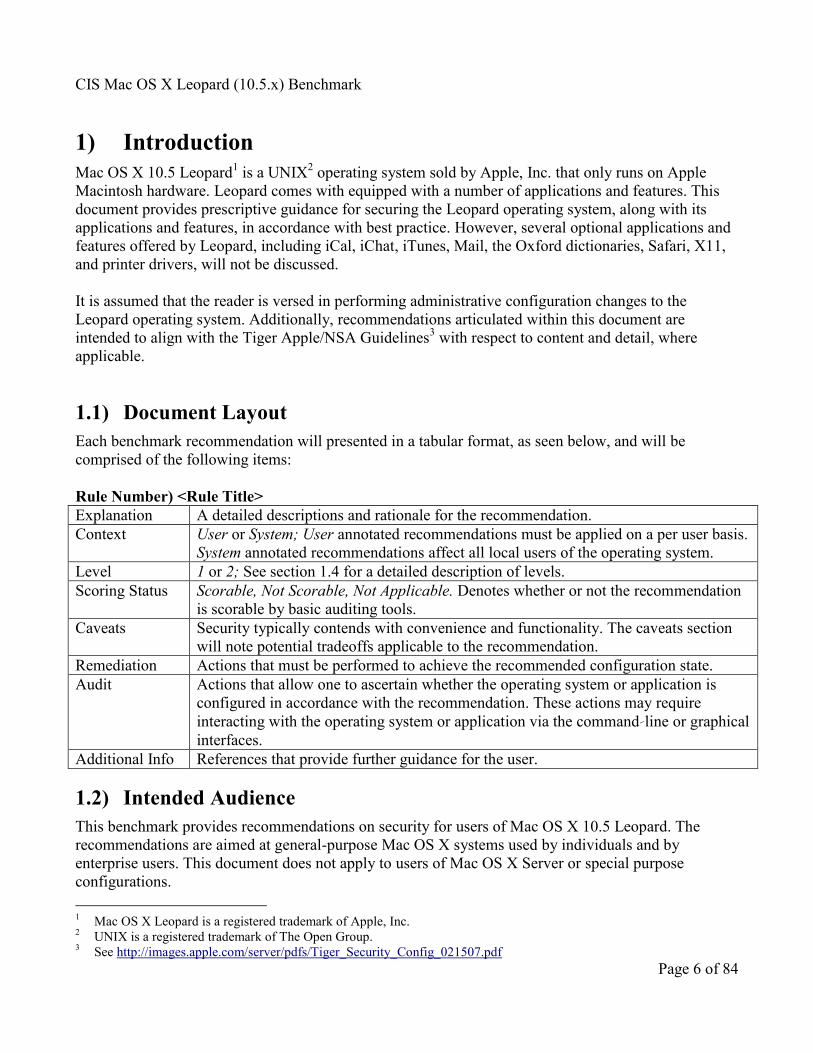
1.1) Document Layout
Each benchmark recommendation will presented in a tabular format, as seen below, and will be
comprised of the following items:
Rule Number) <Rule Title>
Explanation A detailed descriptions and rationale for the recommendation.
Context User or System; User annotated recommendations must be applied on a per user basis.
System annotated recommendations affect all local users of the operating system.
Level 1 or 2; See section 1.4 for a detailed description of levels.
Scoring Status Scorable, Not Scorable, Not Applicable. Denotes whether or not the recommendation
is scorable by basic auditing tools.
Caveats Security typically contends with convenience and functionality. The caveats section
will note potential tradeoffs applicable to the recommendation.
Remediation Actions that must be performed to achieve the recommended configuration state.
Audit Actions that allow one to ascertain whether the operating system or application is
configured in accordance with the recommendation. These actions may require
interacting with the operating system or application via the command‐line or graphical
interfaces.
Additional Info References that provide further guidance for the user.
1.2) Intended Audience
This benchmark provides recommendations on security for users of Mac OS X 10.5 Leopard. The
recommendations are aimed at general-purpose Mac OS X systems used by individuals and by
enterprise users. This document does not apply to users of Mac OS X Server or special purpose
configurations.
1 Mac OS X Leopard is a registered trademark of Apple, Inc.
2 UNIX is a registered trademark of The Open Group.
3 See http://images.apple.com/server/pdfs/Tiger_Security_Config_021507.pdf
CIS Mac OS X Leopard (10.5.x) Benchmark
Page 7 of 84
1.3) Practical Application
Security is always a balance between convenience, functionality and protection. Users and
organizations using this document to help secure their Macintosh computers should weigh each
recommendation’s merits against the user’s or organization’s needs. Some recommendations are
relatively innocuous, while others may more obviously reduce or restrict functionality. Where possible,
the benefits and caveats of each recommendation are explained to aide users and organizations in this
determination.
1.4) Security Levels Explained
Each recommendation is annotated with a Level. The following describes the significance of each level.
Level 1:
Can be understood and performed by system administrators with any level of security
knowledge and experience;
Are unlikely to cause an interruption of service to the operating system or the applications that
run on it; and
Can be automatically monitored either by CIS Scoring Tools or by CIS Certified tools available
from security software vendors.4
Level 2:
Prudent security beyond the minimum level.
May affect operating system function and are therefore of greatest value to system
administrators who have sufficient security knowledge to apply them with consideration to OS
functions and software applications running in their particular environments.
1.5) Precursor Technical Information
A majority of the recommendations herein can be performed from the GUI. However, some require
interaction at the command line. Where possible, the remediation section will provide steps for both
approaches. In many cases, managing property list files, or plists, may be required. Property lists may
be managed through the defaults command or similar mechanism such as the plistlib Python module,
the Parental Controls feature, or a directory service with the Apple MCX schema (such as Apple’s Mac
OS X Server). See ―man defaults‖ for more information on that command.
Many recommendations refer to the /etc, /var, or /tmp directories. Technically, these directories are
merely soft links to /private/etc, /private/var, and /private/tmp, respectively. These shorthand versions
are provided by Leopard to maintain conformance with other UNIX systems.
4 As of February 2008, no scoring tool is available for Mac OS X.

CIS Mac OS X Leopard (10.5.x) Benchmark
Page 8 of 84
1.6) Basic Security Principles:
1. Awareness is the best security tool.
2. Without good physical security there is NO security. No matter how well you configure a
system for security, a person with physical access to the hardware does have full access to your
data.
3. The security and integrity on a system are the System Owner’s primary responsibility.
4. Backups of user data are essential. Copies of disaster recovery backups and current data
backups should be stored off site.
5. An unmanaged or poorly-managed system is a threat to the entire network.
6. Use Privileged Accounts only when required.

CIS Mac OS X Leopard (10.5.x) Benchmark
Page 9 of 84
2) Benchmark Elements
2.1) Installation Action Items
Security starts when the operating system is installed. There are a number of items to consider when a
new system is set up for the first time, or when an existing system is repurposed.
2.1.1) Securely erase the Mac OS X partition before installation
Explanation One never knows what is on a hard drive when one receives a computer, even new
from Apple. Spyware or other malware may be present on a hard drive, so the safest
course of action is to erase (reformat) the drive. Using the erase capability of Disk
Utility (found on the Mac OS X Install DVD) will only erase the directory structure of
disk and leave its contents intact. To make sure everything on the disk is erased, the
Secure Erase feature of the Disk Utility must be used.
Context System
Level 2
Scoring Status Not Scorable
Caveats This process can take a long time.
Remediation Boot from the Mac OS X Install DVD.
Select a Language.
Select Disk Utility from the Utilities menu.
Select the disk to install Mac OS X on in the left panel.
Select the ―Erase‖ tab.
Click on the Security Option button.
Choose ―Zero out data,‖ and then the ―OK‖ button.
Click the ―Erase‖ button.
Audit None
Additional Info None
2.1.2) Do not connect to the Internet when setting up a Mac
Explanation The internet is where most of the bad stuff is located, so connecting to the internet can
expose the Mac to attacks and malware. When setting up a Mac it is a good idea not to
connect to the internet until the Mac is secure.
Context System
Level 2
Scoring Status Not Scorable
Caveats May require extra hardware
Remediation The primary reason to connect to the internet before a Mac is secure is to update the
operating system. There are three options to provide additional safety when updating
and securing a Mac before connecting it to the internet at large:
1. Install all the necessary updates from local media.
2. Connect the computer directly to a hardware firewall/router with no other
CIS Mac OS X Leopard (10.5.x) Benchmark
Page 10 of 84
computers connected to the firewall/router. Use Software Update to update the
computer.
3. Update from a trusted Mac OS X Server’s Software Update service on an
isolated internal network.
Audit None
Additional Info None
2.1.3) Install Mac OS X using Mac OS Extended Journaled disk format
Explanation This type of file system is the most compatible and supports all of the built-in security
features of Mac OS X.
Context System
Level 1
Scoring Status Not Scorable
Caveats None
Remediation None
Audit None
Additional Info None
2.1.4) Do not install any unnecessary packages
Explanation Unneeded software unnecessarily increases the attack surface of the system.
Context System
Level 1
Scoring Status Not Scorable
Caveats If the software is later needed, it will need to be installed and updated.
Remediation In the ―Easy Install on partition_name‖ step, click ―Customize.‖ Deselect any
packages, languages, or print drivers that you do not plan on using. Do not install X11
unless the user has a need for it.
Audit None
Additional Info Use of disk imaging technology, such as Apple System Image Utility (included with
Mac OS X Server) or other third party image utilities, is recommended wherever a
standard image can be used. Deployment of standard images is beyond the scope of
this document, but a list of some imaging technologies is listed in Appendix A.
2.1.5) Do not transfer confidential information in Setup Assistant
Explanation The Setup Assistant will prompt the user for name, address, phone number, e-mail
address, and other information. If you don’t want personal information transferred to
Apple, skip this step.
Context System
Level 1
Scoring Status Not Scorable
Caveats None
Remediation In the Registration Information screen, press Command-Q to quit. Click the ―Skip‖
button to bypass the registration process.
CIS Mac OS X Leopard (10.5.x) Benchmark
Page 11 of 84
Audit None
Additional Info None
2.1.6) Create administrator accounts with difficult-to-guess names
Explanation Simple names like ―Administrator‖ or ―Admin‖ are easy to guess, and provide an
attacker some information needed to break into a system. Use a difficult-to-guess
name for accounts with administration privileges to the Mac
Context System
Level 1
Scoring Status Not Scorable
Caveats None
Remediation When creating the first account in the Setup Assistant, use a difficult-to-guess name.
Audit None
Additional Info This applies to both the long name and short name, either of which may be used to log
in to the computer through various login mechanisms. The short name is likely to have
the widest exposure.
2.1.7) Create complex passwords for administrator accounts
Explanation Passwords are the primary protection against unauthorized access. Accounts with
administrative privileges are the most important to protect. Therefore, using a
complex password for these accounts is very important.
Context User
Level 1
Caveats A complex password may be difficult to remember, so some users will write them
down. If the password is written down, it should be kept is a safe place, preferably
sealed in an envelope and locked up.
Remediation Apple provides a Password Assistant in the dialogs used to set password. When
setting a password, click on the key icon to the right of the New Password field to
display the assistant. Make sure the password for the administrator account shows a
quality of green. Make sure the quality meter is about halfway across or more.
Alternatively, use a password is at least 10 characters, and three of the following four
items. Make sure the password does not contain a name or word found in the
dictionary.
Uppercase letter
Lowercase letter
Punctuation characters
Numbers
Audit None
Additional Info If you are color blind you may not be able to determine the quality of the password
from the password assistant. However, numeric password quality information may be
retrieved by hovering the cursor over the quality meter.

CIS Mac OS X Leopard (10.5.x) Benchmark
Page 12 of 84
The ―pwpolicy‖ tool can be used to enforce password policies in Mac OS X directory
services, but the policies do not apply to administrator-level users.
2.1.8) Do not enter a password-related hint
Explanation A password hint will help you remember your password, but may also help an attacker
to guess your password.
Context User
Level 1
Scoring Status Not Scorable
Caveats The absence of a password hint may make remembering a password more difficult.
Additionally, if using FileVault, not setting a hint may not allow a user to use a
Master Password to reset a user account password.
Remediation In the System Preferences: Accounts: Change Password dialog, enter the appropriate
hint.
Audit None
Additional Info Organizations might consider entering an organizational help desk phone number or
other text (such as a warning to the user). A help desk number is only appropriate for
organizations with trained help desk personnel.
2.1.9) Update system software using verified packages
Explanation When manually downloading update packages from Apple (or other locations),
always verify that what you downloaded is what you think it is. On the Apple
download page there should be an SHA-1 Digest for the download. This long series of
numbers and letters that is the result of a computer algorithm that is unique to the
package download.
Also, when looking at Apple’s Web page to read the SHA-1 Digest, make sure you
are using the https:// Web page. If not, just add an ―s‖ to the http in the URL location
bar.
Context System
Level 2
Scoring Status Not Scorable
Caveats Verifying the SHA-1 digest requires the use of Terminal.
Remediation See http://docs.info.apple.com/article.html?artnum=75510
Audit None
Additional Info Apple has a good explanation of how to use the SHA-1 Digest at
http://docs.info.apple.com/article.html?artnum=75510
2.2) Hardware and Core Mac OS X Action Items
The easiest way to break into a Mac is with physical access to the computer. Restricting physical access
is a very important step when protecting a computer.

CIS Mac OS X Leopard (10.5.x) Benchmark
Page 13 of 84
2.2.1) Use an Open Firmware or EFI password
Explanation Open Firmware (PowerPC) and EFI (Intel) are the Mac equivalent of the BIOS on a
PC. The Basic Input/Output System (BIOS) is a small piece of computer code
embedded in the computer that lets the computer boot up. There are a few options that
can be set in Open Firmware or EFI, and should only be set by experience
administrators.
One of the most commonly used options is a password. The firmware password will
not prevent the computer from booting, but is required when booting from different
media, such as an external drive, a CD or DVD disc, or a NetBoot volume, which can
protect a computer from someone booting and quickly changing an account password
with an install disk.
Context System
Level 2
Scoring Status Scorable
Caveats Resetting the firmware password is not overly difficult, but does require physical
access and changes to the hardware. Also, the encryption used for firmware passwords
is not strong; it is not overly difficult to retrieve the password, so using a common
password is not recommended.
Remediation Use the Firmware Password Utility to set a firmware password.
Audit Open the Firmware Password Utility and verify the ―Require password to change
firmware settings‖ checkbox is checked.
Run the following command:
sudo nvram -p | grep security-mode
look for ―security-mode command‖
Additional Info When a firmware password is present, it must also be entered to:
boot into single user mode, which provides root access by default
boot into verbose mode
start up in Target Disk Mode to access the internal hard disk (and on some
models, the optical drive) from another computer.
A firmware password may disable FireWire DMA access, but this appears to be
undocumented.
http://docs.info.apple.com/article.html?artnum=106482
2.2.2) Create an access warning for the login window
Explanation Some organizations require an access warning or login banner to be displayed before a
user logs in.
Context System
CIS Mac OS X Leopard (10.5.x) Benchmark
Page 14 of 84
Level 2
Scoring Status Scorable
Caveats Requires use of Terminal to set the banner text.
Remediation To add text with elevated privileges:
sudo defaults write /Library/Preferences/com.apple.loginwindow \
LoginwindowText "your text here"
Use ―\n‖ for a return.
To remove the text with elevated privileges:
sudo defaults delete /Library/Preferences/com.apple.loginwindow LoginwindowText
Audit Run the following command to see the login window text:
defaults read /Library/Preferences/com.apple.loginwindow.plist LoginwindowText
Additional Info None
2.2.3) Create an access warning for the command line
Explanation There are two common ways to login to a Mac using the command line, bypassing the
GUI login window: FTP and SSH. Some organizations require an access warning or
login banner to be displayed before a user logs in.
Context System
Level 2
Scoring Status Scorable
Caveats The banner will be displayed before the user logs in. This may interfere with scripted
logins.
Remediation Create a text file with the login text. This is commonly done in /etc/motd for ssh and
/etc/ftpwelcome for ftp.
For ssh, edit /etc/sshd_config (using sudo) and add the line:
Banner /etc/banner
Where /etc/banner is the path to your login banner text file.
Audit Run the following commands to determine if the banner text is set:
cat /etc/sshd_config | grep Banner
If there is a valid entry for Banner, cat the path show and view the results.
Additional Info see man sshd_config
2.2.4) Disable Bluetooth
Explanation Bluetooth is a very useful technology, but it also can expose a Mac to certain risks.
Bluetooth can be disabled via software or hardware. Temporary disablement via
CIS Mac OS X Leopard (10.5.x) Benchmark
Page 15 of 84
System Preferences will be discussed in Section 2.4.10.4.
To completely secure Bluetooth, the Bluetooth hardware should be removed from the
Mac. Alternatively, and somewhat less secure,
remove the Bluetooth extensions (drivers) from the operating system
disable the Bluetooth process using launchd
use MCX settings to disable Bluetooth
Context System
Level 2
Scoring Status Scorable
Caveats Removing the Bluetooth hardware may void the Mac’s warranty and should only be
done by an authorized Apple technician. Software disablement will not completely
secure the Bluetooth as the software can be reinstalled.
Remediation 1) Have an authorized Apple technician remove the Bluetooth hardware from the
Mac.
2) Remove the following files from /System/Library/Extensions and reboot the Mac:
IOBluetoothFamily.kext
IOBluetoothHIDDriver.kext
3) sudo launctl unload -w /System/Library/LaunchDaemons/com.apple.blued.plist
4) Use a Mac OS X Server or Apple’s free WorkGroup Manager (part of the Server
Administration Tools) to disable Bluetooth.
Audit Run the following command to determine if Bluetooth is present. Note: This
command cannot distinguish between software or hardware disabled Bluetooth.
system_profiler SPBluetoothDataType
Additional Info None
2.2.5) Disable the iSight camera
Explanation The iSight camera built-in to many Macs can allow a remote attacker to watch and
view potentially sensitive information. External iSight cameras (and other brands too)
should be disconnected when not in use. Internal iSight cameras should be
disconnected if required by the organization.
Context System
Level 2
Scoring Status Scorable
Caveats Disabling the internal iSight camera may void the Mac’s warranty and should only be
done by an authorized Apple technician.
Remediation Have an authorized Apple technician disconnect the internal iSight camera.
Alternatively, but less secure, place opaque tape or label over the camera lens.
Audit Run the following command to determine if an iSight is present.

CIS Mac OS X Leopard (10.5.x) Benchmark
Page 16 of 84
system_profiler SPUSBDataType | grep iSight
Additional Info None
2.2.6) Reduce the sudo timeout period
Explanation The sudo command is used by a user to elevate privileges. By default, privileges will
remain escalated for 5 minutes after the sudo command is completed. During this
time, the sudo command can be executed again without authentication. This window
of opportunity should be eliminated.
Context System
Level 2
Scoring Status Scorable
Caveats None
Remediation Execute the following command in Terminal. This command required knowledge of
the ―vi‖ editor.
sudo visudo
In the ―# Defaults specification‖ section, add the line:
Defaults timestamp_timeout=0
Audit Run the following command:
sudo cat /etc/sudoers | grep timestamp
and make sure the result is:
Defaults timestamp_timeout=0
Additional Info None
2.2.7) Remove unneeded QuickTime components
Explanation QuickTime provides a modular architecture that allows for components to increase the
number of media types QuickTime understands. These add-in components can be
used in whatever context QuickTime runs.
While these components can be used in local applications, the QuickTime plug-in
allows browsers (including any that are based on WebKit) to play embedded content
in the Web pages. If a particular QuickTime component, such as a codec, is not
needed then consider removing it. This reduces the kind and number of media that
could be used as vectors for attack in a web environment.
Context System and User
Level 2
Scoring Status Not Scorable
Caveats A component may be required at a later date to play content. The component may be
reinstalled through various software updates or software installs. Removal of a

CIS Mac OS X Leopard (10.5.x) Benchmark
Page 17 of 84
component that is a default part of the QuickTime installation may require the
reinstallation of QuickTime or the entire operating system, particularly if that software
was installed within the system domain (or ―/System‖).
This also prevents the playback of media types supported by a QuickTime component
opened locally in applications.
Remediation QuickTime components are stored in ―/Library/QuickTime‖ and
―~/Library/QuickTime.‖ Other components are stored in the system domain at
―/System/Library/QuickTime,‖ where removal is not recommended.
Additional Internet plug-ins for browsers, which may or may not have a relationship
with QuickTime, may be found in the local domain at ―/Library/Internet Plug-ins‖ as
well as in the user domain at ―~/Library/Internet Plug-ins.‖ Any unneeded Internet
plug-ins may be removed.
Audit None
Additional Info Opening media types in local applications could be an attack vector for documents
attached to e-mail or stored/transferred in other ways. Viewing the same media in a
Web browser may be considered riskier since the data could be coming from an
untrusted source and will likely be interpreted immediately by the browser.
Some optional QuickTime components, such as additional codecs, can be obtained
through the QuickTime System Preferences pane. It links to this Web page:
http://www.apple.com/quicktime/resources/components.html
2.2.8) Disable Core Dumps
Explanation When an application encounters a runtime error the operating system has the
opportunity to dump the application’s state, including memory contents, to disk. This
operation is called a core dump. It is possible for a core dump to contain sensitive
information, including passwords. Therefore it is recommended that core dumps be
disabled in high security scenarios.
Context System and User
Level 2
Scoring Status Scorable
Caveats None
Remediation Run the following command:
launchctl limit core 0
Audit Run the following command:
launchctl limit core
Additional Info For more information, execute ―man core‖
CIS Mac OS X Leopard (10.5.x) Benchmark
Page 18 of 84
2.3) Account Configuration Action Items
Account management is critical to computer security. Accounts, which are also known as identities in
Mac OS X Leopard, are comprised of account information and, for some account types, a home
directory for storage of settings and files.
The account information in Leopard is stored in the new DSLocal store, which replaces the legacy
NetInfo service used in previous versions of Mac OS X. The DSLocal store is a filesystem hierarchy of
individual property list (plist) files, rather than a database (as in NetInfo) or a set of flat files (as might
be seen in other Unix systems).
Mac OS X provides for a number of different types of accounts, each with different levels of default
privileges. Each account type needs to be secured.
An administrator account has full privileges, largely because of its membership in the local
―admin‖ group. Members of this group are granted access to portions of the file system outside
of its own home folder, especially in the system domain (such as ―/Library‖). By default,
members of ―admin‖ also have sudo rights. An administrator account is sometimes referred to
as a privileged account.
A standard account has a medium level of privileges, generally providing access only to only its
own settings, folders, and files.
A managed account is equivalent to a standard account with the addition of Parental Controls or
Managed Client (MCX) settings applied to it. While a managed account can log in and store
data or settings in its home directory, further restrictions can be enforced on it. These
restrictions are defined in Accounts System Preferences for Parental Controls.
A sharing only account is roughly equivalent to a standard account. Its shell is set to
―/usr/bin/false‖ and it does not have login access. It has no home directory (which is set to
―/dev/null‖). It can have access to some other portions of the file system, such as temporary
space, as a member of the ―staff‖ group. A sharing only account is meant solely for access to
the local system’s sharing services, as seen in the Sharing System Preferences, as well as any
other sharing features enabled by applications that use the Identity Services system.
The guest account has the least privileges (and is new in Leopard). It is meant for temporary
access to the system. The guest account is similar to a standard account whose settings are
purged between logins. It requires no password.
More information on the different types of accounts is available in Apple’s Identity Services
documentation at:
http://developer.apple.com/documentation/Networking/Conceptual/IdentityServices_ProgGuide/archite
cture/chapter_2_section_4.html#/apple_ref/doc/uid/TP40004490-CH3-DontLinkElementID_8
Each user should have an account to ensure that their settings and documents are kept separate. This
can provide compartmentalization, so that compromise of one does not necessarily lead to another.
Even with kids on the family computer, each user should have their own account, which can make it
easier to apply individual controls (such as enforced time limits or applications that can be launched) to
them.
CIS Mac OS X Leopard (10.5.x) Benchmark
Page 19 of 84
Each user should try to run with the least privileges necessary for whatever they are doing on the
computer. This also provides compartmentalization, since users with lower privileges have less access
system-wide to settings and the file system.
Never have shared accounts, and take special note of how the guest account is similar to one.
Managed accounts are subject to Parental Controls or MCX settings, which both use the same
underlying account control mechanisms in the operating system. The settings can be applied locally or
remotely. Parental Controls can be shared between Leopard-based computers (see the Parental Controls
System Preferences pane). MCX settings can be applied from a directory service with Apple’s schema
additions.
It is important for some environments to note that Leopard enables a local Kerberos Key Distribution
Center (KDC) for the accounts specific to each computer. This is used with the new Identity Services
system in Leopard to support sharing. For more on Identity Services, identities, and their Access
Control Lists (ACLs) see:
http://developer.apple.com/documentation/Networking/Conceptual/IdentityServices_ProgGuide/Introd
uction/chapter_1_section_1.html
2.3.1) Create an administrator account and a standard account for each administrator
Explanation An administrator account should rarely be used. In most cases when administrative
privileges are needed, the Mac will prompt the user for a user name and password.
There are some operations where logging in as an administrator is necessary, but these
are rare.
The reason to not regularly use an administrator account for daily operations is
security. Many operations that affect security can be accomplished without a
password when an administrator is logged in. When logged in as a standard user, very
few, if any, of the operations that affect the entire computer are possible without
authentication to obtain elevated privileges.
Context User
Level 1
Scoring Status Not Scorable
Caveats Administrators have unrestricted write/delete access to various directories, including
―/Applications‖ and ―/Library.‖ Administrators, by default, can escalate themselves to
have access to any directory on the computer. Care should be given when granting a
user administrative access.
Remediation Do not log in with an administrator account unless necessary.
Audit Open System Preferences: Accounts and verify there is a regular user account for each
administrator.
Additional Info If administrator rights need to be controlled, consider granting specific ―sudo‖ rights
to individual users as needed.
CIS Mac OS X Leopard (10.5.x) Benchmark
Page 20 of 84
In larger environments, you may wish to grant administrator rights only to directory
service-based groups.
2.3.2) Create a standard or managed account for each non-administrator
Explanation A non-administrator should not need administrator privileges on the Mac, so create a
standard (or managed, if using Mac OS X Server or Parental Controls) account for
these users.
Context User
Level 1
Scoring Status Not Scorable
Caveats Standard users have reduced rights which may affect their ability to alter things on the
computer. Standard users cannot install software in the /Applications folder and
cannot change various System Preferences, including creation and modification of
network settings or the computer’s time zone. Standard users can still make some
changes, such as switching between administrator-defined network locations.
Remediation Do not give the ―Allow user to administer this computer‖ right to standard users in
System Preferences: Accounts.
Audit None
Additional Info If you need to grant specific rights to non-administrator users, such as the ability to
change time zones, consult the Apple support knowledgebase. Some of these rights
can be changed in the authorization rights database, ―/etc/authorization,‖ and Apple
does provide articles for common ones.
2.3.3) Set appropriate parental controls for managed accounts
Explanation Many aspects and features of the Mac can be restricted on a user-by-user basis,
including computer usage time limits. Although this feature is called Parental
Controls, these restrictions may be appropriate for corporate, government, or
educational use.
Context User
Level 1
Scoring Status Not Scorable
Caveats None
Remediation In the System Preferences: Accounts or in WorkGroup manager, activate Parental
Controls and set the appropriate controls for each standard user.
Audit None
Additional Info Parental Controls typically apply locally, although in Leopard they can be shared
between computers. For wider deployments, consider the use of the Apple MCX
schema in your directory service; it is available in Mac OS X Server by default.
2.3.4) Restrict sudo users to being able to access only required commands
Explanation The sudo command allows a user to execute a command in Terminal as another user,

CIS Mac OS X Leopard (10.5.x) Benchmark
Page 21 of 84
typically the ―root‖ user. By default, standard users cannot use the sudo command and
administrator users can use all commands via sudo. Specific commands can be
restricted to specific users or groups as needed.
Context System and User
Level 2
Scoring Status Scorable
Caveats Restriction of the sudo command can be complicated and should only be implemented
by an experienced system administrator.
Remediation Always use the visudo command to edit the ―/etc/sudoers‖ file. Read the ―man sudo‖
page for more information.
Audit Run the following command and verify the correct groups and user and the correct
authorities.
sudo cat /etc/sudoers
Additional Info man visudo
man sudo
man sudoers
2.3.5) Securely configure LDAPv3 access
Explanation When configuring LDAPv3, you should not add DHCP-supplied LDAP servers to
automatic search policies. Whenever possible, use authenticated and encrypted LDAP
connections.
Context System
Level 2
Scoring Status Not Scorable
Caveats When using authenticated and/or encrypted connections, the LDAP server must
support these options.
Remediation Proper and secure configuration of LDAP is beyond the scope of this document. Make
sure to have an experienced LDAP administrator configure and secure the connection.
Audit None
Additional Info None
2.3.6) Securely configure Active Directory access
Explanation When configuring Active Directory on the Mac client, verify that all the settings are
correct. Specifically, make sure that the:
UID and GID mapping (if used) are appropriate
The list of groups that can administer the Mac (if used) is configured as
intended.
Context System
Level 2
Scoring Status Not Scorable
Caveats None
Remediation Proper and secure configuration of AD is beyond the scope of this document. Make
sure to have an experienced AD administrator configure and secure the connection.

CIS Mac OS X Leopard (10.5.x) Benchmark
Page 22 of 84
Audit None
Additional Info None
2.3.7) Use Password Assistant to help generate complex passwords
Explanation Passwords are the primary protection against unwanted access.
Context User
Level 1
Scoring Status Not Scorable
Caveats A complex password may be difficult to remember, so some users will write them
down. If the password is written down, it should be kept is a safe place, preferably
sealed in an envelope and locked up.
Remediation Apple provides a Password Assistant in the dialogs used to set password. When
setting a password, click on the key icon to the right of the New Password field to
display the assistant. Make sure the password for the administrator account shows a
quality of green. If you are color blind you may not be able to determine the quality of
the password from the Password Assistant. Make sure the quality meter is about
halfway across or more, or hover over the meter to see its calculated entropy value in
a tooltip. For the entropy value, higher is better.
Audit None
Additional Info None
2.3.8) Set a strong password policy
Explanation Mac OS X Server allows the use of centrally managed password policies. If possible,
use this feature to set a strong policy for passwords.
Context System
Level 2
Scoring Status Not Scorable
Caveats Mac OS X Server and a managed Mac environment are required for centralized
management.
Remediation Determining a strong policy and making the appropriate settings in Mac OS X Server
is beyond the scope of this document.
Audit None
Additional Info Apple provides the pwpolicy command which can set some policies locally, without a
Mac OS X Server. See ―man pwpolicy― for more information. Note that many of the
options are not available without Mac OS X Server (and are not documented as such).
Also note that use of the pwpolicy command is not enforced for administrators or for
users when using the CLI passwd command.
2.3.9) Secure the login keychain
Explanation The keychain is a secure database store for passwords and certificates. A keychain is
created for each user account on Mac OS X, and the system software itself uses
keychains for secure storage. As of this writing, items secured in a keychain are
encrypted with 3DES, while the directory or metadata information is available in clear

CIS Mac OS X Leopard (10.5.x) Benchmark
Page 23 of 84
text.
For example, when Safari asks if you want to save a password and you answer yes,
the password is stored in the default keychain. This is true for passwords in many
other applications, but not for Firefox, which currently has its own password storage.
By default, the login keychain for an account, especially a local account, has the same
password as the account’s logon password. If the logon password is compromised, the
login keychain would also be compromised. It is possible to change the password on
the login keychain to something different than the logon password, and doing so
would keep that keychain locked until it is needed after login.
Context User
Level 2
Scoring Status Not Scorable
Caveats Having two different passwords can be an inconvenience. Logging in to an account
would no longer unlock the login keychain by default.
Remediation Open /Applications/Utilities/Keychain Access
Select login in the left panel
Select Edit:Change Password for Keychain and change the password
Audit None
Additional Info None
2.3.10) Secure individual keychain items
Explanation Each keychain entry can have different access controls. It’s possible to set the
keychain item to require a keychain password every time an item is accessed, even if
the keychain is unlocked. This level of security could be useful for bank passwords or
other passwords that need extra security.
Context User
Level 2
Scoring Status Not Scorable
Caveats Having to enter the keychain password for each access could be inconvenient.
Remediation In Keychain Access search for the entry to protect
Open the Entry and click on the Access Control tab
Make sure the Ask for Keychain password checkbox is checked
Audit None
Additional Info None
2.3.11) Create specialized keychains for different purposes
Explanation A user can have more than one keychain. If the user can logically split password and
other entries into different keychains with different passwords, a compromise of one
password will have limited effect.
Context User
Level 2
Scoring Status Not Scorable

CIS Mac OS X Leopard (10.5.x) Benchmark
Page 24 of 84
Caveats Using multiple keychains can be inconvenient. It is also not necessarily possible for
all kinds of data, such as Safari auto-fill information, to be stored in secondary
keychains. Not all keychain-aware applications may provide an interface to choose
secondary keychains.
Remediation Use Keychain Access to create multiple keychains. Store entries in the appropriate
keychain when possible.
Audit None
Additional Info One useful separation of keychains might be in a business environment. Personal
information might be stored in one keychain and business information in a different
keychain.
2.3.12) Use a portable drive to store keychains
Explanation Keychains are just files on the computer, and thus do not need to be stored on the
computer. Storing a keychain file on a portable drive (such as a USB flash drive)
could help protect the data in the event the computer were stolen or compromised.
Context User
Level 2
Scoring Status Not Scorable
Caveats Using keychains stored on portable drives can be inconvenient. The portable drive
needs to be protected and backed up. The potential for the portable drive being lost or
stolen must be weighed against the security benefit.
Remediation Copy the files from ~/Library/Keychains/ to a portable drive then securely delete the
files on the computer.
Audit None
Additional Info None
2.3.13) Do not enable the “root” account
Explanation The ―root‖ account is a superuser account that has access privileges to perform any
actions and read/write to any file on the computer. In the UNIX/Linux world, the
system administrator commonly uses the root account to perform administrative
functions. On a Mac, root should not be enabled. In any circumstance an
administrator can escalate privileges using the ―sudo‖ command (use -s or -i to get a
root shell).
By default the root account is not enabled on a Mac OS X client computer. It is
enabled on Mac OS X Server.
Context System
Level 1
Scoring Status Scorable
Caveats UNIX/Linux system administrators need to learn to use ―sudo -s‖ instead of ―su -‖.
Also, sudo on the Mac is not Kerberized, but can be with a free third party PAM
module.
Remediation Nothing specific; just don’t enable root using the Directory Access program (in
―/Applications/Utilities/‖), with the CLI passwd command via sudo, or with the Reset

CIS Mac OS X Leopard (10.5.x) Benchmark
Page 25 of 84
Password utility on the installer DVD.
Audit Open /Applications/Utilities/Directory Utility program and verify root is disabled.
Alternatively, run the following command:
dscl . -read /Users/root AuthenticationAuthority
The result should be:
No such key: AuthenticationAuthority
Additional Info The root password, like those of other local user accounts, can still be reset when
using the Password Reset Utility on the Mac OS X Install DVD.
The AuthenticationAuthority attribute could also contain ―;DisabledUser;‖ which
would prevent logins by the account.
2.4) Securing System Software Action Items
Every system preference with security-related configuration settings has its own action item checklist.
2.4.1) .Mac Preferences Action Items
―With .Mac and iLife ’08, you can share high-quality photos and movies with friends and family
directly from iPhoto and iMovie. There’s no easier or more stunning way to show off your pictures and
video online.‖ -- http://www.apple.com/dotmac/
.Mac is a service offered by Apple, Inc. that allows seamless integration between many Mac
applications and the .Mac service. The service can be very useful but there are limited security risks
associated with use of the service. In some configurations, the Mac can automatically synchronize data
between the .Mac service and the Mac, possibly allowing sensitive data to be stored on Apple’s .Mac
servers.
2.4.1.1) Do not enable .Mac for administrative accounts
Explanation Since an administrative account has special privileges on the Mac, and since the
administrative account should be used rarely, there is no reason to enable .Mac for
administrative accounts. If the .Mac service is used, it should be use with a standard
user account.
Context User
Level 1
Scoring Status Not Scorable
Caveats None
Remediation Do not enter a user name and password and connect to .Mac for administrative
accounts.
Audit Open System Preferences: .Mac for each admin user and make sure the user name and
password field are blank.
CIS Mac OS X Leopard (10.5.x) Benchmark
Page 26 of 84
Alternatively, run the following command for each administrative user account:
defaults read ~/Library/Preferences/.GlobalPreferences iToolsMember
And make sure the results are blank.
Additional Info None
2.4.1.2) Disable all Sync options
Explanation The ability to sync files, preferences, keychains, bookmarks, and more with .Mac is
very compelling, but poses a potential vulnerability to information. While the data
itself is encrypted between the Mac and .Mac and is protected when stored on Apple’s
servers, data leaks and compromised corporate servers have been known to happen. If
you have sensitive data of concern, do not use the sync options of the .Mac service.
Context User
Level 2
Scoring Status Scorable
Caveats Greatly diminishes the utility of .Mac.
Remediation In System Preferences: .Mac, Sync tab, turnoff all the options.
Audit Verify the all sync options are off for each account in System Preferences: .Mac
Alternatively, run the following command for each user account:
defaults read com.apple.DotMacSync ShouldSyncWithServer
And make sure the result is 0.
Additional Info None
2.4.1.3) Disable iDisk Syncing
Explanation The iDisk is a storage space given to .Mac subscribers. It’s accessed like a network
hard drive; files and folders can be copied to and from the iDisk. The .Mac System
Preference pane offers an option to keep a local copy of the iDisk and sync it with
.Mac either manually or periodically. If you have sensitive data of concern, do not use
the iDisk sync option of the .Mac software.
Context User
Level 2
Scoring Status Scorable
Caveats Diminishes the utility of .Mac.
Remediation In System Preferences: .Mac, iDisk tab, turnoff all iDisk Sync option.
Audit Open System Preferences: .Mac for each user and verify .Mac iDisk syncing is off.
Alternatively, run the following command for each user account (logged in as the
user):
defaults read com.apple.idisk {userName}_MirrorEnabled

CIS Mac OS X Leopard (10.5.x) Benchmark
Page 27 of 84
where {userName} is the user’s .Mac username.
Make sure the result is 0.
Additional Info None
2.4.1.4) Enable Public Folder password protection
Explanation The .Mac service offers a Public Folder option so that subscribers can upload files and
make them available to the public. The service also offers an option to password
protect this folder. If anything even remotely sensitive is put into this public folder,
the password option should be used.
Context User
Level 1
Scoring Status Not Scorable
Caveats The password needs to be securely distributed to anyone who needs it.
Remediation In System Preferences: .Mac, iDisk tab, make sure the ―Password-protect your public
folder‖ checkbox is checked.
Audit None
Additional Info None
2.4.1.5) Do not register computers for synchronization
Explanation In order to use the sync options in .Mac, each computer that will sync needs to be
registered with .Mac. By monitoring which computers are registered, the user has
more control over which computers are syncing. If no computers need to sync, no
computers need to be registered.
Context User
Level 2
Scoring Status Not Scorable
Caveats None
Remediation In System Preferences: .Mac, Sync tab, press the Advanced button.
Make sure there are no computers listed, or that the computers that are listed are the
correct computers.
Audit None
Additional Info None
2.4.1.6) Sign out of .Mac if signed in
Explanation The user can sign out of .Mac when .Mac is not being used. This is the safest use of
.Mac.
Context User
Level 1
Scoring Status Not Scorable
Caveats Automatic syncing will not work. May be inconvenient.
Remediation In System Preferences: .Mac, press the Sign Out... button if signed in.
Audit None

CIS Mac OS X Leopard (10.5.x) Benchmark
Page 28 of 84
Additional Info None
2.4.1.7) Disable the .Mac preference pane from System Preferences
Explanation If the .Mac preference pane is disabled, the user cannot easily enter the information
needed to connect and sync to .Mac.
Context System
Level 2
Scoring Status Not Scorable
Caveats If the preference pane is removed, it might be reinstalled after a system update.
Remediation Use a Mac OS X Server or Apple’s free Workgroup Manager (part of the Server
Administration Tools) to disable the .Mac system preference.
Alternatively, move or remove the directory:
/System/Library/PreferencePanes/Mac.prefPane
Audit None
Additional Info None
2.4.2) Accounts Preferences Action Items
Proper account management is critical to computer security. Many options and settings in the Account
System Preference Pane can be used to increase the security of the Mac.
2.4.2.1) Change initial password for the system administrator account
Explanation If you did not set the initial password to the Mac, the password should be changed for
all accounts, including the administrator account, as soon as possible. If the initial
admin account is not needed, the account should be deleted.
Context User
Level 1
Scoring Status Not Scorable
Caveats None
Remediation In System Preferences: Accounts, select the user, then change the password or delete
the account if not needed.
Audit None
Additional Info At least one admin account is required, although it does not necessarily need to be
enabled or have a known password at any given time. The admin account could be
disabled to prevent logins. Or, its password could be set to a strong, highly
complicated password that is forgotten and not used. In such cases, you would need to
re-enable the account or change its password before use.
It should also be noted that an attacker who has the ability to remove the
―/var/db/.AppleSetupDone‖ file can restart the computer and create a new
administrator account from the Mac OS X Setup Assistant. The .AppleSetupDone file
determines whether the system runs the Setup Assistant or not.

CIS Mac OS X Leopard (10.5.x) Benchmark
Page 29 of 84
2.4.2.2) Disable automatic login
Explanation Having a computer automatically log in bypasses a major security feature (the login)
and can allow a casual user access to sensitive data in that user’s home directory and
keychain.
Context System
Level 1
Scoring Status Scorable
Caveats None
Remediation In System Preferences: Accounts, Login Options, disable Automatic Login.
Note: Automatic login can also be disabled in System Preferences: Security.
Alternatively, run the following command
sudo defaults write /Library/Preferences/.GlobalPreferences \
com.apple.userspref.DisableAutoLogin -bool yes
Audit Open System Preferences: Accounts, Login Options, and verify Automatic Login is
disabled.
Alternatively, run the following command:
defaults read /Library/Preferences/.GlobalPreferences \
com.apple.userspref.DisableAutoLogin
Make sure the value returned is 1.
Additional Info None
2.4.2.3) Display login window as name and password
Explanation Displaying the names of the accounts on the computer may make breaking in easier.
Force the user to enter a login name and password to log in.
Context System
Level 1
Scoring Status Scorable
Caveats Users will need to remember their login name.
Remediation In System Preferences: Accounts, Login Options, select Name and Password
Alternatively, run the following command
sudo defaults write /Library/Preferences/com.apple.loginwindow \
SHOWFULLNAME -bool yes
Audit Open System Preferences: Accounts, Login Options, and verify Name and Password
is selected.

CIS Mac OS X Leopard (10.5.x) Benchmark
Page 30 of 84
Alternatively, run the following command:
defaults read /Library/Preferences/com.apple.loginwindow SHOWFULLNAME
Make sure the value returned is 1.
Additional Info None
2.4.2.4) Disable “Show password hints”
Explanation Password hints can give an attacker a hint as well, so the option to display hints
should be turned off. If your organization has a policy to enter a help desk number in
the password hints areas, do not turn off the option.
Context System
Level 1
Scoring Status Scorable
Caveats Might make remembering a password more difficult. If using FileVault, not setting a
hint may not allow a user to use a Master Password to reset a user account password.
Remediation In System Preferences: Accounts, Login Options, make sure the ―Show password
hints‖ checkbox is off.
Alternatively, run the following command
sudo defaults write /Library/Preferences/com.apple.loginwindow \
RetriesUntilHint -int 0
Audit Open System Preferences: Accounts, Login Options, and verify ―Show password
hints‖ checkbox is off.
Alternatively, run the following command:
defaults read /Library/Preferences/com.apple.loginwindow RetriesUntilHint
Make sure the value returned is 0.
Additional Info None
2.4.2.5) Configure “Allow network users to login to this computer”
Explanation This option is only available is the Mac is configured to authenticate through a
Directory Service (like Active Directory or Open Directory). The Options button will
allow the computer to restrict which network user can log on to the Mac; the default is
to allow all network users to log in.
Context System
Level 2
Scoring Status Not Scorable
Caveats None
Remediation In System Preferences: Accounts, Login Options, turn on ―Allow network users to
login to this computer,‖ then click the Options button to configure logon access as
CIS Mac OS X Leopard (10.5.x) Benchmark
Page 31 of 84
needed.
Audit None
Additional Info None
2.4.2.6) Disable “Enable fast user switching”
Explanation Fast user switching allows a person to quickly log in to the computer with a different
account. While only a minimal security risk, when a second user is logged in, that user
might be able to see what processes the first user is using, or possibly gain other
information about the first user.
Context System
Level 2
Scoring Status Not Scorable
Caveats Security benefit of not allowing fast user switch is of limited value.
Remediation In System Preferences: Accounts, Login Options, make sure the ―Enable fast user
switching‖ checkbox is off.
Audit In System Preferences: Accounts, Login Options, make sure the ―Enable fast user
switching‖ checkbox is off.
Additional Info Mac OS X is a multi-user operating system, and there are other similar methods that
might provide the same kind of risk. The Remote Login service that can be turned on
in the Sharing System Preferences pane is another.
2.4.2.7) Disable “Allow guest to log into this computer”
Explanation The Guest account allows a guest to log in to a Mac and use all of its services. When
the guest logs out, the Mac clears most of whatever the guest did on the Mac. This
allows one person to let another borrow the computer for a short period, and still
protect information in other accounts on the Mac.
The usage of a Guest account may give the Mac owner a false sense of security. If the
guest has physical access to the Mac and the owner is not present, the guest could gain
full access to the Mac. That said, use of the Guest account allows for quick and
moderately safe computer sharing.
Context System
Level 1
Scoring Status Scorable
Caveats None
Remediation In System Preferences: Account, click on the Guest user.
Make sure the ―Allow guests to log into this computer‖ is not checked.
Alternatively, run the following commands:
sudo dscl . -create /Users/Guest AuthenticationAuthority ";basic;"
sudo dscl . -create /Users/Guest passwd "*"

CIS Mac OS X Leopard (10.5.x) Benchmark
Page 32 of 84
sudo dscl . -create /Users/Guest UserShell "/sbin/nologin"
Audit Run the following command
dscl . -read /Users/Guest AuthenticationAuthority
The result should be:
AuthenticationAuthority: ;basic;
Additional Info By default, the guest account is enabled for access to sharing services, but is not
allowed to log in to the computer.
The guest account does not need a password when it is enabled to log in to the
computer.
2.4.2.8) Disable “Allow guests to connect to shared folders”
Explanation If files need to be shared, a dedicated file server should be used. If file sharing on the
client Mac must be used, then only authenticated access should be used. Guest access
allows guest to access files they might not need access to.
Context System
Level 1
Scoring Status Scorable
Caveats None
Remediation In System Preferences: Account, click on the Guest user.
Make sure the ―Allow guests to connect to shared folders‖ is not checked.
Alternatively, run the following commands:
For AFP sharing:
sudo defaults write /Library/Preferences/com.apple.AppleFileServer \
guestAccess -bool no
for SMB sharing:
sudo defaults write /Library/Preferences/SystemConfiguration/com.apple.smb.server \
AllowGuestAccess -bool no
Audit In System Preferences: Account, click on the Guest user.
Make sure the ―Allow guests to connect to shared folders‖ is not checked.
Alternatively, run the following command:
For AFP sharing:
defaults read /Library/Preferences/com.apple.AppleFileServer guestAccess
for SMB sharing:
defaults write /Library/Preferences/SystemConfiguration/com.apple.smb.server \

CIS Mac OS X Leopard (10.5.x) Benchmark
Page 33 of 84
AllowGuestAccess
Make sure the results are 0.
Additional Info This setting is enabled by default in Leopard, but the sharing services themselves are
all turned off.
The guest account does not need a password for access to shared services when it is
enabled.
2.4.3) Bluetooth Preferences Action Items
Bluetooth can be a very useful technology, but it can also leave an unprotected computer open to
compromise. Bluetooth is best used in a secure environment where unauthorized users have no physical
access near the Mac. If Bluetooth is used, it should be secured properly (see below). Also, please note a
recommendation earlier in this document to completely disable Bluetooth.
2.4.3.1) Disable Bluetooth by using System Preferences for each user account
Explanation As stated earlier, Bluetooth can be very useful, but can also expose a Mac to certain
risks. Unless specifically needed and configured properly, Bluetooth should be turned
off
Context User
Level 1
Scoring Status Scorable
Caveats Removes Bluetooth functionality. See recommendations in sections 2.4.3.3 and
2.4.3.4 on how to secure Bluetooth if it is used.
Remediation In System Preferences: Bluetooth, uncheck the ―On‖ box.
Alternatively, run the following commands:
sudo defaults write /Library/Preferences/com.apple.Bluetooth \
ControllerPowerState -int 0
sudo killall -HUP blued
Audit In System Preferences: Bluetooth, verify ‖On‖ box is unchecked.
Alternatively, run the following command:
defaults read /Library/Preferences/com.apple.Bluetooth ControllerPowerState
and make sure the value returned is 0.
Additional Info None
2.4.3.2) Disable Bluetooth internet connection sharing
Explanation Bluetooth internet sharing can expose a Mac and the network to certain risks and
should be turned off.

CIS Mac OS X Leopard (10.5.x) Benchmark
Page 34 of 84
Context System
Level 1
Scoring Status Scorable
Caveats None
Remediation In System Preferences: Bluetooth, Advanced options, turn off ―Share my internet
connection with other Bluetooth devices‖
Alternatively, run the following commands:
sudo defaults write /Library/Preferences/com.apple.Bluetooth \
PANServices -int 0
sudo killall -HUP blued
Audit In System Preferences: Bluetooth, Advanced options, verify ―Share my internet
connection with other Bluetooth devices‖ if off
Alternatively, run the following commands
defaults read /Library/Preferences/com.apple.Bluetooth PANServices
and make sure the value returned is 0.
Additional Info This setting is turned off by default in Leopard.
2.4.3.3) If Bluetooth is used, turn off “Discoverable” when not needed
Explanation When Bluetooth is set to "discoverable" mode, the Mac sends a signal indicating that
it's available to "pair" with another Bluetooth device. When in discoverable state an
attacker could gain access to data on the Mac. Use discoverable mode when ―pairing‖
a Bluetooth device to the Mac, but once the ―pairing‖ is complete, turn discoverable
mode off.
Context User
Level 1
Scoring Status Not Scorable
Caveats None
Remediation In System Preferences: Bluetooth, turn Discoverable off when not actively ―pairing‖ a
Bluetooth device.
Audit None
Additional Info None
2.4.3.4) Show Bluetooth status in menu bar
Explanation By showing the Bluetooth status in the menu bar, a small Bluetooth icon is placed in
the menu bar. This icon quickly shows the status of Bluetooth, and can allow the user
to quickly turn Bluetooth on or off.
Context User
Level 1
CIS Mac OS X Leopard (10.5.x) Benchmark
Page 35 of 84
Scoring Status Not Scorable
Caveats None
Remediation In System Preferences: Bluetooth, turn Show Bluetooth Status In Menu Bar on.
Audit None
Additional Info None
2.4.4) CDs & DVDs Preferences Actions Items
Automatic actions, while useful in many situations, can expose a computer to unintended
consequences. The rules in this section all deal with the automatic actions associated with the optical
drive.
2.4.4.1) Disable automatic actions for blank CDs for each user account
Explanation In general, automatic actions that can execute a program are not a good idea. A
malicious automatic action could have unintended side affects and compromise
system security.
Context User
Level 2
Scoring Status Scorable
Caveats None
Remediation In System Preferences: CDs & DVDs: set the When you insert a blank CD: option to
Ignore
Alternatively, run the following command:
defaults write com.apple.digihub \
com.apple.digihub.blank.cd.appeared -dict action 1
Audit Verify the setting is correctly set in System Preferences: CDs & DVDs. Alternatively,
run the following command:
defaults read com.apple.digihub com.apple.digihub.blank.cd.appeared
and make sure the result is {action = 1; }
Additional Info None
2.4.4.2) Disable automatic actions for blank DVDs for each user account
Explanation In general, automatic actions that can execute a program are not a good idea. A
malicious automatic action could have unintended side affects and compromise
system security.
Context User
Level 2
Scoring Status Scorable
Caveats None
Remediation In System Preferences: CDs & DVDs: set the When you insert a blank DVD: option
to Ignore
CIS Mac OS X Leopard (10.5.x) Benchmark
Page 36 of 84
Alternatively, run the following command:
defaults write com.apple.digihub \
com.apple.digihub.blank.dvd.appeared -dict action 1
Audit Verify the setting is correctly set in System Preferences: CDs & DVDs. Alternatively,
run the following command:
defaults read com.apple.digihub com.apple.digihub.blank.dvd.appeared
and make sure the result is {action = 1; }
Additional Info None
2.4.4.3) Disable automatic actions for music CDs for each user account
Explanation In general, automatic actions that can execute a program are not a good idea. A
malicious automatic action could have unintended side affects and compromise
system security.
Context User
Level 2
Scoring Status Scorable
Caveats None
Remediation In System Preferences: CDs & DVDs: set the When you insert a music CD: option to
Ignore
Alternatively, run the following command:
defaults write com.apple.digihub \
com.apple.digihub.cd.music.appeared -dict action 1
Audit Verify the setting is correctly set in System Preferences: CDs & DVDs. Alternatively,
run the following command:
defaults read com.apple.digihub com.apple.digihub.cd.music.appeared
and make sure the result is {action = 1; }
Additional Info None
2.4.4.4) Disable automatic actions for picture CDs for each user account
Explanation In general, automatic actions that can execute a program are not a good idea. A
malicious automatic action could have unintended side affects and compromise
system security.
Context User
Level 2
Scoring Status Scorable
Caveats None

CIS Mac OS X Leopard (10.5.x) Benchmark
Page 37 of 84
Remediation In System Preferences: CDs & DVDs: set the When you insert a picture CD: option to
Ignore
Alternatively, run the following command:
defaults write com.apple.digihub \
com.apple.digihub.cd.picture.appeared -dict action 1
Audit Verify the setting is correctly set in System Preferences: CDs & DVDs. Alternatively,
run the following command:
defaults read com.apple.digihub com.apple.digihub.cd.picture.appeared
and make sure the result is {action = 1; }
Additional Info None
2.4.4.5) Disable automatic actions for video DVDs for each user account
Explanation In general, automatic actions that can execute a program are not a good idea. A
malicious automatic action could have unintended side affects and compromise
system security.
Context User
Level 2
Scoring Status Scorable
Caveats None
Remediation In System Preferences: CDs & DVDs: set the When you insert a blank DVD: option
to Ignore
Alternatively, run the following command:
defaults write com.apple.digihub \
com.apple.digihub.dvd.video.appeared -dict action 1
Audit Verify the setting is correctly set in System Preferences: CDs & DVDs. Alternatively,
run the following command:
defaults read com.apple.digihub com.apple.digihub.dvd.video.appeared
and make sure the result is {action = 1; }
Additional Info None
2.4.5) Date & Time Preferences Action Items
As stated earlier in this document, setting the correct date and time can be very important. Use the Set
date & time automatically feature.
2.4.5.1) Enter correct time settings
Explanation Having the correct date, time, time zone, and daylight saving time setting (if
CIS Mac OS X Leopard (10.5.x) Benchmark
Page 38 of 84
applicable) on a Mac is very important. File creation and modification dates use the
system time. Log entries use the system time. Kerberos may not operate correctly if
the time on the Mac is off by more than 5 minutes, which can affect Apple’s single
sign-on feature, Active Directory logons, and other features.
Context System
Level 1
Scoring Status Scorable
Caveats If port 123 (the NTP port) is blocked by a firewall, the automatic date and time feature
will not work. If the port is blocked, a time server accessible behind the firewall must
be used to set the date and time automatically. A mix of internal and external time
servers is recommended for mobile systems.
Remediation In System Preferences: Date & Time, Select the Time Zone tab. Make sure the correct
Time Zone is selected. Next, select the Date & Time tab. Make sure the ―Set date &
time automatically‖ checkbox is checked. If your organization runs its own time
server, enter its address in the field. You can enter multiple time servers by separating
them with a space, listing them in order of preference.
Alternatively, run the following commands:
Edit /private/etc/hostconfig (using sudo) and change the TIMESYNC entry to -YES-
Edit /private/etc/ntp.conf (using sudo) and enter desired servers. For example:
server time.mycompany.com preferred
server time.apple.com
Then restart the time daemon:
sudo launchctl load -w /System/Library/LaunchDaemons/org.ntp.ntpd.plist
Audit In System Preferences: Date & Time select the Date & Time tab. Make sure the ―Set
date & time automatically‖ checkbox is checked.
Alternatively, run the following commands:
cat /etc/hostconfig | grep TIMESYNC
Make sure the results are:
TIMESYNC=-YES-
cat /etc/ntp.conf
Make sure the results list desired time servers. For example:
server time.apple.com

CIS Mac OS X Leopard (10.5.x) Benchmark
Page 39 of 84
Verify the /System/Library/LaunchDaemons/org.ntp.ntpd.plist job is running
cat /System/Library/LaunchDaemons/org.ntp.ntpd.plist | grep Disabled
make sure the results are blank.
Additional Info man ntp.conf
http://support.ntp.org/bin/view/Main/WebHome
By default, a system set up with the Mac OS X Setup Assistant will use one of
Apple’s time servers.
Be sure you understand the ramifications if you do not use fully-qualified domain
names (FQDN) or IP addresses when specifying your time servers.
2.4.5.2) Use an internal Software Update server
Explanation Apple offers a Software Update Service in the Mac OS X Server product. If your
organization uses such a service, set the computer to use your internal server.
Context System
Level 2
Scoring Status Scorable
Caveats Your computer will not be able to get updates using Software Update unless it has
network access to the organizational software update server.
Remediation The Software Update Service setting can be set though a managed Mac environment
using Apple’s Workgroup Manager.
Alternatively, the following command can be run from Terminal:
sudo defaults write /Library/Preferences/com.apple.SoftwareUpdate CatalogURL
<url>
where <url> is the URL to the update server.
Use the following command to clear the setting and use the Apple, Inc., software
update server:
sudo defaults delete /Library/Preferences/com.apple.SoftwareUpdate CatalogURL
Audit Run the following comment to determine if a software update server is defined.
defaults read /Library/Preferences/com.apple.SoftwareUpdate CatalogURL
Note: in a Mac OS X server environment the software update server may be defined
using MCX and may be located in a different place.
Additional Info Mac OS X defaults to using Apple’s Software Update servers.

CIS Mac OS X Leopard (10.5.x) Benchmark
Page 40 of 84
2.4.6) Desktop & Screen Saver Preferences Action Items
2.4.6.1) Set a short inactivity interval for the screen saver
Explanation By obscuring the screen with a picture, graphic, or just an opaque color, the screen
saver can keep prying eyes off of an unattended screen and potentially sensitive
information.
Context User
Level 1
Scoring Status Scorable
Caveats None
Remediation In System Preferences: Desktop & Screen Saver, Screen Saver Tab, make sure the
Start screen saver slider is to a reasonably low value.
Alternatively, run the following command:
defaults -currentHost write com.apple.screensaver idleTime -int 900
where 900 is the number of idle seconds until the screen saver starts. A logout of the
user may be required for the new settings to take effect.
Audit Open System Preferences: Desktop & Screen Saver, Screen Saver Tab, make sure the
Start screen saver slider is to a reasonably low value (like 15 minutes).
Alternatively, run the following command:
defaults -currentHost read com.apple.screensaver idleTime
and verify the setting is adequately low (<= 900)
Additional Info None
2.4.7) Energy Saver Preferences Action Items
2.4.7.1) Disable sleeping the computer when connected to power
Explanation In some institutions certain software must be run that requires the computer to be
awake. In these situations the computer should not be set to sleep.
Context System
Level 2
Scoring Status Scorable
Caveats Not allowing the computer to sleep will use more power and increase the cost to
operate the computer. This must be weighed against the needs of the organization.
Remediation In System Preferences: Energy Saver, drag the slider for ―Put the computer to sleep...‖
to never.

CIS Mac OS X Leopard (10.5.x) Benchmark
Page 41 of 84
Alternatively, use the following command:
sudo pmset -c sleep 0
Audit In System Preferences: Energy Saver, verify the slider for ―Put the computer to
sleep...‖ to never.
Alternatively, use the following command:
pmset -g | grep sleep
and verify the value returned is 0
Additional Info man pmset
2.4.7.2) Verify Display Sleep is set to a value larger than the Screen Saver
Explanation If the Screen Saver is used to lock the screen, verify the Display Sleep settings are
longer than the Screen Saver setting. If the display goes to sleep before the screen
saver activates, the computer will appear to be off, but will be unprotected.
Context System
Level 1
Scoring Status Scorable
Caveats None
Remediation In System Preferences: Energy Saver, drag the slider for ―Put the display(s) to
sleep...‖ to a reasonable number, but longer than the screen saver setting. The Mac
will display a warning if the number is too short.
Alternatively, use the following command:
sudo pmset -c displaysleep 0
Note: The –c flag means ―wall power.‖ Different settings must be used for other
power sources.
Audit In System Preferences: Energy Saver, verify the slider for ―Put the display(s) to
sleep...‖ to a reasonable number, but longer than the screen saver setting. The Mac
will display a warning if the number is too short.
Alternatively, use the following command:
pmset -g | grep displaysleep
and verify the value returned is longer than the Screen Saver, if the Screen Saver is
used to lock the screen.
Additional Info man pmset
2.4.7.3) Disable “Wake when the modem detects a ring” for all power settings
Explanation Unless the computer is used to receive facsimiles or is used as a modem access point
CIS Mac OS X Leopard (10.5.x) Benchmark
Page 42 of 84
for incoming calls, this feature is not needed. An attacker could remotely wake a
machine using a modem, then attack the machine through the internet.
Context System
Level 1
Scoring Status Scorable
Caveats None.
Remediation In System Preferences: Energy Saver, Options tab, make sure the ―Wake when the
modem detects a ring‖ is not checked.
Alternatively, use the following command:
sudo pmset -c ring 0
Note: The -c flag means ―wall power.‖ Different settings must be used for other power
sources.
Audit In System Preferences: Energy Saver, Options tab, verify the ―Wake when the modem
detects a ring‖ is not checked.
Alternatively, use the following command:
pmset -g | grep ring
and verify the value returned is 0.
Additional Info man pmset
2.4.7.4) Disable “Wake for Ethernet network administrator access” for power adapter settings
Explanation This option might be used in certain organizations. The feature, sometimes called the
―Wake-on-LAN‖, is only useful for those organizations that specifically need it.
Otherwise it should be turned off so an attacker cannot use it to wake your computer
remotely.
Context System
Level 1
Scoring Status Scorable
Caveats Management programs like Apple Remote Desktop Administrator use this feature to
wake computers. If turned off, such management programs will not be able to wake a
computer over the LAN. If the wake-on-LAN feature is needed, do not turn off this
feature.
Remediation In System Preferences: Energy Saver, Options tab, make sure the ―Wake for Ethernet
network administrator access‖ is not checked.
Alternatively, use the following command:
sudo pmset -c womp 0
Note: The -c flag means ―wall power.‖ Different settings must be used for other power

CIS Mac OS X Leopard (10.5.x) Benchmark
Page 43 of 84
sources.
Audit In System Preferences: Energy Saver, Options tab, verify the ―Wake for Ethernet
network administrator access‖ is not checked.
Alternatively, use the following command:
pmset -g | grep womp
and verify the value returned is 0.
Additional Info man pmset
2.4.8) Exposé & Spaces Preferences Action Items
Management of the Exposé and Spaces preferences are useful primarily to change ―hot corner‖ settings
that affect the screen saver and display sleep.
2.4.8.1) Do not set any screen corner to Disable Screen Saver
Explanation The screen saver should be set to turn on after a period of inactivity, and should
require a password to dismiss. Disabling the screen saver would disable the screen
lock.
Context User
Level 1
Scoring Status Scorable
Caveats None
Remediation In System Preferences: Exposé & Spaces, make sure none of the Active Screen
Corners are set to disable the screen saver.
The screen corners can be set using the defaults command, but the permutations of
combinations are many. The plist file to check is
~/Library/Preferences/com.apple.dock and the keys are
wvous-bl-corner
wvous-br-corner
wvous-tl-corner
wvous-tr-corner
There are also modifier keys to check and various values for each of these keys. A
value of ―1‖ for any of corners should not be allowed (1 = disable screen saver). If any
value is ―1‖, change the value to ―6‖ (which means no action). Also change the
corresponding wvous-xx-modifier key to 1048576
Audit In System Preferences: Exposé & Spaces, make sure none of the Active Screen
Corners are set to disable the screen saver.
Alternatively, Use the following command when logged is as each user:

CIS Mac OS X Leopard (10.5.x) Benchmark
Page 44 of 84
read ~/Library/Preferences/com.apple.dock
verify none of the *-corner keys has a value of ―1‖.
Additional Info None
2.4.8.2) Set a screen corner to Start Screen Saver
Explanation A user should be able to activate the screen saver quickly.
Context User
Level 1
Scoring Status Scorable
Caveats None
Remediation In System Preferences: Exposé & Spaces, make sure at least one Active Screen
Corner is set to Start Screen Saver. Make sure the user knows about this feature.
The screen corners can be set using the defaults command, but the permutations of
combinations are many. The plist file to check is
~/Library/Preferences/com.apple.dock and the keys are
wvous-bl-corner
wvous-br-corner
wvous-tl-corner
wvous-tr-corner
There are also modifier keys to check and various values for each of these keys. A
value of ―5‖ means the corner will start the screen saver. The corresponding wvous-
xx-modifier key should be set to 0 (no idea why).
Audit In System Preferences: Exposé & Spaces, make sure at least one Active Screen
Corner is set to Start Screen Saver. Make sure the user knows about this feature.
Alternatively, Use the following command:
read ~/Library/Preferences/com.apple.dock
verify at least one of the *-corner keys has a value of ―5‖.
Additional Info None
2.4.8.3) Do not set any screen corner to Sleep Display
Explanation When this feature is used the screen goes blank but moving the mouse or pressing a
button brings up the screen again with no password required. The screen saver (with
its lock) will still kick in after X minutes, but the user could be lulled into a false sense
of security if she sees her screen is blank and the screen saver has not activated.
Context User
Level 1
Scoring Status Scorable

CIS Mac OS X Leopard (10.5.x) Benchmark
Page 45 of 84
Caveats None
Remediation In System Preferences: Exposé & Spaces, make sure none of the Active Screen
Corners are set to Sleep Display.
The screen corners can be set using the defaults command, but the permutations of
combinations are many. The plist file to check is
~/Library/Preferences/com.apple.dock and the keys are
wvous-bl-corner
wvous-br-corner
wvous-tl-corner
wvous-tr-corner
There are also modifier keys to check and various values for each of these keys. A
value of ―10‖ for any of corners should not be allowed (10 = sleep display). If any
value is ―10‖, change the value to ―6‖ (which means no action). Also change the
corresponding wvous-xx-modifier key to 1048576 (no idea why).
Audit In System Preferences: Exposé & Spaces, make sure none of the Active Screen
Corners are set to Sleep Display.
Alternatively, Use the following command:
read ~/Library/Preferences/com.apple.dock
verify none of the *-corner keys has a value of ―10‖.
Additional Info None
2.4.9) Keyboard & Mouse Action Items
2.4.9.1) Disable “Allow Bluetooth devices to wake this computer”
Explanation Unless you are using a Bluetooth keyboard or mouse in a secure environment, there is
no reason to allow Bluetooth devices to wake the computer. An attacker could use a
Bluetooth device to wake a computer and then attempt to gain access.
Context User
Level 1
Scoring Status Scorable
Caveats This setting is only available in the Mac is equipped with Bluetooth.
Remediation In System Preferences: Keyboard & Mouse, Bluetooth tab, make sure the ―Allow
Bluetooth devices to wake this computer‖ is not checked.
Alternatively, run the following command:
defaults -currentHost write ~/Library/Preferences/com.apple.Bluetooth \
BluetoothSystemWakeEnable -bool 0
CIS Mac OS X Leopard (10.5.x) Benchmark
Page 46 of 84
Audit In System Preferences: Keyboard & Mouse, Bluetooth tab, make sure the ―Allow
Bluetooth devices to wake this computer‖ is not checked.
Alternatively, run the following command:
defaults -currentHost read ~/Library/Preferences/com.apple.Bluetooth \
BluetoothSystemWakeEnable
And verify the result is 0.
Additional Info None
2.4.10) Network Preferences Action Items
Configuring the network from the CLI is extremely tricky, but some options can be configured using
the networksetup command. This command was previously bundled with Apple Remote Desktop but is
now available by default in Leopard.
An alternative to the networksetup command is the third party ncutil tool, which is available from:
http://turin.nss.udel.edu/ncutil/
Use of these commands and the programming logic necessary to configure the network is beyond the
scope of this document.
2.4.10.1) Create network specific locations
Explanation The network location feature of the Mac is very powerful tool to mange network
security. By creating different network locations, a user can easily (and without
administrative privileges) change the network settings on the Mac. By only using the
network interfaces needed at any specific time, exposure to attackers is limited.
Context System
Level 2
Scoring Status Not Scorable
Caveats A little understanding of how the Network System Preferences pane works is required.
Remediation Create multiple network locations as needed.
Delete the Automatic location:
1. Select Edit Locations from the Locations popup menu.
2. Select the Automatic location.
3. Click the minus button.
Create network locations as needed. Ideally, if your goal is to limit which interfaces
can be used at any given time, one network location for each interface should be
created. See the Appendix C for an example.
Audit Open System Preferences: Network
Verify each network location is set up properly.
Additional Info Deleting the Automatic location cannot be undone.

CIS Mac OS X Leopard (10.5.x) Benchmark
Page 47 of 84
2.4.10.2) Disable AirPort
Explanation If Airport is installed and not needed, disable it. There is no need to allow attackers a
possible route to the Mac.
Context System
Level 1
Scoring Status Not Scorable
Caveats None
Remediation In System Preferences: Network, select the Airport interface and click the minus
button or turn the Airport card off.
Audit In System Preferences: Network, select the Airport interface and verify the Airport
card off.
Additional Info None
2.4.10.3) Enable Show AirPort Status in Menu Bar
Explanation If an Airport or other wireless card is installed, show the AirPort status in the menu
bar so that user can quickly determine if AirPort is on or off. If on, the user can
quickly turn it off if AirPort interface should be off.
Context System
Level 1
Scoring Status Not Scorable
Caveats None
Remediation In System Preferences: Network, select the Airport interface, then click the Advanced
button. Turn on Show AirPort status in menu bar.
Audit In System Preferences: Network, select the Airport interface, then click the Advanced
button. Verify Show AirPort status in menu bar is on.
Additional Info AirPort is Apple’s marketing name for its 802.11b, g, and n wireless interfaces.
2.4.10.4) Disable Bluetooth
Explanation If Bluetooth is installed and not needed, disable it. There is no need to allow attackers a
possible route to the Mac.
Context System
Level 1
Scoring Status Not Scorable
Caveats None
Remediation In System Preferences: Network, select the Bluetooth interface and click the minus
button or turn Bluetooth off.
Audit In System Preferences: Network, select the Bluetooth interface and verify that
Bluetooth is not offered as a network interface option.
Additional Info None
CIS Mac OS X Leopard (10.5.x) Benchmark
Page 48 of 84
2.4.10.5) Disable IPv6
Explanation Unless used, IPv6 should be turned off for each interface. IPv6 is not widely used yet,
so most people can turn this off until needed.
Context System
Level 2
Scoring Status Not Scorable
Caveats None
Remediation In System Preferences: Network, select the each active interface then click the
Advanced button.
Find the Configure IPv6 popup menu and set it to Off.
Audit In System Preferences: Network, select the each active interface then click the
Advanced button.
Find the Configure IPv6 popup menu and verify it is Off.
Additional Info None
2.4.11) Print & Fax Preferences Action Items
2.4.11.1) Only use known printers
Explanation The Mac’s ability to browse and find printers is very good. One should only print to a
known printer. When at a public location, such as a hotel or trade show, many printers
may appear available in the Print & Fax panel. Only print to a known printer.
Context User
Level 1
Scoring Status Not Scorable
Caveats None
Remediation This rule cannot be implemented technically. One just has to use one’s judgment
when printing.
Audit None
Additional Info None
2.4.11.2) Disable receiving faxes
Explanation Unless fax reception is required, the option should be turned off. While there is no
known vector to attack a Mac using a fax, an attacker could attempt to use fax
reception to determine if a modem is connected to a computer.
Context System
Level 1
Scoring Status Not Scorable
Caveats This option is only available if the Mac is equipped with a fax modem.
Remediation In System Preferences: Print & Fax, Fax tab, turn off fax reception.
Audit In System Preferences: Print & Fax, Fax tab, verify fax reception is off. This option
will only be present if the computer is equipped with a fax modem.
Additional Info None

CIS Mac OS X Leopard (10.5.x) Benchmark
Page 49 of 84
2.4.12) QuickTime Preferences Action Items
One of the few known common attack vectors is QuickTime. Securing QuickTime can help protect
your computer against malware.
2.4.12.1) Disable “Save movies in disk cache”
Explanation Do not save movies in the disk cache. If a person gained access to the Mac, that
person would be able to watch the cached movies. Sensitive organizational
information may be made available.
Context User
Level 2
Scoring Status Not Scorable
Caveats None
Remediation In System Preferences: QuickTime: Browser tab, disable ―Save movies in disk cache‖
Audit In System Preferences: QuickTime: Browser tab, verify ―Save movies in disk cache‖
is disabled.
Additional Info None
2.4.12.2) Do not install third-party QuickTime software
Explanation Do not install any QuickTime software unless the source is known and trusted.
Context System and User
Level 1
Scoring Status Not Scorable
Caveats None
Remediation Check that software in /Library/QuickTime and ~/Library/QuickTime is valid.
Audit Check that software in /Library/QuickTime and ~/Library/QuickTime is valid.
Additional Info None
2.4.12.3) Disable "Play Movies automatically"
Explanation QuickTime is used in browsers to play audio and video content. When the browser
sees such content the browser passes off control to QuickTime through its Web
browser plug-in. QuickTime can be set to start playing this content immediately.
Some content may contain malicious code embedded in the audio or video. Ensure the
user wants to play the embedded content by turning off the ―Play Movie
Automatically‖ option.
Context User
Level 1
Scoring Status Not Scorable
Caveats The user will need to press a play button to play the content in the browser.
Remediation In System Preferences: QuickTime: Browser tab, disable ―Play movies automatically‖
Audit In System Preferences: QuickTime: Browser tab, verify ―Play movies automatically‖
is disabled.
Additional Info None

CIS Mac OS X Leopard (10.5.x) Benchmark
Page 50 of 84
2.4.13) Security Preferences Action Items
2.4.13.1) Require a password to wake the computer from sleep or screen saver
Explanation Sometimes referred to as a ―screen lock‖ this option will keep the casual user away
from your Mac when the screen saver has started.
Context User
Level 1
Scoring Status Scorable
Caveats None
Remediation In System Preferences: Security, General tab, check ―Require a password to wake the
computer from sleep or screen saver‖
Alternatively, run the following command. The current user will need to log off and
on for changes to take effect.
defaults -currentHost write com.apple.screensaver askForPassword -int 1
Audit In System Preferences: Security, General tab, verify ―Require a password to wake the
computer from sleep or screen saver‖ is on
Alternatively, run the following command:
defaults -currentHost read com.apple.screensaver askForPassword
and verify the setting is 1
Additional Info This only protects the system when the screen saver is running.
2.4.13.2) Disable automatic login
Explanation Having a computer automatically log in bypasses a major security feature (the login
password) and can allow a casual user access to sensitive data.
Context System
Level 1
Scoring Status Not Scorable
Caveats None
Remediation In System Preferences: Security, General tab, check ―Disable Automatic Login‖.
Note: Automatic login can also be disabled in System Preferences: Accounts.
Audit In System Preferences: Security, General tab, verify ―Disable Automatic Login‖ is
checked.
Additional Info None
2.4.13.3) Require a password to unlock each System Preferences pane
Explanation By requiring a password to unlock System Preferences, a casual user is less likely to
compromise the security of the Mac.
CIS Mac OS X Leopard (10.5.x) Benchmark
Page 51 of 84
Context System
Level 1
Scoring Status Not Scorable
Caveats None
Remediation In System Preferences: Security, General tab, check ―Require a password to unlock
each System Preferences pane.‖
Alternatively, edit the /private/etc/authorization file (using sudo). This file should be
backed up first and then edited. This is a critical file for OS X operations and should
edited with the greatest of care.
Find <key>system.preferences</key>
Then find <key>shared</key>
Then replace true with false.
Audit In System Preferences: Security, General tab, verify ―Require a password to unlock
each System Preferences pane‖ is checked.
Additional Info None
2.4.13.4) Disable “automatic logout” after a period of inactivity
Explanation If the machine automatically logs out, unsaved work might be lost. The same level of
security is available by using a Screen Saver and the ―Require a password to wake the
computer from sleep or screen saver‖ option.
Context System
Level 1
Scoring Status Scorable
Caveats This option might be appropriate for kiosk Macs or for other organizational reasons.
Remediation In System Preferences: Security, General tab, uncheck ―Log out after X minutes of
inactivity.‖
Alternatively, run the following command
sudo defaults write /Library/Preferences/.GlobalPreferences \
com.apple.autologout.AutoLogOutDelay -int 0
Audit In System Preferences: Security, General tab, verify ―Log out after X minutes of
inactivity‖ is unchecked.
Alternatively, run the following command
defaults read /Library/Preferences/.GlobalPreferences \
com.apple.autologout.AutoLogOutDelay
and verify the result is 0.
Additional Info None
CIS Mac OS X Leopard (10.5.x) Benchmark
Page 52 of 84
2.4.13.5) Use secure virtual memory
Explanation Passwords and other sensitive information can be extracted from insecure virtual
memory, so it’s a good idea to secure virtual memory. If an attacker gained control of
the Mac, the attacker would be able to extract user names and passwords or other
kinds of data from the virtual memory swap files.
Context System
Level 1
Scoring Status Scorable
Caveats Use the secure virtual memory will tax the computer a little bit as it has to encrypt and
decrypt virtual memory. The small overhead, however, is worth the added security.
Note: Encrypting virtual memory is not foolproof. Proof of concept attacks by security
researchers have recently shown that computer memory, even in a Mac, is readable for
up to ten minutes after shut down! When shutting down a Mac, make sure the
computer is protected from physical access for at least ten minutes.
Remediation In System Preferences: Security, General tab, check ―Use secure virtual memory.‖
Alternatively, run the following command
sudo defaults write /Library/Preferences/com.apple.virtualMemory \
UseEncryptedSwap -bool yes
A reboot is required to make a change.
Audit In System Preferences: Security, General tab, verify ―Use secure virtual memory‖ is
checked.
Alternatively, run the following command
defaults read /Library/Preferences/com.apple.virtualMemory UseEncryptedSwap
verify the result is 1
Additional Info Enabling secure virtual memory in Leopard also encrypts the hibernation file if the
safe sleep feature is enabled on compatible hardware.
2.4.13.6) Disable remote control infrared receiver
Explanation It’s very humorous to watch a jokester use an Apple remote at a Mac trade show.
Macs all over the place start to obey the remote and the unsuspecting user is left
bewildered. More importantly, a remote could be used to page through a document or
presentation, thus revealing sensitive information. The solution is to turn off the
remote and only turn it on when needed.
Optionally, the user can ―pair‖ the remote with the computer. Pairing will force the
computer to only respond to commands from the paired remote. Pairing a remote is
discussed in section 2.4.13.7.
Context System

CIS Mac OS X Leopard (10.5.x) Benchmark
Page 53 of 84
Level 1
Scoring Status Scorable
Caveats Requires the user to turn on the remote when needed. An administrative password is
needed to activate the remote.
Remediation In System Preferences: Security, General tab, check ―Disable remote control infrared
receiver‖.
Alternatively to disable the remote use the following command:
sudo defaults write /Library/Preferences/com.apple.driver.AppleIRController \
DeviceEnabled -bool no
Audit In System Preferences: Security, General tab, verify that ―Disable remote control
infrared receiver‖ is checked or the computer is paired with a specific remote.
Alternatively, run the following command:
defaults read /Library/Preferences/com.apple.driver.AppleIRController
Verify the DeviceEnabled is 0 or the UIDFilter does not equal ―none‖
Additional Info None
2.4.13.7) Pair the remote control infrared receiver
Explanation If a remote is used often with a computer, the remote can be ―pair‖ to work with the
computer. This will allow on the paired remote to work on that computer.
Context System
Level 1
Scoring Status Scorable
Caveats None
Remediation See http://docs.info.apple.com/article.html?artnum=302545 for complete instructions.
Audit
Open System Preferences: Security and verify the remote is paired.
Alternatively, run the following command:
defaults read /Library/Preferences/com.apple.driver.AppleIRController
Verify the UIDFilter does not equal ―none.‖
Additional Info Pairing your Apple Remote with your computer:
http://docs.info.apple.com/article.html?artnum=302545
2.4.13.8) Enable FileVault for every account
Explanation FileVault offers protection for data at rest. This means that the data is only protected
when the user is not logged in, which is useful if the computer is stolen.
Context User
CIS Mac OS X Leopard (10.5.x) Benchmark
Page 54 of 84
Level 2
Scoring Status Not Scorable
Caveats There are many caveats to using FileVault. Apple does not provide a means for
organizational key recovery if the password is lost. Double the size of the user’s home
directory is required to be available on the hard drive when FileVault for the user is
turned on. Not everything on the disk is encrypted, so a false sense of security may
ensue when using FileVault. And finally, FileVault can cause a significant slowdown
of the system. All that said, however, FileVault is still a good method to provide data
at rest protection.
There are also challenges in using FileVault with Directory accounts, particularly
around external password changes and password expiration on off-line computers.
Note: Encrypting user data is not foolproof. Proof of concept attacks by security
researchers have recently shown that computer memory, even in a Mac, is readable for
up to ten minutes after shut down! When shutting down a Mac, make sure the
computer is protected from physical access for at least ten minutes.
Remediation In System Preferences: Security, FileVault tab, press the ―Set Master Password‖
button and set a master password. Set and secure this master password according to
your organization’s policies.
Press the Turn FileVault on button to turn FileVault on.
Apple offers a workaround solution for organizations to maintain a common Master
password. Contact your Apple representative for more information.
Audit In System Preferences: Security, FileVault tab, verify FileVault is on for each user.
Additional Info http://www.apple.com/sg/macosx/features/filevault/
2.4.13.9) Enable firewall protection
Explanation Apple’s firewall will protect your computer from certain incoming attacks. Apple
offers three firewall options: Allow all, Allow only essential, and Allow access for
specific incoming connections. Unless you have a specific need to allow incoming
connection (for services such as ssh, file sharing, or web services), set the firewall to
―Allow only essential services,‖ otherwise use the ―Allow access for specific
incoming connections‖ option.
Context System
Level 1
Scoring Status Scorable
Caveats None
Remediation In System Preferences: Security, Firewall tab, select ―Allow only essential services‖
or ―Set access for specific services and applications‖.
Alternatively, run the following command:
sudo defaults write /Library/Preferences/com.apple.alf globalstate -int <value>

CIS Mac OS X Leopard (10.5.x) Benchmark
Page 55 of 84
where <value> is
0 = off
1 = on for specific services
2 = on for essential services
Audit In System Preferences: Security, Firewall tab, verify ―Allow only essential services‖
or ―Set access for specific services and applications‖ is selected.
Alternatively, run the following command:
defaults read /Library/Preferences/com.apple.alf globalstate
verify the value returned is 1 or 2
Additional Info http://docs.info.apple.com/article.html?artnum=306938
2.4.14) Sharing Preferences Action Items
2.4.14.1) Change the computer name
Explanation If the computer is used in an organization that assigns host names, it is a good idea to
change the computer name to the host name. This is more of a best practice than a
security measure. If the host name and the computer name are the same, computer
support may be able to track problems down easier.
Context System
Level 2
Scoring Status Scorable
Caveats Of minimal security benefit
Remediation In System Preferences: Sharing, change the computer name to the host name.
Alternatively, use the following command:
sudo systemsetup -setcomputername <host name>
Audit In System Preferences: Sharing, verify the computer name is set to the host name.
Alternatively, use the following command:
systemsetup -getcomputername
Additional Info None
2.4.14.2) Configure Screen Sharing
Explanation Screen Sharing uses the open source VNC protocol to let one computer observe or
control the screen on another computer. Apple Screen Sharing is encrypted (using a
proprietary encryption protocol), so others cannot eavesdrop on a screen sharing
session. The most important aspect of securing screen sharing is to make sure only the
correct people can observe or control the Mac.
CIS Mac OS X Leopard (10.5.x) Benchmark
Page 56 of 84
Apple allows for a few options when configuring screen sharing and each has its place
for a secure Mac. These option are not mutually exclusive.
1. Screen Sharing off
This is the most secure option.
2. Anyone may request permission to control screen
This is the second most secure option. When a remote user attempts to share the
screen, the Mac will prompt the local user for permission. If the local user doesn’t
grant permission, the remote user cannot share the screen. If a local user is not at
the Mac to grant permission, then the screen cannot be shared.
3. VNC viewers may control screen with password
This is the least secure option since the remote user only needs to know the
password.
4. Allow access to all users of the Mac, or specific users (or groups of users)
Allowing access to only users with accounts on the Mac, or if a directory service
(like Open Directory or Active Directory) is used, specific users or groups, allows
some restriction of who can share the screen. Any authorized user would be able
to observe or control the screen without the express permission of the local user.
This option should only be used when necessary (possibly in a school
environment).
Context System
Level 1
Scoring Status Not Scorable
Caveats A thorough understanding of each setting’s advantages and disadvantages is necessary
when turning Screen Sharing on.
Remediation In System Preferences: Sharing, turn on Screen Sharing only if necessary. Configure
Screen Sharing according to personal or organizational needs, but be aware of the
implications of each option.
Audit None
Additional Info None
2.4.14.3) Configure File Sharing
Explanation Apple’s File Sharing uses a combination of many technologies: FTP, SMB (Windows
sharing) and AFP (Mac sharing). Generally speaking, file sharing should be turned off
and a dedicated, well-managed file server should be used to share files. If file sharing
must be turned on, the user should be aware of the security implications of each
option.
Turning on File Sharing automatically shares the entire hard drive to anyone with an
account on the Mac, or anyone who can access the Mac using a network account. File
and folder access control restrictions are enforced by default, so user Mary cannot
access user Joe’s Documents folder (by default). Specific access controls can be
relaxed or strengthened for specific folders in the Sharing System Preference pane.
Each method of sharing files has advantages and disadvantages. Regardless of which
CIS Mac OS X Leopard (10.5.x) Benchmark
Page 57 of 84
method used, the folder and file access permissions must be controlled to make sure
only the correct data is shared. The three ways to share files using File Sharing are:5
1. Apple File Protocol (AFP)
AFP under Leopard automatically uses encrypted logins, so this method of sharing
files is fairly secure. The entire hard disk is shared to administrator user accounts.
Individual home folders are shared to their respective user accounts. Users’
―Public‖ folders (and the ―Drop Box‖ folder inside) are shared to any user account
that has sharing access to the computer (i.e. anyone in the ―staff‖ group, including
the guest account if it is enabled).
2. File Transfer Protocol (FTP)
FTP send password via clear text and thus is very insecure. FTP is commonly used
for anonymous upload and download of files where security is of less concern.
FTP is best not used on a client Mac.
3. Server Message Block (SMB), Common Internet File System (CIFS)
When Windows (or possibly Linux) computers need to access file shared on a
Mac, SMB/CIFS file sharing is commonly used. Apple warns that SMB sharing
stores passwords is a less secure fashion than AFP sharing. When sharing with
SMB, each user that will access the Mac must have SMB enabled.
Context System
Level 1
Scoring Status Scorable
Caveats A thorough understanding of each protocol’s advantages and disadvantages, as well as
an understanding of what folders and files are shared is necessary when turning File
Sharing on.
Remediation In System Preferences: Sharing, turn on Screen Sharing only if necessary. Configure
Screen Sharing according to personal or organizational needs, but be aware of the
implications of each option.
To turn off AFP from the command line:
sudo launctl unload -w
/System/Library/LaunchDaemons/com.apple.AppleFileServer.plist
To turn off FTP from the command line:
sudo launctl unload -w /System/Library/LaunchDaemons/ftp.plist
To turn off SMB sharing from the CLI:
sudo defaults delete /Library/Preferences/SystemConfiguration/com.apple.smb.server
\
EnabledServices
5 Technically the Mac can share files other ways out of the box: Secure Copy Protocol (scp), secure File Transfer Protocol
(sftp), and Network File System (NFS). scp and sftp are a subset of the Remote Login feature and are discussed is the
Remote Login section of this document. Apple doesn’t provide a GUI means of enabling NFS, so the NFS protocol will
not be discussed in this document. NFS poses significant security risks and should only be configured by an experienced
system administrator familiar with inherent NFS risks.

CIS Mac OS X Leopard (10.5.x) Benchmark
Page 58 of 84
sudo launctl unload -w /System/Library/LaunchDaemons/nmbd.plist
sudo launctl unload -w /System/Library/LaunchDaemons/smbd.plist
Audit In System Preferences; Sharing, File Sharing; Options, verify only the needed sharing
services are on.
Alternatively, run the following commands:
launchctl list
and look for the various services listed above in the remediation section.
Additional Info None
2.4.14.4) Secure SMB
Explanation SMB can be configured using the /etc/smb.conf file. By default, SMB is fairly secure,
but it can be made more secure with a few additions to the /etc/smb.conf file.
Context System
Level 2
Scoring Status Scorable
Caveats May provide more restrictions on SMB sharing than needed.
Remediation Edit the file /etc/smb.conf (using sudo)
Find the [Global] section and add the following lines:
; don’t allow any anonymous connections
restrict anonymous = 2
; do not allow guest access (this is the default)
guest OK = no
; only allow NTLMv2 and LMv2 response (much more secure than earlier versions)
client ntlmv2 auth = yes
Audit cat /etc/smb.conf and look for the options as listed in the remediation section.
Additional Info man smb.conf
2.4.14.5) Configure Printer Sharing
Explanation Printer Sharing makes the Mac into a print server. Attackers could attempt to exploit
the print server to gain access to the Mac. As with File Sharing, Printer Sharing is best
left off and a dedicated, well-managed print server is recommended.
Context System
Level 1
Scoring Status Not Scorable
Caveats None
Remediation In System Preferences: Sharing, turn on Printer Sharing only if necessary. Only share
printers that need to be shared.
Audit In System Preferences: Sharing, verify Printer Sharing is off for each printer listed.

CIS Mac OS X Leopard (10.5.x) Benchmark
Page 59 of 84
Additional Info None
2.4.14.6) Configure Web Sharing
Explanation Web Sharing uses the Apache 2.2.x Web server to turn the Mac into an HTTP/Web
server. When Web Sharing is on, files in /Library/WebServer/Documents as well as
each user’s ―Sites‖ folder are made available on the Web. As with File Sharing, Web
Sharing is best left off and a dedicated, well-managed Web server is recommended.
Context System
Level 1
Scoring Status Scorable
Caveats None
Remediation In System Preferences: Sharing, turn on Web Sharing only if necessary.
To turn off Web sharing from the command line:
sudo launchctl unload -w /System/Library/LaunchDaemons/org.apache.httpd.plist
Audit In System Preferences: Sharing, verify Web Sharing is off.
Alternatively, run the following command:
launchctl list
and look for a line with ―apache.‖
Additional Info Leopard includes Apache 2.2, whereas the workstation edition of Mac OS X 10.4
Tiger included Apache 1.3.
2.4.14.7) Secure Web Sharing
Explanation Web Sharing can be configured using the /etc/apache2/httpd.conf file (for global
configurations). By default, Apache is fairly secure, but it can be made more secure
with a few additions to the /etc/apache2/httpd.conf file.
Context System
Level 2
Scoring Status Scorable
Caveats The UserDir directive below will stop the ―Sites‖ folders from being shared on the
Web. Only the /Library/WebServer/Documents folder is shared if UserDir is off. A
user might not understand the relevance of the ―Sites‖ folder and may place sensitive
files in the ―Sites‖ folder that would be shared if Web Sharing is turned on. Also, an
attacker might attempt to determine user names using Web requests if UserDir is on.
Do not disable UserDir if your needs dictate that the ―Sites‖ folders for users need to
be shared.
Remediation Edit the/apache2/httpd.conf file (using sudo) and add the following to the bottom of
the file. Restart Web Sharing after making the changes (turn it off and on again)
# limit the information the server gives out about its version
ServerTokens Prod

CIS Mac OS X Leopard (10.5.x) Benchmark
Page 60 of 84
# limit the information the server gives out about its version
ServerSignature Off
# turns off all username-to-directory translations except
# those explicitly named with the enabled keyword
# this directive turns off the Sites folder for every user as a Web share
# Only the DocumentRoot folder is shared
UserDir Disabled
# causes the core server and mod_proxy to return
# a 405 (Method not allowed) error to the client.
TraceEnable Off
Audit cat /etc/apache2/httpd.conf and look for the remediations above.
Additional Info http://httpd.apache.org/docs/2.2/
2.4.14.8) Configure Remote Login
Explanation Remote Login is Apple’s implementation of Secure Shell (ssh). The ssh protocol has
replaced telnet as the primary means of remotely accessing a computer using the
command line interface (CLI).
Remote Login can also be used to securely transfer files using scp (secure copy) from
the CLI. Secure FTP (SFTP) uses this protocol as well, so if FTP (which is an entirely
different protocol from SFTP) is needed for anything other than anonymous file
transfers, Remote Login is much preferable over FTP. Most GUI FTP clients support
SFTP as well.
If possible, restrict access only to users that require remote login.
Context System
Level 1
Scoring Status Not Scorable
Caveats None
Remediation In System Preferences: Sharing, turn on Remote Login only if necessary. If turned on,
add users to the Allow Access for list if possible.
Audit In System Preferences: Sharing, turn on Remote Login is off.
Additional Info None
2.4.14.9) Secure Remote Login
Explanation Remote Login can use a number of authentication methods including passwords, key
pairs, and Kerberos. Each method has its advantages and disadvantages.
Passwords are transfer encrypted when using ssh, so they are safe. Passwords have
the advantage of requiring no extra set-up to work. Disadvantages of password are
CIS Mac OS X Leopard (10.5.x) Benchmark
Page 61 of 84
potential compromise and the inconvenience of have to enter the password each
time one connects.
Key Pairs allow a user to generate a public/private key pair on their Mac, then
transfer the public key to one or more computers. Once the public key is one the
remote computer, the user can connect to the remote computer without entering a
password. The Mac is configured out of the box to allow the use of these
public/private keys. The main concern when using a key pair is if the private key
is compromised, any server with the public key can be accessed. In addition,
keypairs fall outside any password management you may require because they no
longer rely on password authentication. You should be careful to manage
authentication via this method, especially when or if you need to disable accounts.
Kerberos (named after the three headed dog guarding Hades in Greek mythology)
is an MIT technology used widely by Apple, Microsoft, and others. Out of the
box, the Mac uses Kerberos to authenticate with some Mac sharing services (like
Back to my Mac), because each Leopard-based computer runs its own Kerberos
realm and Key Distribution Center (KDC). However, the Mac is not configured to
use Kerberos out-of-the-box when connected to a Kerberized server via ssh.
Instructions on how to configure a Mac to use Kerberos for ssh connections are
below.
Which authentication method should be used? That simply depends on the situation.
Kerberos is probably considered the safest, but it requires a significant infrastructure
and thus is better suited to organizations. Key pairs are probably the next best.
Passwords are the least desirable, but can serve as a lowest common denominator
between systems.
A Mac can be configured to only allow one, two or all of these methods.
Organizational and personal requirements will dictate which should be used.
In addition to authentication, ―ssh protocol 1‖ should be disallowed since it is an older
and insecure means of using ssh. It is disabled by default in Leopard, but was enabled
in earlier versions of Mac OS X.
Finally, the Mac should not allow the user ―root‖ to connect. If a person with
administrative rights needs to perform operations on the computer as the ―root‖ user,
the ―sudo‖ command can be used through a Remote Login session. See ―man sudo‖
for more information.
Context System
Level 2
Scoring Status Not Scorable
Caveats Organizational and personal requirements will dictate which should be used.
Remediation Passwords are enabled by default. No changes are needed to use passwords.
Key Pairs are enabled by default. No changes are needed to allow Key Pairs. Use the
ssh-keygen program to generate a keypair. A pass-phrase is recommended when
CIS Mac OS X Leopard (10.5.x) Benchmark
Page 62 of 84
generating a Key Pair. See ―man ssh-keygen‖ and ―ssh-agent‖ for more information
on the use of Key Pairs and pass-phrases.
Use of sudo is required to edit these configuration files.
For the Mac to access Kerberized ssh or SFTP servers, edit /etc/ssh_config and
add/edit the following line:
GSSAPIAuthentication=yes
For the Mac to accept Kerberos tickets for ssh, edit /etc/sshd_config and add/edit the
following lines:
GSSAPIAuthentication yes
GSSAPICleanupCredentials yes
Note: Different organization’s Kerberos configurations may require different
alterations to the sshd_config file, particularly if your organization operates its own
KDC.
To make sure the Mac doesn’t connect with protocol 1, edit /etc/ssh_config and/edit
the following line:
Protocol 2
To make sure the root user doesn’t connect, edit /etc/ssh_config and/edit the following
line:
PermitRootLogin no
―Add/edit‖ means to either find the line containing the directive, uncomment it if
commented, and edit it as needed. If not found in the configuration file, add the line.
Audit None
Additional Info Completely securing ssh is beyond the scope of this document. For a good article, see:
http://www.macos.utah.edu/documentation/security/lab_security/ssh.html
There are other steps you may wish to take in order to harden SSH against attackers.
The MaxAuthTries, MaxStartups, LoginGraceTime, AllowUsers, DenyUsers,
AllowGroups, and DenyGroups directives in ―man sshd_config‖ may be of particular
interest.
Kerberos authenticates a user’s password locally, then passes a token to a central
server (called a Key Distribution Center, or KDC). The KDC validates the token and
issues a ticket to the client, which is then passed to the server the user is trying to
connect to. The server validates the ticket with the KDC and then lets the user

CIS Mac OS X Leopard (10.5.x) Benchmark
Page 63 of 84
connect.
By default, a Kerberos ticket is good for 10 hours, so once a user has obtained a ticket,
no password needs to be used for up to 10 hours.
Kerberos is considered a very effective and secure means of authentication, but there
are some disadvantages. The client ticket can be hijacked if an attacker has remote
access to the client computer. The hijacked ticket will expire when the ticket expires,
but can be used until then to access Kerberized services and servers. Since the ticket
expires, this disadvantage is seen as less of an issue than if a private key is
compromised.
Please note that an earlier recommendation has a banner warning set up for Remote
Login.
2.4.14.10) Configure Remote Management
Explanation Remote Management is the client portion of Apple Remote Desktop (ARD) <
http://www.apple.com/remotedesktop/>. Remote Management has a screen sharing
component similar to the Screen Sharing feature described above. Remote
Management can also be used by administrators to install software, report on, and
generally manage client Macs. ARD is mostly likely to be used in an organization and
not by home users.
The screen sharing options in Remote Management are identical to those in the Screen
Sharing section. In fact, only one of the two can be configured. If Remote
Management is used, refer to the Screen Sharing section above on issues regard screen
sharing.
Other features of Remote Management should be configured if the service is used.
One option is to ―Show Remote Management status in the menu bar.‖ Turning this
option on allows the user to see if screen sharing or other remote management features
are being used.
More security settings of relevance are found after clicking on the Options button.
Only those options needed by the Remote Management Administrator should be
turned on.
The final security concern with Remote Management is the list of users that access the
Mac with Remote Management. The easiest, and least secure method, it to have the
same username and password for a Remote Management administrator on every Mac
in an organization. If this one name/password combination is compromised, the entire
network of Macs is compromised.
The second method would be to have a different username/password combination on
each Mac. This is difficult to implement since one would need to remember a large

CIS Mac OS X Leopard (10.5.x) Benchmark
Page 64 of 84
number of passwords and usernames, or one would need to write them down, thus
creating a target for compromise.
The ideal solution is to use a directory service (like Open Directory or Active
Directory) and only allow group access. This method allows an organization to add or
remove people to the directory group as needed, thus controlling access to the network
of Macs. There are four groups used by ARD for this purpose: ard_admin,
ard_interact, ard_manage and ard_reports. Therefore, combining or nesting local or
network groups and user accounts may meet your needs. Various versions of Mac OS
X and ARD may or may not allow the use of these groups, particularly if groups are
nested within groups.
Context System
Level 1
Scoring Status Not Scorable
Caveats A wide variety of configuration permutations are possible with Remote Management.
Remote Management should be configured by an experienced administrator.
Remediation In System Preferences: Sharing, turn on Remote Management if necessary. If turned
on, configure the screen sharing options as discussed above in the Screen Sharing
section. Turn on the option: ―Show Remote Management status in the menu bar‖
Only turn on the options in the Options button if necessary.
Use a directory service to allow Remote Management access. Do not use a common
username/password across multiple Macs.
Audit Use the kickstart program to set or determine Remote Management settings.
Additional Info /System/Library/CoreServices/RemoteManagement/ARDAgent.app/Contents/Resourc
es/kickstart -help
2.4.14.11) Configure Remote Apple Events
Explanation Apple Events is a technology that allows one program to communicate with other
programs. Remote Apple Events allows a program on one computer to communicate
with a program on a different computer. Typically Remote Apple Events is used to
automate a business process. Unless needed, Remote Apple Events should be turned
off. If needed, it should be configured with the least access granted as possible. If Mac
OS 9 is not being used, the option to allow events from OS 9 should be turned off. If
OS 9 events are needed, a username and password should be used.
Context System
Level 1
Scoring Status Scorable
Caveats None
Remediation In System Preferences: Sharing, turn on Remote Apple Events only if necessary. If
turned on, add users to the Allow Access for list if possible. If OS 9 events are
needed, use a username and password in the Options... button.
To turn off Remote Apple Events from the command line:
CIS Mac OS X Leopard (10.5.x) Benchmark
Page 65 of 84
sudo launchctl unload -w /System/Library/LaunchDaemons/eppc.plist
Audit In System Preferences: Sharing, verify Remote Apple Events is off.
Alternatively, run the following command:
launchctl list
and look for a line with eppc
Additional Info None
2.4.14.12) Configure Xgrid Sharing
Explanation Xgrid is Apple’s distributed computing technology. Xgrid should be turned off unless
specifically needed. If needed, access should be controlled using the Single Sign On
option.
Context System
Level 1
Scoring Status Not Scorable
Caveats None
Remediation In System Preferences: Sharing, turn on XGrid only if necessary. If turned on, select
Single Sign On for the Authentication method.
Audit None
Additional Info http://www.apple.com/server/macosx/technology/xgrid.html
The single sign on option for Xgrid uses Kerberos.
2.4.14.13) Configure Internet Sharing
Explanation Internet Sharing uses the open source natd process to share an internet connection
with other computers and devices on a local network. Unless specifically required,
Internet Sharing should be turned off. If used, it should only be turned on when actual
sharing is needed. A much better solution is a dedicated router (available for as little
as $10US). Apple makes a number of certified compatible routers.
Context System
Level 1
Scoring Status Scorable
Caveats None
Remediation In System Preferences: Sharing, turn on Internet Sharing only if necessary.
Alternatively, run the following commands:
sudo defaults write /Library/Preferences/SystemConfiguration/com.apple.nat \
NAT -dict Enabled -int 0
sudo launchctl unload -w /System/Library/LaunchDaemons/
com.apple.InternetSharing.plist

CIS Mac OS X Leopard (10.5.x) Benchmark
Page 66 of 84
Audit In System Preferences: Sharing, verify Internet Sharing is off.
Alternatively, run the following commands:
launchctl list
and look for a line with InternetSharing
Additional Info http://www.apple.com/wifi/
2.4.14.14) Completely disable sharing services
Explanation Various sharing services can offer an attacker a conduit to compromise a system.
Unless absolutely needed, sharing should be turned off or completely disabled so that
it cannot be turned on. If any of these services are needed, a better solution is a
dedicated server.
Context System
Level 2
Scoring Status Scorable
Caveats The recommended way to disable these services can be reversed by an administrative
user or possibly by a system update.
Removal of the LaunchDaemons does not prevent an attacker with elevated privileges
from re-creating them, copying them from another Leopard-based computer, or
running the sharing executables outright.
Remediation The following files should be moved or deleted from
/System/Library/LaunchDaemons/
com.apple.AppleFileServer.plist (AFP)
ftp.plist (FTP)
smbd.plist (SMB)
org.apache.httpd.plist (Web)
eppc.plist (Remote Apple Events)
com.apple.mDNSResponder.plist (Bonjour)
com.apple.mDNSResponderHelper.plist (Bonjour)
com.apple.xgridagentd.plist (Xgrid)
com.apple.xgridcontrollerd.plist (Xgrid)
com.apple.InternetSharing.plist (Internet Sharing)
Audit Verify the files are removed for the service(s) disabled.
Additional Info
2.4.15) Software Update Preferences Action Items
Note: Software Update preferences must be set for each user.

CIS Mac OS X Leopard (10.5.x) Benchmark
Page 67 of 84
2.4.15.1) Disable “Check for updates” for standard users
Explanation Since most updates require an administrative password to install, there is little need to
notify standard users when updates are available. The exception would be if the
standard user also has an administrator account on the same Mac.
Context System
Level 1
Scoring Status Not Scorable
Caveats Only disable for standard users that do not have an administrator account.
Remediation In System Preferences: Software Update, turn on ―Check for updates‖ for
administrator accounts, and for standard users that also have an administrator account.
Turn off ―Check for updates‖ for all others.
Audit None
Additional Info None
2.4.15.2) Download important updates automatically
Explanation Generally, it is not a good idea to have a computer automatically download operating
level software patches from unknown sites automatically. Since the Software Update
process will either use the Apple’s own Software Update service or one provided by
the organization (via Mac OS X Server), there is little benefit in turning this option
off.
Context System
Level 2
Scoring Status Not Scorable
Caveats The security benefits are minimal.
Remediation In System Preferences: Software Update, turn off ―Download important updates
automatically‖.
Audit None
Additional Info This option only downloads, but does not install, the updates.
2.4.15.3) Transfer installer packages from a test-bed computer
Explanation In the software update program, one can choose to download only or install and keep
packages. Ideally one would download the updates from Apple, install them on a test
computer, then test the functionality and compatibility of the new software. If
approved, the installer packages would be moved to production machines for
installation.
Context System
Level 2
Scoring Status Not Scorable
Caveats This process is probably too burdensome for the SoHo market but is recommended for
high sensitivity environments.
Remediation In Apple Menu: Software Update, select File Download Only when updates are
available. Update packages are stored in the users ~/Download folders. Test updates
for compatibility and functionality and if approved, deploy the updates to other Macs.
Audit None

CIS Mac OS X Leopard (10.5.x) Benchmark
Page 68 of 84
Additional Info Downloading and vetting packages for various kinds of Apple hardware may be
difficult to manage even for an organization. Some updates apply only to specific
computer models. The Software Update utility, in contrast, only makes updates
available if they apply to the current computer — but it lists all updates that apply.
2.4.16) Sound Preferences Action Items
2.4.16.1) Change sound input device to Line In
Explanation Apple provides no way to turn off the internal microphone (if so equipped). A remote
attacker could enable the microphone and listen in on potentially sensitive
conversations. The only way to limit the microphone is to turn the input volume off
and to set the input to line in. Even if done, however, the internal microphone can still
be turned on by a remote hacker or by an application running on the Mac. The safest
method to disable the internal microphone it to have it disconnected by an authorized
Apple technician.
Context System
Level 2
Scoring Status Not Scorable
Caveats The microphone can easily be turned on by an application or remote attacker.
Remediation If the Mac is equipped with an internal microphone, in System Preferences: Sound,
Input tab, set the input to Line In.
Audit If the Mac is equipped with an internal microphone, in System Preferences: Sound,
Input tab, verify the input is set to Line In.
Additional Info None
2.4.16.2) Minimize input volume for all inputs
Explanation Apple provides no way to turn off the internal microphone (if so equipped). A remote
attacker could enable the microphone and listen in on potentially sensitive
conversations. The only way to limit the microphone is to turn the input volume off
and to set the input to line in. Even if done, however, the internal microphone can still
be turned on by a remote hacker or by an application running on the Mac. The safest
method to disable the internal microphone it to have it disconnected by an authorized
Apple technician.
Context System
Level 2
Scoring Status Not Scorable
Caveats The microphone can easily be turned on by an application or remote attacker.
Remediation If the Mac is equipped with an internal microphone, in System Preferences: Sound,
Input tab, set the input volume all the way to left (off). Click on each input device and
set the volume to off for each device.
Audit If the Mac is equipped with an internal microphone, in System Preferences: Sound,
Input tab, verify the input volume is set all the way to left (off). Click on each input
device and verify the volume is set to off for each device.
Additional Info None

CIS Mac OS X Leopard (10.5.x) Benchmark
Page 69 of 84
2.4.17) Speech Preferences Action Items
Note: Speech preferences must be set for each user.
2.4.17.1) Only enable speech recognition in a secure environment
Explanation Apple’s speech recognition allows a user to speak a finite list of commands that are
recognizable by the computer. If configured improperly, anyone within earshot of the
Mac can initiate these actions. Use of speech recognition should be in a secure
environment where only the user of the Mac can issue commands.
Context User
Level 1
Scoring Status Not Scorable
Caveats None
Remediation In System Preferences, Speech, Speech Recognition tab, turn off Speakable Items
unless in a secure environment.
Audit In System Preferences, Speech, Speech Recognition tab, verify Speakable Items is off.
Additional Info Apple’s speech recognition is listener independent, does not require training, and is
optimized for a speaker within about 21 inches of the built-in microphones on
Macintosh models. It may work better with a speech-quality microphone. A brief
calibration routine for each user (and often, in each new aural environment) is
recommended.
The speech command sets enabled by default include:
Address Book
Global Speakable Items (such as ―What time is it‖ and ―What day is it‖)
Application Specific Items (provided in the bundles of running applications)
Application Switching.
Additional Speakable Items are found in ―~/Library/Speech/Speakable Items,‖ a
directory which does not exist by default (and is not in the User Template).
2.4.17.2) Configure Speech Recognition to use a Listening Key
Explanation Speech Recognition can be configured to listen continuously or only when a specific
key is pressed. Listening continuously can allow anyone within earshot of the Mac to
initiate an operation on the Mac. Configure speech recognition to use a Listening Key
to commands are only executed when the Mac user desires them to be.
Context User
Level 1
Scoring Status Not Scorable
Caveats None
Remediation In System Preferences, Speech, Speech Recognition tab, select ―Listen only while key
is pressed‖.
Audit In System Preferences, Speech, Speech Recognition tab, verify ―Listen only while key
is pressed‖ is selected.

CIS Mac OS X Leopard (10.5.x) Benchmark
Page 70 of 84
Additional Info None
2.4.17.3) Use headphones if you enable text to speech, or turn text to speech off
Explanation When using the Text to Speech feature, use headphones to others cannot hear what the
computer is saying. The computer may convert sensitive text to speech, so limit who
can hear it.
Context User
Level 1
Scoring Status Not Scorable
Caveats None
Remediation In System Preferences, Speech, Text to Speech tab, turn off all options or wear
headphones.
Audit None
Additional Info None
2.4.18) Spotlight Preferences Action Items
2.4.18.1) Prevent Spotlight from searching all confidential folders
Explanation Spotlight is Apple’s search technology built into the operating system. By default it
indexes every file on any local hard drive. While spotlight will enforce access control
restrictions to limit access to files, the index itself may contain information about
sensitive files that others should not see. The Spotlight System Preference Pane allows
the user to exclude volume, folders, and data types from being indexed.
Context User and System
Level 1
Scoring Status Not Scorable
Caveats Adding folders or volumes to the privacy settings will restrict searching for
information in those folders and volumes. For example, adding ~/Library/Mail will
disable the ability to search through the body of Mail messages, even within the Mail
application.
Also, authentication is not required to add or remove items to the exclusion list. Any
user can remove items from the exclusion list.
Remediation In System Preferences: Spotlight, Search Results tab turn off any categories that
should not be indexed.
In System Preferences: Spotlight, Privacy tab add any volumes or folders that contain
sensitive data.
Alternatively you can disable spotlight from indexing and search specific volumes
with the following command:
sudo mdutil -E -i off <volumename>
Audit None

CIS Mac OS X Leopard (10.5.x) Benchmark
Page 71 of 84
Additional Info None
2.4.18.2) Prevent Spotlight from searching backup folders or volumes
Explanation Spotlight is Apple’s search technology built into the operating system. By default it
indexes every file on any local hard drive. If a local hard drive is used for backup,
spotlight will find the original and the backup of a file. The user may edit the backup
file and lose changes if the back up file overwrites the backup with the original.
Context User and System
Level 1
Scoring Status Not Scorable
Caveats None
Remediation In System Preferences: Spotlight, Privacy tab add any volumes or folders that contain
backups.
Audit In System Preferences: Spotlight, Privacy tab verify all backup volumes or folders are
in the privacy list.
Additional Info None
2.5) Data Maintenance and Encryption Action Items
2.5.1) Backup
Explanation Backing up is very important. This point cannot be stressed enough. Apple includes
Time Machine to make backing up easier. Numerous third party free and commercial
products are also available to back up one’s Mac. A good backup scheme can mitigate
the loss of data if a Mac is compromised, lost, stolen, or becomes unusable.
Context System
Level 1
Scoring Status Not Scorable
Caveats None
Remediation When using Time Machine, simply connect and external drive to the Mac and the Mac
will ask if you want to use the drive as a backup drive. Select yes.
When using other software, follow the software’s instructions to backup.
Audit None
Additional Info None
2.5.2) Secure Home Folders
Explanation By default the Mac is set up to allow every user to see into the top level of the home
folder of other users. This allows user to drop files into the ―Drop Box‖ folders of
other users. This also allows users to see newly-created files and folders in the top
level of other users’ home folders but not within the standard subfolders such as
―Documents‖ and ―Library.‖ This access to the top of other users’ home folders may
not be desirable. To resolve this potential revelation of sensitive information,
permissions should be set on home folder to restrict access to the owner of the folder.

CIS Mac OS X Leopard (10.5.x) Benchmark
Page 72 of 84
Context User
Level 2
Scoring Status Scorable
Caveats If implemented, users will not be able to use the ―Public‖ folders in other users’ home
folders. ―Public‖ folders with appropriate permissions would need to be set up in the
/Shared folder.
Remediation Open Terminal and enter:
sudo chmod 700 /Users/<username>
where <username> is the name of each user. This command has to be run for each
user account with a local home folder.
Audit Run the following command:
ls -l /Users/
verify that each user home folder looks like drwx------
Additional Info None
2.5.3) Encrypt sensitive files
Explanation Sensitive files should be encrypted, especially when sent over e-mail, the network, or
on removable media or laptops. FileVault will encrypt all files in the home directory,
including Mail, but only at rest (when the user is logged out). In order to encrypt files
when in transit (mailed, copied over the network, on removable media), encryption
software is required. Apple provides encrypted disk images as a feature of Disk
Utility, and Apple Mail supports encryption for Mail. There are also numerous third
party products that provide for individual or enterprise level encryption and key
management. Which product to use and how to use it is beyond the scope of this
document.
Context User
Level 2
Scoring Status Not Scorable
Caveats Encryption is complicated and very commonly site and user specific.
Remediation Encrypt sensitive data whenever possible.
Audit None
Additional Info None
2.5.4) Securely erase files in the Finder
Explanation When a file is put into the trash and trash is emptied, only the directory entry for the
file is deleted; the data in the file is not actually deleted.
Think of a magic book library. When the librarian wants to remove a book she just
removes the card catalog card for the book. The book stays on the shelf until the space
is needed. When space is needed, pages from the book are removed until the needed
space is made available. Until all the space of the original book is needed, some pages
CIS Mac OS X Leopard (10.5.x) Benchmark
Page 73 of 84
may remain on the shelf.
The computer operates in a similar fashion. The data from the file is still on the hard
drive until the operating systems needs the space. ―Undelete‖ software is available to
recover these files, and special disk reading software is available to look at partial
remains of the file if part of its space is used.
To be sure a deleted file is actually deleted, the Mac has a feature called Secure Empty
Trash (under the Finder menu). When selected the Mac not only removes the file
information from the file directory, the Mac also overwrites the data in the file with
meaningless data, thus preventing the file from being recovered.
Use Secure Erase Trash to erase sensitive files.
Finder: Preferences: Advanced allows the user to set Empty Trash Securely as the
default.
The command line tool ―srm‖ is also available as an alternative to ―rm.‖
Context User
Level 1
Scoring Status Not Scorable
Caveats Secure Empty Trash can take a long time.
Remediation When emptying the trash, use Finder: Secure Empty Trash if sensitive files are in the
trash.
If sensitive files are commonly deleted, set the Finder: Preferences: Advanced Empty
Trash Securely option to on.
Use the ―srm‖ command in Terminal when deleting sensitive files from the CLI.
Audit None
Additional Info man srm
2.5.5) Securely erase partitions
Explanation Using the erase capability of Disk Utility (found on the Mac OS X Install DVD) will
only erase the directory structure of disk and leave its contents intact. To make sure
everything on the partition is erased, the Secure Erase feature of the Disk Utility must
be used.
Unless an organizational hard drive disposal policy must be followed, a 7 pass wipe
secure erase should be used before a hard drive is discarded, sold, or transferred to
another party. If time permits, a 35 pass wipe can be used, but a 7 pass wipe is
generally adequate.
Context System
Level 2
CIS Mac OS X Leopard (10.5.x) Benchmark
Page 74 of 84
Scoring Status Not Scorable
Caveats This process can take a long time, possibly days if the 35 pass wipe is used on a high-
capacity disk.
Perform this on a laptop only if it is connected to power with its power adapter.
Remediation Open /Applications/Disk Utility.
Select the partition to erase on in the left panel.
Select the Erase tab.
Click on the Security Option button.
Choose ―Zero out data‖, then OK. Use a 7 or 35 pass erase if required.
Click the erase button.
Audit None
Additional Info According to Apple, in Tiger the ―7-Pass Erase‖ option conforms to the DoD 5220.22-
M specification. This specification calls for three passes, but Disk Utility performs
seven. We assume this is true for Leopard as well. See
http://docs.info.apple.com/article.html?artnum=303462
2.5.6) Securely erase free space
Explanation If sensitive files have been erased without using Secure Erase, Mac OS X offers an
additional way to securely erase all of the free space on a drive. This action will make
it even harder for anyone to recover deleted files from the Mac.
Context System
Level 2
Scoring Status Not Scorable
Caveats Can take a very long time (hours). If interrupted, the free space may not be easily
recoverable.
Remediation Open /Applications/Disk Utility
Select the desired partition on in the left panel
Select the Erase tab
Click the Erase Free Space... button
Choose the desired option
Click the Erase Free Space button.
Warning: if performing this operation on a laptop, make sure the power adaptor
is plugged in. Also, even though there is a cancel option, we do not recommend
canceling.
The following CLI command will securely erase free space:
sudo diskutil secureErase freespace [1|2|3] /
where [1|2|3] is one of the following:
1 is a single pass, 2 is a US DOD 7 pass, and 3 is a 35 pass erase.

CIS Mac OS X Leopard (10.5.x) Benchmark
Page 75 of 84
Audit None
Additional Info man diskutil
2.5.7) Repair disk permissions after installing software or software updates
Explanation Sometimes file permissions get set differently from the desired permissions. A
number of reasons might cause this, and most are beyond the control of the user.
Every time a package is installed, the package leaves a receipt that tells the computer
what files were installed and what their permissions on disk should be.
Using the repair permissions feature of Disk Utility, the permissions of most program
files can be reset to the desired values.
Context System
Level 1
Scoring Status Not Scorable
Caveats If custom permissions were set on items in /Applications or /Library, these
permissions may need to be reset.
Remediation Open Applications: Disk Utility.
Select the startup disk in the left panel.
Select the First Aid tab.
Click on the Repair Permission button
Alternatively the command can be run from Terminal:
diskutil repairPermissions /
Permissions can be repaired when started up from a Mac OS X Install DVD, but
Apple recommends running it from a fully-updated Mac OS X system instead.
Audit None
Additional Info Apple recommends running repair permissions from an up-to-date system disk, rather
than the system installer DVD.
http://docs.info.apple.com/article.html?artnum=25751
If the system is not maintained by a configuration management tool that manages
permissions, a good best practice is to schedule a permission repair to occur at least
monthly. Tools like launchd can be used (use Lingon as a GUI front end for launchd).
Also, the command line above can be placed in the file /etc/monthly.local and the
command will be executed monthly (/etc/weekly.local will execute the command
weekly).
CIS Mac OS X Leopard (10.5.x) Benchmark
Page 76 of 84
2.6) Network Services Configuration Action Items
2.6.1) Secure Bonjour
Explanation Bonjour is an auto-discovery mechanism for TCP/IP devices. Because Bonjour can
enumerate devices and services on a network, it makes finding things on the network
easy, but this also concerns security experts. An attacker could use Bonjour’s
multicast DNS feature to discover a vulnerable or poorly-configured service. A person
could brows a local network for poorly-configured services and gain access to
sensitive information. The actual discovery is performed via DNS Service Discovery
(DNS-SD).
Context System
Level 2
Scoring Status Scorable
Caveats Anything Bonjour discovers is already available on the network and probably
discoverable with network scanning tools. The security benefit of disabling Bonjour
for that reason is minimal. Also note that some applications, like Final Cut Studio and
AirPort Base Station management, may not operate properly if the mDNSResponder
is turned off.
Remediation Bonjour can be turned off using this shell command in Terminal:
sudo launchctl unload –w \
/System/Library/LaunchDaemons/com.apple.mDNSResponder.plist
Audit Run the following command:
launchctl list
verify that mDNSResponder is not in the result list.
Additional Info Without multicast DNS, Bonjour can still allow DNS-SD discoverability through a
traditional DNS server, but that is beyond the scope of this document. See
http://www.dns-sd.org/.
2.6.2) Use an outbound network detection system
Explanation The Apple firewall will prevent unwanted incoming network traffic, but will not
prevent unwanted outbound network traffic. Unwanted outbound traffic might include
spyware or malware traffic. Included with Mac OS X is a firewall called ipfw, which
is what Apple used as the main firewall in prior releases of the operating system.
Apple doesn’t use ipfw anymore, but still includes it in Leopard. Configuring ipfw to
prevent unwanted outbound traffic is beyond the scope of this document. Various
third party software products, notably Little Snitch, have outbound traffic firewall
capabilities.
Context System
Level 2
Scoring Status Not Scorable

CIS Mac OS X Leopard (10.5.x) Benchmark
Page 77 of 84
Caveats Firewalls are complex and the rules can be difficult to set up.
Remediation Use a firewall product that blocks unwanted outbound traffic.
Audit None
Additional Info http://seaotter.berkeley.edu/cab/mac-firewalls/ has a good run down of firewall
products for Mac OS X
For information on Little Snitch see http://www.obdev.at/products/littlesnitch
2.7) System Integrity Validation Action Items
2.7.1.1) Increase the retention time for system.log and secure.log
Explanation Many log files are archived and retained for 5 days based on the default Mac OS X
configuration. Leopard includes a new utility (newsyslog) to configure how log files
are stored and retained. Two important logs should be retained for longer than the
default 5 days: syslog.log and secure.log.
Context System
Level 2
Scoring Status Scorable
Caveats None
Remediation Backup then edit /etc/newsyslog.conf (using sudo)
Change the 5 in the count column to 30 for the syslog.log line and the secure.log line.
Audit Cat /etc/newsyslog.conf and verify the count is 30 for system.log and secure.log
Additional Info man newsyslog.conf
Leopard includes the Apple System Log (ASL) facility, which is a replacement for
syslog but provides compatibility with it. See ―man syslogd‖ and ―man asl.conf‖ for
more information.
CIS Mac OS X Leopard (10.5.x) Benchmark
Page 78 of 84
3) Appendix A: Imaging Technologies and References
Descriptions of each technology are copied from their respective Web pages or help files. Each
technology is trademarked by their respective owners.
This list is only a partial list of solutions. Other solutions for disk-imaging may be available. Inclusion
on this list is not an endorsement.
3.1) Apple, Inc., solutions
3.1.1) Apple Disk Utility and hdiutil command
Please see the help or man page for Disk Utilities or the hdiutil command.
3.1.2) Apple System Image Utility
―System Image Utility is a tool you use to create and customize NetBoot and NetInstall images.
With System Image Utility, you can:
Create NetBoot images that can be booted to the Finder.
Create NetInstall images from a DVD or existing Mac OS X partition.
Assemble a workflow that creates customized NetBoot and NetInstall images.‖
http://images.apple.com/server/macosx/docs/System_Imaging_and_SW_Update_Admin_v10.5.pdf
3.1.3) Apple Software Restore (ASR)
ASR efficiently copies disk images onto volumes, either directly or via a multicast network stream.
ASR can also accurately clone volumes without the use of an intermediate disk image.
See: man asr (in Terminal)
3.1.4) Apple NetBoot
―Using NetBoot and NetInstall, your client computers can start from a standardized Mac OS configuration suited to specific
tasks. Because the client computers start from the same image, you can quickly update the operating system for users by
updating a single boot image.‖
http://images.apple.com/server/macosx/docs/System_Imaging_and_SW_Update_Admin_v10.5.pdf
3.2) NetRestore
―Whether you're deploying five, five thousand, or 32,000 systems, NetRestore is the software
deployment solution for you. Built on Apple's Apple Software Restore technology, NetRestore can be
used to quickly and accurately restore a master disk image to a computer's hard disk while that disk
image is hosted locally, on a network via AFP, NFS or multicast, or on the internet via HTTP.
CIS Mac OS X Leopard (10.5.x) Benchmark
Page 79 of 84
NetRestore can also be used in conjunction with NetBoot to fully automate the deployment of a lab full
of machines. NetRestore was designed to be very easy to use, yet flexible, powerful, and extensible.
NetRestore supports the deployment of Mac OS X and Windows XP.‖
http://www.bombich.com/software/netrestore.htmlApple, Inc. Solutions
3.3) radmind
―A suite of Unix command-line tools and a server designed to remotely administer the file systems of
multiple Unix machines. For Mac OS X, there's also a graphical interface.‖
http://rsug.itd.umich.edu/software/radmind/Casper Suite: http://www.jamfsoftware.com
3.4) LANrev
―LANrev ImageLive™ enables you to deploy a complete disk image to any managed Mac OS X
computer, even while it is being used. No intermediate boot from a server, partition or boot disk is
necessary, and no pre-configuration of the target computer is required. LANrev can even automatically
migrate your users' home folders, local user accounts, network settings, and Directory Access settings
for you. On re-boot, end-users will find a new operating system, or clean image of the existing system,
with no interruption in user or productivity.‖
http://www.lanrev.com/solutions/imaging.shtml
3.5) Quest Management Xtensions for SMS 2003
―Microsoft Systems Management Server (SMS) 2003 is an ideal solution for change and configuration
management of Windows-based systems. However by itself, SMS can’t deliver system management
capabilities to non-Windows systems. Thanks to Quest® Management Xtensions for SMS – formerly
known as Vintela Management Systems – organizations with complex, heterogeneous IT environments
can now natively extend the system management capabilities of SMS 2003 from the Windows domain
to non-Windows systems such as Unix, Linux and Mac OS X. ―
http://www.quest.com/quest-management-xtensions-for-sms/
3.6) LANDesk
―LANDesk® Management Suite provides the tools you need to manage your enterprise client systems
running the Mac OS. Indeed, LANDesk Management Suite offers native support for Macintosh
computers, so your IT staff can automate systems and security management tasks and proactively see,
manage, update and protect all your desktops, servers and mobile devices. No management solution is
more complete, more integrated or easier to use.‖
http://www.landesk.com/

CIS Mac OS X Leopard (10.5.x) Benchmark
Page 80 of 84
3.7) InstaDMG
See http://www.afp548.com/article.php?story=ImageCreationRevolution
http://www.afp548.com/article.php?story=instadmg-beta
3.8) FileWave
―FileWave's enterprise software, designed for Windows, Mac OS X and Linux, represents a superior
way to distribute software and manage inventory that results in enhanced network security, improved
license compliance and an accurate system profile. No other existing software can match FileWave's
and Asset Trustee's extensive functionality, ease of use and utility.‖
http://www.filewave.com/
3.9) Casper Suite
―The integration of all components within the Casper Suite allows for a unique and powerful solution
that is unparalleled. Rather than bundling in an imaging utility, the Casper Suite uses packages created
in Composer, assembles them into configurations via Casper Admin and then deploys them using
Casper. The utilization of single OS or Application Packages with multiple configurations means that
there are identical components that make up the end user configuration.‖
http://www.jamfsoftware.com/products/composer.php
CIS Mac OS X Leopard (10.5.x) Benchmark
Page 81 of 84
4) Appendix B: Acknowledgements
The following people contributed to the creation of this document:
Allan Marcus, Los Alamos National Laboratory (Bechmark Leader and Editor)
Bob Fairbairn, Motorola
Charles Heizer, Lawrence Livermore National Laboratory
Eric Hall, DarkArt Consulting
Mick Kohler, SYSCO
Ron Colvin, NASA
Susan Bradley, Pacific Bell
Jeremy Reichman, Rochester Institute of Technology
Richard.A.Haas, NASA Glenn Research Center (Wyle Information Systems, Inc.)

CIS Mac OS X Leopard (10.5.x) Benchmark
Page 82 of 84
5) Appendix C: Network Locations Example
Open System Preferences: Network
Select Edit Locations from the Locations popup menu.
Click the plus button.
Enter ―Wireless Automatic‖
Click the plus button.
Enter ―Wired Automatic‖
Click the plus button.
Enter ―Office‖
Click Done
There is no need for the Wireless Automatic or Office locations if they are not appropriate for your
environment.
Select Wireless Automatic from the Locations popup menu.
Click on each interface in the left part of the window and click the minus button until only the wireless
interface is left.
Configure the wireless interface Using DHCP
Select Wired Automatic from the Locations popup menu.
Click on each interface in the left part of the window and click the minus button until only the Ethernet
interface is left.
Configure the Ethernet interface Using DHCP.
Select Office from the Locations popup menu.
Click on each interface in the left part of the window and click the minus button until only the
appropriate interface is left for the office environment.
Configure the interface as appropriate for the environment.
Each person’s need for network interfaces will be different. The idea is to have one location for each
needed interface, or interface configuration.

CIS Mac OS X Leopard (10.5.x) Benchmark
Page 83 of 84
6) Appendix D: Change History
Date Version Changes for this version
May 9th, 2008 1.0 Public Release