cisco hcs customer administration guide with cisco ... · web viewivcisco hcs customer...
TRANSCRIPT

Cisco HCS Customer Administration Guide with Cisco Unified CDM, Release 11.5(3)
First Published: 04/25/2018Last Modified:
Copyright © 2018 Cisco Systems, Inc

Full Cisco Trademarks with Software License THE SPECIFICATIONS AND INFORMATION REGARDING THE PRODUCTS IN THIS MANUAL ARE SUBJECT TO CHANGE WITHOUT NOTICE. ALL STATEMENTS, INFORMATION, AND RECOMMENDATIONS IN THIS MANUAL ARE BELIEVED TO BE ACCURATE BUT ARE PRESENTED WITHOUT WARRANTY OF ANY KIND, EXPRESS OR IMPLIED. USERS MUST TAKE FULL RESPONSIBILITY FOR THEIR APPLICATION OF ANY PRODUCTS.
THE SOFTWARE LICENSE AND LIMITED WARRANTY FOR THE ACCOMPANYING PRODUCT ARE SET FORTH IN THE INFORMATION PACKET THAT SHIPPED WITH THE PRODUCT AND ARE INCORPORATED HEREIN BY THIS REFERENCE. IF YOU ARE UNABLE TO LOCATE THE SOFTWARE LICENSE OR LIMITED WARRANTY, CONTACT YOUR CISCO REPRESENTATIVE FOR A COPY.
The Cisco implementation of TCP header compression is an adaptation of a program developed by the University of California, Berkeley (UCB) as part of UCB's public domain version of the UNIX operating system. All rights reserved. Copyright © 1981, Regents of the University of California.
NOTWITHSTANDING ANY OTHER WARRANTY HEREIN, ALL DOCUMENT FILES AND SOFTWARE OF THESE SUPPLIERS ARE PROVIDED “AS IS" WITH ALL FAULTS. CISCO AND THE ABOVE-NAMED SUPPLIERS DISCLAIM ALL WARRANTIES, EXPRESSED OR IMPLIED, INCLUDING, WITHOUT LIMITATION, THOSE OF MERCHANTABILITY, FITNESS FOR A PARTICULAR PURPOSE AND NONINFRINGEMENT OR ARISING FROM A COURSE OF DEALING, USAGE, OR TRADE PRACTICE.
IN NO EVENT SHALL CISCO OR ITS SUPPLIERS BE LIABLE FOR ANY INDIRECT, SPECIAL, CONSEQUENTIAL, OR INCIDENTAL DAMAGES, INCLUDING, WITHOUT LIMITATION, LOST PROFITS OR LOSS OR DAMAGE TO DATA ARISING OUT OF THE USE OR INABILITY TO USE THIS MANUAL, EVEN IF CISCO OR ITS SUPPLIERS HAVE BEEN ADVISED OF THE POSSIBILITY OF SUCH DAMAGES.
Any Internet Protocol (IP) addresses and phone numbers used in this document are not intended to be actual addresses and phone numbers. Any examples, command display output, network topology diagrams, and other figures included in the document are shown for illustrative purposes only. Any use of actual IP addresses or phone numbers in illustrative content is unintentional and coincidental.
Cisco and the Cisco logo are trademarks or registered trademarks of Cisco and/or its affiliates in the U.S. and other countries. To view a list of Cisco trademarks, go to this URL: https://www.cisco.com/go/trademarks. Third-party trademarks mentioned are the property of their respective owners. The use of the word partner does not imply a partnership relationship between Cisco and any other company. (1721R)

Change history Change History on page 4
Cisco HCS Customer Administration Guide with Cisco Unified CDM, Release 11.5(3) iii
Change history / Change History
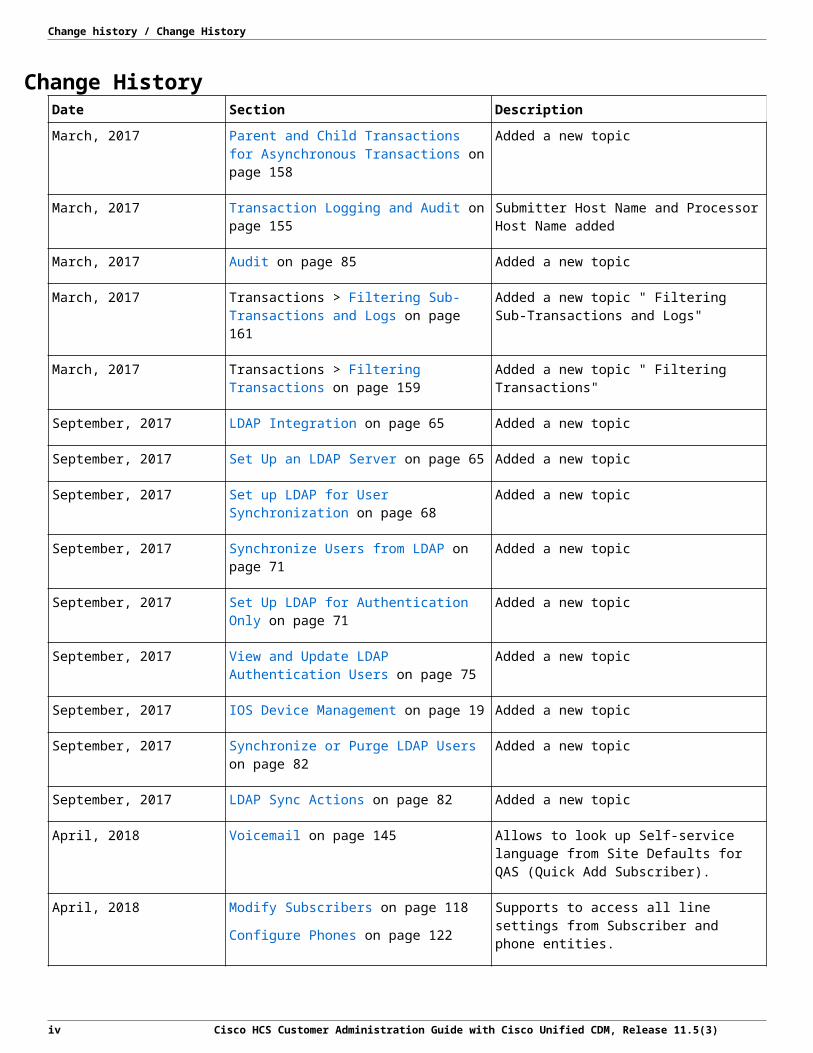
Change History Date Section Description
March, 2017 Parent and Child Transactions for Asynchronous Transactions on page 115
Added a new topic
March, 2017 Transaction Logging and Audit on page 113 Submitter Host Name and Processor Host Name added
March, 2017 Audit on page 65 Added a new topic
March, 2017 Transactions > Filtering Sub-Transactions and Logs on page 117
Added a new topic " Filtering Sub-Transactions and Logs"
March, 2017 Transactions > Filtering Transactions on page 115
Added a new topic " Filtering Transactions"
September, 2017 LDAP Integration on page 51 Added a new topic
September, 2017 Set Up an LDAP Server on page 51 Added a new topic
September, 2017 Set up LDAP for User Synchronization on page 53
Added a new topic
September, 2017 Synchronize Users from LDAP on page 55 Added a new topic
September, 2017 Set Up LDAP for Authentication Only on page 55
Added a new topic
September, 2017 View and Update LDAP Authentication Users on page 58
Added a new topic
September, 2017 IOS Device Management on page 15 Added a new topic
September, 2017 Synchronize or Purge LDAP Users on page 62 Added a new topic
September, 2017 LDAP Sync Actions on page 62 Added a new topic
April, 2018 Voicemail on page 105 Allows to look up Self-service language from Site Defaults for QAS (Quick Add Subscriber).
April, 2018 Modify Subscribers on page 85
Configure Phones on page 88
Supports to access all line settings from Subscriber and phone entities.
April, 2018 Quick Add Subscriber Device Pool on page 104 Specifies the information related to the Subscriber.
April, 2018 Quick Add Subscriber on page 91
Quick Add Subscriber Conditions on page 94
Provision the Voicemail Service on page 100
Allows to select phone-types and related field from QAS (Quick Add Subscriber).
iv Cisco HCS Customer Administration Guide with Cisco Unified CDM, Release 11.5(3)

Contents
Contents
Full Cisco Trademarks with Software License..................................................................
Change history....................................................................................................................
Change History..........................................................................................
Customer Administration Introduction..............................................................................
Understanding Hierarchy...................................................................................
Navigating the Hierarchy...................................................................................
Manage the Hierarchy Structure......................................................................
Log on..............................................................................................................
Administrator User Interface............................................................................
Device Management..........................................................................................................
IOS Device Management.................................................................................
IOS Device Management Workflow.........................................................
Local Break Out and Analog Gateway Events, IOS Commands, and Variables.............................................................................................
MGCP Analog Gateway Events and IOS Commands.......................
Translation Rule Numbering..............................................................
Set up a Command Builder.......................................................................
Clone a Command Builder........................................................................
Set up an IOS Device................................................................................
Analog Gateways......................................................................................
Set up an Analog Gateway........................................................................
Set up SIP Local Gateway.........................................................................
IOS Gateway Manual Configuration........................................................
Associate a SIP Local Gateway to a Site..................................................
View IOS Commands Log........................................................................
Consolidate IOS Commands.....................................................................
LDAP management............................................................................................................
LDAP Integration.............................................................................................
Set Up an LDAP Server...................................................................................
Set up LDAP for User Synchronization...........................................................
Synchronize Users from LDAP........................................................................
Set Up LDAP for Authentication Only............................................................
View and Update LDAP Authentication Users................................................
User Management..............................................................................................................
User Management Overview............................................................................

Contents
Managing Duplicate Usernames...............................................................
Create a User....................................................................................................
Delete a User....................................................................................................
Synchronize or Purge LDAP Users..................................................................
LDAP Sync Actions.........................................................................................
Audit....................................................................................................................................
Audit.................................................................................................................
Provisioning Status (CUCDM, LDAP and SyncTo).................................
User Type..................................................................................................
Subscriber..................................................................................................
Audit Report..............................................................................................
Password Management.....................................................................................................
Password Management.....................................................................................
Users Synchronized from LDAP to Cisco Unified CDM 10.x/11.5(x)...............................................................................................
User Synchronized from LDAP to Cisco Unified CDM 10.x/11.5(x) (SSO Enabled)......................................................................
User Synced from Cisco Unified CDM 10.x+ to Cisco Unity Connection................................................................................................
Delete Incorrectly Configured Subscriber.........................................
Enable LDAP Sync and LDAP Authentication in Cisco Unity Connection.........................................................................................
Sync LDAP Users into Cisco Unified Communications Domain Manager...............................................................................
Resolution Option 1...........................................................................
Resolution Option 2...........................................................................
Users Synchronized from LDAP to Cisco Unified Communications Manager....................................................................................................
Users Synchronized to Cisco Unified CDM 10.x/11.5(x)........................
User Added Manually from User Management........................................
Create a Default Password with Cisco Unified Communications Manager.................................................................
Manually Set the Password in the Cisco Unified CM End User Page....................................................................................................
User Added Manually Through Subscriber Management.........................
Force User Password Change...................................................................
Force Administrator Password Change.....................................................
Manage Your Own Account Password......................................................
Change Your Own Password..............................................................
Reset Your Own Password.................................................................
Configure Your Own Password Reset Questions...............................

Contents
Dial Plan management.......................................................................................................
View Directory Number Inventory..................................................................
View E.164 Number Inventory........................................................................
Associate a Range of E.164 Numbers to a Range of Directory Numbers.......
View the Ranges of E.164 Numbers Associated with a Range of Directory Numbers...........................................................................................
Associate a Set of E.164 Numbers to One Directory Number.........................
View the Sets of E.164 Numbers Associated with One Directory Number.............................................................................................................
Subscriber management...................................................................................................
User Management and Subscriber Management..............................................
Subscriber Management Overview..................................................................
Add Subscribers...............................................................................................
Modify Subscribers..........................................................................................
Move Subscriber..............................................................................................
Configure Lines................................................................................................
Add a Shared Line.....................................................................................
Add Agent Line (Phone)..................................................................................
Configure Phones.............................................................................................
Delete Phones............................................................................................
Quick Add Subscriber......................................................................................
Configuration............................................................................................
Exposing Device Pools in Quick Add Subscriber.....................................
Quick Add Subscriber Group....................................................................
Quick Add Subscriber Group Default Model....................................
Quick Add Subscriber Conditions.............................................................
Configuration Templates...........................................................................
Clone a Configuration Template........................................................
Configuration Template Field Reference.........................................
Workflows...............................................................................................
Creating Configuration Templates...................................................
Creating Quick Add Subscriber Groups..........................................
Creating Subscribers........................................................................
Create Subscribers with Existing Users....................................
Create Subscribers with New Users.........................................
Updating Subscribers.......................................................................
Provisioning Services to Users........................................................
Provision the Voice Service......................................................
Provision the Extension Mobility Service................................
Provision the Voicemail Service...............................................

Contents
Provision the WebEx Service...................................................
Provision the Single Number Reach Service............................
Provision the Jabber Device Service........................................
Provision the Self Service ID Service......................................
Workflow for Deleting Subscribers.................................................
Delete a Subscriber from Subscriber Management..................
Delete a Subscriber from User Management............................
Quick Add Subscriber Device Pool........................................................
Voicemail.................................................................................................
Configure Device, Voicemail, Extension Mobility, and Single Number Reach..............................................................................................................
Add Subscribers......................................................................................
Modify Subscribers.................................................................................
Delete Subscribers...................................................................................
Hunt Group Management...............................................................................
Hunt Group Management Workflows.....................................................
Add a Hunt Group............................................................................
Modify a Hunt Group.......................................................................
Delete a Hunt Group........................................................................
Call Pickup Groups........................................................................................
Call Pickup Groups Management...........................................................
Creating a Call Pickup Group..........................................................
Deleting a Call Pickup Group..........................................................
Administration Tools........................................................................................................
Transaction Logging and Audit......................................................................
Parent and Child Transactions for Asynchronous Transactions.....................
View a Transaction.........................................................................................
Filtering Transactions.....................................................................................
Filtering Sub-Transactions and Logs..............................................................
Transaction Behavior......................................................................................

Customer Administration Introduction Understanding Hierarchy on page 9
Navigating the Hierarchy on page 9
Manage the Hierarchy Structure on page 10
Log on on page 10
Administrator User Interface on page 13
Understanding Hierarchy It is important to understand hierarchy used in Cisco Unified Communications Domain Manager 10.(x) or later to successfully provide collaboration services for users.
Hierarchy levels are used to organize configuration tasks and control scoping visibility.
There are four standard hierarchy levels:
Provider
Reseller (optional)
Customer
Site
The order of the hierarchy is maintained. Provider is the top level of the hierarchy. Reseller is beneath Provider, but is optional. Customer is beneath Provider or Reseller. Site is beneath Customer.
Intermediate nodes can be created between the standard hierarchy nodes to provide logical grouping of lower hierarchy nodes. For instance, the Provider could create intermediate nodes to group Customers by industry, or a Customer could create intermediate nodes to group Sites by region.
Each hierarchy node, standard and intermediate, can have one or more administrators to manage that node and the hierarchy beneath that node. The administrator's scope does not include other nodes at the same level. Thus, an administrator for Customer A can see Customer A and Customer A's sites, but cannot see Customer B or Customer B's Sites.
Administrators at the standard levels have dedicated menu layouts, according to the role assigned when the node is created. So the Provider administrator's menu layout is not the same as a Customer administrator's menu layout.
The four standard hierarchy nodes are automatically synchronized with the HCM-F hierarchy. Site nodes are mapped to Locations in HCM-F.
Navigating the Hierarchy Navigate through the hierarchy by using the hierarchy bar at the top of the page. Each hierarchy node selection from the bar that is a parent node may further enable a drop-down list to select its child node.
Use the tree icon on the hierarchy bar at the top of the page to show a tree view of the entire hierarchy. Choose a hierarchy node on the tree to navigate to the node.
The hierarchy level to which an object belongs is indicated in a list view of the objects in the Hierarchy column. The hierarchy is indicated in a dot notation in the format<System>.<Provider>.<Reseller>.<Customer>.<Site>, for example sys.hcs.VS-P1.VS-OB.GenCorp.GenCorp-EMEA.GenCorp-London.
Cisco HCS Customer Administration Guide with Cisco Unified CDM, Release 11.5(3) 9

Customer Administration Introduction / Log on
Manage the Hierarchy Structure Hierarchy levels are created and deleted by adding and deleting Providers, Resellers, Customers, Sites, and Intermediate nodes. Permissions for these operations are available to administrators that are configured at higher levels in the hierarchy. For example, Provider administrators have permission to create and delete Resellers; both Provider and Reseller administrators have permission to create and delete Customers; etc. These operations are available from the Provider Management, Reseller Management, Customer Management, and Site Management menu items. Note that the Provider Management menu item is only available to the built-in hcsadmin account.
Each business entity that is created (Provider, Reseller, Customer, Site) will create a new node in the hierarchy that will appear in the hierarchy bar at the top of the Cisco Unified Communications Domain Manager user interface. New intermediate nodes can be created between the standard nodes using the Hierarchy Management menu item. Deleting both standard hierarchy nodes and intermediate nodes is done with a special cascade delete page available in each of the Hierarchy Management menu items. For example: Site Management > Delete Site, Customer Management > Delete Customer, and Hierarchy Management > Delete Intermediate Node.
Log on You can use various browsers to access the Cisco Unified Communications Domain Manager GUI. For a list of browsers, refer to Cisco Unified Communications Domain Manager Planning and Install Guide.
Note: Obtain the address (URL) of your Cisco Unified Communications Domain Manager, your username, and your password from your System Administrator.
Procedure1. Enter the URL of your Cisco Unified Communications Domain Manager in your browser; for example,
https://10.81.54.82/login/. The sign-in screen appears.
10 Cisco HCS Customer Administration Guide with Cisco Unified CDM, Release 11.5(3)

Customer Administration Introduction / Administrator User Interface
2. Enter your email address (for example, [email protected]) or hierarchy address (for example, [email protected].<Provider>.<Customer>.<Site>.
Note: When entering a hierarchy address, sys.hcs must be specified before the Provider name.
3. Enter the password provided by your administrator. 4. Click Log in.
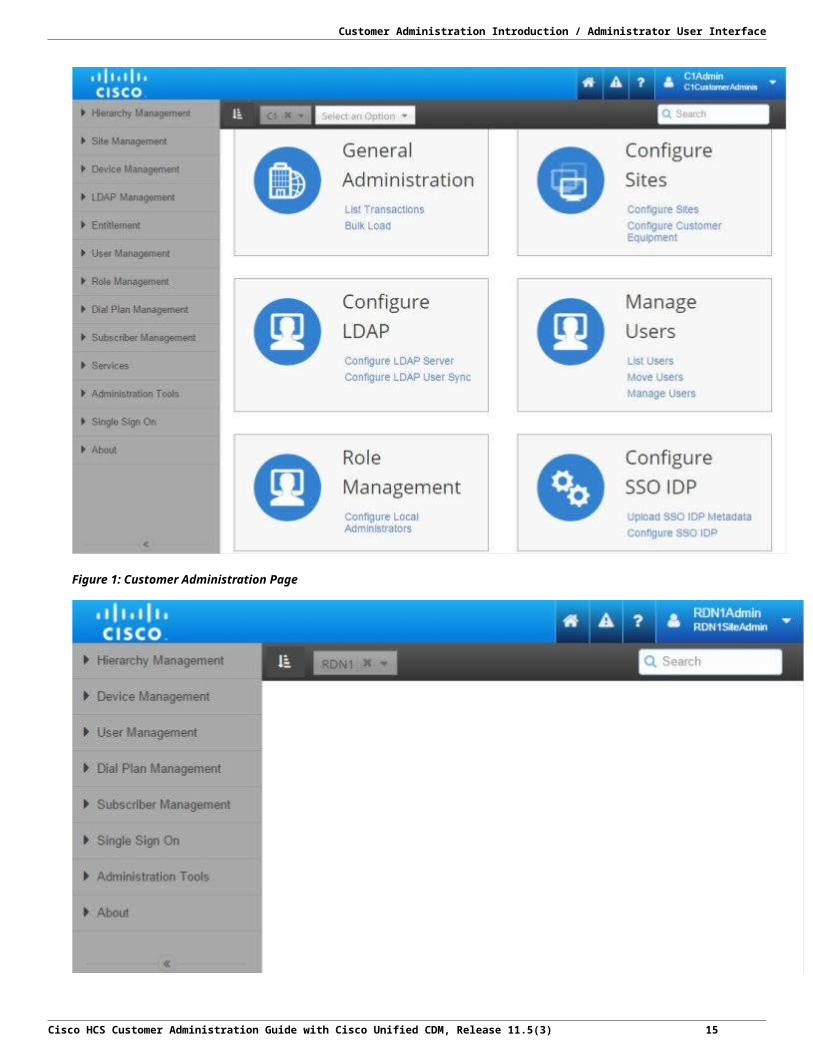
The Customer Administration page or Site Administration page appears, depending on whether you signed in as a customer administrator or site administrator.
Note: You may see a subset of the navigation options shown, depending on what functionality is installed.
Cisco HCS Customer Administration Guide with Cisco Unified CDM, Release 11.5(3) 11
Customer Administration Introduction / Log on
Figure 1: Customer Administration Page
12 Cisco HCS Customer Administration Guide with Cisco Unified CDM, Release 11.5(3)

Customer Administration Introduction / Administrator User Interface
Figure 2: Site Administration Page
Administrator User Interface The main user interface displays a Menu bar with information and controls as shown in this diagram:
1. Notifications indicator (triangle symbol)—Provides a menu to access the Transaction log. A popup displays when a transaction is done. Click Notifications to inspect the transaction. When you are finished viewing the transaction, close the popup notification.
2. On-line Help button (question mark symbol)—Opens general, conceptual support documentation in a new browser tab. The general Online Help is different than task-based Help that appears when you click Help while on a specific page.
3. Username, Role, Logout, Change Password—Displays the signed-in username and role as well as the Logout and Change Password menu items.
4. Home—A navigation button to return to the customizable landing page.
5. Hierarchy tree view—To display the tree and available nodes.
6. Search—To filter and search.
7. Hierarchy element—Displays the highest hierarchy level. The associated child hierarchy element is displayed in a similar field display box next to the main hierarchy element. If there is more than one node at a specific hierarchy, you can choose a specific node by selecting it from the drop-down list.
When using the application, you are presented with forms and lists:
Detail forms: During input, mandatory fields are highlighted in a red frame.
List views of details.
A Cached slide-out notification on the right side of the interface appears when the locally cached data of a resource is used. You can minimize this slide-out notification to a narrow bar on the side of the screen. When the Cached slide-out disappears, it means that a current copy of the data has been successfully retrieved from the remote device and both the cache and the page being viewed are updated.
For accessibility functionality, use the black bar above the menu bar to use the keyboard to navigate. When the cursor is in the URL box and you press Tab, this bar is displayed and has three menu items corresponding with the three areas of the main user interface:
Home screen—To return to the main user interface from any form on the interface. This control is the same as the Home button on the menu bar and can be accessed, for example, by a screen reader shortcut.
Skip to content—To move the focus to the landing page menu items on the main user interface. Press Tab to move the focus to the first landing page link.
Skip to navigation—To move the focus to the menu bar on the main user interface. The first menu item receives focus.
Cisco HCS Customer Administration Guide with Cisco Unified CDM, Release 11.5(3) 13

Device Management IOS Device Management on page 15
IOS Device Management In Cisco Unified Communications Domain Manager 10.x/11.5(x), you can set up IOS devices such as SIP Local Gateways and Analog Gateways. You can set up Command Builders to generate the appropriate IOS commands for you to copy to the IOS device CLI.
See Cisco Hosted Collaboration Solution Compatibility Matrix for information on supported IOS versions.
IOS Device Management Workflow The following is a possible workflow for setting up Local Break Out using a SIP Local Gateway. This workflow copies IOS commands to the IOS device CLI after each step. Alternatively, you can use the consolidate commands tool to create one set of IOS commands to run all at once.
Procedure1. Create customized Command Builders for events. Either add new ones, or clone the default ones and update the clones. See Set
up a Command Builder on page 34 or Clone a Command Builder on page 34. 2. Add an IOS device at customer hierarchy level. See Set up an IOS Device on page 35. 3. View the IOS Commands log and copy commands to the IOS device CLI. See View IOS Commands Log on page 48. 4. Add SIP Local Gateways at customer hierarchy level. See Set up SIP Local Gateway on page 44. 5. View IOS Commands log and copy commands to copy to the IOS device CLI. 6. Perform manual configuration on the SIP Local Gateway. See IOS Gateway Manual Configuration on page 46. 7. Associate SIP Local Gateways to sites. See Associate a SIP Local Gateway to a Site on page 47. 8. View IOS Commands log and copy commands to the IOS device CLI. 9. Create E.164 Associations. See Associate a Set of E.164 Numbers to One Directory Number on page 77 or Associate a Range of
E.164 Numbers to a Range of Directory Numbers on page 75. 10. View IOS Commands log and copy commands to the IOS device CLI.
Cisco HCS Customer Administration Guide with Cisco Unified CDM, Release 11.5(3) 15
Device Management / IOS Device Management
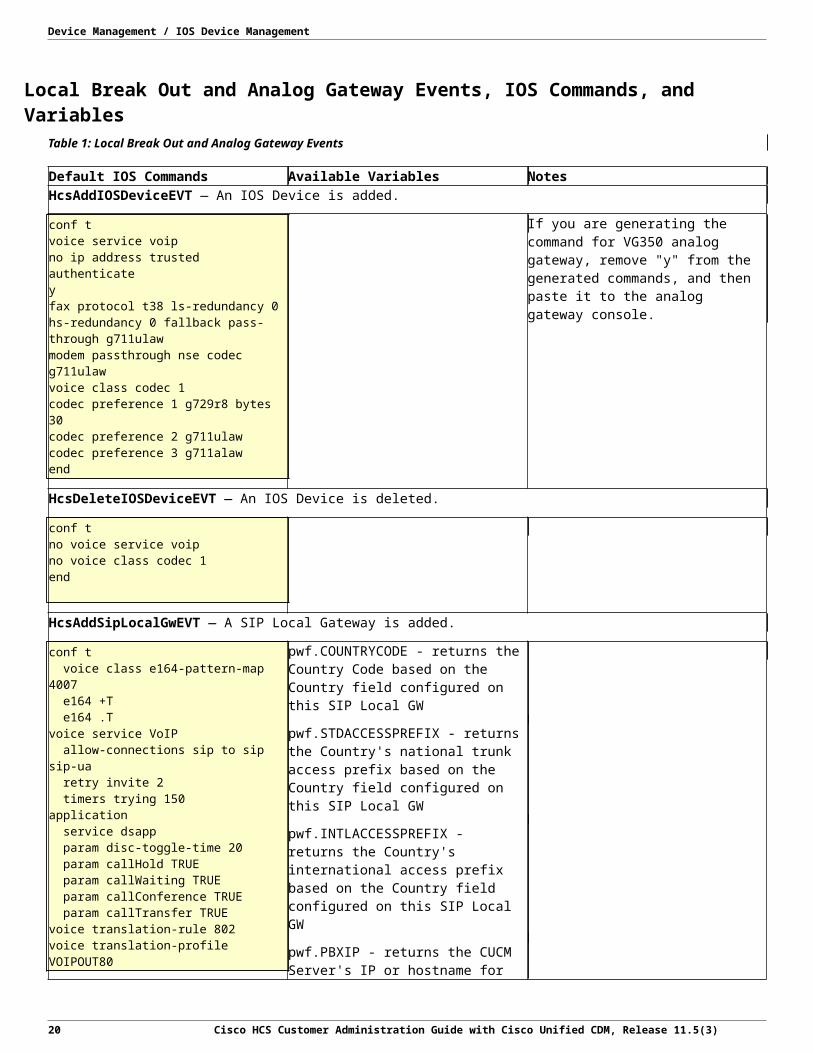
Local Break Out and Analog Gateway Events, IOS Commands, and Variables Table 1: Local Break Out and Analog Gateway Events
Default IOS Commands Available Variables Notes HcsAddIOSDeviceEVT — An IOS Device is added.
conf tvoice service voip no ip address trusted authenticateyfax protocol t38 ls-redundancy 0 hs-redundancy 0 fallback pass-through g711ulawmodem passthrough nse codec g711ulaw voice class codec 1codec preference 1 g729r8 bytes 30codec preference 2 g711ulawcodec preference 3 g711alawend
If you are generating the command for VG350 analog gateway, remove "y" from the generated commands, and then paste it to the analog gateway console.
HcsDeleteIOSDeviceEVT — An IOS Device is deleted.
conf tno voice service voip no voice class codec 1end
HcsAddSipLocalGwEVT — A SIP Local Gateway is added.
conf t voice class e164-pattern-map 4007 e164 +T e164 .T voice service VoIP allow-connections sip to sip sip-ua retry invite 2 timers trying 150 application service dsapp param disc-toggle-time 20 param callHold TRUE param callWaiting TRUE param callConference TRUE param callTransfer TRUE voice translation-rule 802 voice translation-profile VOIPOUT80 translate called 802 voice translation-rule 812 voice translation-profile VOIPIN81 translate calling 811 translate called 812 no voice hunt invalid-number no voice hunt unassigned-number dial-peer voice 8 VoIP translation-profile incoming VOIPIN81 session protocol sipv2
pwf.COUNTRYCODE - returns the Country Code based on the Country field configured on this SIP Local GW
pwf.STDACCESSPREFIX - returns the Country's national trunk access prefix based on the Country field configured on this SIP Local GW
pwf.INTLACCESSPREFIX - returns the Country's international access prefix based on the Country field configured on this SIP Local GW
pwf.PBXIP - returns the CUCM Server's IP or hostname for dial peer
pwf.PREFERENCE - returns the CUCM server's priority in the dial peer list
pwf.DIALPEER - returns the dial peer number we use to generate dial peer. It starts from 4 for the first dial peer, and increase by 1 for the next one.
16 Cisco HCS Customer Administration Guide with Cisco Unified CDM, Release 11.5(3)

Device Management / IOS Device Management
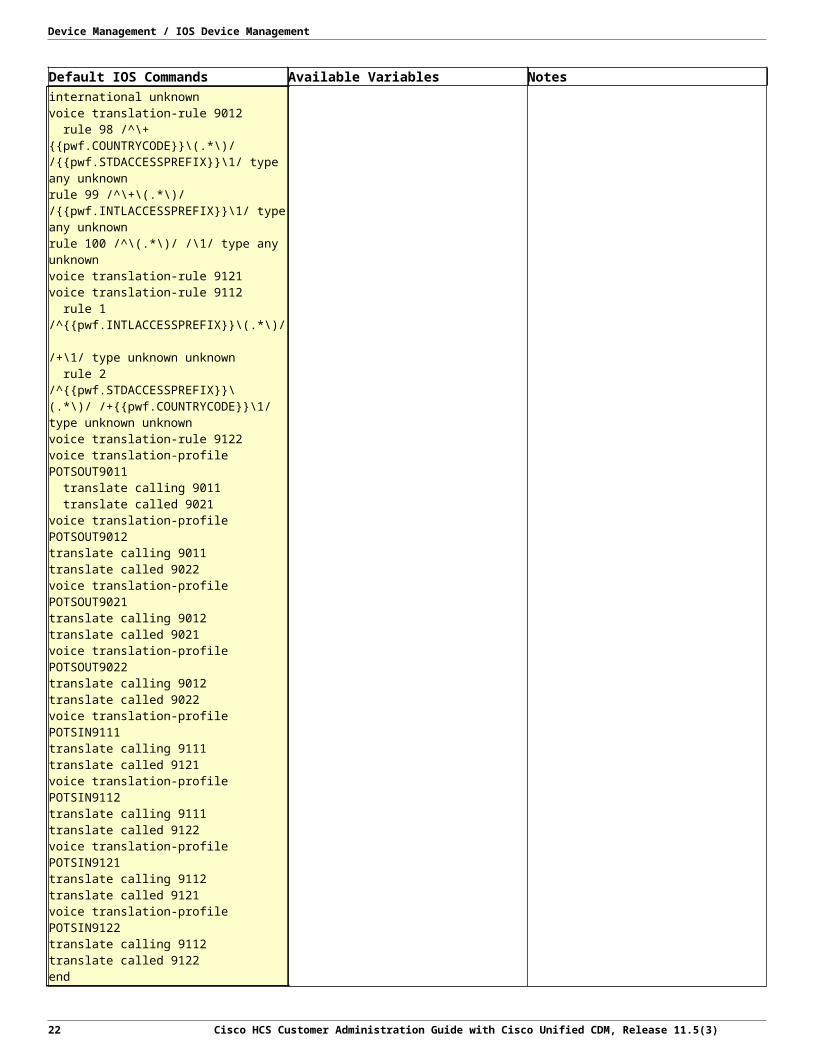
Default IOS Commands Available Variables Notes incoming called e164-pattern-map 4007 fax rate 14400 no vad voice translation-rule 812 rule 97 /^\+01\(.*\)/ /904\1/ rule 98 /^\+1\(.*\)/ /901\1/ rule 99 /^\+\(.*\)/ /902\1/ rule 100 /^\(.*\)/ /904\1/ voice translation-rule 9011 rule 98 /^\+{{pwf.COUNTRYCODE}}\(.*\)/ /\1/ type any national rule 99 /^\+\(.*\)/ /\1/ type any international rule 100 /^\(.*\)/ /\1/ type any unknown voice translation-rule 9021 rule 81 /^901\(.*\)/ /\1/ type any national rule 82 /^902\(.*\)/ /\1/ type any international rule 83 /^903\(.*\)/ /\1/ type any unknown rule 84 /^904\(.*\)/ /\1/ type any unknown voice translation-rule 9022 rule 81 /^901\(.*\)/ /{{pwf.STDACCESSPREFIX}}\1/ type any unknown rule 82 /^902\(.*\)/ /{{pwf.INTLACCESSPREFIX}}\1/ type any unknown rule 83 /^903\(.*\)/ /\1/ type any unknown rule 84 /^904\(.*\)/ /\1/ type any unknown voice translation-rule 9111 rule 1 /^\(.*\)/ /+{{pwf.COUNTRYCODE}}\1/ type national unknown rule 2 /^\(.*\)/ /+\1/ type international unknown voice translation-rule 9012 rule 98 /^\+{{pwf.COUNTRYCODE}}\(.*\)/ /{{pwf.STDACCESSPREFIX}}\1/ type any unknown rule 99 /^\+\(.*\)/ /{{pwf.INTLACCESSPREFIX}}\1/ type any unknown rule 100 /^\(.*\)/ /\1/ type any unknown voice translation-rule 9121 voice translation-rule 9112 rule 1 /^{{pwf.INTLACCESSPREFIX}}\(.*\)/
/+\1/ type unknown unknown rule 2 /^{{pwf.STDACCESSPREFIX}}\(.*\)/ /+{{pwf.COUNTRYCODE}}\1/ type unknown unknown voice translation-rule 9122 voice translation-profile POTSOUT9011
Cisco HCS Customer Administration Guide with Cisco Unified CDM, Release 11.5(3) 17

Device Management / IOS Device Management
Default IOS Commands Available Variables Notes translate calling 9011 translate called 9021 voice translation-profile POTSOUT9012 translate calling 9011 translate called 9022 voice translation-profile POTSOUT9021 translate calling 9012 translate called 9021 voice translation-profile POTSOUT9022 translate calling 9012 translate called 9022 voice translation-profile POTSIN9111 translate calling 9111 translate called 9121 voice translation-profile POTSIN9112 translate calling 9111 translate called 9122 voice translation-profile POTSIN9121 translate calling 9112 translate called 9121 voice translation-profile POTSIN9122 translate calling 9112 translate called 9122 end
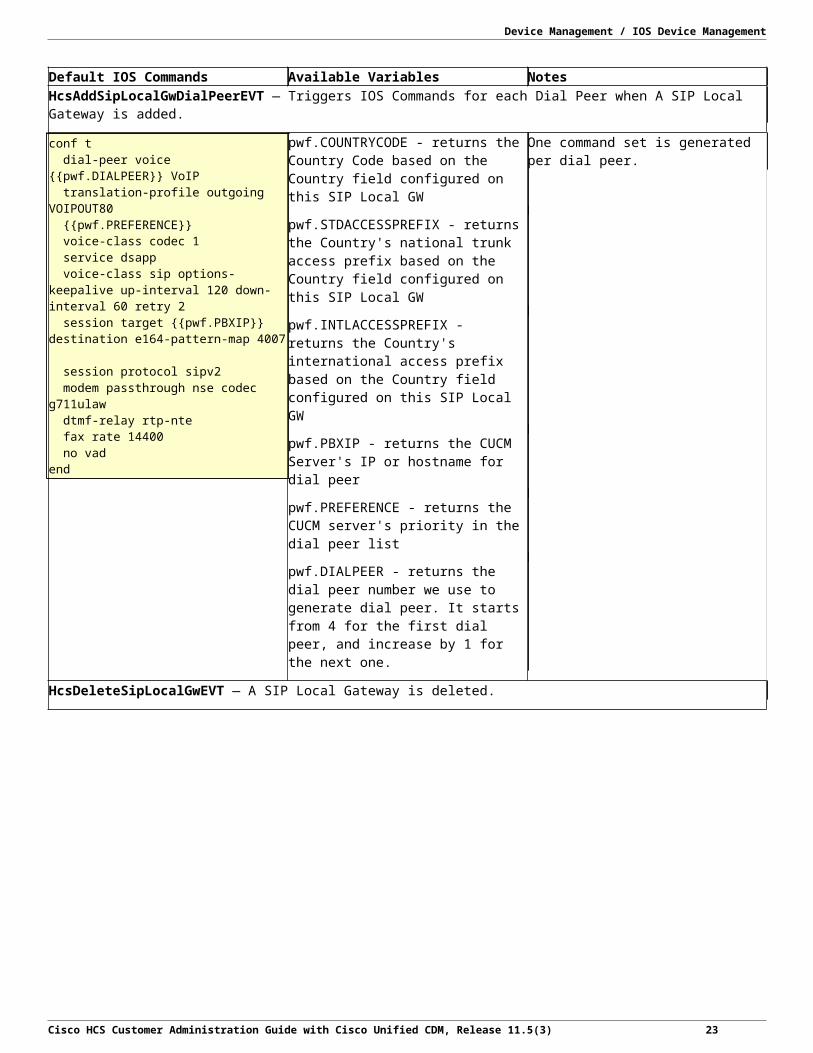
HcsAddSipLocalGwDialPeerEVT — Triggers IOS Commands for each Dial Peer when A SIP Local Gateway is added.
conf t dial-peer voice {{pwf.DIALPEER}} VoIP translation-profile outgoing VOIPOUT80 {{pwf.PREFERENCE}} voice-class codec 1 service dsapp voice-class sip options-keepalive up-interval 120 down-interval 60 retry 2 session target {{pwf.PBXIP}} destination e164-pattern-map 4007
session protocol sipv2 modem passthrough nse codec g711ulaw dtmf-relay rtp-nte fax rate 14400 no vad end
pwf.COUNTRYCODE - returns the Country Code based on the Country field configured on this SIP Local GW
pwf.STDACCESSPREFIX - returns the Country's national trunk access prefix based on the Country field configured on this SIP Local GW
pwf.INTLACCESSPREFIX - returns the Country's international access prefix based on the Country field configured on this SIP Local GW
pwf.PBXIP - returns the CUCM Server's IP or hostname for dial peer
pwf.PREFERENCE - returns the CUCM server's priority in the dial peer list
pwf.DIALPEER - returns the dial peer number we use to generate dial peer. It starts from 4 for the first dial peer, and increase by 1 for the next one.
One command set is generated per dial peer.
HcsDeleteSipLocalGwEVT — A SIP Local Gateway is deleted.
18 Cisco HCS Customer Administration Guide with Cisco Unified CDM, Release 11.5(3)

Device Management / IOS Device Management
Default IOS Commands Available Variables Notes conf t no voice translation-profile POTSIN9122 no voice translation-profile POTSIN9121 no voice translation-profile POTSIN9112 no voice translation-profile POTSIN9111 no voice translation-profile POTSOUT9022 no voice translation-profile POTSOUT9021 no voice translation-profile POTSOUT9012 no voice translation-profile POTSOUT9011 no voice translation-rule 9122
no voice translation-rule 9112
no voice translation-rule 9121
no voice translation-rule 9012
no voice translation-rule 9111
no voice translation-rule 9022
no voice translation-rule 9021
no voice translation-rule 9011
no voice translation-rule 812 no voice translation-rule 802 no dial-peer voice 8 VoIP no voice class e164-pattern-map 4007 application no service dsapp no sip-ua voice service VoIP no allow-connections sip to sip
end
pwf.COUNTRYCODE - returns the Country Code based on the Country field configured on this SIP Local GW
pwf.STDACCESSPREFIX - returns the Country's national trunk access prefix based on the Country field configured on this SIP Local GW
pwf.INTLACCESSPREFIX - returns the Country's international access prefix based on the Country field configured on this SIP Local GW
pwf.PBXIP - returns the CUCM Server's IP or hostname for dial peer
pwf.PREFERENCE - returns the CUCM server's priority in the dial peer list
pwf.DIALPEER - returns the dial peer number we use to generate dial peer. It starts from 4 for the first dial peer, and increase by 1 for the next one.
HcsDeleteSipLocalGwDialPeerEVT — Triggers IOS Commands for each Dial Peer when A SIP Local Gateway is deleted.
Cisco HCS Customer Administration Guide with Cisco Unified CDM, Release 11.5(3) 19
Device Management / IOS Device Management
Default IOS Commands Available Variables Notes conf t no dial-peer voice {{pwf.DIALPEER}} VoIP end
conf t pwf.COUNTRYCODE - returns the Country Code based on the Country field configured on this SIP Local GW
pwf.STDACCESSPREFIX - returns the Country's national trunk access prefix based on the Country field configured on this SIP Local GW
pwf.INTLACCESSPREFIX - returns the Country's international access prefix based on the Country field configured on this SIP Local GW
pwf.PBXIP - returns the CUCM Server's IP or hostname for dial peer
pwf.PREFERENCE - returns the CUCM server's priority in the dial peer list
pwf.DIALPEER - returns the dial peer number we use to generate dial peer. It starts from 4 for the first dial peer, and increase by 1 for the next one.
One command set is generated per dial peer.
HcsUpdateSipLocalGw1EVT — Triggers IOS Commands when A SIP Local Gateway is updated.
conf t no dial-peer voice {{pwf.DIALPEER}} VoIP end
pwf.COUNTRYCODE - returns the Country Code based on the Country field configured on this SIP Local GW
pwf.STDACCESSPREFIX - returns the Country's national trunk access prefix based on the Country field configured on this SIP Local GW
pwf.INTLACCESSPREFIX - returns the Country's international access prefix based on the Country field configured on this SIP Local GW
pwf.PBXIP - returns the CUCM Server's IP or hostname for dial peer
pwf.PREFERENCE - returns the CUCM server's priority in the dial peer list
pwf.DIALPEER - returns the dial peer number we use to generate dial peer. It starts from 4 for the first dial peer, and increase by 1 for the next one.
Removes configuration related to previous dial peer. One set of commands per dial peer.
Note: If "Enable Command Builder" is updated from False to True, IOS commands will be regenerated for the SIP Local Gateway.
HcsUpdateSipLocalGw2EVT — Triggers IOS Commands when A SIP Local Gateway is updated.
20 Cisco HCS Customer Administration Guide with Cisco Unified CDM, Release 11.5(3)

Device Management / IOS Device Management
Default IOS Commands Available Variables Notes conf t dial-peer voice {{pwf.DIALPEER}} VoIP translation-profile outgoing VOIPOUT80 {{pwf.PREFERENCE}} voice-class codec 1 service dsapp voice-class sip options-keepalive up-interval 120 down-interval 60 retry 2 session target {{pwf.PBXIP}} destination e164-pattern-map 4007 session protocol sipv2 modem passthrough nse codec g711ulaw dtmf-relay rtp-nte fax rate 14400 no vad end
pwf.COUNTRYCODE - returns the Country Code based on the Country field configured on this SIP Local GW
pwf.STDACCESSPREFIX - returns the Country's national trunk access prefix based on the Country field configured on this SIP Local GW
pwf.INTLACCESSPREFIX - returns the Country's international access prefix based on the Country field configured on this SIP Local GW
pwf.PBXIP - returns the CUCM Server's IP or hostname for dial peer
pwf.PREFERENCE - returns the CUCM server's priority in the dial peer list
pwf.DIALPEER - returns the dial peer number we use to generate dial peer. It starts from 4 for the first dial peer, and increase by 1 for the next one.
Adds configuration related to new dial peer. One set of commands per dial peer. Event is triggered only if the SIP Trunk information has been updated.
HcsSipLocalGwAddSiteAreaCodeEVT — Triggers IOS commands for Area Code when a SIP Local Gateway is associated with a Site.
conf t voice translation-rule 9021 rule {{pwf.RULENUMBER}} /^901{{pwf.NATCODE}}\(.*\)// {{pwf.NATCODEFORLOCALDIALING}}\1/ type any subscriber voice translation-rule 9022 rule {{pwf.RULENUMBER}} /^901{{pwf.NATCODE}}\(.*\)//{{pwf.NATCODEFORLOCALDIALING}}\1/ type any unknown end
{{pwf.RULENUMBER}} and {{pwf.NATCODE}} are sequence numbers and area codes that is substituted by workflow during runtime
{{pwf.NATCODEFORLOCALDIALING}} is the Area Code if the administrator selected the "Area Code Used for Local Dialing" option when deploying the site dial plan. If this option was not selected, this variable has no value.
The workflow for this event generates IOS Commands for each Area Code defined for the associated Site.
HcsSipLocalGwDelSiteAreaCodeEVT — Triggers IOS commands for Area Code when a SIP Local Gateway is disassociated from Site.
conf t no voice translation-rule 9021 no rule {{pwf.RULENUMBER}} end conf t no voice translation-rule 9022 no rule {{pwf.RULENUMBER}} end
{{pwf.RULENUMBER}} is substituted as sequence number by workflow during run time
The workflow for this event generates IOS Commands for each Area Code defined for the disassociated Site.
If Area Codes are shared across multiple sites and associated with the same gateway, the commands are generated only when the gateway is disassociated from the last site that shares the Area Code.
HcsSipLocalGwAddSitePstnEVT — Triggers IOS commands for PSTN when a SIP Local Gateway is associated with a Site.
Cisco HCS Customer Administration Guide with Cisco Unified CDM, Release 11.5(3) 21
Device Management / IOS Device Management
Default IOS Commands Available Variables Notes conf t voice translation-rule 9111 rule 3 /^\(.*\)/ /{{pwf.PSTNACCESSPREFIX}}\\1/ type subscriber unknown rule 4 /^\(.*\)/ /{{pwf.PSTNACCESSPREFIX}}\\1/ type unknown unknown voice translation-rule 9112 rule 3 /^\(.*\)/ /{{pwf.PSTNACCESSPREFIX}}\\1/ type unknown unknown end
pwf.PSTNACCESSPREFIX - PSTN breakout associated with the country associated with the site
HcsSipLocalGwDelSitePstnEVT — Triggers IOS commands for PSTN when a SIP Local Gateway is disassociated from Site.
conf t no voice translation-rule 9111 no rule 3 no rule 4 no voice translation-rule 9112 no rule 3 end
By default, these commands are not generated to avoid deleting the voice translation rule for PSTN if the gateway is shared by multiple sites. If you need to delete the translation rules for PSTN when SIP Local Gateway is disassociated from site, clone the command builder template and set the Enabled flag.
HcsSipLocalGwAddE164AssociationEVT — Triggers IOS commands for SIP Local Gateway when an E164 Association (N to 1 DN) is made.
22 Cisco HCS Customer Administration Guide with Cisco Unified CDM, Release 11.5(3)
Device Management / IOS Device Management
Default IOS Commands Available Variables Notes conf t voice translation-rule 9011 rule {{ pwf.RULENUMBER }} /^{{pwf.DNESCAPE }}{{ pwf.DNPREFIX }} \\ ({{ pwf.RGMASK }} \\ )/ /{{ pwf.DDIPREFIX }} \\ 1/ type any national voice translation-rule 9012 rule {{ pwf.RULENUMBER }} /^{{pwf.DNESCAPE }}{{ pwf.DNPREFIX }} \\ ({{ pwf.RGMASK }} \\ )/ /{{ pwf.STDACCESSPREFIX }}{{ pwf.DDIPREFIX }} \\ 1/ type any unknown voice translation-rule 802 rule {{ pwf.RULENUMBER }} /^{{pwf.DNESCAPE }}{{ pwf.DNPREFIX }} \\ ({{ pwf.RGMASK }} \\ )/ /+{{ pwf.COUNTRYCODE }}{{ pwf.DDIPREFIX }} \\ 1/ voice translation-rule 9121 rule {{ pwf.RULENUMBER }} /^{{ pwf.DDIPREFIX }} \\ ({{ pwf.RGMASK }} \\ )/ /{{ pwf.DNPREFIX }} \\ 1/ type national unknown voice translation-rule 9122 rule {{ pwf.RULENUMBER }} /^{{ pwf.STDACCESSPREFIX }}{{ pwf.DDIPREFIX }} \\ ({{ pwf.RGMASK }} \\ )/ /{{ pwf.DNPREFIX }} \\ 1/ type unknown unknown voice translation-rule 712 rule {{ pwf.RULENUMBER }} /^{{ pwf.PSTNACCESSPREFIX }}{{ pwf.STDACCESSPREFIX }} {{ pwf.DDIPREFIX }} \\ ({{ pwf.RGMASK }} \\ )/ /{{ pwf.DNPREFIX }} \\ 1/ end
pwf.DNPREFIX - Contains the directory number prefix (DN without the mask digits)
pwf.DNESCAPE - Contains a backslash escape character if the DNPREFIX contains a +
pwf.RGMASK - Contains the range mask for prefix (for example if range is 100, then the value is ..)
pwf.DDIPREFIX - Contains the DDI (E.164) prefix (DDI without + prefix, country code, or mask digits) Note: this still contains the national code (area code)
pwf.STDACCESSPREFIX - National Trunk Prefix for the country associated with the site
pwf.COUNTRYCODE - Country Code for the country associated with the site
pwf.PSTNACCESSPREFIX - PSTN breakout associated with the country associated with the site
pwf.RULENUMBER - Contains the appropriate rule index for associate/disassociate
HcsSipLocalGwDelE164AssociationEVT — Triggers IOS commands for SIP Local Gateway when an E164 Association (N to 1 DN) is deleted.
Cisco HCS Customer Administration Guide with Cisco Unified CDM, Release 11.5(3) 23

Device Management / IOS Device Management
Default IOS Commands Available Variables Notes conf t voice translation-rule 9011 no rule {{ pwf.RULENUMBER }} end conf t voice translation-rule 9012 no rule {{ pwf.RULENUMBER }} end conf t voice translation-rule 802 no rule {{ pwf.RULENUMBER }} end conf t voice translation-rule 9121 no rule {{ pwf.RULENUMBER }} end conf t voice translation-rule 9122 no rule {{ pwf.RULENUMBER }} end conf t voice translation-rule 712 no rule {{ pwf.RULENUMBER }} end
pwf.DNPREFIX - Contains the directory number prefix (DN without the mask digits)
pwf.DNESCAPE - Contains a backslash escape character if the DNPREFIX contains a +
pwf.RGMASK - Contains the range mask for prefix (for example if range is 100, then the value is ..)
pwf.DDIPREFIX - Contains the DDI (E.164) prefix (DDI without + prefix, country code, or mask digits) Note: this still contains the national code (area code)
pwf.STDACCESSPREFIX - National Trunk Prefix for the country associated with the site
pwf.COUNTRYCODE - Country Code for the country associated with the site
pwf.PSTNACCESSPREFIX - PSTN breakout associated with the country associated with the site
pwd.RULENUMBER - Contains the appropriate rule index for associate/disassociate
HcsSipLocalGwAddMultiE164AssociationEVT — Triggers IOS commands for SIP Local Gateway when an E164 Association (N to N DN) is made.
24 Cisco HCS Customer Administration Guide with Cisco Unified CDM, Release 11.5(3)

Device Management / IOS Device Management
Default IOS Commands Available Variables Notes conf t! Handle outgoing PSTN calling number where Nature of Address (NOA) is used! 9(PSTN)0(outgoing)1(calling number)1(NOA)voice translation-rule 9011rule {{ pwf.RULENUMBER }} /^{{ pwf.DNESCAPE }}{{ pwf.DN }}/ /{{ pwf.DDIPRIMARY }}/ type any national ! Handle outgoing PSTN calling number where Nature of Address (NOA) is NOT used! 9(PSTN)0(outgoing)1(calling number)2(non-NOA)voice translation-rule 9012rule {{ pwf.RULENUMBER }} /^{{ pwf.DNESCAPE }}{{ pwf.DN }}/ /{{ pwf.STDACCESSPREFIX }} {{ pwf.DDIPRIMARY }}/ type any unknown ! Handle outgoing VoIP called number! 8(VoIP)0(outgoing)2(called number)voice translation-rule 802rule {{ pwf.RULENUMBER }} /^{{ pwf.DNESCAPE }}{{ pwf.DN }}/ /+{{ pwf.COUNTRYCODE }} {{ pwf.DDIPRIMARY }}/ ! Handle incoming PSTN called number where Nature of Address (NOA) is used! 9(PSTN)1(incoming)2(called number)1(NOA)voice translation-rule 9121rule {{ pwf.RULENUMBER }} /^{{ pwf.DDIPREFIX }}{{ pwf.RGMASK }}/ /{{ pwf.DN }}/ type national unknown ! Handle incoming PSTN called number where Nature of Address (NOA) is NOT used! 9(PSTN)1(incoming)2(called number)2(non-NOA)voice translation-rule 9122rule {{ pwf.RULENUMBER }} /^{{ pwf.STDACCESSPREFIX }}{{ pwf.DDIPREFIX }} {{ pwf.RGMASK }}/ /{{ pwf.DN }}/ type unknown unknown ! Handle incoming SRST called number! 7(SRST)1(incoming)2(called number)voice translation-rule 712rule {{ pwf.RULENUMBER }} /^{{ pwf.PSTNACCESSPREFIX }}{{ pwf.STDACCESSPREFIX }}{{ pwf.DDIPREFIX }}
pwf.DN - Contains the directory number
pwf.DNESCAPE - Contains a backslash escape character if the DNPREFIX contains a +
pwf.RGMASK - Contains the range mask for prefix (for example if range is 100, then the value is ..)
pwf.DDIPRIMARY - Contains the primary E.164 associate with the N:1 association (DDI without + prefix and country code) Note: this still contains the national code (area code)
pwf.DDIPREFIX - Contains the DDI (E.164) prefix (DDI without + prefix, country code, or mask digits) Note: this still contains the national code (area code)
pwf.STDACCESSPREFIX - National Trunk Prefix for the country associated with the site
pwf.COUNTRYCODE - Country Code for the country associated with the site
pwf.PSTNACCESSPREFIX - PSTN breakout associated with the country associated with the site
pwd.RULENUMBER - Contains the appropriate rule index for associate/disassociate
Cisco HCS Customer Administration Guide with Cisco Unified CDM, Release 11.5(3) 25

Device Management / IOS Device Management
Default IOS Commands Available Variables Notes HcsSipLocalGwDelMultiE164AssociationEVT — Triggers IOS commands for SIP Local Gateway when an E164 Association (N to N DN) is deleted.
conf t! 9(PSTN)0(outgoing)1(calling number)1(NOA)voice translation-rule 9011no rule {{ pwf.RULENUMBER }}endconf t! 9(PSTN)0(outgoing)1(calling number)2(non-NOA)voice translation-rule 9012no rule {{ pwf.RULENUMBER }}endconf t! 8(VoIP)0(outgoing)2(called number)voice translation-rule 802no rule {{ pwf.RULENUMBER }}endconf t! 9(PSTN)1(incoming)2(called number)1(NOA)voice translation-rule 9121no rule {{ pwf.RULENUMBER }}endconf t! 9(PSTN)1(incoming)2(called number)2(non-NOA)voice translation-rule 9122no rule {{ pwf.RULENUMBER }}endconf t! 7(SRST)1(incoming)2(called number)voice translation-rule 712no rule {{ pwf.RULENUMBER }}end
pwf.DN - Contains the directory number
pwf.DNESCAPE - Contains a backslash escape character if the DNPREFIX contains a +
pwf.RGMASK - Contains the range mask for prefix (for example if range is 100, then the value is ..)
pwf.DDIPRIMARY - Contains the primary E.164 associate with the N:1 association (DDI without + prefix and country code) Note: this still contains the national code (area code)
pwf.DDIPREFIX - Contains the DDI (E.164) prefix (DDI without + prefix, country code, or mask digits) Note: this still contains the national code (area code)
pwf.STDACCESSPREFIX - National Trunk Prefix for the country associated with the site
pwf.COUNTRYCODE - Country Code for the country associated with the site
pwf.PSTNACCESSPREFIX - PSTN breakout associated with the country associated with the site
pwd.RULENUMBER - Contains the appropriate rule index for associate/disassociate
HscSipLocalGwAddVoiceMailPilotNumberEVT — Associates a Voice Mail Pilot Number with a Site.
26 Cisco HCS Customer Administration Guide with Cisco Unified CDM, Release 11.5(3)

Device Management / IOS Device Management
Default IOS Commands Available Variables Notes conf t ! Handle incoming PSTN called number where Nature of Address (NOA) is used! 9(PSTN)1(incoming)2(called number)1(NOA)voice translation-rule 9121rule {{ pwf.RULENUMBER }} /^{{ pwf.DDIPREFIX }}\({{ pwf.RGMASK }}\)/ /{{ pwf.DNPREFIX }}\1/ type national unknown ! Handle incoming PSTN called number where Nature of Address (NOA) is NOT used! 9(PSTN)1(incoming)2(called number)2(non-NOA)voice translation-rule 9122rule {{ pwf.RULENUMBER }} /^{{ pwf.STDACCESSPREFIX }}{{ pwf.DDIPREFIX }}\ ({{ pwf.RGMASK }}\)/ /{{ pwf.DNPREFIX }}\1/ type unknown unknown end
pwf.DNPREFIX - Contains the voice mail pilot number prefix (without the mask digits)
pwf.DNESCAPE - Contains a backslash escape character if the DNPREFIX contains a +
pwf.RGMASK - Contains the range mask for prefix (for example if range is 100, then the value is ..)
pwf.DDIPREFIX - Contains the DDI (E.164) prefix (DDI without + prefix, country code, or mask digits) Note: this still contains the national code (area code)
pwf.STDACCESSPREFIX - National Trunk Prefix for the country associated with the site
pwf.COUNTRYCODE - Country Code for the country associated with the site
pwf.PSTNACCESSPREFIX - PSTN breakout associated with the country associated with the site
pwd.RULENUMBER - Contains the appropriate rule index for voice mail pilot association
HscSipLocalGwDelVoiceMailPilotNumberEVT — Disassociates a Voice Mail Pilot Number from a Site.
Cisco HCS Customer Administration Guide with Cisco Unified CDM, Release 11.5(3) 27

Device Management / IOS Device Management
Default IOS Commands Available Variables Notes conf t! 9(PSTN)1(incoming)2(called number)1(NOA)voice translation-rule 9121no rule {{ pwf.RULENUMBER }}endconf t! 9(PSTN)1(incoming)2(called number)2(non-NOA)voice translation-rule 9122no rule {{ pwf.RULENUMBER }}end
pwf.DNPREFIX - Contains the voice mail pilot number prefix (without the mask digits)
pwf.DNESCAPE - Contains a backslash escape character if the DNPREFIX contains a +
pwf.RGMASK - Contains the range mask for prefix (for example if range is 100, then the value is ..)
pwf.DDIPREFIX - Contains the DDI (E.164) prefix (DDI without + prefix, country code, or mask digits) Note: this still contains the national code (area code)
pwf.STDACCESSPREFIX - National Trunk Prefix for the country associated with the site
pwf.COUNTRYCODE - Country Code for the country associated with the site
pwf.PSTNACCESSPREFIX - PSTN breakout associated with the country associated with the site
pwd.RULENUMBER - Contains the appropriate rule index for voice mail pilot association
HcsAddAnalogGatewayEVT — Adds an Analog Gateway.
conf tstcapp ccm-group 1 stcapp stcapp feature access-code stcapp feature speed-dial sccp local {{ pwf.GatewayDAT.networkInterface }} sccp ccm-manager fax protocol cisco {{ macro.HcsAnalogGwCommandForCCMIdentifierMCR }}sccp ccm group 1
bind interface {{ pwf.GatewayDAT.networkInterface }} {{ macro.HcsAnalogGwCommandForCCMPriorityMCR }}ccm-manager configserver {{ fn.one macro.HcsCucmsAssociatedToNDLRMCR}} ccm-manager sccp local {{ pwf.GatewayDAT.networkInterface }} ccm-manager sccp stcapp
pwf.GatewayDAT.networkInterface - This is the physical device network interface (Ethernet Port) for the analog gateway.
HcsAddAnalogGatewayEndpointEVT — Adds an Endpoint for the Analog Gateway.
28 Cisco HCS Customer Administration Guide with Cisco Unified CDM, Release 11.5(3)

Device Management / IOS Device Management
Default IOS Commands Available Variables Notes conf tvoice-port {{ pwf.PORT_NUM }} caller-id enable timeouts call-disconnect {{ fn.as_string pwf.GatewayDAT.disconnectTimeout }} cptone {{ pwf.GatewayDAT.cpTone }} signal {{macro.HcsIosCmdAnalogGwSignalMCR}} no shutdown dial-peer voice {{ pwf.DIAL_PEER_NO }} pots service stcapp port {{ pwf.PORT_NUM }} end
pwf.PORT_NUM - This is the FXS port number of the analog gateway device.
pwf.GatewayDAT.disconnectTimeout - Time in seconds for which a connection is maintained after the completion of a communication exchange.
pwf.GatewayDAT.cpTone - This is the call progress tone of the country that supports each analog device in the gateway.
pwf.DIAL_PEER_NO - returns the dial peer number we use to generate dial peer. It starts from 4 for the first dial peer, and increase by 1 for the next one.
HcsAddAnalogGatewayEndpointModEVT — Adds an Endpoint Module for the Analog Gateway.
conf tvoice-port {{ pwf.PORT_NUM }} caller-id enable timeouts call-disconnect {{ fn.as_string pwf.GatewayDAT.disconnectTimeout }} cptone {{ pwf.GatewayDAT.cpTone }} signal {{macro.HcsIosCmdAnalogGwSignalMCR}} no shutdown dial-peer voice {{ pwf.DIAL_PEER_NO }} pots service stcapp port {{ pwf.PORT_NUM }} end
pwf.PORT_NUM - This is the FXS port number of the analog gateway device.
pwf.GatewayDAT.cpTone - This is the call progress tone of the country that supports each analog device in the gateway.
pwf.GatewayDAT.disconnectTimeout - Time in seconds for which a connection is maintained after the completion of a communication exchange.
pwf.DIAL_PEER_NO - returns the dial peer number we use to generate dial peer. It starts from 4 for the first dial peer, and increase by 1 for the next one.
HcsDeleteAnalogGatewayEVT — Delets an Analog Gateway.
conf tno ccm-manager config server no sccp ccm {{ fn.one macro.HcsCucmsAssociatedToNDLRMCR }} no stcapp ccm-group 1 no stcapp feature access-code no stcapp feature speed-dial no stcapp no ccm-manager sccp local {{ input.GatewayDAT.networkInterface }} no ccm-manager sccp no sccp no sccp local {{ input.GatewayDAT.networkInterface }} no sccp ccm group 1 end
HcsDeleteAnalogGatewayEndpointEVT — Delets an Analog Gateway Endpoint.
Cisco HCS Customer Administration Guide with Cisco Unified CDM, Release 11.5(3) 29

Device Management / IOS Device Management
Default IOS Commands Available Variables Notes conf tvoice-port {{ pwf.PORT_NUM }} default timeouts initial default timeouts interdigit no timeouts ringing infinity no caller-id enable no timeouts call-disconnect no cptone no signal shutdown no dial-peer voice {{ pwf.DIAL_PEER_NO }} pots end
pwf.PORT_NUM - This is the FXS port number of the analog gateway device.
pwf.DIAL_PEER_NO - returns the dial peer number we use to generate dial peer. It starts from 4 for the first dial peer, and increase by 1 for the next one.
HcsDeleteAnalogGatewayEndpointModEVT — Deletes an Analog Gateway Endpoint Module.
conf tvoice-port {{ pwf.PORT_NUM }} default timeouts initial default timeouts interdigit no timeouts ringing infinity no caller-id enable no timeouts call-disconnect no cptone no signal shutdown no dial-peer voice {{ pwf.DIAL_PEER_NO }} pots end
pwf.PORT_NUM - This is the FXS port number of the analog gateway device.
pwf.DIAL_PEER_NO - returns the dial peer number we use to generate dial peer. It starts from 4 for the first dial peer, and increase by 1 for the next one.
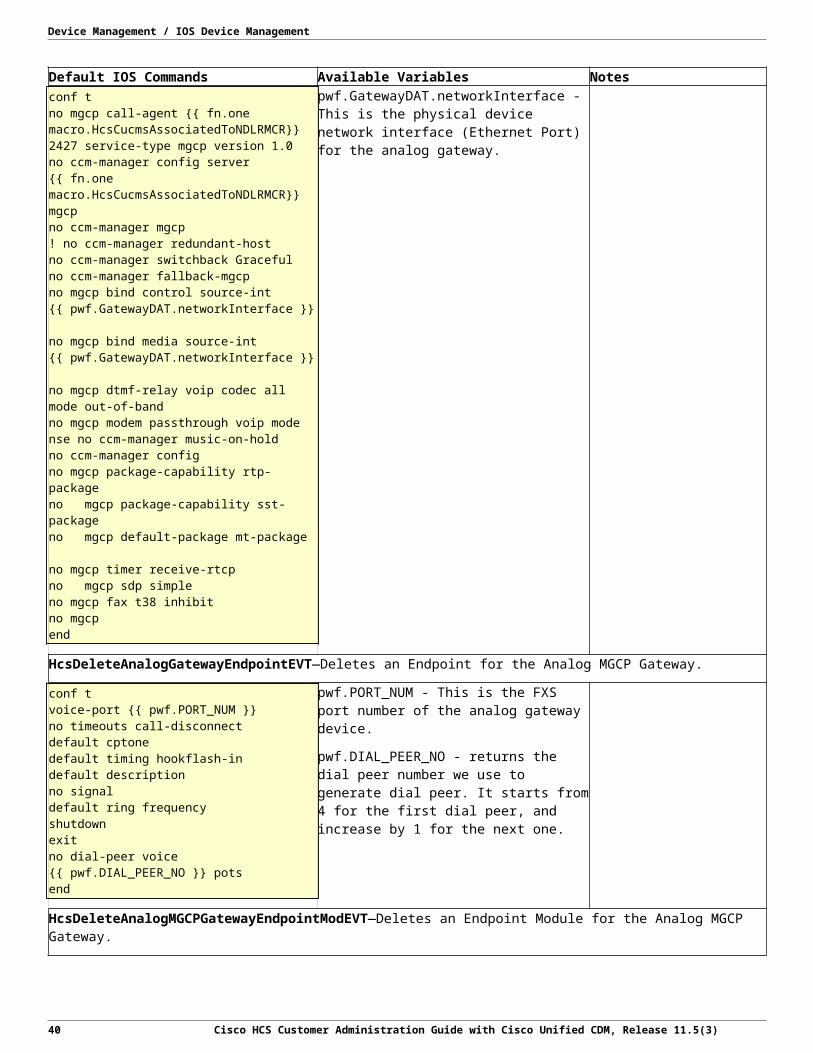
MGCP Analog Gateway Events and IOS Commands Table 2: MGCP Analog Gateway Events
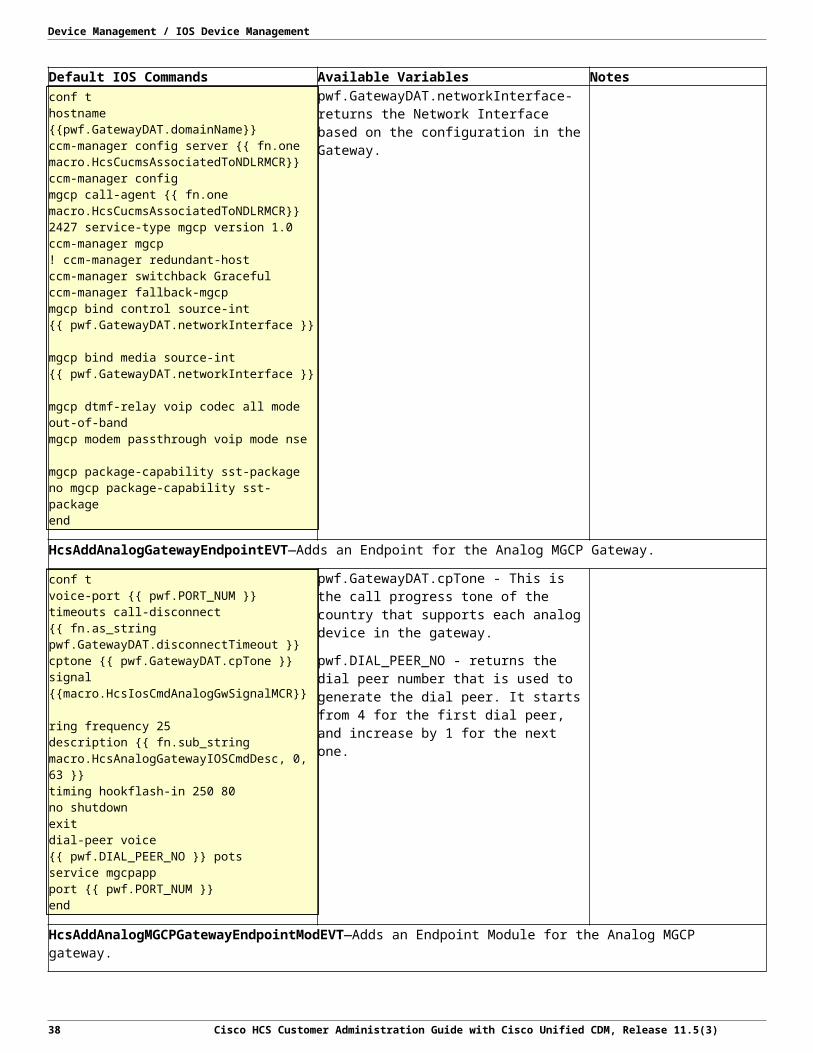
Default IOS Commands Available Variables Notes HcsAddAnalogGatewayEVT—Adds an Analog MGCP Gateway.
conf t hostname {{pwf.GatewayDAT.domainName}} ccm-manager config server {{ fn.one macro.HcsCucmsAssociatedToNDLRMCR}} ccm-manager config mgcp call-agent {{ fn.one macro.HcsCucmsAssociatedToNDLRMCR}} 2427 service-type mgcp version 1.0 ccm-manager mgcp ! ccm-manager redundant-host ccm-manager switchback Graceful ccm-manager fallback-mgcp mgcp bind control source-int {{ pwf.GatewayDAT.networkInterface }}
mgcp bind media source-int {{ pwf.GatewayDAT.networkInterface }}
mgcp dtmf-relay voip codec all mode out-of-band mgcp modem passthrough voip mode nse
mgcp package-capability sst-package no mgcp package-capability sst-package end
pwf.GatewayDAT.networkInterface- returns the Network Interface based on the configuration in the Gateway.
30 Cisco HCS Customer Administration Guide with Cisco Unified CDM, Release 11.5(3)

Device Management / IOS Device Management
Default IOS Commands Available Variables Notes HcsAddAnalogGatewayEndpointEVT—Adds an Endpoint for the Analog MGCP Gateway.
conf tvoice-port {{ pwf.PORT_NUM }} timeouts call-disconnect {{ fn.as_string pwf.GatewayDAT.disconnectTimeout }} cptone {{ pwf.GatewayDAT.cpTone }} signal {{macro.HcsIosCmdAnalogGwSignalMCR}}
ring frequency 25 description {{ fn.sub_string macro.HcsAnalogGatewayIOSCmdDesc, 0, 63 }} timing hookflash-in 250 80 no shutdown exit dial-peer voice {{ pwf.DIAL_PEER_NO }} pots service mgcpapp port {{ pwf.PORT_NUM }} end
pwf.GatewayDAT.cpTone - This is the call progress tone of the country that supports each analog device in the gateway.
pwf.DIAL_PEER_NO - returns the dial peer number that is used to generate the dial peer. It starts from 4 for the first dial peer, and increase by 1 for the next one.
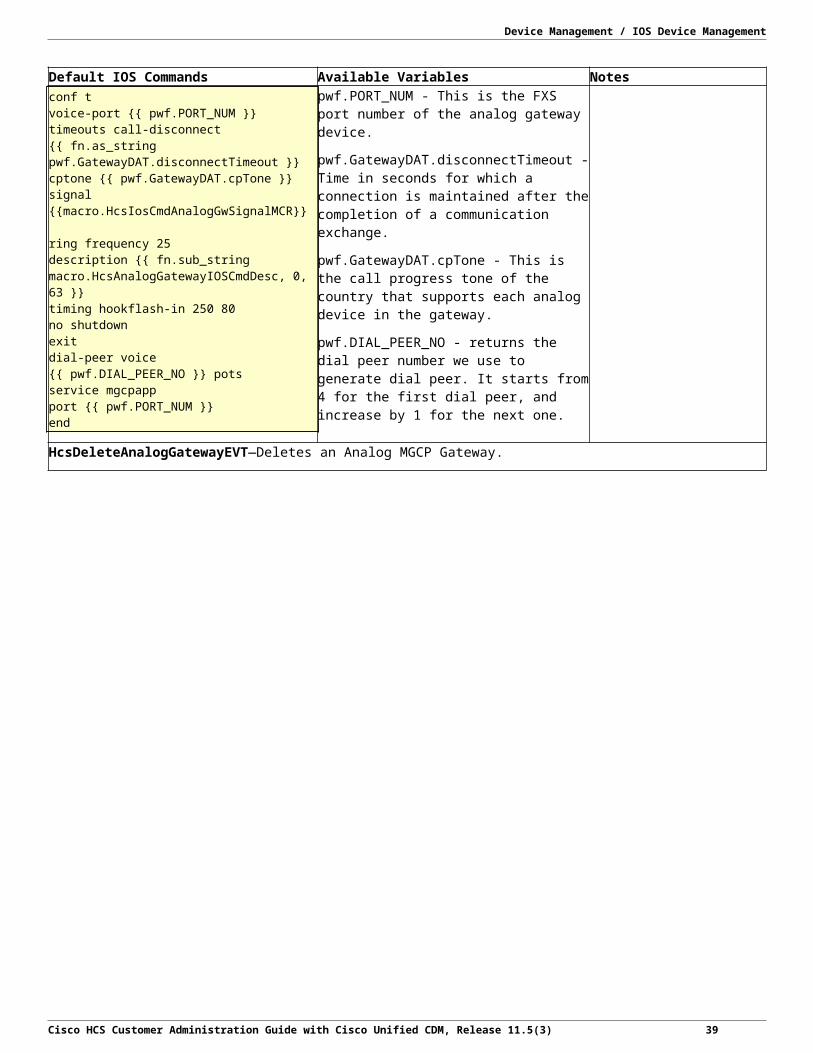
HcsAddAnalogMGCPGatewayEndpointModEVT—Adds an Endpoint Module for the Analog MGCP gateway.
conf tvoice-port {{ pwf.PORT_NUM }} timeouts call-disconnect {{ fn.as_string pwf.GatewayDAT.disconnectTimeout }} cptone {{ pwf.GatewayDAT.cpTone }} signal {{macro.HcsIosCmdAnalogGwSignalMCR}}
ring frequency 25 description {{ fn.sub_string macro.HcsAnalogGatewayIOSCmdDesc, 0, 63 }} timing hookflash-in 250 80 no shutdown exit dial-peer voice {{ pwf.DIAL_PEER_NO }} pots service mgcpapp port {{ pwf.PORT_NUM }} end
pwf.PORT_NUM - This is the FXS port number of the analog gateway device.
pwf.GatewayDAT.disconnectTimeout - Time in seconds for which a connection is maintained after the completion of a communication exchange.
pwf.GatewayDAT.cpTone - This is the call progress tone of the country that supports each analog device in the gateway.
pwf.DIAL_PEER_NO - returns the dial peer number we use to generate dial peer. It starts from 4 for the first dial peer, and increase by 1 for the next one.
HcsDeleteAnalogGatewayEVT—Deletes an Analog MGCP Gateway.
Cisco HCS Customer Administration Guide with Cisco Unified CDM, Release 11.5(3) 31

Device Management / IOS Device Management
Default IOS Commands Available Variables Notes conf t no mgcp call-agent {{ fn.one macro.HcsCucmsAssociatedToNDLRMCR}} 2427 service-type mgcp version 1.0 no ccm-manager config server {{ fn.one macro.HcsCucmsAssociatedToNDLRMCR}} mgcp no ccm-manager mgcp ! no ccm-manager redundant-host no ccm-manager switchback Graceful no ccm-manager fallback-mgcp no mgcp bind control source-int {{ pwf.GatewayDAT.networkInterface }}
no mgcp bind media source-int {{ pwf.GatewayDAT.networkInterface }}
no mgcp dtmf-relay voip codec all mode out-of-band no mgcp modem passthrough voip mode nse no ccm-manager music-on-hold no ccm-manager config no mgcp package-capability rtp-package no mgcp package-capability sst-package no mgcp default-package mt-package
no mgcp timer receive-rtcp no mgcp sdp simple no mgcp fax t38 inhibit no mgcp end
pwf.GatewayDAT.networkInterface - This is the physical device network interface (Ethernet Port) for the analog gateway.
HcsDeleteAnalogGatewayEndpointEVT—Deletes an Endpoint for the Analog MGCP Gateway.
conf tvoice-port {{ pwf.PORT_NUM }} no timeouts call-disconnect default cptone default timing hookflash-in default description no signal default ring frequency shutdown exit no dial-peer voice {{ pwf.DIAL_PEER_NO }} pots end
pwf.PORT_NUM - This is the FXS port number of the analog gateway device.
pwf.DIAL_PEER_NO - returns the dial peer number we use to generate dial peer. It starts from 4 for the first dial peer, and increase by 1 for the next one.
HcsDeleteAnalogMGCPGatewayEndpointModEVT—Deletes an Endpoint Module for the Analog MGCP Gateway.
32 Cisco HCS Customer Administration Guide with Cisco Unified CDM, Release 11.5(3)

Device Management / IOS Device Management
Default IOS Commands Available Variables Notes conf tvoice-port {{ pwf.PORT_NUM }} no timeouts call-disconnect default cptone default timing hookflash-in default description no signal default ring frequency shutdown exit no dial-peer voice {{ pwf.DIAL_PEER_NO }} pots end
pwf.PORT_NUM - This is the FXS port number of the analog gateway device.
pwf.DIAL_PEER_NO - returns the dial peer number we use to generate dial peer. It starts from 4 for the first dial peer, and increase by 1 for the next one.
HcsUpdateAnalogGatewayEVT—Updates the Analog MGCP Gateway.
conf t hostname {{pwf.GatewayDAT.domainName}} no mgcp bind control source-int {{ pwf.previousGatewayDAT.networkInterface }} mgcp bind control source-int {{ pwf.GatewayDAT.networkInterface }}
no mgcp bind media source-int {{ pwf.previousGatewayDAT.networkInterface }} mgcp bind media source-int {{ pwf.GatewayDAT.networkInterface }}
end
pwf.GatewayDAT.networkInterface - This is the physical device network interface (Ethernet Port) for the analog gateway.
HcsUpdateAnalogGatewayEndpointEVT—Updates the Endpoint for the Analog MGCP Gateway.
conf t voice-port {{ pwf.PORT_NUM }} no signal signal {{macro.HcsIosCmdAnalogGwSignalMCR}}
no timeouts call-disconnect timeouts call-disconnect {{ fn.as_string pwf.GatewayDAT.disconnectTimeout }} no cptone cptone {{ pwf.GatewayDAT.cpTone }} no shutdown end
pwf.PORT_NUM - This is the FXS port number of the analog gateway device.
pwf.GatewayDAT.disconnectTimeout - Time in seconds for which a connection is maintained after the completion of a communication exchange.
pwf.GatewayDAT.cpTone - This is the call progress tone of the country that supports each analog device in the gateway.
Translation Rule Numbering The following information can be helpful to decode the number of Translation Rules included in IOS Command Builders.
The first digit indicates if the rule is for SRST, VoIP, or TDM: 7 for SRST, 8 for VoIP, and 9 for PSTN.
The second digit indicates if it is for incoming or outgoing call: 1 for incoming and 0 for outgoing
The third digit indicates if it is for calling or called number: 1 for calling and 2 for called
The fourth digit indicates if NOA is used: 1 is for NOA and 2 for no NOA and defines on the TDM trunk to the PSTN.
Examples:
Translation-rule 9011 - for handling calling number of an outgoing call to the PSTN where NOA is used.
Cisco HCS Customer Administration Guide with Cisco Unified CDM, Release 11.5(3) 33

Device Management / IOS Device Management
Translation-rule 9022 - for handling called number of an outgoing call to the PSTN where NOA is not used.
Translation-rule 9111 - for handling calling number of an incoming call from the PSTN where NOA is used.
Set up a Command Builder Use this procedure to set up a Command Builder that contains an IOS Commands template for an event.
Note: One event can trigger multiple Command Builders.
Procedure1. Log in as a provider, reseller, or customer administrator. 2. Set the hierarchy path to the level where you want to define your Command Builder. 3. Select Device Management > IOS > Command Builder. 4. Click Add. 5. Provide the following information:
Field Description
Name Enter a unique name for the builder. This field is mandatory.
Event Name Select the event that triggers the builder. This field is mandatory
Description Enter a description for the builder.
Command Template Enter the IOS Commands template for the event, one command per line. You can use macros in the IOS Commands template for variable substitution.
Enabled Uncheck the Enabled check box to create a builder but not have it available to run.
Applicable Device Type Select the device type that the commands can run on. This field is mandatory.
6. Click Save.
Clone a Command Builder Use this procedure to clone a Command Builder that contains an IOS Commands template for an event. For instance, use this procedure to modify one of the default Command Builders to suit your needs.
Note: One event can trigger multiple Command Builders.
Procedure1. Log in as a provider, reseller, or customer administrator. 2. Set the hierarchy path to the level where you want to clone an existing Command Builder. 3. Select Device Management > IOS > Command Builder. 4. Click the Command Builder name you want to clone. 5. In the Command Builder window, select Action > Clone. 6. Modify the following information as needed:
34 Cisco HCS Customer Administration Guide with Cisco Unified CDM, Release 11.5(3)

Device Management / IOS Device Management
Field Description
Name Enter a unique name for the builder. This field is mandatory.
Event Name Select the event that triggers the builder. This field is mandatory
Description Enter a description for the builder.
Command Template Enter the IOS Commands template for the event, one command per line. You can use macros in the IOS Commands template for variable substitution.
Enabled Uncheck the Enabled check box to create a builder but not have it available to run.
Applicable Device Type Select the device type that the commands can run on. This field is mandatory.
7. Click Save.
Set up an IOS Device Procedure1. Log in as a provider, reseller, or customer administrator. 2. Set the hierarchy path to the customer hierarchy node where you want to set up the IOS Device. 3. Select Device Management > IOS > IOS Devices. 4. Click Add. 5. Provide the following information:
Field Description
IOS Device Name Enter the name for the IOS Device. This field is mandatory.
Description Enter a description for the IOS Device.
Prime Collaboration Select the Prime Collaboration to manage the IOS Device.
6. In the Network Addresses pane, configure the SERVICE_PROVIDER_SPACE address space. Field DescriptionAddress Space Address Space Type. SERVICE_PROVIDER_SPACE is the
default. This field is required.
IPV4 Address Enter the IP address of the IOS Device.
Cisco HCS Customer Administration Guide with Cisco Unified CDM, Release 11.5(3) 35

Device Management / IOS Device Management
Field DescriptionHost Name The Host Name field is automatically populated with the IOS
Device Name. If the IOS Device Name is not the host name, you can edit this field to provide the host name, or provide an IP address in the IPV4 Address field.
Note: Either a host name or an IP address is required. If both are provided, the host name is used. If a host name is provided must be resolvable by the IOS Device.
Domain The domain of the IOS Device.
Description An optional description for the network address
If NAT is used, also configure an APPLICATION_SPACE network address. If a double NAT is deployed, also configure a CUSTOMER_SPACE network address.
7. Optionally, expand Credentials. a) Add credentials for CLI, SNMP_V2, SNMP_V3 credentials types. Click + to add more credentials. b) For CLI and SNMP_V3, fill in the user ID and password that you configured when you installed the IOS Device. For
SNMP_V2, only the password is required. c) For SNMP credentials, select RO (Read-only) or RW (Read or Write) for the Access Type. The default is RO. d) Provide an optional description for the credential.
SNMP credentials are used by PCA to manage the IOS Device. CLI credentials are used to log in to the IOS Device.
Note: SNMP configuration must be done manually on the IOS Device.
8. Click Save.
Analog Gateways
Note: The following concept applies only to Cisco Unified Communications Domain Manager 10.6(2) or later.
The MGCP analog gateway is supported from Cisco Unified Communications Domain Manager 11.5(2) or later.
A Cisco analog gateway connects fax machines, analog phones, and modems in the SCCP/MGCP protocol. Any IOS device that has FXS ports configured as SCCP/MGCP endpoints on Cisco Unified Communications Manager is considered an SCCP/MGCP analog gateway.
An analog device contains analog phones, which are endpoints in Cisco Unified Communications Manager.
Set up an Analog Gateway
Before you Begin
Add an IOS device in Cisco Unified Communications Domain Manager at the Customer level hierarchy. To add an IOS device, see Set up an IOS Device on page 35
Ensure that the site-level dial plan is applied on the site where the gateway is being added.
Note: Cisco Unified Communications Domain Manager supports SCCP and MGCP protocols. It does not support BRI endpoints for version 10.6(2) and later. Do not add slots or modules or subunits for BRI.
36 Cisco HCS Customer Administration Guide with Cisco Unified CDM, Release 11.5(3)

Device Management / IOS Device Management
Procedure1. Log in as a provider, reseller, or customer administrator. 2. Select Device Management > IOS > Analog Gateways. 3. Click Add. 4. Select the required hierarchy path from the drop-down and click OK. 5. Provide the following information:
Field Description IOS Device Select the required IOS Device from the drop-down list. For
example: IOS 11. This is a mandatory field.
Note: The IOS device identifies the devices that are not associated with any Analog Gateways.
Product Select the product from the drop-down list. For example: VG202, where VG represents Voice Gateway and 202 represents port. It has 2 ports, 0 and 1. This is a mandatory field.
Note: The analog gateway supports these models:
VG202: 2 ports
VG204: 4 ports
VG224: 24 ports
VG310: 24 ports
VG320: 48 ports
VG350: 48 ports and 72 ports
Protocol Select the protocol from the drop-down list. The available protocols are SCCP and MGCP. This is a mandatory field.
Gateway Name Enter the MAC address of the analog gateway. For example: SKIGW0102030405, where SKI represents SCCP, GW represents gateway, and the last 10 digits represent the MAC address of the gateway. This is a mandatory field.
Domain Name Enter a fully qualified domain name. For example: E7C1VG310.hcsent17.com. This is a mandatory field for MGCP protocol.
Call Manager Group Select the call manager group from the drop-down list. For example: Default. This is a mandatory field.
Note: Call Manager Group is default based on the site default device pool.
Cisco HCS Customer Administration Guide with Cisco Unified CDM, Release 11.5(3) 37
Device Management / IOS Device Management
Field Description Enable Command Builder Leave the check box checked to generate IOS commands, when
Analog Gateway is added, deleted, or modified. For more information, see Local Break Out and Analog Gateway Events, IOS Commands, and Variables on page 16.
Note: To view generated commands from Command Builder, see View IOS Commands Log on page 48.
Gateway Network Interface Enter a Gateway Network Interface. For example: FastEthernet0/0, FastEthernet0/1 or GigabitEthernet0/0, GigabitEthernet0/1. This is a mandatory field.
Note: Check the network interface at the Physical Device, then select the appropriate Network Interface and Port as applicable. The Network Interface is used in Command Generation.
Call Disconnect Timeout Enter the time unit for Call Disconnect Timeout. For example: 2. This is a mandatory field.
Note: The time unit is always in seconds. Do not enter any negative timer values.
CP Tone Select the call progress tone (country code) from the drop-down list. For example: in (for India). This is a mandatory field.
Note: CP Tone is an FXS configuration parameter that supports each analog device in the gateway.
Signal Select a signal from the drop-down list. For example: loop-start or ground-start. This is a mandatory field.
Note: Signal is an FXS configuration parameter that supports each analog device in the gateway.
6. Click the Gateway Units tab. 7. Click + to expand Modules. 8. Provide the following information:
Field Description Slot Select the required value from the drop-down list. For example:
0. This is a mandatory field.
Note:
Add only those Units (Modules) and Subunits that are listed in the drop-down list, without duplicating the units and subunit numbers.
If duplicate entry is made for a slot, then the new slot overwrites the older configuration. You may lose previously configured endpoints.
For VG310 model, do not select any module for slot 1.
38 Cisco HCS Customer Administration Guide with Cisco Unified CDM, Release 11.5(3)
Device Management / IOS Device Management
Field Description Module Select the available module from the drop-down list. For
example: NM-4VWIC-MBRD.
Note: Only modules that are available for the slot appear in the list.
Subunits Click + to expand Subunits. This is a mandatory field.
Note: If the subunit module in VG350 MGCP Analog gate is changed, the corresponding Endpoint is not deleted. You must manually delete the endpoint from Cisco Unified Communications Domain Manager.
Subunit Position Select the subunit position from the drop-down list. For example: 0.
Subunit Select the subunit from the drop-down list. For example: VIC3-2FXS-E/DID-SCCP.
9. Click the Endpoints tab. 10. Click + to expand the SCCP Endpoints/MGCP Endpoints.
Provide the following information for the SCCP Endpoints: Option Description Gateway Name This read-only field is populated from the analog gateway for the
SCCP protocol. This is a mandatory field.
Slot This read-only field is populated from the gateway units. This is a mandatory field.
Subunit Position This read-only field is populated from the gateway units. This is a mandatory field.
Port Number This read-only field is populated from the gateway units. This is a mandatory field.
Product Type Select the product type from the drop-down list. For example: Analog Phone. This is a mandatory field.
Device Protocol Select the device protocol from the drop-down list. This is a mandatory field.
Device Name This read-only field is populated from the analog gateway. This is a mandatory field.
Description Enter an optional description for the device. This is an optional field and accepts a string value.
Device Pool Select the device pool from the drop-down list. For example: Cu2Si2-DevicePool. This is a mandatory field.
Phone Button Template Select the phone button template from the drop-down list. For example: Standard Analog. This has a specific phone button template for the analog gateway. This is a mandatory field.
Cisco HCS Customer Administration Guide with Cisco Unified CDM, Release 11.5(3) 39
Device Management / IOS Device Management
Option Description Common Phone Profile Select the common phone profile from the drop-down list. For
example: Standard Common Phone Profile. It includes the attributes (services or features) that are associated with a particular user. This is a mandatory field.
Location Select a location from the drop-down list. For example: Cu2Si2-Location. This is a mandatory field.
Always Use Prime Line for Voice Message Select the required options from the drop-down list. For example: On, Off or Default. This is a mandatory field. This specifies whether the device always uses the prime line for voice messages.
Transmit UTF-8 for Calling Party Name Keep the check-box unchecked.
Use Device Pool Called Party Transformation CSS Check the check-box.
Allow Control Of Device From CTI Check the check-box.
Logged Into Hunt Group Check the check-box.
Use Device Pool Calling Party Transformation CSS (Device Mobility Related Information)
Check the check-box.
BLF Presence Group Select the presence group for busy lamp field buttons from the drop-down list. For example: Standard Presence group is the default value. This is a mandatory field.
Device Security Profile Select options from the drop-down list. For example: Analog Phone - Standard SCCP Non-Secure Profile. This is mandatory field.
MLPP Indication Select options from the drop-down list. For example: On, Off, or Default. This is a mandatory field.
MLPP Preemption Select options from the drop-down list. For example: Disabled, Forceful, Default. This is a mandatory field.
Note: If there are changes to the phone line, do not refer line settings. For example: Changing CSS is done under Subscriber Management.
Line Click + to expand Line.
Pattern Select the route pattern from the drop-down list. For example: 08231006.
Enduser Click + to expand Enduser.
User ID Select the available user ID from the drop-down list. For example: Subscriber 1
Product Specific Configuration Layout Click + to expand Product Specific Configuration Layout.
40 Cisco HCS Customer Administration Guide with Cisco Unified CDM, Release 11.5(3)

Device Management / IOS Device Management
Option Description Key Enter the Key for the product-specific configuration layout. For
example: stcappRegCap.
Value Enter the Key for the product-specific configuration layout. For example: 0.
Note: For more optional field information, see the Configure Phones section in the Cisco Hosted Collaboration Solution, Release 11.5 End-User Provisioning Guide.
Provide the following information for MGCP Endpoints: Option Description
Domain Name This read-only field is populated from the analog gateway for the MGCP protocol. This is a mandatory field.
Slot This read-only field is populated from the gateway units. This is a mandatory field.
Subunit Position This read-only field is populated from the gateway units. This is a mandatory field.
Port Number This read-only field is populated from the gateway units. This is a mandatory field.
Product Type Select the product type from the drop-down list. For example: Analog Phone. This is a mandatory field.
Device Protocol Select the device protocol from the drop-down list. This is a mandatory field.
Protocol Side This is a read-only field except when creating a device. This is a mandatory field.
Class This is a read-only field except when creating a device. This is a mandatory field.
Device Name This read-only field is populated from the analog gateway. This is a mandatory field.
Description Enter an optional description for the device. This is an optional field and accepts a string value.
Device Pool Select the device pool from the drop-down list. For example: Cu2Si2-DevicePool. This is a mandatory field.
Calling Search Space Select the space name form the drop-down list. This is an optional field.
Common Device Configuration Specify the Configuration name of the device. This is an optional field.
Cisco HCS Customer Administration Guide with Cisco Unified CDM, Release 11.5(3) 41

Device Management / IOS Device Management
Option Description
Network Locale Select the location from the drop-down list. This is an optional field.
Location Select a location from the drop-down list. For example: Cu2Si2-Location. This is a mandatory field.
Media Resource Group List Select a media resource to allocate for a device. This is an optional field.
AAR calling search space Choose the appropriate calling search space for the device to use when it performs automated alternate routing (AAR) from the drop-down list. This is an optional field.
User Trusted Relay Point Choose one of the following values:
Off—Choose this value to disable the use of a Trusted Relay Point (TRP) with this device. This setting overrides the Use Trusted Relay Point setting in the common device configuration with which this device associates.
On—Choose this value to enable the use of a TRP with this device. This setting overrides the Use Trusted Relay Point setting in the common device configuration with which this device associates.
Default—If you choose this value, the device uses the Use Trusted Relay Point setting from the common device configuration with which this device associates.
AAR group Specify the automated alternate routing (AAR) group for this device. The AAR group provides the prefix digits that are used to route calls that are otherwise blocked due to insufficient bandwidth.
Geolocation Specify the location name. This is an optional field.
Transmit UTF-8 for Calling Party Name Keep the check-box unchecked.
Port Number Configure the ports for the MGCP Endpoint. This is a mandatory field.
Trunk This field value auto-populates depending on the value set for the Port Number. This is a mandatory field.
Trunk Direction The field value auto-populates depending on the value set for the Port Number. This is a mandatory field.
Trunk Level The field value auto-populates depending on the value set for the Port Number. This is a mandatory field.
42 Cisco HCS Customer Administration Guide with Cisco Unified CDM, Release 11.5(3)
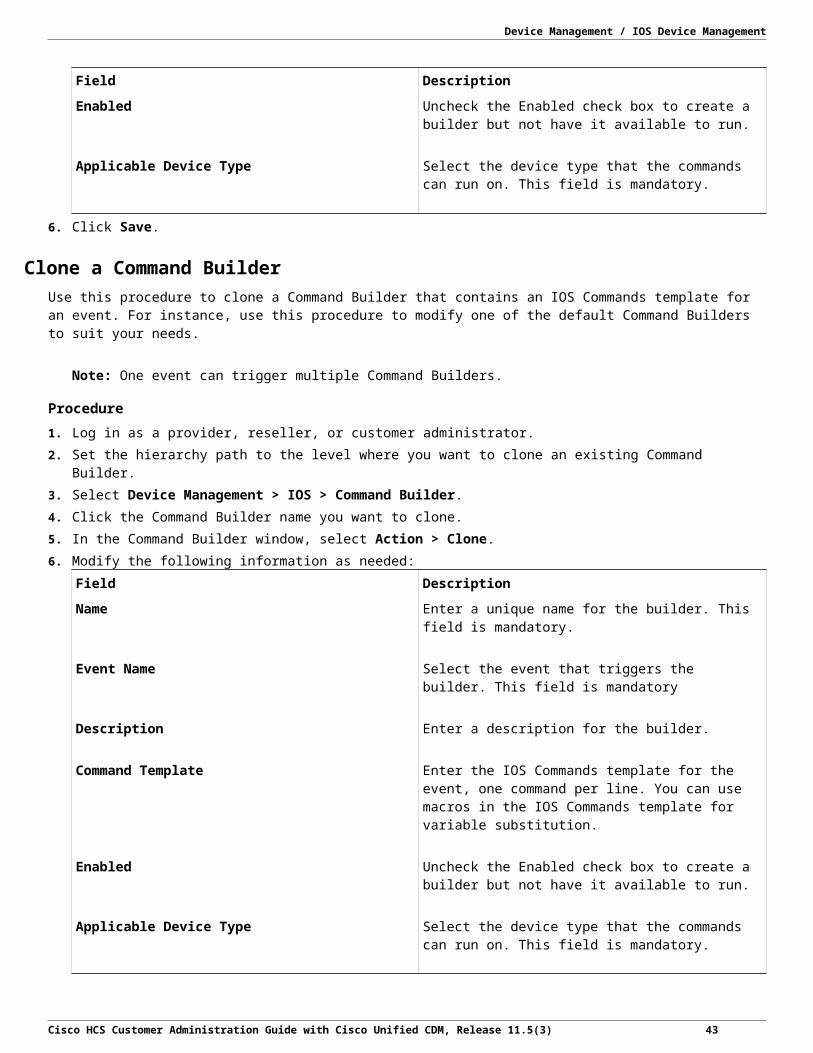
Device Management / IOS Device Management
Option Description
Attendant DN Specify this field for group start and loop start. This is a mandatory field.
Prefix DN Enter the prefix digits that are appended to the digits that this trunk receives on incoming calls.
Num Digits Enter the number of significant digits to collect between 0 to 32.
Expected Digits Enter the number of digits that are expected on the inbound side of the trunk. You can leave zero as the default value, if you are unsure.
SMDI Port Number(0-4096) Enter the first SMDI port number of the T1 span.
If you set this parameter to a nonzero value and this gateway belongs to an unknown type of route list, route group, or route list; hunting does not continue beyond this span.
Unattended Port Check this check box to indicate an unattended port on this device.
Line Click + to expand Line.
Label Use this field only if you do not want the directory number to show on the line appearance. Enter text that identifies this directory number for a line and phone combination.
E164Mask Indicate a phone number (or mask) that is used to send Caller ID information when a call is placed from the line.
You can enter a maximum of 24 number, the international escape character +, and "X" characters. The Xs represent the directory number and must appear at the end of the pattern. For example, if you specify a mask of 972813XXXX, an external call from extension 1234 displays a caller ID number of 9728131234.
Dirn, Pattern Select the route pattern from the drop-down list. For example: 08231006.
Dirn, Route Parition Choose the partition to which the directory number belongs. Make sure that the directory number that you enter in the Directory Number field is unique within the partition that you choose. If you do not want to restrict access to the directory number, choose <None> for the partition.
Enduser Click + to expand Enduser.
User ID Select the available user ID from the drop-down list. For example: Subscriber 1.
Cisco HCS Customer Administration Guide with Cisco Unified CDM, Release 11.5(3) 43

Device Management / IOS Device Management
Option Description
Index This field is the line position on the device. If left blank, an integer is automatically assigned.
Trunk Selection Order Select the order from the drop-down list to display the call routing logic for the route pattern.
Config, Product Specific Configuration Layout Click + to expand Product Specific Configuration Layout.
Key Enter the Key for the product-specific configuration layout. For example: stcappRegCap.
Value Enter the Key for the product-specific configuration layout. For example: 0.
You can configure multiple endpoints for an MGCP gateway. 11. Click Save.
These are few scenarios that show the expected behavior of an Analog gateway when adding, deleting, or modifying a gateway. Successful Scenario Failure Scenario
Adding an Analog device with a phone line. Removing the phone line from the endpoint.
Adding an Analog gateway without using enable command builder.
Adding a phone line after adding the enable command builder.
Removing the command builder after adding an analog gateway with command builder.
Adding an analog gateway without a phone line after adding a phone line to an endpoint.
Note: Ensure to add the Directory Names to both the endpoints.
Set up SIP Local Gateway
Before you Begin
You must configure an IOS Device at the customer hierarchy node.
You must configure an NDL containing the Cisco Unified CM for the customer.
You must configure a SIP Trunk at the customer hierarchy node.
A SIP Local Gateway is a logical gateway running on a physical IOS device.
Procedure1. Log in as provider, reseller, or customer administrator. 2. Set the hierarchy path to the customer for which you are setting up the SIP Local Gateway. 3. Select Device Management > IOS > SIP Local Gateway. 4. Click Add. 5. Provide the following information:
Field Description
Name Enter a name for the SIP Local Gateway. This field is mandatory.
44 Cisco HCS Customer Administration Guide with Cisco Unified CDM, Release 11.5(3)

Device Management / IOS Device Management
Field Description
Description Enter a description for the SIP Local Gateway.
IOS Device Select the IOS Device on which the SIP Local Gateway is located. This field is mandatory.
Note: An IOS Device can have only one SIP Local Gateway.
Once selected, the IOS Device cannot be changed.
Country Select the country where the SIP Local Gateway is. This field is mandatory.
The country selected must be the same country as the Site to which the SIP local gateway will be associated.
CUCM Publisher Select the CUCM Publisher. All CUCM Publishers that are in the customer's NDL are displayed. This field is mandatory.
The CUCM Publisher selected must be the same as the CUCM Publisher in the NDL for the Site to which the SIP local gateway will be associated.
SIP Trunk Select the SIP Trunk from the ones available on the CUCM Publisher. This field is mandatory.
Note: Only SIP Trunks configured at the customer hierarchy are available. If the customer uses a shared CUCM, then SIP Trunks must be manually configured at the customer level in CUCDM to be selectable here.
Gateway Address Gateway Address. This field is read-only and is derived from the selected SIP Trunk.
Note: If a SIP Trunk has multiple destination addresses, only the first one is used.
Gateway Port Gateway Port. This field is read-only and is derived from the selected SIP Trunk.
Run on Every Node Indicates whether call processing is distributed across all CUCM subscriber nodes. This field is read-only and is derived from the selected SIP Trunk.
Dial Peer Info If Run on Every Node is not enabled, then the Call Manager Group members are displayed in priority order.
If Run on Every Node is enabled, then all CUCM nodes in the cluster are displayed, but without priority.
Cisco HCS Customer Administration Guide with Cisco Unified CDM, Release 11.5(3) 45

Device Management / IOS Device Management
Field Description
Enable Command Builder Select to have Command Builder generate commands when SIP Local Gateway is added, deleted, or modified.
6. Click Save.
Results
The SIP Local Gateway appears in the SIP Local Gateway list view.
The HcsAddSipLocalGwEVT event is generated. If enabled, the IOS Command Builder generates the default IOS commands associated with the event.
The HcsAddSipLocalGwDialPeerEVT event is generated. If enabled, the IOS Command Builder generates the default IOS commands associated with the event for each dial peer.
IOS Gateway Manual Configuration Cisco Unified Communications Domain Manager 10.x/11.5(x) does not generate any controller, interface, or dial peer commands for the gateway. This has to be manually added after the command builder has generated the gateway configuration.
The steps shown here are for adding a PRI Trunk to connect to the PSTN.
Procedure1. Configure PRI on a channelized E1 or T1 controller with the following commands:
a) controller <T1 or E1><slot/port> where slot/port is the controller location in the gateway
b) framing <esf | sf or crc4 | non crc4> esf/sf for T1 and crc4/non crc4 for E1
c) linecode <b8zs | ami or bdb3 | ami> b8zs/ami for T1 and hdb3/ami for E1
d) clock source <internal/line> e) pri-group timeslots <1-24 | 1-31>
Use all channel on the trunk 1-24 for T1 and 1-31 for E1 2. Configure Serial Interface with the following commands:
a) interface serial <slot/port>:<23 | 15> slot/port similar to the above for controller and use 23 for T1 and 15 for E1
b) no ip address c) encapsulation hdlc d) isdn protocol-emulate <network | user> e) isdn switch-type <switch-type>
See IOS documentation for supported switch types. f) isdn incoming-voice voice g) isdn bchan-number-order <ascending | descending> h) no cdp enable
3. Configure POTS dial peer with the following commands:
a) dial-peer voice 95 pots b) translation-profile incoming <91XX>
For incoming call: use 9111 when both called and calling number have NOA
46 Cisco HCS Customer Administration Guide with Cisco Unified CDM, Release 11.5(3)

Device Management / IOS Device Management
use 9121 when called number does not have NOA but Calling number has NOA
use 9112 when calling number does not have NOA but Called number has NOA
use 9122 when both called and calling number do not have NOA
c) translation-profile outgoing <90XX> For outgoing call:
use 9111 when both called and calling number have NOA
use 9121 when called number does not have NOA but Calling number has NOA
use 9112 when calling number does not have NOA but Called number has NOA
use 9122 when both called and calling number do not have NOA
d) destination-pattern 90[1-9]T e) incoming called-number . f) no digit-strip g) direct-inward-dial h) port <slot/port>:<23 | 15>
Similar to what is configured for serial interface i) no register e164
Example IOS gateway manual configuration
controller T1 0/0/0 framing esf linecode b8zsclock source linepri-group timeslots 1-24 interface serial 0/0/0:23no ip addressencapsulation hdlcisdn protocol-emulate user isdn switch-type primary-net5isdn incoming-voice voiceisdn bchan-number-order descending no cdp enable dial-peer voice 95 potstranslation-profile incoming 9111translation-profile outgoing 9011destination-pattern 90[1-9]Tincoming called-number .no digit-stripdirect-inward-dialport 0/0/0:23 no register e164
Associate a SIP Local Gateway to a Site
Before you BeginThese restrictions apply:
The SIP Local Gateway and the target site must be in the same country.
The SIP Local Gateway and the target site must have the same CUCM Publisher.
The target site must have a site dial plan deployed.
Cisco HCS Customer Administration Guide with Cisco Unified CDM, Release 11.5(3) 47
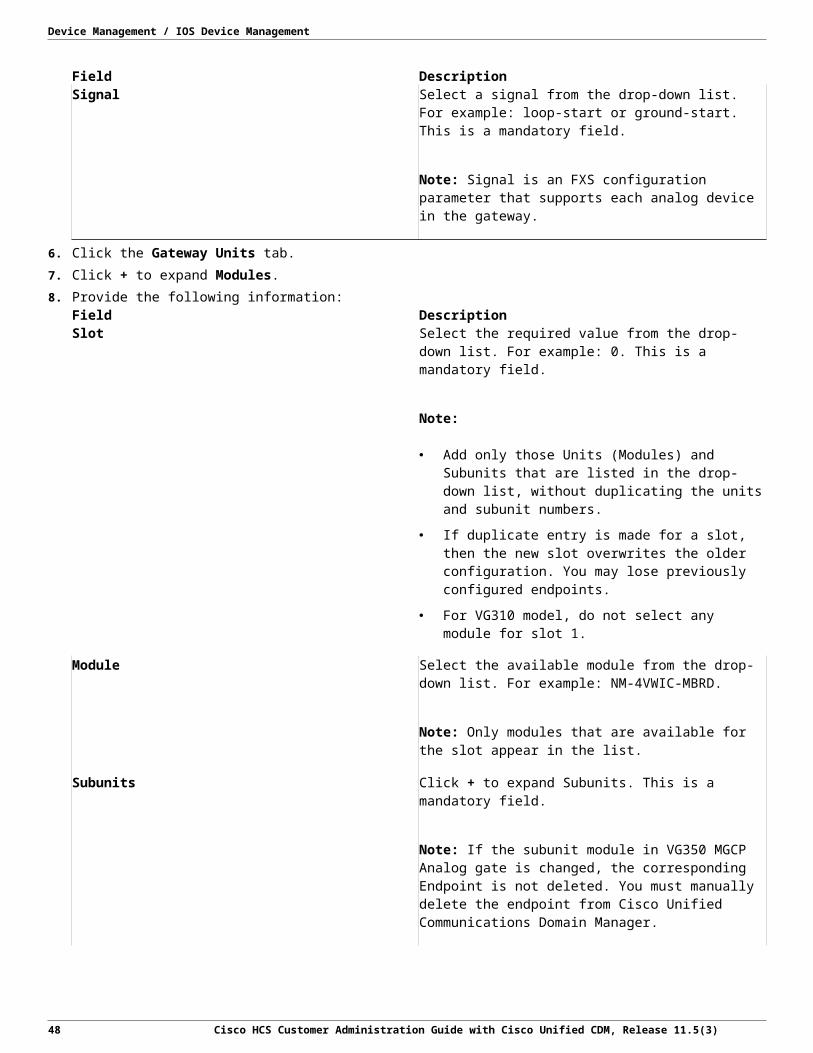
Device Management / IOS Device Management
If you are migrating from a pre-10.6(2) Dial Plan, you must update the dial plan schema group for the customer to enable the LBO custom workflows. See Cisco Hosted Collaboration Solution, Release 11.5 Dial Plan Management Guide for Cisco Unified Communications Domain Manager, Release 10.(x)/11.5(x) for detailed information.
Use this procedure to associate a SIP Local Gateway with a site.
Note:
A SIP Local Gateway can be associated with multiple sites given the prerequisite conditions are met.
A site can be associated with multiple SIP Local Gateways given the prerequisite conditions are met.
If a SIP Local Gateway is deleted, all existing site associations are disassociated.
If a site is deleted through Site Management > Delete Site and at least "Remove Dial Plan Items" is selected, all SIP Local Gateway associations for that site are disassociated.
If a site dial plan is deleted, all SIP Local Gateway associations are disassociated.
Procedure1. Log in as provider, reseller, or customer administrator. 2. Set the hierarchy path to the site for which you want to associate a SIP Local Gateway.
If you do not have the path set to a site, you are prompted to select the site. 3. Select Site Management > Associate SIP Local Gateway. 4. Click Add. 5. Select the SIP Local Gateway you want to associate with the site from the menu.
Only SIP Local Gateways that have the same country and CUCM Publisher configuration as the site are available to be selected. 6. Click Save.
Results
The SIP Local Gateway appears in the Associate SIP Local Gateway list view.
The HcsSipLocalGwAddSitePstnEVT event is generated. If enabled, the IOS Command Builder generates the default IOS commands associated with the event.
For each Area Code defined on the target site's dial plan, the HcsSipLocalGwAddSiteAreaCodeEVT event is generated. If enabled, the IOS Command Builder generates the default IOS commands associated with the event.
If the site has an existing E.164 to DN Association (N to N), either the HcsSipLocalGwAddE164AssociationEVT (for N to N) or the HcsSipLocalGwAddMultiE164AssociationEVT event (for N to 1) is generated. If enabled, the IOS Command Builder generates the default IOS commands associated with the event.
If the site has an existing Voice Mail Pilot Number Association, the HcsSipLocalGwAddVoiceMailPilotNumberEVT event is generated. If enabled, the IOS Command Builder generates the default IOS commands associated with the event.
If the Dial Plan Schema Group that is associated with the customer dial plan has the associateLboGateway custom workflow provisioned, the associateLboGateway custom workflow is executed.
The Site association to the SIP Local Gateway creates a Route Group with the SIP Trunk created and associated to the SIP Local Gateway.
View IOS Commands Log Using the IOS Commands log, an administrator can see a list of command sets that were triggered by different events. An administrator can copy the IOS Commands template and paste it into the IOS device CLI to be executed.
By default, the command sets are listed with the most recent at the top.
Note: Deleting a hierarchy node, such as a site, deletes all IOS Command Builders and associated IOS Commands templates configured at the hierarchy node.
48 Cisco HCS Customer Administration Guide with Cisco Unified CDM, Release 11.5(3)

Device Management / IOS Device Management
Procedure1. Log in as provider, reseller, or customer administrator. 2. Set the hierarchy path to the level for which you want to view IOS Commands. 3. Select Device Management > IOS > Commands.
A table containing the Command Builders that have been triggered is displayed. The table contains this information: Column Description
Timestamp The time of the event that triggered the Command Builder.
Device Name The IOS device associated with the event that fired the Command Builder.
Gateway Name The SIP Local Gateway or Analog Gateway associated with the event that fired the Command Builder.
Command Builder The name of the Command Builder that was triggered.
To view the IOS Commands template associated with a Command Builder, click the Command Builder name. The Command Builder configuration is displayed, including the IOS Commands template.
Description The description of the Command Builder that was triggered.
Device Deleted Set to "true" if the associated device has been deleted.
Hierarchy The hierarchy level of the event that triggered the Command Builder.
Consolidate IOS Commands To copy IOS commands to an IOS device CLI that is generated by multiple events, follow these steps:
Procedure1. Log in as provider, reseller, or customer administrator. 2. Set the hierarchy path to the customer or site for which you want to consolidate the IOS commands. 3. Select Device Management > IOS > Consolidate Commands. 4. Click Add. 5. Provide the following information:
Field DescriptionName Enter a unique name for the command consolidation. This field
is mandatory.
Description Enter an optional description for the command consolidation.
IOS Device Select the IOS device from which you want to consolidate commands.
Cisco HCS Customer Administration Guide with Cisco Unified CDM, Release 11.5(3) 49

Device Management / IOS Device Management
Field DescriptionDevice Type Select the device types for which you want to consolidate
commands.
IOS Device
Select this to get commands for the IOS device and any SIP Local Gateway or Analog Gateway hosted on that device.
SIP Local Gateway
Select this to get commands only for the SIP Local Gateway.
Analog Gateway
Select this to get commands only for the Analog Gateway. You do not get commands for devices that are deleted.
Note: If you select site hierarchy, only specific commands such as IOS Device or SIP Local gateway are displayed. To view both the IOS and Analog gateway commands, select the customer hierarchy path.
6. Click the required command templates listed in the Available list and click Select to move them to the Selected list. Click Remove to unselect a command template.
Note: You can change the order of the command templates by clicking Move Up and Move Down. However, the consolidated commands are generated in chronological order regardless of the order of the selected command templates.
7. Click Save. The new command consolidation instance appears in the list.
8. Click the command consolidation instance you created.
In the Command Template field, all the commands from the command templates you selected appear in one window. Comments are used to separate and identify the source command templates. You can edit the consolidated commands. Any modifications to the Command consolidation, displays the entire list of commands in a single instance. The commands present earlier to the modification cannot be viewed separately as the commands from the earlier events are treated as a single instance.
What to do nextAfter you have consolidated the IOS commands you want, copy them from the Commands Template field to the IOS device CLI.
50 Cisco HCS Customer Administration Guide with Cisco Unified CDM, Release 11.5(3)

LDAP management LDAP Integration on page 51
Set Up an LDAP Server on page 51
Set up LDAP for User Synchronization on page 53
Synchronize Users from LDAP on page 55
Set Up LDAP for Authentication Only on page 55
View and Update LDAP Authentication Users on page 58
LDAP Integration LDAP servers can be integrated with Cisco Unified CDM for these two purposes:
User synchronization – sync users from LDAP into Unified CDM and use LDAP to authenticate users.
User authentication only – use LDAP to authenticate users in Unified CDM (either added locally or synced from Cisco Unified CM).
You can sync users from multiple organizational units of a customer's LDAP server.
LDAP integration is available for Active Directory (AD) and OpenLDAP.
Note: Using LDAP for authentication only requires Unified CDM 10.6(3) or later.
Note:
Unified CDM supports only one LDAP server host to be set up at a hierarchy node. Spread users across multiple organization units of a single LDAP server.
Unified CDM supports case insensitive search base DN similar to the LDAP server search base. For example: These two search are similar:
CN=Users,DC=example,DC=com
cn=Users,dc=example,dc=com
Do not set up the same LDAP server with the same search base DN at more than one node in the same hierarchy path. This type of configuration causes the LDAP server addition transaction to fail.
Set Up an LDAP Server Only one LDAP server can be enabled at each hierarchy node. Attempting to enable more than one causes the transaction to fail.
Adding the same LDAP server with the same search base DN to any of the related hierarchies causes the LDAP server addition transaction to fail.
Use this procedure to set up an LDAP server for integration with Cisco Unified CDM.
Cisco HCS Customer Administration Guide with Cisco Unified CDM, Release 11.5(3) 51

LDAP management / View and Update LDAP Authentication Users
Procedure1. Log in as a provider, reseller, or customer administrator. 2. Set the hierarchy node to the desired node where you want the users synchronized. 3. Navigate to LDAP Management > LDAP Server. 4. Click Add. 5. Complete the fields:
Fields Description
Description Defaults to the current hierarchy level.
Hostname Hostname or IP address of the LDAP server. This field is required.
Port Port number for LDAP traffic. Defaults to 389.
User DN The user distinguished name of an administrative user who has access rights to the base DN on the LDAP server. This field is required.
Examples:
OU=LDAP0,DC=stb,DC=com
Admin Password The admin password associated with the user. This field is required.
Search Base DN Base distinguished name for LDAP search. This is a container or directory on the LDAP server where the LDAP users exist, such as an organization unit (OU). For example, to search within an organizational unit called CUS01 under a domain called GCLAB.COM, the search base DN is OU=CUS01,DC=GCLAB,DC=COM. This field is required.
Search Filter An RFC 2254 conformant string used to restrict the results returned by list operations on the LDAP server.
Filter examples:
(telephoneNumber=919*): all phone numbers starting with 919
((&(OfficeLocations=RTP)(|(department=Engineering)(department=Marketing))): office is located in RTP and department is either Engineering or Marketing
(&(MemberOf=cn=Admin,ou=users,dc=foo,dc=com)(!(c=US))): all admins except those in the U.S.
Server Type LDAP server type
AD Sync Mode Defaults to Direct.
52 Cisco HCS Customer Administration Guide with Cisco Unified CDM, Release 11.5(3)

LDAP management / Set Up LDAP for Authentication Only
Fields Description
CUCM LDAP Directory Name The LDAP directory name configured on Cisco Unified Communications Manager, from which the users are considered synced from or users considered to use LDAP for authentication. When you use this optional parameter, consider these scenarios:
For top down sync scenario—If this parameter is not set, users are added to Cisco Unified Communications Manager as Local Users.
For bottom up sync scenario—If this parameter is not set, users cannot log on to Cisco Unified Communications Domain Manager.
Encryption Method Choose from No Encryption, Use SSL Encryption (ldaps://), or Use StartTLS Extension.
Server Root Certificate If Trust All is not checked, the LDAP server's SSL certificate is validated against this root certificate. If no server root certificate is specified, validation is done against any existing trusted CA certificates. Use this option for custom root certificates in .pem format.
Trust All Check to disable certificate validation.
6. Click Save to save the LDAP server with a single OU.
Note: To create multiple OUs, follow the complete procedure again.
What to do nextPerform a test connection to ensure that the LDAP server is configured correctly.
Set up LDAP for User Synchronization Follow these steps to set up an LDAP for user synchronization. This process synchronizes users from the configured LDAP directory into Cisco Unified CDM. The users then appear at the hierarchy node at which the LDAP User Sync object exists. You can manage the users through User Management menu options (for example, move users to other hierarchies, or push to Cisco Unified Communications Manager).
You can add multiple Organisational Units (OU) under the same hierarchy, but all the LDAP sync must be pointing to one LDAP and it must be of the same type.While adding LDAP, OUs must be mentioned.
Procedure1. Sign in as a provider, reseller, or customer administrator. 2. Set the hierarchy path to the node of the LDAP server you want to synchronize users from. 3. Select LDAP Management > LDAP User Sync. 4. Click Add. 5. On the Base tab, provide the following information:
Field Description
LDAP Server Select the required LDAP Server from the drop down list.
Cisco HCS Customer Administration Guide with Cisco Unified CDM, Release 11.5(3) 53

LDAP management / View and Update LDAP Authentication Users
Field Description
LDAP Authentication OnlyImportant: Leave unchecked to synchronize users from LDAP.
Default is unchecked. When unchecked, users are synchronized from the configured LDAP directory and their passwords are authenticated against the configured LDAP directory. When checked, users are not synchronized from the configured LDAP directory, but their passwords are authenticated against the LDAP directory. When checked, you can manually add users from the GUI or API, bulk load them, or synchronize them from Cisco Unified CM.
User Model Type The User Model Type identifies which LDAP object, defined in the configured LDAP server, is used to import and authenticate users.
If the LDAP server is Active Directory, the default is device/ldap/user.
If the LDAP server is OpenLDAP, the default is device/ldap/inetOrgPerson.
To identify a non-default User Model Type to use, contact the LDAP administrator for the LDAP server from which you are synchronizing users.
User Entitlement Profile Select the User Entitlement Profile that specifies the devices and services to which users synchronized from the LDAP server are entitled.
The selected entitlement profile is assigned to each synchronized user. It is checked during user provisioning to ensure the user's configuration does not exceed the allowed services and devices specified in the entitlement profile.
User Role Select the User Role to be assigned to all synchronized users. This value can be changed manually for individual users after synchronization. This field is mandatory.
User Move Mode User Move Mode can be Automatic or Manual. Users are automatically moved to sites based on the filters and filter order defined in User Management > Manage Filters. In case of Manual mode users are not moved to site when filter is applied.
User Delete Mode User Delete Mode can be Automatic and Manual. Users are automatically deleted from Cisco Unified CDM if they are deleted from the LDAP directory. If set to automatic, all subscriber resources associated with the user, such as a phone, are also deleted.
User Purge Mode User Purge Mode can be Automatic and Manual. Users are automatically deleted from Cisco Unified CDM if they are purged from the LDAP device model. An administrator can remove the LDAP user from the device layer even if the user has not been removed from the LDAP directory.
54 Cisco HCS Customer Administration Guide with Cisco Unified CDM, Release 11.5(3)

LDAP management / Set Up LDAP for Authentication Only
6. Click the Field Mappings tab and enter the following required mappings: LDAP Username (for example, sAMAccountName)
Sn (Surname)
7. If needed, complete required field mappings for other operations such as pushing users to Cisco Unified Communications Manager or creating move filters.
Note: The methods for pushing users to Cisco Unified CM are:
Synchronization from the LDAP directory
Synchronization from Cisco Unified CM
Manual configuration in Cisco Unified CDM
8. Click Save.
ResultsAn LDAP synchronization is scheduled, but is not activated by default. See Synchronize Users from LDAP on page 55.
Synchronize Users from LDAP For Cisco Unified Communications Domain Manager 10.6(x) and later, you can synchronize users from LDAP by either activating a scheduled synchronization, or by performing a manual synchronization.
Procedure1. To activate a scheduled LDAP synchronization:
a) Navigate to LDAP Management > LDAP Schedule. b) Click an LDAP Schedule. c) Check the Active check box. d) Click Save.
2. To perform a manual LDAP synchronization, see Synchronize or Purge LDAP Users on page 62.
ResultsCisco Unified CDM attempts to synchronize users from the LDAP server. It may take a few minutes for the users to show up in Cisco Unified CDM.
Note:
You cannot cancel a synchronization, and you cannot delete an LDAP server while a synchronization is in progress.
LDAP Sync Action allows you to perform bulk syncing for users from multiple Organization Units (OU) of any LDAP server.
What to do nextNavigate to User Management > Users and verify that users were synchronized from LDAP.
Set Up LDAP for Authentication Only Use this procedure to set up LDAP to only authenticate users in Cisco Unified CDM.
Users may be added locally, or synced from Cisco Unified CM.
Cisco HCS Customer Administration Guide with Cisco Unified CDM, Release 11.5(3) 55
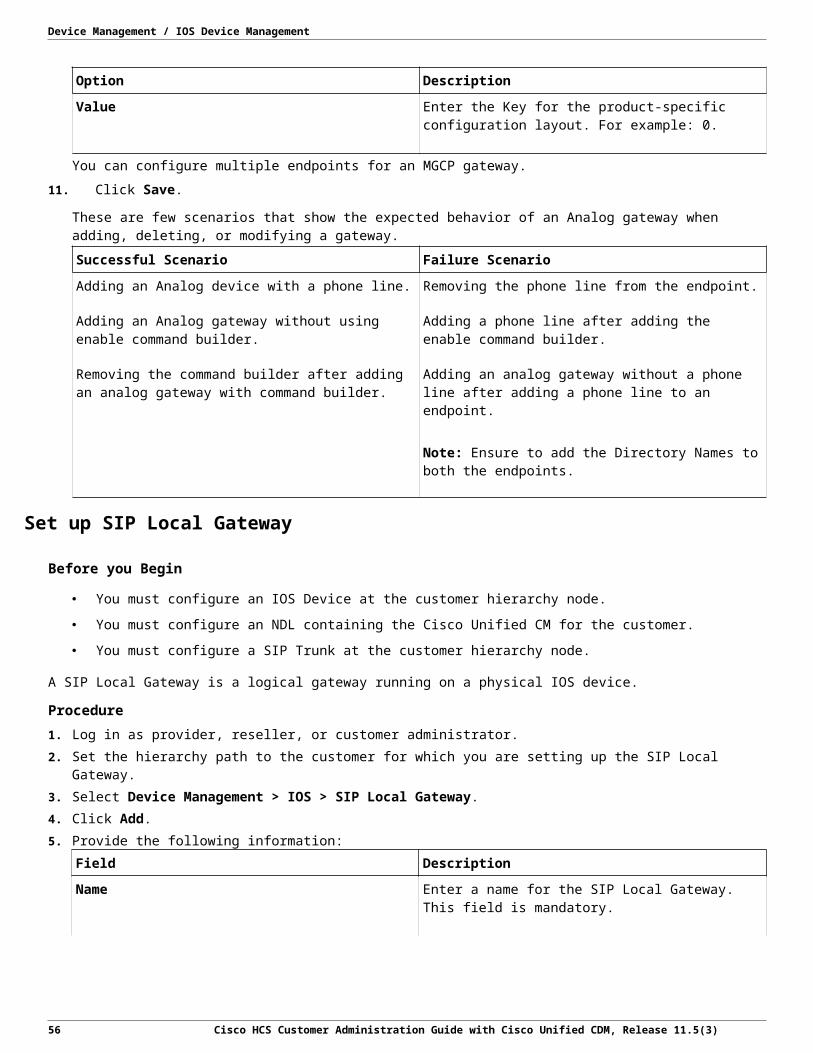
LDAP management / View and Update LDAP Authentication Users
Users that are LDAP synced in Unified CM and then synced into Unified CDM are LDAP authenticated by default.
Users that are manually configured in Unified CM and then synced into Unified CDM will not be LDAP authenticated by default.
Users that are manually configured in Unified CDM also will not be LDAP authenticated by default.
For users synced from multiple OUs in Unified CM, Cisco recommends adding one instance of LDAP with OU pointing to the top hierarchy of LDAP while adding LDAP for Authentication Only.
To change the default behavior, refer to "View and Update LDAP Authentication Users" in the LDAP Management chapter of the Cisco Unified Communications Domain Manager, Release 11.5(1) Maintain and Operate Guide.
Note: LDAP for Authentication Only is available at hierarchy nodes that have an LDAP server. Therefore, LDAP for Authentication Only is not available for users created at the site level.
When LDAP is enabled only for Authentication, enter the CUCM LDAP Directory Name for the LDAP server. If you create more than one LDAP server sync then do not enter the information in the LDAP server, the LDAP users are not created and a warning message is displayed in the transaction log.
Procedure1. Sign in as a provider, reseller, or customer administrator. 2. Set the hierarchy path to the node where you have set up the LDAP server you want to use to authenticate users.3. Navigate to LDAP Management > LDAP User Sync. 4. Click Add. 5. On the Base tab, provide this information:
Field Description
LDAP Server Select the required LDAP Server from the drop-down list.
LDAP Authentication OnlyImportant: Check this field to use the LDAP server only to authenticate users.
Unchecked by default. When this field is unchecked, users are synced from the configured LDAP directory and their passwords are authenticated against the configured LDAP directory.
When this field is checked:
When LDAP is enabled only for Authentication, enter the CUCM LDAP Directory Name for the LDAP server. If you create more than one LDAP server sync then do not enter the information in the LDAP server, the LDAP users are not created and a warning message is displayed in the transaction log.
Users are not synced from the configured LDAP directory, but their passwords are authenticated against the LDAP directory.
You can manually add users from the GUI or API, bulk load them, or sync them from Unified CM.
User Model Type This read-only field identifies which LDAP object, defined in the configured LDAP server, is used to authenticate users.
56 Cisco HCS Customer Administration Guide with Cisco Unified CDM, Release 11.5(3)

LDAP management / Set Up LDAP for Authentication Only
Field Description
LDAP Authentication Attribute Select the LDAP attribute to be used to authenticate users. This field is required. Options are:
sAMAccountName – AD only. This is the default for AD.
uid – OpenLDAP only. This is the default for OpenLDAP.
employeeNumber
telephoneNumber
userPrincipalName – AD only
These are the same values Unified CM uses for LDAP Attribute for User ID.
Caveats (AD only)
For the following user types, do not select userPrincipalName, unless the userPrincipalName value was set as the username when the user was created:
Users created using the Unified CDM GUI
Users created using the Unified CDM API
Users bulk loaded into Unified CDM
Users manually created in Unified CM and synced into Unified CDM
Cisco strongly recommends selecting the same LDAP authentication attribute as Unified CM uses for LDAP Attribute for User ID.
If you sync users into Unified CM using attributes other than sAMAccountName, do not choose sAMAccountName.
Caveats (AD and OpenLDAP)
For users synced from LDAP into Unified CM and then into Unified CDM:
Cisco strongly recommends selecting the same LDAP authentication attribute as Unified CM uses for LDAP Attribute for User ID.
If you sync users into Unified CM using attributes other than sAMAccountName/uid, do not choose sAMAccountName/uid.
If you sync users from LDAP into Unified CM using employeeNumber, choose employeeNumber for the LDAP authentication attribute. However, to get the LDAP authentication to work properly, one of these conditions must be met:
Before syncing users from Unified CM to Unified CDM, set the Employee Number field on the Unified CM server's FieldMapping tab to userid.
Define the LDAP for Authentication Only sync before syncing users from Unified CM into Unified CDM.
Cisco HCS Customer Administration Guide with Cisco Unified CDM, Release 11.5(3) 57

LDAP management / View and Update LDAP Authentication Users
6. Click Save.
ResultsAll users that have SyncToHierarchy set to the hierarchy of the LDAP server now use the LDAP server for authentication. The users are added to the LDAP Authentication Users list.
View and Update LDAP Authentication Users All users that use LDAP for authentication are displayed here. This list includes users that use LDAP for authentication only, and users that have been synced from LDAP.
Procedure1. Sign in as a provider, reseller, or customer administrator. 2. Select LDAP Management > LDAP Authentication Users
For each user that uses LDAP for authentication, the following information is displayed: Field Description
LDAP Username Matches the value of the LDAP authentication attribute which is specified in the User Model Type field of the LDAP User Sync configuration.
Data Username The username either created in Unified CDM, or synced from Cisco Unified CM, or synced from LDAP.
LDAP Server The LDAP server being used for authentication.
3. To disable LDAP authentication for a user, click the user, then click Delete. The user is removed from the LDAP Authentication Users list. Local authentication is used for the user to log in.
4. To update LDAP authentication for a user, click the user. Make the update, then click Update.
You can update only the LDAP Username field. However, LDAP authentication fails if the corresponding change is not also done on LDAP.
58 Cisco HCS Customer Administration Guide with Cisco Unified CDM, Release 11.5(3)

User Management User Management Overview on page 59
Create a User on page 60
Delete a User on page 61
Synchronize or Purge LDAP Users on page 62
LDAP Sync Actions on page 62
User Management Overview Users are added to Cisco Unified Communications Domain Manager 10.x/11.5(x) from these potential sources:
Synchronized from LDAP
Synchronized from Cisco Unified Communications Manager
Bulk loader template
Manually created
Typically, users are associated with a site. You can create move filters to automatically assign users to sites when they are synchronized from LDAP or Unified CM. Bulk loaded and manually created users can be moved using filters or by individually selecting users.
There are two categories of users, local administrators and end users. The local administrators can be assigned to any of the hierarchy nodes (provider, customer, site). End users can only be assigned at the site level.
If an Identity Provider server is deployed at a hierarchy node above the site, you can configure Cisco Unified Communications Domain Manager 10.x/11.5(x) to provide Single Sign-On support for users created or synchronized at that hierarchy node.
Conflicts between users synchronized from different sources are handled according to the strategy described in Managing Duplicate Usernames on page 59. For information about user password management, depending on the source of the user, see Password Management on page 67.
Users associated with a site can be pushed to the Unified CM that appears in the Network Device List assigned to that site. Once pushed to Unified CM, users become subscribers that can be provisioned with various collaboration services.
If a user's language is not explicitly set, the language is inherited from the nearest hierarchy node (at or above the user node) that has a default language. If no default language is set anywhere in the hierarchy at or above the user node, the language is set to English.
Managing Duplicate Usernames Users are created in a synchronization with LDAP or Cisco Unified CM, or they are created manually in the Cisco Unified CDM GUI. All users are created according to these duplicate username guidelines:
The username of a user cannot be updated if another user in the current hierarchy has the same username. This restriction includes above, below, or at the same level in the current hierarchy.
A user cannot be added if another user that is above, or was originally above before being moved, in the current hierarchy has the same username.
A user cannot be manually added if another user that is at the same level or below in the current hierarchy has the same username.
Cisco HCS Customer Administration Guide with Cisco Unified CDM, Release 11.5(3) 59

User Management / Synchronize or Purge LDAP Users
You cannot convert a user to a Subscriber / Unified CM user if another user at the same level or below the Unified CM in the current hierarchy has the same username.
A user may or may not be synchronized from LDAP or Unified CM if another user at the same level or below in the current hierarchy has the same username. This condition depends on the source of the existing user as shown in these tables:
Table 3: Users Created in an LDAP Synchronization
Table 4: Users Created in a Cisco Unified CM Synchronization
Table 5: Users Created in Cisco Unified CDM and Pushed to Cisco Unified CM
This table refers to Subscribers created from Unified CDM using:
Quick Add Subscriber and Subscriber Management menus create Subscribers and users, while Manage Users and the Auto Push feature convert existing users into Subscribers.
Note:
If a user cannot be created or updated during an LDAP or Unified CM synchronization, a log is created in User Management > Log Messages and the synchronization succeeds. If a user cannot be created or updated manually, an error message is generated.
If the duplicate user check fails, the transaction fails, and the user is not converted to a Subscriber.
If a user's SyncTo value is updated, SSO User updates can result. The SSO User's IDP is set to the IDP configured at the new SyncTo hierarchy node. If no IDP is configured at the new SyncTo hierarchy node, the SSO User is deleted, if it existed. If an IDP is configured at the new SyncTo hierarchy node, but no SSO User exists, an SSO User is created at the user's hierarchy node.
An update is blocked if two duplicate users are from the same source but originate from different servers.
Create a User Use this procedure to manually create a user.
Procedure1. Log in as the administrator at the hierarchy node where you want to create the user. 2. Select User Management > Users. 3. Click Add. 4. At a minimum, complete the following fields:
Fields Description
Username Sign-in username. This field is mandatory.
Entitlement Profile Select the entitlement profile that specifies which devices and services the user is entitled to.
Role Select the user's role. This field is mandatory.
60 Cisco HCS Customer Administration Guide with Cisco Unified CDM, Release 11.5(3)

User Management / Delete a User
Fields Description
Language Select the user's language.
Note:
If no language is selected, the language is inherited from the nearest hierarchy node (at or above the user) that has a default language configured. If no default language is configured anywhere in the hierarchy at or above the user, the user's language is English.
If a language is manually set for a user, that language remains unchanged even if the user is moved to a new place in the hierarchy. However, if the language is inherited, then the user's language changes when the user is moved to a hierarchy node that has a different default language.
Surname User's family name. This field is mandatory.
Email Address User email address.
Note: Email address is required to push admin users to PCA when admin users are assigned to either Service Assurance or Both (fulfillment and service assurance) roles; irrespective of whether admin users are created directly or through LDAP.
ResultsA user is created. If SSO is enabled for the hierarchy node where the user is added, the corresponding SSO user is created.
Note: IdPs are not configured at the site hierarchy node. Therefore, you can enable SSO for a user created at the site level only by performing these steps. Select Single Sign On > SSO User, click Add, and choose the IdP that can authenticate the user.
Delete a User You can delete users from either the User Management > Users page or the Subscriber Management > Subscribers page.
If a user appears on the Subscriber Management page, the user exists on Unified CM, and may have phones, lines, voicemail, and other services configured. If a user appears on the User Management page only, the user exists in Unified CDM only, and has not been pushed to any UC applications.
When you delete a user from either the User Management or Subscriber Management page, this deletes the user from Unified CDM. It also deletes the user from all UC applications that the user has been pushed to. In addition, all phones, device profiles, and remote destination profiles associated with the user are deleted.
Note: Lines associated with a user are not automatically deleted when you delete the user. To delete lines, navigate to Subscriber Management > Lines, select the line to be deleted from the list, and click Delete.
Important: If you prefer to delete the subscriber without deleting the phones and devices associated with the user, first remove the Controlled Devices that are listed in the User tab on the Subscriber Management page as described in Steps 1 to 6. If you want all phones associated with the user to be deleted, perform Steps 1, 2, and 7 to 9.
Cisco HCS Customer Administration Guide with Cisco Unified CDM, Release 11.5(3) 61

User Management / Synchronize or Purge LDAP Users
Procedure1. (Steps 1 to 6 are optional.) To disassociate phones from the user before deleting the user, log on as the administrator at the
hierarchy node where you want to update the user. 2. Navigate to Subscriber Management > Subscribers. 3. Select the user to be updated.4. On the User tab, scroll down to the bottom of the screen to the Controlled Devices list.5. Click the minus sign (-) on each device to be disassociated from the user.6. Click Save.7. Select the user to be deleted. 8. Click Delete.
A confirmation window appears. 9. Click Yes.
You can review the transaction record using Administration Tools > Transaction. Select the transaction from the list, or click the Notifications icon (triangle) at the top of the screen.
Synchronize or Purge LDAP Users Use this procedure to synchronize or delete (purge) users that were synchronized from an LDAP server.
Procedure1. Set the hierarchy path to the hierarchy node where the LDAP server is. 2. Click User Management > Sync & Purge > LDAP Users. 3. Complete the following fields:
Field Description
Remove Log Messages Select if you want to remove user management logs before synchronizing or purging.
Remove Log Direction Select Local to remove logs at the hierarchy of the LDAP server. Select Down to remove logs at and below the hierarchy of the LDAP server. This field appears only if Remove Log Messages is checked.
LDAP Server Select the Organization Unit of the LDAP Server from which you need to sync or purge the users. This is mandatory field.
LDAP Action Select synchronize or purge. This field is mandatory.
4. Click Save to start the action you selected.
LDAP Sync Actions LDAP Sync Action enables you to perform bulk syncing for users from multiple Organization Units (OU) of any LDAP server.
Note: It also allows you to select the required OUs of a single LDAP server, and perform the users sync only from the selected OUs.
Procedure1. Log in as a provider, reseller, or customer administrator. 2. Navigate to Device Management > Advanced > LDAP Sync Actions.3. Select the required sync action from Action drop-down list. Select Import for bulk syncing of users from multiple Organization
Units. Select EnableScheduleSync to enable syncing for already LDAP scheduled job. Select DisableScheduleSync to disable syncing for already LDAP scheduled job.
62 Cisco HCS Customer Administration Guide with Cisco Unified CDM, Release 11.5(3)
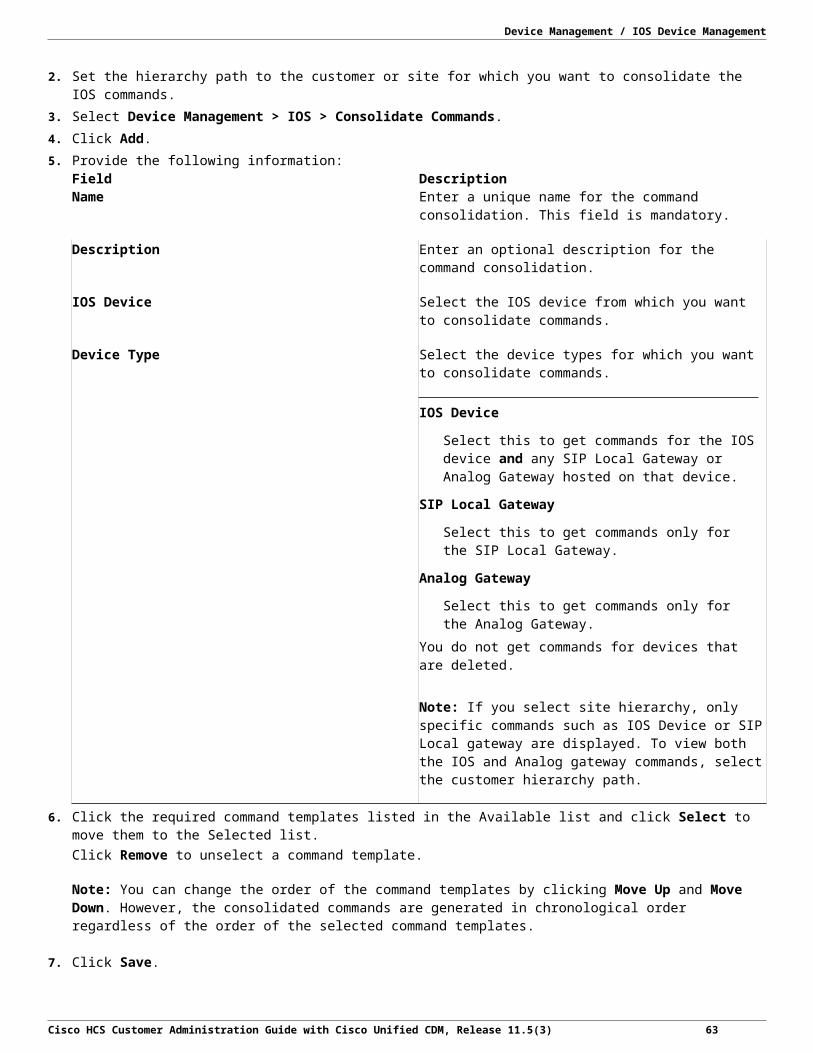
User Management / Delete a User
4. Select the required LDAP Server from Available table, and click Select. The selected LDAP Server appears under Selected table. 5. Click Save. 6. Use Move Up and Move Down tabs to alter the order of user syncing action for LDAP Server.
Cisco HCS Customer Administration Guide with Cisco Unified CDM, Release 11.5(3) 63

Audit Audit on page 65
Audit Use this procedure to audit user data for SyncTo, User Type, LDAP and CUCM Audit, and Subscriber at the selected hierarchy node. The following checks and corrections are performed:
1. Check for duplicate usernames. Warning messages are logged in User Management > Log Messages. For more information about duplicate usernames, see Managing Duplicate Usernames.
2. Check SyncTo settings. If the SyncTo setting is incorrect and the user is not a duplicate, the SyncTo setting is updated.
3. Check SSO User settings. If the SSO User setting is not correct based on the SyncTo setting and the user is not a duplicate, the SSO User is updated.
4. Check User Type settings. If the User Type is incorrect, it will be updated.
Provisioning Status (CUCDM, LDAP and SyncTo) Use this procedure to identify if the right SyncTo value is set for a given user, and to identify scenarios where the HcsUserProvisioningStatusDAT has invalid
Procedure1. Log in as a provider, reseller, or customer administrator.2. SelectAudit > Audit User Data 3. Select a Hierarchy node.
Its recommended to run at Site hierarchy for a better performance.4. In Provisioning Status (CUCDM, LDAP and SyncTo) table select Options as Off, Report Only and Report & Fix.5. Check the box Log to Transactions Only to get audit data only in transaction logs not as Audit Report.6. Click Save.
User Type Use this procedure to identify if the right user type is set for a given user and fix if required.
Procedure1. Log in as a provider, reseller, or customer administrator.2. Select Audit > Audit User Data 3. Select a Hierarchy node.
Its recommended to run at Site hierarchy for a better performance.4. In User Type table select Options as Off, Report Only and Report & Fix.5. Check the box Log to Transactions Only to get audit data only in transaction logs not as Audit Report.6. Click Save.
Subscriber Use this procedure to get report to identify secnarios where the subscriber is found with no corresponding user.
Cisco HCS Customer Administration Guide with Cisco Unified CDM, Release 11.5(3) 65

Audit / Audit
Procedure1. Log in as a provider, reseller, or customer administrator.2. Select Audit > Audit User Data 3. Select a Hierarchy node.
Its recommended to run at Site hierarchy for a better performance.4. In Subscriber table select Options as Off, Report Only and Report & Fix.5. Check the box Log to Transactions Only to get audit data only in transaction logs not as Audit Report.6. Click Save.
Audit Report If you have not checked the box Log to Transactions only, then the Audit Report gets created per user basis if there is any discrepency.
You can view this reports under Audit > Audit Report.
You can also export the report to .xls and .json format.
Select Administration Tools > Transaction to view the transaction log. Click the Hcs Audit User Sync To View transaction to open it. For example the message indicates:
The number of users found at or below the hierarchy node.
The number of duplicate users detected.
The number of SyncTo corrections made.
The number of SSO User corrections made.
66 Cisco HCS Customer Administration Guide with Cisco Unified CDM, Release 11.5(3)

Password Management Password Management on page 67
Password Management The following sections describe the various ways passwords are set by default and can be configured between LDAP, Cisco Unified Communications Domain Manager 10.x/11.5(x), and Cisco Unified Communications Manager:
Users Synchronized from LDAP to Cisco Unified CDM 10.x/11.5(x) on page 67
User Synchronized from LDAP to Cisco Unified CDM 10.x/11.5(x) (SSO Enabled) on page 67
Set Up LDAP for Authentication Only on page 55
Users Synchronized from LDAP to Cisco Unified Communications Manager on page 70
Users Synchronized to Cisco Unified CDM 10.x/11.5(x) on page 70
User Added Manually Through Subscriber Management on page 71
Users Synchronized from LDAP to Cisco Unified CDM 10.x/11.5(x) When users are synchronized top-down from LDAP into Cisco Unified Communications Domain Manager 10.x/11.5(x), LDAP authentication is enabled by default in Unified CDM for these users. When LDAP users are pushed to Unified CM and Cisco Unity Connection, authentication is either LDAP or local authentication, depending on how the applications are configured. If LDAP authentication is not configured in Unified CM or Cisco Unity Connection, the user is considered to be a local user in UC applications. To enable LDAP authentication in Cisco Unity Connection, see “LDAP User Synchronized from Cisco Unified CDM to Cisco Unity Connection Appears as a Local User” in the Cisco Unified Communications Domain Manager Troubleshooting Guide.
Note: If SSO is enabled, SSO authentication is used for users at the hierarchy where SSO is enabled, rather than LDAP authentication.
User Synchronized from LDAP to Cisco Unified CDM 10.x/11.5(x) (SSO Enabled) Passwords are defined and enforced at the Identity Provider when the user is synchronized from LDAP to Cisco Unified Communications Domain Manager 10.x/11.5(x) with SSO enabled.
User Synced from Cisco Unified CDM 10.x+ to Cisco Unity Connection
Note:
An LDAP user that is synchronized from Cisco Unified Communications Domain Manager (Unified CDM) appears in Cisco Unity Connection as a local user. This is because the Ldap Type field in the default CUC User Template in Quick Add Subscriber is blank or is not available in Advanced Subscriber Management.
You have two options for resolving this issue. Both options require you to take some additional steps before you perform them. These steps are the same for both options.
Delete Incorrectly Configured Subscriber Before performing either resolution option, delete the subscriber that was incorrectly configured.
Cisco HCS Customer Administration Guide with Cisco Unified CDM, Release 11.5(3) 67

Password Management / Password Management
Procedure1. Go to Subscriber Management > Subscribers. 2. In the list of subscribers, select the subscriber that is incorrect. 3. Click Delete.
What to do nextProceed to Enable LDAP Sync and LDAP Authentication in Cisco Unity Connection on page 68.
Enable LDAP Sync and LDAP Authentication in Cisco Unity Connection After performing the steps in Delete Incorrectly Configured Subscriber on page 67, follow this procedure to enable LDAP sync and LDAP authentication in Cisco Unity Connection.
Procedure1. Log in to Cisco Unity Connection. 2. Go to System Settings > LDAP > LDAP Setup. 3. Check Enable Synchronizing from LDAP Server, and then Save. 4. Go to System Settings > LDAP > LDAP Directory Configuration. 5. Add a new LDAP Directory for the LDAP server you wish to sync users from. 6. Save the LDAP Directory, and click Perform Full Sync Now. 7. Go to System Settings > LDAP > LDAP Authentication. 8. Configure the LDAP server to be used for LDAP authentication. It is usually the same LDAP server you configured in the
previous step.
Results
Note: Sync any changes in the LDAP directory into Cisco Unity Connection, but do not import the users. The Quick Add Subscriber or Advanced Subscriber workflows perform the import.
What to do nextProceed to Sync LDAP Users into Cisco Unified Communications Domain Manager on page 68
Sync LDAP Users into Cisco Unified Communications Domain Manager After the LDAP Sync in Cisco Unity Connection is complete, the LDAP users must be synced into Cisco Unified Communications Domain Manager. These users have not been imported in Cisco Unity Connection but they exist in a special holding area and are referred to as ImportUsers. These ImportUsers are synced into Unified CDM as part of a full CUC sync using the Perform Publisher Actions menu item.
Note: For users who are not synced into Unified CDM, sync these users using the Zip Code field.
Procedure1. Log in to Unified CDM as a provider administrator. 2. Navigate to Device Management > Advanced > Perform Publisher Actions. 3. Select Import in the Action dropdown and CUC Device in the App Type dropdown. 4. Select the Cisco Unity Connection device from the Available Clusters list and click Select to move it to the Selected list. 5. Click Save. 6. Monitor the transaction and wait for it to finish successfully before proceeding.
68 Cisco HCS Customer Administration Guide with Cisco Unified CDM, Release 11.5(3)

Password Management / Password Management
What to do nextProceed to either Resolution Option 1 on page 69 or Resolution Option 2 on page 69.
Resolution Option 1 Resolution option 1: Set the Ldap Type field in the template and apply the template to the Quick Add Subscriber group that contains the LDAP customer.
Note: Use this option if subscribers will be configured with Subscriber Management > Quick Add Subscriber page.
Procedure1. Log in to Unified CDM as a provider administrator. 2. Select the customer hierarchy where the LDAP user is configured. 3. Navigate to Role Management > Configuration Template. 4. In the list of templates, click Default CUC User Template.
The template opens. 5. Click Action > Clone. 6. Rename the cloned template to reflect the intended use. This name will appear in the Quick Add Group drop-down on the Quick
Add Subscriber page. 7. Select Integrate with LDAP Directory in the Ldap Type field, and then click Save. 8. Select the customer hierarchy again. 9. Navigate to Subscriber Management > Quick Add Subscriber Groups. 10. In the list of groups, choose an existing group that you want to use for the LDAP users. This can be one of the default groups that
are listed in the sys hierarchy, or a new group that has been created at a lower hierarchy. 11. If the group selected is one of the default groups, it must be cloned before modifying. Click Action > Clone and rename the
group. 12. In the Default CUC User Template field, select the template you created in step 7. 13. Click Save. 14. Navigate to Subscriber Management > Quick Add Subscriber 15. Click Add and fill in the form with the user information to be added. Select the Quick Add Group you created in the previous
steps. 16. Click Save.
Resolution Option 2 Resolution option 2: Set the Ldap Type field through Advanced Subscriber Management.
Note: Use this option for subscribers configured with the Subscriber Management > Subscribers page.
Procedure1. Log in to Unified CDM as a provider administrator. 2. Select the hierarchy of the customer containing the subscriber. 3. Navigate to Role Management > Field Display Policies. 4. The default SubscriberAdvancedDefault Field Display Policy exists at sys level. In order to change it, it must be cloned to a lower
hierarchy level (such as the customer level), but retain the same name. Click Action > Clone, update the Description, and click Save. This creates a copy of the Field Display Policy at the customer hierarchy.
5. From the list view, select the SubscriberAdvancedDefault you created at the customer hierarchy. 6. In the Voicemail section, move CUCUser.LdapType from the Available list to the Selected list. 7. Click Save.
Cisco HCS Customer Administration Guide with Cisco Unified CDM, Release 11.5(3) 69

Password Management / Password Management
The Ldap Type field is now available to configure for subscribers. 8. Repeat steps 4 to 7 for the SubscriberAdvanced-SiteFDP policy. 9. Navigate to Subscriber Management > Subscribers. 10. Click the subscriber that you want to push to Cisco Unity Connection. 11. Click the Voicemail tab. 12. Select Integrate with LDAP Directory in the Ldap Type dropdown. 13. Click Save. 14. Navigate to Subscriber Management > Subscribers. 15. Click Add and fill in the form with the user information. 16. In the Voicemail tab, click the + button and add the Line and PIN information. Select Integrate with LDAP Directory in the
Ldap Type dropdown. 17. Click Save.
Users Synchronized from LDAP to Cisco Unified Communications Manager When a user is synchronized from LDAP to Cisco Unified Communications Manager (Unified CM), the password is not synchronized like other user information that is pulled from LDAP. If LDAP Authentication is enabled, the password in the LDAP Server is used unless the password was changed locally in Unified CM, forcing the Unified CM password to be used. However, if LDAP Authentication is not enabled, the default password is whatever was configured in Unified CM as the default. If no default password is defined, then configure a password manually.
Users Synchronized to Cisco Unified CDM 10.x/11.5(x) Passwords are not transferred when users are synchronized from Cisco Unified Communications Manager (Unified CM) to Cisco Unified Communications Domain Manager 10.x/11.5(x) or later. An administrator must configure the passwords before the accounts can be used.
The following Unified CM users are affected: users that were manually added to Unified CM and users that were synchronized from LDAP.
User Added Manually from User Management When a user is added manually through User Management, the password is set to the local Cisco Unified Communications Domain Manager 10.x or later password that was specified when the user was created. When this type of user is pushed to Cisco Unified Communications Manager, the password is not pushed. Instead the password can be configured in one of the following ways:
Create a Default Password with Cisco Unified Communications Manager Procedure1. Log in to Cisco Unified Communications Manager as an admin. 2. Navigate to User Management > User Settings > Credential Policy Default. 3. Select the line item that has the Credential User to 'End User' and Credential Type to 'Password'.
Note: Ensure the user has the correct role defined.
4. Enter the default password in the confirmation box and click Save.
Manually Set the Password in the Cisco Unified CM End User Page Procedure1. Log in to Cisco Unified Communications Manager as an admin. 2. Navigate to User Management > End User. 3. Filter for the user you wish to modify.
70 Cisco HCS Customer Administration Guide with Cisco Unified CDM, Release 11.5(3)

Password Management / Password Management
4. Change password fields for the specified user. 5. Click Save.
User Added Manually Through Subscriber Management A user that is added through Subscriber Management has the same password that was configured in Cisco Unified Communications Domain Manager when the subscriber was provisioned.
Force User Password Change You can use a credential policy to force users to change their passwords on initial login. However, an administrator can manually force a user password change on the next login attempt.
Procedure1. Log in as provider, reseller, or customer admin. 2. Select User Management > Users. 3. Click the user whose password you want to be changed on the next login attempt. 4. Click the Account Information tab. 5. Check the Change Password on Next Login check box. 6. Click Save.
ResultsWhen the user next attempts to login, the user will be prompted to change the password. Once the password is changed the Change Password on Next Login check box is cleared.
Force Administrator Password Change You can use a credential policy to force administrators to change their passwords on initial login. However, an administrator at a higher hierarchy level can manually force an administrator to change password on the next login attempt.
Procedure1. Log in as provider, reseller, or customer admin. 2. Select User Management > Local Admins. 3. Click the administrator whose password you want to be changed on the next login attempt. 4. Click the Account Information tab. 5. Check the Change Password on Next Login check box. 6. Click Save.
ResultsWhen the administrator next attempts to login, the administrator will be prompted to change the password. Once the password is changed the Change Password on Next Login check box is cleared.
Manage Your Own Account Password Logged in users or administrators can manage their own account passwords.
Note: Users who are configured for Single Sign On or through LDAP do not manage their account passwords in Cisco Unified Communications Domain Manager 10.x/11.5(x).
Change Your Own Password Follow this procedure to change your own password if required:
Cisco HCS Customer Administration Guide with Cisco Unified CDM, Release 11.5(3) 71

Password Management / Password Management
Procedure1. Log in to Cisco Unified Communications Domain Manager 10.x/11.5(x) or later. 2. Click the arrow next to the logged in user at the top right-hand side of the screen. 3. Choose the Change Password option from the drop-down menu. The Change Password screen is displayed. 4. Enter your existing password in the Old Password field. 5. Enter your new password in the New Password field. See also: "Password Complexity and Re-use" in the Troubleshooting User
Access chapter of Cisco Unified Communications Domain Manager, Release 11.5(1) Troubleshooting Guide. 6. Confirm your new password by re-entering it in the Repeat New Password field. 7. Click Change Password in the button bar. Your password is changed.
Administrators can also change passwords of administrator users below their hierarchy through the menu.
Reset Your Own Password Follow this procedure if you forget your password while attempting to log in to Cisco Unified Communications Domain Manager 10.x/11.5(x) or later.
You can reset your password only if you have already provided answers to the security questions created by your administrator.
Procedure1. Enter your username in the Username field on the Log in screen. 2. Click the Forgot Password? hyperlink located below the Log in button. 3. Enter your username again. 4. Click Reset my password. 5. Click in each security question field and type the correct answer. 6. Click in the New Password field and type your new password. 7. Click in the Repeat Password field and re-type your new password. 8. Click Reset my Password. Your password is changed. 9. Click the Login hyperlink if you want to attempt to log in again.
Configure Your Own Password Reset Questions Use this procedure to configure your password reset questions:
Note: Configuring your own password reset questions is available only if the credential policy applied to your user account has Number of Questions Asked During Password Reset set to > 0.
Procedure1. Log in to Cisco Unified Communications Domain Manager 10.x/11.5(x). 2. Click the arrow next to the logged in user at the top right-hand side of the screen. 3. Choose the Password Reset Questions option from the drop-down menu. The Password Reset Questions screen is displayed. 4. Type your password in the Current Password* field. 5. Choose the required security question from the Question* drop-down list. 6. Enter your answer to the above question in the Answer* field. 7. Repeat steps 5 and 6 until you have configured the required amount of security questions (as determined by your administrator). 8. Click the Update Security Questions button in the button bar when complete. Your security questions and answers are updated.
72 Cisco HCS Customer Administration Guide with Cisco Unified CDM, Release 11.5(3)

Dial Plan management View Directory Number Inventory on page 73
View E.164 Number Inventory on page 74
Associate a Range of E.164 Numbers to a Range of Directory Numbers on page 75
View the Ranges of E.164 Numbers Associated with a Range of Directory Numbers on page 76
Associate a Set of E.164 Numbers to One Directory Number on page 77
View the Sets of E.164 Numbers Associated with One Directory Number on page 78
View Directory Number Inventory Use this procedure to view the range of directory numbers that have been defined for a site.
Procedure1. Sign in as the provider, reseller, or customer administrator. 2. Select an available site from the hierarchy node breadcrumb at the top of the interface. 3. Select Dial Plan Management > Number Management > Directory Number Inventory.
The list of all directory numbers (DNs) configured for the site appears. You can view the list of DN numbers or delete a DN number from this page. To filter the list of directory numbers, click the up arrow beside the title of the Internal Number column. Enter the search string you want to locate, and all directory numbers that match the search string appear. When a DN is first added to the inventory, the Used column is blank, and the Available column shows “true.” The Used column changes to “true” when the DN is put into use when a line is created and associated to a phone or subscriber. The Available column indicates that the DN is used by a device or service that does not allow a shared line (for example, a hunt pilot).
Directory numbers that begin with a * (asterisk) denote DNs that are used with hunt groups, assistant lines, contact center lines, and so on. This type of directory number cannot be reached from an outside line. Typically, a DN with the * prefix is not called from another line (user). Rather, it is tied to a service feature such as call pickup, hunt groups, or contact center.
Note: Adding a new DN to inventory on Cisco Unified Communications Domain Manager 10.x/11.5(x) does not add a directory number on Cisco Unified Communications Manager until it is associated to a line on Unified CDM.
The directory number inventory entries appear in other end-user provisioning tasks in Cisco Unified Communications Domain Manager 10.x/11.5(x) as described in the table that follows. For more information on provisioning each of these tasks, refer to Cisco Hosted Collaboration Solution End-User Provisioning Guide.
Task Cisco Unified Communications Domain Manager 10.x/11.5(x) Location
Notes
Lines Subscriber Management > Lines When lines are added through phones and subscriber, line details can be modified.
The DN for the line cannot be modified; if you attempt to change the DN assigned to the line, the operation fails.
Cisco HCS Customer Administration Guide with Cisco Unified CDM, Release 11.5(3) 73

Dial Plan management / View the Sets of E.164 Numbers Associated with One Directory Number
Phones Subscriber Management > Phones > Lines tab > Dirn > Pattern
The Dirn > Pattern contains a list of available directory numbers.
DNs that are used are marked as "true" in the directory number inventory.
Only available DNs are listed.
Subscribers Subscriber Management > Subscribers > Phones > Lines > Dirn
The Dirn > Pattern contains a list of available directory numbers.
DNs that are used are marked as "true" in the directory number inventory.
Only available DNs are listed.
Subscriber Management > Subscribers > Voicemail
The Voicemail Line list contains DNs provisioned to lines.
Quick Add Subscribers
Subscriber Management > Quick Add Subscriber > Lines > Directory Number.
The Directory Number list contains available directory numbers.
DNs that are used are marked as "true" in the directory number inventory.
Only available DNs are listed.
PLAR (Hotdial) Subscriber Management > PLAR (Hotdial)
DNs provisioned to lines are displayed in the Hotdial Destination Pattern list.
Hunt Groups Subscriber Management > Hunt Groups > Members > Directory Number
DNs provisioned to lines are displayed in the Pattern list.
Call Pickup Groups Subscriber Management > Call Pickup Groups > Call Pickup Group > Line
DNs provisioned to member lines are displayed in the Pattern list.
View E.164 Number Inventory Use this procedure to view the inventory of E.164 numbers.
Procedure1. Log in as a provider, reseller, customer, or site administrator. 2. Set the hierarchy path to limit the scope of E.164 numbers being viewed. 3. Select Dial Plan Management > Number Management > E164 Inventory.
A table containing this information is displayed:
Column Description
E164 Number The individual E.164 number in the inventory.
Country The country associated with the E.164 number.
Associated Flag Indicates the E.164 number has been associated with a Directory Number
74 Cisco HCS Customer Administration Guide with Cisco Unified CDM, Release 11.5(3)

Dial Plan management / Associate a Set of E.164 Numbers to One Directory Number
Column Description
Hierarchy Indicates the hierarchy of the site the E.164 number was created for.
Associate a Range of E.164 Numbers to a Range of Directory Numbers Use this procedure to associate a range of E.164 numbers with a range of directory numbers (DN) at a customer or site. These associations create direct dial inward (DDI) associations so that incoming PSTN numbers are routed to directory numbers.
If you create the association at a site, you can mix customer-level DNs and E.164 numbers with site-level DNs and E.164 numbers.
Note:
You cannot associate numbers if number management has been disabled for the customer.
Only DNs or E.164 numbers that are not already associated are available for association.
Procedure1. Sign in as provider, reseller, customer, or site administrator. 2. Set the hierarchy path to point to the customer or site where you want to associate E.164 numbers with directory numbers. 3. Select Dial Plan Management > Number Management > E164 Associations (N to N DN). 4. Click Add. 5. Provide the following information:
Field Description
Range Select one of these ranges:
Note: The range values you select map to the mask value when the association translation pattern is created. For example, when 10 is selected, all E.164 numbers and directory numbers that end in 0 are listed. The mask affects all digits 0 to 9, so you can't start the mask on a nonzero number. Likewise, when 100 is selected, the E.164 number and DN end in two zeros. This pattern results in a mask of XX.
1—To list all E.164 numbers and DNs
10—To list all E.164 numbers and DNs that end in one zero (0)
100—To list all E.164 numbers and DNs that end in two zeros (00)
1000—To list all E.164 numbers and DNs that end in three zeros (000)
This field is required and affects what appears in the fields that follow.
E164 Number Select the starting number of the range of E.164 numbers from the drop-down list. For a customer-level association, only customer-level E.164 numbers are available. For a site-level configuration, both customer-level and site-level E.164 numbers are available.This field is required.
Cisco HCS Customer Administration Guide with Cisco Unified CDM, Release 11.5(3) 75

Dial Plan management / View the Sets of E.164 Numbers Associated with One Directory Number
Field Description
DN Number Select the starting extension number from the drop-down list. This field is required.
Note: You cannot associate extension numbers that begin with the prefix * (asterisk).
6. Click Save.
Results
For a site-level association, a translation pattern that is used to route inbound PSTN calls to their associated DNs is created on the Unified CM. This pattern is the mapping between the E164 range and DN range.
For a customer-level association, a translation pattern is created on each Unified CM cluster that has a dial plan provisioned.
For a site-level association, if the site has one or more SIP local gateways associated with it, the HcsSipLocalGwAddE164AssociationEVT event is generated. If enabled, the IOS Command Builder generates the default IOS commands associated with the event for each SIP local gateway.
For a customer-level association, if the E.164 number has the same country as any SIP local gateway configured for the customer, the HcsSipLocalGwAddE164AssociationEVT event is generated. If enabled, the IOS Command Builder generates the default IOS commands associated with the event for each SIP local gateway.
View the Ranges of E.164 Numbers Associated with a Range of Directory Numbers
Use this procedure to view the ranges of E.164 numbers that are associated with a range of Directory Numbers (DNs).
Procedure1. Sign in as provider, reseller, customer, or site administrator. 2. Set the hierarchy path to the site where the E.164 numbers and DNs are associated. 3. Select Dial Plan Management > Number Management > E164 Associations (N to N DN).
A table containing this information is displayed: Column Description
E164 Number The starting E.164 number in the range
DN Number The starting DN in the range
Range One of the following:
1—To indicate that one E.164 number and DN are associated
10—To indicate that a range of ten numbers including the starting E.164 and starting DN are associated
100—To indicate that a range of 100 numbers including the starting E.164 and starting DN are associated
1000—To indicate that a range of 1000 numbers including the starting E.164 and starting DN are associated
76 Cisco HCS Customer Administration Guide with Cisco Unified CDM, Release 11.5(3)

Dial Plan management / Associate a Set of E.164 Numbers to One Directory Number
Column Description
Hierarchy Indicates the hierarchy of the site where the E.164 number range and DN range association was created
Associate a Set of E.164 Numbers to One Directory Number Use this procedure to associate a set of E.164 numbers with one Directory Number (DN) at a customer or site. For example, you could associate a set of E.164 numbers for the sales department with an attendant's DN.
If you create the association at a site, you can mix customer-level DNs and E.164 numbers with site-level DNs and E.164 numbers.
You can optionally specify a primary E.164 number to associate with the DN. This step can be useful when you perform a DN-to-E.164 translation (for example, when provisioning translation rules for LBO gateways) and the DN is associated to more than one E.164 presentation.
Note:
You cannot associate numbers if Number Management has been disabled for the customer.
Only DNs or E.164 numbers that are not currently associated are available for association.
Procedure1. Sign in as a provider, reseller, customer, or site administrator. 2. Set the hierarchy path to the customer or site where you are associating a set of E.164 numbers with one DN. 3. Select Dial Plan Management > Number Management > E164 Associations (N to 1 DN). 4. Click Add. 5. From the DN Number menu, select an extension number. This field is mandatory. 6. In the E164 Ranges table, click + as required, to add multiple sets of E.164 numbers. The E.164 numbers do not need to be
contiguous. Provide the following information for each association: Field Description
E164 Range Select one of the following sets:
1—To list all E.164 numbers
10—To list all E.164 numbers that end in one zero (0)
100—To list all E.164 numbers that end in two zeros (00)
1000—To list all E.164 numbers that end in three zeros (000)
This field is mandatory and affects what appears in the E164 Number field.
E164 Number Select the starting number of the set of E.164 numbers. For a customer-level association, customer-level E.164 numbers are available. For a site-level configuration, both customer-level and site-level E.164 numbers are available. This field is mandatory.
7. In the Primary E164 field, enter the primary E.164 number to associate with the DN. Ensure the E.164 number you enter starts with \+ and falls within the range you specified in the E164 Range field. This field is optional.
8. Click Save.
Cisco HCS Customer Administration Guide with Cisco Unified CDM, Release 11.5(3) 77

Dial Plan management / View the Sets of E.164 Numbers Associated with One Directory Number
Results
For a site-level association, one or more translation patterns that are used to route inbound PSTN calls to their proper DN are created on the Unified CM. These patterns are the mappings between the set of E.164 numbers and the single directory number. When you associate a set of E.164 numbers to a single DN, multiple translation patterns are created; that is, each DN-to-E.164 range association results in a translation pattern being created on Cisco Unified Communications Manager.
For a customer-level association, the translation patterns are created on each Unified CM cluster that has a dial plan provisioned.
For a site-level association, if the site has one or more SIP Local Gateways associated with it, the HcsSipLocalGwAddMultiE164AssociationEVT is generated. If enabled, the IOS Command Builder generates the default IOS commands associated with the event for each SIP Local Gateway.
For a customer-level association, if the E.164 number has the same country as any SIP Local Gateway configured for the customer, the HcsSipLocalGwAddE164AssociationEVT event is generated. If enabled, the IOS Command Builder generates the default IOS commands associated with the event for each SIP Local Gateway.
View the Sets of E.164 Numbers Associated with One Directory Number Use this procedure to view the sets of E.164 numbers that are associated with one Directory Number (DN).
Procedure1. Sign in as a provider, reseller, customer, or site administrator. 2. Set the hierarchy path to the site where the DN and E.164 numbers are associated. 3. Select Number Management > E164 Associations (N to 1 DN).
A table containing the following information is displayed: Column Description
DN Number The associated DN
Hierarchy The hierarchy of the site where the E.164 number range and DN association was created
4. Click a DN in the table to select it.
Details about the sets of E.164 numbers that are associated with the DN appear in read-only format.
78 Cisco HCS Customer Administration Guide with Cisco Unified CDM, Release 11.5(3)
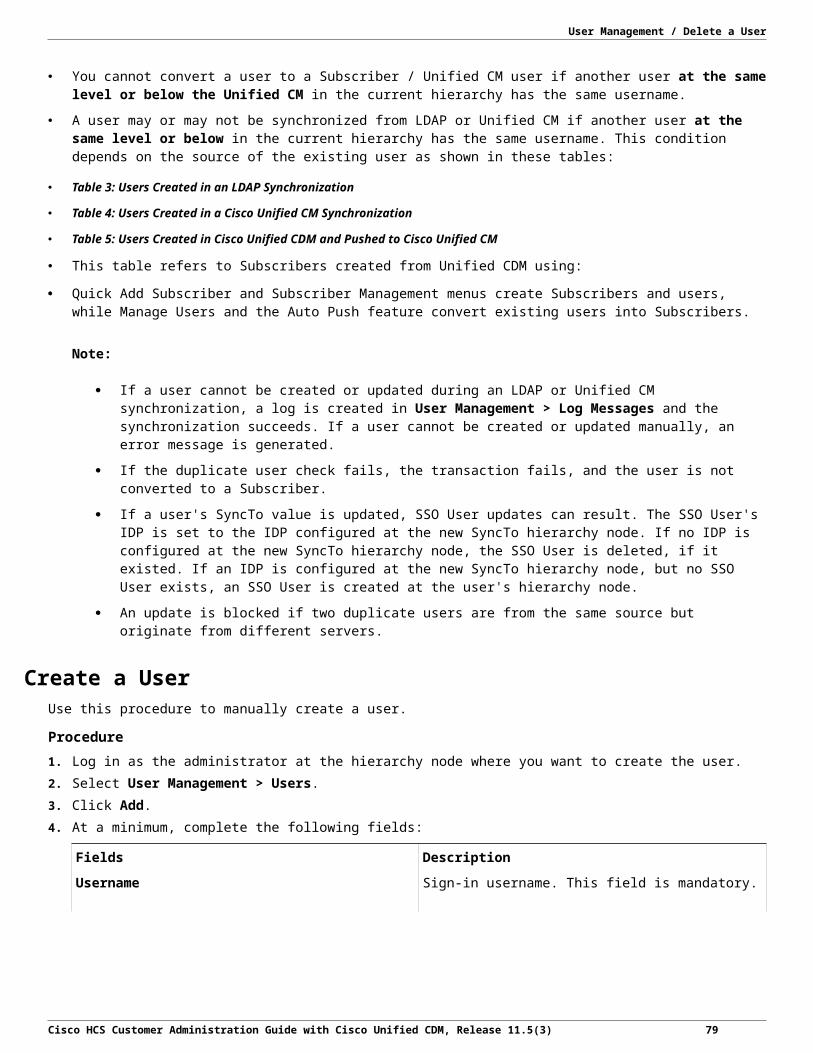
Subscriber management User Management and Subscriber Management on page 79
Subscriber Management Overview on page 81
Add Subscribers on page 82
Modify Subscribers on page 85
Move Subscriber on page 85
Configure Lines on page 86
Add Agent Line (Phone) on page 87
Configure Phones on page 88
Quick Add Subscriber on page 91
Add Subscribers on page 82
Modify Subscribers on page 85
Delete Subscribers on page 108
Hunt Group Management on page 109
Call Pickup Groups on page 110
User Management and Subscriber Management In Cisco Unified Communications Domain Manager (Cisco Unified CDM), there are two types of users, each with different properties and purposes, but closely related:
Cisco HCS Users (found in User Management > Users)
Subscribers (found in Subscriber Management > Subscribers)
It is important to understand how the two types of users operate and how they relate to each other. Both types of users have an impact during user provisioning operations such as LDAP sync, Cisco Unified Communications Manager (Cisco Unified CM) sync, or user bulk loading. The major distinction between the two types of users is that HCS Users exist only on Cisco Unified Communications Domain Manager while Subscribers exist on the UC applications (Cisco Unified Communications Manager, Cisco Unity Connection, and WebEx).
The primary purpose of HCS Users is to provide a way for you to stage users into Cisco Unified CDM before you determine which site, and which UC applications to assign to the users. Once an HCS User is sent to a Cisco Unified CM, a corresponding Subscriber comes into existence.
A typical flow of user provisioning is to sync users from LDAP into Cisco Unified CDM, move the users to one or more sites, and push the users to UC applications. When the user is synced from LDAP to Cisco Unified CDM, an HCS User is created (but not a subscriber). The HCS User is then moved to a site (User Management > Move Users). The subscriber can be created with either the advanced subscriber (Subscriber Management > Subscribers) or the quick add subscriber (Subscriber Management > Quick Add Subscriber). This is known as the “top-down” approach to user provisioning that progresses from LDAP to HCS User to Subscriber. The HCS User provides a way for you to manage the user before the user is assigned to a specific site and sent the Cisco Unified CM.
You do not need to send all HCS Users to a Cisco Unified CM and have a corresponding Subscriber created; this is a decision by the administrator based on criteria associated with each user. We recommend that you filter out any users from LDAP that are not eligible for UC services. It is possible that some ineligible users cannot be filtered due to missing attributes and thus get synced into Cisco Unified CDM. These users remain as HCS Users and do not have a corresponding Subscriber created.
Cisco HCS Customer Administration Guide with Cisco Unified CDM, Release 11.5(3) 79

Subscriber management / Quick Add Subscriber
HCS Users provide more capabilities other than the ability to stage users in Cisco Unified CDM prior to sending to Cisco Unified CM:
LDAP sync—The workflows to manage syncing users from LDAP
LDAP authentication—Enabling and disabling LDAP authentication
SSO—Enabling and disabling SSO authentication
Provisioning status—Tracking where the user came from (LDAP, Cisco Unified CM, manual configuration) and which hierarchy the user was originally added to
Moving users—Moving users between hierarchy nodes
All Subscribers have a corresponding HCS User. This allows the user to sign in to Cisco Unified CDM using either local authentication, LDAP authentication, or SSO authentication, and to track the provisioning status. You can also create a Subscriber directly, either through the GUI, through bulk load, or using Cisco Unified CM sync. An HCS User instance is created automatically. Therefore, as an administrator, you don't have to explicitly add an HCS User as a separate step, if staging is not needed, as is the case when configuring Subscribers directly on a site using bulk loading.
Subscribers provide all of the UC application provisioning logic by distributing the user configuration to each of the UC applications: Cisco Unified Communications Manager, Cisco Unity Connection, and WebEx. Subscribers combine most of the data associated with a user into one logical entity:
Cisco Unified CM users
Phones
Lines
Extension Mobility profiles
Remote destinations
Voicemail
WebEx users
Each subscriber comes into existence when the Cisco Unified CM End User is created, and disappears when the Cisco Unified CM End User is deleted. Unlike HCS Users, there is no local data in Cisco Unified Communications Domain Manager that defines the Subscriber. It is all based on data in the UC applications themselves. In the Subscriber Management > Subscribers list view, any user that has a Cisco Unified CM End User instance appears in the list, regardless of whether there is any other data associated with the user (for example, phone, line, and so on).
If the Cisco Unified CM End User is deleted, either on Cisco Unified CM directly, or from Cisco Unified Communications Domain Manager, the Subscriber disappears. The Subscriber disappears even if there are phones, lines, or profiles that remain that were previously associated with that user. This is why you see the phrase “comes into existence”, because the Subscriber is simply a representation of data in the UC applications. When the UC application data is created (in particular, the Cisco Unified CM End User), the Subscriber appears in the list view and can be viewed. When the UC application data is deleted (in particular, the Cisco Unified CM End User), the Subscriber disappears.
Note: Any changes on the Cisco Unified CM, such as adding or deleting end users, appear in Cisco Unified CDM only after a sync has been performed. Refer to the “Data Sync” section of the Cisco Unified CDM Maintain and Operate Guide for more information on data syncing.
Because Subscribers are simply a representation of the data in the UC applications, you make changes either in Cisco Unified CDM or in the UC applications directly. As an administrator, you make changes in the Advanced Subscriber GUI page (Subscriber Management > Subscribers) and that updates the data on the UC applications immediately. Alternatively, you can make changes directly in the UC applications. The next time you view a particular subscriber in Cisco Unified Communications Domain Manager, the changes appear. Thus, the UC applications provide accurate information about the user configuration and you can use whichever interface is most effective.
In summary, the difference between HCS Users and Subscribers is primarily the distinction between Cisco Unified Communications Domain Manager data and UC application data. HCS Users encapsulate all of the Cisco Unified CDM-local data associated with the user, and Subscribers encapsulate all of the UC application data associated with the user. An HCS User can be created independent of a Subscriber, but a Subscriber always has an associated HCS User. This is shown in the following two typical user provisioning use cases.
80 Cisco HCS Customer Administration Guide with Cisco Unified CDM, Release 11.5(3)

Subscriber management / Quick Add Subscriber
Figure 3: “Top Down” versus “Bottom Up” User Provisioning
Use the following menus in Cisco Unified CDM to perform the operations shown in the preceding figure:
1. User Management > Sync & Purge > LDAP Users
2. User Management > Move Users
3. Performed by any of the following:
User Management > Manage Users
Subscriber Management > Subscribers
Subscriber Management > Quick Add Subscriber
4. User Management > Sync & Purge > CUCM Users, Lines, Phones
5. User Management > Move Users
In each diagram, the user starts on an external server, either an LDAP server (for example, Open LDAP or Active Directory), or on Cisco Unified CM. When the user is synced into Cisco Unified Communications Domain Manager, either an HCS User is created, or both an HCS User and Subscriber are created. For each step, the diagram also shows the hierarchy node where the user exists. The result in both cases is that both a Subscriber and an HCS User exist. From that point, the user is primarily managed from Subscriber Management.
Refer to the “User Management” section and “Subscriber Management” sections of this document for more details about each type of user.
Subscriber Management Overview The Subscriber Management interface allows an administrator to add, modify, or delete users, associate devices, and subscribe them to services from one form. The user that is added to the system is also added to Unified CM. Relevant selected services are also added to Unified CM and other network devices.
Note: Adding or deleting a device while modifying a Subscriber requires more than one task. For example, a Subscriber’s details cannot be modified at the same time that a device is added or removed.
Cisco HCS Customer Administration Guide with Cisco Unified CDM, Release 11.5(3) 81

Subscriber management / Quick Add Subscriber
Customer-level and Site-level subscribers have different user interfaces to Subscriber Management. A Customer-level administrator who uses the interface from the Site-level hierarchy is provided with a more detailed interface than the Site-level administrator at the same level.
You can provision the following devices and services in the Subscriber Management interface:
User
Phones
Device Profile
Remote Destination Profile
Voicemail
WebEx
Presence
Mobile Identity
To ensure that the Subscriber workflows execute successfully, the following items must be configured or created on Unified CM and then imported into Cisco Unified Communications Domain Manager 10.x/11.5(x) or later:
Softkey templates and phone button templates
Service parameters and enterprise parameters that must be set for a subscriber service
Custom SIP profiles
Service profiles for Jabber
Phone services
To enable IM and Presence for users synchronized from LDAP to Unified CM, enable Home Cluster for the phone Default Feature Group Template. Also, select this template as the LDAP Directory.
The Subscriber input form on the user interface is presented as a row of tabs, each tab showing a form where a service can be configured. If the Entitlement profile that is associated with a Subscriber does not include the service, then the corresponding tab is not available. For example, if the selected Entitlement profile for the Subscriber does not include Voice services, then the Phones tab is not available.
For the Voicemail service, controls are not available if the site’s Site Defaults Doc has no default value on the CUC Defaults tab for the Default CUC Subscriber Template. This default value (voicemailusertemplate) should already exist on the Unified CM and is automatically populated on an HCS system when a VoiceMail Pilot is created. A Cisco Unity Connection device must also be configured at the related NDL (Network Device List) at site level.
API and Bulk Load operations check for the presence of the Default CUC User Template in the Site Defaults Doc and a configured WebEx Server in the NDL before the selected services can be added.
If you select an Entitlement Profile that has no services associated with it, but a Unified CM is available at the Subscriber’s site, the basic fields on the User tab still appear. However, if no Unified CM is configured at the Subscriber's hierarchy, then the Subscriber form has no tabs and only a warning message: No Call Manager has been configured. Similarly, if API calls or events include the operation to create a Subscriber when no Unified CM is available, the failed transaction appears in the transaction log.
Add Subscribers Use this procedure as a high-level workflow to add one or more subscribers in Cisco Unified Communications Domain Manager (Unified CDM).
Note: If Enable CSS filtering is enabled at the customer dial plan, then for all calling search space fields in this procedure, the list of available calling search spaces includes only those that are marked as a Class of Service under Dial Plan Management > Site > Class of Service at the particular site. If another CSS is required, you can add custom CSSs in a CSS field if you know the exact syntax.
82 Cisco HCS Customer Administration Guide with Cisco Unified CDM, Release 11.5(3)
Subscriber management / Quick Add Subscriber
If Enable CSS filtering is not enabled, then the list of available calling search spaces includes all CSSs that are configured on the Cisco Unified Communications Manager (Unified CM).
Procedure1. Log in as a customer or site level administrator. If you are logged on as the customer administrator for a specific site you can see
all the fields described in this procedure. If you are logged in as the site administrator, you can see a subset of the fields that are available on the interface.
2. Select a site from the hierarchy breadcrumb. 3. Go to Subscriber Management > Subscribers. 4. Click Add. 5. On the User tab, complete fields to add a Unified CM user and a Unified CDM user.
Consider the following when adding a user: Use only alphanumeric characters.
A selected Entitlement Profile will be associated with the Subscriber.
The options available in the Service Profile dropdown menu are those that were imported from Unified CM.
If an existing phone is to be associated with a user, select the device from the Associated Devices group.
After an existing phone is associated to the user in the Associated Devices group Device dropdown menu, click Save. The subscriber is updated so that the Phones tab is populated with the information of the new phone associated with the user.
If the added user is configured as an LDAP user, the Password and Repeat Password fields are hidden. The Enable Mobility checkbox is auto-enabled if any of the following are included or added: a remote destination phone, mobile identity for a phone, or remote destination profile (RDP).
Note: To enable Extend and Connect in Unified CDM 10.x/11.5(x), complete the following task:
A) Check the Enable Mobility checkbox.
B) Add the following three groups of users:
I. Standard CCM End-Users
II. Standard CTI Enabled
III. Standard CCMUSER Administration
Select a BLF Presence Group for the end user from the pulldown. The selected group specifies the destinations that the end user can monitor and is configured in Cisco Unified Administration. BLF Presence Group authorization works with BLF Presence Groups to allow or block presence requests between groups. The Busy Lamp Field default is set according to the selected number and specifies the Standard Presence Group that is configured with installation. For more information, see the Cisco Unified Communications Manager Features and Services Guide.
6. On the Phones tab, complete fields to add a new phone. Consider the following when adding a phone: Modify the values for the following fields if desired: Product Type, Device Protocol, Phone Button Template, and Device
Security Profile. The possible value options for these fields change depending on which associated fields are selected. For example, when you enter the Phone Name with the Product Type prefix and the MAC address, 79XX-type phones have the Phone Name “SEP” prefixed, while ATA-type phones have “ATA” prefixed to the MAC address. Fields are validated and tooltips are available to assist you to select Product Type.
Modify phone-specific settings such as DND Option dropdown menu, Do Not Disturb checkbox, and Hot Line Device. The phone settings that are available differ depending on the Product (phone) type selected, the protocol (for example SIP or SCCP), and the Field Display Policy (FDP) applied by the administrator. You can select a Mobile User ID Name from the dropdown list when a Dual-Mode Phone for Android or iPhones is selected. This associates the selected user to the Mobile Identity feature on this phone and must match the Userid added on the User tab.
The advanced settings fields are updated automatically for the phone based on the phone type. The phone is automatically associated to the user and is then displayed as an associated device when you view the subscriber after adding it. If a phone that has been associated with a user is also associated with another user, the Owner User ID defaults to the first user.
Cisco HCS Customer Administration Guide with Cisco Unified CDM, Release 11.5(3) 83

Subscriber management / Quick Add Subscriber
In the Lines section of the tab, complete line assignments. Note that when you select a Route Partition Name, the available Pattern options are filtered according to the selected partition. However, you can add a custom pattern by typing it into the Pattern field. The associated Enduser field identifies the user for Presence, but you can add a new User ID. Unified CDM adds the user first and then adds the User ID.
In the Speeddial section, add speed dial information. Available speed dials depend on the Phone Button Template.
In the Blf Directed Call Park section, specify Busy Lamp Field Directed Call Park values. Values depend on a valid Directed Call Park on Unified CM.
In the Add On Module section, specify Add On Modules if desired. The Add On Modules Load Name can be any value, but the Model has to be supported by the phone.
In the Service section, add services that are valid IP services for Phones. To add a service to the device, a number must be added as the Uri Button index. If you do not add a number, only the service is added.
Use the Mobile Identity form to configure mobile identity details when you select a Dual-Mode Phone. Fields include: Name, Dual-Mode Device Name (automatically populated from the Device Name field), and Mobility Profile Name (chosen from a dropdown list). The Destination field is a mandatory field and determines the destination number that is dialed when a call is made to the dual-mode phone.
Use the Remote Destination Phone form to configure your remote destinations when a Dual-Mode Phone is selected. Remote destinations represent the mobile (or other) phones that are able to accept transfer from the desktop phone and can be used to initiate calls. Set the Pattern for the Line Association to the Route Partition name. If you enter more than one Pattern and the new Pattern is not on the system, enter the Route Partition Name manually.
Use the Vendor Config section of the tab to view and edit the configuration settings for each device. The available configuration settings depend on each Product type selected. Modify settings as required.
7. On the Extension Mobility tab, complete fields to configure Extension Mobility for the end user. Consider the following: Only one Device Profile can be added for Extension Mobility.
As with the Phones tab, Product Type, Device Protocol and Phone Button Template fields change, depending on the selection of an associated field.
The fields on this tab behave in the same way that they do on the Phones tab, with the exception of Remote Destination information, which is not available on Device Profiles.
Ensure that you associate the Extension Mobility Device Profile and target phone for login with the Extension Mobility service.
8. On the Single Number Reach tab, note that you cannot add more than one Remote Destination Profile for Single Number Reach. However, you can add more than one Remote Destination Rdp.
Note: To enable Extend and Connect in Unified CDM, make sure to complete the following task:
A) Check the Enable Extent and Connect checkbox.
B) Select the CTI remote device that you created from the CTI Remote Device Name drop-down list.
9. On the Voicemail tab, configure voice mail service for the end user if a valid Cisco Unity Connection server is available. Consider the following when configuring voice mail: You can leave the PIN and Password empty, in which case the default credential policy on the Cisco Unity Connection is
used.
If a user is prompted from ImportUsers to an LDAP Cisco Unity Connection user, the Password field is visible but should not be ignored. This is because there is no way to know that the user being added is an LDAP-synced user.
84 Cisco HCS Customer Administration Guide with Cisco Unified CDM, Release 11.5(3)

Subscriber management / Quick Add Subscriber
The Voicemail Line dropdown list shows available lines but you can also add values manually. The Cisco Unity Connection server uses this line as a caller ID, so you should set it to the user's default line.
10. On the WebEx tab, add details if a valid server is available. The mandatory fields on this tab are populated with the values entered on the User tab. Note however, that any updates on the User tab do not update these values; values are populated only during the Add workflow.
11. When you are finished adding information for the subscriber, click Save. 12. Repeat steps 4 to 11 to add another subscriber.
Modify Subscribers Use this procedure to modify settings for one or more subscribers.
Procedure1. Log in as a customer or site level administrator. If you are logged on as the customer administrator for a specific site, you can see
all the fields described in this procedure. If you are logged in as the site administrator, you can see a subset of the fields that are available on the interface.
2. Select a site from the hierarchy breadcrumb. 3. Go to Subscriber Management > Subscribers. 4. Choose the subscriber to be updated by clicking on its box in the far left column, then click Edit. 5. Modify subscriber information as required, using the workflow described in Add Subscribers on page 82.
Note: You can use the pop-up form that is available when modifying the Subscriber on the Phones tab to add more than one phone. Also, instances of one-to-many or zero-to-many items can be deleted, such as a Phone.
The line settings of a phone can be modified directly from the Subscriber form. When expanding the Line group of a Phone or Extension Mobility Profile, the Link to Line hyperlink on each Line form directs to the specific Line relation details. These details can be modified and saved, and you can return to the base tab of the Subscriber form. You can also navigate to the base tab of the Subscriber using the back button. If the menu layout has more than one entry for relation/LineRelation and associated Field Display Policy, then the form opened by the Link to Line hyperlink uses the first Field Display Policy (searching from top to bottom) found in the menu layout.
6. Click Save.
Note: Filtering on these columns on the Subscribers list view produces the following results:
Located At - Displays an abbreviated version of the hierarchy showing the lowest point in the hierarchy. The hierarchy type is shown in brackets. When you filter on this column, do not use text included inside the brackets in the filtering criteria. For example: “SiteName (Site)”, where (Site) = the hierarchy node type, only search using the “SiteName” portion of the field.
Device - Filters on IP address or hostname.
Phone - Includes all phones at the hierarchy level and below, regardless of the Phone column in which they reside.
Move Subscriber Use this procedure to move subscribers from one hierarchy to another hierarchy in Cisco Unified Communications Domain Manager (Unified CDM).
Procedure1. Log in as a customer or site level administrator. If you are logged on as the customer administrator for a specific site you can see
all the fields described in this procedure. If you are logged in as the site administrator, you can see a subset of the fields that are available on the interface.
2. Select a site from the hierarchy breadcrumb. 3. Go to Subscriber Management > Subscribers.
Cisco HCS Customer Administration Guide with Cisco Unified CDM, Release 11.5(3) 85

Subscriber management / Quick Add Subscriber
4. Select the Subscriber.5. Go to Action > Move. 6. In the Move Resources(s) to Hierarchy, select the required hierarchy and click Ok.
Configure Lines Use this procedure as a high level workflow to configure one or more lines (directory numbers) in Cisco Unified Communications Domain Manager (Unified CDM). Note that if the Number Inventory feature has been enabled by the administrator, lines are not added; rather, lines are selected from a dropdown list of available numbers.
Note: The Lines interface in Unified CDM provides an easy method to add, modify, or delete individual lines and associated line settings to, or from the system. For inbound calls to work from PSTN, make sure that the line has the correct E.164 alternate number configured.
Procedure1. Log in as a provider, customer, or site level administrator. If you are logged in as the site administrator, you can see a subset of the
fields that are available on the interface. 2. Select a site from the hierarchy breadcrumb. 3. Go to Subscriber Management > Lines. 4. Click Add. 5. Configure the line and its associated line settings using the following tabs. For more information on the values to fill in for the
various line parameters such as partitions and CSS, refer to the Cisco Hosted Collaboration Solution, Dial Plan Management Guide for Cisco Unified Communications Domain Manager.
Note: If Enable CSS filtering is enabled at the customer dial plan, then for all calling search space fields in this procedure, the list of available calling search spaces includes only those that are marked as a Class of Service under Dial Plan Management > Site > Class of Service at the particular site. If another CSS is required, you can add custom CSSs in a CSS field if you know the exact syntax.
If Enable CSS filtering is not enabled, then the list of available calling search spaces includes all CSSs that are configured on the Cisco Unified Communications Manager (Unified CM).
Tab DescriptionDirectory Number Basic Information Includes a directory number (mandatory), a route partition,
calling search space, call pickup group (to which the line belongs), and other basic settings. The Directory Number field is either a dropdown list or a free text field, or a dropdown containing only the available directory numbers(depending on whether the Number Inventory feature is enabled or disabled). Only the actual Directory Number is mandatory.
Directory Number Advanced Information Includes various profiles, groups, and advanced settings for the line; for example, voice mail profiles. It also includes enterprise and E.164 alternate number information, as well as URIs.
Shared Device Info Shows any phones, device profiles, or remote destination profiles that have been associated with the particular line.
Line Settings for all Devices Includes fields such as hold reversion ring duration, hold reversion notification interval, party entrance tone (selected from a dropdown list).
AAR Settings Automated alternate routing (AAR) handles the calls that are routed to the AAR Destination Mask or Voice Mail.
86 Cisco HCS Customer Administration Guide with Cisco Unified CDM, Release 11.5(3)

Subscriber management / Quick Add Subscriber
Tab DescriptionPark Monitoring Includes text fields such as park monitoring forward no retrieve
destination external or internal voice mail enabled check boxes, park monitoring forward no retrieve destination external, external calling search space, internal, internal calling search space, and park monitoring reversion timer text fields.
Note: If Enable CSS filtering is enabled at the customer dial plan, then for all calling search space fields in this procedure, the list of available calling search spaces includes only those that are marked as a Class of Service under Dial Plan Management > Site > Class of Service at the particular site.
If Enable CSS filtering is not enabled, then the list of available calling search spaces includes all CSSs that are configured on the Unified CM.
Call Forwarded Information Includes call forward all settings, call forward busy external and internal settings, call forward no answer external and internal settings, and so on.
6. When you are finished adding line information, click Save. All additions or changes to Lines and line settings in the system are also reflected in the Unified CM. After configuring a line, the transaction menu item (Administration Tools > Transaction) can be used to verify the configuration.
7. To modify existing line and line setting details, change the settings or add new line settings using the process described in Steps 1 to 6. For example, you can add additional directory URIs and directory URI partitions. Manual configuration must first be done on the Unified CM before URIs will function. Note that not all line settings are configured using Subscriber Management > Lines. Device specific settings such as caller ID display, line label, E.164 mask, and associated user are configured with the Phones and Subscriber menu items.
Add a Shared Line Provisioning a user with a shared line or adding a shared line to an existing user is very similar to provisioning a new user or a line but selecting an already used line instead of the new line.
Add Agent Line (Phone) Procedure1. Navigate to Subscriber Management > Agent Lines. 2. On the Agent Lines page, click the Add icon to add a new agent line .3. Do the following:
Field Description
Device Type Select device type: Phone
Device Name Select the name of the Cisco Unified Communications Manager Phone. This is a mandatory field.
Line Select the line to be marked as an agent line. This is a mandatory field.
Application User Select the application user to be associated with the Phone. This is a mandatory field.
Cisco HCS Customer Administration Guide with Cisco Unified CDM, Release 11.5(3) 87

Subscriber management / Quick Add Subscriber
Field Description
Agent Line Prefix CC_Line. This is read only.
4. Click Save to add the agent line.
Configure Phones
Before you BeginTo ensure that the Add Phones work flows execute successfully, create and configure the following items first on Cisco Unified Communications Manager (Unified CM). Then import them into Cisco Unified Communications Domain Manager (Unified CDM):
Softkey templates and phone button templates
Service parameters and enterprise parameters that must be set for a subscriber service
Custom SIP profiles
Service profiles for Jabber
Phone services
During the end-to-end creation of providers, customers, and sites, default values are created (for example, Site ID). If the dial plan for the site specifies Device Pool, CSS, and Partition names, these are available for selection. To identify these site-related values, refer to the naming conventions used in the “Modify Site Defaults” procedure in this guide.
The Site Defaults Menu item populates certain default values for phones. To view and edit the menu (depending on your sign-in level), navigate to Site Management > Defaults and click the site name in the list view. For phone parameter information, use the fields on the General Defaults and Device Defaults tabs. Refer to the “Modify Site Defaults” procedure in this guide for additional information regarding the values to fill in for phone parameters such as partitions and CSSs.
Note: If Enable CSS filtering is enabled at the customer dial plan, then the list of available calling search spaces includes only those that are marked as a Class of Service under Dial Plan Management > Site > Class of Service at the particular site. You can add a custom CSS in a CSS field if you know the exact syntax.
If Enable CSS filtering is not enabled, then the list of available calling search spaces includes all CSSs that are configured on Unified CM.
Use this procedure as a high-level workflow to configure one or more phones and associated settings. If the Number Inventory feature is enabled, phone lines are not added. Instead, phones are selected from a drop-down list of available numbers.
The Phones menu screen is an integrated display to add, modify, or delete the following on the Unified CM device:
A line
Devices and device details related to the user
The association of a line with the user's device
For a Dual-Mode Phone, any provisioned mobile identity is added to the phone. You can add more remote destinations if necessary.
The User is updated. For a Dual-Mode Phone, the Mobility User ID Name must be set.
When adding a device for a subscriber, ensure that the following properties of the selected device are related correctly:
Product
Protocol
Security Profile Name
88 Cisco HCS Customer Administration Guide with Cisco Unified CDM, Release 11.5(3)
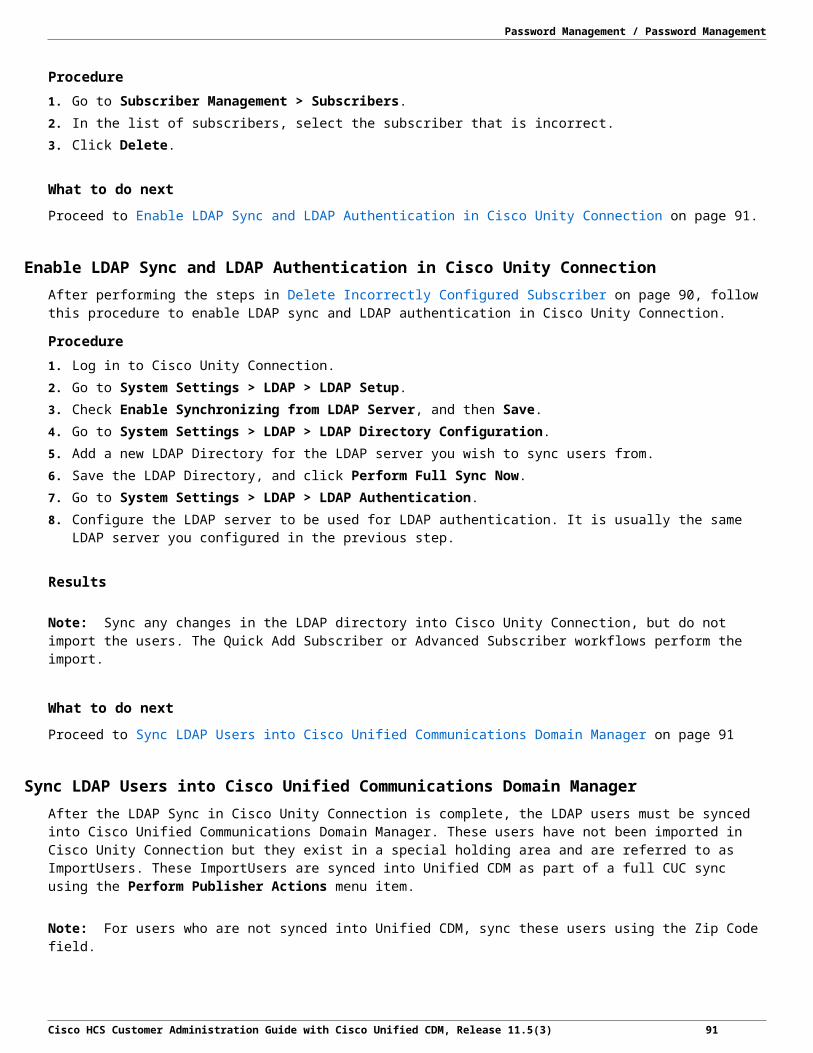
Subscriber management / Quick Add Subscriber
Phone Template Name. If a new phone is added to Unified CM using COP files, the phone and associated template are only available in Unified CDM after it has been synchronized with Unified CM.
Procedure1. Sign in as a provider, customer, or site level administrator. If you are signed in as the site administrator, you can see a subset of
the fields that are available on the interface. 2. Select a site from the hierarchy breadcrumb. 3. Go to Subscriber Management > Phones. 4. Click Add. 5. Configure the phone and its associated settings using the following tabs.
Tab DescriptionBasic Information Default values for Protocol, Phone Button Template name,
Security Profile, and other fields are updated automatically based on the selected product type. The Vendor Config area displays the configurable vendor features available for the selected phone type. Configure each field as required. The fields displayed vary depending on the selected product (device type) and the device protocol (such as SIP or SCCP). The availability of the Vendor Config settings depends on the Field Display Policy.
Tip: If you don't see a template that you are looking for in the drop-down list (for example, for Phone Button Template, Device Security Profile, Common Phone Profile, Softkey Template, or SIP Profile), edit the template on Unified CM. Sync the template into Cisco Unified CDM to have it appear in the drop-down list.
Tip: If the Product Type list does not contain the phone or endpoint you want, take the following steps. In Unified CM, install a COP file for the endpoint you want. Install the COP file only once for the Unified CM instance where the endpoint is added. Then in Unified CDM, import the phone button template from Unified CM.
Note: Follow these steps while creating a CTI Remote Device to enable Extend and Connect in Cisco Unified Communications Domain Manager 10.x/11.5(x):
1. Enter the device name. For example, CTIRD<USERID>.
2. Select the Product Type as CTI Remote Device.
3. Select the Owner User ID from the drop-down list.
4. Select the Subscriber Calling Search Space Name from the drop-down list.
5. Select the Reroute Calling Search Space Name from the drop-down list.
Cisco HCS Customer Administration Guide with Cisco Unified CDM, Release 11.5(3) 89

Subscriber management / Quick Add Subscriber
Tab DescriptionLines This tab serves two purposes.
1. To show all the lines that are associated with the device
2. To associate lines with the device.
The Lines sections reflect the Lines object in Unified CM. You can add lines to this group and associate lines with the device. You can add custom lines by entering a line in the drop-down list (depending on the status of the Number Inventory feature).
Speed Dials Allows you to configure speed dials for the device. Available speed dials depend on the device's Phone Button Template. The order in which Speed Dial entries are added matches the slots that are available in Unified CM.
Services Used to set IP Phone services.
Busy Lamp Fields Allows you to configure busy lamps for the device. Available busy lamp fields depend on the device's Phone Button Template.
Blf Directed Call Parks Allows you to configure Busy Lamp Field directed call parks for the device. Available BLF-directed call parks depend on the device's Phone Button Template. Create BLF-directed call parks in Call Routing > Directed Call Parks on Unified CM before configuring them from this tab. The available BLF-directed call parks match those created for each specific Route Partition Name.
Dual Mode Settings Only applies to a Dual-Mode phone, and allows you to enter the relevant Mobile Identity and Remote Destination parameters for the phone. These parameters include Name, Destination, Dual Mode Device Name of the Phone, and Answer Too Soon and Too Late Timers.
6. When you are finished adding phones and phone settings, click Save. 7. To modify phone and phone settings, use the process described in Steps 1 to 6. When you modify a phone, the following
workflow is executed (depending on what was modified):
When adding a line, a check is made to see if it exists. If the line does not exist, it is created. When modifying a line, the Line hyperlink on each Line form shows the Line relation details. These details can be modified
and saved. You can also navigate to the Phone using the back button. If the user’s menu layout has more than one entry for relation/LineRelation and the associated Field Display Policy, then the form opened by the Link to Line hyperlink uses the first Field Display Policy (searching from top to bottom) found in the menu layout.
The Phone and User Remote Destination are updated.
Note: The Status column in the Phones list view or the field on the instance form of a phone refers to the registration status of the phone on Unified CM. For example “None”, “UnRegistered with CUCM-11-5-IP2”, “Registered with CUCM-11-5-IP2”.
Delete Phones Use this procedure to delete one or more phones, or phone settings. When phones are deleted, the following occurs:
The Remote Destination is removed first, so that the Cisco Unified Communications Domain Manager cache remains in sync with the Cisco Unified Communications Manager.
90 Cisco HCS Customer Administration Guide with Cisco Unified CDM, Release 11.5(3)

Subscriber management / Quick Add Subscriber
The Phone is deleted.
Note: Lines are not affected.
Procedure1. Log in as a customer or site level administrator. If you are logged on as the customer administrator for a specific site, you can see
all the fields described in this procedure. If you are logged on as the site administrator, you can see a subset of the fields that are available on the interface.
2. Select a site from the hierarchy breadcrumb. 3. Go to Subscriber Management > Phones. 4. Choose one of the following methods to delete phones or phone settings:
Choose an individual phone to be deleted by clicking on its box in the far left column, then click Delete. From the popup window, click Yes to confirm the deleted phone.
Delete multiple phones at once by checking the relevant check boxes, then clicking Delete. From the popup window, click Yes to confirm the deleted phones.
Remove phone settings as required by removing them from the relevant tab of a selected phone. Click Save.
When the delete action is complete, the phone disappears from the list.
Quick Add Subscriber Quick Add Subscriber provides a single page where you can:
Add users to Unified Communications Manager
Provision a Voice service for Unified Communications Manager users. See Provision the Voicemail Service on page 100 for detailed information.
Add users to Voicemail and WebEx accounts
Provision users with services, such as Single Number Reach, Extension Mobility, and Jabber Devices (Mobile Identity)
Add lines for Unified Communications Manager users.
Associate a Device Pool directly from the interface to a subscriber’s newly associated devices or services other than the Device Pool provided in the Site Defaults Doc (SDD) or reference Configuration Template (CFT) in the Quick Add Group (QAG). See Exposing Device Pools in Quick Add Subscriber on page 92 for detailed information.
Associate Calling Search Space (CSS) values to a subscriber’s newly associated lines, devices or services other than the CSS’s provided in the Site Defaults Doc (SDD) or reference Configuration Template (CFT) in the Quick Add Group (QAG), by selecting a Class of Service (CoS) directly from the interface.
Quick Add Subscriber supports many user types, including:
LDAP users
Unified Communications Manager integrated users
LDAP-integrated users on Unified Communications Manager
Manually created users
If the default Self-service language is set on the SDD, users are assigned to the corresponding Self-service language.
Quick Add Group is a collection of templates that configure the subscriber features. Quick Add Group is required to use Quick Add Subscriber.
Note: To add subscribers using Quick Add Subscriber, a default user template called "voice-mailusertemplate" must exist on the Unified CM. It is possible, through Dial Plan management, to change this default by editing the Default CUC User Template value in the Site Defaults reference.
Cisco HCS Customer Administration Guide with Cisco Unified CDM, Release 11.5(3) 91

Subscriber management / Quick Add Subscriber
An advanced settings option allows you to configure the required advanced settings available to the added subscriber and associated services.
For self-provisioned phones to show as being associated with a Subscriber, perform a Cisco Unified Communications Manager Data Sync after setting up a self-provisioned phone.
Any modifications of the added subscriber and associated services are done from the respective service menu items.
The input form on the user interface shows a number of check boxes to enable user services such as Voicemail, WebEx and Single Number Reach. If the Entitlement profile selected on the Quick Add Subscriber form does not include a particular service, then the check boxes for that service is not available. For example, if the selected Entitlement profile for the Subscriber does not include Voice services, then the checkbox controls for Voice, Jabber, and Self Service ID will not show on the form. If you select the Entitlement profile option, the available options in the Phone Type drop-down are filtered to show only the enabled devices.
For the Voicemail service, controls will also not be available if the site’s Site Defaults Doc has no default value on the CUC Defaults tab for the Default CUC Subscriber Template. This default value (voicemailusertemplate) should already exist on the Unified CM and is automatically populated on an HCS system when a VoiceMail Pilot is created. A Cisco Unity Connection device must also be configured at the related NDL (Network Device List) at site level.
While the GUI hides controls if services are not available, API and Bulk Load operations have Provisioning Workflow checks for the presence of the Default CUC User Template in the Site Defaults Doc and a configured WebEx Server in the NDL before the selected services can be added.
If no Unified CM has been configured at the hierarchy that the Subscriber belongs, then Quick Add Subscriber bulk load transactions and API calls will show a warning message: No Call Manager has been configured.
Configuration To create or configure users, enable users with services, or associate users with devices, configure the following items on the system.
1. Server Configurations
Configure the following servers in Cisco Unified Communications Domain Manager (Unified CDM):
Cisco Unified Communications Manager (Unified CM) Server - Adding a Unified CM server. This server is required to:
LDAP Server. This server is required if you want to configure LDAP-synced users in Unified CDM. If you do not want to configure LDAP-synced users, this server is optional.
Cisco Unity Connection Server. This server is only required if you want to add Cisco Unity Connection voicemail users that are configured in Unified CDM.
2. Dial Plan Deployment
Configure a Dial Plan at both the Customer and Site hierarchies.
3. Voicemail Service
Deploy Voicemail Service with a pilot number created and associated to a site under Services > Voicemail in Unified CDM. This item is required to create a "Default CUC Subscriber Template" under Site Defaults > CUC Defaults. The template is required to create Cisco Unity Connection Voicemail users.
4. WebEx Service
Configure a WebxEx Server in Unified CDM to deploy any WebEx users provisioned through QAS. Set a password for WebEx users in Site Defaults.
Exposing Device Pools in Quick Add Subscriber An Administrator with access to Field Display Policies (FDP) can expose the Device Pools field on the Quick Add Subscriber (QAS) interface at a specific hierarchy.
92 Cisco HCS Customer Administration Guide with Cisco Unified CDM, Release 11.5(3)

Subscriber management / Quick Add Subscriber
Procedure1. Log in as provider, reseller, or customer administrator and access the Field Display Policies (FDP), go to Customizations > Field
Display Policies.2. Select the Target Model Type on view/QuickSubscriber.3. Complete this action depending on the hierarchy or hierarchies of the Device Pools exposed in QAS:
If the FDP exists at the correct hierarchy, open it.
If the FDP is not at the required hierarchy, clone one of the available FDP’s on a higher hierarchy to the required hierarchy using Actions > Clone.
4. Open the FDP and go to the first group’s Available list in the Fields block. Select device_pool.5. Click the Select button, to move the device_pool label from the Available list to the Selected list.6. Use the Move up and Move down buttons to move the label to the desired position.7. Ensure that the cloned FDP name is set as default, and click Save.
If an administrator is at the same hierarchy as the cloned FDP or at a lower hierarchy, then the Device Pool is exposed in the Quick Add Subscriber.
Quick Add Subscriber Group Quick Add Subscriber Groups allow administrators to group feature and configuration templates for use with the Quick Add Subscriber and Add Subscriber Wizard functions. This grouping helps to quickly and easily configure subscribers.
For example, if you want to add 100 back-office users and 50 sales users:
The back-office users all use the 7965 phone with SCCP protocol and no services.
The sales users all use the 7970 phone with SCCP protocol and Single Number Reach service.
To quickly configure these two groups, create two Configuration Templates:
One for the 7965 phone with no services for the back-office users.
One for the 7970 phone with the Single Number Reach service for the sales users.
You also create two Quick Add Groups:
One for the back-office users which reference the back-office user Configuration Template.
One for the sales users which reference the sales users Configuration Template.
When adding subscribers with the Quick Add Subscriber and Add Subscriber Wizard functions, choose the appropriate Quick Add Group for the user you are provisioning.
All subscriber services use configuration templates that belong to a Quick Add Group.
Quick Add Subscriber Group Default Model Table 6: Default Group Model for Quick Add Subscriber and Add Subscriber Wizard Functions
Title Field Name Configuration Template Name
Group Name * group_name N/A
Default Webex User Template default_webex_user_template Default Webex User Template
Default CUCM Jabber iPhone Template default_cucm_jabber_iphone_template Default CUCM Jabber iPhone Template
Default CUCM Jabber CSF Template default_cucm_jabber_csf_template Default CUCM Jabber CSF Template
Cisco HCS Customer Administration Guide with Cisco Unified CDM, Release 11.5(3) 93

Subscriber management / Quick Add Subscriber
Title Field Name Configuration Template Name
Default CUCM Jabber iPad Template default_cucm_jabber_ipad_template Default CUCM Jabber iPad Template
Default CUCM Jabber Android Template default_cucm_jabber_android_template Default CUCM Jabber Android Template
CTI Remote Device Template default_cucm_jabber_ctird_template Default CTI Remote Device Template
Carrier Integrated Mobile Device Template default_cucm_jabber_cim_template Default Carrier Integrated Mobile Device Template
Default CUCM User Template default_cucm_user_template Default CUCM User Template
Default CUCM Phone Template default_cucm_phone_template Default CUCM Phone Template
Default CUCM Line Template default_cucm_line_template Default CUCM Line Template
Default CUCM Extension Mobility Template
default_cucm_device_profile_template Default CUCM Extension Mobility Template
Default CUCM Remote Destination Profile Template
default_cucm_rdp_template Default CUCM Remote Destination Profile Template
Default CUCM Remote Destination Template
default_cucm_rd_template Default CUCM Remote Destination Template
Default CUC User Template default_cuc_user_template Default CUC User Template
CUC User Password Template default_cuc_user_password_template Default CUC User Password Template
CUC User PIN Template default_cuc_user_pin_template Default CUC User Pin Template
Fields marked with * are mandatory.
Quick Add Subscriber Conditions When creating users with the Quick Add Subscriber function, consider these conditions:
From the Quick Add Subscriber Group menu, create a custom group or use the default group.
You can edit existing users Cisco Unified Communications Manager through Quick Add Subscriber only if the users exist at the Site level.
LDAP synced or LDAP integrated at Cisco Unified Communications Manager user fields are always read only and cannot be edited.
You can associate a Line with multiple phones.
You can associate a Phone with multiple Lines.
If you choose to add a Phone for the user, the Phone Name drop-down list will show available phones at the user’s site, according to the Phone Type as specified in the Site Defaults for the site.
The phones available in the drop-down list are from the associated Quick Add Subscriber Group at the Customer level, which are synced from Unified CM, as well as the phones that are available at the specific site level.
You can also add a new phone, if required by entering a valid name in the Phone Name field. The Phone Name must consist of a prefix ( for instance SEP) followed by a MAC address, which is 12 hexadecimal characters. If you enter the Phone Name incorrectly, for example too few or too many characters, then the subsequent associated transactions will fail.
Associate an Entitlement Profile with the Subscriber.
94 Cisco HCS Customer Administration Guide with Cisco Unified CDM, Release 11.5(3)
Subscriber management / Quick Add Subscriber
You can create multiple devices for a user. Therefore, the Voice check box is always visible. When the Voice check box is selected, these four optional fields are available:
Phone Type
Phone Protocol
Phone Button Template
Phone Security Profile
Values set in the Phone Type, Phone Protocol, Phone Button Template, and Phone Security Profile fields override any existing values in QAG, CFT, SDD or any other backend CFTs that can not be edited. If a field is blank, the existing values in QAG, CFT, SDD or other backend CFTs are used.
If a specific phone type is not allowed in an entitlement profile, that phone type will not be displayed in the Phone Type drop-down list for a Subscriber associated to that entitlement profile.
If a field is blank, the existing values in QAG, CFT, SDD or other backend CFTs will be used.
If a Phone Template is not specified in QAG, or if the specified Phone Template has blank values for the phone fields, then the phone field values are derived from the SDD.
You can override the default Phone Button Template value by entering a custom value in the Phone Button Template field. The value entered will be applied on Unified CM, if the Unified CM allows the phone type.
Note: To avoid having conflicting QAS settings for the optional fields, it is recommend to set the required fields in the order displayed on the Quick Add Subscriber screen:
i. Entitlement Profile
ii. Quick Add Group
iii. Voice (Phone Type, Phone Protocol, Phone Button Template and Phone Security Profile)
You can set only one Extension Mobility profile for a user. Therefore, the Extension Mobility check box is not visible after you create an Extension Mobility profile.
You can set only one WebEx account for a user.
You can associate multiple Jabber Devices and Dual Mode devices to a user.
Jabber and Dual Mode devices are assigned with the first line specified in the QAS form.
Jabber Devices do not have any Line associations.
You can set only one Self-Service Id for a user. The Self-Service Id is set from the Self Service ID check box and is updated by assigning a new line from QAS in Cisco Unified Communications Domain Manager.
You can create a Directory Number in Unified Communications Manager in two ways:
When you create a Voicemail or Voicemail Line using Quick Add Subscriber, the Directory Number Used field is set to "true" under Subscriber Management > Directory Number Inventory.
A Directory Number created without any device associations (for example, a Voicemail Line) is tagged under Subscriber Management > Lines as “DN created without device from QAS.”
When the Enable Self Provisioning check box is checked, phone lines are added using the Universal Line Template (ULT) . The ULT is referenced in the Self Provisioning User Profile, which is chosen from the Self Provisioning User Profile drop-down list and is displayed if the check box is selected.
If a User is added with lines but no devices, then selecting the Enable Self Provisioning check box automatically sets the CUCM User Primary Extension to the QAS line pattern and ULT route partition. If a user is added with devices and lines, then selecting this check box also automatically sets the CUCM User Primary Extension to the QAS line pattern and ULT route partition.
Choose the required User Profile from the Self Provisioning User Profile drop-down list. The available User Profiles are those under User Management > Self Provisioning > User Profile. A User Profile must be selected when a user is enabled for Self
Cisco HCS Customer Administration Guide with Cisco Unified CDM, Release 11.5(3) 95

Subscriber management / Quick Add Subscriber
Provisioning. A default User Profile (as shown under Site Management> Site-Defaults) is selected. You can change the default Profile, if required.
Configuration Templates Configuration templates are used to define values for attributes of any model. The values can be fixed values or existing macros visible from the hierarchy context where the configuration template is applied. The templates provide a useful way to define default values for items that are exposed in the GUI (visible, invisible or read only). They also provides a mechanism to map data from data input via the GUI or device model events to other models or Provisioning Workflows in the system.
One may want to hide attributes of a model whilst setting them to a specific fixed value (e.g. a hardcoded setting); or one may wish to derive the value based on a macro (for example, look up the value based on data in the system).
For example, if a model has an attribute that is defined to be a date string, a Configuration Template for the attribute can be defined as a macro {{fn.now \"%Y-%m-%d\"}} in order to set the current date stamp as the value, such as 2013-04-18. Designers can access reference material for details on macros.
Another example is a model such as the Quick Add Subscriber that limits the user input to a few fields, whilst deriving the value of other hidden attributes from various Configuration Templates that are each applied to different underlying models that make up a Subscriber (for example, Voicemail account settings, conference account settings, phone, line, device profile settings, and so on).
When an instance of the model is added or updated, the Configuration Template that has been enabled for the model applies. For array elements of data- and domain models, a list and a variable can be specified to be looped through so that a value is applied to each element in the model array.
More than one Configuration Template can be created for a model. These can then be used as needed. Configuration Templates can also be applied to models in the design of for example Provisioning Workflows and Wizards.
A Menu Layout that can be associated with a user role can also apply a Configuration Template to a model that is selected as a menu item.
For administrators at Provider Administrator level of higher, a quick way to create a Configuration Template would be to open a similar template from for example the Role Management > Configuration Templates menu and to customize a clone of it.
Administrators at levels above the Site Administrator can also customize these templates, including Field Display Policies.
Note: In a multi-cluster environment, the Configuration Template to the device model may contain duplicate entries. The user can select a duplicate entry from the list.
Clone a Configuration Template Procedure1. Login as hcsadmin or provider administrator. 2. Choose the desired hierarchy. 3. From the left menu, select Role Management > Configuration Templates. 4. Click on the Configuration Template that you want to clone. 5. Click the Actions button and choose Clone. 6. Update the necessary fields for the cloned Configuration Template. 7. Click the Save button.
Configuration Template Field Reference Title Field Name Description
Name * name The name that is given to the Configuration Template.
Description description A description for the Configuration Template instance.
96 Cisco HCS Customer Administration Guide with Cisco Unified CDM, Release 11.5(3)

Subscriber management / Quick Add Subscriber
Title Field Name Description
Foreach Elements foreach.[n] Iterates over the list returned by the macro and appends array elements to the specified field.
Property * property The field/property to iterate over.
Macro List * macro_list The macro that produces the list to iterate over.
Context Variable * context_var The context variable that will contain the data from the iteration.
Target Model Type *
target_model_type The target model type and name that the Configuration Template applies to.
Template * template The contents of the template, such as defaults and macros. The names shown in the template are determined by the attribute names of the Target Model Type.
Workflows
Creating Configuration Templates Procedure1. Log in as HcsAdmin or as a provider administrator. 2. Select Customizations > Configuration Templates.
The list of templates appears. 3. Click the template that you want to clone.
The template information appears. 4. Select Action > Clone. 5. Edit the template fields.
Note: Certain fields only populate choices depending on specific conditions; refer to the CSCur61890 release notes.
For example: When creating a device instance configuration template in a multi device or clustered environment, the values in the drop-down fields in the template that originate from a device will be the values from all the devices in the cluster. Therefore, this list can include duplicates and duplicate values can be chosen.
6. Click Save.
The newly cloned template appears at the selected hierarchy level. Example: Create a template for the Cisco 6941 SCCP Phone1. Enter the hierarchy where the Cisco Unified Communications Manager you want to use exists. This step is required if the fields
are to populate values because some of the values are derived from the actual device model through the API.
2. Select a “Default CUCM Phone Template” and then select Action > Clone. Do not click Save yet.
3. Change the template name and description.
4. Edit the template fields:
Tip: If you know the values for the fields, you can type the files in the fields instead of selecting the values from the list.
Cisco HCS Customer Administration Guide with Cisco Unified CDM, Release 11.5(3) 97

Subscriber management / Quick Add Subscriber
5. Click Save.
Creating Quick Add Subscriber Groups Procedure1. Log in as a provider, reseller, customer, or site administrator. 2. Select Subscriber Management > Quick Add Subscriber Groups. 3. Click Add. 4. In the Group Name field, enter a group name. This is a required field. 5. From the Template fields, select a template.
For example, take the following steps to create back-office QAS users with phone type 6911 using SCCP protocol (voice account):
a) From the Default CUCM Phone Template list, select Backoffice Phone 6911 SCCP. b) From the Default CUCM Line Template list, select Default CUCM Line Template. This associates a line with the phone. c) You can also use custom configuration templates to assign to a Quick Add Subscriber Group.
Note: The custom configuration template must be at the same level in the hierarchy as the group.
6. Click Save.
Creating Subscribers You can create new subscribers with:
Existing users: see Create Subscribers with Existing Users on page 98
New users: see Create Subscribers with New Users on page 98
Create Subscribers with Existing Users
Existing Users exist at the Site Level under User Management > Users but are not yet pushed to Cisco Unified Communications Manager.
Procedure1. Create a custom Quick Add Group or use the default Quick Add Group. 2. Select Subscriber Management > Quick Add Subscribers. From the Username list, select a user.
The user data fields, such as First Name and Last Name, display the existing values for the user from User Management > Users.
3. From the Quick Add Group list, select a group to assign to the user. The default value in the Quick Add Group list is "default".
4. If necessary, edit the user information in the First Name, Last Name, and Email Address fields. 5. If necessary, provision the user with services using the Voice, Extension Mobility, Voicemail, WebEx, Single Number Reach,
Jabber Device, and Self-Service Id fields. 6. Click Save.
Create Subscribers with New Users
New users do not yet exist in Cisco Unified Communications Domain Manager and Cisco Unified Communications Manager.
Procedure1. Select Subscriber Management > Quick Add Subscribers. 2. In the Username, enter a user name.3. In the First Name field, enter the user's first name.
The user's first name is optional but is required if you want to provision the user with a WebEx account.
98 Cisco HCS Customer Administration Guide with Cisco Unified CDM, Release 11.5(3)
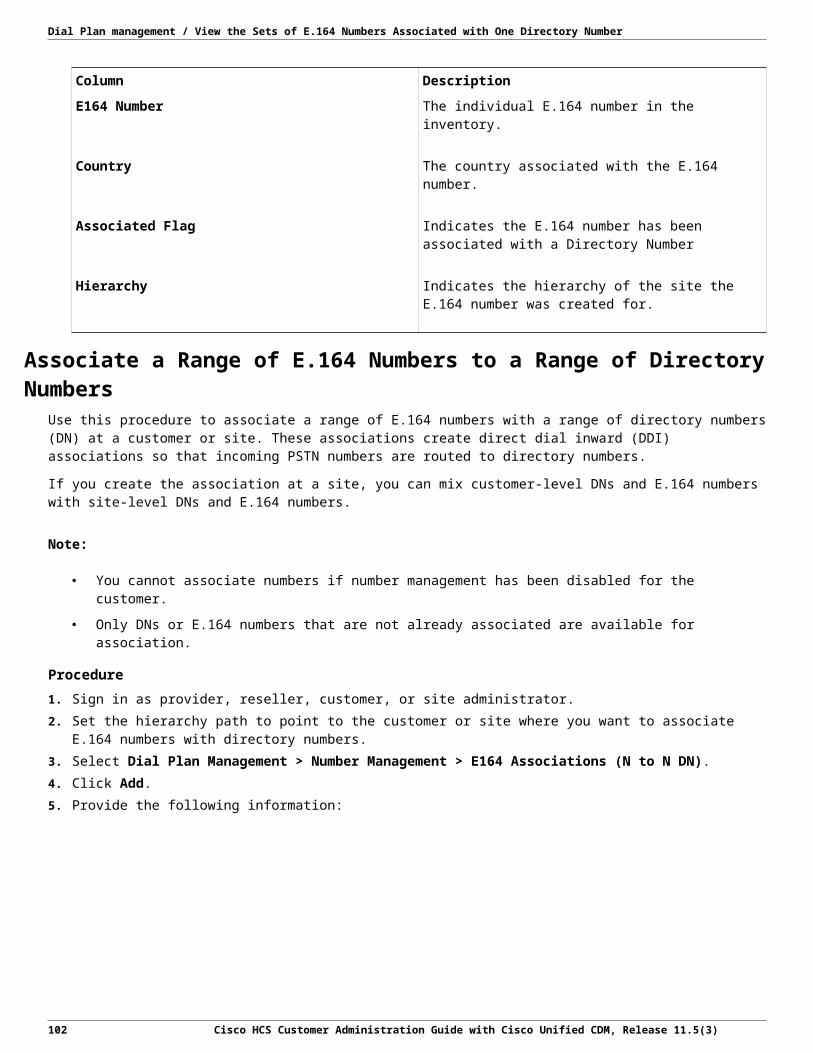
Subscriber management / Quick Add Subscriber
4. In the Last Name field, enter the user's last name. The user's last name is required.
5. From the Quick Add Group list, select a group to assign to the user. The default value in the Quick Add Group list is "default".
6. If required, provision the user with services using the Voice, Extension Mobility, Voicemail, WebEx, Single Number Reach, Jabber Device, and Self Service Id fields.
7. Click Save.
Updating Subscribers Subscribers are users that already exist under User Management > Users and in Cisco Unified Communications Manager.
Procedure1. Select Subscriber Management > Quick Add Subscriber. From the Username list, select a user.2. The user data fields show the user information found under User Management > Users. Any associated devices or subscribed
services for the user appear under the Existing Services tab. 3. From the Quick Add Group list, select a Quick Add Group to assign to the user.
The default value in the Quick Add Group field is "default".4. If required, edit the user fields and provision new services to the user. 5. Click Save.
Provisioning Services to Users To provision services to users, follow these instructions:
Provision the Voice Service on page 99
Provision the Extension Mobility Service on page 100
Provision the Voicemail Service on page 100
Provision the WebEx Service on page 100
Provision the Single Number Reach Service on page 100
Provision the Jabber Device Service on page 101
Provision the Self Service ID Service on page 101
Provision the Voice Service
Procedure1. Select Subscriber Management > Quick Add Subscribers. From the Username list, select a user.2. Select Voice. The optional Phone details such as Phone Type, Phone Protocol, Phone Button Template, Phone Security Profile
fields are displayed, and the mandatory Lines and Phones fields are highlighted.The Lines and Phones fields highlight.
3. Select the required options from the Phone Type, Phone Protocol, Phone Button Template, and Phone Security Profile drop-down lists. The default values are based on the selected Quick Add Group (QAG).Ensure that the selected template for example Phone Type exists in the Quick Add Group, and is also allowed by the Entitlement Profile. The selected Entitlement Profile will filter the available options in the Phone Type drop-down to show only the enabled devices in the Entitlement Profile.
4. In the Lines field, click +.The Directory Number list appears.
5. From the Directory Number list, select a line.The line must be one of the Directory Numbers found under Subscriber Management > Directory Number Inventory.
6. In the Phones field, click +.
Cisco HCS Customer Administration Guide with Cisco Unified CDM, Release 11.5(3) 99
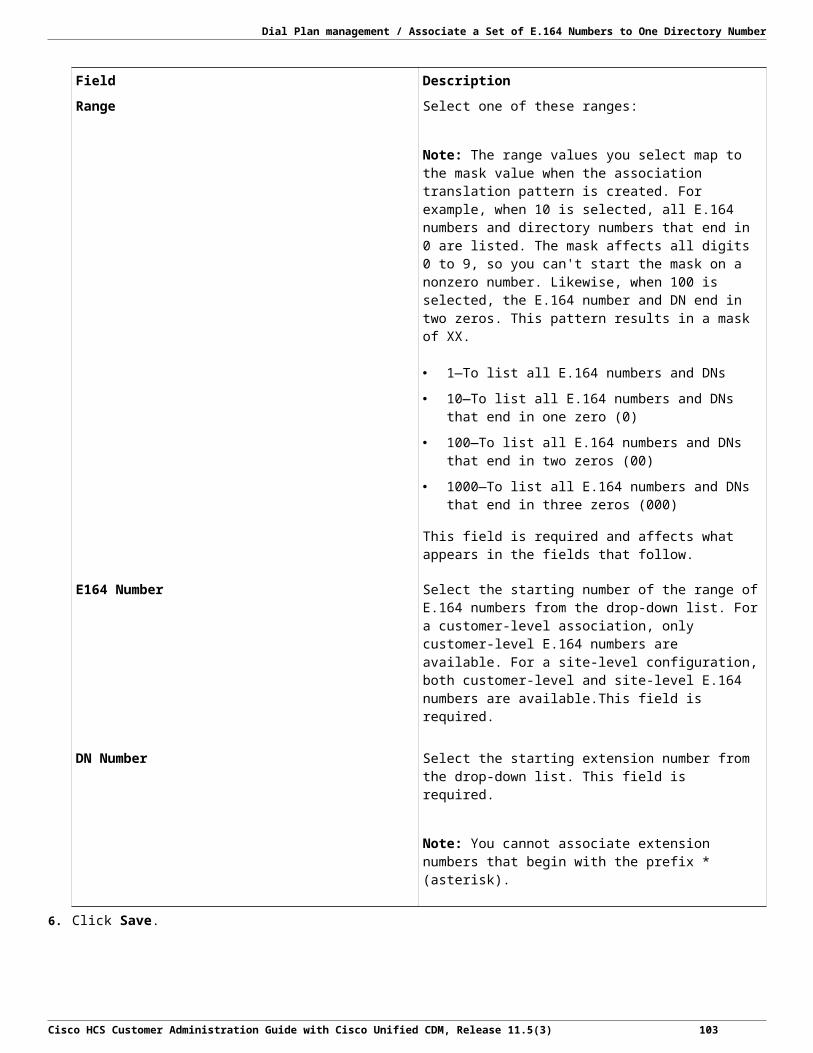
Subscriber management / Quick Add Subscriber
The Phone Name field appears.7. In the Phone Name field, enter a valid phone name.8. You can add more than one phone in the Phones field. To add another phone, click + and enter a valid phone name.9. Click Save.
Provision the Extension Mobility Service
Procedure1. Select Subscriber Management > Quick Add Subscribers. From the Username list, select a user.2. Select Extension Mobility.3. Click Save.4. Select Subscriber Management > Quick Add Subscribers. From the Username list, select the same user.5. Ensure that the Extension Mobility profile name appears in the Extension Mobility Profiles field.
Provision the Voicemail Service
Procedure1. Select Subscriber Management > Subscribers. From the Subscribers list, click on the name of the subscriber to be provisioned
with voicemail.2. Select the Voicemail tab. 3. In the Voicemail field, click +.
The Voicemail Line list appears.4. Select a line from the list. 5. Click Save.6. Select Subscriber Management > Quick Add Subscribers. From the Username list, select the same user.7. Select the Existing Services tab. 8. Ensure that the voicemail line appears in the Voicemail field.
Provision the WebEx Service
Procedure1. Select Subscriber Management > Subscribers. From the Subscribers list, click the name of the subscriber to be provisioned
with WebEx service.2. Select the WebEx tab.3. In the Web Ex User field, click +.
The WebEx configuration fields appear.4. Enter information in the First Name, Last Name, Email, Password, and Repeat Password fields. Select WebEx privileges in
the Privilege section.5. Click Save.6. Select Subscriber Management > Quick Add Subscribers. From the Username list, select the same user.7. Select the Existing Services tab.8. Ensure that "ACTIVATED" appears in the WebEx field.
Provision the Single Number Reach Service
Procedure1. Select Subscriber Management > Quick Add Subscribers. From the Username list, select a user.2. Select Single Number Reach.
The SNR Mobile Number field appears.3. In the SNR Mobile Number field, enter the mobile number. Do not add any spaces or special characters to the number.
The SNR Mobile Number can be the same as the user's Mobile Number shown in User Management > Users.4. Click Save. 5. Select Subscriber Management > Quick Add Subscribers. From the Username list, select the same user.
100 Cisco HCS Customer Administration Guide with Cisco Unified CDM, Release 11.5(3)

Subscriber management / Quick Add Subscriber
6. Select the Existing Services tab. 7. Ensure that the Single Number Reach displays the Single Number Reach profile name.
The Single Number Reach profile name is the user name followed by "-RDP". For example: jsmith-RDP.Provision the Jabber Device Service
Procedure1. Select Subscriber Management > Quick Add Subscribers. From the Username list, select a user.2. Select Jabber Device.
The Jabber Devices fields appear.3. In Jabber Devices, click +.
The Jabber Agent and Device Name fields appear. 4. Click +.5. From the Jabber Agent list, select a device type. In the Device Name field, enter a name in the correct format.
Table 7: Device Type and Device Name Combinations
For this type of device Enter the Device Name in this format
Android Bot<<Name>>
For example: BOT123
CSF <<Name>>
For example: 123
iPad TAB<<Name>>
For example: TAB123
iPhone TCT<Name>>
For example: TCT123
6. Click Save.7. Select Subscriber Management > Quick Add Subscribers. From the Username list, select the same user.8. Select the Existing Services tab.9. Ensure that the Phones field displays the Jabber device.
Provision the Self Service ID Service
Procedure1. Select Subscriber Management > Quick Add Subscribers. From the Username list, select a user. 2. Select Self Service Id. 3. In the Lines field, click +.
The Directory Number field appears. 4. Select a line from the list. 5. Click Save. 6. Select Subscriber Management > Quick Add Subscribers. From the Username list, select the same user. 7. Ensure that the Self Service field displays the Self Service ID.
The Self Service ID is usually the same as the line when it is created through Cisco Unified Communications Domain Manager. The Self Service ID creates a primary extension in Cisco Unified Communications Manager for the user. The extension consists of a Pattern and a Route Partition Name.
Cisco HCS Customer Administration Guide with Cisco Unified CDM, Release 11.5(3) 101

Subscriber management / Quick Add Subscriber
Workflow for Deleting Subscribers You can delete and unprovision subscribers in two ways:
Use the Subscriber Management > Subscribers menu path.
Use the User Management > Manage Users > Remove Users from CUCM menu path.
Note: Using the Subscriber Management menu path is the preferred method for deleting and unprovisioning subscribers.
Deleting a subscriber works differently based on:
The Subscriber Type
The subscriber's Device Associations
Subscribers are typically of these types:
Non-LDAP Synchronized Users
Users created in Unified CDM 10.x/11.5(x) and pushed to Cisco Unified Communications Manager.
Users provisioned in Cisco Unified CM and synchronized to Unified CDM 10.x/11.5(x).
LDAP Integrated at Unified CDM 10.x/11.5(x) Users
Users that are LDAP integrated at Cisco Unified CM and synchronized to Unified CDM 10.x/11.5(x).
LDAP Synchronized Users
Users that are directly synchronized from an LDAP Server to Unified CDM 10.x/11.5(x).
Subscribers can have these associations:
Associated devices, such as Phones, Extension Mobility, Single Number Reach, Voicemail, and WebEx.
No device associations.
When you delete a user using Subscriber Management > Subscribers, the system performs these tasks, depending on the user type and device associations.
User Type With Devices Without Devices
Non-LDAP Synchronized Users
LDAP Integrated at Cisco Unified CM Users
Deletes all devices:
Phones: device/cucdm/Phone
Single Number Reach: device/cucm/RemoteDestinationProfile
Extension Mobility: device/cucdm/DeviceProfile
Voicemail: device/cuc/User
WebEx: device/WebEx/User
Deletes the Provisioning Status.
Deletes the Provisioning Status.
102 Cisco HCS Customer Administration Guide with Cisco Unified CDM, Release 11.5(3)

Subscriber management / Quick Add Subscriber
User Type With Devices Without Devices
LDAP Synchronized Users Deletes all devices:
Phones: device/cucdm/Phone
Single Number Reach: device/cucm/RemoteDestinationProfile
Extension Mobility: device/cucdm/DeviceProfile
Voicemail: device/cuc/User
WebEx: device/webex/User
Deletes the user from Cisco Unified CM: device/cucm/User
Removes the Cisco Unity Call Manager from the Provisioning Status.
Deletes the user from Cisco Unified CM: device/cucm/User
Removes the Cisco Unity Call Manager from the Provisioning Status.
When you delete a user using User Management > Manage Users > Remove Users from CUCM, the system performs the following tasks, depending on the user type and device associations.
User Type With Devices Without Devices
Non-LDAP Synchronized Users
LDAP Integrated at Cisco Unified CM Users
The user is not deleted from Cisco Unified Communications Manager.
These associations for the user are not deleted from Cisco Unified CM:
Phones: device/cucdm/Phone
Single Number Reach: device/cucm/RemoteDestinationProfile
Extension Mobility: device/cucdm/DeviceProfile
Voicemail: device/cuc/User
WebEx: device/webex/User
A log message appears under User Management > Log Messages. The message describes why the user was not deleted and lists the user's associated devices.
Removes the user from the Cisco Unified CM: (device/cucm/User).
Removes the Cisco Unified CM server from the Provisioning Status.
Cisco HCS Customer Administration Guide with Cisco Unified CDM, Release 11.5(3) 103

Subscriber management / Quick Add Subscriber
User Type With Devices Without Devices
LDAP Synchronized Users The user is not deleted from Cisco Unified CM.
These associations for the user are not deleted from Cisco Unified CM:
Phones: device/cucdm/Phone
Single Number Reach: device/cucm/RemoteDestinatinProfile
Extension Mobility: device/cucdm/DeviceProfile
Voicemail: device/cuc/User
WebEx: device/webex/User
A log message appears under User Management > Log Messages. The message describes why the user was not deleted and lists the user's associated devices.
Removes the user from the Cisco Unified CM: (device/cucm/User).
Removes the Cisco Unified CM server from the Provisioning Status.
Delete a Subscriber from Subscriber Management
Follow these steps to delete and unprovision Subscribers.
Procedure1. Select Subscriber Management > Subscribers. 2. Select the subscriber you want to remove. 3. Click Delete. 4. Click Yes to confirm.
Delete a Subscriber from User Management
Follow this step to delete users from Cisco Unified Communications Manager.
ProcedureSelect User Management > Manage Users > Remove Users from CUCM.
Quick Add Subscriber Device Pool A Device Pool contains system, device, and location-related information, and is mandatory when adding a Subscriber using Quick Add Subscriber. A Device Pool can be referenced by:
Site Defaults Doc (SDD)
Reference Configuration Template (CFT) referenced in the Quick Add Subscriber Group (QAG)
Admin GUI (if exposed)
Site Defaults Doc
The Device Pool referenced in the SDD ensures that a Subscriber's devices are always associated to a Device Pool. If there is no Device Pool referenced in either the QAG or Admin GUI drop-down (see below) the value defaults to the SDD.
Quick Add Subscriber Group (QAG)
The Device Pool referenced by a Configuration Template (CFT) in the QAG takes precedence over the Device Pool referenced in either the SDD or the Admin GUI drop-down (if exposed). See Quick Add Subscriber Group for details.
Admin GUI
An Administrator can expose a Device Pool drop-down on the QAS page on the Admin GUI by editing or cloning the Field Display Policy (see Expose Device Pools in Quick Add Subscriber). The Device Pool drop-down allows an Administrator to overwrite the
104 Cisco HCS Customer Administration Guide with Cisco Unified CDM, Release 11.5(3)

Subscriber management / Quick Add Subscriber
value in the SDD by selecting a custom Device Pool from the drop-down list. The options available in the list are the site-level Device Pools if they are available, otherwise it displays all Device Pools available at Customer level (NDLR aware).
Note: When exposing the Device Pool drop-down, the Administrator must remove the value in the Device Pool field of the CFT referenced in the QAG, that is, the field must be blank. This is done to make sure that the value in the CFT does not overwrite the custom value in the drop-down.
The CFTs and their target models for which the Device Pool name can be made blank to allow the GUI to drive the Device Pool selection include:
Phone templates (device/cucm/Phone)
Jabber device templates (device/cucm/Phone)
Remote Destination Profile templates (device/cucm/RemoteDestinationProfile)
Voicemail The Voicemail interface makes it easy for an Administrator to add, modify or delete CUC Voicemail users as well as associated Voicemail services from a single tabbed form. The user that is added to the system is also added to the CUC Voicemail system, and if the relevant services are selected these are also added to the CUC Voicemail system.
The following can be provisioned by means of the Voicemail interface:
CUC Account - A CUC User, which includes a VM account name, a VM number and an associated subscriber template. The CUC Subscriber Template default value is pulled from the Site Defaults menu, which can be viewed and edited (if logged in at the appropriate administrator level) by choosing the CUC Defaults tab from Dial Plan Management > Site Defaults.
Alternate Extensions - Alternate extension numbers that are available to the CUC Voicemail user.
Message Actions - Determine the actions to handle incoming Voicemail, Email, Fax, and Receipt messages. The message actions include:
Reject the Message
Accept the Message
Relay the Message
Accept and Relay the Message
If the selected message action involves relaying the message, you must enter a valid email address in the Relay Address field.
Credentials - Password and PIN
Notification Devices - Devices used to notify the CUC user of Voicemails sent to the user. These include: Phone, HTML, SMTP (email), Pager, and SMS (if an SMPP Provider is added on the relevant Voicemail server).
Configure Device, Voicemail, Extension Mobility, and Single Number Reach
Add Subscribers Use this procedure as a high-level workflow to add one or more subscribers in Cisco Unified Communications Domain Manager (Unified CDM).
Note: If Enable CSS filtering is enabled at the customer dial plan, then for all calling search space fields in this procedure, the list of available calling search spaces includes only those that are marked as a Class of Service under Dial Plan Management > Site > Class of Service at the particular site. If another CSS is required, you can add custom CSSs in a CSS field if you know the exact syntax.
If Enable CSS filtering is not enabled, then the list of available calling search spaces includes all CSSs that are configured on the Cisco Unified Communications Manager (Unified CM).
Cisco HCS Customer Administration Guide with Cisco Unified CDM, Release 11.5(3) 105

Subscriber management / Quick Add Subscriber
Procedure1. Log in as a customer or site level administrator. If you are logged on as the customer administrator for a specific site you can see
all the fields described in this procedure. If you are logged in as the site administrator, you can see a subset of the fields that are available on the interface.
2. Select a site from the hierarchy breadcrumb. 3. Go to Subscriber Management > Subscribers. 4. Click Add. 5. On the User tab, complete fields to add a Unified CM user and a Unified CDM user.
Consider the following when adding a user: Use only alphanumeric characters.
A selected Entitlement Profile will be associated with the Subscriber.
The options available in the Service Profile dropdown menu are those that were imported from Unified CM.
If an existing phone is to be associated with a user, select the device from the Associated Devices group.
After an existing phone is associated to the user in the Associated Devices group Device dropdown menu, click Save. The subscriber is updated so that the Phones tab is populated with the information of the new phone associated with the user.
If the added user is configured as an LDAP user, the Password and Repeat Password fields are hidden. The Enable Mobility checkbox is auto-enabled if any of the following are included or added: a remote destination phone, mobile identity for a phone, or remote destination profile (RDP).
Note: To enable Extend and Connect in Unified CDM 10.x/11.5(x), complete the following task:
A) Check the Enable Mobility checkbox.
B) Add the following three groups of users:
I. Standard CCM End-Users
II. Standard CTI Enabled
III. Standard CCMUSER Administration
Select a BLF Presence Group for the end user from the pulldown. The selected group specifies the destinations that the end user can monitor and is configured in Cisco Unified Administration. BLF Presence Group authorization works with BLF Presence Groups to allow or block presence requests between groups. The Busy Lamp Field default is set according to the selected number and specifies the Standard Presence Group that is configured with installation. For more information, see the Cisco Unified Communications Manager Features and Services Guide.
6. On the Phones tab, complete fields to add a new phone. Consider the following when adding a phone: Modify the values for the following fields if desired: Product Type, Device Protocol, Phone Button Template, and Device
Security Profile. The possible value options for these fields change depending on which associated fields are selected. For example, when you enter the Phone Name with the Product Type prefix and the MAC address, 79XX-type phones have the Phone Name “SEP” prefixed, while ATA-type phones have “ATA” prefixed to the MAC address. Fields are validated and tooltips are available to assist you to select Product Type.
Modify phone-specific settings such as DND Option dropdown menu, Do Not Disturb checkbox, and Hot Line Device. The phone settings that are available differ depending on the Product (phone) type selected, the protocol (for example SIP or SCCP), and the Field Display Policy (FDP) applied by the administrator. You can select a Mobile User ID Name from the dropdown list when a Dual-Mode Phone for Android or iPhones is selected. This associates the selected user to the Mobile Identity feature on this phone and must match the Userid added on the User tab.
The advanced settings fields are updated automatically for the phone based on the phone type. The phone is automatically associated to the user and is then displayed as an associated device when you view the subscriber after adding it. If a phone that has been associated with a user is also associated with another user, the Owner User ID defaults to the first user.
In the Lines section of the tab, complete line assignments. Note that when you select a Route Partition Name, the available Pattern options are filtered according to the selected partition. However, you can add a custom pattern by typing it into the
106 Cisco HCS Customer Administration Guide with Cisco Unified CDM, Release 11.5(3)

Subscriber management / Quick Add Subscriber
Pattern field. The associated Enduser field identifies the user for Presence, but you can add a new User ID. Unified CDM adds the user first and then adds the User ID.
In the Speeddial section, add speed dial information. Available speed dials depend on the Phone Button Template.
In the Blf Directed Call Park section, specify Busy Lamp Field Directed Call Park values. Values depend on a valid Directed Call Park on Unified CM.
In the Add On Module section, specify Add On Modules if desired. The Add On Modules Load Name can be any value, but the Model has to be supported by the phone.
In the Service section, add services that are valid IP services for Phones. To add a service to the device, a number must be added as the Uri Button index. If you do not add a number, only the service is added.
Use the Mobile Identity form to configure mobile identity details when you select a Dual-Mode Phone. Fields include: Name, Dual-Mode Device Name (automatically populated from the Device Name field), and Mobility Profile Name (chosen from a dropdown list). The Destination field is a mandatory field and determines the destination number that is dialed when a call is made to the dual-mode phone.
Use the Remote Destination Phone form to configure your remote destinations when a Dual-Mode Phone is selected. Remote destinations represent the mobile (or other) phones that are able to accept transfer from the desktop phone and can be used to initiate calls. Set the Pattern for the Line Association to the Route Partition name. If you enter more than one Pattern and the new Pattern is not on the system, enter the Route Partition Name manually.
Use the Vendor Config section of the tab to view and edit the configuration settings for each device. The available configuration settings depend on each Product type selected. Modify settings as required.
7. On the Extension Mobility tab, complete fields to configure Extension Mobility for the end user. Consider the following: Only one Device Profile can be added for Extension Mobility.
As with the Phones tab, Product Type, Device Protocol and Phone Button Template fields change, depending on the selection of an associated field.
The fields on this tab behave in the same way that they do on the Phones tab, with the exception of Remote Destination information, which is not available on Device Profiles.
Ensure that you associate the Extension Mobility Device Profile and target phone for login with the Extension Mobility service.
8. On the Single Number Reach tab, note that you cannot add more than one Remote Destination Profile for Single Number Reach. However, you can add more than one Remote Destination Rdp.
Note: To enable Extend and Connect in Unified CDM, make sure to complete the following task:
A) Check the Enable Extent and Connect checkbox.
B) Select the CTI remote device that you created from the CTI Remote Device Name drop-down list.
9. On the Voicemail tab, configure voice mail service for the end user if a valid Cisco Unity Connection server is available. Consider the following when configuring voice mail: You can leave the PIN and Password empty, in which case the default credential policy on the Cisco Unity Connection is
used.
If a user is prompted from ImportUsers to an LDAP Cisco Unity Connection user, the Password field is visible but should not be ignored. This is because there is no way to know that the user being added is an LDAP-synced user.
The Voicemail Line dropdown list shows available lines but you can also add values manually. The Cisco Unity Connection server uses this line as a caller ID, so you should set it to the user's default line.
10. On the WebEx tab, add details if a valid server is available. The mandatory fields on this tab are populated with the values entered on the User tab. Note however, that any updates on the User tab do not update these values; values are populated only during the Add workflow.
11. When you are finished adding information for the subscriber, click Save.
Cisco HCS Customer Administration Guide with Cisco Unified CDM, Release 11.5(3) 107

Subscriber management / Quick Add Subscriber
12. Repeat steps 4 to 11 to add another subscriber.
Modify Subscribers Use this procedure to modify settings for one or more subscribers.
Procedure1. Log in as a customer or site level administrator. If you are logged on as the customer administrator for a specific site, you can see
all the fields described in this procedure. If you are logged in as the site administrator, you can see a subset of the fields that are available on the interface.
2. Select a site from the hierarchy breadcrumb. 3. Go to Subscriber Management > Subscribers. 4. Choose the subscriber to be updated by clicking on its box in the far left column, then click Edit. 5. Modify subscriber information as required, using the workflow described in Add Subscribers on page 82.
Note: You can use the pop-up form that is available when modifying the Subscriber on the Phones tab to add more than one phone. Also, instances of one-to-many or zero-to-many items can be deleted, such as a Phone.
The line settings of a phone can be modified directly from the Subscriber form. When expanding the Line group of a Phone or Extension Mobility Profile, the Link to Line hyperlink on each Line form directs to the specific Line relation details. These details can be modified and saved, and you can return to the base tab of the Subscriber form. You can also navigate to the base tab of the Subscriber using the back button. If the menu layout has more than one entry for relation/LineRelation and associated Field Display Policy, then the form opened by the Link to Line hyperlink uses the first Field Display Policy (searching from top to bottom) found in the menu layout.
6. Click Save.
Note: Filtering on these columns on the Subscribers list view produces the following results:
Located At - Displays an abbreviated version of the hierarchy showing the lowest point in the hierarchy. The hierarchy type is shown in brackets. When you filter on this column, do not use text included inside the brackets in the filtering criteria. For example: “SiteName (Site)”, where (Site) = the hierarchy node type, only search using the “SiteName” portion of the field.
Device - Filters on IP address or hostname.
Phone - Includes all phones at the hierarchy level and below, regardless of the Phone column in which they reside.
Delete Subscribers Use this procedure to delete one or more subscribers.
Procedure1. Log in as a customer or site level administrator. If you are logged on as the customer administrator for a specific site you can see
all the fields described in this procedure. If you are logged in as the site administrator, you can see a subset of the fields that are available on the interface.
2. Select a site from the hierarchy breadcrumb. 3. Go to Subscriber Management > Subscribers.4. Choose the subscriber to be deleted by clicking on its box in the leftmost column, then click Delete.5. From the popup window, click Yes to confirm the deletion.
Note: For scenarios that include an LDAP-integrated Cisco Unified Communications Manager, the process for deleting a user is from the LDAP directory and not from the Cisco Unified communications Domain Manager system. Set up a data sync to synchronize the removal of the user.
108 Cisco HCS Customer Administration Guide with Cisco Unified CDM, Release 11.5(3)

Subscriber management / Quick Add Subscriber
When the delete action is complete, the Subscriber disappears from the list. All elements associated with the Subscriber are deleted, except Lines.
Hunt Group Management Hunt groups can be configured at the customer or site level.
The purpose of hunt group management is to provide business context for the lines selected as members of line groups and to provide you with a single consolidated view of the following hunting elements.
Hunt Pilot
Hunt List
Line Groups
All fields of the hunt pilot and hunt list are mapped to the your input.
When selecting a Call Pickup Group from the drop-down list, the available Call Pickup groups to choose are:
The available options at the hierarcy of the current Hunt Group.
The options at a hierarchy level above the current, if none are available at the current level.
Not all hunt group fields are exposed to the administrator. You must select the lines that belong to line groups or any existing line groups that must be added to the hunt list members.
For hunt groups configured at the customer level:
You are prompted for an NDL that identifies the Cisco Unified CM where the hunt group is defined.
You can define a unique hunt pilot pattern for the hunt group. The hunt pilot pattern is added to the customer-level DN inventory and is marked as in-use and unavailable.
You can include lines defined at the customer level and at any site within the customer.
Searches can be performed on any of the details of the hunt pilot.
A hunt group is a combination of the hunt pilot, hunt list, and line groups that are automatically linked together using unique identifiers for the following:
The hunt pilot's hunt list is set to the name of the hunt list. The hunt list name must be configured first in order for it to appear in the hunt pilot tab.
The hunt list's line group members are set to the name of the associated line groups.
Certain default values for hunt groups are populated by the site defaults menu item, which can be viewed and edited (depending on your log-in level). Go to Site Management > Defaults and click the required site name in the list view.
Hunt groups can be:
Added—You can specify the parameters of the hunt pilot and the hunt list, and select one or more new or pre-existing line groups. If your administrator has enabled the number inventory feature, you can select the Hunt Pilot PatternV1ct0rR4sk4 from a drop-down list of available numbers. If the feature is disabled, the Hunt Pilot Pattern field is a free text field or a drop-down containing only selected available numbers. To allow the successful use of call forwarding in a hunt pilot, the defaults for Max Callers In Queue (32) and Max Wait Time In Queue (900) are cleared. To use queuing instead of call forwarding, set these values other than the default, for example to 33 and 901.
Modified—You can modify the parameters of the hunt pilot or hunt list. Examples include adding or deleting line groups, or adding or deleting line group members.
Deleted—You can delete a hunt group.
Hunt Group Management Workflows When adding a new Hunt Group, the following workflow is executed:
Cisco HCS Customer Administration Guide with Cisco Unified CDM, Release 11.5(3) 109

Subscriber management / Quick Add Subscriber
A hunt list is added with the details input by the user.
A hunt pilot is added with the details input by the user.
One or more line groups are created with the specified directory numbers as members.
When modifying a Hunt Group, the following workflow is executed (depending on what was modified):
The line group details are modified.
Added line groups are added. Note that removed line groups are not deleted.
The hunt list is modified.
The hunt pilot is modified.
When deleting a Hunt Group, the following workflow is executed:
The line groups that are members of the hunt list are deleted (if they are not used by any other hunt list in the system).
The hunt pilot is deleted.
The hunt list is deleted.
Add a Hunt Group When adding a new Hunt Group, the following workflow is executed:
Procedure1. Add a hunt pilot with the details input by the user. 2. Add hunt list with the details input by the user. 3. Create one or more line groups with the specified directory numbers as members.
Modify a Hunt Group When modifying a Hunt Group, the following workflow is executed:
Procedure1. Select the hunt group to be modified.2. Modify the line group details. 3. Add the newly added line groups. Note that removed line groups are not deleted. 4. Modify the hunt list. 5. Modify the hunt pilot.
Delete a Hunt Group When deleting a Hunt Group, the following workflow is executed (depending on what was modified):
Procedure1. Select the hunt group to be deleted.2. Delete the line groups that are members of the hunt list (if they are not used by any other hunt list in the system). 3. Delete the hunt pilot. 4. Delete the hunt list.
Call Pickup Groups Certain default values for call pickup groups are populated by the site defaults menu item, which can be viewed and edited (depending on your log in level). Go to Dialplan Management > Site Defaults and click on the required site name in the list view.
110 Cisco HCS Customer Administration Guide with Cisco Unified CDM, Release 11.5(3)

Subscriber management / Quick Add Subscriber
The Call Pickup Groups feature provides an administrator with the following:
A single interface on which to create call pickup groups, and to select one or more lines as members of a pickup group.
The ability to add Unified CM call pickup groups and to modify the call forward and call pickup settings of each Unified CM directory number for membership to a newly added call pickup group. When adding a call pickup group, if your administrator has enabled the number inventory feature, the Pattern can be selected from a drop-down list of available numbers. If the feature is disabled, the Pattern field is a free text field or a drop-down containing only selected available numbers.
The ability to add lines to an existing call pickup group by selecting the pattern (directory number). When adding a member line, if your administrator has enabled the number inventory feature, the Pattern can be selected from a drop-down list of available numbers. If the feature is disabled, the Pattern field is a free text field or a drop-down containing only selected available numbers. The Route Partition Name field is populated automatically based on the selected Pattern.
The ability to delete a pre-existing call pickup group, and to delete one or more lines from an existing call pickup group.
The first member of the associated pickup group name is set the newly created pickup group, and associated pickup groups can be added as part of the workflow.
Call Pickup Groups Management When creating a Call Pickup Group, the following workflow is executed:
Adds a Unified CM Call Pickup Group.
Modifies the Call Forward and Call Pickup Settings of each line by setting the Call Pickup Group to the newly created Call Pickup Group.
When deleting a Call Pickup Group, the following workflow is executed:
All lines belonging to the call pickup group are updated to remove them from the call pickup group.
All associated pickup groups are modified to remove the call pickup group associations to the deleted call pickup group.
The call pickup group is deleted from Unified CM.
When modifying a Call Pickup Group, change to the name of the Call Pickup Group also requires a corresponding change to the name in the list of Included Call Pickup Groups.
Creating a Call Pickup Group When creating a Call Pickup Group, the following workflow is executed:
Note: When modifying a Call Pickup Group, a change to the name of the Call Pickup Group also requires a corresponding change to the name in the list of Included Call Pickup Groups.
Procedure1. Add a Unified CM Call Pickup Group. 2. Modify the Call Forward and Call Pickup Settings of each line by setting the Call Pickup Group to the newly created Call Pickup
Group.
Deleting a Call Pickup Group When deleting a Call Pickup Group, the following workflow is executed:
Procedure1. Update all lines belonging to the call pickup group to remove them from the call pickup group. 2. Modify all associated pickup groups to remove the call pickup group associations from the deleted call pickup group. 3. The call pickup group is deleted from Unified CM.
Cisco HCS Customer Administration Guide with Cisco Unified CDM, Release 11.5(3) 111
Administration Tools Transaction Logging and Audit on page 113
Parent and Child Transactions for Asynchronous Transactions on page 115
View a Transaction on page 115
Filtering Transactions on page 115
Filtering Sub-Transactions and Logs on page 117
Transaction Behavior on page 117
Transaction Logging and Audit Activity on the system results in transactions that are recorded. The Transaction menu provides auditing information for each transaction.
The recorded information includes:
Transaction ID - Identifier of the transaction
Action - The type of action recorded in the transaction, for instance Execute, Create, Modify, Data Import, and so on.
Resource - the affected resource of the transaction, including the model type (for example, data/User) and its hierarchy.
Username - Of the user who initiated the transaction.
Submitted Time, Started Time, and Completed Time - The date and time of the progress of the transaction.
Rolled Back - Indicates whether the transaction was rolled back or not.
Status - for running transactions, this is In Progress; for completed transactions there are three scenarios:
Fail
Success or
Success with Async failure
Detail - A brief description of the processed transaction.
Duration - The duration of the selected transaction. If there are subtransactions, this parent transaction duration is the total duration of the transaction. This includes the total duration of import transactions that carry out provisioning workflows asynchronously.
Priority - The priority of the transaction, for example Normal.
Submitter Host Name - The host name of the application node that scheduled the transaction. On a clustered system, this can differ from the Processor Host Name.
Processor Host Name - The host name of the application node that processed the transaction (this value is only set once the transaction is processed). On a clustered system, this can differ from the Submitter Host Name.
The Unified CDM GUI displays the transaction details upon selection of transaction in the list view.
When a transaction is selected, the Base tab shows details of the columns of the transaction list view. The button bar on the detail list view shows Help and Refresh buttons if the transaction is still running. If the transaction is running, click the Refresh button to update the Progress field.
Cisco HCS Customer Administration Guide with Cisco Unified CDM, Release 11.5(3) 113

Administration Tools / Transaction Behavior
Lists of transactions can also be filtered. Refer to the topics on Filtering Transactions on page 115 and Filtering Sub-Transactions and Logs on page 117 for details.
If you want to cancel a transaction while it is running, click the Cancel button. A popup confirmation dialog is displayed. Click Yes to cancel or No to cancel the request. If a transaction, with subtransactions, is cancelled, the subtransaction currently in progress completes. This subtransaction and all preceding subtransactions rolls back to their previous states. Bulk load transactions do not follow this behavior. Each bulk load subtransaction is seen as a main transaction, and only the ‘in progress’ subtransaction rolls back to its previous state.
The Replay button is available if the transaction is complete. A transaction can be replayed if necessary, for example if a transaction failed because a target system service was not running. The replay of the transaction can then be used instead of re-entering data on a GUI form.
The Edit and Replay button is also available for completed transactions. This is similar to the Replay button, but allows you to first change the previously submitted form before the transaction is resubmitted.
The button is available for transactions, that did not originate from bulk loads, wizards, or popup forms.
The bulk loader does not support Replay; and Edit and Replay functionalities because the bulk load files are not stored by default. The bulk loader extracts data from the spreadsheets and then performs the necessary actions. The only time a bulk load file is stored in the database is when the bulk load is scheduled. In this case, the bulk loader keeps the file until it triggers the scheduler to execute the actions in the file. When the data is extracted from the file, it is deleted.
When using Edit and Replay for a failed Quick Add Subscriber transaction, the user information fields do not automatically update when changing the Username field:
Entitlement Profile
Firstname
Lastname
Jabber Device
These are edited manually.
Selecting the button opens the original input form that resulted in the transaction. The form also contains the original data that was posted. This data can be edited and the form can be submitted to replay the transaction. This functionality can therefore be used, for example, to edit a failed transaction or to modify data of a successful transaction.
Since GUI Rules apply to a form from a specific hierarchy, the Edit and Replay functionality is only used from the same hierarchy as the original transaction was executed.
If a transaction has subtransactions, a Sub Transaction list is available of the form with links to their details. The subtransaction form displays a link to a parent transaction. On the transaction list view, sub-transactions are identified by a down-right arrow preceding the Id number.
Failed transactions display an error message. However, a subtransaction with a create action that has a fail on error workflow condition for duplicates, may show its status as Fail when not creating a duplicate, while the parent transaction shows its status as Success.
For asynchronous transactions and sub-transactions, refer to Parent and Sub-transactions for Asynchronous Transactions.
The Logs section on the Transaction base tab displays Message and Severity details of transactions performed by Cisco Unified Communications Domain Manager 10.x/11.5(x) . For example, if the Severity has the status of error, the Message section can be expanded to inspect the error, and optionally copy it and send it to Support. If a workflow is inspected, a separate log entry provides details of each step with a log message as Step n, starting with Step 0.
The Resource tab, which has content for transaction types where a resource changed, displays the additional information, depending on the transaction type:
Hierarchy - The point in the hierarchy at which the transaction occurred.
Model Type - For example data or User.
114 Cisco HCS Customer Administration Guide with Cisco Unified CDM, Release 11.5(3)

Administration Tools / Transaction Behavior
Current State - if available, click the Entity link to inspect the instance on the GUI form.
The Back button on the button bar can be used to navigate to the previous screen; for example, from the parent transaction screen to the list view of all transactions.
Parent and Child Transactions for Asynchronous Transactions Parent and child transactions of asynchronous transactions are shown in transaction logs as follows:
Parent transactions are in a processing state until the last asynchronous child transaction completes the following tasks:
Asynchronous workflows triggered by Device Import
Asynchronous operations triggered by Bulk Load (with parallel = true)
Asynchronous workflow steps
The following asynchronous transactions for non-bulk operations are not grouped under parent transactions:
Asynchronous device import triggered by DataSync executions
Asynchronous event executions triggered by another operation
Top-level transactions with any level of failed asynchronous sub-transactions display a Success With Async Failures status. The detailed view of a top-level transaction also displays the list of failed asynchronous transactions below the list of sub-transactions. This list allows an easy access to all failed asynchronous transactions.
The Details column of sub-transactions also displays the number of failed asynchronous transactions.
The details of parent transactions with a Success status also provide the number of failed child transactions for Device Import and Workflows.
View a Transaction You can only view transactions that are relevant to your specific hierarchy level. For instance, if you are logged into the system as a Customer Administrator you will be able to view all transactions that were performed at the customer for which you are the administrator. This includes transactions that were performed at any of the sites that belong to the customer. If you are logged in as a Site Administrator you will be able to view only the transactions that were performed at your specific site. The steps below can be followed on the GUI.
Procedure1. Log in as the sysadmin administrator.2. Click Administration Tools > Transactions. The Transaction list view is displayed.
The Transaction list view shows transactions in progress or executed. This is indicated in the Status column of the list. For completed transactions, the Success column indicates if the transaction was successful. The Description column provides additional details on the transaction if available.
3. Click an individual transaction (if required) to show a detailed view of the transaction. 4. If there are sub-transactions, click on the Link in the Sub Transactions list to show its details.
Filtering Transactions Navigate to Administration Menu > Transaction to open the list of parent transactions. When a parent transaction is selected and opened from the list view, its details and sub-transactions are shown.
To open the Transaction Search Filter pop-up, use either:
1. The Filter button at the bottom of the list
Cisco HCS Customer Administration Guide with Cisco Unified CDM, Release 11.5(3) 115
Administration Tools / Transaction Behavior
2. One of the filter icons in a column header of the list
A transaction filter is a logical AND operation over a number of active search criteria related to column values that are entered in the Transaction Search Filter pop-up form:
Transaction ID:
Equal: Default setting. The search only matches on the entered transaction or subtransaction ID value.
If a value is entered, all other criteria are disabled.
If no value is entered, any transaction ID is matched according to the other criteria.
Range: Start and End ID input boxes are available to specify the search ID range.
Include Sub-transactions:
Criteria in the search filter also apply to sub-transactions. Only one level of sub-transactions are filtered, in other words, if sub-sub-transactions are for example present, these are not included.
The search result list view shows both parent and sub-transactions.
By default, sub-transactions of a parent are listed above the parent in the search result list view, latest date at the top.
Status:
A drop-down is available to select the transaction status
Date Range: a drop-down to select a date range. All and Custom date options will enable Start Date and End Date controls.
Note: If the user selects date range as Last Day, Last Week or Last Month, then the subsequent reopening of this filter shows it as a Custom date range, since the range is then less than the selected interval.
Start Date and End Date: specify a transaction date range in the format of the system locale. For example, for language code en-us, the typed format is mm/dd/yyyy. The number format “9” instead of “09” is also valid.
Date picker widgets and time drop-downs can be used to specify the range, but values can also be typed in. While time drop-down values only show 15 minute intervals, any valid minute value can be typed in. The widget values also follow the system locale format.
If a Username, Detail or Message filter is added, a warning about possible slow filtering will show if the transaction date range is more than 7 days.
By default, all transaction dates are searched, but if used, both Start Date and End Date values are required.
Action: a drop-down to select a value from the Action column.
The drop-down options are filtered while text is entered.
If text is entered that does not match any action exactly, all actions containing the text (caseinsensitive), will be listed.
If the transaction date range is more than 7 days, a warning about possible slow filtering will show.
Username: filter on the Username column text.
The column should contain the entered text, case-insensitive.
If the transaction date range is more than 7 days, a warning about possible slow filtering will show.
Detail: filter on the Detail column text.
The column should contain the entered text, case-insensitive.
If the transaction date range is more than 7 days, a warning about possible slow filtering will show.
Message: filter on the transaction message
The message contains the entered text, case-insensitive
116 Cisco HCS Customer Administration Guide with Cisco Unified CDM, Release 11.5(3)

Administration Tools / Transaction Behavior
If the transaction date range is more than 7 days, a warning about possible slow filtering will show.
For failed transactions, hover over the Status column to see the message or inspect it in the detail view.
Some successful transactions also show messages when viewing its details, for example data import and bulk load.
Since transaction filters can take a long time, a filter timeout is added to limit the filter duration to 2 minutes.
Active transaction, sub-transaction and transaction log filters show as:
The X button next to the active Filter funnel icon. Selecting this X button will cancel a running filter. If the filter is a modification of a previous successful filter, the running filter will be reverted to the successful filter.
Highlighted funnel icons on the right hand side of the column headers included in the filter.
Filtering Sub-Transactions and Logs Some transactions have sub-transactions as well as a log list on the transaction detail view. The filtering of sub-transactions and logs works like the list view filter, in other words, a range of matching operators are available.
If a sub-transaction has further sub-transactions, click the Link in its Transaction column to carry out any filtering on nested sub-transactions. To navigate up the sub-transaction hierarchy, click the parent Link.
The sub-transactions and log columns to filter by, are:
Sub-Transactions:
Action
Status
Detail
Logs:
Severity
Message
Duration (some logs - only equals and not equals)
Transaction Behavior The transaction engine for Cisco Unified Communications Domain Manager 10.x/11.5(x) ensures that configuration changes are made efficiently and reliably.
If a transaction failure or error occurs, Unified CDM lets you roll transactions back to a state preceding the failed transaction.
For example, where a workflow step fails, all successful steps before a failed step are rolled back.
Transactions are hierarchical and have parent-child relationships with other transactions. Subtransactions are always executed sequentially and synchronously. In other words, the child transactions of a workflow parent transaction are executed one after another.
Transaction behavior is different for the following actions in the system:
API
The API supports executing transactions in both synchronous and asynchronous modes. When executed in synchronous mode, the API responds only after the transaction is completed. When executed asynchronously, the API responds immediately with a transaction ID so that the progress and status of the transaction can be polled.
Bulk Loaders
With bulk loading, the load of each row on a sheet is a separate transaction. These transactions are run in series. There is no rollback of rows that have loaded successfully before or after a failed transaction (a failed row on a sheet). Multiple bulk load sheets can be loaded in parallel.
Cisco HCS Customer Administration Guide with Cisco Unified CDM, Release 11.5(3) 117

Administration Tools / Transaction Behavior
Data Import
One transaction is created for each record in the import file. If a transaction fails, the import continues and does not roll back the preceding successful transactions.
Data Sync
A data sync transaction contains subtransactions that record each device model operation that takes place during a data sync action, for example add, update and delete.
Events
Events are triggered as part of data sync operations or as triggers on operations performed on certain model types. The provisioning workflow executed when the event triggers is executed as a new parent transaction. Transaction failures with the workflow executed after an event do not affect the original transaction that triggered the event.
All transactions are placed on a queue before they are run. Parent transactions can run concurrently, but their subtransactions run serially. Parent transactions are prioritized so that user input, such as adding on a GUI form, is prioritized over a running import or bulk load process.
The following diagram shows an example transaction flow and also the relationship between parent and child transaction queues and workers.
118 Cisco HCS Customer Administration Guide with Cisco Unified CDM, Release 11.5(3)

Administration Tools / Transaction Behavior
Figure 4: Example Transaction Flow
Cisco HCS Customer Administration Guide with Cisco Unified CDM, Release 11.5(3) 119

Index
Cisco HCS Customer Administration Guide with Cisco Unified CDM, Release 11.5(3) Index-120