cold process soap made easy - savvyhomemade.com
TRANSCRIPT


DISCLAIMERThe author and publisher of this Ebook and the accompanying materials have used their best efforts in preparing this Ebook. The author and publisher make norepresentation or warranties with respect to the accuracy, applicability, fitness, or completeness of the contents of this Ebook. The information contained in thisEbook is strictly for educational purposes, and does not constitute legal or other professional advice on any subject matter. Therefore, if you wish to apply ideas
contained in this Ebook, you are taking full responsibility for your actions.

So you wanna make cold process soap like a pro? It seems complicated at first, butit’s actually very easy and not much harder than baking a cake. In fact, I’ve foundit to be extremely addictive and a wonderfully rewarding creative hobby.
Long before I started my DIY crafts I knew that making homemade soap usingcold process was the most authentic and difficult method, but once I got the hangof it. I quickly realized the total cost to make several months worth of bars was farcheaper than buying the chemical cocktails from the store.
I also realized that because you have total control over what goes into homemadesoap recipes, you can avoid using any ingredients that do not suit your skin.

A lot of folks express concern around making homemade soap, in particular the dangersof working with soapmaking Lye and yes you do want to take some precautions whenev-er you handle it. Lye is the most common alkali used for making soap. Its official name issodium hydroxide (NaOH) and is also known widely as caustic soda.
Having said that, all that’s required to make homemade soap is a bit of common-sense.Which you already have otherwise you would not be reading through these safety tips!
1All of the soapmaking recipes on Savvyhomemade allow 5% superfatting. Thisinsures correct saponification (the reaction that creates soap) making sure there iszero free caustic alkali remaining and a good ph balance achieved. As long as youhave measured your ingredients correctly you have nothing to worry about. To besure always test soap using a ph strip to make sure it is somewhere between 7-10.
2When making soap always protect the eyes and skin by putting on safety glassesand rubber gloves. Should you get some on your skin rinse with vinegar beforewashing it off using water.
3Once you add the water to your Lye some choking fumes will rise from your
4
bowl. Keep your face away from these fumes while you stir the mixture and try tonot breath them in. You could use a mask here if you want.
Never leave your soap mixture unattended, this is a big no no especially if youhave children or pets in your home
5When cleaning your soap pot, allow the mixture to solidify and scrape it into a
6
bag to be sealed and disposed of. Keep your gloves on when cleaning and addsome vinegar to your washing up water to help thoroughly clean your utensils.
Don’t be tempted to use your soap until you are sure that it has cured, if in doubttest it with a ph strip to make sure it is somewhere between 7-10. If you made amistake and after 4 weeks it measures above 10 don’t just throw it away as you canrebatch soap.

The full rundown of the item that i recommend can be found at wholesale soap sup-plies and equipment. some of them you will have already, some you can make andsome you will need to purchase. These item are not very expensive, so your setup costswill not break the bank!
• Soap mold• PH Strips• Soap Cutter and Box• Digital Scales (grams)• Large Stainless Steel Pan• Hand Whisk or Stick Blender
• 2 Candy or Lazer Themometers• 1 Old Towel• Safety Glasses and Rubber
Gloves• Large Plastic/Glass Jug• Plastic Spatula

Over the next few pages, I’ll share my basic soapmaking recipe and method that I’vemade dozens of times. It’s one of my favorite soap recipes, it’s made with simple in-gredients to make a great creamy natural soap. It holds a good hardness and lathers upvery well.
It’s also a good old fashioned lye soap recipe that makes a great base for any fragrance,colorants and exfoliates that you may wish to add.
380g Shortening (vegetable fat)330g Coconut Oil300g Olive Oil310g Mineral Water (distilled water)145g Soapmaking Lye (caustic soda)25ml (6 tsp) Essential Oil or Fragrance Oil
This should produce a batch of around 12 standard bars or 10 chunkier ones
You can adjust the scent volume here. I’ve set it at 25ml which is 2% of all the oilsand water added together. Depending on your preference you can increase it up to 5%which in this recipe would be 66ml Max. That however would be very strong depend-ing on what oils you are choosing, so I recommend starting at 2%.

First, you will need to measure your soap making ingredients carefully. Do Not try toguess or use cup sizes. When you make soap it needs the correct mixture to completethe saponification process. Use either grams or ounces, do not mix the two. We reallyneed precision here.
I prefer grams as I find it much more accurate, if you need to convert ounces into gramsfor any reason simply multiply by 28.35. More information on measuring, easy conver-sion and other cosmetic tips can be found here.

Prepare a soap mold. If you don’t have a specific soap mold, then any good size con-tainer will do. Sturdy plastic containers that still have enough give to ease the soap outmake the best containers because you don’t have to line them. Recently I’ve been usingsilicon molds as its so much easier to remove the soap.
A quick grease round with a little solid oil from the recipe, and they’re good to go.Glass, wood, ceramic or cardboard all lined with freezer/butcher paper will also makesuitable molds. Avoid using any metal molds unless you can be sure they are stainlesssteel.
TIP! To get a good idea of the size of mold needed add together the oils and water inthe recipe and then fill a mold with that amount of water.
The best way to line your mold when using the freezer/butcher paper is to cut twostrips, one to go across the width of your box and the other going across the length.Leave enough on the paper to fold over the edges

Put on protective eyewear, mask, apron and long rubber gloves. Pour the mineral wa-ter into a large glass/sturdy plastic jug or plastic bucket. Slowly, add the lye (causticsoda), using a plastic spatula to stir until dissolved.
The water will start to heat when it reacts with the lye, it will need to cool until itreaches the required temperature (see specific recipe).
In a large stainless steel or enamel pan, gently melt any oils or waxes over a low heat.(this does not include essential or fragrance oils). Use two candy thermometers placeone in the caustic soda mix and one in the oil mix. Alternativly you can use an infra-red thermometer gun like I do, it’s much easier.

When both mixtures reach an equal temperature (see specific recipe) begin to stir thelye into the oil, do this SLOWLY, and remember that you should always add lye toother materials, not the other way around, pouring a liquid into lye crystals can causeit to splash and can burn your skin.

Using a stick blender begin carefully stirring your mixture for several minutes, slowlyat first without switching the blender on.
Reaching The ‘Trace’ Stage: Then give your mixture a few short 3 second bursts, stir-ring between each burst until the mixture thickens slightly and looks a little like thickcustard.
This is called “trace” and it’s a sign that your soap is turning out well. By dipping yourspatula or spoon into the mixture and dribbling a small amount back into the mix. Itshould leave a light “trace” behind (like a small mound of soap that takes a few sec-onds to blend back within the mixture.) This is when you know you’ve reached the“trace” stage.
Or by hand which will take a little longer, maybe up to an hour but with consistentslow even stirring with a hand whisk you will eventually reach the trace stage.

And now is usually the time to add any extras like flowers, fragrance, essential oils,colors or textures into your soap recipe. But check the individual recipe to be sure.
There are so many things that you can add when you make your own soap, check outsome of interesting soap making ingredients and textures on our website.
TIP! I’ve noticed that soap making recipes containing beeswax usually reach thetrace stage after about 15 minutes, so they’re worth looking out for.
Although a hand whisk can be used to reach the trace stage it can be quite time-con-suming sometimes taking up to an hour to reach the trace stage. A stick blender cando the same task in just a few minutes.
Whether you are learning how to make your own soap for gifts, or just for personaluse I am fairly confident once you start using your soap, the store bought stuff willbe a thing of the past so a cheap stickblender will be well worth the investment.
When I started my soapmaking journey I bought the cheapest stick blender I couldfind and it works great!

Pour your soap into the mold and smooth out using a spatula.
Place a piece of cardboard over the top of it and wrap an old towel around the wholething to keep the heat in.

Allow your soap to set for 24 hours in a warm place until the soap has hardened. Don’tbe too alarmed if you take a quick peek a your soap and it looks translucent; this iscalled the gel stage and is perfectly natural
When the soap has hardened (usually around 24 hrs), remove from the mold and allowit to air for a few hours..
As a general rule it should be about the consistency of hard cheese before you cutit. The soap will still be caustic at this point so I would recommend still handlingit with gloves for the first 48 hours..

Cut your soap into blocks, for this you can simply cut by hand for a more rugged lookor use your soap cutting box for something more symmetrical.
Next cover/line a cooling rack, tray or box with a cloth and stand the soap blocksupright without touching each other so the air can circulate. Store them in a dry venti-lated place turning them each day in the first week and then every other day thereafterfor 4 weeks.
This time continues the curing process ensuring that all of the lye has been neutralizedand water evaporated. During this time you may find a fine dust on

All of the cold process soap recipes on Savvyhomemade allow 5% superfatting. Thisensures correct saponification (the reaction that creates soap) making sure there iszero free caustic alkali remaining and a good ph balance is achieved.
As long as you have measured your ingredients correctly you have nothing to worryabout. To be sure always test soap using a ph strip to make sure it is somewhere be-tween 7-10.
If your soap does not harden or just hasn’t turned out quite as well as you expectedit to, or maybe you forgot to add something. Then you may be able to rebatch it bymelting it down and adding any missing, or miss calculated ingredients.
If your batch is too lye heavy, making it very brittle and crumbly or if your lye andoils have separated (you will notice a layer of liquid on the top or underneath thesoap) I would encourage you to discard it.

We have so many homemade lye soap recipes that you can make right away, but have you con-sidered experimenting a little?
Working with SAP values and calculating the amount of Lye or water required may seem alittle complicated at first glance but it really isn’t.
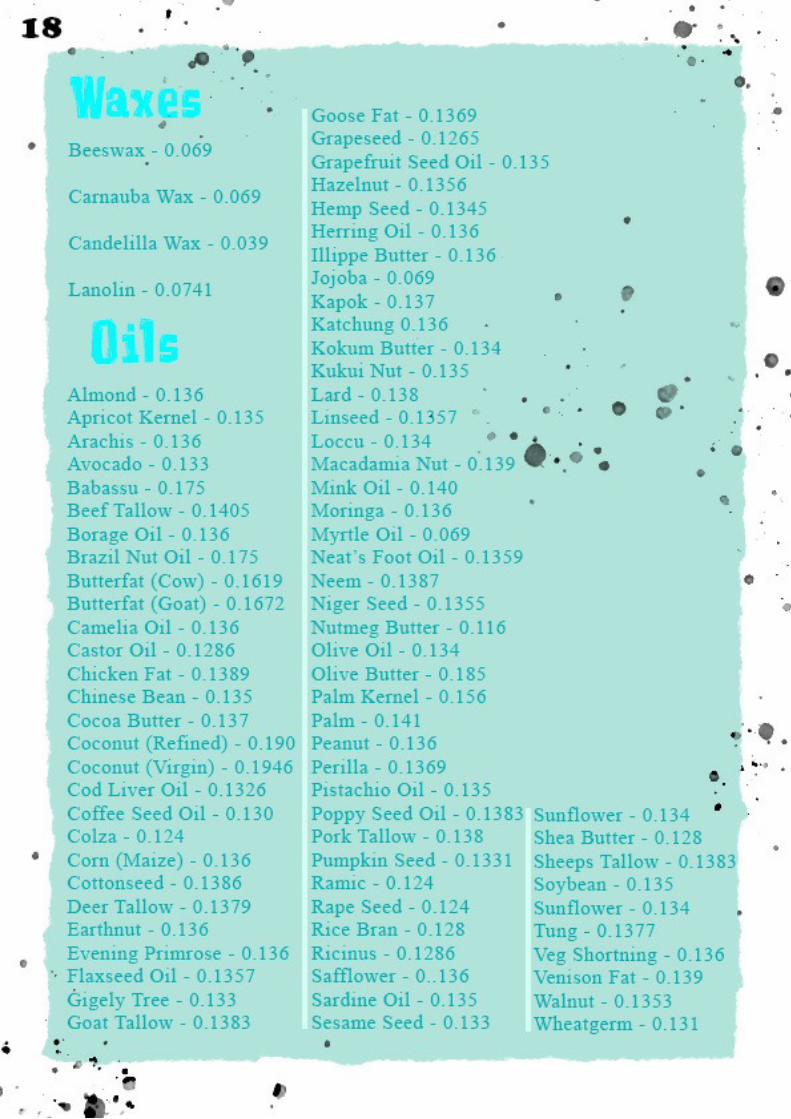
All you actually need are the Sap values of the oils you are using which I’ll give in the chartbelow. With these values and a calculator (which most people have on their computers andmobiles!) you can experiment with soapmaking and its so much fun!
By working this through myself I gained a better understanding of lye soap recipes and how tomake make homemade soap.
The most important element when making lye soap is the SAP Value (Saponificationvalue) of your oil. Saponification is the reaction that takes place to make your soap. TheSAP Value of a chosen oil allows you to calculate the correct amount of Lye (SodiumHydroxide – NaOH) needed to fully saponify it when making homemade soap usingcold process.
If you search online you will find a host of online soap calculators, you can even down-load some of them. But to me they all seem very complicated… Folks this is not
Simply decide on the weight of each oil in your lye soap recipe then multiply each oil bythe given factor in the chart below to see how much Lye (alkali) you need to add.
You can use either grams or ounces, I use grams for soapmaking as its more accurate,check out more info on measuring here. First calculate the lye for each oil independent-ly, then add them all together to get an overall weight of lye required to saponify the oils.

Ingredients here are taken from my Basic Soap Recipe, we simply multiply thegrams of each oil by the SAP value in the chart below.
Olive Oil – 500g X 0.134 = 67g Lye.Coconut Oil – 300g X 0.190 = 57g Lye.Palm Oil – 200g X 0.141 = 28.2g Lye.Total Lye Required To Saponify Oils = 152.2g
So far we have simply calculated that it takes exactly 152.2g of Lye to saponify ouroils, but we cant actually use the whole 152g, there would be zero room for error.The calculation is so exact that if we stick to 152g once all the ingredients were com-pletely saponified your soap could still be too caustic and harsh. Here’s how we usesupperfatting to help…
After you have calculated the exact amount of lye required to saponify the oils inyour lye soap recipe you need to discount this by between 2% and 10% (I recommend5%). This will leave a little excess fat remaining in your soap and ensure all of thecaustic alkali has been eradicated. If you don’t use superfatting the soap could be fartoo harsh and still caustic.
The key is to have a nice balance. If you end up with too much oil/fat left unsaponifiedyou could be left with a soap that’s too soft. If you have too little left it can be way tooharsh.
in general for a softer soap discount more, for harder soap discount less. To be surethat you have a good PH balance always test soap using a ph strip to make sure it issomewhere between 7-10.
In Our Basic Soap Example:The Lye Required To Saponify was 152.2g
5% of 152.2g = 7.61g152.2 minus 7.61 = 144.59g
Lye To Add = 145g (rounded up from 144.59g)
STOP!We cant use 152g of Lye, there is no room for error. The calculation is so exact that ifwe stick to 152g once all the ingredients were completely saponified your soap couldstill be too caustic and harsh.

The other element is the amount of water used, Lye is added to this water before mix-ing with the oils and as a general rule you should be using be between 30% and 35%of the total weight of all the other ingredients used.
In Our Basic Soap Example:All oils weighed 1000g
After superfatting Lye was calculated at 145gTotal Weight = 1145g
33% or divide by 3 = 381gWater To Add = 381
Take a look at the sap chart on the next page. You can use it as a reference forcalculating the amount of lye you’ll need for sap. I keep a copy on my fridge just so Ican get to it easily!