colorado community college system web view · 2016-06-10the “ship to address...
TRANSCRIPT

Colorado Community College SystemColorado Community College System
PURCHASING TRAINING MANUALPURCHASING TRAINING MANUAL
Updated February 2009

Table of ContentsTable of ContentsGeneral InformationBanner Purchasing Terms of Note 3Common Function Keys 4Creating or Modifying Clauses 4
Maintenance TablesCreating or Modifying Ship to Codes 5Creating Buyer Codes 5Modifying Buyer Codes 6Other Maintenance Tables 6Entering Document & Item Text 7
Taking Care of VendorsVendor Data Standards 9Searching for a Vendor using GUIALTI 10Searching for a Vendor using FTIIDEN 11Pulling a Vendor from the Master File 12Creating a New Vendor 13Vendor Maintenance - Alternate ID/Changing Info/Inactivating/Terminating 15
Working with POsCreating a Regular or Standing Purchase Order Using Document Level
or Commodity Level Accounting 16Copying Information to a New Purchase Order 18Creating a Blanket Order 19Canceling a Purchase/Blanket Order 20Closing a Purchase Order and Clearing Encumbrances 21Creating a Change Order 22Canceling a Change Order 25Printing a Regular/Standing/Blanket Purchase Order or a Change Order 26
Handling ReceivingReceiving Purchased Goods 27Adjusting Completed Goods Receiver Documents 29Returning Purchased Goods 30
Reports and QueriesBanner Reports and Schedule 31COGNOS Reports and Schedule 33Other Forms - Tables - Reports 33Running the Posting Process 34Query Information 34Querying Document History on FOIDOCH 35
2

GENERAL INFORMATION
Banner Purchasing: Terms of NoteAuto-Help Line A primary trouble-shooting aide. The Auto-Help Line is at the bottom left
corner of every screen, and will display error information if there was a problem on the page and prompts for what to do in many cases.
Block An isolated area of related information. Blocks will show as divided by borders on a single page, or divided by tabs on screens with multiple pages, and you can move forward in the form by using the Next Block function.
Commit Alternate way to say Save (as in Save your file).Commodity A good or service being purchased.Commodity Code A unique number assigned to each commodity which identifies the
commodity in Banner and allows you to pull up full commodity information.Commodity Level Accounting
A way of processing purchase orders in which each “line” (commodity) of the purchase order will have its own accounting distribution. All capital purchase orders must be done using this type of accounting.
Deferred Editing A feature which defers editing of transactions until posting. This speeds up your front-end system processing time but does not show you errors when entering documents.
Document Level Accounting
A way of processing purchase orders in which the accounting distribution entered on the purchase order applies to the whole purchase order.
ERP Enterprise Resource Planning. The name for the Finance piece of Banner, in use to refer to the Banner implementation as a whole at CCCS.
Fixed Asset Property or item of a lasting nature owned by the institution. Fixed assets are assets that cannot be instantly liquidated. Examples of fixed assets include real estate and equipment.
FOAPAL: Fund, Organization, Account, Program, Activity, Location
Six budgetary levels: Organization is what we have previously referred to as Budget Cost Center, and Account is what we have previously referred to as Object or Expenditure codes.
NSF Insufficient Funds notice
If NSF is marked, the system checks if there are sufficient funds in your account to pay for the order, if not, it will not allow you to proceed.
Purchase Order Types
◘ Regular Purchase Order – Encumbers funds and all commodities have quantity and unit price.◘Standing Purchase Order – Encumbers funds, no receiving is required to pay this. Recommend you use for leases and rentals.◘Blanket Order - A Non-Encumbering Purchase Order, recommend you use for Capital Construction which then must be encumbered in COFRS.
Remaining Commodity Amount
Difference between the commodity and accounting FOAPAL totals. Document level accounting, which CCCS uses, displays the amount for the document as a whole.
Reservation A reservation is created when a requisition is complete and is liquidated when a PO is created (which encumbers the funds). It represents an internal request for expenditures against budget.
Vendor A person or company selling goods or providing services to your institution.
VPD Virtual Private Database
3

Common Function Keys
Keystroke Result Keystroke ResultTab Next Field Shift-Tab Previous Field
Ctrl + U Clear Field Ctrl + E Edit
Up Arrow Up Down Arrow Down
Ctrl-H Help Enter Return
Shift + F1 Display Error Ctrl + Q Exit
Shift + F3 Next Prim. Key Shift + F4 Clear Record
Shift + F5 Clear Block Shift + F6 Delete Record
Shift + F7 Clear Form Shift + F8 Print
Ctrl + F1 Show Keys F2 List Tab pages
F3 Duplicate Item F4 Dup. Record
F5 Block Menu F6 Insert Record
F7 Enter Query F8 Execute Query
F9 List of Values F10 Commit/Save
Shift + Up Previous Record Shift + Down Next Record
Ctrl + PageUp Previous Block Ctrl + PageDown Next Block
Creating or Modifying Clauses The “Clause Entry FOACLAU” form is used to modify or create clauses within Banner. Clauses are used to enter standard text/multiple lines of text without having to retype it. This is used when entering document and item text within a form. Step Action1 Access the “Clause Entry FOACLAU” form.
2Enter an existing or new clause in the Clause Number field or click on the L.O.V. button next to the field to search for/select an existing clause.
3 Perform a Next Block function. If you are creating a new clause you will see the message, “FRM-40350: Query caused no records to be retrieved.” Click “OK.”
4 Enter a brief description of this clause in the Description field. Mandatory field max 34 characters
5 Perform a Next Block function.6 Enter your standard text/clause text in the fields below the header “Clause Text.” Arrow
down or click on next record to complete the line. It will default in increments of 10.7 Click the save icon to save this clause in Banner.8 Click the “X” to exit this form or Rollback to enter a new clause.
Sample ClausesPer Telephone Quote Insurance certificate required prior to work beginningPer State Mandatory Pricing Agreement #_____________ Per State Pricing Agreement #__________________
The College will not be accepting deliveries from Dec 24, 20__ - Jan __, 20___; all campuses will be closed.
This Purchase Order is subject to the terms & conditions issued by the State of Colorado, revised 10/25/06, attached as pages 2 and 3.
Due to the closing of our fiscal year this order must be received and invoiced prior to June ___, 20___. Failure to comply with this requirement or make previous arrangements with the Purchasing Agent will result in cancellation of the order without further correspondence.
I state that I accept the Terms & Conditions revised 10/25/06, attached as pages 2 & 3 to this purchase order._______________________________________________
4

MAINTENANCE TABLES
Creating or Modifying Ship To Codes
The “Ship to Address Maintenance FTMSHIP” form is used to modify or create ship to addresses within Banner. By establishing multiple ship to addresses, you can identify the appropriate address to ship items to on a purchase order.
Step Action1 Access the “Ship to Address Maintenance FTMSHIP” form.2 Enter an existing or new ship to code in the Ship To Code field or click on the L.O.V. button
next to the field to search for/select an existing ship to code.3 Perform a Next Block function. If you are creating a new ship to code you will see the
message, “FRM-40350: Query caused no records to be retrieved.” Click “OK.” 4 Enter the first line of the address in the Address Line 1 field. Mandatory field5 Complete all other fields as appropriate.6 Click the save icon to save this code in Banner.7 Click the “X” to exit this form.
Creating Buyer Codes
The “Buyer Code Maintenance FTMBUYR” form is used to create buyers within Banner.
Step Action1 Access the “Buyer Code Maintenance FTMBUYR” form.2 Enter the new buyer code and the buyer's description in the Buyer field.3 Perform a Next Block function.4 Enter the date the buyer code will be active in the Start Date field.5 Enter the date in the Termination Date field when the buyer code will no longer be available
for use. Only enter a date if appropriate.6 Go to the LVPO Indicator (Low Value Purchase Order) field and enter “Y” (Yes) if you
would like to set a low value purchase order limit to this buyer. Only enter a “Y” if appropriate.
7 In the LVPO Dollar Amount field, enter the dollar limit for this buyer.The purchase order will be stopped at the balancing/completion stage when the net PO amount is greater than the LVPO limit.
8 Go to the Telephone fields and enter the buyer's area code, phone number and extension.9 Perform a Next Block function.10 If you are using the “Automatic Buyer Assignment by Commodity,” select those commodities
that would apply to this buyer by clicking on the L.O.V button to search and select.11 Click the Save icon.12 Click the Exit icon.
5

Modifying Buyer Codes
Step Action1 Access the “Buyer Maintenance FTMBUYR” form.2 Click the L.O.V. button next to the Buyer field, and select the buyer you want to modify.3 Perform a Next Block function.4 Enter or change information for the buyer. 5 Click the Save icon when finished.6 Click the Exit icon.
Other Maintenance Tables
There are additional maintenance tables in Banner for Purchasing.
The following tables will be updated at the CCCS level. All requests/recommendations for changes will be addressed to the CCCS Purchasing Agent.
BANNER FORM TITLEFTMCOMM Commodity CodesFTMCRSN PO Cancellation CodesFTMFOBS FOB CodesFTMPCLS PO Classification CodesFTMRCMT Receiving Method CodesFTMRRSN Returned Goods ReasonsFTMUOMS Unit of Measure Codes
6

Entering Document and Item Text
There are numerous points in the Banner processes where you have the option to add text to explain an entry, a variance, or simply to put in a note about something to expect in regard to an order’s delivery or other aspects. We’ve marked in the procedures where you have the option to do this; here’s how you do it when it comes up.
Remember to check documents for existing text! Only use Item or Document text. Do Not use Commodity Text, it can cause problems within the system.
Step Action1 Click on “Options” from the toolbar menu on any screen with the option to add text. This will
give you a drop down box with a number of different options.2 Choose the option for either “Item Text” or “Document Text” entry.3 If you would like to enter a saved standard clause, click on the L.O.V button next to the
Modify Clause field or enter the clause name if known. If you used the L.O.V. button, select the clause you wish to use by double-clicking on the Clause field. Once you are back in the “Procurement Text Entry FOAPOXT” form the name should now be in the Modify Clause field. Perform an Insert Record to bring this text into your document. Perform a Next Block function.
4 You can enter text manually by typing in the fields below the column header Text. The default for text creation will number the lines in increments of 10. That is, the first line is number 10, the second 20, and so forth. You can override these line numbers by typing over the existing line number.
5
You have the option to either print the text on the Purchase Order or to leave it off. To have it print, make sure there is a check mark in the print box for the lines you wish to print. For no print, make sure the box is unchecked.
6 When you are satisfied with what you have typed, click Save.7 After you’ve saved your text, click the “X” icon to exit text entry and continue with your
process on the original screen. Documents with Document or Item Text entered will now show a checkmark in the Document or Item Text checkbox.
If you go back into either text entry form that has information saved it will initially appear blank. You will need to perform a Next Block in order to view/refresh any saved information.
If you have a comment of extreme brevity and do not wish it to print, an alternative option is to use the Comment field available in some forms.
7

VENDORS
Steps to successfully working with vendors in Banner:
1. Always start with a W-9.2. Begin with GUIALTI. Searching the database using a TIN/SSN is a more accurate method than
searching by name. 3. Go to FTMVEND to either pull down a vendor into your college’s Virtual Private Database (aka, VPD
or silo) or to enter a completely new vendor.4. Enter the vendor name as stated on the W-9. 5. If the vendor is a dba, enter the parent company first and the dba company second. Be sure to
enter the parent company as the owner ID when creating the dba entry.6. Don’t enter a dba unless you actually need and use that dba name.7. Common acronyms and “nick names” can be entered as alternate IDs on FOAIDEN to make
searching easier.8. Follow vendor data standards.
8

Vendor Data Standards
Vendor Data Standards have been developed in order to have a more uniform system for all institutions and to help in the prevention of duplicate information. When entering any vendor information, please refer to the examples below. A complete set of Data Standards is available from CCCS. If you have any uncertainty, please contact the System office for guidance.
DO NOT: Use “#” (pound), “%” (percent) or “,” (comma) when entering a name. Leave blank lines between Street Lines. Use a “.” (Period) when entering data. For companies with a period in their
name, leave a space in the place of the period. Start an address line with a name. DBAs should be entered separately and
linked to the parent company through the Owner ID check box. Use abbreviations or acronyms. Enter an alternate ID if needed.
DO: Enter a vendor exactly as indicated on the W-9 Use upper and lower case when entering data. Use a space in a name IF the legal spelling or format includes a space or
period. Use hyphens to separate double names. Use an “&” (ampersand) when it is part of a formal name.
Example of PersonsLast Name Jones O’Connor McPherson Smith-KellerFirst Name Amy Mary-Ann Mary AnnMiddle Initial F M JPrefixes Mr Dr Mrs Miss Rev Sr (sister) HonSuffixes Sr Jr II (the second) III (the third)
Example of Non-Persons/CorporationsCompany The Book Rack IBM Henry’s HatsSuffixes Co Corp Ltd IncAttention Lines Do not use attention linesAddress Lines PO Box 1000 100 Major St Apt Bldg Rm
Ste Dept NWCity Colorado Springs Fort MorganZip Code 80222-4439
9

Searching for a Vendor using GUIALTI
Because GUIALTI allows searches on vendors by TIN/EIN/SSN, this is the most accurate searching method. Searches may also be done using only a name.
It is important that you search for a vendor before attempting to create a new vendor in order to prevent duplications. Remember, if the vendor is already entered but the address you are ordering from is different, you will only need to add the new address to the vendor file. This can be done as you are completing the purchase order through the “Vendor Maintenance FTMVEND” form. You can also search for a vendor using the “Entity Name/ID Search FTIIDEN” form.
Step Action1 Access the “SSN/SIN Alternate ID Search GUIALTI” form.2 Enter the Tax ID Number (TIN, EIN or SSN) from the W-9 form in the SSN/SIN/TIN field.
Searching by TIN is the most accurate search method.
OR
Perform a search by entering all or part of the name or number for the field you are querying. Use the “%” before and after your search criteria as a wild card. Please keep in mind that querying is a case sensitive feature.
Example: To search for Corporate Express you could type “%Corp%” or “%Express%” or any other combination of letters within the vendor name. It is a best practice to use the “%” sign at both the beginning and end of your search criteria.
3 Execute the query in one of three ways: Execute the query by selecting “Execute” from the dropdown menu under the “Query” option on the toolbar, click on the toolbar icon “Execute Query” or hit the F8 key on your keyboard.
4 You can either use the scroll bar to the far right, the “Next Record” and “Previous Record” icons on the toolbar or your down arrow key on your keyboard to scroll up and down through the records returned by the query.
5 Note the Vendor ID number (S#)
10

Searching for a Vendor using GUIALTI
It is important that you search for a vendor before attempting to create a new vendor. Remember, if the vendor is already entered but the address you are ordering from is different, you will only need to add the new address to the vendor file. This can be done as you are completing the purchase order through the “Vendor Maintenance FTMVEND” form. Search for a vendor using the “Entity Name/ID Search FTIIDEN” form.
Step Action1 Access the “Entity Name/ID Search FTIIDEN” form.2 Remove the check mark from the box for “Vendors” by clicking on it once.
You are only querying the vendors in your institutions Virtual Private Database (VPD) if you have only the Vendor box checked.
If accessing the “Entity Name/ID Search FTIIDEN” form through another form you are automatically in query mode. In order to access the top portion of the form you will need to cancel the query by either clicking on the “Cancel Query” icon on the toolbar, hitting CTRL Q or clicking on the “X” icon one time. Click on the “Rollback” icon on the toolbar once the query has been cancelled to access the top portion of the form.
3 Insert a check mark in the box for “All” by clicking once on the empty box.4 Perform a Next Block function.5 Click on the shaded field under the column “Last Name” to search by the vendor name or a
person’s last name. You may also search using some of the other highlighted fields.6 Perform a search by entering all or part of the name or number for the field you are querying.
Use the “%” before and after your search criteria as a wild card. Please keep in mind that querying is a case sensitive feature.
Example: To search for Corporate Express you could type “%Corp%” or “%Express%” or any other combination of letters within the vendor name. It is a best practice to use the “%” sign at both the beginning and end of your search criteria.
7 Execute the query in one of three ways: Execute the query by selecting “Execute” from the dropdown menu under the “Query” option on the toolbar, click on the toolbar icon “Execute Query” or hit the F8 key on your keyboard.
8 You can either use the scroll bar to the far right, the “Next Record” and “Previous Record” icons on the toolbar or your down arrow key on your keyboard to scroll up and down through the records returned by the query.
9 At this point you should be able to determine if your vendor is entered into the Banner Vendor file based on the information you have queried.
11

Pulling a Vendor from the Master File
Pulling a vendor from the Master File brings that vendor into your institutions Virtual Private Database (VPD). This can be done through the “Vendor Maintenance FTMVEND” form.
Step Action1 Access the “FTMVEND” form. 2 Click on the L.O.V. button next to Vendor field3 Once open you are in query mode. In order to access the top portion of the form you will need
to cancel the query by either clicking on the “Cancel Query” icon on the toolbar, hitting CTRL Q or clicking on the “X” icon one time.
4 Click on the “Rollback” icon on tool bar to access the top portion of the form.5 Delete the check mark in the box for Vendors by clicking on it.6 Insert a check mark in the box for “All” by clicking once on the empty box.7 Perform a Next Block8 Click on the shaded field under the column “Last Name” to search by the vendor name or a
person’s last name. You may also search using any of the other highlighted fields.9 Perform a search by entering all or part of the name or number for the field you are querying.
Use the “%” before and after your search criteria as a wild card. Please keep in mind that querying is a case sensitive feature.Example: To search for Corporate Express you could type “%Corp%” or “%Express%” or any other combination of letters within the vendor name. It is a best practice to use the “%” sign at both the beginning and end of your search criteria.
10 Execute the query in one of three ways: Execute the query by selecting “Execute” from the dropdown menu under the “Query” option on the toolbar, click on the toolbar icon “Execute Query” or hit the F8 key on your keyboard.
11 You can either use the scroll bar to the far right, the “Next Record” and “Previous Record” icons on the toolbar or your down arrow key on your keyboard to scroll up and down through the records returned by the query.
12 Double click on vendor to bring it into the “Vendor Maintenance FTMVEND” form.13 Perform a Next Block function.14 Go to the “Address” tab to see if the address you need is in there - check this by hitting next
record or using the down arrow on your keyboard until there are no longer any addresses displayed.
15 If the address you need IS NOT there, enter that address as the next sequential number for the Address Type “PO.”
16 Click the “Save” icon.17 Exit the “Vendor Maintenance FTMVEND” form.
12

Creating a Vendor
The “Vendor Maintenance FTMVEND” form is used to add, change, or delete vendor information. All institutions are set-up for common matching when creating a vendor. This means that when you attempt to enter a new vendor, either by using the “Generate ID” icon or by entering a new vendor ID number in the Vendor field and performing a Next Block, Banner will automatically launch you into the “Common Matching Entry GOAMTCH” form. The purpose of this form is to avoid entering duplicate vendor information into Banner.
FOLLOW THE STEPS FOR SEARCHING FOR A VENDOR FIRST BEFORE CREATING!!!
Step Action1 Access the “Vendor Maintenance FTMVEND” form.2 Click the “Generate ID” icon. This will automatically launch you into the “Common Matching
Entry GOAMTCH” form. 3 Select the Matching Source you wish to use: “VENDOR NON-PERSON” if your vendor is a
corporation or “VENDOR PERSON” if your vendor is a person.4 Perform a Next Block function.5 Is the vendor you are creating a person or a corporation?
Person - Complete the Last Name, First Name and Middle Name fieldsCorporation - Complete the Non-Person Name field
6 Tab through the other fields and enter all relevant information.7 Perform a Next Block function.8 The “Common Matching Entry GOAMTCH” form will bring back all potential matches based on
the information you have entered. You can proceed in one of three ways: If you wish to update information for one of the vendors listed under “Potential Matches,”
highlight that vendor and click on the “Select ID” icon. If the vendor information you have entered does not match any of the Potential Matches
and you wish to create it as a new vendor click on the “Create New” iconIf Banner is unable to find any Potential Matches it will prompt you with the message, “No matches found, create as new?” Click “OK” if you would like to proceed with creating a new vendor.
9 Perform a Next Block function.10 Enter the date the vendor information is active in the Start Date field.
It is recommended you enter the date that Banner went live for your institution for this field. 11 Enter a date in the Termination Date field, if appropriate. Leave this field blank when creating a
new vendor.12 Set-up the address defaults information for Procurement. To do this, locate the header
“Procurement” in the “Address Defaults” information block under the “Vendor Maintenance” tab. Select “PO” from the L.O.V. button for the Type Code field and enter “1” (one) in the Sequence field.
13 If the billing address is different from the business address, select “AP” from the L.O.V. button for the Type Code and enter “1” (one) in the Sequence field under the header “Accounts Payable” in the “Address Defaults” information block under the “Vendor Maintenance” tab. If you do not complete the Type Code or Sequence fields for “Accounts Payable” in the “Address Defaults” information block, Banner will assume the address is the same as the Procurement Address Default .
13

Creating a Vendor, Continued
Step Action14 Complete the Contact, Phone and Extension fields for the primary contact if appropriate.15 Leave the default “Collects No Taxes” in the Collects Taxes field..16 The Owner ID field is only to be used if you are entering a Doing-Business-As (DBA) vendor or
when the vendor shares a 1099 Tax ID with a parent company. Click the L.O.V button next to the Owner ID field to search for and enter the parent corporation. Or type in the Vendor ID and the name will populate.
The Owner ID must have been created previously on the vendor table and also be pulled into the institutions VPD prior to selecting it as a parent company.
To choose an owner ID you will need to follow the directions on “Pulling a Vendor from the Master File”.
17 Purchasing will not populate the Discount Code field. If applicable, Accounts Payable will assess any discounts at the time of payment.
18 You can enter text for this vendor if needed. To do this, go to the drop down menu under “Options” in the toolbar and select “Text.” Follow the steps in “Entering Document and Item Text.” Once entered click the save icon and exit by clicking on the “X” icon. If text was entered, notice that the Text Exists field is now populated with a Y (Yes).
19 Select the “Additional Information” tab or perform a Next Block function.20 Do not enter the Tax ID number in the Tax ID field in the “1099 Information” block, this is filled
out by Accounts Payable. 21 Purchasing will not populate the Federal Withholding or State Withholding fields. 22 Purchasing will not populate the Base Currency field. The Currency Code in Banner will default
in as U.S. Dollars. If you select “USD” it will not allow you to proceed. 23 Purchasing will not populate the Name Type field when creating a new vendor. This field is used
to describe the origination of vendors that have been loaded into Banner24 Select the Domestic Carrier, Foreign Carrier, or None radio buttons that describes the Carrier
Type. 25 Select the In State Vendor, Out of State Vendor, or None radio button that describes State
Indicator.26 Select a payment option in the Invoice Grouping field. 27 Leave the E-Procurement Vendor field as the default of “No” as none of our institutions will
currently be using E-Procurement. 28 Click the “Save” icon.29 Select the “Vendor Types” tab or perform a Next Block function.30 Click on the L.O.V. button below Code and select all vendor types that apply. The “Vendor Type
List FTVVTYP” lists the available user-defined types.31 Click the Save icon.32 Select the “Address” tab or perform a Next Block function.33 Click on the L.O.V. button next to the Address Type field and select from the available list of
address types. Keep in mind that this may tie into the address defaults you entered in step 12.34 Enter the sequence number for the address in the Sequence Number field. Banner will assign the
next consecutive number for the chosen address type if this field is left blank.35 Enter or edit the address in the Street Line 1, Street Line 2 and Street Line 3 fields. If you
complete the Zip or Postal Code field with a valid zip code, Banner will automatically populate the City and State or Province fields avoiding steps 37-39.
14

Creating a Vendor, Continued
Step Action36 Enter or edit the city in the City field. 37 Select a State or Province by clicking on the L.O.V. button next to the State or Province field.
You may also type in the two letter code if you know it.38 Select a Zip or Postal Code by clicking on the L.O.V. button next to the Zip or Postal Code
field. You may also type in the 5 digit code if you know it.39 The County field is optional. 40 Do not complete the Nation Code field.41 Click on the L.O.V. button next to the Phone Type field, and select the appropriate phone type. 42 Enter or edit a phone number in the Telephone fields. Do not enter dashes in the phone
number. Selecting the L.O.V. button next to the Telephone fields brings up a number of tabs for entering very detailed information about a person or a vendor.
43 Perform an Insert Record function to enter a second address and repeat steps 34-43. 44 Click the Save icon. If you are using the same type code, be sure the Sequence Number field
updates with the next available number.
Alternate IDOnce you create a vendor, you can also add an alternative id (vendors may often use acronyms). For example, Colorado Correctional Industries is also known as CCI. Once you complete steps for Entering a New Vendor, exit and access FOAIDEN. - Next block, go to the Alternate ID tab, skip the name type and either type in "Name" in the ChangeType or select the LOV button and select Name. The ID will automatically populate type in the information in the Last Name field and save.
Changing Vendor Information The best approach to changing a vendor address is to add a new address and inactivate the old address. NEVER CHANGE THE EXISTING ADDRESS - if you change current vendor information you will lose the history attached to that vendor.
Changing Vendor NameFollow guide on Searching for a Vendor, then close the screen and go to FOAIDEN using the vendor selected, click next block, tab down to Non-Person, click in Name field, enter new name and click Save. Close form and repeat Step 1) to ensure all changes have been saved. Note: When a search is done by following Step 1 and using the old name to search, it will come up with an “N” in the Change Indicator to show the name has been changed. If you click on the old name, it will populate the name field in FTMVEND with the new name.
Inactivating an AddressIf the address change is permanent, you can inactivate an address by accessing the vendor using the FTMVEND form. Click on the “Inactivate Address” box on the address tab. Make sure when you do this, you are looking at the address you want to inactivate.
Terminating a VendorTo terminate a vendor you will need to update the record using the FTMVEND form. On the Vendor Maintenance Tab, use the “termination date field”.
15

PURCHASE ORDERS
Creating a Regular or Standing Purchase Order Using Document Level or Commodity Level Accounting
Information entered in the Comments field will be passed from the Purchase Order through the Change Order, and can be used for brief internal notes without having to access Document Text.
Before you begin the purchase order creation, make sure the Vendor you wish to use is already set up in the “Vendor Maintenance FTMVEND” form.
Step Action1 Access the “Purchase Order FPAPURR” form.2 Leave the Purchase Order field blank to automatically generate the next purchase order number. 3 Perform a Next Block function. The Purchase Order field will read “NEXT” until data is saved. 4 Leave the Blanket Order field blank.5 The Order Type field will default to Regular. This will create a regular Purchase Order. Select
“Standing” if this is a Standing Purchase Order that does not use quantities. 6 Change the order date in the Order Date field, if appropriate.7 Change the transaction date in the Transaction Date field, if appropriate.8 Enter an estimated delivery date in the Delivery Date field. The delivery date must be the same
as or later than the order date. This is a REQUIRED FIELD and it will not let proceed without filling in this date.
9 If you have brief comments associated with this purchase order enter them in the Comments field. These will not print out on the document.
10 If you want this PO to use Commodity Level Accounting, uncheck the box for Document Level Accounting.
11 Enter in a Buyer Code or click on the L.O.V. button to search for/select one. This is a REQUIRED FIELD, it will not allow you to proceed until a valid buyer code is entered.
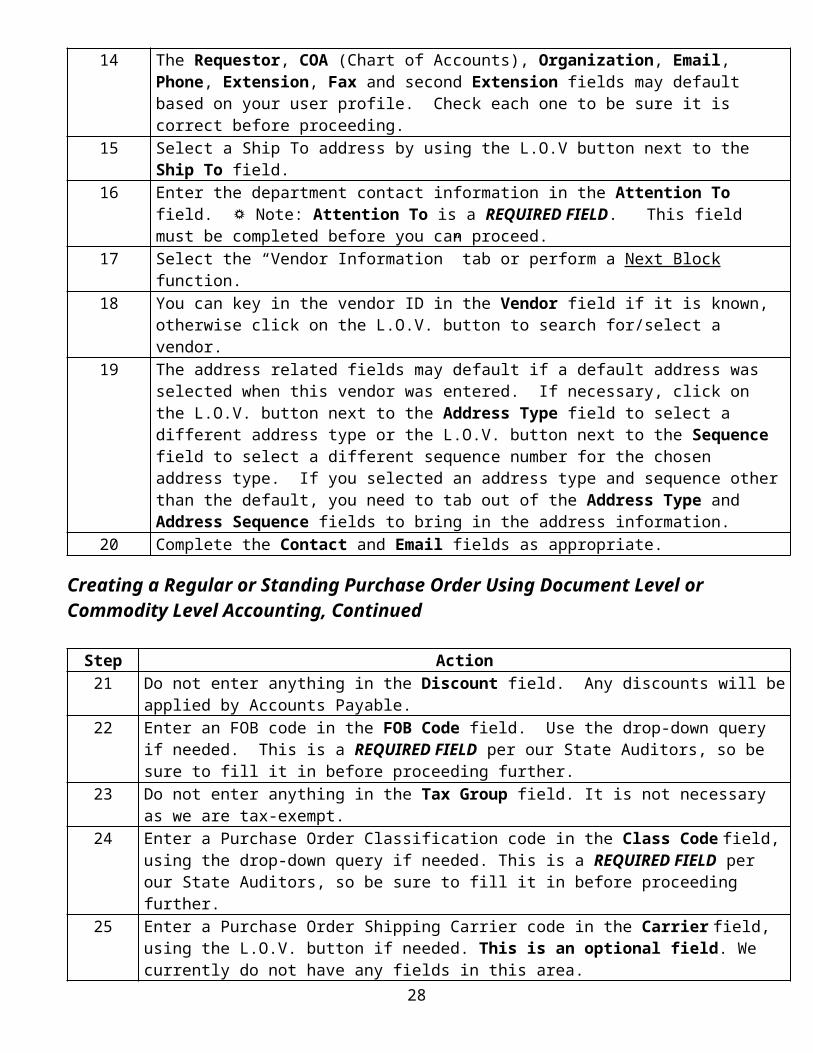
12 Select the “Requestor/Delivery Information” tab or perform a Next Block function.13 Enter the requestor in the Requestor field; if appropriate.14 The Requestor, COA (Chart of Accounts), Organization, Email, Phone, Extension, Fax and
second Extension fields may default based on your user profile. Check each one to be sure it is correct before proceeding.
15 Select a Ship To address by using the L.O.V button next to the Ship To field. 16 Enter the department contact information in the Attention To field. ☼ Note: Attention To is a
REQUIRED FIELD. This field must be completed before you can proceed.17 Select the “Vendor Information” tab or perform a Next Block function.18 You can key in the vendor ID in the Vendor field if it is known, otherwise click on the L.O.V.
button to search for/select a vendor. 19 The address related fields may default if a default address was selected when this vendor was
entered. If necessary, click on the L.O.V. button next to the Address Type field to select a different address type or the L.O.V. button next to the Sequence field to select a different sequence number for the chosen address type. If you selected an address type and sequence other than the default, you need to tab out of the Address Type and Address Sequence fields to bring in the address information.
20 Complete the Contact and Email fields as appropriate.
16

Creating a Regular or Standing Purchase Order Using Document Level or Commodity Level Accounting, Continued
Step Action21 Do not enter anything in the Discount field. Any discounts will be applied by Accounts Payable.22 Enter an FOB code in the FOB Code field. Use the drop-down query if needed. This is a
REQUIRED FIELD per our State Auditors, so be sure to fill it in before proceeding further.23 Do not enter anything in the Tax Group field. It is not necessary as we are tax-exempt.24 Enter a Purchase Order Classification code in the Class Code field, using the drop-down query if
needed. This is a REQUIRED FIELD per our State Auditors, so be sure to fill it in before proceeding further.
25 Enter a Purchase Order Shipping Carrier code in the Carrier field, using the L.O.V. button if needed. This is an optional field. We currently do not have any fields in this area.
26 Do not enter anything in the Currency field. The Currency field will default to U.S. Dollars. If you select “USD” from the drop down menu it will not let you proceed.
27 You can enter document text for this purchase order if needed. To do this, go to the drop down menu under “Options” in the toolbar and select “Document Text.” Follow the steps in “Entering Document and Item Text.
28 Select the “Commodity/Accounting” tab or perform a Next Block function. *Reminder: Always add a line for shipping/receiving unless the quote includes this cost.
29 Enter a commodity code in the Commodity field if it is known. Otherwise, click on the L.O.V. button above the field to search for/select a commodity code. You can also click on the L.O.V. button above the Description field to search for/select the commodity code by description. This is a REQUIRED FIELD. Once you have selected a commodity code you can override what has defaulted in the Description field.
30 Enter a unit of measure in the U/M field, using the L.O.V. button if necessary.31 Tab to the Quantity field and enter the amount requested.32 Tab to the Unit Price field and enter the price per unit. If this is a Standing Order complete the
Amount field.33 Tab to the Discount field and enter any discounts that may apply to this line item. 34 Tab to the Additional field and enter any additional freight charges if applicable.35 You can enter Item Text or Commodity Text for this purchase order if needed. To do this, go to the
drop down menu under “Options” in the toolbar and select “Item Text” or Commodity Text.” Follow the steps in “Entering Document and Item Text.”If using commodity level accounting follow steps 29-35 above then hit next block. Type in the FOAP or tab through and save. Hit previous block, enter commodity information and then repeat steps for each commodity line. (Commodity Level Accounting ties each line to the FOAP string.)
36 To enter more than one commodity, perform a Next Record function or use your down arrow key. Repeat steps 2-8. If you have performed a Next Record and have not entered any information Banner will not let you proceed. You must remove the record by clicking on “Record” from the toolbar and selecting “Remove” from the drop down. Make sure you are on the line you wish to remove.
37 Perform a Next Block function. 38 Tab through the COA (Chart of Accounts), Year, Fund, Orgn (Organization) and Prog (Program)
fields will default based on your user profile. If you need to change your organization use the drop L.O.V. button to search for the one you need. The Fund and Program will automatically change with the selection of another organization.
39 You can click on the L.O.V. button above each field to correct your Fund, Orgn and Prog information if the default is not correct. The accounting code will automatically load.
17

Creating a Regular or Standing Purchase Order Using Document Level or Commodity Level Accounting, Continued
Step Action40 Enter the amount to be charged to this FOAP in the field next to the Extended row under the USD
column header. Tab through this field to default in the total of all of the commodities. 41 If you are applying the expense to more than one FOAP perform a Next Record and repeat the
previous four steps for each additional FOAP to be charged.42 You may also assign a percentage of all commodities to separate FOAPS by checking the box next to
the Extended row under the column header % and entering in the percentage in the field under the column header USD.
43 Another feature is applying any discounts or entering any additional charges to the individual FOAPS by entering them in the Discount and Additional fields under the column header USD. You can also enter these as percentages by following the same instructions in the previous step for these respective fields.
44 Select the “Balancing/Completion” tab or perform a Next Block function.45 Review the Header, Commodity, and Accounting amounts.46 Are these amounts correct and balanced? Look to the four fields under the column header Status to
see if the Approved Amount, Discount Amount and any Additional Amount fields are balanced. 47 If these amounts are in balance, click the Complete button. If you would like to save this document
and return back to edit it at a later time click on the icon for In Process. The status line at the bottom left of the screen will read ”Inventory Purchase Order PXXXXXXX has been completed and approved,” where PXXXXXXX refers to the number assigned to your document. Note the number generated for your Purchase Order. If the generation failed for any reason, the status line will let you know if it has been put into suspense.
*** The Banner solution for the FRS Blanket order is the Standing order. One pitfall of the Standing Order is that it doesn’t require receiving to pay – once an invoice is posted, it will pay with no 3-way match.
***The standardization decision is that all colleges will use the Standing Order. Before AP enters an invoice on a standing order they must have some type of backup documentation from the end user showing they did receive the items and the invoice is okay to pay. **Each college will need to adjust their receiving policy to include this requirement for Standing Orders.
Copying Information to a New Purchase Order
Step Action1 Access the “Purchase Order FPAPURR” form.2 Leave the Purchase Order field blank to get the next system-generated number.3 Click on the “Copy” icon, located next to the Purchase Order field.4 Key the Purchase Order number you want to copy from in the Purchase Order field within the Copy
From pop up box. Click on the L.O.V button next to the Purchase Order field if you wish to search/select from the existing purchase orders.
5 If you are satisfied with your selection click “OK.” If you wish to cancel click “Cancel.” You may need to tab out of the Purchase Order field in order to refresh the “OK” option. All suspense flags are set to Y. You must navigate through the new Purchase Order to remove the document from suspense and complete it. The copy functionality will not check or update available balances until you navigate through the form.
6 Continue on with the copied purchase order by following the steps in “Creating a Regular or Standing Purchase Order Using Document Level or Commodity Level Accounting.”
18

Creating a Blanket Order
The “Blanket Order FPABLAR” form is used to track quantities and dollar amounts expended for a contract with a specific vendor. It is not used to encumber monies from which to draw down; use the standing purchase order option in the “Purchase Order FPAPURR” form if you wish to encumber funds.
Step Action1 Access the “Blanket Order FPABLAR” form.2 Enter a unique number of your own. 3 You can key in the vendor ID in the Vendor field if it is known, otherwise click on the L.O.V.
button to search for/select a vendor. 4 Perform a Next Block function.5 Change the date in the Order Date field, if appropriate. 6 Enter the date the Blanket Order will be terminated in the Termination Date field. This is a
REQUIRED FIELD.7 Enter in a Buyer Code or click on the L.O.V. button to search for/select one. This is a
REQUIRED FIELD, it will not allow you to proceed until a valid buyer code is been entered.8 Do not enter anything in the Discount Code field.9 Enter any freight charges in the Additional Amount field.10 Select the appropriate option from the Document Control field pull-down list. This field
indicates whether the system tracks and controls the Blanket Order at the entire document level. Since all CCCS tracking is at the document level, leave this field set as “Total.”
11 Enter a Purchase Order Classification code in the Class Code field. Click on the L.O.V. button to select a classification code if needed. This is a REQUIRED FIELD.
12 Leave the Currency field blank. The Currency field will default to U.S. Dollars. If you select “USD” Banner will not allow you to proceed.
13 You can enter Document Text for this blanket order if needed. To do this, go to the drop down menu under “Options” in the toolbar and select “Item Text” or Commodity Text.” Follow the steps in “Entering Document and Item Text.”
14 Perform a Next Block function.15 Select “Shipping Information” from the “Options” menu or perform a Next Block function.16 Enter an FOB code in the FOB Code field. Click on the L.O.V. button to search for/select an
FOB Code if needed. This is a REQUIRED FIELD. 17 Select a ship to address in the Ship Code field. Click on the L.O.V. button to select a Ship Code if
needed. 18 The address related fields may default if a default address was selected when this vendor was
entered. If necessary, click on the L.O.V. button next to the Address Type field to select a different address type or the L.O.V. button next to the Sequence field to select a different sequence number for the chosen address type.
19 Perform a Next Block function. . *Reminder: Always add a line for shipping/receiving unless the quote includes this cost.
20 Enter a commodity code in the Commodity Code field if it is known. Otherwise, click on the L.O.V. button next to the field to search for/select a commodity code. You can also click on the L.O.V. button next to the Commodity Description field to search for/select the commodity code by description. This is a REQUIRED FIELD. Once you have selected a commodity code you can override what has defaulted in the Commodity Description field.
21 Enter a unit of measure in the U/M field, using the L.O.V. button if necessary.
19

Creating a Blanket Order, Continued
Step Action22 Tab to the Quantity field and enter the amount requested.23 Tab to the Unit Price field and enter the price per unit.24 You can enter Line Item Text for this blanket order if needed. To do this, go to the drop down
menu under “Options” in the toolbar and select “Line Item Text”. Follow the steps in “Entering Document and Item Text.”
25 To enter more than one commodity, perform a Next Record function or use your down arrow key. Repeat steps 1-5. If you have performed a Next Record and have not entered any information Banner will not let you proceed. You must remove the record by clicking on “Record” from the toolbar and selecting “Remove” from the drop down. Make sure you are on the line you wish to remove.
26 Perform a Next Block function.27 If you would like to complete this blanket order, click on the Complete button. If you would like
to save this document and return back to edit it at a later time click on the icon for In Process. The status line at the bottom left of the screen will read “Blanket Order PXXXXXXX has been completed” where PXXXXXXX refers to the number assigned to your document. Note the number generated for your Blanket Order. If the generation failed for any reason, the status line will let you know if it has been put into suspense.
Canceling a Purchase/Blanket Order
The “Purchase/Blanket Order Cancel FPAPDEL” form is used to permanently cancel Purchase Orders and Blanket Orders that have been previously completed, approved, and posted within the Banner system. The original Purchase Orders will be reversed, if all Change Orders have been cancelled. Canceling an order will prevent any further activity against the document.
Step Action1 Access the “Purchase/Blanket Order Cancel FPAPDEL” form.2 Enter the purchase or blanket order number in the respective Purchase Order or Blanket Order
field or click the L.O.V button to search/select one.3 Perform a Next Block function. 4 Select “Access Cancel Date” from the “Options” menu on the toolbar or perform a Next Block
function to bring up the “Cancel Date” window. The Cancel Date field displays the current date. You can enter another date, but it must be after the original Transaction date and in an open fiscal year period.
5 Click on the L.O.V. button next to the Reason Code field, and select a reason for the cancellation. Reason Codes are user-defined.
6 Select “Document Text” from the “Options” menu to enter text, if needed.7 Select “Process Cancellation” from the “Options” menu or click the “Make Cancellation
Permanent” icon to cancel the purchase/blanket order.8 Click the Exit icon.
20

Closing a Purchase Order and Clearing Encumbrances
The "FPAEOCD" form is used to close out purchase orders that have activity on them and clear out the encumbrance.
1 Run the FGROPNE report for open encumbrances to use for this process.2 Access FPAEOCD. Enter "NEXT" in the Document Number field.3 Select Close PO Document or commodity (should default to this option) and perform a next block4 Enter your PO number and check the Close All Items AND Change Accounting fields. Perform a
next block.5 Perform a next block again to get to the Accounting Information. In the Adjust Embrance By
field, enter the amount of the encumbrance you want to be reduced (this should be the dollar amount remaining as shown on your report). Even ZERO dollar amounts need to be closed if they show up on the report. Do a Next Record and repeat the process if you have more than one line item.
6 From the Options menu, select Complete. 7 Run posting FGRACTG8
21

Creating a Change Order
The “Change Order FPACHAR” form is used to revise header, commodity, and accounting information on a completed, approved, and posted Purchase Order or Standing Order.
You cannot change Vendor, Currency code, Document Type (i.e., regular versus standing), or Document Accounting indicator without canceling and reissuing the purchase order. You can change the monetary amounts of the distributions and add new ones and/or add new commodities if needed.
Step Action1 Access the “Change Order FPACHAR” form.2 Perform one of these actions depending on your original P.O. Type:
For a Regular Purchase Order, enter the Purchase Order number in the Purchase Order field or use the L.O.V. button to query/select one.
For a Blanket Purchase Order, enter a Blanket Purchase Order in the Blanket Order field or use the L.O.V. button to query/select one.
3 Enter “NXT” in the Change Sequence Number field to generate the next change sequence number. If you want to access an incomplete Change Order, enter that change sequence number. You cannot generate a new Change Order sequence number until you complete, approve, and post the previous Change Order sequence number. There is no “E” in the NXT entered in this field.
4 Perform a Next Block function.5 Verify the Order Date, Transaction Date, Delivery Date and Comments fields. Change if
necessary.6 Check the Change Accounting Only checkbox if appropriate. If this checkbox is checked, only
changes to the accounting distribution can now occur. If this checkbox is left unchecked it enables you to change all permitted fields.
7 The Purchase Order Type field will indicate whether this is a Regular or Standing order.8 Verify the option selected in the Original Document Text pull-down list; change if necessary.
Options will only show if Document Text exists.9 You may enter or modify the current document text by following the steps in “Entering Document
and Item Text.”10 Change the buyer code entered in the Buyer Code field if necessary.11 Verify the Blanket Order Termination Date (if the Purchase Order being changed references a
Blanket Order), NSF Checking and Deferred Editing fields. Change if necessary. Blanket Order items will only allow changes if you selected Blanket Order when you opened the change order.
12 Select “Requestor/Delivery Information” from the drop-down menu under “Options” in the toolbar or perform a Next Block function.
13 Verify the Requestor, COA, Organization, Email, Phone, Extension Fax, other Extension, Ship To, and Attention To fields. Make changes if necessary. Information such as the Ship To code and the Delivery Date also affect the commodity records; updating this information will cause all commodity records to be included in the Change Order, whether or not you specifically include them. Use the Commodity Supplemental Information window to change Ship To or Delivery Date by line item. When creating a Change Order for a Blanket Order, some fields in the Requestor/Delivery window will require entry, even though they were not required for the original Blanket Order.
22

Creating a Change Order, Continued
Step Action14 Select “Vendor Information” from the drop-down menu under “Options” in the toolbar or perform
a Next Block function. 15 Verify the vendor information and change, if necessary. Although you cannot change the vendor
on a Purchase Order, you can update the address code and sequence number.16 Verify the Contact, Email, Discount, FOB Code, Class Code, and Carrier fields. Make
changes if necessary.17 Select “Commodity/Accounting Information” from the drop-down menu under “Options” in the
toolbar or perform a Next Block function. 18 To change all items, put a check mark in the Change All checkbox. The Change All function is a
method for copying all of the commodities from the original Purchase Order, plus any Change Orders, to the commodity page of the Change Order.
19 To change only specific items, perform a Next Block function, highlight the item you would like to add and click the Add checkbox on the right side of the form.
20 Click the Save icon and a popup box will confirm the records have been saved. Click OK to exit this popup box.
21 Click the “X” icon to return to the “Change Order: Commodity/ Accounting” window. All commodity and accounting information you have selected will be carried forward and populated on the “Change Order FPACHAR” form.
22 Change/enter a commodity code in the Commodity field if it is known. Otherwise, click on the L.O.V. button above the field to search for a commodity code. You can also click on the L.O.V. button above the Description field to search for the commodity code by description. This is a REQUIRED FIELD. Once you have selected a commodity code you can override what has defaulted in the Description field.
23 Change/enter a unit of measure in the U/M field, using the L.O.V. button if necessary.24 Tab to the Quantity field and change/enter the amount requested.25 Tab to the Unit Price field and change/enter the price per unit.26 Tab to the Discount field and change/enter any discounts that may apply to this line item. 27 Tab to the Additional field and change/enter any additional freight charges if applicable.28 You can change/enter Item Text or Commodity Text by clicking on “Options” on the toolbar and
selecting either “Item Text” or “Commodity Text.” See “Entering Document and Item Text”29 To enter/change more than one commodity, perform a Next Record function or use your down
arrow key. Repeat steps 6-12. If you have performed a Next Record and have not entered any information Banner will not let you proceed. You must remove the record by clicking on “Record” from the toolbar and selecting “Remove” from the drop down. Make sure you are on the line you wish to remove.
30 Perform a Next Block function.31 Although you cannot delete existing accounting distributions from the Change Order because they
have already been posted by the original Purchase Order and any subsequent Change Orders, you can zero out the existing distributions, which will reverse the accounting behind them. If you are changing the existing FOAPAL information proceed to step 19. You can also change existing distributions with a new monetary amount or add new accounting distributions
23

Creating a Change Order, Continued Step Action32 If you are adding one or more additional FOAP’s perform a Next Record. Tab through the COA
(Chart of Accounts), Year, Fund, Orgn (Organization) and Prog (Program) fields will default based on your user profile. If you need to change your organization use the drop L.O.V. button to search for the one you need. The Fund and Program will automatically change with the selection of another organization.
33 You can click on the L.O.V. button above each field to correct your Fund, Orgn and Prog information if the default is not correct.
34 Search for and select the correct Acct (Account) by clicking on the L.O.V button above this field. 35 Enter/change the amount to be charged to this FOAP in the field next to the Extended row under
the USD column header. Tab through this field to default in the total of all of the commodities. You can enter a zero to clear out the information associated with an existing FOAPAL line.
36 You may also assign a percentage of all commodities to separate FOAPS by checking the box next to the Extended row under the column header % and entering in the percentage in the field under the column header USD.
37 Another feature is applying any discounts or entering any additional charges to the individual FOAPS by entering them in the Discount and Additional fields under the column header USD. You can also enter these as percentages by following the same instructions in the previous step for these respective fields.
38 If you are applying the expense to more than one FOAP perform a Next Record and repeat the previous four steps for each additional FOAP to be charged.
39 Select “Balance/Completion” from the drop-down menu under “Options” in the toolbar or perform a Next Block function.
40 Review the Header, Commodity, and Accounting amounts.41 Are these amounts correct and balanced? Looks to the four fields under the column header Status
to see if the Approved Amount, Discount Amount and any Additional Amount fields are balanced.
42 If these amounts are in balance, click the Complete button. If you would like to save this document and return back to edit it at a later time click on the icon for In Process. The status line at the bottom left of the screen will read ”Document PXXXXXXX sequence Y is completed and forwarded to the Posting process,” where PXXXXXXX refers to the original purchase order number and Y is the change order number. If the generation failed for any reason, the status line will let you know if it has been put into suspense.
*AP will have a 5% override ability on PO’s to cover cost differences that would require a Change Order be issued. This will save time for everyone and ensure timely payment to the vendor. Each AP clerk needs to aware that they should not override a PO that is the result of a Documented Quote, Bid, RFP or State Pricing Agreement where shipping has been included in the cost.
24

Canceling a Change Order
The “Change Order Cancel FPACDEL” is used to permanently cancel Change Orders. You cannot cancel Change Orders until after they have been completed, approved, and posted.
Step Action1 Access the “Change Order Cancel FPACDEL” form.2 You can key in the purchase order or blanket order number you want to cancel in the respective
Purchase Order or Blanket Order fields, otherwise click on the L.O.V. button to select the number.
3 Enter the latest Change Order sequence number in the Change Sequence Number field.4 Perform a Next Block function.5 Select “Access Cancel Date” from the Options menu on the toolbar or perform a Next Block
function to bring up the Cancel Date window. The Cancel Date field displays the current date. You can enter another date, but it must be after the original Transaction date and in an open fiscal year period.
6 Click on the L.O.V. button next to the Reason Code field, and select a reason for the cancellation.7 Select “Document Text” from the “Options” menu to enter text, if needed. Follow the steps in
“Entering Document and Line Item Text.”8 Select “Process Cancellation” from the “Options” menu or click the “Make Cancellation
Permanent” icon to cancel the Requisition.9 Click the Exit icon.
25

Printing a Regular/Standing/Blanket Purchase Order or a Change Order
To print a regular/standing/blanket purchase order access the “Purchase Order Print FPAPORD” form
Step Action1 Access the “Purchase Order Print FPAPORD” form. To print a change order access the “Change
Order Print FPACORD” form.2 Perform a Next Block function.3 In the Printer Control box, select the network Printer and Special Print information for your
college. For example, the system office is: Printer: cccspo and Special Print: po_cccs.4 Perform a Next Block function.5 01 – Purchase Order Number, Values: If this is left blank Banner will print every PO that has not
been printed. If appropriate enter the PO number you wish to print.02 – Status, Values: You can print the original PO by entering an “O” or the current PO, with changes, by typing in a “P.”03 – Purchase Order Print Option, Values: You have three options: (R) Regular, (S) standing or (B) both.04 – Include E-Procurement, Value: Set at “N” for No.
6 Enter a check mark in the “Save Parameter Set” checkbox to save your selections. This will save the parameters you set for each time you return to this form
7 Perform a Next Block function.8 Click the “Save” icon to run the job and print the PO. 9 You will get an “OK” message.10 Click on “Options” from the main toolbar and select “Review Output” from the drop down menu.11 Double-click on the “File Name” field.12 Double-click on the “…lis” file to review what was processed.
26

HANDLING RECEIVING
Receiving Purchased GoodsThe receiving process enables you to enter receipt information for items ordered through the Purchase Order process. You can receive goods based on the quantity identified on a regular Purchase Order or based on the dollar amount identified on a Standing Purchase Order.
Step Action1 Access the “Receiving Goods FPARCVD” form.2 Enter “NEXT” In the Receiver Document Code field to allow the system to generate a new
document number or click the L.O.V. button (List of Value) to launch the “Receiver/Packing Slips Validation FPIPKSL” form which will allow you to search for/select an incomplete document.
To select a document from the “Receiver/Packing Slips Validation FPIPKSL” form you can either click on the “Select” icon on the toolbar or double click in the Receiver Document, Packing Slip or Purchase Order fields for the item you wish to update.
You do not need to launch the “Receiver/Packing Slips Validation FPIPKSL” form unless you are completing a previously uncompleted document.
Make sure you don’t accidentally put any spaces before or after “NEXT” if using this method. If you do, Banner will recognize this as your document number.
3 Perform a Next Block function.4 Click on the L.O.V. button next to the Receiving Method field to search for/select a receiving
method. (Optional) 5 Click the L.O.V. button next to the Carrier field to search for/select a carrier. (Optional)6 Tab to the Date Received field to override the date displayed (will default with today’s date).
This is a REQUIRED FIELD. 7 Banner populates the Received By field from System Maintenance and enters the document
creator’s unique User ID based on your login information.8 Perform a Next Block function.9 Enter the packing slip number in the Packing Slip field. This is a REQUIRED FIELD.
If the packing slip includes the receipt of items from more than one Purchase Order, click the L.O.V. button next to the Packing Slip field to search for/select the a packing slip number that was already entered for a different Purchase Order number.
Since all packing slips do not have a number and sometimes there is no packing slip at all, it is recommended to use “PSXXXXXX” where “PS” stands for packing slip and “XXXXXX” represents your PO number.
10 Enter the Bill of Lading number in the Bill of Lading field if appropriate. (Optional)11 Perform a Next Block function.12 Enter the Purchase Order number in the Purchase Order field or click the L.O.V. button to
search for/select a completed Purchase Order. You can use one of the three forms to search for the PO number: “Purchase Order Validation,” “Purch/Blanket/Change List” or “Open PO by Vendor.”
13 If you used the L.O.V. button to search for/select a completed Purchase Order the Buyer and Vendor fields with automatically fill in. If you entered a Purchase Order number manually, tab out of the Purchase Order field to automatically populate the Buyer and Vendor fields.
14 If you are not already there, tab to the Receive Items radio button and verify that it is selected. Your cursor must be out of the Purchase Order field in order to proceed.
27
Receiving Purchased Goods, Continued
Step Action15 From the “Options” drop down menu on the toolbar select “Receive all Purchase Order Items” if
you are receiving all items for this particular Purchase Order or “Select Purchase Order Items [FPCRCVP]” if you are entering partial receiving information for this Purchase Order.
16 If you selected “Receive all Purchase Order Items” proceed to step 21. If you selected “Select Purchase Order Item [FPCRCVP]” it will launch you into the “Receiving Goods PO Item Selection FPCRCVP” form. Follow steps 17 through 20. If any receiving has previously been completed on a Purchase Order you will have to select “Receiving Goods PO Item Selection.”
17 Perform a Next Block function. This will bring up all line items for the Purchase Order for which there is remaining receiving. The first the first line item of the Purchase Order is highlighted. This information defaults in from the Purchase Order.
18 Select the line item(s) you wish to receive by checking the Add Item box to the far right by clicking inside the box. To select multiple line items, simply click this field for each line item you wish to include. You cannot fill in or change the Quantity Accepted field in this step. The numbers displayed in this field reflect previous receiving quantities for each particular line item.
19 Click the “Save” icon. A popup screen will display “FRM 40400: Transaction Complete: X records applied and saved,” where X is the number of line items you selected. Click “OK.”
20 Click the “X” icon to exit the “Receiving Goods PO Item Selection” form and return to the FPARCVD screen. A popup screen will display “Close this form?” Click “Yes.”
21 You have now returned to the “Receiving Goods FPARCVD” form. Perform a Next Block function to move on to the “Commodity FPARCVD” information area.
22 For a regular Purchase Order or Standing Order, go to the field under the column header Current for the row Received and enter the quantity of goods received for the item you are on. If this document is a Standing Order, you will only see the row headers Received and Ordered.
23 Tab to the corresponding U/M (Unit of Measure) field and it will automatically fill from the U/M specified on the Purchase Order. You can override the U/M field if the unit of measure received is different than what was specified on the Purchase Order.
24 If you are entering receiving for multiple line items use the Next Record function to access the other records and repeat steps 20 and 21. You can access the Next Record by using your down arrow key, selecting “Record” from the toolbar and choosing “Next” or by clicking the “Next Record” icon on the toolbar.
25 Have you received all the goods for each line item? Yes – check the Final Received box. No – make sure the Final Received box is empty.
If you selected “Receive all Purchase Order Items” in step 16 the Final Received box will automatically be checked.This is a per item feature. If you have three line items that you are entering receiving for you will need to check three boxes for each item individually.
26 Select “Access Completion” from the “Options” drop down menu on the toolbar or perform a Next Block function to bring up the “Completion FPARCVD” window.
27 Click Complete to complete the receiving document. Once you click on “Complete” the Auto-Hint Help line will display the message “Receiver Document YXXXXXXX has been completed.” The “YXXXXXXX” represents your document number. Once completed, you cannot make further changes to the Receiver Document. If you need to make adjustments, use the “Adjusting Completed Goods Receiver Documents” procedure.
28

28 The “Receiving Goods FPARCVD” form will refresh and the cursor will be back in the Receiver Document Code field to allow you to enter another receiving document.
29 Click the exit icon, “X” if finished.
Adjusting Completed Goods Receiver Documents
If a Receiver Document has already been created, you can adjust the goods received using the same packing slip and Purchase Order numbers.
Step Action1 Access the “Receiving Goods FPARCVD” form.2 Enter “Next” In the Receiver Document Code field to allow the system to generate number or
click the Search icon to have the system select an existing incomplete document.3 Perform a Next Block function.4 Double-click in the Receiving Method field to select a receiving method. 5 Click the L.O.V. button to search for/select a Carrier (optional).6 Tab to the Date Received field and override the date displayed if appropriate. This is a
REQUIRED FIELD.7 Enter Text if needed. 8 Perform a Next Block function.9 Enter the original packing slip number used or use the drop-down query if needed.10 Perform a Next Block function.11 Enter the original Purchase Order used or use the drop-down query if needed. The Buyer and
Vendor fields are automatically populated from the Purchase Order when you Tab forward.12 Perform a Next Block function.13 Select the Adjusted Items radio button. 14 Select “Select Purchase Order Items” from the “Options” menu. This will take you to the
“Receiving Goods PO Item Selection FPCRCVP” form.15 Perform a Next Block function. This will highlight the first line of the Purchase Order
commodity information for you to work with. The commodity information defaults from the Purchase Order.
16 Click the Add Item checkbox for the commodities that need to be adjusted.17 Click the Save icon. A popup screen will tell you that the transaction is complete, with the
number of records saved. Click OK on this screen to exit it.18 Click the “X” icon to exit the commodity list and return to the FPARCVD screen. When it asks if
you wish to close this form, answer Yes.19 Perform a Next Block function.20 For a regular Purchase Order, go to the Adjustment Quantity Received field and enter the
quantity of goods adjusted for this item. The adjustment must be a negative quantity. For additional goods received, a second Receiving Document should be done.
21 Tab to the U/M field to populate it from the Purchase Order, and change it if needed. For a regular Purchase Order, Banner converts the quantity into the Purchase Order's unit of measure as long as an equivalency record exists in the “Equivalency Maintenance FTMEQUL” form.
22 If you selected multiple commodity line items to adjust, step through each on the commodity screen by using the Next Record function or the down-arrow key, and enter the number received and unit measure of each item.
23 Perform a Next Block function.
29

Adjusting Completed Goods Receiver Documents, continued
Step Action24 Click Complete to complete the receiving document. Once you complete the document, the
Receiver Document number will be displayed on the Auto-Hint Help line and the cursor will rollback to allow you to enter another receiver.
25 Click the Exit icon. Remember your document must be posted before it is available for the next process!
Returning Purchased Goods
The “Returned Goods FPARTRN” form is used to identify returned goods for items ordered with a regular Purchase Order. Both the “Returned Goods FPARTRN” form and an adjustment entered on the “Receiving Goods FPARCVD” form update the Accepted field in the “Invoice/Credit Memo FAAINVE” form.
Step Action1 Access the “Returned Goods FPARTRN” form.2 Type in your own unique number in the Return Code field or click the Search icon to select
an incomplete return. 3 Tab to the Purchase Order Code field.4 Enter the Purchase Order code that the goods have been received on or click the Search icon to
find a Purchase Order that the goods have been received on. 5 Perform a Next Block function. 6 Enter a Carrier Code if appropriate (optional, we suggest not using).7 Review the destination information and adjust if needed.8 Select “Returned Goods Information” from the “Options” menu or perform a Next Block
function.9 Enter the Purchase Order line item number to be returned in the Item field. 10 Tab out of this field to cause the commodity information to automatically populate from the
Purchase Order.11 Tab to the Reason field and enter the reason code for this return or use the drop-down menu.12 Enter the quantity returned for this item in the Quantity Returned field. The system updates
the Quantity-To-Date Returned when the return document is saved. The Quantity-To-Date Received-Rejected field shows information from data entry on the “Receiving Goods FPARCVD” form.
13 Click the Save icon.14 Click the Exit icon.
30

REPORTS AND QUERIES
Banner Reports and Schedule
It is our recommendation you run these reports at a minimum in the timeframe indicated. Keep in mind that will all change at end of fiscal year, you will need to run more often.
Daily:Purchase Order Suspense List (FPIPORS). The “Purchase Order Suspense List FPIPORS” form/report displays a list of purchase orders that are in suspense and require additional work to complete and approve.
Incomplete Document Listing (FGRIDOC). The Incomplete Document Listing FGRIDOC form/report may be used to identify incomplete documents so that the appropriate action may be taken to complete them. You can list any combination of the types of documents listed. Enter “N” for all parameters except for “Include Purchase Orders,” Purchase Orders, enter “Y” and “D” or “U” for “Sort Option” on last parameter.
Before A Warrant:Receiving Matching Process (FABMATC). This process matches invoice information to receiving information. The report displays invoices that are completely matched, invoices awaiting receipts, and invoices that require further analysis in order for a match to be completed.
Weekly:Invoice Aging Report (FARIAGE). This report provides an aging of open invoices from 30-120 days and over.
Open Invoices Report (FAROINV). Details the invoices and credit memos that were/are open based on the “as of date” selected by the user. The report also reflects the current status of the invoice or credit memo including any pertinent check information as well as any cancelled invoice, credit memos, and/or checks. (Just enter the Chart, As of Date the last day of the month and A for Fund Option Parameter. All other parameters leave blank.)
Invoices Awaiting Receiver Report (FARIREC). This report lists invoices, commodity and receiving information for invoices awaiting the final receiving/matching process.
Monthly:Open Encumbrances Report (FGROPNE). Print header information and remaining encumbered or reserved balance amounts for selected PO’s, requisitions and general encumbrances. To remove $0.00 balance PO’s or small dollar amounts that did not encumber you can close them using Encumbrance Open/Close (FAPEOCD) or PO Batch Close Process (FPPPOBC)
As Needed:Open Purchase Orders by FOAPAL (FPIOPOF). The “Open Purchase Orders by FOAPAL FPIORQF” form/report provides an online display of open purchase orders by accounting distribution. This includes any combination of fund, organization, account, program, activity and location (FOAPAL). Just enter the chart and leave all of the FOAPAL elements blank and perform a Next Block function.
Open Purchase Orders by Buyer (FPIOPOB). The “Open Purchase Orders by Buyer FPIOPOB” form/report provides an online display of open purchase order for a specified buyer. If PO is closed, it will not show on the list. For this report/form you will need to select a buyer and perform a Next Block function.
Open Purchase Orders Report (FPROPNP). The Open Purchase Order Report FPROPNP” form/report may be used to produce a hard copy report of open purchase orders as of a particular date and sorted by purchase order type
31

followed by the purchase order number. If values are entered in the parameters that are not required, only open purchase orders corresponding to the parameters will be displayed. Otherwise, all open purchase orders for the purchase order type will be displayed. Leave parameters 1 & 2 blank and enter “B” in parameter 3.
Open Invoices by FOAPAL (FAIOINF). Provides an online display of open invoices by any combination of chart of accounts, index or FOAPAL. This form only displays those invoices that meet the specified FOAPAL criteria. (Just enter chart, leave all FOAPAL elements blank)
Vendor Alphabetical Listing Report (FARVALP). Lists vendors in alphabetical order.
Vendor History Report (FARVHST). Shows payment activity data for a vendor including check number, check date, invoice number, invoice date, PO number, invoice and check amounts and vendor total. Vendor activity is displayed on a range of dates.
Delivery Log Report (FPRDELV). Displays delivery and routing of goods received including: delivery date, address register, and description of goods.
PO Batch Close Process (FPPPBOC). Closes PO’s in batches. You can identify the documents to be effected with various parameters including a check of activity date, dollar value of encumbrance, or PO document code. All documents selected for the process will be closed and the encumbrance balance (if any) liquidated. IMPORTANT: RUN THE REPORT IN AUDIT MODE FIRST. WHEN IT IS RUN IN UPDATE MODE IT LIQUIDATES THE ENCUMBRANCES!!
Purchase Order Activity Report (FPRPURA). This report enables you to print detail and summary PO activity information for a specified period of time, vendor, or user. This report gathers the total amount of PO’s processed by each individual during the specified time period, as well as the total amount of PO’s processed on each day during the specified time period.
Receiving & Delivery Report (FPRRCDL). Used to determine the status of received and delivered commodities versus ordered commodities. If a specific PO is not specified, it displays all PO’s sorted by vendor. If a particular vendor is indicated, then all PO’s pertaining to that vendor display.
PO Receiving Status Report (FPRRCST). Lists PO’s that have packing slips but have not yet been invoiced. This report sorts by Vendor Name or Vendor Code, as specified by sort sequence parameter. The receiver document number, displayed under the DOCUMENT column, is obtained from the Packing Slip Header Table. If no purchase order documentation is indicated, you may run the report for only certain PO types.
Vendor Volumes Report (FPRVVOL). This report may be used to ascertain the volumes of business between the college and its vendors. This can be done for a specific vendor or for a specific vendor type. This report can also be defaulted to display all vendors. It displays the commodity purchase history including a description, unit of measure, the amount ordered and accepted, the unit price, quantity of approved amounts, and the extended price. It calculates and displays a total expended price for each vendor and vendor commodity activity.
Purchase Orders by Vendor (FPIOPOV). You can look at all PO’s for a vendor.
Vendor Detail History (FAIVNDH). You can look at invoice, check date and check number.
Purchase Orders by Vendor (FPIOPOV). Shows all PO’s for a vendor.
Detail Encumbrance Activity (FGIENCD). Select a PO and see the payments.
32

COGNOS Reports and Schedule
Monthly:
Vendor Ad Hoc Report. This report needs to be run and reviewed to ensure that no vendors were added to the database by individuals who work in the AP side of the house. While you are reviewing, watch for address errors – you can go in and fix those as well to keep the database clean. Sign and date that you have reviewed, this is a requirement of the State Controllers Office.
Quarterly:Vendor Type Mismatch - Minority and Women Owned Businesses. This report is run to make sure your minority information is matching all the other silo’s. You run this and update your silo BEFORE you run the Minority and Woman report. Once you get the report for your school, update the vendor’s in your database. You will need to wait for the overnight process to run for the new information to be posted to COGNOS.
Minority and Women. You use this report to pull your minority usage numbers as a part of your reporting requirements to State Purchasing.
Other Available Forms - Tables - Reports
FPA - Finance Purchasing Application FTM - Finance Table Maintenance FPI - Finance Purchasing InquiryFPABLAR Blanket Order FTMPCLS Purchase Order Classification FPIBLAR Blanket Order ActivityFPAABUY Buyer Assignment FTMRCMT Receiving Method Maintenance FPIACOM Commodity Alpha SearchFPACHAR Change Order FTMRRSN Return Reason Maintenance FPIOPOB Open Purchase Order by BuyerFPACDEL Change Order Cancel FTMSHIP Ship to Address Maintenance FPIBORD Purchase Order ValidationFPADELV Delivery Log FTMUOMS Unit of Measure Maintenance FPIRCVD Receiving Goods QueryFPAEOCD Encumbrance Open/Close FTMVEND Vendor Maintenance FPIOPOF Open Purchase Orders by FOAPALFPAPURR Purchase Order FTMVTYP Vendor Type Code Maintenance FTV - Finance Table ValidationFPAPOAS PO Assignment FOM - Finance Operations Maintenance FTVCOMM Commodity ValidationFPAPDEL PO Delete FOMPROF User Profile Maintenance FTVPCLS Purchase Order Classification ListFPAPORD PO Print FOA - Finance Operations Application FTVPCLS Purchase Order Class’n ListFPARCVD Receiving Goods FOASYSC System Control Form FTVTGRP Tax Group TableFPARTRN Returned Goods FOAPOXT Procurement Text Entry FTVVTYP Vendor Type ListFPAPORD PO Print Form FPR - Finance Purchasing Reports FAI - Finance Accounts Payable InquiryFPACORD Change Order Print Form FPRRCST PO Receiving Status Report FAICHKH Check Payment History FPAERSD Resend EDI PO & Changes FPRPURA PO Activity Report FAIONF Open Invoices by FOAPALFFI - Finance Fixed Assets Inquiry FPRDELV Delivery Log FAA - Finance Accounts Payable ApplicationFFIFDJF Fixed Asset Adjustment FPRRCDL Receiving and Delivery Report FAAINVE Invoice/Credit MemoFFIMAST Fixed Asset Master FPRVVOL Vendor Volumes Report FAB - Finance Accounts Payable Base TableFGR - Finance General Ledger Report FPROPNP Open Purchase Orders Report FABMATC Receiving & Matching ProcessFGROPNE Open Encumbrances FPRRCDL Receiving & Delivery Report FAR - Finance Accounts Payable ReportFGRIDOC Incomplete Doc Listing FPP - Finance Purchasing Process FARIAGE Invoice Aging ReportFTI - Finance Table Inquiry FPPPOBC PO Batch Close Proces FAROINV Open Invoices ReportFTIIDEN Entity ID Search FOI - Finance Operations Inquiry FARIREC Invoices Awaiting Receiver Report
FOIDOCH Document History FARVALP Vendor Alphabetical ListingFARVHST Vendor History Report
33

RUNNING THE POSTING PROCESS
The posting process in Banner runs off of a sleep/wake feature which provides for frequent automatic posting. In the event that you need something to post immediately (manually), follow these steps.
Step Action1 Access the “Process Submission Controls FGRACTG” form.2 Perform a Next Block function.3 In the Printer Output field enter “DATABASE.” This will print to the database. Once we are
live you will select a network printer to print to.4 Perform a Next Block function.5 Perform a Next Block function a second time.6 Click the “Save” icon to run the job.7 You will get an “OK” message.8 Click on “Options” from the main toolbar and select “Review Output” from the drop down
menu.9 Double-click on the “File Name” field.10 Double-click on the “…lis” file to review what was processed.
QUERY INFORMATION
There are numerous screens in Banner which let you query information about topics you need, such as lists of open Requisitions, Goods received, or FOB codes. You are often able to use a search option and enter these query screens directly from the screen where you need the data.
Although query screens for different topics may look a little different, you will find how you move through these screens is the same. For instance, you might use the query screen for Vendor names (FTIIDEN), Completed and Approved Purchase Orders (FPIPURR), Commodity Validation (FTVCOMM), or Document History (FOIDOCH). Although the screens look different, you use the same methods in each one to find the data you need.
You can review a P.O., C.O. or B.L.A.R. at any status using the FPIPURR form.
Step Action1 Access the Purchase/Blanket Order Inquiry Form (FPIPURR).2 Enter the Purchase Order in the Purchase Order field, or click the Search icon to select one,
or enter a Blanket Purchase Order in the Blanket field.3 Enter change number in the Change Sequence Number field if you want to review a specific
Change Order. If not, leave the field blank.4 Perform a Next Block function, or select Document Information from the Options menu to go
to the Document Information window.5 Perform a Next Block function or select Requestor/Delivery Information from the Options
menu to view the requestor and the ship to address.6 View the Document Text, if it exists, by selecting Document Text from the Options menu.
This will display the Procurement Text Entry Form (FOAPOXT).7 Perform a Next Block function or select Vendor Information from the Options menu to show
the current vendor information.
34

8 Select “Commodity/Accounting Information” from the “Options” menu to access the Commodity/Accounting window.
This window shows the commodity and accounting information entered on any of the three order creation forms. This window also includes the Original Commodity Description pop-up window, which allows you to see the commodity description as defined for the code, even if the description has been overwritten.
Important! Reviewing a Change Order that has been posted only displays changes that were made to the items. Any items that were not changed will not be displayed. You can also see the amount the Change Order has been changed by; whereas when you entered the Change Order, you entered the amount you wanted the Purchase Order to be changed to. Make a note of this so you are aware of the differences in display.
9 The Commodity Supplemental Data window is displayed when you select “Commodity Supplemental Information” from the “Options” menu, and shows additional information regarding this commodity.
It displays the Delivery Date and Ship To fields entered on the Requisition, as well as the Assigned Buyer, Bid Assigned (if applicable), Assigned to PO, and PO Item Number fields.
10 Click Close to close this window.11 Click the Exit icon to exit the form.
Querying Document History. The “Document History FOIDOCH” form displays the processing history of purchasing and payment documents. It identifies related documents and provides the status of all documents that are in the processing stream for the queried document.
Step Action1 Access the “Document History FOIDOCH” form.2 Enter the type of document in the Document Type field or double-click to retrieve one from
the existing document types.3 Go to the Document Code field and enter a document code or retrieve one from the existing
documents for the selected document type.4 Perform a Next Block function. The cursor goes to the block that corresponds to the
Document type and code selected. The following are the query forms associated with each of the blocks.Purchase Order - Purchase/Blanket Order Inquiry Form (FPIPURR)Invoice - Invoice/Credit Memo Query Form (FAIINVE)Check - Check Payment History Form (FAICHKH)Return - Returned Goods Validation List Form (FPIRTRN)Receiver - Receiving Goods Query Form (FPIRCVD)Asset Tag - Fixed Asset Master Query Form (FFIMAST)Asset Adjustment - Fixed Assets Adjustment Query Form (FFIADJF)
5 You can use the Direct Access function for the following document types. Check Payment History Form (FAICHKH) Returned Goods Validation List Form (FPIRTRN)
Selecting Status on the Options menu will give an explanation of the status code on the document.
6 When finished viewing the history, click the Exit icon.
35