colours guide - heresybrush completa totent… · afrikakorps tank crew (336, vmc panzer aces)...
TRANSCRIPT

www.modelbrush.comPainting, modelling and wargames blog 1
HIS
TORI
CAL
HIS
TORI
CAL
15m
m
1980 Spanish Armywww.modelbrush.com
1980 Spanish Armywww.modelbrush.com
HIS
TORI
CAL
15m
m
M67 “Chickpea”
M82 “NATO Green”
Woodland
Beige brown (875 VMC)
Translation by Gaizka Basaldua
+ Chocolate brown (964 VMC)
U.S.A. uniform (922 VMC)
U.S.A. uniform (922 VMC)
Russian uniform (924 VMC)
Beige brown (875 VMC)
+
+Black (950 VMC)
VMC · Vallejo Model ColorVGC · Vallejo Game Color
+
Colours Guide

www.modelbrush.comPainting, modelling and wargames blog 2
HIS
TORI
CAL
15m
m
15m
m
1980 Spanish Armywww.modelbrush.com
1980 Spanish Armywww.modelbrush.com
Step 1 First we remove any burr from the models with a modelling knife and a pair of files, before undercoat-ing them. For this scale I’d rather like to use black colour, as it will help me afterwards when it comes to make the Blacklining (as we will see). I recommend that you apply your undercoat with an airbrush or a spray, rather than using a brush as it will be much thinner and homogeneous.
Step 2 We paint the shadows of the uniforms using a darker colour than the one we really need. In this painting guide we show you how to paint the NATO Green uniform, although you can paint some of your sol-
diers with the veteran Chickpea uniform or even the new Woodland uniform. To obtain the NATO Green colour I have mixed equal parts of Russian Uniform (924 VMC) and USA Uniform (922 VMC), but we can vary the proportion in order to get some variety in the unit. So, to get the shadows I have just mixed this colours with a bit of Black (950 VMC) and painted the whole uniform.
Step 3 We start to work out the highlights. When I paint 15mm miniatures I usually apply 4 or 5 coats of highlighting. For the first highlight I add a bit more of both Russian Uniform and USA Uniform to the shadow mix, making it a bit brighter. With this high-
light I pretend to make the creases and reliefs stand out. For the second highlight I directly apply the 1:1 mix of Russian and USA Uniform. This new light covers a smaller surface, and still seeks standing out the reliefs.
Step 4Now we need to introduce more prominent high-lights. In order to fulfil that, we will try to add to our last mix a little bit of White in the next two highlights: We add a little bit of White in the first one, and a bit more in the second one. We will find, once more, the same idea: Every new highlight will try to cover a
smaller surface, always looking for the most exposed area. This will not be reduced just to creases; knees, necks or shoulders, for example, must be taken into account. The more contrast we obtain, the better.
Step 5Next step, before painting accessories, consists on applying what is called a “Black-lining”. Now you will see why I prefer to use black priming. With a thin brush and black paint we will clearly delimit all the accessories to clearly separate them from the uniform (What I do in this 15mm scale is to directly
1 2 3
www.modelbrush.comPainting, modelling and wargames blog 3
HIS
TORI
CAL
HIS
TORI
CAL
15m
m
1980 Spanish Armywww.modelbrush.com
1980 Spanish Armywww.modelbrush.com
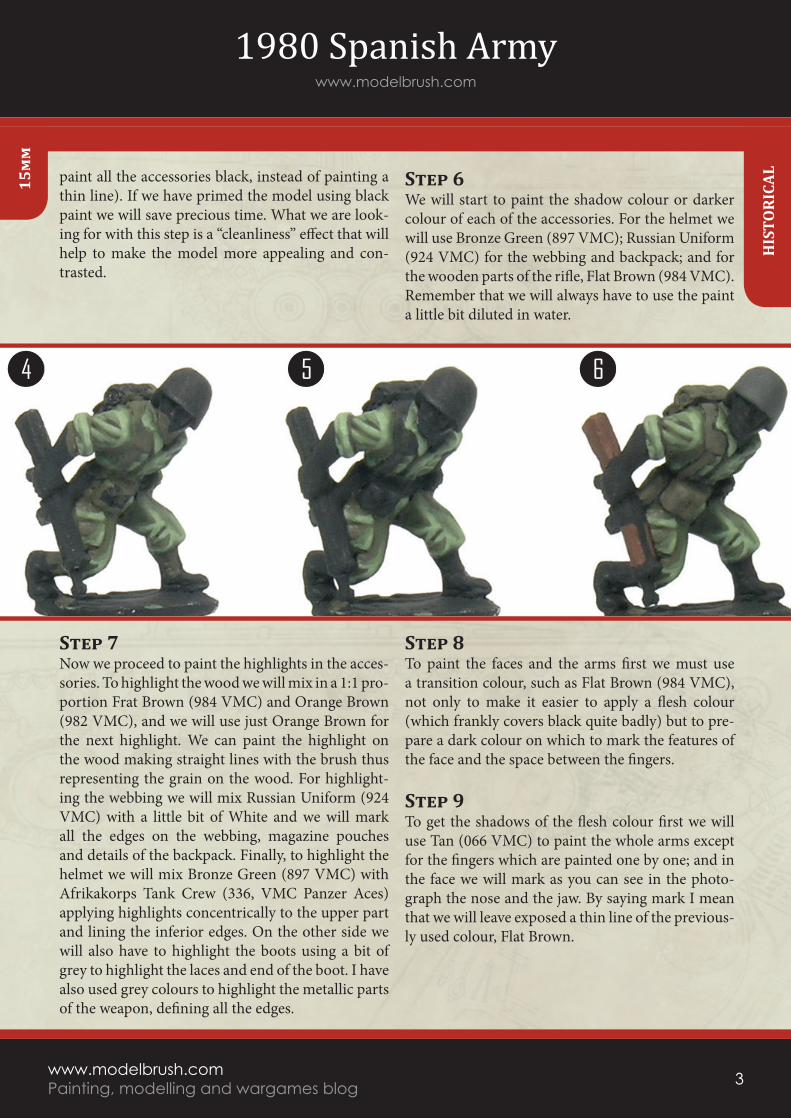
paint all the accessories black, instead of painting a thin line). If we have primed the model using black paint we will save precious time. What we are look-ing for with this step is a “cleanliness” effect that will help to make the model more appealing and con-trasted.
Step 6We will start to paint the shadow colour or darker colour of each of the accessories. For the helmet we will use Bronze Green (897 VMC); Russian Uniform (924 VMC) for the webbing and backpack; and for the wooden parts of the rifle, Flat Brown (984 VMC). Remember that we will always have to use the paint a little bit diluted in water.
Step 7Now we proceed to paint the highlights in the acces-sories. To highlight the wood we will mix in a 1:1 pro-portion Frat Brown (984 VMC) and Orange Brown (982 VMC), and we will use just Orange Brown for the next highlight. We can paint the highlight on the wood making straight lines with the brush thus representing the grain on the wood. For highlight-ing the webbing we will mix Russian Uniform (924 VMC) with a little bit of White and we will mark all the edges on the webbing, magazine pouches and details of the backpack. Finally, to highlight the helmet we will mix Bronze Green (897 VMC) with Afrikakorps Tank Crew (336, VMC Panzer Aces) applying highlights concentrically to the upper part and lining the inferior edges. On the other side we will also have to highlight the boots using a bit of grey to highlight the laces and end of the boot. I have also used grey colours to highlight the metallic parts of the weapon, defining all the edges.
Step 8To paint the faces and the arms first we must use a transition colour, such as Flat Brown (984 VMC), not only to make it easier to apply a flesh colour (which frankly covers black quite badly) but to pre-pare a dark colour on which to mark the features of the face and the space between the fingers.
Step 9To get the shadows of the flesh colour first we will use Tan (066 VMC) to paint the whole arms except for the fingers which are painted one by one; and in the face we will mark as you can see in the photo-graph the nose and the jaw. By saying mark I mean that we will leave exposed a thin line of the previous-ly used colour, Flat Brown.
4 5 6

www.modelbrush.comPainting, modelling and wargames blog 4
HIS
TORI
CAL
15m
m
15m
m
1980 Spanish Armywww.modelbrush.com
1980 Spanish Armywww.modelbrush.com
Step 10Now we start to work out the highlights. First we mix up equal parts of Tan (066 VMC) and Dwarf Skin (041 VGC). We start to highlight areas with this mix. Take a look at the photograph. In the arm I have highlighted the upper part and the edge of
the hand right next to the fingers. In the face I have highlighted the nose, cheeks, chin and upper lip. Taking into account this directions, we apply a new highlight only with Dwarf Skin (041 VGC); and fi-nally, another highlight with Dwarf Skin mixed with a bit of White.
7 8 9
10

www.modelbrush.comPainting, modelling and wargames blog 5
HIS
TORI
CAL
HIS
TORI
CAL
15m
m
1980 Spanish Armywww.modelbrush.com
1980 Spanish Armywww.modelbrush.com
Miniature from Totentanz Miniatures
Flat brown (982, Vallejo)
M67 uniform (“Garbanzo”) M82 Uniform (OTAN green)
Webbings
Bronze green (897, Vallejo)
Helmet Marte
Bronze green (897, Vallejo)
Instalaza (rocket launcher)
Beige brown (875, Vallejo)+ Chocolate brown (964, Vallejo)
U.S.A. Uniform (922, Vallejo)
Russian uniform (924, Vallejo)+
Tan (066, GC Vallejo)
Dwarf Skin (041, GC Vallejo)
Skin
+
CETME (assault rifle)
Boots
Black (950, Vallejo)
Neutral grey (992, Vallejo)+
White (950, Vallejo)
Russian uniform (924, Vallejo)+ Black (950, Vallejo)

www.modelbrush.comPainting, modelling and wargames blog 6
HIS
TORI
CAL
15m
m
15m
m
1980 Spanish Armywww.modelbrush.com
1980 Spanish Armywww.modelbrush.com
Miniatures from Totentanz Miniatures
AMX 30 (Spanish army, 1980)www.modelbrush.com
Flat brown (982, Vallejo)
Orange brown (981, Vallejo)
ChippingGreen
+
Russian base A.MIG-932
Wash effect
Russian dark base A.MIG-931
Medium rust A.MIG-3005
Pigments
Streaking rust effects A.MIG-1204
Streaking effects
Streaking grim A.MIG-1203
Tracks (and ~spare)
Gunmetal grey (863, Vallejo)
Dark brown A.MIG-1005
Russian light base A.MIG-933
Beige (917, Vallejo)
Dark oxide (302, Vallejo)
Rainmarks effect A.MIG-1208
Find how to paint vehicles in the following link: How to paint 15mm tanks