commonwealth of kentucky · commonwealth of kentucky ekos ... check list for creating a new job...
TRANSCRIPT

Commonwealth of Kentucky
EKOS
Employ Kentucky Operating System
User Manual
Office of Employment and Training
275 E. Main St. Frankfort, KY 40601
“An information exchange for the Department for Workforce Investment” Produced by the Office of Employment and Training
Version 1, May 2010
- i -
Table of Contents
Introduction....................................................................................................................... 5 EKOS Interfaces ............................................................................................................. 6 Login & Password........................................................................................................... 7 Logging In....................................................................................................................... 7 Login Timeout ................................................................................................................ 8 Logging Out .................................................................................................................... 9
Rules of the Road ............................................................................................................ 10 Things to Remember..................................................................................................... 10 Required Fields ............................................................................................................. 10 Hints.............................................................................................................................. 11 Special Function Keys .................................................................................................. 11 Business Rules .............................................................................................................. 12
Customers ................................................................................................................. 12 Employer................................................................................................................... 12 Job Orders ................................................................................................................. 13
Creating a New Customer Record................................................................................. 15 Check list for creating a new Job Seeker Record ......................................................... 15 Initial Review/Launch of a New Customer Record...................................................... 17 The General Info Tab.................................................................................................... 18
Customer Data .......................................................................................................... 19 Customer Assignment............................................................................................... 25 Ethnic Heritage ......................................................................................................... 29 Education & Employment......................................................................................... 30 Example of completed Gen Info page ...................................................................... 33
Additional Information (Add’l Info) Tab ..................................................................... 34 Programs ................................................................................................................... 35 Income Status............................................................................................................ 37 Military Service ........................................................................................................ 40 Customer List Participation ...................................................................................... 45 Employment Preferences .......................................................................................... 49 Shift Preference......................................................................................................... 51 Selective Service....................................................................................................... 52
The Objective Tab......................................................................................................... 53 Employee Objective.................................................................................................. 55 Desired O*Net .......................................................................................................... 55 AutoCoder Tab.......................................................................................................... 57 Hierarchy Search Tab ............................................................................................... 59 The Details Tab......................................................................................................... 60 Delete an O*Net Title ............................................................................................... 62 O*Net Title Skill Selector......................................................................................... 63 Desired Employers.................................................................................................... 64 Desired Employers’ Pop-up List............................................................................... 65 Acceptable Job Locations ......................................................................................... 66
Work History Tab ......................................................................................................... 67
- ii -
Add a New Work History Job Entry......................................................................... 68 AutoCoder Tab.......................................................................................................... 69 Hierarchy Search Tab ............................................................................................... 71 The Details Tab......................................................................................................... 72 AutoCoder tab........................................................................................................... 76 Hierarchy Search Tab ............................................................................................... 77 The Details Tab......................................................................................................... 78 View/Edit Work History Job Information ................................................................ 84 Delete a Work History Job Entry.............................................................................. 85
Education/Licenses Tab ................................................................................................ 86 Entering/Changing Driver’s License Information .................................................... 87 Adding Certificate & License Information ............................................................... 88 Editing Certificate & License Information ............................................................... 89 Deleting Certificate & License Information ............................................................. 89 Adding School Information ...................................................................................... 90 Editing School Information....................................................................................... 92 Deleting School Information..................................................................................... 92
Skills Tab ...................................................................................................................... 93 Activities Tab................................................................................................................ 95
Adding an Activity.................................................................................................... 96 Deleting an Activity.................................................................................................. 99 Printing a List of Activities..................................................................................... 100 Viewing Match and Referral Activities .................................................................. 100
Comments Tab ............................................................................................................ 101 Adding a Comment ................................................................................................. 102 Editing a Comment ................................................................................................. 103 Deleting a Comment ............................................................................................... 104 Printing Comments ................................................................................................. 105
Tests Tab..................................................................................................................... 106 Viewing the Tests Page........................................................................................... 106 Adding Test Scores ................................................................................................. 107 Viewing and Changing Test Scores........................................................................ 114 Deleting Tests ......................................................................................................... 115
Job Seeker to Job Orders Matching............................................................................ 116 Checklist for Matching Job Seeker to Job Orders ...................................................... 116 Customer Search page................................................................................................. 117 Customer Detail page.................................................................................................. 118 Desired Employers for Job Seeker Matching ............................................................. 120
Identifying Job Orders for Desired Employer Matches.......................................... 120 The Employer Job Order Search Page ........................................................................ 121 Job Order Matching and Referrals.............................................................................. 122
Identifying Job Order Matches ............................................................................... 122 Performing Referrals............................................................................................... 129
Customer Correspondence .......................................................................................... 130 Letter/E-mail Correspondence ................................................................................ 131
Employer Correspondence.......................................................................................... 134
- iii -
Employer Referral Correspondence........................................................................ 134 Searches ...................................................................................................................... 136
Saving the Search.................................................................................................... 136 Running a Saved Search ......................................................................................... 137
Review Activities........................................................................................................ 139 Job Order to Job Seeker Matching ............................................................................. 140
Checklist for Matching Job Orders to Job Seekers..................................................... 140 Employer Search......................................................................................................... 141 Matching from the Job Order to the Job Seeker ......................................................... 146
Veteran’s Priority Search........................................................................................ 147 Save Search............................................................................................................. 150 Customer Review.................................................................................................... 151 Posting Matches ...................................................................................................... 153
Comments ................................................................................................................... 154 Adding a Comment ................................................................................................. 154 Editing a Comment ................................................................................................. 155 Deleting a Comment ............................................................................................... 156 Printing Comments ................................................................................................. 157
Customer Correspondence .......................................................................................... 158 Letter/E-mail Correspondence ................................................................................ 158 Interactive Voice Response (IVR) Transactions..................................................... 161 Customer Referral Correspondence........................................................................ 162
Employer Correspondence.......................................................................................... 163 Employer Referral Correspondence........................................................................ 163
Correspondence............................................................................................................. 165 Templates.................................................................................................................... 165
Correspondence Templates..................................................................................... 165 Data Source Templates ........................................................................................... 167
Customer Correspondence .......................................................................................... 169 Letter/E-mail Correspondence ................................................................................ 169 Interactive Voice Response (IVR) Transactions..................................................... 172 Customer Referral Correspondence........................................................................ 173
Employer Correspondence.......................................................................................... 174 Employer Referral Correspondence........................................................................ 174
Searches ......................................................................................................................... 176 Saved Searches............................................................................................................ 176 Running a Saved Search ............................................................................................. 176
List Participation .......................................................................................................... 178 Creating New Lists ..................................................................................................... 178 Modifying/Deleting Existing Lists ............................................................................. 180 Customer List Participation ........................................................................................ 182 Employer/Job Order List Participation ....................................................................... 186
Glossary ......................................................................................................................... 189 Index............................................................................................................................... 193 Appendices..................................................................................................................... 199
Activities ..................................................................................................................... 199

- iv -
Participant ............................................................................................................... 199 Employer................................................................................................................. 222
Types of Testing ......................................................................................................... 229

EKOS User Manual – Introduction
Page 5 of 231
Introduction The Kentucky Employment Operating System (EKOS) is an automated approach designed to help Kentucky and its Workforce Investment Boards (WIB) by: Integrating with existing state systems to maximize the “one stop” experience. Planning and tracking capabilities based on a customer's needs. EKOS contains all the services required to meet the WIA business requirements
common to all states. Links the records of customers, providers, and employers and provides powerful
matching tools. Case manage, track, and meet the reporting requirements of Federal, State, and local
workforce development programs. Is fully “Common Measures compliant”. Its correspondence and powerful mail merge capabilities provide the ability to use
templates or create new letters, charts, or labels for employers, customers and providers.
EKOS has an Interactive Voice Response (IVR) system compatibility which includes the mechanism to set up the contact of large volumes of customers to notify them of job openings, appointment reminders, job fairs, etc.
EKOS includes the ability to create, with one click, an electronic resume that can be updated by either the staff or the customer.
EKOS User Manual – Introduction
Page 6 of 231
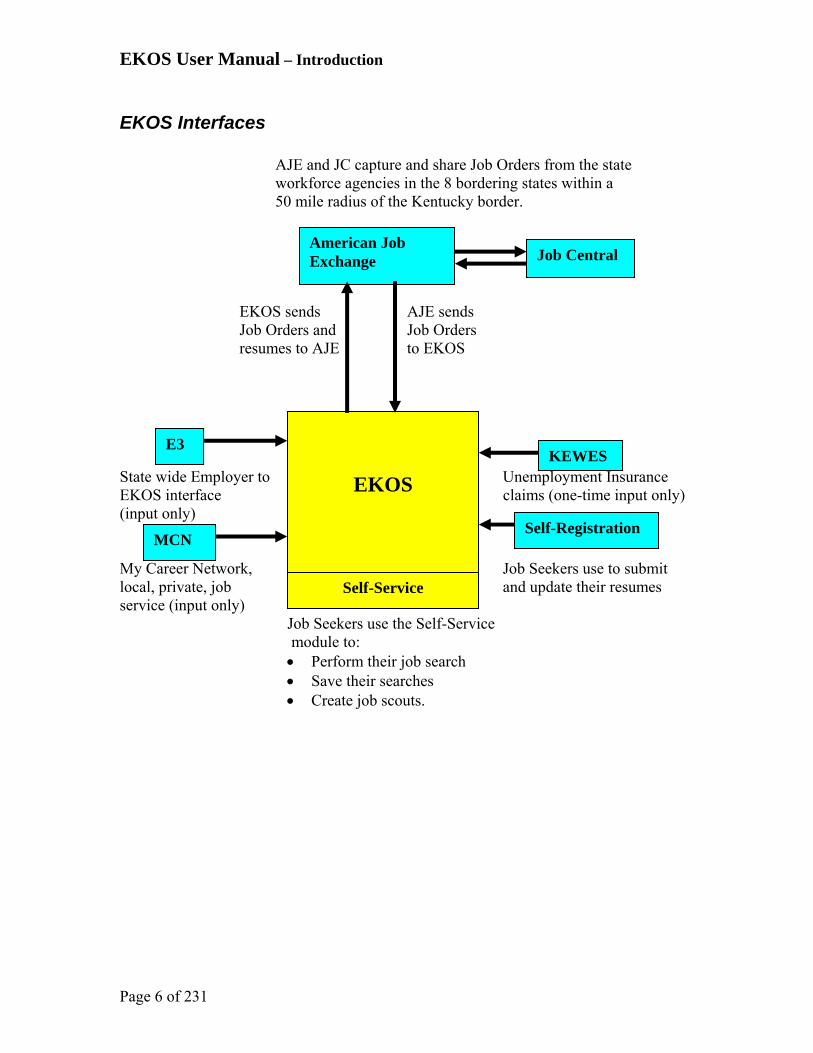
EKOS Interfaces
AJE and JC capture and share Job Orders from the state workforce agencies in the 8 bordering states within a 50 mile radius of the Kentucky border.
EKOS sends AJE sends
Job Orders and Job Orders resumes to AJE to EKOS State wide Employer to Unemployment Insurance EKOS interface claims (one-time input only) (input only) My Career Network, Job Seekers use to submit local, private, job and update their resumes service (input only)
Job Seekers use the Self-Service module to: Perform their job search Save their searches Create job scouts.
American Job Exchange Job Central
MCN
EKOS
Self-Registration
KEWES E3
Self-Service

EKOS User Manual – Introduction
Page 7 of 231
Login & Password The EKOS Login Window, available when the application is opened, allows you to enter your username and password in order to log into the system.
Logging In When the EKOS application is loaded, you will be presented with the Login Window. Enter your username (up to 80 alphanumeric characters) in the Username field.
Enter your password (up to 12 alphanumeric characters) in the Password field.
Click the Login button to log in.
You must click the Login button to activate the Login. Pressing Enter will not log you in to the EKOS system.

EKOS User Manual – Introduction
Page 8 of 231
Logging In – con’t If the log in is successful, the Inbox page of the Staff Detail module will be displayed with your inbox entries. You will proceed by clicking the appropriate Module: CUSTOMER, PROVIDER, EMPLOYER, STAFF, HELP.
Login Timeout After a state defined number of minutes of inactivity, the EKOS Login Window will automatically appear. In this case, you will be required to re-enter your password in the Password field. No data will be lost. If you enter a different Username, the system will automatically log out the original user and the new user will be logged in.

EKOS User Manual – Introduction
Page 9 of 231
Logging Out To log out of EKOS:
Click on the Staff module and then click Logout.
The current user will be logged out of the system. When you log out of EKOS, the display returns to the EKOS Login Window.

EKOS User Manual – Rules of the Road
Page 10 of 231
Rules of the Road
Things to Remember Once EKOS Basic Training has been completed, your supervisor should request you have the ability to enter new employer records, revise existing employer records, and enter job order referrals. This can be done by the supervisor requesting this access via email to [email protected]. We suggest you update your password at least once a quarter. Check appointments, calendar, and reminders daily. The Help Module is a comprehensive indexed on-line help manual for each module. The Correspondence Help module can access the templates used in generating correspondence and can be downloaded to your PC. There are three different types of information inserted into this document in boxes as appropriate. The information is color coded by type of information: Yellow, Blue and Red.
Required Fields In mediated EKOS, on all pages, any field shown with a Green Dot to the left of the field’s name is a required field for that page. For other than records created by self registration and KEWES, failure to complete any required field will result in an error message when you try to save the record. It should also be noted that while some fields are not flagged as required for EKOS (Green Dots), they are required for Federal Reporting. If they are not completed, they will fail federal edit checks for Quarterly and Annual reporting. Examples of this are Date of Birth and Country Code.
Yellow boxed information is action that is to be taken.
Blue boxed information is a special note about the function.
Red boxed information is a warning of an error or error action/activity.

EKOS User Manual – Rules of the Road
Page 11 of 231
Date Fields Unless otherwise specified, all mm/dd/yyyy Date Field values will be formatted by the system (i.e. separators such as slashes, are automatically inserted by the system) so only enter numeric characters. e.g., the 10/20/1991 shown would be entered as 10201991. To change a date, the entire new date must be entered. e.g. to change 10/20/1991 to 10/22/1991, you must enter 10221991.
Hints
Do not use the BACK/FORWARD buttons or the REFRESH button on your window bar located at the top of the page or you will lose all the information you entered, and be kicked out of the EKOS system.
EKOS has an automatic time out feature. After 30 minutes of inactivity on the system, you will be required to log back into the EKOS system.
Always key in data with the proper Upper and Lower case when entering into the EKOS system.
Any tab or button that is grey or muted means you do not have access at that time.
Always use a double click instead of just a single click.
All State fields default to KY and country fields default to USA. Legal vs. illegal characters: A-z, 0-9, plus the special characters: = + - _ ) ( * & ^ % $ # @ ! \ ] } [ { ‘ ” ; : / ? . , > < are legal for use in any text field in EKOS. However, when using cut and paste, it is safer if you paste into and out of a notepad document before pasting into an EKOS documents. This will filter out invisible illegal characters that might have been inserted during the cut and paste operation.
Special Function Keys
F11 – Allows you to switch between a normal and a full screen.
SHIFT - Allows you to select more than one customer record at a time in sequence. Hold down the SHIFT and Click on the first customer name. While holding down the SHIFT key, click on the last customer name you want to highlight.
Alt – Allows you to select more than one customer record at a time randomly. Hold down the ALT key and Click on each of the records you want to select.
EKOS User Manual – Rules of the Road
Page 12 of 231
Business Rules
Customers All Customers must be registered in EKOS prior to job referrals and/or services being provided.
If the Customer is not registered in EKOS, you will need to enter the registration information into EKOS.
The registration record must be reviewed for accuracy and completeness with updates made as appropriate.
The Customer’s registration Status must be active if the Customer is receiving activities or services from any agency. If this field is in Inactive status, it must be changed to Active.
If the Customer is seeking employment, the Job Seeker Status must be Active. If this field is in Inactive Status, it must be changed to Active.
For individuals receiving unemployment benefits, “Failed to Report” and “Refused Job” are activities that must be reported in EKOS on a Customer’s record and must be reported to UI staff for Disputed Claims Investigator (DCI) to investigate.
When entering a new record for a customer, staff should enter a pseudo SSN number when the customer’s social security number is not available. If this is used, the staff must place a check mark in the “N/A” field reflecting that the customer record will not count in performance. A pseudo SSN will need to be entered in the customer’s SSN field:
System = 3 9’s Your 2 digit office number Customer’s month and year of birth, e.g. 999-71-1962
Employer The Federal Employer Identification Numbers (FEIN) is used to identify and validate employers. The FEIN is a unique nine-digit number assigned by the Internal Revenue Service (IRS) to business entities operating in the United States for the purposes of identification.
To create a new employer record, first conduct a search by FEIN and then by employer name to determine whether the employer record is already in EKOS. There should be only one active record per FEIN.
If there are duplicate employer records, and one of the records is an e3 record, the e3 record will always be your active record. If there is not an e3 record, inactivate the other record(s) with no job orders or activities. If the other record(s) have open job orders attached, inactivate the one(s) with the oldest job order. The system will allow staff to inactive an employer record with an open order.
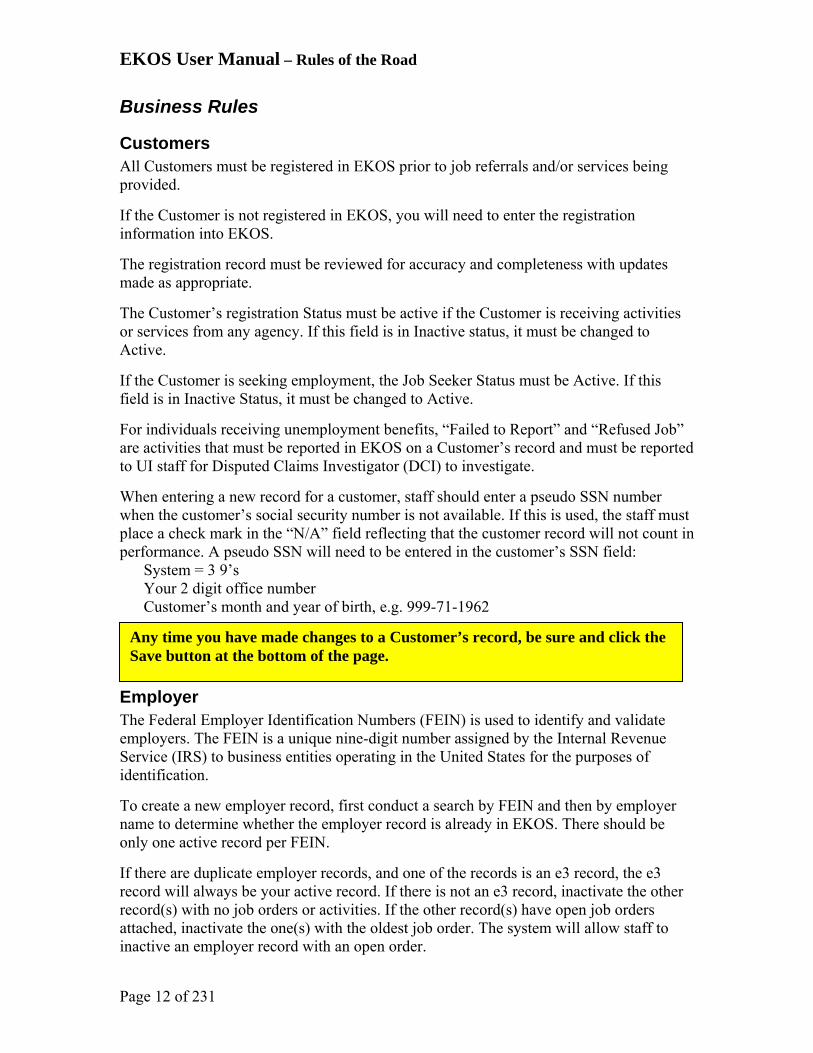
Any time you have made changes to a Customer’s record, be sure and click the Save button at the bottom of the page.
EKOS User Manual – Rules of the Road
Page 13 of 231
Business Rules – con’t
Staff will also need to manually add the employer contacts from the ‘inactive’ record(s) to the ‘active’ record if they do not already exist. Place a post a note on the employer record’s comment section stating why it is being inactivated.
When reviewing duplicate records never inactive the e3 record, this will result in locking out the e3 employer from their account.
Activities to an employer must be documented in the Employer Module using the ‘Activity’ button. If the specific activity is not available as a selection, staff should document information in comments with ‘Post A Note’. Or contact the EKOS Team with a request to have that specific activity added to the activities list. This will give all agencies access to the history.
Up to 300 employer contacts can be added to an existing employer record. Employers may have multiple locations, each with their own contact.
When entering a new record for an independent contractor (as defined by UI auditors), we will use a pseudo FEIN number: System = 3 9’s Your 2 digit office number Contractor’s month and year of birth or last four digits of their social security number
e.g.: 99-9701161
The FEIN is not required for independent contractors. Always put a ‘Post A Note’ that the employer stated they are not required to have a FEIN.
Prior to contacting an existing employer, review the employer record for recent activities and comments. After contacting the employer, update the record as appropriate.
When entering an employer activity, add comments as appropriate.
Job Orders Federal Performance mandates the reporting of job orders and openings received. Therefore, it is critical that all the business rules relating to the taking, writing and maintenance of job orders be followed.
Veterans Priority: All staff, not just Veteran staff, must maintain Veterans priority and those agencies
that enter job orders must ensure that Veterans are accommodated. At the time a new job order is received and input into EKOS, a Veterans priority
search must be performed. If there are veterans matching the job order criteria, you should initiate an IVR and/or
contact the veteran.
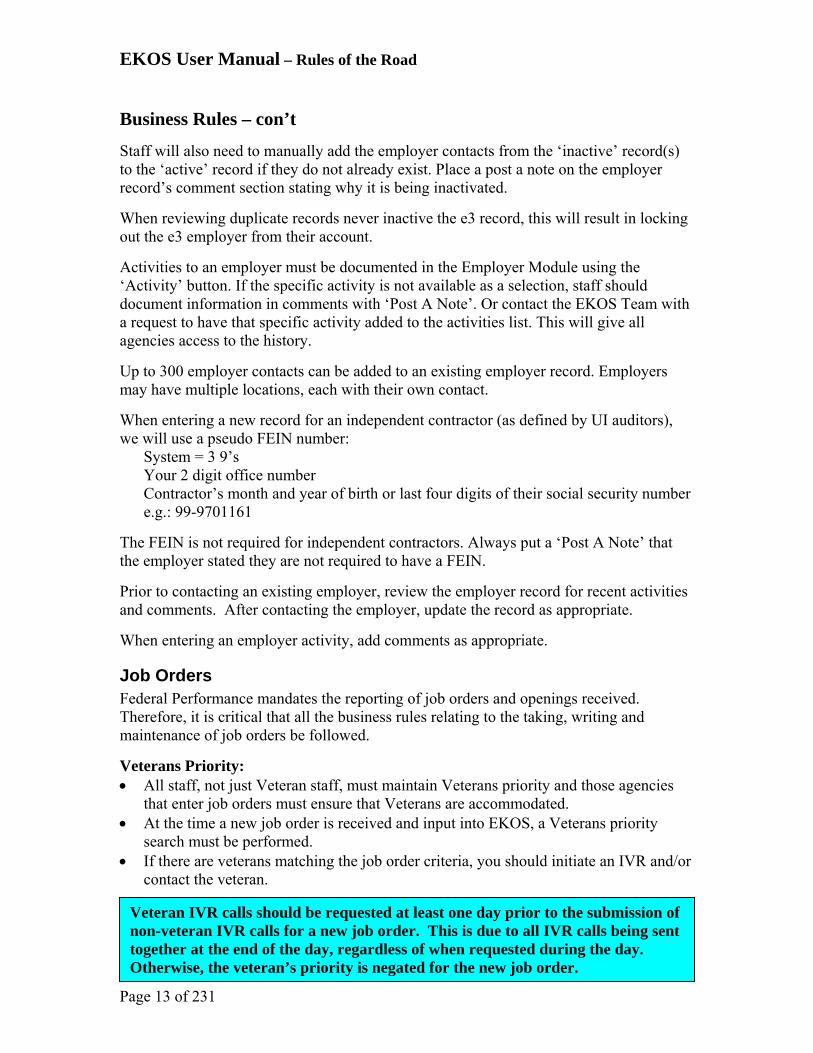
Veteran IVR calls should be requested at least one day prior to the submission of non-veteran IVR calls for a new job order. This is due to all IVR calls being sent together at the end of the day, regardless of when requested during the day. Otherwise, the veteran’s priority is negated for the new job order.

EKOS User Manual – Rules of the Road
Page 14 of 231
Business Rules – con’t
Employers have a variety of options to post jobs in EKOS/AJE. Input job orders through e3 at www.e3.ky.gov. Input job orders directly into America’s Job Exchange (AJE). Job Central My Career Network Contact a One-Stop Career Center or Local Office in-person, phone, fax, mail, and/or
email. If an employer outside your service area or out-of-state, contacts you to list a job
order, inform the employer that there is a One-Stop Center in his/her area. However, you are to take and input the job order if the employer prefers.
An assigned staff shall be designated for each job order when it is written.
The assigned staff for a job order shall be the one contacted if there are questions or changes regarding the job order.
If it is discovered that the employer already has the same job listed, the employer should be informed that a job order is currently open in the system and it not be duplicated.
When entering a job order, the Referral Info tab should always be completed. This is where staff will get the referral information to give to job seekers. The Hiring Contact on this tab may be different than the person listed on the Contact Info tab making it all the more important to complete the Referral Info tab. Any specific referral instructions are to be entered on this tab in the designated field. There is also other vital information about the job that is housed on this tab making screening applicants more efficient and referrals more appropriate.
A referral can only be made on an ‘open’ job order by staff with the appropriate security access.
The referral method and hiring contact information are located on the Referral Info tab in the Job Order. This is where staff should get all referral information when referring job seekers on that order. There is a field on this tab that contains specific referral instructions for the job seeker along with the hiring contact and method.
Once you confirm that the customer meets the job order requirements and that they have a work history completed that reflects the years experience require by the employer, referrals may be made in person, by IVR to have customer call back and receive referral, or telephone.
If an employer requests that an agency screen applicants based on factors that violate state or federal law, the employer must be told we will be unable to service that order. Applications containing questions that violate state or federal ADA and EEO laws will not be distributed by staff.
EKOS User Manual – Creating a New Customer Record
Page 15 of 231
Creating a New Customer Record
Check list for creating a new Job Seeker Record The General Information Tag Sections Ο Customer Data
Ο Customer Assignment
Ο Ethnic Heritage
Ο Education and Employment
Additional Information (Add’l Info) Tab Ο Programs
Ο Income Status
Ο Military Service
Ο Customer List Participation
Ο Employment Preferences
Ο Shift Preference
Ο Selective Service
The Objective Tab Ο Employee Objective
Ο Desired O*Net
Ο Auto Coder Tab
Ο Hierarchy Search Tab
Ο Details Tab
Ο Desired Employers
Ο Acceptable Job Location
Work History Tab Ο Work History Job Entries
Ο Auto Coder Tab
Ο Hierarchy Search Tab
Ο The Details Tab
Education/Licenses Tab Ο Driver’s License Information
Ο Certificates and Licenses
Ο School Information

EKOS User Manual – Creating a New Customer Record
Page 16 of 231
Check list for creating a new Job Seeker Record – con’t
Load Skills Information Ο Load Skills Information
Add Comments as appropriate Ο Add Comments as appropriate
Add Test Scores Ο Add Test Scores

EKOS User Manual – Creating a New Customer Record
Page 17 of 231
Initial Review/Launch of a New Customer Record The Job Seeker’s initial entry into the system will often have been entered by the Job Seeker themselves using Self Registration. In those cases, some or all of the required information might already be completed and it only needs to be reviewed and updated. Whether Self Registration was used or the Job Seeker’s record is being established by you in the office, it is a good idea to review all the Customer tabs, for completeness and accuracy while you have the Job Seeker available to you. Special consideration should be given to the Work History (Employment History) tab. This tab is often either ignored or only partially completed by the Job Seeker. This information is used to generate the Job Seeker’s resume which is used by perspective Employers to determine which candidates to contact.
To launch the Customer Detail window to create a new customer record:
Click Customer on the menu bar, and select Customer Search from the menu.
The Customer Search window will appear.
If necessary, perform a customer search to determine whether a record currently exists for the customer:
Enter their SSN, Customer ID, or Name and Birth date information and click the Search button.
Be mindful that in some cases, the field name the Job Seeker is seeing on their screen is different from the field name being displayed on your screen. For example, Military Service for you is displayed as Veteran’s Info to them. Desired O*Net for you is Desired Occupation to them, Work History = Employment History and so forth…

EKOS User Manual – Creating a New Customer Record
Page 18 of 231
Initial Review/Launch of a New Customer Record – con’t
If the message “No Matches Found” is displayed in the upper top right of the page,
Click the New button below the Search Results list.
A blank Customer Detail, General Info tab window will appear, allowing you to begin entering the new customer information.
The General Info Tab The General Info page consists of four sections:
Customer Data, Customer Assignment, Ethnic Heritage, Education & Employment.
Customer Data
Ethnic Heritage
Customer Assignment
Education and Employment

EKOS User Manual – Creating a New Customer Record
Page 19 of 231
Customer Data
The Customer Data section of the General Info page consists of the following fields: SSN (Social Security Number) - The SSN field allows you to record the customer’s Social Security Number field.
Enter the customer’s unique nine-digit social security number.
N/A – The N/A box is clicked when you do not have the customer’s Social Security number or do not want to include this customer in the Common Measures reporting for some reason. In this instance, staff should enter a pseudo number as follows:
System = 3 9’s Your 2 digit office number Customer’s month and year of birth, e.g. 999-71-1962
Status - The Status field allows you to define the current status of the customer record. Available customer status values in EKOS include:
Active - An active customer record. If you are creating a new customer record, Active status will be selected by default. Deleted - A customer record that has been deleted from the system. Inactive - A customer record that has been temporarily removed from Active status. An Inactive customer can be moved back into Active status. While a customer record is in Inactive mode, it is unavailable for Match operations. Pending - A customer record for which data entry has not yet been completed. If you are creating a new customer record and do not have all the necessary information to complete the record, you can select the Pending status. This will allow you to save the customer record without all of the required information, and later add the necessary information and move the record to Active status.
For a customer record to be saved with a status of Pending, the only required fields are Username, Password, and SSN (Social Security Number).
You must have certain EKOS security permissions in order to move a customer record to Deleted status, otherwise, an error message will be generated.
Unless otherwise specified, the number fields in the Customer Data section will be formatted by the system (i.e., separators, such as dashes are automatically inserted), so enter only numeric characters.

EKOS User Manual – Creating a New Customer Record
Page 20 of 231
Customer Data – con’t
Click on the arrow button in the Status field and select the appropriate customer
status designation from the drop-down list. Job Seeker – The Job Seeker field is used to determine whether the customer is actively seeking a job, and determines whether or not the customer’s EKOS resume is active in the system.
Click on the arrow button in the Job Seeker field, and select the appropriate job seeker designation (Active or Inactive) from the drop-down list.
Username - The Username field is used to enter, change, or view the customer’s Self-Service EKOS username (used for system access). If you are displaying a customer record that originated from Self-Service EKOS, this field will display the customer’s chosen username.
Enter the customer’s Self-Service EKOS username in this field. The username must be at least 6 alphanumeric characters in length (up to 80 characters are permitted).
If Inactive is selected in the Job Seeker field, the customer record will not be available for Match and Refer operations.
If the customer is an Active job seeker, you must still use the Internet Resume check box to determine whether the customer’s system-generated resume should be made available in the national job bank system.
If the customer is hired for a job with a Temporary, Seasonal or Regular duration (full- or part-time), the Job Seeker field value will automatically be changed to Inactive.
If the customer is hired for a job with a Short Term duration (full- or part-time), the Job Seeker field value will remain Active.
If you are moving a customer record from Pending to Active status, make sure that all of the required information is correct.
Once a customer record has been saved in Active status, it cannot be placed back into Pending mode.
A customer record can only remain in Pending status for a period of 90 days. After that, it is permanently purged from the system and cannot be retrieved.
In order for Job Seeker to be set to Active, the Status field must also be set to Active.

EKOS User Manual – Creating a New Customer Record
Page 21 of 231
Customer Data – con’t
Password - The Password field is used to enter, change, or view the customer’s Self-Service EKOS password (used for system access). If you are displaying a customer record that originated from Self-Service EKOS, this field will display the customer’s chosen password.
Enter the customer’s Self-Service EKOS password in this field. The password must be at least 6 alphanumeric characters in length (up to 12 characters are permitted).
Last Name – The Last Name field is used to record a customer’s last name.
Enter the customer’s last name (up to 20 characters) in this field.
First Name – The First Name field is used to record a customer’s first name.
Enter the customer’s first name (up to 20 characters) in this field.
MI – The MI field is used to record a customer’s middle initial.
Enter the customer’s middle initial (1 character only) in this field.
The password must not be the same as the customer’s username, and must not contain any embedded spaces or punctuation.

EKOS User Manual – Creating a New Customer Record
Page 22 of 231
Customer Data – con’t Date of Birth – The Date of Birth field is used to record a customer’s birth date.
Enter the customer’s birth date (in mmddyyyy format) in this field.
Gender – The Gender field is used to record a customer’s gender.
Click on the arrow button in the Gender field, and select the appropriate customer gender value (Male, Female or Not Disclosed) from the drop-down list.
Address - The Address fields are used to enter a customer’s mailing address. An entry in the first address field is required; the second field is optional.
Enter the customer’s mailing address (up to 80 characters in each field). Use both Address fields if necessary.
Do not enter the customer’s city, state, or zip code in these fields. City - The City field is used to identify the customer’s city of residence.
Enter the customer’s full city name in this field (up to 20 characters).
State - The State field is used to identify the customer’s state of residence.
Click on the arrow button in the State field, and select the appropriate state’s name from the drop-down list.
Although Date of Birth is not marked as a required field, the value is used elsewhere in EKOS for reporting and eligibility processing purposes.
Customers should be advised that certain benefits and/or services (e.g., comprehensive assessment) may not be available to them if their date of birth is not voluntarily provided.
If the customer is a Migrant/Seasonal Worker (as indicated on the Additional Info page of the Customer Detail window, EKOS will check the Date of Birth value to make sure that the customer is at least 12 years old.
If the customer is not at least 12 years of age, an error message will be generated. All other customers must be at least 14 years of age, or it will error.
EKOS User Manual – Creating a New Customer Record
Page 23 of 231
Customer Data – con’t
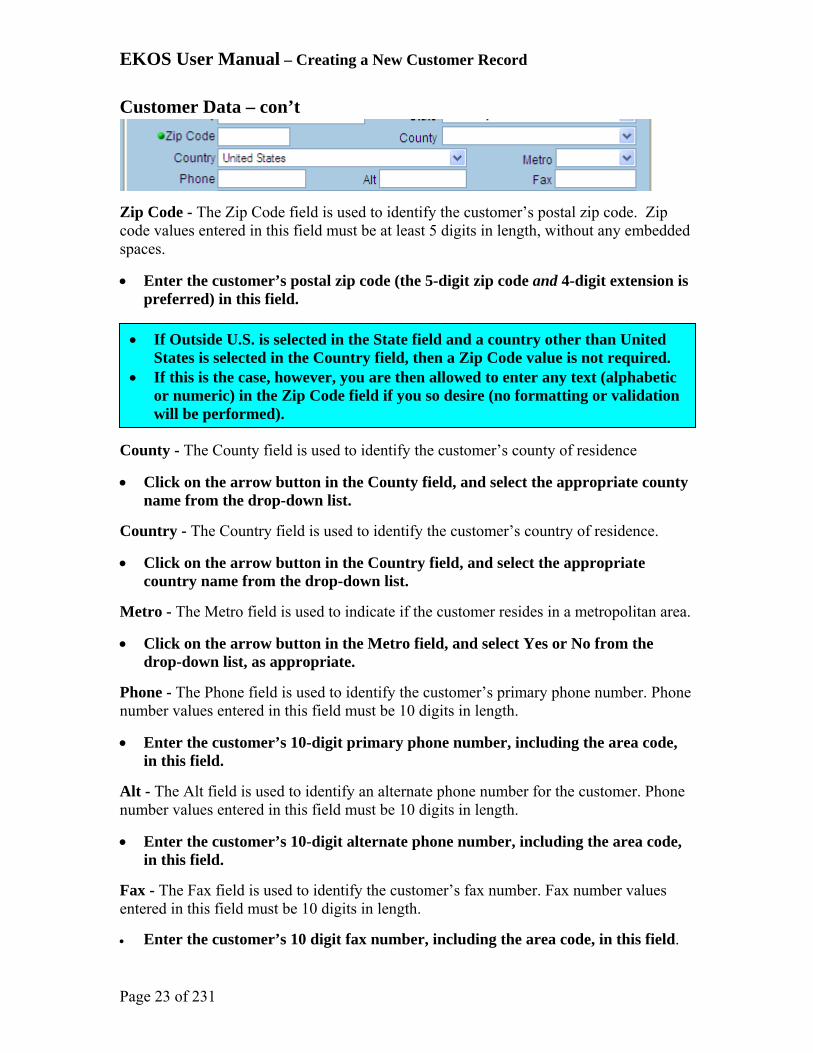
Zip Code - The Zip Code field is used to identify the customer’s postal zip code. Zip code values entered in this field must be at least 5 digits in length, without any embedded spaces.
Enter the customer’s postal zip code (the 5-digit zip code and 4-digit extension is preferred) in this field.
County - The County field is used to identify the customer’s county of residence
Click on the arrow button in the County field, and select the appropriate county name from the drop-down list.
Country - The Country field is used to identify the customer’s country of residence.
Click on the arrow button in the Country field, and select the appropriate country name from the drop-down list.
Metro - The Metro field is used to indicate if the customer resides in a metropolitan area.
Click on the arrow button in the Metro field, and select Yes or No from the drop-down list, as appropriate.
Phone - The Phone field is used to identify the customer’s primary phone number. Phone number values entered in this field must be 10 digits in length.
Enter the customer’s 10-digit primary phone number, including the area code, in this field.
Alt - The Alt field is used to identify an alternate phone number for the customer. Phone number values entered in this field must be 10 digits in length.
Enter the customer’s 10-digit alternate phone number, including the area code, in this field.
Fax - The Fax field is used to identify the customer’s fax number. Fax number values entered in this field must be 10 digits in length.
Enter the customer’s 10 digit fax number, including the area code, in this field.
If Outside U.S. is selected in the State field and a country other than United States is selected in the Country field, then a Zip Code value is not required.
If this is the case, however, you are then allowed to enter any text (alphabetic or numeric) in the Zip Code field if you so desire (no formatting or validation will be performed).

EKOS User Manual – Creating a New Customer Record
Page 24 of 231
Customer Data – con’t Email - The Email field can be used to identify an email address to which customers would like correspondence to be sent. Email addresses should be entered in [email protected] format, with no embedded spaces. To enter multiple email addresses, separate each email address with a comma.
Enter the customer’s valid email address in this field. Up to 80 characters are permitted in this field.
US Citizen – The US Citizen check box is used to indicate whether the customer is a United States citizen. If the customer is a United States citizen:
Click on the US Citizen check box.
Alien Reg # - The Alien Reg # field is used to record the customer’s Alien Registration Number, if the customer is not a United States citizen. In the Alien Reg # field:
Enter the customer’s Alien Registration Number (up to 10 characters).
The first character of the Alien Registration Number must be an alphabetic character (either upper- or lower-case). Expires – The Expires field is used to record the expiration date for the customer’s Alien Registration, if the customer is not a United States citizen. If the customer does not have permanent status, this is a required field. The date entered in this field must be greater than the current system date.
Enter the expiration date for the customer’s Alien Registration (in mmddyyyy format) in this field.
Permanent - The Permanent check box is used to indicate whether the customer has permanent status. If the customer is not a United States citizen. If the customer is an alien with permanent status:
Click on the Permanent check box.
A check mark in the check box indicates that it is selected (i.e., a check mark indicates a value of Yes for the field). To deselect this option:
Click on the check box again, and the check mark will disappear.
If the US Citizen check box is selected, the Alien Reg #, Expires, and Permanent fields will not show.
If the US Citizen check box is not selected, then the fields will display and are required.
If the Permanent check box is selected, no entry is required in the Expires field.
EKOS User Manual – Creating a New Customer Record
Page 25 of 231
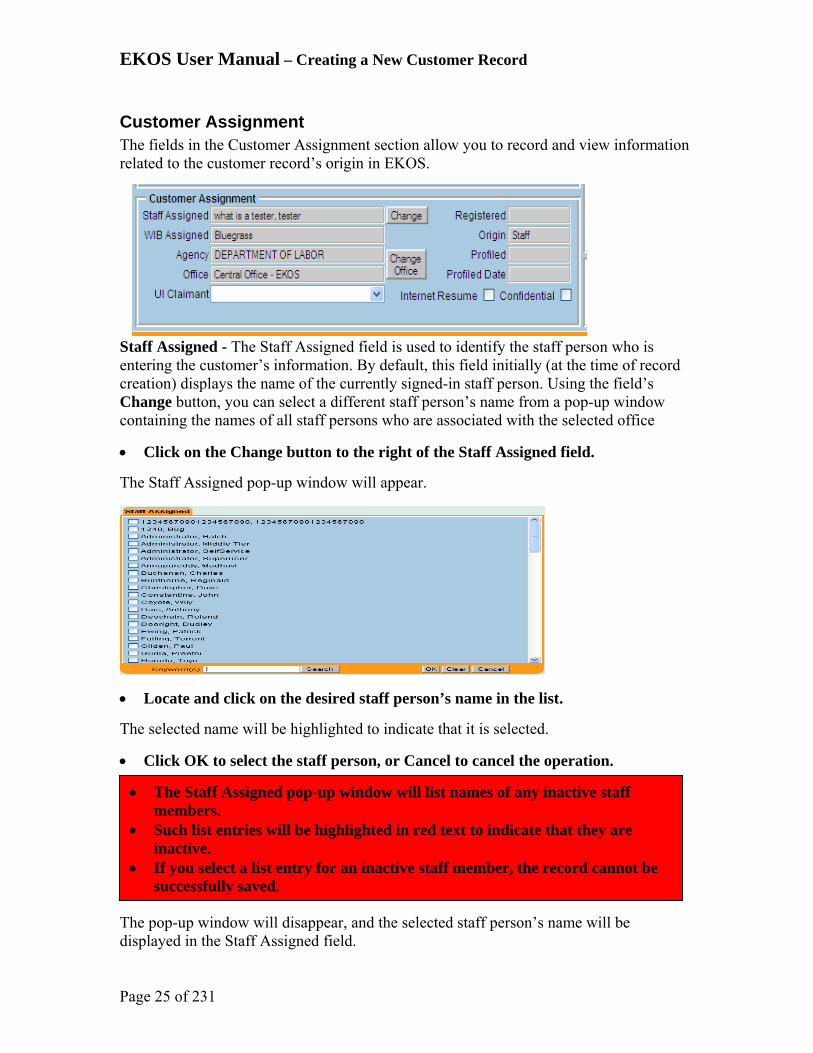
Customer Assignment The fields in the Customer Assignment section allow you to record and view information related to the customer record’s origin in EKOS. Staff Assigned - The Staff Assigned field is used to identify the staff person who is entering the customer’s information. By default, this field initially (at the time of record creation) displays the name of the currently signed-in staff person. Using the field’s Change button, you can select a different staff person’s name from a pop-up window containing the names of all staff persons who are associated with the selected office
Click on the Change button to the right of the Staff Assigned field.
The Staff Assigned pop-up window will appear.
Locate and click on the desired staff person’s name in the list.
The selected name will be highlighted to indicate that it is selected.
Click OK to select the staff person, or Cancel to cancel the operation.
The pop-up window will disappear, and the selected staff person’s name will be displayed in the Staff Assigned field.
The Staff Assigned pop-up window will list names of any inactive staff members.
Such list entries will be highlighted in red text to indicate that they are inactive.
If you select a list entry for an inactive staff member, the record cannot be successfully saved.
EKOS User Manual – Creating a New Customer Record
Page 26 of 231
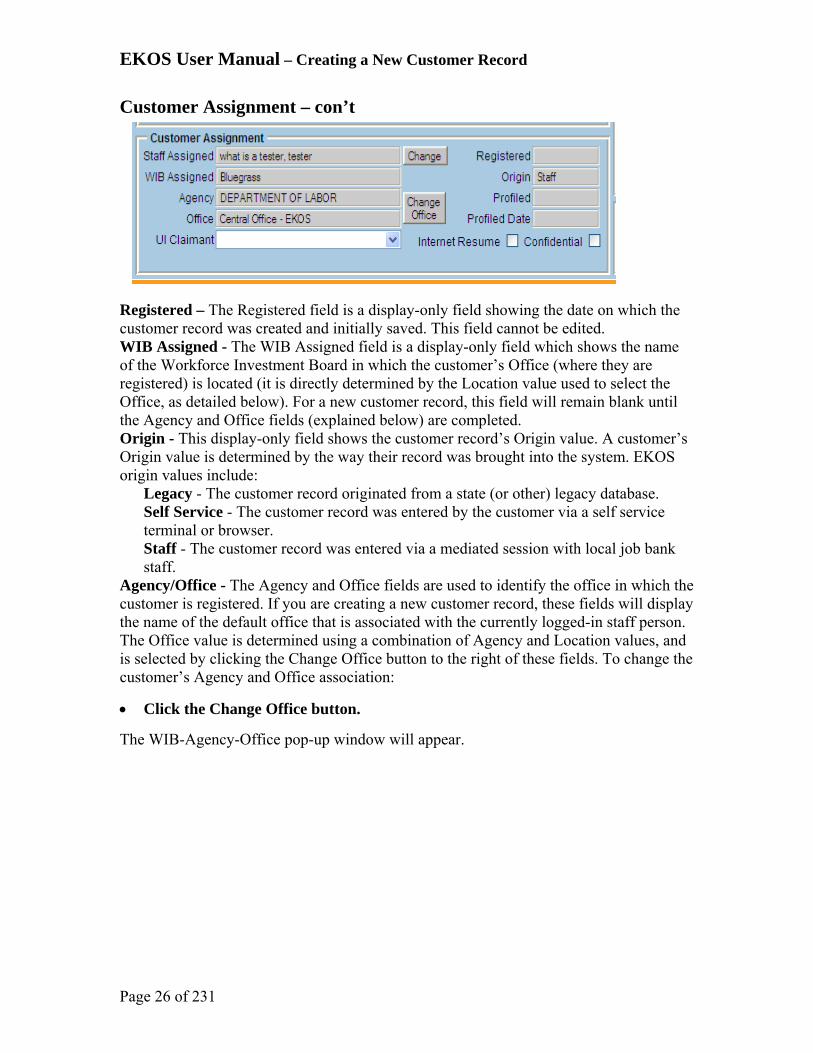
Customer Assignment – con’t Registered – The Registered field is a display-only field showing the date on which the customer record was created and initially saved. This field cannot be edited. WIB Assigned - The WIB Assigned field is a display-only field which shows the name of the Workforce Investment Board in which the customer’s Office (where they are registered) is located (it is directly determined by the Location value used to select the Office, as detailed below). For a new customer record, this field will remain blank until the Agency and Office fields (explained below) are completed. Origin - This display-only field shows the customer record’s Origin value. A customer’s Origin value is determined by the way their record was brought into the system. EKOS origin values include:
Legacy - The customer record originated from a state (or other) legacy database. Self Service - The customer record was entered by the customer via a self service terminal or browser. Staff - The customer record was entered via a mediated session with local job bank staff.
Agency/Office - The Agency and Office fields are used to identify the office in which the customer is registered. If you are creating a new customer record, these fields will display the name of the default office that is associated with the currently logged-in staff person. The Office value is determined using a combination of Agency and Location values, and is selected by clicking the Change Office button to the right of these fields. To change the customer’s Agency and Office association:
Click the Change Office button.
The WIB-Agency-Office pop-up window will appear.

EKOS User Manual – Creating a New Customer Record
Page 27 of 231
Customer Assignment – con’t
When it is initially launched, the window displays a list of state WIB’s:
Locate and click on the WIB name that includes the desired agency location.
The selected WIB will expand into sub-folders, listing all agencies that are located in that WIB.
Locate and click on the desired agency name within the WIB.
The selected agency will expand into a listing all of that agency’s locations in the selected WIB.
Locate and click on the desired agency location within the window’s tree structure to highlight. Then click the OK button
The pop-up window will disappear, and the selected values will be displayed in the Agency and Office fields. Once the Office selection has been defined, the WIB Assigned field will display the name of the Workforce Investment Board in which the selected Office is located.
Profiled – The Profiled display-only field specifies whether or not the customer has been profiled (Yes or No) in the Worker Profiling & Re-Employment System. Profiled Date - If the value in the Profiled field is set to Yes, the Profiled Date display-only field displays the date (in mm/dd/yyyy format) on which the customer was profiled in the Worker Profiling & Re-Employment System.
This pop-up window will list names of any inactive WIBs and agencies.
Such list entries will be highlighted in red text to indicate that they are inactive.
If you select list entries for inactive WIBs and agencies, the record cannot be successfully saved.
The Profiled and Profiled Date fields are not populated manually. They are automatically populated by a weekly upload file from the UI system.

EKOS User Manual – Creating a New Customer Record
Page 28 of 231
Customer Assignment – con’t UI Claimant - The UI Claimant field allows you to specify the customer’s current Unemployment Insurance status. Possible values for this field include:
Exhaustee None (Not Claiming UI) Other (Temp. Layoff or Perm Deferred) Seek (Subject to Work Search)
Click on the arrow button in the UI Claimant field, and select the appropriate value from the drop-down list.
Internet Resume - The Internet Resume check box allows you to determine whether the customer’s system-generated resume should be made available in the national job bank system. If the customer’s resume is to be available nationally:
Click on the Internet Resume check box.
A check mark in the check box indicates that it is selected (i.e., a check mark indicates a value of Yes for the field). To deselect this option:
Click on the check box again, and the check mark will disappear.
Confidential - For customers with a nationally-available internet resume (i.e., if the Internet Resume check box is selected), the Confidential check box allows you to determine whether the customer’s name and address should be displayed on the resume, as well as the names of their employers in the customer’s Work History information. The customer’s name and address and Work History information is displayed by default. If the customer’s name and address should not be displayed on their internet resume:
Click on the Confidential check box.
A check mark in the check box indicates that it is selected. To deselect this option:
Click on the check box again, and the check mark will disappear.
If the Profiled and Profiled Date fields have been populated by the system, the UI Claimant field will also be populated with “Seek (Subject to Work Search)” and not updateable.

EKOS User Manual – Creating a New Customer Record
Page 29 of 231
Ethnic Heritage The Ethnic Heritage section of the General Info page consists of two segments: Ethnic Heritage and Race Ethnic Heritage You can only select one value at a time to specify a customer’s ethnic heritage.
Select the appropriate radial button.
Race You can select one or more of the check boxes to specify the customer’s race.
Check the check box to indicate it is selected.
A check mark indicates a value of Yes for the field. To deselect an option:
Click on the check box again, and the check mark will disappear.

EKOS User Manual – Creating a New Customer Record
Page 30 of 231
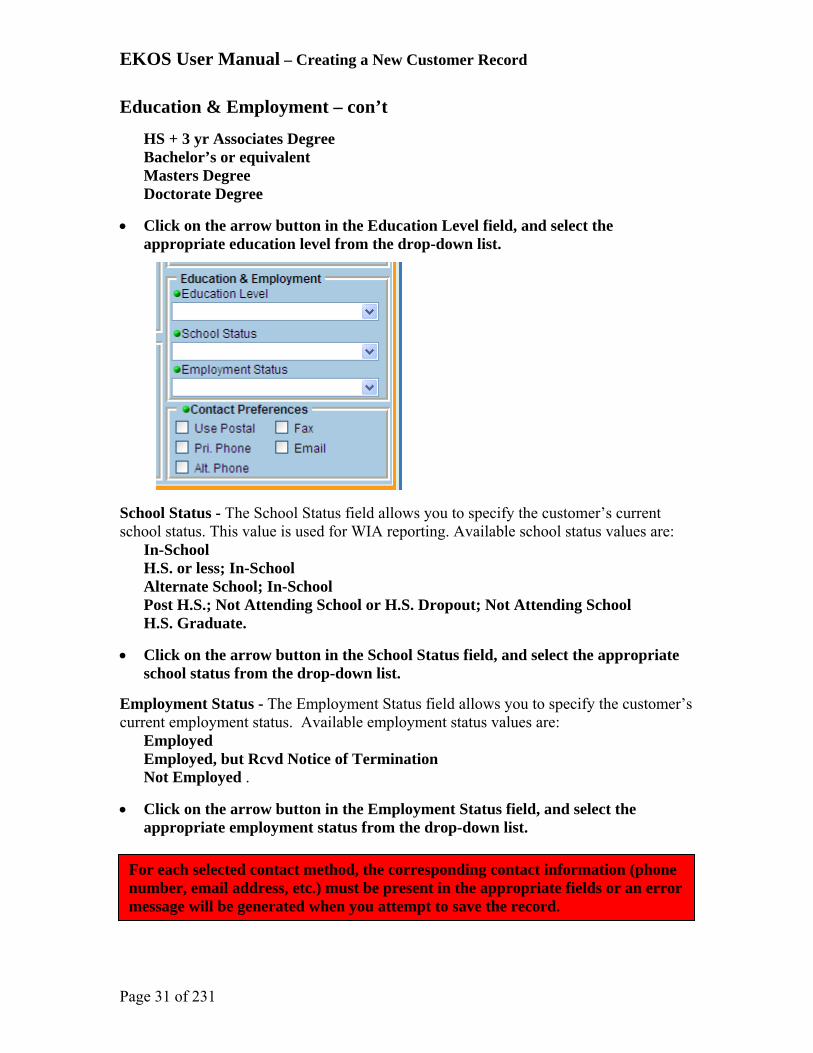
Education & Employment The fields in the Education & Employment section of the General Info page allow you to record and view the customer’s current education and employment status. Education Level – The Education Level field allows you to specify the customer’s current education level. Available education level values are:
Blank No Grade 1 Grade 2 Grade 3 Grade 4 Grade 5 Grade 6 Grade 7 Grade 8 Grade 9 Grade 10 Grade 11 Grade 12 Grade No Diploma GED 12 Grade - HS Graduate Disabled w/Cert./IEP, HS + 1 yr coll. or voc/tech - no degree HS + 2 yr coll. or voc/tech - no degree HS + 3 yr coll. or voc/tech - no degree HS + 1 yr Vocational Degree HS + 2 yr Vocational Degree HS + 3 yr Vocational Degree HS + 1 yr Associates Degree HS + 2 yr Associates Degree
The entries in these three fields are used for the Common Measures Federal Reporting but the values are frozen at the time of the time of the initial enrollment for the activity/service. Be sure the information accurately reflects the Job Seeker’s situation.
EKOS User Manual – Creating a New Customer Record
Page 31 of 231
Education & Employment – con’t
HS + 3 yr Associates Degree Bachelor’s or equivalent Masters Degree Doctorate Degree
Click on the arrow button in the Education Level field, and select the appropriate education level from the drop-down list.
School Status - The School Status field allows you to specify the customer’s current school status. This value is used for WIA reporting. Available school status values are:
In-School H.S. or less; In-School Alternate School; In-School Post H.S.; Not Attending School or H.S. Dropout; Not Attending School H.S. Graduate.
Click on the arrow button in the School Status field, and select the appropriate school status from the drop-down list.
Employment Status - The Employment Status field allows you to specify the customer’s current employment status. Available employment status values are:
Employed Employed, but Rcvd Notice of Termination Not Employed .
Click on the arrow button in the Employment Status field, and select the appropriate employment status from the drop-down list.
For each selected contact method, the corresponding contact information (phone number, email address, etc.) must be present in the appropriate fields or an error message will be generated when you attempt to save the record.
EKOS User Manual – Creating a New Customer Record
Page 32 of 231
Education & Employment – con’t
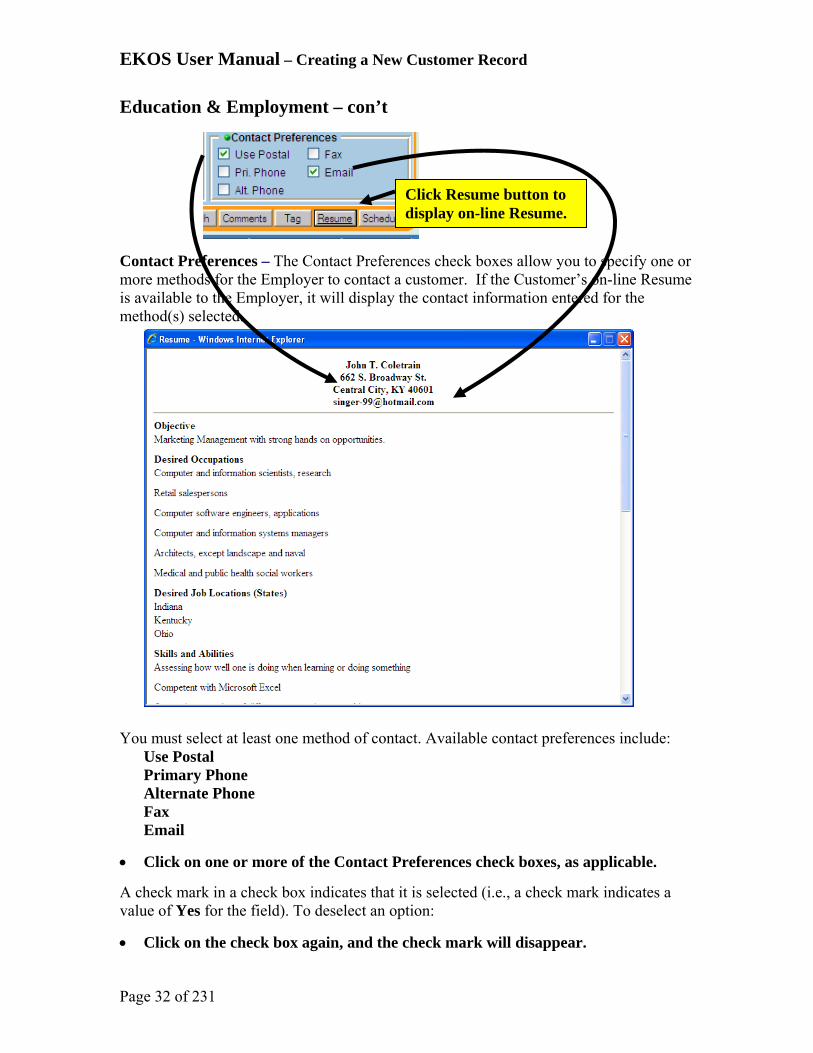
Contact Preferences – The Contact Preferences check boxes allow you to specify one or more methods for the Employer to contact a customer. If the Customer’s on-line Resume is available to the Employer, it will display the contact information entered for the method(s) selected. You must select at least one method of contact. Available contact preferences include:
Use Postal Primary Phone Alternate Phone Fax Email
Click on one or more of the Contact Preferences check boxes, as applicable.
A check mark in a check box indicates that it is selected (i.e., a check mark indicates a value of Yes for the field). To deselect an option:
Click on the check box again, and the check mark will disappear.
Click Resume button to display on-line Resume.

EKOS User Manual – Creating a New Customer Record
Page 33 of 231
Example of completed Gen Info page

EKOS User Manual – Creating a New Customer Record
Page 34 of 231
Additional Information (Add’l Info) Tab The customer information on the Add’l Info page of the EKOS Customer Detail window relates to the customer’s program participation, military service, membership on various lists. as well as employment and shift preferences.
Click on the Add’l Info tab. The Additional Info page will appear The Additional Info page consists of six sections:
Programs Military Service Customer List Participation Employment Preferences Shift Preferences Selective Service
Some data elements on this page can be criteria for a customer search, so be as thorough as possible when entering this information.

EKOS User Manual – Creating a New Customer Record
Page 35 of 231
Programs The Programs section of the Additional Info page allows you to specify customer participation in programs and public assistance, define the customer’s income and disability status, and specify whether the customer is a migrant or seasonal worker. The Programs/Public Assistance Selection button launches a pop-up window that allows you to specify the customer’s current (not past) participation or interest in various programs (used for WIA reporting).
Click the Programs/Public Assistance Selection button and the Programs & Public Assistance pop-up window will appear.
This window features a list of programs and a list of public assistance types. To specify that the customer is currently participating or interested in one or more programs, for each listed Programs field:
Click on the arrow button and select Yes or No from the drop-down list.
In the corresponding Date field for each Yes, enter the date (in mmddyyyy format) on which the customer began participation in the program.
For each Program, click Yes or No.
For each Yes, enter the date on which the customer began participation in the Program.

EKOS User Manual – Creating a New Customer Record
Page 36 of 231
Programs – con’t
To specify that the customer is currently receiving one or more types of public assistance: For each corresponding type of Public Assistance:
Click on the arrow button and select Yes or NO from the drop-down list.
In the corresponding Date field for each Yes, enter the date (in mmddyyyy format) on which the customer began participation in the Public Assistance program.
Click on the Submit button to save this information, or the Cancel button to ignore your entries.
The Programs & Public Assistance pop-up window will disappear, returning you to the Additional Info page of the Customer Detail window.
For each type of Public Assistance, click Yes or NO.
For each Yes, enter the date) on which the customer began participation in the Public Assistance program.

EKOS User Manual – Creating a New Customer Record
Page 37 of 231
Income Status Lower Living Standard – The Lower Living Standard field is used to indicate whether the customer’s current income meets your region’s Lower Living Standard. Possible values are:
Yes No N/A (the default value).
Click on the arrow button in the Lower Living Standard field, and select Yes, No, or N/A from the drop-down list.
Income 70% LLSIL – The Income 70% LLSIL field is used to indicate whether the customer’s current income is 70% or less of your region’s Lower Living Standard. Possible values are:
Yes No N/A (the default value).
Click on the arrow button in the Income 70% LLSIL field, and select Yes, No, or N/A from the drop-down list.
Local Priority - If there are insufficient funds available in your area, the Local Priority field can be used to indicate that the customer has a priority for funding. Possible values are:
Yes No N/A (the default value).
Click on the arrow button in the Local Priority field, and select Yes, No, or N/A from the drop-down list.
Disability Status – The Disability Status field is used to indicate the customer’s current disability status. Possible values are:
Disabled Not Disabled.
Click on the arrow button in the Disability Status field, and select Disabled, Not Disabled or Not Disclosed from the drop-down list.

EKOS User Manual – Creating a New Customer Record
Page 38 of 231
Income Status – con’t
Disability Category – The Disability Category field is used to indicate the customer’s current disability category. This is a required field when Disability Status is “Disabled”. Possible values are:
Physical Impairment Mental Impairment Both Physical and Mental Imp Not Disclosed.
Click on the arrow button in the Disability Category field, and select a value from the drop-down list.
Migrant/Seasonal Worker – The Migrant/Seasonal Worker radio buttons are used to indicate whether the customer is a migrant/seasonal worker.
If the customer is a migrant/seasonal worker, click the Yes radio button. If not, click the No radio button.
The following fields with drop down lists will be displayed on the page: Class - Available values for this field are:
Migrant Farm Worker Migrant Farm Worker.
Click on the arrow button in the Class field, and select a value from the drop-down list.
Farmwork Type - Available values for this field are: Agricult. Production and Services Food Processing Establishment
Click on the arrow button in the Farmwork Type field, and select a value from the drop-down list.
If the customer is a migrant/seasonal worker, then the customer must also have a valid Date of Birth.
EKOS User Manual – Creating a New Customer Record
Page 39 of 231
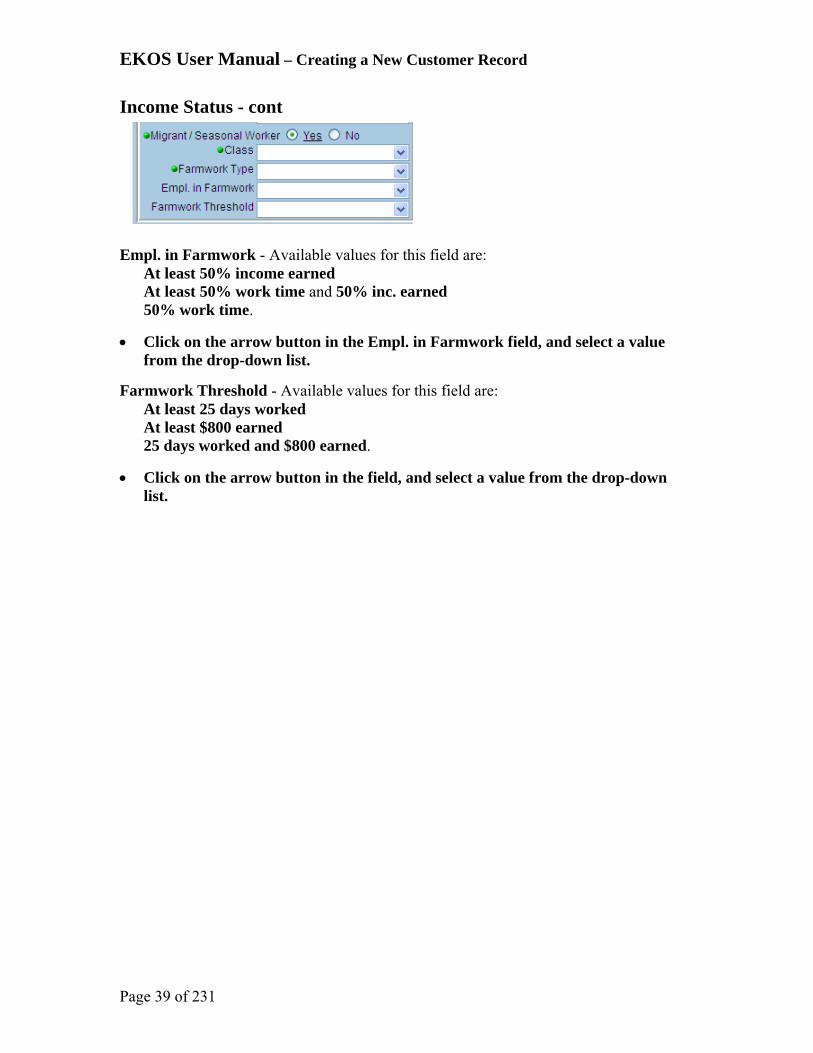
Income Status - cont Empl. in Farmwork - Available values for this field are:
At least 50% income earned At least 50% work time and 50% inc. earned 50% work time.
Click on the arrow button in the Empl. in Farmwork field, and select a value from the drop-down list.
Farmwork Threshold - Available values for this field are: At least 25 days worked At least $800 earned 25 days worked and $800 earned.
Click on the arrow button in the field, and select a value from the drop-down list.
EKOS User Manual – Creating a New Customer Record
Page 40 of 231
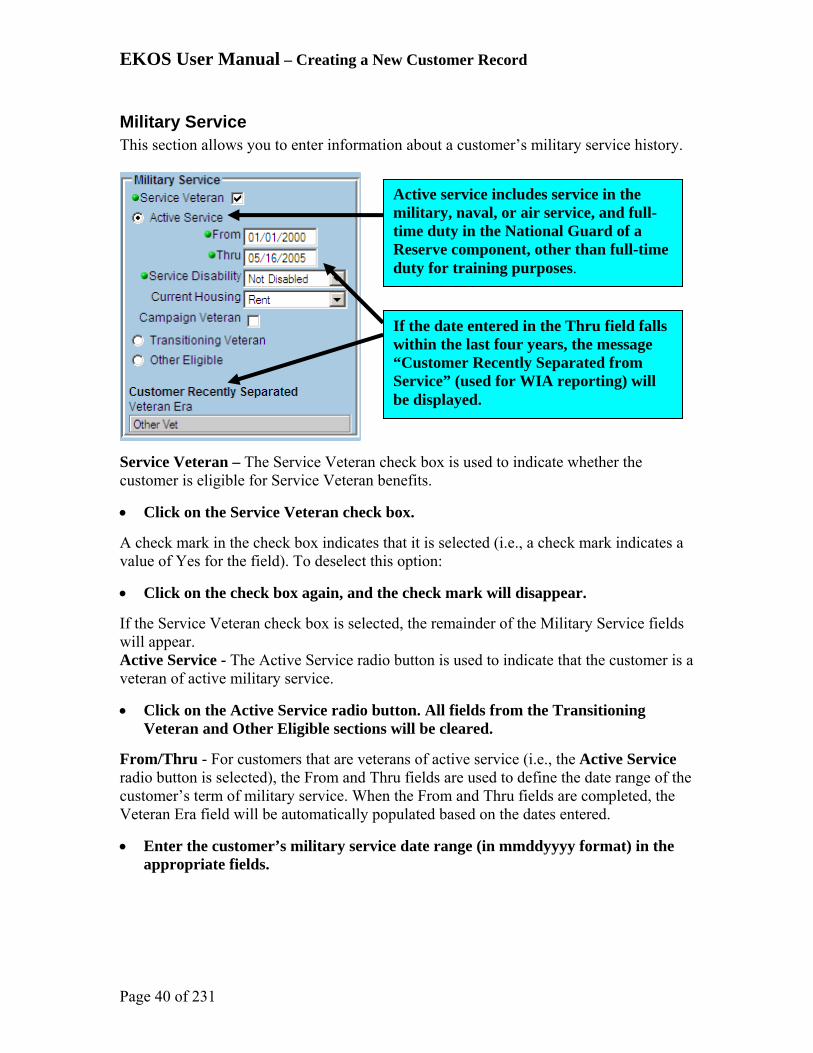
Military Service This section allows you to enter information about a customer’s military service history.
Service Veteran – The Service Veteran check box is used to indicate whether the customer is eligible for Service Veteran benefits.
Click on the Service Veteran check box.
A check mark in the check box indicates that it is selected (i.e., a check mark indicates a value of Yes for the field). To deselect this option:
Click on the check box again, and the check mark will disappear.
If the Service Veteran check box is selected, the remainder of the Military Service fields will appear. Active Service - The Active Service radio button is used to indicate that the customer is a veteran of active military service.
Click on the Active Service radio button. All fields from the Transitioning Veteran and Other Eligible sections will be cleared.
From/Thru - For customers that are veterans of active service (i.e., the Active Service radio button is selected), the From and Thru fields are used to define the date range of the customer’s term of military service. When the From and Thru fields are completed, the Veteran Era field will be automatically populated based on the dates entered.
Enter the customer’s military service date range (in mmddyyyy format) in the appropriate fields.
Active service includes service in the military, naval, or air service, and full-time duty in the National Guard of a Reserve component, other than full-time duty for training purposes.
If the date entered in the Thru field falls within the last four years, the message “Customer Recently Separated from Service” (used for WIA reporting) will be displayed.

EKOS User Manual – Creating a New Customer Record
Page 41 of 231
Military Service – con’t
Service Disability – The Service Disability field allows you to specify the customer’s level of eligibility for Service Disability benefits. Available values include:
Disabled - Disability amount is 20% or less. Not Disabled Special Disabled - Disability amount is 30% or more.
Click on the arrow button in the Service Disability field and select the appropriate level of Service Disability eligibility from the drop-down list.
Current Housing – The Current Housing field allows you to specify the customer’s current housing situation. Available values for this field are:
Foster Child Homeless Own Home Rent Runaway
Click on the arrow button in the Current Housing field and select the appropriate value from the drop-down list.
Campaign Veteran - The Campaign Veteran check box is used to indicate whether the customer is a military campaign veteran. To use this field:
If the customer is a Military Campaign Veteran, click on the Campaign Veteran check box.
A check mark in the check box indicates that it is selected (i.e., a check mark indicates a value of Yes for the field). To deselect this option:
Click on the check box again, and the check mark will disappear.
In Country – The In Country check box is used to indicate whether the customer served in Vietnam between 02/28/1961 and 08/04/1964.
If the customer served in Vietnam between 02/28/1961 and 08/04/1964, click on the In Country check box.
A check mark in the check box indicates that it is selected (i.e., a check mark indicates a value of Yes for the field). To deselect this option:
Click on the check box again, and the check mark will disappear.
A Campaign Veteran is any veteran who served on active duty during a period of war or in a campaign or expedition for which a campaign badge is authorized and was discharged or released from such duty with other than a dishonorable discharge (e.g. Gulf War).

EKOS User Manual – Creating a New Customer Record
Page 42 of 231
Military Service – con’t Transitioning Veteran - The Transitioning Veteran radio button is used to indicate that the customer is transitioning due to retirement, discharge or they are a spouse. To use the Transitioning Veteran button:
Click on the Transitioning Veteran radio button. All fields from the Active Service and Other Eligible sections will be cleared.
Type - The Type field is used to define the type of transition that the customer is going to perform. Available values are:
Discharge Retirement Spouse
To use the Type field:
Click on the arrow button in the Type field and select the appropriate type from the drop-down list.
If the customer’s birth date is provided on the General Info page, EKOS performs data validation on the From value to verify that the customer was at least 16 years of age at the start of active service
If the Planned Thru date is equal to or before the current system date, an error message will be generated stating that the Planned Thru date is invalid
If Active Service is checked:
If the dates between the From field and the Thru field contain any day between 08/05/1964 and 05/07/1975 then the Veteran Era field will display “Vietnam”.
If the date entered in the Thru field is between 02/28/1961 and 08/04/1964 and the In Country checkbox is checked, then the Veteran Era field will display “Vietnam”.
If the date entered in the Thru field is between 02/28/1961 and 08/04/1964 and the In Country checkbox is unchecked, then the Veteran Era field will display “Other Vet”.
If none of the above apply, then the Veteran Era field will display “Other Vet”.

EKOS User Manual – Creating a New Customer Record
Page 43 of 231
Military Service – con’t
From - The From field is used to define the date range of the customer’s term of military service. When the From field is completed, the Veteran Era field will be automatically populated based on the date entered. To use the From field:
Enter the customer’s military service date range (in mmddyyyy format) in the Planned Thru field.
Planned Thru - The Planned Thru field is used to define the date that the customer’s plans on leaving military service. To use the Planned Thru field:
Enter the customer’s military service date range (in mmddyyyy format) in the Planned Thru field.
Other Eligible - The Other Eligible radio button is used to indicate that the customer is eligible for veteran benefits but may not be a Veteran. To use the Other Eligible button:
Click on the Other Eligible radio button. All fields from the Active Service and Transitioning Veteran sections will be cleared.
Veteran Era – The Veteran Era display-only field shows the customer’s veteran era based on the date range entered in the From and Thru fields. This field cannot be edited. Possible values include:
Vietnam Other Vet Other Eligible Transitioning Service Member Transitioning Service Member Spouse Transitioning Vietnam Service Member

EKOS User Manual – Creating a New Customer Record
Page 44 of 231
Military Service – con’t If Transitioning Veteran is checked:
If Type equals “Spouse”, then the Veteran Era field will display: “Transitioning Service Member Spouse.”
If Type equals “Retirement” or “Discharge” and the date entered in the Planned Thru field is equal to or before 05/07/1975, then the Veteran Era field will display:
“Transitioning Vietnam Service Member.” If Type equals “Retirement” or “Discharge” and the date entered in the Planned Thru field is after 05/07/1975, then the Veteran Era field will display:
“Transitioning Service Member.” If Other Eligible is checked: The Veteran Era field will display:
“Other Eligible”.
EKOS User Manual – Creating a New Customer Record
Page 45 of 231
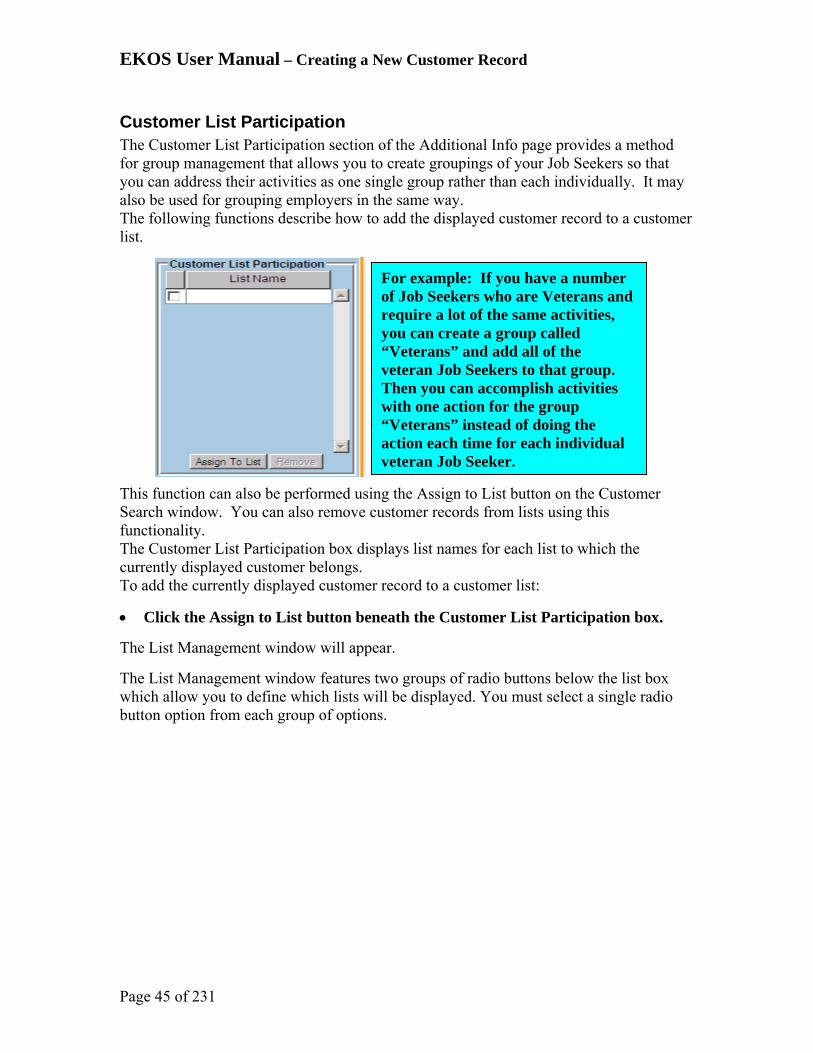
Customer List Participation The Customer List Participation section of the Additional Info page provides a method for group management that allows you to create groupings of your Job Seekers so that you can address their activities as one single group rather than each individually. It may also be used for grouping employers in the same way. The following functions describe how to add the displayed customer record to a customer list. This function can also be performed using the Assign to List button on the Customer Search window. You can also remove customer records from lists using this functionality. The Customer List Participation box displays list names for each list to which the currently displayed customer belongs. To add the currently displayed customer record to a customer list:
Click the Assign to List button beneath the Customer List Participation box.
The List Management window will appear.
The List Management window features two groups of radio buttons below the list box which allow you to define which lists will be displayed. You must select a single radio button option from each group of options.
For example: If you have a number of Job Seekers who are Veterans and require a lot of the same activities, you can create a group called “Veterans” and add all of the veteran Job Seekers to that group. Then you can accomplish activities with one action for the group “Veterans” instead of doing the action each time for each individual veteran Job Seeker.

EKOS User Manual – Creating a New Customer Record
Page 46 of 231
Customer List Participation – con’t
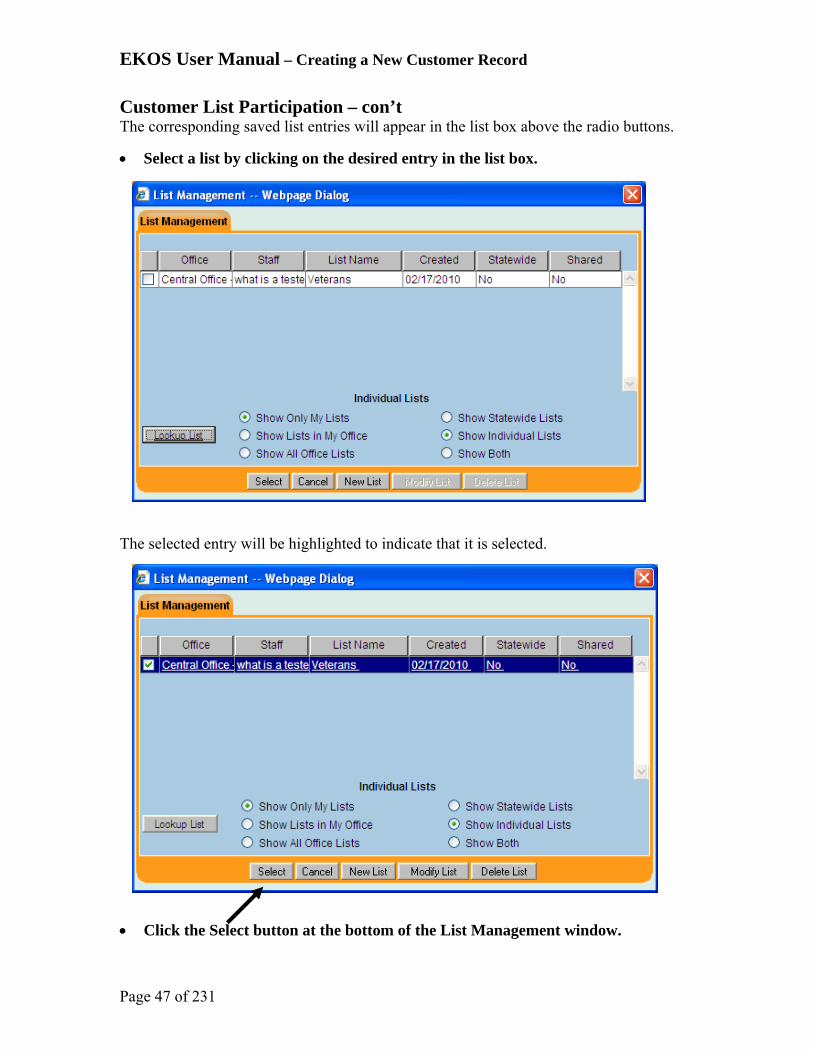
The leftmost group of radio buttons includes: Show Only My Lists - Selecting the Show Only My Lists radio button will display customer lists which are owned/administered only by the staff person that is currently logged in Show Lists in My Office - Selecting the Show Lists in My Office radio button will display customer lists which are owned/administered by any staff person that is in the same office as the person that is currently logged in. Show All Office Lists - Selecting the Show All Office Lists radio button will display customer lists which are owned/administered by any staff person in any office in the entire state.
The rightmost group of radio buttons applies to the Statewide flag, which can be selected for a list. This group of radio buttons includes: Show Statewide Lists - Selecting the Show Statewide Lists radio button will display customer lists for which the Statewide flag has been selected. Show Individual Lists - Selecting the Show Individual Lists radio button will display customer lists for which the Statewide flag has not been selected. Show Both - Selecting the Show Both radio button will display all customer lists, regardless of the status of the Statewide flag.
Select a radio button option from each group of radio buttons on this page.
Click the Lookup List button.
EKOS User Manual – Creating a New Customer Record
Page 47 of 231
Customer List Participation – con’t The corresponding saved list entries will appear in the list box above the radio buttons.
Select a list by clicking on the desired entry in the list box. The selected entry will be highlighted to indicate that it is selected. Click the Select button at the bottom of the List Management window.

EKOS User Manual – Creating a New Customer Record
Page 48 of 231
Customer List Participation – con’t The customer record will be added to the selected list. Once a customer record has been added to a list, the list entry will appear in the Customer List Participation box for that customer. The List Management window can also be used to create, modify, and delete customer lists. To remove a customer record from a list:
In the Customer List Participation box, click on the entry for the list from which the customer will be deleted.
The list entry will be highlighted to indicate that it is selected. Click the Remove button beneath the Customer List Participation box.

EKOS User Manual – Creating a New Customer Record
Page 49 of 231
Customer List Participation – con’t A confirmation window will appear, asking you to confirm the customer’s removal from the list.
Click OK to confirm and perform the removal.
To cancel the removal,
Click Cancel.
Once a customer record has been removed from a list, the list entry will no longer appear in the Customer List Participation box for that customer.
Employment Preferences The Employment Preferences section of the Additional Info page allows you to enter a customer’s preferences regarding employment, including a job’s Work Week, Duration, Salary, Pay Unit, and the customer’s Date Available. Work Week – The Work Week field allows you to define a customer’s desired work week. Work week values include:
Any Full Time Part Time
To use the Work Week field:
Click on the arrow button in the Work Week field, and select the appropriate value from the drop-down list.
Duration – The Duration field allows you to enter a customer’s desired job duration. Available duration values include:
Regular Regular or Temporary Temporary
To use the Duration field:
Click on the arrow button in the Duration field, and select the desired duration value from the drop-down list.

EKOS User Manual – Creating a New Customer Record
Page 50 of 231
Employment Preferences – con’t Salary - The Salary field allows you to define a customer’s desired starting pay amount. Salary values are used in conjunction with the Pay Unit to determine the desired pay amount. Salary values must be entered in whole dollar and cent amounts, which must be separated by a decimal point. Commas and dollar signs should not be used. To use the Salary:
Enter the desired starting pay amount (in the format detailed above) in the Salary field
Pay Unit - The Pay Unit field allows you to define a customer’s desired starting pay amount in conjunction with the Salary value The Pay Unit values are:
Hourly Daily Weekly Monthly Yearly Other
To select the desired Pay Unit for the specified pay amount or pay range:
Click on the arrow button in the Pay Unit field and select the desired unit of measure from the drop-down list.
Date Available – The Date Available field is used to indicate the date on which the customer is available to begin work. To use the Date Available field:
Enter the date (in mmddyyyy format) on which the customer is available to begin employment.
EKOS validates the Salary and Pay Unit values as follows: If Hourly is chosen for the Pay Unit, the acceptable Salary values are $4.90 - $168.26 If Daily is chosen for the Pay Unit, the acceptable Salary values are $39.20 - $1,346.15 If Weekly is chosen for the Pay Unit, the acceptable Salary values are $196.00 - $6,730.76 If Monthly is chosen for the Pay Unit, the acceptable Salary values are $849.34 - $29,166.66 If Yearly is chosen for the Pay Unit, the acceptable Salary values are $10,192.00 - $350,000.00 The maximum allowable normalized salary in EKOS is $350,000.00 per year.
If the salary value entered in the Salary and Pay Unit fields exceeds $350,000.00/year, an error message will be generated.

EKOS User Manual – Creating a New Customer Record
Page 51 of 231
Shift Preference The Shift Preference fields allow you to enter a customer’s preferred working shift(s). This section contains the following fields:
Work Any Shift First Shift Second Shift Third Shift Split Shift Rotating Shift
Work Any Shift – The Work Any Shift field is used to indicate whether the customer is willing to work any available shift. If Yes is selected, all of the Shift Selection check boxes below this field will be automatically selected. If No is selected, all of the Shift Selection boxes will be cleared (if necessary) so that the customer’s individual preferred shifts can be selected. To use the Work Any Shift field: If the customer is willing to work any available shift:
Click the Yes radio button.
All of the Shift Selection check boxes (explained below) will be automatically selected. If the customer is not willing to work any available shift:
Click the No radio button.
Any entries in the other Shift Preference check boxes will be cleared (if necessary). The other Shift Preference check boxes allow you to select the individual shifts that the Job Seeker is willing to work. To use the Shift Selection check boxes:
Click on one or more of the Shift Preference check boxes, as applicable.
A check mark in a check box indicates that it is selected (i.e., a check mark indicates a value of Yes for the field). To deselect an option:
Click on the check box again, and the check mark will disappear.

EKOS User Manual – Creating a New Customer Record
Page 52 of 231
Selective Service The Selective Service section of the Additional Info page allows you to enter the customers Selective Service registration information Selective Service? - The Selective Service? Check box is used to indicate whether the customer is eligible for Selective Service registration. To use this check box, if the customer is eligible for Selective Service registration:
Click on this check box.
A check mark in the check box indicates that it is selected (i.e., a check mark indicates a value of “Yes” for this field). To deselect this option:
Click on the check box, and the check mark will disappear.
If the Selective Service? check box is selected, the Selective Service # field and Register/Lookup button will appear. This field is used to record the customer’s Selective Service registration number. To do so:
Place the cursor in the # field and enter the customer’s Selective Service registration number (up to 11 characters).
If the customer’s Selective Service number is unknown, or if the customer is unregistered, the Register/Lookup button can be used to find the customer’s number, or to register the customer. The button navigates the user to the Selective Service System’s web site. This site can be used to find the customer’s Selective Service registration number, or to register the customer. To use this feature: 1.
Click the Register/Lookup button to the right of the #field.
A client browser window will open and navigate to the Selective Service System web site.

EKOS User Manual – Creating a New Customer Record
Page 53 of 231
The Objective Tab Much of the information recorded on this page is used to build a customer’s EKOS resume. Some data elements on the Objective page can be used as criteria for a customer search, so you should attempt to be as thorough as possible when entering this information. To view the Objective page:
Click on the Objective tab. The Objective page will appear.
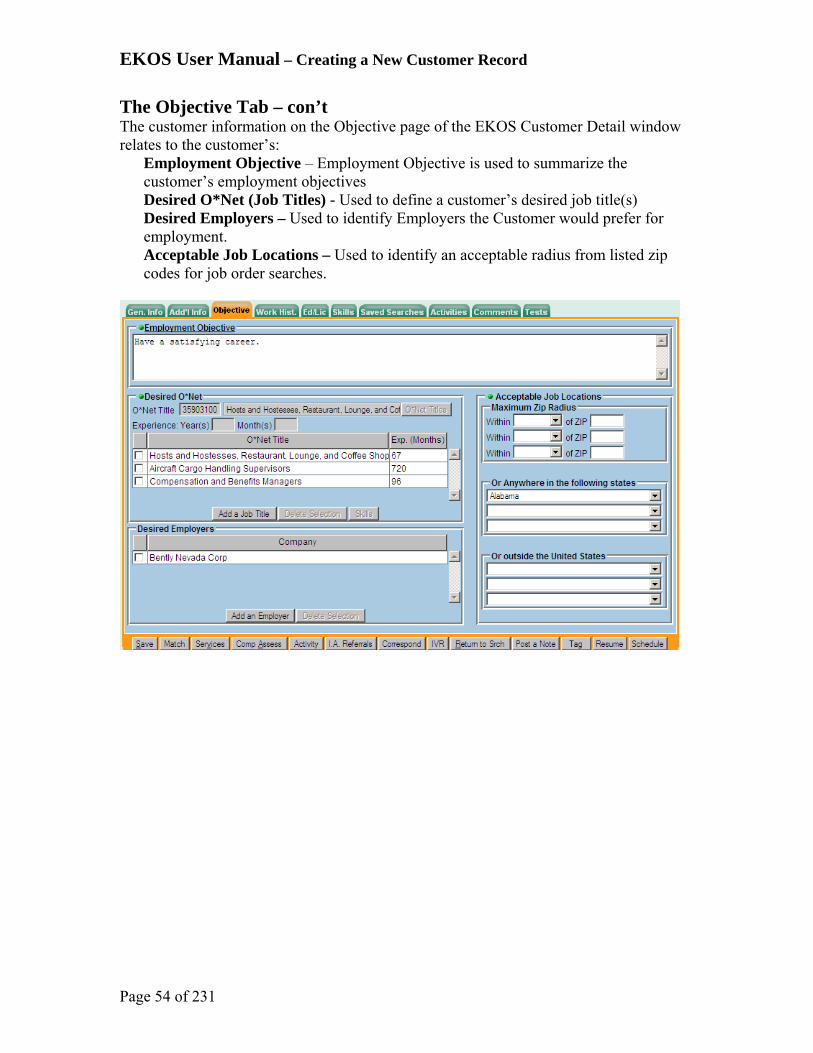
EKOS User Manual – Creating a New Customer Record
Page 54 of 231
The Objective Tab – con’t The customer information on the Objective page of the EKOS Customer Detail window relates to the customer’s:
Employment Objective – Employment Objective is used to summarize the customer’s employment objectives Desired O*Net (Job Titles) - Used to define a customer’s desired job title(s) Desired Employers – Used to identify Employers the Customer would prefer for employment. Acceptable Job Locations – Used to identify an acceptable radius from listed zip codes for job order searches.
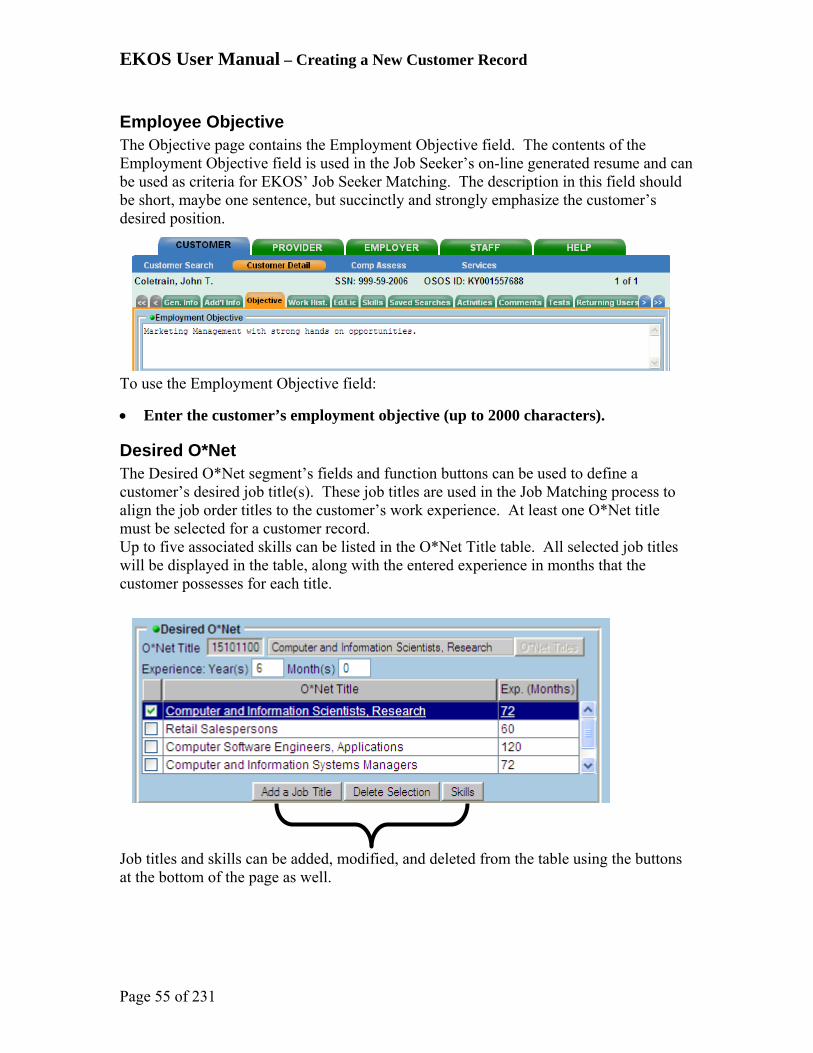
EKOS User Manual – Creating a New Customer Record
Page 55 of 231
Employee Objective The Objective page contains the Employment Objective field. The contents of the Employment Objective field is used in the Job Seeker’s on-line generated resume and can be used as criteria for EKOS’ Job Seeker Matching. The description in this field should be short, maybe one sentence, but succinctly and strongly emphasize the customer’s desired position. To use the Employment Objective field:
Enter the customer’s employment objective (up to 2000 characters).
Desired O*Net The Desired O*Net segment’s fields and function buttons can be used to define a customer’s desired job title(s). These job titles are used in the Job Matching process to align the job order titles to the customer’s work experience. At least one O*Net title must be selected for a customer record. Up to five associated skills can be listed in the O*Net Title table. All selected job titles will be displayed in the table, along with the entered experience in months that the customer possesses for each title. Job titles and skills can be added, modified, and deleted from the table using the buttons at the bottom of the page as well.

EKOS User Manual – Creating a New Customer Record
Page 56 of 231
Desired O*Net – con’t Customer skill information is used to build a customer’s EKOS resume. The customer may provide their skill information either in the table or by entering them into Additional Skills Text field on the Skills page of the Customer Detail window. To manually enter a O*Net code:
Click on the O*Net Code field to the right of the O*Net Titles label.
Enter O*Net Code. If a valid code is entered the O*Net Title field will fill in, and the O*Net Code will no longer appear in red.
If you do not know the Title code and want to select an O*Net Title from a table, use the Select O*Net popup option:
Click the O*Net Titles button. The Selected O*Net pop-up window will appear.
Failing to provide customer skill information using either of these methods will result in an error message when you attempt to save the customer record.

EKOS User Manual – Creating a New Customer Record
Page 57 of 231
AutoCoder Tab Using the AutoCoder tab:
Enter phrases you want the title, or description to contain in the Title, and Description fields.
Click Search to display the results for your desired O*Net entry in the AutoCoder Search Results table.
When selected, the row will highlight and the Current O*Net fields will fill to indicate the selection.
If AutoCoder is disabled the AutoCoder tab will not appear and Hierarchy Search will be the default tab.
If the O*Net Code field on the Objective tab contains a valid O*Net code the O*Net Code and O*Net Title fields on the popup will be pre-filled.
Enter the Title or Description you want in the Title, and Description fields.
Click Search button to display the results.

EKOS User Manual – Creating a New Customer Record
Page 58 of 231
AutoCoder Tab – con’t
AutoCoder Search Results table: - You can click on any column heading to sort the table by that column.
Code: The Code field lists O*Net codes. O*Net Title: The O*Net Title field lists O*Net Titles. Match Score: The Match Score field lists percentages of how exact your search criteria matched each O*Net.
The Select, Cancel, and Clear buttons have the same functionality on every tab: Select closes the window and sets the O*Net field value on the Objective
tab. Cancel closes the window with no changes to the O*Net field value on the
Objective tab. Clear closes the window and clears the O*Net field value on the Objective
tab.

EKOS User Manual – Creating a New Customer Record
Page 59 of 231
Hierarchy Search Tab
The Hierarchy will pre-select the Current O*Net if it is not null. To select the desired O*Net Title from the pop-up table:
Locate the desired O*Net job title within the window’s tree structure.
Check the desired title entry to highlight it and the Current O*Net fields will pre-fill to indicate its selection.
Click Select.
The highlighted O*Net Title code and Description will populate the corresponding Desired O*Net fields.

EKOS User Manual – Creating a New Customer Record
Page 60 of 231
The Details Tab The Code, Title, and Description fields will pre-fill with values for the Current O*Net. In the Internet Resources section:
Select one of the listed resources by highlighting it.
Click the Go button.
A new window will open to the Internet Resource you have selected. The page will display details on the Current O*Net job title.
Click Go
Select Resource

EKOS User Manual – Creating a New Customer Record
Page 61 of 231
The Details Tab – con’t
To modify experience for an O*Net Title:
Click on the Job Title you wish to modify the experience for.
The row in the table will highlight and the Experience Year(s) and Month(s) fields in the top section will fill in with information for the selected Job Title to indicate the selection.
In the Year(s) field, enter the number of years of experience (up to 60) for the selected job title.
In the Month(s) field, enter the number of months of experience for the selected job title.
The Exp. (Months) field on the right will be updated to reflect the total months calculated from the years and months you entered in the Experience: Year(s) Month(s) fields.
Select Job Title
Key Number of Years and Months Experience
Updated Total Months Experience

EKOS User Manual – Creating a New Customer Record
Page 62 of 231
Delete an O*Net Title
In the Desired O*Net table:
Click on the list entry for the job title to be deleted.
The selected entry will be highlighted to indicate its selection.
Click the Delete Selection button.
A confirmation window will appear, asking you to confirm the job title’s deletion.
Click OK to confirm and perform the deletion. The selected title will be removed from the Desired O*Net table.
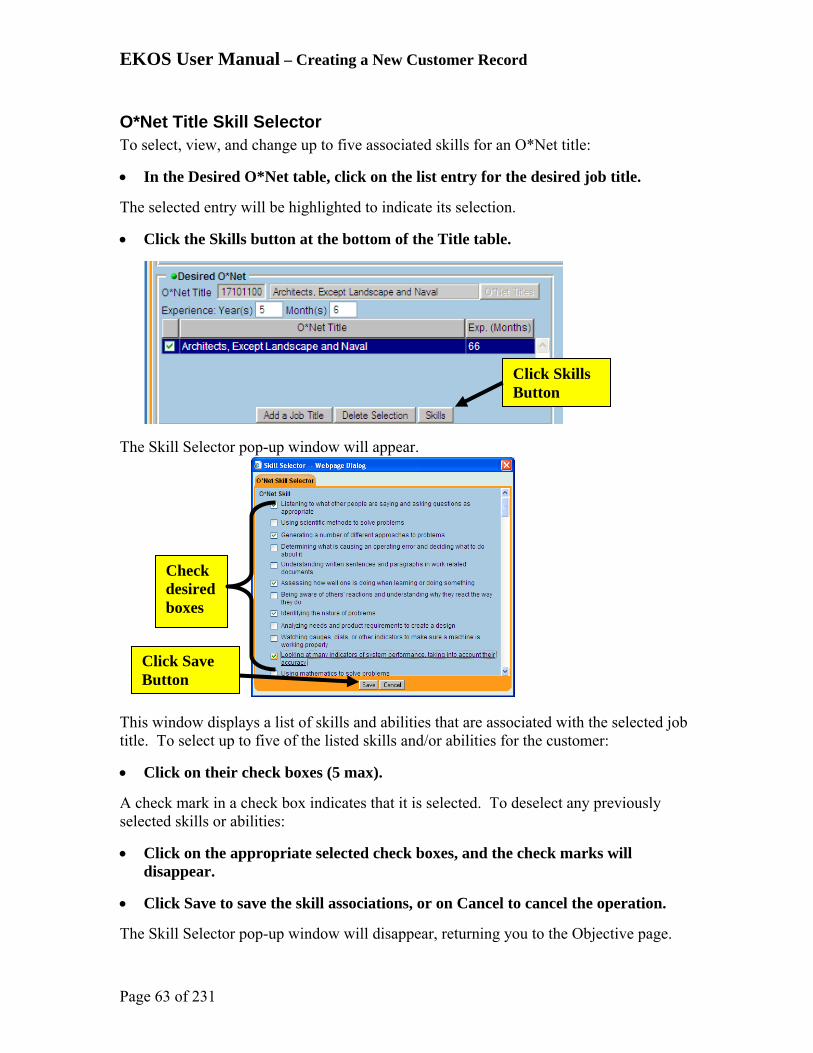
EKOS User Manual – Creating a New Customer Record
Page 63 of 231
O*Net Title Skill Selector To select, view, and change up to five associated skills for an O*Net title:
In the Desired O*Net table, click on the list entry for the desired job title.
The selected entry will be highlighted to indicate its selection.
Click the Skills button at the bottom of the Title table.
The Skill Selector pop-up window will appear. This window displays a list of skills and abilities that are associated with the selected job title. To select up to five of the listed skills and/or abilities for the customer:
Click on their check boxes (5 max).
A check mark in a check box indicates that it is selected. To deselect any previously selected skills or abilities:
Click on the appropriate selected check boxes, and the check marks will disappear.
Click Save to save the skill associations, or on Cancel to cancel the operation.
The Skill Selector pop-up window will disappear, returning you to the Objective page.
Click Skills Button
Click Save Button
Check desired boxes

EKOS User Manual – Creating a New Customer Record
Page 64 of 231
Desired Employers
The Desired Employers list box and function buttons are used to select a customer’s desired employers by selecting from a list of employer names. The Desired Employers list, from which these employer names are selected, is populated with employers that have an agreement with the state/local office to conduct candidate screening and selection on the employer’s behalf. All selected employer names will be displayed in the Desired Employers list box. Employer names can be added and deleted from this list box. To add a desired employer for a customer:
Click the Add an Employer button.
The Desired Employers pop-up window will appear, listing all EKOS Desired Employers.
The employer names available for addition are obtained in a transaction that is controlled by the Employer Query security process.
In order to use this feature, the user's group must be granted access to the Employer Query process using the EKOS Admin application.
If the user does not have Employer Query permissions, the Add an Employer button will be grayed out and unavailable for use.
Previously added employer names can still be deleted from the list. If the Desired Employers list contains more than 500 employer names, only
the first 500 will be available for selection from the Desired Employers list box.
If this is the case, a note will be displayed on the screen next to the list box indicating the condition.
Click Add an Employer Button

EKOS User Manual – Creating a New Customer Record
Page 65 of 231
Desired Employers’ Pop-up List Click on a desired employer entry within the list box. The entry will be highlighted to indicate that it is selected.
Click OK.
The Desired Employers pop-up window will disappear, returning you to the Objective page. The selected employer will be listed in the Desired Employers list box. To cancel the operation:
Click Cancel.
To add more desired employers for the customer, repeat for each desired employer. To delete an employer entry:
Click on the list entry to be deleted.
The selected entry will be highlighted to indicate its selection.
Click the Delete Selection button.
A confirmation window will appear, asking you to confirm the employer’s deletion.
Click OK to confirm and perform the deletion, or Cancel to cancel the operation.
Check an Employer’s Box to Select
Click OK
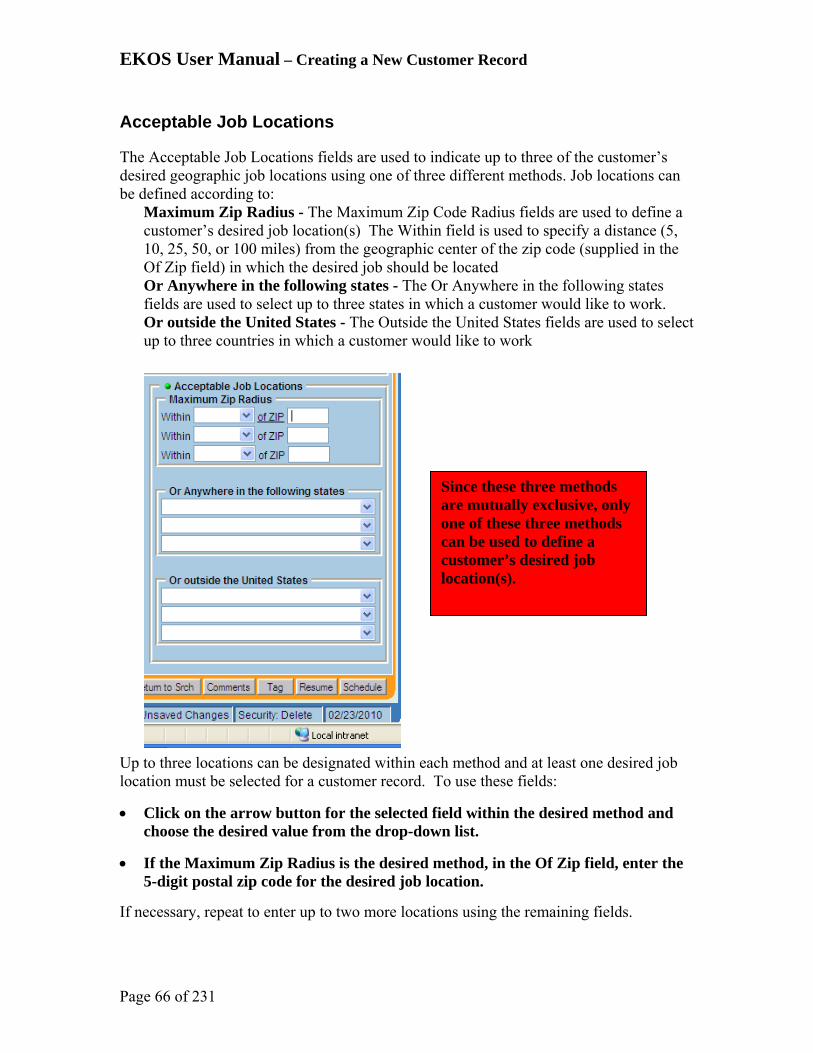
EKOS User Manual – Creating a New Customer Record
Page 66 of 231
Since these three methods are mutually exclusive, only one of these three methods can be used to define a customer’s desired job location(s).
Acceptable Job Locations
The Acceptable Job Locations fields are used to indicate up to three of the customer’s desired geographic job locations using one of three different methods. Job locations can be defined according to:
Maximum Zip Radius - The Maximum Zip Code Radius fields are used to define a customer’s desired job location(s) The Within field is used to specify a distance (5, 10, 25, 50, or 100 miles) from the geographic center of the zip code (supplied in the Of Zip field) in which the desired job should be located Or Anywhere in the following states - The Or Anywhere in the following states fields are used to select up to three states in which a customer would like to work. Or outside the United States - The Outside the United States fields are used to select up to three countries in which a customer would like to work
Up to three locations can be designated within each method and at least one desired job location must be selected for a customer record. To use these fields:
Click on the arrow button for the selected field within the desired method and choose the desired value from the drop-down list.
If the Maximum Zip Radius is the desired method, in the Of Zip field, enter the 5-digit postal zip code for the desired job location.
If necessary, repeat to enter up to two more locations using the remaining fields.

EKOS User Manual – Creating a New Customer Record
Page 67 of 231
Work History Tab
The Work History page of the EKOS Customer Detail window should be given special consideration. While this tab is often either ignored or only partially completed by the Job Seeker during Self-Registration, this information is used to generate the Job Seeker’s resume which is used by perspective Employers to determine which candidates to contact. It is also used to record, view, change, and/or delete previous jobs for a customer. All defined previous employers for a customer will be listed in the list box at the bottom of the page. Click on an entry in the list box to cause the fields displayed to be updateable.
The information recorded on this page is used to build a customer’s EKOS resume.
While no work history entries are required in order to save the customer record, this page contains several Detail fields that are required to enter a work history job entry.

EKOS User Manual – Creating a New Customer Record
Page 68 of 231
Add a New Work History Job Entry To add a new job entry for the Work History page:
Before attempting to enter information in any of the Detail fields, click the New Job Entry button.
This will clear any information from these fields so that a new job entry can be added.
In the Job Title field, enter the title for the job (up to 120 characters). OR Click the O*Net Titles button next to the Job Title field.
The Select O*Net pop-up window will appear.
Click to clear fields for new entry
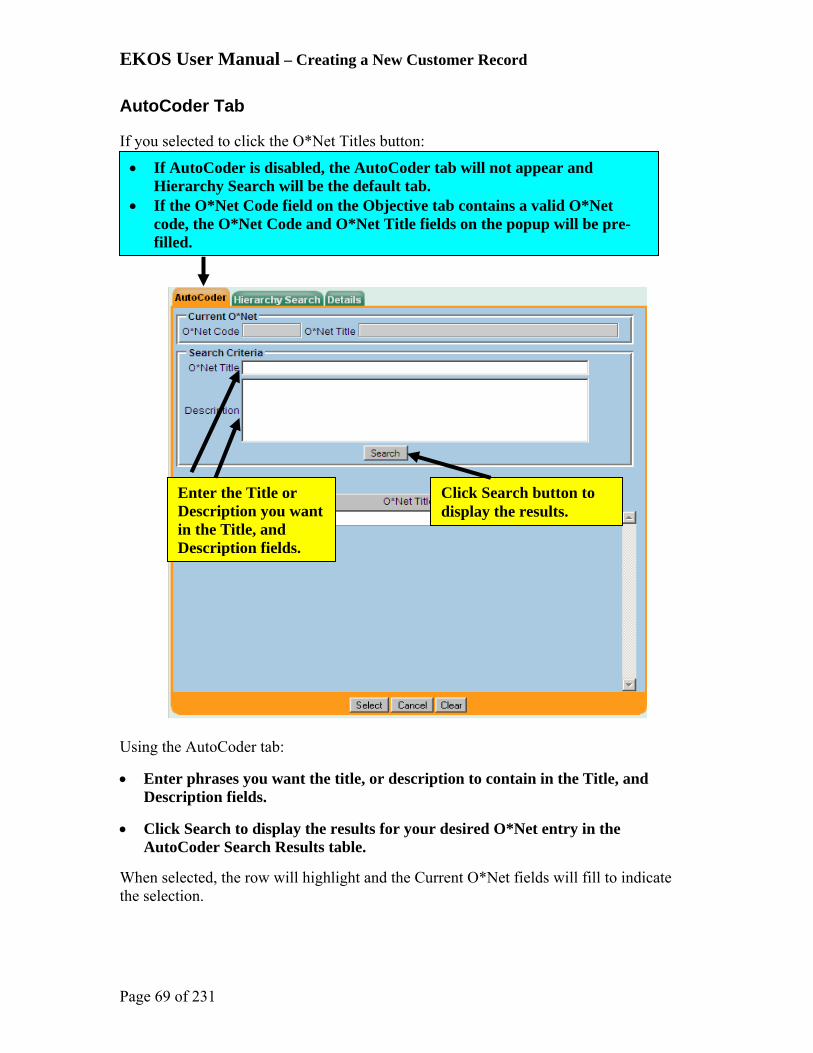
EKOS User Manual – Creating a New Customer Record
Page 69 of 231
AutoCoder Tab
If you selected to click the O*Net Titles button: Using the AutoCoder tab:
Enter phrases you want the title, or description to contain in the Title, and Description fields.
Click Search to display the results for your desired O*Net entry in the AutoCoder Search Results table.
When selected, the row will highlight and the Current O*Net fields will fill to indicate the selection.
If AutoCoder is disabled, the AutoCoder tab will not appear and Hierarchy Search will be the default tab.
If the O*Net Code field on the Objective tab contains a valid O*Net code, the O*Net Code and O*Net Title fields on the popup will be pre-filled.
Enter the Title or Description you want in the Title, and Description fields.
Click Search button to display the results.
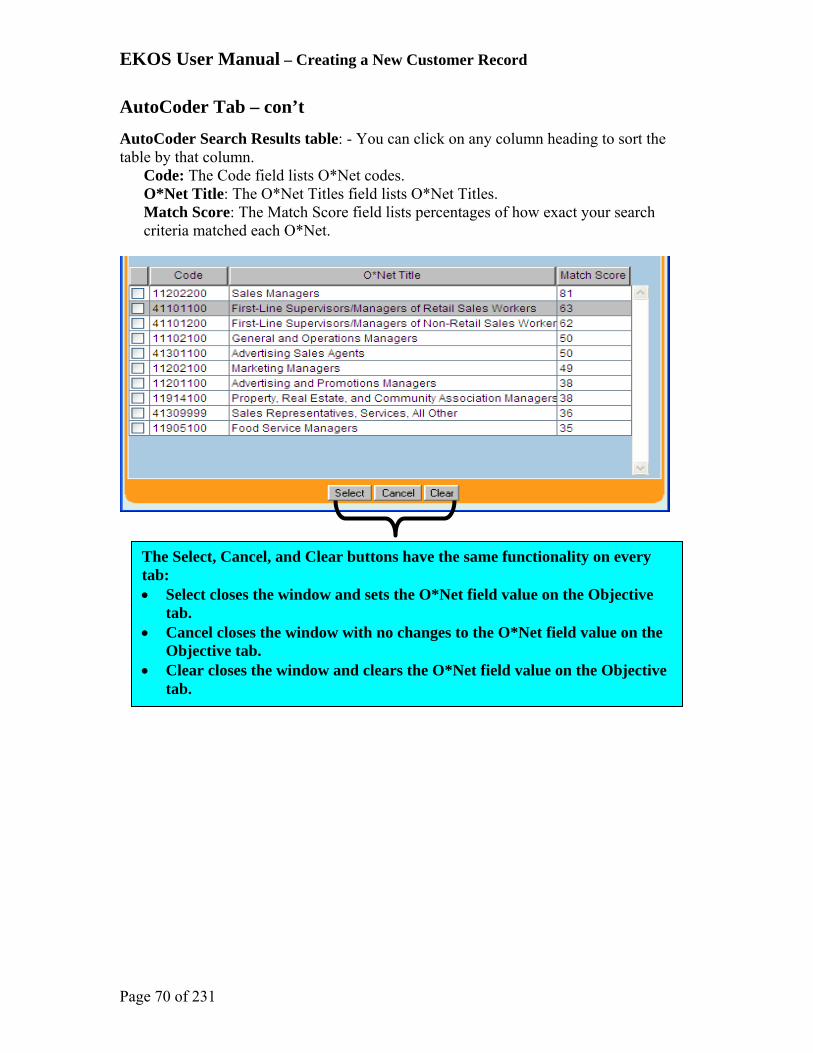
EKOS User Manual – Creating a New Customer Record
Page 70 of 231
AutoCoder Tab – con’t
AutoCoder Search Results table: - You can click on any column heading to sort the table by that column.
Code: The Code field lists O*Net codes. O*Net Title: The O*Net Titles field lists O*Net Titles. Match Score: The Match Score field lists percentages of how exact your search criteria matched each O*Net.
The Select, Cancel, and Clear buttons have the same functionality on every tab: Select closes the window and sets the O*Net field value on the Objective
tab. Cancel closes the window with no changes to the O*Net field value on the
Objective tab. Clear closes the window and clears the O*Net field value on the Objective
tab.

EKOS User Manual – Creating a New Customer Record
Page 71 of 231
Hierarchy Search Tab
The Hierarchy will pre-select the Current O*Net if it is not null. To select the desired O*Net Title from the pop-up table:
Locate the desired O*Net job title within the window’s tree structure.
Check the desired title entry to highlight it and the Current O*Net fields will pre-fill to indicate its selection.
Click Select.
The highlighted O*Net Title code and Description will populate the corresponding Desired O*Net fields.

EKOS User Manual – Creating a New Customer Record
Page 72 of 231
The Details Tab
The Code, Title, and Description fields will pre-fill with values for the Current O*Net In the Internet Resources section:
Select one of the listed resources by highlighting it.
Click the Go button.
A new window will open to the Internet Resource you have selected. The page will display details on the Current O*Net job title.
Click Go
Select Resource

EKOS User Manual – Creating a New Customer Record
Page 73 of 231
Work History Tab – con’t
The Work History page will now be populated with the selected or entered Job Title. To continue completing the remainder of the Work History information:
In the Employer field, enter the employer name for the job entry (up to 80 characters).
Enter the address for the job in the Address and Address 2 fields (up to 80 characters per field).
An entry in the Address field is required; the Address 2 field is optional. Use both fields if necessary. Do not enter the job’s city, state, or country in these fields.
Enter the job’s city name (up to 40 characters) in the City field.
To enter the job’s state, click on the arrow button in the State field and select the appropriate state’s name from the drop-down list.
Click on the arrow button in the Country field, and select the appropriate country name for the job from the drop-down list.
Click on the Include Online check box to indicate that this job entry is selected (i.e., a check mark indicates a value of Yes for the field) to be included on the customer’s EKOS online resume. To deselect this option, click on the check box again, and the check mark will disappear.
Enter the date(s) in the Start Date and/or End Date field (in mmyyyy format).
Enter the supervisor’s name for the job (up to 40 characters), in the Supervisor field.
Enter a phone number for the job in the Phone field.
Phone number values must be 10 digits in length, including the area code.

EKOS User Manual – Creating a New Customer Record
Page 74 of 231
Work History Tab – con’t Enter the job’s pay amount in the Wage field.
Wage values must be entered in whole dollar and cent amounts, which must be separated by a decimal point. Commas and dollar signs should not be used.
Select the appropriate unit of pay (Hour, Day, Week, Month, Year, or Other) to be applied to the Wage value by clicking on the arrow button in the Per field and selecting the appropriate unit of measure from the drop-down list.
Enter the number of hours worked per week for the job in the Hours/Week field (up to 2 digits).
Select a reason why the customer left the job by clicking on the arrow button in the Reason for Leaving field and selecting the appropriate reason for leaving from the drop-down list.
Available reasons for leaving include: Category 1 – DW Category 2 - DW Mass Layoff or Closure Category 3 - DW Self-Employed Category 4 - DW Displaced HomeMaker Dislocated Due To Foreign Trade Fired Lack of Work Medical/Health Other Quit Retired Still Employed Strike

EKOS User Manual – Creating a New Customer Record
Page 75 of 231
Work History Tab – con’t If the selected Reason for Leaving is either Category 1 – DW, Category 2 - DW Mass Layoff, or Closure, the Dislocated Worker Information fields will appear, and must be completed (for WIA purposes). In the Qualifying Dislocation Date field:
Enter the date (in mmddyyyy format) on which the customer qualified for Dislocated Worker status.
To manually enter the O*Net Code:
Click on the O*Net Code field next to the O*Net Titles label.
Enter O*Net Code.
If a valid code is entered, the O*Net Title field will fill in, and the O*Net Code will no longer appear in red. To use the Select O*Net pop-up:
Click the O*Net Titles button next to the O*Net Title field.
The Select O*Net pop-up window will appear.
If the value of the Reason for Leaving field is set to Dislocated Due To Foreign Trade and the petition number for the work history entry is associated with a service for the customer, you will not be allowed to change the Reason for Leaving value.
You cannot change the Reason for Leaving value if there is a service whose funding is based upon this value.

EKOS User Manual – Creating a New Customer Record
Page 76 of 231
AutoCoder tab
Using the AutoCoder tab:
Enter phrases you want the title, or description to contain in the Title, and Description fields.
Click Search to display the results for your desired O*Net entry in the AutoCoder Search Results table.
When selected, the row will highlight and the Current O*Net fields will fill to indicate the selection. AutoCoder Search Results table: - You can click on any column heading to sort the table by that column.
Code: The Code field lists O*Net codes. O*Net Title: The O*Net Title field lists O*Net Titles. Match Score: The Match Score field lists percentages of how exact your search criteria matched each O*Net.
The Select, Cancel, and Clear buttons have the same functionality on every tab: Select closes the window and sets the O*Net field value on the Objective
tab. Cancel closes the window with no changes to the O*Net field value on the
Objective tab. Clear closes the window and clears the O*Net field value on the Objective
tab.

EKOS User Manual – Creating a New Customer Record
Page 77 of 231
Hierarchy Search Tab
The Hierarchy will pre-select the Current O*Net if it is not null. To select the desired O*Net Title from the pop-up table:
Locate the desired O*Net job title within the window’s tree structure.
Check the desired title entry to highlight it and the Current O*Net fields will pre-fill to indicate its selection.
Click Select.
The highlighted O*Net Title code and Description will populate the corresponding Desired O*Net fields.
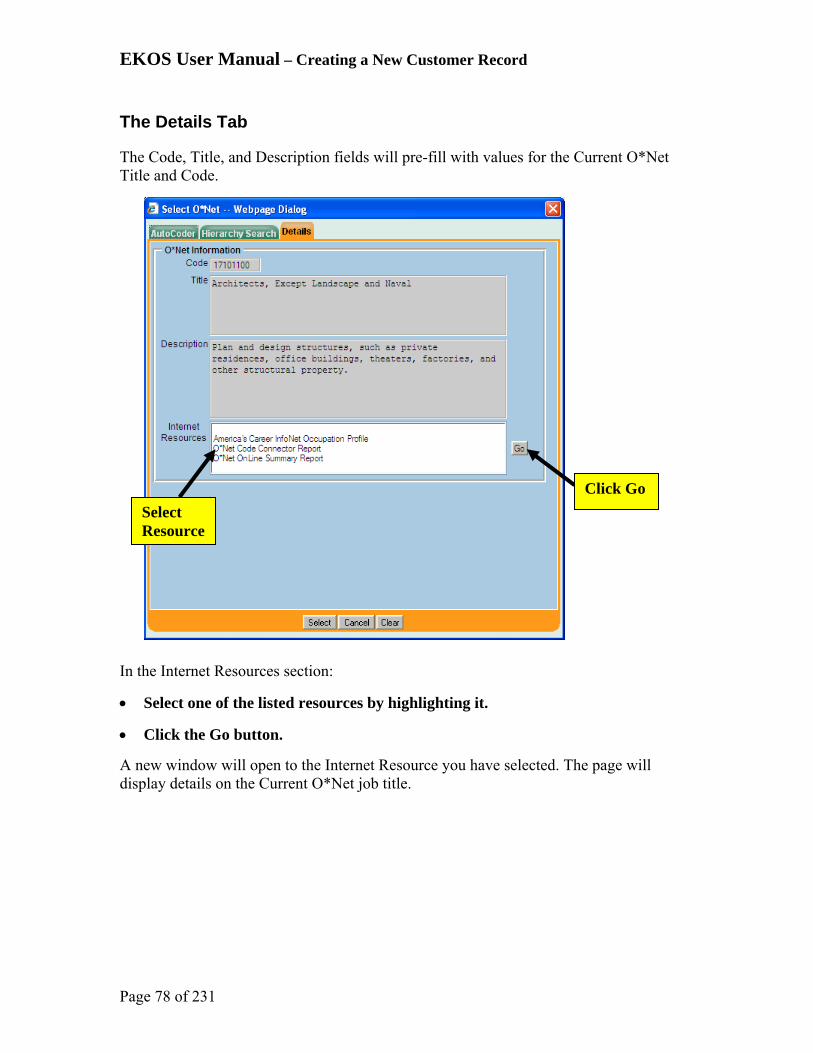
EKOS User Manual – Creating a New Customer Record
Page 78 of 231
The Details Tab
The Code, Title, and Description fields will pre-fill with values for the Current O*Net Title and Code. In the Internet Resources section:
Select one of the listed resources by highlighting it.
Click the Go button.
A new window will open to the Internet Resource you have selected. The page will display details on the Current O*Net job title.
Click Go
Select Resource
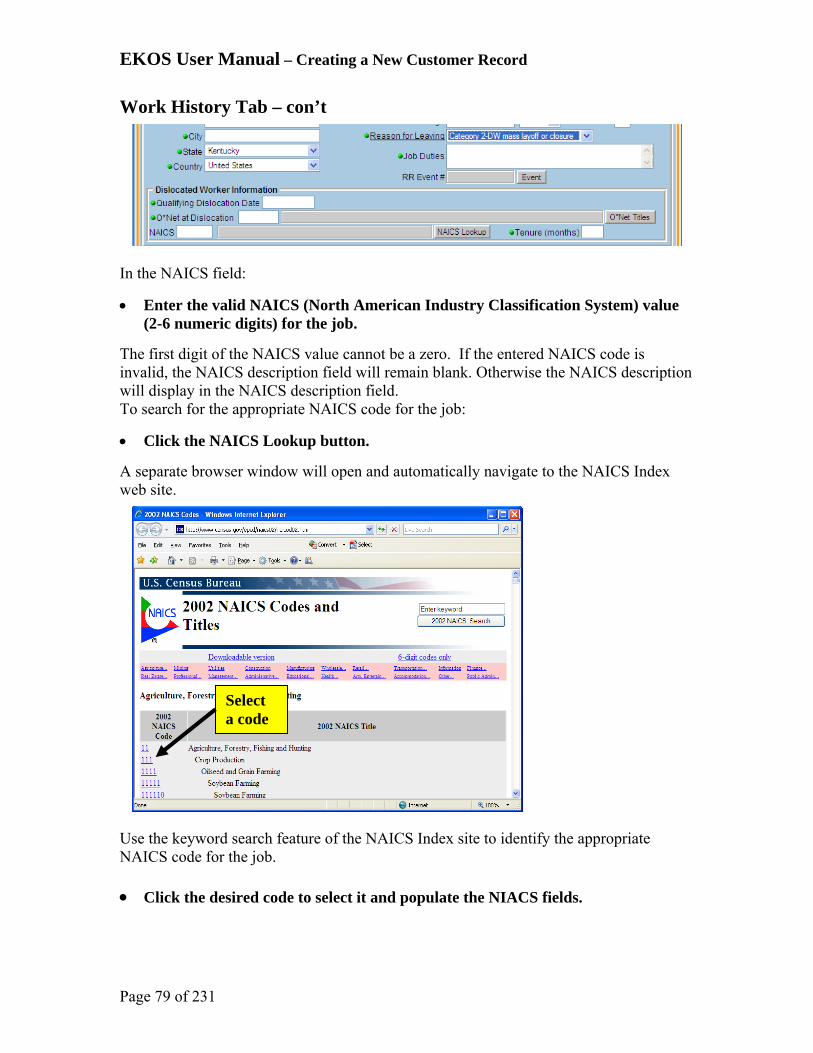
EKOS User Manual – Creating a New Customer Record
Page 79 of 231
Work History Tab – con’t In the NAICS field:
Enter the valid NAICS (North American Industry Classification System) value (2-6 numeric digits) for the job.
The first digit of the NAICS value cannot be a zero. If the entered NAICS code is invalid, the NAICS description field will remain blank. Otherwise the NAICS description will display in the NAICS description field. To search for the appropriate NAICS code for the job:
Click the NAICS Lookup button.
A separate browser window will open and automatically navigate to the NAICS Index web site. Use the keyword search feature of the NAICS Index site to identify the appropriate NAICS code for the job.
Click the desired code to select it and populate the NIACS fields.
Select a code
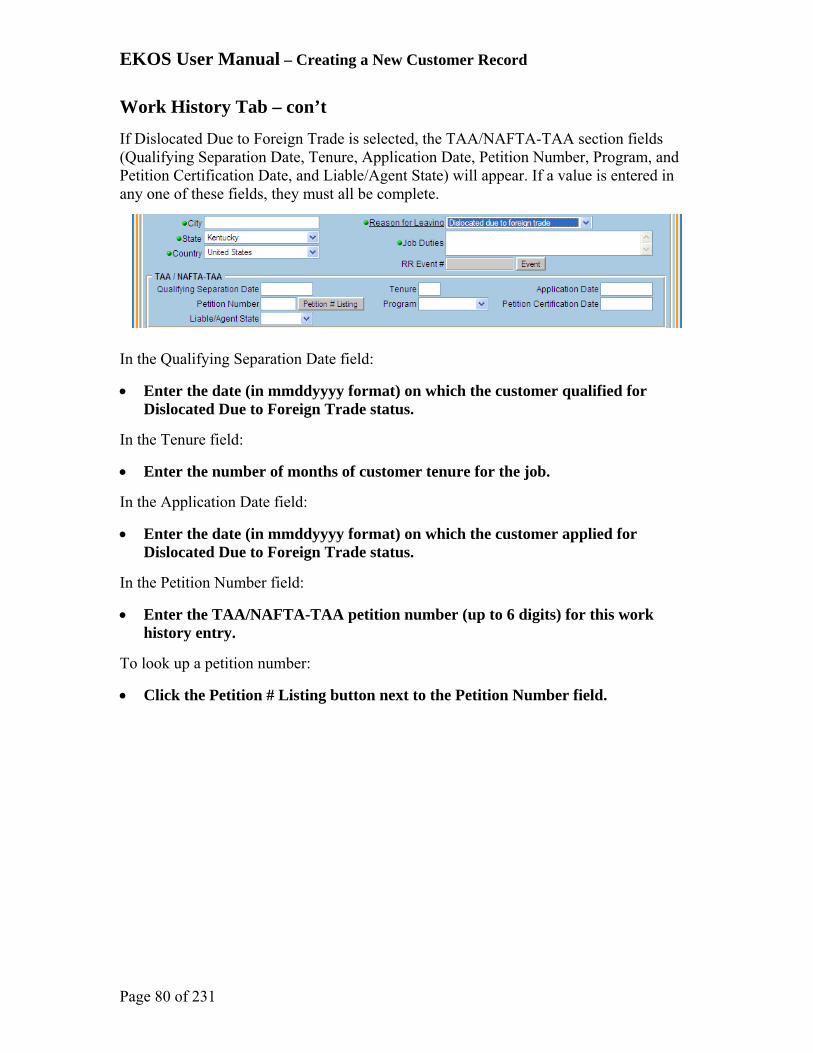
EKOS User Manual – Creating a New Customer Record
Page 80 of 231
Work History Tab – con’t
If Dislocated Due to Foreign Trade is selected, the TAA/NAFTA-TAA section fields (Qualifying Separation Date, Tenure, Application Date, Petition Number, Program, and Petition Certification Date, and Liable/Agent State) will appear. If a value is entered in any one of these fields, they must all be complete. In the Qualifying Separation Date field:
Enter the date (in mmddyyyy format) on which the customer qualified for Dislocated Due to Foreign Trade status.
In the Tenure field:
Enter the number of months of customer tenure for the job.
In the Application Date field:
Enter the date (in mmddyyyy format) on which the customer applied for Dislocated Due to Foreign Trade status.
In the Petition Number field:
Enter the TAA/NAFTA-TAA petition number (up to 6 digits) for this work history entry.
To look up a petition number:
Click the Petition # Listing button next to the Petition Number field.

EKOS User Manual – Creating a New Customer Record
Page 81 of 231
Work History Tab – con’t
A separate browser window will open and navigate to the U.S. Department of Labor Employment & Training Administration Trade Act Programs: Petition Determinations web site, where specific petition numbers can be found. TAA/NAFTA-TAA Section
Available programs include: TAA NAFTA/TAA
In the program field:
Click on the arrow button in the Program field and select the appropriate program from the drop-down list.
In the Petition Certification Date field
Enter the petition certification date (in mmddyyyy format) for this work history entry.
In the Liable/Agent State field:
Select either Liable or Agent from the drop down.
In the Job Duties field:
Enter a description of the duties and responsibilities of the job (up to 2000 characters).
Click drop-downs to select Options.

EKOS User Manual – Creating a New Customer Record
Page 82 of 231
Work History Tab – con’t
In the RR Event # field:
Enter the rapid response number for this work history record using the Event popup.
Click the Event button to display the Rapid Response Lookup popup.
In the Event Number field
Enter the rapid response number to search for.
If a valid rapid response number is entered, the other fields will display the data associated to that rapid response. If an invalid rapid response number is entered, the Event Number field will remain in red. The format for a valid Rapid Response number is RR-STATE-YEAR-4 digits. For example, RR-NJ-2007-0001 would be valid.
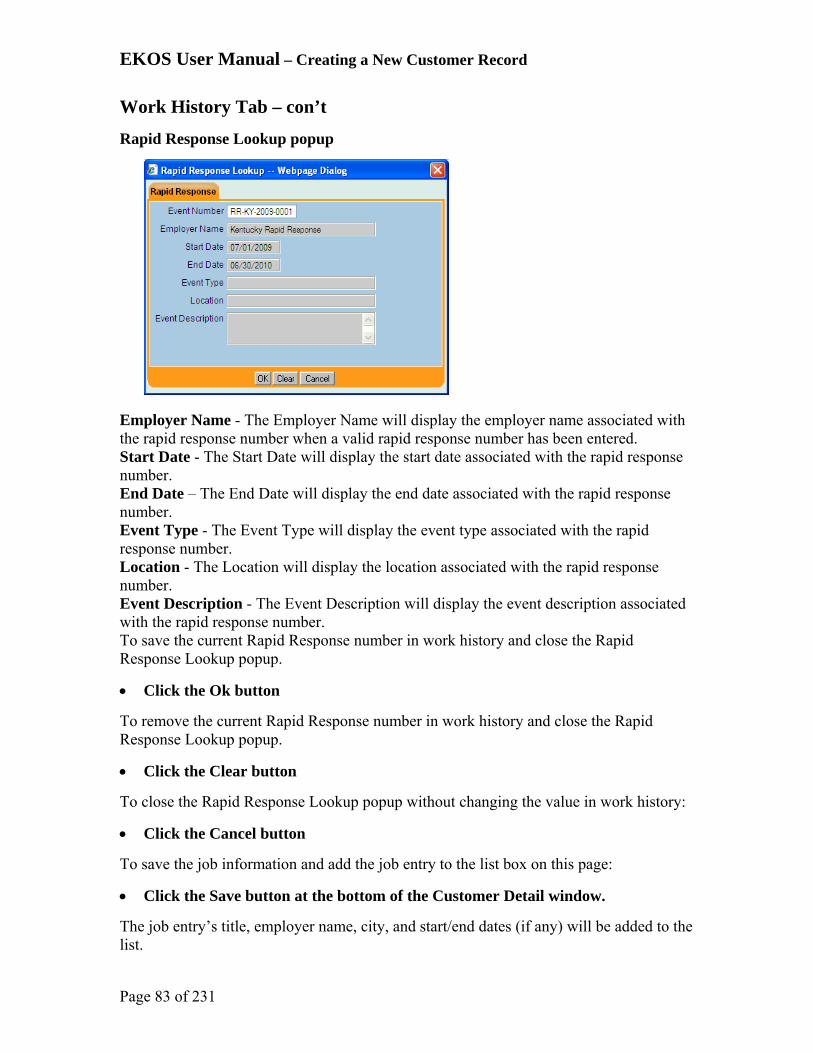
EKOS User Manual – Creating a New Customer Record
Page 83 of 231
Work History Tab – con’t
Rapid Response Lookup popup
Employer Name - The Employer Name will display the employer name associated with the rapid response number when a valid rapid response number has been entered. Start Date - The Start Date will display the start date associated with the rapid response number. End Date – The End Date will display the end date associated with the rapid response number. Event Type - The Event Type will display the event type associated with the rapid response number. Location - The Location will display the location associated with the rapid response number. Event Description - The Event Description will display the event description associated with the rapid response number. To save the current Rapid Response number in work history and close the Rapid Response Lookup popup.
Click the Ok button
To remove the current Rapid Response number in work history and close the Rapid Response Lookup popup.
Click the Clear button
To close the Rapid Response Lookup popup without changing the value in work history:
Click the Cancel button
To save the job information and add the job entry to the list box on this page:
Click the Save button at the bottom of the Customer Detail window.
The job entry’s title, employer name, city, and start/end dates (if any) will be added to the list.

EKOS User Manual – Creating a New Customer Record
Page 84 of 231
View/Edit Work History Job Information To view and/or edit information for an existing work history job entry: In the list box below the Detail fields:
Locate and click on the list entry for the work history job that you wish to view and/or edit.
The selected job entry’s information will be displayed in the Detail fields for viewing and/or editing purposes. The fields may be modified using the same rules that were in place for adding them initially (see section Add a new Work History Job Entry).

EKOS User Manual – Creating a New Customer Record
Page 85 of 231
Delete a Work History Job Entry To delete an existing work history job entry, in the list box below the Detail fields:
Locate and click on the list entry for the work history job that you wish to delete.
The selected job’s information will be displayed in the Detail fields.
Click the Delete Selection button below the list box.
A confirmation window will appear. In the confirmation window:
Click the OK button.
To cancel the deletion, in the confirmation window:
Click the Cancel button.
If the deletion is OK’d and not Canceled, the selected job entry will be removed from the list box.
If the value of a work history entry’s Reason for Leaving field is “Dislocated Due To Foreign Trade” and the petition number for the work history entry is associated with a service for the customer, you will not be allowed to delete the work history entry.
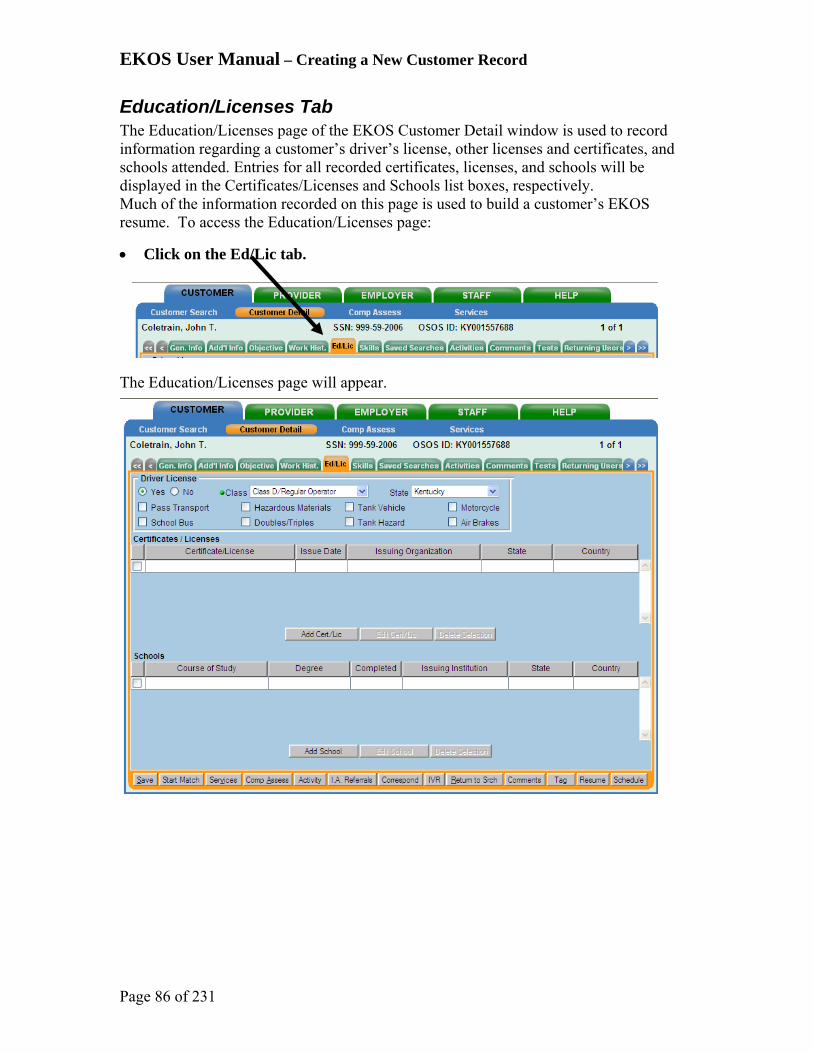
EKOS User Manual – Creating a New Customer Record
Page 86 of 231
Education/Licenses Tab The Education/Licenses page of the EKOS Customer Detail window is used to record information regarding a customer’s driver’s license, other licenses and certificates, and schools attended. Entries for all recorded certificates, licenses, and schools will be displayed in the Certificates/Licenses and Schools list boxes, respectively. Much of the information recorded on this page is used to build a customer’s EKOS resume. To access the Education/Licenses page:
Click on the Ed/Lic tab. The Education/Licenses page will appear.
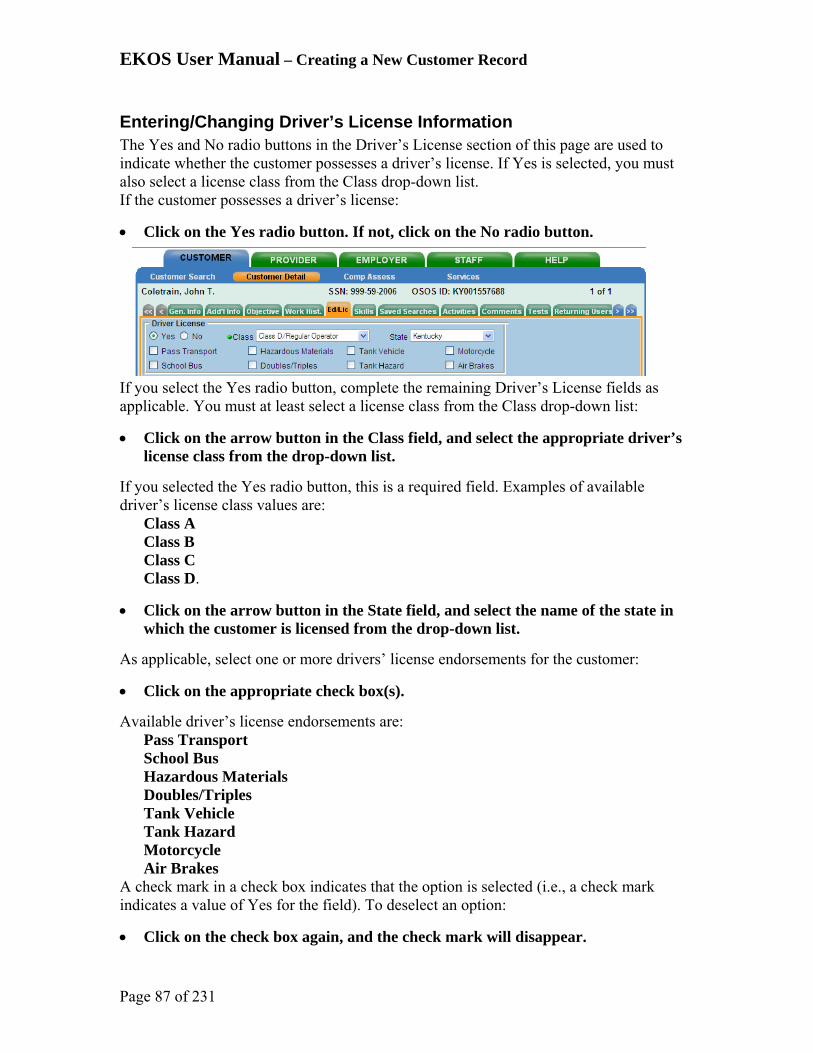
EKOS User Manual – Creating a New Customer Record
Page 87 of 231
Entering/Changing Driver’s License Information The Yes and No radio buttons in the Driver’s License section of this page are used to indicate whether the customer possesses a driver’s license. If Yes is selected, you must also select a license class from the Class drop-down list. If the customer possesses a driver’s license:
Click on the Yes radio button. If not, click on the No radio button. If you select the Yes radio button, complete the remaining Driver’s License fields as applicable. You must at least select a license class from the Class drop-down list:
Click on the arrow button in the Class field, and select the appropriate driver’s license class from the drop-down list.
If you selected the Yes radio button, this is a required field. Examples of available driver’s license class values are:
Class A Class B Class C Class D.
Click on the arrow button in the State field, and select the name of the state in which the customer is licensed from the drop-down list.
As applicable, select one or more drivers’ license endorsements for the customer:
Click on the appropriate check box(s).
Available driver’s license endorsements are: Pass Transport School Bus Hazardous Materials Doubles/Triples Tank Vehicle Tank Hazard Motorcycle Air Brakes
A check mark in a check box indicates that the option is selected (i.e., a check mark indicates a value of Yes for the field). To deselect an option:
Click on the check box again, and the check mark will disappear.

EKOS User Manual – Creating a New Customer Record
Page 88 of 231
Adding Certificate & License Information To add a Certificate or License entry:
Click the Add Cert/Lic button beneath the Certificates/Licenses list box.
The Certificate/License pop-up window will appear. In the Certificate/License Information fields:
Enter the name of the certification or license (up to 60 characters).
Enter the name of the organization that issued the certificate or license (up to 40 characters).
Enter the date on which the certificate or license was issued (in mmddyyyy format).
Click on the arrow button in the State field, and select the appropriate state name from the drop-down list.
Click on the arrow button in the Country field, and select the appropriate country name from the drop-down list.
When all the desired information has been loaded into the appropriate fields and is ready to be saved:
Click the OK button to save the Certificate/License entry or the Cancel button to cancel before saving.
The new entry will be displayed in the Certificates/Licenses list box on the Education/Licenses page if not canceled.

EKOS User Manual – Creating a New Customer Record
Page 89 of 231
Editing Certificate & License Information To change information for an existing certificate or license entry, in the Certificates/Licenses list box:
Locate and click on the list entry that you wish to edit.
The selected entry will be highlighted to indicate that it is selected.
Click the Edit Cert/Lic button. The Certificate/License pop-up window will appear, displaying the selected entry’s information available to be updated. Once the changes have been made, to save again:
Click the OK button to save the updated Certificate/License information.
Deleting Certificate & License Information To delete an existing certificate or license entry, in the Certificates/Licenses list box:
Locate and click on the list entry that you wish to delete.
The selected entry will be highlighted to indicate that it is selected.
Click the Delete Selection button.
A confirmation window will appear. In the confirmation window:
Click the OK button to delete or the Cancel button to cancel the Deletion.
The selected entry will be removed from the list box if the deletion isn’t canceled.
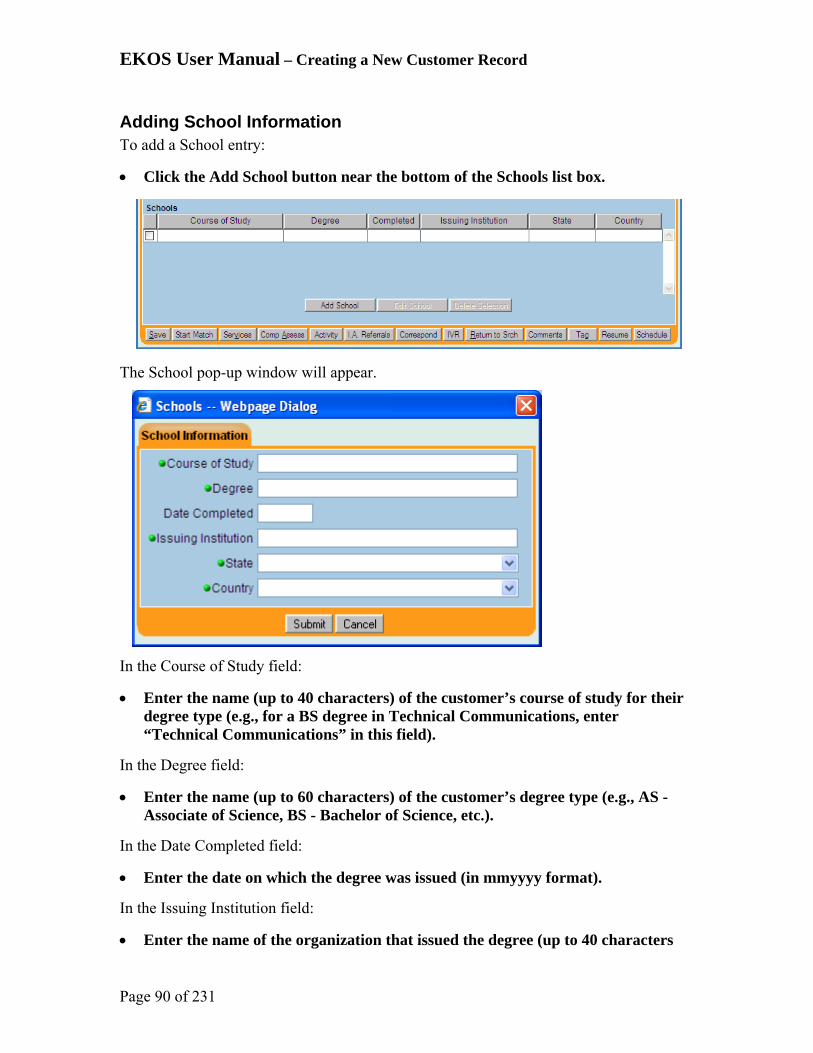
EKOS User Manual – Creating a New Customer Record
Page 90 of 231
Adding School Information To add a School entry:
Click the Add School button near the bottom of the Schools list box.
The School pop-up window will appear. In the Course of Study field:
Enter the name (up to 40 characters) of the customer’s course of study for their degree type (e.g., for a BS degree in Technical Communications, enter “Technical Communications” in this field).
In the Degree field:
Enter the name (up to 60 characters) of the customer’s degree type (e.g., AS - Associate of Science, BS - Bachelor of Science, etc.).
In the Date Completed field:
Enter the date on which the degree was issued (in mmyyyy format).
In the Issuing Institution field:
Enter the name of the organization that issued the degree (up to 40 characters
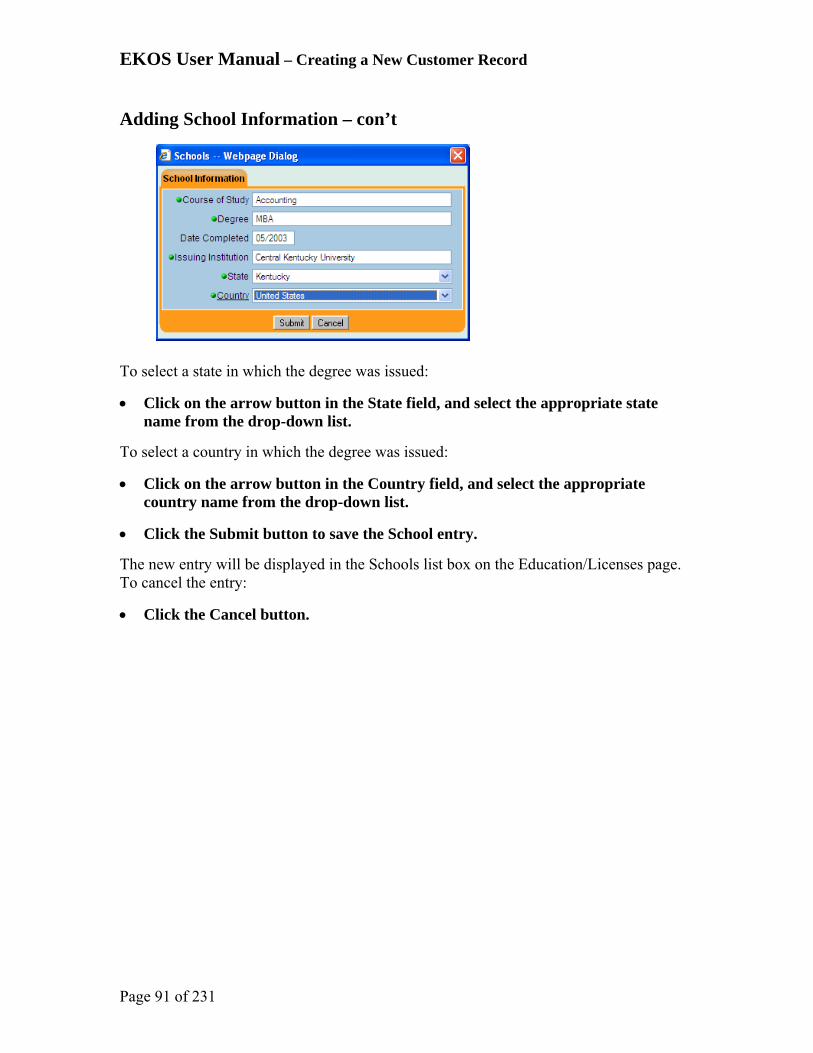
EKOS User Manual – Creating a New Customer Record
Page 91 of 231
Adding School Information – con’t
To select a state in which the degree was issued:
Click on the arrow button in the State field, and select the appropriate state name from the drop-down list.
To select a country in which the degree was issued:
Click on the arrow button in the Country field, and select the appropriate country name from the drop-down list.
Click the Submit button to save the School entry.
The new entry will be displayed in the Schools list box on the Education/Licenses page. To cancel the entry:
Click the Cancel button.

EKOS User Manual – Creating a New Customer Record
Page 92 of 231
Editing School Information To change information for an existing school entry, in the Schools list box:
Locate and click on the list entry that you wish to edit.
The selected entry will be highlighted to indicate that it is selected.
Click the Edit School button. The School pop-up window will appear, displaying the selected entry’s information available to be updated. Once the changes have been made, to save again:
Click the OK button to save the updated School information.
Deleting School Information To delete an existing School entry, in the Schools list box:
Locate and click on the list entry that you wish to delete.
The selected entry will be highlighted to indicate that it is selected.
Click the Delete Selection button.
A confirmation window will appear. In the confirmation window:
Click the OK button.
The selected entry will be removed from the list box. To cancel the deletion:
Click the Cancel button.
To save the information entered on this page at anytime, click the Save button at the bottom of the Customer Detail window

EKOS User Manual – Creating a New Customer Record
Page 93 of 231
Skills Tab The Skills page of the EKOS Customer Detail window is used to enter any additional skills and abilities that are important in the customer’s job performance. This page can also be used to record a customer’s academic honors and activities, and record related notes (such as additional training received). The information recorded on this page is used to build a customer’s EKOS resume. Remember that the information recorded on this page can be used as text search criteria for a customer search, so you should attempt to be as thorough as possible when entering this information. To access the Skills page:
Click on the Skills tab. The Skills page will appear. The Skills page contains the following fields: Additional Skills Text – The Additional Skills Test field is used to enter any additional skills and abilities that are important in the customer’s job performance. This field should succinctly and strongly emphasize the customer’s skills. To use the Additional Skills Text field:
Enter a description of any additional skills and abilities that the customer possesses (up to 4000 characters).
If the Additional Skills Text field on this page is not used, then you must define customer skills using the Skills functionality provided in the Desired O*Net section of the Objective page.
Likewise, if the Desired O*Net section of the Objective page is not utilized, then you must provide an entry in the Additional Skills Text field on this page.
Failing to provide customer skill information using either of these methods will result in an error message when you attempt to save the customer record.

EKOS User Manual – Creating a New Customer Record
Page 94 of 231
Skills Tab – con’t Honors & Activities – The Honors & Activities field is used to enter any academic honors and activities for the customer. To use the Honors & Activities field:
Enter a description of the customer’s academic honors and activities (up to 2000 characters).
Notes – The Notes field is used to enter any additional skill-related notes for the customer. To use the Notes field:
Enter any additional skill-related notes for the customer record. (up to 2000 characters).
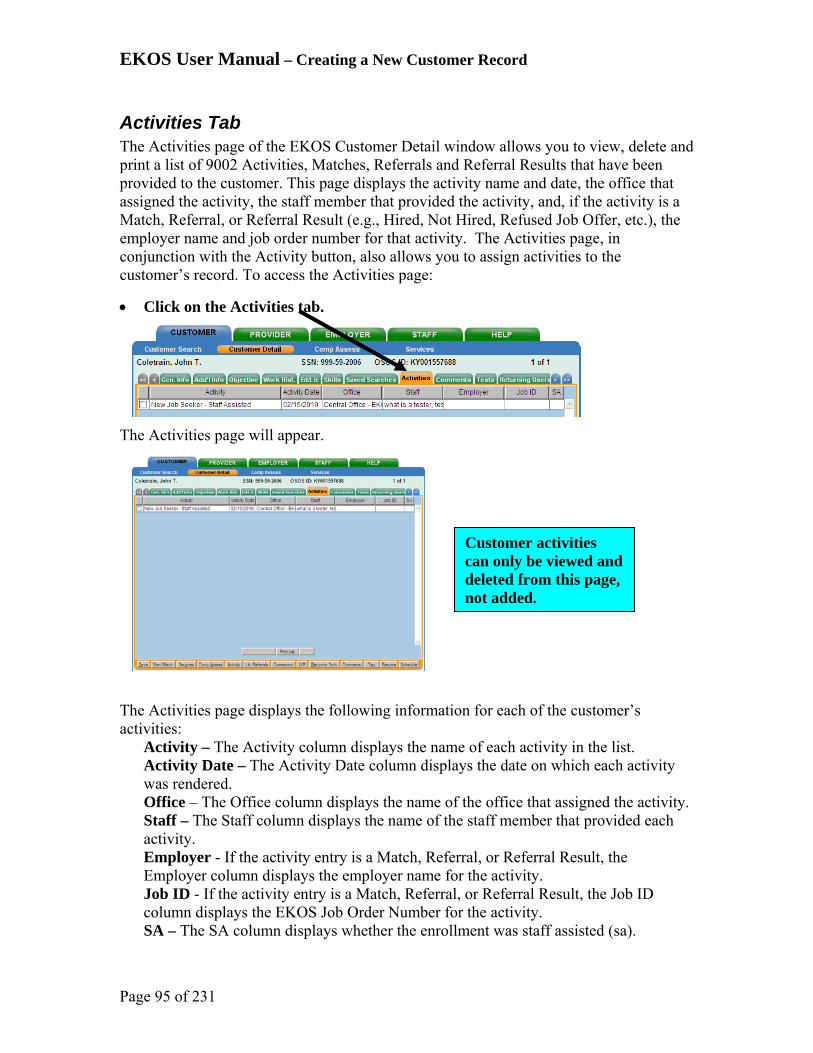
EKOS User Manual – Creating a New Customer Record
Page 95 of 231
Activities Tab The Activities page of the EKOS Customer Detail window allows you to view, delete and print a list of 9002 Activities, Matches, Referrals and Referral Results that have been provided to the customer. This page displays the activity name and date, the office that assigned the activity, the staff member that provided the activity, and, if the activity is a Match, Referral, or Referral Result (e.g., Hired, Not Hired, Refused Job Offer, etc.), the employer name and job order number for that activity. The Activities page, in conjunction with the Activity button, also allows you to assign activities to the customer’s record. To access the Activities page:
Click on the Activities tab. The Activities page will appear. The Activities page displays the following information for each of the customer’s activities:
Activity – The Activity column displays the name of each activity in the list. Activity Date – The Activity Date column displays the date on which each activity was rendered. Office – The Office column displays the name of the office that assigned the activity. Staff – The Staff column displays the name of the staff member that provided each activity. Employer - If the activity entry is a Match, Referral, or Referral Result, the Employer column displays the employer name for the activity. Job ID - If the activity entry is a Match, Referral, or Referral Result, the Job ID column displays the EKOS Job Order Number for the activity. SA – The SA column displays whether the enrollment was staff assisted (sa).
Customer activities can only be viewed and deleted from this page, not added.

EKOS User Manual – Creating a New Customer Record
Page 96 of 231
Adding an Activity The Activities pop-up window, which is launched using the Activity button at the bottom of any Customer Detail window, allows you to assign 9002 activities to a customer record. To add an activity for a customer, display the desired customer’s record in the Customer Detail window:
Click the Activity button at the bottom of the window.
The Activities pop-up window will appear.
When it is initially launched, the Activities pop-up window displays a list of activity categories.
Locate and click on one or more categories that include the desired activity.
The selected categories will expand into tree structures, listing all subcategories for each selected category.
Locate and click on one or more subcategories that include a desired activity.
The selected subcategories will expand into tree structures, listing all activities that are included in the selected subcategories.
Locate and click on the desired activity within the window’s tree structure.
The selected activity entry will be highlighted to indicate that it is selected. To select more than one activity from the displayed tree structure:
Hold down the ALT key and click on the desired activities.
Each selected activity entry will be highlighted to indicate that they are selected. In the Activity Date field:
Enter the date on which the activity was rendered (in mmddyyyy format).
Dates prior to the start date of the previous calendar quarter or beyond the current system date are not allowed. If you attempt to add such an activity date, an error message will result.

EKOS User Manual – Creating a New Customer Record
Page 97 of 231
Adding an Activity – con’t
In the RR Event # field, select the rapid response number to associate with this activity. Check the Additional Assistance flag if necessary. This flag will become available when an RR Event # is selected.
Click on the OK button to save the activity, or on the Cancel button to cancel the operation and return to the Customer Detail window.
If the selected activity will create an enrollment for the Customer, the enrollment verification popup window will be presented. Enrollment Verification This allows you to verify that all necessary fields are set to the proper values before the enrollment is created.
The following fields may be available for display/update on the Enrollment Verification pop-up:
Education Level School Status Employment Status UI Claimant Status Profiled Date Lower Living Standard Income 70% LLSIL Local Priority Disability Status

EKOS User Manual – Creating a New Customer Record
Page 98 of 231
Enrollment Verification – con’t
Disability Category Migrant / Seasonal Worker Migrant Class Employed in Farmwork Farmwork Threshold Farmwork Type Service Veteran Veteran Status Vet TSM Type Cd Vet Start Date Vet End Date Vietnam Pre 1965 Flag Vet Disability Status Campaign Vet Flag Vet Era Limited English Offender Status Current Housing Offender Status Current Housing
After any necessary updates are made:
Click the OK button at the bottom of the screen.

EKOS User Manual – Creating a New Customer Record
Page 99 of 231
Deleting an Activity
To delete an activity from this page, in the Activity List:
Click on the entry for the activity that you wish to delete.
The entry will be highlighted to indicate that it has been selected.
Click the Delete Activity button below the list.
A confirmation window will appear.
Click OK to delete the activity, or Cancel to cancel the deletion.
Unless you have administrative Delete security permissions for the Activities page, you can only delete activities that you have entered. You cannot delete activities entered by other staff members.
Job referral activities and job referral result activities cannot be deleted from the Activities page. Such activities can only be deleted from the Referrals page of the Job Order Detail module for the job in question.

EKOS User Manual – Creating a New Customer Record
Page 100 of 231
Printing a List of Activities To print a list of the customer’s assigned activities,
Click the Print List button.
A Print Preview pop-up window will appear, allowing you to view the list of activities as it will be printed.
In the pop-up window:
Click the Print button.
The list will be sent to your configured print queue. To cancel the operation:
Click Cancel.
Viewing Match and Referral Activities To view the Job information for a match or a referral activity, in the Activity List
Click on the entry for the activity that you wish to view.
The entry will be highlighted to indicate that it has been selected. If the selected record is a valid match or referral record, the Detail button will enable below the list.
Click the Detail button to navigate to the job record associated with the selected activity.
If the selected row is a match activity, the Job record will open with the match tab displayed.

EKOS User Manual – Creating a New Customer Record
Page 101 of 231
Comments Tab The Comments page of the EKOS Customer Detail window, in conjunction with the Comments button, allows you to record, view and print customer information that may not be recorded elsewhere in the customer’s record. The Comment window also provides a spell check feature, which incorporates the Microsoft® Word™ application. When the Spell Check button is clicked, the comment text is automatically placed into a new Word document and spell checked using the Spelling and Grammar function. To access the Comments page:
Click on the Comments tab. The Comments list provides the following information about each comment: Created - The Created column displays the creation date for each comment. The sort default is that all comments are displayed in descending order according to their date of entry (i.e., the earliest comments are displayed first). Staff Assigned - The Staff Assigned column displays the name of the staff member that entered each comment. Comments - The Comments column displays the text of each comment.
You must have Microsoft® Word™ installed on your client machines in order to use the Spell Check function
Click on the column headings (Created, Staff Assigned, Comments) to sort the list by that field.

EKOS User Manual – Creating a New Customer Record
Page 102 of 231
Adding a Comment To add a comment to the Customer Comments list:
Click the Comments button at the bottom of the Customer Detail window.
The Comment pop-up window will appear. Type your comment in the central area of the window.
Your comment can be up to 2000 characters in length. To spell check the comment:
Click the Spell Check button.
Your Microsoft Word application will start, and the comment’s text will be placed in a new Word document. Word’s Spelling and Grammar tool will automatically be applied to the comment text. If the Microsoft Word Spelling and Grammar tool finds no spelling errors in the comment text, the Add Comment pop-up window will reappear and display the unchanged text. If the Microsoft Word Spelling and Grammar tool finds any suspected spelling errors, use the tool’s Spelling window to correct or ignore the errors. When all suspected spelling errors have been corrected or ignored, the Add Comment pop-up window will reappear and display the comment text. Save the comment by:
Click the Save button.
Your comment will be added to the Customer Comments list. To cancel the operation and return to the comments page:
Click Cancel.
Save or Cancel.
Click Spell Check.
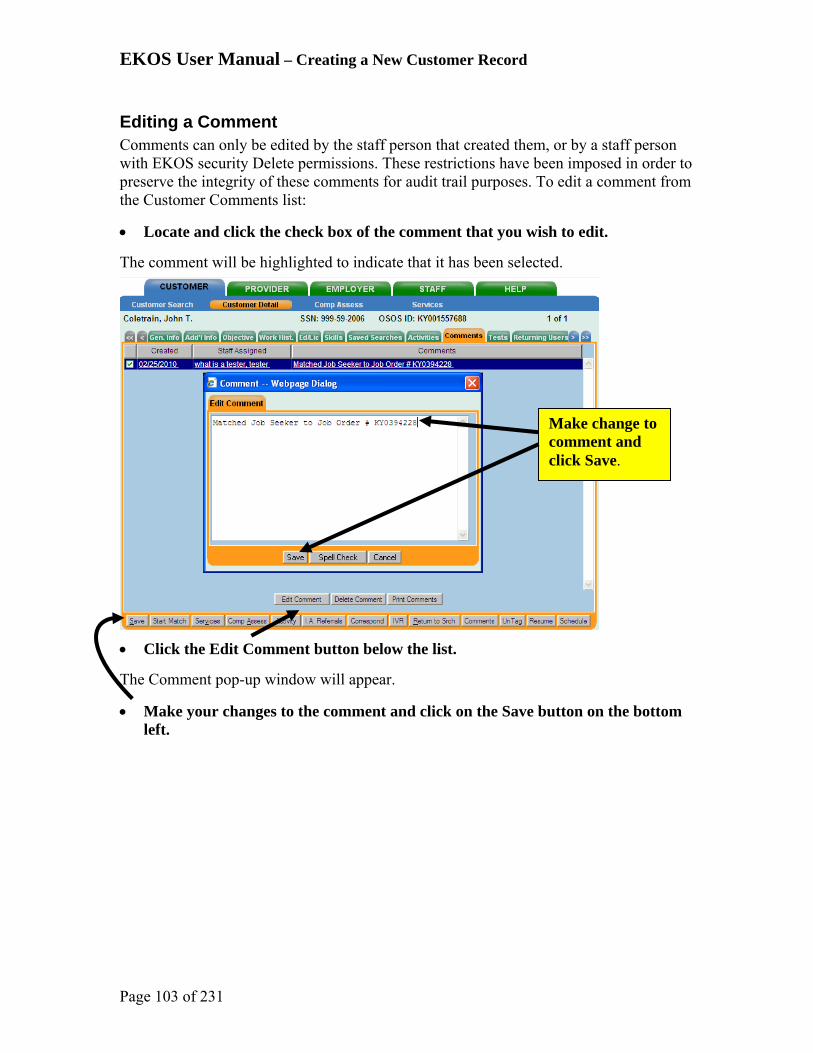
EKOS User Manual – Creating a New Customer Record
Page 103 of 231
Editing a Comment Comments can only be edited by the staff person that created them, or by a staff person with EKOS security Delete permissions. These restrictions have been imposed in order to preserve the integrity of these comments for audit trail purposes. To edit a comment from the Customer Comments list:
Locate and click the check box of the comment that you wish to edit.
The comment will be highlighted to indicate that it has been selected. Click the Edit Comment button below the list.
The Comment pop-up window will appear.
Make your changes to the comment and click on the Save button on the bottom left.
Make change to comment and click Save.

EKOS User Manual – Creating a New Customer Record
Page 104 of 231
Deleting a Comment Comments can only be deleted by the staff person that created them, or by a staff person with EKOS security Delete permissions. These restrictions have been imposed in order to preserve the integrity of these comments for audit trail purposes. To delete a comment from the Customer Comments list:
Locate and click on the comment that you wish to delete.
The comment will be highlighted to indicate that it has been selected. Click the Delete Comment button below the list.
A verification pop-up window will appear.
Click OK in the verification window, and the selected comment will be removed from the list.
Review and click OK or Cancel.
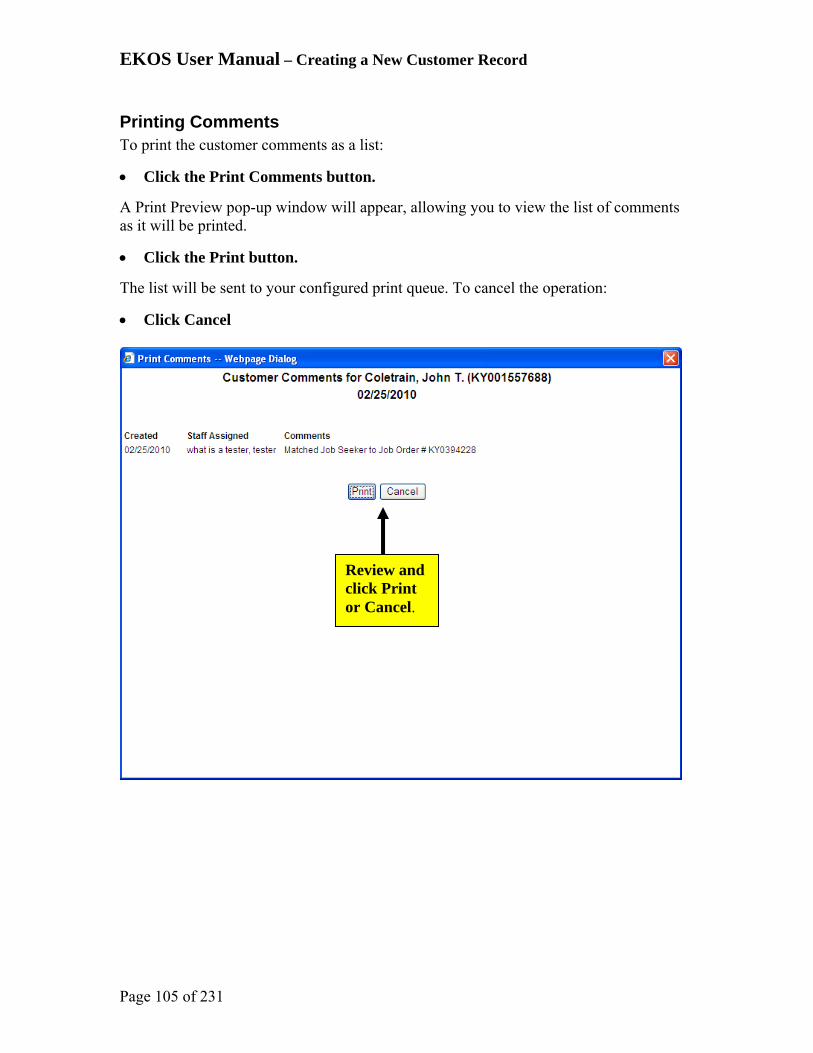
EKOS User Manual – Creating a New Customer Record
Page 105 of 231
Printing Comments To print the customer comments as a list:
Click the Print Comments button.
A Print Preview pop-up window will appear, allowing you to view the list of comments as it will be printed.
Click the Print button.
The list will be sent to your configured print queue. To cancel the operation:
Click Cancel
Review and click Print or Cancel.

EKOS User Manual – Creating a New Customer Record
Page 106 of 231
Tests Tab The Tests tab on the EKOS Customer Detail window allows you to enter, view, change, and delete test scores for a variety of customer tests.
Viewing the Tests Page To access the Tests page:
Click on the Tests tab. The Tests page will appear The list box on this page displays all the test types and dates for each test that has been entered for the customer.

EKOS User Manual – Creating a New Customer Record
Page 107 of 231
Adding Test Scores The fields in the Test Detail section of the Tests page are used to add test results for a customer. To add a test result for the customer:
Click the Add Test button at the bottom of the Tests page.
Click on the arrow button in the Test Type field, and select the appropriate test name from the drop-down list.
Available test types include: Basic Occupational Literacy Test (BOLT) – Math & Reading General Aptitude Test (GATB) Non-Reading Aptitude Test (NATB) O*Net Interest Profiler O*Net Work Importance Locator O*Net Ability Profiler Tests of Adult Basic Education (TABE) - Math & Reading Tests of Adult Basic Education (TABE2) – Math & Reading Typing Proficiency Wonderlic Personnel Test (WPT) - Employability Level Wonderlic Basic Skills Test (WBST) - Verbal & Quantitative
Click on the arrow button in the Office field, and select the appropriate office name from the drop-down list.
In the Test Date field:
Enter the date on which the test was administered (in mmddyyyy format).
Click the Test Details button.
Add Test data in these fields
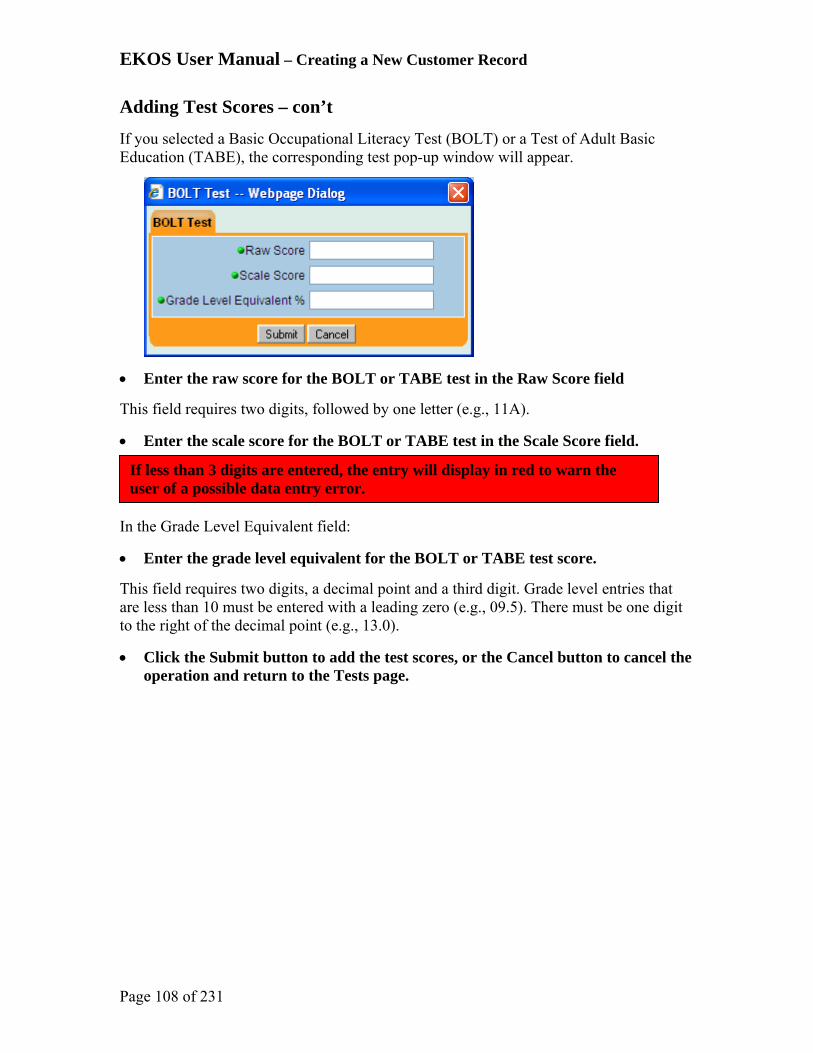
EKOS User Manual – Creating a New Customer Record
Page 108 of 231
Adding Test Scores – con’t
If you selected a Basic Occupational Literacy Test (BOLT) or a Test of Adult Basic Education (TABE), the corresponding test pop-up window will appear. Enter the raw score for the BOLT or TABE test in the Raw Score field
This field requires two digits, followed by one letter (e.g., 11A).
Enter the scale score for the BOLT or TABE test in the Scale Score field.
In the Grade Level Equivalent field:
Enter the grade level equivalent for the BOLT or TABE test score.
This field requires two digits, a decimal point and a third digit. Grade level entries that are less than 10 must be entered with a leading zero (e.g., 09.5). There must be one digit to the right of the decimal point (e.g., 13.0).
Click the Submit button to add the test scores, or the Cancel button to cancel the operation and return to the Tests page.
If less than 3 digits are entered, the entry will display in red to warn the user of a possible data entry error.

EKOS User Manual – Creating a New Customer Record
Page 109 of 231
Adding Test Scores – con’t
If you selected a General Aptitude test (GATB) or a Non-Reading Aptitude test (NATB), the corresponding test pop-up window will appear.
Click on the arrow button in the Test Form field, and select the appropriate test form (A, B, C or D) from the drop-down list
In each of the Raw Score fields (1 - 12):
Enter the raw scores for each corresponding test in the battery.
Click the Calculate Aptitude button.
EKOS will calculate the customer’s various aptitude scores (G, V, N, S, P, Q, K, F and M) using the provided raw scores, and display them in the corresponding Aptitude Scores fields.
Click the Submit button to add the test scores, or the Cancel button to cancel the operation and return to the Tests page.
If you selected the Typing Proficiency test, the Typing Proficiency pop-up window will appear. In the displayed fields:
Enter the customer’s estimated typing speed.
Enter the customer’s tested typing speed.
Enter the error count from the customer’s typing test.
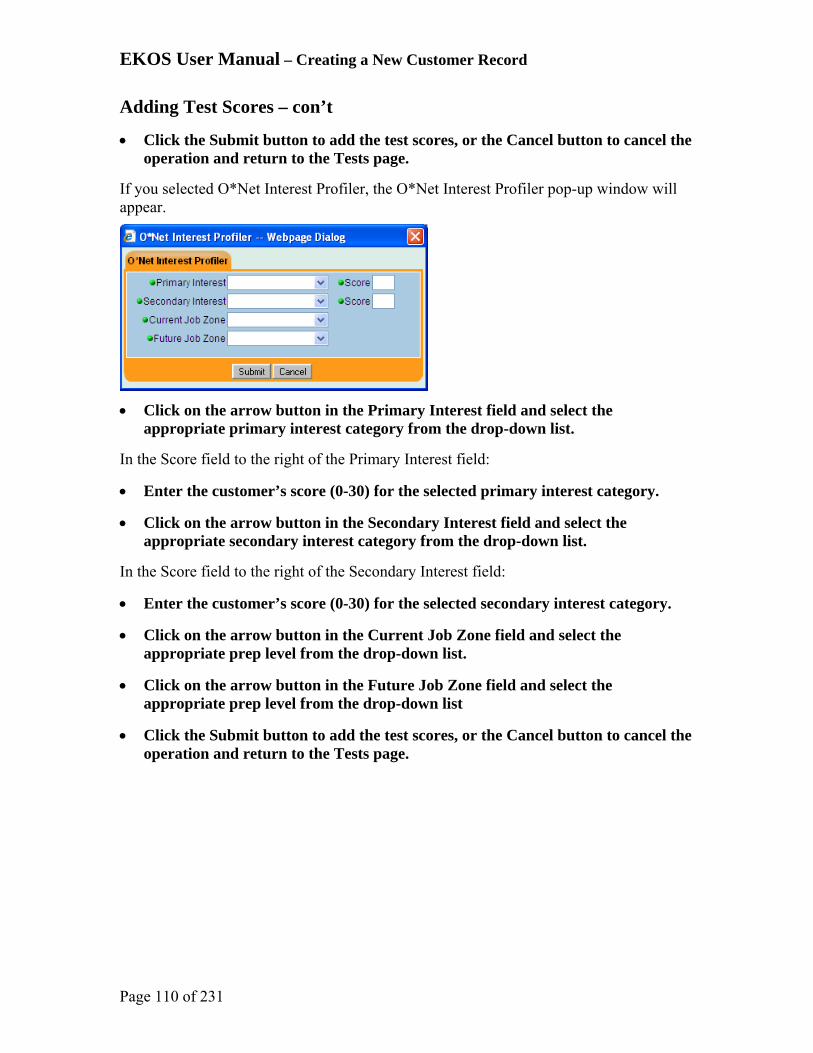
EKOS User Manual – Creating a New Customer Record
Page 110 of 231
Adding Test Scores – con’t
Click the Submit button to add the test scores, or the Cancel button to cancel the operation and return to the Tests page.
If you selected O*Net Interest Profiler, the O*Net Interest Profiler pop-up window will appear. Click on the arrow button in the Primary Interest field and select the
appropriate primary interest category from the drop-down list.
In the Score field to the right of the Primary Interest field:
Enter the customer’s score (0-30) for the selected primary interest category.
Click on the arrow button in the Secondary Interest field and select the appropriate secondary interest category from the drop-down list.
In the Score field to the right of the Secondary Interest field:
Enter the customer’s score (0-30) for the selected secondary interest category.
Click on the arrow button in the Current Job Zone field and select the appropriate prep level from the drop-down list.
Click on the arrow button in the Future Job Zone field and select the appropriate prep level from the drop-down list
Click the Submit button to add the test scores, or the Cancel button to cancel the operation and return to the Tests page.
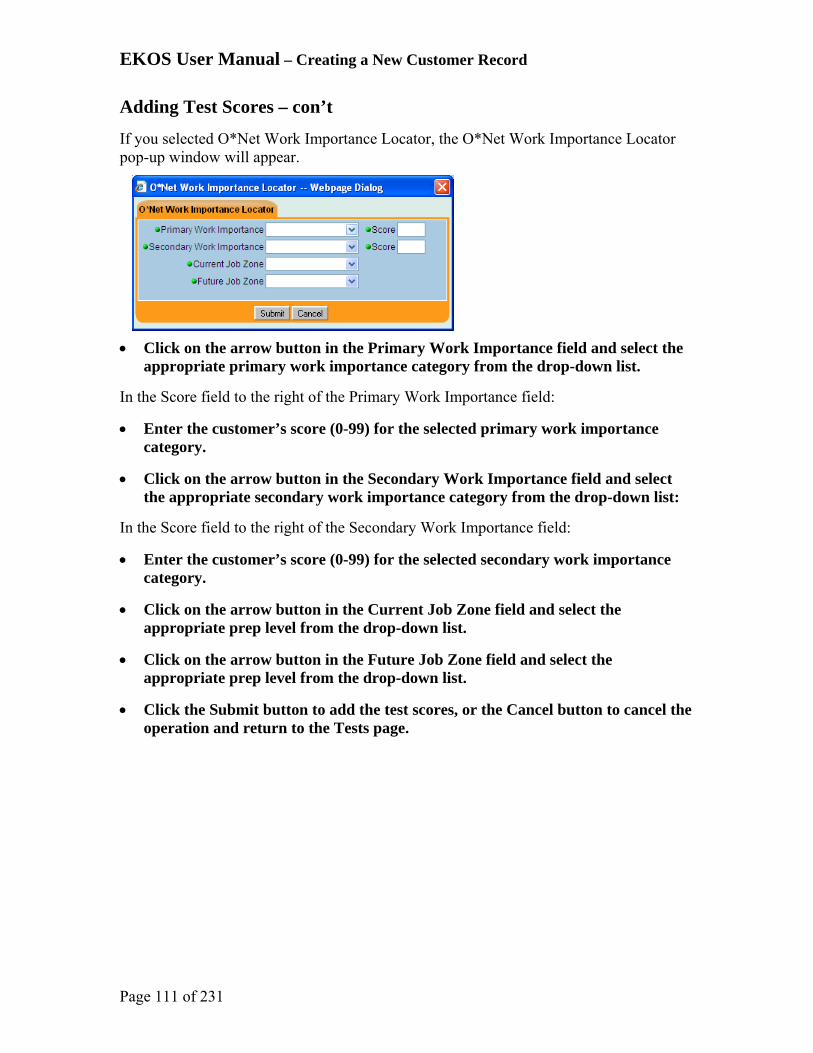
EKOS User Manual – Creating a New Customer Record
Page 111 of 231
Adding Test Scores – con’t
If you selected O*Net Work Importance Locator, the O*Net Work Importance Locator pop-up window will appear.
Click on the arrow button in the Primary Work Importance field and select the appropriate primary work importance category from the drop-down list.
In the Score field to the right of the Primary Work Importance field:
Enter the customer’s score (0-99) for the selected primary work importance category.
Click on the arrow button in the Secondary Work Importance field and select the appropriate secondary work importance category from the drop-down list:
In the Score field to the right of the Secondary Work Importance field:
Enter the customer’s score (0-99) for the selected secondary work importance category.
Click on the arrow button in the Current Job Zone field and select the appropriate prep level from the drop-down list.
Click on the arrow button in the Future Job Zone field and select the appropriate prep level from the drop-down list.
Click the Submit button to add the test scores, or the Cancel button to cancel the operation and return to the Tests page.

EKOS User Manual – Creating a New Customer Record
Page 112 of 231
Adding Test Scores – con’t
If you selected O*Net Ability Profiler, the O*Net Ability Profiler pop-up window will appear.
Click on the arrow button in the Test Form field, and select the appropriate test form (1 or 2) from the drop-down list.
In each of the Aptitude Percentile fields:
Enter the percentile scores (0-99) for each corresponding test in the battery.
At least one percentile score must be entered in order to successfully save the test record.
Click on the arrow button in the Current Job Zone field and select the appropriate prep level from the drop-down list.
Click on the arrow button in the Future Job Zone field and select the appropriate prep level from the drop-down list.
Click the Submit button to add the test scores, or the Cancel button to cancel the operation and return to the Tests page.
If you selected Wonderlic Personnel Test (WPT) - Employability Lvl, the Wonderlic Personnel Test pop-up window will appear.
In the Employment Potential Scores field:
Enter the customer’s employment potential score (0-50).
Click the Submit button to add the test score, or the Cancel button to cancel the operation and return to the Tests page.
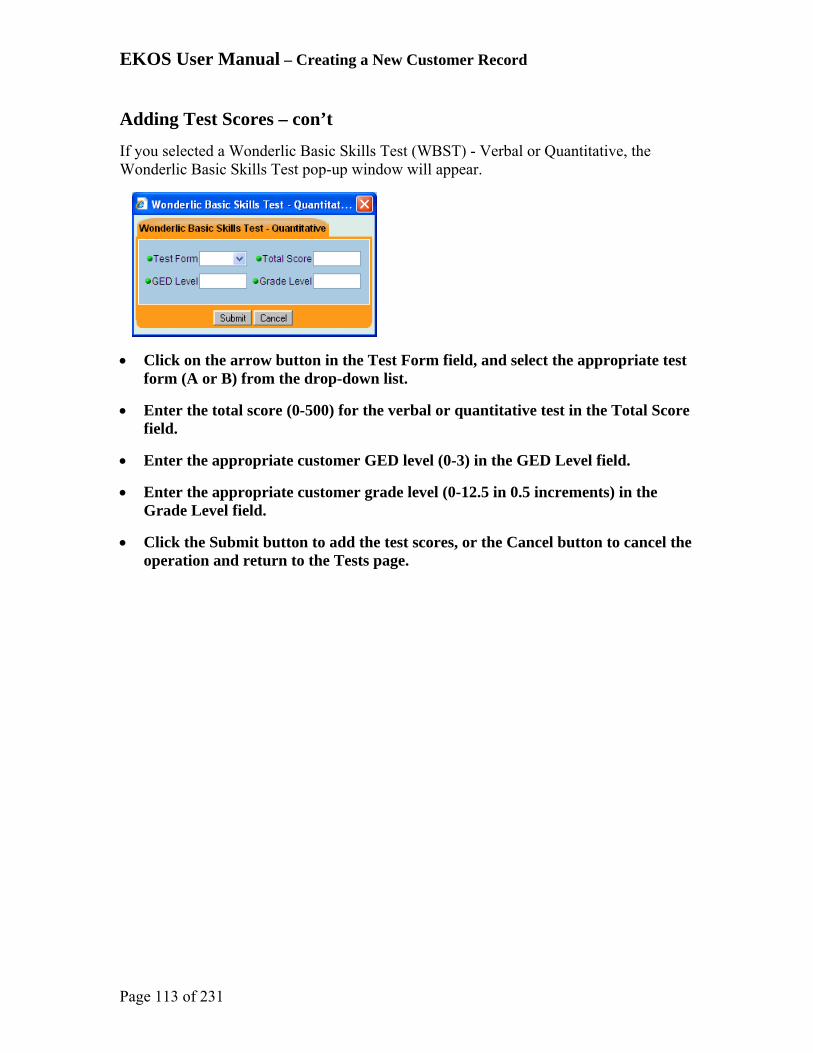
EKOS User Manual – Creating a New Customer Record
Page 113 of 231
Adding Test Scores – con’t
If you selected a Wonderlic Basic Skills Test (WBST) - Verbal or Quantitative, the Wonderlic Basic Skills Test pop-up window will appear.
Click on the arrow button in the Test Form field, and select the appropriate test form (A or B) from the drop-down list.
Enter the total score (0-500) for the verbal or quantitative test in the Total Score field.
Enter the appropriate customer GED level (0-3) in the GED Level field.
Enter the appropriate customer grade level (0-12.5 in 0.5 increments) in the Grade Level field.
Click the Submit button to add the test scores, or the Cancel button to cancel the operation and return to the Tests page.

EKOS User Manual – Creating a New Customer Record
Page 114 of 231
Viewing and Changing Test Scores
To view and/or change information for an existing test entry, in the list box on the Tests page:
Locate and click on the test entry that you want to view or edit. The selected entry will be highlighted to indicate that it is selected, and its information will be displayed in the Test Detail section of the page.
Click the Test Details button.
The appropriate test’s pop-up window will appear, displaying the selected test’s scores. To edit scores for the selected test: Enter the updated scores into the appropriate boxes as needed.
Click Save to update the scores or Cancel to delete the changes.
Click to display details

EKOS User Manual – Creating a New Customer Record
Page 115 of 231
Deleting Tests To delete an existing test entry, in the list box on the Tests page
Locate and click on the test entry that you want to delete. The selected entry will be highlighted to indicate that it is selected
Click the Delete Selection button.
A confirmation window will appear, in the confirmation window: Click the OK button.
The selected entry will be removed from the list box. To cancel the deletion:
Click the Cancel button.
EKOS User Manual – Job Seeker to Job Order Matching
Page 116 of 231
Job Seeker to Job Orders Matching
Checklist for Matching Job Seeker to Job Orders
Ο Customer Search to Obtain Job Seeker Record
Ο Review contents of Customer Detail Record
Ο General Information Tab
Ο Additional Information Tab
Ο Objective Tab
Ο Work History Tab
Ο Education/License Tab
Ο Skills Tab
Ο Start Matching Job Seeker to Job Orders
Ο Identify Matched Job Orders of interest
Ο Tag Appropriate Job Orders
Ο Create and send Job Seeker Correspondence – Letter, E-mail, IVR
Ο Create and send Employer Correspondence – Letter, E-mail, IVR
Ο Save the Search
Ο Update Job Seeker’s Activities for search results
Ο Do Referrals to tagged Job Orders
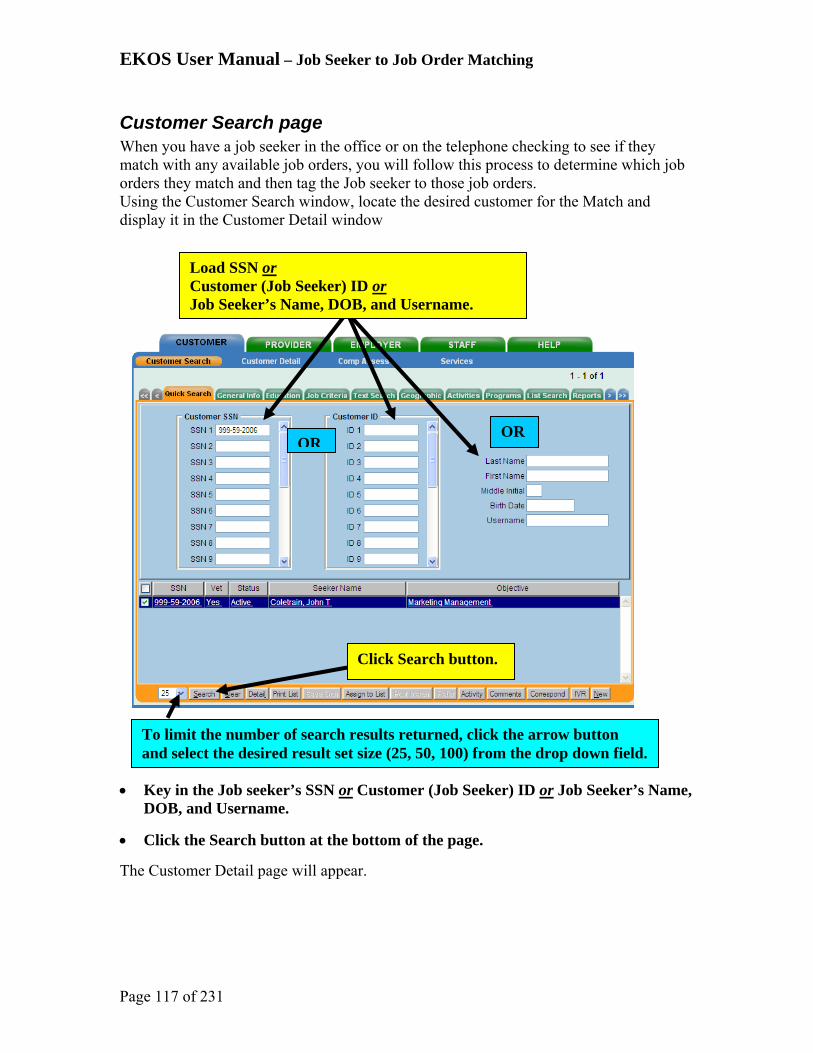
EKOS User Manual – Job Seeker to Job Order Matching
Page 117 of 231
Customer Search page When you have a job seeker in the office or on the telephone checking to see if they match with any available job orders, you will follow this process to determine which job orders they match and then tag the Job seeker to those job orders. Using the Customer Search window, locate the desired customer for the Match and display it in the Customer Detail window Key in the Job seeker’s SSN or Customer (Job Seeker) ID or Job Seeker’s Name,
DOB, and Username.
Click the Search button at the bottom of the page.
The Customer Detail page will appear.
Click Search button.
To limit the number of search results returned, click the arrow button and select the desired result set size (25, 50, 100) from the drop down field.
OROR
Load SSN or Customer (Job Seeker) ID or Job Seeker’s Name, DOB, and Username.

EKOS User Manual – Job Seeker to Job Order Matching
Page 118 of 231
Customer Detail page On the Gen. Info tab page, ensure the Status and Job Seeker drop down boxes are both displaying “Active”. While you have the Job seeker available to you is a good time to work across the Gen Info, Add’l Info, Objective, Work Hist., ED/Lic, and Skills tabs to get as complete and updated information in each of these pages as possible. While all fields in all the tabs are important information to our mission in EKOS, but during the matching process, some fields are particularly key in making the best potential matches.
Gen Info Tab In the Customer Data area, be sure that the demographic information is accurate as it will defeat our best efforts to find a match for the job seeker if we cannot contact them to let them know. The Education and Employment area is key in the matching operation so the most up to date data is essential there as well.
Add’l Info Tab There are special considerations for Job Seekers with Military service. Therefore we want to ensure they get credit for being qualified veterans. A qualifying Veteran is one who served in the military, naval, or air service, and who was discharged or
When complete, Click Start Match button.
Ensure both Status and Job Seeker are set to “Active”.
Check the contents of the tabs to get best information possible.

EKOS User Manual – Job Seeker to Job Order Matching
Page 119 of 231
released under conditions other than dishonorable. This service includes full-time duty in the National Guard or a Reserve component (if for 180 days or more other than full-time duty for training purposes, unless the individual has a service connected disability). Employment and shift preferences can be a key consideration in a valid Job match.
Objective Tab
Employment Objective needs to be reflective of the key elements in his desired career. The O*Net Title is a major factor in the matching process as well as the months of experience. Acceptable Job locations should be as flexible as possible while still being reasonable.
Work Hist. Tab Review to ensure there is work history entered that supports the amount of work experience reflected with the job titles.
Ed/Lic Tab Ensure all fields reflect the most recent information.
Skills Tab Ensure all fields reflect the most recent information.
When satisfied with the information on the pages:
Click the Start Match button at the bottom of the page.
The Job Order Search, Quick Search page will display. Several Job Order Search window fields will be pre-populated with criteria from the customer record.
If you do not select an O*Net title from the customer’s record before starting the Match operation, the system will use the first title listed in the O*Net Titles list box to pre-populate the O*Net Title field in the Job Order Search window

EKOS User Manual – Job Seeker to Job Order Matching
Page 120 of 231
Desired Employers for Job Seeker Matching
Identifying Job Orders for Desired Employer Matches The Desired Employers matching is a feature that allows the Job Seeker to focus their search and matching to a specific employer who the Job Seeker has designated as a Desired Employer in their Objective Tab in the Customer Module. The search process is the same as all other searches except it is restricted to only Job Orders open for the selected Desired Employer.
Click the Start Match button to begin the Matching process
The Job Order Search page will appear in the Employer Module.
Select one employer from the displayed list.

EKOS User Manual – Job Seeker to Job Order Matching
Page 121 of 231
The Employer Job Order Search Page Click the Search tab.
The Job Order Search General Info page will display with all the matching Job Orders listed in the bottom section of the screen.
Click the Search Tab to display matched jobs.
If you click the Job Order Search window’s Clear button while performing a Match operation, a confirmation pop-up window will appear. In the pop-up: Click Yes and all fields will be cleared and
theMatch mode will be cancelled. Click on 'No' to clear all fields and
continue searching in match mode. To remove or change search criteria for your Match operation, you should manually alter the necessary fields.

EKOS User Manual – Job Seeker to Job Order Matching
Page 122 of 231
Job Order Matching and Referrals
Identifying Job Order Matches If no Job Orders are displayed in the list field or just a few, you may want to:
Click the Customer Detail Objective tab to change the Job Seeker’s search criteria.
Does the match display any jobs?

EKOS User Manual – Job Seeker to Job Order Matching
Page 123 of 231
Identifying Job Order Matches – con’t
The information in the Objective tab is used in the matching process to compare the Job Seeker’s criteria for a job to the Job Order’s criteria for job seekers. Desired O*Net Titles, Desired Employers, and Acceptable Job Locations section options can all be modified to expand or contract the Job Seeker’s population of available job opportunities. For example, review the entries in the Acceptable Job Locations to possibly expand for a broader Job Order search. To expand the Acceptable Job Locations search criteria:
Click the drop down box for the within value and pick a larger radius.
The within radius is a maximum for the search criteria. If the radius is 50 miles and the job is 51 miles, it will not return a match.
Review zip and mileage.

EKOS User Manual – Job Seeker to Job Order Matching
Page 124 of 231
Identifying Job Order Matches – con’t
Another area where the search/matching criteria can be expanded is the O*Net Titles. If the title is too restrictive, fewer or no matches may be returned.
To increase the possibility for finding more job order matches by expanding the O*Net Title:
Click the O*Net Title box.
The O*Net Title search page will be displayed.
Enter the desired title description into the O*Net Title box in the displayed page.
Click search to display matching titles in the bottom section of the page.
Check the box next to the desired title and click the Select button at the bottom of the page.
Click Search to display available matched O*Net titles.
Check desired title and click Select
Enter desired title description.
Click the O*Net Title box to display Select O*Net search page.

EKOS User Manual – Job Seeker to Job Order Matching
Page 125 of 231
Identifying Job Order Matches – con’t
The Job Order Search page will redisplay with available job orders displayed in the bottom section of the page reflecting the new Acceptable Job Location and/or O*Net Title entry. If there were matches with the original Title and Acceptable Job Locations entries, the Job Order Search page would have been populated with job orders as displayed below as well. If interested in all of the displayed Job Orders:
Check the box at the top of the selections next to Company.
If only interested in some of the Job Orders:
Check the box next to the desired Job Orders. Multiple selections are acceptable.
Click the Detail button at the bottom of the page to review each selected Job Order in sequence.
Click the top box for all Job Orders. Otherwise, click individual boxes to the left of the desired job orders.
Click Detail button to review each selected job order.

EKOS User Manual – Job Seeker to Job Order Matching
Page 126 of 231
Identifying Job Order Matches – con’t
The details of each selected job order will be displayed one at a time in the order they were listed on the previous Job Order Search page.
To page through the selected Job Orders one at a time, click the single arrow button.
To skip to the last job order selected, click the double arrows button.
To go back, click the buttons to the left of the numbers.
If the Job Seeker is qualified and interested in the displayed Job Order:
Click the Tag button at the bottom of the screen
When the Job Seeker and you have reviewed all selected Job Orders and the desired Orders have been tagged to the Job Seeker:
Click the Return to Search button at the bottom of the page to display the matched Job Orders with the tagged orders highlighted.
After a job order has been tagged, the button will be labeled Untag. If the job seeker changes their mind about being interested in a particular job order, clicking the now labeled Untag button will remove that job order from being selected.
To page through the selected Job Orders.
If the job seeker is qualified and interested in displayed Job Order, click the Tag button. When all job orders have been tagged, click
the Return to Search button.

EKOS User Manual – Job Seeker to Job Order Matching
Page 127 of 231
Identifying Job Order Matches – con’t
Return to Search page will display all the matched job orders with the job orders that were tagged checked and highlighted. To post the matches of the selected (tagged) job orders to the job seeker:
Click the Post Match button at the bottom of the page.
To post the matches, click the Post Match button.

EKOS User Manual – Job Seeker to Job Order Matching
Page 128 of 231
Identifying Job Order Matches – con’t
The customer will be listed on the Matches page of the Job Order Detail window for each job order.
A Match activity will also appear on the Customer Detail Activities.

EKOS User Manual – Job Seeker to Job Order Matching
Page 129 of 231
Performing Referrals From the Matches page of the Job Order Detail window, a customer can be referred to the employer for the job.
Click on the Customer listed for the customer to be referred.
The entry will be highlighted to indicate that it is selected. Click the Referral button.
The selected customer will be listed on the Referrals page of the Job Order Detail window. A Refer service will also appear on the Activities page of the customer record and the Service History page (in the Services module) for the customer.
Click to highlight and refer
EKOS User Manual – Job Seeker to Job Order Matching
Page 130 of 231
Customer Correspondence If the Job Seeker is sitting with you or on the phone with you while the search and matching is taking place, you obviously would not send them a letter/e-mail or set up an IVR call to notify them about the activities. However, the Job Seeker might want an e-mail or letter as a reminder for them later of exactly what was accomplished. The following are instructions on creating the e-mail or letter which you may do after the Job Seeker has left.
The body of the e-mail/letter will be written to reflect the reason for the correspondence and inserted into the selected letter template.
The body of the e-mail may contain some description of the Job Order as well. EKOS Correspondence can be initiated (using the Correspond button) from several locations within the EKOS application, including:
Customer Detail window (customer correspondence) Customer Comprehensive Assessment window (customer correspondence) Customer Search window (customer correspondence) Employer Detail window (employer correspondence) Employer Search window (employer correspondence) Job Order Detail window (employer and referral correspondence)
Most EKOS correspondence templates contain an area in the body of the letter that is not part of the exported EKOS data source and therefore must be replaced manually. If multiple copies are being generated, replace the body text before the Mail Merge. This will automatically generate the copies with the replaced text. If the body text is replaced after the Mail Merge, the text will require being replaced in each separate copy.

EKOS User Manual – Job Seeker to Job Order Matching
Page 131 of 231
Letter/E-mail Correspondence Letter correspondence to the customer can be initiated from any of the Customer Detail Tabs in the Customer Module: Click the Correspond button at the bottom of the page to display

EKOS User Manual – Job Seeker to Job Order Matching
Page 132 of 231
Letter/E-mail Correspondence – con’t
The Pick a Document Template pop-up window will display. You might have to select different views to get to the window containing your EKOS Templates.
Click on the desired document template to select and highlight it.
Click the Open button to display the unmerged document
This page will be populated with all the correspondence templates that you have set up for EKOS
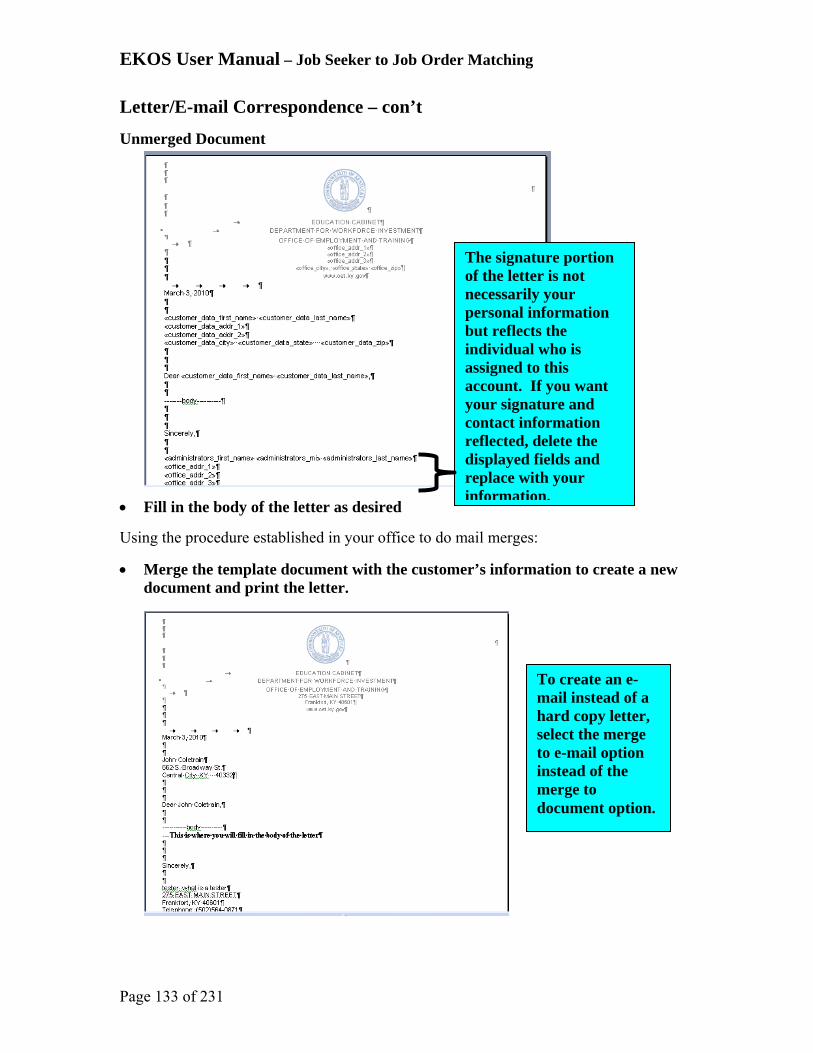
EKOS User Manual – Job Seeker to Job Order Matching
Page 133 of 231
Letter/E-mail Correspondence – con’t
Unmerged Document Fill in the body of the letter as desired
Using the procedure established in your office to do mail merges:
Merge the template document with the customer’s information to create a new document and print the letter.
To create an e-mail instead of a hard copy letter, select the merge to e-mail option instead of the merge to document option.
The signature portion of the letter is not necessarily your personal information but reflects the individual who is assigned to this account. If you want your signature and contact information reflected, delete the displayed fields and replace with your information.

EKOS User Manual – Job Seeker to Job Order Matching
Page 134 of 231
Employer Correspondence
Employer Referral Correspondence Before initiating correspondence from the Employer Search windows: Display the contact information in the search results list using the Show/Hide
Contacts button.

EKOS User Manual – Job Seeker to Job Order Matching
Page 135 of 231
Employer Referral Correspondence – con’t
To generate the Customer Referral Letter on the Referrals page:
Click the check box next to the Customer
Click the Employer Letter w/ Resume button: This will generate correspondence to notify an employer of referrals for their job order.
Correspondence of this type normally includes a cover letter and one or more customer resumes. This correspondence uses the data items included in the Job Order Referral Letter to Employer.
EKOS Employer correspondence can only be conducted with employers that have at least one contact person designated in the system.
Click the Customer’s Check Box to select and highlight customer. Click the Employer Letter w/Resume button

EKOS User Manual – Job Seeker to Job Order Matching
Page 136 of 231
Searches
Saving the Search At this point in the Match operation, if your Job Order Search returned any search results, the Save Search button will become active. This button allows you to save the search parameters used in this Match operation so that the search can be performed again later. All saved searches will be listed on the Saved Searches page of the Customer Detail window for later use. Click the Saved Searches button to initiate the process to identify and save the
search.
In the Search Name field, enter a name for the search.
Click the Submit or Cancel button to save the search or cancel to cancel the
operation.

EKOS User Manual – Job Seeker to Job Order Matching
Page 137 of 231
Running a Saved Search All saved searches for this customer will be listed on the Saved Searches page of the Customer Detail Module. To access the Saved Searches page:
Click on the Saved Searches tab. The Saved Searches page will appear. To run a previously saved search from this page:
Click on the listed search name for the search that you wish to run.
The entry will be highlighted to indicate that it is selected.
Click the Re-run Search button.
Check to Highlight Click to run

EKOS User Manual – Job Seeker to Job Order Matching
Page 138 of 231
Running a Saved Search – con’t
The appropriate search window (Job Order Search or Customer Search) will appear. The search criteria for the selected search will be pre-populated in the appropriate fields. Click the Search button to perform the search.

EKOS User Manual – Job Seeker to Job Order Matching
Page 139 of 231
Review Activities To review all the activities that have been completed for the Job Seeker, return to Customer/Customer Detail module and tab.
Click Activities tab.
The most recent activity will display at top of the list.
Click the Print List button for a hard copy list of the activities, if desired.
A Match activity will also appear on the Customer Detail Activities page and the Service History page (in the Services module) for each matched job.

EKOS User Manual – Job Order to Job Seeker Matching
Page 140 of 231
Job Order to Job Seeker Matching
Checklist for Matching Job Orders to Job Seekers
Ο Employer Search
Ο Match Job Order to Job Seeker
Ο Veteran’s Priority Search
Ο Save the Search
Ο Review contents of Job Seeker Detail Record
Ο General Information Tab
Ο Additional Information Tab
Ο Objective Tab
Ο Work History Tab
Ο Education/License Tab
Ο Skills Tab
Ο Start Matching Job Seekers to Job Orders
Ο Identify Matched Job Orders of interest
Ο Tag Appropriate Job Orders
Ο Create and send Employer Correspondence – Letter, E-mail, IVR
Ο Create and send Job Seeker Correspondence – Letter, E-mail, IVR
Ο Update Job Order/Job Seeker’s Activities for search results
Ο Do Referrals of Job Seekers to tagged Job Order
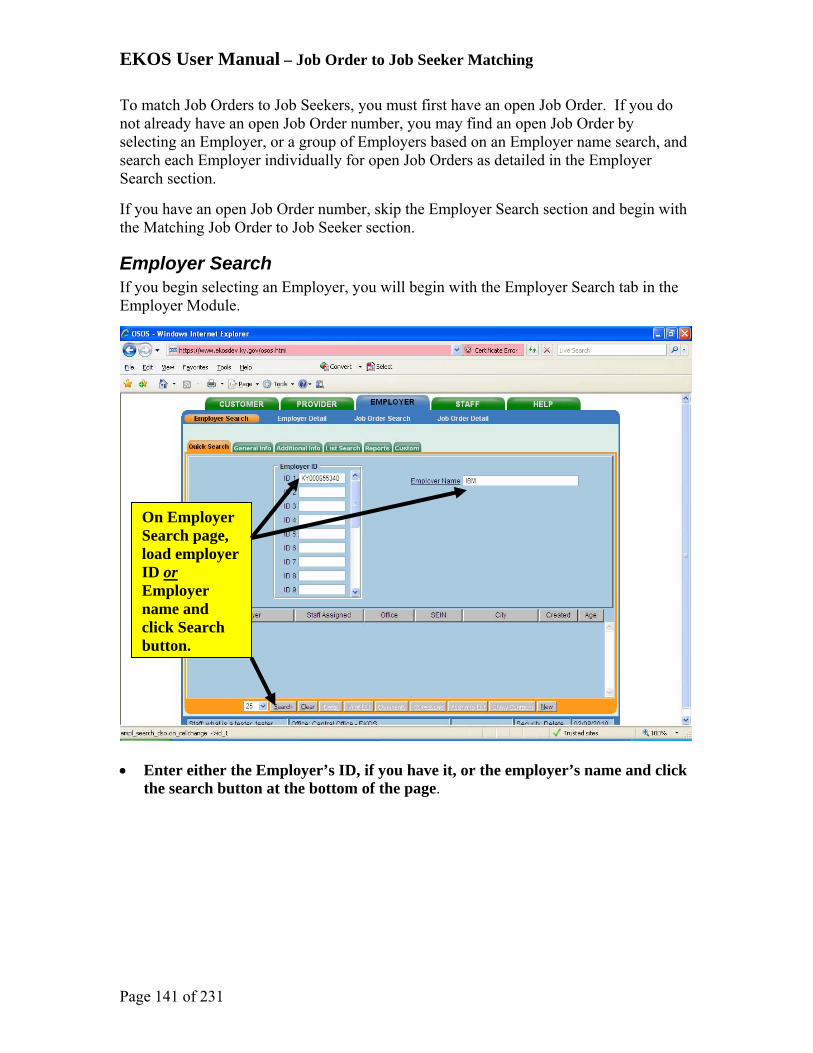
EKOS User Manual – Job Order to Job Seeker Matching
Page 141 of 231
To match Job Orders to Job Seekers, you must first have an open Job Order. If you do not already have an open Job Order number, you may find an open Job Order by selecting an Employer, or a group of Employers based on an Employer name search, and search each Employer individually for open Job Orders as detailed in the Employer Search section.
If you have an open Job Order number, skip the Employer Search section and begin with the Matching Job Order to Job Seeker section.
Employer Search If you begin selecting an Employer, you will begin with the Employer Search tab in the Employer Module.
Enter either the Employer’s ID, if you have it, or the employer’s name and click
the search button at the bottom of the page.
On Employer Search page, load employer ID or Employer name and click Search button.

EKOS User Manual – Job Order to Job Seeker Matching
Page 142 of 231
Employer Search – con’t
If Employer Name was entered, this page is displayed listing all matches to the entered name. You have the option to select one, multiple, or all of the listed employers to be searched by clicking the top check box at the left of the heading Employer, or next to the desired Employer(s) name. The selected Employer(s) can be displayed by paging through them one at a time.
Click Detail button that is brightened when Employer(s) is selected to display employer’s detail information.
Select Employer displayed at the bottom area of screen by clicking on box to its extreme left.
Click Detail button that is brightened.
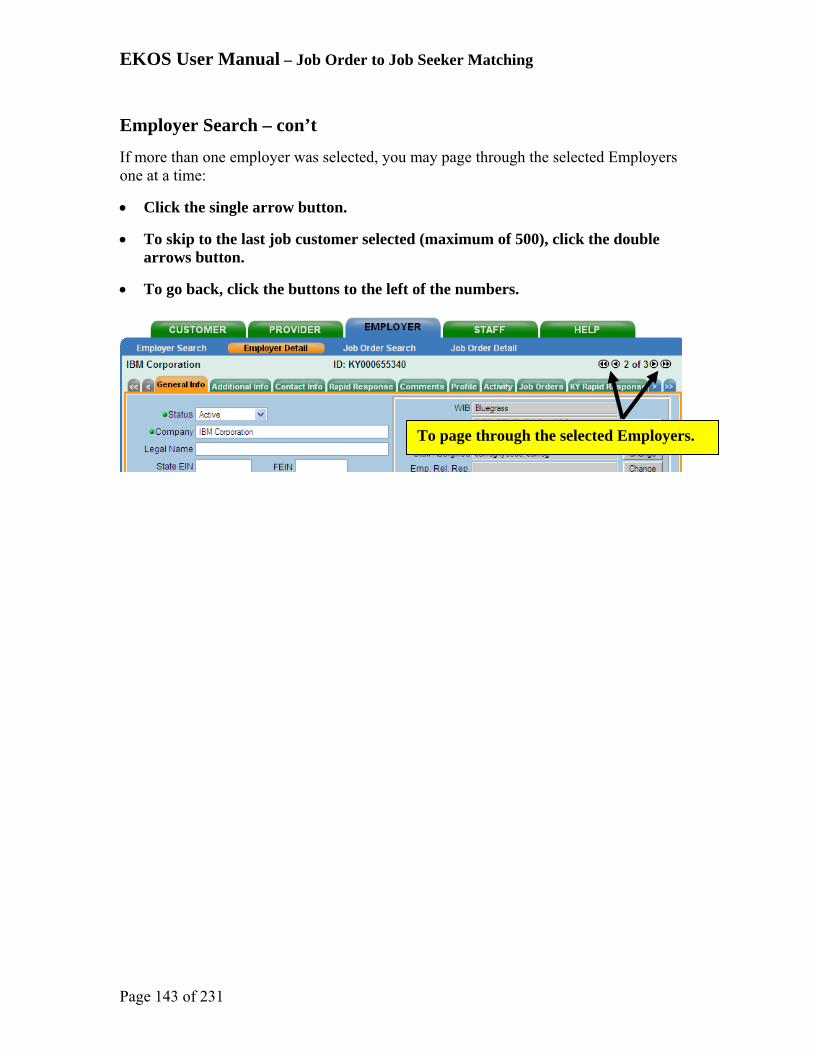
EKOS User Manual – Job Order to Job Seeker Matching
Page 143 of 231
Employer Search – con’t
If more than one employer was selected, you may page through the selected Employers one at a time:
Click the single arrow button.
To skip to the last job customer selected (maximum of 500), click the double arrows button.
To go back, click the buttons to the left of the numbers.
To page through the selected Employers.

EKOS User Manual – Job Order to Job Seeker Matching
Page 144 of 231
Employer Search – con’t
If an individual Employer ID number was entered on the initial Employer Search, Quick Search page, or the detail button on the Quick Search Results page was clicked, the Employer Detail page is displayed for the entered Employer ID or the first of the group of selected Employers. Click the Job Orders tab to display all Job Orders for this Employer.
The job orders for this Employer, both open and closed, are listed for selection.
Click Job Orders tab to list all open orders for the displayed employer.
Click to move to next Employer.
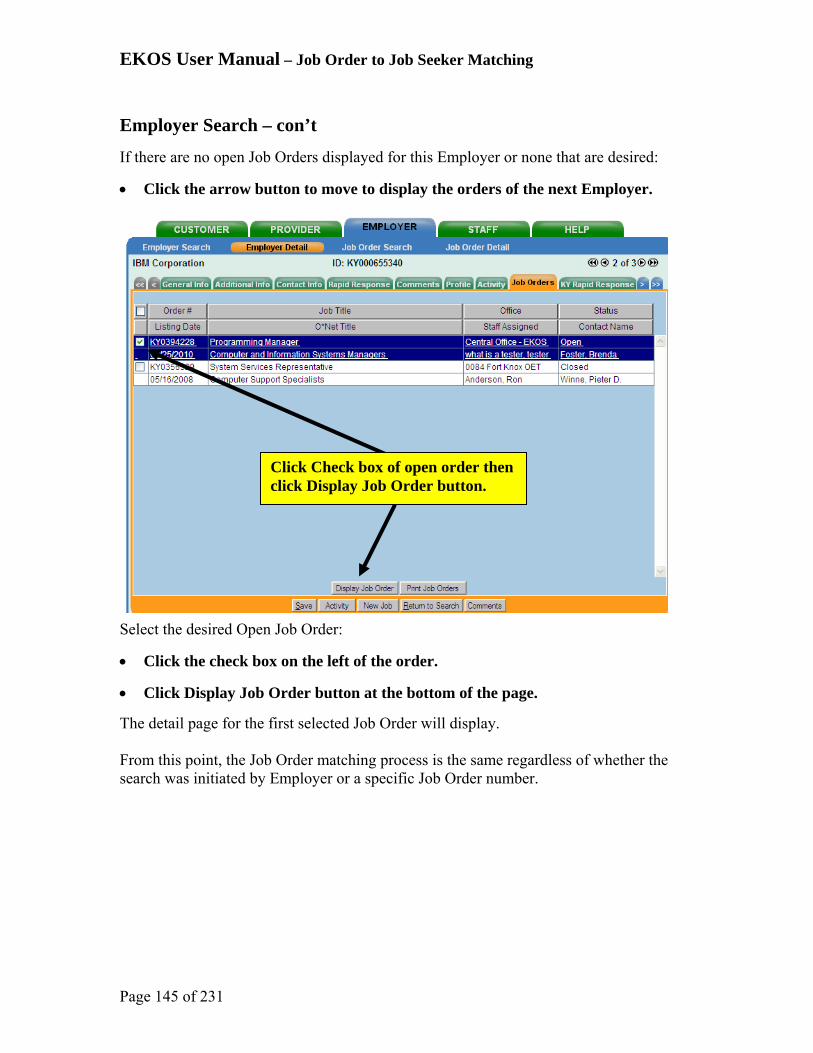
EKOS User Manual – Job Order to Job Seeker Matching
Page 145 of 231
Employer Search – con’t
If there are no open Job Orders displayed for this Employer or none that are desired:
Click the arrow button to move to display the orders of the next Employer. Select the desired Open Job Order:
Click the check box on the left of the order.
Click Display Job Order button at the bottom of the page.
The detail page for the first selected Job Order will display. From this point, the Job Order matching process is the same regardless of whether the search was initiated by Employer or a specific Job Order number.
Click Check box of open order then click Display Job Order button.

EKOS User Manual – Job Order to Job Seeker Matching
Page 146 of 231
Matching from the Job Order to the Job Seeker From any tab in the Job Order Detail window:
Click the Start Match button.
The Customer Search window will appear with several Customer Search window fields pre-populated with criteria from the job order.
You cannot use the Customer SSN, ID, and Name fields while in Match mode.

EKOS User Manual – Job Order to Job Seeker Matching
Page 147 of 231
Veteran’s Priority Search If this is a new job posting, you are required to do a Veteran’s Priority search first. From the Customer Search screen:
Select the Programs tab. In the Military Service section,
Click on the Veteran Status drop-down box and select Eligible Veterans from the list of options.
Click the Search button.
This will generate a search operation that identifies the veterans for the Job order. If no veterans are identified as qualified for the Job Order, or after enough time has passed to provide the veterans the required Priority search and matching, repeat this step to remove “Covered Veterans” from the Veteran Status box and continue the search.
Click arrow and select “Eligible Veterans” from the Drop-down box.
Click Search button to generate the Search operation.
Be sure and make a comment entry about having done the Veteran’s priority search for this Job Order.
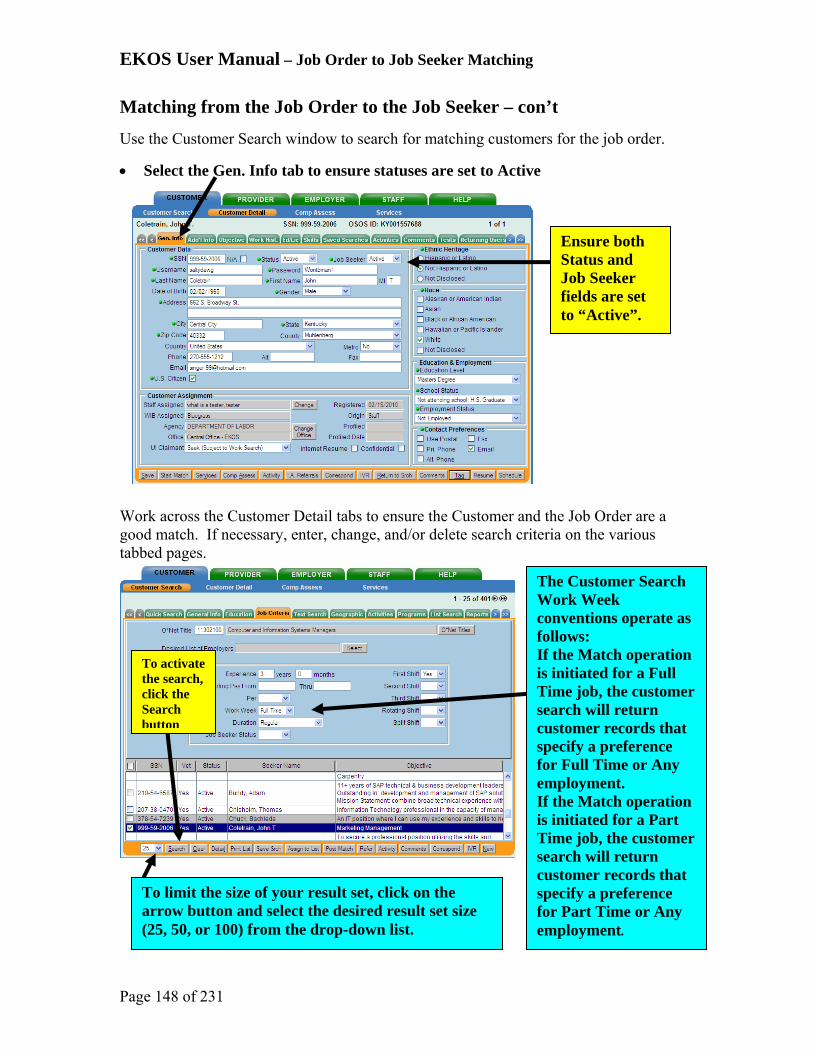
EKOS User Manual – Job Order to Job Seeker Matching
Page 148 of 231
Matching from the Job Order to the Job Seeker – con’t
Use the Customer Search window to search for matching customers for the job order.
Select the Gen. Info tab to ensure statuses are set to Active Work across the Customer Detail tabs to ensure the Customer and the Job Order are a good match. If necessary, enter, change, and/or delete search criteria on the various tabbed pages.
Ensure both Status and Job Seeker fields are set to “Active”.
The Customer Search Work Week conventions operate as follows: If the Match operation is initiated for a Full Time job, the customer search will return customer records that specify a preference for Full Time or Any employment. If the Match operation is initiated for a Part Time job, the customer search will return customer records that specify a preference for Part Time or Any employment.
To limit the size of your result set, click on the arrow button and select the desired result set size (25, 50, or 100) from the drop-down list.
To activate the search, click the Search button

EKOS User Manual – Job Order to Job Seeker Matching
Page 149 of 231
Matching from the Job Order to the Job Seeker – con’t
In the Geographic tab, you might want to limit the matching to counties in close proximity to the job location as a search criteria. To select appropriate counties for search customers:
In the Counties boxes, click on the drop down arrows to select up to 5 counties at a time for the search criteria.
When all tabs have been researched and updated as appropriate:
Click Search button and customers that match the search criteria will display in the bottom section of the page.

EKOS User Manual – Job Order to Job Seeker Matching
Page 150 of 231
Save Search
At this point in the Match operation, if your customer search returns any search results, the Save Search button will become active. This button allows you to save the search parameters used in this Match operation so that the search can be performed again later.
Click the Save Srch button and a pop-up window will appear to name the search.
Key in the search name and click Submit or Cancel as appropriate.
If you have used the search name before, the page will prompt you to select another name. All saved searches will be listed on the Saved Searches page of the Job Order Detail window for later use.
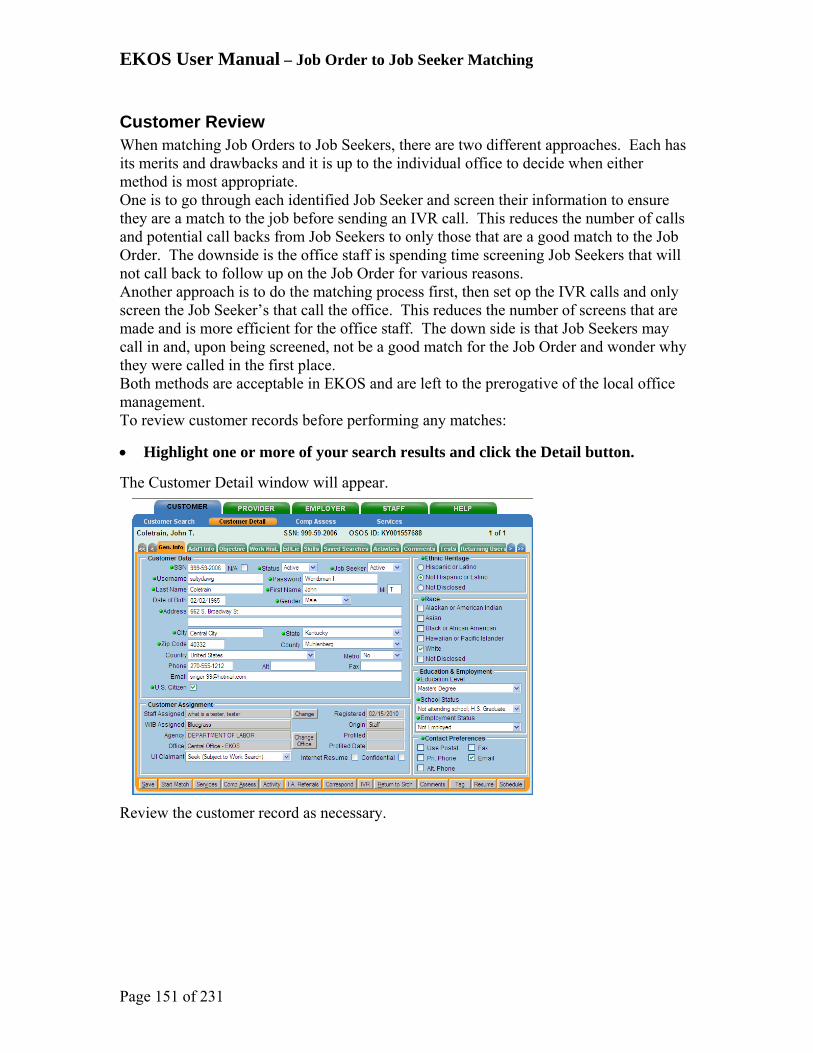
EKOS User Manual – Job Order to Job Seeker Matching
Page 151 of 231
Customer Review When matching Job Orders to Job Seekers, there are two different approaches. Each has its merits and drawbacks and it is up to the individual office to decide when either method is most appropriate. One is to go through each identified Job Seeker and screen their information to ensure they are a match to the job before sending an IVR call. This reduces the number of calls and potential call backs from Job Seekers to only those that are a good match to the Job Order. The downside is the office staff is spending time screening Job Seekers that will not call back to follow up on the Job Order for various reasons. Another approach is to do the matching process first, then set op the IVR calls and only screen the Job Seeker’s that call the office. This reduces the number of screens that are made and is more efficient for the office staff. The down side is that Job Seekers may call in and, upon being screened, not be a good match for the Job Order and wonder why they were called in the first place. Both methods are acceptable in EKOS and are left to the prerogative of the local office management. To review customer records before performing any matches:
Highlight one or more of your search results and click the Detail button.
The Customer Detail window will appear. Review the customer record as necessary.

EKOS User Manual – Job Order to Job Seeker Matching
Page 152 of 231
Customer Review – con’t
If you decide to match a customer record after reviewing it in the Customer Detail window: Click the Tag button at the bottom of the window.
The button’s label will change to UnTag. To deselect the record:
Click the UnTag button.
Click the Return to Srch button.
The Customer Detail window will disappear, returning you to the Customer Search window. You will still be in Match mode.
Click Tag
Click Return to Srch

EKOS User Manual – Job Order to Job Seeker Matching
Page 153 of 231
Posting Matches If you tagged any customer records in their Customer Detail windows, their search result list entries will be highlighted. Click the Post Match button.
The selected customer record(s) will be listed on the Matches page of the job order’s Detail window. A Match activity will also appear on the Customer Detail Activities page and the Service History page (in the Services module) for each matched customer record. This completes the matching activity for this job posting. If desired, you can post a comment identifying that this job was matched on this date.

EKOS User Manual – Job Order to Job Seeker Matching
Page 154 of 231
Comments
Adding a Comment To add a comment to the Customer Comments list:
Click the Comments button at the bottom of the Customer Detail window.
The Comment pop-up window will appear. Type your comment in the central area of the window.
Your comment can be up to 2000 characters in length. To spell check the comment:
Click the Spell Check button.
Your Microsoft Word application will start (if necessary), and the comment’s text will be placed in a new Word document. Word’s Spelling and Grammar tool will automatically be applied to the comment text. If the Microsoft Word Spelling and Grammar tool finds no spelling errors in the comment text, the Add Comment pop-up window will reappear and display the unchanged text. If the Microsoft Word Spelling and Grammar tool finds any suspected spelling errors, use the tool’s Spelling window to correct or ignore the errors. See your Microsoft Word documentation for instructions. When all suspected spelling errors have been corrected or ignored, the Add Comment pop-up window will reappear and display the comment text. Save the comment by:
Click the Save button.
Your comment will be added to the Customer Comments list. To cancel the operation and return to the comments page:
Click Cancel.
Save or Cancel.
Click Spell Check.
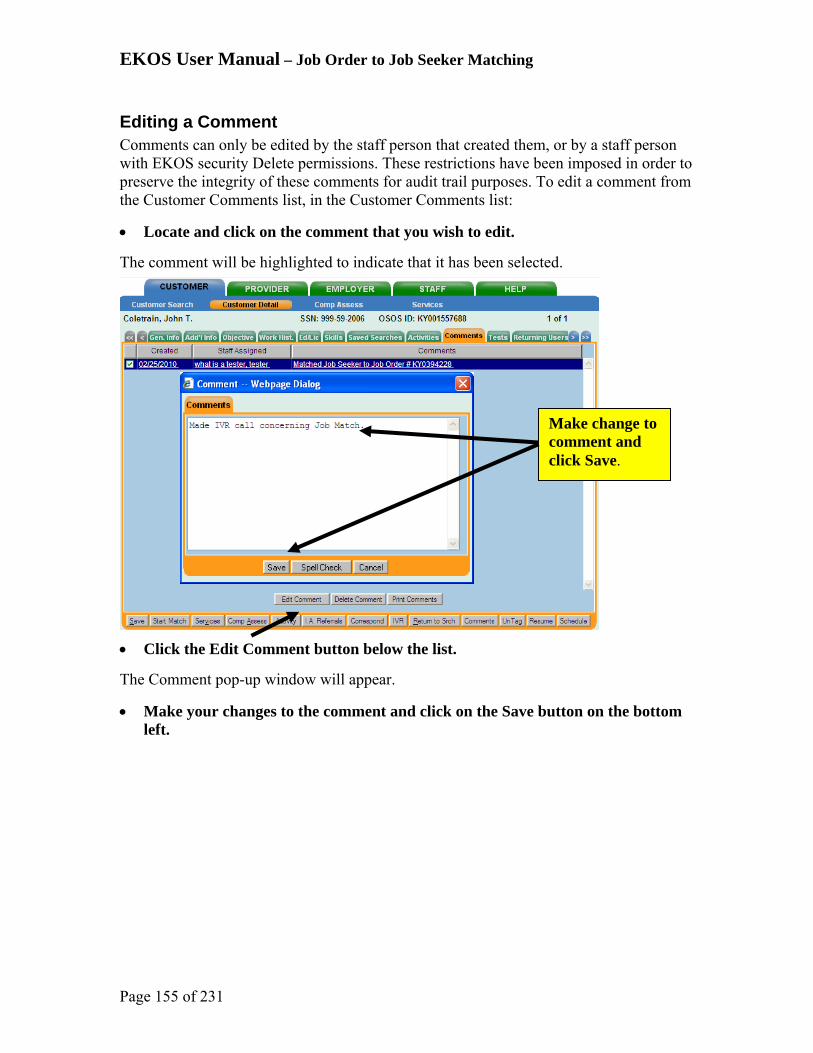
EKOS User Manual – Job Order to Job Seeker Matching
Page 155 of 231
Editing a Comment Comments can only be edited by the staff person that created them, or by a staff person with EKOS security Delete permissions. These restrictions have been imposed in order to preserve the integrity of these comments for audit trail purposes. To edit a comment from the Customer Comments list, in the Customer Comments list:
Locate and click on the comment that you wish to edit.
The comment will be highlighted to indicate that it has been selected. Click the Edit Comment button below the list.
The Comment pop-up window will appear.
Make your changes to the comment and click on the Save button on the bottom left.
Make change to comment and click Save.

EKOS User Manual – Job Order to Job Seeker Matching
Page 156 of 231
Deleting a Comment Comments can only be deleted by the staff person that created them, or by a staff person with AOSOS security Delete permissions. These restrictions have been imposed in order to preserve the integrity of these comments for audit trail purposes. To delete a comment from the Customer Comments list, in the Customer Comments list:
Locate and click on the comment that you wish to delete.
The comment will be highlighted to indicate that it has been selected. Click the Delete Comment button below the list.
A verification pop-up window will appear.
Click OK in the verification window, and the selected comment will be removed from the list.
Review and click OK or Cancel.

EKOS User Manual – Job Order to Job Seeker Matching
Page 157 of 231
Printing Comments To print the customer comments as a list:
Click the Print Comments button.
A Print Preview pop-up window will appear, allowing you to view the list of comments as it will be printed. In the pop-up window
Click the Print button.
The list will be sent to your configured print queue. To cancel the operation
Click Cancel
Review and click Print or Cancel.
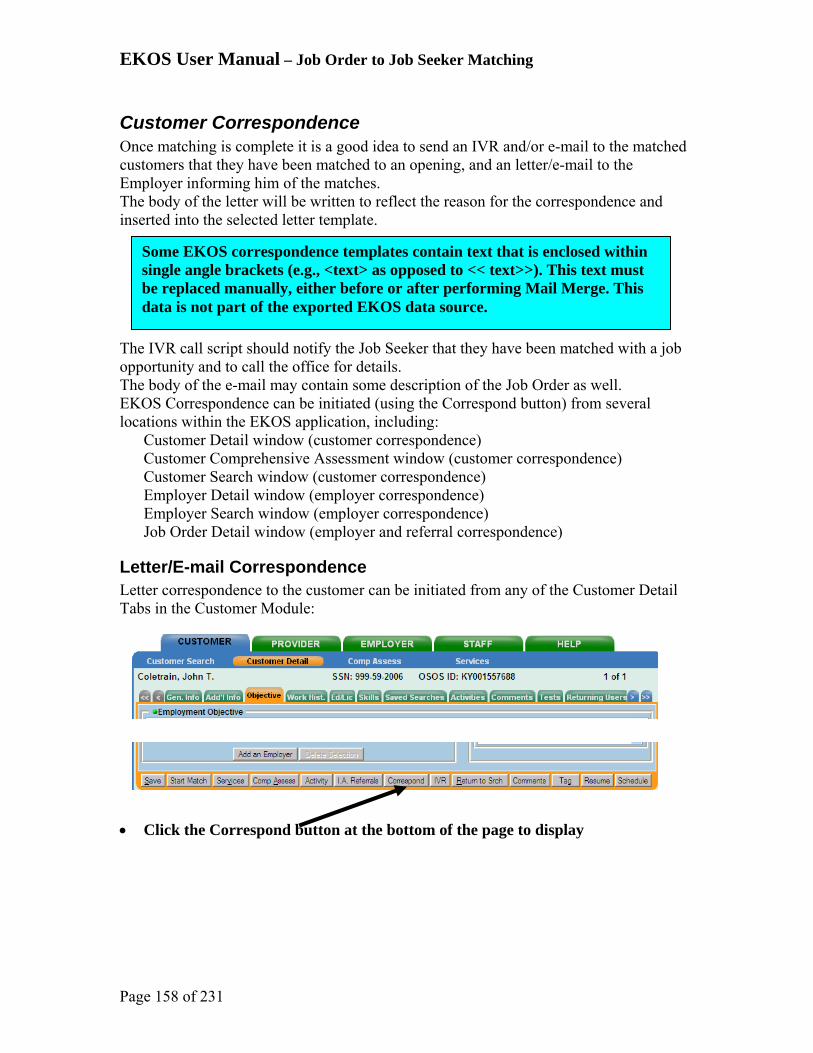
EKOS User Manual – Job Order to Job Seeker Matching
Page 158 of 231
Customer Correspondence Once matching is complete it is a good idea to send an IVR and/or e-mail to the matched customers that they have been matched to an opening, and an letter/e-mail to the Employer informing him of the matches. The body of the letter will be written to reflect the reason for the correspondence and inserted into the selected letter template. The IVR call script should notify the Job Seeker that they have been matched with a job opportunity and to call the office for details. The body of the e-mail may contain some description of the Job Order as well. EKOS Correspondence can be initiated (using the Correspond button) from several locations within the EKOS application, including:
Customer Detail window (customer correspondence) Customer Comprehensive Assessment window (customer correspondence) Customer Search window (customer correspondence) Employer Detail window (employer correspondence) Employer Search window (employer correspondence) Job Order Detail window (employer and referral correspondence)
Letter/E-mail Correspondence Letter correspondence to the customer can be initiated from any of the Customer Detail Tabs in the Customer Module:
Click the Correspond button at the bottom of the page to display
Some EKOS correspondence templates contain text that is enclosed within single angle brackets (e.g., <text> as opposed to << text>>). This text must be replaced manually, either before or after performing Mail Merge. This data is not part of the exported EKOS data source.
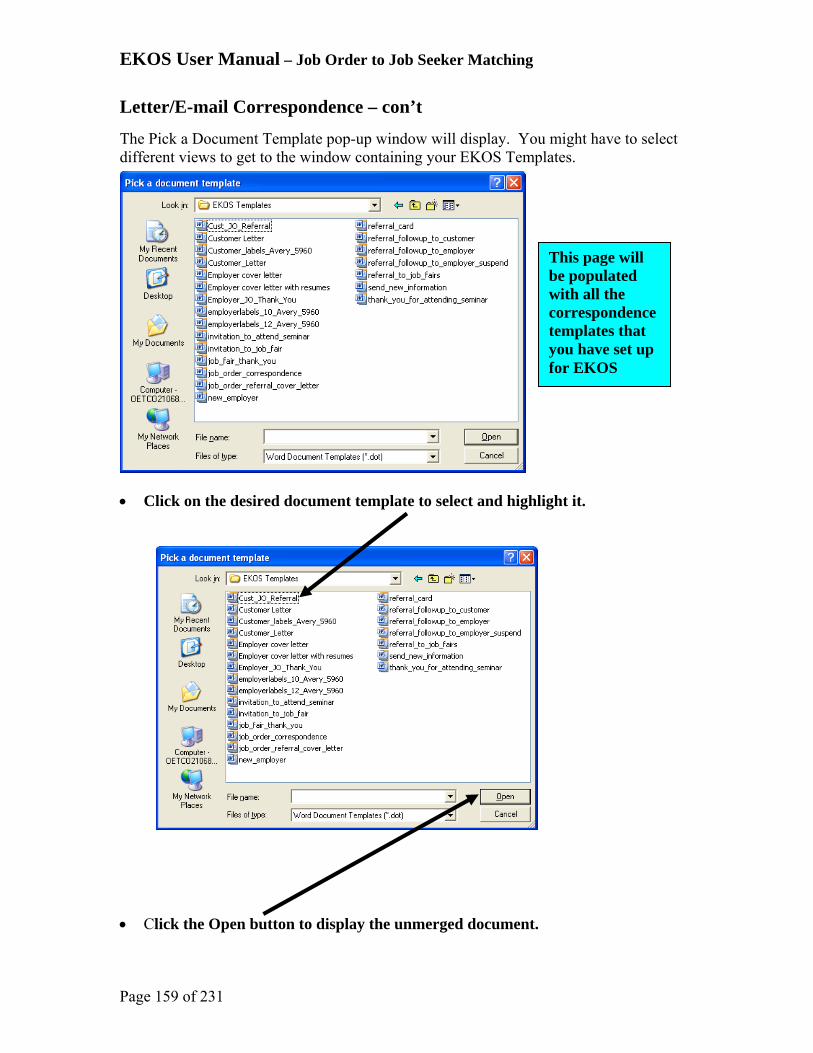
EKOS User Manual – Job Order to Job Seeker Matching
Page 159 of 231
Letter/E-mail Correspondence – con’t
The Pick a Document Template pop-up window will display. You might have to select different views to get to the window containing your EKOS Templates.
Click on the desired document template to select and highlight it. Click the Open button to display the unmerged document.
This page will be populated with all the correspondence templates that you have set up for EKOS
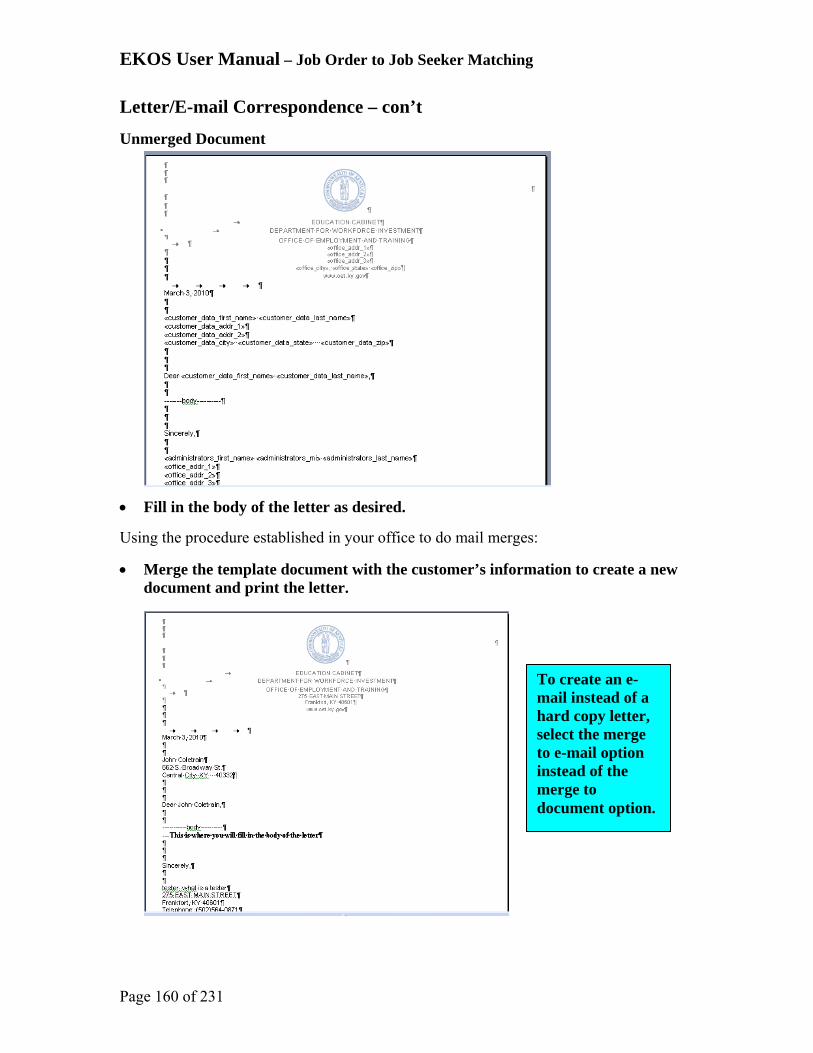
EKOS User Manual – Job Order to Job Seeker Matching
Page 160 of 231
Letter/E-mail Correspondence – con’t
Unmerged Document Fill in the body of the letter as desired.
Using the procedure established in your office to do mail merges:
Merge the template document with the customer’s information to create a new document and print the letter.
To create an e-mail instead of a hard copy letter, select the merge to e-mail option instead of the merge to document option.

EKOS User Manual – Job Order to Job Seeker Matching
Page 161 of 231
Interactive Voice Response (IVR) Transactions The IVR functionality in the Customer module allows you to select a pre-defined IVR script to be associated with the customer information. Only one IVR script can be selected for a customer. The IVR button is available at the bottom of all the tab pages within the Customer/Customer Detail module. To initiate the IVR process:
Click the IVR button at the bottom of the Customer Module window.
The IVR Script Selector pop-up window will appear. Select a pre-defined IVR script by clicking on the arrow button and selecting the
desired script name from the drop-down list.
To assign a staff member’s phone number to the transaction(s)
Enter the phone number (including the area code) in the Staff Phone # field.
If no phone number is entered in this field, the phone number of the currently signed-on staff person’s office will be assigned to each transaction by default.
If a selected customer’s record does not have a phone number assigned to it, the customer’s IVR transaction will be disregarded. The user is not given any warning regarding this failure

EKOS User Manual – Job Order to Job Seeker Matching
Page 162 of 231
Interactive Voice Response (IVR) Transactions – con’t Click Save to save the transaction(s) or Cancel to cancel the operation and
return to the initiating Customer page.
Customer Referral Correspondence
Highlight one or more referrals on the Referrals page.
Click the Customer Letter w/Job Order button
This will generate correspondence to notify the selected customer(s) of their referral to the job order. Correspondence of this type normally includes a cover letter and a copy of the job order. If multiple referrals are selected, the Microsoft Word correspondence document will, after the Mail Merge operation, contain multiple copies of the correspondence, separated by page breaks within the document. This correspondence uses the data items included in the Job Order Customer Letter W/ Job Order.
Select the Referrals Tab. Click the box to highlight the desired Customer. Click the Customer Letter w/Job Order Button.

EKOS User Manual – Job Order to Job Seeker Matching
Page 163 of 231
Employer Correspondence
Employer Referral Correspondence Before initiating correspondence from the Employer Search windows: Display the contact information in the search results list using the Show/Hide
Contacts button.

EKOS User Manual – Job Order to Job Seeker Matching
Page 164 of 231
Employer Referral Correspondence – con’t
To generate the Customer Referral Letter on the Referrals page:
Click the check box next to the Customer
Click the Employer Letter w/ Resume button: This will generate correspondence to notify an employer of referrals for their job order.
Correspondence of this type normally includes a cover letter and one or more customer resumes. This correspondence uses the data items included in the Job Order Referral Letter to Employer.
EKOS Employer correspondence can only be conducted with employers that have at least one contact person designated in the system.
Click the Customer’s Check Box to select and highlight customer. Click the Employer Letter w/Resume button

EKOS User Manual - Correspondence
Page 165 of 231
Correspondence
Templates
Correspondence Templates All pre-defined (sample) and custom EKOS Correspondence templates must be placed in your machine’s C:\Program Files\Microsoft Office\Templates directory. To obtain the pre-defined templates:
Click Help on the menu bar, and select Correspondence Help from the menu.
A client browser window will appear, displaying the Correspondence Help site.
Click the Templates button on the left side of the window.
The Correspondence Templates page will appear, listing the available templates. Download the desired templates as follows:
Right-click on the desired template file entry.

EKOS User Manual - Correspondence
Page 166 of 231
Correspondence Templates – con’t
A menu will appear.
Select Save Target As... from the menu.
A standard Microsoft Save As window will appear. Using the Save As window:
Save the file in your client machine’s C:\Program Files\Microsoft Office\Templates directory.
Repeat this process for each template to be downloaded.

EKOS User Manual - Correspondence
Page 167 of 231
Data Source Templates Seven data source templates are provided for use in creating custom correspondence templates. These files contain the field names of all data that is exported by EKOS for each component, and are used by the Mail Merge process to define available field names. These files should be placed in your machine’s C:\Program Files\Microsoft Office\Templates directory. To obtain the data source templates:
Click Help on the menu bar, and select Correspondence Help from the menu.
A client browser window will appear, displaying the Correspondence Help site.
Click the Data Sources button.
The Correspondence Data Sources page will appear, listing the available data source templates. Download the desired data source templates as follows:
Right-click on the desired data source file entry.
A menu will appear.
Select Save Target As... from the menu.

EKOS User Manual - Correspondence
Page 168 of 231
Data Source Templates – con’t
A standard Microsoft Save As window will appear. Using the Save As window: Save the file in your client machine’s C:\Program Files\Microsoft
Office\Templates directory.
Repeat this process for each data source to be downloaded.

EKOS User Manual - Correspondence
Page 169 of 231
Customer Correspondence Once matching is complete it is a good idea to send an IVR and/or e-mail to the matched customers that they have been matched to an opening, and a letter/e-mail to the Employer informing him of the matches. The body of the letter should be written to reflect the reason for the correspondence and inserted into the selected letter template. The IVR call script should notify the Job Seeker that they have been matched with a job opportunity and to call the office for details. The body of the e-mail may contain some description of the Job Order as well. EKOS Correspondence can be initiated (using the Correspond button) from several locations within the EKOS application, including:
Customer Detail window (customer correspondence) Customer Comprehensive Assessment window (customer correspondence) Customer Search window (customer correspondence) Employer Detail window (employer correspondence) Employer Search window (employer correspondence) Job Order Detail window (employer and referral correspondence)
Letter/E-mail Correspondence Letter correspondence to the customer can be initiated from any of the Customer Detail Tabs in the Customer Module: Click the Correspond button at the bottom of the page to display
Some EKOS correspondence templates contain text that is enclosed within single angle brackets (e.g., <text>). This text must be replaced manually, either before or after performing Mail Merge. This data is not part of the exported EKOS data source.

EKOS User Manual - Correspondence
Page 170 of 231
Letter/E-mail Correspondence – con’t
The Pick a Document Template pop-up window will display. You might have to select different views to get to the window containing your EKOS Templates. Click on the desired document template to select and highlight it. Click the Open button to display the unmerged document.
This page will be populated with all the correspondence templates that you have set up for EKOS

EKOS User Manual - Correspondence
Page 171 of 231
Letter/E-mail Correspondence – con’t
Unmerged Document Fill in the body of the letter as desired
Using the procedure established in your office to do mail merges:
Merge the template document with the customer’s information to create a new document and print the letter.
To create an e-mail instead of a hard copy letter, select the merge to e-mail option instead of the merge to document option.
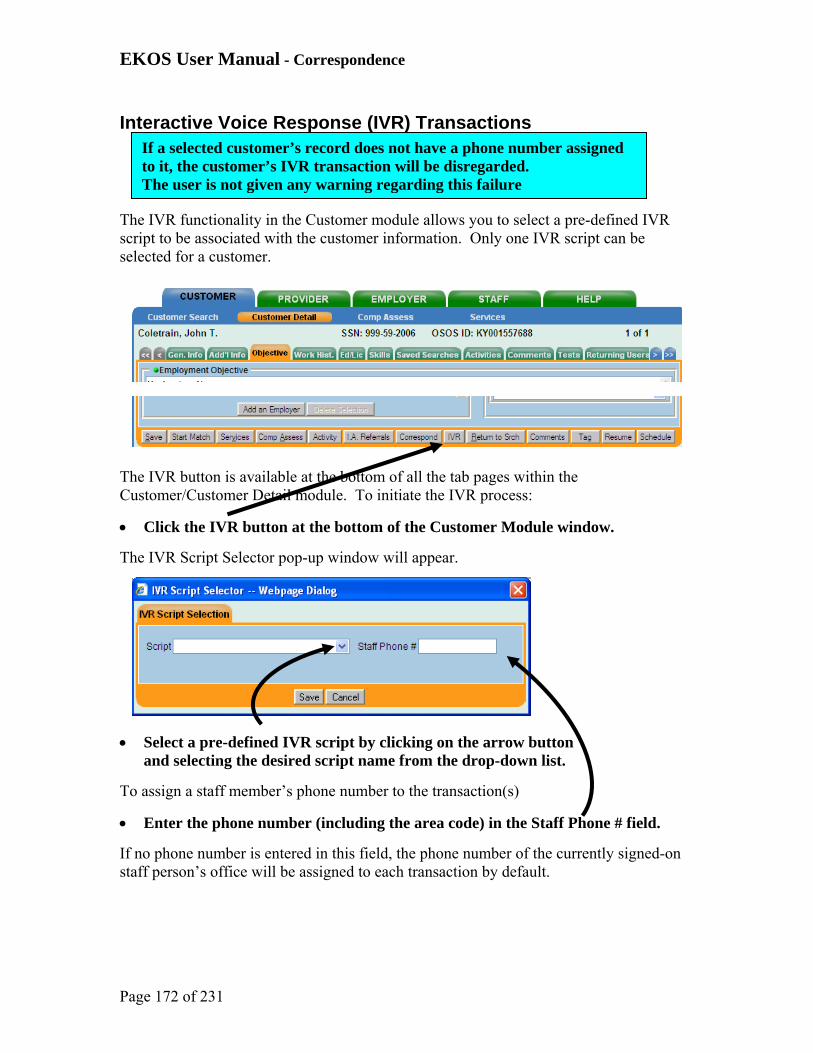
EKOS User Manual - Correspondence
Page 172 of 231
Interactive Voice Response (IVR) Transactions The IVR functionality in the Customer module allows you to select a pre-defined IVR script to be associated with the customer information. Only one IVR script can be selected for a customer. The IVR button is available at the bottom of all the tab pages within the Customer/Customer Detail module. To initiate the IVR process:
Click the IVR button at the bottom of the Customer Module window.
The IVR Script Selector pop-up window will appear. Select a pre-defined IVR script by clicking on the arrow button
and selecting the desired script name from the drop-down list.
To assign a staff member’s phone number to the transaction(s)
Enter the phone number (including the area code) in the Staff Phone # field.
If no phone number is entered in this field, the phone number of the currently signed-on staff person’s office will be assigned to each transaction by default.
If a selected customer’s record does not have a phone number assigned to it, the customer’s IVR transaction will be disregarded. The user is not given any warning regarding this failure

EKOS User Manual - Correspondence
Page 173 of 231
Interactive Voice Response (IVR) Transactions – con’t Click Save to save the transaction(s) or Cancel to cancel the operation and
return to the initiating Customer page.
Customer Referral Correspondence
Highlight one or more referrals on the Referrals page.
Click the Customer Letter w/Job Order button
This will generate correspondence to notify the selected customer(s) of their referral to the job order. Correspondence of this type normally includes a cover letter and a copy of the job order. If multiple referrals are selected, the Microsoft Word correspondence document will, after the Mail Merge operation, contain multiple copies of the correspondence, separated by page breaks within the document. This correspondence uses the data items included in the Job Order Customer Letter W/ Job Order.
When this type of correspondence is generated, the resumes of the referred customers are automatically appended to the generated Microsoft Word document, and are separated by page breaks within the document.
Select the Referrals Tab. Click the box to highlight the desired Customer. Click the Customer Letter w/Job Order Button.

EKOS User Manual - Correspondence
Page 174 of 231
Employer Correspondence
Employer Referral Correspondence Before initiating correspondence from the Employer Search windows: Display the contact information in the search results list using the Show/Hide
Contacts button.

EKOS User Manual - Correspondence
Page 175 of 231
Employer Referral Correspondence – con’t
To generate the Customer Referral Letter on the Referrals page:
Click the check box next to the Customer
Click the Employer Letter w/ Resume button: This will generate correspondence to notify an employer of referrals for their job order.
Correspondence of this type normally includes a cover letter and one or more customer resumes. This correspondence uses the data items included in the Job Order Referral Letter to Employer.
EKOS Employer correspondence can only be conducted with employers that have at least one contact person designated in the system.
Click the Customer’s Check Box to select and highlight customer. Click the Employer Letter w/Resume button

EKOS User Manual - Searches
Page 176 of 231
Searches
Saved Searches At some point in the Match operation, if the Search returned any results, the Search was probably saved for later retrieval and use.
Running a Saved Search All saved searches for this customer will be listed on the Saved Searches page of the Customer Detail Module. To access the Saved Searches page:
Click on the Saved Searches tab. The Saved Searches page will appear. To run a previously saved search from this page:
Click on the listed search name for the search that you wish to run.
The entry will be highlighted to indicate that it is selected.
Click the Re-run Search button.
Check to Highlight Click to run

EKOS User Manual - Searches
Page 177 of 231
Running a Saved Search – con’t
The appropriate search window (Job Order Search or Customer Search) will appear. The search criteria for the selected search will be pre-populated in the appropriate fields. Click the Search button to perform the search.

EKOS User Manual – List Participation
Page 178 of 231
List Participation
Creating New Lists The Add/Modify List pop-up window allows you to define or alter a list’s name, as well as its Statewide and Shared flag settings. To create a new list from the: Customer Module or Employer Module,
the process is the same:
Click the Assign to List button for the List Management pop-up window to
appear.
Click the New List button on the List Management pop-up window for the Add Modify List pop-up window to appear

EKOS User Manual – List Participation
Page 179 of 231
Creating New Lists – con’t
In the List Name field:
Enter a name for your list (up to 39 characters).
To allow the list to be viewed by other offices in your state:
Click the Statewide List check box.
To allow other staff personnel in your local office to change the attributes (e.g., name, statewide check box, etc.) of the list:
Click the Allow others to change list attributes check box.
A check mark in the check box indicates that it is selected. To deselect this option:
Click on the check box again, and the check mark will disappear.
Click the Save button to save the new list, the Cancel button to cancel the new list.
If both the “Statewide List” and the “Allow others to change list attributes” check boxes are selected, staff personnel in other offices in your state will also be able to change the list attributes.

EKOS User Manual – List Participation
Page 180 of 231
Modifying/Deleting Existing Lists
To modify an existing list:
Click the Lookup List button to display the list of entries available to be modified.
Click on the desired list entry.
The entry will be highlighted to indicate that it is selected.
Click the Modify List button below the list box. The Add/Modify List pop-up window will appear.
Click Lookup List button
Select list entry
Click Modify List or Delete List button

EKOS User Manual – List Participation
Page 181 of 231
Modifying/Deleting Existing Lists – con’t
To modify, change the list’s name and/or flag settings and save your changes.
To delete a list:
Click on the list entry to be deleted.
The entry will be highlighted to indicate that it is selected.
Click the Delete List button below the list box.
A confirmation pop-up window will appear.
Click OK to confirm the deletion or Click Cancel to cancel the deletion.
Change information as desired and Save or Cancel
When displaying lists, particularly statewide and all offices lists, if the number of selected lists exceeds 500, the oldest lists are displayed. This is a very good reason to keep your obsolete lists cleaned out of the system, as well as system performance issues.
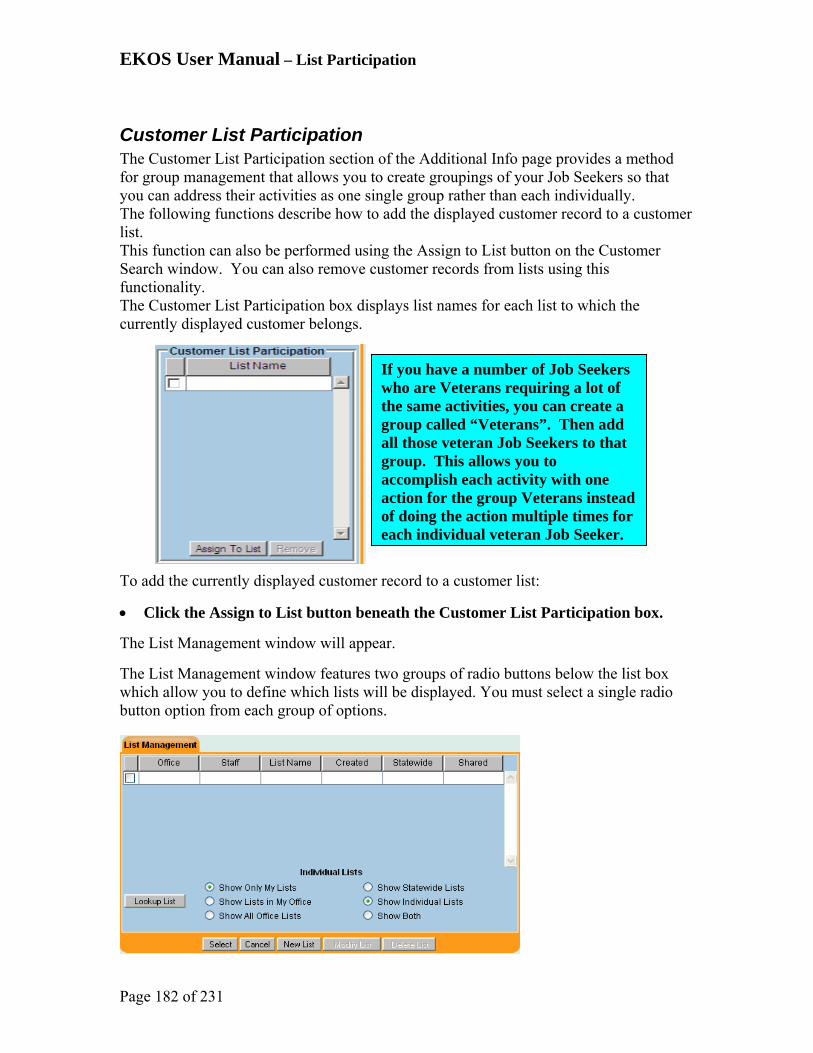
EKOS User Manual – List Participation
Page 182 of 231
Customer List Participation The Customer List Participation section of the Additional Info page provides a method for group management that allows you to create groupings of your Job Seekers so that you can address their activities as one single group rather than each individually. The following functions describe how to add the displayed customer record to a customer list. This function can also be performed using the Assign to List button on the Customer Search window. You can also remove customer records from lists using this functionality. The Customer List Participation box displays list names for each list to which the currently displayed customer belongs. To add the currently displayed customer record to a customer list:
Click the Assign to List button beneath the Customer List Participation box.
The List Management window will appear.
The List Management window features two groups of radio buttons below the list box which allow you to define which lists will be displayed. You must select a single radio button option from each group of options.
If you have a number of Job Seekers who are Veterans requiring a lot of the same activities, you can create a group called “Veterans”. Then add all those veteran Job Seekers to that group. This allows you to accomplish each activity with one action for the group Veterans instead of doing the action multiple times for each individual veteran Job Seeker.
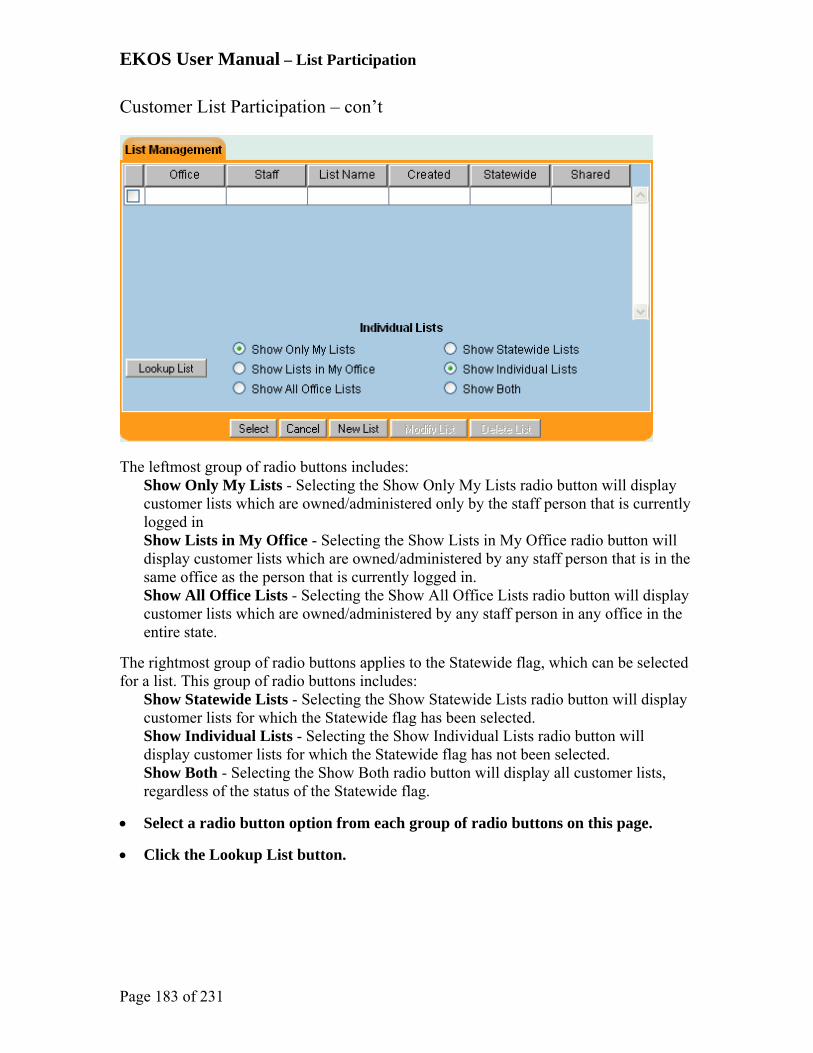
EKOS User Manual – List Participation
Page 183 of 231
Customer List Participation – con’t
The leftmost group of radio buttons includes:
Show Only My Lists - Selecting the Show Only My Lists radio button will display customer lists which are owned/administered only by the staff person that is currently logged in Show Lists in My Office - Selecting the Show Lists in My Office radio button will display customer lists which are owned/administered by any staff person that is in the same office as the person that is currently logged in. Show All Office Lists - Selecting the Show All Office Lists radio button will display customer lists which are owned/administered by any staff person in any office in the entire state.
The rightmost group of radio buttons applies to the Statewide flag, which can be selected for a list. This group of radio buttons includes:
Show Statewide Lists - Selecting the Show Statewide Lists radio button will display customer lists for which the Statewide flag has been selected. Show Individual Lists - Selecting the Show Individual Lists radio button will display customer lists for which the Statewide flag has not been selected. Show Both - Selecting the Show Both radio button will display all customer lists, regardless of the status of the Statewide flag.
Select a radio button option from each group of radio buttons on this page.
Click the Lookup List button.

EKOS User Manual – List Participation
Page 184 of 231
Customer List Participation – con’t
The corresponding saved list entries will appear in the list box above the radio buttons.
Select a list by clicking on the desired entry in the list box. The selected entry will be highlighted to indicate that it is selected. Click the Select button at the bottom of the List Management window.

EKOS User Manual – List Participation
Page 185 of 231
Customer List Participation – con’t The customer record will be added to the selected list. Once a customer record has been added to a list, the list entry will appear in the Customer List Participation box for that customer. The List Management window can also be used to create, modify, and delete customer lists. To remove a customer record from a list:
In the Customer List Participation box, click on the entry for the list from which the customer will be deleted.
The list entry will be highlighted to indicate that it is selected.
Click the Remove button beneath the Customer List Participation box.
A confirmation window will appear, asking you to confirm the customer’s removal from the list.
Click OK to confirm and perform the removal, or Cancel to cancel the removal.
Once a customer record has been removed from a list, the list entry will no longer appear in the Customer List Participation box for that customer.

EKOS User Manual – List Participation
Page 186 of 231
Employer/Job Order List Participation The EKOS List Management window, which is accessed from several places in the Employer and Job Order modules, allows you to create new lists and add to, modify, and delete existing lists. The List Management window can be accessed in the following ways: From the Employer Search window, by performing a successful employer search: Click the Assign to List button to add one or more of your search results to a list.

EKOS User Manual – List Participation
Page 187 of 231
Employer/Job Order List Participation – con’t
From the Contact Info page of the Employer Detail window: Add an employer contact to an employer list. Click the Assign to List button below the Lists box.
Employer contacts can also be removed from a list from this location as well.
Click Delete Contact button
From the Job Order Search window, by performing a successful job order search: Click the Assign to List button to add one or more of your search results to a list.
Click to Add a Contact
Click Assign to List

EKOS User Manual – List Participation
Page 188 of 231
Employer/Job Order List Participation – con’t
From the Job Detail page of the Job Order Detail window, add the displayed job order to a job order list. Click the Assign to List button in the Lists box.
The job order can also be removed from lists from this location. Click the Remove From List button in the Lists box.

EKOS User Manual – Glossary
Page 189 of 231
Glossary Driver’s License Class A - For any combination of vehicles with a gross vehicle weight
rating (GVWR) of 26,001 pounds or more, provided the GVWR of the vehicle(s) being towed is more than 10,000 pounds.
Driver’s License Class B - Any straight truck with two or more axles and a GVWR of 26,0001 pounds or more; Any vehicle with two or more axles and a GVWR of 26,001 pounds or more, pulling a vehicle with a GVWR of 10,000 pounds or less; A single vehicle designed to transport 16 or more passengers (including the driver) if the GVWR is 26,001 pounds or more.
Driver’s License Class C- Any vehicle with a GVWR of less than 26,001 pounds transporting hazardous materials for which placarding is required. Any vehicle transporting 16 or more passengers, including the driver, with a GVWR of less than 26,001 pounds.
Driver’s License Class D - This class of license includes passenger cars, station wagons, pickup trucks, utility vehicles, and most panel trucks. This type and class of license is valid for any single motor vehicle, and a trailer, with weights not greater than 26,000 pounds, designed to carry less than 16 passengers (including the driver) and not placarded for the purpose of transporting hazardous materials.
Driver’s License Endorsements – Passenger Transport – Have taken the state test required for driving a bus.
Driver’s License Endorsements – School Bus – Hold a valid driver’s license that must contain an "S" endorsement.
Driver’s License Endorsements – Hazardous Materials – Holds a valid Class C CDL and has passed the Endorsement test for Hazardous Materials.
Driver’s License Endorsements – Doubles/Triples - Holds a valid CDL and has passed the Endorsement test for Doubles/Triples.
Driver’s License Endorsements – Tanker - Holds a valid CDL and has passed the Endorsement test for Tankers.
Driver’s License Endorsements – Motorcycle – Holds a valid Class D Driver’s License with a class M Endorsement.
Driver’s License Endorsements – Air Brakes – Has taken the state test required for driving a vehicle that has air brakes.
Farm worker - A person who works on, but does not own, a farm; an agricultural laborer.
Farm Work threshold (Days/$ earned) - The following criteria identifies the amount of qualifying farm work during the last 12 months: At least 25 days worked; At least $800 earned; At least 25 days worked & $800 earned.
Food Processing Establishment – An establishment which follows an established set of methods and techniques to transform raw ingredients into food or to transform food into other forms for consumption by humans or animals. Food processing typically takes clean, harvested crops or slaughtered and butchered animal products and uses these to produce attractive, marketable and often long shelf-life food products. Similar processes are used to produce animal feed.

EKOS User Manual – Glossary
Page 190 of 231
Income 70% LLSH – Under Title I of the Workforce Investment Act (WIA) of 1998 (Public Law 105-220) the Secretary of Labor, through the Department of Labor's Employment and Training Administration, annually determines the Lower Living Standard Income Level (LLSIL) for uses described in the Law. WIA defines the term "Low Income Individual" as one who qualifies under various criteria, including an individual who received income for a six-month period that does not exceed the higher of the poverty line or 70 percent of the lower living standard income level.
Lower Living Standard - Under Title I of the Workforce Investment Act (WIA) of 1998 (Public Law 105-220) the Secretary of Labor, through the Department of Labor's Employment and Training Administration, annually determines the Lower Living Standard for uses described in the Law.
Metro - The United States Census Bureau defines a Metropolitan Statistical Area (MSA) as a Core Based Statistical Area having at least one urbanized area of 50,000 or more population, plus adjacent territory that has a high degree of social and economic integration with the core as measured by commuting ties.
Migrant - An individual who is temporally employed on a seasonal basis and has been so employed within the last 24 months. The individual moves to other areas of employment as different needs arise and who establishes for the purpose of such employment a temporary abode.
Migrant Farm Worker - An individual whose principal employment is in agriculture on a seasonal basis, who has been so employed within the last 24 months, The individual moves to other areas of employment as different crop needs arise and establishes for the purpose of such employment a temporary abode.
NAICS - The North American Industry Classification System (NAICS) is the standard used by Federal statistical agencies in classifying business establishments for the purpose of collecting, analyzing, and publishing statistical data related to the U.S. business economy.
O*Net Titles - The Occupational Information Network (O*NET) was developed under the sponsorship of the US Department of Labor/Employment and Training Administration (USDOL/ETA) and is a database containing information on hundreds of standardized and occupation-specific descriptors.
Profiled – Identified by the WPRS systems as an unemployment insurance beneficiary who is most likely to exhaust their regular benefits, and to be referred quickly to re-employment services to speed the transition to new employment.
Rapid Response - Rapid Response is initiated when the state Dislocated Worker Unit or Rapid Response team learns of impending layoffs. Rapid Response is services and resources that can be brought to the Job Seeker, on site at their company prior to the layoff date, with a goal of getting the Job Seeker back to work as soon as possible and minimize the disruptions on their life that a layoff will cause. The Rapid Response team will provide the means to maintain an income (unemployment insurance), information on health insurance options, access to skills upgrading and training resources, and much more.
Reasons for Leaving – Category 1 – DW - To be eligible as a WIA DW under this Category, the participant must meet all three of the criteria below: The individual has been terminated or laid off, or has received a notice of
termination or layoff from employment;
EKOS User Manual – Glossary
Page 191 of 231
The individual is eligible for, or has exhausted entitlement to, unemployment compensation; or has been employed for a duration sufficient to demonstrate attachment to the workforce, but is not eligible for unemployment compensation due to insufficient earnings or having performed services for an employer that was not covered under a State unemployment compensation law; and
The Individual is unlikely to return to a previous industry or occupation. Reasons for Leaving – Category 1 – DW Mass Layoff or Closure - To be eligible as a
WIA DW under this Category, the participant must meet any one of the three criteria below: Individual has been terminated or laid off, or has received a notice of termination
or layoff, from employment as a result of any permanent closure of, or any substantial layoff at, a plant, facility, or enterprise;
The individual is employed at a facility at which the employer has made a general announcement that such facility will close within 180 days; or
For purposes of eligibility to receive services other than training services described in section 134(d)(4), intensive services described in section 134(d)(3), or supportive services, is employed at a facility at which the employer has made a general announcement that such facility will close.
Reasons for Leaving – Category 1 – DW Self-employed - The individual was self-employed (including employment as a farmer, a rancher, or a fisherman) but is unemployed as a result of general economic conditions in the community in which the individual resides or because of natural disasters.
Reasons for Leaving – Category 1 – DW Displaced HomeMaker - The term “displaced homemaker” means an individual who has been providing unpaid services to family members in the home, and who: Has been dependent on the income of another family member but is no longer
supported by that income. Is unemployed or underemployed and is experiencing difficulty in obtaining or
upgrading employment. Reasons for Leaving – Dislocation due to foreign Trade - An individual determined
eligible for Trade Act services is also eligible as a WIA DW. An individual is determined Trade Act eligible if issued a determination by NYSDOL on State form TA722, provides an eligibility determination from another state and/or is verified eligible by the State Trade Tracker system (State MIS) which is used to track all eligible NYS TAA participants.
Selective Service - The Selective Service System is a means by which the United States maintains information on those potentially subject to military conscription. All males between the ages of 18 to 25 are required by law to register within 30 days of their 18th birthday. Registration for Selective Service is also required for various federal programs and benefits, including student loans, job training, federal employment, and naturalization.
TAA/NAFTA-TAA - The NAFTA-Transitional Adjustment Assistance program provides rapid and early response to worker dislocations resulting from trade with, or shifts in production to, Canada and/or Mexico. These workers which are threatened by unemployment are given the opportunity to receive reemployment assistance,

EKOS User Manual – Glossary
Page 192 of 231
including job search assistance, retraining and income support while in training, to enhance and ease the transition to a new job.
Veteran Active service - Active service includes service in the military, naval, or air service, and full-time duty in the National Guard of a Reserve component, other than full-time duty for training purposes.
Veteran Campaign Veteran – A Campaign Veteran is any veteran who served on active duty during a period of war or in a campaign or expedition for which a campaign badge is authorized and was discharged or released from such duty with other than a dishonorable discharge.
Veteran Era - If the dates of service contain any day between 08/05/1964 and 05/07/1975, then the Veteran Era is Vietnam. If the date of service is between 02/28/1961 and 08/04/1964 and the Veteran was in Country in Vietnam, then the Veteran Era is Vietnam. If the date of service is between 02/28/1961 and 08/04/1964, then the Veteran Era is Other Vet. If none of the above apply to the veteran, then the Veteran Era is Other Vet.
Veteran: Service Disabilities - An individual who has served on active duty in the armed forces, was honorably discharged, and has a service-connected disability, or is receiving compensation, disability retirement benefits, or pension because of a public statute administered by the Department of Veterans Affairs or a military department. If the disability amount is 20% or less, the individual is considered Disabled. If the disability amount is 30% or greater, the individual is considered Special Disabled.
Veteran: Service Veteran – A Service Veteran is a person who served in the military, naval, or air service, and who was discharged or released there from under conditions other than dishonorable. Active service includes full-time duty in the National Guard or a Reserve component, if for 180 days or more other than full-time duty for training purposes, unless the individual has a service connected disability.

EKOS User Manual - Index
Page 193 of 231
Index
A Acceptable Job Location, 15, 125 Acceptable Job Locations, 54, 66, 123, 125 Account Management, 222 Active Service, 40, 42, 43 Activities, 13, 94, 95, 96, 100, 116, 128, 129, 139,
140, 153 Activity, 13, 95, 96, 97, 99, 100 ADA, 14 Add’l Info, 15, 34, 118 Additional Info, 34, 35, 36, 45, 49, 52, 182 Address fields, 22 AJE, 6, 14 Alien Labor Certification, 222 Alien Registration Number, 24 Alt, 11, 23 Assessment ASSET (A Support System Entrance
Test, 208 Assessment CAB (Comprehensive Ability Battery,
208 Assessment COMPASS (COMputer-adaptive
Placement Assessment and Support System):, 209
Assessment Discover, 209 Assessment Educational Basic Skill Level, 209 Assessment Employment Work History, 209 Assessment Interview, Initial Assessment, 199 Assessment JobFit, 209 Assessment KMSS, 209 Assessment Pre-GED (General Educational
Development test, 209 Assessment SAGE, 209 Assessment SDS – (Self-Directed Search):, 210 Assessment TABE, 210 Assessment TABE-WF, 210 Assessment Toyota, 210 Assessment Typing/Clerical, 210 Assessment WorkKeys, 210 Assign to List, 45, 178, 182, 186, 187, 188 Assigned Case Management (Dislocated worker,
Profiled Claimant, TANF, Food Stamps, 206 Assigned Case Manager (Vets Only Service), 199 Assistance With Writing Job Descriptions, 222 Auto Coder Tab, 15 AutoCoder, 57, 58, 69, 70, 76
B Basic Computer Training Tutorials, 210 BEAG Test, 202 BOLT, 107, 108 Budgeting Salary, 211 Business Information and Support Services, 222 Business Rules, 12, 13, 14
C CAB (Comprehensive Ability Battery), 223 Campaign Veteran, 41, 192 Cancel, 136, 150, 154, 157, 162, 173 Career Assessment, 199 Case Management, 206 Case Management Other, 211 Certificate & License, 88, 89 Certificate/License, 88, 89 Certificates and Licenses, 15 Change button, 25 Citizen, 24 City field, 22, 73 comment, 153, 154, 155, 156 Comment, 154, 155, 156 Comments, 16, 101, 102, 103, 104, 105, 154, 155,
156, 157 Common Measures, 5, 19 Comprehensive Assessment, 130, 158, 169 Computer Skills Training, 211 contact, 134, 163, 174 Contact Info tab, 14 Contact Preferences, 32 correspondence, 130, 131, 134, 135, 158, 162, 163,
164, 169, 173, 174, 175 Correspondence, 130, 131, 132, 133, 134, 135, 158,
159, 160, 162, 163, 164, 169, 170, 171, 173, 174, 175
Correspondence Data Sources, 167 Correspondence Help, 10, 165, 167 Counseling - Group Sessions, 199 Counseling Individual & Career Planning, 199 Counties, 149 Country Code, 10 Country field, 23, 73, 88, 91 County field, 23 cover letter, 135, 162, 164, 173, 175 Current O*Net, 57, 59, 60, 69, 71, 72, 76, 77, 78 Customer, 117, 118, 122, 128, 129, 130, 131, 135,
136, 137, 138, 139, 146, 148, 151, 152, 153, 154, 155, 156, 158, 161, 162, 164, 169, 172, 173, 175, 176, 177
CUSTOMER, 8 Customer Assignment, 15, 18, 25, 26, 27, 28 Customer Data, 15, 18, 19, 20, 21, 22, 23, 24, 118 Customer Detail, 17, 18, 34, 36, 54, 56, 67, 83, 86, 93,
95, 96, 97, 101, 102, 106, 116, 117, 139, 161, 172 Customer List Participation, 15, 34, 45, 46, 47, 48, 49,
182, 183, 184, 185 Customer Search, 17, 45, 55, 116, 146, 147, 182 customer’s gender, 22 Customers, 12
D Date Available, 49, 50 Date Fields, 11

EKOS User Manual - Index
Page 194 of 231
Date of Birth, 10, 22 Desired Employer, 120 Desired Employers, 15, 54, 64, 65, 120 Desired O*Net, 15, 54, 55, 56, 59, 62, 63, 71, 77 Details Tab, 15, 60, 61, 72, 78 Disability Category, 38, 98 Disability Status, 37, 38, 97, 98 Disputed Claims Investigator, 12 Document Template, 132, 159, 170 driver’s license endorsements, 87 Driver’s License Information, 15, 87 DTE Participant Registration, 211 DTE Participant Services Provided, 211
E e3 record, 12, 13 Economic/Labor Market Issues, 223 ED/Lic tab, 118 Education & Employment, 18, 30, 31, 32 Education Level, 30, 31, 97 Educational/Basic Skill Level, 223 EEO, 14 EKOS, i, 5, 6, 7, 8, 9, 10, 11, 12, 13, 14, 19, 20, 21,
25, 26, 34, 53, 54, 55, 56, 64, 67, 73, 86, 93, 95, 101, 103, 104, 106, 109, 118, 130, 132, 151, 155, 158, 159, 165, 167, 169, 170, 186
EKOS Basic Training, 10 EKOS Correspondence templates, 165 EKOS resume, 20, 53, 56, 67, 93 EKOS Templates, 132, 159, 170 Eligibility Determination, 206 Eligibility Determination Childcare Assistance, 211 Eligibility Determination HCTC (Health Care Tax
Credit), 211 Eligibility Determination Medical Assistance, 211 Eligibility Determination Program Services, 211 Eligibility Determination Trade, 211 Eligibility Determination Trade ATAA/RTAA, 211 Eligibility Review ERP, 212 Eligible Veterans, 147 Email, 24, 32 Empl. in Farmwork, 39 Employability Skills, 212 Employee Objective, 15, 55 employer, 129, 130, 135, 142, 143, 158, 164, 169, 175 Employer, 6, 12, 13, 32, 64, 73, 83, 95, 116, 120, 121,
130, 134, 135, 140, 141, 142, 143, 144, 145, 158, 163, 164, 169, 174, 175, 178, 186, 187, 188
EMPLOYER, 8 Employer Company Profile, 223 Employer Contact E-Mail, 223 Employer Contact Mailing, 223 Employer Contact On-Site Visit, 223 Employer Contact Phone Call, 223 Employer Follow-Up, 223 Employer ID, 144 Employer Letter, 135, 164, 175 Employer Module, 13, 120, 141, 178 Employer Name, 83, 142 Employer Search, 141, 142, 143, 144, 145, 158, 163,
169, 174
Employer’s ID, 141 employers name, 141 Employment Follow Up, 212 Employment Objective, 54, 55, 119 Employment Preferences, 15, 34, 49, 50 Employment Status, 31, 97 Employment/Work History, 223 Enrollment Verification pop-up, 97 Enterprise Zone Tax Credit, 224, 226 Ethnic Heritage, 15, 18, 29 Event Description, 83 Exempted From UI Profiling Mandatory
Participation, 204 Experience, 61
F F11, 11 Farmwork, 38, 39, 98 Farmwork Threshold, 39, 98 Fax field, 23 Federal Performance mandates, 13 Federal Reporting, 10 FEIN, 12, 13 FEIN number, 13 First Name, 21 Follow Up, 207 Follow Up Adult and Dislocated Worker, 212 Follow Up TRADE, 212 Follow Up Youth, 212 FTR Call In, 204 FTR Profiling Orientation, 204
G GATB, 107, 109 GATB Test: General Aptitude Test Battery, 202 GATB/VG, 203 GED, 30, 113 Gen. Info tab, 118 Gen.Info, 148 Gender field, 22 General Info, 18, 19, 29, 30, 121 Geographic tab, 149 Green Dot, 10 Green River Coal, 212
H HELP, 8 Help Module, 10 Help Writing Resume, 212 Hierarchy Search Tab, 15, 59, 71, 77 Hiring Contact, 14 Honors & Activities, 94 Human Resources Issues, 224
I In Country, 41 In Training – Other, 207

EKOS User Manual - Index
Page 195 of 231
In Training - Post Secondary, 207 In Training – Secondary, 207 Income 70% LLSIL, 37, 97 Income Status, 15, 37, 38, 39 Incumbent Worker Training Services, 224 Individual Employment Plan, 199 Internet Resources, 60, 72, 78 Internet Resume, 28 Interviewing Skills, 212 IRS, 12 ITA Approved Occupational Skills Training, 213 IVR, 5, 13, 14, 116, 130, 140, 151, 158, 161, 162, 169,
172, 173
J JC, 6 Job Analysis, 224 Job Coaching, 207 Job Development Contact, 200 Job Fair, 204 Job Fairs, 224 Job ID, 95 Job Order, 14, 95, 119, 120, 121, 122, 123, 124, 125,
126, 127, 128, 129, 130, 135, 136, 138, 140, 141, 145, 146, 147, 148, 149, 150, 151, 158, 162, 164, 169, 173, 175, 176, 177, 186, 187, 188
Job Order Taking, 224 Job Orders, 6, 13, 116, 120, 121, 122, 125, 126, 140,
141, 144, 145, 151 Job Relocation Assistance, 213 Job Retention Services, 213 Job Search, 213 Job Search Planning, 200 Job Seeker, 12, 15, 16, 17, 20, 51, 55, 67, 116, 117,
118, 120, 122, 123, 126, 130, 139, 140, 141, 146, 148, 149, 151, 158, 169, 190
Job Seeker Screening, 224 Job Seeker Status, 12 Job Seekers, 6, 45, 118, 140, 141, 151, 182 Job Shadowing, 213 Job Title, 61, 68, 73 job titles, 55, 119 Job Zone, 110, 111, 112 JobFit Employer Documentation, 224 JobFit Employer Orientation, 224 JobFit Employer Training, 224 JobFit Surveys, 225 JSEC Meeting, 224 JSEC Member, 224
K Kentucky Employ Network, 213 KMSS (Kentucky Manufacturing Skills Standard),
225
L Labor Market Preview, 225 Last Name, 21
Letter/E-mail, 131, 132, 133, 158, 159, 160, 169, 170, 171
Liable/Agent State, 80, 81 List Management, 45, 47, 48, 178, 182, 184, 185, 186 Literacy Test, 203 LMI, 203, 206, 223, 225 Local Priority, 37, 97 Logging In, 7, 8 Logging Out, 9 Login, 7, 8, 9 Login Window, 7, 8, 9 Lower Living Standard, 37, 97, 190
M Mail Merge, 162, 167, 173 Marketing Service Programs, 225 Match, 117, 128, 136, 139, 150, 152, 153, 176 Match Score, 58, 70, 76 Match, Referral, 95 Matches, 120, 122, 123, 124, 125, 126, 127, 128, 129,
153 Matching, 122, 140, 146, 148, 149 Math Test, 203 Maximum Zip Code Radius, 66 Metro, 23, 190 MI, 21 Microsoft Word, 154, 162, 173 Migrant, 38, 98, 190 Migrant/Seasonal Worker, 38 Military Service, 15, 34, 40, 41, 42, 43, 44, 147 My Career Network, 6
N NAICS, 79, 190 NATB, 107, 109 NATB Test, 203 NKY HC Case Management, 213 NKY Youth Case Management, 213
O O*Net Ability Profiler, 107, 112 O*Net Interest Profiler, 107, 110 O*Net pop-up window, 56, 68, 75 O*Net Title, 55, 56, 58, 59, 61, 62, 63, 70, 71, 75, 76,
77, 119, 124, 125 O*Net Titles, 124 O*Net Work Importance Locator, 107, 111 Objective page, 53, 54, 55, 63, 65 Objective tab, 118, 122, 123 Obtained Employment, 204 Obtained Employment - Bonding Assistance, 204 Obtained Employment - Following Counseling, 204 Obtained Employment - Following Job Search
Planning, 205 Obtained Employment - Following Resume
Preparation Assistance, 205 Obtained Employment - Following Testing, 205 Obtained Employment – From Workforce
Information Services, Staff Assisted, 205

EKOS User Manual - Index
Page 196 of 231
Obtained Employment – Individual Employment Plan, 205
Obtained Employment - Job Finding Club, 205 Obtained Employment - Job Search Workshop,
205 Obtained Employment - Tax Credit Eligibility
Determination, 205 Obtained Employment - Termination from
Training - Successful – Other, 207 Obtained Employment - Termination from
Training - Successful – Secondary, 207 Obtained Employment - Termination from
Training-Successful- Post Secondary, 207 OJT - On the Job Training Contract, 225 OJT- On the Job Training Contract, 213 one stop, 5 One-Stop Center, 14 On-Site Recruitment, 225 On-Site Review of Customized LMI, 225 Or Anywhere in the following states, 66 Orientation (Other), 200 Orientation (UI Reemployment Service), 200 Orientation One-stop, 213 Other Reportable Service-Follow Up (Vet):, 201 Other Reportable Services (ES, DVOP, LVER):,
201 Other Service, 207, 213 Other Test, 203 Outside the United States, 66
P Password, 7, 8, 21 Pay Unit, 49, 50 Petition # Listing, 80 Phone field, 23, 73 phone number, 161, 172 Placed in HCTC (Health Coverage Tax Credit, 214 Placed in Trade, 214 Placed in Trade ATAA/RTAA, 214 Placed in Training (Job Corps):, 207 Placed in Training (Other Federal):, 208 Placed in Training (WIA):, 208 pop-up window, 25, 26, 27, 35, 36, 63, 64, 65, 88, 89,
96, 100, 102, 103, 104, 105, 108, 109, 110, 111, 112, 113, 114, 132, 150, 154, 155, 156, 157, 159, 161, 170, 172, 178, 180, 181
Post A Note, 13 Post Employment Services, 214 Post Match, 127, 153 Posting Matches, 153 Print List, 139 Printing, 100, 105, 157 Proficiency Test, 203 Profiled, 27, 97, 190 Profiled Case Managed, 214 Programs, 15, 34, 35, 36, 81, 147 Programs tab, 147 PROVIDER, 8 pseudo SSN number, 12
Q Qualifying Dislocation Date, 75
R Rapid Response, 82, 83, 190, 200, 225 Rapid Response Lookup popup, 82, 83 Reason for Leaving, 74, 75 Received Case Management Services (Vets Only
Service):, 201 Received Case Mgmt. Services (Dislocated worker,
Profiled Claimant, TANF, Food Stamps):, 208 referral, 130, 158, 162, 169, 173 Referral, 129, 134, 135, 162, 163, 164, 173, 174, 175 Referral Info tab, 14 Referral Result, 95 Referral to Adult Daycare, 214 Referral to Adult Ed, 214 Referral to Assessment Center, 214 Referral to Career Resource Center, 214 Referral to Certificate of Financial Need, 215 Referral to Commonwealth Educational
Opportunity Center, 215 Referral to Community Service Block Grant
(CSBG), 215 Referral to Compassion Capital, 215 Referral to Early Headstart, 215 Referral to Eastern Kentucky Child Care
Coalition, 215 Referral to ESG Rental/Utilities Assistance, 215 Referral to FEMA Emergency Food & Shelter, 215 Referral to HCTC (Health Coverage Tax Credit):,
216 Referral to Headstart, 215 Referral to Homeless Program, 216 Referral to Housing, 216 Referral to Job Corps, 216 Referral to JobFit Services, 216 Referral to Kentucky Vision Assistance, 216 Referral to KTAP, 216 Referral to LIHEAP, 216 Referral to Migrant and Seasonal Farmworkers,
216 Referral to Native American Programs, 217 Referral to Office for the Blind (OFB), 217 Referral to Self-Help Parenting, 217 Referral to Senior Citizen Nutrition, 217 Referral to Summer Feeding, 217 Referral to Technical Education, 217 Referral to Trade, 217 Referral to Trade ATAA/RTAA, 214 Referral to Transportation, 217 Referral to Veteran Program, 217 Referral to Vocational Rehabilitation, 218 Referral to Wagner Peyser, 218 Referral to WIA Adult, 218 Referral to WIA Dislocated Worker, 218 Referral to WIA Youth, 218 Referral to Workshop Money Smart, 218 Referral to Workshop Other, 218 Referral to Workshop Success N Sight, 218

EKOS User Manual - Index
Page 197 of 231
Referral to Workshop Work Wise, 218 Referral to Workshop Yes You Can Own a Home,
218 Referrals, 122, 129, 135, 162, 164, 173, 175 Referrals From Partners, 218 Referred to Basic Skills Training, 201, 219 Referred to Job Corps, 201 Referred to Other Federal, 201 Referred to Supportive Services - Non-Partner, 202 Referred to WIA, 202 Refused Referral, 205 Registered, 26 Required Fields, 10 Resume Preparation Assistance, 202 Review Activities, 139 Review Employer Employment Applications, 226 RR Event #, 82, 97
S Salary, 49, 50 SATB Test, 203 Save As, 166, 168 Save button, 154, 155 Save Search, 136, 176 Save Srch, 150 Saved Searches, 136, 137, 150, 176 School Information, 15, 90, 91, 92 School pop-up, 90, 92 School Status, 31, 97 Script Selector, 161, 172 SDS (Self-Directed Search), 226 Search, 117, 119, 121, 125, 126, 127, 130, 134, 136,
137, 138, 146, 148, 149, 150, 152, 158, 169, 176, 177
Selective Service, 15, 34, 52, 191 Self Registration, 17 Self-Registration, 67 Self-Service, 6, 20, 21 Self-Service Job Matching, 206 Seminar, 226 Service Disability, 41 Service History, 129, 139, 153 Service Veteran, 40, 98, 192 Services module, 129, 139, 153 SHIFT, 11 Shift Preference, 15, 51 Show All Office Lists, 46, 183 Show Both, 46, 183 Show Individual Lists, 46, 183 Show Lists in My Office, 46, 183 Show Only My Lists, 46, 183 Show Statewide Lists, 46, 183 Show/Hide Contacts, 134, 163, 174 Skill Selector, 63 Skills, 16, 56, 63, 93, 94, 107, 113, 116, 118, 119, 140 Skills tab, 118 Social Security Number, 19 Spell Check, 101, 102, 154 SSN, 12, 17, 19, 117 STAFF, 8 Staff Assigned, 25, 101
Staff Detail, 8 Staff Phone #, 161, 172 Start Match, 119, 146 State field, 22, 73, 87, 88, 91 State Specific Activities, 208 Status, 118 Status field, 19, 20, 31, 37 Statutory (legal) Issues, 226 Submit, 136, 150 Summer-Related Employment Opportunities, 205
T TAA, 80, 81, 191 TAA/NAFTA-TAA, 80, 81, 191 TABE, 107, 108, 203, 210, 226, 229 TABE2, 107 TABE-WF, 226 Tag, 126, 152 TAP, 202 Tax Credit Certification, 226 Tax Credit Eligibility Determination, 202 template document, 133, 160, 171 Termination from Training - Successful – Other,
208 Termination from Training - Successful –
Secondary, 208 Termination From Training – Un-Successful, 219 Test Detail, 107, 114 Test Scores, 16, 107, 108, 109, 110, 111, 112, 113,
114 Testing, 199, 208, 209, 210, 226, 227, 229 Tests, 106, 107, 108, 109, 110, 111, 112, 113, 114,
115 time out feature, 11 Trade Purchase/Pennyrile, 219 Training Inappropriate, 219 Transitioning Veteran, 40, 42, 43, 44 Translation Service, 219 Type field, 38, 42, 107 Typing Proficiency, 107, 109 Typing/Clerical, 227
U UI Benefits Right Interview, 219 UI Claimant, 28, 97 UI Information Issues, 227 UI staff, 12 Unemployment Insurance, 6, 28 Unemployment Insurance Tax (UTC), 227 unmerged document, 132, 159, 170 Unmerged Document, 133, 160, 171 UnTag, 152 Username, 7, 8, 20, 117 Utilizing Resource Rooms, 203
V Valid Test Provided by Employer, 227 Vet, 43, 98, 192 Veteran, 13, 40, 41, 42, 43, 44, 98, 147, 192

EKOS User Manual - Index
Page 198 of 231
Veteran Era, 40, 43, 44, 192 Veteran Status box, 147 Veteran’s Priority Search, 147 Veterans Outreach, 227 Veterans priority, 13 Vietnam, 41, 43, 44, 98, 192 Vocational Guidance (Other):, 203 Vocational Guidance (VET):, 204 Vocational Rehab from Other, 204 Vocational Rehab from Vet Admin, 204
W WBST, 107, 113 Welfare to Work Tax Credit (WtW, 227 West KY Energy, 219 WIB, 5, 26, 27 WIB Assigned, 26, 27 WIB-Agency-Office, 26 Work Any Shift, 51 Work Hist.tab, 118 Work History, 15, 17, 28, 67, 68, 73, 74, 75, 79, 80,
81, 82, 83, 84, 85, 116, 140 Work History Job Entries, 15 Work Importance, 107, 111 Work Keys, 210, 228 Work Opportunity Tax Credit (WOTC), 228 Work Week, 49 Workforce Information Services Self-Service
(LMI):, 206
Workforce Information Services, Staff Assisted (LMI):, 203
Workforce Investment Board, 26, 27 Workforce Investment Boards, 5 Workshop Career Basics Career Exploration, 219 Workshop Career Basics Computer ABCs, 219 Workshop Career Basics Interviewing Skills, 219 Workshop Career Basics Resumes and More, 219 Workshop Career Choices, 219 Workshop Discover, 220 Workshop Getting the Job You Really Want, 220 Workshop Guide to Getting and Keeping a Good
Job, 220 Workshop Identify Your Skills, 220 Workshop Job Savvy, 220 Workshop KY Paraeducator Assessment Review,
220 Workshop Learning for Earning, 220 Workshop Life Skills for the World of Work, 220 Workshop Money Smart, 220 Workshop Work Wise, 220 Workshop Workers in Transition, 221 Workshop Yes You Can Own A Home, 221 WPT, 107, 112 www.e3.ky.gov, 14
Z Zip Code field, 23

EKOS User Manual - Appendix
Page 199 of 231
Appendices
Activities
Participant
Labor Exchange Reportable Activities: There are specific activities that must be reported for your participants to ensure they are registered with Employment Services and are enrolled in Labor Exchange federal performance measures and Common Measures. These activities are all those identified as Common Measures Enrollment.
Assessment Interview, Initial Assessment: (Common Measures Enrollment) The participant had an initial analysis of educational level, work history, vocational skills strengths and weaknesses, or identification of employment barriers and development of an action plan using their strengths and reducing weaknesses.
Assessment Services - Career Assessment: (Common Measures Enrollment) Assessment services are designed, usually through interviewing, to determine each participant’s employability, aptitudes, abilities, and interests and to develop a plan to achieve the participant’s employment and related goals. Testing, counseling and employability planning may also be used during the assessment process.
Assigned Case Manager (Vets Only Service): (Common Measures Enrollment) For those veterans to whom a local office staff member, i.e., DVOP, LVER, is assigned to provide ongoing one-on-one personal assistance and regular follow-up using a case management approach to services. This includes, but is not limited to, providing advice pertaining to vocational choice, assistance to obtaining training to reach employability, and follow-up services over the time required to obtain employment.
Counseling - Group Sessions: (Common Measures Enrollment) The process whereby a trained counselor, using the principles of group dynamics in group discussion, assists selected participants with similar employment problems (such as inability to find or hold a job), through peer interaction, group members are aided in achieving a better understanding of their problems and in clarifying or modifying feelings, attitudes, and behavior which are barriers to successful employment. Group counseling is an extension of the overall counseling process but does not replace the individual counseling interview.
Counseling Individual & Career Planning: (Common Measures Enrollment) A meeting in which an employment counselor or counselor trainee provides ongoing or one-time assistance to help a participant gain a better understanding of themselves so they can more realistically choose or change an occupation, or make a suitable job adjustment.
Individual Employment Plan: (Common Measures Enrollment) The development of a plan for a participant that includes the necessary steps and timetables to achieve employment in specific occupational, industry, or geographic area.

EKOS User Manual - Appendix
Page 200 of 231
Interest Inventory: (Common Measures Enrollment) An inventory of occupational activities, occupational titles and occupationally related life experience activities used in vocational counseling. Measures interests in a wide range of occupations, occupational activities, hobbies, leisure activities and types of people. Based on the idea that individuals are more satisfied and productive when they work in jobs or at tasks that they find interesting and when they work with people whose interests are similar to their own.
Job Development Contact: (Common Measures Enrollment) The act of soliciting a public or private employer to obtain a job interview for a specific individual for whom an ETA program sponsor has no suitable opening currently on file. Is considered a Job Search activity for federal reporting.
Job Finding Club: (Common Measures Enrollment) An organized activity that provides instructions on resume writing, application preparation, interviewing skills, and/or job lead development. Includes a period of structured application where participants attempt to obtain jobs. Job Finding Club encompasses all elements of the Job Search Workshop, plus a one to two week period of structured, supervised application where participants attempt to obtain jobs.
Job Search Planning: (Common Measures Enrollment) Development of a plan (not necessarily a written plan) that identifies employment goals and includes the necessary steps and timetables to achieve employment in "specific" occupational, industry, or geographic areas.
Job Search Workshop: (Common Measures Enrollment) An organized activity that provides instructions on resume writing, application preparation, interviewing skills, and/or job lead development. A seminar designed to provide the participants with knowledge that will enable them to find jobs. Subjects are not limited to but should include labor market information, application/resume writing, interviewing techniques, and finding job openings.
Orientation (Other): (Common Measures Enrollment) Participant was provided and/or participated in an Orientation. Can be used for any type of Orientation not elsewhere specified.
Orientation (Rapid Response): (Common Measures Enrollment) Participant is participating in the Rapid Response Program. Employees are made aware of the different services available to workers after a layoff. Received services intended to assist with the loss of a job.
Orientation (UI Reemployment Service): (Common Measures Enrollment) Participant Orientation provides a formalized effort to offer the UI Program Claimant with an overview of the program and services available, the criteria and requirements for program participation and receipt of services, and an understanding of what is required and what is optional. Orientation may be individual or in-group sessions. It could provide information on the services available, including other community services, and completing forms.

EKOS User Manual - Appendix
Page 201 of 231
Other Reportable Service-Follow Up (Vet): (Common Measures Enrollment) For follow up to veteran participants after provision of these types of activities that are not specifically accountable in other activities: Some examples of services covered under this activity: - Handling Participant Complaints - Providing Information about Training and Apprenticeship - Providing state and federal civil service information and applications - Providing information about the interstate job bank - Activity that is not specifically defined elsewhere
Other Reportable Services (ES, DVOP, LVER): (Common Measures Enrollment) This activity can be reported on all participants, not just to veteran participants and can be reported by all staff. It is used to report activities that are not specifically accountable elsewhere. Some examples of activities covered under this selection is: - Handling Participant Complaints - Providing Information about Training and Apprenticeship - Providing state and federal civil service information and applications - Providing information about the interstate job bank - Activity that is not specifically defined elsewhere
NOTE: Other Reportable Services is not an activity for which you can report an Obtained Employment.
Received Case Management Services (Vets Only Service): (Common Measures Enrollment)
A veteran assigned a case manager who receives career guidance, referral to supportive services, job development contacts, referral to jobs, referral to training, or any combination of those services.
Referred to Basic Skills Training: (Common Measures Enrollment) Referral to a program or course designed to develop competency in basic educational skills such as; reading, comprehension, mathematics, writing, speaking and reasoning and/or programs leading to educational credentials such as GED or high school diploma or college degree.
Referred to Job Corps: (Common Measures Enrollment) Participant was referred to Job Corps for assessment for services and training programs. Job Corps is a residential, education and job training program for at-risk youth, ages 16 through 24. Students are provided integrated academic, vocational, and social skills training needed to gain independence and get quality, long-term jobs or further their education.
Referred to Other Federal: (Common Measures Enrollment) For participants referred to any intensive service or training program supported or funded by the Federal Government.

EKOS User Manual - Appendix
Page 202 of 231
Referred to Supportive Services - Non-Partner: (Common Measures Enrollment) Referral of the participant to an organization or entity that is not a One Stop partner for services designed to assist participant to achieve physical, mental, social or economic well-being and reduce or eliminate barriers to employment. These include health and medical services, childcare, emergency financial services, relocation assistance, residential support, nutritional and legal services. When reporting this activity you should also report the appropriate State Specific activity to reflect the Non-Partner agency to which the participant was referred.
Referred to WIA: (Common Measures Enrollment) For participants referred to a service delivery component funded under Title I of the Workforce Investment Act of 1998. This would be reported for all participants referred to WIA staff.
Resume Preparation Assistance: (Common Measures Enrollment) Providing instructions on the content and format of resumes and cover letters and providing assistance in the development and production of the same. For additional information: http://www.des.ky.gov/des/vws/virtual_workshop.asp and http://www.acinet.org/acinet/resume/resume_intro.asp
TAP: (Common Measures Enrollment) Workshops to provide service members in the process of leaving the military necessary information so they may make informed career decisions as they transition to civilian life.
Tax Credit Eligibility Determination: (Common Measures Enrollment) A determination process which culminates in the issuance of a tax credit voucher for an employer who has agreed to provide employment to an individual who falls within a defined group of hard to employ applicants. The participant meets tax credit eligibility requirements and a voucher has been issued. If an employer has sent a written request postmarked prior to the first day of work, the activity is reportable even if the voucher was not issued before the individual started work. For additional information regarding Tax Credits: http://www.doleta.gov/business/Incentives/opptax/#content
Test - BEAG Test: (Common Measures Enrollment) The Spanish language version of the General Aptitude Test Battery (GATB). This is a test that measures a broad range of general abilities that are found in all jobs.
Test - GATB Test: General Aptitude Test Battery (GATB) (Common Measures Enrollment) Participant was given the GATB. The GATB measures a broad range of general abilities, which are found in all jobs. It is a battery of 12 tests which measure aptitude in nine different skills: General Learning Ability, Verbal Aptitude, Numerical Aptitude, Spatial Aptitude, Form Perception, Clerical Perception, Motor Coordination, Finger Dexterity and Manual Dexterity.

EKOS User Manual - Appendix
Page 203 of 231
Test - GATB/VG: (Common Measures Enrollment) GATB/VG is the method of validating the test to the job or work to be performed. GATB/Validity Generalization allows the testing of virtually all jobs in the economy and the ability to report more precise information to employers based on percentile rank.
Test - Literacy Test: (Common Measures Enrollment) A test provided to determine the literacy level of the participant. This could include the Tests of Adult Basic Education (TABE) test. Literacy includes, reading, writing, and the creative and analytical acts involved in producing and comprehending text.
Test - Math Test: (Common Measures Enrollment) A test given to evaluate levels of math competency.
Test - NATB Test: (Common Measures Enrollment) A non-reading version of the GATB for use with educationally deficient participants who do not have the literacy skills to take the GATB.
Test - Other Test (Common Measures Enrollment) A test that is not elsewhere identified such as the State Merit test or an employer test that is administered by staff. When reporting this activity you should also check in the State Specific Activities and if the test is listed you should also report it.
Test - Proficiency Test: (Common Measures Enrollment) A test that is used to measure the skill or knowledge that a participant has acquired. Example: Typing Test, Data Entry, Ten-Key
Test - SATB Test: (Common Measures Enrollment) An aptitude test battery developed to determine the participant’s potential for acquiring the skill involved in a particular occupation.
Utilizing Resource Rooms: (Common Measures Enrollment) The Participant was provided access to the services and materials of a One-Stop Resource Room/Center.
Workforce Information Services, Staff Assisted (LMI): (Common Measures Enrollment) Information concerning occupational staffing patterns, hiring patterns, high growth industries, working conditions, benefits, and pay of firms or industries. For LMI information: www.WorkforceKentucky.ky.gov .
Vocational Guidance (Other): (Common Measures Enrollment) Participant was provided a wide range of information, materials, suggestions and advice that is intended to assist in a vocational decision regarding employment and training opportunities. This term is used to cover reporting activities that are not already covered in a specific countable service such as counseling or testing.

EKOS User Manual - Appendix
Page 204 of 231
Vocational Guidance (VET): (Common Measures Enrollment) All veterans who receive services provided by trained staff, which involve providing a wide range of information, materials, suggestions and advice to veterans which are intended to assist in a vocational decision by the veteran regarding employment and training opportunities. (Veteran applicants only).
Vocational Rehab from Other: (Common Measures Enrollment) Services provided through other state or local training programs to participants with serious disadvantages in the job market.
Vocational Rehab from Vet Admin: (Common Measures Enrollment) Services provided by DVOP specialists through the Federally-funded Department of Veterans Affairs' Vocational Rehabilitation job training program to veterans with serious disadvantages in the job market. DVOP specialists are available to those veterans and their employers to help ensure that necessary follow up services are provided to promote job retention. Labor Exchange non Reportable Activities:
Exempted From UI Profiling Mandatory Participation: Profiled Claimants who have been exempted from having to participate in the federally mandated Re-employment/Profiling Program. A Claimant can be exempted based on such criteria as already receiving Re-employment services, or was an inappropriate selection.
FTR Call In: (Failed To Respond/Report to Call In): Participant failed to follow up with agency after receiving a telephone call, an automated call and/or a request of any kind asking the participant to contact/follow up with agency staff.
FTR Profiling Orientation: Claimant ‘failed to report’ to a scheduled Re-Employment Profiling Program Orientation.
Job Fair: Participant attended a Job Fair at which the One-Stop participated by having a booth at the Job Fair and/or the Job Fair was held by the One-Stop.
Obtained Employment: Reporting this activity will not generate a re-registration or renewal for the participant. Obtained Employment Activities are not Common Measures Enrollment activities.
Obtained Employment - Bonding Assistance: The participant obtained employment within 90 calendar days of provision of bonding assistance.
Obtained Employment - Following Counseling: The participant obtained employment within 90 calendar days of receiving employment counseling.

EKOS User Manual - Appendix
Page 205 of 231
Obtained Employment - Following Job Search Planning: The participant obtained employment within 90 calendars days of provision of Job Search Planning.
Obtained Employment - Following Resume Preparation Assistance: The participant obtained employment within 90 calendar days of receiving resume preparation assistance.
Obtained Employment - Following Testing: The participant obtained employment within 90 calendar days following testing.
Obtained Employment – From Workforce Information Services, Staff Assisted: The participant obtained employment within 90 calendars days following provision of Workforce Information Services such as occupational staffing patterns, hiring patterns, working conditions, and pay of firms or industries.
Obtained Employment – Individual Employment Plan: The participant obtained employment within 90 calendar days following the development of an individual employment plan.
Obtained Employment - Job Finding Club: The participant obtained employment within 90 calendars days of participation in a Job Finding Club.
Obtained Employment - Job Search Workshop: The participant obtained employment within 90 calendars days of participation in Job Search activity.
Obtained Employment - Tax Credit Eligibility Determination: The applicant obtained employment following receipt of, but before expiration of a Tax Credit Eligibility Determination voucher.
Refused Referral: Participant refused to accept an appropriate referral to a job opening.
Summer-Related Employment Opportunities: This is a WIA Youth activity. Labor Exchange Non Common Measures Enrollment Reportable Activities: Another category of activities listed in the Labor Exchange Category that do not generate a Labor Exchange enrollment for your participant are the Self-Service activities and others identified in this category. However, these activities do allow for reporting and tracking that can be used for state and local reporting and should be reported for your participants.
EKOS User Manual - Appendix
Page 206 of 231
Self-Service Job Matching: Participant conducts self-directed job search. This activity does not create an enrolled in Labor Exchange. However it is reported on the 9002 as self-service. This activity is created automatically when a participant completes a self-registration and selects the job search option. Register and conduct job search: https://selfreg.ky.gov/
Workforce Information Services Self-Service (LMI): Participant conducts self-directed search for Workforce Information Services Self-Service (LMI). Information concerning occupational staffing patterns, hiring patterns, high growth industries, working conditions, benefits, and pay of firms or industries. This activity does not create an enrolled in Labor Exchange. However, it is reported on the 9002 as self-service. This activity is created automatically when a participant completes a registration and select they will be conducting a search for Workforce Information Services Self-Service (LMI). For LMI information: http://www.WorkforceKentucky.ky.gov Participant Employment & Training Activities There are some Common Measures Enrollment activities included in the Employment and Training Category. However not all activities listed in this category will generate a Labor Exchange Enrollment for your participant.
Assigned Case Management (Dislocated worker, Profiled Claimant, TANF, Food Stamps: (Common Measures Enrollment) A case manager is assigned to provide ongoing one-on-one personal assistance and regular follow-up using a case management approach to services. This includes, but is not limited to, providing advice pertaining to vocational choice, assistance to obtaining training to reach employability, and follow-up services over the time required to obtain employment.
Case Management: (Common Measures Enrollment) Client-centered approach in the delivery of services, designed to prepare and coordinate comprehensive employment plans, such as service strategies, for participants to ensure access to the necessary training and supportive services, using, where feasible, computer based technologies and provide job and career counseling during program participation and after job placement.
Eligibility Determination: The participant was assessed to determine program and service eligibility.
Entrepreneurial Training: (Common Measures Enrollment) Classroom training designed to prepare and assist participant in starting their own business and to provide them with the on-going management skills necessary to operate their own business. Participant may be taught how to develop business plans for marketing. Found in the Employment and Training Category of Activities under Training.

EKOS User Manual - Appendix
Page 207 of 231
Follow Up: A follow up contact was made with the participant following the provision of services, training and/or job search assistance.
In Training – Other: (Common Measures Enrollment) Participant enrolled in other State or Local Training. Found in the Employment and Training Category of Activities under Training.
In Training - Post Secondary: (Common Measures Enrollment) Participant is enrolled in a Post Secondary Education program at an accredited degree-granting institution that leads to an academic degree (e.g., AA, AS, BA, BS). Found in the Employment and Training Category of Activities under Training.
In Training – Secondary: (Common Measures Enrollment) Participant is enrolled in a secondary (high school) program recognized by the State with the intent to attain a High School Diploma or a High School equivalency diploma (GED). Found in the Employment and Training Category of Activities under Training.
Job Coaching: (Common Measures Enrollment) On-site job training for those participants needing assistance in adjusting to employment, and instruction in learning the skills necessary to perform job competently.
Obtained Employment - Termination from Training - Successful – Other: Found in the Employment and Training Category of Activities. The participant obtained employment within 90 calendar days of termination from a state or local training program.
Obtained Employment - Termination from Training - Successful – Secondary: Found in the Employment and Training Category of Activities. The participant obtained employment within 90 calendar days following the successful completion of a secondary (high school) program recognized by the State to attain a High School Diploma or a High School equivalency diploma (GED).
Obtained Employment - Termination from Training-Successful- Post Secondary: Found in the Employment and Training Category of Activities. The participant obtained employment within 90 calendar days following the successful completion of a Post Secondary Education program at an accredited degree-granting institution that lead to an academic degree (e.g., AA, AS, BA, BS).
Other Service: Participant was provided services not specifically identified elsewhere.
Placed in Training (Job Corps): (Common Measures Enrollment) Participant is placed in a Job Corps Training Program. Job Corps is a residential, education and job training program for at-risk youth, ages 16 through 24. Students are provided integrated academic, vocational, and social skills training needed to gain independence and get quality, long-term jobs or further their education. Found in the Employment and Training Category of Activities under Training.

EKOS User Manual - Appendix
Page 208 of 231
Placed in Training (Other Federal): (Common Measures Enrollment) Participant who has been verified to have entered any job-training program supported by the Federal government such as WIA funded projects, TAA, NAFTA, and Job Corps. Found in the Employment and Training Category of Activities under Training.
Placed in Training (WIA): (Common Measures Enrollment) Participant is enrolled in WIA Institutional training. Found in the Employment and Training Category of Activities under Training.
Received Case Mgmt. Services (Dislocated worker, Profiled Claimant, TANF, Food Stamps): (Common Measures Enrollment) A participant assigned a case manager who receives career guidance, referral to supportive services, job development contacts, referral to jobs, referral to training, or any combination of those services.
Termination from Training - Successful – Other: (Common Measures Enrollment) Participant successfully completed other State or Local Training. Found in the Employment and Training Category of Activities under Training.
Termination from Training - Successful - Post Secondary: (Common Measures Enrollment) Participant successfully completed a Post Secondary Education program at an accredited degree-granting institution that led to an academic degree (e.g., AA, AS, BA, BS). Found in the Employment and Training Category of Activities under Training.
Termination from Training - Successful – Secondary: (Common Measures Enrollment) Participant successfully completed a secondary (high school) program recognized by the State and earned a High School Diploma or a High School equivalency diploma (GED). Found in the Employment and Training Category of Activities under Training. State Specific Activities: Activities included in the State Specific Category allow for reporting and tracking of One-Stop activity and/or for specific Program related activities. Reporting these activities will not generate Common Measures Enrollment activities nor a Labor Exchange enrollment for your participant. If you have any questions or problems relating to reporting activities for participants please contact the EKOS Support Team at [email protected].
Assessment ASSET (A Support System Entrance Test): The ASSET is a testing and advising program for placing students into postsecondary institutions. Paper-pencil format is available to test reading, math and writing skills.
Assessment CAB (Comprehensive Ability Battery): A comprehensive assessment where a wide range of factors and ability levels can be measured. When reporting this activity you should also report ‘Other Test’ found under the Labor Exchange Category for Testing. ‘Other Test’ is a Common Measures Enrollment activity.

EKOS User Manual - Appendix
Page 209 of 231
Assessment COMPASS (COMputer-adaptive Placement Assessment and Support System): The COMPASS is a placement test that includes reading, writing and math sections for placement into an appropriate starting level.
Assessment Discover: Internet based computer software designed to assess an individual's interests, values and abilities to help pinpoint specific occupations and career areas. Provides information on which colleges and other postsecondary institutions offer training needed for careers identified in the assessment process.
Assessment Educational Basic Skill Level: Participant was provided basic academic assessment designed to determine literacy levels, listening and speaking skills.
Assessment Employment Work History: Participant’s employment work history was reviewed to determine weaknesses and strengths identify any problem patterns with obtaining and maintaining employment, and to assist with planning the participant’s future job search.
Assessment JobFit: Participant receives JobFit assessment and services. JobFit provides an array of services and assessment. JobFit allows for soft skills assessment, career exploration, job-match, etc. JobFit is provided in the EKCEP WIA.
Assessment KMSS: Participant was assessed using Kentucky Manufacturing Skills Standards. Skill Standards are an indicator of an individual’s understanding of the “culture” of the manufacturing industry, an indicator of what workers need to know to be successful on the job and performance specifications that identify the knowledge, skills and abilities to be productive. When reporting this activity you should also report ‘Other Test’ found under the Labor Exchange Category for Testing. ‘Other Test’ is a Common Measures Enrollment activity. For additional information: http://adulted.state.ky.us/KMSS.doc .
Assessment Pre-GED (General Educational Development test): The Pre-GED test is given to indicate whether the student is prepared to participate in the official GED test. The test covers five sections: reading, writing, social studies, science and math.
Assessment SAGE: Participant was assessed using the System for Assessment and Group Evaluation (SAGE). The SAGE measures interests, strengths, aptitudes and cognitive abilities. There are four categories, Vocational Interest Inventory, Cognitive and Conceptual Abilities and Vocational Aptitude Battery.

EKOS User Manual - Appendix
Page 210 of 231
Assessment SDS – (Self-Directed Search): Participant will conduct Self Directed Job Searches while receiving services and assistance to enable them to become self-sufficient through employment. When reporting this activity you should also report ‘Self-Service Job Matching’ found under the Labor Exchange Category for Informational/Self-Service. ‘Self-Service Job Matching’ is a Common Measures Enrollment activity. https://selfreg.ky.gov/
Assessment TABE: Participant was given the Test for Adult Basic Education (TABE), an assessment instrument for adult basic and secondary education. The TABE is a norm-referenced test designed to measure achievement in reading, mathematics, language, and spelling. When reporting this activity you should also report ‘Other Test’ found under the Labor Exchange Category for Testing. ‘Other Test’ is a Common Measures Enrollment activity.
Assessment TABE-WF: Test for Adult Basic Education (TABE) WorkForce tests basic skills within a workforce context. When reporting this activity you should also report ‘Other Test’ found under the Labor Exchange Category for Testing. ‘Other Test’ is a Common Measures Enrollment activity.
Assessment Toyota: Participant was given Toyota assessment to determine employment eligibility.
Assessment Typing/Clerical: A proficiency test for typing/clerical skills was administered to the participant. When reporting this activity you should also report the ‘Proficiency’ Test found under the Labor Exchange Category for Testing. ‘Proficiency’ Test is a Common Measures Enrollment activity.
Assessment WorkKeys: Participant was given the Work Keys assessment. WorkKeys tests skills in problem solving, communication, and teamwork. It also identifies the skill levels needed to do specific jobs. WorkKeys assessments give students and workers reliable information about their workplace skill levels and stresses skills development important for every type of employment. To earn a Kentucky Employability Certificate, individuals are tested in reading, applied math and locating information through the Work Keys assessment tool, which is widely used in the private sector to analyze jobs and assess employee skill levels. Work Keys is a product of ACT Inc., a nonprofit organization best known for the ACT college entrance exam. As a result of the testing, individuals earn an employability certificate or identify areas in which they need further instruction. For additional information: http://adulted.state.ky.us/WorkKeys_KEC.doc or http://www.act.org/workkeys/index.html or http://www.act.org/workkeys/centers.html
Basic Computer Training Tutorials: Participant is provided access to basic computer training tutorials to increase their knowledge and ability to use computers.
EKOS User Manual - Appendix
Page 211 of 231
Budgeting Salary: Participant was given assistance on how to establish and maintain a budget based on their income and resources.
Case Management Other: Client-centered approach designed to prepare and coordinate comprehensive employment plans, to ensure access to the necessary training and supportive services, and provide job and career counseling during program participation. This can be used to report case management for any program.
Computer Skills Training: Participant is receiving or has completed training to increase their skills in using a computer. When reporting this activity you should also report ‘In Training – Other’ found under the Employment and Training Category ‘Training’. ‘In Training – Other’ is a Common Measures Enrollment activity.
DTE Participant Registration: A Department for Technical Education (DTE) participant was registered in EKOS. For additional information about DTE: http://kytech.ky.gov/
DTE Participant Services Provided: Activities were provided to a Department for Technical Education (DTE) participant. For additional information about DTE: http://kytech.ky.gov/
Eligibility Determination Trade ATAA/RTAA: A review was conducted to determine eligibility of Trade participant to receive ATAA/RTAA assistance.
Eligibility Determination Childcare Assistance: A review was conducted to determine eligibility of participant to receive childcare assistance and/or participant was determined to be eligible for childcare assistance.
Eligibility Determination HCTC (Health Care Tax Credit): A review was conducted to determine eligibility of Trade participant to receive HCTC assistance.
Eligibility Determination Medical Assistance: A review was conducted to determine if participant was eligible to receive medical assistance.
Eligibility Determination Program Services: Participant was evaluated to determine eligibility for program services provided by agency and other partners.
Eligibility Determination Trade: A review was conducted to determine eligibility of participant to receive assistance through the Trade Program.

EKOS User Manual - Appendix
Page 212 of 231
Eligibility Review ERP: An ERP was conducted to determine whether or not the participant is following the work registration, job search requirements, etc., and is still eligible for receiving UI benefits. An Eligibility Review (ERP or ERI) is a federal requirement, conducted every six weeks, to ensure that claimants continue to meet the eligibility requirements for receiving Unemployment Insurance Benefits.
Employability Skills: The participant is provided services to assist with developing employability skills in their field of choice; assistance to overcome any barriers they may have in obtaining a full-time, stable job; exposure to specific jobs and skills and prepares participant for regular full-time employment.
Employment Follow Up: Follow up was conducted to determine employment status.
Follow Up Adult and Dislocated Worker: Follow-up service must be made available, for a minimum of 12 months following the first day of employment, to registered participants who are placed in unsubsidized employment.
Follow Up TRADE: Follow up was conducted for a participant that is a participant in TRADE and/or has exited from the TRADE Program.
Follow Up Youth: Follow-up services for youth may include: leadership development and supportive service activities listed in 664.420 and 664.440; regular contact with a youth participant’s employer, including assistance in addressing work-related problems; assistance in securing better paying jobs, career development and further education; work-related peer support groups; adult mentoring; and tracking the progress of the youth. All youth participants must receive some form of follow-up services for a minimum duration of 12 months.
Green River Coal: Participant is provided training for inexperienced coal miners in OJT training contracts in the Green River area.
Help Writing Resume: Participant was provided assistance with preparing a resume. For additional information on resume writing: http://www.des.ky.gov/des/vws/virtual_workshop.asp and http://www.acinet.org/acinet/resume/resume_intro.asp
Interviewing Skills: Participant is provided services that teach and prepare them for interviews for employment, importance of listening, appropriate dress, types of questions to expect, importance of researching a company prior to interview, follow-up with employer, etc. Can also include mock interviews.

EKOS User Manual - Appendix
Page 213 of 231
ITA Approved Occupational Skills Training: Individual Training Account (ITA) Training that has been approved in a specific occupation or specific program of study.
Job Relocation Assistance: Participant receives services that assist in relocating to an area outside of their current residence location for purposes of employment.
Job Retention Services: Services provided to assist participant in keeping and maintaining employment. These services can include but are not necessarily limited to pre-and post employment services, case management, job readiness, employment follow-up after job placement, supportive counseling, child care and transportation help and referrals, advice on workplace behavior, and referrals to other services in the community.
Job Search: Participant conducted job search either through the Internet, job development, with or without the assistance of agency staff.
Job Shadowing: Career awareness opportunities for students to observe individuals in the workplace.
Kentucky Employ Network: An intense approach to case-management for UI Claimant Participants. Orientation and Job Search Workshop is conducted followed by structured job search, referral and follow-up. Also involves working closely with employers. For additional information: http://www.des.ky.gov/des/employer/ken.asp
NKY HC Case Management (Northern Kentucky Health Connections Case Management): All Adults and Dislocated Workers who are enrolled in Health/Medical activities in Northern Kentucky.
NKY Youth Case Management (Northern Kentucky Youth Case Management): All Northern Kentucky youth who are enrolled in youth activities.
OJT- On the Job Training Contract: A job seeker customer is working under a contract which has been written for a specific employer. The training is provided by the employer for a specific occupational title. The Employer is reimbursed by a state agency for providing the training.
Orientation One-stop: Customer was provided and/or participated in an Orientation about the One-Stop Center and all services that are available through its partners.
Other Service: Any supportive service provided that does not have a specific activity listed and is not elsewhere identified.

EKOS User Manual - Appendix
Page 214 of 231
Placed in Trade ATAA/RTAA: The eligible Trade Program participant was placed in ATAA/RTAA in order to receive assistance.
Placed in HCTC (Health Coverage Tax Credit): The eligible Trade Program participant was placed in HCTC in order to receive assistance.
Placed in Trade: The participant was placed in the Trade Program under a TAA petition number in order to receive assistance.
Post Employment Services: Follow up services provided to participant after being placed in a job. These services can be any that will assist the participant in continuing employment and self-sufficiency.
Profiled Case Managed: This activity is to be reported when the UI Claimant Participant has been assigned to receive ES Case Management activities.
Referral to Trade ATAA/RTAA: Participant is referred to Alternative Trade Adjustment Assistance for assistance. This program provides benefits as an alternative to the benefits offered under the regular TAA Program. Participation in ATAA/RTAA allows older workers, for whom retraining may not be appropriate, to accept reemployment at a lower wage and receive a wage subsidy. Eligible workers age 50 or older who obtain new, full-time employment at wages of less than $50,000 within 26 weeks of their separation may receive a wage subsidy of 50% of the difference between the old and new wages, up to $10,000 paid over a period of up to two years. A worker receiving a wage subsidy under the ATAA program may not receive benefits under the TAA Program. To qualify for ATAA a worker must obtain qualifying reemployment within 26 weeks of layoff. This remains true even if the certification is not issued until after the 26 weeks have passed.
Referral to Adult Daycare: Customer was referred to Adult Daycare, which provides traditional nursing services to clients of need during daytime hours, enabling family members to fulfill their daily responsibility.
Referral to Adult Ed: Participant is referred to Adult Education for purposes of raising educational or literacy level. For information about Kentucky Adult Education: http://adulted.state.ky.us/
Referral to Assessment Center: Customer was referred to Assessment center for assessment or testing services.
Referral to Career Resource Center: Customer was referred to Career Resource Center for self-service or assistance with self-registration for EKOS or KEWES, job search, resume preparation, use of resource materials, telephone or fax use to contact employers.
EKOS User Manual - Appendix
Page 215 of 231
Referral to Certificate of Financial Need: Customer was referred to Certificate of Financial Need, which provides assistance for reconnection of electric and gas utility services during the winter months of November through March in hardship situations after financial need and other circumstances of the customer have been documented.
Referral to Commonwealth Educational Opportunity Center: Customer was referred to Commonwealth Educational Opportunity Center (CEOC) for assistance with financial aid information or scholarship information relating to post secondary educational institutions.
Referral to Community Service Block Grant (CSBG): Customer was referred to CSBG, which provides supportive services that directly and indirectly address the needs of low-income families and the elderly through many community based funded programs.
Referral to Compassion Capital: Customer was referred to Compassion Capital, which assists faith-based and community based organizations by increasing and building capacity in their communities.
Referral to Early Headstart: Customer was referred to Early Headstart for child education, family services, healthcare, health education, disability therapies and parent involvement for children who are zero to three years old.
Referral to Eastern Kentucky Child Care Coalition: Customer was referred to Eastern Kentucky Child Care Coalition (EKCCC), which provides quality developmental childcare through a childcare provider network, which allows opportunities for parents to pursue employment and self-development courses.
Referral to ESG Rental/Utilities Assistance: Customer was referred to Emergency Shelter Grant, which provides funding for rental and utilities assistance for prevention services due to eviction, utilities shut off, etc.
Referral to FEMA Emergency Food & Shelter: Customer was referred to Federal Emergency Management Agency (FEMA), which provides assistance to families in emergency situations due to delayed K-TAP or food stamp assistance, loss of home through fire or other disaster and assistance to local food pantries.
Referral to Headstart: Customer was referred to Headstart for child education, family services, healthcare, health education, disability therapies and parent involvement for children who are three to four years old.

EKOS User Manual - Appendix
Page 216 of 231
Referral to HCTC (Health Coverage Tax Credit): A Trade impacted participant is referred for (Health Coverage Tax Credit) HCTC for assistance. Workers who are receiving the wage subsidy under the ATAA Program may be eligible to receive tax credits for 65% of the monthly health insurance premium they pay. Qualifying insurance coverage includes COBRA, state COBRA, continuing individual coverage or other state-qualified plans. For detailed information on HCTC, and a list of state-qualified health plans, visit the Internal Revenue Service website.
Referral to Homeless Program: Customer was referred to a homeless program, which provides emergency shelter for homeless families along with extended services that assist in transitioning the homeless into permanent housing and self-sufficiency.
Referral to Housing: The participant was referred to the local Housing Authority for housing assistance.
Referral to Kentucky Vision Assistance: Customer was referred to Kentucky Vision Assistance, which provides eye exam and eyeglasses to eligible recipients in exchange for a twenty dollar donation to the project.
Referral to Job Corps: Participant is referred to the Job Corps Program for training. Job Corps is a residential, education and job training program for at-risk youth, ages 16 through 24. Students are provided integrated academic, vocational, and social skills training needed to gain independence and get quality, long-term jobs or further their education.
Referral to JobFit Services: Participant is referred to JobFit assessment and services. JobFit provides an array of services and assessment and allows for soft skills assessment, career exploration, job-match, etc. JobFit is provided in the EKCEP WIA.
Referral to KTAP: Participant is referred to the Kentucky Temporary Assistance Program.
Referral to LIHEAP: Customer was referred to Low Income Home Energy Assistance Program (LIHEAP), which provides assistance with energy costs directly to approved vendors on behalf of low-income individuals and families who are eligible.
Referral to Migrant and Seasonal Farmworkers: A participant that is deemed to meet the definition of a Migrant or Seasonal Farmworker is referred to that program for assistance and services. The National Farmworker Jobs Program (NFJP) under section 167 of the Workforce Investment Act assists migrant and other seasonally employed farmworkers and their families achieve economic self-sufficiency through job training and other related services that address their employment related needs. For additional information: http://www.doleta.gov/msfw/

EKOS User Manual - Appendix
Page 217 of 231
Referral to Office for the Blind (OFB): Customer was referred to the Office for the Blind, which provides services to individuals who are blind or have impaired vision, in order to assist with barriers that could interfere with work. The Office for the Blind can also assist with training that will provide needed skills for the customer to be self-sufficient and get a job.
Referral to Native American Programs: Participant is referred to the Native American Program for additional services and assistance. Public Law 102-477 is the Indian Employment, Training, and Related Services Demonstration Act of 1992, as amended by Public Law 106-568, the Omnibus Indian Advancement Act of 2000. Public Law 102-477 is unique among Federal legislation, in that it allows Federally recognized tribes and Alaska Native entities to combine formula-funded Federal grants funds that are employment and training-related into a single plan with a single budget and a single reporting system. For additional information: http://www.doleta.gov/dinap/cfml/477glnc1.cfm .
Referral to Self-Help Parenting: Customer was referred to Self-Help Parenting to improve parenting skills.
Referral to Senior Citizen Nutrition: Customer was referred to Senior Citizen Nutrition program, which provides nutritionally balanced meals to senior citizens through group meals provided at a senior citizen center and home delivery meal services.
Referral to Summer Feeding: Customer was referred to Summer Feeding program, which provides nutritious meals to children during long school vacations.
Referral to Trade: A participant that is dislocated ‘due to foreign trade’ is referred to the Trade Program for assessment and training opportunities. The Trade Program provides assistance in the form of reemployment services, training and job readjustment allowances to individuals whose unemployment is linked to increased imports of foreign-made products and relocation of business establishments from the United States to other countries.
Referral to Technical Education: Participant is referred for technical education and skills training.
Referral to Transportation: Provides public non-emergency medical transportation for a nominal fee. Basic public transportation is also available in some areas at a minimal charge. Passengers must call in advance to schedule service. Lift-equipped vehicles are available for individuals with disabilities.
Referral to Veteran Program: A Veteran or Other Eligible Participant is referred to the Veteran’s Program for priority services that include job search assistance, counseling, case management, referral to supportive services, etc.

EKOS User Manual - Appendix
Page 218 of 231
Referral to Vocational Rehabilitation: Participant is referred to Department for Vocational Rehabilitation (DVR) for assessment and/or services.
Referral to Wagner Peyser: Participant is referred to Wagner Peyser Labor Exchange for job search assistance.
Referral to WIA Adult: Participant is referred to WIA to determine eligibility for training under the WIA Adult Program.
Referral to WIA Dislocated Worker: Participant who has lost their job due to mass layoff is referred to WIA to determine eligibility for training and other assistance.
Referral to WIA Youth: Participant age 14 through 18 is referred to WIA Youth Program to determine eligibility for further services.
Referral to Workshop Money Smart: Customer is referred to Money Smart workshop, which provides financial education information such as budgeting, opening a bank account, credit cards, car loans, home ownership and other related topics.
Referral to Workshop Other: Customer is referred to a workshop not listed under any other category.
Referral to Workshop Success N Sight: Customer is referred to Success N Sight workshop for out-of-school, at-risk youth, ages 17 to 21. The workshop, which is three weeks long, connects each participant with counselors who can help chart an individualized course to employment based on skills, education, and interest. Counselors continue the relationship after the workshop is over as each participant implement their individual plan to become employed.
Referral to Workshop Work Wise: Customer is referred to a workshop designed for those who need to know the essentials of finding and keeping a job in the changing workforce by offering strategies and hints that job seekers need to be able to succeed in a highly competitive work environment.
Referral to Workshop Yes You Can Own a Home: Customer is referred to "Yes You Can Own A Home" workshop that assists with information on buying a home.
Referrals from Partners: Participant was referred from a partner agency or organization

EKOS User Manual - Appendix
Page 219 of 231
Referred to Basic Skills Training: Referral to a program or course designed to develop competency in basic educational skills such as; reading, comprehension, mathematics, writing, speaking and reasoning and/or programs leading to educational credentials such as GED or high school diploma or college degree
Termination From Training – Un-Successful: Participant did not successfully complete training.
Trade Purchase/Pennyrile: Identifies eligible Trade participant’s in the Purchase Pennyrile WIB.
Training Inappropriate: Selected training was not appropriate for the participant’s needs or eligibility.
Translation Service: Staff serve as translators for participant’s doing business with their agency.
UI Benefits Right Interview: Interview given to customer’s receiving unemployment insurance benefits. During the interview staff explain the unemployment insurance eligibility requirements, appeal rights, amount of weekly benefit amount (if determined eligible), how long a disqualification will last, and job search requirements (if appropriate).
West KY Energy Governor’s Statewide Reserve funding activity that is only to be used by Western KY and Green River staff.
Workshop Career Basics Computer ABCs: Career Basics Computer ABCs workshop assists beginning level users with basic computer knowledge and skills.
Workshop Career Basics Career Exploration: Career Basics Career Exploration workshop helps to explore interests, values and abilities as well as to identify behavioral traits in order to begin planning the career that is right for each individual.
Workshop Career Basics Interviewing Skills: Career Basics Interviewing Skills workshop assists customers in preparing for a successful job interview.
Workshop Career Basics Resumes and More: Career Basics Resumes & More workshop provides information for individuals wanting to get a job or a better job. Topics include networking to find the right job, job search, resume preparation, job applications, preparing for an interview and much more.
Workshop Career Choices: A guide for teens and young adults to help them discover who they are, what do they want and how to achieve it. This course walks them through developing a personal profile, deciding a goal, problem solving and attitude.

EKOS User Manual - Appendix
Page 220 of 231
Workshop Discover: Discover workshop, which provides career planning information such as tools to find out interests, values and abilities to help pinpoint specific occupations and career areas that line up with each individual's results. Provides information on which colleges and other institutions offer training needed for careers of interest.
Workshop Getting the Job You Really Want: This is a step-by-step guide to finding a good job in less time. Teaches them to identify their skills, explore career options, develop a career objective, write a superior resume, improve interviewing skills, and get ahead on their job.
Workshop Guide to Getting and Keeping a Good Job: Basically developed for High School Juniors and Seniors to help them with career planning, job search methods, resume writing and job survival skills.
Workshop Identify Your Skills: Assists the participant in identifying their skills and how to better know themselves. Also, it teaches the participant to use those discovered skills to get a job and a better life.
Workshop Job Savvy: Designed to help people improve their basic job skills by teaching them critical job-survival skills, how to increase their productivity and improve job satisfaction and success.
Workshop KY Paraeducator Assessment Review: Covers the areas of reading, writing, math and responsibilities needed to prepare for and pass the Kentucky Paraeducator Assessment. Approximately three hours long.
Workshop Learning for Earning: A thirty-one-chapter course designed to introduce participants to the skills they will need to succeed in school, on the job and on their own. It will help prepare them for the career of their choice and to become a productive member of society.
Workshop Life Skills for the World of Work: Teaches basic career exploration and how to find the right job. Teaches basic application completion, interview techniques, first day on the job preparation and success on the job.
Workshop Money Smart: Money Smart workshop provides financial education information such as budgeting, opening a bank account, credit cards, car loans, home ownership and other related topics.
Workshop Work Wise: Designed for those who need to know the essentials of finding and keeping a job in the changing workforce by offering strategies and hints that job seekers need to be able to succeed in a highly competitive work environment.

EKOS User Manual - Appendix
Page 221 of 231
Workshop Workers in Transition: Participant participated in a Workshop designed to assist workers challenged with having to make choices about changing jobs, decisions on seeking additional education or training that help with their transition from one occupation to another.
Workshop Yes You Can Own A Home: "Yes You Can Own A Home" workshop assists customers with information on buying a home.

EKOS User Manual - Appendix
Page 222 of 231
Employer When reporting employer activities, please provide additional detail in the Comments Section to further explain/describe the Activity. If you have any questions or problems relating to reporting activities for employers please contact the EKOS Support Team at [email protected].
Account Management: Employer is provided more intensive services by Agency/One-Stop staff. The Account Manager can be the designated agency person to contact for an employer/company. This person could be responsible for follow-up and follow-through regarding services that are being provided to the employer/company, such as follow-up to determine needs of the employer regarding number of customers to be referred on a specific job order, to determine results and quality of referrals, etc.
Alien Labor Certification: Employer was provided information regarding the Alien Labor Certification Program and the requirements and policies associated with hiring foreign workers and/or the Employer is certified under the Alien Labor Certification Program to hire foreign workers. The Alien Labor Certification Program allows employers to hire workers temporarily or permanently when there are not sufficient U.S. workers who are able, willing, qualified and available to perform the job. In addition, the program ensures that the employment of the foreign workers will not adversely affect the wages and working conditions of U.S. workers that are similarly employed. The Department of Labor Regional Certifying Officer will grant certification if he/she finds that qualified persons in the U.S. are not available and that the terms of employment will not adversely affect the wages and working conditions of workers in the United States similarly employed. For additional information: http://www.des.ky.gov/des/employer/empservices.asp#ALC–Temp(Agricultural)
NOTE: Comments Example: Provided information about Alien Labor Program. Employer is certified to hire foreign workers (if you have the date of certification you should included this also in the Comments).
Assistance With Writing Job Descriptions: Provided guidance and instruction to an employer(s) regarding the proper format in which a job order description should be written. Explains why it is important to provide a precise and full job description with requirements and qualifications clearly defined. Reviews policy and regulations against the use of discriminatory terminology, such as using a gender specific job title. For additional information: http://www.acinet.org/acinet/jobwrite_search.asp?soccode=&stfips
Business Information and Support Services: Met with employer and provided information about the local area workforce, general wage information, OET services and offered the facility to conduct interviews and orientations.
EKOS User Manual - Appendix
Page 223 of 231
CAB (Comprehensive Ability Battery): Employer requests that customers/job seekers referred to their company be administered a Comprehensive Ability Battery assessment.
Economic/Labor Market Issues: Discussion and/or provision of labor market information from a national, state or local perspective, the economic impact of specific trends in the workforce, labor shortages, labor turnover, economic and employment projections, etc. The employer received information concerning the labor market or other economic data pertinent to the local or regional economy. Examples of such information may include, but are not limited to, occupational staffing or hiring patterns, wage information, labor supply and demand data, job market trends, and business climate survey information. For additional LMI information: www.WorkforceKentucky.ky.gov
Educational/Basic Skill Level: Customers referred to employer will be given a basic academic assessment designed to determine literacy levels, listening and speaking skills.
Employer Company Profile: Information gathered about the company, detailing a business description identifying the type of business, its interests, and mission. Whether it is a large or small company or is a growing or expanding industry, if employer is conducting business in an industry that is considered high-growth, hiring practices, benefits paid, number of workers employed at the establishment, etc.
Employer Contact E-Mail: Correspondence was sent to the employer via email.
Employer Contact Mailing: Correspondence was sent to the employer. This could be in the form of a letter or other mailing.
Employer Contact On-Site Visit: Staff visit to an employer at the company’s place of business and/or an employer visit to a One-Stop Center.
Employer Contact Phone Call: Employer was contacted by phone and/or Employer contacted agency staff by phone.
Employer Follow-Up: Meeting (in person, by phone, or email) with employers to discuss issues regarding the use of the JobFit system or other services provided.
Employment/Work History: Job Seekers Employment and Work History will be screened prior to referral to Company based on criteria provided by the employer.
EKOS User Manual - Appendix
Page 224 of 231
Enterprise Zone Tax Credit: Employer was provided information about the Enterprise Zone Tax Credit and/or was certified eligible to receive the tax credit. For additional information: http://www.thinkkentucky.com/kyedc/pdfs/keza.pdf
Human Resources Issues: Discussed HR issues with employer, i.e., high turnover, pay and benefits, family medical leave, workers compensation, health benefits, insurance, vacation and sick days, flexible work hours and shift schedules, etc.
Incumbent Worker Training Services: Services provided to employees to help pay for specific training in a particular field or area when a customized training agreement is made with an employer.
JSEC Meeting: The employer participated in a meeting of the Kentucky Employers Council (KEC).
JSEC Member: Employer is a board member of the Kentucky Employers Council (KEC).
Job Analysis: Assistance was provided in analyzing jobs/positions such as determining what ONET Code or occupational title the position would be considered. A review was conducted of the requirements and qualifications of the job to identify aptitude, skills and abilities, etc., required for the job.
Job Fairs: Employer participated in a Job Fair.
Job Order Taking: Agency staff obtains job position criteria and requirement information from employer and writes a job order.
Job Seeker Screening: Assistance was provided in screening job seekers that are applying for an employer(s) job opening(s) to ensure they meet criteria set forth by employer for specific skills, experience, education, etc.
JobFit Employer Documentation: Enrolled the employer as a participating employer in JobFit.
JobFit Employer Orientation: Presentation to employers on the uses and benefits of the JobFit job profiling system
JobFit Employer Training: A 1 to 1 ½ hour session training the participating employer on how to log on to and use the JobFit profiling system

EKOS User Manual - Appendix
Page 225 of 231
JobFit Surveys: Administration of JobFit to employers SME’s (Subject Matter Experts) used to create job profiles. Survey is also administered to job seekers.
KMSS (Kentucky Manufacturing Skills Standard): Employer uses the Kentucky Manufacturing Skills Standard and/or employer was provided information regarding the KMSS. For additional information: http://www.kctcs.edu/workforcenetwork/kmss
Labor Market Preview: Provision of short and/or long-term LMI projections, local wage data, occupational and industry information on employment and wages, market analysis, employment trends by industry and occupation, earnings growth, economic and employment projections, labor supply and demand data, job market trends. For additional information: www.WorkforceKentucky.ky.gov
Marketing Service Programs: Marketed services and programs of One-Stop System and/or agency to employer(s) or employer groups or organization.
OJT - On the Job Training Contract: A contract has been written with the employer for ‘on-the-job-training’. The job for which the contract is written is one that traditionally requires specific occupational training as a prerequisite. The trainee working under the contract shall receive the same wages and benefits and be subject to the same working conditions as other employees working an equivalent length of time and performing a substantially equivalent job at the work site.
On-Site Recruitment: Employer conducted recruitment and interviews at agency/One Stop location and/or One Stop staff assisted employer(s) with recruitment at the employer(s) business or designated location.
On-Site Review of Customized LMI: Labor Market Information that has been compiled and customized to target a specific employer. The on-site review and provision of specific LMI as it relates to and impacts the employer(s). For additional information: www.WorkforceKentucky.ky.gov
Rapid Response: Rapid Response Orientation was conducted for the Company. Rapid Response is a strategy designed to respond to major layoffs and plant closings by quickly coordinating services and providing immediate aid to affected companies and their workers. Rapid Response teams work with company(s) to customize public and private efforts to minimize the disruptions of a major layoff on the company, affected workers, and the community. Rapid Response is carried out by the States and local workforce development agencies. For additional information: http://www.oet.ky.gov/rresponse/rapidresponse.htm

EKOS User Manual - Appendix
Page 226 of 231
Review Employer Employment Applications: One Stop is responsible for reviewing job seeker applications for specific jobs/employer.
SDS (Self-Directed Search): Employer allows customers to self-refer and/or the employer conducts their own search for job seekers utilizing the e3 site.
Seminar: A Seminar/Workshop specifically targeting employers was conducted to provide information regarding a variety of topics and/or a specific subject.
Statutory (legal) Issues: Assist employers with their responsibility to ADA, EEO, FCJL, discriminatory issues, affirmative action requirements, labor law compliance information, etc. For additional information and assistance: http://www.labor.ky.gov
TABE: Employer has requested that the TABE be administered to job seekers who are referred to their company seeking employment. Test for Adult Basic Education (TABE) is an assessment instrument for adult basic and secondary education. The employer has requested that job seekers referred to their company be given the TABE assessment test. The TABE is a norm-referenced test designed to measure achievement in reading, mathematics, language, and spelling. It is divided into a locator test and five levels, including pre-literacy. The scores are reported according to grade-level equivalency to measure achievement of basic skills commonly found in adult basic education curricula and taught in instructional programs. Reading, language, mathematics, and spelling are the areas measured. There are five overlapping levels – L (Literacy), E (Easy), M (Medium), D (Difficult), or A (Advanced) that range from GLE 0 to GLE 14.9. The Locator test is administered to determine the appropriate level of the TABE test to administer to the individual student.
TABE-WF: Test for Adult Basic Education (TABE) WorkForce tests basic skills within a workforce context.
Tax Credit Certification: Agency staff provides information regarding Tax Credits and/or an employer is determined eligible for tax certification, such as UTC, Enterprise Zone Tax Credit, WOTC, etc. Identify the specific Tax Credit in the Comments section when reporting the “Tax Credit Certification” activity. For additional information: http://www.doleta.gov/business/incentives/opptax/
Testing: Testing of job seeker(s) is conducted per employer’s request. Can be an employer test or other agency/federal/state test. Identify the type of test provided in the Comments section when reporting the “Testing” activity.

EKOS User Manual - Appendix
Page 227 of 231
Typing/Clerical: The Employer requests that job seekers be given a Proficiency Test for Typing/Clerical Testing.
UI Information Issues: Employer is provided information relevant to Unemployment Insurance. For additional information: http://www.des.ky.gov/des/ui/ui.asp
Unemployment Insurance Tax (UTC): Employer has been provided information regarding the Unemployment Tax Credit (UTC) and/or is eligible to receive UTC. The Unemployment Tax Credit (UTC) program provides employers a credit of $100 per eligible hire against Kentucky income taxes owed for hiring residents who have been unemployed for 60 days and remain on the payroll for at least 180 days.
Valid Test Provided by Employer: The Employer is requesting that a test they provide will be used to test/assess job seekers referred to them. You should identify the type of test provided in the Comments section, ie. Math, Reading, etc.
Veterans Outreach: Activity includes visits or phone contact with organizations and agencies that provide services for disabled veterans, economically or educationally disadvantaged veterans, and veterans with barriers to employment. The outreach activity includes, but is not limited to visits to Vocational and Rehabilitation programs, Homeless Veterans Reintegration Project grantees, Department of Veteran Affairs Medical Centers and Vet Centers, Homeless Shelters, Civic and Service Organizations, Community Stand Downs, and State Vocational Rehabilitation Agencies.
Welfare to Work Tax Credit (WtW): Employer has been provided information regarding the Welfare to Work Tax Credit (WtW) and/or is eligible to receive WtW. The Welfare-to-Work (WtW) Tax Credit is a tax credit for employers who hire individuals certified as long-term recipients of cash welfare assistance, Temporary Assistance to Needy Families (TANF). The Welfare-to-Work Tax Credit is equal to 35% of the first $10,000 of qualifying wages paid to a certified employee during the first year of employment and 50% of the first $10,000 in qualifying wages paid during the second year of employment, for a maximum $8500 tax credit over a two-year period. In addition, for the WtW Tax Credit, wages may include certain tax-exempt amounts relating to accident and health coverage, educational assistance programs, and dependent care assistance programs, which are not included in the definition of qualifying wages for the WOTC. In order for the employer to claim the WtW Tax Credit, the employee must work for the employer at least 400 hours or 180 days. The WtW Tax Credit is coordinated with the WOTC so that employers may claim both tax credits for the same individual, but not in the same taxable year. For additional information: http://www.doleta.gov/business/incentives/opptax/

EKOS User Manual - Appendix
Page 228 of 231
Work Keys: Employer requires the Work Keys Assessment test be administered to all job seekers referred to the company and/or agency staff have discussed administering the WorkKeys Assessment for the employer. WorkKeys tests skills in problem-solving, communication, and teamwork. It also identifies the skill levels needed to do specific jobs. WorkKeys assessments give students and workers reliable information about their workplace skill levels and stresses skills development important for every type of employment.
Work Opportunity Tax Credit (WOTC): Employer has been provided information regarding the Work Opportunity Tax Credit (WOTC) and/or is eligible to receive WOTC. The Work Opportunity Tax Credit (WOTC), authorized by the Small Business Job Protection Act of 1996 (P.L. 104-188), is a federal tax credit that encourages employers to hire nine targeted groups of job seekers by reducing employers’ federal income tax liability by as much as $2,400 per qualified new worker; $750, if working 120 hours or $1,200, if working 400 hours or more, per qualified summer youth. This program provides Federal tax credits to encourage employers to hire job seekers with barriers to employment. Individuals who are: receiving Federal public assistance or food stamp benefits, SSI, vocational rehabilitation services, high-risk youth and summer youth who live in a Federal Empowerment Zone or Enterprise Community, disabled veterans or veterans receiving food stamp benefits, and ex-felons, are eligible to earn WOTC tax credits for their employers. Among those eligible are certain welfare, food stamp and Supplemental Security Income (SSI) recipients; youth who live in areas designated as federal empowerment zones and enterprise communities; ex-felons; and people with disabilities. For additional information: http://www.doleta.gov/business/incentives/opptax/

EKOS User Manual - Appendix
Page 229 of 231
Types of Testing Basic Occupational Literacy Test (BOLT) – The BOLT provides measures of literacy achievement in the areas of reading and arithmetic expressed in terms of occupational requirements for reading and arithmetic " in order to facilitate " vocational counseling and placement by providing direct comparison of a person's literacy skills with literacy skills required for satisfactory performance in various occupations.
General Aptitude Test Battery (GATB) - (Common Measures Enrollment) The GATB measures a broad range of general abilities, which are found in all jobs. It is a battery of 12 tests which measure aptitude in nine different skills: General Learning Ability, Verbal Aptitude, Numerical Aptitude, Spatial Aptitude, Form Perception, Clerical Perception, Motor Coordination, Finger Dexterity and Manual Dexterity.
Non-Reading Aptitude Test (NATB) - (Common Measures Enrollment) The NABT is a non-reading version of the GATB for use with educationally deficient participants who do not have the literacy skills to take the GATB.
O*NET Interest Profiler - The O*NET Interest Profiler (IP) is a self-assessment career exploration tool that can help clients discover the type of work activities and occupations that they would like and find exciting. Clients identify and learn about broad interest areas most relevant to themselves. They can use their interest results to explore the world of work.
O*NET Work Importance Locator - The O*NET Work Importance Locator (WIL) is a self-assessment career exploration tool that allows customers to pinpoint what is important to them in a job. It helps people identify occupations that they may find satisfying based on the similarity between their work values (such as achievement, autonomy, and conditions of work) and the characteristics of the occupations.
O*Net Ability Profiler - The O*NET Ability Profiler (AP) is a career exploration tool that helps clients plan their work lives. The O*NET Ability Profiler uses a paper and pencil format with optional apparatus parts and computerized scoring. Individuals can use O*NET Ability Profiler results to: Identify their strengths and areas for which they might want to receive more training and education; and identify occupations that fit their strengths
Test of Adult Basic Education (TABE & TABE 2) – Math & Reading - The TABE is a norm-referenced test designed to measure achievement in reading, mathematics, language, and spelling. When reporting this activity you should also report ‘Other Test’ found under the Labor Exchange Category for Testing. ‘Other Test’ is a Common Measures Enrollment activity.
Typing Proficiency - (Common Measures Enrollment) – The Typing Proficiency test is one of a group of proficiency tests that is used to measure the skill or knowledge that a participant has acquired. Other tests include: Data Entry and Ten-Key.

EKOS User Manual - Appendix
Page 230 of 231
Wonderlic Personnel Test (WPT) – Employability Level - The Wonderlic Personnel Test is a test that measures a prospective employee's cognitive ability to learn the specific job that the person is applying for.
Wonderlic Basic Skills Test (WBST) – Verbal - The Wonderlic Basic Skills Test (WBST) is a test that measures a prospective employee's basic verbal skills to the particular skills required for the job being desired.
Wonderlic Basic Skills Test (WBST) – Quantitative - The Wonderlic Basic Skills Test (WBST) is a test that measures a prospective employee's basic math skills to the particular skills required for the job being desired.