compact laser series - home - acupak
TRANSCRIPT

Content: Seite:
Permitted Accessories: ..................................................................................... 0
Permitted Protection Goggles: .................................................................. 0 Pemitted Device in connection with the CL mini Laser: ................................ 0
1 Intended Use ................................................................................................ 1 2 Safety precautions to be observed during the use of therapy lasers ...................... 1
2.1 Alignement Laser Spectacles (Therapist’s Spectacles): ........................... 2 2.2 Laser Protection Spectacles (Patient’s Spectacles): ................................ 2 2.3. Indications ..................................................................................... 2 2.4 Contraindications ............................................................................. 3
3 Compact - Laser CL mini : View ...................................................................... 4 3.1 Accessory ......................................................................................... 4 3.2 Initial use ......................................................................................... 5 4.1 Commissioning ................................................................................. 6 4.2 Laser-point and distance of irradiation ................................................. 7 4.3 Irradiation Angle ............................................................................... 8 4.5 Search of Acupuncture points with the Compact – Laser mini: ................ 9
4.5.1. Preparation of the assembly ................................................. 9 4.5.2. Acupuncture point detection on the body ............................... 9 4.5.3. Detection of ear- and sculp acupuncture points ..................... 10
4.6 Irradiation period and Absorption Doses ............................................. 10 4.6.1 Formule ........................................................................... 10 4.6.2 Measuring units ................................................................ 10 4.6.3 Calculation of the correct dose ............................................ 11
4.7 Kontrolle der Leistung des Lasers ...................................................... 14 4.8 Charge of the NiMH- Battery ............................................................. 14
5 Possible dysfunctions of the laser ................................................................... 14 6 Cleaning and maintenance ............................................................................ 15 7 Waste management of laser and accessory ..................................................... 15 8 Warranty .................................................................................................... 16 9 Laser inspection ........................................................................................... 16
9.1 Scope of inspection: ........................................................................ 16 9.1 Inspection Certificate ....................................................................... 17
10 Laser dispatch ........................................................................................... 17 11 Warning advices and Decal Information : ...................................................... 18 12 Technical Data:.......................................................................................... 19 Declaration of Conformity ................................................................................ 20 Calibration Certificate .................................................................................... 21 CL_mini_BED1.doc 6. August 2008

Compact - Laser Series CL mini Instructions for use
0
Admitted Assessory: Lightning cable bent (Dental top)
Power reducing tip
Admitted Protection Goggles: Soft-Caps Laser goggles (=glasses for the patient)
Mini-Soft-Caps Laser goggles for children
Comfort Laser goggles (=glasses for the patient)
Comfort Laser adjust glasses (=glasses for the therapist)
Comfort Laser goggles for children
Admitted Device in connection with the CL mini Laser: Point Detector PS3, with Connection Cable
Compact - Laser Series CL mini Instructions for use
1
1 Intended Use
The Compact – Laser mini is a Soft Laser (Low Level Laser) for radiation of skin,
mucous membrane and dental applications in human and veterinary medicine.
It is a ―Medical Product― in accordance with the EU Medical Product Law and
93/42 EWG.
2 Safety precautions to be observed during the use of therapy lasers
The appropriate legal security precautions are to be observed!
Direct irradiation of the opened eye should be avoided at all costs! Irreparable
damage can be expected!
With a power of over 10 mW even the closed eye should not be irradiated!
During radiation to the face use Soft Caps!
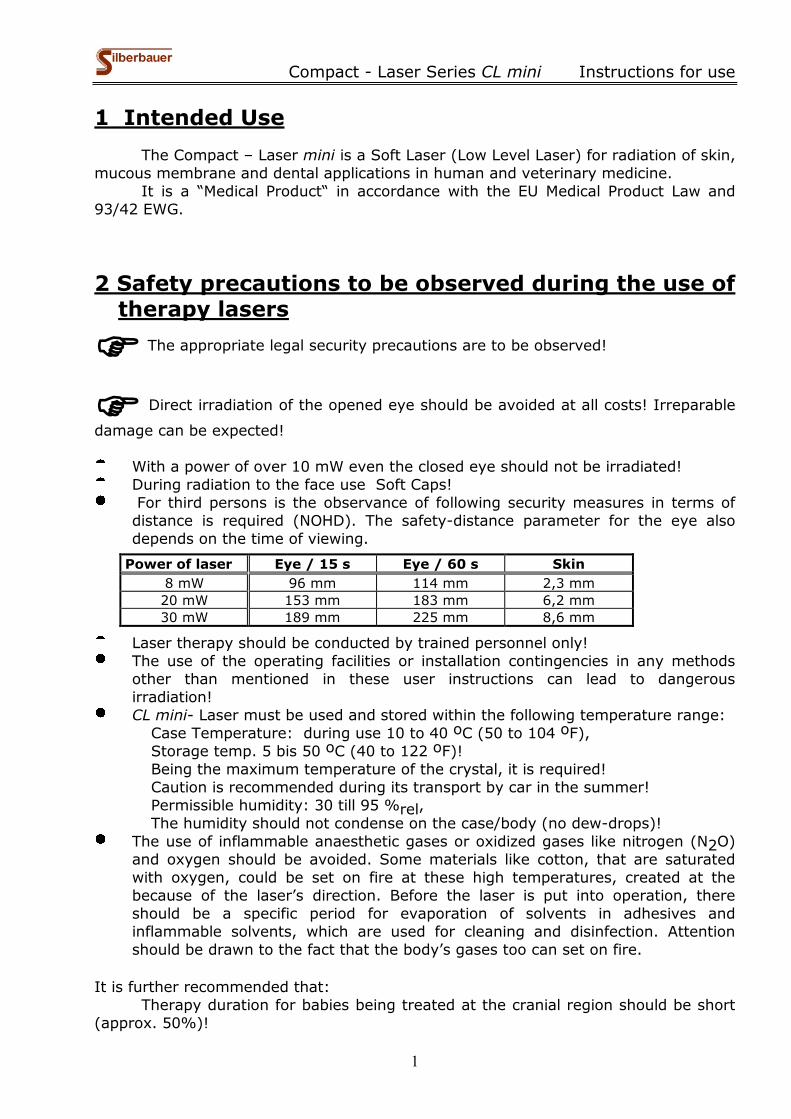
For third persons is the observance of following security measures in terms of
distance is required (NOHD). The safety-distance parameter for the eye also
depends on the time of viewing.
Power of laser Eye / 15 s Eye / 60 s Skin
8 mW 96 mm 114 mm 2,3 mm
20 mW 153 mm 183 mm 6,2 mm
30 mW 189 mm 225 mm 8,6 mm
Laser therapy should be conducted by trained personnel only!
The use of the operating facilities or installation contingencies in any methods
other than mentioned in these user instructions can lead to dangerous
irradiation!
CL mini- Laser must be used and stored within the following temperature range:
Case Temperature: during use 10 to 40 oC (50 to 104 oF),
Storage temp. 5 bis 50 oC (40 to 122 oF)!
Being the maximum temperature of the crystal, it is required!
Caution is recommended during its transport by car in the summer!
Permissible humidity: 30 till 95 %rel,
The humidity should not condense on the case/body (no dew-drops)!
The use of inflammable anaesthetic gases or oxidized gases like nitrogen (N2O)
and oxygen should be avoided. Some materials like cotton, that are saturated
with oxygen, could be set on fire at these high temperatures, created at the
because of the laser’s direction. Before the laser is put into operation, there
should be a specific period for evaporation of solvents in adhesives and
inflammable solvents, which are used for cleaning and disinfection. Attention
should be drawn to the fact that the body’s gases too can set on fire.
It is further recommended that:
Therapy duration for babies being treated at the cranial region should be short
(approx. 50%)!

Compact - Laser Series CL mini Instructions for use
2
2.1 Alignment Laser Spectacles (Therapist’s Spectacles): At the use of lasers of the laser-protection-class 2M
the therapist can wear the laser alignement
spectacles as in accordance with the current
edition of international standard EN208.
Minimal specifications of these spectacles for the
CL mini corresponding to EN208: Protection level at 658 nm: for CL mini 8: R 1 for all other CL mini lasers: R 2 and admitted for laser mode D (continuous operation)
Silberbauer - laser alignment spectacles offer only protection against accidental
irradiation through laser up to these levels!
They are NOT ALLOWED to be used for the deliberate view of beam!
They are only protection against casual irradiation, when the eye lid closure
reflex is not suppressed or slowed down (medical treatment, illness ...); and thus
repeated irradiations of the eye have to be reduced.
Attention! Colour identification is disturbed by the glasses!
Clean glasses only with a glasses-cleaning-cloth or cloth and windows-detergent.
2.2 Laser Protection Spectacles (Patient’s Spectacles): The patient should wear laser-goggles. As per the
international standard EN 207 in its current edition.
Minimal Specification of laser protection spectacles
correspond to EN 207: Protection level at 658nm : L3; Laser mode: D (continuous operation)
The Silberbauer laser protection spectacles offer only protection against
accidental irradiation through laser up to these powers!
They are NOT ALLOWED to be used for the deliberated view into the beam!
They protect only then against casual irradiation, when the eye lid closure reflex
is not suppressed or slowed down (medical treatment, illness ...); and thus
repeated irradiations of the eye have to be reduced.
Attention! Colour identification is disturbed by the glasses!
Clean glasses only with a glasses-cleaning-cloth or cloth and windows-detergent.
2.3. Indications See scientific literature and soft laser courses!

Compact - Laser Series CL mini Instructions for use
3
2.4 Contraindications
The laser treatment has a low risk only. Different authors have controversial positions
because the laser is especially successful in applications where you for forensic
reasons might have concerns. However, if no sufficient tests are available, some
contraindications should be observed:
Direct irradiation of the open eye, it is essential to avoid!
In the area of open fontanelles or open skullcaps, as well as growth gaps in
childhood and adolescence should not be irradiated.
During pregnancy, the penetration of the abdominal area is to be avoided.
Attention! Sopme acupuncture points can trigger labour (Bl31, Bl32, Bl60, Bl67, Di4,
Di5, Gbl21, Gbl34, LG20, MP6)
Endocrine organs may not be treated!
For epileptics, the scalp region may not be treated.
In the literature, there are notes at the one side that tumors and malignant skin
diseases should not be treated, at the other side tumor pains and damages due to
radiation are a successful field of application. In the veterinary medicine there are
good results after laser penetration of tumors because the lymphatic jam and the pain
eases back.
In case of higher photosensibility, it is not allowed to penetrate (for all kinds of
dermatoses which react with formation of erythems or vesicles to small doses of
light).
Pacemakers cannot be affected by penetration with the cw- laser, so there are
no contraindications.
Too long therapy time
does not give better results,
but also no harmful side
effects. Exceptions are
penetrations in the scalp
region (more minutes), which
can cause headache, and
daily penetration with high
doses which can cause that
pain comes again.
See also scientific literature!

Compact - Laser Series CL mini Instructions for use
4
3 Compact - Laser CL mini : View
1 2 3 4
Compact - LaserCL mini xx-658
5 6
7
9
Ser.Nr.:xxxx H
"Constant Power" 8
1 Laser point 6 Type plate and details
2 Light Emitting Diode, yellow 7 Socket for Silberbauer Point Detector PS3
3 Push-button 8 Battery Cap
4 Aluminium Body 9 Laser warning label
5 Rotary switch
3.1 Accessory
Optic Fibre, bent:
Direction of the
Laser Beam
Power loss with optic fibre: 25 % almost!
Power-reducing-tip:
Direction of the
Laser Beam
Transmission 50%: e.g.: for CL mini 30 – Output Power reduces to approx. 15 mW

Compact - Laser Series CL mini Instructions for use
5
3.2 Initial use
The Silberbauer Compact - Laser mini is delivered with Alkali-Mangan-
Batteries, Type AAA, and optionally also with rechargable NiMH- Batteries in Size AAA
and with a charger for these batteries.
Open battery cap (8) at the end of the
laser and insert battery with positive end pointing
into the tube; close the cap and turn it clockwise
until it stops.
Now your Silberbauer Compact - Laser mini is ready to use!

Compact - Laser Series CL mini Instructions for use
6
4 Use of the Compact – Lasers CL mini
4.1 Commissioning The rotary switch (5) is for switching the device on and off and to select the dose time of penetration. In ―Off― – position the device is switched off completely, no waste of battery power. Nevertheless the battery should be removed from the laser if it is not used for a longer period because there is the risk of the battery leaking and then the risk of oxidation of the contacts. This causes a defect of the device! In ―Standby― position the laser is powered up and waits for selection of the necessary dose (time). After selection of the dose the laser cannot be started promptly, but only after a security delay of 2 sec. Now the laser can be started by pressing the button (3). This button must be hold down during the whole penetration time because of security. After releasing, the laser will stop suddenly.
Place the laser perpendicular to the area to be irradiated (see heading "Possibilities for use of Compact-Laser"),
At the end of every therapy session the rotary switch must turned again into
OFF- position. The integrated timer starts promptly after pressing the button, the control LED glows yellow and indicates that the output power has the correct value and that the battery is OK. The timer stops the laser automatically after the chosen time for therapy and the LED becomes dark. Shorter times of irradiation than the shortest selectable time of 15 seconds: Release the push-button early and the laser stops immediately. Longer times of irradiation than the longest selectable time of 60 seconds: at the end of the therapy time, release the laser button (3) and start the therapy by pressing it again – and the next dose of selected time will start.

Compact - Laser Series CL mini Instructions for use
7
4.2 Laser-point and distance of irradiation
Direction of the
Laser Beam
The point of the Silberbauer - CL-Laser is created in the shape of a small
tube that follows the cone. The point is easily found through it – the point, where the
laser-radiation radiates on the skin. Normally, nearly inaccessible points, like behind
the ear are easily radiated with no problems.
At the point there is a short light conductor. This light conductor serves among
other things as mechanical protection for the heart of your therapy equipment, the
laser diode. The impact point or the areas of operation are specified by this laser
point. With all models the light emerges, whereby the size of points can be changed
according to requirements through the choice of the distance from the skin.
The irradiation distance can be selected at will! Therefore the laser is
allowed to be set on the skin's surface. The skin can also be pressed in with smooth
pressure by the laser-point, to reduce the distance between deeper-set areas needing
to be irradiated (e.g. area of abdomen).
Apart from this the laser-point is conductive and is connected with the socket at
the rear end of the laser battery. The point-searcher PS3 can be connected to this
socket with a connecting cable. Herewith the laser-point can be used at the same time
as searching point-peak for acupuncture points.

Compact - Laser Series CL mini Instructions for use
8
4.3 Irradiation Angle
To obtain optimal success during treatment, the laser must be positioned
perpendicular to the skin's surface.
Low reflection, wide reflection, Optimal penetration depth lower penetration depth = optimal success = less success
4.4 Use of the assessory If necessary put the bent light conductor or the power reducing tip onto the
point until a limit is reached (see drawing):
Power-reducing-tip
Direction to put on
Direction of theLaser Beam
Direction of the
Laser BeamLight Conductor,
bent
Direction of theLaser Beam

Compact - Laser Series CL mini Instructions for use
9
4.5 Location of Acupuncture points with the Compact – Laser
mini:
4.5.1. Preparation of the assembly As well as the Silberbauer Compact - Laser mini (without power reducing tip!) a
Silberbauer Point Detector PS3 and a connection cable is required.
Put one plug of the connecting cable into the rear socket of the laser. The other
cable plug is required to be inserted into the golden socket of the Silberbauer PS3
instead of the point-search-tip.
The point finder Silberbauer Punktsucher PS 3 must now be handed over into
the hand of the patient. The laser-tip can now serve now as a point finder.
4.5.2. Acupuncture point detection on the body The Silberbauer Point Detector PS 3 indicates the electrical conductivity of the
skin both optically (with higher or lower frequency of the installed light-diode) and
acoustically (with a varying tone pitch). The latter can be heard by the doctor while
focussing his eyes on the acupuncture point.
Hence the laser tip is positioned slightly diagonally above the acupuncture point,
which should be localized on the skin’s surface. The area assumed to be an
acupuncture point is sought out; then search the area, where you suppose the
acupuncture point is, without lifting the tip from the skin. The pressure of the tip
should be light and consistent while searching.
Continue the search in the direction of a higher tone or a quicker signal. The
tone pitch reaches its maximum light and maximum pitch or frequency at the centre
of the acupuncture point.
The push-button must be pressed on the laser above the acupuncture point
thus beginning the irradiation. The time of therapy programmed in the Silberbauer
Compact-Laser mini is optimised for this kind of application required in every model.
See chapter 1.3. ―Acupuncture― in the booklet Applications of the Soft - Laser!

Compact - Laser Series CL mini Instructions for use
10
4.5.3. Detection of ear- and sculp acupuncture points
The acupuncture points at the cranial
zone because of Yamamoto and at the ear
are ―silent― -in contrast to acupuncture
points for the rest of the body. This
indicates that the electrical conductivity of
the skin is very low there. However if a
disturbance in the organism is projected to
the reflexion zones, the electric
conductivity of the skin changes at the
relevant acupuncture points and zones.
These points can be located like with the
body’s acupuncture. Very high tones
appear at points with strong disturbances
which should be irradiated.
4.6 Irradiation period and Absorption Doses Suggested References: e.g.: Baxter: Therapeutic Lasers – Theory and Practice
Füchtenbusch/Bringmann: Laser Therapy and Laser Acupuncture, Treatment tables
Tunér/Hode: Laser Therapy – Clinical Practice and Scientific Background
Tunér/Hode: The Laser Therapy Handbook
4.6.1 Formule
Energy = Laser power x irradiation period
Irradiation dose = Energy /unit area
4.6.2 Measuring units
Energy: in Joules (J) = Watt-secunds (Ws)
Power: in milli-watt (mW) 1 mW = 0,001 W
Time: in secunds (s)
Unit area: in cm²
Irradiation-doses: in Joule / cm²

Compact - Laser Series CL mini Instructions for use
11
4.6.3 Calculation of the correct dose
Necessary irradiation period in seconds/cm² to get a certain dose (left row)
for different laser models (upper line):
CL mini Compare:
8 20 30 CL 50 CL 90
Dose 0,1 12 5 3 2 1,1
in Joule / cm² 0,2 25 10 7 4 2,2
0,3 42 15 10 6 3,3
Region 0,5 62 25 17 10 5,5
for 0,8 100 40 27 16 9
skin: 1 125 50 33 20 11
1,5 188 75 50 30 16,5
2 250 100 67 40 22
3 375 150 100 60 33
in case of pain: 4 500 200 133 80 44
5 625 250 167 100 56
6 750 300 200 120 67
7 875 350 233 140 78
8 1000 400 267 160 89
9 1125 450 300 180 100
10 1250 500 333 200 111
12 1500 600 400 240 133
14 1750 700 467 280 155
16 2000 800 533 320 178
18 2250 900 600 360 200
20 2500 1000 666 400 222
This table shows how more power saves time!
Example: The area to be irradiated is 50 x 10 mm large and should be irradiated with a 8 mW-laser with 1 Joule per cm². It is observed from the table that: 1 Joule /cm² = 125 seconds /cm² with the 8 mW-laser,
For 50 x 10 mm = 5 cm² would it be 5 x 125 = 625 seconds for time for, that are more than 10 minutes! With a more powerful laser these times are much shorter:
1 Joule /cm2 = 20 secundes /cm
2 with the CL 50 ,
for 50 x 10 mm = 5 cm2 there are 100 second necessary..
With the CL90 there are only 55 seconds to penetrate!
Or:

Compact - Laser Series CL mini Instructions for use
12
for treatment of areas with help of the card:
Place the card close to the wound and check which circle has the same area like
the wound (e.g. 4x1,8J).
At this circle you find the number how often this dose has to be applied at once
(e.g. 4x) and the dose setting of your laser (e.g. 1,8J).
Set your laser to this dose setting. Place the laser tip close to the rim of the
wound, press the start button and remain pressing until you hear the permanent warn
tone and the laser switches off.
Now release the button and press it again. Repeat this corresponding to the
number.
Example for model CL mini 30 – 658:
In the literature there are values between 0,54 and 3 J/cm2 recommended. Preset duration time in Joule at Silberbauer CL mini models:
model: at 15 seconds: at 1 minute:
CL mini 8 - 658 0,12 J 0,5 J
CL mini 20 - 658 0,3 J 1,2 J
CL mini 30 - 658 0,45 J 1,8 J
For comparison: the CL – laser has
CL 50 - 660 0,75 J 3,0 J
CL 90 - 660 1,35 J 5,4 J
the Profi — laser has
PL 250 - 660 3,75 J 15 J

Compact - Laser Series CL mini Instructions for use
13
For comparison between different Silberbauer laser models:
For penetration of this small wound (1cm2) with 1 J/cm2 (usual dose) you will need following times:
Model: Seconds:
CL mini 8 - 658 125
CL mini 20 - 658 50
CL mini 30 - 658 33
CL 50 - 660 20
CL 90 - 660 11,1
PL 250 - 660 4
Or: In one minute you can irradiate following area:
CL mini 8 CL mini 30 CL 50 CL 90 PL 250

Compact - Laser Series CL mini Instructions for use
14
4.7 Control of Use of Lasers
The Silberbauer Compact - Laser mini has a mechanism for control of the laser output power: The yellow light emittimg diode (2) glows when the laser works with 90% of its rated power at least.
4.8 Charge of the NiMH- Battery
See manual of the battery charger! Attention! Don’t try to charge normal one use batteries!
5 Possible dysfunctions of the laser
Attention must be paid to the existing danger involved in meddling with
a damaged instrument and being exposed to dangerous laser-radiations!
If the yellow lighting LED does not glow once the start-button is
pressed, then please leave the button and observe whether
A few seconds have passed after the rotary switch was switched on?
(It takes about 2 seconds till the laser can be switched on)
Could the battery be flat?
It is enough to recharge the flat battery for a few minutes and irradiation can
begin for a short time!
If the laser does not work in spite of a correct battery or fully charged
battery, please do not make any further attempts, but send or bring the laser
together with the battery for monitoring purposes to our service!
Do not under any circumstance turn or pull the mains adapter or the battery out
of the laser while it is switched on! In case of the tiniest loss of contact – possible
after a dropped battery or laser – the laser-diode could be badly damaged!
Fluid traces or small colorless or white crystals at the battery or at contacts indicate
that a battery or a rechargeable battery has leaked and the contacts do not work. In
this case, please send the device to the service for professional cleaning!

Compact - Laser Series CL mini Instructions for use
15
6 Cleaning and maintenance
To avoid any danger of infection, the laser point must be disinfected
before and after each treatment (and the power-reducing-tip and the bent
light conductor).
The laser can be cleaned carefully with a cloth moistened with alcohol or
surgical disinfection. No liquid should be allowed to enter the openings.
The laser point itself can be cleaned with a pad or cloth moistened with alcohol.
The drill of the ―power-reducing-tip― can be cleaned with a toothpick and
thereafter be washed with alcohol. For this, the power-reducing-tip must be pulled
out of the laser always.
The "bent light conductor" can be cleaned like the laser top. The rear surface is
well protected with a black hull made out of synthetic material. If this surface does get
soiled the hull must be taken off. The lighting cable can then be proceeded to be
cleaned, see laser-point. Ensuing which the hull must remain attached to the lighting
cable again, in such a way that the lighting cable just touches the front-surface of the
laser point after the hull is pulled up, whereby the hull has to loom until the end of the
cylindrical area of the laser point.
Direction to put on
Direction of the
Laser Beam
Light conductor, bent
Additional maintenance by the user is not required.
7 Waste management of laser and accessory
For waste management please regard the valid legal regulations of each
country/region!
Disposal of the device: Not like household waste, but in the nearest
receiving depot for disposal of electric devices!
The batteries have to be brought to the next receiving depot for
special waste disposal.

Compact - Laser Series CL mini Instructions for use
16
8 Warranty According to the product liability law, general conditions apply to liability
insurance (AHVB), supplementing general conditions for the liability insurance (EHVB)
and the special conditions NR. 3401 valid in each case version. During the processing
of our distributed devices the relevant legal safety regulations and editions in the valid
in each case version are to be followed.
We will provide free replacement of all parts which are defective because of
material failure or mistake in production or we will repair them.
Guarantee:
All recently manufactured Silberbauer products: 3 years
All used products: 1 year.
Excluded from the warranty are
batteries, accumulators and
damage by effect of mechanical force eg dropping or
by too high or too long working- or storage- temperature and
damage by inappropriate handling.
Also excluded from warranty are all damages at any device or accessory caused
by leaked batteries.
After demounting of the device by non-authorized ones there is no more
warranty!
9 Laser inspection The CL-Laser mini must be inspected at regular intervals of 2 years.
9.1 Scope of inspection: 1. Examination of Output Power:
Measuring Equipment required:
Measuring device for the laser output with a large Si-photo-diode (at least 10 x
10 mm) is well suited for the measurement of every monitoring phase of the laser
output and the wave-length of the CL mini Laser.
Specification:
Measuring accuracy: +/- 5%
Measuring Process: The output power is measured when the laser is turned on and
the sensor is hold perpendicular to the laser beam.
Range of tolerance of the measured power: Nominal Power +/- 5%
Compact - Laser Series CL mini Instructions for use
17
If the measured power is out of the mentioned range of tolerance, the laser must be
calibrated or repaired.
2. Examination of controlling elements
Due to danger of mechanical abrasion, the laser-button (3) must be checked and also
the rotary switch (5).
Scope of examination:
a) Control of strokes of rotary switch: The switch must be turned to its 3 intended
positions. The white point at the knob must corrspond to the labeling.
b) Procedure for monitoring function of the rotary switch (5) and laser-button (3):
Turn the rotary switch into its off position.
Insert battery.
Press the laser-button.
No laser radiation has to emerge out of the instrument.
Turn the rotary switch into its standby position.
Press the laser-button.
No laser radiation has to emerge out of the instrument.
Turn the rotary switch into 15 s position.
Press the laser-button.
The instrument has to give laser-radiation for 15 s (control of time).
Turn the standby-ready-switch into the position of 60 s.
Press the laser-button.
The instrument must radiate for 60 s (control of time).
3. Checking the readability of all labels All labels must be perfectly readible!
4. Checking of all accessories Inspection of all accessories by visual inspection for breaks or wear should be
done. ,Also goggles for deep scratches which disturb the view.
9.1 Inspection Certificate To confirm the accurate functioning of the instrument the owner will receive an
inspection certificate including its measured power. The results are given in the
instruction book.
10 Laser dispatch
The laser is delivered in its original packing, devoid of any defects by post as bulk goods. Pull the battery out of the laser during transport!
Storage temperature must not exceed 50 °C (122 °F) !

Compact - Laser Series CL mini Instructions for use
18
11 Warning advices and Label Information : For the Laser there are used different warning labels depending of the model: e.g. for the model CL mini 8 - 658:
All other models have the same warning labels with other values for power and wavelength.
Caution! Laser radiation!
Disposal of the device: Not like household
waste, but in the nearest depot for disposal of
electric devices!
The batteries have to be brought to the
nearest depot for special waste disposal.
Application part type BF
Year of manufacturing: coded at the end of the serial number:
letter A for 2001, B for 2002, etc.
! Attention! The attached documents are to be noted!
The manufacturer is only considered responsible to bearing on security, reliability and capacity of the instrument, when A. changes or repairs are made by personnel authorized by him, B. the electrical installation of the room is according to the regulations of ÖVE-EN 7, C. the instrument is used in accordance with the directions of use. The instrument must not to be used with volatile gases or fumes during narcosis. This could cause sparks in the button or at the contacts. Apart from normal valid regulations the ―Instructions to avoid explosive dangers in operational equipment―of BM for social administration Zl. V-88015-17 are to be considered in the advisory statement made by the medical experts from 03.02.1968 and ÖVE-EN 7 regarding the use of the instrument in an atmosphere enriched with oxygen.
Standby 15 s (0,12 J)
6 0 s (0 ,5 J)
“Constant Power”
Output Power: 8 mW / 658 nm
DO NOT STARE INTO BEAM OR VIEW
Aperture / Direction of Laser Beam
EN 6
08
25-1
+A1
+A
2 :2
003
Classe 2M Laser Product
Laser Radiation
DIRECTLY WITH OPTICAL INSTRUMENTS!
Off

Compact - Laser Series CL mini Instructions for use
19
12 Technical Data:
Lasergerät, Serie Compact - Laser CL mini xx - xxx :
Manufacturer and distributor: Prof. Dipl.Ing. Gerhard Silberbauer 0120
Medical Electronics Hiessgasse 13 - 15, A- 1030 Wien, Austria, European Union Intended use: for laser radiation of skin, mucosa and dental applications Accessory: see page 0 Internal power source: Alkali-Mangan- Battery or NiMH- battery, size AAA = LR03 Classification: - protection level against electr. shock: Internal electric power source
Part of application type BF - protection level against harmful water invasion: Common device - protection level during application together with explosive mixtures of
anaethesias with air or with oxygen or laughing-gas: Instrument is not to be used in an explosive atmosphere or with explosive
mixtures from anaesthesias with oxygen to laughing-gas -Kind of operation: Permanent operation -due to EU - direction 93 / 42 / EWG: II A - Laser class: 2 M divergence of beam: 0,33 rad +/- 10% therapy time: 15s or 60s (switchable) +/-3% battery current: max. 0,25 A weight: without / with battery: 78 g / 89 g dimensions: 15 x 188 mm (D x L)
Model: CL mini 8-658 CL mini 20-658 CL mini 30-658
nominal laser power +/-10% (mW): 8 20 30
wavelength (nm): 658 658 658
beam diameter at output (mm): 1,5 1,5 1,5
admitted case temperature (operating): 10 to 40 oC 50 to 122 oF
10 to 40 oC 50 to 122 oF
10 to 40 oC 50 to 122 oF
operating time of battery (Alkali-Mangan-Type): 16 h 13 h 10 h
operating time of battery (800 mAh- NiMH) 9 h 7 h 5 h
Interval for periodical inspection: 2 years
Rights for technical changes reserved! CL_mini_BED1.doc

Compact - Laser Series CL mini Instructions for use
20

Compact - Laser Series CL mini Instructions for use
21
Calibration - Certificate
Device: Compact - Laser Model: CL mini....................... Serial number: …………………………………….. It is hereby confirmed that the instrument mentioned above, has been examined and calibrated at its time of manufacturing. Measured output-capacity: _ _ , _ mW The date of examination of the output power of the laser is planned at intervals of 2 years. The test badge on the instrument serves as a reminder of this test.
Vienna................ _______________________
Technical examiner

Compact - Laser Series CL mini Instructions for use
22
Change directory: