compass installation documentationcompass.mcckc.edu/compass_workstation_setup_instructions.pdf · 2...
TRANSCRIPT

COMPASS Metropolitan Community College
Installation and Configuration Guide
Version 2013-01-16

Table of Contents
1 Introduction ................................................................................................................................................. 1
1.1 Workstation Requirements ................................................................................................................... 2
1.2 Network Requirements ........................................................................................................................... 2
2 Installing and Updating COMPASS ........................................................................................................ 4
2.1 Downloading the installation and update files ............................................................................... 4
2.2 Install COMPASS using the full installer file ..................................................................................... 4
2.3 Install COMPASS Updates using the update installer ................................................................... 5
2.4 Configure file system permissions ...................................................................................................... 6
2.5 Configure Internet Options – Trusted Sites ...................................................................................... 7
2.6 Workstation Registration ....................................................................................................................... 7
3 Launching a COMPASS Test .................................................................................................................. 10
3.1 Set Screen Resolution to 800x600 .................................................................................................... 10
3.2 Set the default printer ........................................................................................................................... 11
3.3 Launching COMPASS .............................................................................................................................. 11
3.4 Logging into COMPASS .......................................................................................................................... 12
3.5 Select the testing site ............................................................................................................................. 12
3.6 Select the test package .......................................................................................................................... 13
3.7 Student Login ........................................................................................................................................... 14
3.8 Exiting COMPASS ..................................................................................................................................... 15

1
1 Introduction COMPASS is an Internet based test, but it does require software to be installed on each
testing workstation to facilitate the testing sessions.
Note:
The current version of this document can be found at the link below. Please check for a
newer document, before beginning an install. The version number is on the title page. The
version number follows the YYYY-MM-# format. A higher version number indicates a
newer document.
http://compass.mcckc.edu/mcckc-compass-installation-and-configuration-guide.pdf
Section 2 of this document covers the installation of the workstation components and the
registering of the workstation with ACT.
Section 3 covers the launching of a COMPASS test.
To complete the workstation setup process on each workstation the steps from both
sections must be completed on each workstation. Completing the steps in Section 3 the
first time on a workstation will automatically load ACT’s ActiveX controls. If a non-
administrator level account will be used to login to the workstations the day of the test,
Sections 2 and 3 must be completed at least one time with an administrator level account,
otherwise the ActiveX controls will not register properly. After completing these sections
once with an administrator level account, the steps in Section 3 can be repeated with a
regular user account to verify COMPASS loads properly (COMPASS is not fully loaded until
the Student Login, shown in Section 3.7, is shown) with a non-administrator level account
Warning:
Non-administrator level student and staff accounts, or any account with restricted access to
the workstation (e.g. group policy-based restrictions limiting hard drive access), cannot be
used for a testing session unless Sections 2 and 3 are completed in their entirety using an
administrator level account. After completing Sections 2 and 3 with an administrator-level
account, repeat Section 3 with a non-administrator level account to determine if a more
restrictive user account can be successfully used in your environment. Any account, used
to log into the workstation, which can successfully make it to the Student Login screen
(shown in 3.7), will work for the testing sessions.

2
1.1 Workstation Requirements
• Windows XP, Windows Vista, or Windows 7
• Video card capable of displaying a screen resolution of 800x600
• Internet Explorer 6, 7, 8, or 9 (Internet Explorer is the only support browser)
1.2 Network Requirements
• High-speed Internet access (at least 40 Kbps per concurrent testing session)
• Inbound and outbound port 80 and 443 access must be available through all
firewalls
• The *.act.org domain must be allowed through any content filtering devices.
• The *.mcckc.edu domain must be allowed through any content filtering devices.
1.3 Internet Explorer Browser Settings
The following Internet Explorer settings must also be verified for the account(s) used for
the testing sessions. These settings may already be set in your environment, if not they can
be applied via a Windows group policy object with the assistance of your IT Department.
Location Name Setting
Security > Trusted Sites > Custom Level Download Signed ActiveX controls Prompt or Enable
Security > Trusted Sites > Custom Level Run ActiveX controls and plug-ins Prompt or Enable
Security > Trusted Sites > Custom Level Script ActiveX controls marked
safe for scripting
Prompt or Enable
Security > Trusted Sites > Custom Level Allow mixed content Enable

3
1.4 Windows Vista and Windows 7 Requirements
If you are installing COMPASS on Windows Vista or Windows 7, the User Access Control
(UAC) setting must be disabled and the workstation rebooted, prior to completing Sections
2 and 3. UAC can be re-enabled after completing these sections.
1. Open the Control Panel.
2. Click User Accounts.
3. Click User Accounts one more time.
4. Click Change User Account Control Settings.
5. Move the slider to the Never Modify setting.
6. Click OK.
7. Reboot the workstation.
Note:
If UAC was already set to the Never Modify setting, no change is needed and the
workstation does not need to be rebooted.

4
2 Installing and Updating COMPASS The installation process uses two files, the full installer and the update installer. The files
can be downloaded from the compass.mcckc.edu site and must be installed on each
workstation. Run installations using an account that has full administrative privileges on
the workstation.
2.1 Downloading the installation and update files
Download and save the full installer file using the link below:
http://compass.mcckc.edu/compasseslinternetversionfull.exe
Download and save the update installer using the link below:
http://compass.mcckc.edu/compasseslinternetversionupdate.exe
2.2 Install COMPASS using the full installer file
Double-click the compasseslinternetversionfull.exe file Accept all the default options.

5
2.3 Install COMPASS Updates using the update installer
Double-click the compasseslinternetversionupdate.exe file Accept all the default options.

6
2.4 Configure file system permissions
COMPASS requires the modify permission for the following directory:
C:\Program Files\ACT\COMPASSESL Internet Version Setup\ecompass
1. Navigate to the COMPASSESL Internet Version Setup directory.
2. Right-click the ecompass directory, click Properties.
3. Click the Security tab, click the Edit button.
4. Click the Users group, check the Modify checkbox.
5. Click the Apply button, and the OK button until all dialog are closed.

7
2.5 Configure Internet Options – Trusted Sites
COMPASS utilizes Internet Explorer ActiveX controls. To facilitate the use of these controls,
please add the act.org domain to the trusted sites list
1. Open the Control Panel.
2. Click Network and Internet
3. Click Internet Options
4. Select the Security tab, select Trusted sites, click the Sites button.
5. Type *.act.org in the Add this website to the zone field, click the Add button.
6. Click the Close button.

8
2.6 Workstation Registration
Each testing workstation must be registered with ACT’s COMPASS testing site. You must
use Internet Explorer (other browsers will not work) to complete the registration process.
The website used to register the workstations is below:
https://compass.act.org/eCompass/index.jsp
1. Open Internet Explorer, navigate to the website shown above.
2. Login in to the ACT COMPASS site.
3. Under the Maintenance section, Select Workstation Setup.
4. Click Install, when prompted to Install each ActiveX control, there may be
several prompts, click Install on all of them.
5. On the Workstation Setup page, under Step #1, select Register, then click the
Get MAC Address link
6. On the Workstation Setup page, under Step #3, Select Do not download
anything …

9

10
3 Launching a COMPASS Test
3.1 Set Screen Resolution to 800x600
Each testing workstation must have its screen resolution set to 800x600 prior to launching
a COMPASS test.
1. Right-click on the desktop.
2. Select Screen Resolution
3. Click on the Resolution drop down box
4. Change the resolution to 800x600
5. Click Apply

11
3.2 Set the default printer
In order for scores to print, a default printer must be set prior to launching a COMPASS test.
1. Open the Control Panel
2. Select Hardware and Sound
3. Select Devices and Printers
4. Right-click the printer that COMPASS should use, select Set as default printer
3.3 Launching COMPASS
To start a COMPASS test session, double-click the COMPASS Test Launcher icon on the
desktop.
12
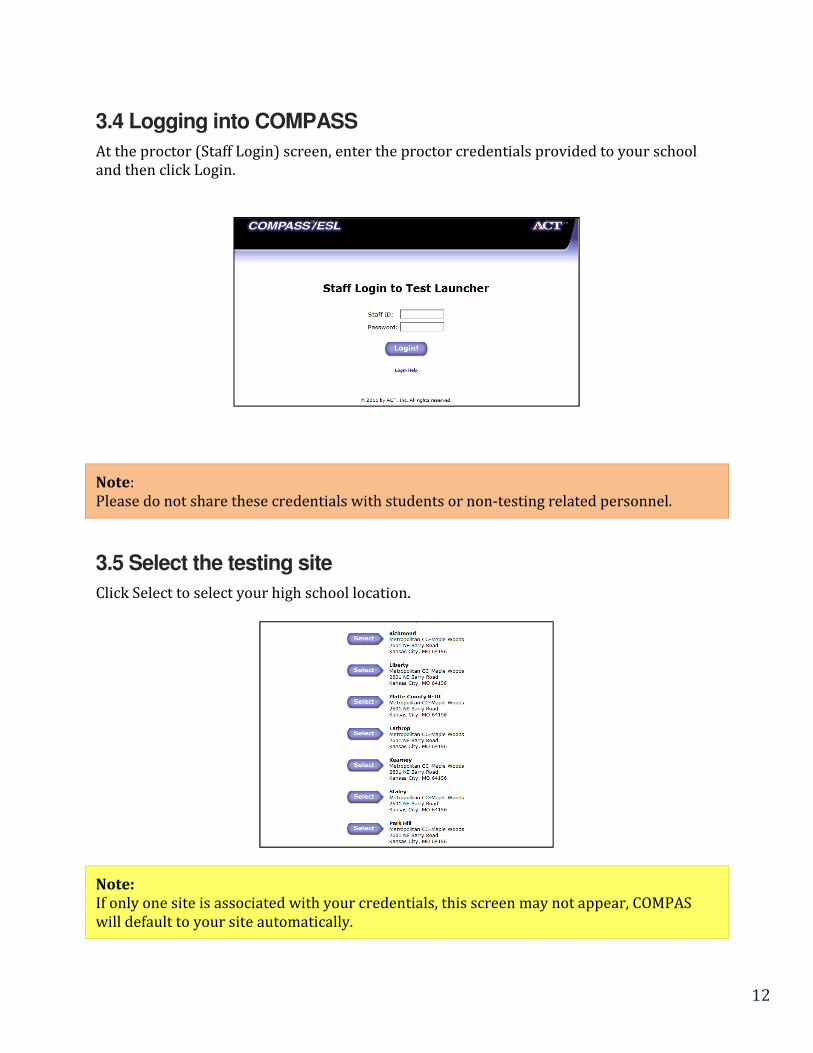
3.4 Logging into COMPASS
At the proctor (Staff Login) screen, enter the proctor credentials provided to your school
and then click Login.
Note:
Please do not share these credentials with students or non-testing related personnel.
3.5 Select the testing site
Click Select to select your high school location.
Note:
If only one site is associated with your credentials, this screen may not appear, COMPAS
will default to your site automatically.

13
3.6 Select the test package
1. Select the desired testing package
2. Click the Go button
3. After clicking Go, a progress bar will appear, it can take a few minutes to load the
test package, especially the initial time on each workstation.

14
3.7 Student Login
After the test package loads, you will see the student login screen. To login, the student
must use their last name and their MCC Student ID. The MCC Student ID is in the
following format:
S####### (capital S followed by their 7 digit id)
After a student enters their last name and Student ID, clicking the Click Here to Begin button
will officially start the test.
Note:
A message saying “Please wait 10 seconds while registration is being created” may appear on
the screen. If it does, please wait 10 to 15 seconds before clicking the “Click Here to Begin”
button again.

15
3.8 Exiting COMPASS
During the COMPASS testing session, COMPASS prevents testers from accessing the
desktop or other applications on the workstation. When a tester finishes a test session,
COMPASS will revert back to the student login screen. This allows multiple tests to be
administered without requiring a proctor login for each test given. This is helpful, for
example, if morning and afternoon testing sessions are being held on the same day in the
same lab. COMPASS can be left on this screen without timing out. Please note that the
selected test package does not change.
To change the current test package or to exit COMPASS completely, follow the steps below.
If you do need to change the selected test package you will need to repeat the proctor login
steps shown in this section, after exiting COMPASS.
1. To exit COMPASS, hold down the Ctrl and Alt and Q keys simultaneously.
2. Click the Exit button.