computer maintenances3.amazonaws.com/scschoolfiles/65/chapter04_1.pdf · lesson 4 computer...
TRANSCRIPT

Mod1-67
Estimated Time: 1 hour
■ VOCABULARYcable management
corona wires
cookie
defragmentation
ergonomic keyboard
fragmentation
maintenance
Recycle Bin
sectors
seek time
touchpad
wireless keyboard
LESSON 4
Computer Maintenance
■ OBJECTIVESUpon completion of this lesson, you should be able to:
■ Identify problems that can occur if hardware is not properly
maintained.
■ Identify routine maintenance that can be performed by users.
■ Identify maintenance that should be performed by experienced
professionals.
■ DATA FILESYou do not need data files to complete this lesson.
Copyright 2009 Cengage Learning. All Rights Reserved. May not be copied, scanned, or duplicated, in whole or in part.

Mod1-68 MODULE 1 Computing Fundamentals
This lesson explores the importance of computer maintenance, the risks of
computing if equipment is not properly maintained, and the measures that can
be taken to minimize those risks. The type of maintenance determines whether a
professional or you as the computer user should perform the maintenance tasks.
Maintenance IssuesConsider the following: To properly maintain a car and have it run smoothly, you
change the oil and filter, check the tire pressure, and complete other required
maintenance on a regular schedule. The computer is no different. It also requires
regular maintenance. Sooner or later, you will begin to experience problems with
the hardware. For instance, the performance of a hard disk starts to slow and printer
problems may start to occur. The keyboard and the mouse can become sluggish, and
the monitor may not work properly. This could be the result of loose or incorrect
cables, poor power connections, or could be other more severe problems.
Managing computer cables is an overlooked problem when maintaining a
computer system. Damaged and poorly maintained cables can prevent peripheral
devices from communicating with the computer. Unorganized and unprotected
cables can also create safety hazards (see Figure 4–1).
FIGURE 4–1 Unprotected cables are a safety hazard
Cable management kits and individual cable management products are available
online and through most stores that sell computer equipment (see Figure 4–2).
FIGURE 4–2 Managing cables
◗ VOCABULARYmaintenance
cable management
1-1.2.5
Copyright 2009 Cengage Learning. All Rights Reserved. May not be copied, scanned, or duplicated, in whole or in part.

LESSON 4 Computer Maintenance Mod1-69
Hardware Maintenance One of the best ways to cut down on computer repair is through preventative
maintenance performed on a regular schedule. As a general rule, you should clean a
computer every 3–6 months. If it is in a dusty environment, however, you should clean
it more often. This section provides guidelines that you can easily put into practice.
Keyboard and MouseYou should check and clean the keyboard periodically. Dirt, dust, hair, and food
particles can accumulate, causing the keys to jam or otherwise malfunction. Many
people clean the keyboard by turning it upside down and shaking it. A more effective
method, however, is to use compressed air. Every 6 months, you can use a can of
compressed air to remove the dust from the keyboard (see Figure 4–3).
FIGURE 4–3 Cleaning a keyboard
If you spill a liquid onto the keyboard, turn off the computer immediately.
Disconnect the keyboard, spray it with water to clean it, turn it upside down and
shake to remove the liquid, and then use a cloth to dry it as much as possible. After it
is cleaned, leave it upside down for at least 12 hours.
A mouse with a ball (which is a mechanical mouse) can be difficult to move if
the rollers are clogged. Cleaning mechanical mice often eliminates jerky or erratic
movement of the mouse pointer. To clean the rollers, you need to remove the bottom
cover of the mouse (see Figure 4–4a). Generally, you will find dirt or hair in the
middle of the roller. Remove as much of this debris as much as possible, and then
reassemble the mouse (see Figure 4–4b).
1-1.2.6
Copyright 2009 Cengage Learning. All Rights Reserved. May not be copied, scanned, or duplicated, in whole or in part.

Mod1-70 MODULE 1 Computing Fundamentals
(A) (B)
FIGURE 4–4 (A) Removing the bottom cover of a mouse
(B) Cleaning debris
Cleaning a printer helps prolong the printer’s life. The first step is to check the
printer documentation. If this is unavailable, most likely you can find information
online. Clean only the parts recommended. Recall that the two more popular types of
printers are inkjet and laser. The following general instructions apply to both types
of printers:
■ Turn off the printer.
■ Use a cleaner recommended by the manufacturer, or a lint-free cloth, and then
moisten it with a 50-50 percent solution of water and vinegar. Wring out all
excess moisture and thoroughly clean the outside of the printer, making sure that
no fluid gets inside the printer.
■ Never spray an aerosol directly onto the printer.
■ It is not necessary, but consider wearing latex gloves to protect your hands from
dirt and other debris.
Inkjet PrinterAfter so much usage, small deposits of dry ink accumulate on the print head of the
printer. Eventually, these deposits begin to clog the printer’s ink jets and affect the
print quality of the document. This also causes streaks and blotchy printing.
Many inkjet printers have a self-cleaning mode that is accessed through the
printer’s control panel. If this is not available, an inkjet cleaning cartridge can be
used. This flushes dirt and debris out of clogged printer nozzles. Verify that the
cleaning cartridge is approved for your printer.
Copyright 2009 Cengage Learning. All Rights Reserved. May not be copied, scanned, or duplicated, in whole or in part.
LESSON 4 Computer Maintenance Mod1-71
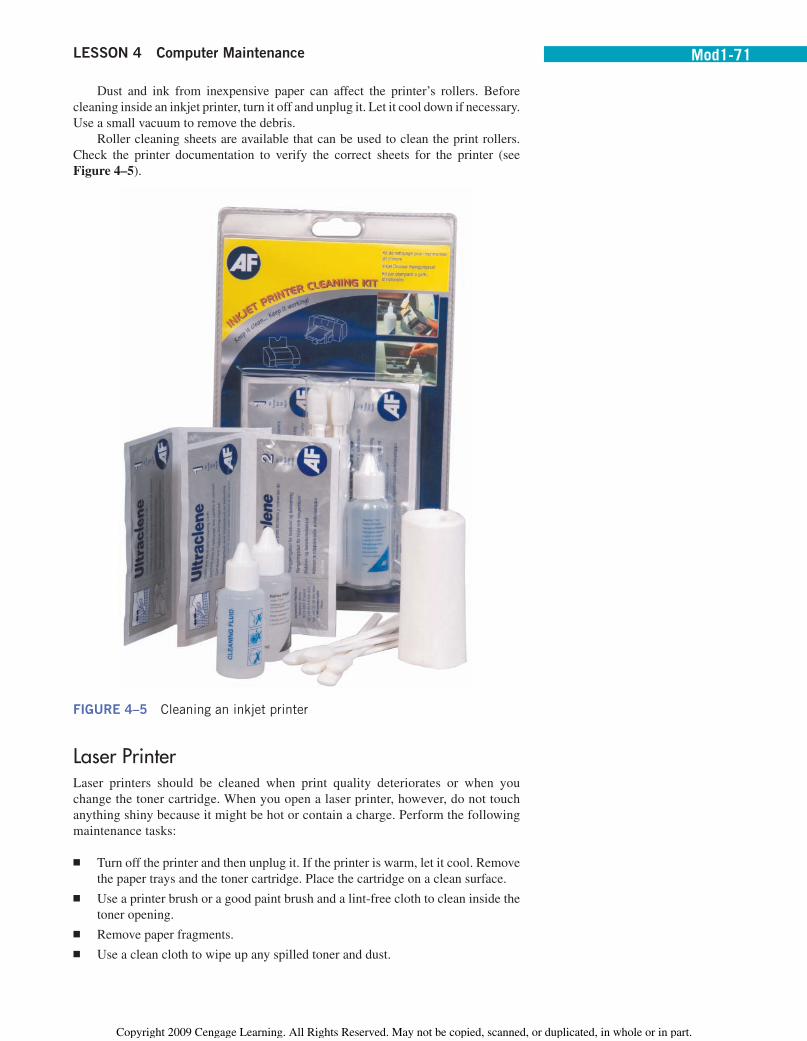
Dust and ink from inexpensive paper can affect the printer’s rollers. Before
cleaning inside an inkjet printer, turn it off and unplug it. Let it cool down if necessary.
Use a small vacuum to remove the debris.
Roller cleaning sheets are available that can be used to clean the print rollers.
Check the printer documentation to verify the correct sheets for the printer (see
Figure 4–5).
FIGURE 4–5 Cleaning an inkjet printer
Laser PrinterLaser printers should be cleaned when print quality deteriorates or when you
change the toner cartridge. When you open a laser printer, however, do not touch
anything shiny because it might be hot or contain a charge. Perform the following
maintenance tasks:
■ Turn off the printer and then unplug it. If the printer is warm, let it cool. Remove
the paper trays and the toner cartridge. Place the cartridge on a clean surface.
■ Use a printer brush or a good paint brush and a lint-free cloth to clean inside the
toner opening.
■ Remove paper fragments.
■ Use a clean cloth to wipe up any spilled toner and dust.
Copyright 2009 Cengage Learning. All Rights Reserved. May not be copied, scanned, or duplicated, in whole or in part.

Mod1-72 MODULE 1 Computing Fundamentals
■ Clean the rollers, but don’t touch the transfer (sponge) roller (see Figure 4–6).
■ Replace the toner cartridge.
FIGURE 4–6 Maintaining a laser printer
Some laser printers contain exposed corona wires. These wires are used to
generate a field of positive charges on the surface of the drum and the paper. You
should not brush or vacuum these wires.
Upgrades and ConsumablesAt some point, hardware components may be damaged and need to be changed, or
output and production needs to be increased. This can be enhanced by upgrading
various elements within the computer system. For instance, adding computer memory
is often the best value for increasing overall computer performance. Updating the
keyboard and the mouse can also enhance computer performance. The following
section describes upgrade options that you can implement and apply.
◗ VOCABULARYcorona wires
WARNING
Exposure to light can damage toner cartridges. Always cover the toner cartridge with an extra lint-free cloth or piece of paper after removing it.
Copyright 2009 Cengage Learning. All Rights Reserved. May not be copied, scanned, or duplicated, in whole or in part.

LESSON 4 Computer Maintenance Mod1-73
Computer MemoryOne way to measure a computer’s power is by its capacity to remember. RAM is
made up of small memory chips that form a memory module. These modules are
installed in the RAM slots on the motherboard of your computer (see Figure 4–7).
FIGURE 4–7 RAM chips on the motherboard
The hard drive can be compared to long-term memory and random access
memory (RAM) to short-term memory. Data stored in RAM is temporary. When
the computer is processing data, it reads and writes to RAM. If RAM fills up, then
the processor continually goes to the hard drive to replace old data in RAM with
new data. Because hard drive access is considerably slower than RAM, you notice a
processing slowdown when a computer’s RAM is overloaded. Congested RAM can
even affect the speed of the monitor while the disk operates continuously, writing
and copying RAM data out to the disk.
Adding RAM to a computer generally helps increase performance, speed, and
usability. However, every system has a maximum amount of RAM that it can support.
Check the computer’s documentation, or verify with a professional technician prior
to purchasing additional memory. Complete the following Step-by-Step exercise to
explore the amount of RAM contained in your computer.
WARNING
Most manufacturers recommend against using compressed air since the propellant may add moisture to the inside of the printer.
Copyright 2009 Cengage Learning. All Rights Reserved. May not be copied, scanned, or duplicated, in whole or in part.

Mod1-74 MODULE 1 Computing Fundamentals
Step-by-Step 4.1 1. Click the Start button on the taskbar, and then click Computer. The
Computer window opens.
2. Click System properties to display the System window, shown in
Figure 4–8.
3. Click Performance to display the Rate and improve your computer’s
performance page, shown in Figure 4–9. Read the information con-
tained on this page. What is your computer’s base score?
FIGURE 4–8
System window
FIGURE 4–9
Rate and improve your computer’s
performance page
Copyright 2009 Cengage Learning. All Rights Reserved. May not be copied, scanned, or duplicated, in whole or in part.

LESSON 4 Computer Maintenance Mod1-75
4. Click the Learn how you can improve your computer’s performance link.
Read the information contained in the Windows Help and Support box.
5. List the tasks that you think can help improve your computer’s
performance.
6. Submit your assignment to your instructor.
KeyboardsChoosing a keyboard is complicated by the vast range of choices. Selecting a
keyboard is a choice that should be made by the person who will be using it. The
design, performance, and comfort should be considered.
Ergonomic keyboards allow for a more natural positioning of your arms and
hands. Many ergonomic keyboards have a smaller width, which keeps the mouse
closer to you. This reduces the reach and places the mouse in a more accessible
position (see Figure 4–10).
FIGURE 4–10 Ergonomic keyboard
A wireless keyboard reduces the clutter of unsightly wires and other cable
problems and improves mobility. If necessary, you can move around with a wireless
keyboard as necessary and not be bound to the desk.
◗ VOCABULARYergonomic keyboard
wireless keyboard
Copyright 2009 Cengage Learning. All Rights Reserved. May not be copied, scanned, or duplicated, in whole or in part.

Mod1-76 MODULE 1 Computing Fundamentals
MouseA variety of mouse devices are available, including wireless, optical, and
combinations. Some are ergonomic devices such as the one in Figure 4–11, which is
a wireless ergonomic mouse.
FIGURE 4–11 Wireless ergonomic mouse
Touchpads are another pointing device you can use instead of a mouse. These
devices sense the position of your finger and then move the pointer accordingly.
Most notebook computers contain touchpads, but these are also available for desktop
computers (see Figure 4–12).
FIGURE 4–12 Touchpad
Preventative MaintenanceAll computers slow down as you add and delete files, install and uninstall software,
and perform normal activities. To eliminate and minimize these problems, Microsoft
Windows comes with a set of utilities that perform special functions. You use these
tools to defragment hard drives, empty the Recycle Bin, delete temporary files, and
remove cookies. You should run these utilities following a routine maintenance
schedule so that the computer can run faster and more efficiently.
◗ VOCABULARYtouchpad
Copyright 2009 Cengage Learning. All Rights Reserved. May not be copied, scanned, or duplicated, in whole or in part.
LESSON 4 Computer Maintenance Mod1-77
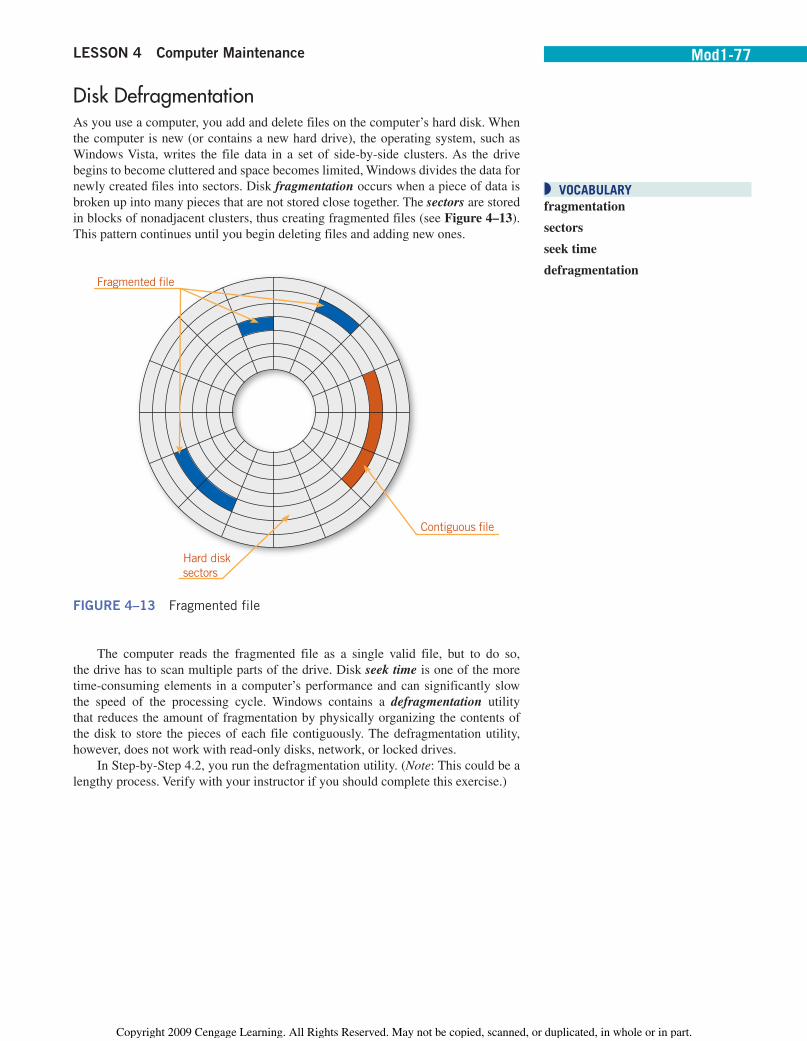
Disk DefragmentationAs you use a computer, you add and delete files on the computer’s hard disk. When
the computer is new (or contains a new hard drive), the operating system, such as
Windows Vista, writes the file data in a set of side-by-side clusters. As the drive
begins to become cluttered and space becomes limited, Windows divides the data for
newly created files into sectors. Disk fragmentation occurs when a piece of data is
broken up into many pieces that are not stored close together. The sectors are stored
in blocks of nonadjacent clusters, thus creating fragmented files (see Figure 4–13).
This pattern continues until you begin deleting files and adding new ones.
Hard disk
sectors
Contiguous file
Fragmented file
FIGURE 4–13 Fragmented file
The computer reads the fragmented file as a single valid file, but to do so,
the drive has to scan multiple parts of the drive. Disk seek time is one of the more
time-consuming elements in a computer’s performance and can significantly slow
the speed of the processing cycle. Windows contains a defragmentation utility
that reduces the amount of fragmentation by physically organizing the contents of
the disk to store the pieces of each file contiguously. The defragmentation utility,
however, does not work with read-only disks, network, or locked drives.
In Step-by-Step 4.2, you run the defragmentation utility. (Note: This could be a
lengthy process. Verify with your instructor if you should complete this exercise.)
◗ VOCABULARYfragmentation
sectors
seek time
defragmentation
Copyright 2009 Cengage Learning. All Rights Reserved. May not be copied, scanned, or duplicated, in whole or in part.

Mod1-78 MODULE 1 Computing Fundamentals
Step-by-Step 4.2 1. Click the Start button on the taskbar, and then click Control Panel
to display the Control Panel window (see Figure 4–14).
System and
Maintenance
category
2. Click System and Maintenance to display the System and Maintenance
window (see Figure 4–15).
Defragment
your hard
drive option
FIGURE 4–14
Control Panel
FIGURE 4–15
System and
Maintenance window
Copyright 2009 Cengage Learning. All Rights Reserved. May not be copied, scanned, or duplicated, in whole or in part.

LESSON 4 Computer Maintenance Mod1-79
3. Scroll down if necessary, and then click Defragment your hard drive to
display the Disk Defragmenter dialog box (see Figure 4–16). (If a User
Account Control dialog box is displayed, click Continue.)
Click
Defragment
now if
instructed to
do so
4. If Indicated by your instructor, click the Defragment now button.
Otherwise, click the Close button.
Recycle BinThe Windows Recycle Bin is a holding area for files and folders before their final
deletion from a storage device. Generally, you access the Recycle Bin through an
icon located on the desktop. The Recycle Bin contains files that have been deleted
from the hard disk, whether accidentally or intentionally. You can use special settings
to review the contents of the Recycle Bin before permanently deleting the items.
Right-click the Recycle Bin and then click Open or Explore on the shortcut menu
to view the Recycle Bin contents. Right-click an item to display the shortcut menu,
which includes commands to Restore, Cut, Delete, or display the item Properties.
To empty the Recycle Bin, right-click the icon and then click Empty Recycle Bin.
A warning box is displayed. Click Yes to continue or No to cancel the command.
To restore a file from the Recycle Bin, right-click the Recycle Bin icon located
on the desktop and then click Open or double-click Recycle Bin to display the list of
deleted files. Right-click the name of the file to be restored, and then click Restore.
Once a file has been deleted from the Recycle Bin, it cannot be restored.
The Recycle Bin settings can be modified by right-clicking the Recycle Bin icon
and then clicking Properties to display the Recycle Bin Properties dialog box (see
Figure 4–17). Select the settings that you want to use and then click the OK button.
FIGURE 4–16
Disk Defragmenter
dialog box
◗ VOCABULARYRecycle Bin
Copyright 2009 Cengage Learning. All Rights Reserved. May not be copied, scanned, or duplicated, in whole or in part.

Mod1-80 MODULE 1 Computing Fundamentals
FIGURE 4–17 Recycle Bin Properties dialog box
Temporary Files Various application programs, such as those in the Microsoft Office suite, create
temporary files. This action is used for the following three reasons:
■ To free memory for other programs
■ To act as a safety net to prevent data loss
■ For printing
The software program determines where and when it needs to create temporary
files. The temporary files normally exist only during the current session of the
software program. When the program is closed through a standard process, the
temporary files are closed and then deleted automatically. If, however, there is a
power loss or the program is not properly closed, the temporary files remain on the
hard drive. The following Step-by-Step exercise provides information on how to use
Disk Cleanup to delete the temporary files and other files that are not needed.
Copyright 2009 Cengage Learning. All Rights Reserved. May not be copied, scanned, or duplicated, in whole or in part.
LESSON 4 Computer Maintenance Mod1-81
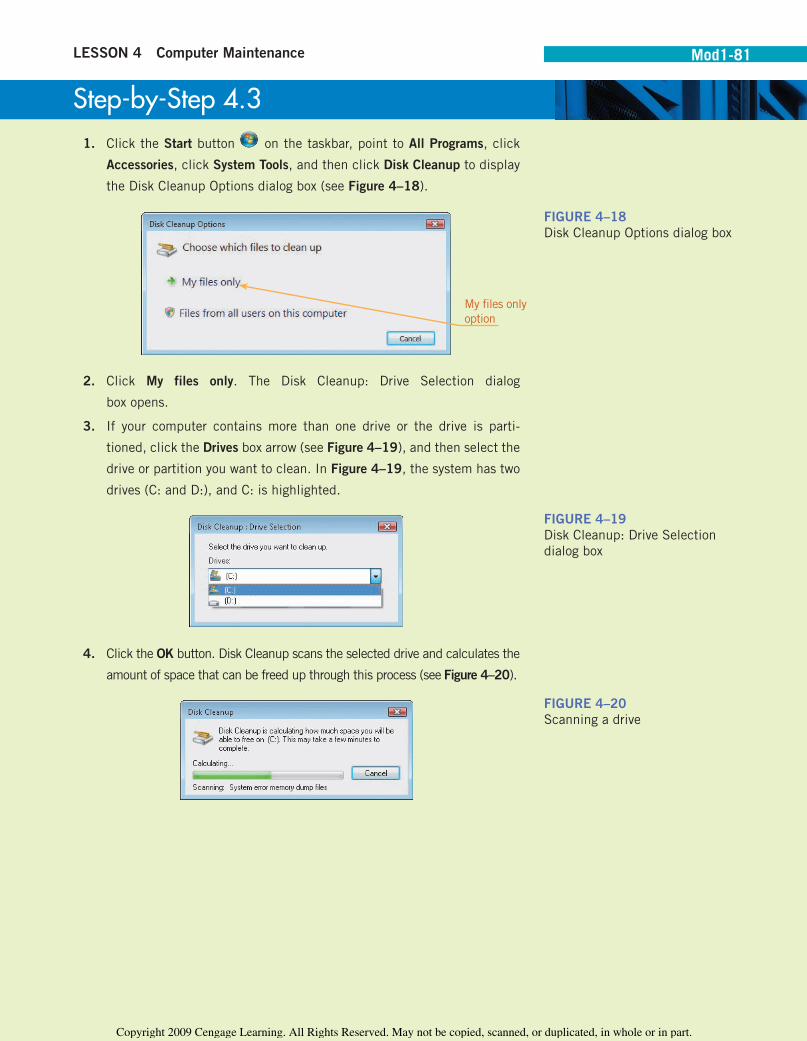
Step-by-Step 4.3 1. Click the Start button on the taskbar, point to All Programs, click
Accessories, click System Tools, and then click Disk Cleanup to display
the Disk Cleanup Options dialog box (see Figure 4–18).
My files only
option
2. Click My files only. The Disk Cleanup: Drive Selection dialog
box opens.
3. If your computer contains more than one drive or the drive is parti-
tioned, click the Drives box arrow (see Figure 4–19), and then select the
drive or partition you want to clean. In Figure 4–19, the system has two
drives (C: and D:), and C: is highlighted.
4. Click the OK button. Disk Cleanup scans the selected drive and calculates the
amount of space that can be freed up through this process (see Figure 4–20).
FIGURE 4–18
Disk Cleanup Options dialog box
FIGURE 4–19
Disk Cleanup: Drive Selection
dialog box
FIGURE 4–20
Scanning a drive
Copyright 2009 Cengage Learning. All Rights Reserved. May not be copied, scanned, or duplicated, in whole or in part.

Mod1-82 MODULE 1 Computing Fundamentals
5. The results are displayed, as shown in Figure 4–21. Clicking an item
in the Files to delete list displays a description of the selection. Click a
check box to select the item for deletion. You can use the check boxes
to select all of the displayed categories or select specific files to be
deleted.
Description of
selected item
Click an item in
the Files to delete
list to display a
description
CookiesA cookie is a small text file that a Web site uses to identify a specific computer.
The file is created and/or updated on your computer’s hard drive each time that
the Web site is visited. Cookies are not a threat to your computer’s security. The
text file contains a code that identifies you to the Web server each time a Web page
is accessed. Primarily, cookies are used to gather information about your surfing
habits and for targeted advertising. The following Step-by-Step exercise provides
information on how to delete cookies from the hard drive.
Step-by-Step 4.4 1. Click the Start button on the taskbar, and then click Control Panel.
Click Network and Internet. See Figure 4–22.
FIGURE 4–21
Results of scanning
◗ VOCABULARYcookie
Copyright 2009 Cengage Learning. All Rights Reserved. May not be copied, scanned, or duplicated, in whole or in part.

LESSON 4 Computer Maintenance Mod1-83
Internet
Options
2. Click Internet Options to display the Internet Properties dialog box (see
Figure 4–23).
Delete button
in Browsing
history section
FIGURE 4–22
Network and Internet
categories
FIGURE 4–23
Internet Properties dialog box
Copyright 2009 Cengage Learning. All Rights Reserved. May not be copied, scanned, or duplicated, in whole or in part.

Mod1-84 MODULE 1 Computing Fundamentals
3. In the Browsing history section, click the Delete button to display the
Delete Browsing History dialog box (see Figure 4–24).
Click to delete
cookies
4. To delete cookies, click the Delete cookies button. A Delete Cookies
confirm dialog box is displayed. Click Yes to delete all cookies.
Other data you can delete through the Delete Browsing History dialog box
includes temporary Internet files, history, form data, and passwords.
Specialized MaintenanceGenerally, you can provide routine maintenance as discussed in this lesson. However,
you should not attempt some maintenance procedures. The following is a list of
internal hardware maintenance or repair that generally should be performed by a
computer professional:
■ Replacing the power supply or opening the power supply case
■ Replacing other electrical components
■ Replacing the processor
■ Replacing or adding a hard disk
■ Replacing or adding additional RAM
Monitors, printers, and scanners are not designed to be opened by the general
computer user. If problems are encountered with these devices, they should be
worked on by an experienced technician.
FIGURE 4–24
Delete Browsing History dialog box
1-1.2.7
Copyright 2009 Cengage Learning. All Rights Reserved. May not be copied, scanned, or duplicated, in whole or in part.

LESSON 4 Computer Maintenance Mod1-85
ETHICS IN TECHNOLOGY
Risks of Networked ComputingThe security of a computer network is challenged every day by equipment malfunctions, system failures,
computer hackers, and virus attacks.
Equipment malfunctions and system failures are caused by a number of factors, including natural
disasters such as floods or storms, fires, and electrical disturbances, such as a brownout or blackout. Server
malfunctions or failures mean users lose temporary access to network resources, such as printers, drives,
and information.
Computer hackers and viruses represent a great risk to networked environments. People who break into
computer systems are called hackers. They break into systems to steal services and information, such as
credit card numbers, test data, and even national security data. Some hackers want to harm a company or
organization they do not like or support; sometimes, they do it just for the thrill of being able to get into the
system.
People create computer viruses and infect other computers for some of the same reasons. Viruses are
very dangerous to networked computers—they usually are designed to sabotage files that are shared.
SUMMARY
In this lesson, you learned:
■ A computer requires maintenance on a regular schedule to
prevent problems such as the degrading of the hard disk
performance and monitor trouble.
■ Damaged and poorly maintained cables can prevent peripheral
devices from communicating with the computer. Unorganized
and unprotected cables can also create safety hazards. Cable
management should therefore be part of a regular computer
maintenance routine.
■ To maintain the computer keyboard, use a can of compressed
air to remove the dust from the keyboard every six months.
■ Clean a mechanical mouse by removing its bottom cover,
removing debris from the roller, and then reassembling
the mouse.
■ Printer maintenance helps to prevent many common printing
problems. Many inkjet printers have a self-cleaning mode. If
yours does not, use an inkjet cleaning cartridge to flush dirt
and debris out of clogged printer nozzles. Clean a laser printer
when you change the toner cartridge.
■ Adding computer memory often provides the best value for
increasing overall computer performance.
■ All computers slow down as you work with them. To improve
or maintain computer efficiency, periodically use Windows
tools to defragment hard drives, empty the Recycle Bin, delete
temporary files, and remove cookies.
■ Some maintenance procedures are not suitable for the average
computer user, and should be performed by a computer profes-
sional, such as replacing the power supply or opening the power
supply case, replacing other electrical components, including
the processor and RAM, and adding an internal hard disk.
VOCABULARY REVIEW
Define the following terms:
cable management
corona wires
cookie
defragmentation
ergonomic keyboard
fragmentation
maintenance
Recycle Bin
sectors
seek time
touchpad
wireless keyboard
Copyright 2009 Cengage Learning. All Rights Reserved. May not be copied, scanned, or duplicated, in whole or in part.

Mod1-86 MODULE 1 Computing Fundamentals
REVIEW QUESTIONS
TRUE / FALSE
Circle T if the statement is true or F if the statement is false.
T F 1. Most computers do not require regular maintenance.
T F 2. A can of compressed air can be used to clean a keyboard.
T F 3. Small deposits of dry ink can accumulate on the print head of a laser printer.
T F 4. Disk fragmentation rarely occurs.
T F 5. Temporary files are always automatically deleted.
MULTIPLE CHOICE
Select the best response for the following statements.
1. A text file that a Web site uses to identify a specific computer is called a .
A. cookie C. cupcake
B. cracker D. sandwich
2. Specialized maintenance on a computer should be performed by .
A. a carpenter C. a professional
B. computer owner D. a neighbor
3. printers should be cleaned when print quality deteriorates or when toner cartridges are changed.
A. Inkjet C. Dot matrix
B. Laser D. Compact
4. The should be checked and cleaned periodically.
A. keyboard C. monitor
B. mouse D. all of the above
5. RAM is .
A. permanent C. permanent or temporary
B. temporary D. none of the above
FILL IN THE BLANK
Complete the following sentences by writing the correct word or words in the blanks provided.
1. Disk is one of the more time-consuming elements in a computer’s performance and can cause considerable slowdown
in the processing cycle.
2. A(n) allows for a more natural positioning of your arms and hands.
3. Most notebook computers use a(n) to replace a mouse.
4. Disk occurs when a piece of data is broken up into many pieces that are not stored close together.
5. The is a holding area for files and folders before their final deletion from a storage device.
Copyright 2009 Cengage Learning. All Rights Reserved. May not be copied, scanned, or duplicated, in whole or in part.

LESSON 4 Computer Maintenance Mod1-87
PROJECTS
PROJECT 4–1
Printers need more frequent maintenance than most types of elec-
tronic devices. Complete the following:
1. Using Google or another search engine, find instructions or tips
on maintaining the type of printer you have or use regularly.
2. As you research, identify periodic and occasional mainte-
nance tasks.
3. Note any hazards or cautions you should observe when main-
taining a printer.
4. Summarize the maintenance routine and cautions in a one-page
explanation.
PROJECT 4–2
Some people say you should leave your computer on at all
times—that turning the computer on and off creates stress on the
components. Others argue that computers use a lot of energy, and
that computers should be turned off when not in use. Your computer
operating system, however, includes power-management settings.
Your instructor has requested that you and your team investigate
these options.
1. Use Windows Help and Support and prepare a report describing
these power-management options.
2. Describe how to create a power plan.
3. Describe how you can change what happens when you press
the power button on a mobile PC.
PROJECT 4–3
Consider the computer that you use at home or school. Suppose
you want to upgrade the hardware so you can use it productively
for another two years or so. Using the Internet and other resources,
research what you can upgrade on your computer. Answer the fol-
lowing questions:
1. What type of computer do you have? Is it a notebook or desk-
top computer?
2. What can you replace or enhance to improve the computer’s
overall performance?
3. What can you replace or enhance to improve the quality of dis-
played images?
4. What other types of equipment would you like to replace?
5. Use a presentation program (such as Microsoft Office
PowerPoint) to create a presentation on upgrading your com-
puter. Find images of your current computer and the upgraded
equipment you want to add, and use them to your presentation.
Share your presentation with your class.
TEAMWORK PROJECT
You work at a video store as a clerk. The computers at the video store
are used by many different clerks in the course of a workday. Your
supervisor has asked you and another employee to come up with a
routine maintenance checklist that any of the clerks can use at the
beginning of the day to make sure the terminals are in good working
order. Create a checklist that includes daily tasks and weekly tasks
to keep the components clean and in good working order.
This lesson explains fragmentation and defragmentation, and pro-
vides steps for defragmenting a hard drive. Using the Internet and
other resources, complete the following:
1. Windows Vista includes a defragmentation tool. Should you
supplement that tool with other defragmentation utilities? If
so, explain why.
2. How often should you defragment your hard disk? What is a
good rule of thumb to follow?
3. Does defragmentation pose any risks to your computer? What
can you do to overcome the risks?
4. Write a one-page report answering these questions and sum-
marizing your findings.
CRITICAL THINKING
ONLINE DISCOVERY
Review the section on keyboards and then consider the elements
of design, comfort, and performance. Use your Web browser to
research ergonomic keyboards and compare the different options
that are available. Use your word-processing program to write a
short report describing the keyboard you would select and why you
would select that particular keyboard.
Copyright 2009 Cengage Learning. All Rights Reserved. May not be copied, scanned, or duplicated, in whole or in part.